10 Spooktacular Halloween Macrame Ideas You Can Make, Style, and Love Year After Year

The Art of Halloween Macrame: Weaving Seasonal Magic Into Timeless Craft
Halloween décor has always been a playground for the imagination—skeletons on porches, pumpkins on stoops, cobwebs in the corners, and flickering lanterns lining walkways. But in recent years, there has been a quiet, beautiful rebellion against mass-produced decorations: handmade artistry is making a comeback. Among the many crafts rising to prominence, one stands out for its unique blend of tactile warmth, timeless beauty, and endless creative potential—macrame.
Most people associate macrame with plant hangers, summer festivals, or bohemian wall art. Rarely does it conjure visions of haunted houses, glowing moons, or black cats with golden eyes. Yet, macrame’s flexibility as a medium means it can transform just as easily into the stuff of seasonal magic. By adapting traditional knotting techniques to Halloween themes, crafters can create pieces that are every bit as eerie as they are elegant.
This guide is not just about how to make Halloween macrame—your step-by-step tutorials below will cover that in detail. Instead, it’s about the why. It’s about exploring the deep creative potential of this craft, understanding its design language, and seeing how seasonal macrame can enhance not just your décor, but the feeling of your entire space.
Why Macrame and Halloween Make a Perfect Pair
At first glance, macrame and Halloween might seem like strange bedfellows. One is traditionally airy, natural, and rustic; the other is theatrical, dark, and dramatic. But therein lies the magic—contrast.
Halloween thrives on atmosphere. It’s not just about scare factor; it’s about mood. Texture, lighting, and shape all play into that mood, and macrame delivers these in abundance. A thick black cord instantly reads as mysterious. A twisted rope in burnt orange captures the essence of autumn. The interplay of knots, patterns, and negative space can mimic spiderwebs, moonlight shadows, or gothic arches. The result? Décor that feels alive in the space, with layers of visual depth that mass-produced items can’t match.
Where plastic store-bought items often look disposable, macrame projects have staying power. Many can be displayed well beyond October 31st simply by removing a seasonal embellishment or changing out a color accent.
Elevating Seasonal Décor Through Texture and Tactility
One of macrame’s most underrated powers is its tactile nature. Halloween is often presented visually—carved pumpkins, printed banners, and colored lights—but few decorations invite you to touch them. A well-made macrame piece adds a tangible warmth to spooky spaces.
Imagine a guest running their fingers over the thick cords of a giant spiderweb hanging on the wall. Or brushing against the soft fringe of a witch’s hat as they pass in the hallway. These textures create subconscious connections, making your Halloween décor feel immersive rather than superficial.
Texture also plays beautifully with lighting. The raised surfaces of knots catch shadows in candlelight, the fringe diffuses light from lanterns, and metallic threads or beads can glint in the glow of jack-o’-lanterns. By layering macrame pieces with existing light sources, you can create theatrical effects without adding a single battery-operated gadget.
Designing Macrame for Seasonal Themes
Seasonal macrame is all about strategic adaptation. The fundamental knots—Square Knot, Lark’s Head, Double Half Hitch, Spiral Knot—are the same. The transformation comes from:
- Color Choices: Swap your usual neutrals for black, deep purple, burnt orange, bone white, or even metallic silver cords.
- Shapes and Silhouettes: Craft recognizable seasonal icons—pumpkins, moons, cats, skulls, witches’ hats—by following a shaped frame or manipulating the cords into curves.
- Embellishments: Add charms, beads, tassels, or faux leaves. Use miniature bats, ghosts, and spiders for thematic detail.
- Mixed Media: Incorporate materials like wood, metal hoops, LED lights, or fabric panels to give the piece dimension and mood.
The goal is not just to make macrame Halloween-colored, but to make it undeniably Halloween-themed. A black and orange wall hanging might nod to the holiday, but a black and orange haunted house silhouette tells a story.
Storytelling Through Handmade Décor
Every macrame project can tell a story—and Halloween is the perfect time for storytelling.
A crescent moon wrapped in black cord and dotted with crystals might evoke a witch in flight. A jack-o’-lantern face rendered in twisted rope can shift from cheerful to menacing depending on the sharpness of its angles. A gothic skull framed in knotted “stained glass” patterns whispers of candlelit cathedrals and ancient mysteries.
When you create your own pieces, you’re not limited to someone else’s design choices. You decide whether your black cat wall hanging looks playful or predatory. You determine how tangled your spiderweb appears—neat and symmetrical, or wild and chaotic. This flexibility allows your décor to reflect your own personal take on the season, making your home not just Halloween-ready, but uniquely yours.
Sustainability: An Overlooked Benefit
Another compelling reason to embrace Halloween macrame is its sustainability. With a single investment in quality cord and basic tools, you can create pieces that last for years. Many macrame projects are modular—fringe, beads, or charms can be swapped out to fit a different theme, meaning a piece made for Halloween could be adapted for autumn, winter, or even everyday décor.
If you’re conscious about reducing waste, this adaptability is a huge win over single-use plastics or cheaply made seasonal items. Cotton cords are biodegradable, and you can repurpose them for new projects if needed. Plus, by making your own decorations, you’re avoiding the packaging and transport costs that come with mass-produced goods.
Where to Use Halloween Macrame
One of the joys of macrame décor is its versatility. It’s lightweight, easy to hang, and can fit into spaces where heavier decorations can’t.
Consider these placement ideas:
- Front Door or Porch: Greet trick-or-treaters with a spooky hanging above your welcome mat.
- Living Room Feature Wall: Replace a year-round wall hanging with a seasonal one for instant transformation.
- Over the Fireplace Mantel: Anchor your mantel display with a macrame focal point surrounded by pumpkins and candles.
- Bedroom or Reading Nook: Add a softer Halloween vibe with moody, textured pieces in private spaces.
- Party Backdrop: Combine large macrame pieces with string lights for photo-worthy moments.
Because macrame can range from small and subtle to large and commanding, you can layer it into almost any Halloween decorating scheme.
Combining Macrame with Other Seasonal Elements
Macrame doesn’t have to stand alone. In fact, it often shines brightest when paired with complementary décor:
- Lighting: Lanterns, fairy lights, or LED candles can be woven into or around the design.
- Natural Accents: Dried herbs, autumn leaves, and twigs can be tied directly into the cords.
- Themed Fabrics: Lace, burlap, or sheer black fabrics can be layered behind macrame to add depth.
- Seasonal Props: Small pumpkins, faux ravens, or potion bottles placed nearby create a complete vignette.
The beauty of macrame is that it can act as both the star of the show and a supporting texture in a larger arrangement.
Tips for First-Time Halloween Macrame Makers
If you’re new to macrame but intrigued by the idea of making your own Halloween décor, start simple. Choose a basic design like a crescent moon or dreamcatcher and focus on mastering a few key knots. Here are some tips:
- Invest in Quality Cord: Cheap cord frays easily and can make your knots look sloppy.
- Use the Right Tools: Sharp scissors, a sturdy work surface, and measuring tape make a huge difference.
- Plan Your Colors: Black and orange are classics, but bone white, deep purple, and silver can make your work stand out.
- Incorporate Store-Bought Accents: Small seasonal charms or beads can instantly elevate a design without adding complexity.
- Practice Symmetry: Many Halloween designs rely on symmetrical patterns. Measure twice, knot once.
Once you’ve completed a project or two, you can begin experimenting with more complex designs and mixed materials.
Why Handmade Always Wins
There’s something powerful about handmade décor. Each knot, each twist of cord, carries intention. Unlike mass-produced decorations, a macrame wall hanging holds the time, care, and creativity of its maker. In a season so often dominated by plastic and polyester, adding handmade touches feels refreshingly human.
Your Halloween macrame becomes more than a decoration—it becomes part of your home’s seasonal story. You’ll remember the night you knotted that black cat’s whiskers, the way your kids helped pick out beads for the ghost charms, or how you adjusted a pattern to fit the spot above your mantel perfectly.
And when you hang it up again next year, it won’t just be décor. It will be a tradition.
Moving from Inspiration to Creation
Below, you’ll find detailed step-by-step tutorials for ten unique Halloween macrame projects, each with linked material sources so you can jump straight into crafting. These projects range from playful (ghost charm dreamcatchers) to striking (giant spiderweb wall art) to elegant (moonlit witch silhouettes). Each one is designed to showcase the incredible range of what macrame can do when adapted to the Halloween theme.
You might choose to make just one, or you might be inspired to create an entire gallery wall of seasonal macrame art. Either way, the point is not to replicate these designs perfectly—it’s to use them as a springboard for your own ideas. Add your own color palette, mix in unexpected materials, or experiment with scaling a design up or down.
Remember: in macrame, as in Halloween, creativity is king.
Final Thoughts: Crafting the Atmosphere You Want
Halloween is as much about emotion as it is about imagery. Whether you aim for eerie elegance, playful spookiness, or full-blown haunted house vibes, macrame can help you achieve it. Through texture, shape, and color, it lets you create décor that feels personal and atmospheric—something you can’t pull off with a trip to the seasonal aisle alone.
When you hang a handmade Halloween macrame piece, you’re not just filling a space on your wall. You’re setting a tone. You’re telling a story. And you’re weaving your own thread into the rich, creative tapestry of this season.
So pick up your cord, choose your design, and start knotting. This Halloween, your walls won’t just be decorated—they’ll be alive with the spirit of the season.
💡 Pro Tip: Why These Are Amazon Search Links (and Why “Add to Cart” Really Helps)
You might notice that every “Shop the Look” section uses Amazon search result links rather than one specific product. That’s not a glitch—it’s a strategy.
Items in fashion, beauty, and home sell out fast. Colors change. Styles get discontinued. Linking to a single item might leave you staring at a “Currently Unavailable” page—and nobody wants that.
With search result links, you’ll get:
• A fresh rotation of similar, in-stock finds
• Options that match your budget, size, and style
• Fewer dead ends and more discoveries
✨ Here’s how you can support this blog with zero extra cost:
If something speaks to you—even if you're still deciding—add it to your cart while you’re browsing. Amazon only credits creators like me if the item is added to your cart during that first visit.
It doesn’t cost you anything extra, but it makes a big difference in helping me keep this blog alive, ad-free, and full of hand-picked inspiration for your next obsession.
Thank you for being here. Thank you for shopping with intention. 💛
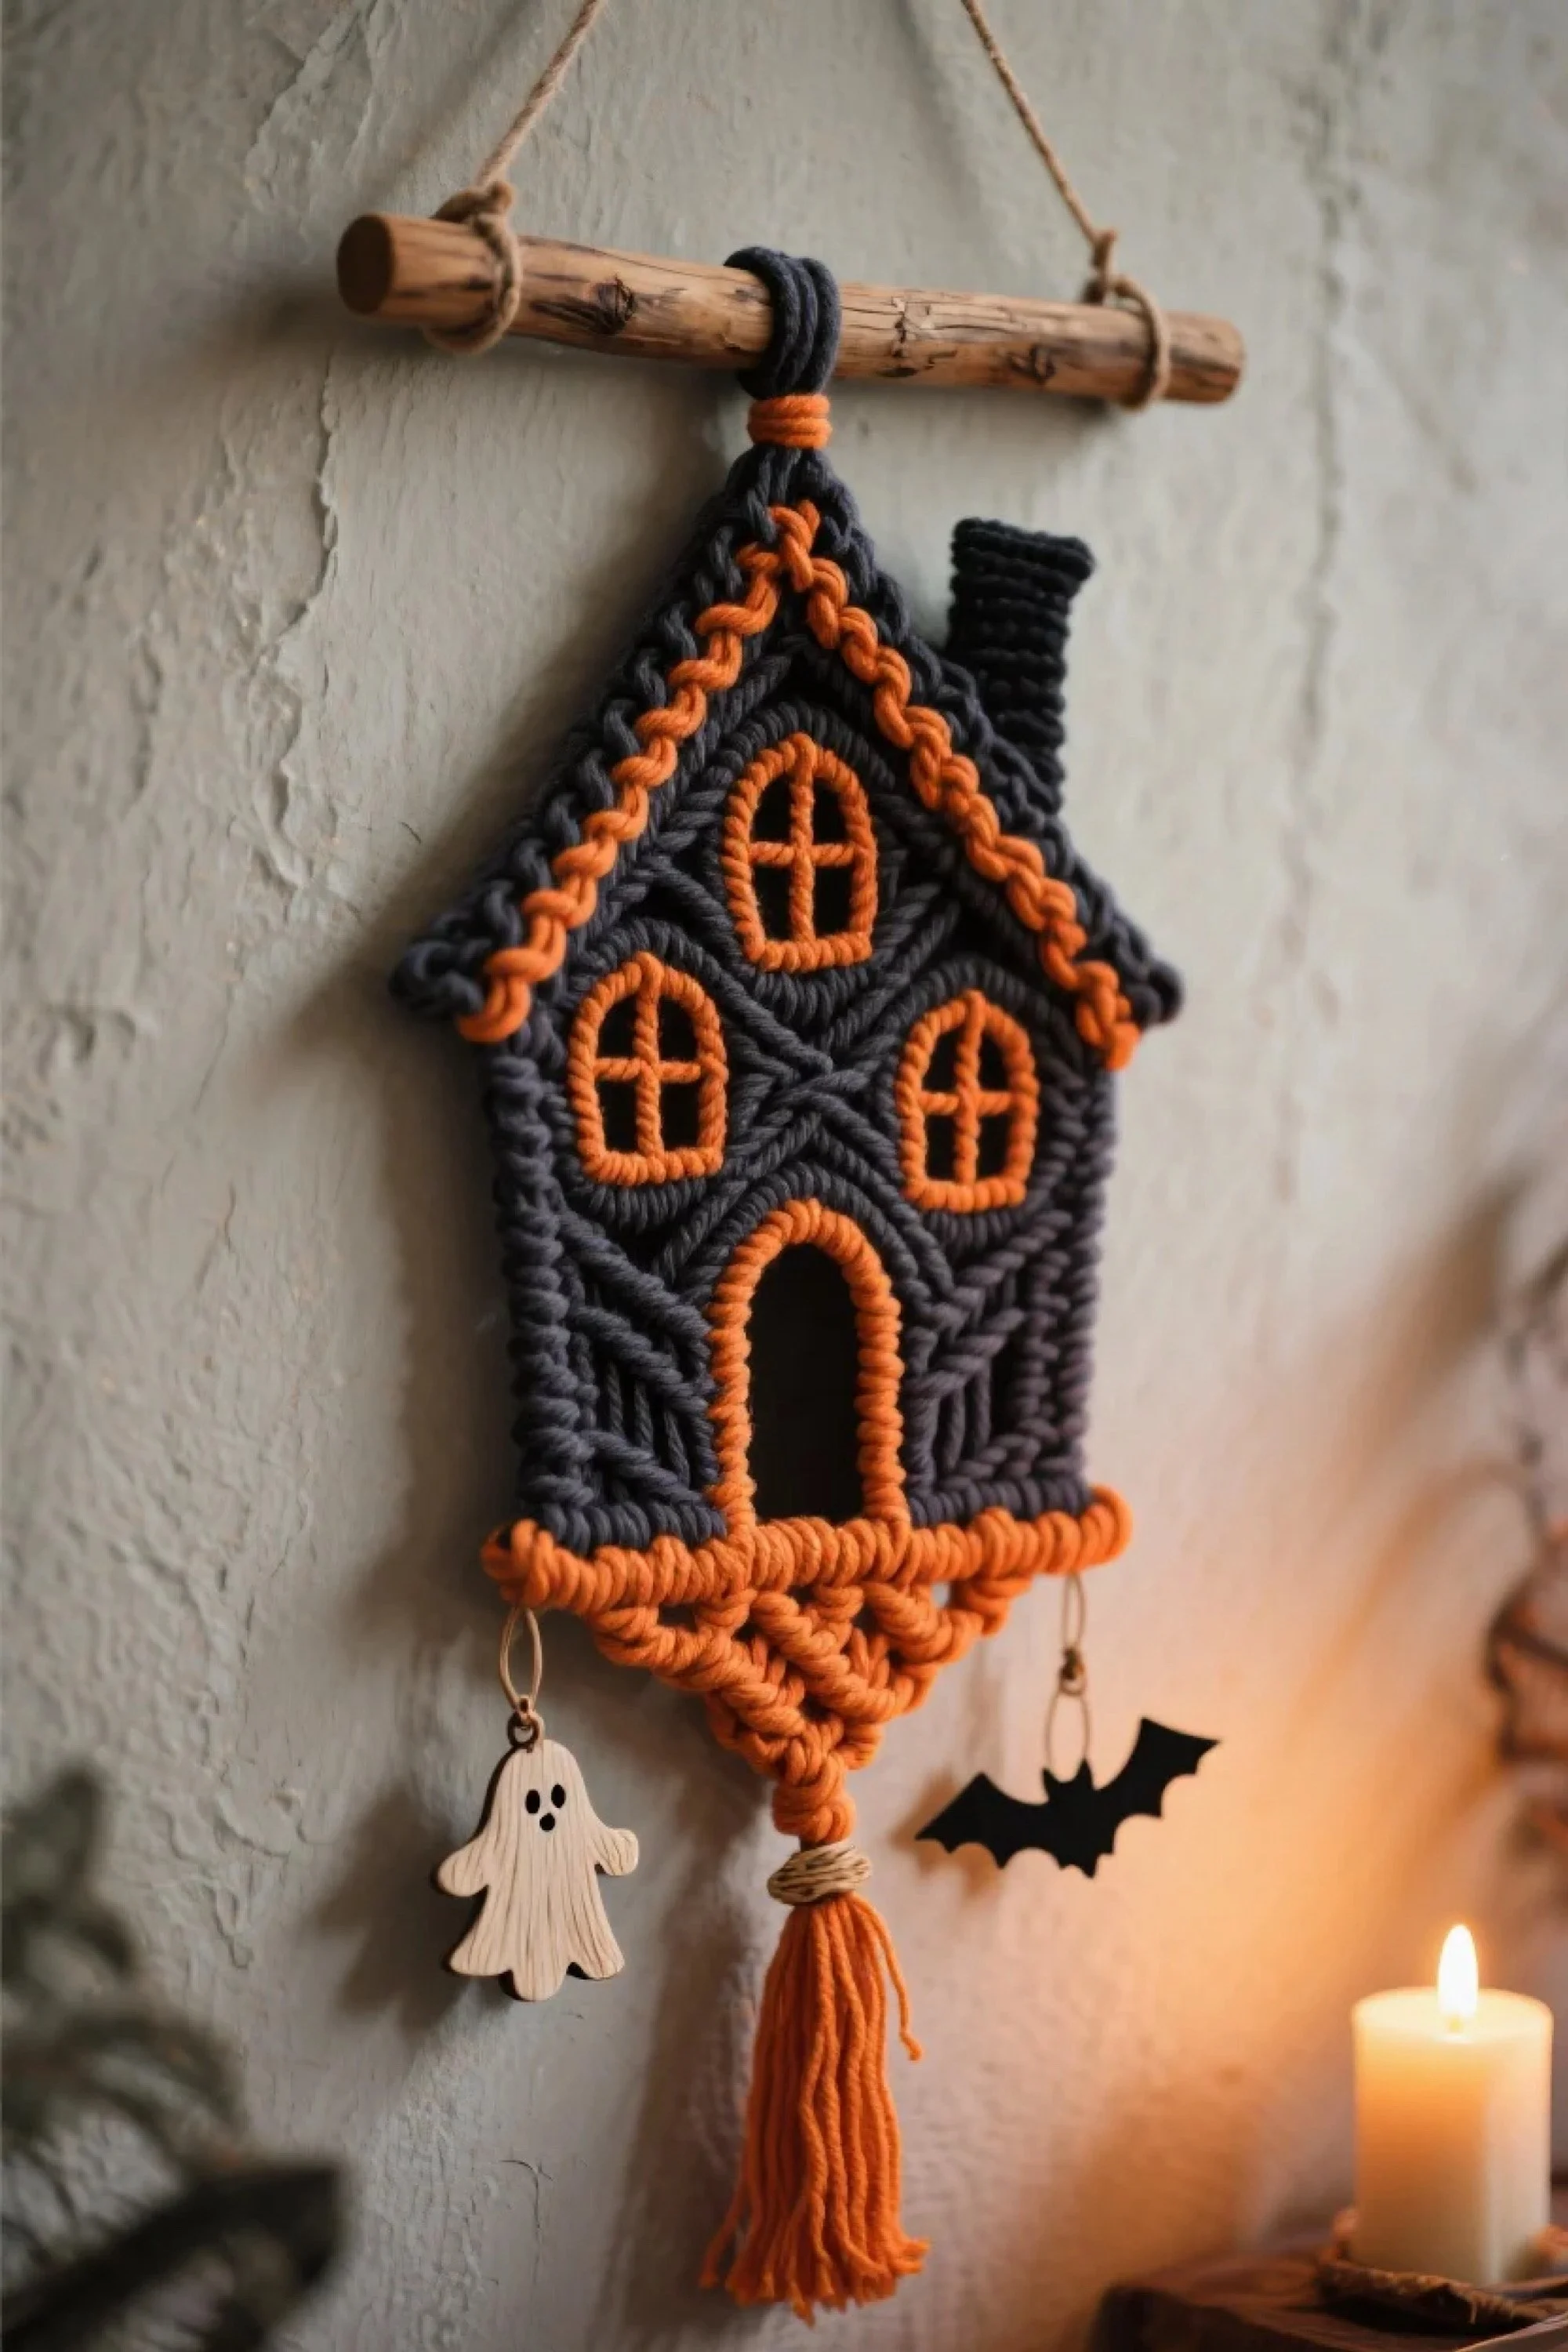
Haunted Haven Macrame Wall Hanging
Description
This Haunted Haven macrame wall hanging captures the eerie charm of a ghostly Halloween night while maintaining a warm, handcrafted appeal. Made with deep charcoal black and vibrant pumpkin orange cotton cord, the piece is shaped into a stylized haunted house complete with a gabled roof, four arched windows, and a central doorway. The windows and door are outlined with bold orange knots, giving them an illuminated, jack-o'-lantern glow. Hanging from the base are two playful wooden charms—a cheerful ghost and a swooping bat—adding a touch of whimsy to the spooky design. The piece is suspended from a rustic wooden dowel that enhances its natural, handmade aesthetic. Whether hung on your front door, above a mantel, or in an entryway, it’s a conversation starter that blends the cozy texture of macrame with seasonal Halloween spirit. Perfect for crafters who love thematic décor, this project balances complexity with charm, making it as enjoyable to make as it is to display.
Step-by-Step Tutorial
Materials Needed
- 5mm cotton macrame cord in charcoal black (approx. 60 meters)
- 5mm cotton macrame cord in pumpkin orange (approx. 30 meters)
- Rustic wooden dowel or driftwood (about 12 inches)
- Wooden ghost charm
- Wooden bat charm
- Keyring jump rings or small split rings
- Scissors
- Measuring tape
- Comb or brush for fraying ends
- Optional: fabric glue for securing knots
Instructions
Step 1: Prepare Your Dowel Cut a length of black cord about 20 inches long. Tie it securely to each end of the dowel to create a hanging loop. This will support your entire piece.
Step 2: Cut Your Cords For the haunted house shape, cut 14 cords of black cord, each about 6 feet long. Cut 8 cords of orange cord, each about 5 feet long. These will be your primary structure cords for the body and accents.
Step 3: Lark’s Head Knots Attach all black cords to the dowel using Lark’s Head Knots, centering them evenly. Leave about 1 inch between each for flexibility in shaping the design.
Step 4: Forming the Roof Use Square Knots to create the triangular roof peak. Start at the outermost cords and work inward, reducing the number of knots per row to create the angle. Continue until you have about a 6-inch tall roof shape.
Step 5: Adding Orange Accents Switch to your orange cords for the roof trim. Use a Spiral Knot (half knots repeated) along each sloped side to make a bold, twisted border. Repeat for the opposite side.
Step 6: Building the House Body Beneath the roof, alternate Square Knots and Double Half Hitch Knots to create a chevron pattern. This mimics the look of wood paneling. Continue down to the area where the windows will go.
Step 7: Creating Windows For each window, switch to orange cord and tie small rectangles using Square Knots. Outline each window with Double Half Hitch Knots for definition.
Step 8: The Doorway In the center bottom, create a tall oval opening by leaving the middle cords unknotted for about 4 inches. Outline with orange cord using a tight row of Square Knots.
Step 9: Base and Tassel At the very bottom, tie all cords into a Diamond Knot shape, tapering inward. Use the remaining orange cord to create a tassel by wrapping and securing at the top, letting the ends hang freely.
Step 10: Adding Charms Attach the ghost and bat charms to the bottom corners using jump rings. Secure firmly so they swing gently without tangling.
Step 11: Finishing Touches Trim excess cord, comb the tassel, and optionally dab fabric glue into the back of knots for extra hold. Hang in your chosen spooky spot.
Shop the Look
- Black Macrame Cord 5mm
- Orange Macrame Cord 5mm
- Rustic Wooden Dowel
- Halloween Wooden Charms
- Macrame Scissors
Style it With
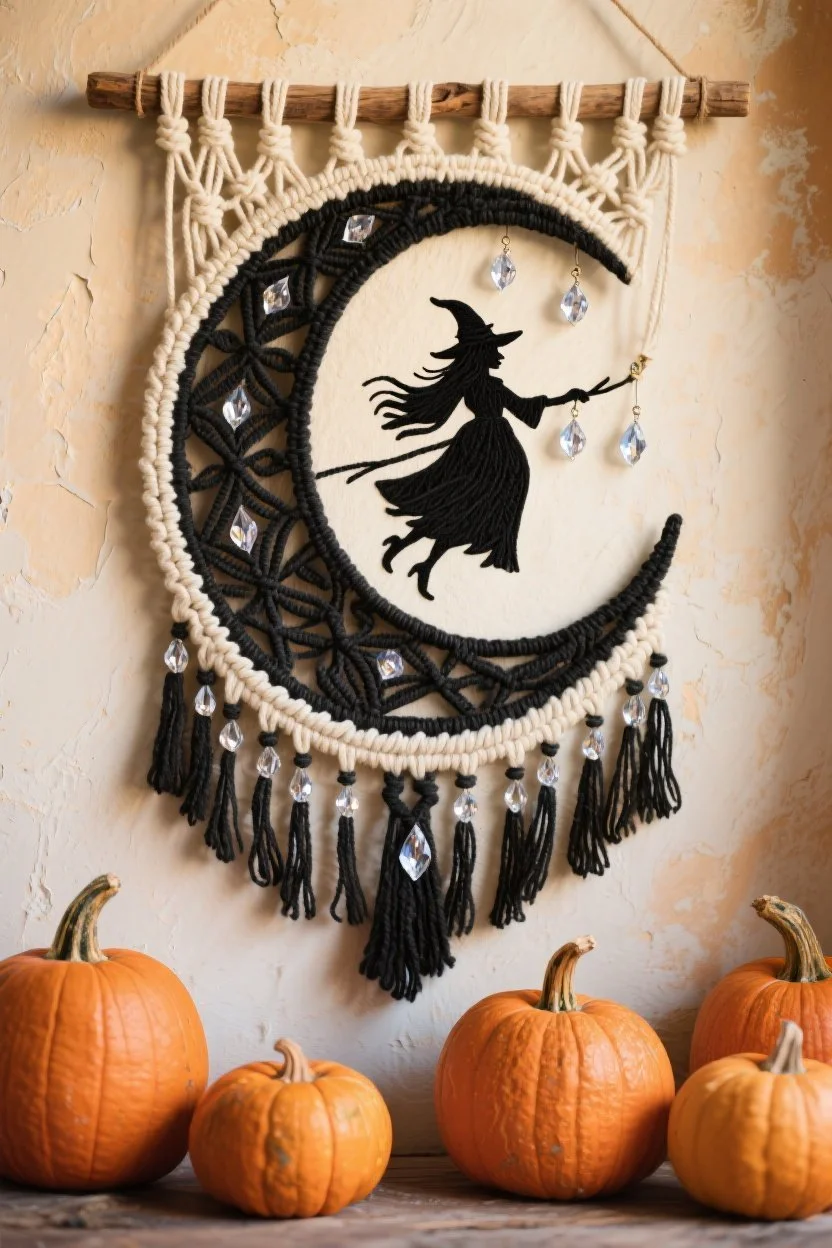
Moonlit Flight Macrame Wall Hanging
Description
The Moonlit Flight macrame wall hanging captures the magic of a Halloween night where a silhouetted witch glides across a crescent moon. This elegant piece blends natural and gothic elements, with the moon shape wrapped in creamy cotton cord and accented by intricate black cord patterns forming a lacy web in the inner arc. Clear crystal beads are suspended like glistening stars, catching and reflecting candlelight or sunlight in a shimmering dance. The witch figure at the center is bold and mysterious, evoking tales of enchanted forests and midnight spells. Black tassels adorned with more crystal drops sway gently at the bottom, enhancing the wall hanging’s ethereal presence. Hung from a rustic wooden dowel, the design balances sophistication with a touch of spooky charm, making it a perfect seasonal accent for a living room, entryway, or Halloween party display. Its mix of textures, colors, and reflective elements make it equally appealing to boho décor lovers and those seeking a refined take on Halloween decorations.
Step-by-Step Tutorial
Materials Needed
- 5mm Cotton Macrame Cord in Black – approx. 50 meters
- 5mm Cotton Macrame Cord in Natural/Cream – approx. 40 meters
- Rustic Wooden Dowel – about 12 inches
- Acrylic or Glass Crystal Beads/Drops
- Witch Silhouette Cutout
- Scissors
- Measuring tape
- Optional: Fabric Glue
Instructions
Step 1: Setting the Base
Cut a length of cream cord about 20 inches long and tie each end to the wooden dowel for hanging. This will support your project while you work.
Step 2: Preparing the Main Cords
Cut 14 black cords, each 6 feet long, and 12 cream cords, each 5 feet long. These will form your moon and decorative patterns.
Step 3: Creating the Crescent Moon Outline
Attach alternating black and cream cords to the dowel using Lark’s Head Knots. Shape them into a half-circle arc by working Double Half Hitch Knots in cream cord along the outer edge and black cord along the inner curve.
Step 4: Building the Lacy Interior
Inside the crescent, use the black cords to form a web-like lattice pattern. Alternate Square Knots and looping techniques to create small diamond shapes. Space them evenly to allow for hanging crystals later.
Step 5: Adding the Witch Silhouette
Position the witch cutout in the center of the moon’s open space. You can stitch it directly onto a backing cord or use discreet ties to secure it in place.
Step 6: Incorporating Crystal Drops
Attach crystal beads at intersecting points of the black lattice using short black cord segments. Use Lark’s Head Knots or small wire loops to secure them firmly.
Step 7: Tassels and Fringe
Cut 10-inch lengths of black cord to create tassels along the bottom curve of the moon. Add a crystal drop to the center of each tassel for sparkle. Comb out or leave them twisted for a sleeker look.
Step 8: Final Embellishments
Thread additional crystals from the top curve of the moon so they appear to dangle like magical stardust. Ensure all knots are tightened and trim excess cord for a polished finish.
Step 9: Securing and Hanging
Optionally, add a dab of fabric glue to high-tension knots for durability. Hang in a well-lit spot to make the crystals glisten.
Shop the Look
- Black Macrame Cord 5mm
- Natural Macrame Cord 5mm
- Crystal Beads for Crafts
- Halloween Witch Silhouette
- Rustic Wooden Dowel
Style it With
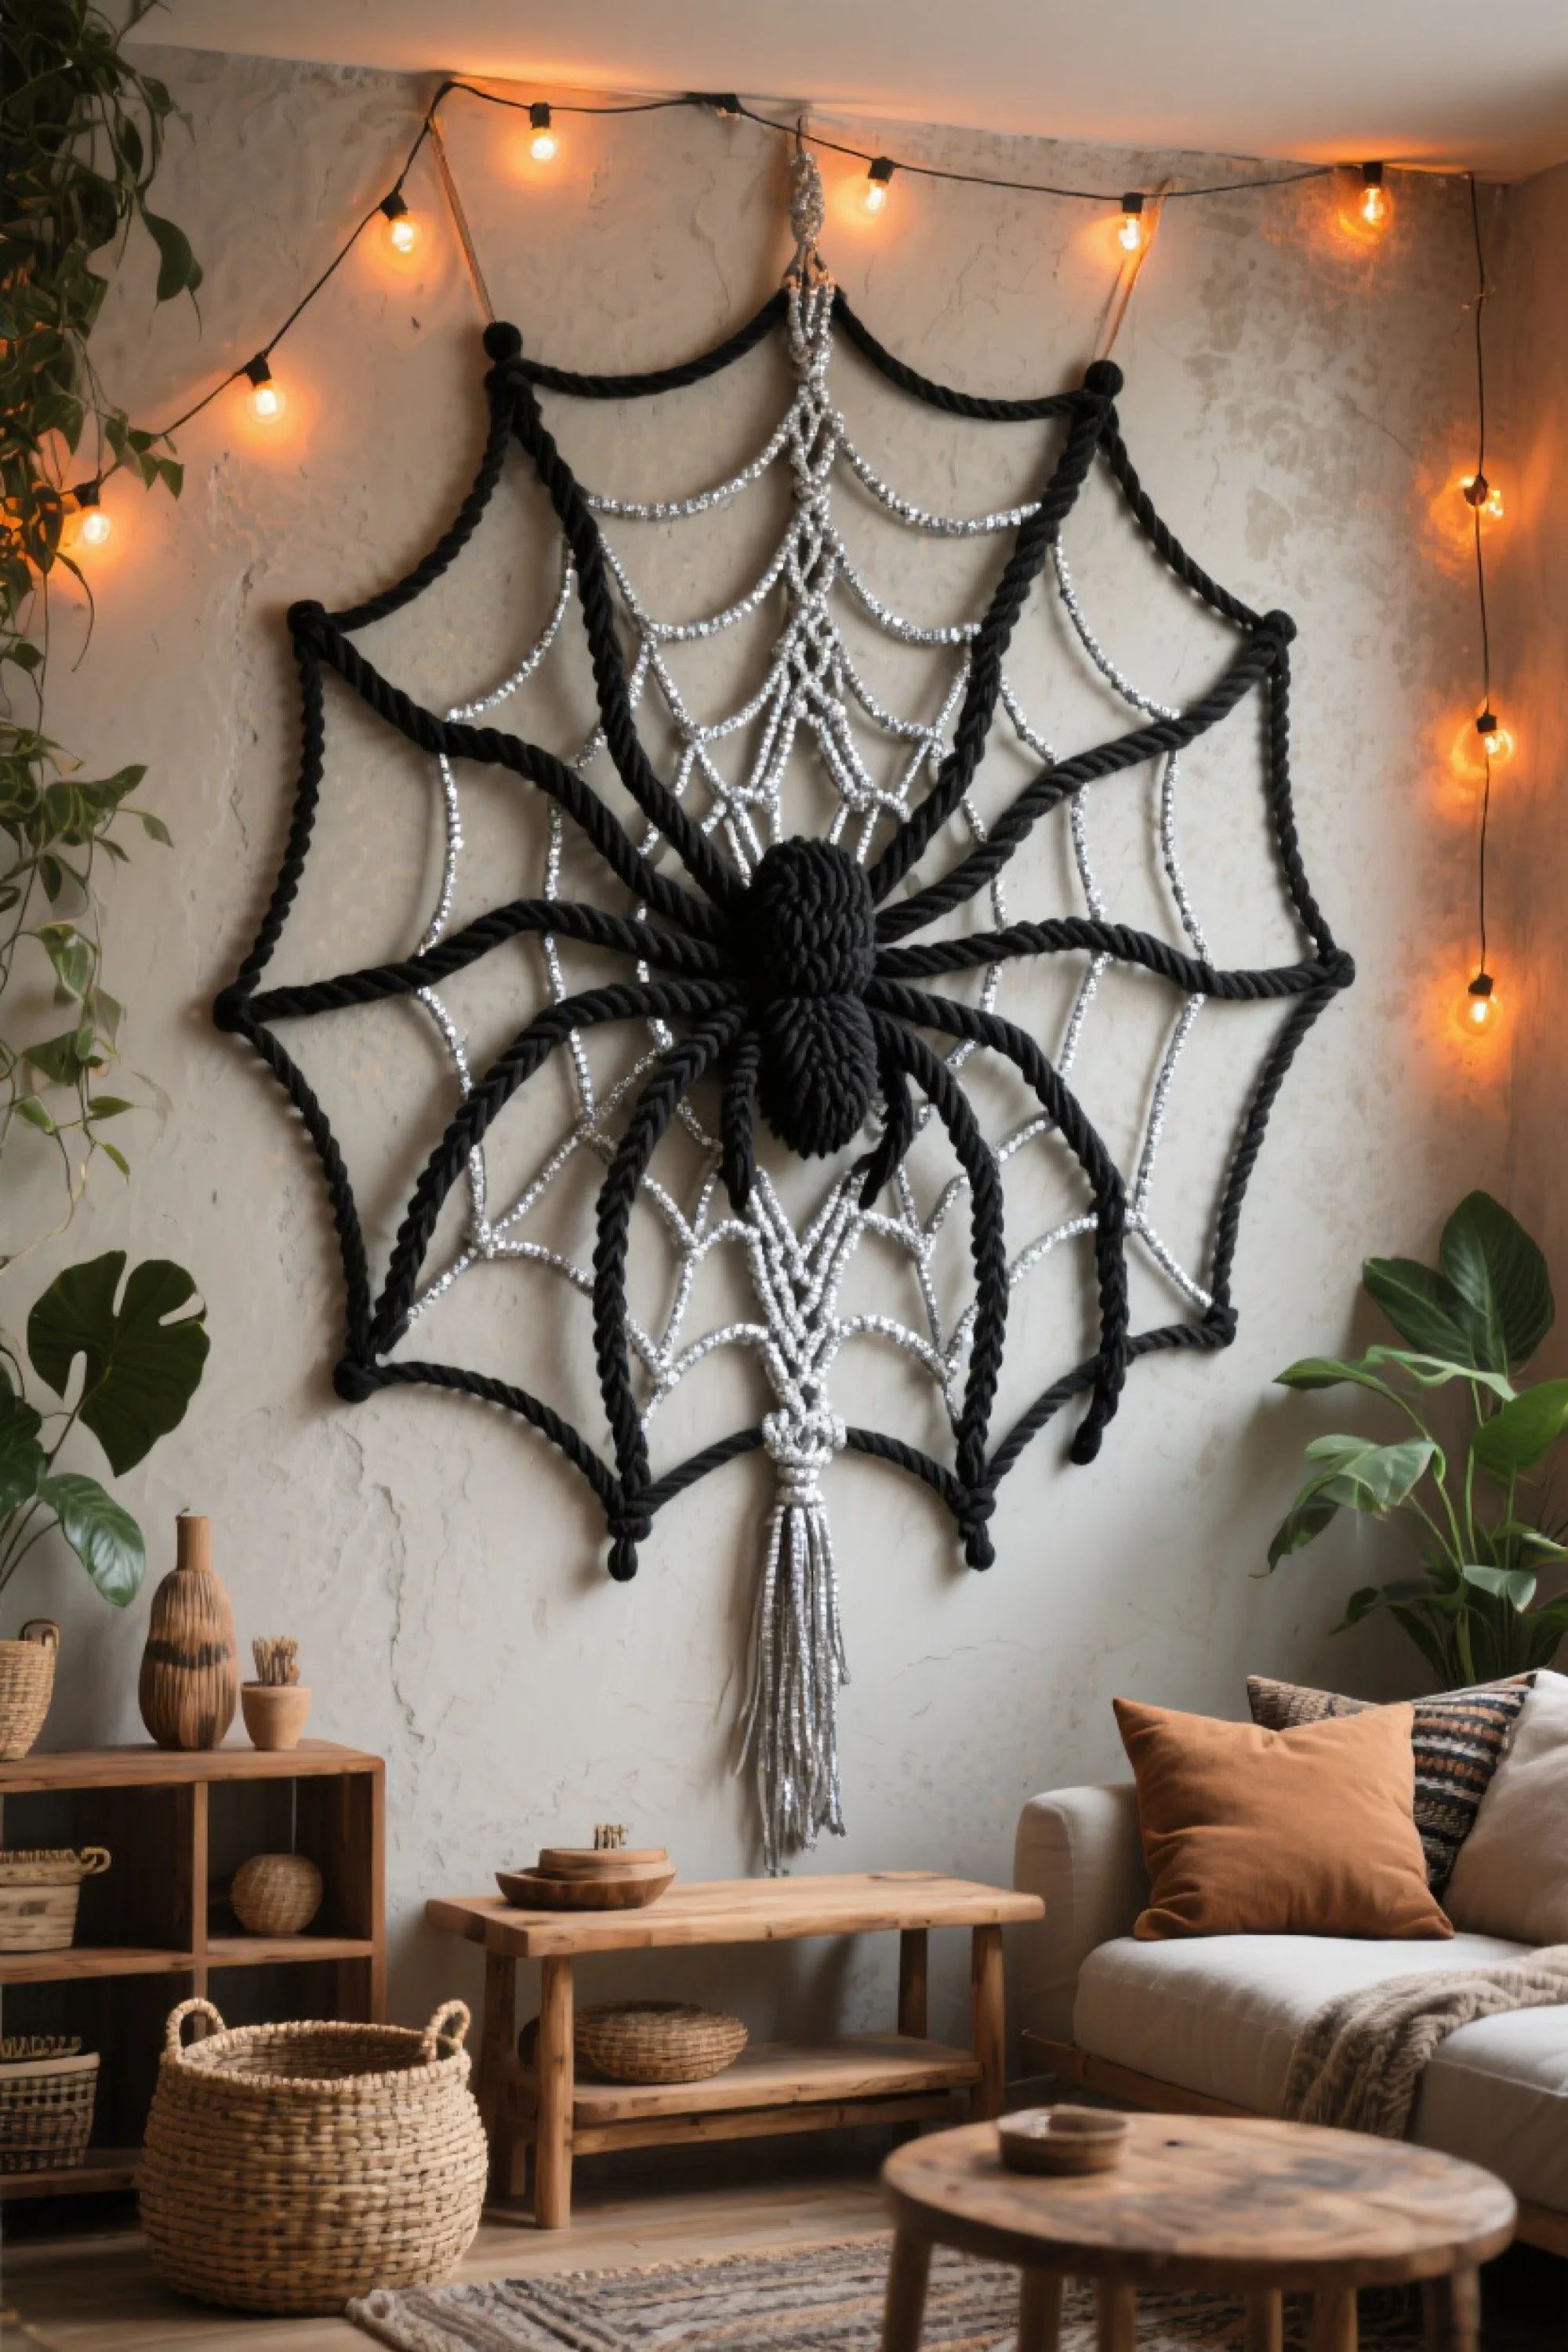
Widow’s Web Macrame Wall Hanging
Description
The Widow’s Web macrame wall hanging is a dramatic and oversized statement piece that instantly transforms any space into a Halloween-ready scene. Crafted from thick black rope and shimmering silver cord, the intricate web radiates from a central knotwork spider, whose body and legs are formed from dense, sculptural macrame techniques. The spider’s presence is both bold and captivating, making it the focal point of the entire piece. Each web strand glimmers subtly in the light, creating a realistic yet stylized take on a spider’s lair. Perfect for mounting over a sofa, bed, or party backdrop, this design combines boho artistry with creepy-cool flair. The large scale ensures it commands attention, while the texture and craftsmanship invite guests to step closer for a better look. For those who enjoy holiday décor with a handmade twist, the Widow’s Web is both a conversation starter and a stunning seasonal accent.
Step-by-Step Tutorial
Materials Needed
- 20mm Soft Cotton Rope in Black – approx. 30 meters
- 6mm Metallic Silver Macrame Cord – approx. 40 meters
- Large Wooden Bead or Foam Ball for Spider Body
- Macrame Scissors
- Heavy-Duty Wall Hooks
- Measuring tape
- Optional: Fabric Glue
Instructions
Step 1: Setting the Frame
Mark the desired web size on your wall using light pencil marks or painter’s tape. This design works best at a diameter of 5–6 feet for dramatic impact.
Step 2: Creating the Outer Ring
Cut black rope into eight equal segments, each about 6 feet long. Form them into a large octagon shape and secure each point to the wall with heavy-duty hooks. This outer frame serves as the foundation for your web.
Step 3: Building Radial Lines
From the center point, run additional black rope segments outward to each hook point, creating 8 spokes like a wheel. Secure them tightly so they remain taut.
Step 4: Adding the Silver Webbing
Using silver cord, begin tying Double Half Hitch Knots between each spoke to create concentric circles. Start close to the center and work outward, increasing spacing between circles as you go.
Step 5: Making the Spider’s Body
For the body, wrap a large wooden bead or foam ball with black rope using tight Spiral Knots until fully covered. Create a smaller version for the head. Join them together using a short length of black rope.
Step 6: Crafting the Legs
Cut 8 black rope segments about 3 feet long each. Use a combination of Square Knots and simple wraps to give them structure. Attach them evenly to the sides of the spider body.
Step 7: Attaching the Spider
Position the spider at the center of the web and secure with silver cord ties around the radial spokes. Ensure it sits flush and stable.
Step 8: Tassel Finish
At the very bottom of the web, create a silver tassel using leftover cord. This adds movement and a polished finish.
Step 9: Securing the Design
Check all knots for tightness. Optionally, dab fabric glue on high-tension knots for added durability.
Shop the Look
- Black Cotton Rope 20mm
- Metallic Silver Macrame Cord
- Large Wooden Beads
- Heavy Duty Wall Hooks
- Macrame Scissors
Style it With
Grinning Jack Macrame Wall Hanging
Description
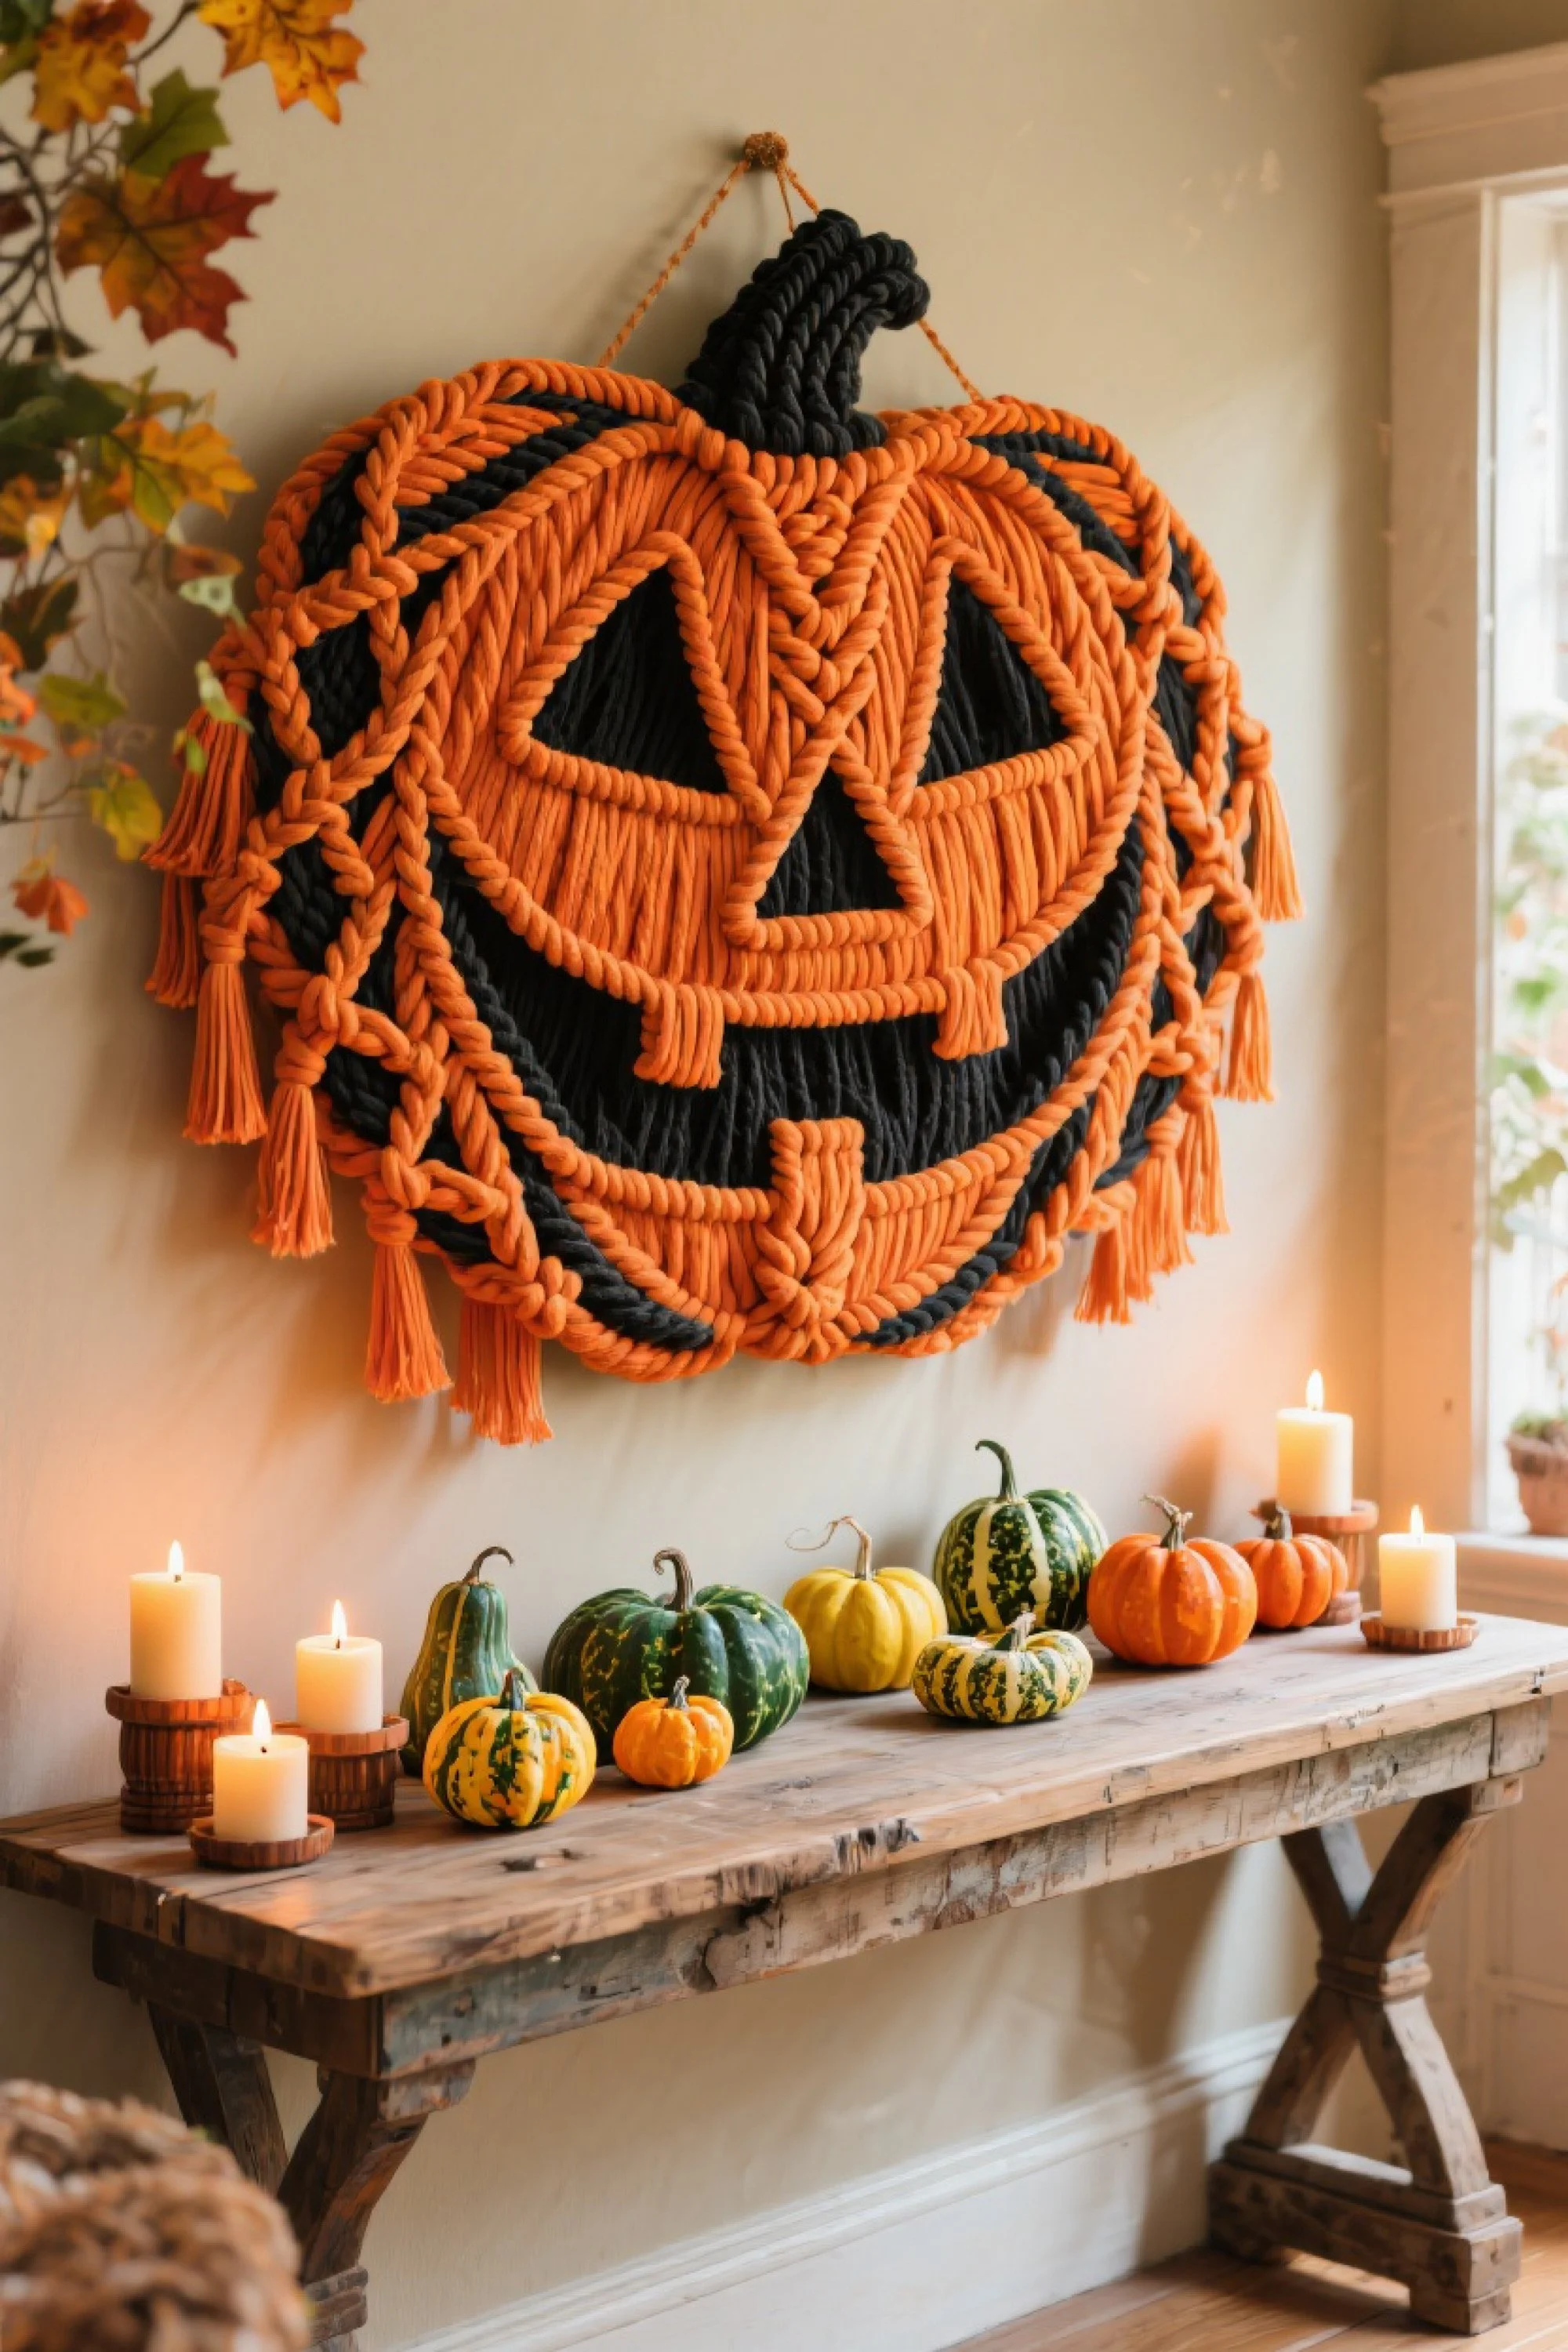
The Grinning Jack macrame wall hanging is the ultimate statement piece for Halloween lovers who appreciate bold, oversized décor. Designed in the shape of a cheerful yet mischievous jack-o’-lantern, this handmade beauty uses thick pumpkin-orange cord for the body and deep black cord for the eyes, nose, and toothy grin. The exaggerated size makes it perfect for hanging above a console table, mantel, or entryway, instantly becoming the focal point of the room. The combination of large braided sections and intricate knotwork creates a striking contrast in texture and color. Tassel fringe edges give the piece a playful finish, while the sturdy braided stem adds to its pumpkin charm. Whether you pair it with an arrangement of real gourds and candlelight or let it stand on its own, this wall hanging is as cozy as it is spooky. Perfect for boho interiors, farmhouse-style homes, or anyone who loves seasonal statement décor.
Step-by-Step Tutorial
Materials Needed
- 20mm Soft Cotton Rope in Pumpkin Orange – approx. 35 meters
- 20mm Soft Cotton Rope in Black – approx. 15 meters
- Macrame Scissors
- Large Tapestry Needle
- Heavy-Duty Wall Hook or Anchor
- Measuring tape
- Optional: Fabric Glue
Instructions
Step 1: Preparing the Design Space
Choose a large wall space to work on or lay your cords on a clean floor. This design works best at around 3 to 4 feet wide for maximum impact.
Step 2: Cutting the Cords
Cut 12 orange rope segments, each about 10 feet long, for the pumpkin body. Cut 6 black rope segments, each about 8 feet long, for the facial features.
Step 3: Shaping the Pumpkin Body
Using the orange cords, start by tying Lark’s Head Knots onto a temporary dowel or hanging rope. Arrange them so they form a wide, rounded outline. Use Square Knots and alternating rows of Spiral Knots to create the pumpkin’s texture.
Step 4: Adding the Jack-o’-Lantern Face
Integrate black cords in triangular sections for the eyes and nose, ensuring the edges are sharp for a clear, defined shape. For the mouth, weave black rope into a large jagged grin, following a template for symmetry.
Step 5: Layering for Dimension
To make the face pop, slightly raise the black sections by using additional rope thickness or layering knots underneath. This adds depth and gives the illusion of carved features.
Step 6: Side Tassels and Fringe
Create tassel bundles from leftover orange rope and attach them along the sides of the pumpkin to enhance its playful, handmade charm.
Step 7: Crafting the Stem
Form the stem with black rope using tight Spiral Knots to achieve a sturdy, curved shape. Attach securely to the top center.
Step 8: Finishing Touches
Trim cords for an even, neat appearance. Add optional fabric glue to secure knots, especially at tension points.
Step 9: Hanging the Piece
Install a heavy-duty wall hook or anchor to display your finished Grinning Jack proudly.
Shop the Look
- Orange Cotton Rope 20mm
- Black Cotton Rope 20mm
- Large Tapestry Needle
- Heavy Duty Wall Hooks
- Macrame Scissors
Style it With
Bats in the Moonlight Macrame Wall Hanging
Description
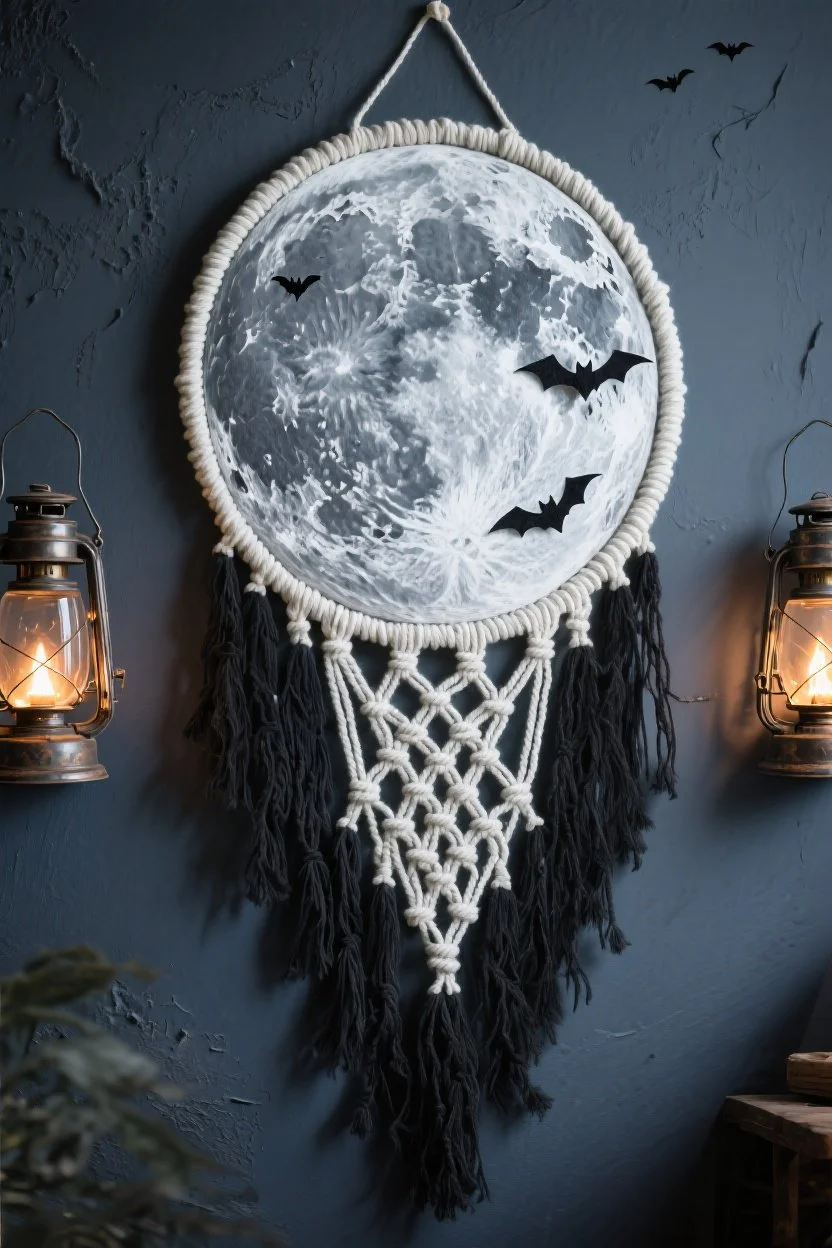
The Bats in the Moonlight macrame wall hanging captures the mystery of a full moon on a crisp October night. A striking moon print fills the center of the hoop, bordered by a hand-knotted cream macrame frame. Three silhouetted bats appear to be gliding across the glowing surface, lending a touch of Halloween drama without overwhelming the piece. Below the moon, cream diamond macrame knots transition into long black fringe, echoing the night sky. This design blends rustic boho charm with a sleek, modern edge, making it versatile enough for year-round display or seasonal Halloween décor. When hung against a dark wall and lit by warm lanterns or candles, the moon appears almost luminous. Perfect for adding an enchanted yet minimalist vibe to your living space, this wall hanging offers just the right balance of elegance and spook.
Step-by-Step Tutorial
Materials Needed
- 12-inch Wooden Embroidery Hoop
- 5mm Cotton Macrame Cord in Cream – approx. 20 meters
- 5mm Cotton Macrame Cord in Black – approx. 15 meters
- Moon Print Fabric or Panel
- Felt Bat Cutouts
- Fabric Glue
- Macrame Scissors
- Hot glue gun and sticks
Instructions
Step 1: Preparing the Hoop
Secure your moon fabric panel inside the embroidery hoop, pulling it taut. Trim excess fabric from the back.
Step 2: Adding the Cream Border
Cut cream macrame cords into 3-foot lengths. Attach them evenly around the hoop using Lark’s Head Knots. This creates the textured cream frame.
Step 3: Creating the Diamond Knot Section
Directly below the moon, tie Square Knots in a diamond pattern with the cream cords. Continue for about 5–6 rows, narrowing the design to a point.
Step 4: Transition to Black Fringe
Cut black macrame cords approximately 4 feet long. Attach them beneath the diamond section using Lark’s Head Knots to create a full fringe. Trim to your desired length.
Step 5: Adding the Bats
Arrange felt bat cutouts on the moon surface. Use fabric glue or hot glue to secure them in place. For a floating effect, glue only the center of each bat so the wings can lift slightly.
Step 6: Finishing Touches
Comb out the fringe if you want a softer look. For a sleeker finish, leave the cords twisted. Trim as needed.
Step 7: Hanging
Attach a cord to the top of the hoop for hanging. Place against a contrasting wall for maximum visual impact.
Shop the Look
- Wooden Embroidery Hoop 12 Inch
- Cream Macrame Cord 5mm
- Black Macrame Cord 5mm
- Moon Fabric Panel
- Felt Bat Cutouts
Style it With
Autumn Witch Macrame Wall Hanging
Description
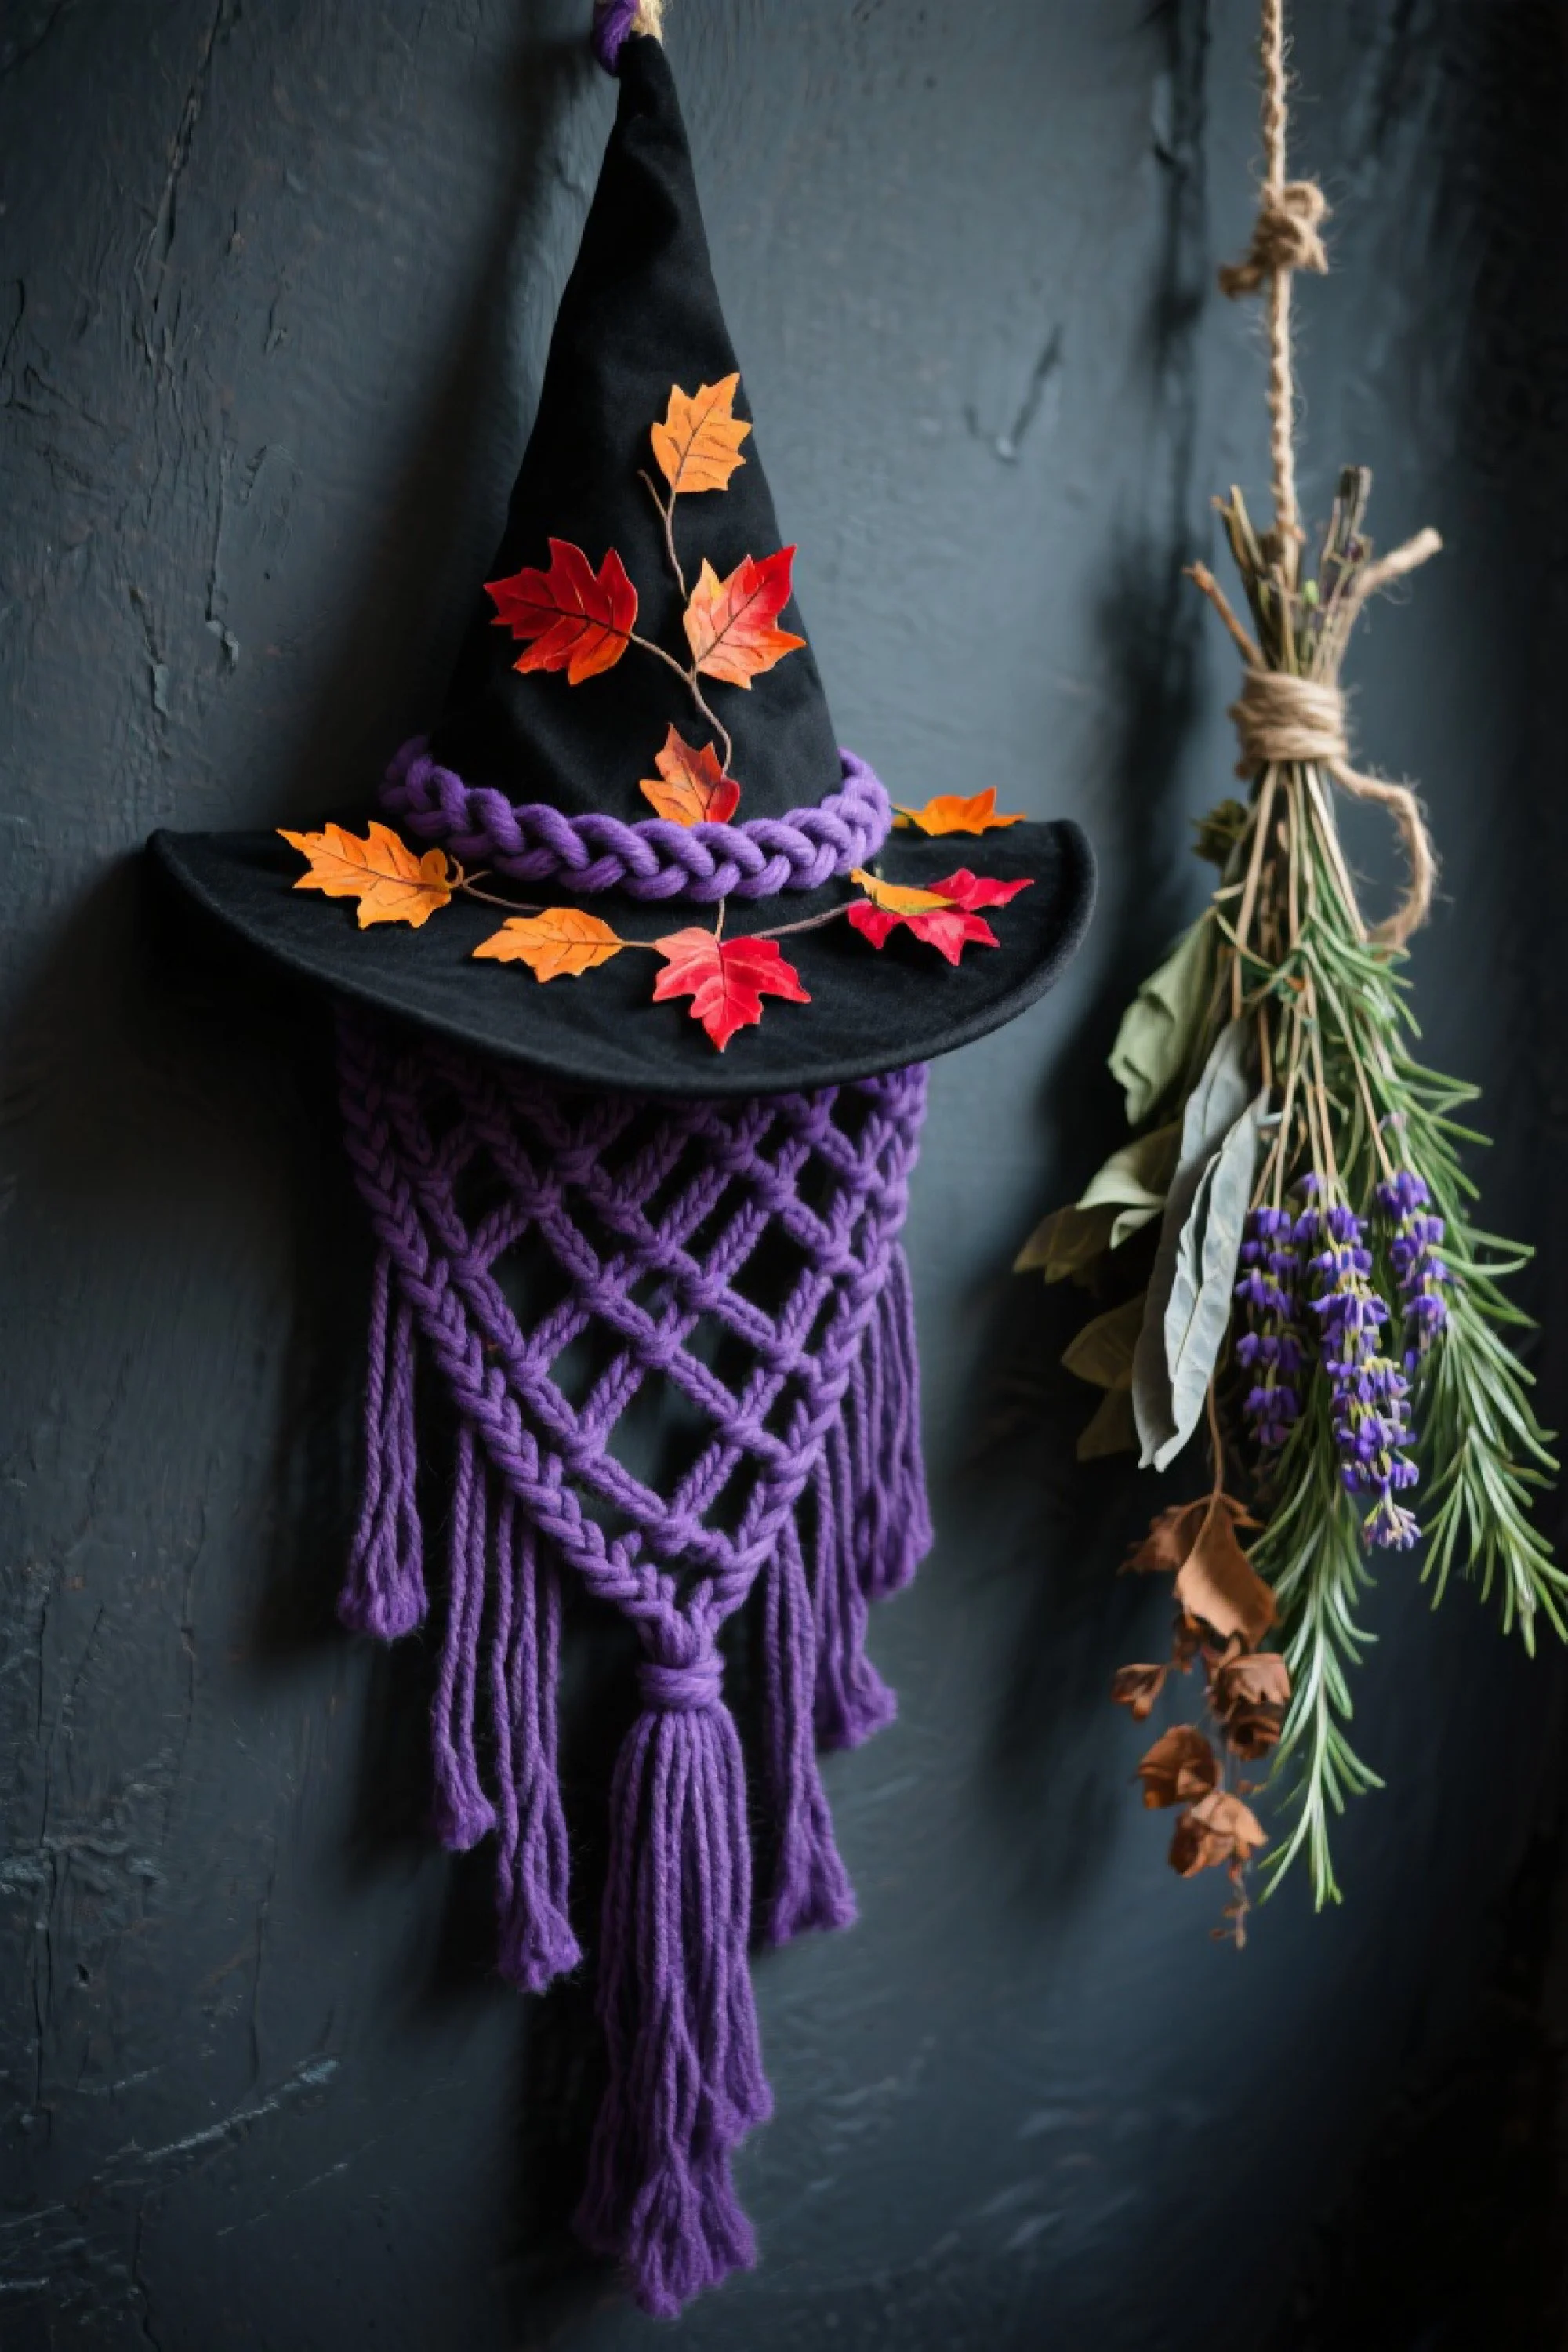
The Autumn Witch macrame wall hanging is a whimsical nod to seasonal magic, blending rich autumn tones with playful Halloween flair. A classic black witch hat forms the upper half, decorated with a braided purple cord band and vibrant faux maple leaves in shades of gold, orange, and crimson. From the brim flows a cascade of purple macrame knots arranged in a diamond lattice pattern, ending in tasseled fringe. This enchanting piece can easily be hung on a door, wall, or above a mantel, serving as both a festive decoration and a stylish statement. Its mix of soft fibers, bold colors, and natural leaf accents make it versatile enough to suit rustic, bohemian, or eclectic interiors. Paired with dried herbs, candles, or a cauldron display, it instantly transforms your space into a cozy witch’s corner.
Step-by-Step Tutorial
Materials Needed
- Black Witch Hat Base
- 5mm Cotton Macrame Cord in Purple – approx. 15 meters
- Faux Maple Leaves
- Fabric Glue
- Macrame Scissors
- Large-eye tapestry needle
- Measuring tape
Instructions
Step 1: Preparing the Hat
Start with a sturdy black witch hat. If the brim is soft, reinforce it with interfacing or cardboard inside to maintain shape.
Step 2: Creating the Braided Band
Cut three purple cords about 4 feet long each. Braid them tightly, then wrap around the hat’s base where the crown meets the brim. Secure ends with fabric glue.
Step 3: Adding the Maple Leaves
Arrange faux maple leaves along the band and brim. Glue in place, mixing colors for a balanced, natural look. Allow glue to fully dry before continuing.
Step 4: Knotting the Macrame Panel
Cut 10 cords, each about 5 feet long, and attach them evenly to the underside of the brim using Lark’s Head Knots. Arrange cords so they hang straight and even.
Step 5: Creating the Lattice Pattern
Tie Square Knots in a staggered pattern, forming diamond shapes. Continue until you reach about 2 feet of knotted length.
Step 6: Finishing with Tassels
Gather the center cords into a large tassel, securing with a wrap knot. Leave the side cords hanging as fringe and trim to your desired length.
Step 7: Attaching for Hanging
If desired, add a loop of purple cord to the tip of the hat for hanging. This allows the piece to be displayed flat against a wall.
Step 8: Styling
Hang beside dried herb bundles or candles for a witchy autumn vignette.
Shop the Look
Style it With
Gothic Skull Macrame Wall Hanging
Description
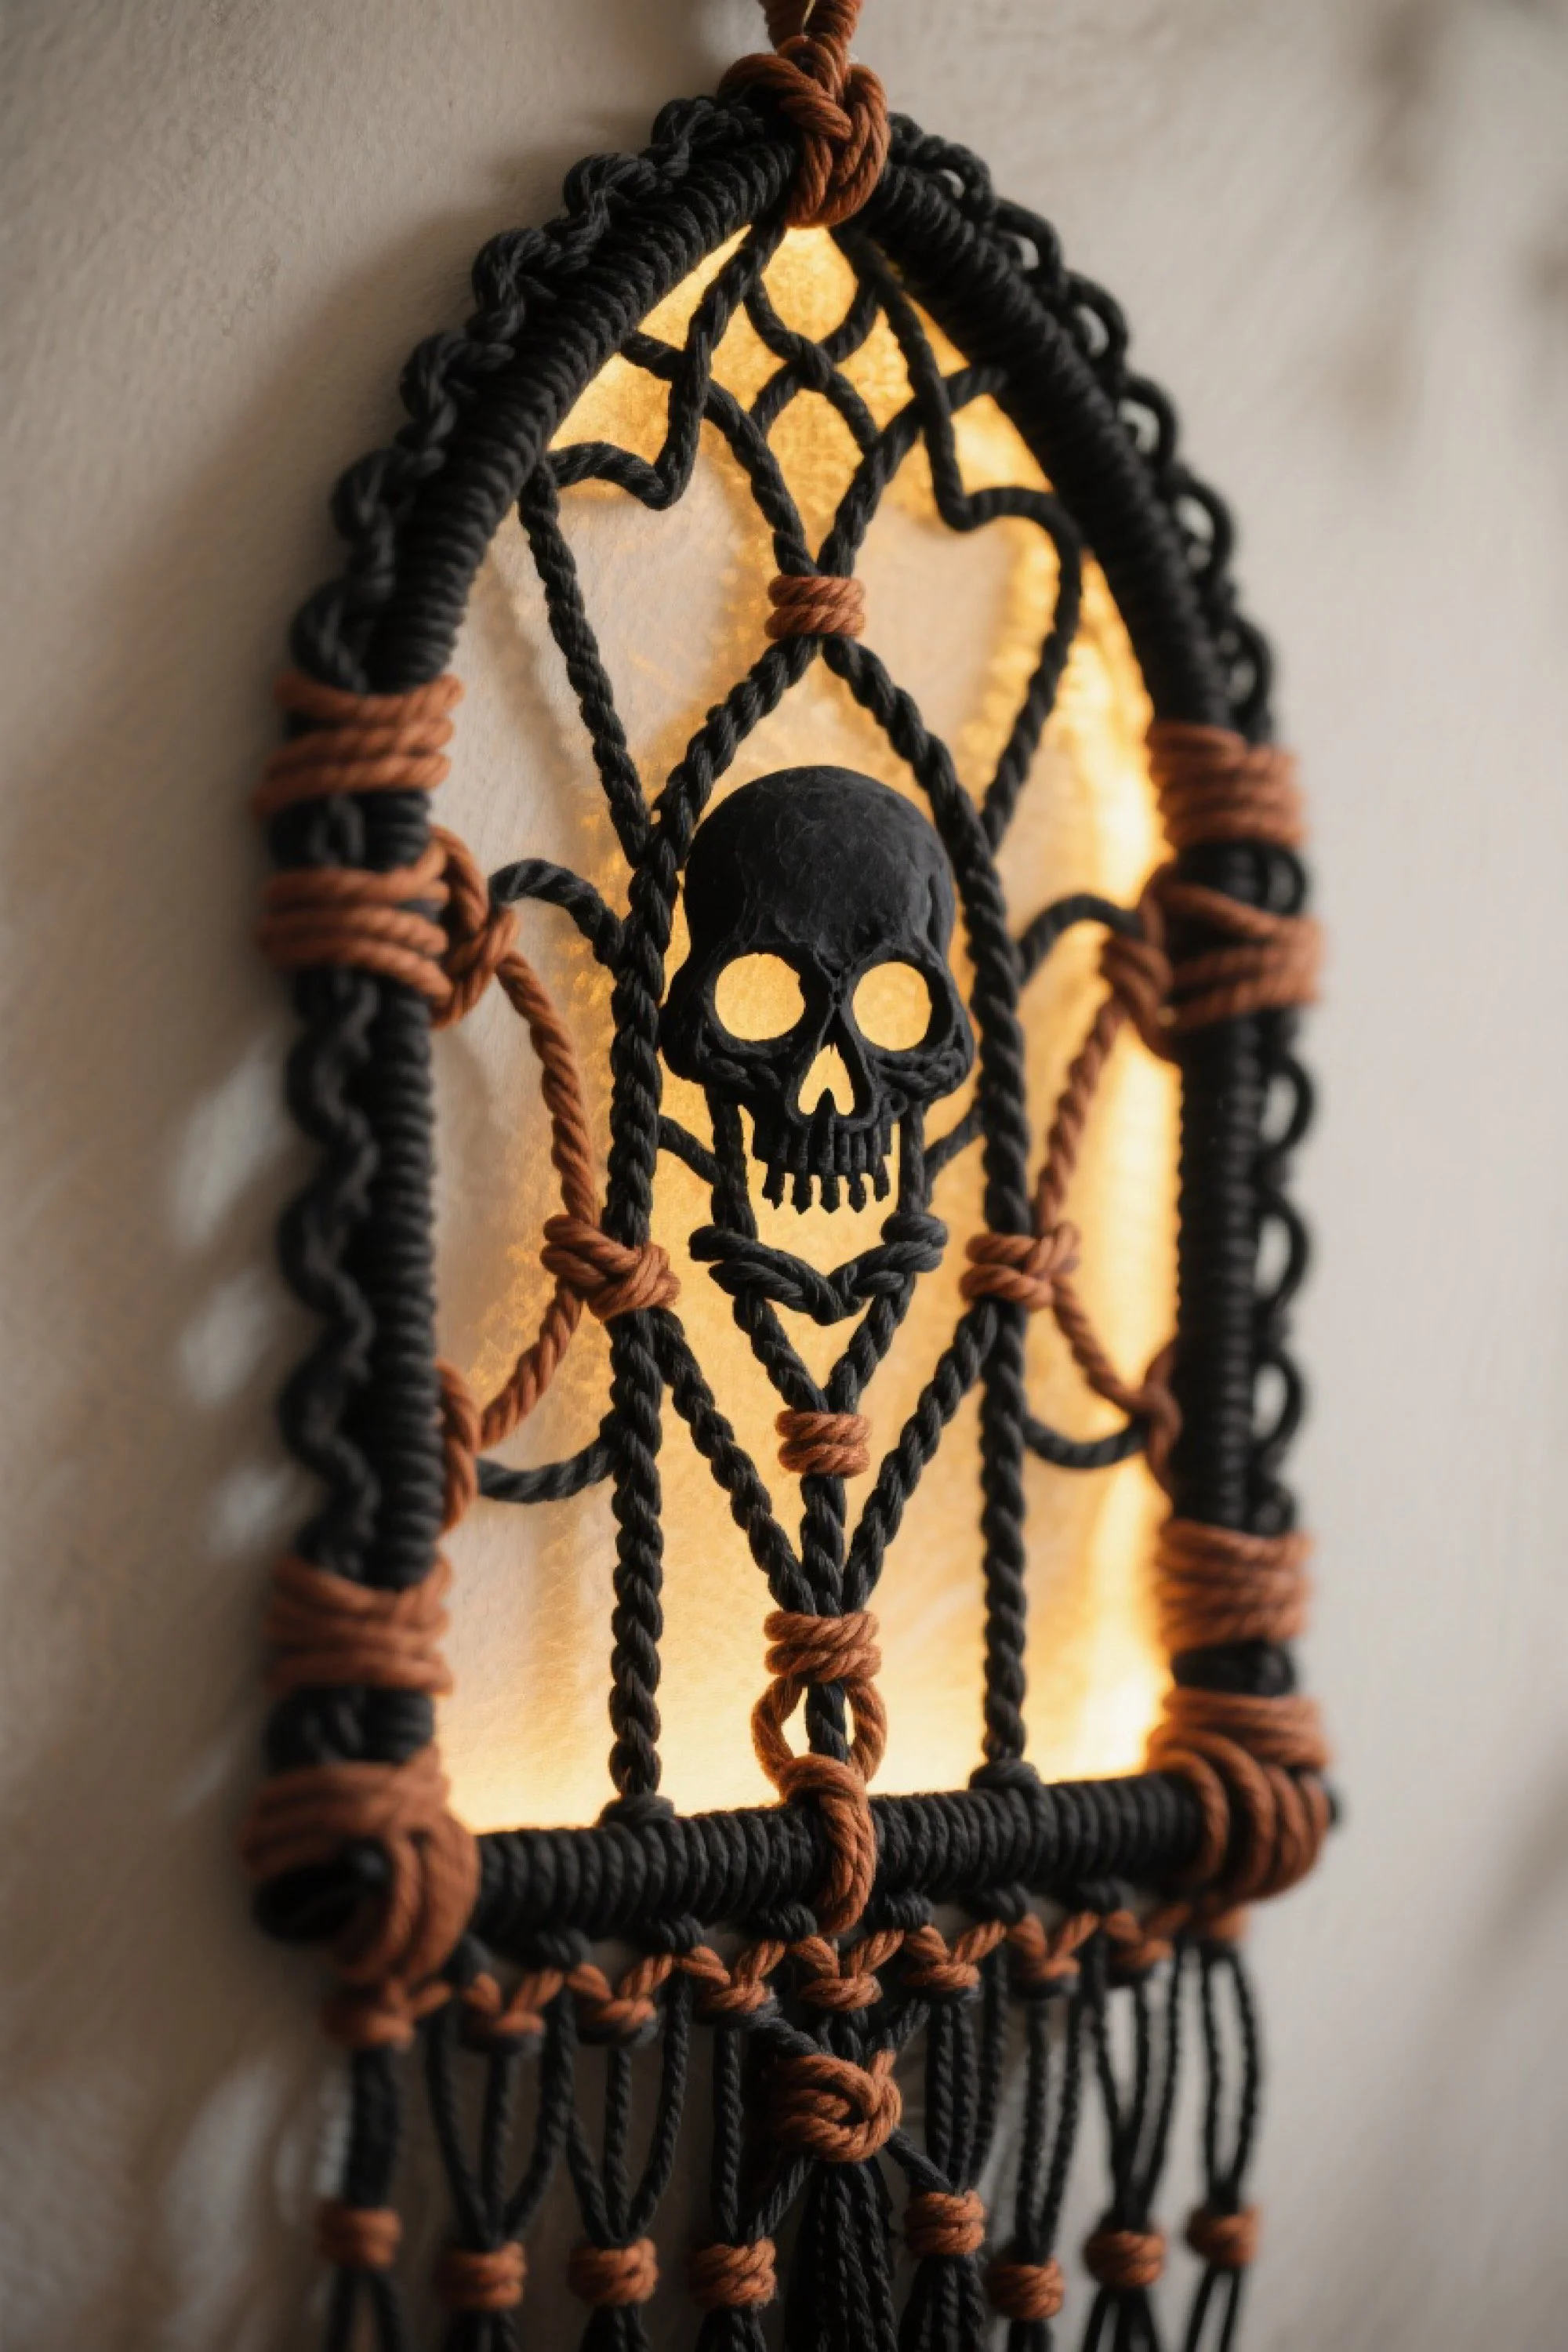
The Gothic Skull macrame wall hanging delivers an edgy, haunting vibe perfect for a moody Halloween aesthetic. Designed with an arched cathedral-style frame, the piece features intricate black knotwork accented with deep rust-brown wraps. At its center, a bold black skull motif commands attention, its hollow eyes illuminated by the soft glow of a backlit panel. The interplay of dark fibers and warm light creates a striking contrast that feels both eerie and artistic. The frame’s symmetrical design and careful knot spacing evoke stained glass windows, while the fringe at the bottom adds a tactile, handmade touch. This wall hanging works beautifully as a statement piece in a hallway, living room, or party setting—especially when paired with gothic or industrial-inspired décor.
Step-by-Step Tutorial
Materials Needed
- 5mm Cotton Macrame Cord in Black – approx. 25 meters
- 5mm Cotton Macrame Cord in Rust Brown – approx. 10 meters
- Black Skull Applique or Patch
- LED Backlight Panel
- Macrame Scissors
- Measuring tape
- Optional: Fabric Glue
Instructions
Step 1: Creating the Arched Frame
Form an arched shape using a stiffened wire or pre-shaped frame. Wrap entirely in black macrame cord using Spiral Knots for texture.
Step 2: Attaching the Base Cords
Cut black cords about 6 feet long and attach them evenly around the inside of the frame using Lark’s Head Knots.
Step 3: Adding Rust Accents
Interlace rust-brown cords at symmetrical points along the frame using Double Half Hitch Knots for stability and decorative interest.
Step 4: Skull Centerpiece
Secure the skull applique in the middle using discreet stitches or glue. If using a fabric version, back it with felt for structure.
Step 5: Knotting the Gothic Pattern
Fill the interior with pointed arches and diamond shapes using Square Knots and Diagonal Clove Hitch Knots. Keep spacing even to frame the skull.
Step 6: Incorporating the Backlight
Attach an LED backlight panel to the back of the frame. Hide wires by running them along the frame wraps.
Step 7: Fringe Finish
Tie a row of Square Knots at the base, then let the remaining cords hang freely as fringe. Add rust-brown wraps to select cords for balance.
Step 8: Securing the Piece
Tighten all knots and optionally add fabric glue to high-tension areas.
Step 9: Hanging
Mount on a wall near an outlet for the LED panel or use a battery-powered version for a cleaner display.
Shop the Look
- Black Macrame Cord 5mm
- Rust Brown Macrame Cord 5mm
- Black Skull Applique
- LED Backlight Panel
- Macrame Scissors
Style it With

Black Cat Familiar Macrame Wall Hanging
Description
The Black Cat Familiar macrame wall hanging captures the mystery and charm of one of Halloween’s most beloved symbols. Crafted entirely from thick black cord, the cat’s head is formed with intricate knotwork that brings texture and dimension to its sleek silhouette. The most captivating feature is its gleaming golden eyes—set with feline pupils—that seem to follow you around the room, adding a touch of enchantment. The rounded face, upright ears, and delicately knotted muzzle are complemented by long cord whiskers that extend outward, giving the piece a playful, lifelike quality. Fringe tassels hang beneath the chin, grounding the design in traditional macrame style. Perfect for hanging above a console table, on a door, or as part of a Halloween wall gallery, this wall hanging blends spooky elegance with handmade artistry.
Step-by-Step Tutorial
Materials Needed
- 20mm Soft Cotton Rope in Black – approx. 25 meters
- Gold Cat Eye Cabochons or Glass Eyes – 2 pieces
- Rustic Wooden Dowel – about 12 inches
- Macrame Scissors
- Hot Glue Gun
- Measuring tape
- Optional: Fabric Glue
Instructions
Step 1: Preparing the Dowel
Cut a black cord about 20 inches long and tie it to each end of the dowel to create a hanging loop.
Step 2: Cutting the Cords
Cut 12 black cords, each about 8 feet long, for the main face structure. Cut 6 cords, each about 3 feet long, for whiskers.
Step 3: Creating the Head Shape
Attach the 8-foot cords to the dowel using Lark’s Head Knots. Shape them into a rounded form using Square Knots and alternating Spiral Knots for texture.
Step 4: Forming the Ears
Separate cords on the far left and right sides. Use Diagonal Clove Hitch Knots to create pointed ear shapes, securing them back into the main head form.
Step 5: Adding the Eyes
Attach the gold cat eyes to the center of the face using hot glue or stitching. Make sure they are aligned and evenly spaced.
Step 6: Defining the Muzzle and Nose
Use a series of tight Square Knots in the center lower portion to form a snout. Slightly angle the knots downward to suggest the nose.
Step 7: Whiskers
Attach the shorter cords at muzzle level and let them extend outward for a lifelike effect.
Step 8: Fringe and Finishing
Knot and trim the lower cords into short fringe tassels. Optionally, comb them out for a softer look.
Step 9: Hanging
Mount on the wall where light can catch the gold eyes for maximum effect.
Shop the Look
Style it With
Ghostly Web Macrame Wall Hanging
Description
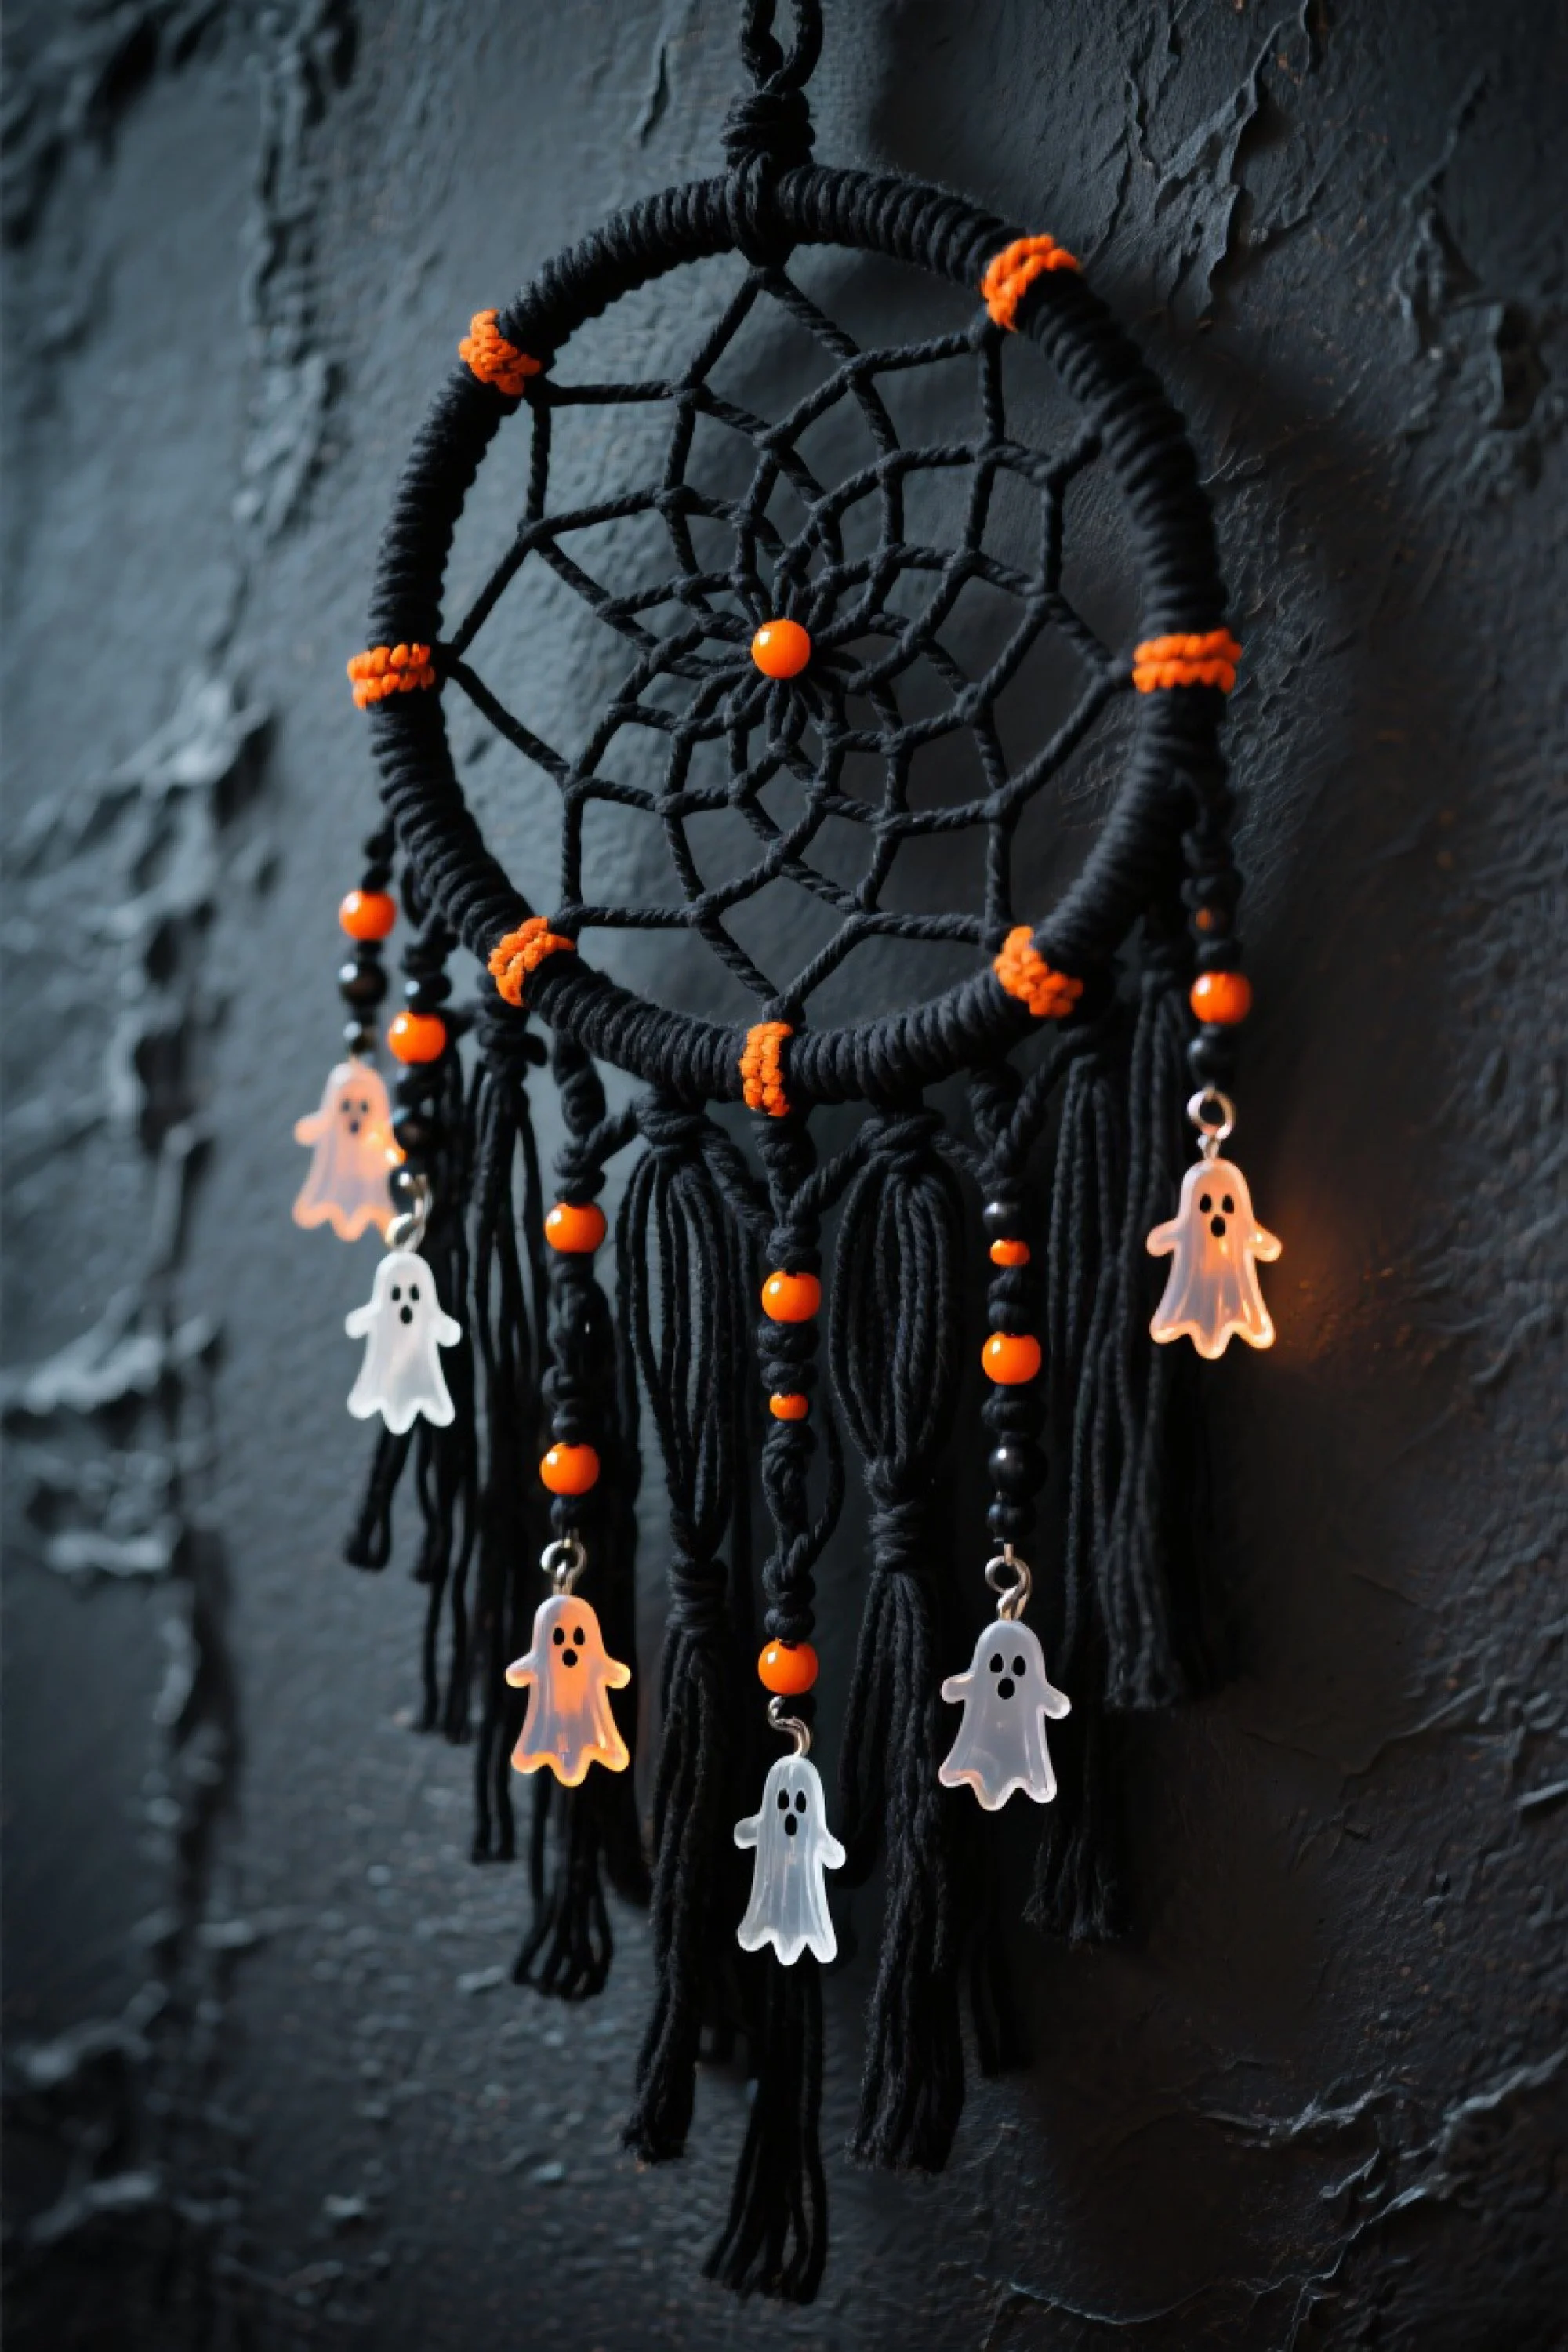
The Ghostly Web macrame wall hanging is a playful Halloween twist on the traditional dreamcatcher. Featuring a tightly woven black cord spiderweb pattern inside a hoop, the design is accented with pops of pumpkin-orange knots and beads for a festive touch. Dangling from the bottom are cascading strands of black cord decorated with alternating orange and black beads, each ending in a friendly ghost charm that sways gently with movement. The contrast between the deep black cords and the bright seasonal accents makes it a striking wall piece, while the whimsical ghosts bring lighthearted charm to the spooky season. Perfect for hanging near an entryway, above a candy table, or as part of a Halloween gallery wall, this piece blends boho style with holiday fun.
Step-by-Step Tutorial
Materials Needed
- 8-inch Metal or Wooden Hoop
- 3mm Cotton Macrame Cord in Black – approx. 15 meters
- 3mm Cotton Macrame Cord in Orange – approx. 3 meters
- Orange and Black Beads
- Ghost Charms – 6 to 8 pieces
- Macrame Scissors
- Hot Glue Gun
Instructions
Step 1: Wrapping the Hoop
Start by wrapping the entire hoop in black cord, securing the ends with a small dab of hot glue.
Step 2: Weaving the Web
Tie one end of the black cord to the hoop and weave it in a continuous spiral pattern, looping around the hoop and pulling taut after each loop to form a spiderweb effect. Continue until you reach the center, then tie off securely.
Step 3: Adding Orange Accents
Tie short orange cord segments at evenly spaced intervals around the hoop. Use Wrap Knots or simple overhand knots to create bright pops of color.
Step 4: Preparing the Hanging Strands
Cut several lengths of black cord about 18 inches long. Attach them to the bottom half of the hoop using Lark’s Head Knots.
Step 5: Bead and Charm Placement
String orange and black beads onto the hanging cords, securing them in place with knots. At the end of each strand, attach a ghost charm using knot loops or small jump rings.
Step 6: Central Bead Accent
Add an orange bead to the very center of the spiderweb for a bold focal point.
Step 7: Finishing Touches
Trim the bottom cords to your desired length. Comb or leave them twisted depending on your style preference.
Step 8: Hanging the Piece
Attach a small loop of cord at the top for easy hanging.
Shop the Look
- 8 Inch Macrame Hoop
- Black Macrame Cord 3mm
- Orange Macrame Cord 3mm
- Ghost Charms
- Orange and Black Beads
Style it With

Rest in Peace Macrame Tombstone Wall Hanging
Description
The Rest in Peace macrame tombstone wall hanging is a hauntingly elegant piece that blends rustic craftsmanship with spooky symbolism. A weathered, gray tombstone serves as the base, featuring the bold "RIP" inscription at its center. Surrounding the stone is an intricate frame of soft, twisted macrame cord in a bone-white hue, forming a diamond-shaped border that draws the eye inward. The cordwork continues into a knotted pattern at the bottom, ending in long, tassel-like fringe that gives the piece a soft, handmade texture against its solid backdrop. This wall hanging adds a gothic yet cozy feel to your Halloween décor, especially when paired with candlelight, faux cobwebs, and dried vines. Whether hung indoors as part of a spooky vignette or outside on a covered porch, it’s a unique, handcrafted alternative to standard seasonal wall art.
Step-by-Step Tutorial
Materials Needed
- Foam or Wood Tombstone Plaque
- 5mm Cotton Macrame Cord in Bone White – approx. 15 meters
- Macrame Scissors
- Hot Glue Gun
- Measuring tape
Instructions
Step 1: Preparing the Tombstone Base
Start with a lightweight foam or wood tombstone. If desired, paint or distress it for a weathered effect.
Step 2: Cutting the Cords
Cut four cords about 6 feet long each for the outer frame, plus several 3-foot cords for knotting around the bottom.
Step 3: Framing the Tombstone
Using the long cords, create a diamond-shaped outline across the front of the tombstone. Secure the ends to the back with hot glue.
Step 4: Wrapping the Top Loop
At the top of the diamond, create a wrapped knot to form a hanging loop. This will allow the piece to be displayed easily on a wall hook.
Step 5: Side Accents
Tie Double Half Hitch Knots along each side of the diamond frame for added texture and stability.
Step 6: Lower Knotwork
At the bottom of the diamond, use the shorter cords to create Square Knots in a small lattice pattern, tapering to a point.
Step 7: Adding the Fringe
Let the remaining cords hang freely as fringe, trimming them to your desired length. For a fuller look, add extra fringe pieces using Lark’s Head Knots.
Step 8: Securing the Piece
Ensure all knots are tight, and reinforce with hot glue where the cord meets the tombstone.
Step 9: Styling
Hang on a wall with cobwebs, branches, and candles for a complete spooky scene.
Shop the Look
- Foam Tombstone Decor
- Bone White Macrame Cord 5mm
- Hot Glue Gun
- Macrame Scissors
- Wall Hooks for Hanging Decor
Style it With
Closing Thoughts
Halloween comes alive in the details—and macrame is a detail-rich art form that elevates any seasonal display from simple to unforgettable. With every knot and twist, you have the power to transform cord into characters, scenes, and symbols that carry the soul of October. Whether your goal is to craft a single statement piece for your entryway or build an entire gallery of handmade wall hangings, each creation will add personality, warmth, and a sense of artistry that store-bought décor simply can’t match.
The ten projects you’ve explored here are more than just instructions; they’re invitations to weave your own story into your seasonal décor. As you create, you’ll not only produce something beautiful for your home but also start traditions, spark conversations, and inspire others to explore their own creativity. This Halloween, let your walls, doors, and mantels become stages where your handmade magic plays out—each knot a testament to the time, care, and imagination you’ve poured into your craft.