How to Create a Glowing 3D Skeleton Frame That Transforms Your Halloween Decor
How to Upcycle an Old Frame into a Glowing 3D Skeleton Halloween Display — The Art of Spooky Storytelling at Home
There’s a certain magic to Halloween that goes far beyond candy bowls and plastic pumpkins. It’s the season where our homes become the stage for small moments of theater, where every hallway corner, flicker of light, and artful shadow can be part of a larger story. Whether you lean into whimsical harvest décor or prefer to dance along the edge of eerie elegance, the true beauty of Halloween decorating is in the details. And sometimes, the most captivating décor pieces aren’t bought straight from the store—they’re made with your own two hands, infused with creativity, and rich with personal touches.
This project is all about one of those centerpiece-worthy creations: transforming an old frame into a glowing 3D skeleton display that feels like it has stepped out of a haunted manor. It’s part craft, part set design, and part storytelling. The frame becomes your stage, the skeleton your actor, the lighting and cobwebs your mood setters. And the end result is a conversation starter that will draw every eye when the lights go down and the glow begins.
Why DIY Décor Feels More Special
We live in an age where you can click a button and have an entire Halloween display shipped to your doorstep. But there’s something deeply satisfying about building it yourself. When you take time to create a piece, you invest not only in its appearance but in the story behind it. Friends who visit won’t just say, “That’s cool.” They’ll ask where you got it, and you’ll get to say, “I made it.” That shift changes the energy of the piece—it’s not just decoration, it’s a reflection of your creativity.
There’s also a subtle wellness benefit to hands-on projects like this. The act of working with your hands, focusing on details, and seeing a vision come together has a grounding effect. It slows you down in the best way, pulling you into the present moment. When you’re stretching cobwebs over a frame or adjusting a light strand for the perfect glow, you’re not thinking about your email inbox—you’re absorbed in the art of making.
The Charm of Using an Old Frame
The starting point here is so simple: an old picture frame. Maybe it’s one you’ve been meaning to donate, or maybe you discover a gem at a flea market or thrift store. Even if it’s scratched or out of style, that’s not a problem—in fact, imperfections add to the character. By reimagining the frame as a shadowy portal for your Halloween scene, you’re giving it new life in a way that feels clever and sustainable.
Upcycling has its own joy. You’re not just crafting, you’re saving something from the landfill and making it beautiful again. And since frames come in so many sizes and styles, you can make this piece fit perfectly into your existing décor. Go ornate and gold for a Victorian haunted house vibe, or keep it simple and black for modern gothic drama.
Creating Atmosphere with Light and Texture
The magic of this display isn’t just in the skeleton—it’s in how you light and dress the scene. This is where it becomes more than just a skeleton in a frame. Light transforms it into a story. A warm amber glow feels like candlelight in a forgotten room. Purple light makes it mystical. Cool white feels like moonlight streaming through a broken window.
Cobwebs are another layer of texture that instantly change the scene. Pull them thin so they look like decades of dust and neglect. Add a few spiders to make it feel alive. Think of it as costuming your stage—it’s not just the main actor (the skeleton) that matters, but the set pieces around it that pull the viewer into the story.
The Multi-Sensory Touch
Part of what makes great décor stand out is when it engages more than just the eyes. The visual impact of this display is undeniable, but you can take it further with subtle scents and tactile details. Imagine brushing past this frame in a hallway and catching a faint note of cinnamon, clove, or smoky cedar. You could even tuck a small satchel of dried herbs or a drop of essential oil behind the foam board. It’s a tiny detail, but one that deepens the sensory experience.
Even the act of creating this project is sensory. There’s the feel of the foam board under your hands as you cut it, the sound of the hot glue gun crackling to life, the slight tug of cobweb fibers catching on your fingertips. These little moments are part of why hands-on seasonal décor feels so much more rewarding than buying something pre-made.
Setting the Scene in Your Home
When your display is complete, it becomes a question of where it will live. Hanging it in an entryway ensures it’s the first thing guests see when they step inside. Placing it above a mantel can make it the crown jewel of your Halloween living room. If you’re feeling especially theatrical, you could create an entire gallery wall of spooky frames, each with its own theme.
The glow from the lights will draw people in, but the layers of texture will keep them looking. Guests might notice a spider they didn’t see at first, or the way the skeleton’s hand seems to reach toward them when the light hits just right. That lingering curiosity is the hallmark of great seasonal décor.
Making It Yours
One of the best parts of a project like this is how easily you can adapt it to your personal style. Maybe you want your skeleton to hold something—a candle, a tiny pumpkin, a faux raven. Perhaps you want to paint the skeleton pieces a metallic gold for a luxe-meets-macabre vibe. Or maybe you’ll weave in strands of black lace or velvet ribbon to soften the look. This is where you get to play.
The Amazon marketplace is full of possibilities for customization. You might start with the basics—skeleton props, Halloween string lights, fake spider webs—but then branch out into decorative touches that make the piece uniquely yours.
The Wellness of Seasonal Rituals
Beyond the aesthetics, there’s a deeper reason to engage in projects like this: seasonal rituals are good for the soul. They mark the passage of time in a tactile, intentional way. In the same way that spring cleaning feels like a reset, decorating for autumn and Halloween can be a way to slow down and immerse yourself in the present season. Lighting your new skeleton display on a chilly October evening can become a ritual in itself—a moment to pause, breathe, and enjoy the atmosphere you’ve created.
And because this piece is built to last, it can come back year after year. Each October, you’ll unpack it like an old friend, remembering the night you made it. You might add a new element each year, evolving it over time. That sense of continuity adds a layer of nostalgia to your seasonal décor.
Why This Project Belongs on Your To-Do List
If you’re looking for a Halloween project that’s visually striking, budget-friendly, and full of creative potential, this is it. It’s not overly complicated, but it gives you plenty of room to experiment and make it your own. It’s as much about the process as it is about the finished product—a few hours spent crafting with music playing and maybe a pumpkin-scented candle burning.
When it’s done, you’ll have a piece that looks like it could have come from an upscale Halloween boutique, but with the pride of knowing you created it yourself. And unlike store-bought decorations that blend into the background, this will be the one guests remember. The one they’ll photograph. The one that makes your Halloween season feel just a little more cinematic.
So gather your frame, your foam board, your skeleton parts, and your lights. Make yourself a warm drink, put on something cozy, and turn your home into a place where stories live in the corners and shadows. This is the kind of DIY that doesn’t just decorate—it transforms.
💡 Pro Tip: Why These Are Amazon Search Links (and Why “Add to Cart” Really Helps)
You might notice that every “Shop the Look” section uses Amazon search result links rather than one specific product. That’s not a glitch—it’s a strategy.
Items in fashion, beauty, and home sell out fast. Colors change. Styles get discontinued. Linking to a single item might leave you staring at a “Currently Unavailable” page—and nobody wants that.
With search result links, you’ll get:
• A fresh rotation of similar, in-stock finds
• Options that match your budget, size, and style
• Fewer dead ends and more discoveries
✨ Here’s how you can support this blog with zero extra cost:
If something speaks to you—even if you're still deciding—add it to your cart while you’re browsing. Amazon only credits creators like me if the item is added to your cart during that first visit.
It doesn’t cost you anything extra, but it makes a big difference in helping me keep this blog alive, ad-free, and full of hand-picked inspiration for your next obsession.
Thank you for being here. Thank you for shopping with intention. 💛
Turn an old frame into a creepy Halloween masterpiece 🎃🖤 Add skeleton parts, lights, webbing & spiders for a 3D haunted wall piece that glows at night 👻 #DIY #HalloweenDecor by https://t.co/Awxd05nXDk pic.twitter.com/sFsRB3YbTU
— DIY Dimension (@diydimension) August 14, 2025
DIY 3D Skeleton Frame — Materials & Overview
What You’ll Need
- Old picture frame (large enough for a dramatic effect)
- Black foam board or cardboard (to fit inside the frame)
- Skeleton parts (skull, hands, or other bones)
- String lights (white, orange, purple, or multi-color for effect)
- Fake spider webbing
- Plastic spiders or other creepy crawlies
- Hot glue gun & glue sticks
- Scissors or utility knife
- Tape (optional for securing wires)
- Hanging hardware (if not already on the frame)
Overview of Steps
- Remove the backing, artwork, and glass from the old frame.
- Cut black foam board or cardboard to fit snugly inside the frame.
- Arrange and glue the skeleton parts in a dramatic, reaching pose.
- Secure string lights around and behind the skeleton pieces for illumination.
- Stretch fake spider webbing over the display for a realistic cobweb effect.
- Add plastic spiders for extra creep factor.
- Place the completed display back into the frame.
- Hang your glowing, spooky masterpiece for Halloween night.
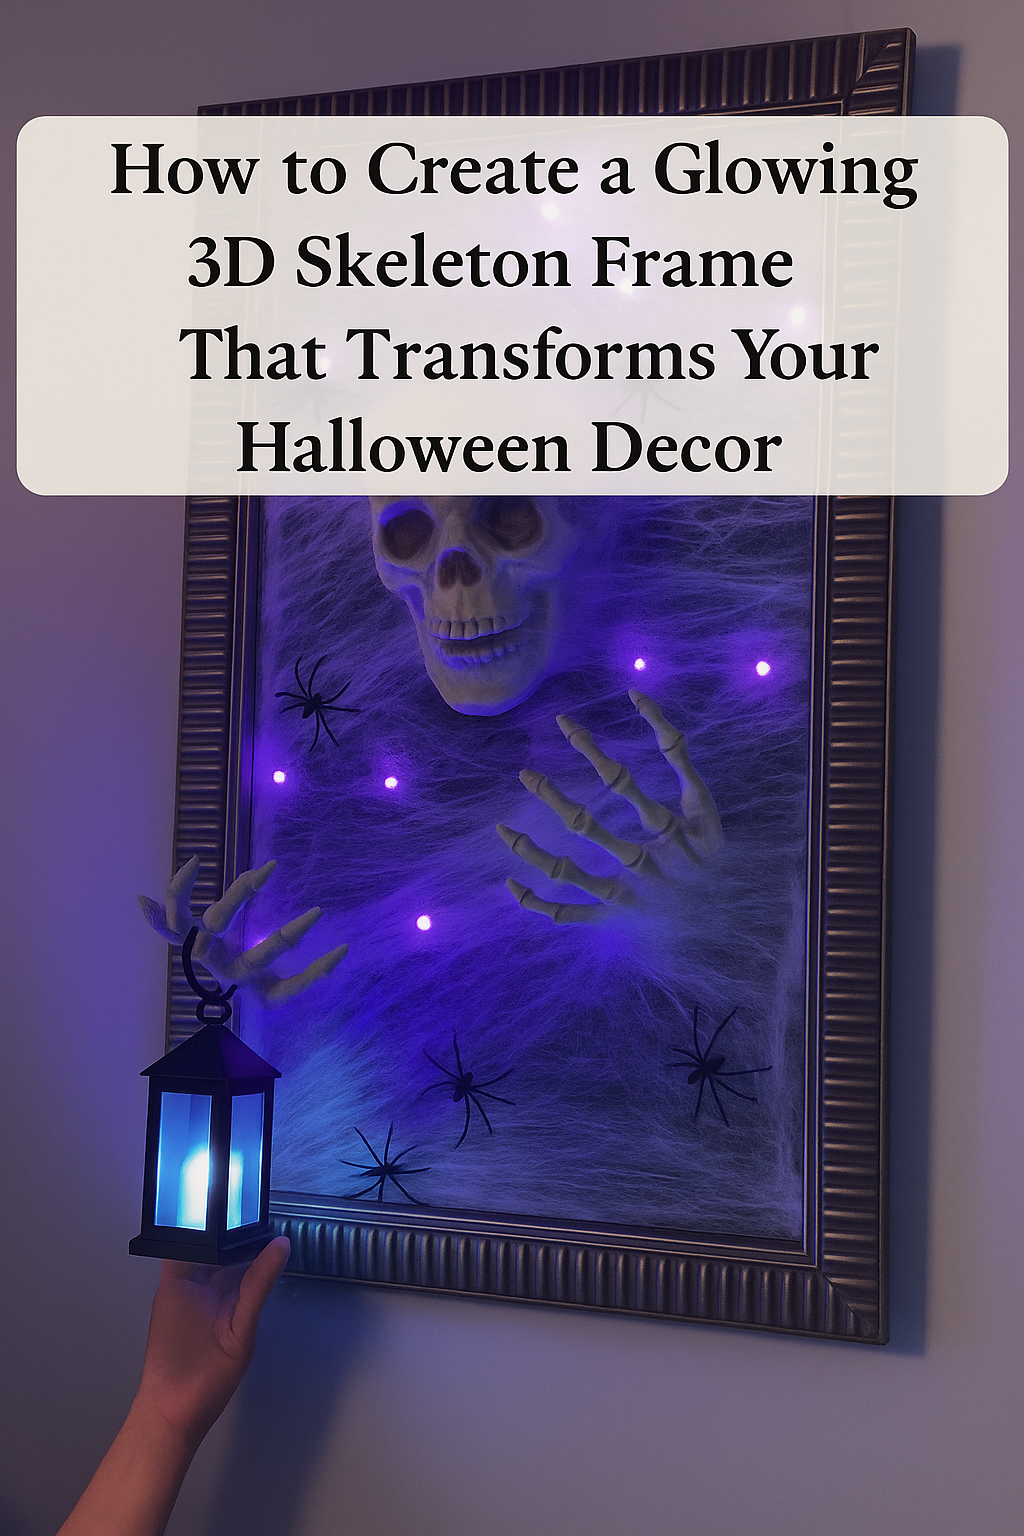
Transforming an Old Frame into a Glowing 3D Skeleton Display for Halloween
There’s something magical about taking an old, forgotten object and breathing new life into it—especially when it’s for a holiday as full of imagination as Halloween. This project combines creativity, a dash of theatrical drama, and a little cozy evening crafting time to transform an outdated picture frame into a hauntingly beautiful 3D skeleton display that glows at night. Think of it as part spooky décor, part wellness ritual—because there’s something grounding and satisfying about making something with your own two hands.
The beauty of this DIY is that it starts with a frame you already have or one you find at a thrift store. That element of upcycling not only saves money but also gives the finished piece a layer of personal history. If you’re drawn to the idea of curating your home’s seasonal décor like a gallery—swapping in pieces that tell a story—this will become a favorite project. And yes, we’re going to go step-by-step, weaving in tips, product suggestions, and ways to make it uniquely yours.
Preparing Your Frame
Start by finding your base. An oversized frame with a bit of depth and character works best here. Maybe it’s leaning against a wall in your garage, or maybe you’ll score one at a flea market for a few dollars. If you don’t have one handy, you can browse old picture frames on Amazon and find options that ship quickly. Lay it flat on a table and remove the backing, glass, and any existing artwork. This is where the transformation begins.
As you take it apart, notice the textures—perhaps the frame’s edges are worn in places or the wood grain is visible beneath the paint. That’s all character you can keep or refinish depending on your vision. If the frame feels loose or unstable, a touch of wood glue or reinforcement at the corners will keep it sturdy. Wipe it clean with a soft cloth so your new materials adhere well later.
Creating Your Backdrop
Once the frame is empty, you’ll want to replace whatever art or print was inside with a bold, dark backdrop. This is the stage that gives your skeleton scene that eerie, theatrical depth. Black foam board works beautifully because it’s lightweight and smooth. You can order black foam board in various sizes and cut it to fit snugly inside your frame.
Cutting foam board is a sensory experience—smooth strokes of a utility knife, the faint crunch of the blade slicing through the material. Take your time for a clean edge. If you’d like, you can add subtle texture to the board by misting it lightly with matte black spray paint, which gives dimension and reduces glare from the lights you’ll add later.
Choosing and Arranging Your Skeleton Pieces
The skeleton is your main character here, and just like in any story, the pose matters. A reaching hand, a tilted skull, fingers curling toward the viewer—all of this adds drama. You can find great options online like skeleton props that come as full figures or separated bones.
Arrange the skull and hands on the foam board before committing with glue. Step back, squint, and see how the composition feels. Do the hands look like they’re emerging from the shadows? Is the skull tilted just enough to catch light and look lifelike? Move them until you get a pose that makes you smile—or shiver. This moment is where your décor piece gets its personality.
When you’re happy, secure each piece with a hot glue gun. A reliable hot glue gun and glue sticks will hold the skeleton in place while also allowing you to layer other elements over it.
Adding Light for Drama
Halloween décor comes alive—literally—with light. The right glow will give your skeleton depth and make it a captivating focal point day or night. Choose Halloween string lights in purple for a ghostly feel, orange for a warm harvest glow, or cool white for an eerie moonlit effect.
Weave the lights across the foam board, tucking them between and around the skeleton parts so they illuminate without overwhelming the scene. You can secure the wires discreetly with clear tape if needed. As you place them, plug them in occasionally to check the effect. This is also the time to troubleshoot—if a section feels too bright, shift the lights so they create pockets of shadow and highlight, just like a stage set.
Spinning the Web
Now it’s time to create the illusion that your skeleton has been waiting, trapped, in this frame for centuries. A package of fake spider web will go a long way. Pull the fibers slowly apart with your fingers until they’re wispy and translucent, then drape them over your frame and skeleton. This part is wonderfully tactile—you’ll feel the strands catch on your fingertips, stretching like candy floss.
The trick is to layer lightly and let the web catch on the skeleton’s fingers, the edges of the frame, and the lights, without obscuring your carefully arranged pose. You want people to be able to see through to the details, as if peering through years of dust and neglect.
Adding Spiders for Texture and Realism
Spiders make the web believable, and they add that perfect creepy-crawly movement to the eye. Scatter plastic spiders across the webbing, some near the skull and others in the corners of the frame. You can hot glue a few in place if you’re worried about them shifting.
For a realistic look, vary the sizes of your spiders. Smaller ones tucked in the corners look like they’ve been there for ages, while a few large, glossy ones front and center create drama.
Finishing the Frame
Slide the foam board with all its glued-on glory back into the frame. If your frame is deep enough, the skeleton’s hands might extend outward, which adds incredible dimensionality. This is a moment to step back and admire your work—already, it’s transformed from a pile of materials into something theatrical and atmospheric.
If your frame doesn’t have hanging hardware, now’s the time to add picture hanging hardware. Choose sturdy options that can handle the weight of the frame and its new embellishments.
Setting the Scene
Once your piece is complete, decide where it will live. Hanging it on a hallway wall makes for a startling surprise as guests pass by. Propping it on a mantel can make it the anchor of your seasonal display. If you have a battery-powered lantern, hanging it nearby will create a moody, flickering effect. And of course, when evening falls, switch on those lights and watch the scene come alive.
In a wellness context, think of this as part of your seasonal ritual. Just as you might transition your wardrobe or rearrange your living room for a new season, setting up a few key décor pieces signals to your senses that it’s time to embrace the shift. The warm or eerie glow of this piece in your home at night can become a little moment of joy—a reminder to pause, take in the atmosphere, and savor the cozy-spooky season.
Troubleshooting and Tips
If your foam board shifts inside the frame, add small pieces of cardboard as spacers behind it before securing the backing. If your glue doesn’t seem to hold the skeleton pieces securely, try lightly sanding the back of each piece so the adhesive has more grip. And if your webbing looks too clumped, pull it apart further—it should be whisper-thin in some areas.
One final touch: consider adding a drop or two of seasonal essential oil to the back of the frame, like cinnamon or clove. It’s a subtle detail that only those close to the piece will notice, but it adds to the multi-sensory experience.
By the time you’re finished, you’ll have not just a Halloween decoration, but a piece of art that feels like part of your home’s seasonal personality. You’ll have taken something old and, with a little creativity and some well-chosen details, given it a new story to tell. And when you catch a glimpse of it glowing in the corner on a chilly October night, you’ll know it was worth every moment.
Closing Thoughts
By the time you step back and look at your finished 3D skeleton frame glowing softly in the corner, you’ll realize this was about more than just Halloween décor. It was about creating something with your own hands that carries your personality, your sense of style, and your seasonal spirit. In a world that moves fast and pushes us toward quick buys and instant results, projects like this invite us to slow down, work with tangible materials, and immerse ourselves in a creative ritual that feels grounding.
What you’ve built isn’t just a decoration—it’s a little piece of theater for your home. It tells a story in every detail, from the tilt of the skeleton’s head to the way the cobwebs catch the light. It will become part of your seasonal tradition, unpacked each October like a treasured artifact, each time reigniting the joy you felt making it.
And the best part? This project is endlessly adaptable. You can change the lighting color next year, add new elements, or even create a series of framed scenes for different corners of your home. The skills you’ve practiced here—layering textures, working with light, creating depth—can spill over into other creative projects, from holiday tablescapes to cozy winter displays.
As the nights grow longer and your home fills with the warm glow of seasonal décor, you’ll know you’ve done something special. You’ve brought a touch of artistry and a lot of heart into your Halloween season. And that, more than anything, is what makes a home feel alive during this magical time of year.