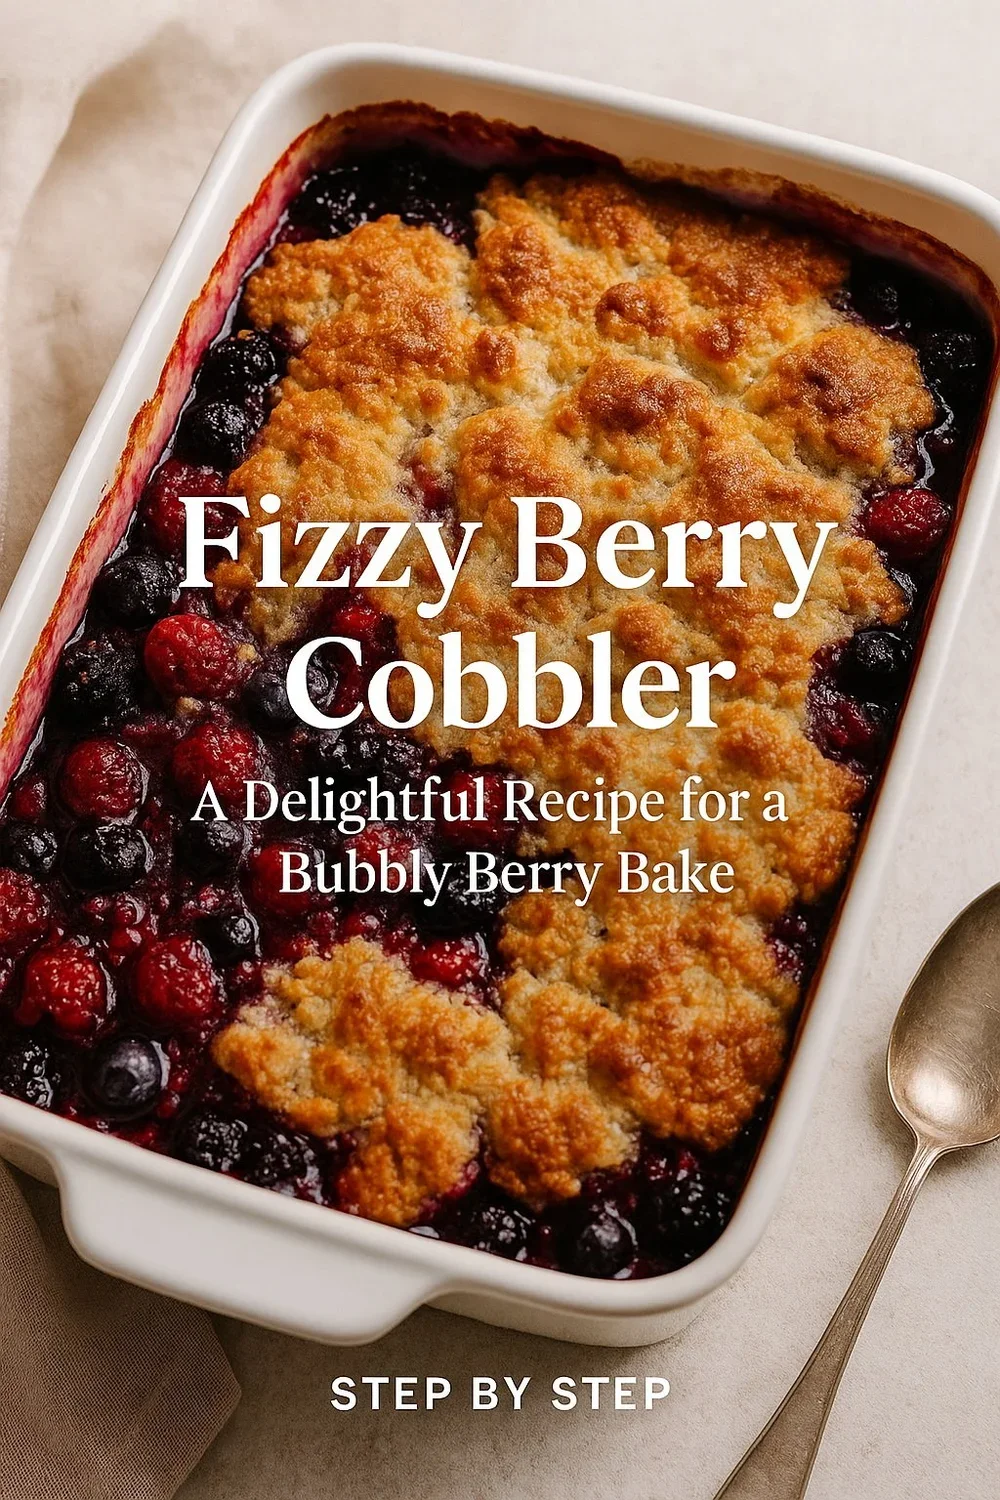
Fizzy Berry Cobbler: A Delightful Recipe for a Bubbly Berry Bake
Fizzy Berry Cake: An Ode to Summer’s Lightest Indulgence
There’s a moment in early summer—before the heat grows heavy and the evenings stretch too far—when the world still hums with cool promise. The berries are at their brightest. The fizz in your drink still feels like a surprise. And the idea of turning on your oven feels like an act of rebellion wrapped in romance.
This is the mood that inspired our Fizzy Berry Cake, a recipe born from the fizzy joy of celebration and the kind of fruit that leaves its juice on your fingertips. It’s not just a cake. It’s a story of how we reclaim small joy, how we fold sweetness into our days without apology, and how we create something deeply beautiful out of the simplest pantry staples.
A Cake That Sparkles With Intention
What makes this cake special is its sparkle. Quite literally. It’s made with sparkling water or soda—think lemon-lime seltzer or berry-flavored fizz—that lifts the crumb into an airy softness you don’t expect from a rustic bake. Each bite is delicate and buoyant, as if the bubbles never quite left. Combined with tart-sweet berries that burst as they bake, this dessert doesn’t just please the palate—it lifts the soul.
If you’ve never baked with sparkling soda before, you’re in for a treat. It’s a clever little trick that adds lightness without needing extra eggs or complex folding techniques. It makes this cake whisper-soft, almost like a chiffon without the fuss.
Want to use a berry soda or natural sparkling water? Either works. This Organic Berry Sparkling Water is a gorgeous choice if you prefer no added sugar, while Sprite or Raspberry Soda gives a nostalgic, party-ready twist.
The Story Behind the Bake
This recipe came from a lazy afternoon, a bowl of too-many berries on the counter, and a bottle of leftover sparkling water from a girls’ brunch. I didn’t want to make something heavy. I didn’t want to follow a complicated recipe. I just wanted something fresh, effortless, and a little surprising.
What emerged from the oven was golden and bubbling, the edges caramelized just enough to offer contrast to the pillowy center. The berries sank and rose like magic, dotting each slice with a mosaic of color and flavor. It was one of those bakes that made me sit down at the counter, fork in hand, and close my eyes with the first bite.
Since then, it’s become a staple—easy to make, endlessly flexible, and always met with smiles. It’s the kind of cake you make when you want to feel like you’re doing something lovely for yourself, even when no one’s watching.
The Wellness Connection: Light, Lively, and Mindful
Though it’s indulgent in flavor, this cake carries a lightness that makes it easy to justify any time of day. The absence of heavy butter or cream in the base keeps things fresh, and you can easily modify the sugar content or opt for gluten-free flour blends without sacrificing texture.
There’s something emotionally nourishing, too, about baking a cake like this. It doesn’t demand exactness. It doesn’t require a mixer. It gives back more than it takes.
This is food for when you’re easing back into yourself—after a busy week, a heartbreak, or even just a day when the world felt too noisy. A slice of fizzy berry cake is your quiet return to softness.
Kitchen Mood: Set the Scene
Let’s talk about ambiance, because yes—it matters. You’re not just baking. You’re crafting an experience.
Light a citrus candle while you preheat the oven. Drape a linen towel across the counter and cue up a playlist with soft indie vocals or vintage French café tunes. You want your kitchen to feel like a moment out of a film, not a task list.
I love this Sicilian Lemon Soy Candle for the kind of clean brightness that mirrors the cake itself. Pair it with a floral linen apron and you’ll feel like the heroine in your own story.
Make It Yours: Variations and Personal Twists
The beauty of this recipe lies in its versatility. You can swap in different fruits—peaches, cherries, or even finely chopped apples in the fall. You can use canned soda, flavored seltzer, or even prosecco for a grown-up version.
Want to make it vegan? Just use plant-based yogurt or milk and a vegan-friendly soda. Gluten-free? Try a 1:1 baking blend like this King Arthur Gluten-Free Flour.
Other ideas to play with:
- Add lemon zest to the batter for extra citrus brightness
- Sprinkle the top with coarse sparkling sugar before baking
- Serve with lavender whipped cream or a drizzle of honeycomb syrup
- Fold in crushed pistachios or almonds for a nutty edge
It’s a base that invites you to be creative, not constrained.
Serving Rituals: Pretty Plates and Picnic Blankets
This cake shines whether served warm with a spoonful of whipped cream or cold from the fridge the next morning with coffee. It looks stunning on vintage china or cut into neat squares and stacked in parchment-lined tins for gifting.
Picnic season? Wrap slices in wax paper and tuck them into a basket with some fizzy drinks and a little speaker. It travels well and feels like an instant party, even if it’s just you and one good friend sitting on a quilt at the park.
A rustic cake stand or vintage enamel tin elevates the whole presentation, and they double as décor pieces for your kitchen.
The Pinterest Moment
If there was ever a cake made to go viral, it’s this one. The golden crust, the bubbling berry bursts, the way it looks soft enough to sleep in. It’s the kind of dessert people pin and save for “that perfect moment” they don’t even know they’re planning for yet.
Snap it on a white linen background with berries scattered around and a gold fork off to the side. Use natural lighting. You’re not just sharing a recipe. You’re sharing a vibe.
This is the magic of Pinterest—where a single image can carry the mood of an entire day, an entire kitchen, even an entire season.
Why You’ll Make It Again (And Again)
This cake doesn’t shout. It doesn’t demand applause. It just quietly wins your heart.
It’s the perfect companion to everything: early mornings, unexpected visitors, long phone calls, evenings under string lights, and rainy Sundays when you need a little cheer.
It reminds you that food doesn’t have to be fancy to be beautiful. That the joy of baking isn’t just in the result, but in the act itself. That sometimes, the best things happen when you mix the ordinary—berries, flour, fizz—with the intention to love whatever comes out of the oven.
And the best part? You’ll already have most of the ingredients in your kitchen.
Stock up on essentials for effortless weekend baking:
The Ritual of Sweet Simplicity
So many cakes come with pressure—to impress, to decorate perfectly, to measure with military precision. This one doesn’t. It gives you room to exhale. It’s forgiving. It’s charmingly imperfect.
And every time you make it, you’ll feel just a little more in tune with yourself. With your space. With the rhythm of slower, sweeter days.
Let this cake be your reminder: not everything needs a reason. Sometimes, a handful of berries and a bottle of fizz are all the reasons you need.
Now, Let’s Get Baking
Ready to bring this to life in your own kitchen? Let’s walk through every step together—from picking the right berries to folding in that last sparkling swirl. Whether you’re baking for brunch, gifting a neighbor, or treating yourself to a slice of midweek magic, this recipe is the one you’ll come back to again and again.
Continue below for the full recipe and all the tips to make it your own.
💡 Pro Tip: Why These Are Amazon Search Links (and Why “Add to Cart” Really Helps)
You might notice that every “Shop the Look” section uses Amazon search result links rather than one specific product. That’s not a glitch—it’s a strategy.
Items in fashion, beauty, and home sell out fast. Colors change. Styles get discontinued. Linking to a single item might leave you staring at a “Currently Unavailable” page—and nobody wants that.
With search result links, you’ll get:
• A fresh rotation of similar, in-stock finds
• Options that match your budget, size, and style
• Fewer dead ends and more discoveries
✨ Here’s how you can support this blog with zero extra cost:
If something speaks to you—even if you're still deciding—add it to your cart while you’re browsing. Amazon only credits creators like me if the item is added to your cart during that first visit.
It doesn’t cost you anything extra, but it makes a big difference in helping me keep this blog alive, ad-free, and full of hand-picked inspiration for your next obsession.
Thank you for being here. Thank you for shopping with intention. 💛

Fizzy Berry Cobbler: A Delightful Recipe for a Bubbly Berry Bake
Fizzy Berry Cake Recipe
Ingredients
- 1 ½ cups all-purpose flour
- 1 teaspoon baking powder
- ½ teaspoon baking soda
- ¼ teaspoon salt
- ¾ cup granulated sugar
- ½ cup plain Greek yogurt or sour cream
- ½ cup sparkling water or lemon-lime soda
- ⅓ cup vegetable oil
- 1 large egg
- 1 teaspoon vanilla extract
- 1 ½ cups fresh mixed berries (blueberries, raspberries, blackberries, or chopped strawberries)
- Optional: coarse sugar for topping
Instructions
- Preheat your oven to 350°F (175°C). Grease a 9-inch round or square baking pan.
- In a medium bowl, whisk together the flour, baking powder, baking soda, and salt.
- In a separate large bowl, combine the sugar, yogurt, sparkling water, oil, egg, and vanilla. Whisk until smooth.
- Gradually stir the dry ingredients into the wet mixture until just combined. Do not overmix.
- Gently fold in the fresh berries.
- Pour the batter into the prepared pan and smooth the top. Sprinkle with coarse sugar if desired.
- Bake for 35 to 40 minutes, or until a toothpick inserted in the center comes out clean.
- Let cool slightly before serving. Enjoy warm or chilled.
Step-by-Step Tutorial: How to Make the Perfect Fizzy Berry Cake
Creating a cake that feels as light and lovely as a spring afternoon might sound like a fantasy—but that’s exactly what this fizzy berry cake delivers. With its bubbly base, juicy fruit pockets, and irresistibly soft crumb, it manages to capture everything we crave in a dessert: ease, elegance, and just the right amount of indulgence. Let’s walk through the full process together, step by step, so you can bring this gorgeous creation into your own kitchen.
Step One: Set the Mood and Prepare Your Space
Before you preheat the oven or pull out a mixing bowl, take a moment to turn your kitchen into a place you actually want to be. This cake is all about softness and playfulness, so let your environment reflect that too. Light a fresh lemon or berry-scented candle—something clean and invigorating. One of my go-tos for this kind of bake is the Chesapeake Bay Balance + Harmony Candle with citrus and floral undertones.
Turn on a playlist that makes you feel light and breezy. Indie pop, mellow jazz, or even French café tunes work beautifully here. Drape a linen towel across your counter, tie on your favorite apron, and pour yourself a sparkling drink to sip as you bake. This recipe is as much about the ritual as it is the result.
Step Two: Preheat and Prep With Purpose
Begin by preheating your oven to 350°F. While it warms, take a moment to prepare your baking pan. I recommend using a 9-inch round cake pan with a removable bottom, which makes serving effortless and elegant. If you don’t have one yet, the Fat Daddio’s 9-Inch Removable Base Pan is a fantastic, professional-grade option.
Lightly grease your pan with nonstick spray or a thin layer of oil and line the base with parchment paper for added ease when removing the cake later. Set it aside on a baking sheet to help distribute heat evenly and reduce any risk of over-browning the base.
Step Three: Gather the Dry Ingredients
This cake starts with a familiar foundation but gains its uniqueness through thoughtful detail. In a medium-sized mixing bowl, whisk together your flour, baking powder, baking soda, and salt. Use a gentle hand here—your goal is to combine, not overwork.
Whisking by hand not only creates less mess, but also allows you to be more connected to your ingredients. If you’re looking for a gorgeous set of nesting mixing bowls, these glass mixing bowls with pour spouts are both functional and beautiful, doubling as countertop décor between uses.
Once your dry ingredients are ready, set them aside and turn your attention to the wet components.
Step Four: Mix the Wet Ingredients Into Something Silky
In a separate large bowl, bring together the granulated sugar, plain yogurt or sour cream, your choice of sparkling soda or water, a splash of neutral oil, one egg, and a touch of vanilla extract. This is the heart of the cake’s character. The sparkling beverage adds a subtle effervescence and keeps the batter incredibly tender without needing a lot of fat.
As you whisk, you’ll see the mixture take on a creamy, almost foamy texture. That’s the magic working already. For the fizziest texture and lightest crumb, I love using something like Spindrift Raspberry Lime Sparkling Water or even classic Sprite if you're in the mood for a nostalgic citrus lift.
Pro tip: Be sure your sparkling water or soda is freshly opened and still bubbling when you add it. If it’s gone flat, the cake won’t rise with the same delicate bounce.
Step Five: Marry Wet and Dry—But Gently
Now it’s time to bring the batter together. Slowly pour the dry ingredients into the wet bowl, stirring just until you no longer see streaks of flour. A silicone spatula is your best friend for this step. Avoid over-mixing, which can deflate the batter and make the texture more dense than we want.
You want a mixture that’s cohesive but still a little fluffy and soft, like whipped pancake batter. If it looks too thick, add a splash more sparkling water. If it’s too thin, a tablespoon more flour will help bring it back to balance.
These berry-colored silicone spatulas are not only on theme, but they’ll also make folding your batter feel downright luxurious.
Step Six: Add the Berry Magic
Now for the star of the show—those luscious, plump berries. You can use any combination you love. I prefer blueberries and raspberries, but chopped strawberries, blackberries, or even pitted cherries work just as well. If your berries are frozen, let them thaw slightly and pat them dry with paper towels to avoid excess moisture.
Gently fold the berries into your batter. You don’t want to crush them—just tuck them in so they’re evenly dispersed. As they bake, they’ll soften and release tiny bursts of juice that create natural pockets of flavor throughout the cake.
This is the part where the batter starts to look truly special. Speckled with vibrant fruit and light as air, it’s already a joy before it even hits the oven.
Step Seven: Pour and Garnish Like a Pro
Pour the finished batter into your prepared cake pan, using your spatula to smooth the top. You don’t need perfection here—an uneven surface creates those beautiful golden swirls and valleys once it bakes.
If you want to add a touch of sparkle and texture to the top, sprinkle it with coarse sparkling sugar. It adds just enough crunch and shimmer to make your cake feel like it came from a boutique bakery.
At this stage, your kitchen probably smells like vanilla and summer already, and your cake is about to take that energy to the next level.
Step Eight: Bake With Intuition
Slide your cake pan into the preheated oven and set a timer for 35 minutes. Depending on your oven and the moisture content of your berries, the total bake time may be anywhere from 35 to 45 minutes. Start checking at the 30-minute mark using the good old toothpick trick: insert it into the center and see if it comes out clean or with just a few crumbs.
Avoid opening the oven too early—this can cause the cake to deflate. If the top begins to brown too quickly while the center is still soft, gently lay a piece of foil over the pan to shield it while it finishes baking.
Trust your instincts here. You’re not just following a recipe—you’re becoming fluent in your own kitchen.
Step Nine: Cool With Care
Once your cake has finished baking, place the pan on a wire rack and let it cool for at least 15 minutes. The aroma will be maddeningly good, and you’ll want to dive in immediately, but this rest is essential. It allows the crumb to set and the edges to firm up just enough to give that satisfying contrast to the soft center.
If you’re using a pan with a removable bottom, now’s the time to release it. Otherwise, run a knife around the edge and invert the cake carefully onto a serving plate. A little patience here pays off in photo-worthy results.
Consider using a rustic wood cake stand or even a vintage ceramic plate to serve—presentation can be its own form of self-care.
Step Ten: Dress It Up or Keep It Simple
Once your cake has cooled, you can keep things minimalist with a light dusting of powdered sugar or go all out with whipped cream, fresh berries, or even a drizzle of honeyed yogurt.
For a floral twist, infuse whipped cream with lavender extract, or whip up a lemon glaze using juice and confectioners' sugar. The possibilities are endless, and none of them are wrong.
The beauty of this cake is how beautifully it adapts to your mood and moment. It can be a centerpiece or a sidekick, depending on how you finish it.
Step Eleven: Serve, Savor, and Store
Slice gently with a serrated knife for the cleanest cut, and serve each piece with a little flourish—maybe a sprig of mint or a single berry on the side. This cake is incredible served warm, with a spoon and soft lighting, but equally delicious cold the next morning with a mug of tea.
To store, wrap the cake in parchment and keep it in an airtight container. It stays tender for up to three days at room temperature and can be refrigerated for a week. That said, it rarely lasts more than a day or two—it’s just too irresistible.
For picnics or gifting, slice and layer the pieces between sheets of wax paper in a vintage enamel tin. It feels nostalgic, cozy, and far more thoughtful than showing up with something store-bought.
Final Thoughts: Let This Be Your Soft Moment
You’ve just made a cake that’s as much about the ritual as the flavor. It’s a cake that says yes to softness, to sweetness, to a little bit of leisure. You didn’t rush it. You didn’t overthink it. You created something light and beautiful out of simple ingredients and your own presence.
This is more than dessert. It’s a moment reclaimed.
So whether you enjoy your fizzy berry cake barefoot in the kitchen or share it with a table full of friends, let it remind you that joy doesn’t have to be complicated. Sometimes it just needs a little fizz, a little fruit, and a little you.
Now take a photo, pour another glass of something sparkly, and enjoy every bite. You earned it.
Affiliate Note: This post includes Amazon affiliate links using my ID, ryankerby-20. As an Amazon Associate I earn from qualifying purchases—thank you for supporting Style Estate.

Fizzy Berry Cobbler: A Delightful Recipe for a Bubbly Berry Bake
Closing Thoughts: A Slice of Simplicity, A Dash of Sparkle
If you’ve made it this far—whether with flour on your cheeks or simply a dreamy vision of cake in your mind—consider this your reminder that the best moments in life are often the ones we make in our kitchens. This fizzy berry cake isn’t just a dessert. It’s a soft rebellion against overcomplication. A celebration of lightness, fruit, and fizz. A love letter to baking that doesn’t feel like a chore.
We baked this with the intention of joy, of ease, of reclaiming the quiet happiness that comes from creating something beautiful with your own hands. You don’t need a holiday or a party to make this. Make it because you want to. Make it because your soul asked for something sweet and unexpected. Or make it because there’s a carton of berries in the fridge whispering for a purpose.
Whether you dress it up with whipped cream and lavender drizzle or eat it standing barefoot by the stove while it’s still warm, just know that you’ve created more than cake. You’ve created a memory.
And if this recipe brought even a little softness to your day, be sure to share it. Pin it, bake it for someone you love, or pass it along to a friend who could use something light and lovely right now. You can also explore more cozy, effortless recipes like this in our Food & Drink section for treats that nourish both body and soul.
Until next time—bake slow, eat soft, and never underestimate the magic of bubbles and berries.
With sweetness always,
Style Estate
Good day, baking enthusiasts! As we prepare to dive into the effervescent world of Fizzy Berry Cake, I’ve put together a list of blog sources that will elevate your baking experience. These blogs are filled with innovative recipes, expert baking tips, and beautiful photography to inspire your own bubbly berry bake. Whether you’re a seasoned baker or just starting out, these resources will guide you to create a cake that’s as delightful to look at as it is to eat.
Fizzy Berry Cake: Blog Sources for a Bubbly Berry Bake
Barefeet in the Kitchen: Discover a simple Berry Cake recipe that’s easy to make and bursting with sweet berry flavors. It’s a versatile recipe that can be adapted to include your favorite berries.
Butter with a Side of Bread: Explore an Easy Berry Cake recipe that’s perfect for beginner bakers. This cake boasts a bright and fruity flavor, topped with a sweet glaze for an extra touch of indulgence.
Rich And Delish: Learn how to make a Moist Mixed Berry Cake that stays fresh for days. This one-bowl recipe is not only easy but also a great way to use ripe berries for a delicious dessert.
Holla’s Veg Recipes: Check out the “Berry Bliss Delight” recipe for an irresistible blackberry-infused cake. This eggless delight is perfect for any occasion and caters to a variety of dietary preferences.
As you embark on this baking adventure, remember that the magic of a Fizzy Berry Cake lies in the joy of creation and the shared pleasure of tasting. Happy baking! 🍰