
Sourdough Easter Bunny Bread: A Springtime Baking Showstopper
Sourdough Magic and the Art of the Easter Table: Why the Bunny Bread Became the Centerpiece of Spring
There’s something about Easter that stirs the air with a different kind of energy. It’s not just the warm breeze brushing past your curtains or the pink shimmer that starts to soften every morning sky. It’s something quieter. Something more interior. A reset of spirit. A reconnection to comfort. And for many of us, that comfort begins in the kitchen.
Spring doesn’t demand grandeur. It celebrates renewal. And one of the most charming ways to lean into this seasonal shift is through baking. Not the kind of baking that stresses you out or turns your kitchen into a war zone of flour and failed intentions. But the kind that feels like a gentle ritual. The kind that smells like nostalgia and looks like joy. The kind that says welcome back to yourself.
And so, the Easter bunny bread was born—not just as a treat, but as a showpiece of love.
A Doughy Expression of Spring
To make bread is to be in conversation with time. Especially sourdough. It’s slow. Purposeful. Alive. The moment you wake your starter and feel the stir of those first bubbles, you know you’re not just making food. You’re nurturing something. Coaxing life into form.
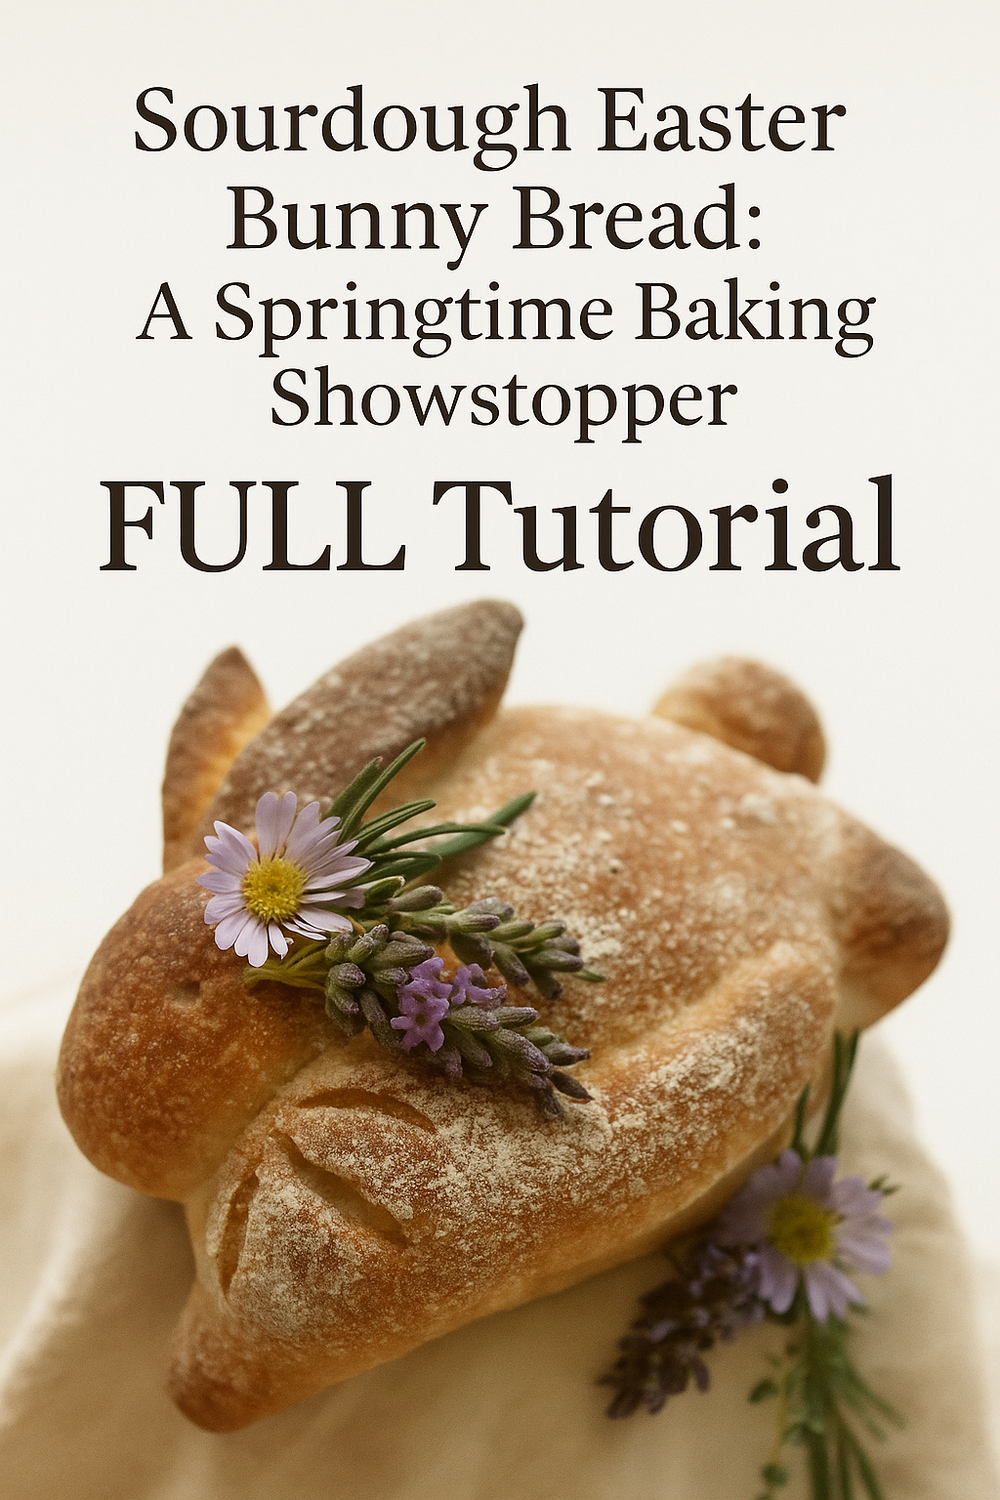
Now take that ritual and wrap it in the whimsy of Easter. Give it long ears. A gentle belly rise. A golden crisp coat that cracks lightly when you tap it. The sourdough Easter bunny bread isn’t just food—it’s a centerpiece, a conversation starter, and a deeply personal expression of care.
Imagine it on your table, nestled in a wreath of spring herbs, flanked by dyed eggs and handpicked tulips. It’s the edible version of a love letter to spring. It’s the kind of thing that makes kids gasp and adults smile with a childlike softness they’d forgotten they had.
Why We Crave Ritual Baking
In an age of speed and screens, sourdough baking feels like rebellion—in the most beautiful way. It’s slow. It’s tactile. It cannot be rushed or hacked. And yet, the return is so tangible. It reminds us that slowness isn’t laziness. It’s art.
During spring holidays, when the urge to make everything perfect gets overwhelming, the bunny bread offers something different. It reminds us that imperfection is part of the charm. That an ear flopped a little too far or an eye that baked a little off-center doesn’t ruin the joy. In fact, it amplifies it.
When you knead that dough, shape those ears, and press in those little raisin eyes, you’re making more than a baked good. You’re setting the tone for an entire celebration. And the act of doing it—hands dusted with flour, apron kissed by butter, timer beeping in the distance—grounds you in the present.
If you’re new to sourdough baking or hesitant about the commitment, I promise: it’s worth it. Start with a reliable sourdough starter kit, keep a bench scraper on hand, and treat yourself to a Dutch oven for even, golden crusts. These tools turn a weekend project into a lifelong ritual.
The Sensory Symphony of Spring Baking
Close your eyes and imagine the moment. You’ve shaped your bunny and placed it gently on a parchment-lined tray. Your kitchen smells faintly of warm fermentation, that almost tangy scent of something ancient and comforting. As it bakes, the sourdough rises into golden curves, the ears slightly curling, the belly forming a soft swell.
The crust crackles. The oven fogs with heat and anticipation. And when you lift it out, the house fills with a smell so nourishing, so whole, it feels like a hug you forgot you needed.
This is the stuff holidays are made of—not plastic décor and complicated tablescapes, but scent memory. Shared laughter. That moment when everyone gathers and someone says, “Wait—did you make that?”
And you did. You made that. With your hands. With your time. With your love.
A Wellness Ritual in Disguise
Don’t let the sugar-drenched holiday aisles fool you—this sourdough bunny is a nod to nourishment. Sourdough is easier to digest than commercial bread. It’s rich in probiotics (thanks to fermentation), has a lower glycemic index, and for many people, feels gentler on the body.
You can use organic flour, incorporate whole grains, and even knead in add-ins like chia seeds or rolled oats for a health-boosting twist. While the shape may be playful, the bread itself is rooted in nourishment.
And on an emotional level, there’s something deeply healing about baking bread. Studies show that kneading, shaping, and watching dough rise reduces cortisol and increases serotonin. Translation? Making bunny bread can literally lift your mood.
Hosting With Heart (and Bunny Bread)
Easter brunch doesn’t need to be stressful. You don’t have to serve a dozen different dishes or create a Pinterest-perfect tablescape to make it magical. A simple table draped in linen, a vase of fresh tulips, a few pastel eggs scattered like jewels—and your sourdough bunny front and center.
Pair it with whipped butter, a drizzle of local honey, or a small pot of herbed cream cheese and it becomes a feast of simplicity. Your guests will remember the feeling of sitting at that table far more than they’ll remember what silverware you used.
And if you’re attending a gathering rather than hosting, imagine walking in with a fresh bunny bread wrapped in linen and tied with twine. It’s the kind of gift that brings people together.
Passing It Down
If you have kids, let them shape their own mini bunny loaves. Let them press raisins for eyes or dust the ears with a sprinkle of flour. Baking becomes memory that way. A tradition they’ll carry forward. One that’s rooted in patience and joy and care.
Even if it’s just you, or you and a partner, or you and a friend doing spring solo—there’s something powerful about claiming this act as your own. Ritual doesn’t require an audience. Only intention.
And if you feel inspired to elevate it further, consider styling your bunny bread for display. A wooden board, a few edible flowers, and a backdrop of soft pastels can turn your table into a mood board worthy of your Pinterest dreams.
Why It’s More Than Just Bread
The real secret of this Easter sourdough bunny? It brings people back to the table. Not just physically, but emotionally.
It reminds us to slow down, to shape joy with our own hands, to mark the changing of seasons with beauty instead of busyness. It teaches kids that food isn’t just fuel—it’s storytelling. It reminds adults that holidays don’t need to be complicated to be meaningful. And it reminds all of us that warmth, whimsy, and wonder belong in our kitchens.
You don’t need to be a bread expert. You don’t need to get it perfect. You only need to begin.
So gather your flour. Stir your starter. Light a candle. Put on a record. Shape your bunny. And let your home fill with the scent of something homemade, heartfelt, and wholly yours.
You’re not just making sourdough. You’re making spring feel sacred again.
Ready to Bake?
Now that you’ve set the mood and soaked in the ritual, it’s time to shape the magic. Below, you’ll find the complete step-by-step guide to creating your own showstopping sourdough Easter bunny bread. Whether it’s your first time working with dough or your fiftieth, this guide will walk you through every lovingly crafted curve.
So preheat the oven, roll up your sleeves, and let’s get baking.
💡 Pro Tip: Why These Are Amazon Search Links (and Why “Add to Cart” Really Helps)
You might notice that every “Shop the Look” section uses Amazon search result links rather than one specific product. That’s not a glitch—it’s a strategy.
Items in fashion, beauty, and home sell out fast. Colors change. Styles get discontinued. Linking to a single item might leave you staring at a “Currently Unavailable” page—and nobody wants that.
With search result links, you’ll get:
• A fresh rotation of similar, in-stock finds
• Options that match your budget, size, and style
• Fewer dead ends and more discoveries
✨ Here’s how you can support this blog with zero extra cost:
If something speaks to you—even if you're still deciding—add it to your cart while you’re browsing. Amazon only credits creators like me if the item is added to your cart during that first visit.
It doesn’t cost you anything extra, but it makes a big difference in helping me keep this blog alive, ad-free, and full of hand-picked inspiration for your next obsession.
Thank you for being here. Thank you for shopping with intention. 💛

Sourdough Easter Bunny https://t.co/OCkgU07Ho3 pic.twitter.com/klFvAtDxOT
— Reel Good Recipes (@reelgoodrecipe) May 16, 2025
Sourdough Easter Bunny Bread
A Whimsical, Slow-Baked Centerpiece for Spring Gatherings
Yield: 1 large bunny loaf (serves 6–8)
Prep Time: 8–12 hours (includes rise time)
Bake Time: 35–40 minutes
Total Time: Overnight prep + ~45 minutes active time
Ingredients
½ cup active bubbly sourdough starter
1 ¼ cups warm water
3 cups bread flour (plus more for dusting)
1 cup all-purpose flour
1 ½ teaspoons sea salt
1 tablespoon honey (optional, for a lightly sweet note)
1 tablespoon olive oil (for softness)
2 raisins (for eyes)
1 egg, whisked (for egg wash)
Extra flour, semolina, or cornmeal for dusting the baking surface
Optional Garnishes
Flaky sea salt for a savory crust
Powdered sugar (for a sweet finish)
Edible flowers or fresh herbs for decorating the display board
Quick Notes
This recipe works best when the dough is made the evening before and shaped the next morning
A Dutch oven, pizza stone, or heavy baking sheet will help achieve even browning
You can scale down the ingredients for mini bunny loaves or double for two large ones
The dough should be tacky but not wet, and it will firm up during fermentation
Flavor Variations
Add ½ teaspoon cinnamon and a handful of dried cranberries for a festive twist
Use rosemary and cracked pepper for a savory spring brunch version
Incorporate a tablespoon of lemon zest for a light, floral finish
Ready to hop into shaping? Scroll down for the full tutorial, complete with rising times, shaping diagrams, oven tips, and bunny styling tricks for your most charming spring bake yet.
Shaping Joy: A Step-by-Step Guide to the Sourdough Easter Bunny Bread
You’ve set the tone. The air smells like spring. Your kitchen feels alive. And now, it’s time to bring your sourdough bunny to life—step by beautifully imperfect step.
Making sourdough bunny bread is not about perfection. It’s about presence. Think of this guide not as a rigid recipe but as a companion. Let it lead you with softness, walk you through the slow beauty of fermentation, and hold your hand as you shape something truly magical.
Let’s begin.
Start by waking your starter. Ideally, your sourdough starter has been fed within the last four to six hours and is bubbly, active, and slightly tangy to the nose. If it’s been sleeping in the fridge, give it a good feed the night before and let it sit at room temperature. When it floats in water and smells like a bread bouquet with a citrus kiss, you’re ready.
In a large mixing bowl, pour in your starter—about half a cup of lively, frothy life. Add a cup and a quarter of warm water, just warmer than your wrist but not hot. Whisk it gently with a fork or your hand. This is the beginning of transformation.
Now gradually stir in your flour. Start with three cups of bread flour and add a cup of all-purpose. If your dough feels tight, you can splash in a tablespoon more water. If it’s too sticky, dust in a bit more flour. The ideal texture is tacky but not wet—soft and pliable like a satin pillow that hugs back when pressed. Add your salt last. This helps the starter work its magic uninterrupted in the early stage.
Add a spoonful of honey and a swirl of olive oil if you like—a quiet nod to spring’s sweetness and the soft finish you’ll want in your bunny’s golden belly. Knead gently, either in the bowl or on a lightly floured surface, for ten minutes. Feel the dough shift beneath your hands. It should go from rough to smooth, from clunky to elastic. This is where intention meets touch.
Tuck the dough into a bowl, smooth side up, and cover with a damp cloth. If you’re using a banneton, lightly dust it with rice flour to prevent sticking. You can also line any bowl with a tea towel and dust it generously with flour or semolina. Let it rest at room temperature for one to two hours—just enough to feel the tension soften. If your kitchen runs chilly, you can place the bowl in your oven with the light turned on.
After the rest, stretch and fold the dough gently in the bowl to build strength. Wet your hands slightly. Take one edge of the dough, stretch it up and over, and repeat three more times, rotating the bowl a quarter turn each time. This gentle folding is like yoga for your bread—it builds a strong gluten network without aggression.
Cover it again and let the dough bulk ferment for about five to six hours, or until it has risen by about 50 percent and feels puffy and jiggly when you tilt the bowl. Don’t rush this part. The rise is where the fermentation flavor deepens, and that subtle sour note develops.
Once it has risen, place the dough onto a lightly floured surface. It’s time to shape. This is where art meets bread. Divide your dough: one large piece for the bunny body, a slightly smaller one for the head, and small bits for the ears, arms, feet, and a little cotton tail.
Gently shape the body into a fat oval—rounded but not flattened. Shape the head into a smaller round and tuck it gently next to the body so the two pieces nestle but do not fuse too tightly. Now take the smaller pieces and roll them into ears and limbs. To give the ears that gentle curve, shape them like long teardrops and twist them slightly. Place them playfully on top of the head.
Add small dough rounds for paws and feet, shaping them to look like relaxed little bunny limbs resting at peace. Press a raisin into the head for each eye, or use cloves if you prefer a darker detail. Gently press in the indentations for nostrils and a soft smile if you want a little more personality.
Once fully shaped, let your bunny rest on a parchment-lined baking tray for its final rise. Cover it with a tea towel and let it proof for 1 to 2 hours. When you poke the dough gently, the indentation should spring back slowly. That’s when you know it’s ready.
Meanwhile, preheat your oven to 425°F. If you’re using a baking stone or Dutch oven, slide it into the oven during the preheat to get hot. For that bakery-style crust, place a pan of water on the bottom rack to generate steam. This helps the bread rise more dramatically and keeps the crust from drying out too soon.
Before baking, give your bunny a gentle egg wash. Crack one egg, whisk it until smooth, and brush it softly across the dough. This will give it a golden, glossy sheen. Be careful not to drench it—just a whisper of color will do.
If you want to accentuate your bunny’s fluff, you can lightly dust parts of the body with flour before baking, giving it a soft matte contrast against the golden crust. For a sweet version, sprinkle with sugar or cinnamon sugar. For a savory take, a pinch of flaky sea salt and herbs adds a stunning finish.
Slide your bunny into the oven and let it bake for 35 to 40 minutes. About halfway through, rotate the pan if you notice one side browning faster than the other. You’ll know it’s done when the crust is a deep golden hue, the ears are slightly crisp, and the base sounds hollow when tapped.
The scent will be intoxicating—an earthy warmth layered with sour tang and golden crust. When you open the oven door, it should feel like stepping into an artisan bakery tucked inside a spring meadow.
Once baked, let your bunny cool completely on a wire rack. This is important. Slicing too early will release steam that should stay inside. The interior needs time to set. If you’re displaying it as a centerpiece, the cooling also helps it hold its shape for longer.
Serve your bunny as-is or surround it with soft touches—a small bowl of whipped honey butter, herbed cream cheese, or a pot of spring jam. Place it on a rustic wooden bread board to give it that farm-style charm, and garnish the scene with sprigs of fresh thyme or a scatter of edible flowers for a beautifully botanical effect.
If you’re traveling with your bread, wrap it gently in linen and place it in a bread carrier basket to keep the crust protected without trapping moisture. For gifting, add a handwritten note and a packet of starter—an invitation for someone else to discover the joy of sourdough.
Storing your bunny is simple. Leave it uncovered for the first day so the crust stays crisp. After that, wrap in a tea towel or place in a breathable bread bag to preserve the interior texture without softening the outside too much. Toast slices or warm them briefly in the oven to revive the magic.
Troubleshooting? If your bunny flattens or spreads too much, your dough may have over-proofed. Next time, shorten the second rise or chill the shaped dough in the fridge before baking. If your crust is too pale, try baking a few minutes longer or increasing oven temp slightly in the last ten minutes. If it’s too dark, cover loosely with foil for the final 10 minutes of baking.
Keep a dough thermometer on hand for peace of mind. A finished loaf should register around 200°F internally. That’s your signal of a well-baked interior.
And if shaping the bunny feels intimidating, remember: you can always simplify. Make just the body and head. Create a rustic round with bunny ears rising from the top. Or form smaller rolls shaped like baby bunnies. The spirit of the bake is what matters.
This is more than bread. It’s a ritual. It’s a way to slow down. To celebrate. To share. Whether you’re baking for a brunch table, gifting to neighbors, or simply making it for the joy of doing something seasonal and special, your sourdough bunny bread will leave an imprint that lasts far beyond the last bite.
So go ahead—flour your counter, cue the music, light a candle if you like. Make this your spring morning ritual. And when the golden bunny comes out of the oven, all warm and whimsical and wonderfully alive, you’ll know something soft has shifted—not just in your kitchen, but in you.


