
Peanut Butter Robin’s Egg Easter Treats (No-Bake, Naturally Dyed)
The Spring Nesting Ritual: Creating Wellness, Wonder, and Something Sweet
Spring doesn’t knock. It sweeps in—softly, unapologetically, and always on its own terms. It reintroduces you to color, to texture, to forgotten little joys like lemon-scented breezes and the sudden sight of petals floating down a sidewalk like confetti. And for those of us who live by rhythm more than rule, spring becomes less of a season and more of a return. A return to lightness. A return to care. A return to crafting things—deliberately, lovingly, and with a sense of ceremony.
For many, that ceremony starts in the kitchen. Not in the full-throttle, holiday-baking kind of way, but in a softer, slower rhythm. Something you do barefoot. Something you do with your hands. Something like shaping tiny nests of peanut butter and oats, tinting them with nature’s pastels, and pressing a few candy “eggs” into their centers like you're making something for fairies rather than guests.
There is something quietly rebellious about rituals like these. In a world wired for hustle, making no-bake treats with natural dye is an act of defiant calm. It says: I still make time. I still believe in beauty. I still celebrate—even if it’s just me, a playlist, and a counter scattered with cocoa powder and edible petals.
And that’s what these Peanut Butter Robin’s Egg Easter Treats are really about. Not just indulgence. Not just nostalgia. But re-rooting yourself in the pleasure of creation, and reimagining what “homemade” can feel like.
Wellness in the Whimsy
No-bake treats might not scream “wellness” at first glance, but when you strip them down, they speak to a kind of self-care that isn’t performative. These are not calorie-counting, macro-tracked bites of guilt. They are joyful. Comforting. Balanced. A blend of healthy fats, plant-based proteins, and natural sweeteners like honey or maple syrup makes these nests both energizing and satisfying.
The beauty of this recipe is that it invites choice. Prefer a vegan version? Swap in this almond butter or sunflower seed spread. Want to cut down on sugar? Choose dark chocolate or dye-free candy eggs like Unreal’s vegan gems. Craving texture? Fold in puffed rice or shredded coconut. This isn’t a rigid recipe—it’s a flexible frame, designed for wellness without sacrificing charm.
And then there’s the color. The subtle blush of beet-dyed oats, the minty tone from spirulina or matcha, the soft robin’s egg blue from red cabbage turned magic. When you use naturally pigmented foods, you're not just avoiding synthetic dyes. You're inviting the earth into your kitchen. You’re reminding yourself that beauty doesn’t always come from a bottle. It can come from a bowl of blueberries or a pinch of turmeric.
To make the process feel more like a ritual and less like a rushed Pinterest project, gather your tools ahead of time. Lay them out on a beautiful wooden board like this one. Use your favorite glass nesting bowls. Set a springtime mood with a soft linen apron, some pastel ceramic measuring spoons, and maybe a bouquet of wildflowers on the windowsill. You’re not just making a snack. You’re making a moment.
The Art of Spring Hosting
If you’re hosting this season—whether for Easter brunch, a flower-crown tea party, or just your closest friends on a sunny porch—these robin’s egg nests are pure magic. They’re whimsical and low-maintenance, which is the dream combination for anyone who wants to impress without the stress. Display them in a vintage cake stand or scatter them on a wooden tray with sprigs of thyme and edible flowers. You can even tuck each one into a mini compostable cupcake liner for a touch of polish and eco-consciousness.
And yes—they travel well. Pack a few into a parchment-lined glass storage container, tie it with ribbon, and you’ve got a gorgeous hostess gift or thoughtful favor. They make perfect additions to Easter baskets for grown-ups, picnic baskets for park brunches, or snack jars on spring road trips.
Each one looks like something from a high-end patisserie, but the secret is: they’re foolproof. Even a distracted parent with a toddler underfoot or a multitasking creative with deadlines looming can make these. That’s the quiet genius of them. They're unpretentious art.
Making With Meaning
There’s a slow kind of pleasure that comes from making something simple and doing it well. That’s what this recipe taps into. The act of stirring, scooping, shaping—it’s meditative. And as you form each nest, you’re also forming space. Space to breathe. To notice. To be present.
Maybe you’re making these with your kids, hands sticky with peanut butter and stories tumbling out between giggles. Maybe you’re making them alone, in silence, with sunlight slicing across the kitchen tiles and your thoughts floating freely. Either way, you are making time. And time is the real luxury.
Pair your baking session with a playlist that feels like blooming: a little Norah Jones, a little Hozier, a few acoustic covers, maybe even a French café tune or two. Light a soy wax floral candle or diffuse spring essential oils like geranium, bergamot, or sweet orange. These are the kinds of sensory touches that don’t just decorate a moment—they deepen it.
If you’re the journaling type, this is a great opportunity to document your process. Take a photo of your ingredients lined up. Write down the version you created. Note what natural dyes you used and how they looked. These nests can be a seasonal tradition, and each year can bring a slightly different variation depending on what’s in your pantry or garden.
A Nest for Every Version of You
In the language of spring, a nest is a metaphor as much as it is a shape. It’s a place of rest. Of protection. Of beginnings. These peanut butter treats, with their soft centers and edible eggs, carry a whisper of that metaphor. They’re not just for children’s tables or Easter centerpieces. They’re for the woman learning to nourish herself. For the man rediscovering his creative side. For the friend who shows up with a handmade box instead of a bottle of wine. For you, exactly as you are, in whatever chapter you’re living.
And perhaps most importantly, they are reminders. That sweetness doesn’t have to be complicated. That joy can be created with the simplest ingredients. That traditions can be rewritten, season by season, bite by bite.
So let this be your invitation to pause. To stir. To shape. To savor.
And when you're ready to begin, I’ll walk you through the full process step by step—from how to prep the peanut butter base to crafting your natural dye palette to styling your finished nests for the season’s most beautiful reveal.
Spring has already begun. Now it’s your turn to meet it in the kitchen.
💡 Pro Tip: Why These Are Amazon Search Links (and Why “Add to Cart” Really Helps)
You might notice that every “Shop the Look” section uses Amazon search result links rather than one specific product. That’s not a glitch—it’s a strategy.
Items in fashion, beauty, and home sell out fast. Colors change. Styles get discontinued. Linking to a single item might leave you staring at a “Currently Unavailable” page—and nobody wants that.
With search result links, you’ll get:
• A fresh rotation of similar, in-stock finds
• Options that match your budget, size, and style
• Fewer dead ends and more discoveries
✨ Here’s how you can support this blog with zero extra cost:
If something speaks to you—even if you're still deciding—add it to your cart while you’re browsing. Amazon only credits creators like me if the item is added to your cart during that first visit.
It doesn’t cost you anything extra, but it makes a big difference in helping me keep this blog alive, ad-free, and full of hand-picked inspiration for your next obsession.
Thank you for being here. Thank you for shopping with intention. 💛

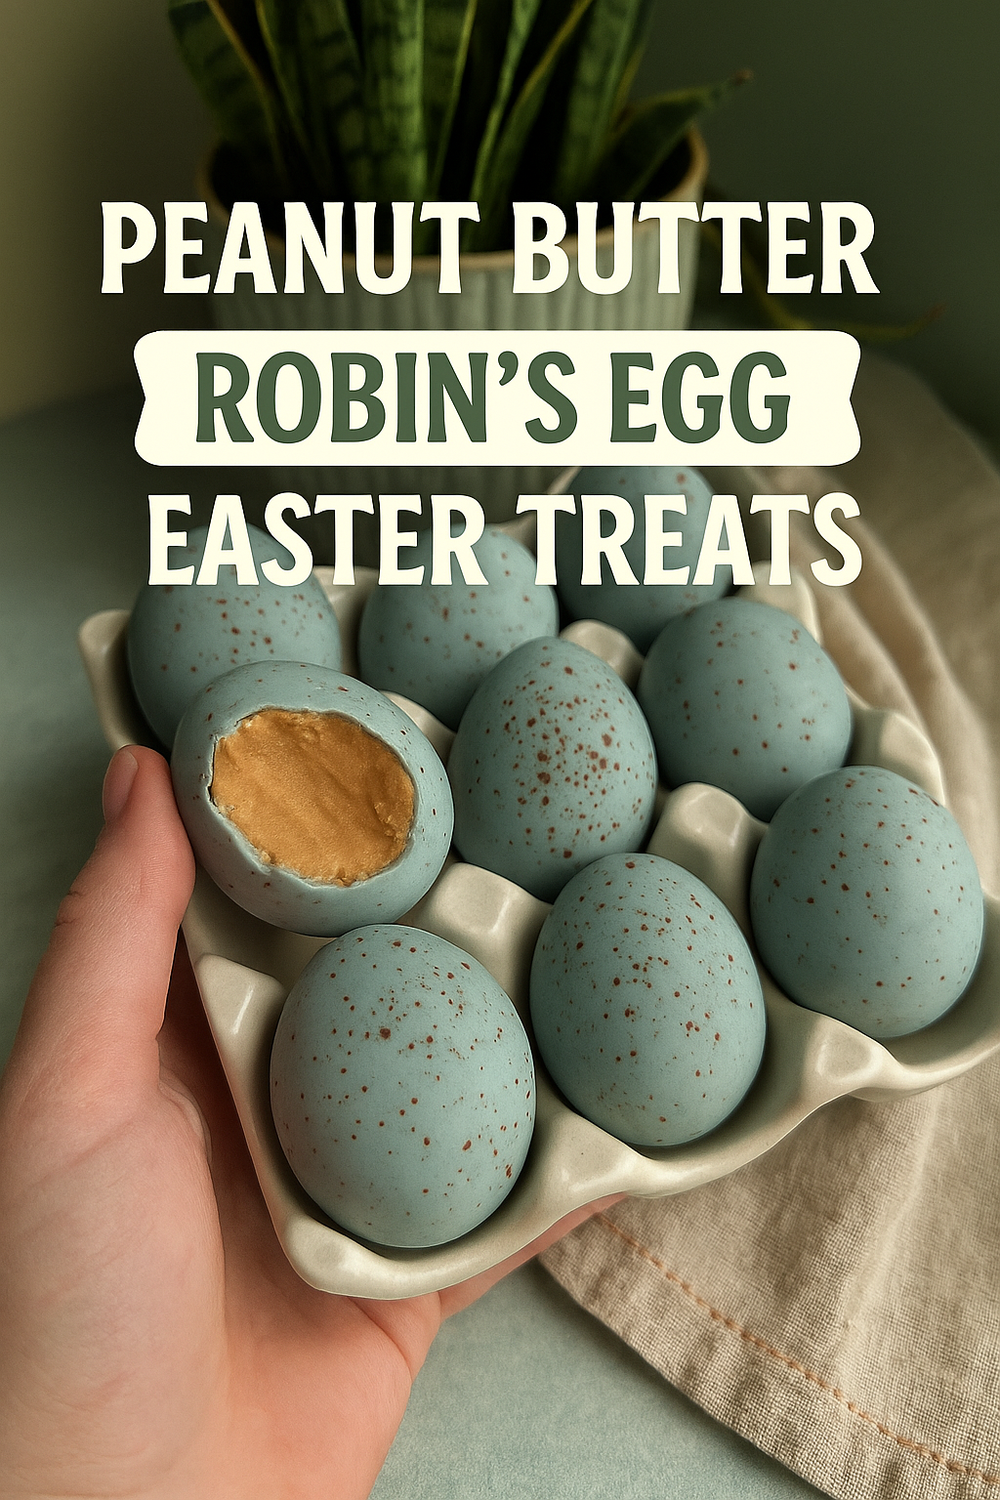
Peanut Butter Robin’s Egg Easter Treats (No-Bake & Naturally Dyed)
These no-bake peanut butter nests are a whimsical springtime treat—crunchy, creamy, subtly sweet, and tinted with nature’s own palette. Made with rolled oats, nut butter, honey or maple syrup, and plant-based dyes, they’re a creative celebration of the season and perfect for Easter baskets, brunch boards, or moments of mindful snacking. Each nest holds a trio of candy-coated “eggs” that can be swapped for dye-free chocolate or dried fruit, depending on your mood or dietary needs.
Ingredients:
1 cup natural peanut butter (or substitute with almond or sunflower butter)
1/3 cup honey or maple syrup
1 teaspoon vanilla extract
Pinch of sea salt
2 tablespoons melted coconut oil
2 1/2 cups old-fashioned rolled oats
Optional: 1/2 cup shredded coconut or puffed rice for texture
Natural dyes for coloring (beet juice, matcha, butterfly pea, red cabbage water, turmeric)
Candy eggs, chocolate-covered nuts, or dried blueberries for topping
Instructions:
In a mixing bowl, stir together the peanut butter, honey, vanilla, salt, and coconut oil until smooth. Fold in the oats and optional add-ins. Separate into small portions and tint each batch using a natural food dye of your choice. Press each portion into a nest shape using a spoon or your hands, creating a center dip for eggs. Chill the nests in the fridge for 20–30 minutes or until firm, then place three candy “eggs” into each one.
Serve on a rustic wood board or pastel ceramic platter, and garnish with fresh herbs, edible flowers, or shredded coconut snow. These keep well in the fridge for up to five days—if they last that long.
Step-by-Step Guide: Making the Dreamiest No-Bake Peanut Butter Robin’s Egg Nests
Let’s begin with a breath. You’re not in a rush. This isn’t the kind of treat that calls for precision or pressure—it’s something soft, something simple, something that invites your creativity to bloom like a daffodil on the first warm afternoon of spring. So take a moment to clear your counter, gather your favorite mixing bowls, and maybe put on a linen apron that makes you feel like the domestic goddess of your own dreamy spring ritual. You’re about to make magic—edible, no-bake, peanut-buttery magic—with a touch of whimsy and wellness woven into every step.
To begin, pull out your medium-sized glass nesting bowls and set them beside your stovetop or prep space. While this is a no-bake recipe, we will gently warm our ingredients to blend them into smooth harmony. Grab a rubber spatula or wooden spoon, your favorite whisk, and a nonstick saucepan like this one if you prefer the stovetop method. Otherwise, you can also use a heatproof bowl and warm the mixture in short microwave bursts if you’re in a cozier, small-batch kind of mood.
In your chosen saucepan or bowl, add one cup of natural peanut butter. Make sure it’s the kind with just peanuts and salt—no extra sugar, no palm oil. This version melts down smoother and keeps the overall texture rich but clean. If your peanut butter has been in the fridge, warm it slightly first so it stirs easily. Then drizzle in one-third cup of honey or maple syrup. Each has its own character. Honey is floral, thick, and grounding. Maple syrup adds a subtle caramel note that pairs beautifully with oats. If you’re making a vegan version, go with maple. Stir gently until the two begin to swirl into a warm, silky union. Add in a teaspoon of vanilla extract and a small pinch of sea salt—just enough to balance the sweetness with a little mineral depth.
Now for the creamy enhancer: melt two tablespoons of coconut oil and pour it into the mixture. This gives your nests structure when chilled, but also a glossy, tender richness that you’ll notice instantly when you take your first bite. Stir everything over low heat, or for about 30 seconds in the microwave, until the ingredients combine into a smooth, luscious mixture. If you want to pause here for a taste, go ahead. It should already smell like warmth and comfort and weekends at home.
Once your base is mixed, bring in the rolled oats. Use two and a half cups of old-fashioned rolled oats—not instant, not steel cut. The texture matters. You want oats that will hold their shape but still yield to the soft embrace of peanut butter. If you like extra texture, this is the perfect moment to add a handful of unsweetened shredded coconut or some puffed rice cereal. Think of it like crafting a nest—do you want your twigs smooth or a little wild? Stir until every oat is slicked with peanut butter glaze and there are no dry patches. The scent will already feel nourishing, like breakfast got dressed up for a garden party.
Now for the part that makes this recipe sing—the color. We’re skipping synthetic dyes entirely and using pigments from nature to give our nests that soft robin’s egg pastel hue. Divide your mixture into two or three smaller bowls, depending on how many colors you’d like. Then choose your natural dyes. If you want a blushing rose color, stir in a few teaspoons of beet juice or even dragon fruit powder. For minty greens, use a half-teaspoon of matcha or a touch of spirulina. And for those iconic soft blues, red cabbage water—boiled and then mixed with a tiny bit of baking soda—transforms into the prettiest periwinkle. Add each dye gradually and stir until you reach the color you’re craving. You’re painting with plants now. Let it be playful.
Here’s where the fun starts to take form. Using a spoon or a cookie scoop, portion out generous dollops of mixture onto a parchment-lined baking sheet like this. If you have a small cookie scoop, this helps keep the nests uniform, but you can easily use your hands. Press the center of each scoop down gently with your thumb or the back of a spoon to create a little dip—a cozy cradle for your “eggs.” If the mixture is too sticky to shape, chill it for 10 minutes to firm it up slightly. Coconut oil can soften quickly in warm kitchens, so don’t be afraid to refrigerate your hands or tools between scoops.
Once you’ve shaped your nests, let them chill in the fridge for 20 to 30 minutes. This is your cue to tidy up, pour a glass of something cold, and enjoy the quiet knowing that something sweet is setting just for you. When you open the fridge again, the scent alone will welcome you—nutty, floral, fresh.
And now comes the egg-laying. Traditionally, people use pastel candy-coated chocolate eggs, but if you want a cleaner option, try chocolate-covered almonds or Unreal dark chocolate gems. For a fruity twist, dried blueberries or yogurt-covered raisins look beautiful and feel a little more grown-up. Nestle three into the center of each chilled treat. Push gently so they settle into the dip, but not so hard that you crack the delicate nest.
At this stage, you can keep the nests rustic, or elevate the whole presentation with botanical flair. Try sprinkling with edible dried flowers like calendula or blue cornflower. Garnish with a whisper of powdered sugar for a springtime frost effect, or scatter fresh mint leaves for color contrast. Display them on a tiered serving tray or marble cheese board for Easter brunch, and you’ve created something that looks like it took hours, but was really a soulful hour of play.
These treats hold beautifully in the fridge for up to five days in a glass airtight container. You can layer parchment between them if stacking. If you prefer a firmer bite, store them toward the back of your fridge where it stays colder. If you want something more tender and melt-in-your-mouth, leave them out for 5–10 minutes before serving.
Now, let’s talk troubleshooting. If your nests fall apart after chilling, chances are your mixture was too dry. Next time, add a splash more melted coconut oil or a drizzle of maple syrup to bring it together. If they’re too soft and won’t hold shape, you likely need a bit more oats or chilling time. Texture is personal here—you’re aiming for the sweet spot between chewy and crisp.
For those of you making these with kids, this is a dream project. The dyeing process alone can feel like kitchen magic. Blue from cabbage? Pink from beets? They’ll be enchanted—and they can shape their own nests while you make yours. It’s a memory-maker and a mess worth making.
You can also theme them for different occasions. Use golden turmeric dye and lavender for spring solstice gatherings. Shape them into hearts for anniversaries. Add cacao nibs and call them forest nests for a woodland-themed picnic. This base is adaptable, endlessly remixable, and always well-received.
Styling tip: Place a few finished nests in a recycled egg carton lined with tissue paper or faux grass for a rustic gifting idea. Tie it with burlap twine and attach a handwritten note that says, “For you, from my nest.” People swoon over things like that—and they remember the thoughtfulness long after the treats are gone.
And just like that, you’ve made something that feels like more than a recipe. You’ve made a little moment of ritual, a nod to nature, and a nourishing treat that tastes like home and hope and maybe even childhood—only better.
If spring had a flavor, this might be it.
Let this be one of those recipes that lives in a drawer or folder or memory, pulled out not just for Easter but whenever you need a little sweetness without stress. The kind of thing you make on rainy Saturdays or quiet mornings or sunny afternoons when you feel like putting something beautiful into the world with your own two hands.
You don’t need a reason. You’ve already got the season. And now, you’ve got the recipe.


