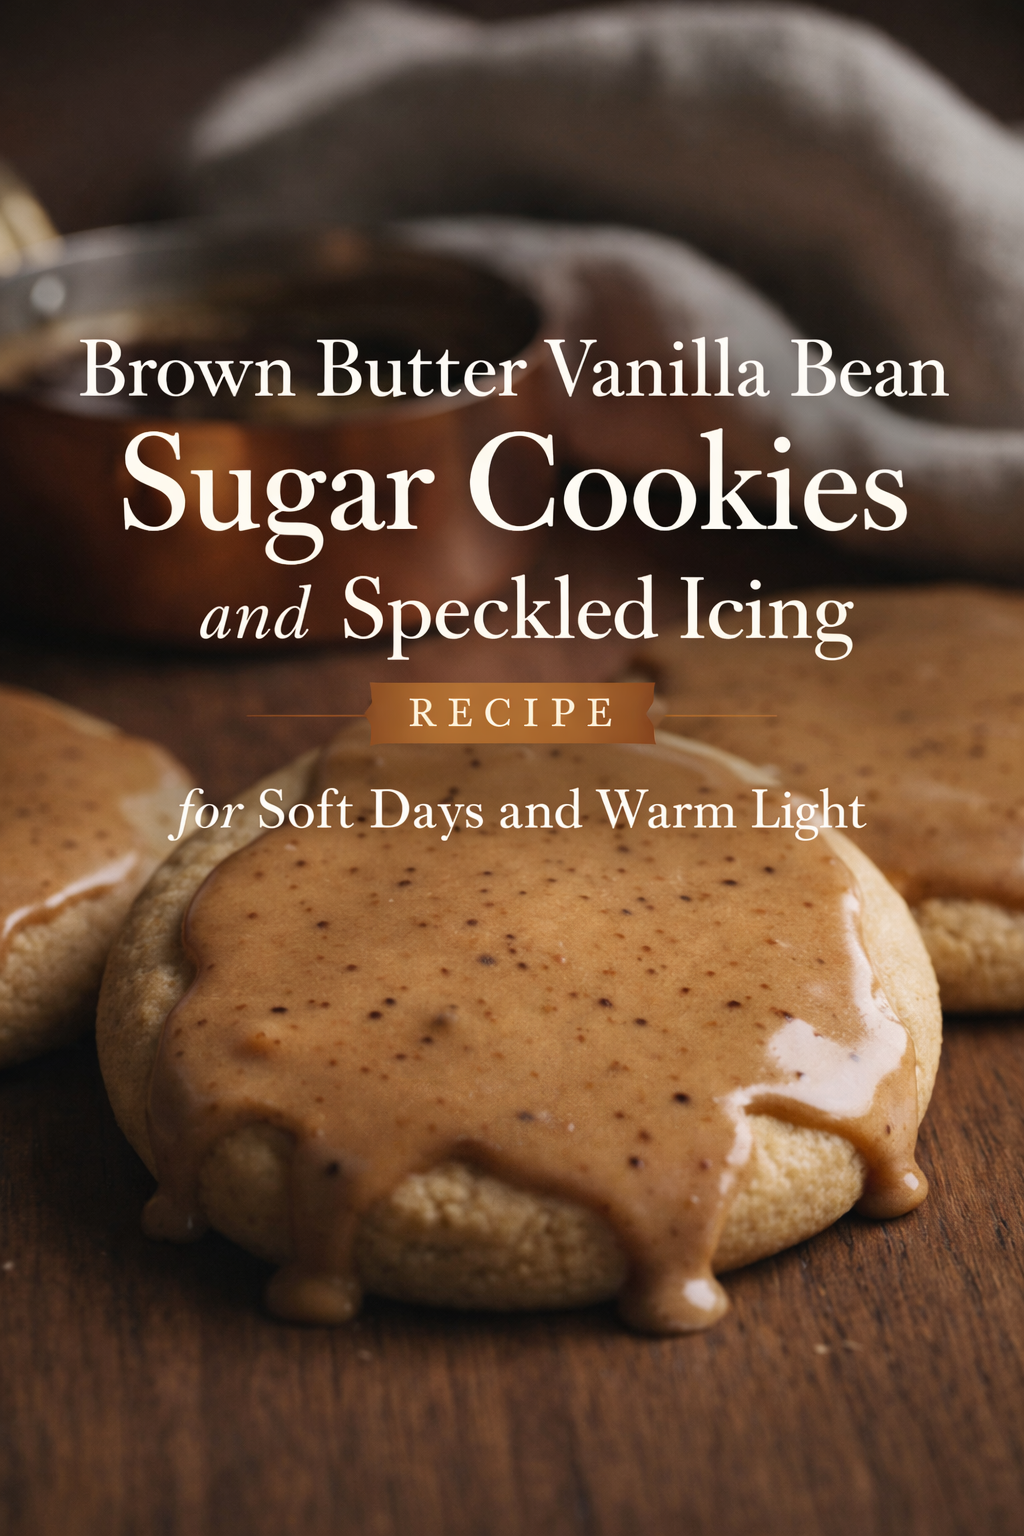
Brown Butter Vanilla Bean Sugar Cookies and Speckled Icing Recipe for Soft Days and Warm Light

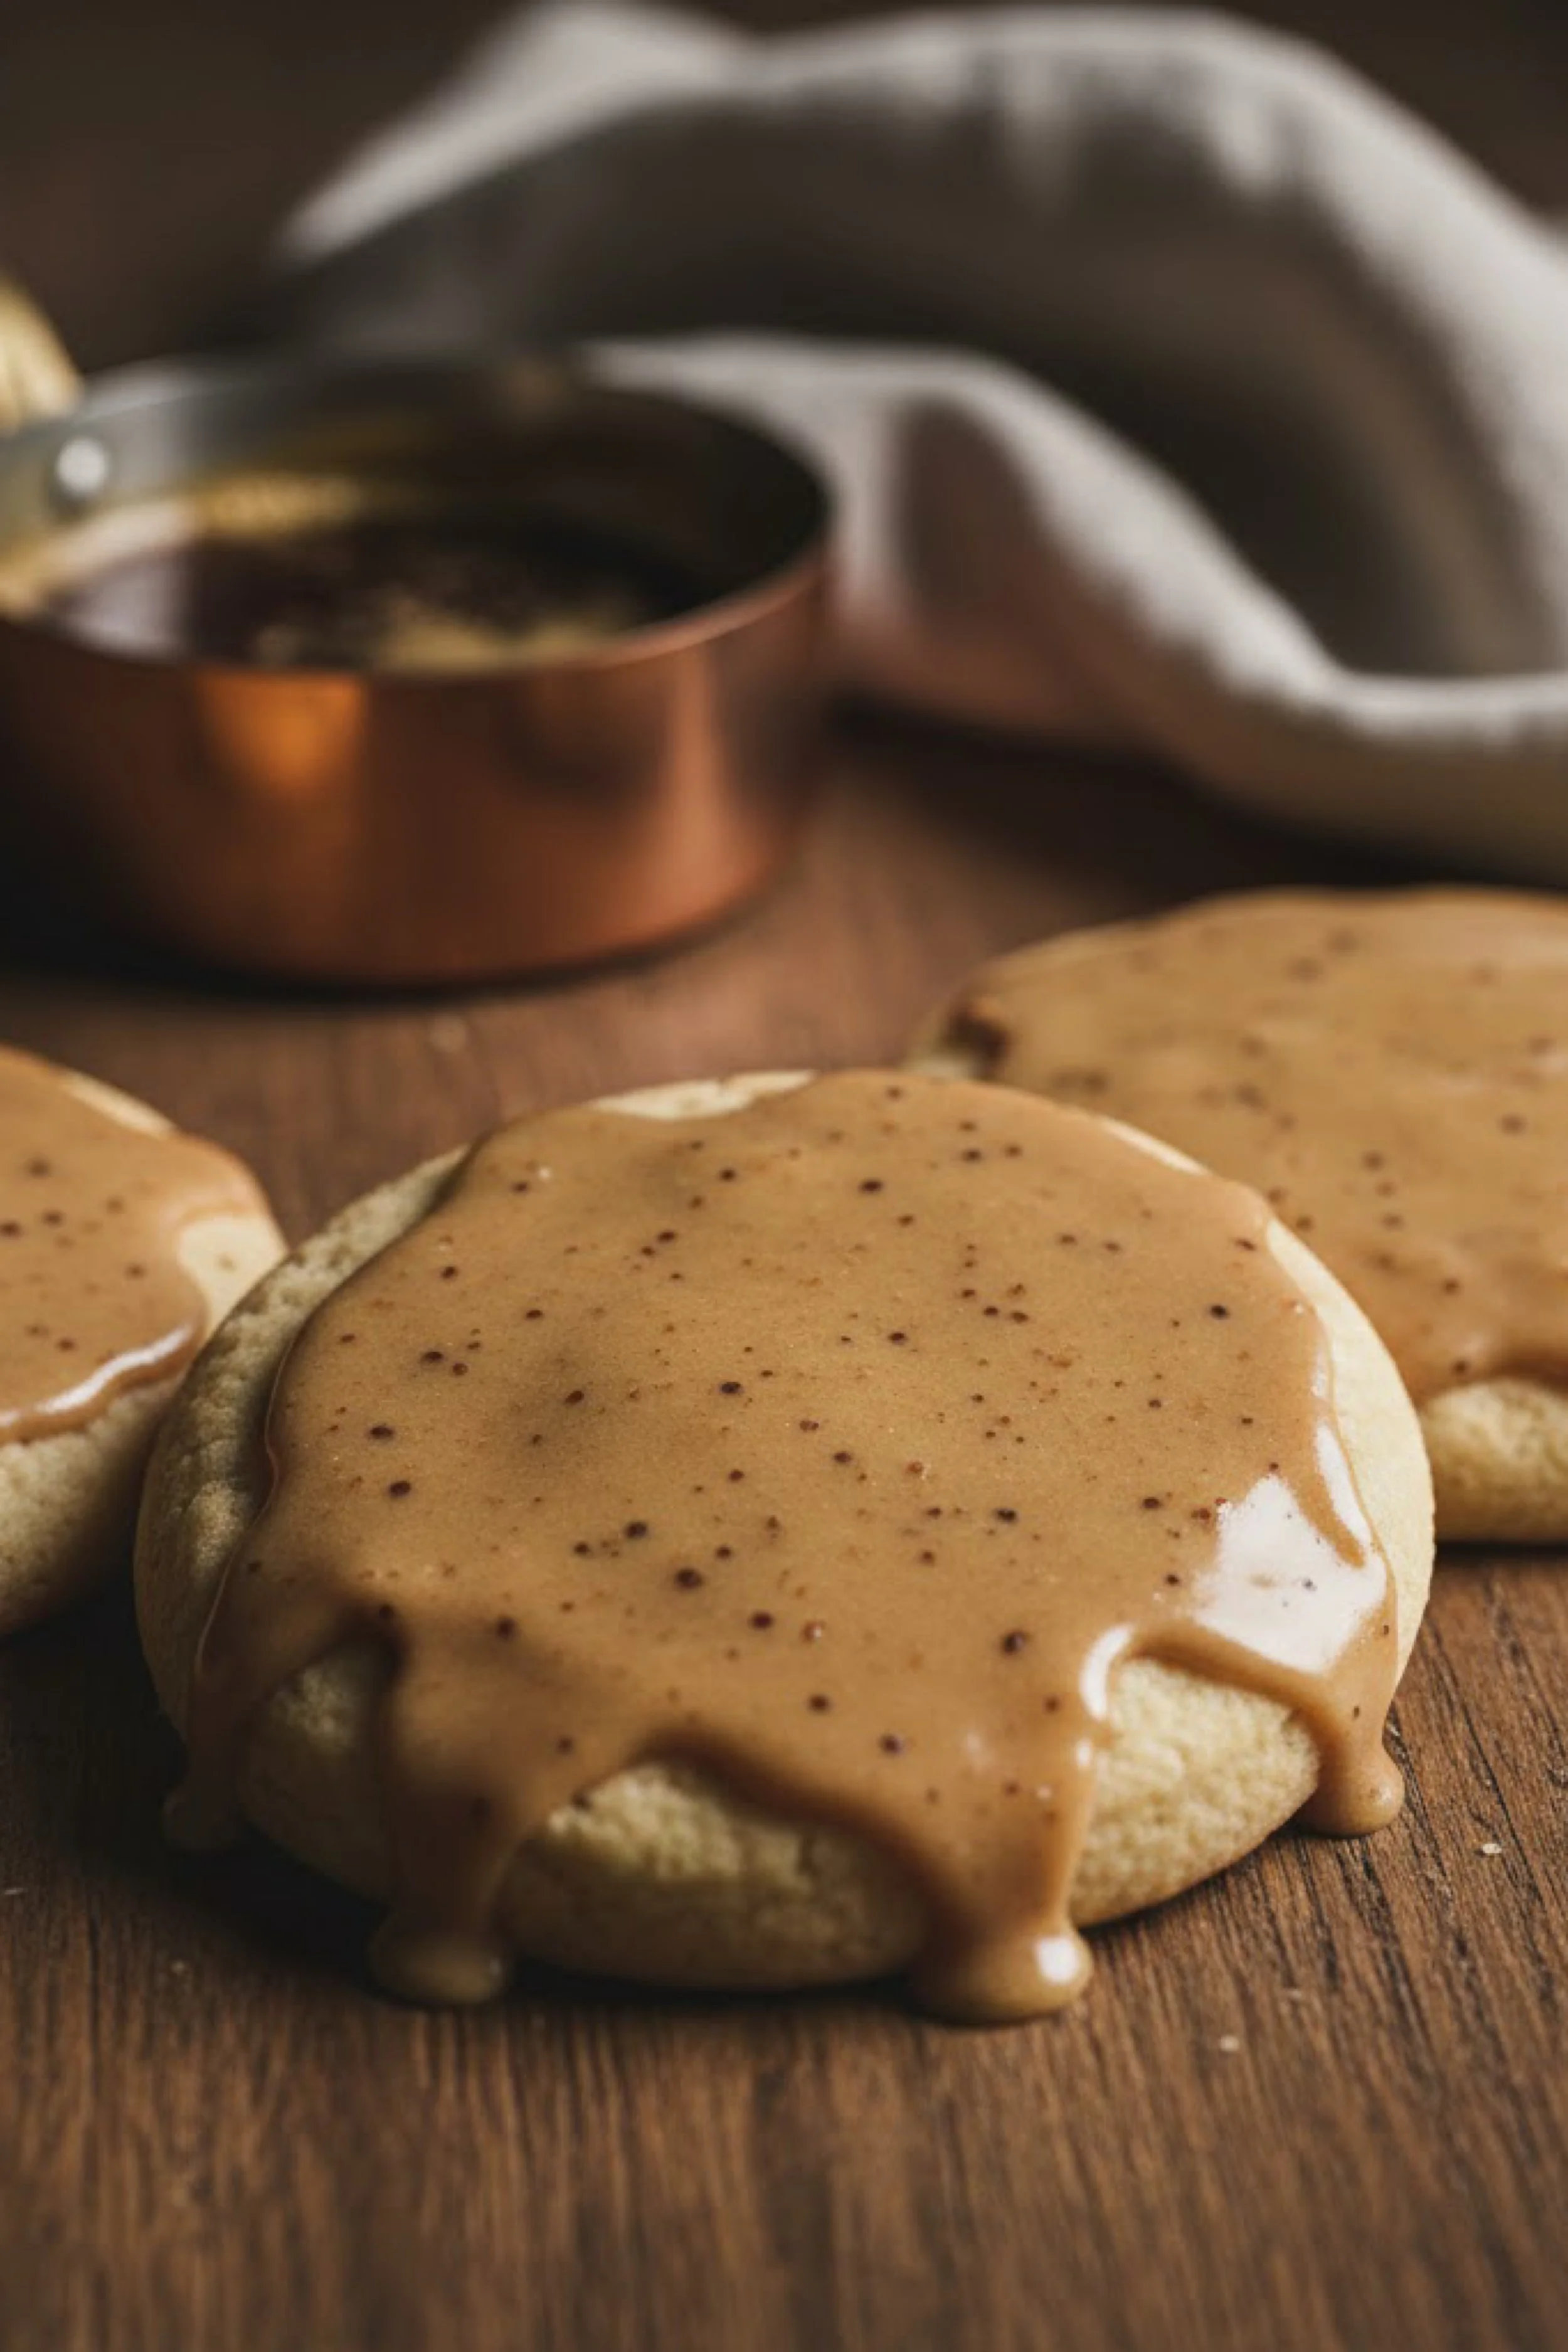
The first thing you notice is the gloss. A warm tan icing settles over pillowy sugar cookies like it meant to be there all along, pooling at the edges and taking its time as it drips. Tiny vanilla bean freckles scatter across the surface, little constellations that make the whole thing feel handmade and a little bit luxurious. The cookies sit on a wood table that looks like it has stories, the kind of surface that holds the scent of sugar and toast and the quiet comfort of something baking while the rest of the day waits its turn. In the background, a copper pot catches the light, and a linen towel relaxes in a casual fold, like the kitchen itself is exhaling.
This is the particular magic of brown butter. It does not just taste richer, it smells like a memory you cannot place at first. It begins as something familiar and then turns golden, nutty, almost caramel in the air. When that browned butter meets vanilla bean, the effect is immediate and unmistakable: warm, rounded sweetness with depth, like the difference between a candle and a fireplace. A good batch starts with the little rituals that make baking feel grounded, like setting out a sturdy light colored saucepan for browning butter so you can actually see the moment the milk solids turn hazelnut gold.
You can feel the texture of the dough before it even becomes dough. Brown butter cools slightly, the kitchen filling with that toasted aroma, while sugar waits in a bowl like fresh snow with intention. Vanilla goes in and immediately perfumes the room. If you want those signature speckles without scraping pods every time, vanilla bean paste with real seeds is the shortcut that still feels like a secret. For the full experience, though, nothing beats splitting whole vanilla beans and watching the dark, glossy seeds cling to your knife.
Then there is the softness. A great sugar cookie like this is not brittle, not crunchy, not trying to be a snap. It is plush and tender with just enough structure to hold a silky icing cap. The kind you pick up and feel it give slightly under your fingers, like a small pillow with edges. Getting that texture is part timing, part temperature, part gentle mixing. A dependable stand mixer for creaming and mixing makes it easy to stop at the right moment, when everything looks smooth and cohesive and you can almost predict the bake.
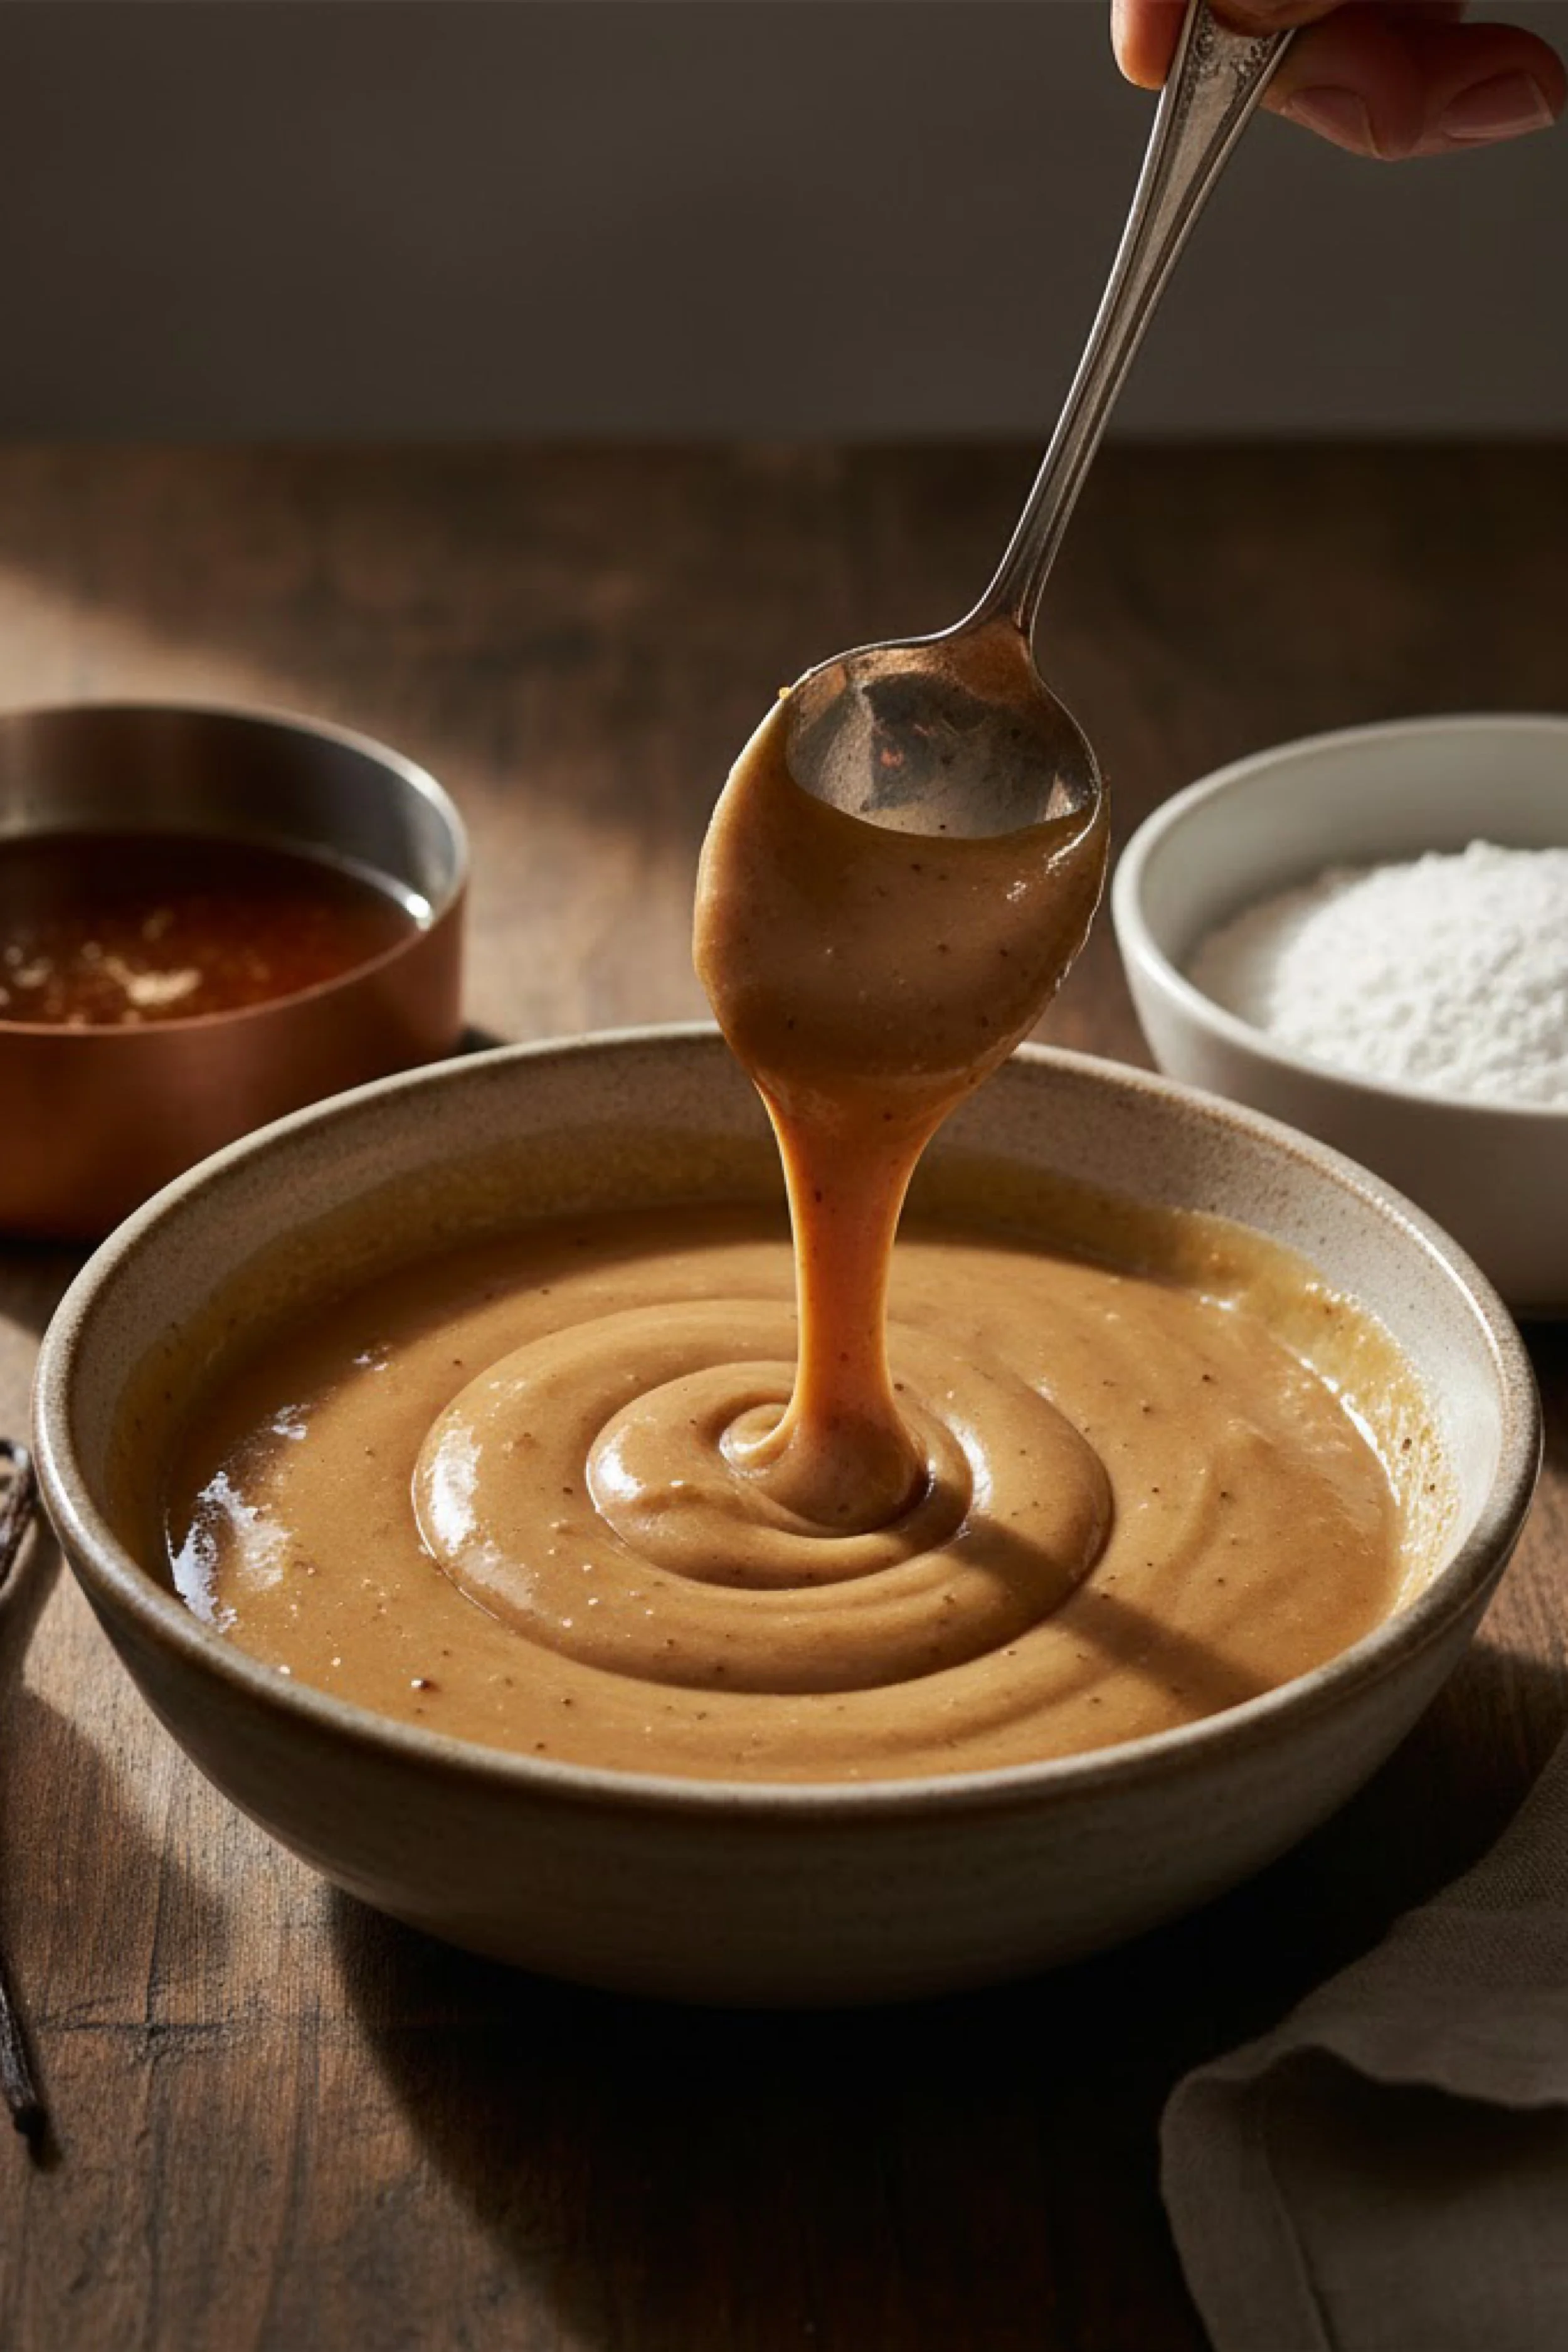
The icing is its own scene. In the second image, it sits in a wide bowl, thick and glossy, swirling into itself like satin. A spoon lifts and the ribbon falls in a slow stream, holding shape for a beat before melting back into the surface. That is the sweet spot: thick enough to drape, loose enough to level, and just fluid enough to drip at the edges without running off completely. Powdered sugar, a whisper of salt, vanilla bean, and a little warmth from brown butter create a color that looks like café au lait and tastes like toasted sugar. You can keep the finish ultra smooth by sifting with a fine mesh strainer for powdered sugar, which sounds fussy until you see how the icing turns glassy.
The scene feels unhurried, and that is the point. These cookies belong to afternoons when you can take your time, or mornings when the sun comes in at an angle that makes everything glow. They are the kind of bake that earns compliments without needing decoration beyond that speckled sheen. They feel classic, but not plain. Cozy, but not basic. Like a soft sweater upgraded with one perfect detail.
If you want the edges clean and the bottoms evenly golden, it helps to treat the baking surface like part of the recipe. A stack of parchment paper sheets for easy release and heavy baking sheets that bake evenly keeps everything consistent. And when the cookies come out, letting them cool fully on a wire cooling rack means the icing sets into that smooth, glossy cap instead of turning dull from trapped steam.
Some recipes are about precision. This one is about mood plus technique. Brown the butter until it smells like toasted hazelnuts, cool it until it is no longer hot, mix just until the dough comes together, bake until the centers look set but still soft, and then flood the tops with icing that falls in ribbons. The rest is atmosphere. Wood table. Linen towel. A pot left out because it is beautiful. Cookies that look like they were made in a kitchen where somebody cares, and where the sweetest part is taking your time.
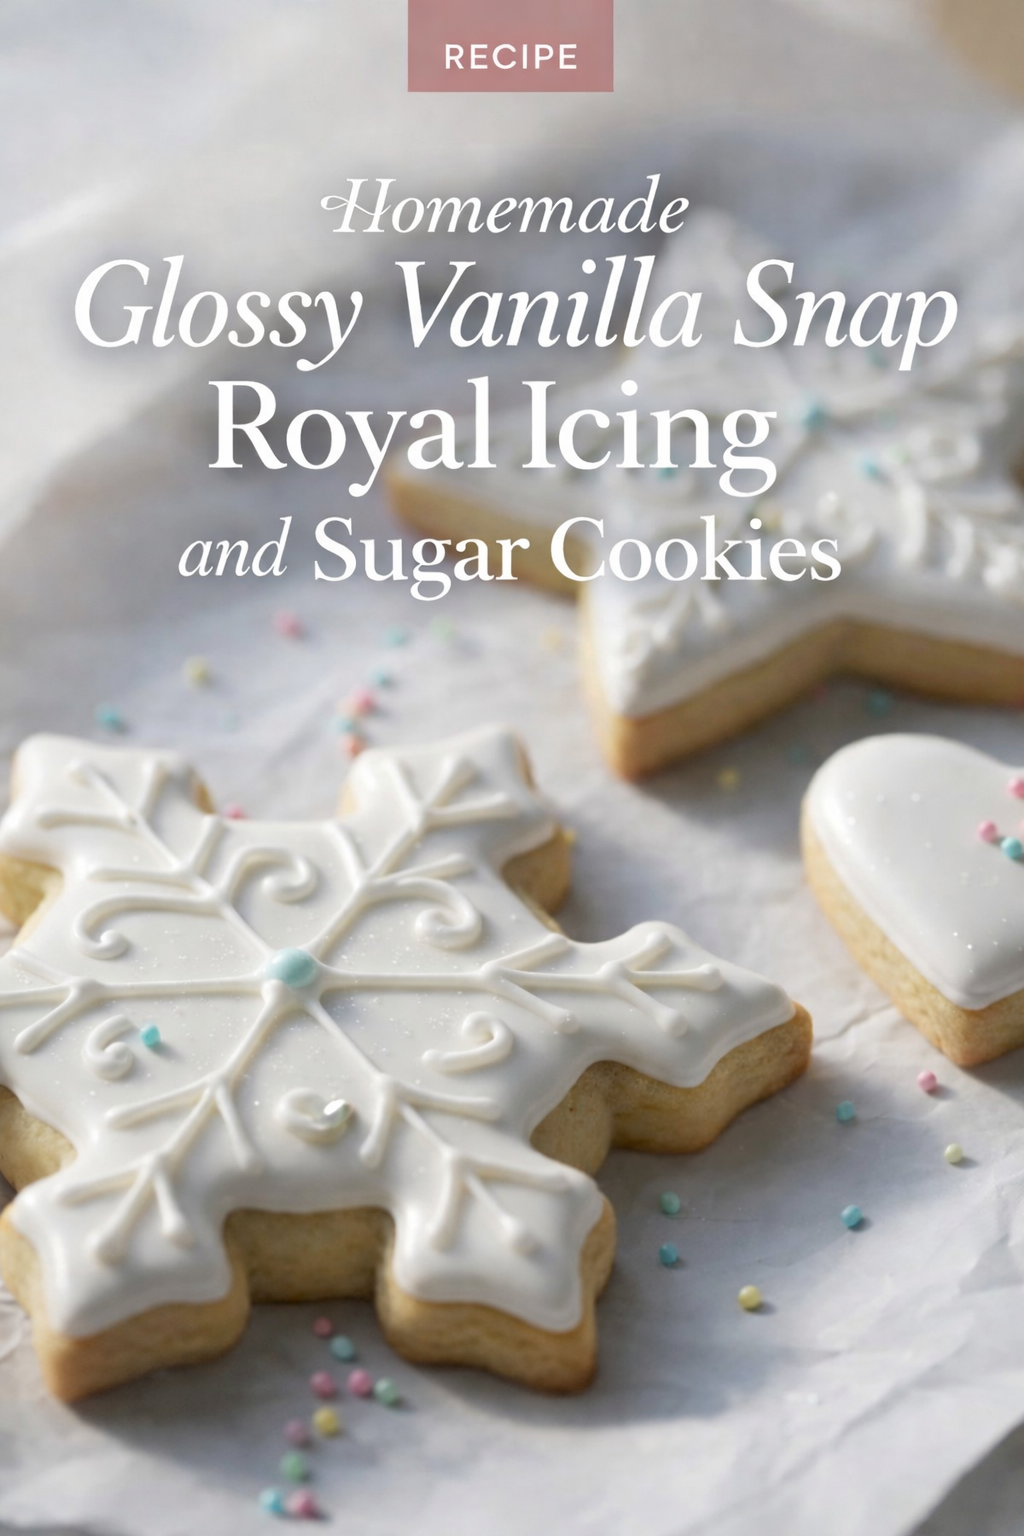
The Recipe
These brown butter vanilla bean sugar cookies bake up soft and tender with a glossy speckled icing that sets like a smooth glaze.
Ingredients
Brown Butter Vanilla Bean Sugar Cookies
- Unsalted butter, 1 cup
- Granulated sugar, 1 cup
- Light brown sugar, 1 half cup packed
- Large egg, 1
- Egg yolk, 1
- Vanilla bean paste, 1 tablespoon
- Sour cream or full fat plain yogurt, 2 tablespoons
- All purpose flour, 2 and 3 quarter cups
- Baking powder, 1 teaspoon
- Baking soda, 1 half teaspoon
- Fine salt, 3 quarter teaspoon
Brown Butter Vanilla Bean Icing
- Unsalted butter, 4 tablespoons
- Powdered sugar, 2 and 1 quarter cups
- Vanilla bean paste, 2 teaspoons
- Fine salt, 1 pinch
- Milk or heavy cream, 3 to 5 tablespoons, as needed
Method
- Brown the butter for the cookies in a light colored saucepan until amber with toasted specks. Pour into a bowl and cool until warm, not hot.
- Whisk flour, baking powder, baking soda, and salt in a separate bowl.
- Beat cooled brown butter with granulated sugar and brown sugar until glossy and blended. Beat in egg and yolk, then vanilla and sour cream.
- Add dry ingredients and mix just until a soft dough forms. Cover and chill 30 minutes.
- Heat oven to 350 degrees. Scoop dough into portions and place on parchment lined baking sheets, leaving space to spread.
- Bake 9 to 11 minutes until edges look set and centers look soft but no longer wet. Cool completely on a rack.
- Brown the butter for the icing, then cool 5 minutes. Whisk in powdered sugar, vanilla, salt, and enough milk or cream to make a thick ribboning glaze.
- Spoon icing over cooled cookies and let it settle. Rest until set, about 30 to 60 minutes depending on thickness.
Start with the brown butter, because it sets the tone for everything else. Use a light colored pan so you can see the color clearly, and keep the heat at medium. Butter will melt, foam, and then quiet down as water cooks off. Swirl often and watch for the milk solids to turn from pale to golden, then to a deeper hazelnut shade. The aroma will shift from sweet dairy to toasted nuts. The moment you smell that change, you are close. Take it off the heat when the butter is amber and the specks look golden brown, not black. Pour it into a bowl right away so the residual heat does not push it too far. If you want a foolproof setup, use a light colored saucepan that shows browning clearly. Let the brown butter cool until it is warm, not hot. Hot butter can melt sugar too aggressively and make the cookies spread more than you want.
While it cools, set up your dry ingredients. Whisk flour, baking powder, baking soda, and salt thoroughly so the leaveners distribute evenly. This recipe is designed for a soft cookie, so the balance matters. Baking powder gives lift, baking soda gives just enough spread and tenderness, and the sour cream or yogurt adds moisture plus a gentle tang that keeps the sweetness from feeling flat.
Mixing is where texture is won or lost. Beat the cooled brown butter with both sugars until it looks glossy and cohesive. You are not trying to whip air like a cake, you are building a smooth base. A hand mixer works, but a stand mixer with a paddle attachment makes it easier to stop exactly when everything looks unified. Add the egg and yolk one at a time, then the vanilla bean paste. The paste does two jobs: flavor and visual. Those speckles are part of the charm. If you want the most dramatic seed flecking, vanilla bean paste with visible seeds delivers it without extra steps. Sour cream or yogurt goes in next, and the batter should look creamy and slightly thick.
Now add the dry ingredients and mix only until you stop seeing flour. Overmixing develops gluten, which turns soft cookies bready. The dough should be soft but scoopable, and chilling is important. Even a short chill lets flour hydrate, gives the butter a chance to firm slightly, and keeps the cookies thick. Thirty minutes is enough for great results, though longer is fine.
Portioning is the secret to uniform bakes. Use a scoop, then gently round the tops with your hands. A medium scoop gives bakery style cookies with a thick center. If you want consistent sizing every time, a cookie scoop set makes it effortless. Arrange on parchment lined sheets with room to spread. Parchment helps the bottoms bake evenly and prevents sticking, and parchment paper sheets also make cleanup feel like a luxury.
Bake at 350 degrees and watch the edges, not the time alone. You want edges that look set and just beginning to take on the lightest golden hue, while centers still look soft. The cookies will finish setting as they cool. Overbaking is the fastest way to lose that plush texture. When they come out, let them sit on the sheet for a minute or two, then transfer to a rack. Cooling on a rack prevents steam from softening the bottoms and keeps the tops ready for icing. A simple wire cooling rack makes the finish cleaner and the icing glossier.
Now the icing, the part that makes the photos feel so rich. Brown a smaller amount of butter the same way. Let it cool briefly so it is warm but not scorching, then whisk in powdered sugar, vanilla, and salt. If you hate lumps, sift the powdered sugar first using a fine mesh strainer. Add milk or cream a tablespoon at a time until the icing falls from the spoon in a thick ribbon. You are looking for a slow pour that holds a line for a second before it melts back into itself. Too thick and it will tear the cookie surface and sit rough. Too thin and it will run off the edges and turn translucent.
Icing technique matters. Make sure cookies are completely cool. Warm cookies melt icing and create a dull, sticky top. Spoon icing onto the center and let it naturally spread, then coax it to the edges with the back of the spoon. If you want dramatic drips like the photo, push just a little over the edge in a few spots and let gravity do the rest. Let them rest at room temperature until set. If your kitchen is warm, it may take longer. If you need to stack cookies sooner, make the icing slightly thicker so it sets faster.
Troubleshooting is simple once you know the cues. If cookies spread too much, the butter was too warm, the dough needed more chill time, or the baking sheet was hot from a previous batch. Always start with a cool sheet, and consider using heavy baking sheets that resist warping for consistent heat. If cookies are dry, they baked a minute too long or the flour was packed. A kitchen scale helps, but if you measure by cups, fluff flour, spoon it in, and level gently.
Flavor variations are easy without losing the core vibe. Add a pinch of cinnamon for a warmer profile, or a tiny amount of espresso powder to deepen the brown butter notes. For a brighter finish, add a few drops of lemon juice to the icing and increase powdered sugar slightly to keep the same texture. For a more dramatic speckle, use extra vanilla bean paste, or scrape a whole bean into the icing for a bakery look.
Storage is kind to these cookies. Once the icing sets, store in an airtight container with parchment between layers. They stay soft for several days because of the brown sugar and sour cream. You can also freeze the uniced cookies, then thaw and ice when needed. If you freeze iced cookies, set them in a single layer first so the tops do not smudge, then stack with parchment.
The goal is the exact feeling in the images: thick soft cookies, glossy speckled tops, and a calm, warm kitchen mood that makes the simplest ingredients feel elevated. Brown the butter carefully, chill the dough, bake just until set, and let the icing fall in slow ribbons. Everything else takes care of itself.