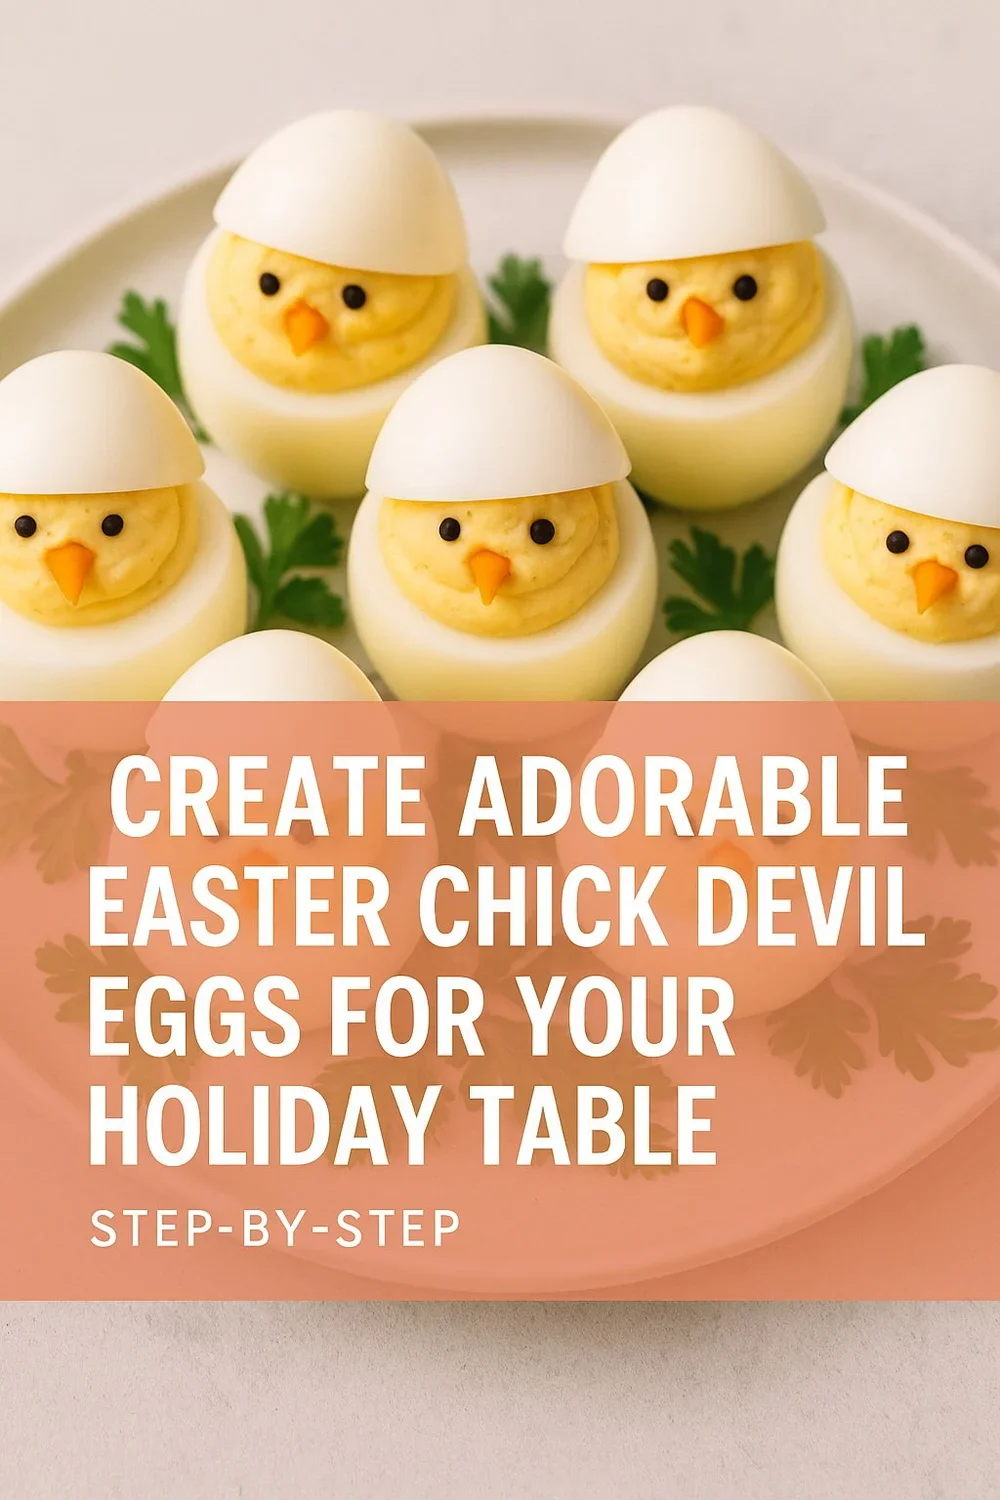
Create Adorable Easter Chick Deviled Eggs for Your Holiday Table
Spring Whimsy on a Plate: Creating the Cutest Easter Chick Deviled Eggs
There’s something about spring that awakens a sense of delight. It’s not just the budding flowers or the soft pastel hues sweeping across store aisles. It’s a deep, almost nostalgic craving for joy — small joys, sweet details, the little touches that say you’re home, you’re safe, you’re cherished. And nowhere does that feeling come to life more vividly than on your Easter table.
Whether you’re hosting brunch for a crowd or setting a simple picnic in your backyard, this holiday begs for whimsy. And few dishes deliver that better than deviled eggs shaped like baby chicks. They’re adorable. They’re edible. And they’re unforgettable.
A Celebration of Charm and Comfort
Let’s begin with the obvious: deviled eggs are already a crowd favorite. But when you turn them into miniature chicks, they become the focal point of the table — charming enough to coax a smile from even the grumpiest uncle and delightful enough to have your nieces and nephews asking if they can help make them.
This recipe is more than cute. It taps into the kind of comfort food nostalgia that defines the best holiday memories. It’s approachable yet elevated. Thoughtful without being fussy. And thanks to a few clever tricks and tools, it’s easier to pull off than it looks.
That’s the real magic of this dish. It delivers joy in the making and the sharing. Whether you’re laughing over split yolks or beaming as someone sneaks a second chick off the platter, this recipe is a love letter to playfulness, hospitality, and home.
The Wellness Behind the Whimsy
Before we dive into the yolks and the peepers, let’s talk about what makes this dish feel so good — not just emotionally, but physically. Deviled eggs are a powerhouse of protein and healthy fats. One egg contains about 6 grams of protein and a variety of vitamins and minerals like choline, B12, and selenium. When paired with simple ingredients like Greek yogurt or avocado instead of mayo, they become even lighter and cleaner.
Of course, holidays are not just about wellness in the nutritional sense. There’s mental wellness here too. Taking time to create something delightful with your hands, to shape something silly and beautiful — this taps into mindfulness. You focus. You smile. You create with intention. And that alone is worth celebrating.
You can even make this part of a low-stress, grounding ritual. Boil the eggs early in the morning, pour a cup of herbal tea, and sit down with a few simple tools to shape your little chicks. If you’re involving kids, let them add the carrot beaks or place the cap back on top like a crown. These moments become memories.
Want to make the experience even more soothing? Try playing a springtime playlist in the background, lighting a soft floral candle, or prepping your ingredients on a gorgeous rustic wooden board like this one on Amazon. The goal is to turn your kitchen into a sanctuary of intention, not a zone of stress.
Setting the Scene: Your Spring Table
Presentation is everything. If you’re crafting these little cuties, give them a stage that matches their energy. Think mossy faux grass runners, porcelain egg cups, pressed linen napkins in soft butter yellow or powder blue. A few sprigs of baby's breath or faux daffodils tucked around your deviled egg plate? Chef’s kiss.
You can elevate the visual impact by placing your deviled chicks on a tiered cake stand or in a vintage egg tray like this ceramic egg platter. If you’re serving them buffet-style, tuck them into faux nests made from shredded kraft paper or arrange them around a large edible centerpiece like a carrot-shaped cheese ball.
The goal isn’t perfection. It’s enchantment. The kind of tablescape that invites people to lean in, snap a photo, and whisper, “Oh my gosh, how cute are these?”
Storytime: Where the Chicks Came From
Let me tell you about the first time I brought these to Easter brunch.
I was staying with my sister for the weekend, and as always, she tasked me with bringing something “festive but not too fancy.” It was a chaotic kitchen morning. Kids underfoot. A blender whirring. Someone had lost the dog’s Easter bowtie.
I started peeling hard-boiled eggs while sipping coffee out of a chipped tulip mug. And somewhere between mixing the filling and slicing tiny carrot beaks, I found my rhythm. The world slowed down. I wasn’t just prepping food. I was making something sweet and intentional. A tiny army of deviled chicks began to take shape, each with its own little lopsided smirk.
That platter barely hit the table before the oohs and aahs started. Even my teenage nephew, who is way too cool for Easter, laughed and said, “Okay, these are kind of awesome.” That moment stayed with me. Not just the compliments, but the way something so simple could bring so much joy.
Tools You’ll Want on Hand
To make your life easier (and your chicks more photogenic), gather a few simple tools:
- A sharp paring knife for slicing cleanly through the whites
- A piping bag or reusable silicone piping tool for a tidy yolk swirl
- Black sesame seeds or peppercorns for the eyes
- A mandoline or sharp knife for cutting carrots into precise triangles
- Optional: food-safe tweezers or precision tongs for delicate assembly
You don’t need professional kitchen skills. Just a calm hand and a sense of humor.
Aesthetic Pairings and Party Ideas
If you’re building an entire Easter spread around these deviled egg chicks, consider complementary dishes that echo the playful vibe. Think:
- Mini fruit skewers with marshmallow bunny tails
- A pastel crudité board shaped like a bunny head
- Spring pea salad in hollowed-out cabbage cups
- Bunny-shaped sandwiches cut with cookie cutters
You can even turn this recipe into a themed activity. Create a little "deviled egg decorating station" with bowls of sliced olives, pimento strips, cucumber curls, and microgreens. Let guests customize their own chicks — no two look the same, and that’s the charm.
Add a little name tag flag next to each one and turn them into edible place cards.
Make it Ahead with Ease
Here’s a secret: these eggs are fantastic for prepping in stages. You can boil and peel the eggs the night before. You can mix the yolk filling and store it in a piping bag in the fridge. You can even slice your carrot beaks and peppercorn eyes ahead of time and store them in a tiny airtight prep container set like this.
When it’s time to assemble, everything is ready to go. This is especially helpful if you’re balancing a ham in the oven or sneaking in a quick Easter egg hunt before brunch.
Just remember: deviled eggs are happiest when served chilled and consumed within a few hours. They don’t love sitting out too long in the sun. You can nestle them in crushed ice on a tray or store them in a deviled egg carrier with a lid if you're transporting them.
Capturing the Perfect Pin
Let’s talk about why these are a Pinterest dream.
The color contrast is subtle but strong — creamy whites, golden yolks, pop-of-orange beaks. The texture is playful. The visual appeal? Off the charts. You can photograph them from above in a ring, from the side like a little chick army, or up close with one smiling directly at the camera.
For best results, shoot in natural daylight near a window. Place them on a soft pastel plate or a neutral wooden cutting board with a linen napkin nearby. Add a pop of greenery or a few mini flowers for spring flair.
Bonus tip: tilt a few of their “caps” at funny angles. The slightly crooked eggshell hats make them even more endearing.
Hosting Vibes and Atmosphere Tips
Think of your deviled chick eggs as more than just a dish. They’re a vibe. They’re the kind of thing that sets the tone for a meal — welcoming, light-hearted, lovingly made.
So don’t just plop them on the counter. Make their debut matter. Maybe you serve them alongside a specialty drink like sparkling lemonade with lavender ice cubes. Maybe you light a softly scented floral candle in the background. Maybe you pass them around on a floral tray with little toothpicks and linen cocktail napkins.
The point is to let the moment breathe. Enjoy the way people light up when they see them. Be proud of your effort. Smile when someone says they’re too cute to eat — and then eats three.
For the Kiddos (or the Young at Heart)
This recipe is also a perfect way to involve little ones in the kitchen without stress. Kids can help mash the yolks, press on the eyes, and place the eggs on the tray. If you're planning an Easter kids' table, these deviled eggs double as edible decor.
Want to take it further? Pair them with a printable coloring page of a chick, a set of jelly bean counting games, or a tiny basket of mini chocolate eggs. Easter doesn’t have to be elaborate to be enchanting.
From Kitchen to Keepsake
It’s funny how a recipe like this can become a tradition. You make it once, and next year someone asks for it again. Then the next. Before you know it, these silly little chicks are a staple of your spring celebrations — like a signature. A wink. A memory you can eat.
That’s the beauty of thoughtful seasonal food. It’s not just fuel. It’s storytelling. It’s a gesture of care. It’s the thread that weaves together holidays and homes.
And now, it’s your turn.
Ready to make these cuties for your own celebration? You’ll find everything you need in the recipe below — plus a few personal tricks to make sure your yolk is smooth, your whites are sturdy, and your chicks are ready to steal the spotlight.
Visit Melissa Johnson at Best Friends For Frosting for 🍋EASY RECIPES that brighten EVERYDAY & HOLIDAYS. Dive into her delightful Easter Chick Deviled Eggs recipe, creating 🩷Recipes that Make Happy Family Memories. Celebrate with this 🎉Mama of 2 and make every day unforgettable. Check out bestfriendsforfrosting.com/explore for more!
💡 Pro Tip: Why These Are Amazon Search Links (and Why “Add to Cart” Really Helps)
You might notice that every “Shop the Look” section uses Amazon search result links rather than one specific product. That’s not a glitch—it’s a strategy.
Items in fashion, beauty, and home sell out fast. Colors change. Styles get discontinued. Linking to a single item might leave you staring at a “Currently Unavailable” page—and nobody wants that.
With search result links, you’ll get:
• A fresh rotation of similar, in-stock finds
• Options that match your budget, size, and style
• Fewer dead ends and more discoveries
✨ Here’s how you can support this blog with zero extra cost:
If something speaks to you—even if you're still deciding—add it to your cart while you’re browsing. Amazon only credits creators like me if the item is added to your cart during that first visit.
It doesn’t cost you anything extra, but it makes a big difference in helping me keep this blog alive, ad-free, and full of hand-picked inspiration for your next obsession.
Thank you for being here. Thank you for shopping with intention. 💛
Hop into Easter with our delightful Chick #DeviledEggs recipe! Perfect for a festive gathering, these charming treats are easy to make, irresistibly cute, and guaranteed to be a hit with both kids and adults. Get ready for a holiday favorite! #RecipeOfTheDay pic.twitter.com/Vf9d3g4yh6
— Reel Good Recipes (@reelgoodrecipe) March 18, 2024
🐣 Easter Chick Deviled Eggs Recipe
Ingredients:
- 12 large eggs
- 1/3 cup mayonnaise or Greek yogurt
- 1 teaspoon Dijon mustard
- Salt and pepper to taste
- Small carrot (for beaks)
- Whole black peppercorns or black sesame seeds (for eyes)
- Optional: paprika or chives for garnish
Steps:
- Boil the eggs and let them cool completely
- Carefully peel the eggs and slice the top third off each egg (save the tops as “hats”)
- Scoop out yolks into a bowl and mash until smooth
- Add mayo, mustard, salt, and pepper to the yolks and mix until creamy
- Use a piping bag or spoon to fill each egg white with the yolk mixture
- Cut tiny triangles from the carrot for beaks
- Press peppercorns or sesame seeds into yolk mixture to make eyes
- Gently place the egg top back on at a tilted angle like a chick hatching
- Chill until ready to serve and enjoy your adorable edible flock!
How to Create Adorable Easter Chick Deviled Eggs for Your Holiday Table
There’s something magical about holiday food that looks too cute to eat. And when it comes to Easter, that magic multiplies. These deviled eggs, shaped like hatching baby chicks, are pure joy — playful, protein-packed, and perfect for spring gatherings. The best part? They’re easy to make with a few thoughtful tools and a little creative flair. This step-by-step guide walks you through the entire process like a conversation with a stylish, well-prepped friend. You’ll get wellness insights, kitchen styling tips, and Amazon affiliate links along the way so you can recreate the moment with ease.
Start with the Perfect Egg Boil
The secret to any deviled egg recipe begins with the boil. You want yolks that are vibrant yellow and firm, without the dreaded green ring. To get there, place your eggs in a pot of cold water, covering them by at least an inch. Bring the pot to a gentle boil, then reduce the heat to a low simmer and set a timer for 10 minutes. When time’s up, immediately transfer the eggs to an ice bath. This halts the cooking and helps the shell separate more cleanly. A stainless steel saucepan like this one is ideal for even heat distribution and keeping your boil controlled.
Peeling eggs can be a moment of chaos or calm depending on your tools. Tap each egg gently on the counter to crack it all over, then roll it under your palm. The ice bath should have loosened the membrane just enough that the shell peels away in long, satisfying curls. Keep a bowl of cool water nearby to rinse away stray shell fragments. This part can feel therapeutic — almost like shelling away the stress of your week.
Slice with Intention and Confidence
Now it’s time to transform these boiled beauties into baby chicks. Instead of slicing them lengthwise like traditional deviled eggs, you’ll slice each one horizontally about a third of the way down. This top third becomes the “hat” of the chick, so set it aside gently. Use a small, sharp paring knife to make the cut clean and smooth. If you need a reliable one, this paring knife set is ideal for precise kitchen work.
Once you’ve sliced all your eggs, carefully scoop out the yolks using a small spoon. A grapefruit spoon works well for this if you want a little edge. Place the yolks into a mixing bowl, and breathe — you’re halfway to cute chick heaven.
Create a Creamy, Dreamy Filling
Now for the heart of the recipe: the yolk mixture. This is where you can play with flavors and textures. Start by mashing the yolks until they resemble fine breadcrumbs. You want them as smooth as possible before adding any mix-ins. Next, stir in mayonnaise or substitute Greek yogurt for a protein-packed version. A teaspoon of Dijon mustard adds a bit of tang, and a pinch of salt and cracked pepper balances everything.
This is also the time to taste and adjust. If you like your filling extra creamy, add a little more mayo or yogurt. Want a pop of flavor? A dash of paprika or garlic powder goes a long way. Mash and stir until the mixture is silky and pipable. For ultimate control and presentation, transfer the filling into a reusable piping bag like this one, which makes shaping your yolk swirls not only easier but tidier.
If you’re going for a plant-forward version, you can experiment with mashed avocado in place of mayo. It gives your chicks a soft green hue and adds those healthy omega fats.
Assemble with Style
It’s time to bring your chicks to life. Carefully pipe a generous swirl of yolk filling into the hollow base of each egg white. The goal is to slightly overfill, so it peaks out above the edges and gives your chick a rounded face. Use steady pressure and a spiral motion to make the swirl neat and uniform. If you don’t have a piping bag, a zip-top bag with the corner snipped will work in a pinch, but you’ll want to wipe the tip clean between eggs for a cleaner finish.
Once all your eggs are filled, place the tops you set aside back on at a slight angle. This creates the illusion of a little egg hat, like a shell that’s just cracked open. The tilt gives your chick a playful personality — like it’s peeking out into the world for the first time.
Add Eyes and Beaks (aka The Moment of Magic)
This is where the transformation happens. To create the chicks’ eyes, you can use whole black peppercorns or black sesame seeds. Peppercorns give more dimension, while sesame seeds create a softer, cuter vibe. Use tweezers or kitchen precision tongs to press them gently into the yolk mixture, spacing them evenly.
Next, cut tiny triangles from a peeled carrot. These will be your chick beaks. Use a sharp paring knife to shape them into even points, then press one beak into the yolk just below the eyes. Suddenly, you’re not looking at deviled eggs. You’re looking at a flock of wide-eyed baby chicks, ready to charm your guests.
You’ll find that each chick has its own tiny expression depending on how you angle the eyes or how much filling you used. That’s the joy. They don’t need to be perfect — just full of character.
Serve with Elegance
Presentation elevates everything, especially when your dish is this darling. Choose a white or pastel ceramic serving platter, or try an egg-shaped tray like this one that cradles each chick in place. You can add a bed of microgreens, curly parsley, or edible flowers beneath them for a soft spring look. Faux moss or a floral napkin underneath the tray also makes a Pinterest-worthy backdrop.
Place the platter in the center of your holiday table or buffet, and watch how people light up when they see it. There’s something about this dish that invites conversation, laughter, and even a few awws.
You can pair the chicks with other playful dishes — mini veggie cups, pastel macarons, or a sparkling spring mocktail in coupe glasses. Add a few bunny figurines nearby, and you’ve set the scene for a memory-making moment.
Make It Ahead Without Losing Freshness
One of the best parts about this recipe is how make-ahead friendly it is. You can boil and peel your eggs a day in advance and store them in the fridge in a sealed container lined with damp paper towels to prevent drying out. You can also prep your yolk filling, pipe it into a storage bag, and chill it until assembly time. Just remember to let the mixture sit at room temperature for 10 minutes before piping, so it softens slightly.
The carrot beaks and peppercorn eyes can be prepped and stored separately in tiny prep bowls. On serving day, all you’ll need is 20 minutes of peaceful assembly, and your chicks will be ready to hatch.
If you need to transport them, consider a locking lid egg carrier like this one that prevents tipping or sliding during travel. Line it with a bit of lettuce or paper towel to absorb any moisture and keep them snug.
Troubleshooting Tips and Tricks
If your yolks turn out crumbly or dry, try adding a teaspoon of warm water or a splash of vinegar to rehydrate the mixture. Mash again until smooth. If your whites wobble on the plate, you can slice a tiny bit off the bottom to give them a flat base — just be careful not to cut too deeply.
Should any eggs crack while peeling, don’t toss them. You can still fill and decorate them as “cracked chick” characters and place them in the back of your tray or enjoy them in the kitchen as a sneaky snack.
Keep a damp towel nearby while working to wipe your fingers and tools clean between steps. Clean hands make clean chicks.
Style Meets Wholesome Eating
Beyond the adorable presentation, these deviled eggs are a wholesome addition to your holiday menu. They’re naturally low in carbs and rich in protein, healthy fats, and micronutrients like vitamin D, choline, and selenium. They keep you feeling full and energized without the sugar crash that often comes with holiday treats.
Pair them with fresh seasonal sides like asparagus salad, herbed quinoa, or lemony roasted carrots. Add a pitcher of cucumber-mint water or sparkling elderflower lemonade for a refreshing balance.
You’ll feel good serving this dish to kids, grownups, and wellness-minded guests alike. It’s indulgent without being heavy. Sweet without sugar. And fun without fuss.
Snap and Share Your Creation
Don’t forget to take a few photos before your chicks disappear. Natural window light is your best friend here. Shoot with your phone in portrait mode to capture dimension, and try a few close-ups that show the texture of the yolk swirl or the sparkle in their little eyes.
A light backdrop like linen or butcher paper helps your chicks pop in photos. Add a spring bouquet or wooden board nearby to tie everything together. If you want to go full influencer, use a mini ring light and shoot from overhead with your phone on a tripod. You’ll have content ready for your Instagram feed or Pinterest board.
And trust us — people will ask for the recipe. Feel free to send them your blog post link, or better yet, tag them in a post and let the comments roll in.
Wrap-Up and Inspiration
Creating these Easter chick deviled eggs is more than following a recipe. It’s a celebration of play, creativity, and care. It’s about taking the time to shape something delightful, to lean into a moment of seasonal joy, and to offer it up on a platter like a little edible gift.
Whether you’re hosting a brunch, bringing a dish to share, or simply treating yourself to a festive kitchen moment, this project invites you to slow down and have a little fun. The result? A table full of smiles, a plate full of praise, and a new Easter tradition you’ll look forward to making year after year.
So grab your eggs, prep your beaks, and let your kitchen hatch a little magic this season. You’ve got everything you need — and the chicks are waiting.

Final Thoughts: Let Joy Take Center Stage
If there's one takeaway from creating these Easter chick deviled eggs, it's this — joy doesn’t have to be complicated. Sometimes, the most heartwarming holiday memories are born from the simplest ingredients, shaped with a little imagination and served with love.
This recipe isn’t just about adorable presentation or even the flavor (though let’s be honest, they taste divine). It’s about crafting something playful that reminds us of what the season stands for — new beginnings, lightness, and moments of pure delight shared around the table. These little chicks bring smiles before the first bite and linger as a sweet memory long after the plates are cleared.
Whether you’re using these for a family brunch, a Pinterest-worthy party spread, or a just-for-fun afternoon in the kitchen, I hope they bring as much joy to your heart as they do to your holiday table. Save the post, share it, or pin your finished flock for others to admire — and let this become part of your springtime tradition.
And if you loved this tutorial, don’t forget to explore other charming spring recipes, entertaining ideas, and feel-good styling tips right here on the blog. From my kitchen to yours — happy Easter, and happy creating.
To enrich your reading experience, I have curated a list of resources that will add depth and creativity to your blog post titled “Create Adorable Easter Chick Deviled Eggs for Your Holiday Table”:
Additionally, you can find visual inspiration and technique demonstrations in these videos:
“Deviled egg chicks: the delicious and fun Easter recipe!” by Cookist Wow.
“How to Make Easter Chick Deviled Eggs | Easter Recipes | Allrecipes.com” by Allrecipes.
“Easy Deviled Egg Chicks For Easter” for a quick and adorable result.
These resources will surely help you create a delightful Easter treat that’s both tasty and visually appealing! 🐣