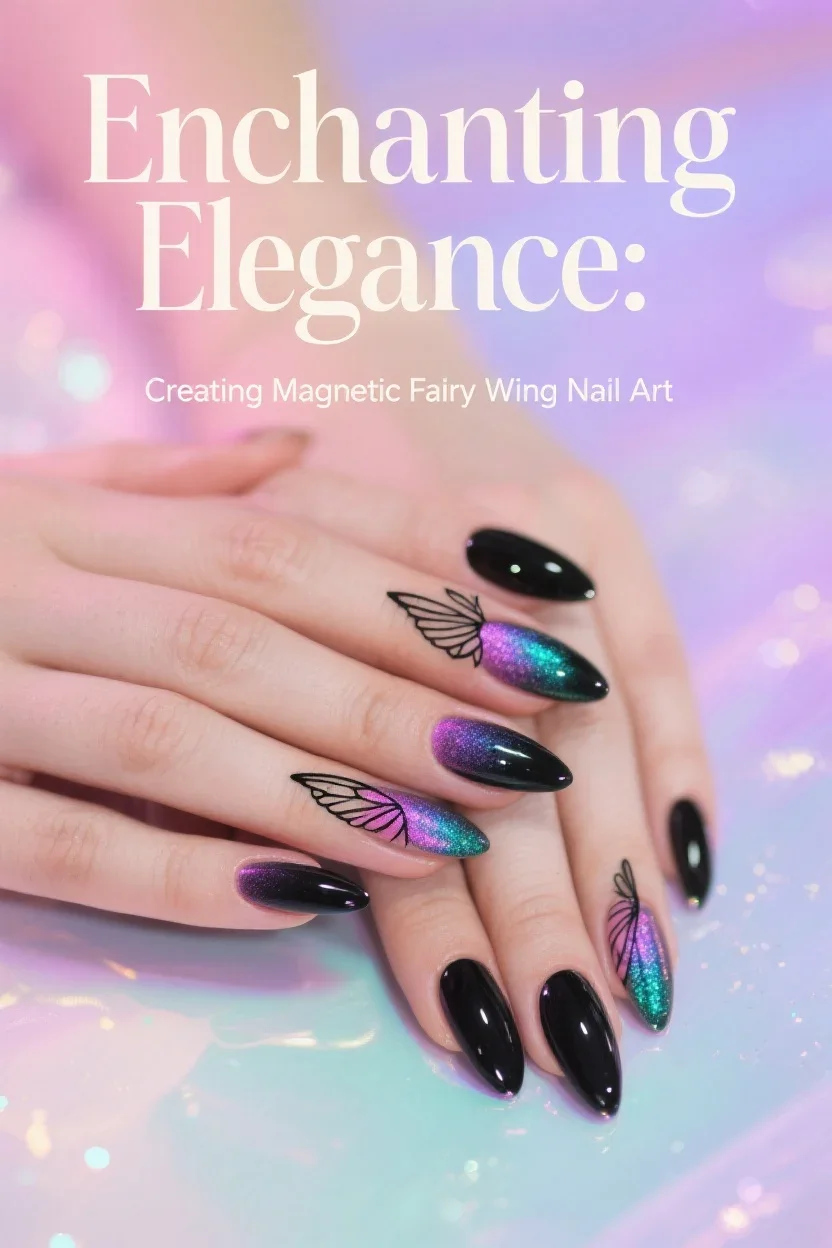
Enchanting Elegance: Creating Magnetic Fairy Wing Nail Art
Enchanting Elegance: The Allure of Fairy Wing Nail Art in a World Starved for Wonder
Beauty is rarely about surface alone. It is about sensation, suggestion, storytelling—the quiet spell cast in a single glance, a slow movement, the shimmer of something ethereal left unexplained. In an age of mass production and mirror filters, to captivate means to conjure. And what better enchantment than the iridescent sweep of fairy wings flickering at your fingertips?
Fairy wing nail art is not simply a trend. It is a mood. A visual fable. A refusal to be ordinary.
It blends shimmer with shadow, detail with daydream. Where other designs mimic, this one conjures. The look flirts with fantasy but lives in the real. It doesn’t scream sparkle—it breathes it, slowly, like light shifting through forest leaves. And while the aesthetic may recall storybook sylphs and glittering sprites, it also channels something undeniably modern: feminine power cloaked in subtle mystery.
This kind of magic is not child’s play. It’s deeply intentional.
Each brush stroke becomes a rune. Every layer of magnetic polish, a veil. The shape and direction of each vein, a choice. The result is more than pretty—it feels alive, fluttering just at the edge of perception, like a secret kept by nature herself.
The Evolution of Ethereal Nails
Nail art has long evolved from accessory to artistic statement. What began with glossy reds and moon manicures has spun outward into textured tapestries, celestial gradients, wearable landscapes. But fairy wing nails do something rare—they resist time.
Their elegance is not bound to a season or outfit. They move with the light, catching soft sun and twilight in equal measure. They’re wearable at a spring wedding or a midnight rooftop party. They work with a sundress or a leather jacket. Their chameleon effect doesn’t just reflect color—it reflects mood.
More importantly, they inspire a feeling. That’s the power of illusion-based nail designs. While neon trends and chrome phases rise and fall, fairy wings linger, like a memory you almost remember.
Why This Design Continues to Seduce
Much of the appeal lies in contrast. You have the rich, dark outline tracing delicate veins—like the perimeter of butterfly wings drawn by moonlight. Against it, you layer sheer iridescence, reflective magnetism, flashes of duochrome shimmer. It’s the marriage of structure and softness. Geometry and glow.
And unlike other ornate designs that feel loud, fairy wing nails whisper. They speak in glances, not shouts. They suggest. They flirt. They invite closer inspection. And they do it with grace.
In a digital world overrun with maximalism, this delicate design is rebellion dressed in elegance.
What’s more, the creation process is genuinely meditative. Laying down soft magnetic lines, fanning out veins with a fine liner brush, watching shimmer pool and shift—it’s as satisfying as it is hypnotic. Whether you’re painting your own set or watching a nail tech work their art, this is ritual beauty. A private spell cast in iridescent lacquer.
The Psychology of Fairy Aesthetics
From TikTok fairycore edits to cottage-inspired fragrance launches, there’s a collective hunger for the feminine mystique reimagined. Not the saccharine, pastel-coated fantasy of childhood—but a mature, artful version that leans dark and luminous at once.
Fairy wing nail art perfectly captures that duality. It is delicate but strong. Impossibly intricate yet wearable. Magical, but grounded in precision. In a way, it represents the modern woman’s aesthetic ethos—refusing to be boxed in.
This design is also hyper-personal. Each set tells a slightly different story depending on your color palette, vein pattern, and overlay technique. Some glow with jewel-toned magnetics. Others channel cool mist with translucent pearl. A few resemble rare moths at midnight, others look dipped in sunrise.
And unlike traditional florals or animal prints, this design taps into something older, something archetypal. Fairy wings trigger a deep mythic memory—the part of us that believes beauty and mystery go hand in hand.
Techniques That Turn Paint Into Spellwork
The fairy wing effect demands more than a pretty polish. It’s a composition of layers—one that mimics nature’s subtle structures with intention.
Most sets begin with a black or dark base to create that signature frame. Then comes the magnetic polish—those glimmering particles that bend and bloom when coaxed by a magnet wand. You layer in transparency with sheer pinks, violets, or duochromes to create depth. Finally, the defining feature: the veins. These are painted in black or white, and depending on your style, they can look like dragonfly wings, butterfly wings, or something otherworldly altogether.
It’s delicate work, but once you’ve got the rhythm, the results are nothing short of captivating. Even slight imperfections can enhance the handmade magic of the final look. These aren’t decals or stickers—they’re wearable art pieces, one-of-a-kind by design.
Who This Aesthetic Speaks To
Fairy wing nails don’t fit into a narrow lane. They’re not just for the whimsical or the glam. They’re for those who want to feel something.
They speak to romantics, to introverts, to artists and dreamers. But they also suit the sharp and strategic. The kind of woman who walks softly and still commands a room. She doesn’t need to broadcast power—she wears it, like glittering armor at her fingertips.
This design is a conversation starter. A form of self-expression. A soft rebellion against the sterile. A modern heirloom you can wear until it chips.
And best of all, it suits every skin tone. Because the beauty isn’t just in the base color—it’s in the interplay of light and motion. The more it moves, the more it reveals.
Choosing Your Wing Mood
If you’re doing your own set, the magic begins at the color selection stage. Think not just about what looks pretty, but what story you want your hands to tell.
Celestial Fairy: Navy base, silver magnetic shimmer, and icy white veins
Woodland Sprite: Olive base, copper or rust shimmer, with delicate black outlines
Frost Queen: Soft grey-lavender base, pearl magnet overlay, and ultra-thin white lines
Opal Muse: Pale pink base, rainbow shimmer magnetic, and subtle gold veining
Night Bloom: Deep plum base, magenta magnetic accent, and smoky purple lines
Each combination creates a mood. Whether you’re after soft and whimsical or bold and mysterious, there’s a version that will suit.
Magnetic Polishes: The Secret Weapon
What elevates fairy wing designs into mesmerizing territory is the use of magnetic polish. When applied while wet and manipulated with a magnet wand, the iron particles gather and create that signature glow—a sort of lit-from-within aura that no flat polish can match.
Use a cat-eye magnet to pull vertical beams of shimmer. Use a circular magnet to fan out the light like a halo. Or layer your magnetic polishes for a richer, dimensional depth that feels downright magical. The trick is to work quickly and deliberately. The magnet does its job while the polish is still tacky. Once it sets, the glow locks into place.
The result? Wings that truly shimmer in motion—like they’re ready to flutter.
Texture, Top Coat, and Final Touches
Once your veins are painted and the shimmer locked, the final topcoat seals the illusion. A glossy finish tends to mimic real insect wings—slick, almost wet-looking. But if you’re feeling moody, a soft matte can turn the whole set into dark fairy poetry.
Small crystal accents at the base of a nail or at intersections of veining can further amplify the look, as if your fingertips caught a few droplets of enchanted dew.
Consider finishing with a hint of cuticle shimmer oil. A subtle sparkle at the base of the nail draws the eye in, creating that layered luxury look.
Nail Shape Matters
Though you can apply the fairy wing effect to any nail shape, certain silhouettes enhance the illusion. Almond and stiletto nails provide that tapered curve that mimics real wings. Coffin shapes give the illusion a grounded base, perfect for bolder vein patterns. Oval nails soften the whole effect, making it a bit more wearable for minimalists.
What matters most is balance. Let the shape guide your vein direction. Follow the natural taper of the nail and create movement that feels organic.
A well-placed curve in a vein can mimic lift. A line angled just right can create the illusion of motion. The design should look as if it could unfurl and fly.
Why We Still Need Magic in Beauty
At its core, fairy wing nail art reminds us that beauty is not about perfection. It’s about seduction. Suggestion. It’s about offering a glimpse of something rare—something fragile and wild that doesn’t need to explain itself.
In a world chasing harder, louder, faster, fairy wing nails ask you to slow down and look closer. To appreciate a whisper in a sea of noise. They speak to the inner child who used to collect feathers and shiny rocks. They speak to the woman who is no longer afraid of being soft.
And perhaps most importantly, they speak to the artist in all of us—the part that still believes beauty should make us feel something deep and unexplainable.
So if your fingers have been craving something more than polish—something with soul, story, and shimmer—this is your design. Whether you’re painting them yourself or asking your nail tech for that iridescent touch, you’re not just wearing a trend.
You’re summoning wonder.
From here, you’ll learn exactly how to create the magnetic fairy wing look yourself. Every step is detailed so you can recreate the magic at home or communicate your vision clearly at the salon. Let’s bring your fingertips to life with shimmer, precision, and a whisper of enchantment.

Enchanting Elegance: Creating Magnetic Fairy Wing Nail Art
@glamartistryhub @Aistė Haas 🦋💕🧚🏻♀️✨ I felt like putting fairy wings on again, and I love this version even more 🥹 so dreamy and magical, with even more shifting colors to be mesmerized by 🫧 *products used are linked on my amzn in the bio _____ (*aff) #bluenails #pinknails #glitternails #sparklynails #butterflynails #springnails #nailinspo #nails #ombrenails cute nails , almond nails , nail art tutorial, pastel nails iridescent #fairycore #fairynails #pastelnails ♬ we can't be friends (wait for your love) - Abra Salem
The Step-by-Step Guide to Magnetic Fairy Wing Nail Art
Fairy wing nail art is where technique meets fantasy, and every layer builds a world. To master this look is to orchestrate light, motion, and texture in a composition that feels alive. The secret lies in your process. Here’s a detailed breakdown of how to transform bare nails into luminous, ethereal wings—whether you're working on a client, a friend, or yourself.
Step 1: Shape and Prepare the Nail
Begin by gently filing the nails into your desired shape. Almond and stiletto nails tend to enhance the wing illusion best, as they echo the natural taper of insect wings. However, oval and coffin shapes also work beautifully depending on the style of veining you plan to draw.
Push back cuticles carefully and clean up any overgrowth with a soft cuticle remover or pusher. Buff the nail plate lightly to remove shine and dehydrate the surface with a prep solution or isopropyl alcohol. This ensures adhesion and longevity.
If you are using gel polish, apply a base coat and cure under a lamp. For regular polish, proceed directly to the base color.
Step 2: Create a Deep Base
A strong base color anchors the entire design. Most fairy wing looks start with a dark foundation—usually black or deep charcoal—because this provides contrast against the shimmer of magnetic polish and helps the iridescent effects appear more dramatic.
Apply one or two coats of the black gel polish or lacquer, depending on opacity. If using gel, cure after each layer. The base should be smooth and even. Any patchiness will show through later.
Optional twist: If you want a softer fairy aesthetic, experiment with a navy, moss green, or deep aubergine base. These subtle shifts in color temperature will affect the final glow in mesmerizing ways.
Step 3: Apply the Magnetic Polish
This is where the magic begins.
Choose a magnetic polish with shimmering iron particles that shift when exposed to a magnet. Most cat-eye polishes or specialized duochrome magnetics will work. You’ll need a magnet wand designed for nail use—some come with both linear and circular heads.
Apply a generous but controlled layer of magnetic polish to one nail at a time. Do not let it dry or cure yet.
Immediately after applying, hover the magnet over the nail. Keep it about 5mm away and hold it steady for 10 to 20 seconds. Watch the shimmer pull and bloom beneath the surface. The direction you hold the magnet determines the light path—vertical lines create a feline glow, diagonal placements give winged movement, and circular magnets create glowing focal points.
Once you’re satisfied with the shift, cure (for gel) or let dry (for lacquer).
Repeat this process one nail at a time to maintain wet polish responsiveness.
Tip: For a layered wing effect, you can apply two different magnetic polishes and manipulate each one with the magnet before layering the next. This creates incredible depth and movement.
Step 4: Add a Sheer Color Veil (Optional)
Once your magnetic shimmer has been set, consider adding a semi-transparent polish layer. This step isn’t mandatory but can help blend the light path and add an ethereal veil over the shimmer.
Choose a sheer jelly shade—soft pink, lilac, teal, or pearl—and sweep it across the nail in a thin layer. It should tint the existing shimmer without covering it. Cure or dry accordingly.
This layer mimics the delicacy of real wings, adding that subtle opalescent glow that seems to dance beneath the surface. It’s especially effective if your magnetic polish leaned cool or silver and you want to add warmth or complexity.
Step 5: Paint the Wing Veins
Now comes the most defining step of the design: the veins.
Using a fine detail brush and black or white gel paint (or highly pigmented nail art polish), begin painting delicate vein lines across the nail. These lines mimic the organic architecture of insect or butterfly wings.
Start at one corner of the nail near the cuticle and fan outward. Veins can arc gently, fork at tips, or mirror each other like stained glass. Think of them like elegant rivers that divide the shimmer. Keep your hand steady and your strokes intentional. If one line feels too thick, balance it by echoing the stroke elsewhere.
The number and placement of veins should follow the natural curve of the nail. For a balanced set, vary the angle and complexity between nails—some can have a dominant central vein with minimal offshoots, while others can resemble full-wing patterns.
Cure your line work thoroughly if using gel. If you’re using polish, let it dry fully before moving on.
Optional: Add a drop shadow to one side of the veins with a diluted darker color. This increases dimension and makes the veins feel slightly raised or luminous depending on your desired look.
Step 6: Add Accent Detailing
At this stage, your wings are nearly ready to fly—but a few extra touches will elevate the design from beautiful to spellbinding.
Consider placing a small crystal or metallic dot at the base of the nail or at key intersections of the wing lines. These mimic natural dew or magical spores and instantly enhance the enchanted look.
You can also use a sheer glitter glaze or tiny flecks of holographic foil sealed under topcoat. Keep it minimal—too much shimmer can overwhelm the structure you’ve built.
Another idea: Use a sheer chrome powder pressed into the background (avoiding the veins) before your final topcoat. This creates a diffused gleam effect that mimics wings catching the light mid-flutter.
Step 7: Seal With a Topcoat
Finish with a high-quality topcoat that preserves all the delicate work beneath. Most fairy wing nails benefit from a glossy topcoat, as it mirrors the slick sheen of real wings, giving them a soft wet look.
However, if you want a more gothic fairy or dark forest vibe, a velvet matte topcoat can completely transform the mood of the design. Try it on a single accent nail to compare before committing to the full set.
Apply evenly, making sure to float the brush over the veins to avoid streaking the details. Cure or dry fully.
If you used embellishments or crystals, double-seal them or use a gel builder to anchor them for added security.
Step 8: Clean Up and Hydrate
Once the design is sealed and dry, gently clean up the sidewalls and cuticles with a soft brush or angled stick dipped in remover. Then nourish the surrounding skin with a cuticle oil or shimmer oil.
Look at your nails in various lighting. Natural daylight, soft indoor light, and flash all reveal different aspects of the design. This is the mark of a successful fairy wing set—it moves with its own hidden rhythm.
Step 9: Maintenance and Longevity
To keep your fairy wings looking their best:
Avoid harsh chemicals or acetone-based products
Reapply topcoat every 5 to 7 days to preserve shine and lock in details
Wear gloves when doing household cleaning or washing dishes
Use a non-drying hand cream daily to maintain skin contrast around the nail bed
If you’re using press-ons or soft gel tips, you can recreate the design ahead of time and glue them on as needed. This is especially helpful if you want the fairy look for a weekend getaway, shoot, or festival without committing to long-term wear.
Troubleshooting Tips
Shimmer won’t move?
Make sure your magnetic polish is fresh and hasn’t settled or dried out. Also ensure the magnet is held close enough and immediately after applying the polish.
Veins look shaky?
Try resting your painting hand on a stable surface and work under a magnifying lamp if needed. Practice on tips before doing it live.
Design looks too busy?
Skip the sheer overlay or simplify your vein lines. Less is more when you want the shimmer to be the star.
Crystals not sticking?
Use a thicker builder gel dot beneath them and cure with pressure. Topcoat around but not over rhinestones.
With patience and precision, magnetic fairy wing nail art becomes less of a project and more of a ritual. Each set is a tiny piece of personal mythmaking, capturing a flicker of light, a hint of nature’s geometry, and a whisper of something untamed.
Whether you're crafting this design for everyday enchantment or saving it for a special spellbinding moment, this technique turns your hands into art. Every movement becomes a flutter. Every flicker of shimmer, a message only you can send.
And just like the wings they mimic—these nails are never static. They live. They move. They shine when you do.

Enchanting Elegance: Creating Magnetic Fairy Wing Nail Art
When all is said and done, magnetic fairy wing nail art is more than a technique—it’s a manifestation. You’re not just painting polish onto nails. You’re crafting illusions, translating breathless beauty into wearable enchantment. Each stroke, each shimmer, each barely-there vein becomes part of a larger story—a visual whisper that dances between fantasy and presence.
In a world rushing toward convenience and automation, this design is a deliberate act of slow beauty. It demands attention. It invites imagination. And when done well, it leaves behind a trace of magic that lingers long after the light shifts. Whether you wear these nails to a moonlit garden party or simply to elevate your morning coffee ritual, they will pull glances, spark questions, and most importantly, remind you of your own ability to create wonder from pigment and patience.
So go ahead. Turn your fingertips into a myth. Let them flutter, shimmer, and speak in a language only the beautiful know.
Dear readers, if you’re ready to immerse yourselves in the enchanting world of fairy wing nail art, I’ve curated a delightful list of high-quality blog posts and resources. These magical sources will inspire your creativity and elevate your nail game. Let’s flutter into the realm of whimsy and elegance:
Whimsical Fairy Nails: Explore trendy fairy core nails that blend chrome tips with floral and wing charms. Perfect for spring, these manicures are magical and utterly chic! 🌸✨
Pretty Fairycore Nails: Dive into a collection of purple, pink, and glittery fairycore nails. From butterfly motifs to shimmering fairy wings, these designs are fit for ethereal beings. 🦋🌟
Enchanting Fairy Nails: Celebrate the delicate beauty of winged creatures with intricate nail designs. Dragonflies, butterflies, and fairies come alive on your fingertips. Let your imagination take flight! 🧚♀️💫
Remember, each link holds a treasure trove of inspiration. Happy nail art adventures!