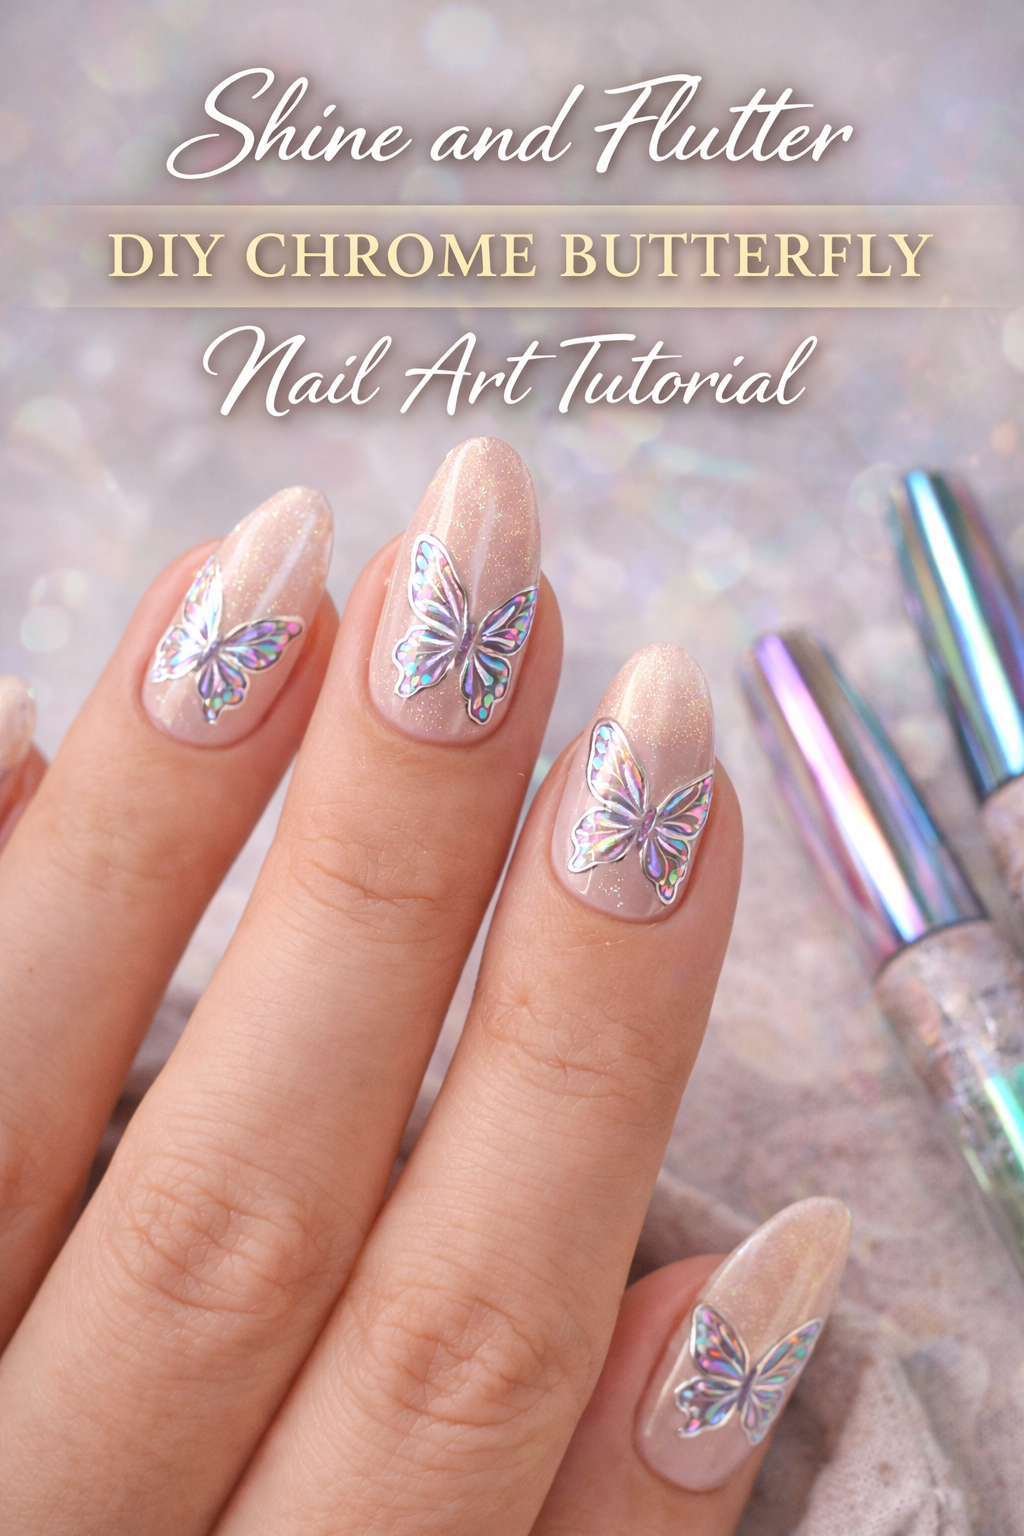
DIY Chrome Butterfly Nail Art Tutorial

Butterfly Wings and Chrome Dreams: The Rise of a Nail Art Revolution
The butterfly has always been a symbol of transformation, delicacy, and beauty—but in the hands of the modern beauty visionary, it becomes something more. It becomes chrome. It becomes holographic. It becomes a statement that catches light from every angle and turns fingers into wings. Welcome to the chrome butterfly nail art revolution, where nature’s most elegant motif is reimagined through a bold, futuristic lens.
In a world where trends can vanish overnight, some designs carve out timeless appeal by evolving with the moment. The chrome butterfly nail is one of those rare creatures—equal parts nostalgic and cutting-edge, playful and seductive. It channels the grace of a monarch in flight and the shimmer of metal under stage lights. It is romantic. It is rebellious. It is everything all at once.
But how did we get here?
Let’s trace the shimmer trail.
A Brief Flight Through Nail Art History
Nail art has gone through countless evolutions. From Cleopatra’s henna-stained fingertips to the pearl-tipped manicures of the 1920s, from ‘90s French tips to today’s press-on maximalism, our nails have always told stories. They signal wealth, creativity, mood, and identity. And when gel technology entered the mainstream, the canvas grew more daring.
Butterflies entered the chat in a major way during the Y2K resurgence. Suddenly, we saw rhinestone butterfly clips in hair, mesh butterfly prints on tops, and butterfly motifs dancing across acrylics. But this time, in the chrome era, butterflies aren’t soft—they’re armored. Metallic outlines, iridescent wings, and futuristic finishes have elevated this nostalgic design into something spectacularly current.
The Irresistible Allure of Chrome
Chrome nails burst onto the scene like a pop star’s entrance. They were not shy. They were not subtle. With their liquid metal sheen, they gave fingertips the power of mirrors, making every movement feel like a light show. Celebrities like Beyoncé, Dua Lipa, and Lizzo have flaunted high-shine chromes on the red carpet and in music videos, solidifying their place as a trend that glows far beyond the salon.
Chrome finishes play with light in a way that makes them feel alive. Add butterflies—symbols of flight, change, and freedom—and you’ve got a pairing that’s poetic and powerful.
What makes chrome butterfly nails especially captivating is the layered contradiction. Butterflies are soft and organic. Chrome is hard and reflective. Together, they evoke the contrast of softness encased in strength—like femininity wrapped in armor.
Why Butterfly Nail Art Still Reigns
Butterflies have evolved in the beauty space for good reason. Their shapes are endlessly customizable. Their symbolism appeals to personal growth, spiritual rebirth, and transformation. Their wings make a perfect template for gradient, shimmer, and outline effects.
On nails, butterflies give designers the chance to tell a story—whether it’s a single delicate wing stretching across two nails, or a full flutter of creatures scattered across each fingertip.
What sets chrome butterflies apart is their duality: the softness of the motif with the edginess of the finish. This balance is the secret to their staying power. They don’t just trend—they reinvent.
Who is This Look For?
You might think this design is only for the bold, but that’s the beauty of chrome butterflies. They’re surprisingly versatile. A neutral-toned base with a silver chrome butterfly detail can be subtle enough for an elegant evening, while an ombré pastel base with vivid multichrome butterfly outlines screams festival chic.
This look works across nail lengths and shapes—from short square gels to extra-long coffin tips. Whether you’re a minimalist who wants one feature nail or a maximalist building a garden party on every fingertip, this style is adaptable to your vibe.
It’s not about fitting in. It’s about expressing transformation—on your terms.
Choosing Your Butterfly Aesthetic
The modern chrome butterfly isn’t a single design—it’s a genre. Here are just a few aesthetic approaches to choose from:
1. Futuristic Fairycore: Think translucent jelly nails with chrome butterfly accents. Add some floating glitter or tiny gems for extra dreaminess.
2. Opulent Metallics: Go full-on glam with black gel nails and thick silver chrome butterflies outlined in white for high contrast. Accent with rhinestones.
3. Pastel Fade with Wings: Use a soft ombré base in lilac, blush, or mint and place delicate chrome butterflies in unexpected orientations. Let them look like they’re fluttering mid-flight.
4. Neon Pop: Electric colors plus chrome decals make for a look that demands attention. Perfect for parties, concerts, or content shoots.
5. Gothic Romantic: A deep plum or navy base with dark chrome butterflies trimmed in gold creates a mysterious, seductive finish.
6. French Twist: Upgrade your French tips with mini butterflies perched near the cuticle or outer edge in a matching chrome shade.
This level of creativity is why the design has such an enduring life. The butterfly is just the beginning. The finish, the placement, the shape—those are your tools for reinvention.
Nail Tools and Materials You’ll Want to Have
Before diving into a chrome butterfly design, make sure your nail kit is stocked with the essentials. Depending on whether you’re doing press-ons, gel extensions, or natural nails, you’ll want:
Chrome powder (silver, gold, rose, or holographic)
Silicone applicator or eyeshadow brush for chrome powder
UV/LED lamp (for gel polish curing)
No-wipe top coat (a must for chrome application)
Fine detail nail art brush
Butterfly nail decals or stamping plates (or hand-paint if you're skilled)
Base coat
Gel or traditional nail polish in your chosen colors
Tweezers (for decal placement)
Nail cleanser and prep tools
Optional enhancements:
Rhinestones or caviar beads
Nail glue (if adding charms)
Nail tape or stencils (for precision)
Nail buffer and file for perfect prep
Having these tools ready means your creative process won’t be interrupted by hunting for supplies. The best results come when you're relaxed and in flow.
Getting Into the Design Mindset
Creating nail art is more than painting—it's storytelling. Every color choice, shimmer, and curve of your butterfly wing says something. So take your time with it. Play some music. Light a candle. Treat it like a ritual, not a task.
You are not just doing your nails. You’re creating a transformation on ten tiny canvases.
Ask yourself: Are you feeling bold or soft? Do you want people to notice your nails from across the room or only when they catch the light just right? Let your mood shape your design.
You can even use inspiration boards—Pinterest is packed with chrome butterfly references, and so is TikTok if you want a dose of live process videos.
But always add your spin. That’s the difference between imitation and art.
Tips for Beginners
If you’re new to chrome or butterfly designs, start simple:
Use a solid base color and apply chrome powder only to a butterfly decal.
Or use butterfly stickers on a chrome base for reverse contrast.
Try one accent nail per hand to build confidence.
The great thing about chrome is how forgiving it is—its shine covers up a lot of small mistakes. And butterflies, even when a bit asymmetrical, still look ethereal.
Perfection is not required. But care and creativity are.
When to Wear Chrome Butterfly Nails
While there’s no wrong time to rock a set of chrome butterfly nails, some occasions truly amplify their magic:
Weddings: As a guest or bride, soft chrome butterflies pair beautifully with lace or floral gowns.
Vacations: Their tropical and airy vibe suits sunlit destinations.
Festivals: Paired with holographic makeup or rhinestone face gems, they complete the look.
Photoshoots: Their dimensional shine adds drama in close-ups.
Seasonal transitions: Spring and autumn are especially symbolic times to wear butterflies.
Life milestones: New job? Ending a relationship? Starting fresh? Wear them like an emblem of metamorphosis.
Let them mark your moment. Let your nails say something you haven’t yet put into words.
From Trend to Ritual
There’s a reason so many people are turning to elaborate nail art not just for aesthetics, but as a ritual. It’s personal time. It’s reflection. It’s mood setting. And in a fast-moving world, it’s one of the few acts of slow, deliberate self-expression we still get to claim.
Chrome butterfly nails are not just pretty. They’re powerful. They give you the permission to show up a little shinier, a little more evolved, and wholly transformed.
They are your invitation to fly.

DIY Chrome Butterfly Nail Art Tutorial
Chrome Butterfly #nails #nailart https://t.co/zGFyampKv1 pic.twitter.com/DcaO4IW5Xw
— Glam Artistry Hub (@glamartistryhub) March 30, 2024
Step-by-Step DIY Chrome Butterfly Nail Art Tutorial
Create breathtaking chrome butterfly nails from the comfort of home. Here’s your comprehensive guide to achieving this dreamy, high-shine, fluttering masterpiece.
Step 1: Gather Your Materials Like a Pro
Before you begin, prepare your nail space like it’s your studio. Good lighting. Clean tools. A clear table. You want to feel like a beauty technician in your own private salon.
You will need:
Nail file and buffer
Cuticle pusher and nipper
Lint-free wipes
Nail cleanser or rubbing alcohol
Base coat (gel or traditional)
Gel nail polish in your base shade of choice
No-wipe gel top coat (for chrome application)
Chrome powder (silver, rose gold, holographic, or color-shifting)
Sponge applicator or silicone tool
Butterfly nail decals, stickers, stamping tools, or art brushes
Tweezers
UV/LED lamp (if using gel)
Optional: Rhinestones, nail glue, detailing brush, fine liner, or top sealant
Create a mini mise en place—a layout of your materials like a nail chef. Every product in reach. Every brush clean. Every chrome sparkle ready to shine.
Step 2: Prep Your Nails for Perfection
Clean, shaped, and prepped nails are everything. No design will look good if the foundation is weak. Here’s how to give your nails the blank canvas they deserve.
File your nails to your desired shape—square, almond, coffin, stiletto. Chrome butterfly looks stunning on every shape. Just keep them even and smooth.
Gently push back and trim your cuticles. Clean edges create a more polished look.
Buff the surface lightly to remove shine. This helps polish or gel adhere.
Wipe nails with cleanser or alcohol to remove oils and dust.
Apply a base coat. Cure under a UV/LED lamp for 30–60 seconds (if gel). Let dry if using regular polish.
Your nails are now primed, smoothed, and prepped for magic.
Step 3: Choose and Apply Your Base Color
Your base shade sets the entire tone. Here are some winning combinations:
Pale pink + silver chrome butterflies = soft and romantic
Black gel + holographic butterflies = fierce and futuristic
Nude base + rose gold chrome = bridal elegance
Lavender ombré + color-shifting butterflies = dreamy and bold
Apply two thin coats of your chosen base color. Cure each layer under the lamp or let dry naturally if using polish. Smooth and even application is key.
If you’re doing a jelly or sheer look, one coat may be enough. Let your color choice guide the mood—mystical, edgy, sweet, cosmic.
Step 4: Seal It With a No-Wipe Top Coat
Here’s the chrome secret: you need a no-wipe top coat.
Why? Because chrome powder won’t stick to sticky top coats. It only clings to smooth, cured finishes.
Apply a thin layer of no-wipe top coat over your colored base. Cure it fully under your lamp—typically 30 to 60 seconds.
Do not touch the surface afterward. No oils. No dust. This surface is your chrome playground.
Step 5: Apply Chrome Powder Like a Goddess
Now for the magic moment. Chrome transforms a simple manicure into something show-stopping. Take your sponge applicator or silicone tool and gently rub your chrome powder onto the nail surface.
Start light. Use circular motions and work from cuticle to tip. Watch your nails become metallic, reflective, and mirror-bright.
Tips:
Use a soft buffing motion, not a dab
Layer for intensity, especially with duochrome or rainbow pigments
Try ombré effects by concentrating powder on one end of the nail
Blend two chrome powders together for custom color shifts
When you’re satisfied with the chrome finish, use a fluffy brush to remove excess powder around the nail beds.
Step 6: Lock in the Shine
To protect the chrome and ensure longevity:
Apply one more layer of no-wipe top coat over the chrome.
Cap the edges by brushing across the tips.
Cure under the lamp completely.
If you’re using traditional polish and chrome pigment over tacky polish (not typical but possible), make sure to seal with a long-lasting top coat to reduce chipping.
Your nails should now be glowing like liquid metal. The butterflies come next.
Step 7: Choose Your Butterfly Design Style
This is where personal creativity takes flight. You can go minimal or maximal, detailed or abstract. You’re the artist now.
Option 1: Butterfly Decals or Stickers
Perfect for beginners or when you want crisp outlines.
Use tweezers to carefully lift the decal.
Place it precisely where you want it—corner, center, tip, or across two nails.
Press gently and smooth down with a silicone tool or your finger.
Seal with a thin layer of top coat. Cure again if using gel.
Option 2: Butterfly Stamping Plates
Use with black or metallic stamping polish for intricate details.
Apply polish to the stamping plate design.
Scrape off excess and lift with the stamper.
Roll gently onto the nail.
Seal with top coat once dry or cured.
Option 3: Hand-Painted Butterflies
Advanced and artistic.
Use a fine liner brush and black or white gel paint.
Outline wings, body, and antennae in delicate strokes.
Fill in with metallic or chrome detail.
Add shimmer or dot accents for realism.
Cure fully and seal.
Whichever method you choose, always add a final sealing layer of top coat. This keeps your butterfly work preserved and brilliant.
Step 8: Add Accents (Optional but Gorgeous)
Ready to go further? Here’s where you elevate chrome butterflies into couture territory.
Rhinestones at the center of each butterfly or scattered like dewdrops
Microbeads along wing edges for a 3D finish
Foil flakes behind or near the butterfly for texture
Glitter gradients behind the wing patterns
Aurora pigment dusting over the entire nail for a fairy-like glow
These extras are what take your butterfly nails from “cute” to “editorial.” Just make sure to secure them with nail glue or thick gel top coat, and always cure thoroughly.
Step 9: Clean Up and Hydrate
Once your masterpiece is finished and fully cured:
Use alcohol or cleanser on a lint-free wipe to remove any top coat tackiness (if using a wipe-off top coat)
Gently clean up the edges with a flat brush dipped in acetone for crisp borders
Moisturize your cuticles with oil or balm
Stretch your fingers. Admire them in the light. Photograph them for Pinterest. Post them with pride.
Chrome reflects light from every angle. Step into the sun or catch golden hour lighting to make your nails truly glow.
Step 10: Maintenance and Longevity Tips
To keep your butterfly beauties looking flawless:
Avoid water exposure for 1 hour after curing
Use cuticle oil daily to prevent cracking
Wear gloves when cleaning or doing dishes
Reapply top coat every 5–7 days if using polish (gel sets last longer)
Fix minor chips with a small dab of chrome powder and top coat
If one butterfly decal starts to lift, press it down with a little gel and re-cure. These nails are durable—but like all art, they deserve care.
Bonus: Butterfly Nail Variations to Try Next
Once you’ve mastered this design, keep experimenting. Here are some evolution ideas:
Chrome Butterflies on Matte Base: Contrast soft matte polish with reflective decals
Mini Butterflies at the Tips: Create a fluttering French tip twist
Negative Space Butterflies: Use stencils to leave empty wing shapes against chrome
Reverse Chrome: Chrome only the butterfly, not the background
Butterfly Wing Nail Series: Paint half a wing on each nail for a full flutter across your hand
This design is only the beginning. Chrome butterflies can be reimagined again and again with color, texture, and creativity.
Final Thoughts
You didn’t just paint your nails—you created tiny, wearable works of art. Every detail from your chrome powder application to the delicate symmetry of your butterflies was a statement of transformation.
You transformed your hands. You took time for beauty. You made a flutter feel like armor.
So flaunt your chrome butterflies. Let them shimmer in sunlight and under moonlight. Let them catch compliments from strangers. Let them remind you what it means to feel powerful and soft at the same time.
Your wings are showing. And they’re stunning.

DIY Chrome Butterfly Nail Art Tutorial
And Just Like That, You’ve Grown Wings
This isn't just nail art. It's personal alchemy. You took soft, fluttering symbolism and cast it in chrome. You turned a delicate wing into a defiant gleam. You gave your fingertips armor and elegance in the same breath.
The beauty of chrome butterfly nails is how they exist between two worlds—natural and fantastical, soft and sharp, nostalgic and futuristic. They don’t whisper. They gleam. They tell stories without saying a word.
Maybe you started this tutorial looking for a cute weekend manicure. But what you created? That was transformation. That was art. That was rebellion dipped in glitter.
So go ahead. Tap your nails on the glass just a little louder. Take the photo. Flash the light. Let someone ask, “Where did you get those done?” And smile knowing you did it yourself.
You didn’t just do your nails today. You made a moment. And the next time life asks who you are becoming, hold up your hands and show them—
You already have wings.
As you embark on your journey to create the stunning Chrome Butterfly nail art, we’ve compiled a comprehensive list of resources to enrich your experience. These resources will provide you with additional insights, tips, and inspiration to enhance your DIY nail art skills. Whether you’re a beginner or an experienced nail artist, these resources are sure to add value to your creative process.
Acrylic Nails Guide: Learn how to apply acrylic nails with a step-by-step guide for beginners.
Nail Blog Ideas: Explore a variety of nail supplies and guidance for your nail art projects.
Easy Nail Art Tutorials: Check out popular nail art tutorials and ideas suitable for beginners.
These resources will guide you through different techniques and styles, helping you to master the art of nail design. Remember, practice makes perfect, and with these resources at your fingertips, you’re well on your way to becoming a nail art aficionado. Enjoy the process and let your creativity shine!