Elegant Half-Up Bow Hairstyle Tutorial
The Art of the Half-Up Bow: A Symbol of Style, Femininity, and Playful Grace
In a world where fashion and beauty trends come and go in the blink of an eye, a hairstyle that manages to feel fresh, timeless, and unmistakably charming deserves a place of honor in any beauty lover’s repertoire. Enter the half-up bow—a hairstyle that blends structure and softness, elegance and ease. It is more than a way to pull your hair back. It is a visual wink, a ribbon made entirely of your own hair, a creative expression that says you're polished but fun, put-together but still ready to play.
The half-up bow is a modern classic. Not because it has been around for decades, but because it borrows the right kind of nostalgia. There’s a whisper of childhood charm wrapped in grown-woman confidence. Unlike some overly elaborate updos or cascading curls that demand a team of stylists and a full afternoon, this style walks the sweet spot between effort and impact. It is ideal for weddings, brunches, date nights, photoshoots, or just a day when you want your reflection to give you butterflies.
But here’s the thing—it looks far more difficult than it is.
With the right technique, a few bobby pins, and some artful teasing, the half-up bow can go from Pinterest board dream to real-world reality in less time than it takes to brew your second cup of coffee. This post is designed to walk you through everything you need to master the look, from choosing the right brush to learning how to give the bow its perfect volume. Whether your hair is straight, wavy, or full of coils, this tutorial will meet you where you are and elevate your natural texture into something a little bit magical.
The Psychology of the Bow
Before diving into steps and tools, let’s talk about the bow itself. Why does it hold such timeless appeal?
A bow is not just decoration. It represents softness and femininity, but also intention. In the world of body language and aesthetics, bows signal care—someone took the time to wrap this up, to tie it neatly. The half-up bow hairstyle plays into this same psychology. You didn’t just toss your hair into a ponytail. You sculpted a silhouette. You shaped an impression. You said something without needing to speak.
It’s also deeply visual. The symmetry of the bow, the curvature of the loops, the way the tails blend into cascading locks—it gives the eye something to dance around. People notice. They ask questions. They smile. And maybe most importantly, you feel a little more graceful for wearing it.
Why the Half-Up Bow Belongs in Your Beauty Routine
There’s a reason this style has taken off on social media platforms and become a go-to for influencers and stylists alike. It’s versatile. You can adapt the half-up bow to suit a dozen moods and settings:
Romantic with loose tendrils and soft waves
Professional with a polished finish and tucked edges
Playful with bubble tails and curled ends
Edgy with slicked sides and high contrast volume
It also works beautifully on medium to long hair and plays well with both thick and fine textures. Add in a few hair accessories—a pearl pin, a rhinestone clip, or even a touch of glitter spray—and it transforms completely.
And perhaps best of all, once you learn it, it becomes second nature. One of those beauty tricks you pull out when you want to feel just a little more radiant, whether for a special event or just because you deserve it.
Common Mistakes and How to Avoid Them
Let’s talk real-world pitfalls. Because while the half-up bow looks delicate, you don’t want it falling apart halfway through the day. There are a few common missteps beginners run into, but they’re all fixable.
Mistake 1: Not prepping the hair properly.
Hair that’s too soft or freshly washed often refuses to hold shape. To avoid this, use a texturizing spray or dry shampoo to add grit and volume before you begin. A little teasing at the crown never hurts either.
Mistake 2: Overdoing the hairspray too early.
Set the style after the bow is shaped. Spraying as you go can stiffen the hair and make shaping the loops more difficult.
Mistake 3: Forgetting symmetry.
The visual charm of the half-up bow is its balance. Work in front of a mirror and use visual reference points—ear height, center parting—to keep your loops even.
Mistake 4: Not pinning securely.
Use bobby pins that match your hair color and insert them in a crisscross pattern to anchor the bow base tightly. If your hair is very thick or slippery, a small clear elastic can help provide a foundation before you build the bow around it.
Mistake 5: Making it too perfect.
Sometimes the charm lies in a touch of asymmetry or looseness. Let some pieces fall. Allow the bow to have movement. It makes the look feel romantic and real, rather than stiff and overly rehearsed.
Choosing the Right Tools and Products
You don’t need an entire salon setup to pull this off, but having the right tools makes a difference. Here’s a breakdown of the essentials:
Tail comb: For clean parting and teasing the roots
Medium-hold hairspray: To secure without stiffness
Bobby pins: Always choose a finish that blends into your hair
Clear elastics: Especially helpful if your hair is heavy or layered
Texturizing spray or dry shampoo: Adds hold and shape
Curling iron or wand (optional): If you want to add wave or curl texture for the bottom half
Optional additions: shine spray, hair glitter, decorative pins, or bow clips for extra flair.
Pairing the Half-Up Bow with Fashion and Makeup
The half-up bow is adaptable not only in structure but also in tone. Depending on what you pair it with, it becomes a different kind of statement.
Outfit pairings:
This hairstyle shines with off-the-shoulder tops, backless dresses, and detailed collars. It draws attention to your neckline and shoulders, so play with silhouettes that complement that framing.Makeup matchups:
Go for flushed cheeks and a luminous base for a soft, feminine look. Or lean into a winged liner and nude lip for a more editorial vibe. A dewy glow with light-catching highlight on the cheekbones pairs beautifully with the whimsical bow silhouette.Jewelry and accessories:
Pearl studs, dainty chains, or a collar necklace can all elevate the look. Avoid heavy earrings that distract from the bow’s charm.
Hair Texture Tips
Straight Hair:
Use a curling wand to add wave or bend before shaping your bow. This adds softness and helps the bow look more voluminous.
Wavy Hair:
Embrace your texture. Define waves with a lightweight mousse or curl cream before styling. Don’t over-brush. Let it breathe.
Curly Hair:
Define curls first, then select a few strands to shape into the bow. A small bow works better with thicker curls. Use edge control or gel if needed to sleek the sides.
Fine Hair:
Backcomb at the crown and use dry shampoo for volume. You can also wrap extensions into the bow itself if you want added fullness.
When and Where to Wear It
There are no rules, but if you’re wondering where the half-up bow fits into your life, here are some ideas:
A first date where you want to feel confident but approachable
A weekend brunch with friends
A low-key engagement party or bridal shower
A casual office look that still reads polished
An afternoon picnic, a spring concert, a birthday dinner, or just a mood
It’s the kind of hairstyle that whispers “I tried” without screaming “I spent an hour doing this.”
A Note on Hair Confidence
Hair is often one of the first things people notice about you, but more importantly, it’s something you carry with you all day. When your hair feels right, you feel more in sync with yourself. It’s not about chasing perfection. It’s about allowing your external appearance to reflect how you want to feel inside.
The half-up bow lets you tap into something playful, elegant, and effortlessly pretty. And that emotional impact lingers far longer than the hairstyle itself.
So if you’ve been hunting for a hairstyle that’s equal parts charming and chic, that doesn’t require a salon appointment or a TikTok dance degree to master, this one’s for you. The half-up bow is a signature move that feels personal, creative, and entirely yours.
It’s time to learn the steps, shape the bow, and fall just a little more in love with your own reflection.
And with that, let’s walk through exactly how to create the perfect half-up bow hairstyle—from parting your hair to securing that final loop. Each step is broken down with care, giving you the power to recreate this look with confidence and ease.
Ask ChatGPT

Elegant Half-Up Bow Hairstyle Tutorial
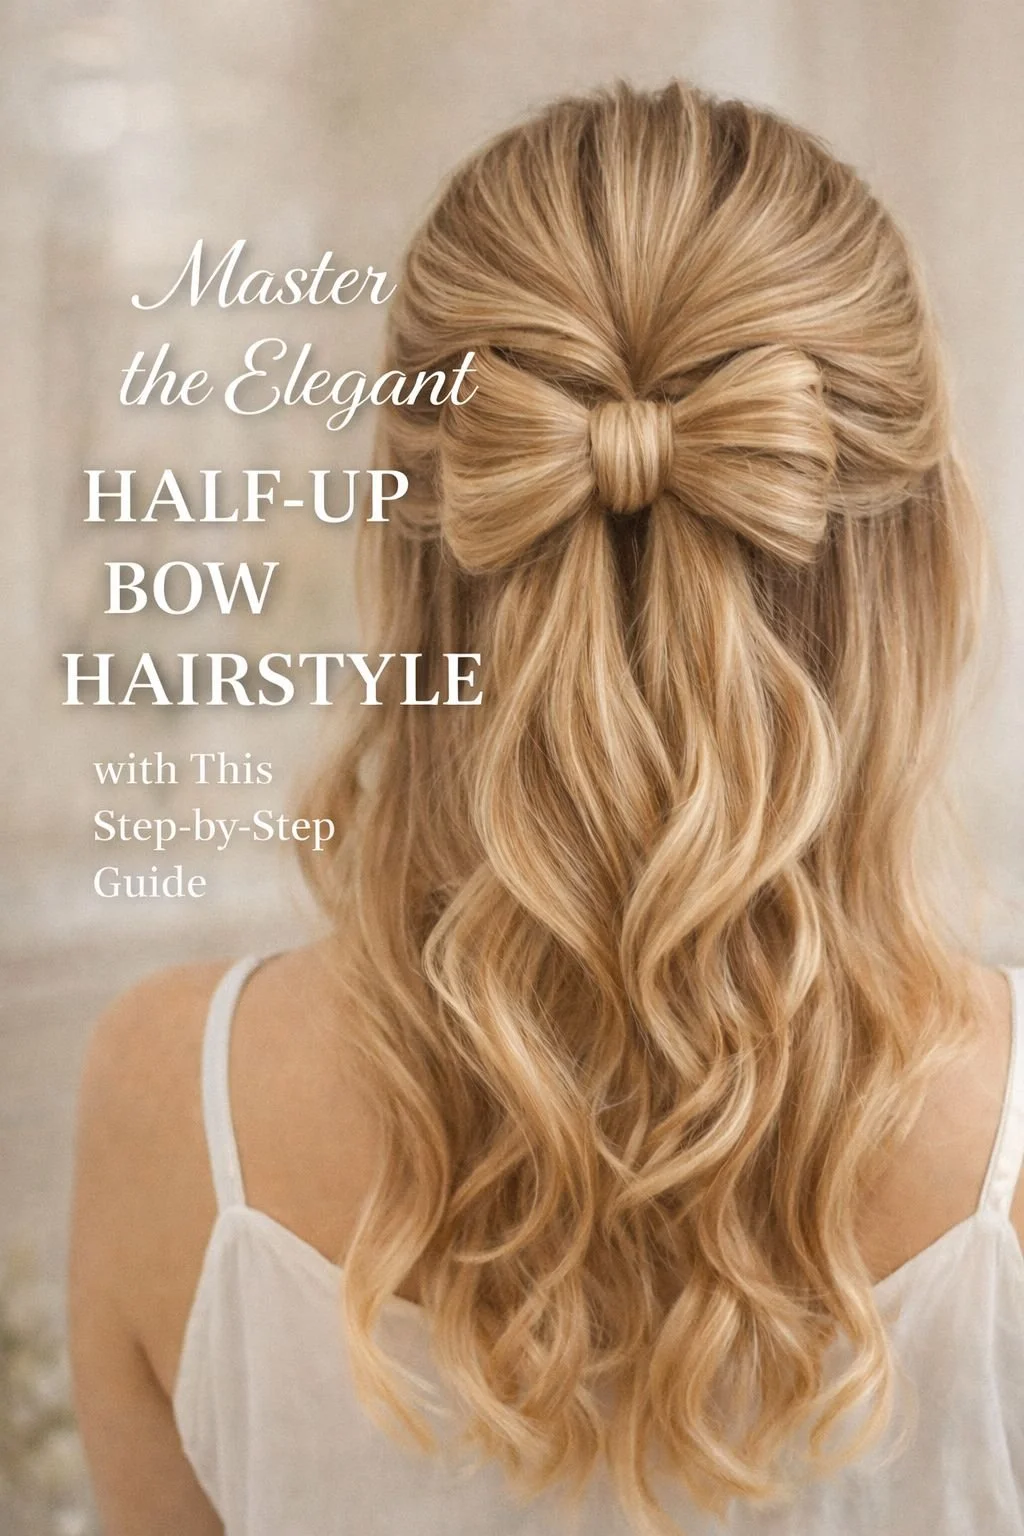
@hairflairaffair @Jamie Vandenberg To achieve this chic half-up bow hairstyle, perfect for any formal event, follow these steps: 1. Start with brushed, smooth hair for easy handling. 2. Select a top section of hair from the crown to the back of your head. 3. Tie this section into a ponytail, ensuring it's tight and secure. 4. On the last loop of your hair tie, don’t pull the ponytail all the way through, creating a loop with ends sticking out at the top. 5. Split the loop in half to form two smaller loops – these will be the bow's sides. 6. Flip the ends of your ponytail forward and tuck them between the two loops, pulling them back to create the center of the bow. 7. Secure the bow's shape and the tucked hair with bobby pins, hiding them beneath the loops. 8. Adjust the bow for symmetry and spread the loops for a fuller effect. 9. Finish with hairspray to hold the style in place. This hairstyle is not only eye-catching but also versatile, suitable for weddings, proms, or any occasion that calls for a touch of elegance. • #HairstyleTutorial • #HairTutorial • #EasyHairstyles • #FormalHair • #BowHairstyle • #DIYHair • #StyleInspo • #BeautyTips • #PromHair • #WeddingHairstyle • #GlamLook • #TrendyHair • #HairGoals • #FashionForward • #ChicHairstyles • #StylishUpdo • #HairHacks • #TikTokBeauty • #HairTrend ♬ original sound - Hair Flair Affair
Step-by-Step Guide: Mastering the Elegant Half-Up Bow Hairstyle
This tutorial walks you through each step to craft the iconic half-up bow hairstyle with finesse and polish. Whether you're styling for a special event or just want something whimsical and romantic, this technique is equal parts charming and surprisingly simple once broken down. Each section below focuses on building the bow from the ground up, ensuring the final result is balanced, secure, and worthy of admiration.
Step 1: Prep the Hair for Hold and Texture
Start by creating a strong foundation. Freshly washed hair can be too soft and slippery to hold a structured bow, so it’s best to begin with hair that’s at least one day old. If your hair is clean, use a dry shampoo or texturizing spray to add grip. Focus the spray around the crown, mid-lengths, and ends.
If your hair is naturally very smooth or fine, gently tease the roots at the crown to provide height and anchor the style. Use a fine-tooth comb to backcomb in short, firm strokes, concentrating on the upper back portion of the head where the bow will sit.
Apply a heat protectant if you plan to curl or wave the remaining hair later. This is also a good moment to lightly brush through any tangles so the strands are separated and smooth for styling.
Step 2: Section and Secure the Half-Up Base
Use a tail comb or your fingers to gather the top half of your hair. The section should begin above the temples and extend back to the crown. The size of this section will determine the fullness of your bow.
Smooth this section with a brush, keeping the tension even but not overly tight. Secure it at the center-back of your head with a clear elastic or one that closely matches your hair color. This ponytail is the structural base of the bow and should sit at the middle of the back of your head—not too high and not too low.
Ensure the ponytail is tight enough to support the bow but not so tight that it flattens your teased volume.
Step 3: Divide the Ponytail into Two Equal Sections
Split the ponytail into two equal parts. These two halves will become the loops of the bow.
Use a clip or hair tie to temporarily secure one side so it stays out of the way. With the free half, gently spread the strands to check for any tangles or knots. Lightly brush through to ensure a smooth surface, which will make your bow loop appear more polished.
Repeat this with the other half. Both sections should be symmetrical in size, texture, and finish.
Step 4: Shape and Secure the First Bow Loop
Take the first half of the ponytail and loop it into a bow shape. Do this by bending the hair back toward the base of the ponytail, forming a rounded loop. The tail of this section should point inward, toward the center of the bow.
Once the loop shape is formed, press it flat against your head and secure it with a bobby pin at the base. Push the pin in at a diagonal angle for extra grip. If needed, use a second pin at the opposite side of the loop to hold it firmly.
Repeat the process with the second half of the ponytail to form the second loop of the bow. Try to match the size and curve of the first loop to maintain symmetry.
Once both loops are secured, take a moment to fluff them gently with your fingers. Pull the outer edges of each loop slightly to widen them and create a fuller bow effect. If the loops look too flat, you can tease the inner part of the hair slightly or use a light mist of hairspray and finger-shape the volume.
Step 5: Create the Center Knot with a Concealed Strand
To give the bow a realistic, tied appearance, take a small piece of hair from the underside of either bow loop or from just below the ponytail base.
Wrap this strand around the center of the bow where the two loops meet. This creates the “knot” and hides the elastic band. Wrap the strand tightly but with finesse, keeping the width of the wrap even as it goes around.
Once it’s wrapped, tuck the end underneath the bow and secure it with a discreet bobby pin. You may also use a small dab of hair wax or styling paste to smooth the end before pinning it.
For extra hold, apply a light mist of hairspray directly to the center knot and press it gently into place with your fingertips.
Step 6: Style the Tail Ends for a Cohesive Finish
With the bow complete, turn your attention to the rest of your hair—the section left down. Depending on your hair length and texture, you can choose from a variety of finishes to complete the look.
For soft waves, use a medium-barrel curling wand and curl the hair in alternating directions for a natural, flowing effect. Let the curls cool completely before finger-combing them into loose waves.
For a sleek finish, use a flat iron to smooth the strands and apply a shine serum to the ends. This contrasts beautifully with the structure of the bow and gives a minimalist edge.
For volume, lightly tease the underlayers of the lower section and then gently brush the top surface. This adds body without compromising smoothness.
Optional: you can also tie the tail ends with a small ribbon, clip in pearl accents, or thread a fine gold chain through for a custom look.
Step 7: Refine the Shape and Balance
Take a final moment to assess the overall shape of the bow from all angles. Use a hand mirror to check the back of your head and adjust as needed.
If one loop is sitting higher or tighter than the other, tug gently on the pinned edge to balance it out. You can use a wide-tooth comb to soften the top crown area if the teased portion appears too stiff.
Mist a flexible-hold hairspray evenly across the entire hairstyle to lock it in without making the hair crunchy. Aim for long-lasting hold with soft touchability.
For extra refinement, smooth down flyaways using a clean mascara wand spritzed with hairspray or a fine mist of setting spray.
Step 8: Add Optional Accessories
While the bow itself is a statement, don’t be afraid to add a personal touch.
A small pearl pin at the center knot can elevate the elegance. A clip-in sparkle barrette can shift the vibe to evening glam. For boho appeal, slide in a couple of dried flowers or tiny fresh blooms on either side of the bow.
Make sure your accessories are lightweight so they don’t weigh down or disrupt the shape. And always position them after the hairstyle is fully formed.
Step 9: Adjust for Face Shape and Outfit
If you want to frame your face more softly, pull a few tendrils loose from the front. Curl them slightly to create movement. This is especially flattering if you’re wearing off-the-shoulder or backless styles.
Pairing the bow with bold earrings works best when the sides are sleek. If you’re going with drop earrings or shoulder-dusters, keep the side hair tucked and neat to highlight the jewelry.
If your outfit has a lot of neckline detail—collars, ruffles, beading—go for a tighter bow and polished tails to avoid competing textures. With simpler clothing, you can let the bow be fuller and a little more playful.
Step 10: Make It Last All Day or Night
Longevity is key, especially if you're wearing the bow for a wedding, party, or photoshoot. Here’s how to extend the hold:
Use invisible setting pins under each loop for discreet reinforcement.
Reapply light texturizing spray if the loops begin to separate over time.
Keep a mini hairspray bottle and extra pins in your bag for emergency touch-ups.
Avoid running your fingers through the back of your hair too often.
Humidity control is also crucial. A weatherproof spray can help guard against frizz or collapse. Apply this as a final mist once the hairstyle is fully in place.
The Result
By the time you finish, you’ll have created a hairstyle that looks complex and elegant but feels effortless. The half-up bow gives structure without stiffness, romance without predictability, and polish without trying too hard.
It adapts beautifully to different hair types, personalities, and outfits. You can wear it to a garden party, a rooftop cocktail hour, a bridal shower, or a candlelit dinner. Or you can wear it just because you feel like wrapping yourself in a little ribbon of confidence.
This look doesn’t require you to reinvent your hair routine—it simply elevates it.
And if this is your first time creating the half-up bow, don’t stress perfection. With every attempt, your fingers will move more intuitively, and your personal flair will start to shine through the loops and curves.
What starts as a technique quickly becomes a signature. Something you return to not just for the look, but for the feeling.

Elegant Half-Up Bow Hairstyle Tutorial
The half-up bow is more than a hairstyle—it’s a conversation starter, a mood elevator, and a signature statement wrapped into a perfectly sculpted silhouette. It plays in that rare space where form meets whimsy, where your reflection feels not only beautiful but completely yours. Whether you’re pairing it with soft linen for an afternoon café date or slipping into satin for an evening event, the bow brings a softness to your face and a sparkle to your aura.
This is the kind of look that photographs beautifully and lingers in memory. It flatters without begging for attention. It whispers femininity while still making its presence known. And best of all—it’s crafted by your own hands. The power of styling your hair like this isn’t just in the bow itself, but in the act of creating something lovely out of something you live in every day.
You don’t need a team of stylists or an endless arsenal of products. You only need intention, a few well-placed pins, and the patience to shape something beautiful for yourself. That’s the secret charm of the half-up bow. It’s personal. It’s versatile. And it’s always ready to rise to the occasion—just like you.
Step into the world of chic and sophisticated styling with our blog post, “Elegant Half-Up Bow Hairstyle Tutorial.” This guide is your ticket to mastering a hairstyle that exudes grace and charm. To support your styling journey, we’ve curated a list of sources, each linked by a keyword, to provide you with a variety of techniques and tips. Let these resources be your guide as you create a hairstyle that’s as elegant as it is enchanting.
Elegant Half-Up Bow Hairstyle Inspirational Sources:
May these sources inspire you to create a hairstyle that’s as stylish as it is simple. Enjoy the elegance of your new look!