How to Create Elegant Floral Nail Art for a Fresh Spring Look
Floral Fingertips: The Story and Style of Spring’s Most Romantic Nails
When the air warms and the sun begins to linger, something stirs in all of us—a gentle nudge toward beauty, toward softness, toward something more tender than winter ever allowed. Spring is not just a change of season. It’s an invitation. A whispered prompt to bloom, to reimagine, and to adorn. And what better way to answer that call than with fingertips wrapped in petals, painted with the poetry of floral nail art?
Floral nails have long been part of the springtime ritual. They sit at the intersection of femininity, whimsy, and detail-driven elegance. But the evolution of this delicate art form tells a deeper story—one of personal reinvention, cultural shifts, and the rising power of individual expression through small canvases that just happen to be attached to our hands.
Why Floral Nails Feel So Personal
Unlike seasonal clothes or even makeup palettes, nail art sits in a class of its own. It is subtle and intimate. It is visible to others but constantly seen by you. Your nails are private yet on display, personal yet performative. A floral design, especially, becomes more than a choice. It becomes a mood, a mood that lingers with every reach, tap, and gesture. You do not just wear floral nails. You live with them.
That intimacy is why floral designs can carry such emotional weight. A vintage daisy cluster might recall a grandmother’s garden. A minimalist lavender stem might channel a calming routine. A blooming bouquet across each nail might scream celebration, like spring wedding season wrapped around your fingers.
A Reflection of the Times
Floral nail art has existed for decades, but it is not static. In the early 2000s, florals were often loud and cartoonish—bubblegum petals with rhinestones and chunky decals. Today, the tone has shifted. Floral nails in this era reflect the broader embrace of moodboards, soft living, slow beauty, and botanical romance. The flowers have grown up.
Today’s floral designs play with negative space, semi-transparency, watercolor fades, and press-dried motifs. The palette leans toward blush tones, sage greens, golden pollen shades, and creamy whites. Even bolder variations—like fuchsia orchids or neon lilies—are rendered with a softness that suggests refinement, not rebellion.
This evolution mirrors the larger aesthetic moment. We are in the age of curated details. Your nails are not just polish—they are Pinterest. They are personal branding. They are self-care as performance art. And spring, with all its renewal energy, provides the perfect excuse to go all in.
Floral Nails as Self-Expression
There is something symbolic about choosing to wear flowers on your hands. Hands are tools of work, of touch, of nurture. Decorating them with floral imagery transforms the mundane into the sacred. A simple rosebud at your cuticle becomes a metaphor for gentleness. A cascade of wildflowers across your thumb becomes an emblem of freedom.
And unlike clothing or jewelry, your nail art follows you everywhere, silently influencing your mood. The choice of florals is especially potent here. Flowers are fleeting, ephemeral, and fragile. To wear them is to embrace the moment. To declare: I am blooming now. Not someday. Not when I’m perfect. Now.
The Craft Behind the Bloom
Floral nail art, though visually soft, requires a surprising amount of skill. The finest designs demand precision, patience, and a steady hand. But in that artistry lies the thrill. Whether painted by a pro or attempted at home, the process of creating flowers on a nail is therapeutic. It demands presence. It slows you down. It pulls you into color, shape, and texture.
That sense of ceremony can be addictive. Planning the exact placement of a tulip. Mixing the right shade of dusty pink for a petal fade. Deciding between matte and gloss. These choices feel small, but in a world that often feels out of control, they offer something rare: agency.
Floral Trends Blossoming This Season
Every spring brings new interpretations. This season, three dominant floral nail trends have emerged:
Botanical Line Work
Thin, sketch-style lines give florals a minimalist and modern edge. Think micro-poppies in black ink over a translucent base. The result feels like tattoo art for the nails—intentional, stylish, and surprisingly wearable for every setting.Pressed Petal Illusions
Designs that mimic the look of real pressed flowers are in high demand. This trend combines sheer pink or milky white bases with soft, scattered petals that look like they were collected from a meadow and frozen in time.Watercolor Gardens
A more painterly take on florals, this trend favors soft blends, gradient blooms, and strokes that mimic watercolor brushwork. The look feels ethereal and dreamlike, with petals that melt into one another for a romantic effect.
When to Wear Floral Nails
While spring is the obvious season, floral nails are not restricted by the calendar. They are deeply versatile. Muted rose and ivory blends work beautifully at weddings. Bold tropical florals play well during summer getaways. Moody plum florals accented with gold foil feel just right for fall. Even icy blue flower motifs hold their own during winter, like blooms trapped under frost.
What changes is not the floral itself but the way it is framed. Shift your palette. Adjust your finish. Let your nails whisper a different tone while keeping the floral spirit intact.
Building Your Signature Floral Look
The real magic happens when you go beyond trends and build your own floral language. What colors call to you? What flower has personal meaning? Which nail shape makes the most of a climbing vine design or scattered blossoms?
Long almond nails offer room for layered florals. Shorter square nails benefit from focused accent blooms. A singular daisy on a thumb can speak just as loudly as a full bouquet on every tip. Mix matte finishes with glossy petal highlights. Add a tiny gold dot to the flower center as a signature move.
The goal is not perfection. It is personality.
Embracing Imperfection in the Process
One of the quiet charms of floral nail art is that flowers, even in nature, are not perfect. A slightly lopsided petal. A bud smaller than the others. These are not flaws. They are character.
The same applies to your nails. Especially for those crafting their looks at home, small imperfections are not failures. They are signs of effort. Of intention. Of play. Let your floral nails be a little wild. A little unexpected. A little like you.
Tools of the Trade
If you are ready to try floral nails yourself, you do not need an overflowing kit. You need the right few things. A fine-tip brush or nail art pen. A dotting tool for flower centers. A base and top coat. And a palette that makes your heart sing.
Optional flourishes include gold foil flakes, pearl stickers, stamping plates, and press-on florals. But even with the basics, you can create something breathtaking. A bloom, after all, starts with just a seed.
The Ritual of Nail Art
Above all, the rise of floral nail art reflects something deeper: our hunger for rituals. For beauty that takes time. For care that feels intentional. For the slow bloom, not the instant result.
When you sit down to paint a flower onto your fingertip, you are doing more than a beauty routine. You are practicing presence. You are telling a story. You are honoring your hands and what they do.
You are, in the most poetic sense, planting something beautiful on yourself and letting it grow.
Spring Fling: Crafting Elegant Floral Nail Art
Many new tutorials going up tonight on the beauty blog #springnails #nails #nailart https://t.co/ESodPEdBTO pic.twitter.com/Dwf5FwpzA7
— Glam Artistry Hub (@glamartistryhub) April 4, 2024
Step-by-Step: Crafting Elegant Floral Nail Art at Home
Floral nail art is more than just a seasonal trend—it’s a personal, wearable art form. Creating these designs yourself allows for full creative expression and a bit of therapeutic calm. Whether you prefer dainty daisies or romantic watercolor blossoms, this tutorial will walk you through a full floral nail process from prep to polish, offering advanced tips and variations as you go.
Step 1: Gather Your Supplies
To create a truly elegant floral design, you’ll need the following tools and materials:
Nail file and buffer
Cuticle pusher or orange stick
Base coat
Nail polish in 2 to 4 complementary shades (including a base shade and 1–3 floral colors)
Nail art brushes (thin detail brush, flat brush, dotting tool)
Acetone or nail polish remover for cleanup
Top coat (matte or glossy, depending on desired finish)
Optional: gold foil, tiny gems, nail stickers, or stamping plates
Clean-up brush or cotton swabs
Nail palette or foil to mix colors
Start by choosing your color story. Elegant floral looks often rely on soft pastels, muted neutrals, and nature-inspired accents—think blush pink, sage green, creamy ivory, terracotta, or soft lilac. You can also go bold with navy, wine, or black backgrounds and lighter petals.
Step 2: Shape and Prep Your Nails
Nail prep is crucial to creating a smooth canvas and helping your design last longer.
Start by trimming and filing your nails to your desired shape. Oval, almond, and squoval shapes tend to work best with floral patterns since they complement the softness of petals.
Buff the surface of each nail lightly to remove shine and help the base coat adhere.
Push back your cuticles gently using a pusher or orange stick.
Wash your hands to remove oils and dust.
Apply a thin layer of base coat. Let it dry fully. This step prevents staining, evens out the surface, and creates a longer-lasting foundation for polish.
Step 3: Apply the Base Color
Choose a base color that will make your flowers pop without overwhelming them. Sheer milky whites, pale pinks, or matte nudes are all great choices.
Apply one thin coat first. Let it dry fully before applying a second.
Two thin coats always yield a more even and chip-resistant finish than one thick layer.
Let your nails dry completely before moving on to floral design.
This is also the stage to decide if you want florals on every nail or only on accent fingers. Many elegant looks use the ring and middle fingers for floral detail and keep the others in solid tones.
Step 4: Plan Your Floral Layout
Before painting anything, mentally sketch or lightly dot where you want your flowers to appear. You can go full-coverage floral, minimalist corner blooms, or a wildflower meadow across the tips.
Elegant floral nail art typically favors subtle placement:
Petals that climb from the corner cuticle
Centered single blooms
Tiny bunches at opposite corners
One full flower per nail, like a hand-painted decal
You don’t need symmetry. Variation in placement can make your set feel more delicate and intentional.
Step 5: Paint the Petals
The key to painting beautiful flowers lies in controlling your pressure and layering. Here are three techniques depending on the flower style:
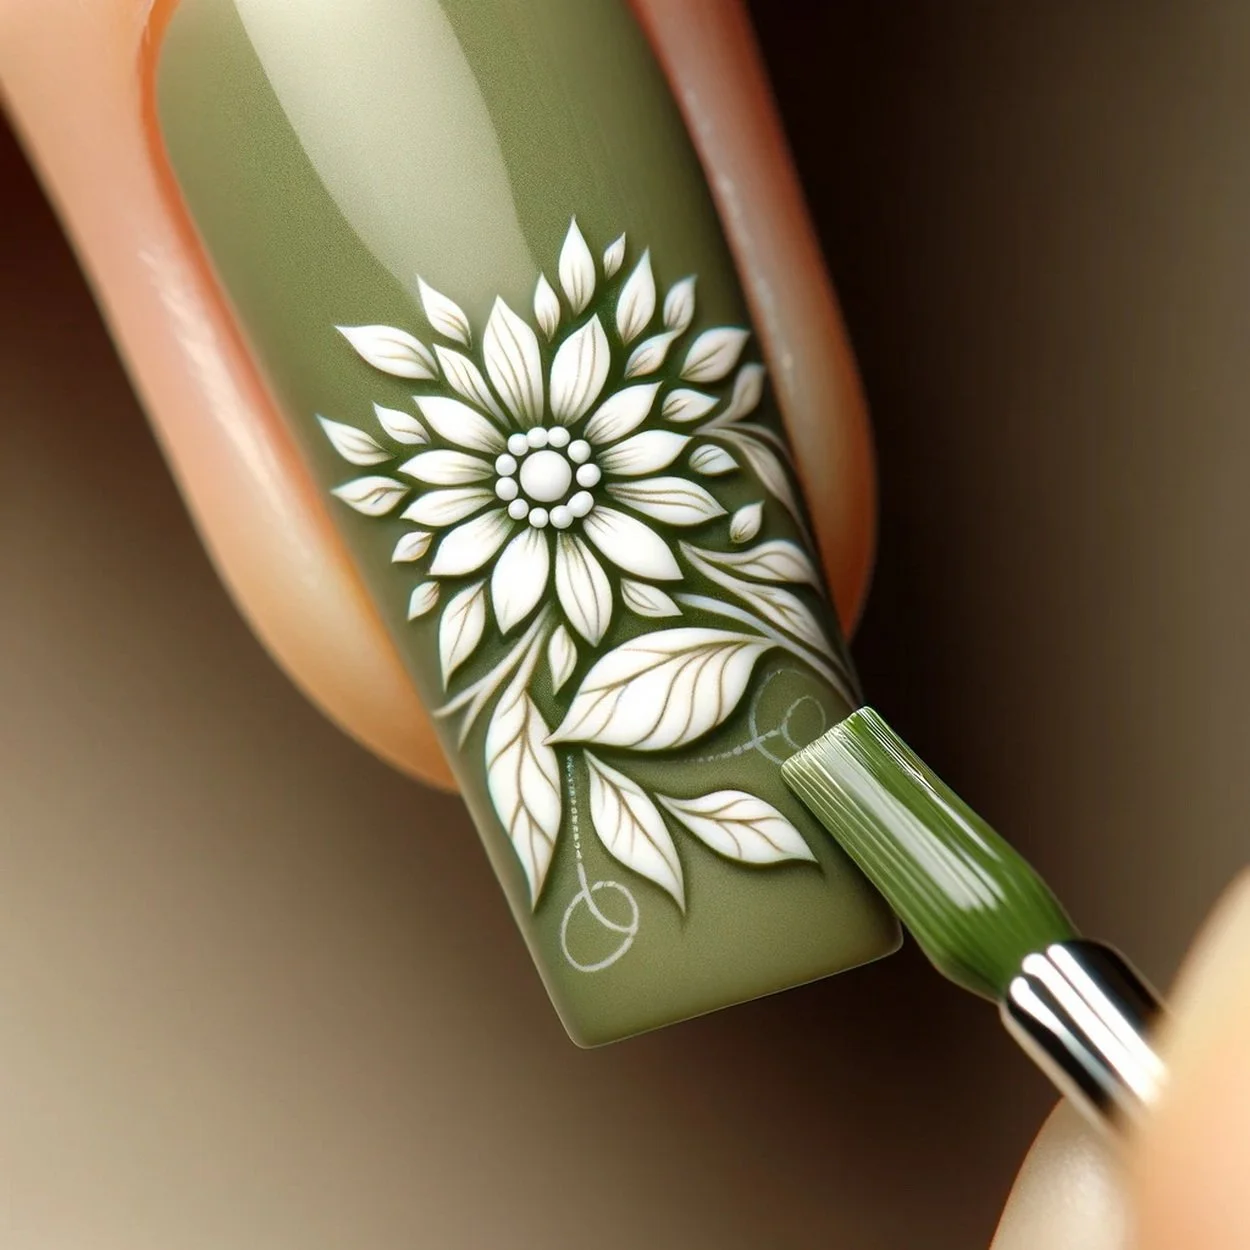
For Simple Five-Petal Blossoms:
Use a dotting tool or the tip of a detail brush.
Dip into your petal color and create five evenly spaced dots in a circle.
Drag the inner edge of each dot toward the center with a detail brush or needle to form petal shapes.
Fill in or refine the edges as needed.
For Abstract Watercolor Florals:
Dab small amounts of colored polish on the nail using a dry flat brush or sponge.
Blend the edges slightly with a sheer base or acetone to create watercolor blooms.
Use a detail brush to add loose leaf strokes or tiny outlines once dry.
This effect works beautifully over a matte base.
For Line-Art Botanicals:
Use a striping or detail brush with black, dark brown, or deep green polish.
Paint fine outlines of flower heads, stems, and leaves.
This technique mimics hand-drawn tattoo-style florals and works well layered over neutral or soft-toned backgrounds.
Take your time with this stage. If one nail gets messy, wipe it clean with acetone and redo it. Nail art is as much about patience as it is precision.
Step 6: Add the Centers and Details
Once your petals are dry, it’s time to give the flowers depth and realism by adding the centers and any extra flourishes.
For centers, use a tiny dotting tool to place a gold, black, or contrasting colored dot.
Try layering micro dots or glitter in the middle for texture.
If desired, add thin leaves using a short, fine brush and a soft green or olive shade.
Add fine strokes of white or deeper shades along the petals for definition.
Minimalist designs might skip this step, but if you’re going for a romantic, garden-inspired finish, these details elevate the whole look.
Step 7: Clean Up the Edges
Use a thin clean-up brush dipped in acetone to tidy up the cuticles and sidewalls of your nails. Crisp lines around the floral design make it look professional, even if it was done at home.
Angle your brush carefully and swipe along the skin to lift stray polish.
Wipe the brush between strokes and keep it saturated for best results.
Clean edges are especially important if your base color is pale or translucent.
Step 8: Seal With Top Coat
Top coat isn’t just the final step—it’s what gives your floral nails that salon-quality finish and ensures longevity.
Choose a glossy top coat to enhance shine and add a “glass” effect over your florals.
For a more romantic or vintage look, go with a matte top coat. This works especially well over watercolor or negative-space designs.
Apply the top coat gently, floating the brush over the design to avoid smudging any painted flowers.
Wrap the tip of the nail with the brush to seal the edges and prevent early chipping.
Let your nails dry for at least 15–30 minutes in a still environment to avoid dents or smears. Use a quick-dry spray or drops if you’re short on time.
Step 9: Add Optional Embellishments
To take your floral art to the next level, consider adding a touch of texture or glimmer.
Place small gold foil pieces at the flower centers or along leaf stems.
Add a single tiny gem to the cuticle area for a grown-up sparkle.
Try placing dried flowers between layers of top coat for a botanical-press effect.
Use negative space and geometric overlays to give your florals a modern edge.
Keep embellishments minimal for an elegant feel. One or two nails with sparkle are often more impactful than a full set.
Step 10: Hydrate and Maintain
Now that your floral nails are dry and sealed, the last step is care.
Apply cuticle oil around each nail to replenish moisture and add shine.
Use hand cream daily to maintain the smoothness of your skin and extend the polish life.
Avoid hot water and harsh chemicals which can dull the finish or cause lifting.
If using gel, consider a reapplication or fill after 2–3 weeks depending on growth.
Elegant nails are not just about how they look when fresh but how beautifully they wear over time.
With these steps complete, your nails become more than just polished—they become living artwork. The elegance of floral nail art lies not in perfection but in the impression it leaves: soft, feminine, expressive, and entirely your own. Each bloom tells a story, whether whispered in watercolor or drawn in ink.
Spring Fling: Crafting Elegant Floral Nail Art
Floral nail art is not just a beauty trend—it’s a gesture of softness in a world that often rewards sharpness. It’s the quiet rebellion of choosing beauty for your own sake. Every petal you place is a reminder that elegance can be intentional, even in the tiniest corners of your life. These designs do not scream for attention—they bloom slowly, drawing the eye in with their gentleness and depth.
Your hands, after all, are storytellers. They work, they nurture, they create, they touch. And when you crown them in florals, you are not just decorating—you are honoring their role in your daily ritual. You are giving shape to a mood, a season, a feeling. Maybe today it’s romance. Maybe next week it’s wildness. Either way, your nails can hold it.
So whether you're painting a bouquet across every fingertip or letting a single bloom shine on your ring finger, remember that every stroke is yours. Every choice is a little act of devotion. And every glance at your hands is a small spark of joy, waiting to be noticed.
Now let’s explore the floral creations that turn this craft into couture.
Welcome to “Spring Fling: Crafting Elegant Floral Nail Art,” a blog post that will guide you through the blooming beauty of creating your own floral nail designs. This guide is your canvas to express the vibrant and delicate essence of spring on your fingertips. To support your creative journey, we’ve curated a list of sources, each linked by a keyword, to provide you with inspiration and expert advice. Let these resources be your guide as you paint a garden of elegance on your nails.
Floral Nail Art Inspirational Sources:
May these sources inspire you to create nail art that’s as fresh and vibrant as the spring season itself. Enjoy the process of bringing floral elegance to your nails!


