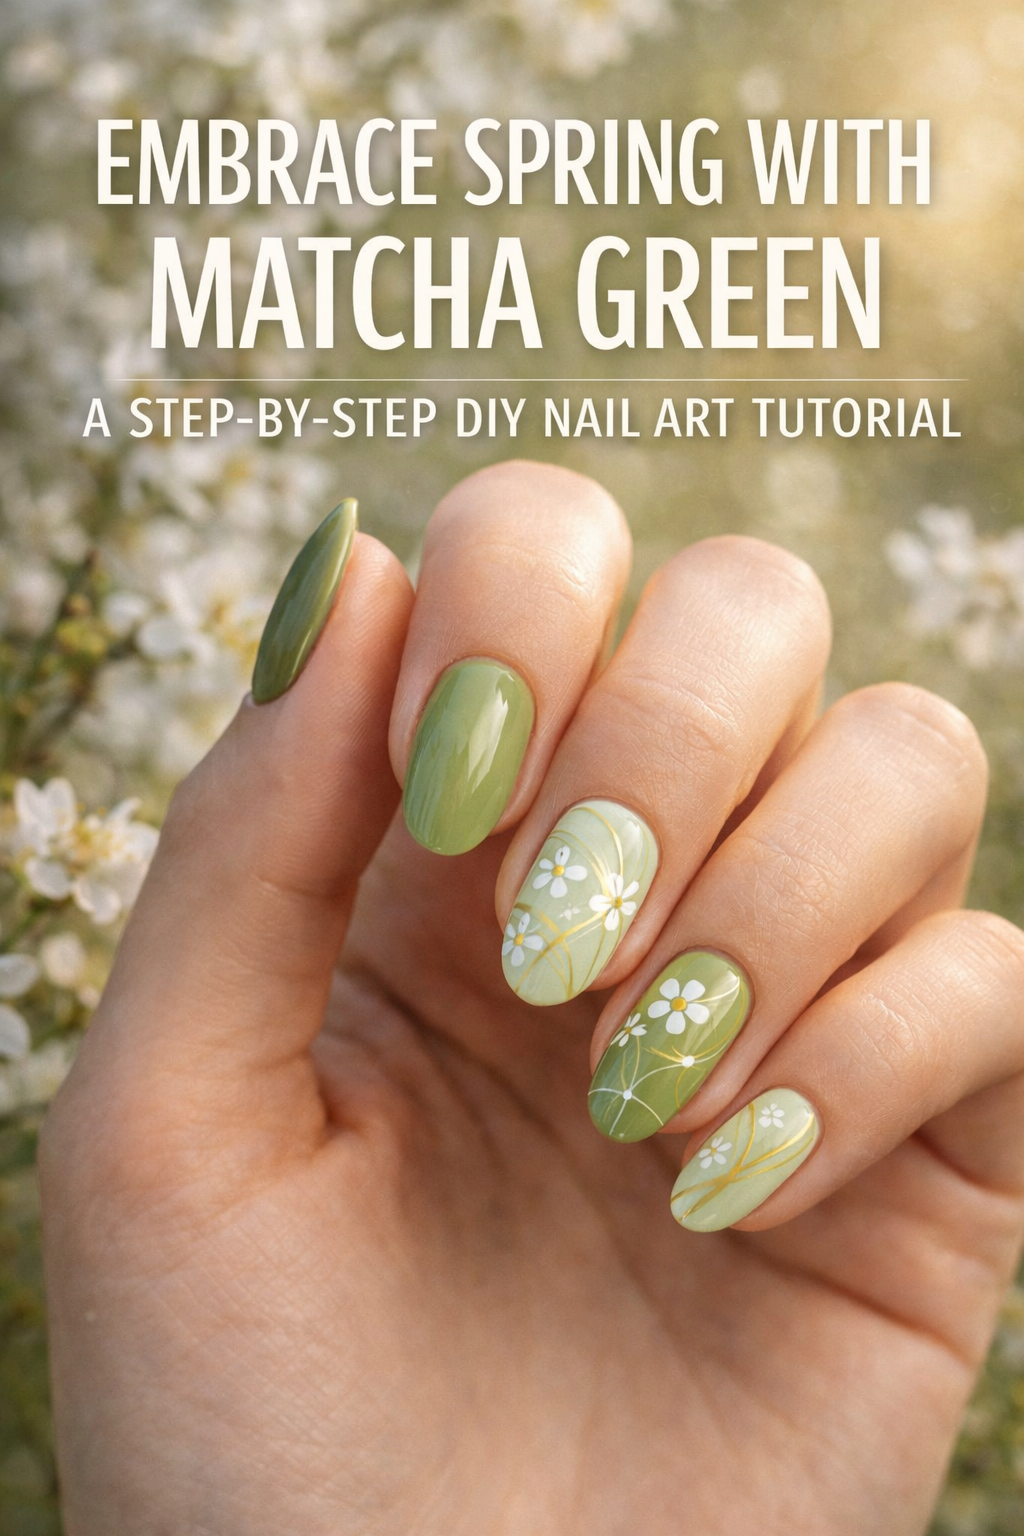
Embrace Spring with Matcha Green: A Step-by-Step DIY Nail Art Tutorial

The Awakening of Spring in Color: A Journey Into Matcha Green Nail Art
There’s something quietly electrifying about the first real week of spring. The soft scent of dew still clings to the grass, daylight stretches just a bit longer, and the world begins to shake off its gray mood and awaken in slow, deliberate beauty. This moment doesn’t ask for loud colors or bold declarations. It whispers. It hums. And that’s why matcha green has become the seasonal statement in beauty circles—especially on nails.
This isn't just about a shade of polish. Matcha green is a feeling. A breath of clean air. A sip of clarity. A color that mirrors nature’s re-entry into full bloom and makes us want to match its pace. There’s a reason fashion houses and editorial shoots are embracing softer greens this year, threading them through everything from silk gowns to eyeliner flicks. In nail art, it’s even more intimate. You carry it with you. Gesture with it. Feel it catch the light with every flick of your fingers.
But let’s be clear: this is not the bright lime or minty pastel that dominated in years past. This version of green feels rooted. It’s a botanical, mossy softness with a creamy matte undertone. It calls to mind iced matcha lattes on terracotta rooftops. Woven market bags. Linen napkins and wild bouquets. Earthy yet clean. Calm yet decisive. It is a color that doesn't shout for attention, but it always gets it.
In the world of DIY nail art, matcha green unlocks endless creative directions. It can lean botanical or modern minimalist. You can pair it with gold leaf for a luxe touch, contrast it with a barely-there nude for a sophisticated split-tip, or use it as a backdrop for dainty florals or dotted accents. Its neutrality makes it endlessly wearable, yet its uniqueness keeps it feeling fashion-forward. It straddles that line effortlessly.
But what makes it especially powerful for spring is its emotional resonance. Green, psychologically, is the color of new beginnings. It’s associated with growth, health, and vitality. After months of winter hibernation—emotional, physical, or spiritual—wearing this color is like giving yourself permission to begin again. It’s a visual cue for yourself and the world: I’m ready. I’m blooming too.
And that’s the heart of it. The real magic of seasonal nail art isn’t about decoration. It’s ritual. It’s celebration. It’s the way we mark time and seasons not just on calendars, but on bodies. A small rebellion against monotony. A moment of pause that says, I see you, spring. I’m part of this renewal too.
From Tea to Tips: The Cultural Romance of Matcha Green
Matcha, the rich powdered green tea from Japan, has its own cultural weight. Ceremonial. Intentional. Beautifully meditative. In beauty, the color takes on those same tones. When we refer to “matcha green” in nails, it’s not only about the hue—it’s about a quiet luxury, a slow beauty movement that contrasts against the fast-paced, glitter-heavy, maximalist trends of the past.
There’s something satisfying about choosing a shade that doesn’t demand but rather welcomes. That evokes serenity instead of spectacle. For women especially, this can be a powerful aesthetic move. In a world of attention-grabbing reds and chrome mirror manicures, opting for something soft, controlled, and nature-inspired is its own form of grace.
Matcha green, in this context, becomes more than a color. It becomes the narrative. An aesthetic of grounded elegance. Think of a Parisian kitchen with pistachio cabinetry. A Japanese matcha bowl with soft cracks in the glaze. An avocado slice on ceramic. A sage linen robe on a woman curled up reading. This shade connects all those worlds—and when worn on nails, you carry those moods with you.
Why Matcha Nails Are the Spring Upgrade You Didn't Know You Needed
We often associate spring beauty with florals, pastels, and maybe a burst of citrus here and there. But matcha green gives you something more refined. It’s the upgrade to last year’s mint. The cooler, more editorial cousin to pistachio. The elevated replacement for safe pinks or transparent nudes.
Where other spring hues can feel seasonal and disposable, matcha has staying power. It pairs beautifully with wardrobe transitions—from winter’s camel knits to spring’s white denim to summer’s beige linen suits. It holds its own against gold jewelry or silver hardware. And most importantly, it works with every skin tone. That’s not hyperbole—it glows on olive skin, pops softly on fair tones, and looks earthy and rich against deeper complexions.
As for nail shapes? It loves them all. Rounded nudes with matcha tips feel editorial and chic. Long square nails covered in matte matcha look impossibly clean and high fashion. Almond-shaped nails with a glossy matcha base and a single floral accent on the ring finger? Absolutely stunning.
In short, it’s versatile, wearable, and quietly rebellious in its calmness. What’s not to love?
The DIY Ritual: Why Doing Your Own Nails Matters
There’s a deeper movement happening behind this matcha green wave. It’s tied to a growing appreciation for slowness, ritual, and presence. Doing your own nails is no longer just about saving money or killing time—it’s become a self-care ceremony.
Lighting a candle. Putting on music. Taking your time to file, prep, and layer each coat with intention. Choosing your polish not just based on trend, but on mood. Feeling the weight of the brush as it glides across your nail. The scent of remover. The chill of top coat. The slow dry between coats. It’s tactile. Grounding. Whole.
This practice makes your final look even more meaningful. You made this. You created something beautiful. You turned a color into a feeling, and then wore it like armor. That’s the power of beauty as ritual—it transforms.
And with a color like matcha green, that transformation feels seasonal and symbolic. You’re not just painting your nails. You’re stepping into spring. You’re honoring growth. You’re softening. You’re letting the light back in.
Design Ideas Before You Begin
Before you dip that brush, let’s unlock a few visual ideas that might spark your imagination:
Matte Matcha Base with Gold Foil Tips: Understated luxury. Works best on almond or oval nails.
Matcha and Nude Split-Color Nails: Diagonal split between matcha and a sheer nude for an editorial vibe.
Floral Accents on Matcha Base: Tiny white or blush pink flowers painted or stamped on a matcha backdrop. Soft, dreamy, romantic.
Negative Space Nail Art: Use tape or stickers to leave geometric lines of bare nail between matcha polish sections. Clean and modern.
French Tip Flip: Reverse French manicure with matcha tips and a clear base.
Matcha Ombré: Blend matcha into ivory or pistachio from cuticle to tip for a smooth fade.
Matte Base, Glossy Tips: Same shade of matcha for both but mix textures for subtle drama.
You don’t need to be a professional to make any of these looks come to life. You just need patience, the right tools, and a desire to make something beautiful for yourself.
What You’ll Need Before You Start
Let’s talk kit. Whether you’re doing this from your kitchen table or your perfectly lit vanity, having the right tools makes all the difference. Here’s what to have on hand:
Nail polish remover and lint-free wipes
A glass nail file or buffer
Cuticle pusher or wooden stick
Base coat (preferably ridge-filling)
Matcha green nail polish (creamy or sheer, matte or gloss)
Detail brush or dotting tool (if doing art)
Top coat (matte or high-shine depending on your finish)
Optional: nail stickers, gold foil flakes, floral stamps, quick-dry spray
Once you’ve got everything laid out and your polish chosen, take a moment. This is your ritual. Breathe it in. Sip your real-life matcha if you’ve got one. Let this be about more than just pretty nails. Let this be the start of your seasonal awakening.
And now, let’s dive into the full tutorial.
Below, you’ll find our step-by-step breakdown for creating your perfect matcha green nail art design—from prep to final touches. Whether you’re going minimalist or ornate, these foundational steps will carry your creativity exactly where it needs to go.
Let’s begin.

Embrace Spring with Matcha Green: A Step-by-Step DIY Nail Art Tutorial
Spring Nails by @ nailzkatkat #nails #nailart #nailpolish #springnails pic.twitter.com/HnufC9fOxB
— Glam Artistry Hub (@glamartistryhub) March 29, 2024
Step-by-Step Matcha Green Nail Art Tutorial: A DIY Spring Awakening
Creating your matcha green nail look is not just about polish—it’s about process. This is a slow ritual. A meditation. Every stroke, every layer, and every moment of waiting between coats becomes part of a calming rhythm. Whether you're seeking simplicity or statement, this step-by-step guide walks you through everything needed to make your nails bloom with grace.
Step One: Create the Atmosphere
Before even touching your nails, build a space that welcomes you. This sets the tone.
Find a surface that feels clean and free from clutter. Natural light is ideal. Light a candle or play something soft in the background. Place your tools and polishes neatly around you. Having everything within reach prevents interruption and maintains the flow.
This is your beauty ritual. Own it.
Step Two: Remove Old Polish and Cleanse the Nails
Use a nourishing, acetone-free nail polish remover to strip any remnants of old polish. Soak a lint-free pad and gently wipe from cuticle to tip.
Even if you aren’t wearing polish, still cleanse the nail bed. This removes oils or debris that could cause bubbling or prevent proper adhesion. Follow this with a quick rinse or wipe with alcohol to ensure a perfectly clean base.
Dry your hands thoroughly. No moisture should remain.
Step Three: Shape and File
Choose the nail shape that best suits your mood or finger length. Almond feels editorial. Round feels effortless. Square-tip works beautifully for graphic looks. Once you decide, use a glass file to shape the nail edge.
Always file in one direction to avoid fraying the keratin layers. Buff the surface lightly if your nails have ridges or peeling. Don’t overdo it—just smooth enough to give polish an even surface.
Wipe away dust with a dry brush or soft cloth.
Step Four: Care for Cuticles
Push your cuticles back with a wooden stick or a gentle metal tool after softening them. You can use a cuticle softener, or simply soak your fingertips in warm water with a touch of oil.
Never cut living skin. Trim only hangnails or peeling dead skin. Massage a drop of jojoba or almond oil into the cuticle beds afterward, letting the moisture absorb while you continue prep.
This part makes a visible difference and keeps everything looking intentional and clean.
Step Five: Apply a Smoothing Base Coat
A high-quality base coat does more than just protect the nail. It fills in imperfections, anchors the color, and prevents staining. Choose one with ridge-filling properties or a slightly milky tint to create a perfected surface.
Apply a thin coat from cuticle to tip in even strokes. Don’t flood the cuticle area—leave a sliver of bare space for a salon-like finish.
Allow this layer to dry completely. It will create a smooth canvas for the polish to glide over.
Step Six: First Coat of Matcha Green
Dip your brush into the bottle and let excess polish drain back in. Your brush should be loaded but not dripping.
Begin in the center of your nail near the base, placing the brush just before the cuticle line and pushing gently toward it before sweeping back toward the tip. Then do the same on each side, creating an even coat.
This first layer doesn’t need to be fully opaque. Think of it as a sheer wash that sets the foundation.
Let this coat dry for at least 2 minutes. Patience is essential for polish longevity.
Step Seven: Second Coat for Full Depth
This second layer is where the color blooms. Repeat the same application pattern, but this time go slowly and focus on full coverage.
If your matcha green polish leans sheer, a third coat may be necessary for the true color to emerge. But two coats will often give that lush, creamy payoff that this shade is known for.
Keep the layers thin to prevent smudging and bubbling. The key is letting each layer breathe before continuing.
Step Eight: Optional Nail Art Accents
At this stage, your nails are a flawless matcha green canvas. You can stop here, or elevate the look with a delicate design.
Some favorite spring-inspired options include:
White Dots or Tiny Florals: Use a dotting tool or toothpick dipped in white polish to create a daisy effect.
Gold Foil Accents: Apply small flecks of gold foil using tweezers onto the tacky second coat for an ethereal gilded vibe.
French Tip Twist: Tape off the tip of each nail diagonally and paint a sheer nude or clear polish to create a diagonal matcha French tip.
Negative Space Stripes: Use striping tape to mask off vertical or diagonal lines before your second coat, then remove it for crisp, bare-nail accents.
Matte Over Gloss Combo: Paint a glossy matcha base and use matte top coat only on a single nail per hand for contrast.
If doing nail art, make sure your green base is fully dry before applying designs. Rushing this stage leads to dragging or denting the polish.
Step Nine: Seal with Top Coat
The top coat is not just shine—it’s armor.
Use a high-gloss or matte top coat depending on your desired finish. A glossy top coat will intensify the richness of the matcha shade and add dimension. A matte top coat creates a velvety, editorial vibe that feels soft and contemporary.
Apply one smooth, generous stroke down the center of each nail, then sweep the sides. Be sure to “cap” the edge of the nail by lightly brushing over the tip—this helps prevent chips.
Let this final coat dry for a full five minutes. If you have a quick-dry spray or drops, now is the time.
Step Ten: Clean Up the Edges
Dip a fine brush or angled eyeliner brush into acetone or remover and gently trace around the cuticles and nail edges to clean up any polish that strayed onto skin.
This is the difference between DIY and flawless. Clean lines make everything look more professional. It only takes a minute, but the payoff is immense.
If any areas feel uneven, add a dot of polish and re-seal with top coat.
Step Eleven: Nourish Again
Once your polish is completely set (after 15–20 minutes), massage cuticle oil into the nail beds again. Let your fingers soak in the moisture and soften from the inside out.
Follow with a rich hand cream and take a moment to admire the finish.
At this point, your hands should feel pampered, polished, and beautiful.
Step Twelve: Daily Maintenance Tips
To extend the life of your matcha manicure, follow a few simple habits:
Wear gloves when washing dishes or using cleaning products
Reapply a thin layer of top coat every 2–3 days to protect from chipping
Avoid using nails to open boxes, scratch off labels, or pry open containers
Keep hand cream and cuticle oil in your bag and use often
If polish begins to wear, buff lightly and recoat just the tips for a quick refresh
A manicure is more than a moment—it’s a commitment to self-presentation and care. Keep the ritual alive, even after the polish dries.
Optional Variations for Different Vibes
One color. Endless expressions. If you’re planning to repeat this look throughout the season, here are ways to keep it fresh:
The Minimalist: Matte matcha on short, rounded nails with no design. Clean. Effortless.
The Romantic: Matcha base with a single hand-painted floral detail on the ring finger.
The Trendsetter: Mix matcha nails with one gold chrome accent nail per hand.
The Edgy Artist: Matcha base with thin white geometric lines or negative space shapes.
The Nature Goddess: Add dried flower decals under a thick clear top coat for an earthy pressed effect.
No matter which direction you take it, the base tone always brings serenity and polish to the entire look.
Let It Be a Springtime Reminder
At the end of it all, your nails are more than a color. They’re a personal gesture. A mirror of how you’re moving through this season. With softness. With intention. With care.
This matcha green look might last a week. Maybe longer. But the memory of taking time for yourself—that stays with you. You didn’t just paint your nails. You honored the season with your fingertips. You brought a botanical hue into your personal orbit and made it part of your daily movement.
So take this ritual with you.
Let it remind you to slow down. To breathe deeper. To touch everything in your life with a little more grace.

Embrace Spring with Matcha Green: A Step-by-Step DIY Nail Art Tutorial
The Final Touch: Why This Manicure Is More Than Just Pretty
This isn’t just a color trend. This isn’t just a tutorial. This is about reclaiming the art of care—real care. The kind that begins in small, deliberate choices. The kind that touches only your fingertips but ripples through how you carry yourself the rest of the day.
Your matcha green nails aren’t loud. They don’t beg for attention. But they speak. Quietly. Powerfully. They tell the world that you’re in bloom, just like everything else outside your window. That you took a moment not just to decorate, but to ground yourself. To match the season. To feel it. And that is luxury.
In a world constantly telling women to go louder, do more, be more visible—there’s something radical in choosing softness. In honoring beauty that soothes instead of shouts. That’s what this look is about. That’s what you just gave yourself.
So whether your fingertips are now wrapped in creamy sage, floral accents, or golden foil, know this—what you wear on your nails is never just a surface decision. It’s a ritual. A reflection. A reminder that beauty lives in the details, and that you are worth every second it took to create something delicate and stunning for no one but yourself.
And if anyone asks about your color?
Just tell them: It’s spring. I’m thriving too.
As you embark on your creative journey to embrace the vibrant hues of spring with a touch of Matcha Green, we’ve curated a list of inspirational sources to guide you through your DIY Nail Art Tutorial. Each source is linked by keywords that resonate with the essence of spring and the artistry of nail design. Let these resources be your guide as you transform your nails into a canvas of springtime splendor.
Inspirational Sources:
May these sources spark your creativity and add a dash of joy to your nail art experience. Happy painting!