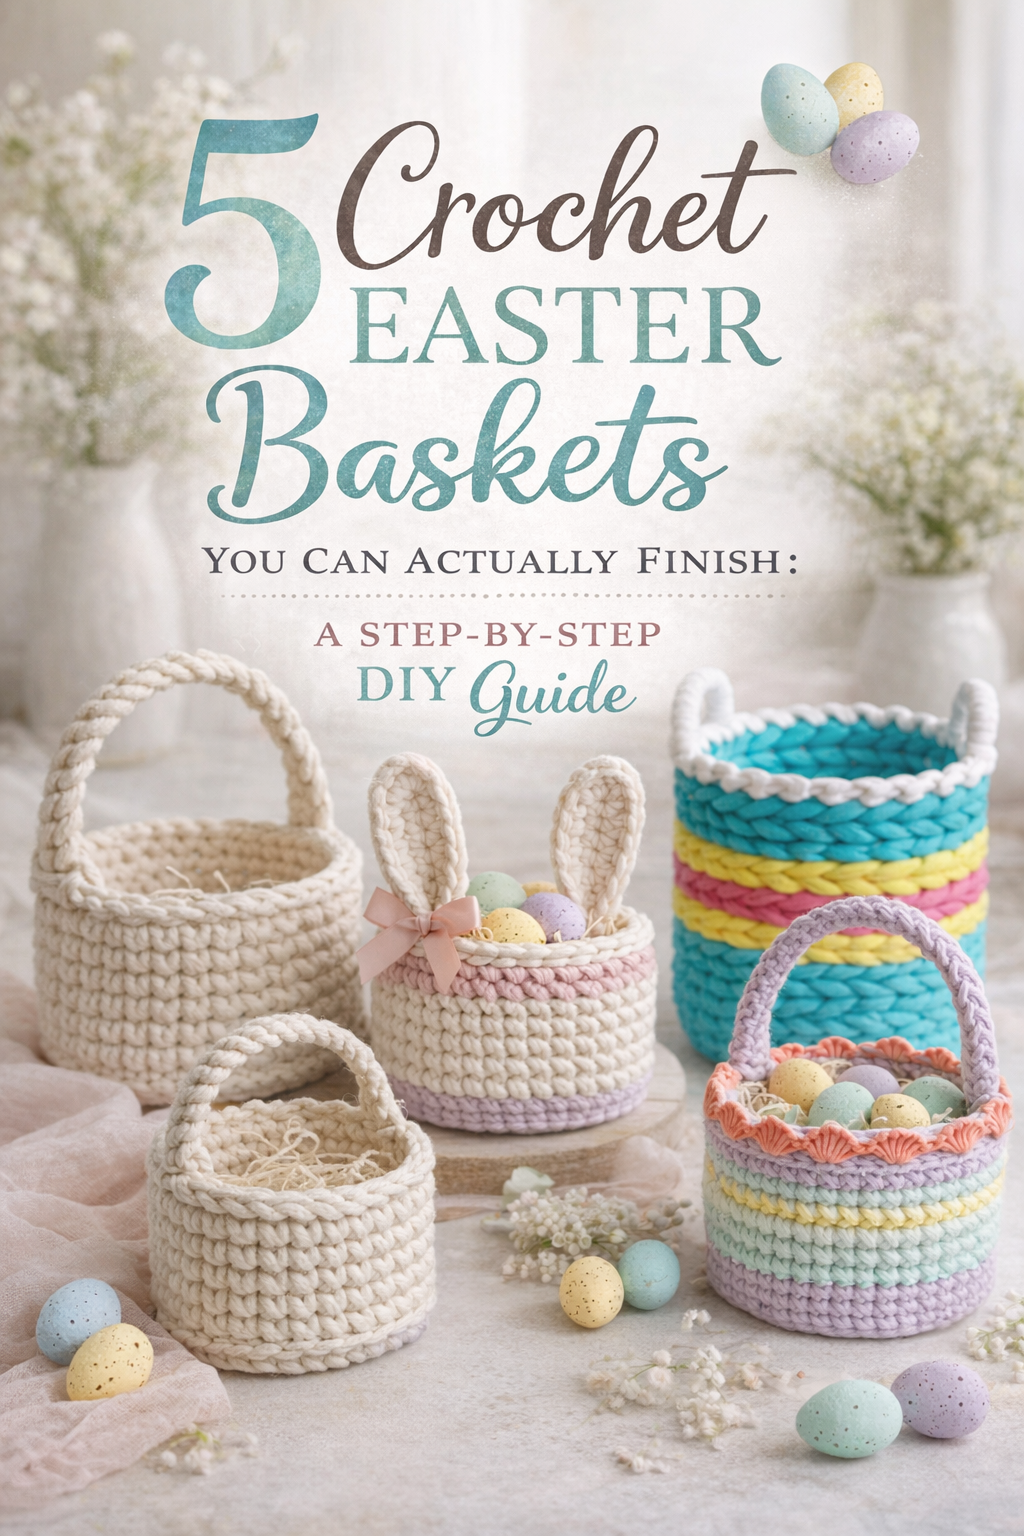
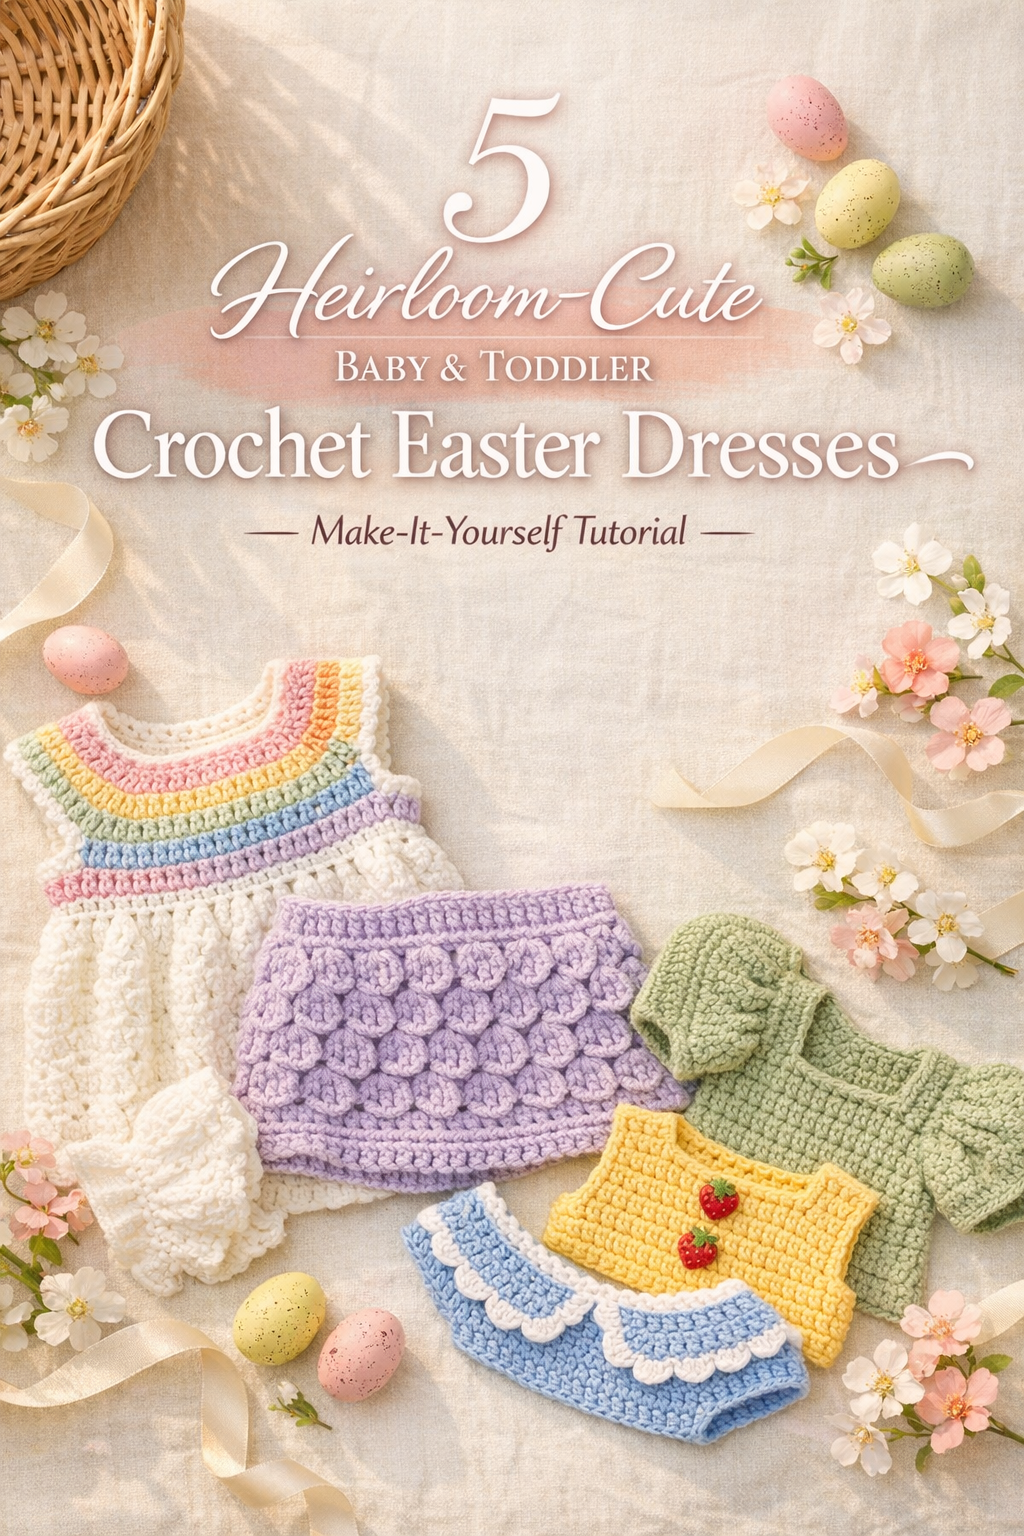
The Easter Dress Edit: 5 Toddler Crochet Dresses You Can Actually Make — Step-by-Step Tutorial

More like this
Little Dresses, Big Memories
There’s something quietly electric about a toddler in a handmade dress at Easter. Not because it’s “perfect”—but because it’s honest. A crooked smile, grass stains on the hem, a tiny hand clutching an egg like it’s treasure. Crochet belongs in that kind of moment. It’s slow fashion in the sweetest sense: loops you can see, time you can feel, and a piece that carries your attention in every stitch.
These five dress looks aren’t just cute (they are dangerously cute). They’re small lessons in texture, color, and silhouette—how a simple yoke becomes an heirloom shape, how gingham checks can feel modern again, how a scalloped edge changes the whole mood of a garment. And maybe that’s the real reason we make things for little ones: because the season moves fast, and this is one way to hold it still—just long enough to take the picture, chase the laughter, and remember what it felt like to be here.
💡 Pro Tip: Why I Link to Amazon Search Results and Not One Product
In the Shop the Look and Style it With sections under each bikini, I link to Amazon search results, not single products. Here’s why this matters:
Hot bikinis sell out fast. I don’t want you clicking on a dead link to a sold-out item. Search pages stay updated.
You get more options. Love the vibe but want a different color, cut, or price point? The search results give you everything that matches the look and energy.
I curate each search carefully. These aren’t generic. I spend hours crafting keywords that bring up exactly the kind of bikinis I’d wear—or recommend to my hottest friends.
Support with no pressure. If you click a link, browse, and buy something later, I may earn a small commission at no extra cost to you. That helps me keep bringing you curated collections like this one—powerful, seductive, and always fresh.
So dive in. Click through. Try something risky. These aren’t just bikinis—they’re commands, statements, and maybe even your new favorite weapon of choice.
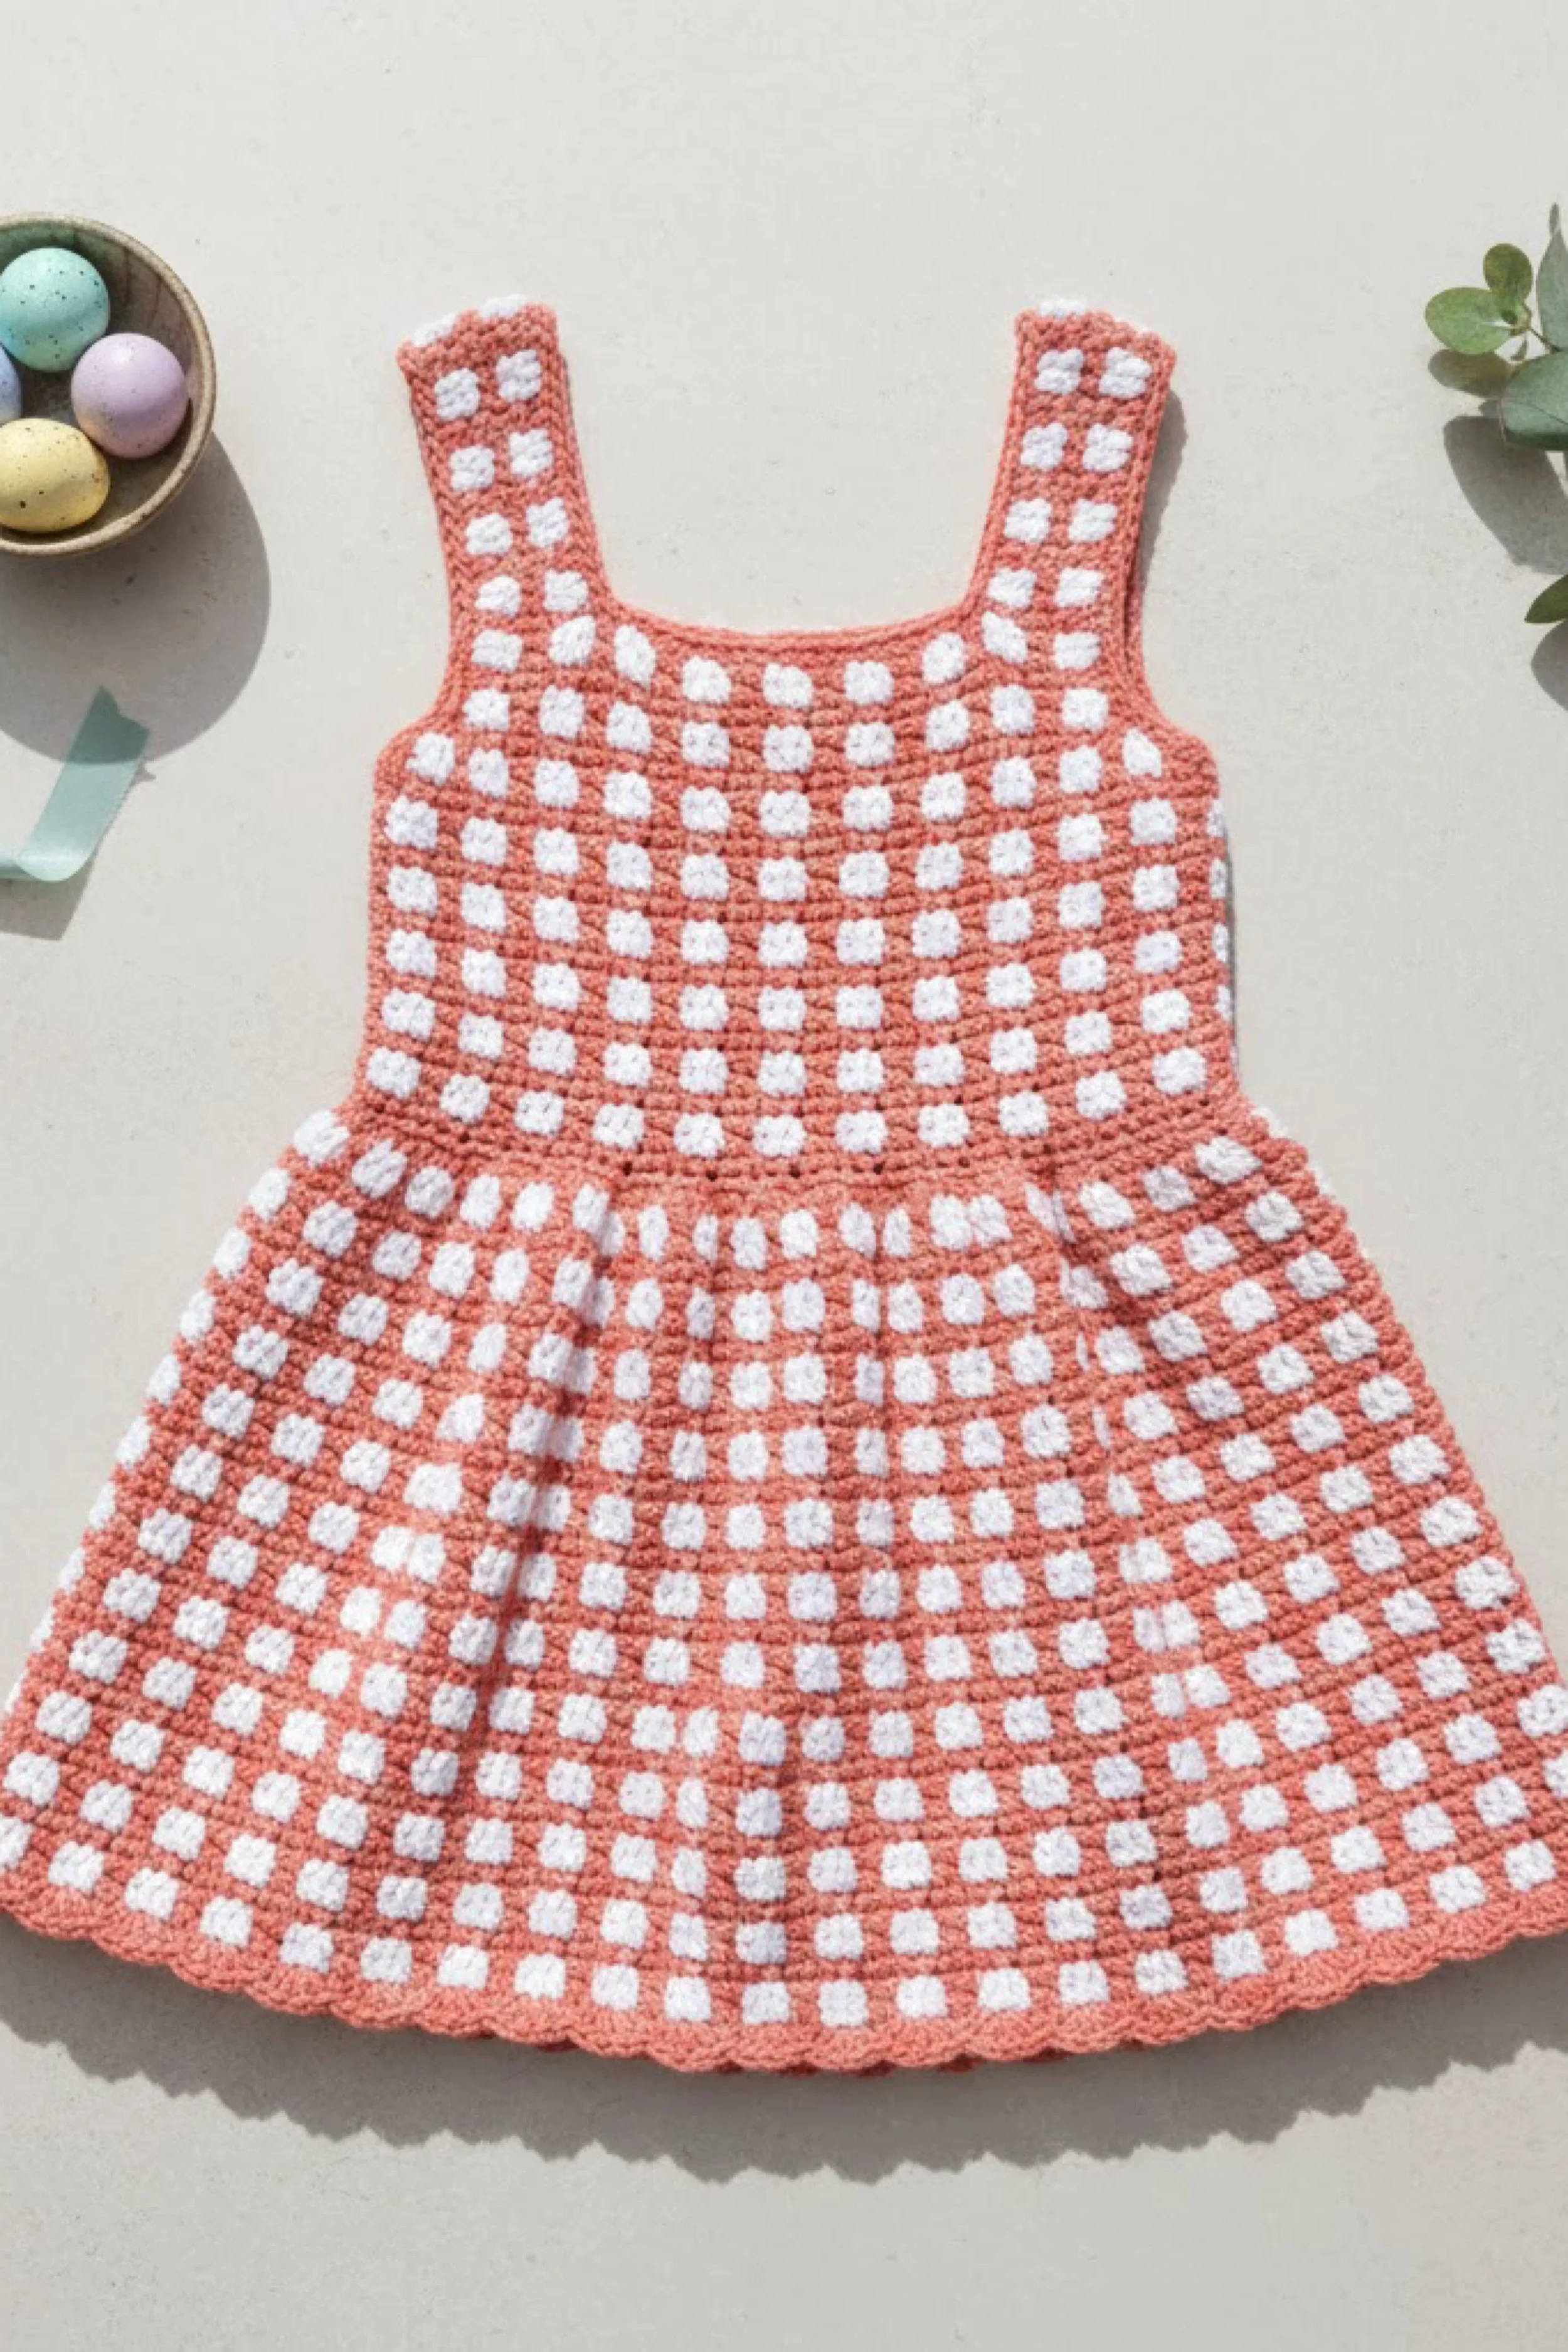
Coral Gingham Pinafore Dress Crochet — Step-by-Step Tutorial
What you’re making
This is a toddler-size crochet pinafore dress with a sweet coral-and-white gingham check pattern, wide shoulder straps, and a flared skirt that drapes like the photo. The look is clean, graphic, and “spring picnic”—perfect for Easter photos, layering over a onesie, or pairing with a little cardigan. The key to nailing this exact vibe is crisp color changes and consistent tension so the checks stay square.
Materials + tools
- Worsted weight (Category 4) yarn in coral and white (smooth cotton or cotton-blend gives the sharpest check; soft acrylic also works)
- Crochet hook: 5.0 mm (H/8) as a starting point (go down to 4.5 mm for tighter checks or up to 5.5 mm for more drape)
- Stitch markers (at least 6)
- Yarn needle (tapestry needle) for weaving in ends
- Scissors
- Measuring tape or ruler
- Optional: lightweight lining fabric (cotton batiste), snaps or small buttons for strap closure, steam iron for blocking (use care with acrylic)
Finished size + customization notes
- Shown style fits roughly 18–24 months / 2T (approx. 18–20" chest with ease; skirt length around 10–12" from waist depending on rows).
- To size up/down: the easiest method is change the yoke width (stitch count across front/back) and/or add/remove skirt increase rounds.
- Checks: you’ll be making two stitches of coral + two stitches of white repeatedly (a classic mini-gingham). If your checks look stretched into rectangles, adjust hook size or tighten color-carrying tension.
Step-by-step instructions
1) Gauge + swatch (don’t skip—gingham shows everything)
- With coral, chain 22.
- Work 1 row of single crochet (sc) across (21 sc). Turn.
- Begin gingham: 2 sc coral, 2 sc white across. Carry the unused color neatly along the top of the row (inside the stitch).
- Work 8–10 rows, alternating colors the same way. Visual checkpoint: Your squares should look like tidy little puffs, not long bricks. If the white “dots” look skinny, go down a hook size.
2) Build the bodice panel (front and back as one piece)
This dress looks like a pinafore with a squared neckline and straps—so we’ll crochet a rectangular bodice that later gets straps and skirt.
- With coral, chain a multiple of 4 + 1. For a 2T look: chain 73 (72 + 1).
- Row 1: sc in 2nd chain from hook and across (72 sc). Turn.
- Rows 2–(bodice height): Work gingham sc:
- Ch 1, 2 sc coral, 2 sc white across.
- Turn and repeat, keeping color blocks stacked so checks align.
- Continue until the bodice panel measures about 6–7" tall. Visual checkpoint: The photo’s bodice has a tidy, structured feel—aim for a firm fabric that holds shape.
3) Shape armholes and neckline (the pinafore cut)
We’ll create the gentle inward curve at the top sides for armholes and leave a scoop/square opening for the straps.
- Divide the panel into front + back by folding in half lengthwise. Mark side edges and center.
- For armholes: on each side edge, you’ll skip a small section at the top.
- Mark 8–10 stitches at each side edge for toddler armhole spacing.
- Work rows back and forth only across the center stitches, leaving those armhole stitches unworked.
- Continue for 2–3" to create the upper chest band. Visual checkpoint: You should now see a “shorter” upper section, like a bib shape, with open armholes on each side.
4) Crochet the straps (wide and checkered)
The straps in the photo are wide and keep the gingham consistent.
- Decide strap placement: measure from each outer edge inward about 8–10 stitches. Mark strap start points on front and back.
- For Strap 1 (front to back):
- Attach coral at front strap start.
- Work a strap width of about 10–12 stitches in gingham sc.
- Crochet upward for 6–7", then join to the matching point on the back with slip stitches (or sew later).
- Repeat for Strap 2. Options if fit is unclear:
- If you want adjustable straps, stop 1" early and add a button loop (chain 6–8, slip stitch to form loop) and sew a button to the back. Visual checkpoint: Straps should sit parallel and evenly spaced like the photo—no twisting.
5) Seam the sides
- With the bodice folded right sides together, seam the side edges from underarm down to the waist line using slip stitch or mattress stitch.
- Leave the armholes open. Tip: Mattress stitch gives the cleanest “store-bought” seam.
6) Add a clean neckline/armhole border
The photo shows a crisp edge around the top.
- Join coral at one back strap corner.
- Work sc evenly around neckline and strap edges.
- Add 1 more round of sc for firmness. Visual checkpoint: The neckline should look smooth and slightly raised.
7) Start the skirt at the bodice bottom
This skirt flares significantly—achieved by controlled increases.
- Join coral at the bodice bottom edge.
- Round 1: sc evenly around, maintaining gingham (2 coral, 2 white). Place a marker at the round start.
- Round 2 (increase round): sc 5, inc around (increase every 6th stitch).
- Work 2 plain rounds.
- Repeat an increase round every 3rd round until the skirt reaches desired fullness. Visual checkpoint: Your skirt should start to “cup” outward and then relax into a bell shape—like the photo’s wide hem.
8) Keep the gingham aligned
To keep checks stacked:
- Always switch colors on the same stitch counts (2 and 2).
- If your round starts shifts the pattern, “cheat” once by doing 1 stitch of a color before returning to 2-and-2 blocks. Visual checkpoint: The check columns should look straight, not spiraled.
9) Length and hem
- Continue rounds until skirt length from waist is about 10–12" (or desired).
- Finish with 2 rounds of coral sc to frame the hem.
- Optional scallop: the photo’s hem is neat and slightly rounded; you can add a subtle scallop:
- Skip 1, 5 dc in next, skip 1, sl st in next around. Tip: Keep scallops shallow so it stays “pinafore-modern,” not overly frilly.
Troubleshooting (common mistakes + fixes)
- Checks look messy or “speckled”: You’re carrying yarn too loosely or switching mid-stitch. Carry the unused color along the top of the row and always complete the last yarn-over with the new color.
- Fabric is stiff and doesn’t drape: Hook is too small or tension too tight. Size up 0.5 mm and re-swatch.
- Skirt ruffles too much: Too many increases too quickly. Remove one increase round (space them farther apart).
- Skirt is too flat/straight: Add increases more frequently (every other round for a few repeats), or increase every 5th stitch instead of every 6th.
- Straps fall off shoulders: Bring straps closer to the center by 2–4 stitches, or add a small back button closure for security.
- Neckline ripples: Too many border stitches. Rip the border and work fewer sc around (skip an extra stitch every 8–10 stitches).
Finishing details
- Weave in ends meticulously (gingham creates lots of ends). Weave through same-color areas for invisibility.
- Block lightly: Pin straps and skirt hem to shape; steam from a distance or wet-block if using cotton.
- Optional lining: For extra polish, sew a simple cotton lining to the inside of the skirt only. Tack at waist seam and side seams—this keeps the dress from catching little legs.
- Optional upgrades (pick 2–4):
- Add a tiny front pocket (solid coral) for an egg-hunt moment.
- Add a back cross-strap option for a trendier pinafore silhouette.
- Stitch a slim waist tie in coral (chain cord) and cinch slightly for shape.
- Add a monogram tag or small crocheted flower at one strap base.
Shop Similar
- Worsted cotton yarn coral and white
- Crochet hook set with 5.0mm and 4.5mm
- Stitch markers for crochet locking
- Tapestry needles for weaving ends
- Cotton fabric for skirt lining
Style It With
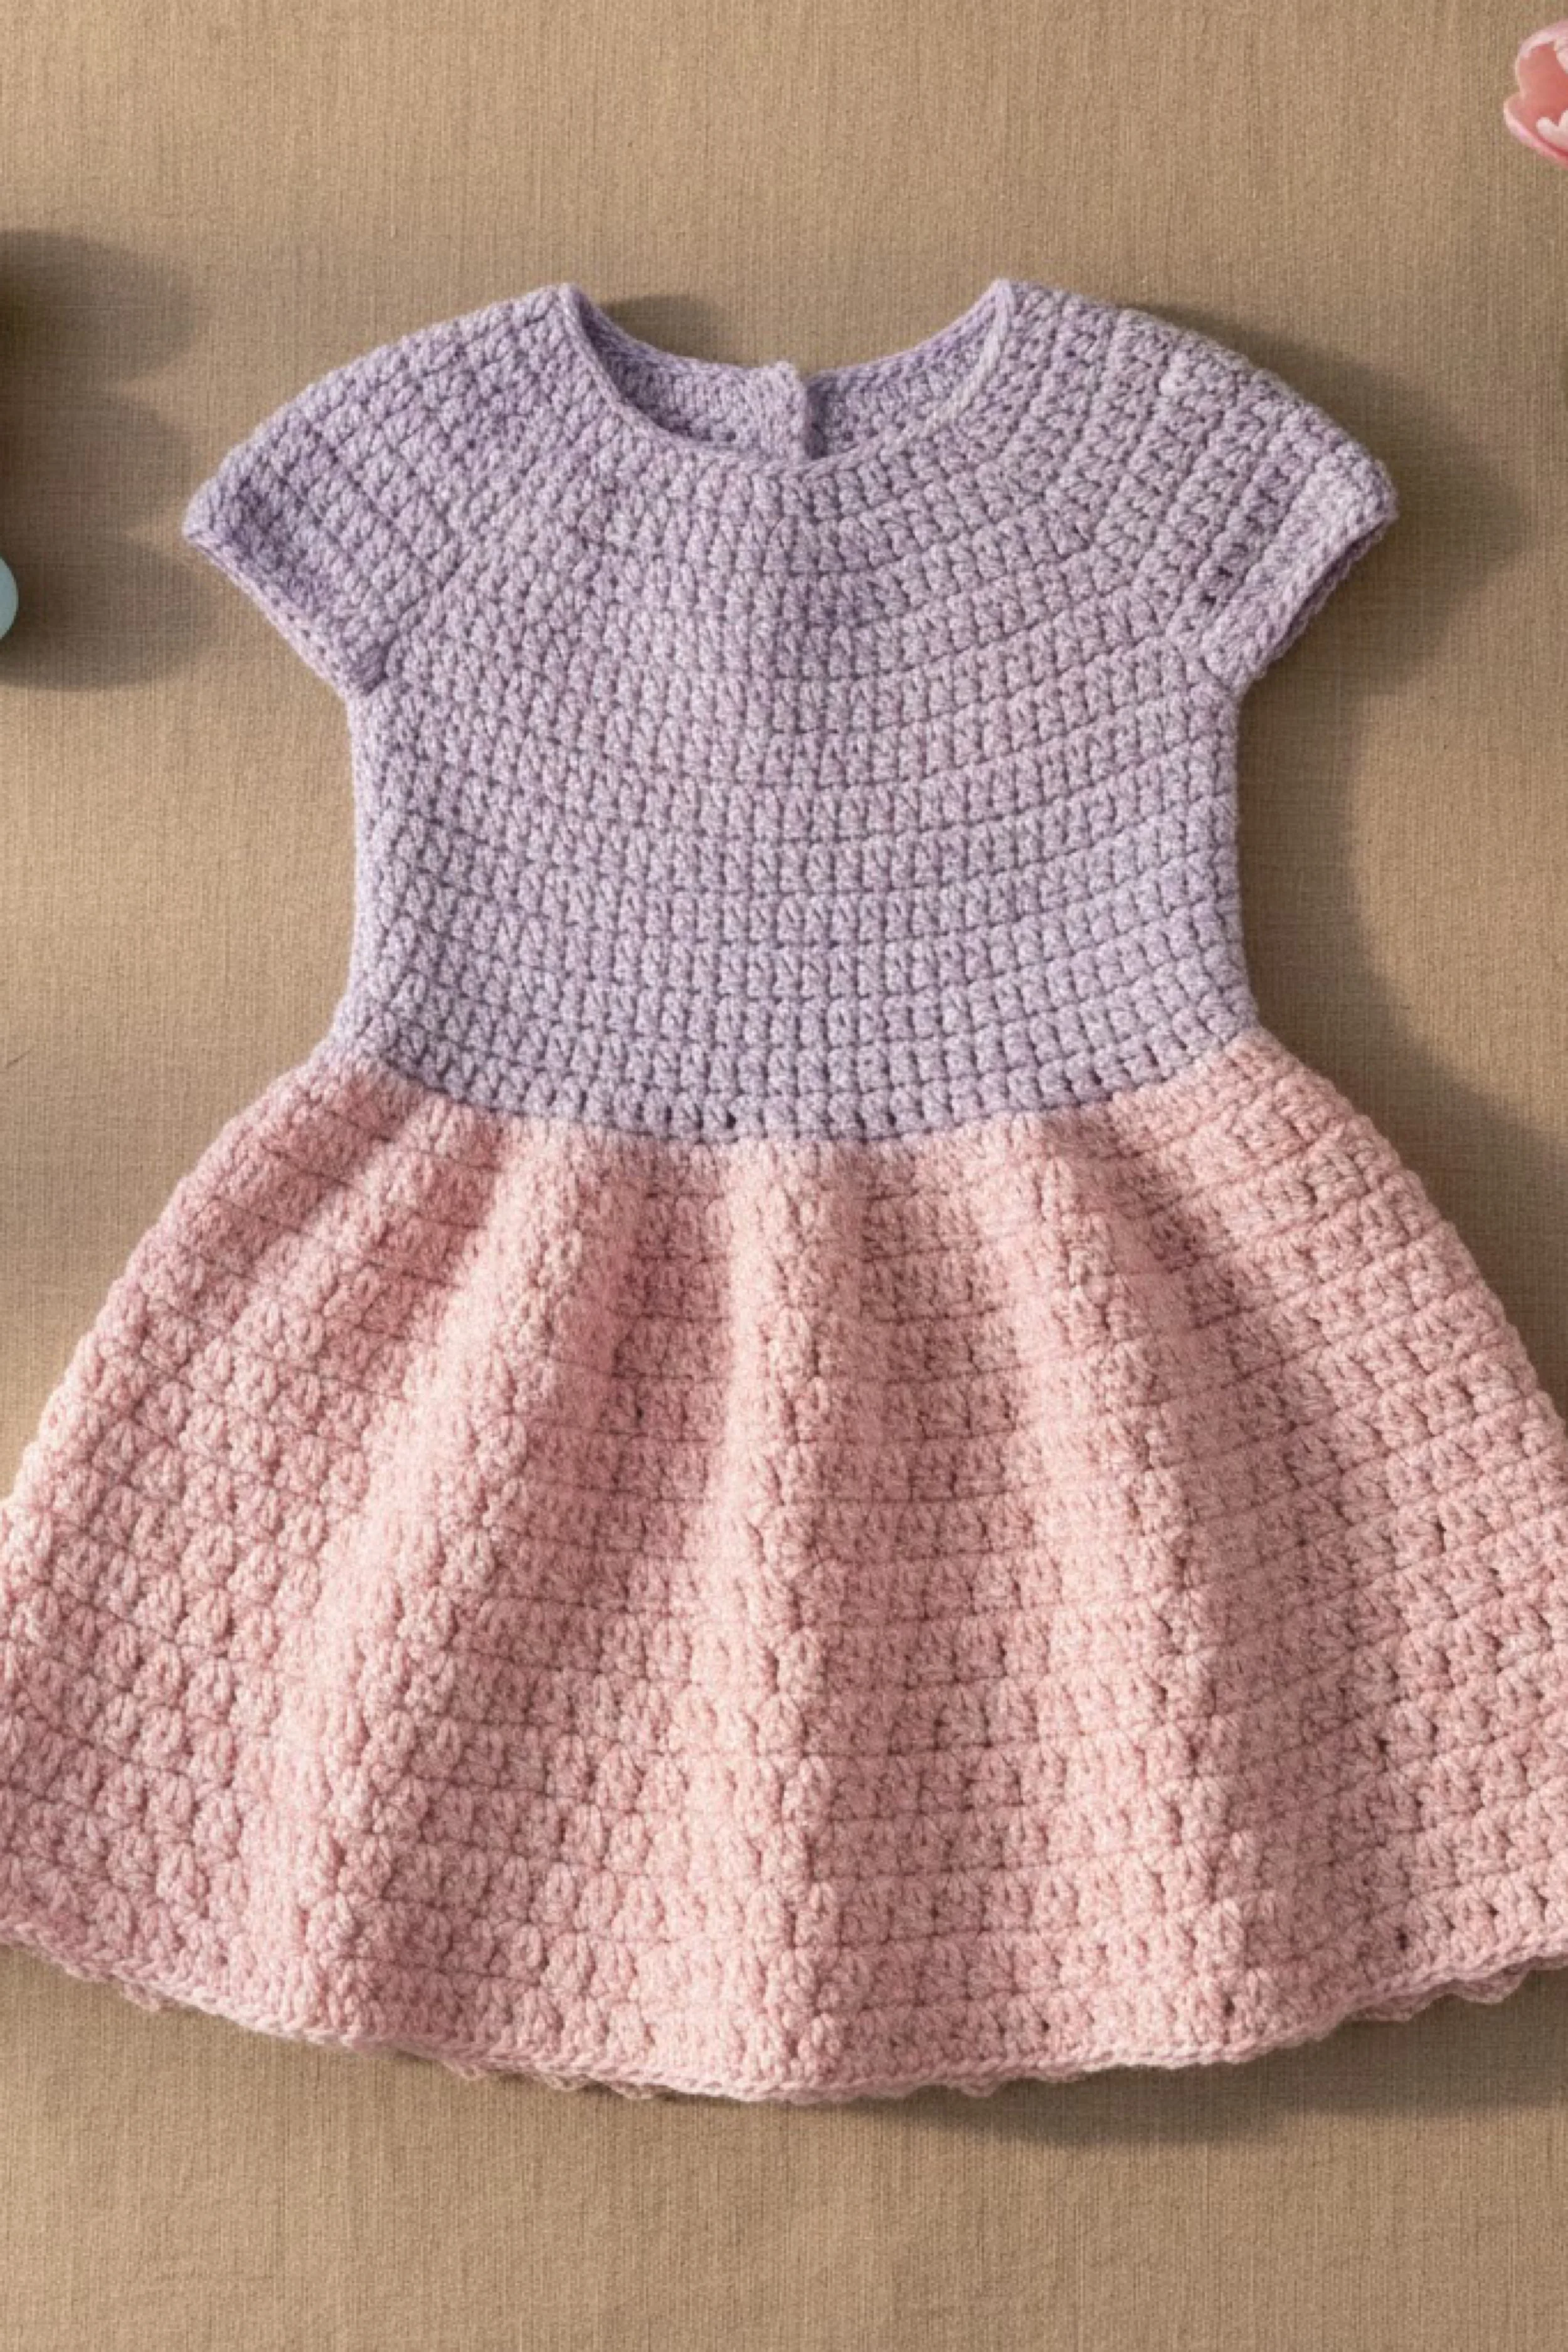
Two-Tone Pastel Twirl Dress Crochet DIY Guide (Lavender Bodice + Blush Skirt)
What you’re making
This is a toddler twirl dress with a soft lavender yoke, cap sleeves, and a blush-pink skirt that flares gently from the waist—exactly the “Easter Sunday” silhouette in the photo. The texture reads like tidy half-double crochet (or a similarly plush stitch) that makes the fabric look cozy and slightly structured. The secret here is a smooth, even circular yoke that sits flat, then a clean color change and steady increases for the skirt’s swing.
Materials + tools list
- Worsted weight yarn (Category 4) in lavender and blush pink (a matte acrylic or cotton-blend matches the photo’s soft, velvety look)
- Crochet hook: 5.0 mm (H/8) (adjust as needed for drape)
- Stitch markers (at least 8)
- Yarn needle + scissors
- Measuring tape
- Optional: 2–3 small buttons or a snap strip for back neck closure
- Optional: thin elastic thread (for gentle waist shaping), ribbon for a bow, fabric for lining
Finished size + customization notes
- Photo reads like 2T / small toddler with a modest neckline and short sleeves.
- Adjusting width: yoke rounds determine chest size. Adjusting length: add skirt rounds.
- If you’re between sizes, choose fit-by-chest first (toddlers can always wear a slightly longer skirt).
Step-by-step instructions
1) Choose the stitch that matches the texture
The dress texture looks like consistent, slightly “ridged” stitches—half double crochet (hdc) is a great match.
- We’ll use hdc for yoke and skirt for that plush, uniform look.
- If you want more drape, use double crochet (dc). Visual checkpoint: Your fabric should look like neat horizontal rows, not lacy holes.
2) Start at the neckline (top-down circular yoke)
- With lavender, make a magic ring (or chain 4 and join).
- Round 1: ch 2 (counts as hdc), work 11 hdc into ring. Join (12 hdc).
- Round 2: ch 2, inc (2 hdc) in each stitch around. Join (24).
- Round 3: ch 2, hdc, inc around. Join (36).
- Round 4: ch 2, 2 hdc, inc around. Join (48).
- Continue increasing evenly each round until the yoke circumference fits the child’s chest/shoulder span.
- Typical stopping point for 2T: 72–84 hdc around, depending on yarn and hook. Visual checkpoint: The yoke should lie flat like a little crocheted plate. If it starts to ripple, you’re increasing too much—skip a few increases next round.
3) Create the back neck opening (the tiny slit in the photo)
That little opening at the back helps the dress slip over a toddler head. Option A (easy): Crochet yoke in joined rounds until close to size, then:
- Stop joining. Work back-and-forth rows across the top back section only for about 1–1.5" to create a slit.
- Add 2–3 button loops on one side (chain 6–8, skip stitches, slip stitch).
- Sew buttons to the other side. Option B (super simple): Sew a small snap strip later and keep neckline stretchier.
4) Mark sleeve “corners” and separate body from sleeves
To get cap sleeves, we’ll create armhole spaces.
- Lay the yoke flat and find four “corners” (front center, back center, and both shoulders). Place markers.
- Count stitches between markers so front and back are similar (sleeve sections slightly smaller).
- At the first sleeve section: chain 6–10 (depending on size) to create an underarm gap, skip the sleeve stitches, and continue around for body.
- Repeat for second sleeve. Visual checkpoint: You now have a tube forming for the body, and two open sleeve holes at the sides.
5) Crochet the lavender bodice length
- Continue in joined rounds with lavender hdc.
- Work until bodice length from underarm is about 4–5". Tip: The photo’s bodice is fairly long before the skirt begins—don’t start the skirt too high.
6) Clean color change at the waist
- On the last lavender stitch of the final bodice round, pull through with blush pink to complete the stitch.
- Join blush, ch 2, and continue. Visual checkpoint: The color break should look crisp, like a neat waistband line.
7) Build the blush skirt (twirl factor)
To get that gentle flare, increase gradually in the first few skirt rounds.
- Round 1 (skirt start): hdc around with blush.
- Round 2: hdc 3, inc around.
- Rounds 3–4: hdc around (no increases).
- Round 5: hdc 4, inc around.
- Repeat an increase round every 3–4 rounds until the skirt matches the fullness you see in the photo. Visual checkpoint: The skirt should hang in a soft bell. If it starts making ruffles, reduce increase frequency.
8) Optional waist shaping (subtle, photo-friendly)
If you want a slightly more defined waist:
- Work one round of hdc in the back loop only right at the waist to create a tiny ridge.
- Or weave a thin elastic thread through the waist round (not tight—just supportive).
9) Add the cap sleeves
The sleeves in the photo are short and tidy.
- Join lavender at the sleeve opening.
- Round 1: work hdc evenly around (you may need to place 2 hdc into each underarm chain space).
- Round 2: hdc around.
- Round 3: optional slight decrease: hdc 6, dec around for a closer sleeve hug.
- Finish with 1 round of sc for a clean edge. Visual checkpoint: Sleeves should angle outward slightly like a cap—not droop like a long sleeve.
10) Finish the neckline
- Join lavender at neckline.
- Work 1 round of sc evenly.
- Add a second round of sc if you want more structure. Tip: If neckline feels tight, switch to a larger hook for the edging only.
11) Hem finish
The hem in the photo is simple and softly rounded.
- Work 1 round of sc, then 1 round of slip stitch for a clean finish. Optional: add a tiny picot edge (sc, ch 3, sl st in first ch) every few stitches—keep it subtle.
Troubleshooting section
- Yoke ripples: Too many increases. On the next round, work a full round of hdc with no increases, then resume slower increases.
- Yoke cups upward: Not enough increases. Add one extra increase every 6–8 stitches for the next round.
- Skirt ruffles: Increases too frequent. Rip back one increase round and space increases farther apart.
- Skirt too straight: Add one extra increase round early (every other round for two repeats), then slow down again.
- Sleeve holes too tight: Increase the underarm chain count by 2–4 next time, or add a gusset: crochet a small triangle and sew in.
- Back neck gap is messy: Add a sc border around the slit and reinforce button loops with slip stitches.
Finishing details section
- Weave ends with a yarn needle, following stitch paths so ends vanish.
- Light blocking: Pin bodice edges and skirt hem flat; steam gently to relax stitches (especially if cotton).
- Optional lining: A thin cotton lining in the skirt helps the twirl stay smooth and prevents snagging.
- Optional upgrades (2–4 ideas):
- Add a tiny bow at the waist seam (lavender ribbon or crochet bow).
- Add a scallop hem in blush for a more dressy finish.
- Add a contrasting waistband (one round of white) between lavender and blush.
- Add back buttons in pearl style for an heirloom look.
Shop Similar
- Worsted yarn lavender and blush pink
- Soft acrylic yarn anti-pilling
- Small buttons for baby garments
- Snap tape for sewing crochet closures
- Blocking mats and T-pins set
Style It With
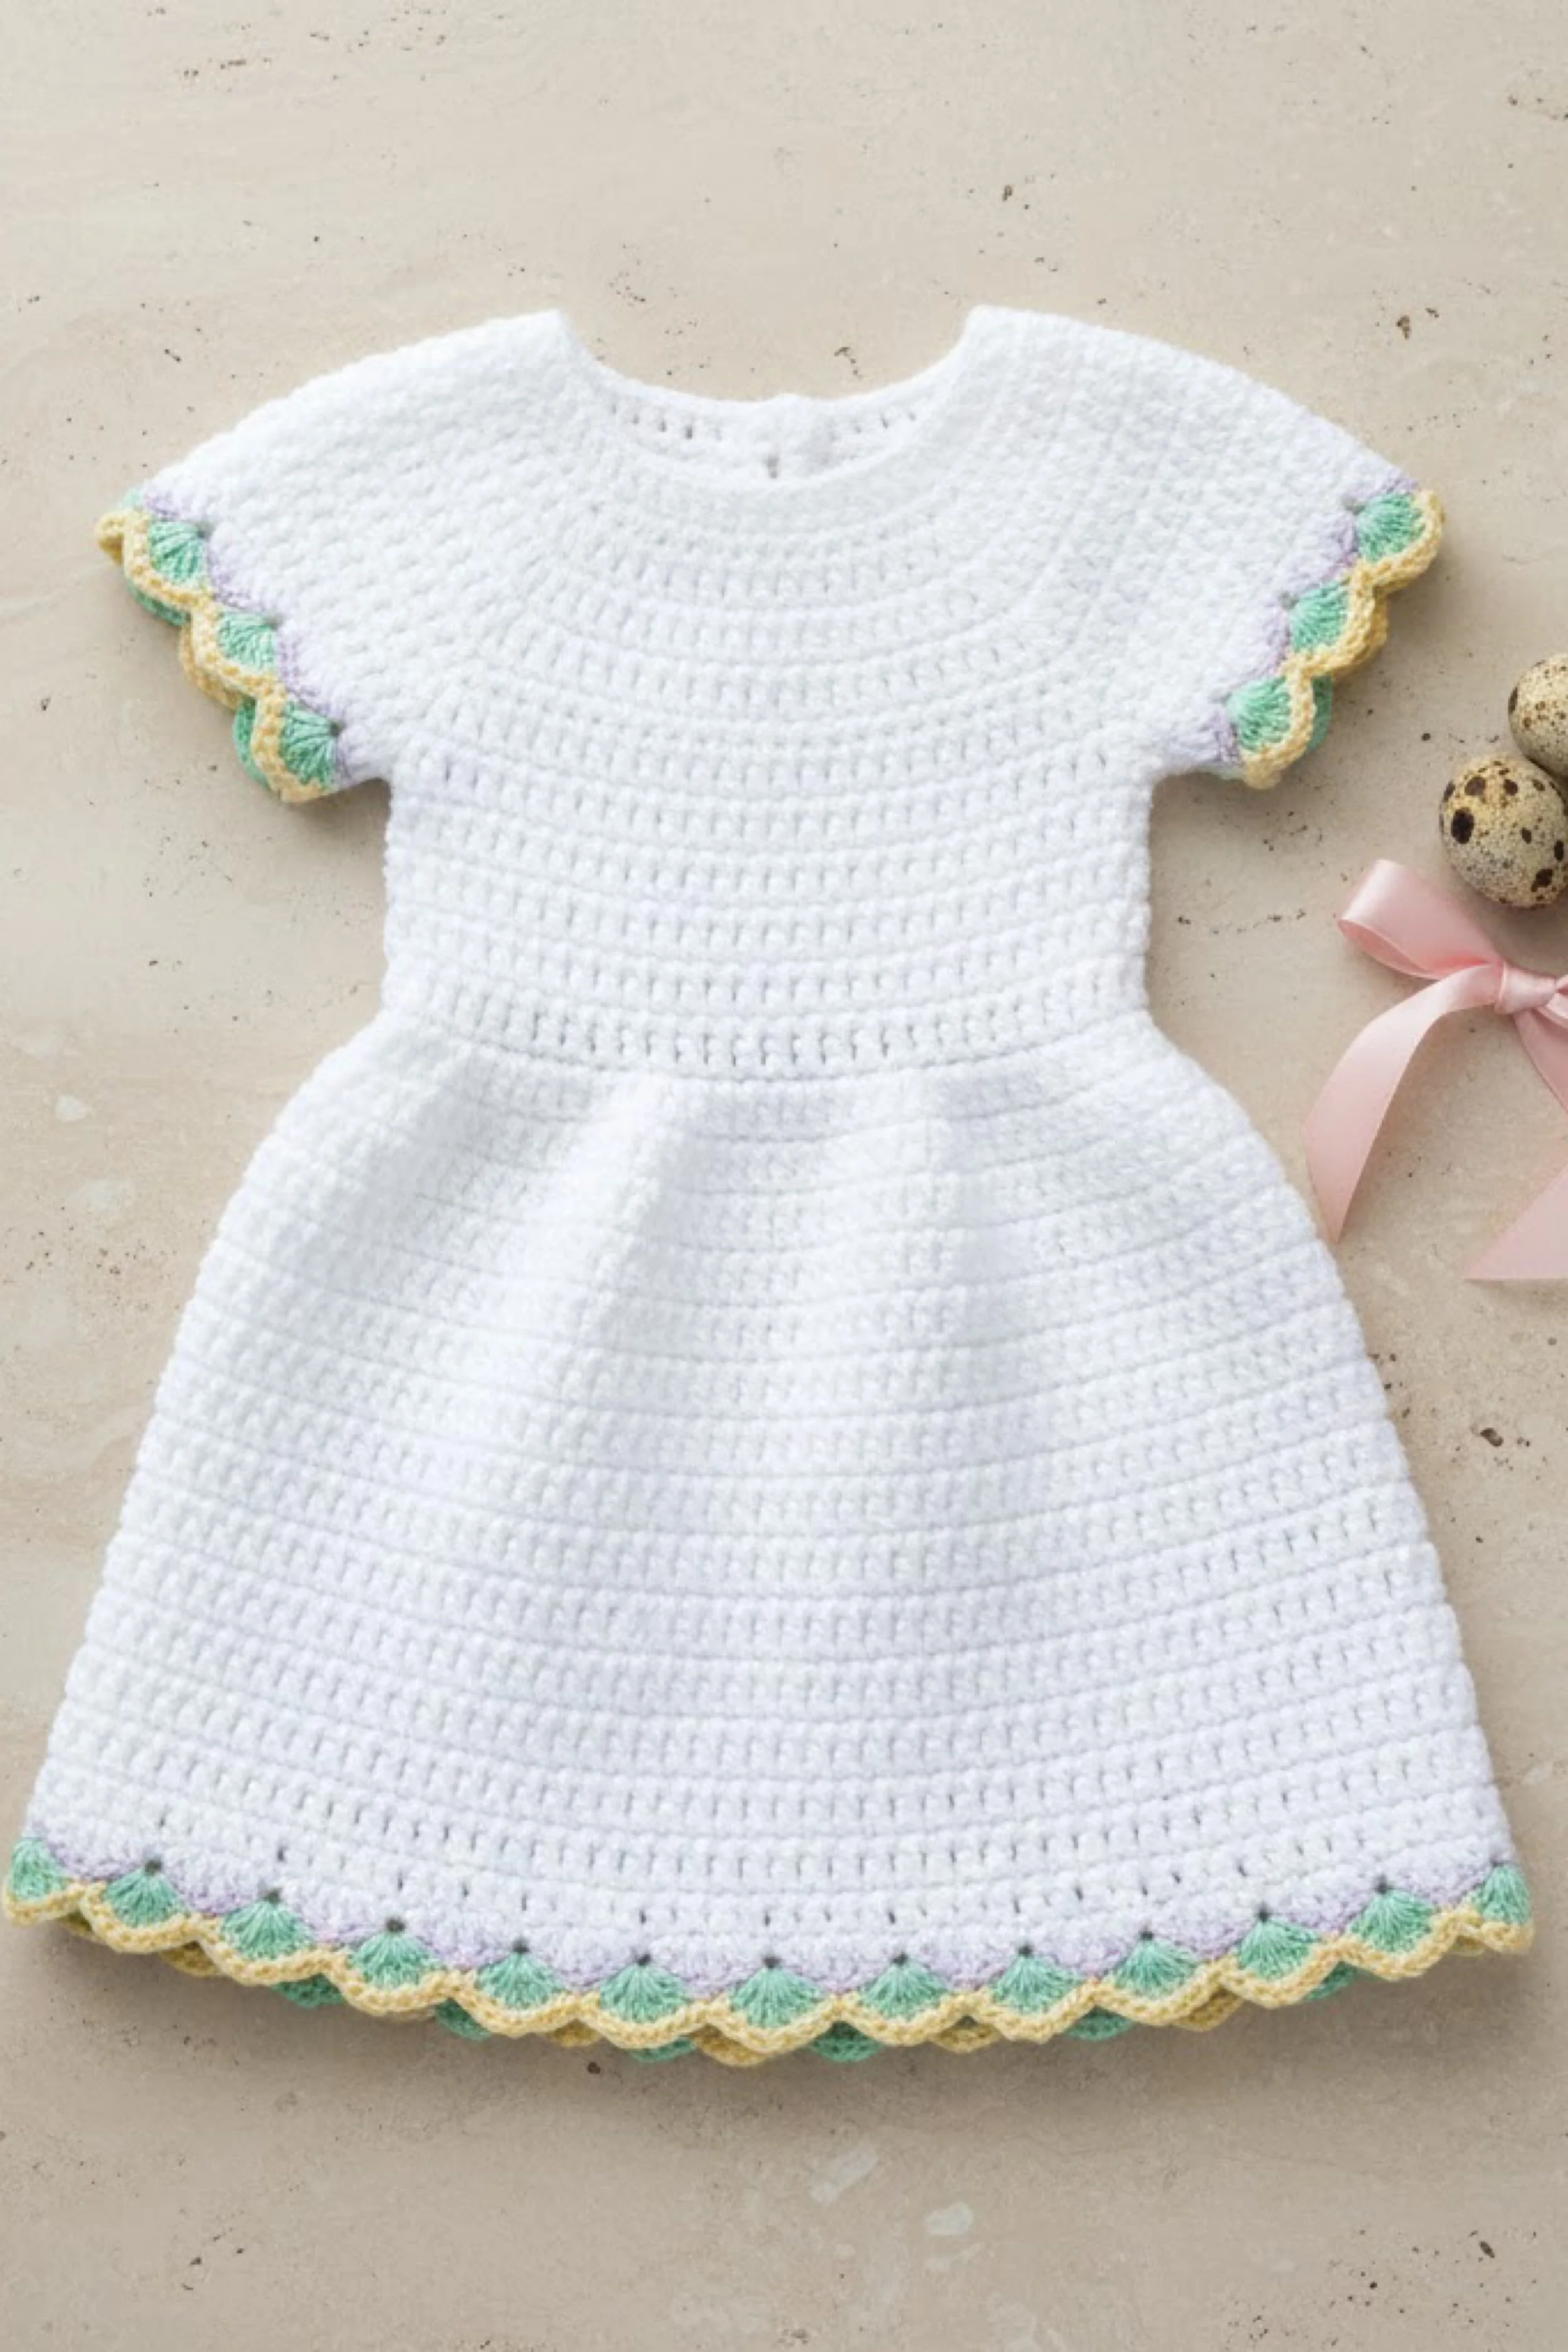
Classic White Heirloom Crochet Dress with Pastel Shell Trim — How-To Guide
What you’re making
This is a classic white toddler dress with a clean, simple bodice and skirt, finished with the prettiest pastel scallop/shell edging on the sleeves and hem—exactly like the photo’s soft mint, lilac, and buttery yellow trim. The silhouette is timeless and “Easter portrait” ready: crisp white, gentle structure, and a decorative edge that feels special without being fussy. The whole look hinges on tidy rows and a bold, even shell border.
Materials + tools list
- Worsted weight yarn (Category 4) in white (main)
- Small amounts of pastel yarn in mint, lilac, and pale yellow (for trim)
- Crochet hook: 5.0 mm for main fabric; optional 4.5 mm for edging for extra crisp scallops
- Stitch markers
- Yarn needle, scissors
- Measuring tape
- Optional: lightweight lining fabric (white cotton), snaps/buttons for back neck, fabric glue (for ribbon only—keep glue off yarn)
Finished size + customization notes
- This reads like a 2T dress with short sleeves and a gently flared skirt.
- It’s easy to customize:
- Make it a top: stop after bodice and add a shorter hem border.
- Make it longer: add skirt rounds/rows before the hem trim.
- Change trim palette: keep the same edging pattern and swap colors for any holiday.
Step-by-step instructions
1) Pick the main stitch (matches the photo’s smooth texture)
The white fabric looks like a simple, dense stitch with subtle row lines—half double crochet (hdc) is a strong match.
- We’ll do a top-down yoke in hdc, then body rounds in hdc. Visual checkpoint: Your stitches should look uniform and slightly plush, not holey.
2) Start the yoke at the neckline (top-down)
- With white, make a magic ring.
- Round 1: ch 2, 11 hdc into ring. Join (12).
- Round 2: ch 2, inc in each stitch (24).
- Round 3: ch 2, hdc, inc around (36).
- Round 4: ch 2, 2 hdc, inc around (48).
- Continue increasing evenly until the yoke is wide enough to reach shoulder tips and comfortably fit the head.
- Typical toddler: 72–84 hdc total around. Checkpoint: Yoke lies flat. If it starts waving, pause increases for 1 round.
3) Create sleeve openings
- Place markers at approximate “corner” points for sleeves (divide into 4 sections: front, sleeve, back, sleeve).
- Round to separate:
- Work across front stitches.
- Chain 6–10 for underarm.
- Skip sleeve stitches.
- Work across back stitches.
- Chain 6–10.
- Skip second sleeve stitches.
- Join round. Checkpoint: You now have a body tube and two sleeve holes.
4) Crochet bodice + skirt in one clean flow
The photo’s waist isn’t sharply defined; it transitions smoothly.
- Work hdc rounds in white for 4–5" from underarm (bodice).
- Begin skirt shaping:
- Round 1 increase: hdc 4, inc around.
- Work 2 plain rounds.
- Next increase: hdc 5, inc around.
- Continue until skirt length is where you want it (typically 10–12" from waist line). Checkpoint: The dress should hang like a gentle bell.
5) Add the sleeve edging base
We’ll keep sleeves short and then add shell trim.
- Join white at sleeve opening.
- Work 1–2 rounds of hdc (short sleeve length).
- Finish with 1 round of sc to stabilize the edge. Checkpoint: Sleeve edge looks firm and even—perfect foundation for shells.
6) Add the pastel shell trim (the signature detail)
The trim shows layered scallops with alternating pastel tones. Approach: Create a shell round using one pastel, then a second shell/contrast accent.
- Choose sleeve trim sequence (example): mint → lilac → yellow repeating.
- Join mint at sleeve edge.
- Work shells: (sl st, skip 1, 5 dc in next stitch, skip 1, sl st in next) repeat around.
- Switch to lilac for the next shell round (optional accent):
- Work sl st into the center dc of each shell, ch 2, 2 dc into same space to create a petite top scallop.
- Repeat with pale yellow if you want a third micro-layer. Safe options if unclear:
- If you want it simpler, do one shell round only using a pastel blend.
- If you want it closer to the photo’s layered look, do two rounds: one bigger shell + one small accent.
7) Hem trim with the same shell pattern
- Join pastel yarn at the bottom hem.
- Work the same shell repeat around the skirt hem.
- Add a tiny contrast round (optional) for that “finished” ribbon-like edge. Checkpoint: The scallops should be evenly spaced and not pulling the hem tight.
8) Back neck finishing (if you need a closure)
If your neckline is snug:
- Add a small back slit with 2–3 buttons, or a snap strip. If your neckline fits comfortably:
- Just add 1–2 rounds of sc around neckline for a clean frame.
Troubleshooting section
- Shells curl inward: Your base edge is too tight. Use a larger hook for the shell round, or add one extra skipped stitch between shells (skip 2 instead of 1).
- Hem ruffles: Too many shells for the stitch count. Reduce shell frequency by skipping 2 stitches between shells.
- Hem pulls tight: Too few shells or too tight tension. Use larger hook or reduce skipped stitches.
- Pastel colors look uneven: Always complete the last yarn-over of the previous stitch with the new color. Weave ends thoroughly behind shells.
- Skirt won’t flare: Add an extra increase round early, or increase more frequently for 2 rounds then slow down.
Finishing details section
- Weave in ends behind shell clusters so they vanish.
- Block the scallops: Pin each scallop point evenly around; steam lightly to set the shape.
- Optional lining: A lightweight white lining makes the dress feel heirloom and helps the skirt hang smoothly.
- Optional upgrades (2–4 ideas):
- Add a satin waist ribbon (thread through a round of chain spaces at the waist).
- Crochet a tiny matching pastel flower for the bodice.
- Add a picot neckline for extra vintage charm.
- Make the hem trim ombré (mint → lilac → yellow around the skirt).
Shop Similar
- White worsted cotton yarn
- Pastel yarn bundle mint lilac yellow
- Crochet hooks 4.5mm and 5.0mm
- Sew-on snaps for baby clothes
- Cotton fabric lining white
Style It With
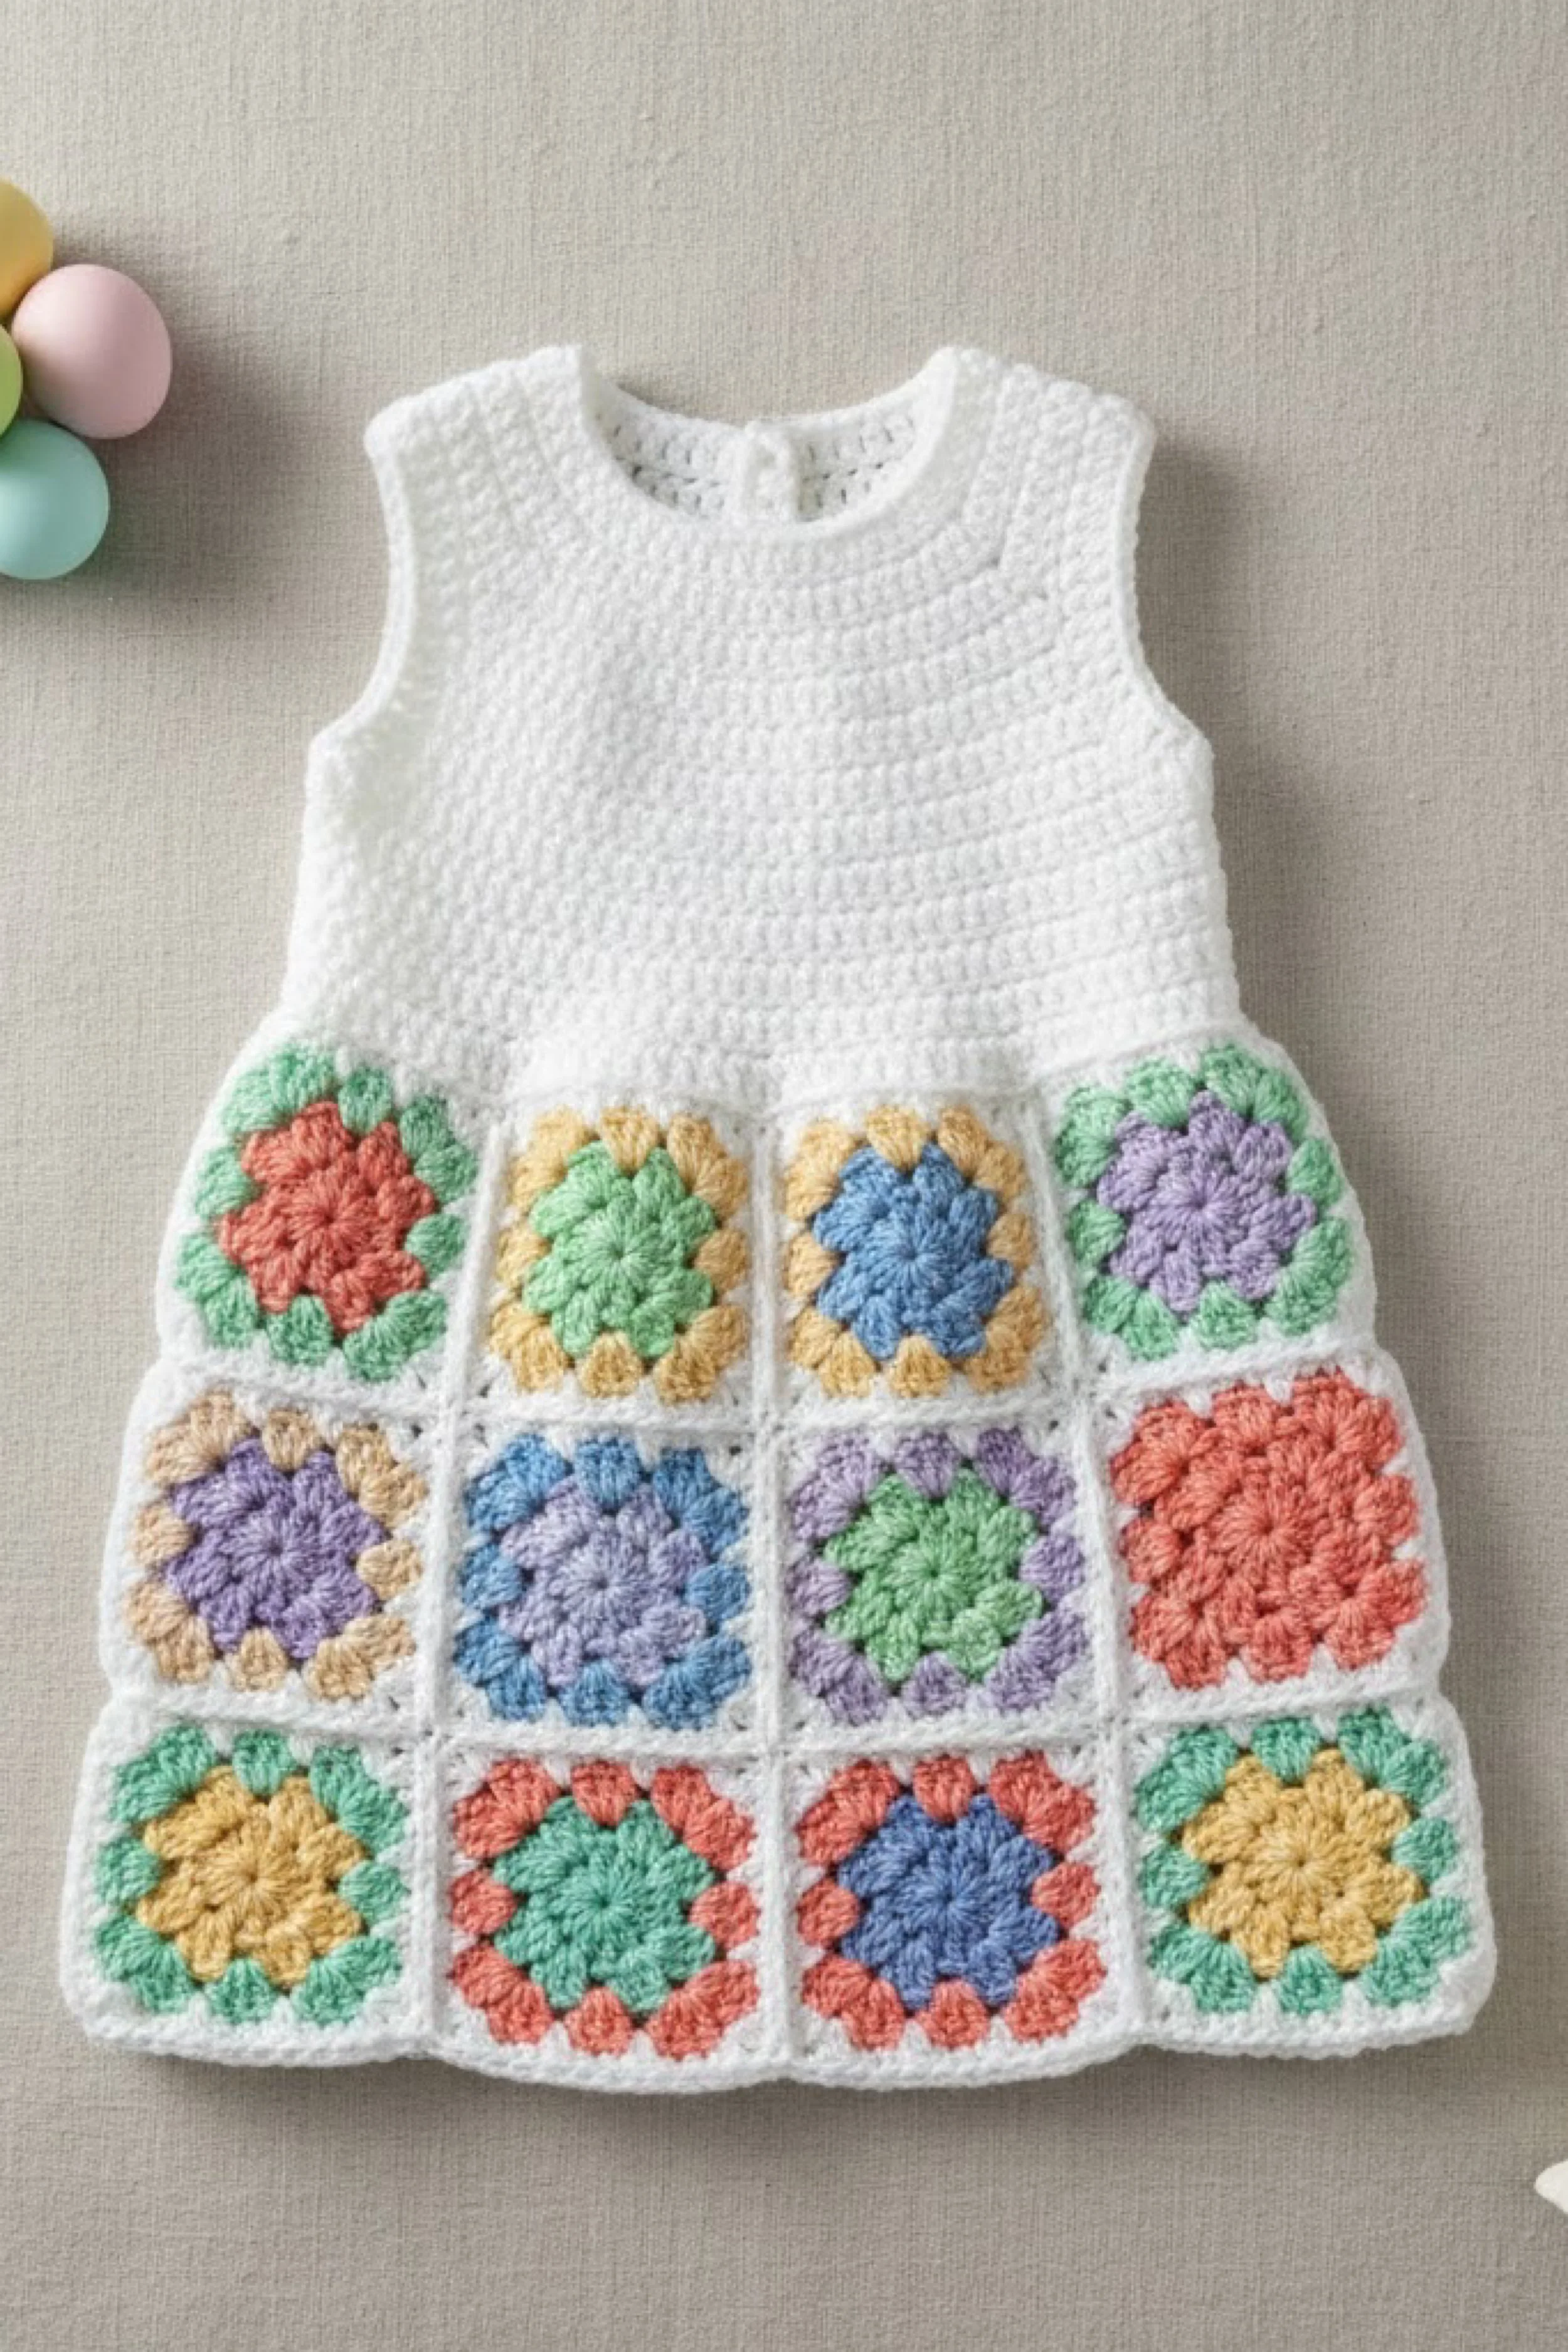
Granny-Square Garden Panel Toddler Dress — Make-It-Yourself Tutorial
What you’re making
This dress is a bright, cheerful granny-square panel skirt paired with a clean white crochet bodice—exactly the “spring quilt” vibe in the photo. The bodice is simple and structured (so the squares really pop), and the skirt is built from a grid of flower-style granny squares in pastel rainbow colors, bordered in white for a crisp, modern finish. The magic is in consistent square sizing and neat joining so the panel lies flat and looks boutique-level.
Materials + tools list
- Worsted weight yarn (Category 4) in white (bodice + joining + borders)
- Small amounts of worsted yarn in pastels (coral, mint, butter yellow, sky blue, lilac—like the photo)
- Crochet hook: 5.0 mm (use same hook for squares + bodice to keep scale consistent)
- Stitch markers
- Yarn needle + scissors
- Measuring tape
- Optional: small button/snap for back neck, fabric lining for skirt, blocking mats/pins
Finished size + customization notes
- The sample looks like a toddler pinafore-dress fit, around 2T.
- Panel skirt sizing is flexible:
- Add a row of squares for width.
- Add a row of squares for length.
- If your squares are slightly larger/smaller than the photo, adjust hook size or yarn weight—panel size changes fast.
Step-by-step instructions
1) Make one “flower granny” square (match the photo’s petal center)
We’ll create a classic layered flower square.
- Center (Color A): magic ring, ch 3, 11 dc into ring. Join (12 dc).
- Petal round (Color B): ch 1, sc in stitch, (hdc, dc, hdc) in next stitch, sc in next repeat to form petals. Join.
- Square-up round (White): work corners with (2 dc, ch 2, 2 dc) and sides with dc groups so you form a square. Checkpoint: Your square corners should be crisp and your flower centered.
2) Standardize your square size (critical for a clean panel)
- Make 2–3 squares and measure them.
- If they vary, your tension is changing—slow down, count stitches, and block lightly. Tip: Block each square once finished (pin to the same measurement). This makes joining look instantly professional.
3) Plan the skirt panel layout (like the photo)
The photo shows a neat grid of squares—approximately 3 squares wide across the front panel, with multiple rows down. A solid toddler-friendly layout:
- Width: 3 squares across front (and 3 across back if you wrap fully), or 3 across total as a front panel with side white panels.
- Length: 3 rows of squares for skirt depth. Safe options if unclear:
- If you want a full skirt, make a complete ring of squares around the body.
- If you want the exact “panel” look, keep squares on the front and use plain white on the back.
4) Make your squares (color story)
Create 9–12 squares in alternating palettes:
- Coral flower + mint border accents
- Mint flower + butter border accents
- Blue flower + butter accents
- Lilac flower + mint accents Checkpoint: When arranged, the colors should feel evenly distributed—no heavy cluster of one color.
5) Join squares with a clean white seam
The photo’s joining lines are white and visible (like a tidy lattice). Option A: Slip stitch join (crisp)
- Place two squares right sides together.
- Slip stitch through both loops along the edge.
- Repeat to create rows, then join rows together. Option B: Mattress stitch (flatter seam, very polished)
- Sew through the outer loops with white yarn. Checkpoint: Your seams should look straight and even, forming a clean grid.
6) Add a white border to the panel (frames the squares)
- Join white at any corner.
- Round 1: sc evenly around, placing (sc, ch 2, sc) in each corner.
- Round 2: hdc around for a slightly thicker frame. Checkpoint: The border makes the panel look intentional and “finished,” not just joined pieces.
7) Crochet the white bodice (top-down yoke)
- With white, make a magic ring.
- Work a flat yoke in hdc (increase evenly) until shoulder width fits.
- Separate sleeves the same way as earlier dresses (chain underarms, skip sleeve stitches).
- Work bodice rounds in white until you reach waist. Checkpoint: Bodice fabric should be smooth and consistent so the skirt panel stands out.
8) Attach the granny panel skirt to the bodice
This is the make-or-break step for fit.
- Measure bodice circumference at waist.
- Measure panel top edge.
- If panel is wider: add a small gather by sewing with gentle ease (don’t bunch—just distribute).
- If panel is narrower: add a white side strip (crochet a rectangle in white and seam it between panel edges) or add another column of squares.
- Seam the panel to the bodice using slip stitch or whip stitch. Checkpoint: The seam should sit flat like a waistband, with no puckers.
9) Finish the skirt (optional extra length)
If you want a slightly longer skirt like the photo:
- Add 3–6 rounds of white hdc at the bottom of the panel before edging (or after, depending on look). Tip: Keeping the bottom clean lets the squares stay the star.
10) Neckline + armhole finishing
- Work 1–2 rounds of sc around neckline.
- Work 1 round of sc around armholes (or tiny cap sleeves if desired). Checkpoint: Edges should look crisp and snug—not wavy.
11) Optional back closure
- Add a small slit at the back neck and sew a button, or attach snaps.
Troubleshooting section
- Squares don’t match size: Block them to the same measurement. If they’re still off, remake the odd ones—panel garments show inconsistencies.
- Panel ripples after joining: Your join tension is too tight. Re-join with looser slip stitches or use mattress stitch.
- Waist seam puckers: Panel and bodice widths mismatch. Adjust with side strips, or ease in evenly with many small stitches.
- Bodice stretches out: Use a smaller hook for bodice edging, or add one sc round at the waist to stabilize before attaching panel.
- Skirt feels stiff: Use cotton-blend with drape or increase hook size by 0.5 mm for the panel border.
Finishing details section
- Weave in ends behind seams and within white borders for invisibility.
- Block the panel flat and square before final attachment (huge difference).
- Optional lining: Add a lightweight lining behind the granny panel to prevent toes snagging through square gaps and to help it hang smoothly.
- Optional upgrades (2–4 ideas):
- Add a tiny pocket made from one extra square.
- Add a waist ribbon tie threaded through a round of chain spaces.
- Turn it into a pinafore by adding straps instead of a full yoke.
- Add a scallop hem in a single pastel for a playful finish.
Shop Similar
- Granny square yarn pastel assortment
- White worsted yarn for garments
- Blocking mats and pins for crochet squares
- Stitch markers locking set
- Sewing snaps small for baby clothes
Style It With
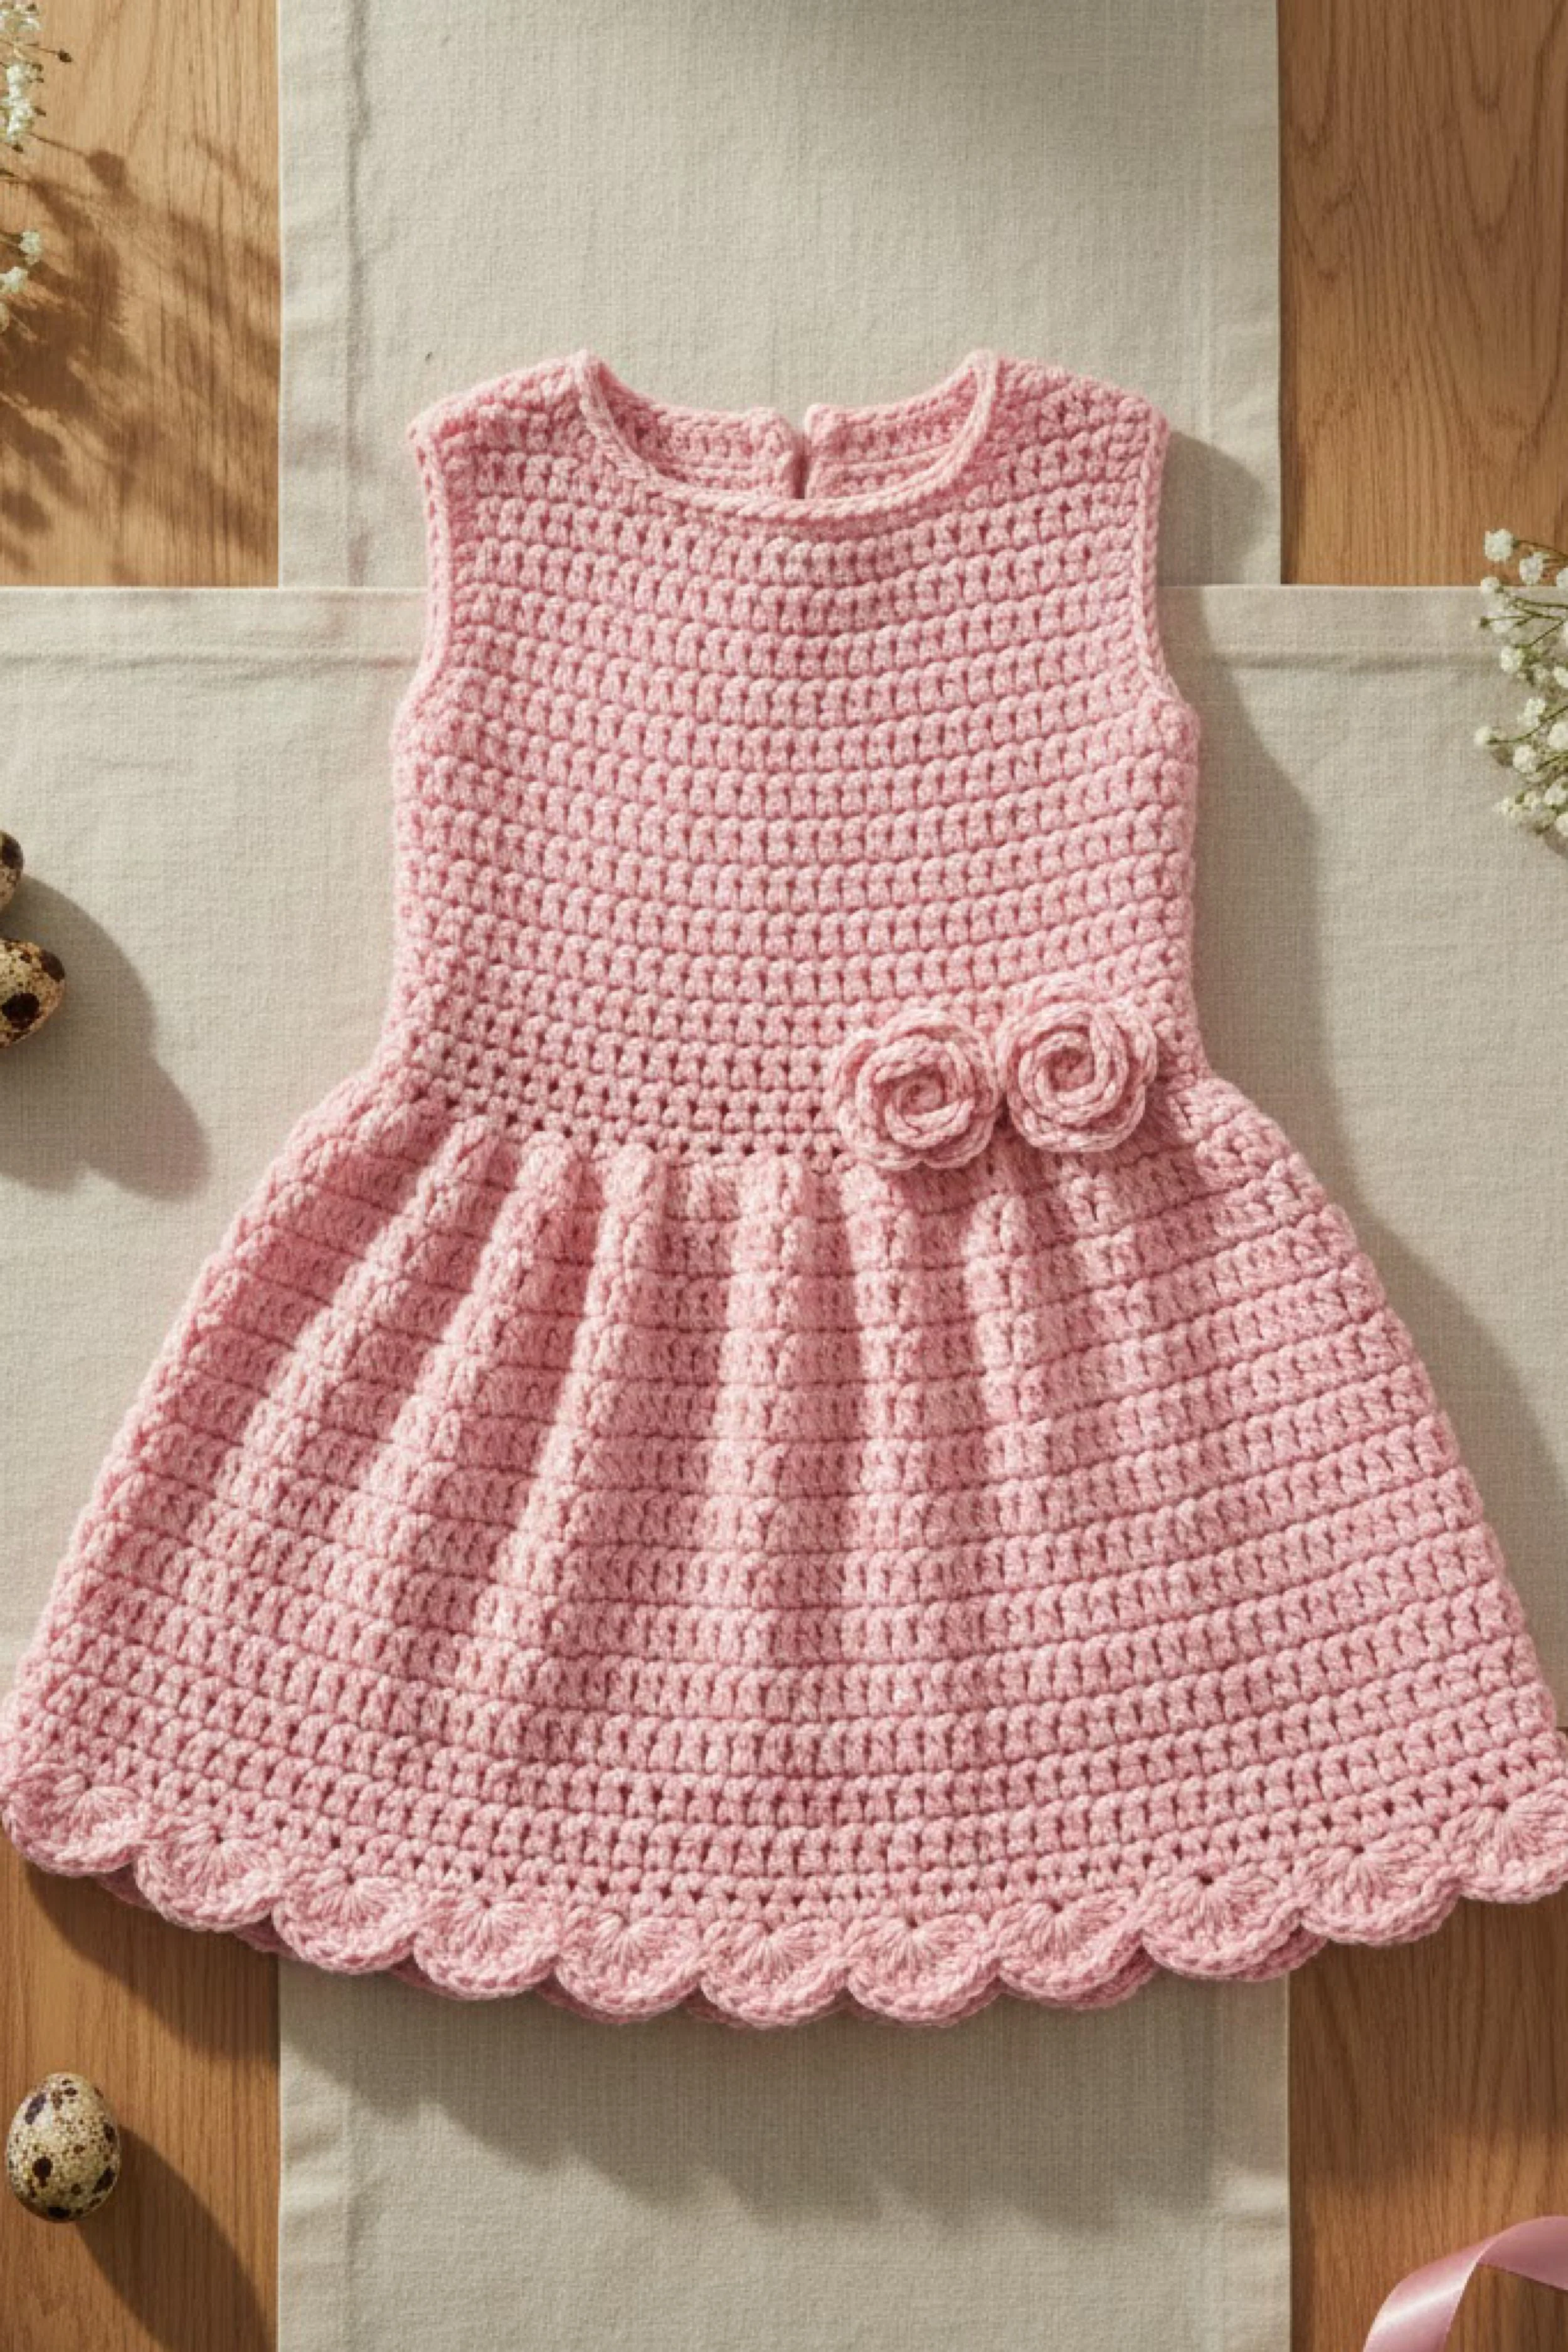
Blush Rosebud Toddler Dress Crochet — Step-by-Step Tutorial with Scallop Hem
What you’re making
This is a blush-pink sleeveless toddler dress with a softly structured bodice, a gently flared skirt, a scalloped hem, and two sweet rosette flowers at the waist—exactly like the photo. It’s the kind of dress that looks heirloom without being complicated: simple stitchwork, clean shaping, and standout finishing touches. The scalloped hem gives that “Easter-perfect” silhouette, and the roses add just enough romance without overwhelming the look.
Materials + tools list
- Worsted weight yarn (Category 4) in blush pink
- Crochet hook: 5.0 mm (optional 4.5 mm for edging/roses for sharper definition)
- Stitch markers
- Yarn needle, scissors
- Measuring tape
- Optional: small button/snap for back neck
- Optional: lining fabric (lightweight cotton), ribbon for waist tie, small sew-on label
Finished size + customization notes
- This looks like a 2T with a fitted-ish bodice and a wide skirt.
- Easy customizations:
- Make it sleeved: add cap sleeves or flutter sleeves.
- Make it longer: add more skirt rounds before the scallops.
- Make it more formal: add a ribbon sash under the roses.
Step-by-step instructions
1) Choose the main stitch (matches the photo’s dense, tidy texture)
The fabric looks like consistent, compact stitches—half double crochet (hdc) or single crochet (sc) both work.
- Use hdc for faster progress and plush texture (recommended).
- Use sc for an even firmer, more structured dress. Checkpoint: Your rows should be even and the dress should hold its shape when laid flat.
2) Top-down yoke start (clean neckline)
- With blush, make a magic ring.
- Round 1: ch 2, 11 hdc into ring. Join (12).
- Round 2: inc in each stitch (24).
- Round 3: hdc, inc around (36).
- Round 4: 2 hdc, inc around (48).
- Continue increasing evenly until yoke reaches the shoulder line. Checkpoint: The yoke lies flat and circular with no ruffling.
3) Create a small back neck slit (the photo shows a neat back opening)
- Crochet yoke to size in joined rounds.
- For the last 2–3 rounds of the yoke, switch to working in rows:
- Turn at the join point and crochet back and forth, leaving a 1–2" opening.
- Add button loop(s) on one side (chain 6–8) and sew a button on the other. Option if you prefer: Skip the slit and make the neckline slightly wider with one extra increase round.
4) Separate for armholes (sleeveless shaping)
- Mark sleeve sections (about 1/5 of stitches each) and front/back sections (slightly larger).
- Round: work across front, chain 6–10 for underarm, skip sleeve stitches, work across back, chain 6–10, skip second sleeve stitches.
- Join to form body tube. Checkpoint: Armholes should look smooth and roomy enough for a toddler’s movement.
5) Crochet the bodice to waist
- Work hdc rounds until underarm-to-waist measures about 4–5".
- Add a stabilizing waist round:
- Work 1 round of sc (or hdc in back loop only) to create a subtle waist line. Checkpoint: You should see a gentle transition point where the skirt will begin.
6) Skirt shaping (the soft flare)
To get that nice drape and fullness:
- Skirt Round 1: hdc 3, inc around (moderate increase).
- Work 2 plain rounds.
- Next increase: hdc 4, inc around.
- Work 2–3 plain rounds.
- Repeat until skirt length is reached. Checkpoint: The skirt should hang in a smooth bell—no ruffles, no stiffness.
7) Add skirt length
Continue hdc rounds until the skirt hits the photo’s proportions:
- Total skirt length from waist: roughly 10–12" for a 2T vibe. Tip: Toddlers love movement—err on slightly longer rather than too short.
8) Build the scallop hem (the signature edge)
The photo hem is scalloped and rounded.
- Foundation round: 1 round of sc evenly around the hem (stabilizes the edge).
- Scallop round:
- Skip 1 stitch, 5 dc in next stitch, skip 1, sl st in next stitch repeat.
- If scallops look too crowded:
- Use skip 2 instead of skip 1 between shells. Checkpoint: Each scallop should look like a soft half-flower, evenly spaced.
9) Finish armholes and neckline
- Neckline: 1–2 rounds of sc, keeping it neat and flat.
- Armholes: 1 round of sc, and optionally a tiny picot every 6–8 stitches for sweetness. Checkpoint: Edges look clean and don’t flare outward.
10) Crochet the rosettes (two waist roses)
- With blush and a slightly smaller hook (optional), chain 32–40.
- Row 1: dc in 3rd chain from hook and across.
- Row 2: 2 dc in each dc across (this forces a ruffle strip).
- Roll the strip tightly into a rose spiral and stitch the base securely with yarn needle.
- Make a second rose.
- Sew both roses at the waist on one side, like the photo. Upgrade option: Add two small leaves in green (simple ch 8 leaf with sc/hdc/dc back) behind the roses.
Troubleshooting section
- Yoke ripples: Too many increases—work a plain round, then resume slower increases.
- Yoke cups: Not enough increases—add an extra increase every 6 stitches next round.
- Armholes gape: Add one extra sc round and slightly tighten tension; or reduce underarm chain by 2.
- Skirt ruffles: Too many increases—remove the most recent increase round and space them farther apart.
- Scallops pull tight: Your foundation sc round is too tight or your shell spacing is too wide. Use a larger hook for scallops or reduce skipped stitches.
- Roses look flat: Roll tighter and secure the base with multiple passes of stitching.
Finishing details section
- Weave in ends especially around scallops and roses (these areas get tugged).
- Block the hem: Pin scallop points evenly to set the curve.
- Optional lining: A lining gives weight and keeps the skirt from catching on tights.
- Optional upgrades (2–4 ideas):
- Add a ribbon sash through chain spaces at the waist.
- Add tiny pearl beads at rose centers (sew on securely; keep safety in mind for toddlers).
- Add a contrast hem: one round of lighter blush before scallops.
- Add a button-back detail with decorative buttons down the top slit.
Shop Similar
- Blush pink worsted yarn
- Crochet hook set with 4.5mm and 5.0mm
- Blocking mats and T-pins for crochet
- Small sew-on buttons for baby dress
- Tapestry needle set for yarn
Style It With
The Sweetest Kind of “Worth It”
When you finish one of these dresses, you’ll notice something funny: the project doesn’t end when you cut the yarn. It ends when you see it in motion—when the skirt flares during a spin, when the straps sit just right on tiny shoulders, when the scallops bounce like a soft little drumbeat at the hem. That’s when crochet stops being “a craft” and becomes a memory with texture.
So make it with the colors you love. Add the extra border. Put the roses slightly off-center like the photo. Leave yourself room to be human—because handmade is allowed to show fingerprints. And if Easter comes and goes and the dress ends up folded in a keepsake box? Good. That means it did its job: it held a season for you, one stitch at a time.