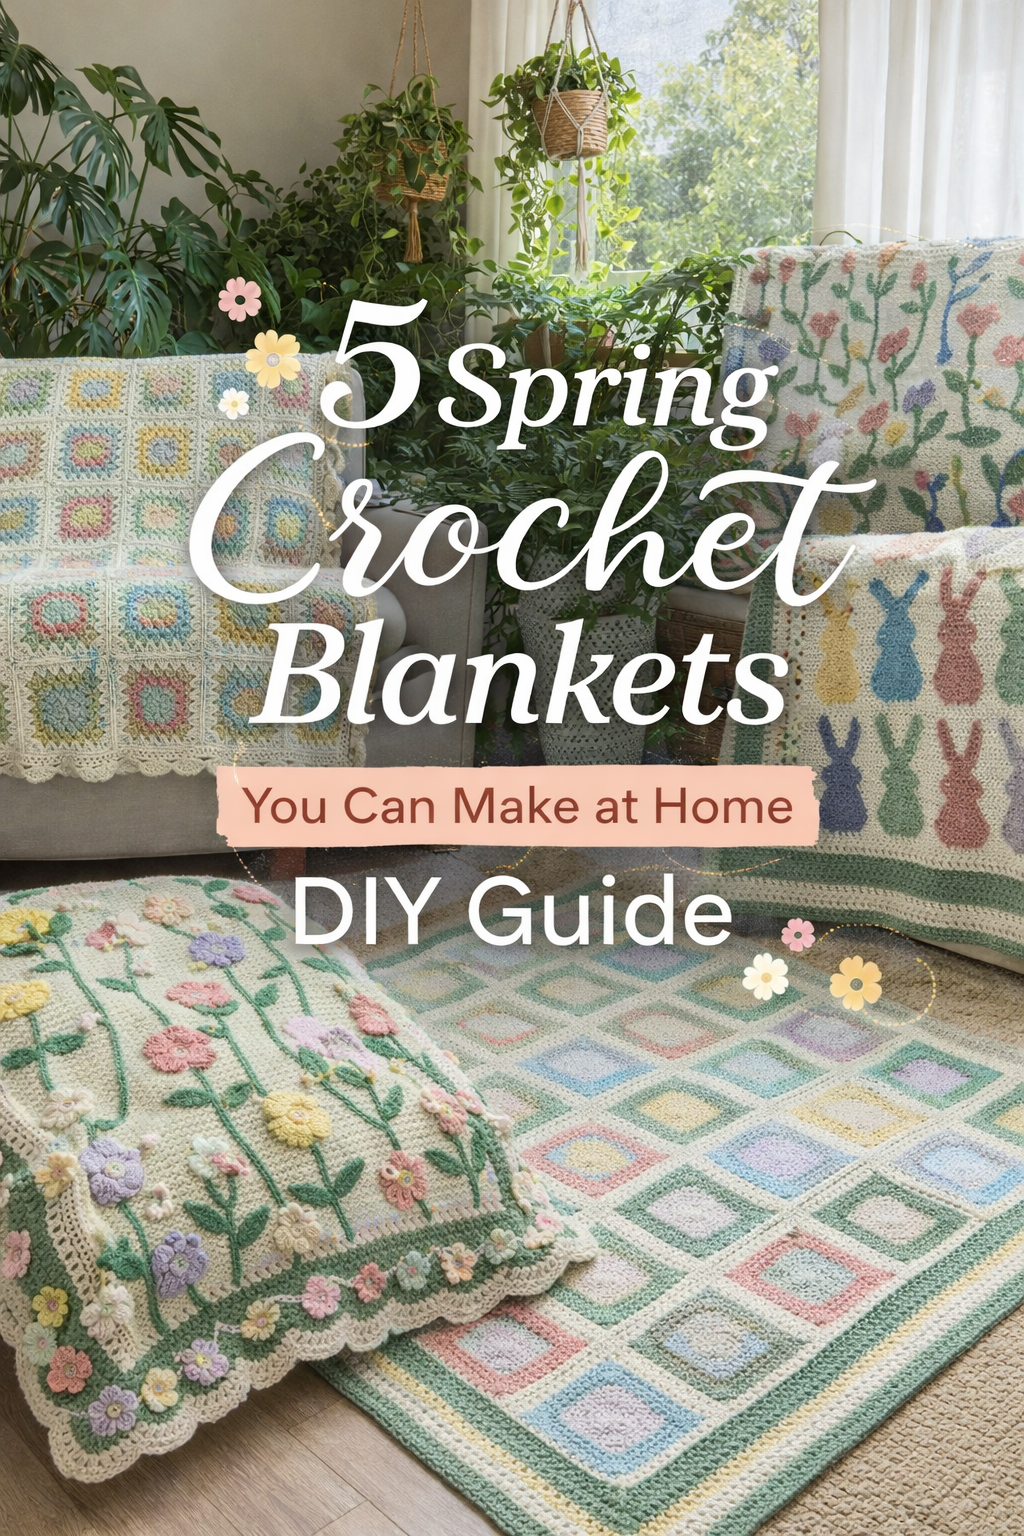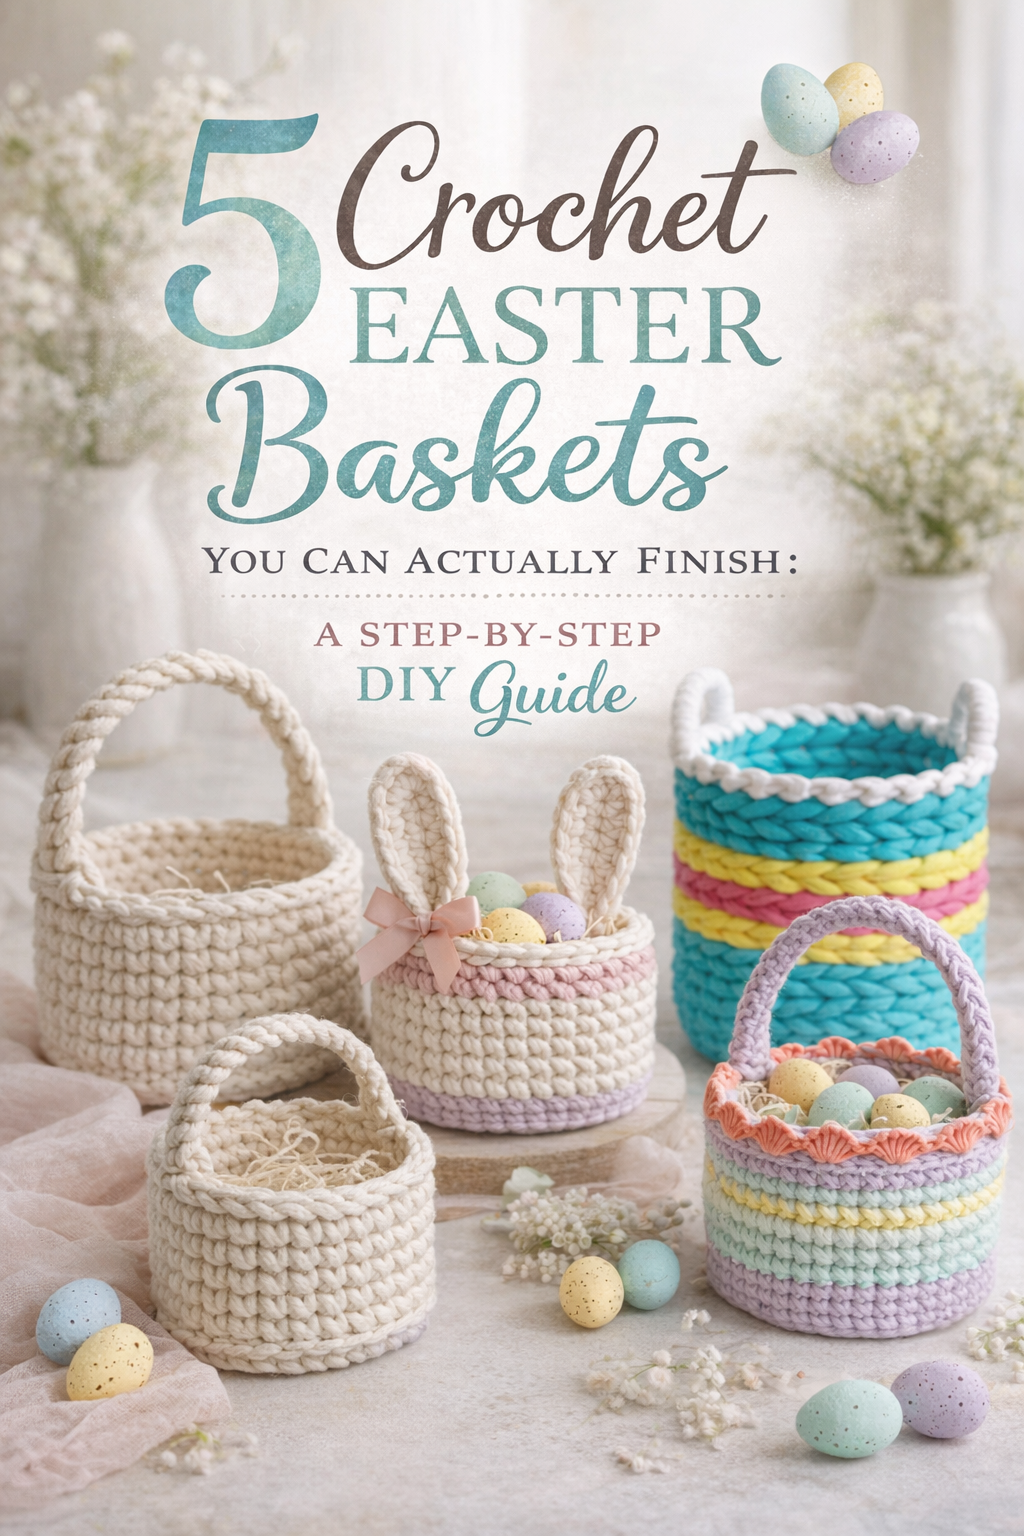
5 Crochet Easter Baskets You Can Actually Finish: A Step-by-Step DIY Guide

More like this
There is something oddly powerful about a handmade basket. It is not just a place to put things. It is a tiny stage for a season, a soft container that makes ordinary moments feel intentional. Easter décor can get loud fast, but crochet has a way of keeping it calm and elevated. One stitch at a time, you build structure, texture, and that quiet little feeling of I made this.
In this guide, you are recreating five distinct basket looks, from minimalist rope style to bunny ear sweetness, rainbow stripes, bold modern color blocking, and a scalloped rim that looks like candy. Each tutorial is written so you can match the photo vibe, avoid the usual beginner traps, and end with a basket that holds its shape and photographs beautifully. Pick one, make it, then immediately start planning the next because that is how this kind of craft works.
💡 Pro Tip: Why I Link to Amazon Search Results and Not One Product
In the Shop the Look and Style it With sections under each bikini, I link to Amazon search results, not single products. Here’s why this matters:
Hot bikinis sell out fast. I don’t want you clicking on a dead link to a sold-out item. Search pages stay updated.
You get more options. Love the vibe but want a different color, cut, or price point? The search results give you everything that matches the look and energy.
I curate each search carefully. These aren’t generic. I spend hours crafting keywords that bring up exactly the kind of bikinis I’d wear—or recommend to my hottest friends.
Support with no pressure. If you click a link, browse, and buy something later, I may earn a small commission at no extra cost to you. That helps me keep bringing you curated collections like this one—powerful, seductive, and always fresh.
So dive in. Click through. Try something risky. These aren’t just bikinis—they’re commands, statements, and maybe even your new favorite weapon of choice.
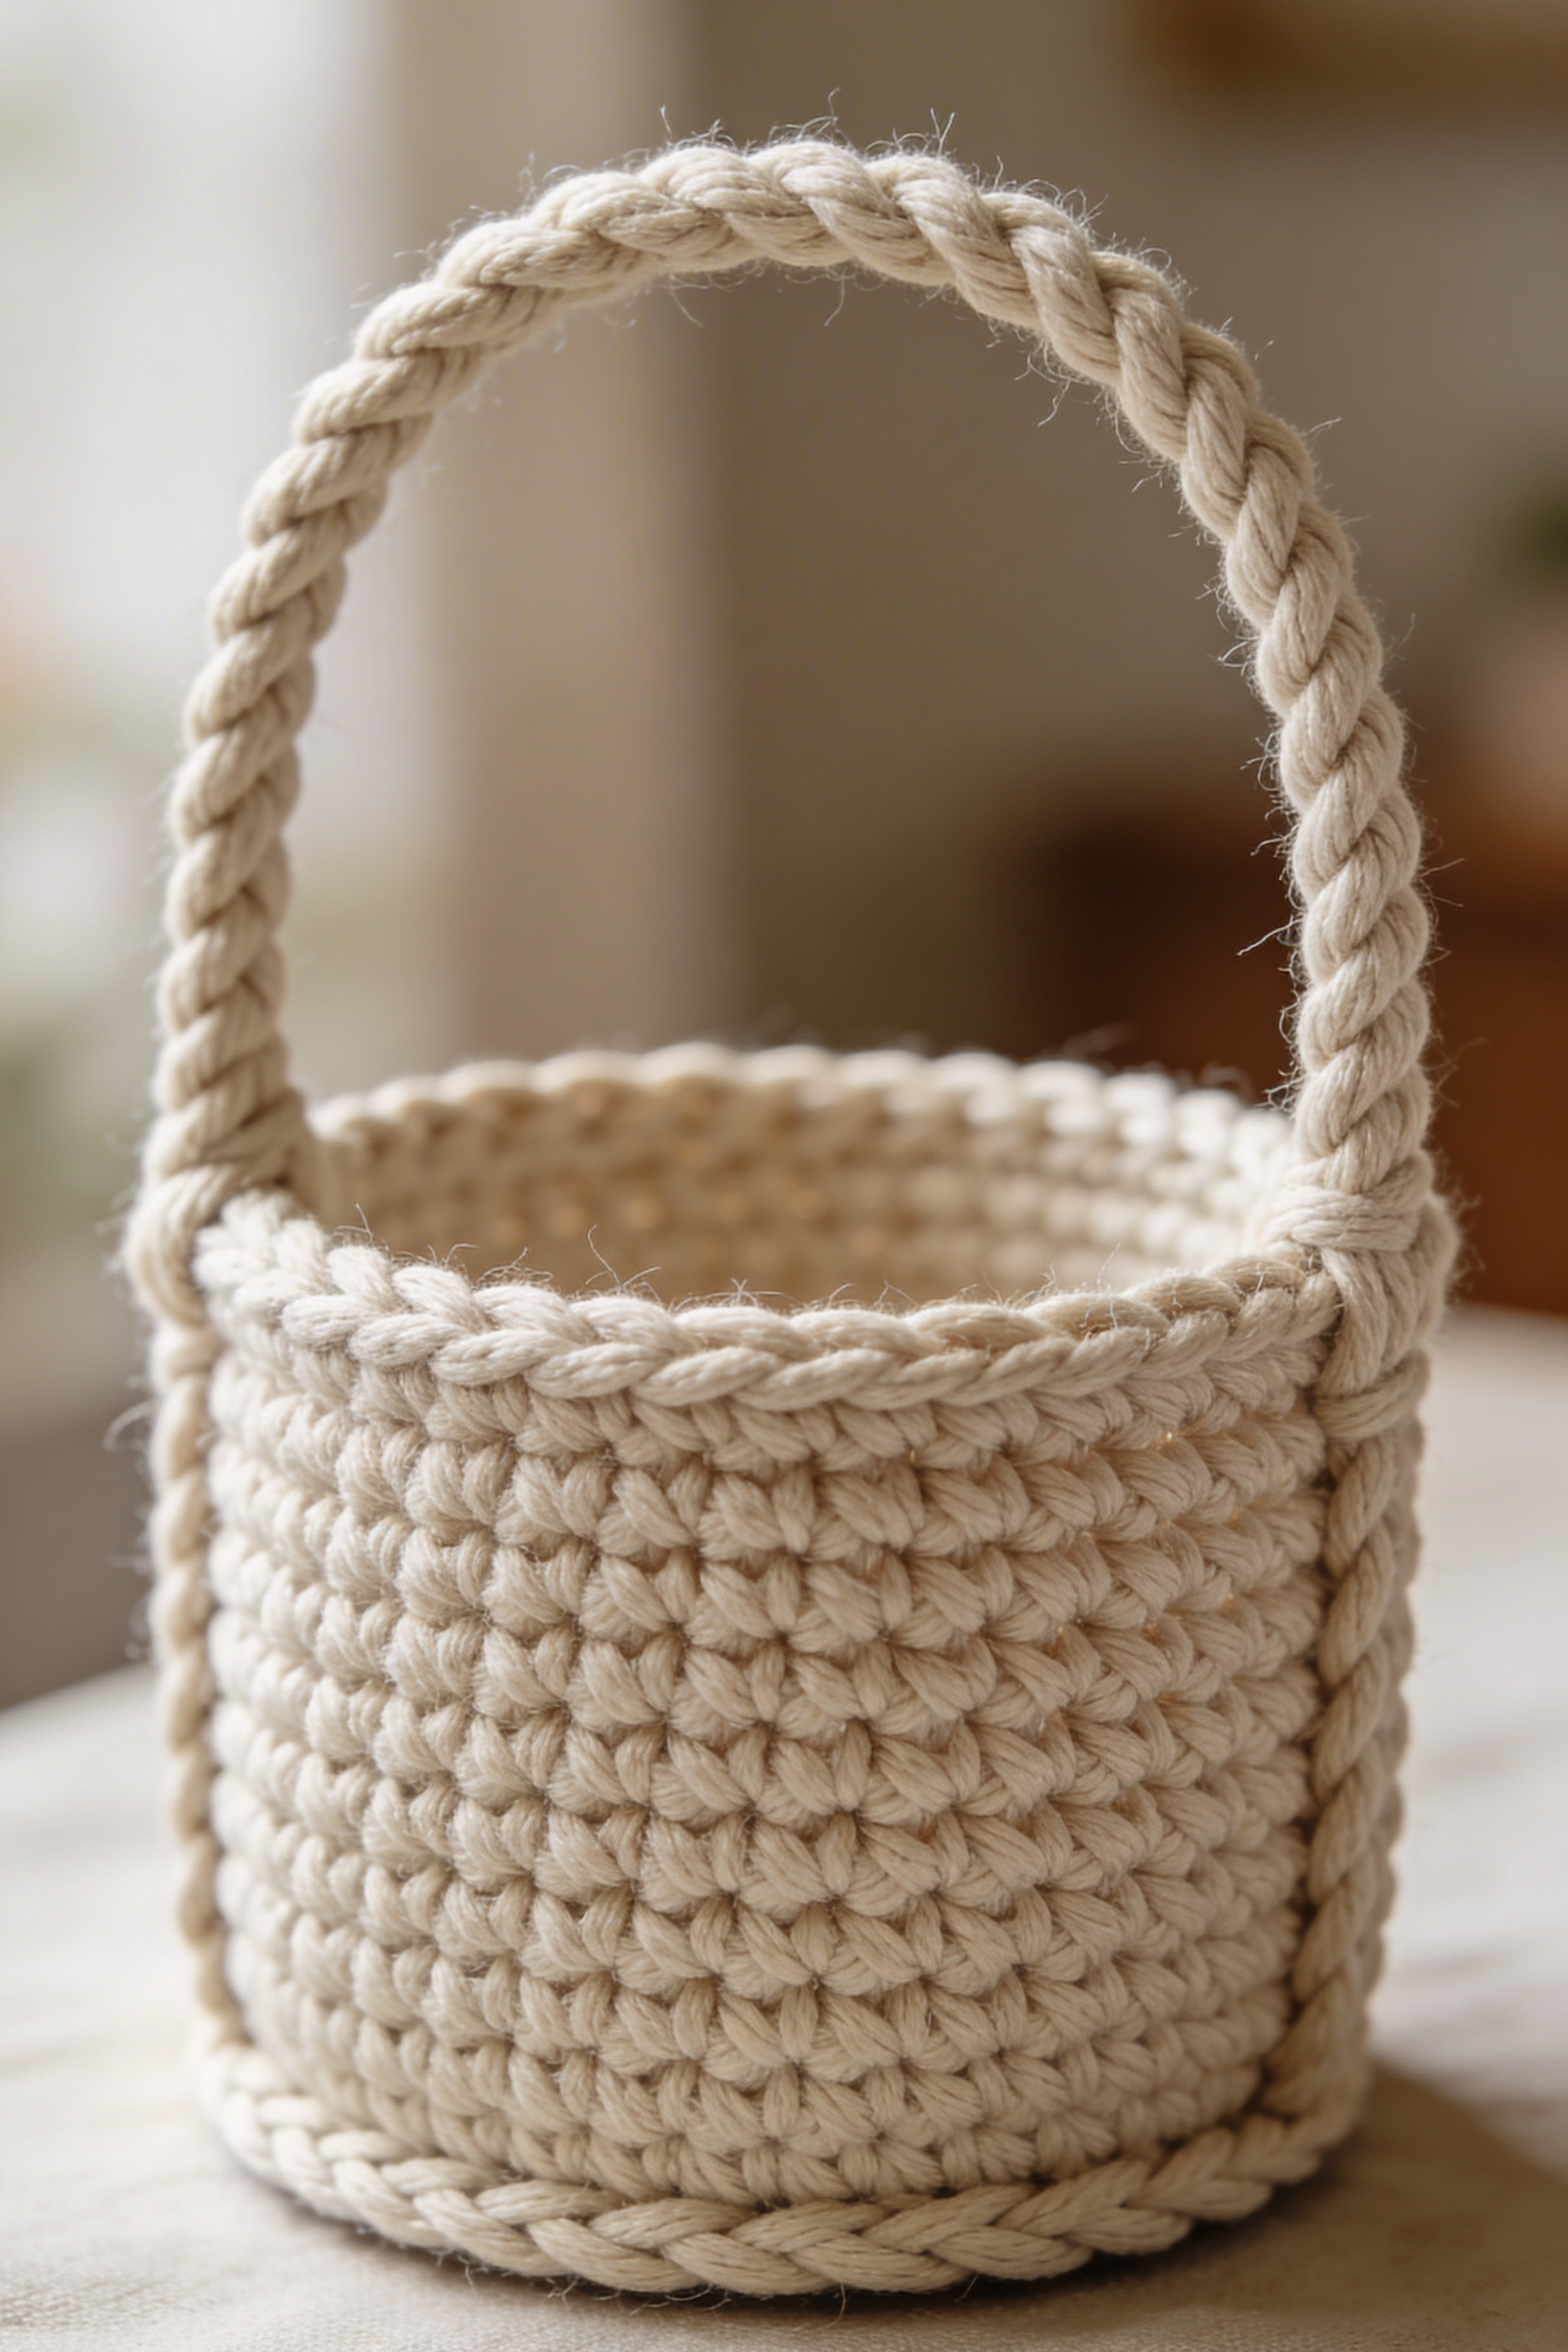
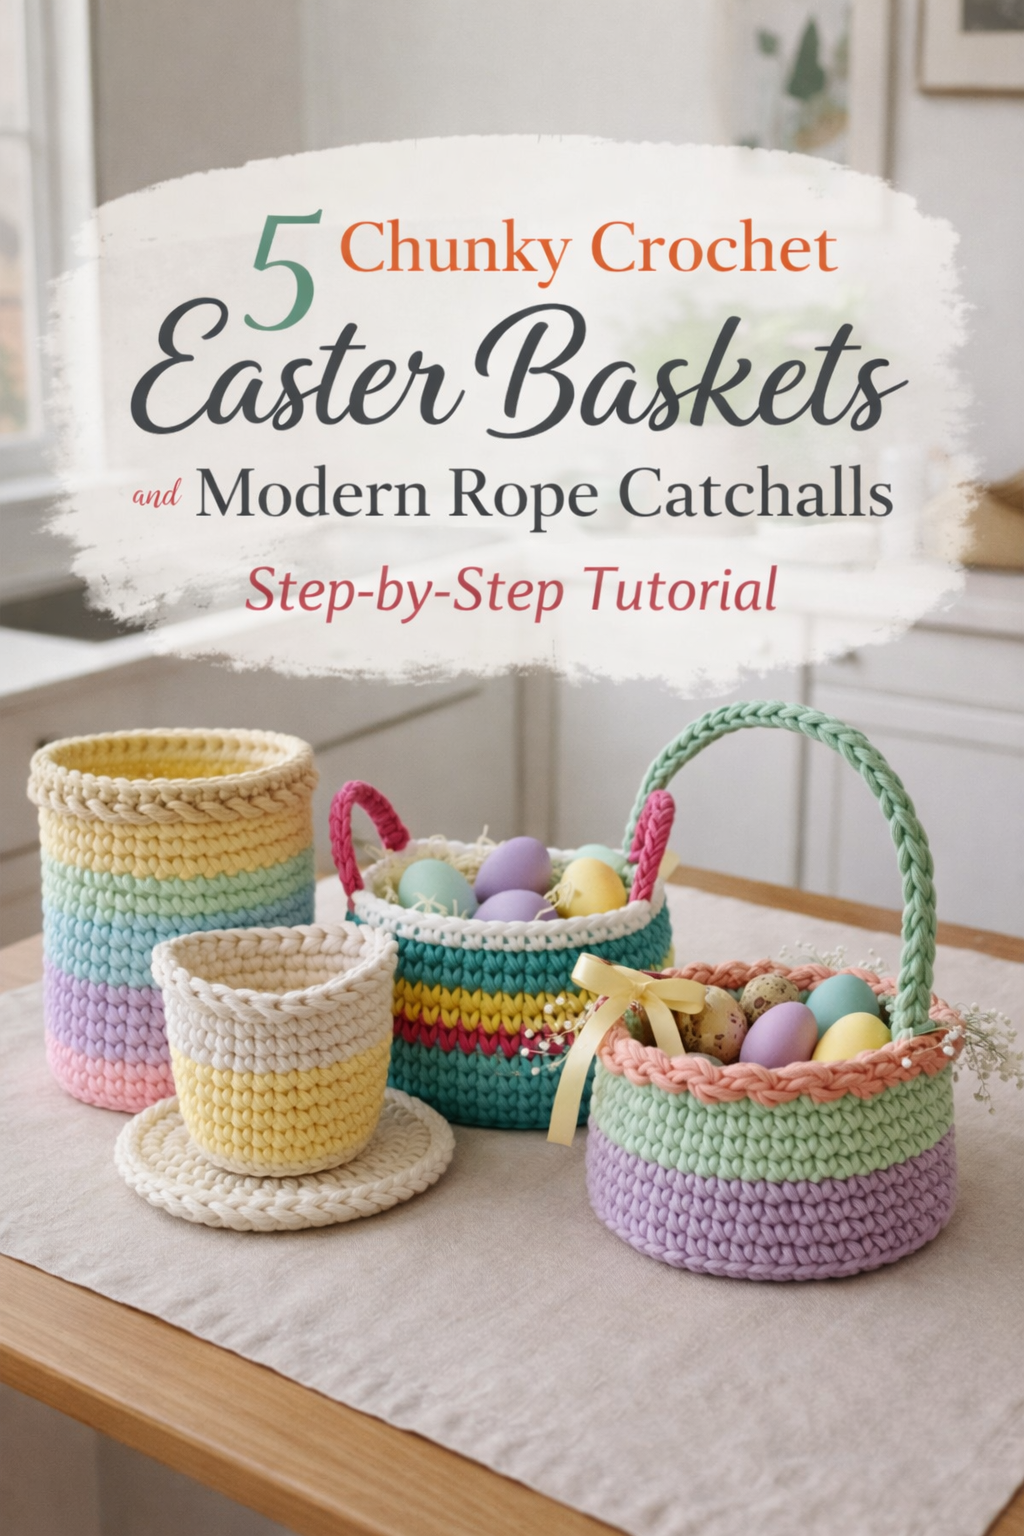
Minimal Braided Rope Crochet Basket: A Step-by-Step Tutorial
What you’re making
This is a clean, minimalist rope style crochet basket with a smooth, dense stitch texture and a thick braided handle that arches from side to side. The look is modern and neutral, with a subtle braided rim and a sturdy base that holds its shape on a tabletop. It reads like elevated storage, perfect for keys, skincare, remotes, or a little Easter refresh without screaming seasonal.
The magic of this look is structure: tight stitches, a firm cord, and a few finishing tricks that make the basket stand up like it was molded.
Materials + tools
- Cotton rope or cotton macrame cord, about 4 mm to 6 mm thick, natural color
- Optional secondary strand: thin cotton yarn to hold together with the rope for extra body
- Crochet hook that matches your rope, usually 6 mm to 9 mm
- Stitch marker
- Tapestry needle with a large eye
- Scissors
- Measuring tape or ruler
- Optional: fabric stiffener or diluted white glue for extra structure
- Optional: felt circle or canvas for a bottom liner
Finished size + customization notes
A typical finished size for this style is about 6 inches wide and 4 to 5 inches tall, with a handle that rises 5 to 7 inches above the rim. To make it bigger, increase the base diameter by adding more increase rounds, then work more even rounds for height. To make it taller without changing width, simply add more wall rounds before the rim finish. If your basket feels floppy, go down one hook size or crochet tighter. If your stitches are too hard to insert into, go up one hook size.
Visual goal: dense stitches that look like tidy little Vs stacked in rows, with very little gap between them.
Step-by-step instructions
Choose your stitch style for the cleanest texture Use single crochet in the round for a classic look. For an even denser, rope like texture, use yarn under single crochet if you like, it forms a tighter X look. Either version works, but the photo look leans dense and structured, so tight single crochet is your north star.
Start a flat, firm base Make a magic ring, or chain 2 and work into the first chain. Round 1: Work 6 single crochet into the ring. Place a marker in the first stitch. Round 2: Increase in each stitch around, 12 total. Round 3: Single crochet, increase, repeat around, 18 total. Round 4: 2 single crochet, increase, repeat around, 24 total. Round 5: 3 single crochet, increase, repeat around, 30 total. Round 6: 4 single crochet, increase, repeat around, 36 total. Keep increasing in this pattern until your base matches the width you want. For a 6 inch basket, you will often land around 42 to 54 stitches, depending on rope thickness and hook size.
Visual checkpoint: you should now see a flat circle that stays flat on the table. If it ruffles, you added too many increases. If it bowls up, you need more increases or you are crocheting very tight.
Create the sharp corner where the walls begin Work one round in back loop only single crochet all the way around, with no increases. This is the hinge that makes the base turn upward. Visual checkpoint: you should see a crisp ridge on the outside edge of the base.
Build the basket walls Work single crochet in both loops, one stitch in each stitch, in continuous rounds. Keep your stitch marker moving up each round. Continue until the basket is the height you want, usually 10 to 14 rounds for a small countertop basket.
Tip for the super smooth look: keep the rope feeding consistently. If you tug the rope harder in some sections, the wall will look slightly pinched. Aim for steady tension.
Visual checkpoint: the sides should stand up and look nearly straight, not flaring dramatically. If yours flares, your tension may be loosening as you go. Tighten up or drop a hook size. If yours narrows too much, loosen slightly or size up your hook.
Add a subtle braided looking rim The rim in the photo reads like a rope braid sitting on top. You can mimic this in two reliable ways. Option A, the clean ridge: work one round of slip stitch into the front loop only around the top. This creates a raised edge that looks like a cord laid along the rim. Option B, the rope cord overlay: cut a separate length of rope, lay it along the rim, and whip stitch it down through the top stitches with a tapestry needle. This looks extremely rope like and is very stable.
Visual checkpoint: the top edge should look thicker than the walls, with a defined rope line.
Prepare for the handle anchors Decide where the handle will attach. Mark two points opposite each other. For a small basket, choose attachment points about 2 to 3 stitches in from the side seams, so the handle sits centered.
You have two anchor choices. Option A: crochet anchors, more integrated Option B: stitched anchors, more rope like
For the photo look, stitched anchors help the handle look like a separate braided rope piece.
Make a thick braided handle Cut three equal lengths of rope. For a 6 inch basket, start with 30 to 36 inches per strand so you have room to braid and finish. Knot the three strands together at one end. Clip that knot to something stable or have someone hold it. Braid tightly, keeping the braid even. When the braid is long enough to arch across the basket with a gentle curve, knot the end and trim.
Visual checkpoint: the braid should look uniform with no loose loops. If yours looks lumpy, you may be switching which strand is pulled tight. Focus on consistent snug pulls.
Attach the handle to the basket Position the braid ends on the outside of the rim so the handle rises cleanly. Thread a tapestry needle with a thinner cotton yarn or a smaller piece of rope strand. Stitch through the rim stitches and around the braid end repeatedly, like lashing it on. Make at least 10 to 12 passes for each side. To hide the end neatly, stitch down the braid end along the outside wall for about 1 inch, then weave the stitching yarn in and out of several stitches and trim.
Tip: pull your stitches snug but not so tight that the rim puckers.
Finish the bottom edge detail The base in the photo has a subtle rope border. You can create this by surface slip stitching around the bottom edge where the base meets the table, or by stitching a separate rope length around the base perimeter. Surface slip stitch method: insert your hook under the edge loops around the base and work slip stitches, keeping them even and snug.
Visual checkpoint: you should see a slightly raised cord line that frames the basket.
Optional stiffening for a sculpture like finish If you want the basket to stand like a little vessel, apply fabric stiffener to the outside and inside, then shape the basket and let it dry. If using diluted glue, use a small amount and keep it even. Let it dry fully before adding items.
Optional bottom liner Cut a felt circle slightly smaller than the base. Place inside. You can tack it down with a few hand stitches or a tiny amount of glue.
Troubleshooting
My base is wavy and ruffling You have too many increases. Rip back one round and redo with fewer increases, or switch to adding increases less frequently.
My base is turning into a bowl before I want it to You need more increases, or your tension is extremely tight. Add another increase round or use a slightly larger hook.
The walls are floppy Switch to a smaller hook, crochet tighter, or use a firmer rope. Adding a stitched rim cord also helps a lot.
My basket is flaring outward Your tension is loosening as you go. Focus on snug stitches and consistent rope feed. You can also add one decrease round, like single crochet 6 then single crochet two together, repeat, to pull it in slightly.
The handle pulls the rim inward Reinforce the handle anchors with extra stitching passes and consider stitching down the braid end along the wall for more support.
Finishing details
Weave in rope ends by splitting the rope into smaller strands, threading them onto a tapestry needle, and sewing them through several stitches inside the basket. Trim flush and tuck the fuzz inward. For a pristine look, lightly steam the basket from a distance, then shape it with your hands. If you choose stiffener, shape the basket on a bowl or jar while it dries so the walls cure smooth and round. A felt liner keeps the base quiet and polished on wood surfaces.
Optional upgrades for this look:
- Add a leather style tag stitched to the rim for a boutique finish.
- Add a removable fabric liner in natural linen for contrast.
- Add two smaller side handles instead of one arch handle for a modern storage bin vibe.
- Add a subtle stripe by switching to a slightly darker natural rope for two rounds.
Shop Similar
- Natural cotton macrame cord 5 mm
- Cotton rope for crochet baskets
- Large eye tapestry needles for yarn and cord
- Fabric stiffener for crochet baskets
- Crochet hooks for thick yarn 8mm
Style It With
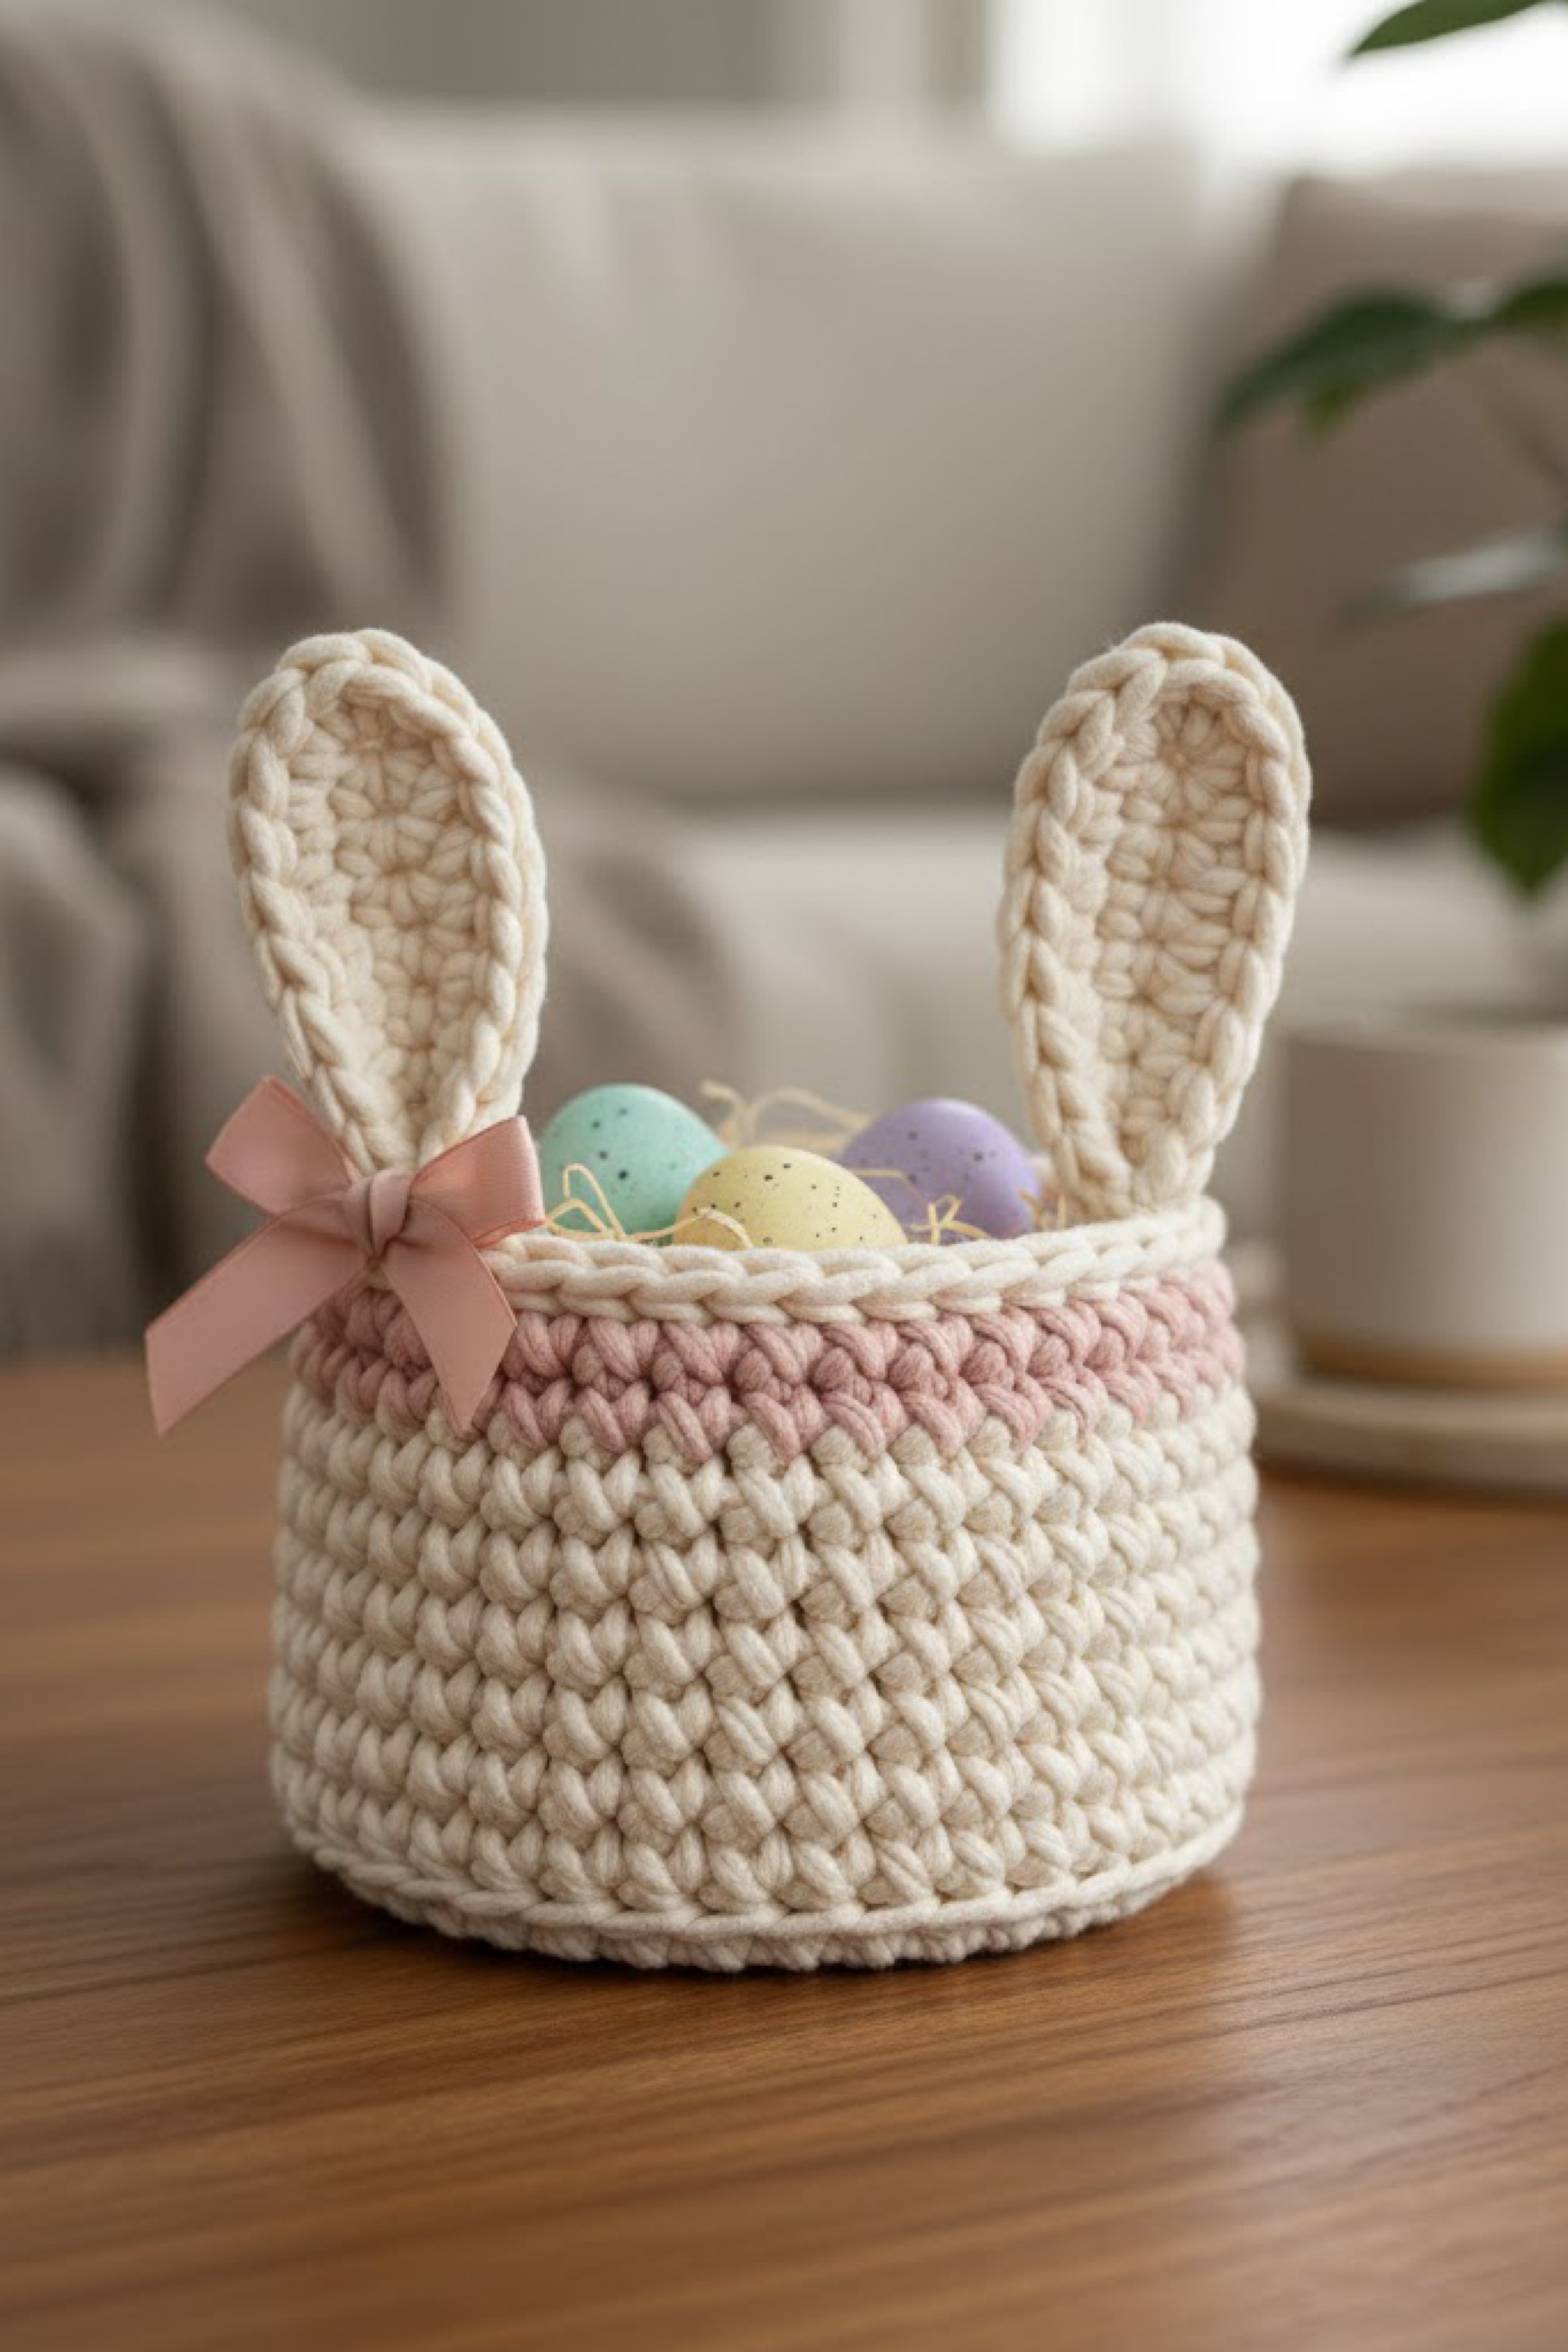
Bunny Ear Crochet Easter Basket With Blush Band: A Step-by-Step DIY Guide
What you’re making
This is a chunky, soft Easter basket with upright bunny ears peeking over the rim, a gentle blush accent band, and a ribbon bow that makes it feel gift ready. The stitch texture is big and plush, like a cozy knit, and the basket is short and wide so it sits confidently on a table. It is the kind of piece that looks adorable filled with pastel eggs, but still clean enough to keep out as spring décor.
The look depends on three things: thick yarn, tight stitches, and ears that are firm enough to stand.
Materials + tools
- Super bulky yarn or thick tube yarn in cream
- Super bulky yarn in blush pink for the accent band
- Crochet hook, usually 8 mm to 12 mm depending on yarn thickness
- Stitch marker
- Tapestry needle
- Scissors
- Satin ribbon in blush or dusty rose
- Optional: craft wire or pipe cleaners for ear support
- Optional: polyester stuffing or felt for ear padding
- Optional: fabric stiffener for ears
- Optional: basket filler grass or paper shred
Finished size + customization notes
A typical finished size is about 7 to 8 inches wide and 4 to 5 inches tall, with ears that rise 4 to 6 inches above the rim. To make it larger, increase the base diameter by adding more increase rounds. To make it taller, add more wall rounds before the color band. For a tighter, more polished stitch, use a smaller hook than the yarn label suggests.
Visual goal: a soft but dense basket that holds eggs without collapsing, with ears that stand upright and slightly rounded.
Step-by-step instructions
Pick your stitch for that plush texture Single crochet creates a sturdy wall and a tidy surface. If you want an even chunkier look, use half double crochet, but keep tension firm so the sides do not sag. The photo texture reads like dense stitches, so single crochet is the most reliable.
Start the base Magic ring. Round 1: 6 single crochet in the ring. Round 2: Increase in each stitch, 12. Round 3: Single crochet, increase, repeat, 18. Round 4: 2 single crochet, increase, repeat, 24. Round 5: 3 single crochet, increase, repeat, 30. Continue increasing until the base matches your target width. For a wide little basket, you may reach 42 to 54 stitches, depending on yarn and hook.
Visual checkpoint: the base should lie flat. If it ripples, remove a few increases. If it cups, add an increase round.
Turn the corner Work one full round back loop only single crochet. No increases. Visual checkpoint: a ridge forms around the base edge.
Build the lower walls in cream Work single crochet in both loops, one stitch per stitch, for 3 to 5 rounds. Keep the stitch marker moving so you do not lose track.
Tip: if you notice the basket leaning, it often means your stitch height changed. Try to keep your hook angle and pull consistent.
Add the blush band Join blush yarn with a simple yarn change at the end of a round. Work 1 to 2 rounds in blush, depending on how thick you want the band. For the photo look, one solid blush round plus a cream round above it creates a sweet stripe effect.
Visual checkpoint: the blush stripe sits near the top, not mid body. If yours looks too low, move it up by doing more cream rounds first.
Finish the top rim Switch back to cream. Work 1 round of single crochet, then 1 round of slip stitch for a firm edge. If you want a rope like rim, work slip stitches in the front loop only so the top edge looks like a cord.
Plan ear placement Mark two ear spots on the rim. In the photo, ears sit near the front, spaced about 6 to 10 stitches apart so there is a center space for the eggs to show between them. Place markers where each ear base will be stitched.
Crochet the bunny ears Make two identical ears. Start with a chain that matches your ear height. For a medium ear, chain 12 to 16. Row 1: Single crochet in second chain from hook and across. Row 2: Chain 1, turn, single crochet across. Repeat rows until the ear is wide enough, usually 6 to 8 rows.
Shape the top: decrease on both sides for a few rows to round it. Example shaping: Next row: chain 1, single crochet 2 together, single crochet across until last 2 stitches, single crochet 2 together. Repeat that decrease row 2 to 4 times until the top looks softly rounded. Finish off leaving a long tail for sewing.
Visual checkpoint: the ear should be an oval rectangle with a rounded top, not pointy. If yours is pointy, do fewer decreases and end earlier.
Add ear structure so they stand You have two safe options. Option A: hidden wire Insert a pipe cleaner or thin craft wire along the edge of the ear, then whip stitch it in place on the wrong side. Option B: stiffened fabric core Cut a felt shape slightly smaller than the ear and tack it inside, then lightly stiffen the ear with fabric stiffener and let dry flat.
Visual checkpoint: you should be able to hold the ear upright and it should resist flopping.
Attach ears to the basket Place the ear base against the rim, slightly angled outward like the photo. Stitch the ear base down with a tapestry needle, going through both the ear and several rim stitches. Stitch around the base edge, then add a few reinforcing stitches down into the first wall round to anchor it.
Tip: if the ears lean forward, stitch one more pass at the back of the ear base, pulling it slightly backward.
Add the ribbon bow Tie a satin ribbon into a neat bow. Position it at the base of one ear, slightly off center, like the photo. Stitch the bow knot to the basket with a few hand stitches so it does not slide.
Final shaping If the basket feels soft, place a small bowl or jar inside for a few minutes to help it hold a perfect round shape. Light steaming from a distance can relax stitches into place.
Troubleshooting
My basket walls are slouchy Use a smaller hook, switch to single crochet if you used half double crochet, or choose a firmer super bulky yarn. A slip stitch rim also adds structure.
My base is not flat If it ripples, reduce increases. If it cups, add increases. With thick yarn, tiny changes matter, so adjust by just one or two increases per round.
My ears flop Add a hidden pipe cleaner or felt core. Also stitch the ear base down deeper into the wall.
The blush band looks messy Yarn changes can leave a jog. To reduce it, change colors on the last pull through of the final stitch of the previous round, then keep the start point consistent with a marker.
The rim looks uneven Slip stitches can tighten. If the rim puckers, switch the slip stitch round to a slightly larger hook.
Finishing details
Weave in all ends on the inside, splitting thick yarn into smaller strands if needed so it disappears cleanly. If you want the basket to feel gift grade, add a simple removable liner: cut a fabric strip and stitch it into a ring, then whip stitch it to the inside rim. For extra polish, add a small fabric tag or a tiny pom on the bow center. If you are gifting it, add paper shred or faux grass, then tuck eggs and treats so the ears frame the arrangement.
Optional upgrades:
- Add inner ear detail by crocheting a smaller ear in blush and stitching it on top.
- Add a name tag to the rim with a small wooden charm.
- Add a sturdier base insert with a cut circle of plastic canvas hidden under felt.
- Add a second bow on the opposite side for symmetry.
Shop Similar
- Super bulky chenille yarn cream
- Super bulky yarn blush pink
- Crochet hook set large sizes
- Satin ribbon blush for bows
- Pipe cleaners for craft support
Style It With
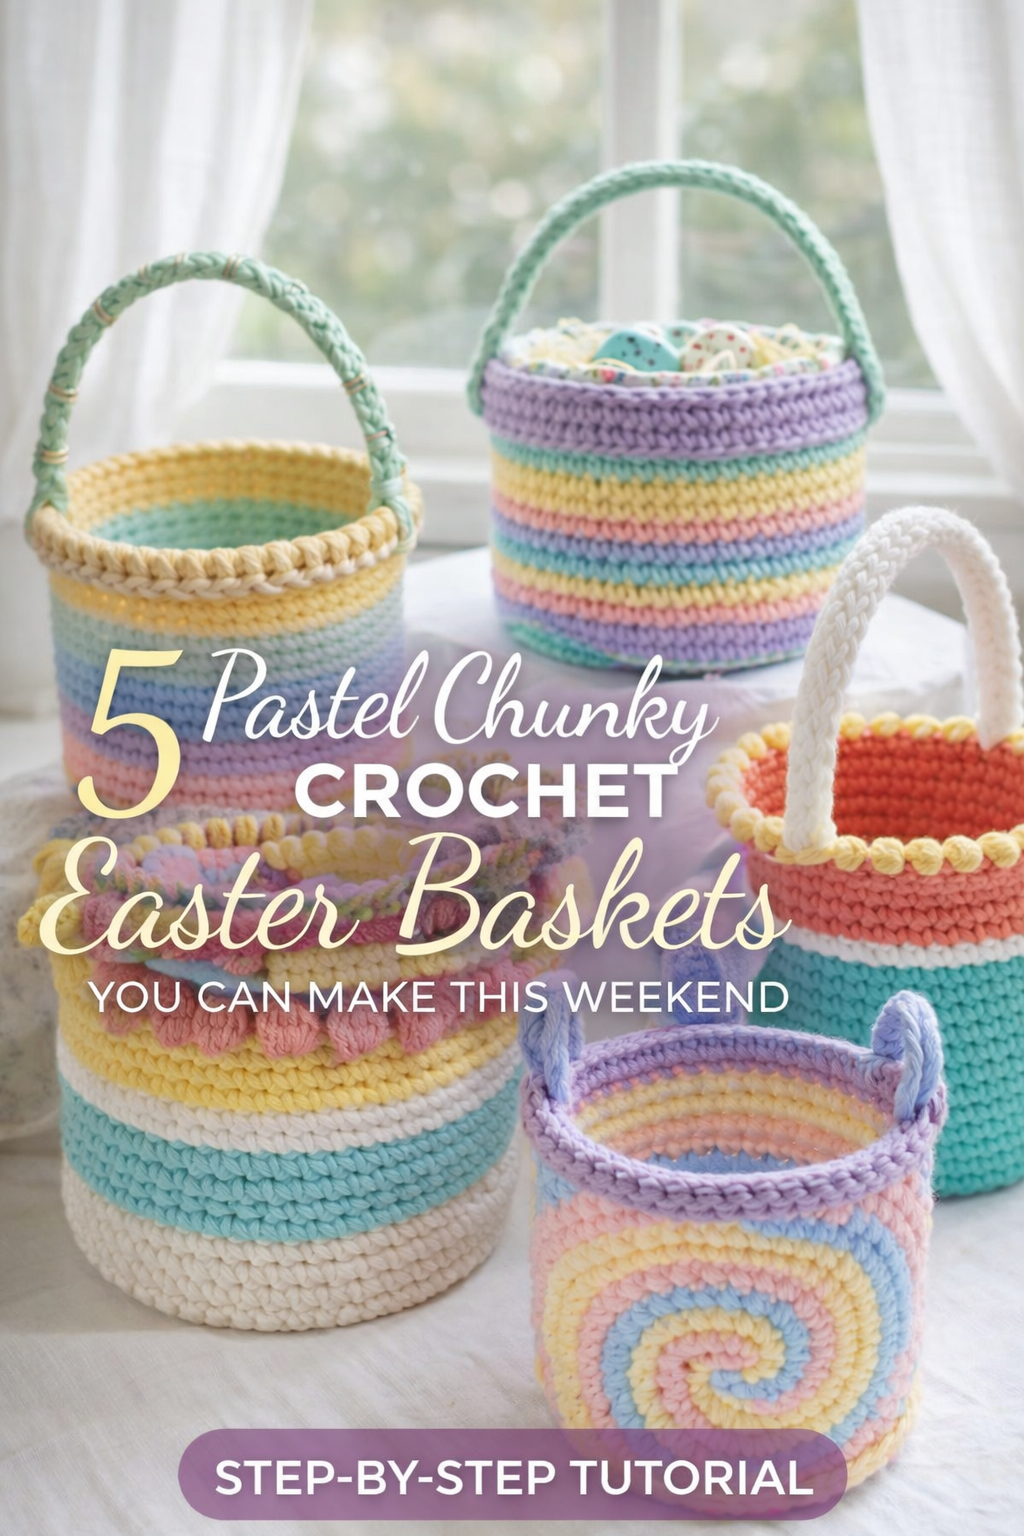
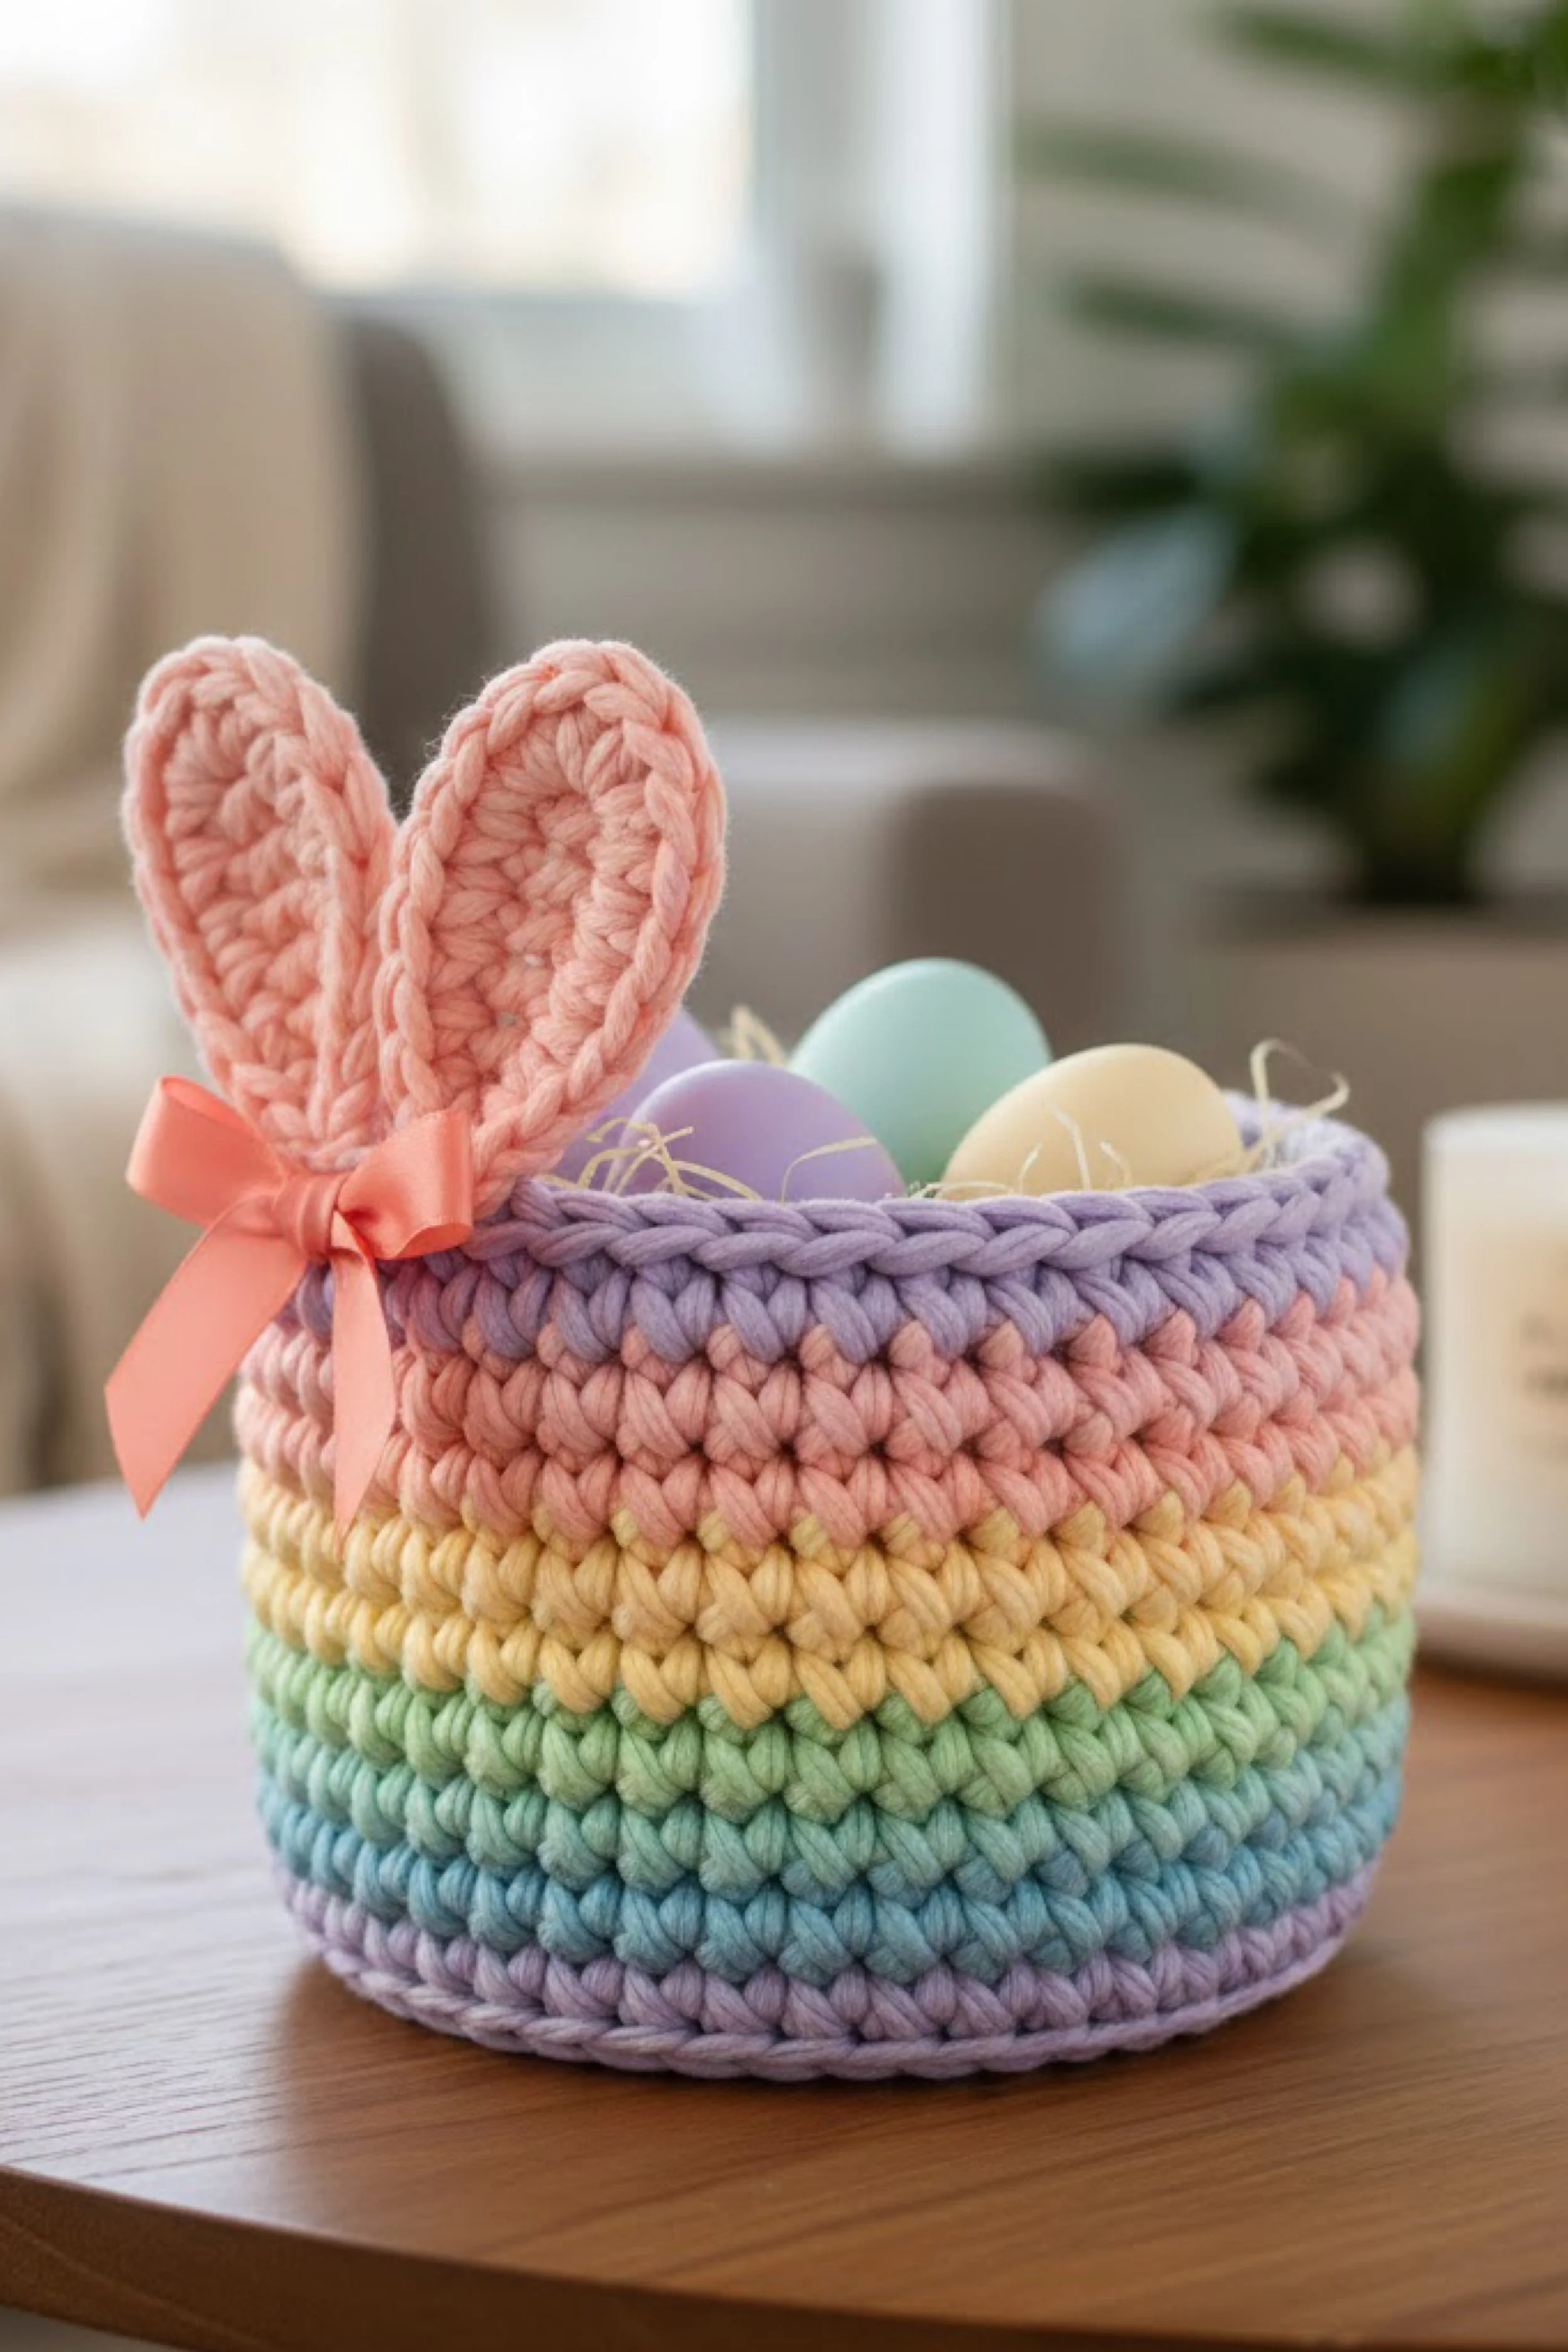
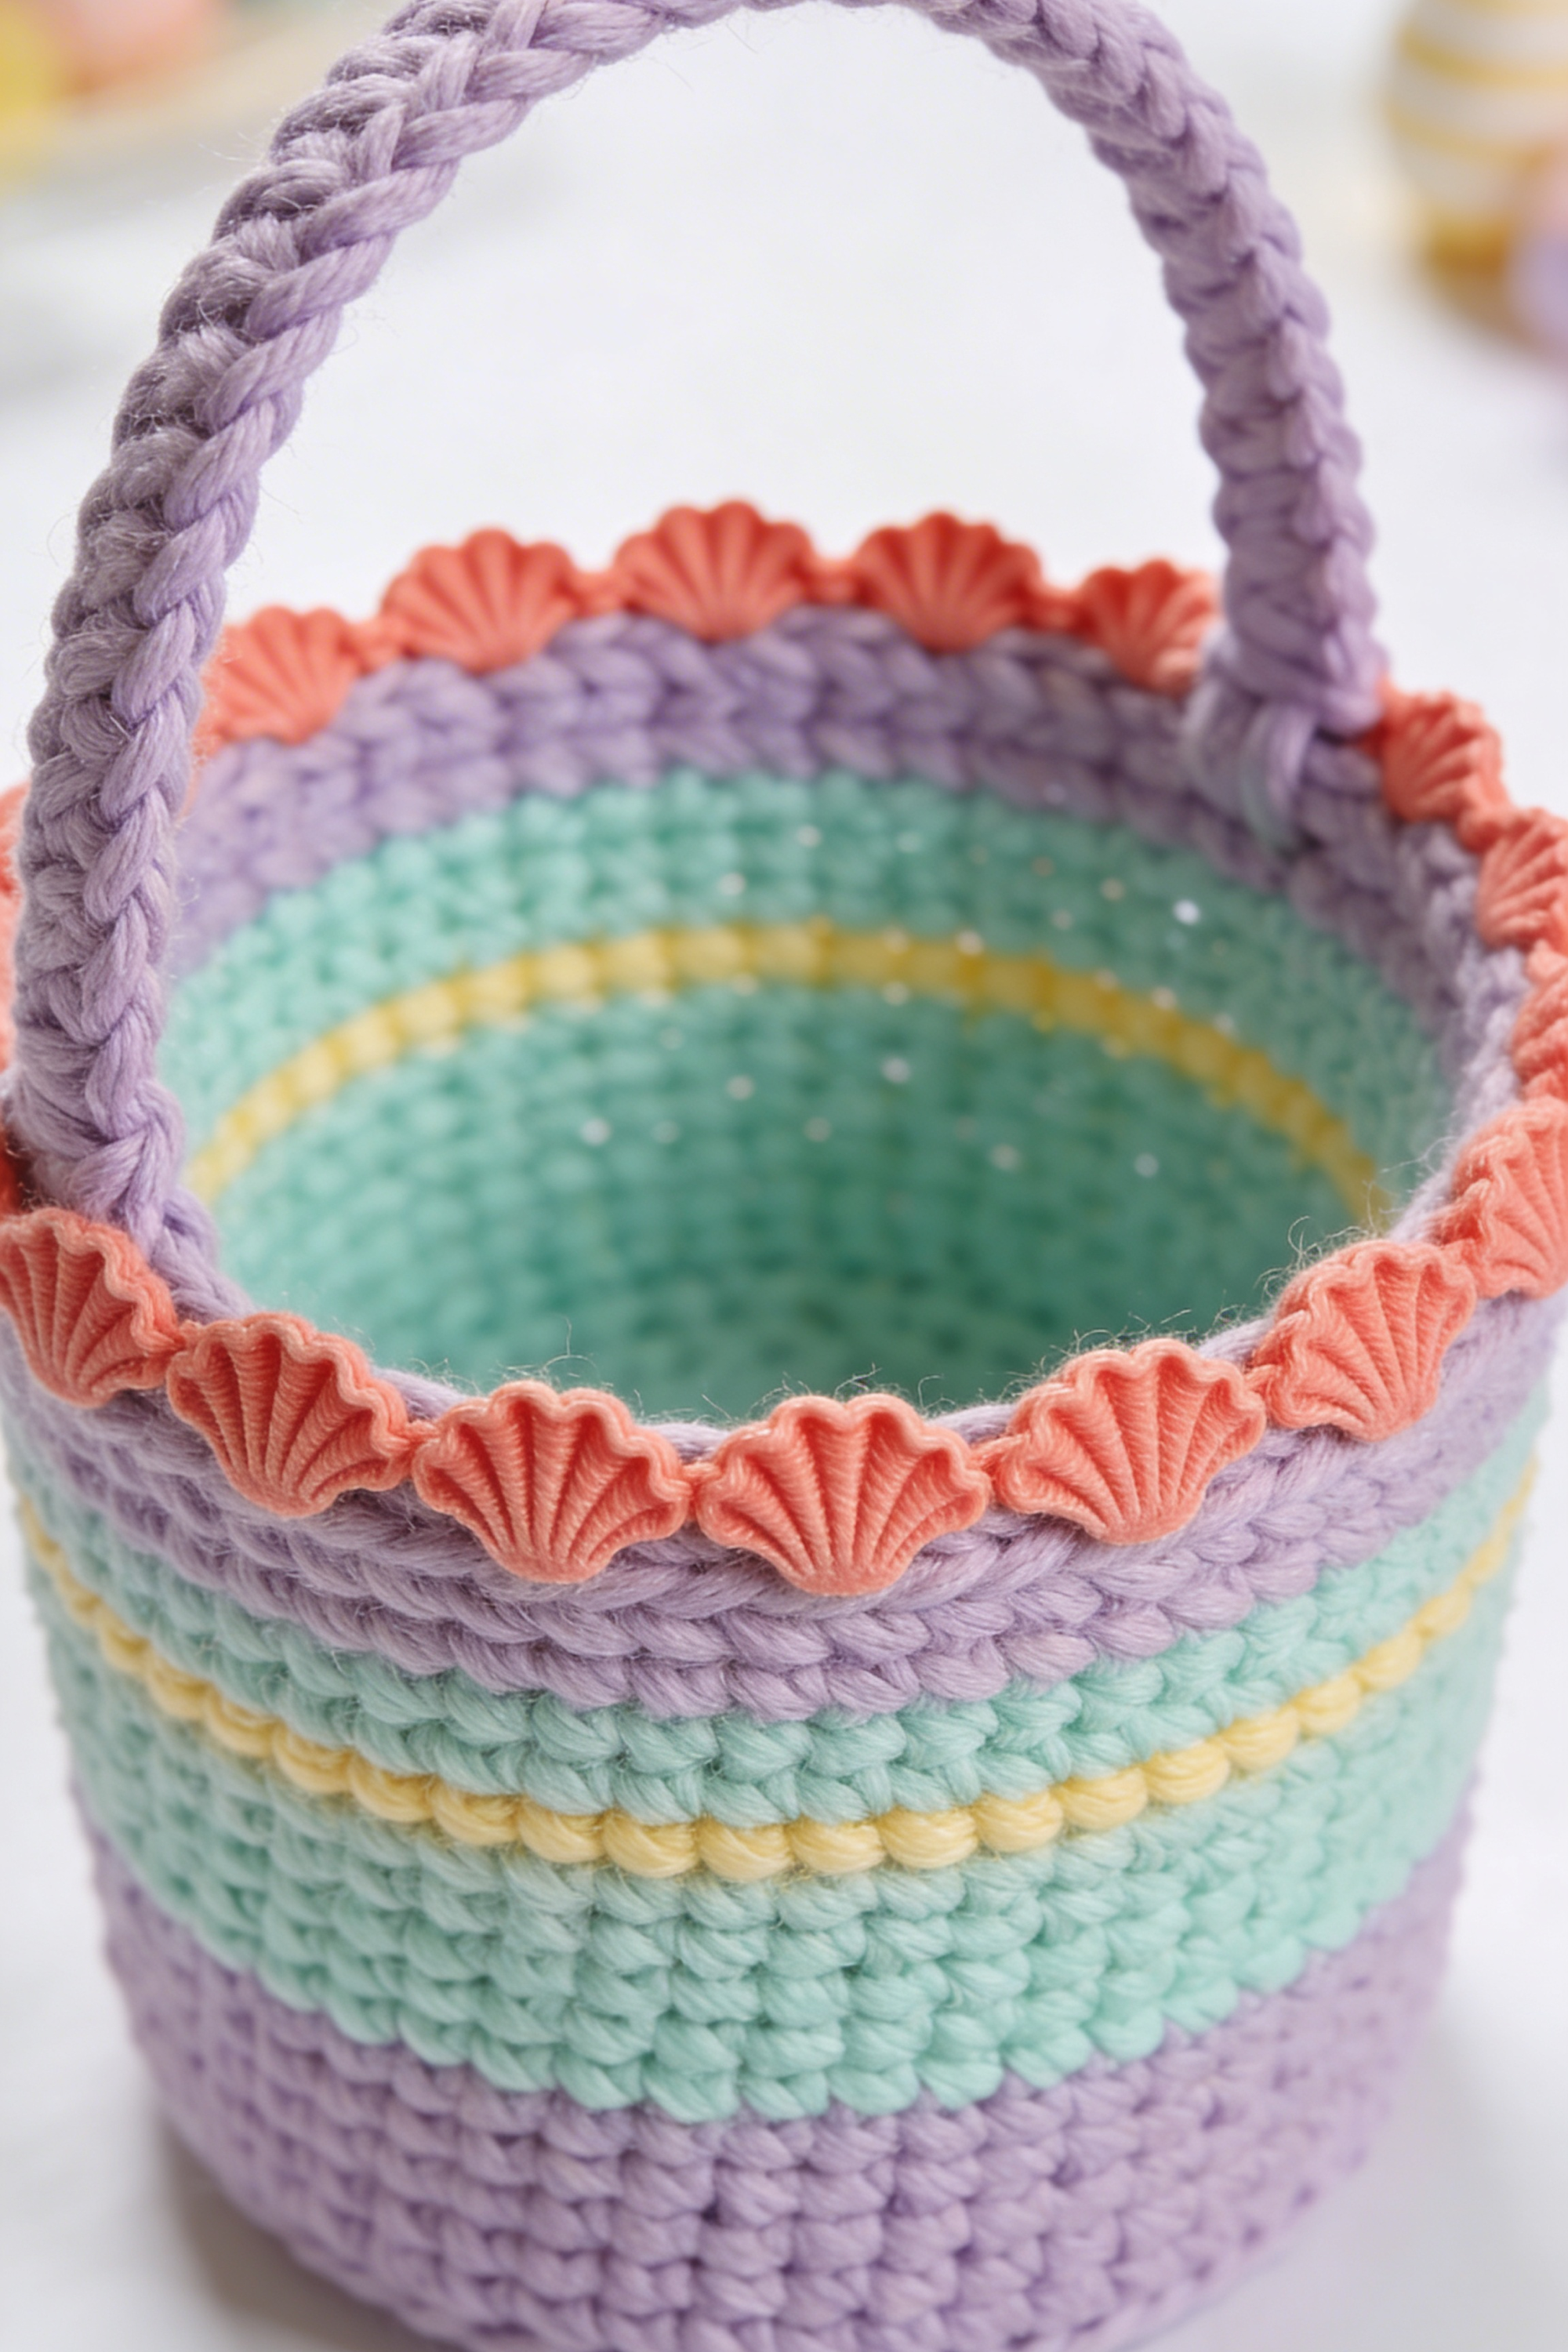
Pastel Rainbow Bunny Basket: A Step-by-Step Make-It-Yourself Tutorial
What you’re making
This is a pastel rainbow crochet basket with chunky horizontal color stripes, a thick rim, and tall bunny ears tied off with a coral ribbon bow. The overall silhouette is short, wide, and cozy, with a dense stitch texture that looks plush and modern. The colors read like soft spring candy: lavender, mint, butter yellow, peach, and light blue, stacked in smooth bands that make the basket look like a little rainbow bowl.
The key to nailing the photo look is clean color changes, consistent stitch size, and ears that match the yarn thickness so they feel intentional, not like an afterthought.
Materials + tools
- Super bulky yarn or thick tube yarn in several pastel colors, at least 5 shades
- Crochet hook, typically 8 mm to 12 mm
- Stitch marker
- Tapestry needle
- Scissors
- Satin ribbon in coral or peach
- Optional: felt or plastic canvas circle for base support
- Optional: fabric stiffener for ears and rim
Finished size + customization notes
A common finished size is about 8 inches wide and 5 inches tall. To change size, adjust the base diameter first, then add or subtract wall rounds. For a taller basket, add more rounds in each color band. For a wider basket, add one more increase round to the base. Keep your bands the same height to preserve the stacked stripe vibe.
Visual goal: thick stitches that show clear rows, with crisp band edges and no big gaps.
Step-by-step instructions
Plan your color order Lay your yarn colors in the order you want. A pleasing rainbow stack often goes lavender, mint, yellow, peach, light blue, then repeats or ends with lavender at the rim. The photo style uses soft transitions rather than high contrast.
Crochet the base Magic ring. Round 1: 6 single crochet. Round 2: Increase around, 12. Round 3: Single crochet, increase, repeat, 18. Round 4: 2 single crochet, increase, repeat, 24. Round 5: 3 single crochet, increase, repeat, 30. Continue until your base is the width you want. With very thick yarn, you may only need 6 to 8 increase rounds total.
Visual checkpoint: the base should lie flat and feel thick. If it feels floppy, switch to a smaller hook.
Turn the corner for the walls One round back loop only single crochet, no increases. Visual checkpoint: a ridge forms and the piece starts to cup upward.
Start the first color band Work 2 to 3 rounds in the first pastel color, single crochet in each stitch around. Keep your stitch marker consistent. The start point matters for clean color changes.
Change colors cleanly On the last stitch of a round, insert hook, yarn over with the current color, pull up a loop, then yarn over with the new color and pull through to finish the stitch. This makes the new round start with the new color cleanly. Work 2 to 3 rounds in each color.
Visual checkpoint: each band should look like a smooth stripe, not like scattered flecks. If you see flecks, your yarn tail may be peeking through. Weave ends to the inside and keep them flat.
Keep the basket shape consistent As you stack color bands, check your wall angle. You want a gentle cylinder, not a cone. If it flares, tighten tension or drop hook size. If it narrows, loosen slightly or size up your hook.
Create a thick rim For the rope like rim look, do this sequence: One round single crochet in your top color. One round slip stitch in front loop only with the same color. This creates a strong top edge that reads like a braided cord.
Place ear markers Decide which side is the front, usually where you want the bow. Mark two ear bases near the front, spaced about 7 to 10 stitches apart.
Make matching chunky ears Since the basket yarn is thick, the ears should be thick too. Crochet each ear as a small oval in rows. Chain 10 to 14. Row 1: Single crochet in second chain from hook and across. Row 2: Chain 1, turn, single crochet across. Repeat until the ear is about 3 inches wide.
Shape the top: Row: chain 1, single crochet 2 together, single crochet across until last 2 stitches, single crochet 2 together. Repeat until the top rounds nicely, then finish off leaving a long tail.
Visual checkpoint: the ear should look like a rounded petal. If it looks too narrow, add more rows before decreasing.
Stiffen the ears so they stand Option A: pipe cleaner spine Stitch a pipe cleaner along the ear edge on the wrong side. Option B: felt insert Cut felt slightly smaller and tack it inside the ear. Option C: fabric stiffener Lightly coat the ear and let dry flat, then curve slightly.
Visual checkpoint: the ear should hold itself upright when you set it on the rim.
Attach ears to the rim Stitch the ear base to the rim and the first wall round. Use multiple passes, especially at the corners of the ear base. Repeat for the second ear.
Add the bow Tie a coral ribbon bow and stitch it at the base of one ear. Keep it slightly to the side for the sweet, styled look.
Final shape and optional base insert If you want it to hold eggs without sagging, add a base insert. Cut plastic canvas to a circle slightly smaller than the base, cover with felt, and place inside.
Troubleshooting
My color bands have a stair step jog Continuous rounds naturally create a slight jog. To minimize it, keep the seam at the back, and consider doing a slip stitch join and chain 1 at the start of each new color, then single crochet around and join again. That creates stacked rounds with cleaner transitions.
My basket twists Thick yarn can torque if you pull unevenly. Keep your working yarn feeding from the same direction and pause every few rounds to straighten the basket.
My ears are too floppy Add a hidden support. Thick yarn alone often needs reinforcement for upright ears.
The rim curls inward Slip stitches can tighten. Use a larger hook for the slip stitch rim, or replace it with one round of crab stitch for a decorative edge.
Finishing details
Weave in ends neatly on the inside, splitting thick yarn into smaller strands if needed. Shape the basket with your hands and let it sit with a bowl inside overnight to train the walls. If you are using stiffener, apply lightly only to the rim and ears for stability while keeping the body soft. For an extra polished look, add a small lining in pastel cotton fabric, stitched just under the rim so it peeks out slightly.
Optional upgrades:
- Add inner ear detail with a smaller ear shape stitched on top in a lighter pastel.
- Add a tiny pom tail on the back using matching yarn.
- Add a removable drawstring liner for candy and eggs.
- Add a name charm tied to the bow.
Shop Similar
- Super bulky yarn pastel rainbow set
- Thick tube yarn for crochet baskets
- Plastic canvas sheets for basket base
- Felt sheets pastel assortment
- Coral satin ribbon
Style It With
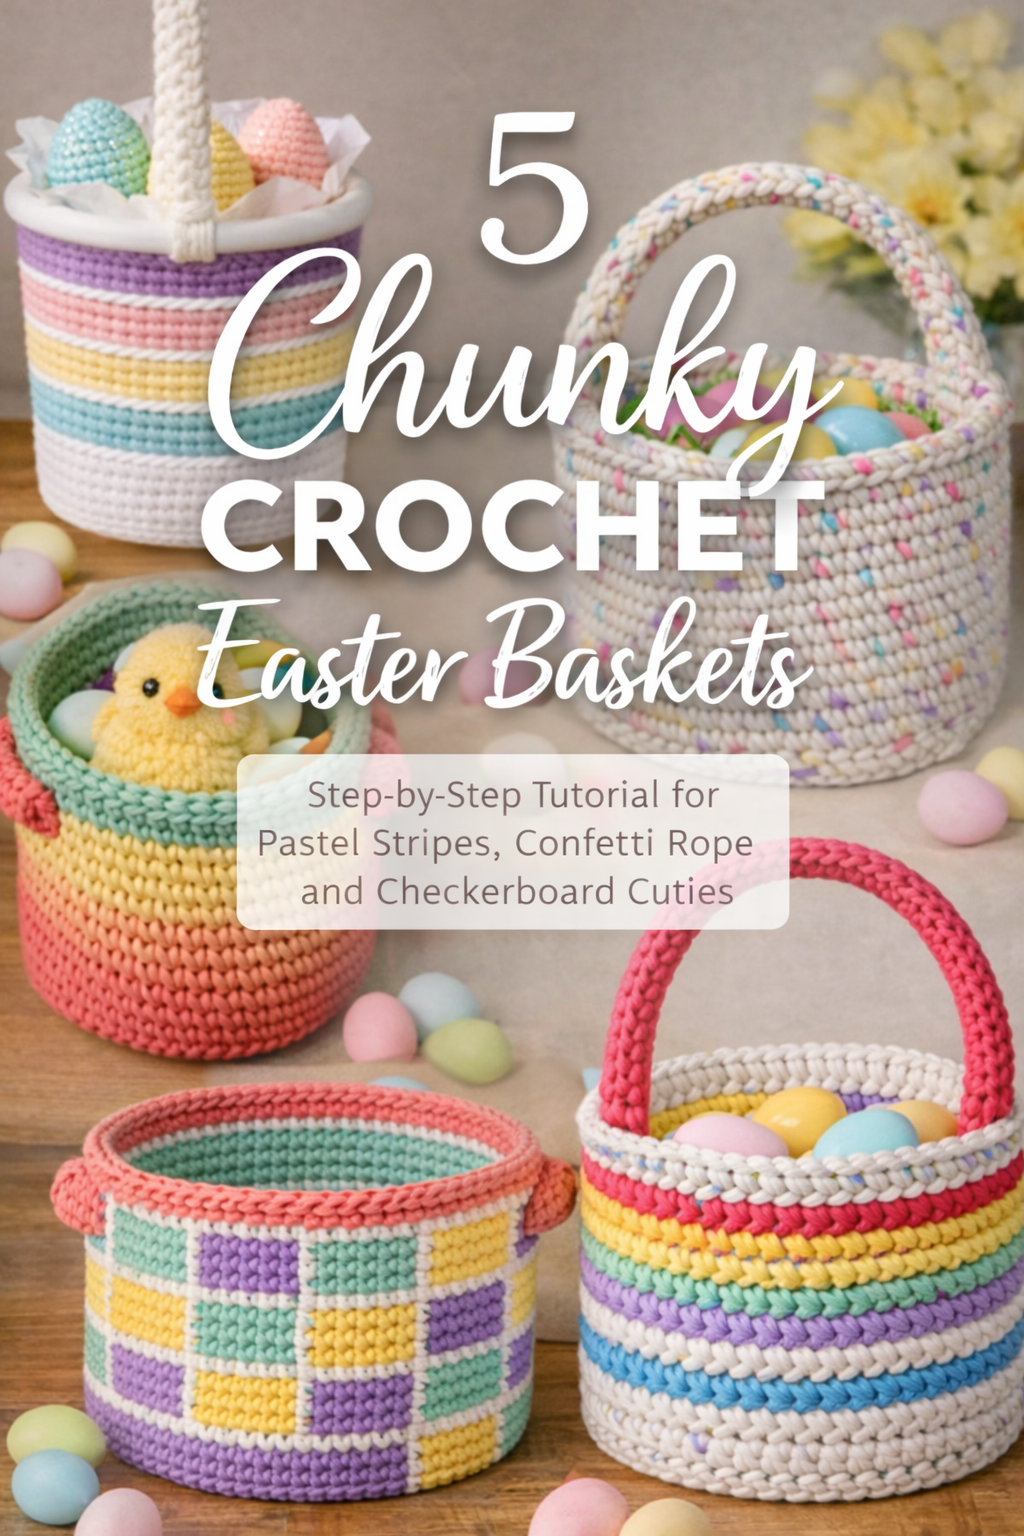
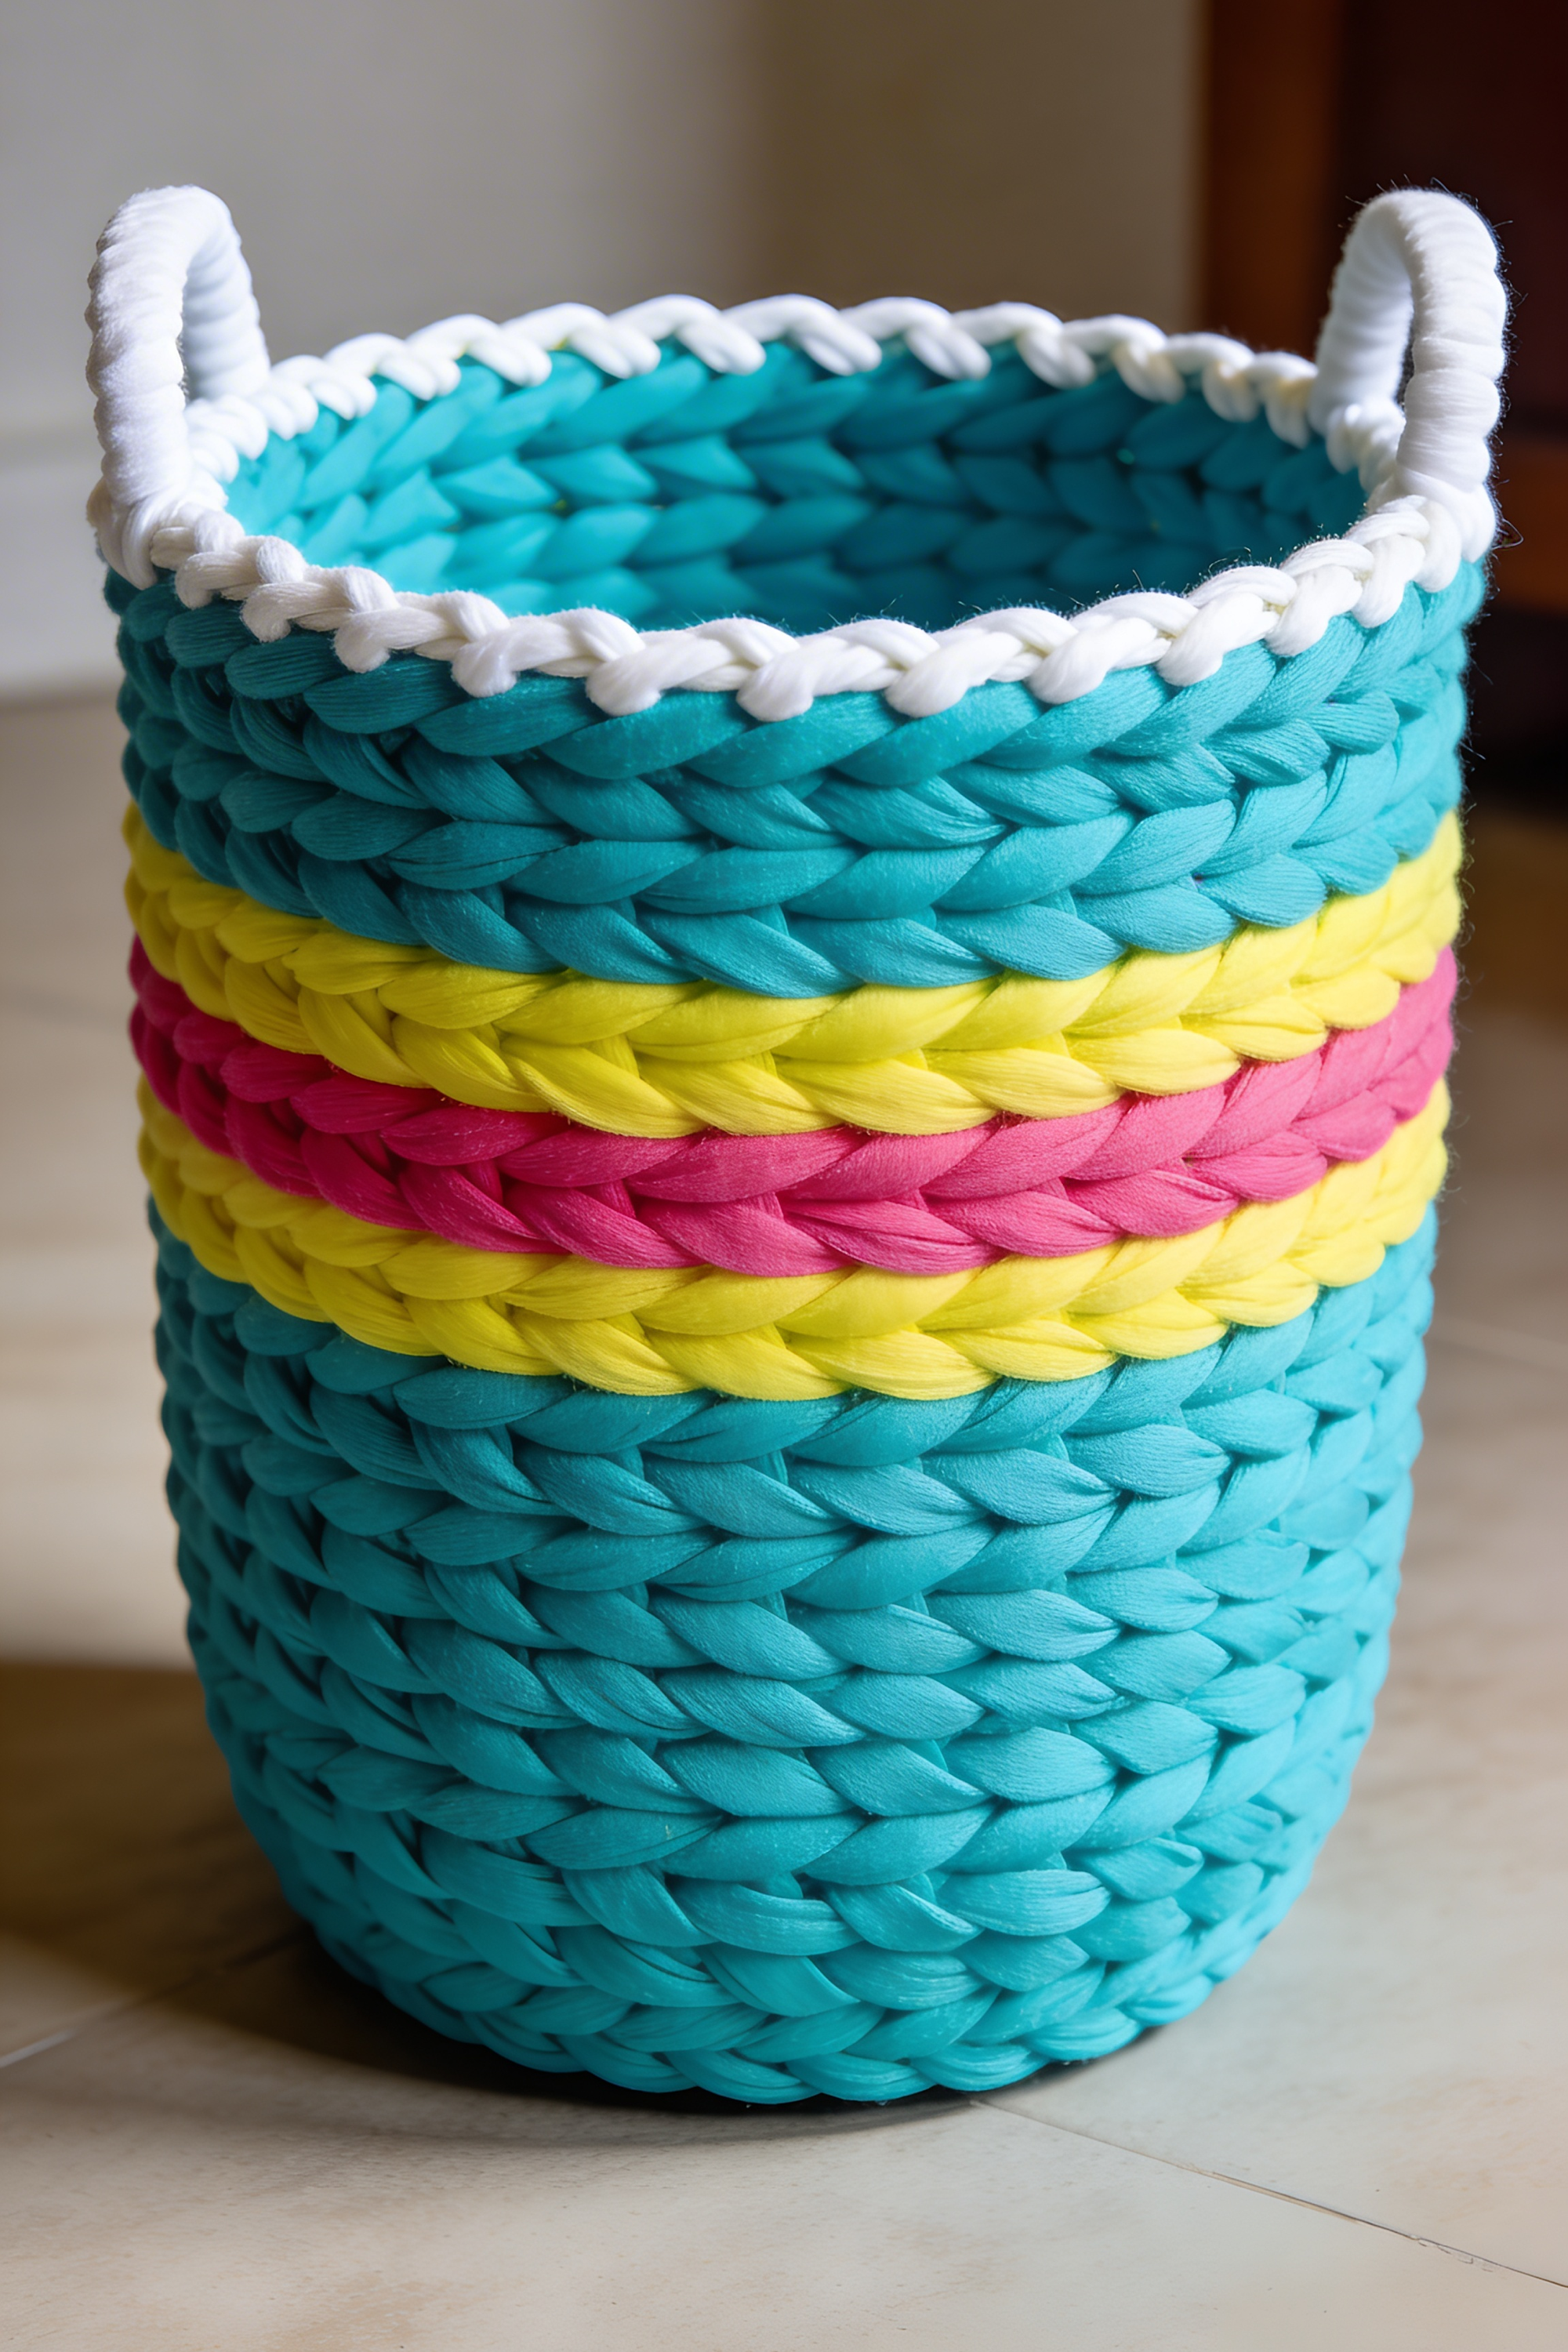
Tall Chunky Stripe Basket With Side Handles: A Step-by-Step How-To Guide
What you’re making
This is a tall, structured crochet basket with bold, graphic stripes and small side handles that curve upward like a soft tote. The stitch texture is extra chunky and braided looking, creating thick horizontal ridges that make the basket feel substantial and modern. The color story is playful and bright: turquoise, lemon yellow, and a hot pink stripe, topped with a crisp white rim that frames the opening.
The look is all about thick material and confident structure. If you pick the right yarn and keep tension steady, this basket will stand on its own like a little storage sculpture.
Materials + tools
- Super bulky fabric yarn or t shirt yarn in turquoise
- Super bulky fabric yarn or t shirt yarn in yellow
- Super bulky fabric yarn or t shirt yarn in hot pink
- Super bulky fabric yarn or t shirt yarn in white for the rim
- Crochet hook, often 10 mm to 15 mm for fabric yarn
- Stitch marker
- Tapestry needle
- Scissors
- Optional: base insert, plastic canvas or stiff craft sheet
- Optional: fabric stiffener for extra firmness
Finished size + customization notes
A typical finished size is about 8 inches wide and 9 to 11 inches tall. To make it wider, increase the base diameter. To make it taller, add more wall rounds. To change the stripe placement, count rounds in each color and keep them balanced. For the thick braided stitch vibe, use tight single crochet or waistcoat stitch if you are comfortable, but single crochet is the beginner friendly option that still looks great with fabric yarn.
Visual goal: big chunky V stitches stacked neatly, with stripes that look like clean bands.
Step-by-step instructions
Choose your yarn and hook for structure Fabric yarn and t shirt yarn behave differently than wool. They are heavier and want to stretch. Use a hook that feels slightly small for the yarn so the stitches lock together. If your stitches look loose, size down.
Crochet the base Start with a magic ring or a chain 2 start. Round 1: 6 single crochet. Round 2: Increase around, 12. Round 3: Single crochet, increase, repeat, 18. Round 4: 2 single crochet, increase, repeat, 24. Keep going until the base is the width you want, often 42 to 60 stitches for a medium basket with chunky yarn.
Visual checkpoint: base should sit flat and feel thick like a coaster. If it feels thin, your hook is too large.
Turn up the walls Work one round back loop only single crochet, no increases. Visual checkpoint: a strong ridge forms and the piece begins to stand.
Work the first turquoise wall section Continue with turquoise. Work single crochet in each stitch around for 4 to 6 rounds.
Tip: keep the basket on a flat surface and check verticality. If it starts to bulge, tighten tension.
Add the yellow stripe Change color at the end of the round using the last pull through method. Work 2 rounds in yellow for a bold band.
Visual checkpoint: yellow band should look even and not thinner than the turquoise. If it looks thinner, your tension changed during the color swap, slow down and match stitch snugness.
Add the hot pink center stripe Work 1 to 2 rounds in hot pink. In the photo it reads as a strong statement band, so one thick round can be enough with fabric yarn.
Return to yellow Work 2 rounds yellow again to frame the pink band.
Return to turquoise and build height Work turquoise rounds until the basket reaches your desired height. For a tall look, add 8 to 12 rounds.
Visual checkpoint: you should now see a tall cylinder. The sides should feel dense and stand without support. If it collapses, tighten tension or consider a base insert.
Create a crisp white rim Change to white. Work 1 round single crochet. Work 1 round slip stitch in front loop only to create a rope like top edge. If slip stitch feels too tight, use a slightly larger hook only for this rim round.
Plan handle placement Mark two handle positions opposite each other. Each handle in the photo is small and sits right at the rim.
Crochet small side handles For each handle: Find your marked stitch. Attach yarn at the rim. Chain 6 to 10 depending on how big you want the handle opening. Skip the same number of stitches on the rim, then slip stitch into the rim at the next marked stitch. Now reinforce: Work single crochet stitches around the chain loop, placing several stitches into the chain space, then slip stitch back to the rim. Repeat a second reinforcing pass so the handle is thick and firm.
Visual checkpoint: handle should stand slightly upright, not flop outward. If it flops, make the handle chain shorter and reinforce with more stitches.
Secure and weave ends Weave all color change tails inside the basket. With fabric yarn, split the yarn into smaller strips before weaving so it hides better.
Optional base insert for a professional finish Cut plastic canvas to a circle slightly smaller than the base. Place it inside. If you want it hidden, cut a felt circle and place on top.
Final shaping Lightly steam from a distance and shape the basket by hand. Let it cool and set.
Troubleshooting
My stripes look uneven in height Count rounds carefully. Fabric yarn can change thickness by brand, so keep the same yarn type for all colors if possible.
My basket leans or twists Continuous rounds can drift. Keep the seam at the back and use a marker. You can also join rounds for stripe sections to keep them visually straight.
Handles rip the rim Reinforce handle anchors by stitching down the handle ends into the wall rounds with a tapestry needle.
Rim is too tight and curls Slip stitch can tighten. Use a larger hook for the rim or replace with a round of single crochet plus a round of crab stitch.
Walls collapse Use tighter stitches, smaller hook, or a stiffer yarn. A base insert also helps the whole basket feel more structured.
Finishing details
Trim ends cleanly and tuck them inside. If you want the basket to look extra crisp, add a light coat of fabric stiffener to the inside walls only, then shape it and let it dry. For a polished storage piece, add a simple label tag on the rim, or stitch a small fabric patch on one side. If the basket will hold heavier items, reinforce the base by stitching an extra round of slip stitches around the outside bottom edge for stability.
Optional upgrades:
- Add a second white stripe above the pink band for a graphic look.
- Add a lining in canvas to protect delicate items.
- Add longer handles for a tote like carry.
- Add a matching lid by crocheting a flat circle and adding a small knob.
Shop Similar
- T shirt yarn turquoise
- T shirt yarn yellow
- T shirt yarn hot pink
- Crochet hook 12mm
- Plastic canvas for basket base
Style It With
If you made it to the end, you now have something better than a seasonal craft. You have a repeatable recipe. Base, turn, build, finish, and then add one signature detail that makes the whole piece feel designed. Once you understand those building blocks, you can remix colors, resize for any use, and create baskets that look curated instead of cutesy.
Set one by the door for keys, style one on a coffee table with pastel eggs, or gift one filled with treats and a ribbon tied like a promise. And when Easter passes, do not pack them away. Swap the palette, change the trim, and keep the shape. The best handmade pieces are the ones that stay useful long after the holiday glow fades.