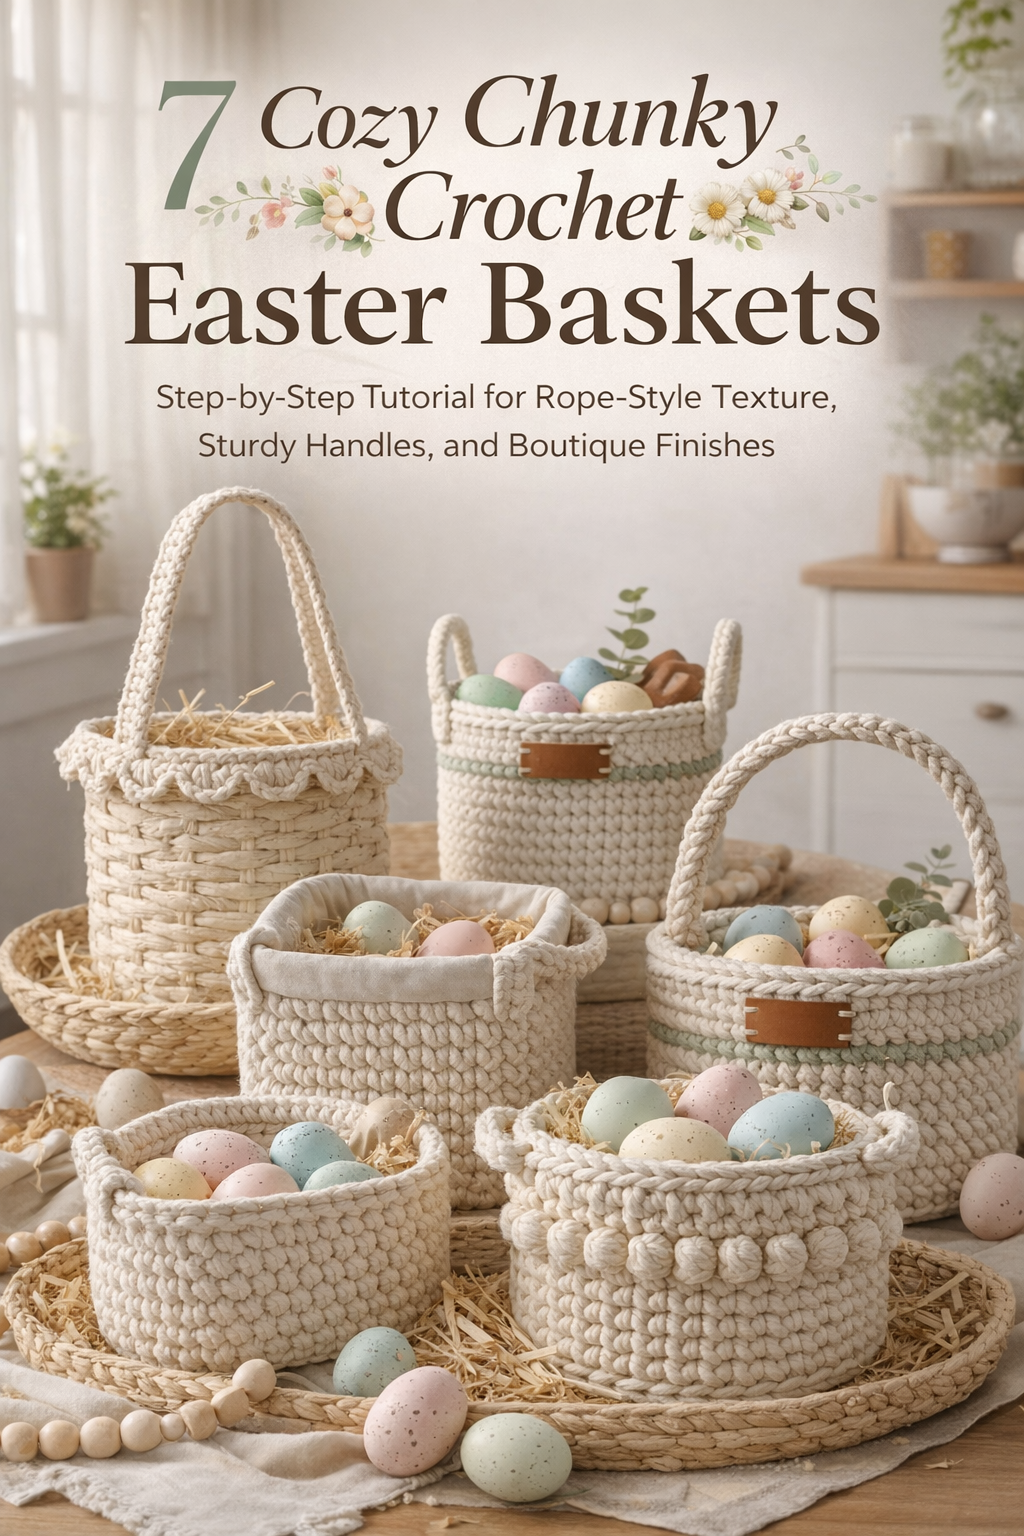
7 Cozy Chunky Crochet Easter Baskets — Step-by-Step Tutorial for Rope-Style Texture, Sturdy Handles, and Boutique Finishes
More like this
Spring has a texture to it — soft light through the windows, pastel eggs scattered across linen, and something handmade sitting at the center of the table. These seven chunky crochet Easter baskets capture that exact feeling. Thick rope-style stitches, sculpted handles, delicate scallops, puff-stitch florals, woven raffia edges — each design feels substantial, heirloom-worthy, and completely achievable. Whether you love clean minimalist storage shapes or sweet pastel details with daisies and bows, this collection is about creating baskets that look boutique, feel sturdy, and photograph beautifully in any spring setting.
💡 Pro Tip: Why I Link to Amazon Search Results and Not One Product
In the Shop the Look and Style it With sections under each bikini, I link to Amazon search results, not single products. Here’s why this matters:
Hot bikinis sell out fast. I don’t want you clicking on a dead link to a sold-out item. Search pages stay updated.
You get more options. Love the vibe but want a different color, cut, or price point? The search results give you everything that matches the look and energy.
I curate each search carefully. These aren’t generic. I spend hours crafting keywords that bring up exactly the kind of bikinis I’d wear—or recommend to my hottest friends.
Support with no pressure. If you click a link, browse, and buy something later, I may earn a small commission at no extra cost to you. That helps me keep bringing you curated collections like this one—powerful, seductive, and always fresh.
So dive in. Click through. Try something risky. These aren’t just bikinis—they’re commands, statements, and maybe even your new favorite weapon of choice.
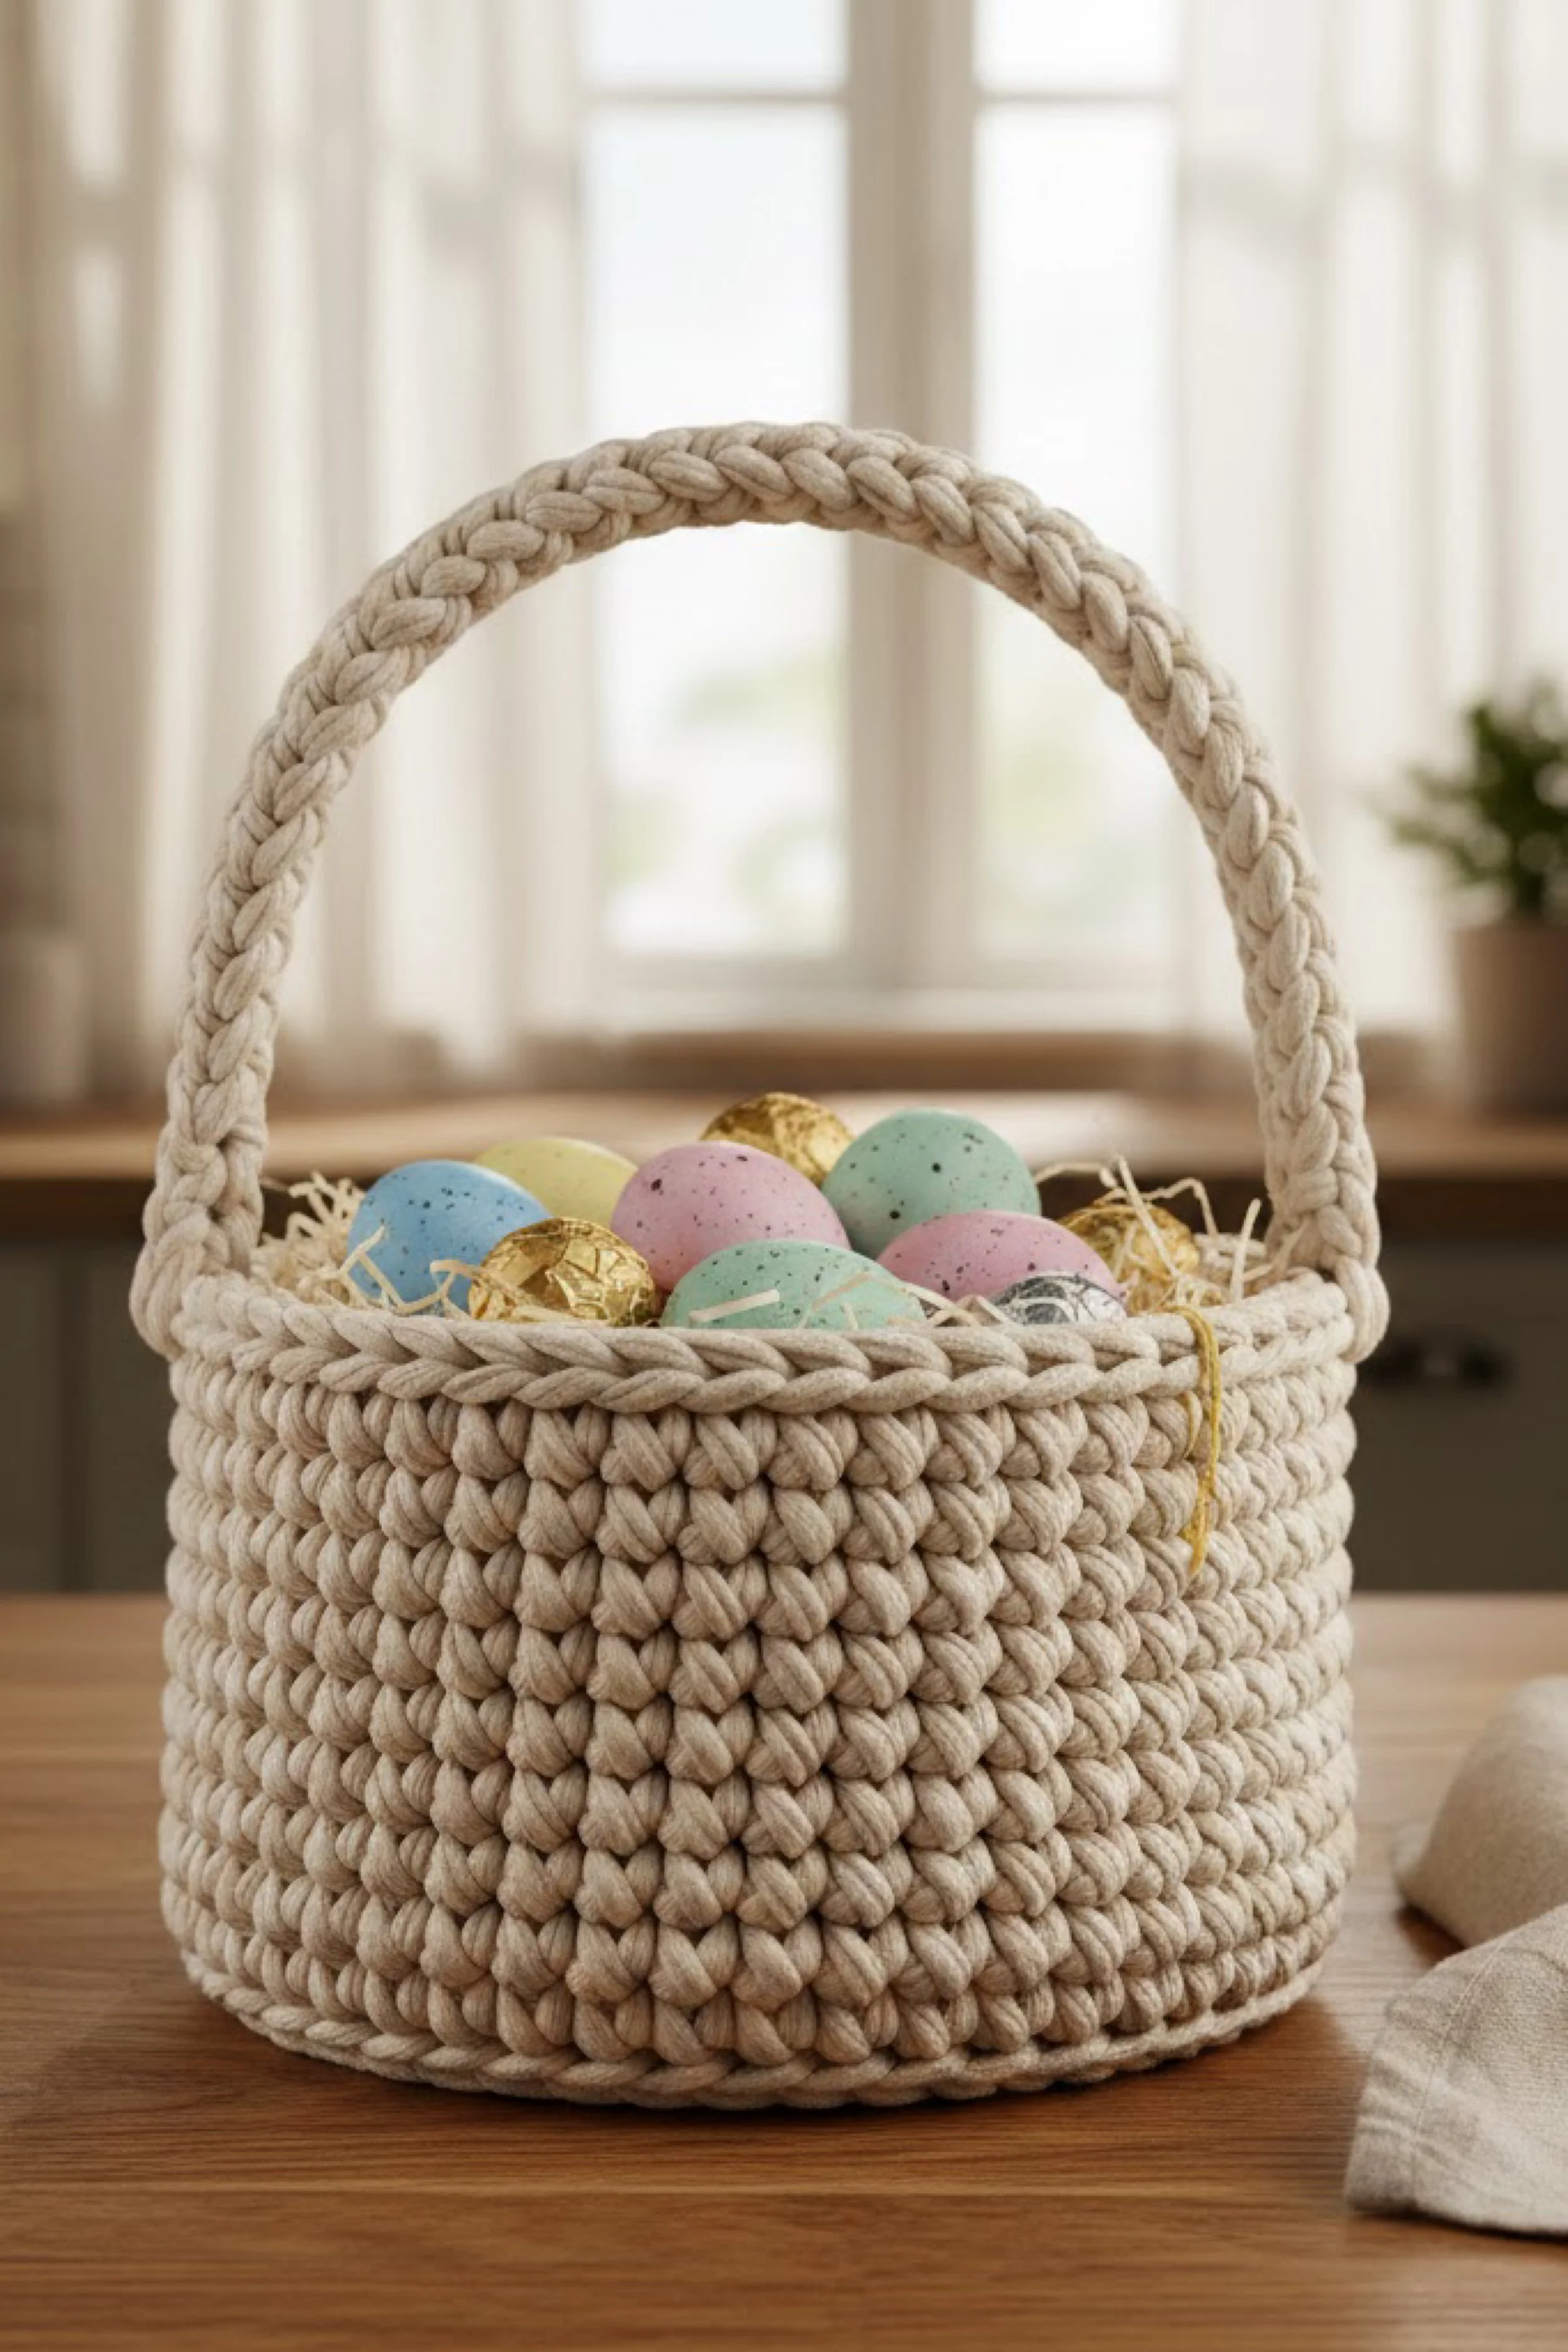
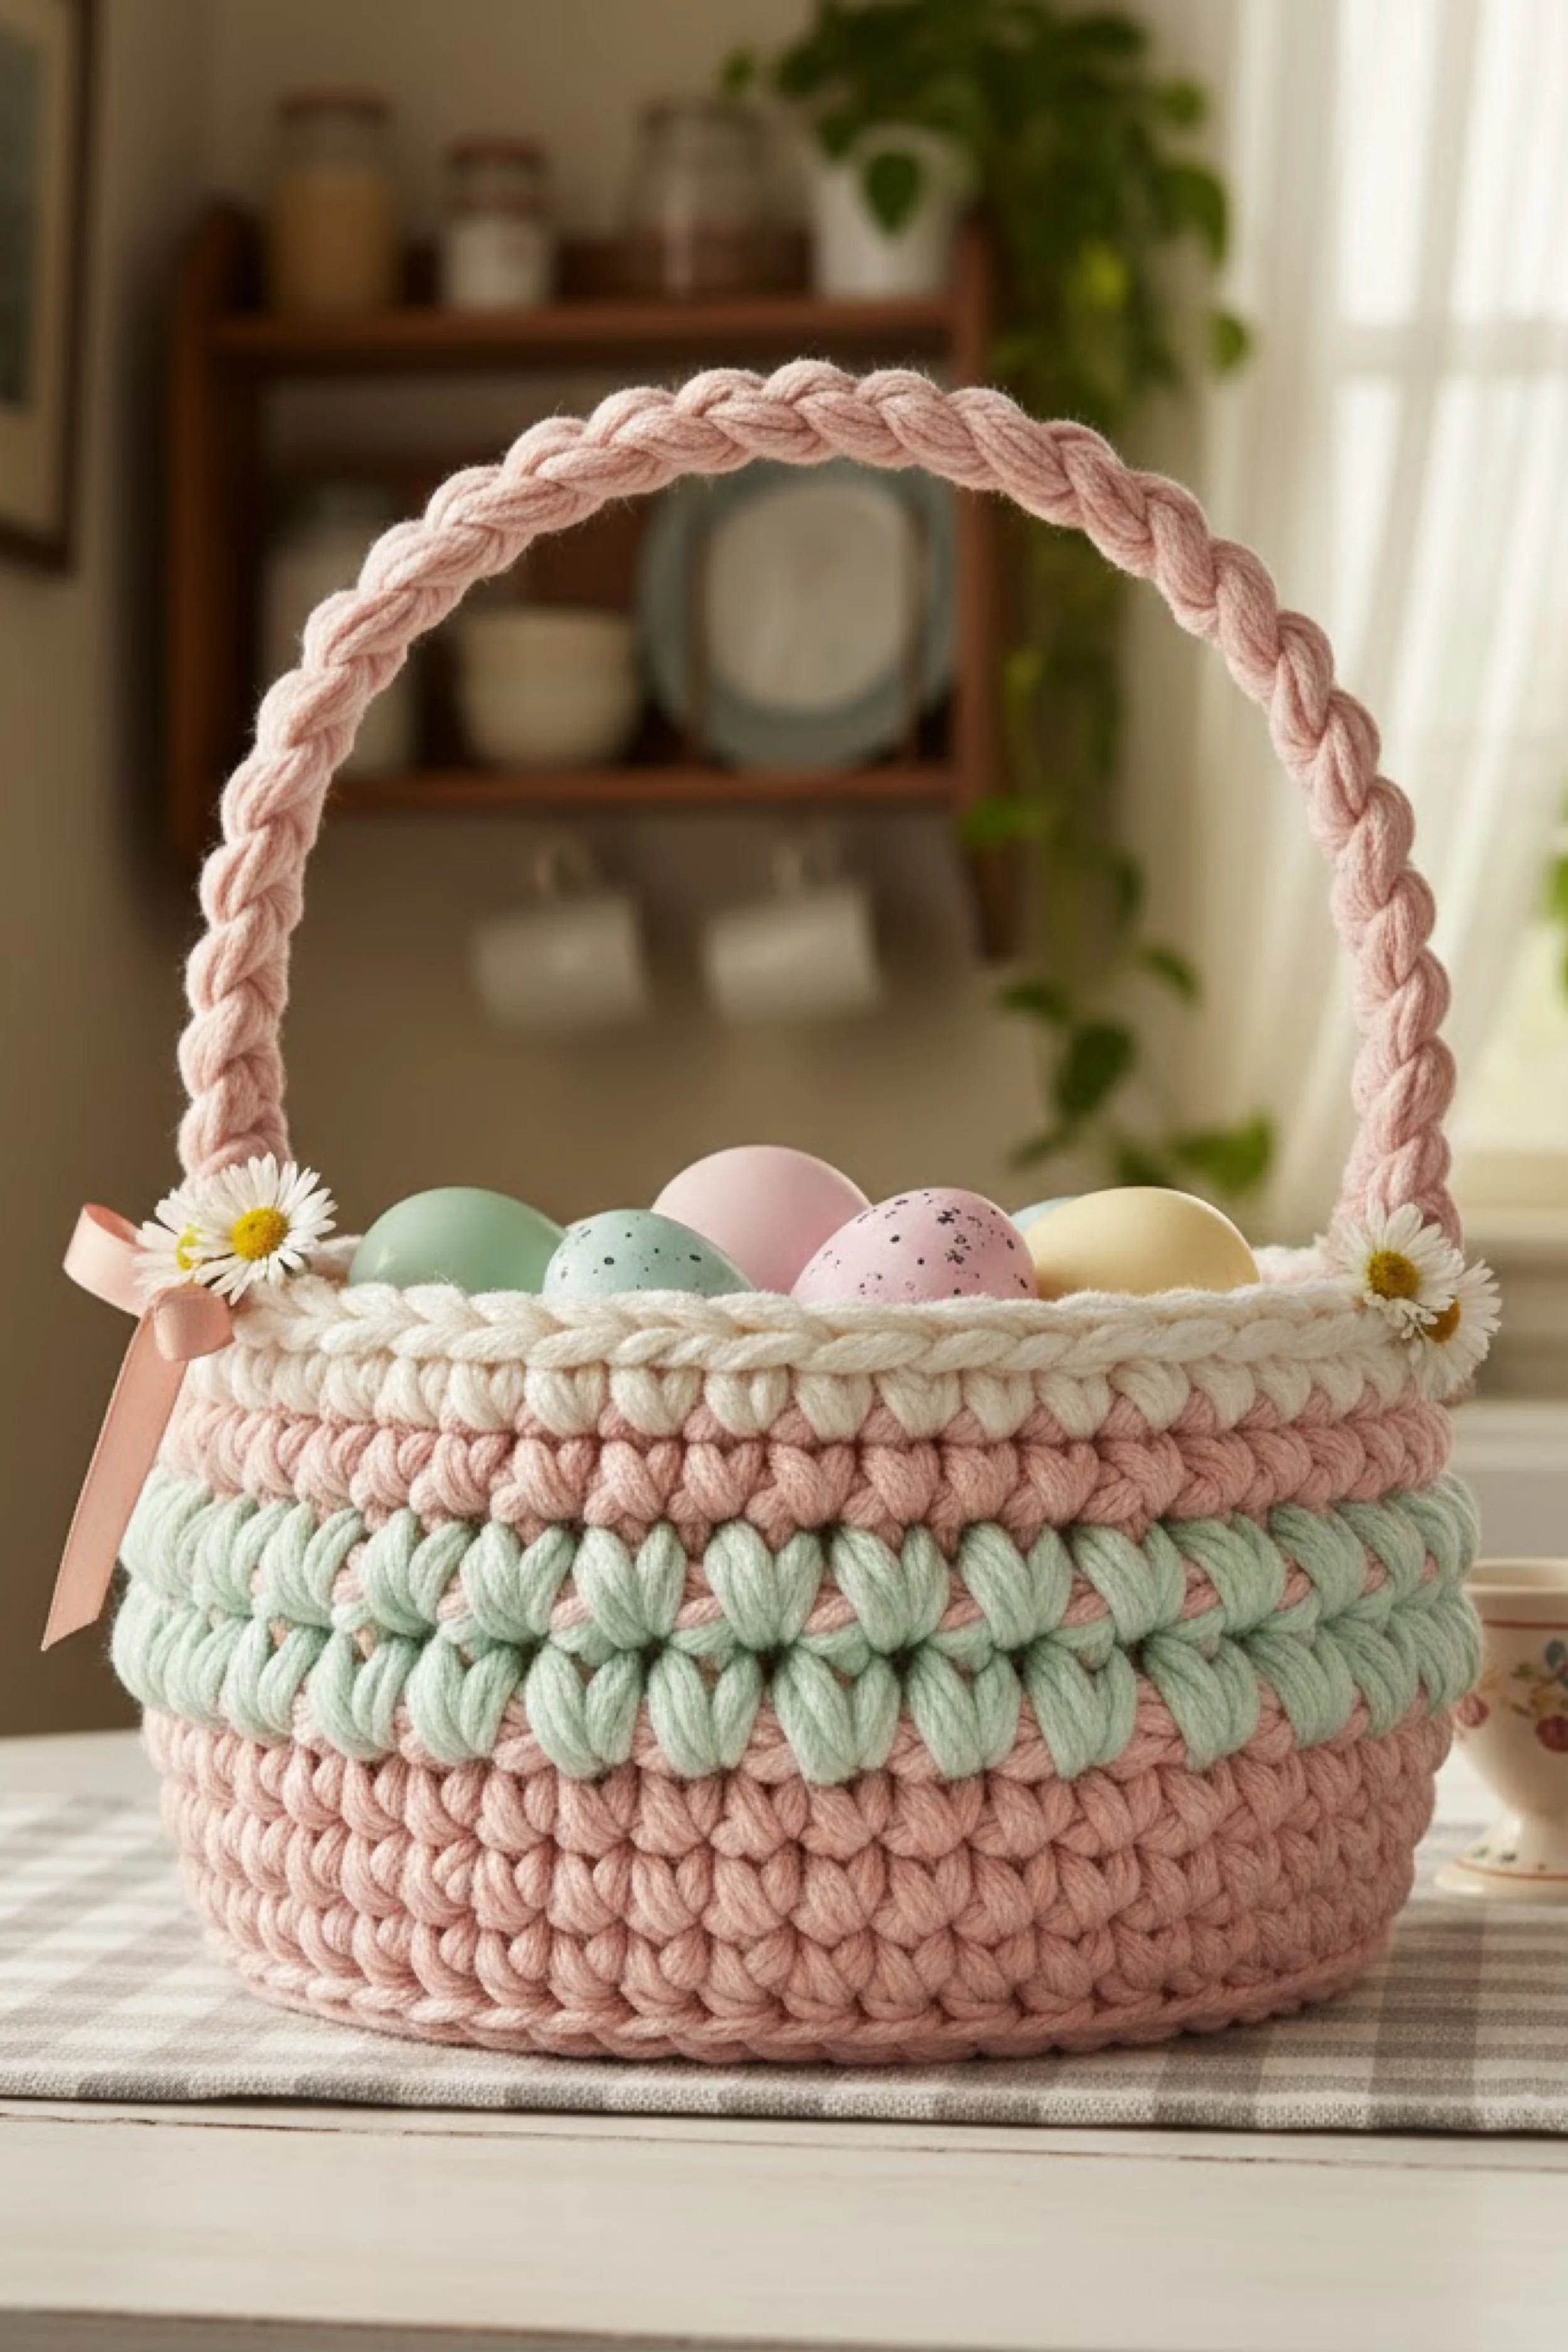
Chunky Rope Crochet Easter Basket With Braided Handle — Make-It-Yourself Tutorial
What you’re making
This is a sturdy, modern “rope-look” crochet Easter basket with a thick, braided handle and a clean, rounded silhouette—exactly like the photo: cozy, neutral, and structured enough to stand on its own. The look comes from super-bulky cotton rope (or cord yarn) worked in tight rounds, plus a thick rim that visually reads like a soft braid.
You’ll crochet a flat base, build straight sides, reinforce the top edge, then attach a handle that’s either crocheted as a tube around a cord core or built as a separate braided piece. The result is a basket that feels like décor (not just holiday), and it holds eggs, filler grass, and small gifts without flopping.
Materials + tools
- Super bulky cotton cord / rope yarn (3–6 mm cord; 100–200 m depending on size)
- Optional: cotton clothesline or nylon rope (3/16"–1/4") to use as a core (for extra stiffness)
- Large crochet hook (9 mm–12 mm; choose based on cord thickness)
- Stitch markers (at least 1; 2 helps for handle placement)
- Tapestry needle (large eye) for weaving ends
- Scissors
- Measuring tape or ruler
- Optional stiffening: fabric stiffener or diluted white glue (1:1 with water)
- Optional liner: scrap cotton fabric + needle/thread (or hot glue for no-sew lining)
- Optional basket filler: crinkle paper or raffia
Finished size + customization notes
- Photo look (approx): 8–10 in wide × 5–7 in tall, with a high arch handle.
- To make it wider: add more increase rounds in the base (keep the circle flat).
- To make it taller: add more straight side rounds after the base.
- To make it stiffer: use a smaller hook than your cord suggests and/or crochet around a rope core.
- Color: natural oatmeal/cream. If your cord is brighter white, tea-dyeing (light) can warm it up—or choose an “ecru” shade.
Step-by-step instructions
Choose your structure strategy (two safe options).
- Option A (simplest): crochet with cord yarn only, tight tension, smaller hook.
- Option B (most like the photo’s stiffness): crochet around a rope core (continuous rope inside your stitches). This adds structure and a “woven rope” heft.
Checkpoint: If you squeeze your first few stitches and they feel squishy/loose, go down a hook size.
Make a magic ring (or chain start) for the base.
With cord yarn: create a magic ring and work 6 single crochets (sc) into it. If your cord is too stiff for a magic ring, chain 2 and work 6 sc into the first chain.
Place a stitch marker in the first stitch of the round.Increase Round 2 (12 stitches).
Work 2 sc in each stitch around (12).
Checkpoint: Your circle should lie flat, not bowl-shaped.Increase Round 3 (18 stitches).
(1 sc, inc) repeat around (18).Increase Round 4 (24 stitches).
(2 sc, inc) repeat around (24).Keep increasing until your base matches the photo’s footprint.
Continue this pattern: each round adds one more single crochet between increases.- Round 5: (3 sc, inc)
- Round 6: (4 sc, inc)
- Round 7: (5 sc, inc)
Stop when the base diameter is about 8–10 inches (or your preferred size).
Checkpoint: Place the base on a table. If it ripples, you increased too fast—undo 1 round and repeat with fewer increases (space them out). If it cups, add a round with slightly more increases.
Create the “turn” round for crisp sides.
Work 1 round of back loop only single crochet (BLO sc) all the way around.
This creates a hinge that makes the sides stand up cleanly.
You should now see: a defined ridge at the bottom edge like the photo’s neat base line.Build the side walls in tight rounds.
For the photo’s chunky texture, use one of these stitches:- Option A (closest, easiest): single crochet in both loops, tight tension.
- Option B (extra thick look): linked half double crochet (linked hdc) or yarn-under single crochet for a denser, ropey texture.
Work even rounds (no increases) until the basket height is 5–7 inches.
Shape-check while you go.
Every 2–3 rounds, set the basket down and gently press the sides straight.- If your basket flares outward: you may be accidentally increasing—count stitches and keep the same stitch count each round.
- If your basket pulls inward: your tension may be too tight—go up a hook size or relax your pull.
Add a thickened rim round (the “lip”).
Work 1 round of half double crochet (hdc) or double crochet (dc) to create a slightly taller top edge.
Checkpoint: The rim should look more substantial than the side stitches—like a soft ledge.Create the braided rim detail (like the photo).
The photo reads as a braided cord line right at the top. Two safe ways:
- Option A (faux braid): work 1 round of front post single crochet or crab stitch (reverse sc) for a raised corded edge.
- Option B (applied braid): crochet a separate chain cord (chain 60–80, then slip stitch back) and sew it around the rim as a “braid.”
You should now see: a defined ropey line that visually matches the basket’s chunky scale.
Plan handle placement.
Decide where the handle attaches: typically opposite sides, about 2–3 stitches in from the “front” center.
Place two stitch markers where you want each handle end to anchor.
Tip: If you want the handle to arch tall like the photo, anchor points should be slightly closer together than you think.Make the handle (two proven options).
Option A: Crocheted tube handle (sturdy, neat).
- Chain to desired length (usually 40–55 chains for a tall arch; adjust to your basket width).
- Work single crochet back along the chain; then continue in rounds/rows to create a thick strap (3–5 rows).
- Fold lengthwise and seam to make a tube-like thickness.
Option B: Wrapped/corded handle (most rope-like). - Cut a rope core the length you want.
- Crochet single crochet around the rope (insert hook under rope + through stitch) so the rope stays inside the handle.
Checkpoint: The handle should feel firm, not floppy, when held from one end.
Attach the handle securely.
Use a tapestry needle and the same cord to stitch each handle end to the rim and top side wall (not just the rim).
Sew through multiple stitches in a rectangle shape—like a belt tab.
Tip: Make at least 10–14 passes per side. This is where baskets fail if under-sewn.Reinforce the inside of the handle joins (optional but recommended).
Add a second line of stitching on the interior, or stitch a small crocheted “patch” behind each handle end.Weave in ends like a structural seam.
With cord yarn, weaving ends isn’t delicate—it’s engineering. Run ends through multiple stitches, change direction, and pull snug. Trim close.Shape and set your basket.
Stuff lightly with towels to shape the walls. Mist with water, press the rim straight, and let dry.
If you want extra stiffness, apply light fabric stiffener to the inside bottom and lower side walls.
Troubleshooting (common mistakes + fixes)
- Base ripples / waves: Too many increases. Frog back 1–2 rounds, redo with evenly spaced increases (or skip an increase every 3rd segment).
- Base bowls upward: Too few increases or too-tight tension. Add 6 increases on the next round (space evenly) or size up your hook.
- Sides flare out: You accidentally increased or added extra stitches near the join. Count stitches each round and keep them constant.
- Sides lean inward: Your tension is too tight. Try a larger hook for side rounds only, or loosen your pull.
- Handle droops: Make it thicker (more rows), add a rope core, or shorten the handle length slightly.
- Rim looks messy: Switch to crab stitch for a clean cord line, or sew on an applied chain-cord “braid.”
Finishing details
- Blocking: With cord baskets, “blocking” is shaping. Stuff it, straighten the rim, and dry fully.
- Stiffening (optional): Brush diluted stiffener on the inside bottom and halfway up the sides. Keep the outer surface clean for a natural fiber look.
- Lining (optional upgrade): Cut a fabric rectangle to wrap the inside + a circle for the base. Hand stitch or glue in place. A lining makes Easter grass and candy wrappers behave.
- Optional upgrades (2–4):
- Add a woven tag or small leather label on the front.
- Add a contrast rim braid (soft blush or sage) for a subtle Easter nod.
- Add a removable liner with a drawstring top for gift-giving.
- Add a stiffer base insert (plastic canvas or cardboard covered in fabric).
Shop Similar
- Super bulky cotton cord yarn, natural/cream
- Cotton rope / clothesline for crochet basket core
- Large crochet hooks 9mm–12mm set
- Fabric stiffener for crochet baskets
- Tapestry needles large eye for thick yarn
Style It With
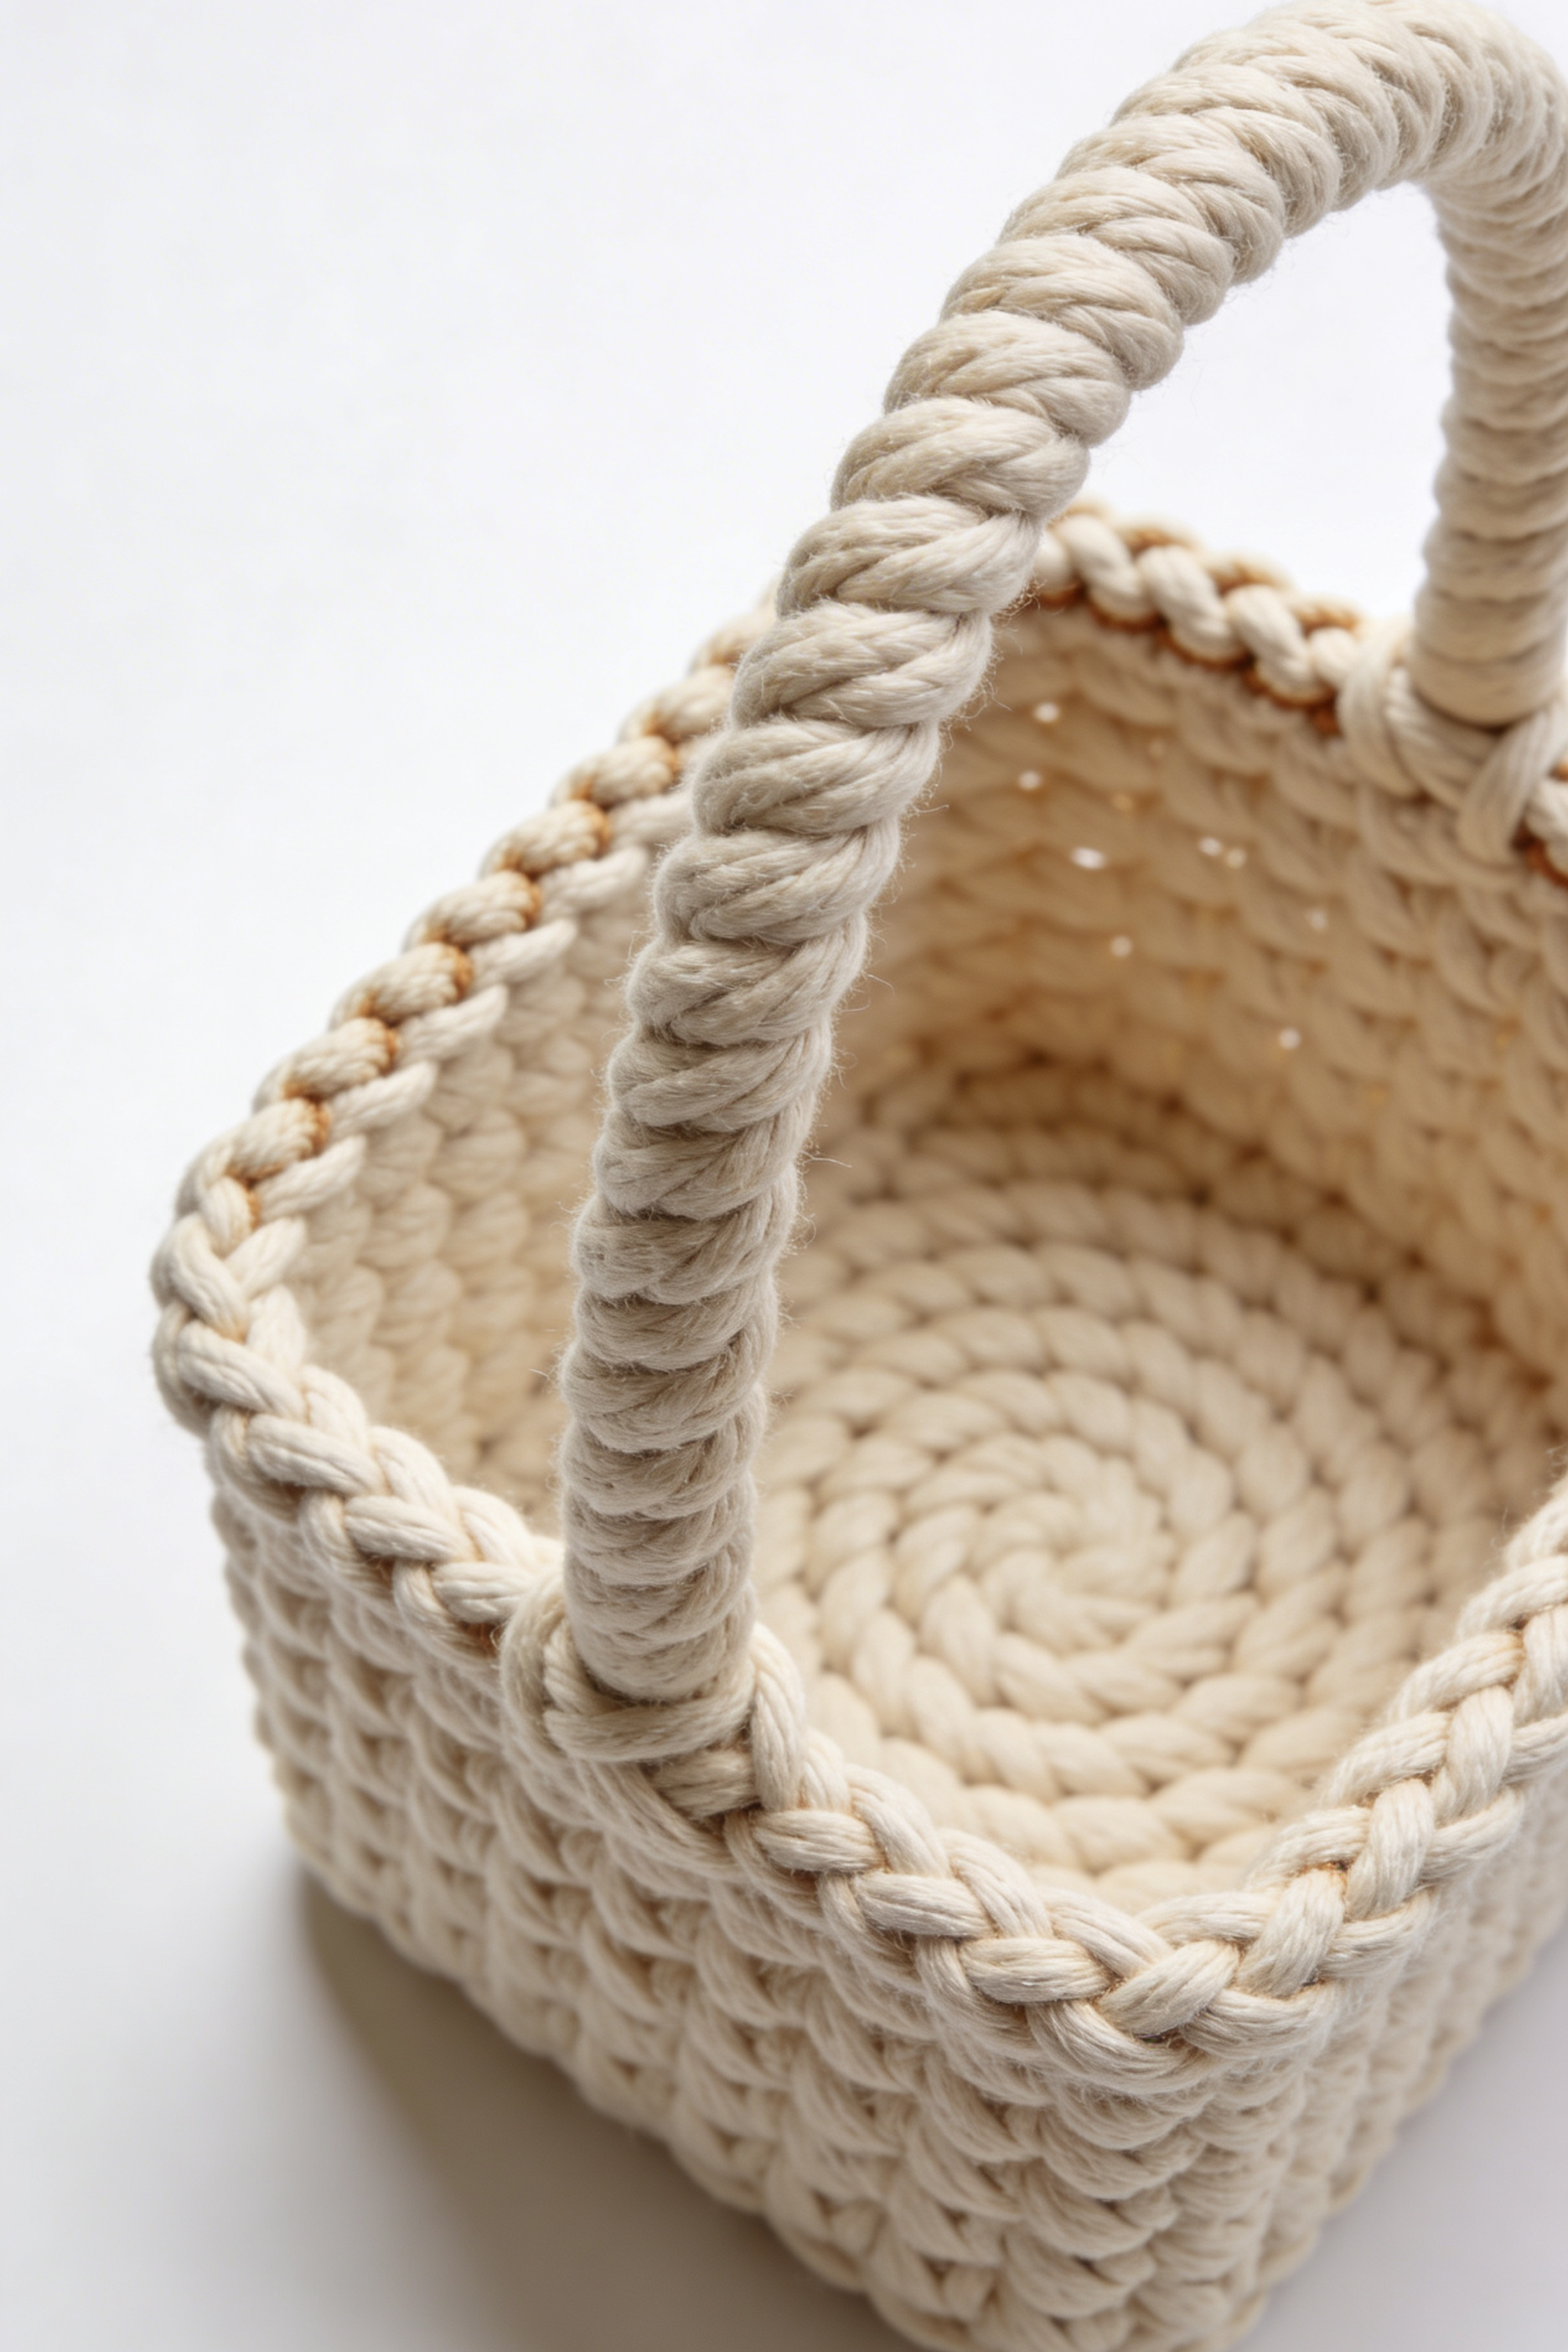
Minimal Square Crochet Basket With Rope-Wrapped Handle — Step-by-Step Tutorial
What you’re making
This is a clean, modern, square(ish) crochet basket with a softly structured body, a braided-looking rim, and a thick rope-wrapped handle—exactly like the bright studio photo. The shape reads “little tote basket”: a flat base, gently squared corners, and a handle that looks like it’s built from rope with crocheted stitches hugging it.
The key to the look is tight stitches with cotton cord (so the basket stands up) and a rim finish that looks like a chunky braid. You’ll crochet a flat base, add height, square the corners subtly, then build/attach a handle that’s sturdy enough to lift a few eggs or small gifts.
Materials + tools
- Super bulky cotton cord yarn (3–5 mm cord; “ecru”/cream)
- Optional rope core (3/16"–1/4") for handle stiffness
- Crochet hook 8 mm–10 mm (or size that makes dense stitches)
- 2 stitch markers
- Tapestry needle (large eye)
- Scissors
- Measuring tape
- Optional: plastic canvas sheet (for a removable base insert)
- Optional: fabric stiffener (light)
Finished size + customization notes
- Photo look (approx): 6–7 in wide, 6–7 in tall, with a firm handle arch.
- Make it more rectangular: start with a longer oval/rectangle base.
- Make it taller: add more side rounds.
- Make corners sharper: use “corner tightening” (explained below) or add a base insert.
Step-by-step instructions
Pick your stitch for the body (two safe options).
- Option A: tight single crochet (sc) for maximum structure.
- Option B: half double crochet (hdc) for slightly more height per round (faster).
The photo’s stitch looks dense and ropey—sc is the safest match.
Start a flat base (round base that will square up).
Magic ring with 6 sc, join or work continuously (continuous rounds look cleanest). Mark the first stitch.Increase to build a flat disk.
- Round 2: inc in each stitch (12)
- Round 3: (1 sc, inc) (18)
- Round 4: (2 sc, inc) (24)
Keep going until the base diameter is about 6–7 inches.
Checkpoint: Base should lie flat without rippling.
Create a crisp edge for the sides.
Work 1 round of BLO sc (back loop only).
You should now see: a clear ridge around the base edge.Begin the side walls (no increases).
Work sc in each stitch around for 2–3 rounds to establish height.Subtle squaring trick (how to get that “square-ish” look).
The basket in the photo feels squared at the rim even if the base is round. Use one of these:- Option A (gentle square): choose 4 “corner points” equally spaced. At each corner, work sc2tog every other round (tightens corners).
- Option B (more square): after 2–3 side rounds, start working front post sc at 4 corner points (creates vertical “edges”).
How to mark corners: count your stitch total, divide by 4, and place markers at those intervals.
Build height to match the photo.
Continue straight rounds (keeping corner shaping if using it) until the basket is about 6–7 inches tall.Add a braid-like rim (signature detail).
The rim in the photo reads like a chunky braided cord. Two reliable ways:- Option A (integrated braid): 1 round slip stitch in FLO (front loop only), then 1 round crab stitch.
- Option B (applied braid): crochet a long chain cord (chain length equal to rim circumference), slip stitch back along it, then sew it around the rim. Checkpoint: The top edge should look thicker and more finished than the side walls.
Reinforce the rim (optional but helps the handle).
Add 1 more round of hdc or sc with slightly tighter tension.Plan handle attachment points.
Mark two points opposite each other, 2–3 stitches back from the “front” center line.
Tip: If you want the handle to sit slightly forward (cute tote vibe), move marks forward by 1–2 stitches.Create the rope-wrapped handle (closest to the photo).
- Cut rope core to desired handle length (about 16–22 inches depending on arch).
- With cord yarn, crochet single crochet around the rope: insert hook under rope and through your working loop, yarn over and pull through, completing sc so the rope stays inside.
Work along the rope until it’s fully wrapped.
You should now see: a thick, twisty, ropey handle surface like the photo.
Alternative handle (no rope core).
Crochet a long strap: chain to length, sc back, then add 3–5 rows of sc. Fold and seam to thicken.Attach handle securely (don’t skip the “box stitch”).
Stitch each end to the basket rim and down the inside wall about 1 inch.
Sew in a box shape with an X across it (like a tote strap).
Checkpoint: If you lift the basket by the handle, the rim shouldn’t collapse inward.Weave in ends with direction changes.
Run ends through 6–10 stitches, turn, run back, then trim. This prevents ends from popping out under tension.Shape the basket for crisp corners.
Stuff with towels, press corners with your fingers, straighten the rim. Let it sit overnight.Optional base insert (makes it look boutique).
Cut plastic canvas to the base shape. Cover with fabric or crochet a small cover circle. Insert inside for a flatter bottom.
Troubleshooting (common mistakes + fixes)
- Basket won’t stand up: Use a smaller hook, tighter tension, or a thicker cord. Add a base insert.
- Rim looks wavy: Your stitch count changed. Count the last round; redo with consistent stitches.
- Corners won’t square: Mark true quarters and use sc2tog corner tightening every other round.
- Handle twists strangely: Keep the rope core untwisted and crochet evenly; don’t pull too tight on one side.
- Gaps between stitches: Cord is too stiff for your hook size—go down a hook or switch to sc.
Finishing details
- Blocking/shaping: Stuff and shape rather than wet-blocking. A light mist helps fibers relax.
- Stiffening (optional): Brush stiffener inside the lower half for structure.
- Lining (optional): A simple fabric sleeve hides the inside seam and makes the basket feel gift-ready.
- Optional upgrades (2–4):
- Add a small leather or faux leather label tab on the rim.
- Add a contrast braid edge (sage or blush).
- Add tiny tassels at the handle bases.
- Add a removable liner with a drawstring.
Shop Similar
- Cotton cord yarn for crochet baskets, cream/ecru
- Rope core for crochet handles 1/4 inch
- Large crochet hook set 8mm 9mm 10mm
- Plastic canvas sheets for basket base insert
- Extra large tapestry needles for bulky yarn
Style It With
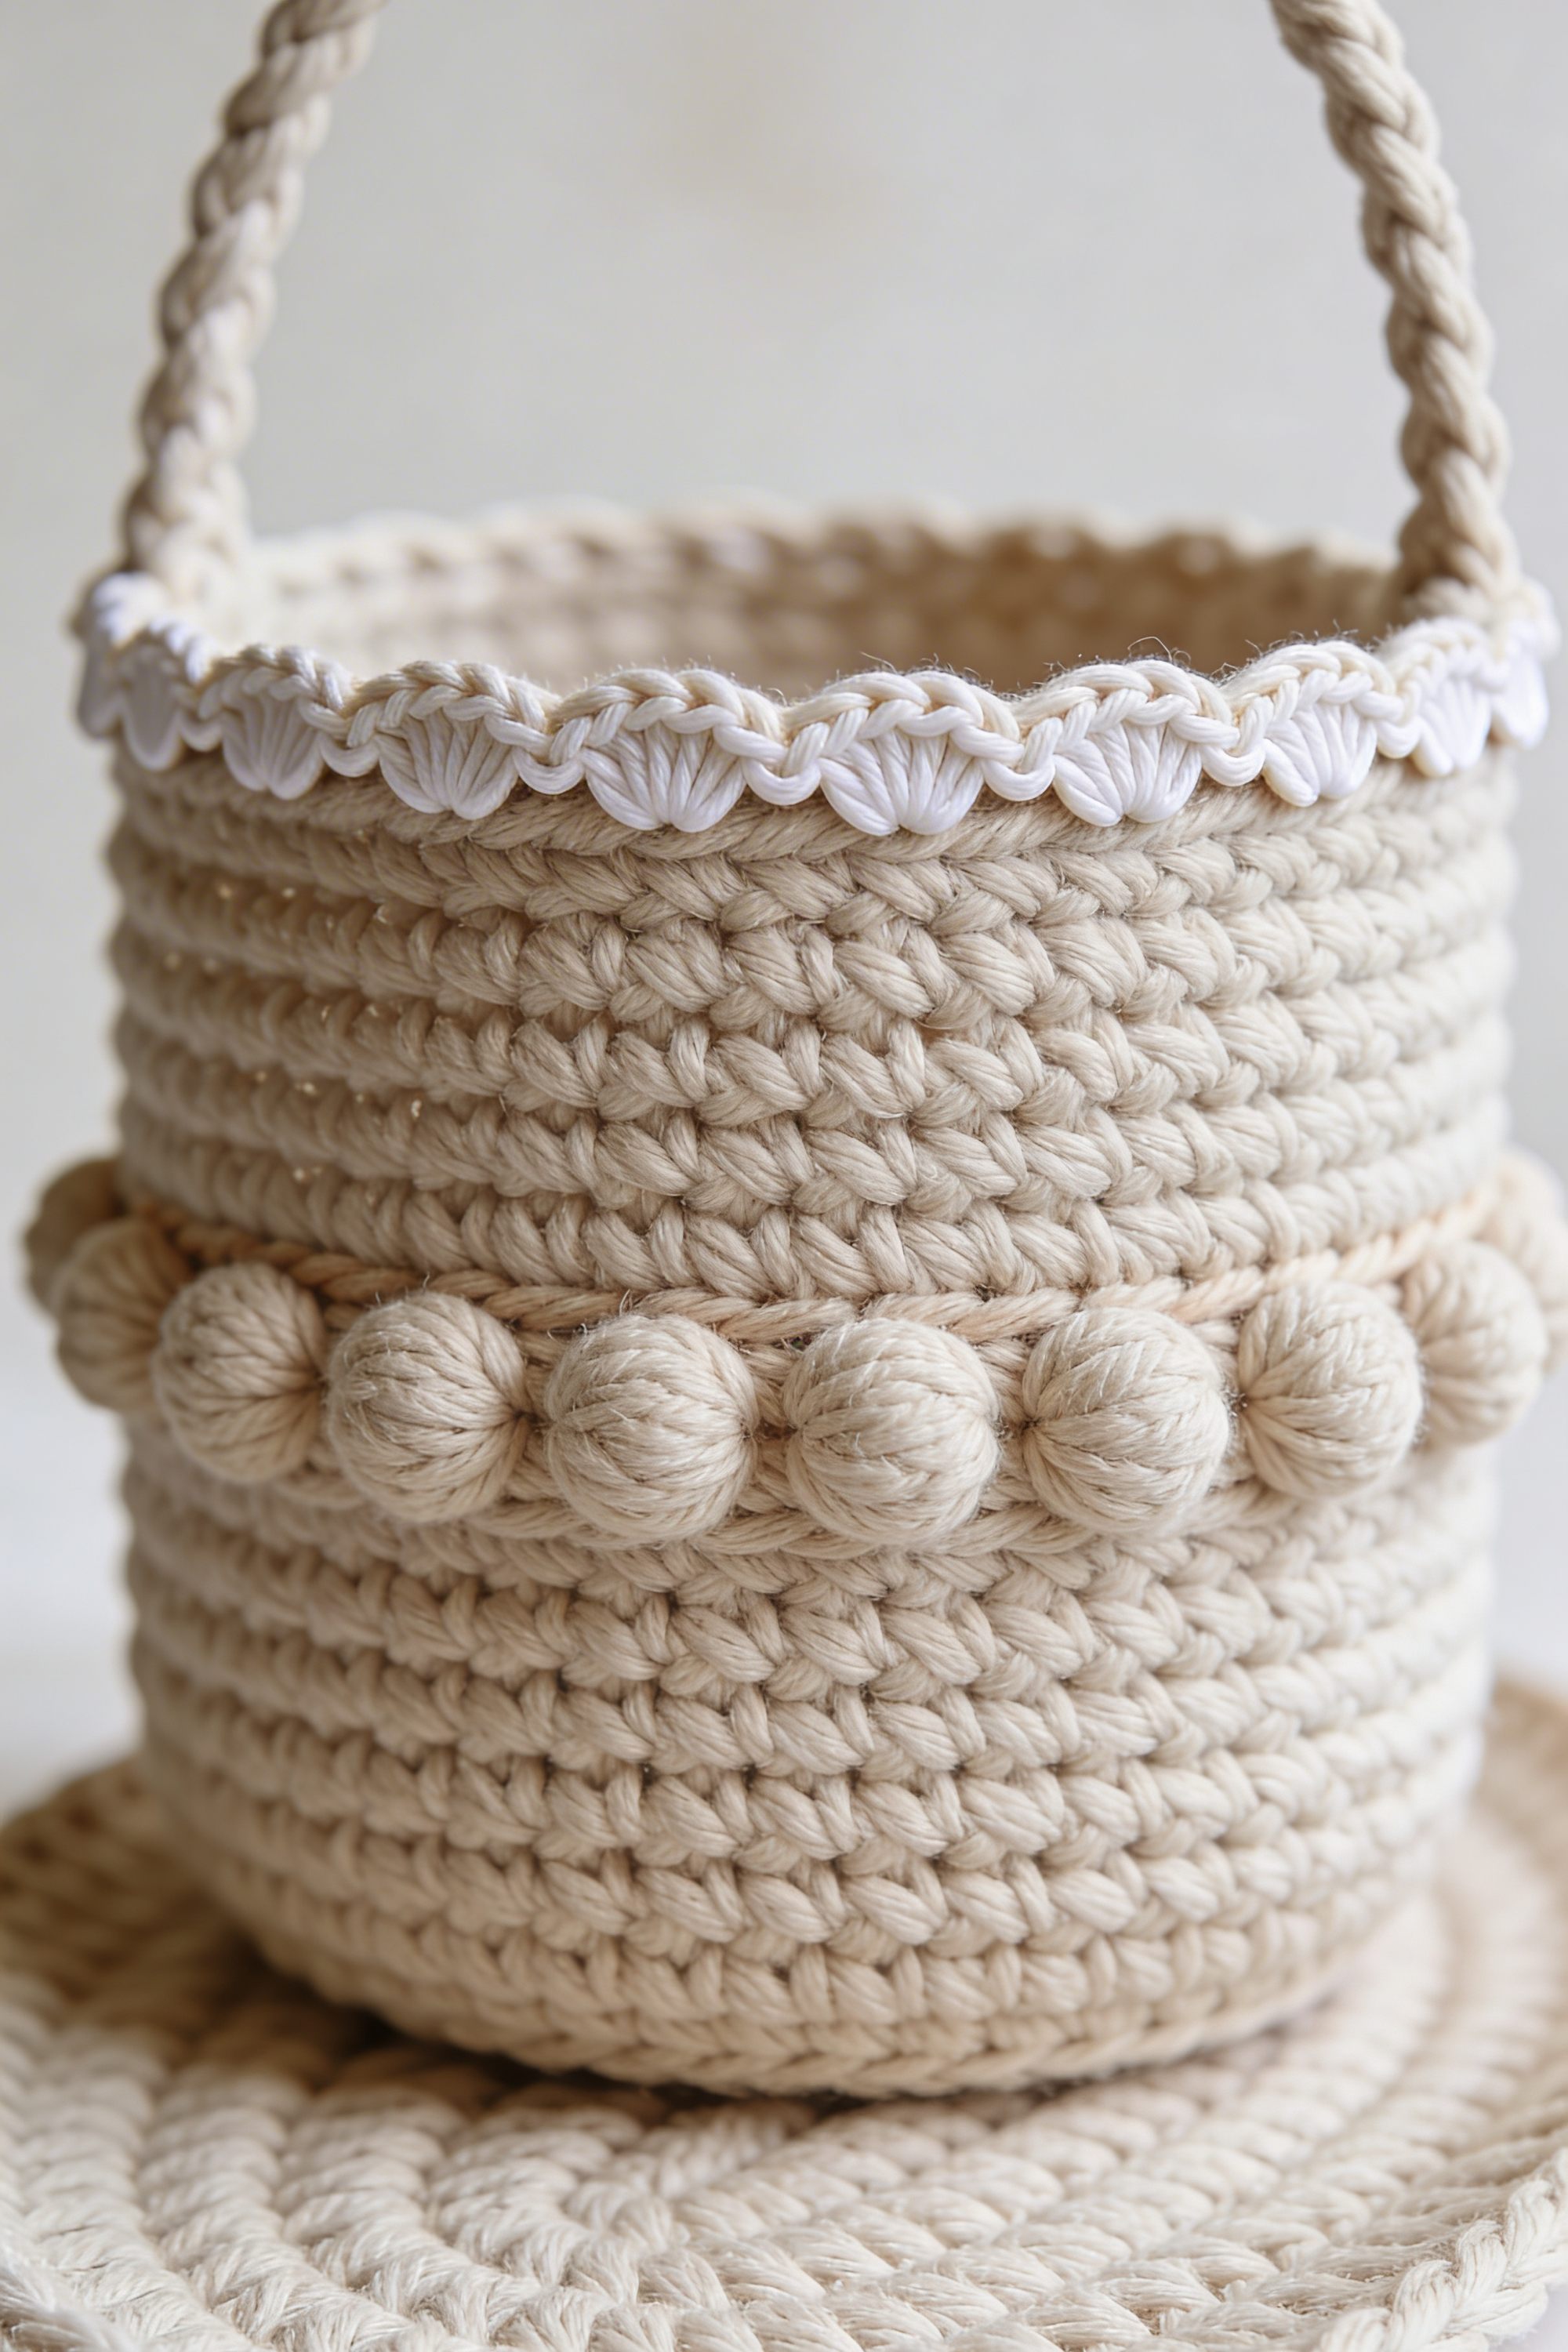
Pom-Pom Band Crochet Easter Basket With Scalloped Rim — DIY Guide
What you’re making
This is a cylindrical, boutique-style crochet Easter basket with three standout details: a soft pom-pom band around the middle, a crisp white scalloped edge at the rim, and a structured handle. The base and sides are classic chunky crochet (tight, even rounds), but the finishing makes it look “designer handmade”—like the photo sitting on a matching crochet mat.
You’ll crochet a sturdy tube basket, add a pom-pom round that looks plush and dimensional, then finish with a braided cord rim and a contrast scallop trim. It’s the kind of basket that can be Easter one month and bathroom storage the next.
Materials + tools
- Super bulky cotton cord yarn (main color: warm cream/oat)
- Optional contrast cord yarn (white/bright cream) for scallop trim
- Crochet hook 8–10 mm (or to achieve dense stitches)
- Stitch marker
- Tapestry needle (large eye)
- Scissors
- Measuring tape
- Optional: rope core for handle
- Optional: fabric stiffener (light)
- Optional: pom-pom maker (or cardboard) if you choose real pom-poms instead of crochet bobbles
Finished size + customization notes
- Photo look (approx): 7–8 in wide × 7–8 in tall (a tall cylinder).
- To make it wider: increase base diameter (more increase rounds).
- To make it taller: add more side rounds before the rim.
- Pom-pom band height: about 1–1.5 inches (one statement round).
- Handle: medium arch; attach opposite sides.
Step-by-step instructions
Decide the “pom-pom” method (two safe options).
- Option A (crocheted bobbles): fastest, washable, photo-accurate in texture.
- Option B (attached mini pom-poms): plushest, but more steps.
The photo reads like evenly spaced crochet bobbles that mimic pom-poms—Option A is the best match.
Start the base with a flat circle.
Magic ring, 6 sc. Mark the first stitch.Increase to grow the base.
- R2: inc around (12)
- R3: (1 sc, inc) (18)
- R4: (2 sc, inc) (24)
Keep increasing evenly (add 6 stitches per round) until diameter is 7–8 inches.
Check for flatness.
You should now see: a tidy disk that lies flat.
If it ripples, you’re increasing too much; if it cups, add a few extra increases next round.Turn the corner for the sides.
Work 1 round BLO sc to create a hinge ridge.Build the side walls (dense and even).
Work sc in each stitch around for several rounds. Keep the stitch count constant.Plan the pom-pom band placement.
In the photo, the pom-pom band sits around the mid-section.
Crochet about 3–4 inches of plain sides first.Crochet the pom-pom/bobble round (statement band).
Use Bobbles spaced evenly:- A common bobble: (yo, insert hook, yo, pull up loop, yo, pull through 2) repeat 3–4 times in same stitch, then yo and pull through all loops.
For super bulky cord, a 3-pull bobble is enough—too many pulls gets bulky fast.
Pattern idea: (bobble, sc in next 2 stitches) repeat around.
Checkpoint: The bobbles should sit on the outside like little puff balls; if they hide, loosen tension slightly on bobble stitches.
- A common bobble: (yo, insert hook, yo, pull up loop, yo, pull through 2) repeat 3–4 times in same stitch, then yo and pull through all loops.
Lock the bobbles in with a “buffer” round.
Crochet 1 round of plain sc. This helps the bobbles pop outward and prevents stretching.Continue plain side rounds to the final height.
Add more sc rounds until total height is about 7–8 inches.Create the braided rim line.
Work 1 round slip stitch in FLO (front loop only) for a ropey ridge.Add the contrast scallop trim (white edge).
Switch to contrast cord (white). Work a scallop/shell stitch:
- (sl st, skip 1, 5 dc in next stitch, skip 1) repeat around.
If 5 dc is too dense with your cord, use 3 dc for smaller scallops.
You should now see: a crisp, decorative edge that reads like the photo’s white scallops.
Handle planning and marking.
Mark two opposite points. For a balanced handle, count stitches and place markers exactly half a round apart.Make a sturdy handle.
Two good methods:
- Corded handle: crochet around a rope core for a firm arch.
- Thick strap: chain to length, sc back, then add 4–6 rows; fold and seam to thicken.
Attach the handle with reinforced stitching.
Stitch each end to the rim and down the inside wall. Use a box + X reinforcement.
Checkpoint: Pull gently; stitches should not shift.Weave in ends and tidy the scallops.
Weave contrast yarn tail through several stitches under the scallops so it disappears.Shape and set.
Stuff with towels to round the cylinder perfectly. Let it sit overnight. Light mist helps.
Troubleshooting (common mistakes + fixes)
- Bobbles look flat: Make the bobble taller (one extra pull), or space them farther apart so they have room.
- Scallops curl: Too many dc for your stitch count—switch from 5 dc to 3 dc, or add one extra skipped stitch between shells.
- Rim is wavy: Your last round stitch count changed; count and redo the round before the scallops.
- Handle pulls rim inward: Reinforce rim with an extra sc round before attachment; sew handle ends lower into the side wall.
- Basket slumps: Use smaller hook, tighter sc, or add a base insert/stiffener.
Finishing details
- Blocking: Stuff and shape; straighten scallops with your fingers while slightly damp.
- Stiffening: Lightly stiffen the inside lower half if you want it to stand “display perfect.”
- Optional upgrades (2–4):
- Add a matching crochet mat coaster like the photo for a styled moment.
- Add a narrow satin ribbon tied near one handle base.
- Add a sewn fabric liner in a tiny floral print.
- Add a small label tag stitched between two scallops.
Shop Similar
- Cotton cord yarn super bulky cream for baskets
- Cotton cord yarn white for scallop edging
- Large crochet hooks 8mm 9mm 10mm
- Rope core for sturdy crochet handles
- Pom pom maker set small sizes
Style It With
Pastel Puff-Stitch Easter Basket With Daisy Details — How-To Guide
What you’re making
This is the sweet, pastel “heirloom but modern” Easter basket: chunky crochet body in blush pink, a mint puff-stitch flower band around the center, a thick braided handle in matching pink, and tiny daisy accents plus a soft ribbon bow—exactly like the photo. It’s plush, dimensional, and still structured enough to hold eggs without collapsing.
You’ll crochet a solid base and sides in single crochet, then add a textured puff/cluster band in a contrasting pastel, finish with a thicker rim, crochet a braided-looking handle, and attach a ribbon + daisies as final styling.
Materials + tools
- Super bulky yarn or cotton cord in blush pink (main)
- Super bulky yarn/cotton cord in mint (accent band)
- Super bulky yarn/cotton cord in cream/white (rim)
- Large crochet hook 8–12 mm (match to your yarn/cord; aim for dense stitches)
- Stitch marker
- Tapestry needle
- Scissors
- Measuring tape
- Optional: rope core for handle
- Optional embellishments:
- Small faux daisies (or crochet daisies)
- Satin ribbon (light pink)
- Hot glue (for faux flower attachment) or needle/thread (for sewn attachment)
Finished size + customization notes
- Photo look (approx): 9–10 in wide × 5–6 in tall, low and wide, with a tall arch handle.
- To adjust width: add or subtract base increase rounds.
- To adjust height: add more plain side rounds before/after the puff band.
- Keep the color order like the photo: pink base → mint flower band → pink → cream rim.
Step-by-step instructions
Choose your stitch density.
This basket looks plush but tight. Use single crochet with firm tension. If your stitches look “holey,” go down a hook size.Start the base circle.
Magic ring, 6 sc. Mark first stitch.Increase to a wide base.
Increase by 6 stitches each round:- R2: inc around (12)
- R3: (1 sc, inc) (18)
- R4: (2 sc, inc) (24)
Continue until base is 9–10 inches across.
Flatness check.
You should now see: a flat, clean circle.
If it ripples, reduce increases; if it cups, add a few extra increases next round.Turn the edge for the sides.
Work 1 round BLO sc to create a crisp corner.Build the lower sides in blush pink.
Work sc in each stitch around for about 1.5–2 inches of height.Set up for the puff-stitch “flower” band.
The mint band in the photo reads as repeated puff “petals.” Two safe texture options:- Option A (puff stitches): puffs spaced evenly, forming flower-like clusters.
- Option B (cluster V-stitches): less bulky, still floral.
Puff stitches are the closest to the photo.
Switch to mint yarn/cord and crochet the puff band.
A simple repeating puff pattern:- (Puff stitch in next stitch, ch 1, skip 1 stitch) repeat around.
For super bulky material, use a short puff (3 partial pulls) so it doesn’t become a giant knot.
Checkpoint: The mint puffs should sit proud and evenly spaced, like little petals around the basket.
- (Puff stitch in next stitch, ch 1, skip 1 stitch) repeat around.
Anchor the puff band with a stabilizing round.
Still in mint: work 1 round of sc, placing sc into each puff top and into the spaces as needed to keep stitch count consistent.
If your puff pattern changed stitch count, this is where you correct it: aim to return to the original stitch count from your plain sc rounds.Switch back to blush pink and add a “framing” round.
Work 1 round sc in pink.
You should now see: the mint band framed cleanly by pink, like the photo.Continue sides in blush pink to desired height.
Add 1–2 more inches of sc rounds.Create the thick rim in cream/white.
Switch to cream/white:
- Work 1 round hdc to build a taller lip.
- Then 1 round crab stitch or slip stitch ridge for a ropey line.
Checkpoint: The rim should look like a soft rope border sitting on top.
Handle planning and placement.
Place markers opposite each other. Because the basket is wide, you’ll want the handle to attach slightly inboard from the exact sides (prevents handle from splaying outward).Crochet a braided-looking handle (photo match).
Three approaches—choose based on what you have:
- Option A (cord core + sc wrap): wrap sc around rope core (stiff and neat).
- Option B (3-strand crochet braid): crochet 3 long cords (chains with slip stitch back), braid them, then stitch ends down.
- Option C (thick strap): multiple rows sc, folded and seamed.
The photo handle reads like a braid—Option B is the most visually accurate.
- If using the 3-cord braid method, make cords.
Crochet three identical cords:
- Chain to length (usually 55–75 chains for a tall arch), slip stitch back along chain to thicken.
Braid snugly (not tight enough to shorten too much).
Checkpoint: The braid should look even—no cord should dominate the front.
Attach the handle securely.
Sew each end under the rim and slightly down the side wall. Use multiple passes and hide stitches under the rim lip.
Tug test: lift basket gently—no shifting.Add ribbon bow detail.
Tie a soft satin bow near one handle base. For the “photo look,” let tails hang slightly. If you prefer washable, stitch the knot down with thread.Add daisy embellishments (two safe options).
- Option A (faux daisies): hot glue a small daisy at each side near the rim.
- Option B (crochet daisies): crochet small daisies and stitch them on (more durable).
Placement tip: Slightly forward of the handle attachment so daisies show from the front.
Weave in ends, hide color changes.
For color changes, weave ends around the inside stitches and back, so they don’t peek out between puffs.Final shaping.
Stuff lightly, straighten the rim, and let it sit. If needed, mist lightly to relax stitches.
Troubleshooting (common mistakes + fixes)
- Puff band looks messy or uneven: Your puff height is inconsistent. Use the same number of partial pulls each time and keep yarn tension steady.
- Mint band makes the basket flare: Puff stitches can add width. Reduce spacing (skip fewer stitches) or tighten puff stitches; add a stabilizing sc round that returns stitch count.
- Color changes show gaps: Switch colors on the last yarn-over of the previous stitch; weave ends thoroughly.
- Handle looks limp: Braid tighter, add rope core, or stitch a hidden support cord inside the braid.
- Rim rolls outward: Add a tighter round (smaller hook) or switch from hdc to sc for the rim base.
Finishing details
- Blocking/shaping: Stuff and shape; press puff band gently outward.
- Stiffening (optional): Light stiffener inside lower half keeps it photo-perfect.
- Optional upgrades (2–4):
- Sew in a removable floral liner.
- Add a name tag (wood or leather) on the front.
- Add tiny bell or charm inside the bow knot (subtle).
- Add a second, thinner accent stripe above the puff band.
Shop Similar
- Super bulky yarn blush pink for crochet baskets
- Super bulky yarn mint green for puff stitch basket
- Cotton cord yarn cream for basket rim
- Large crochet hooks 9mm 10mm 12mm
- Mini faux daisies for crafts
Style It With

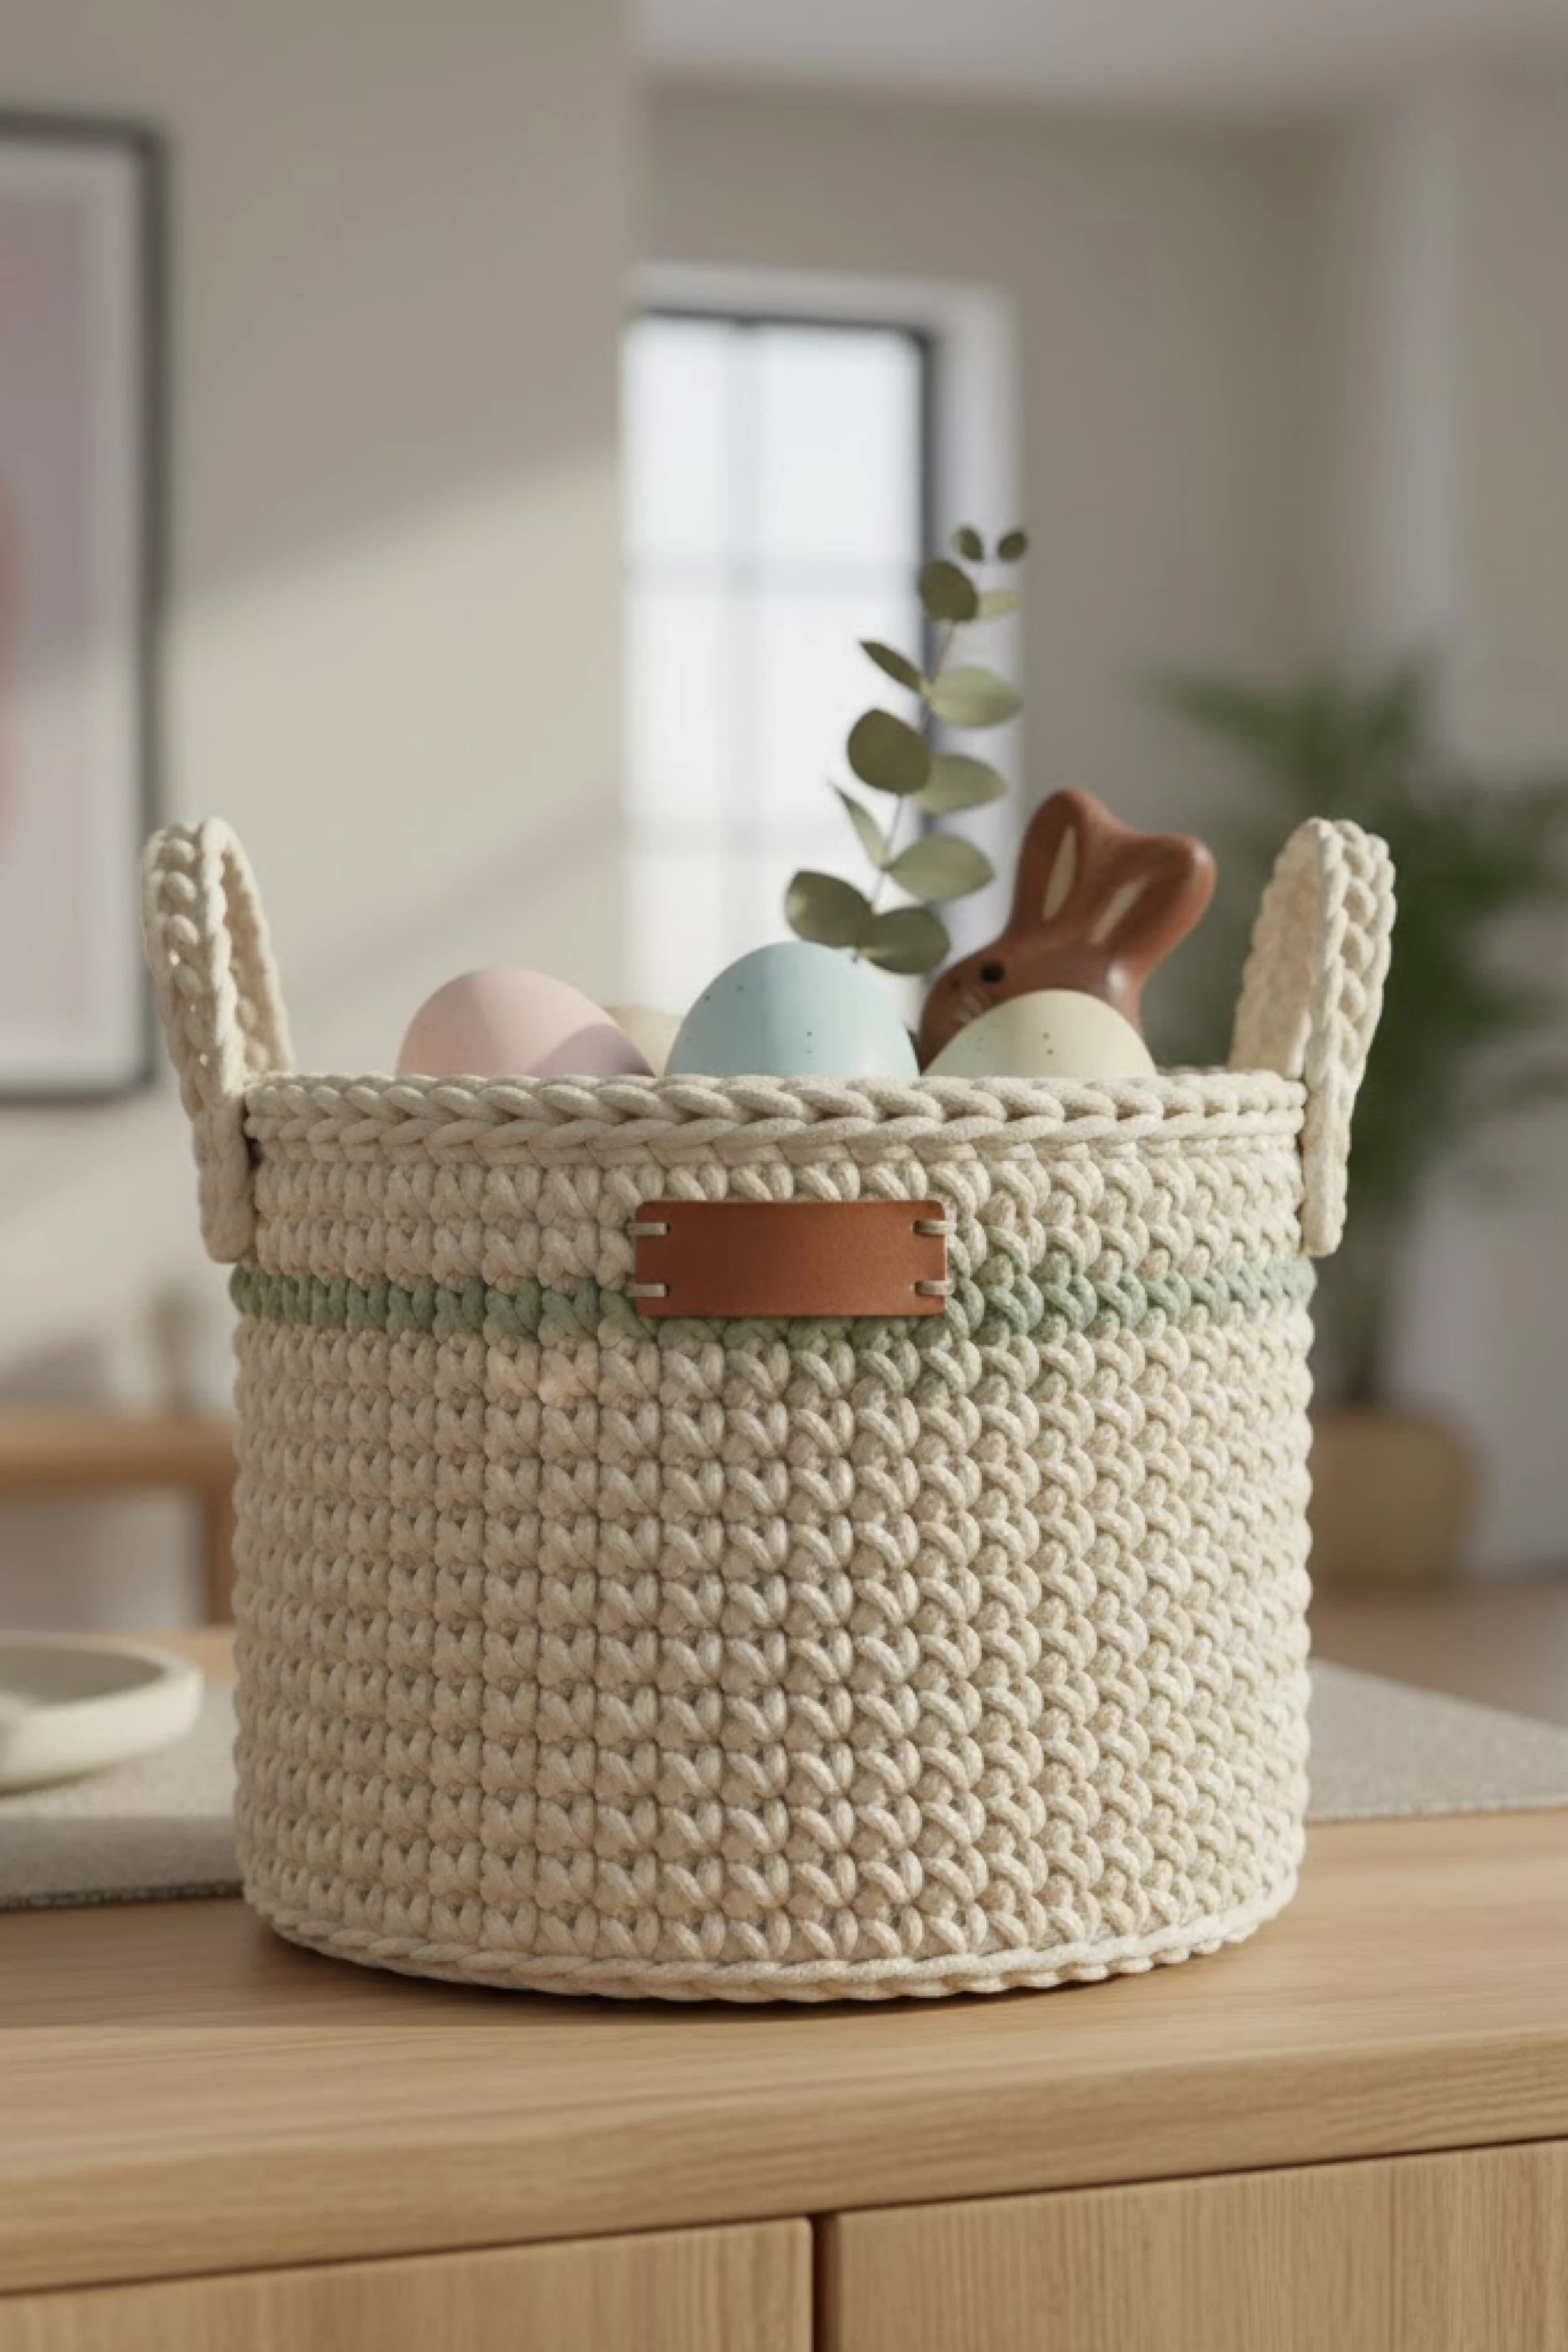
Soft-Rim Crochet Storage Basket With Side Handles — Make-It-Yourself Tutorial
What you’re making
This is a neutral, elevated storage basket with two side handles and a fabric-wrapped rim—exactly like the photo: thick stitched walls, a cozy soft top edge (like a padded collar), and tidy little handles that look wrapped and intentional. It’s less “Easter basket” and more “beautiful home organization,” but it’s perfect for spring styling too (fill it with eggs, books, linens, or a plant pot cover).
The key details are: a dense stitch pattern that creates that stacked, knitted look, a reinforced rim that can hold the fabric wrap, and handles that are small but sturdy.
Materials + tools
- Super bulky cotton cord or tube yarn in cream/ecru
- Crochet hook 8–12 mm (choose for dense stitches)
- Stitch marker
- Tapestry needle
- Scissors
- Measuring tape
- For the padded rim:
- Soft cotton fabric strip (or jersey knit) wide enough to wrap the rim
- Optional thin batting or foam strip (for extra cushion)
- Needle/thread or fabric glue
- Optional: plastic canvas base insert
- Optional: fabric stiffener (light)
Finished size + customization notes
- Photo look (approx): 10–12 in wide × 6–8 in tall (a medium storage bin).
- To resize:
- Wider: increase base diameter.
- Taller: add more side rounds.
- More structured: add a base insert + stiffener.
- Stitch texture: the photo reads like a dense “V” texture (often achieved by waistcoat stitch / center single crochet, or tight sc with a slightly splitty cord). If waistcoat is too hard in your cord, tight sc still looks great.
Step-by-step instructions
Pick your body stitch (two safe options).
- Option A (closest “V” look): waistcoat stitch (center single crochet): insert hook into the “V” of the stitch below.
- Option B (easier): very tight single crochet with a slightly smaller hook.
If your cord is stiff and hard to pierce, do Option B.
Start the base.
Magic ring, 6 sc. Mark first stitch.Increase to a broad base.
Increase by 6 stitches each round until your base is 10–12 inches across (or desired).
Checkpoint: base stays flat on the table.Turn round for crisp walls.
1 round BLO sc creates the hinge.Begin the walls with your chosen stitch.
Work around with waistcoat stitch or tight sc. Keep stitch count constant.Maintain clean vertical sides.
Every few rounds, set it down and press walls straight.- If it flares, you added stitches—count and correct.
- If it pulls in, loosen tension slightly or go up one hook size for side rounds.
Build to the height shown.
Crochet until about 6–8 inches tall, leaving room for the padded rim finish (about 1 inch).Create a reinforced rim base round.
Work 1 round hdc (or sc with tighter tension). This thickens the edge and supports the fabric wrap.Add a rim cord line (for a tidy edge).
Work 1 round slip stitch or crab stitch. This makes the top edge look finished under the fabric wrap.Make side handles (small, rounded tabs).
The photo shows compact handles that sit near the rim. Two ways:
- Option A (crocheted tabs): choose handle placement points opposite each other.
At one spot, chain 6–10 (depending on handle size), skip the same number of stitches, and sc into the next stitch. On next round, sc over the chain to thicken. - Option B (separate wrapped loops): crochet two small loops separately and stitch them on.
Checkpoint: handles should be wide enough for fingers but not floppy.
Reinforce the handles.
Stitch around the handle bases with your cord using a tapestry needle. Make multiple passes. This prevents tearing when pulled.Prepare the padded rim wrap.
Measure the rim circumference and height you want covered (usually 1–1.5 inches).
Cut fabric strip: length = circumference + 1 inch overlap; height = 2× rim height + seam allowance (so it can fold over).
If you want extra cushion, cut a thin batting strip the same size as the rim height.Wrap and secure the rim.
Fold fabric strip over the rim like a sleeve. Tuck raw edges inward for a clean look.
Secure by:
- Sewing: ladder stitch the overlap and a few hidden tacks around the rim.
- Fabric glue: apply sparingly on the inside, press and clip until dry.
You should now see: a soft, smooth collar around the top—exactly like the photo.
Optional: add small wrapped handle grips.
If your handles look too plain, wrap them with a matching fabric strip or extra cord and stitch down.Insert a base support (optional but recommended).
Cut plastic canvas to base size and slip inside. This makes the basket sit flatter and look more “store-bought.”Weave ends and tidy interior.
Weave ends through multiple stitches and change direction. Trim close.Final shaping.
Stuff lightly, adjust the rim collar so it’s even, and let it settle overnight.
Troubleshooting (common mistakes + fixes)
- Waistcoat stitch is too hard to insert into: Switch to tight sc; you’ll still get a beautiful texture with cord.
- Rim fabric slides: Add a few hidden tack stitches at four points (front/back/sides), or add a thin line of glue inside only.
- Handles stretch out: Make handle chains shorter and reinforce bases with stitching; consider a rope core inside handle loop.
- Basket flops: Use smaller hook, add base insert, stiffen inside lower half.
- Top edge looks bumpy under fabric: Add one more sc round before wrapping to even out the rim.
Finishing details
- Blocking/shaping: Stuff and shape; smooth the fabric collar by hand.
- Stiffening (optional): Light stiffener inside the lower half helps walls stay upright.
- Optional upgrades (2–4):
- Add a sewn-in liner that matches the rim fabric.
- Add a label tag (leather/faux leather) on the front.
- Add a second, thinner fabric band under the rim for contrast.
- Add a drawstring liner for hiding clutter.
Shop Similar
- Cotton cord yarn for storage baskets ecru
- Large crochet hooks 10mm 12mm
- Plastic canvas sheets for basket base support
- Cotton fabric strips for basket rim wrap
- Fabric glue clear for crafts
Style It With
Stripe + Label Crochet Basket With Petite Side Handles — Step-by-Step Tutorial
What you’re making
This is a modern, minimalist crochet basket with petite side handles, a subtle sage-green stripe, and a small leather-style label plate on the front—exactly like the photo. The stitches are tight and uniform for a structured cylinder, and the rim has a clean, rope-like finishing line that keeps everything looking crisp.
You’ll crochet a flat base, build straight walls, add a single accent stripe, create small handles, and attach a label plate for that “boutique organizer” finish. It’s a perfect crossover craft: Easter display one week, home storage the next.
Materials + tools
- Super bulky cotton cord/tube yarn in cream/ecru (main)
- Super bulky yarn/cord in sage green (for stripe)
- Crochet hook 8–10 mm (dense stitch goal)
- Stitch marker
- Tapestry needle
- Scissors
- Measuring tape
- Label detail:
- Small faux leather label patch/plate
- 2–4 small rivets or screws (optional), or sew-on holes
- Alternatively: stitch-on faux leather tag
- Optional: rope core for handle reinforcement
- Optional: base insert (plastic canvas)
Finished size + customization notes
- Photo look (approx): 9–10 in wide × 7–9 in tall.
- Stripe placement: upper third of basket.
- Handles: small vertical tabs at left and right.
- Label: centered on the front, slightly above stripe.
Step-by-step instructions
Choose the stitch (structure first).
Tight single crochet is the safest match for the photo: dense, even, and sturdy.Start base.
Magic ring, 6 sc. Mark first stitch.Increase into a flat circle.
Increase by 6 stitches per round until base is 9–10 inches across.
Checkpoint: flat disk, no ripples.Turn round.
1 round BLO sc for crisp sides.Work plain side walls in cream.
Continue sc rounds without increasing. Crochet until you’ve reached about half the basket height.Add the subtle stripe.
Switch to sage green for 1–2 rounds.
For the cleanest color change, change yarn on the last yarn-over of the final cream stitch before the stripe.
You should now see: a calm, modern stripe band that feels understated.Return to cream and continue building height.
Crochet additional sc rounds until you reach final height 7–9 inches.Create a strong rim.
Work 1 round hdc (or tight sc). Then finish with 1 round slip stitch or crab stitch for a rope-like edge.
Checkpoint: rim looks slightly thicker and more finished than body.Mark handle locations.
Place markers on left and right sides (opposite each other). Handles in the photo are small and upright, close to the rim.Make petite side handles (tab style).
On the next round (or as an added step), do:
- At marker: chain 6–10, skip 6–10 stitches, sc into next stitch.
Continue around.
Next round: sc along the chain loop to thicken it.
Checkpoint: handles should stand up and feel firm.
Reinforce handle bases.
With tapestry needle and cord, stitch around where handles meet the rim. Multiple passes prevent stretching.Place the label plate.
Center it on the front. In the photo, it sits slightly above the stripe line. Mark placement with pins or stitch markers.Attach label safely (two options).
- Option A (sew-on): stitch through pre-punched holes with sturdy thread or cord tail.
- Option B (rivets/screws): use small hardware through the crochet fabric with backing washers inside (so it doesn’t pull through).
Checkpoint: label lies flat and doesn’t warp the stitches.
Weave in all ends.
Especially near the stripe change—hide tails along the inside stitch columns.Optional base insert.
Cut plastic canvas circle, slip inside. This makes it sit perfectly flat.Final shaping.
Stuff lightly, straighten handles, and let it rest.
Troubleshooting (common mistakes + fixes)
- Stripe looks jagged: Make sure you change colors on the last yarn-over, and keep tension consistent.
- Handles flop: Make loops shorter, add reinforcement stitches, or crochet around a rope core inside the handle loop.
- Label pulls the fabric: Use backing inside (felt or small washer) and avoid over-tightening.
- Rim waves: You accidentally changed stitch count. Count the last plain round and redo rim rounds evenly.
- Basket feels soft: Smaller hook, tighter sc, add insert/stiffener.
Finishing details
- Blocking: Stuff and shape; no heavy wet-blocking needed.
- Stiffening: Light stiffener inside lower half if you want a sharper cylinder.
- Optional upgrades (2–4):
- Add a second micro-stripe (thin cream-green-cream sandwich).
- Add a fabric liner in a tiny gingham.
- Add a matching tag to the inside for a hidden “maker mark.”
- Add a second set of handles (front/back) for a tote-bin feel.
Shop Similar
- Cotton cord yarn super bulky cream for crochet basket
- Sage green super bulky yarn for stripe
- Faux leather labels for crochet baskets
- Small rivet kit for leather labels
- Plastic canvas circle sheets for basket base
Style It With
Woven Raffia Easter Basket With Crochet Scallop Edge — DIY Guide
What you’re making
This is a tall, cylindrical woven raffia (or wicker-style) Easter basket with long shoulder-style handles and a soft crochet scallop trim at the rim—exactly like the photo staged on a straw tray with raffia filler. The body reads as woven, not crocheted: horizontal bands with vertical stakes, giving it that classic basket texture. The crochet rim is the “handmade signature” that makes it feel elevated and cohesive with other fiber décor.
You’ll build the woven cylinder using a simple over-under weave (beginner-friendly), then add a crochet edge that mimics the scalloped rim detail in the photo. If you prefer an all-crochet build, you can also fake a woven look with waistcoat/linked stitches—but the most accurate way is a real weave plus crochet trim.
Materials + tools
- Raffia / seagrass / paper rope / basket weaving reed (flat or round)
- Optional: thicker reed or dowels for vertical stakes (structure)
- Strong craft glue (for securing ends) and/or needle + heavy thread
- Scissors
- Clothespins or binder clips (to hold weave while working)
- Measuring tape
- For crochet trim:
- Cotton cord yarn in cream/ecru
- Crochet hook 6–9 mm (for trim)
- Tapestry needle
- For handles:
- Thick braided cord, reed bundles, or pre-made straw handles
- Optional: cotton tape to wrap handle bases
- Optional: straw filler or raffia for basket stuffing
Finished size + customization notes
- Photo look (approx): 5–6 in diameter × 7–9 in tall, with long handles.
- To make it wider: increase the base circle size (more stakes).
- To make it taller: weave more rows before finishing the rim.
- To make handles sturdier: double the handle material or wrap around a rope core.
Step-by-step instructions
Choose your weaving material (two safe options).
- Option A (easiest to find): paper rope / raffia ribbon (for a soft rustic weave).
- Option B (most basket-like): flat reed or seagrass (stronger structure).
The photo reads like natural straw/reed—Option B is closest, but Option A can still match visually.
Create the base (simple coil base or woven base).
Two beginner-friendly base methods:- Option A (coil base): coil raffia into a circle and stitch through coils with heavy thread.
- Option B (woven base): lay vertical stakes in a star pattern and weave over-under around them.
For a sturdy cylinder, Option B is ideal.
Woven base setup (Option B).
Cut stakes (vertical pieces) to length: basket height + 3 inches extra.
Arrange stakes in a “spoke” pattern, evenly spaced, and secure the center with thread or a few wraps of raffia.Start weaving the base circle.
Take your weaving strand and weave over 1, under 1 around the spokes, pushing rows snugly together.
Continue until base diameter is about 5–6 inches.Turn up the stakes to form the walls.
Gently bend stakes upward at the base edge. Use clips to hold them upright.
You should now see: a flat base with vertical ribs rising like a cage.Weave the side walls.
Continue the same over-under pattern around the stakes. Every few rows, push the weave downward to keep it tight and uniform.
Checkpoint: The cylinder should stay straight. If it flares, you’re not packing rows evenly; if it narrows, you’re pulling too tight.Maintain even tension.
Keep your weaving strand snug but not strangling the stakes. The photo’s weave has consistent spacing and a smooth cylinder profile.Build to full height.
Weave until the basket is 7–9 inches tall (or desired). Leave about 1 inch at top for finishing/trim.Secure the final weave row.
Tuck the weaving end inside the last few rows and glue it, or stitch it down with heavy thread. Let dry.Finish the rim edge (before crochet trim).
Fold stake ends inward or outward and tuck them into the weave to lock the rim. Trim any excess neatly.
You should now see: a clean top edge, even if it’s slightly rustic—crochet trim will polish it.Add a crochet foundation round to the rim.
With cotton cord yarn, attach yarn to the rim and work single crochet stitches evenly around, piercing between weave gaps.
If piercing is difficult, use a tapestry needle to pre-poke small spaces or crochet into the natural gaps between stakes.
Checkpoint: Stitches should sit evenly around the rim without bunching.Create the scalloped crochet edge (photo match).
Work a scallop pattern:
- (sl st, skip 1 gap, 5 dc in next gap, skip 1 gap) repeat around.
If your weave gaps are large, you may only need 3 dc per scallop.
You should now see: a soft ruffle/scallop that mirrors the photo’s rim.
Handle planning: long, tall loops.
The photo shows long handles that rise high above the rim. Mark two opposite points for handle bases.Create handles (two accurate options).
- Option A (woven handles): bundle reed/raffia strands into a thick rope, form a loop, and stitch to rim at both ends.
- Option B (crocheted handles): crochet long straps with cord, then stitch down.
For the photo’s look, woven or tightly wrapped rope handles feel most accurate.
Attach handles securely (structure first).
Stitch handle ends to the rim and down into the basket wall with heavy thread. Add a second pass.
If using crochet handles, sew through multiple stitches and around stakes so the handle is anchored to structure, not just surface.Reinforce handle bases with wrap (optional but looks pro).
Wrap the base area with thin raffia or cotton tape and stitch/glue it down. This hides stitching and adds strength.Clean up and final shaping.
Trim stray fibers. Gently press the cylinder straight. Add raffia filler inside to help the basket hold its shape for photos.
Troubleshooting (common mistakes + fixes)
- Cylinder flares outward: You’re not packing rows down evenly. Pause and compress rows with your fingers every 2–3 rows.
- Cylinder narrows: You’re pulling too tight. Loosen tension and keep stake spacing consistent.
- Weave looks uneven: Your over-under pattern slipped. Unweave a few rows and correct—better now than later.
- Crochet trim bunches: Too many stitches around the rim. Reduce sc foundation count by spacing stitches farther apart.
- Handles wobble: Anchor handle stitching around stakes and add reinforcement wraps.
Finishing details
- Sealing (optional): A light matte spray sealer can reduce fuzz (test first on a scrap).
- Lining (optional upgrade): Add a fabric liner (simple cylinder) for a cleaner interior and better candy containment.
- Optional upgrades (2–4):
- Add a small front tag (wood or leather) tied to the rim.
- Add a contrast crochet trim color (soft blush) for Easter.
- Add a removable inner pouch liner with drawstring.
- Add a matching woven tray/coaster base like the photo’s styling.
Shop Similar
- Natural raffia ribbon for basket weaving
- Flat reed for basket weaving
- Seagrass rope for crafting baskets
- Cotton cord yarn for crochet basket edging
- Heavy duty hand sewing needles and thread for crafts
Style It With
The beauty of these baskets isn’t just in how they look — it’s in how confidently they stand. Structured sides, reinforced rims, thoughtfully placed handles, and finishing details that elevate them from craft to décor. Choose one style or make all seven for a coordinated spring vignette. Fill them with speckled eggs, ribboned treats, nursery keepsakes, or everyday essentials long after Easter passes. Handmade doesn’t have to mean delicate — these are cozy, chunky, and built to last, ready to anchor your spring styling year after year.