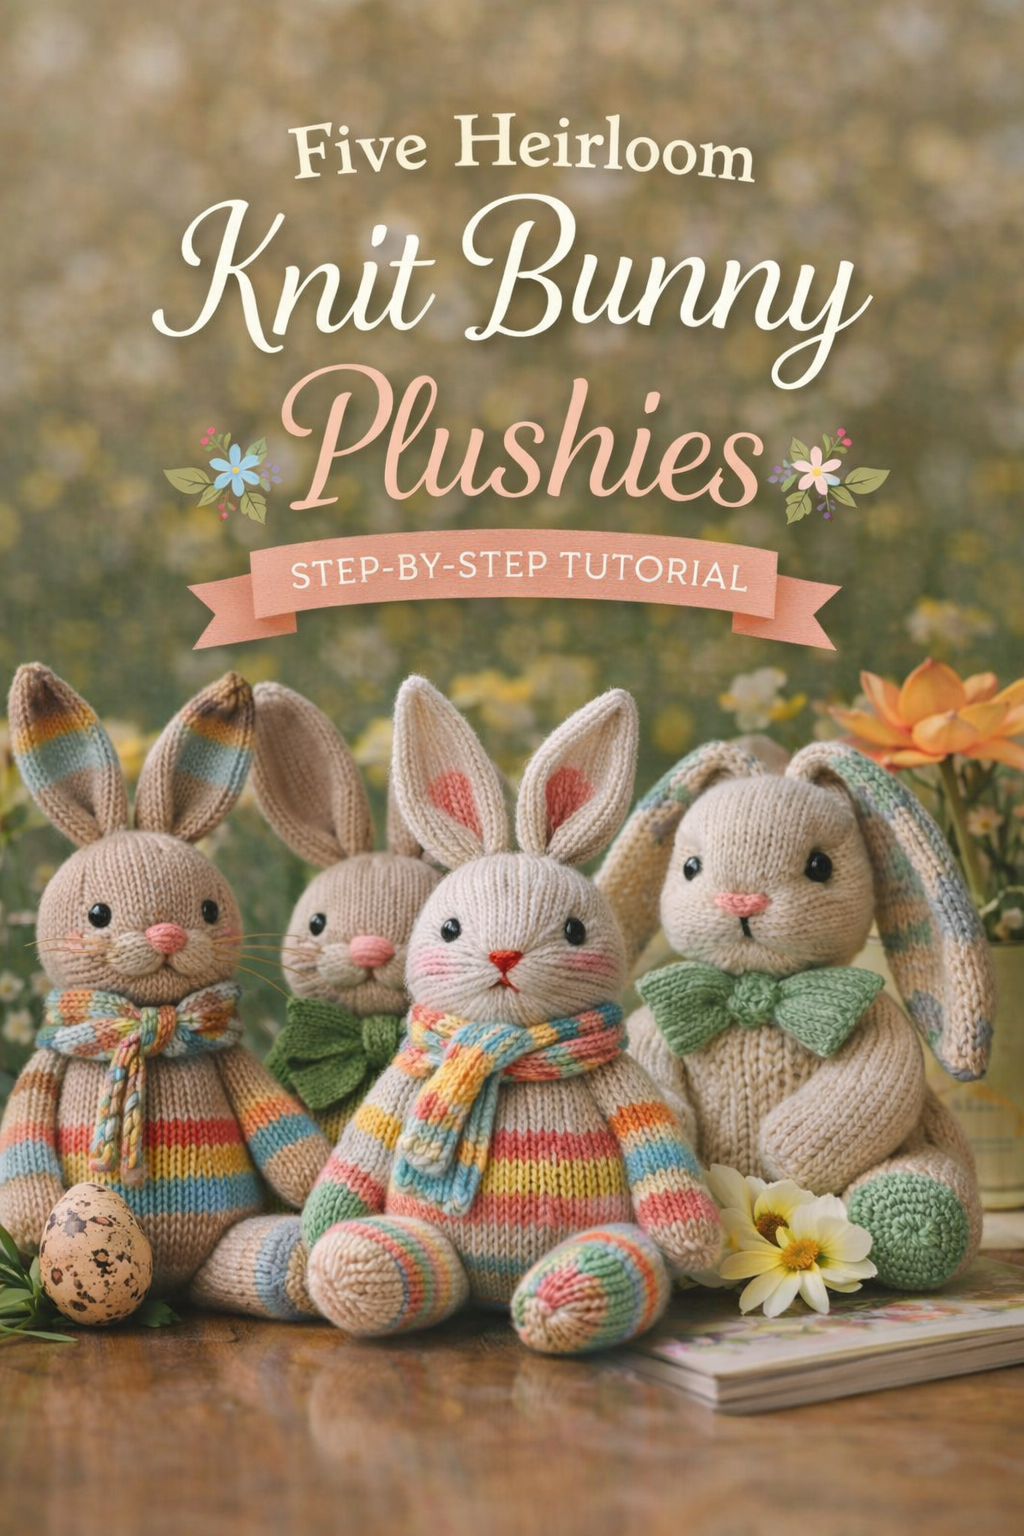
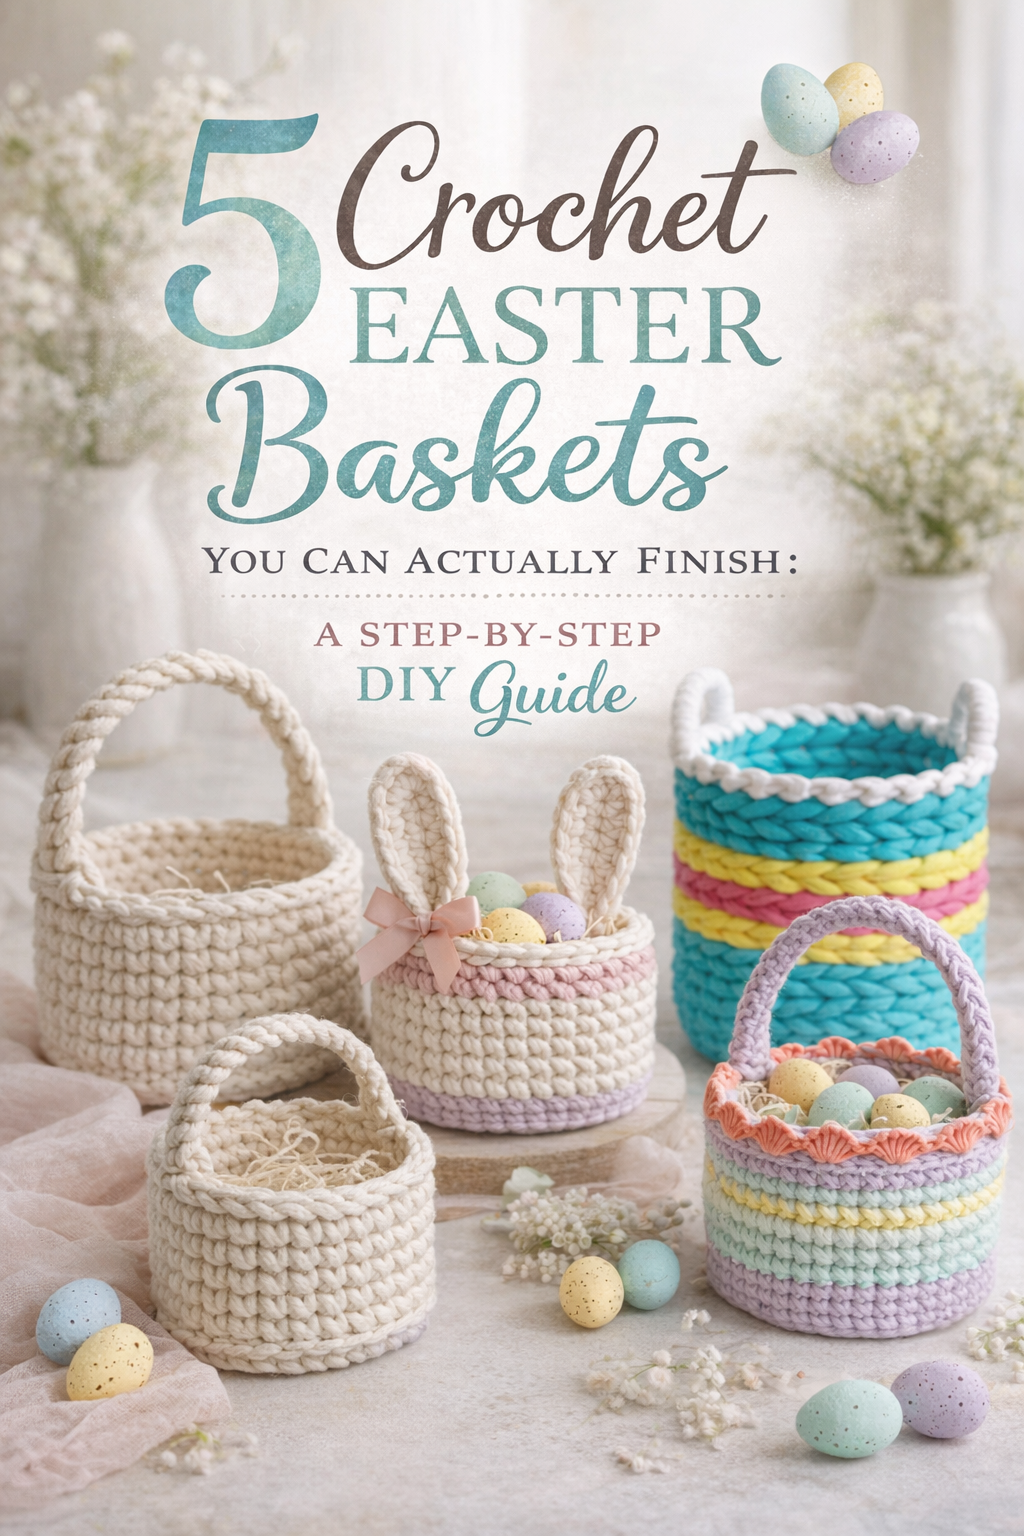
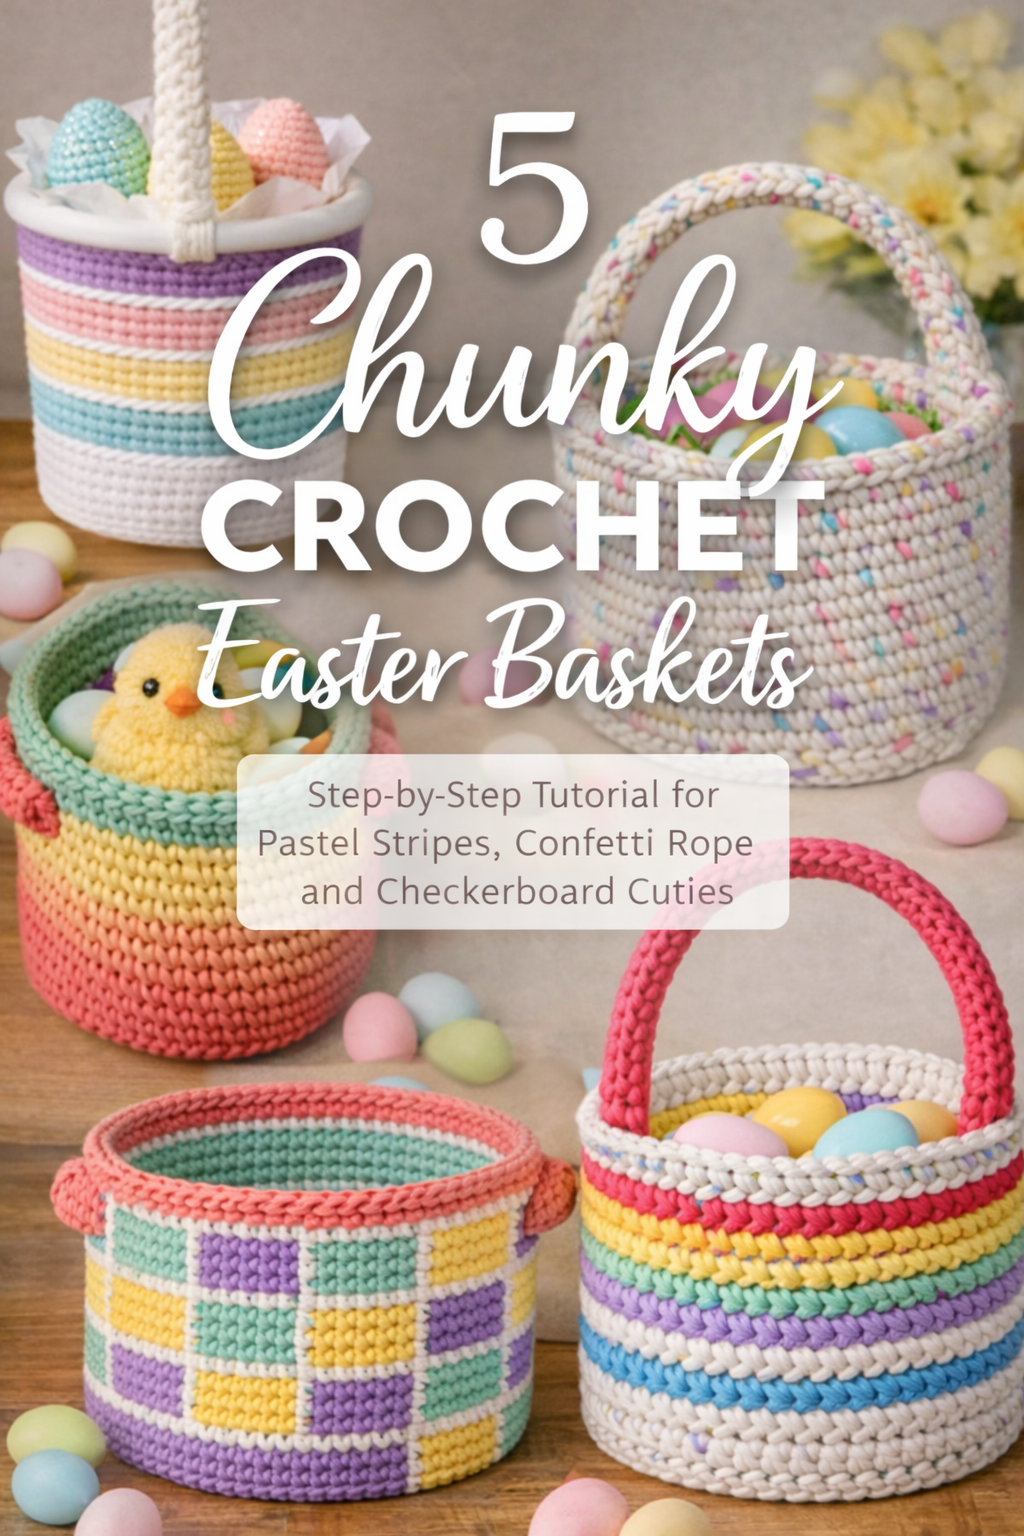
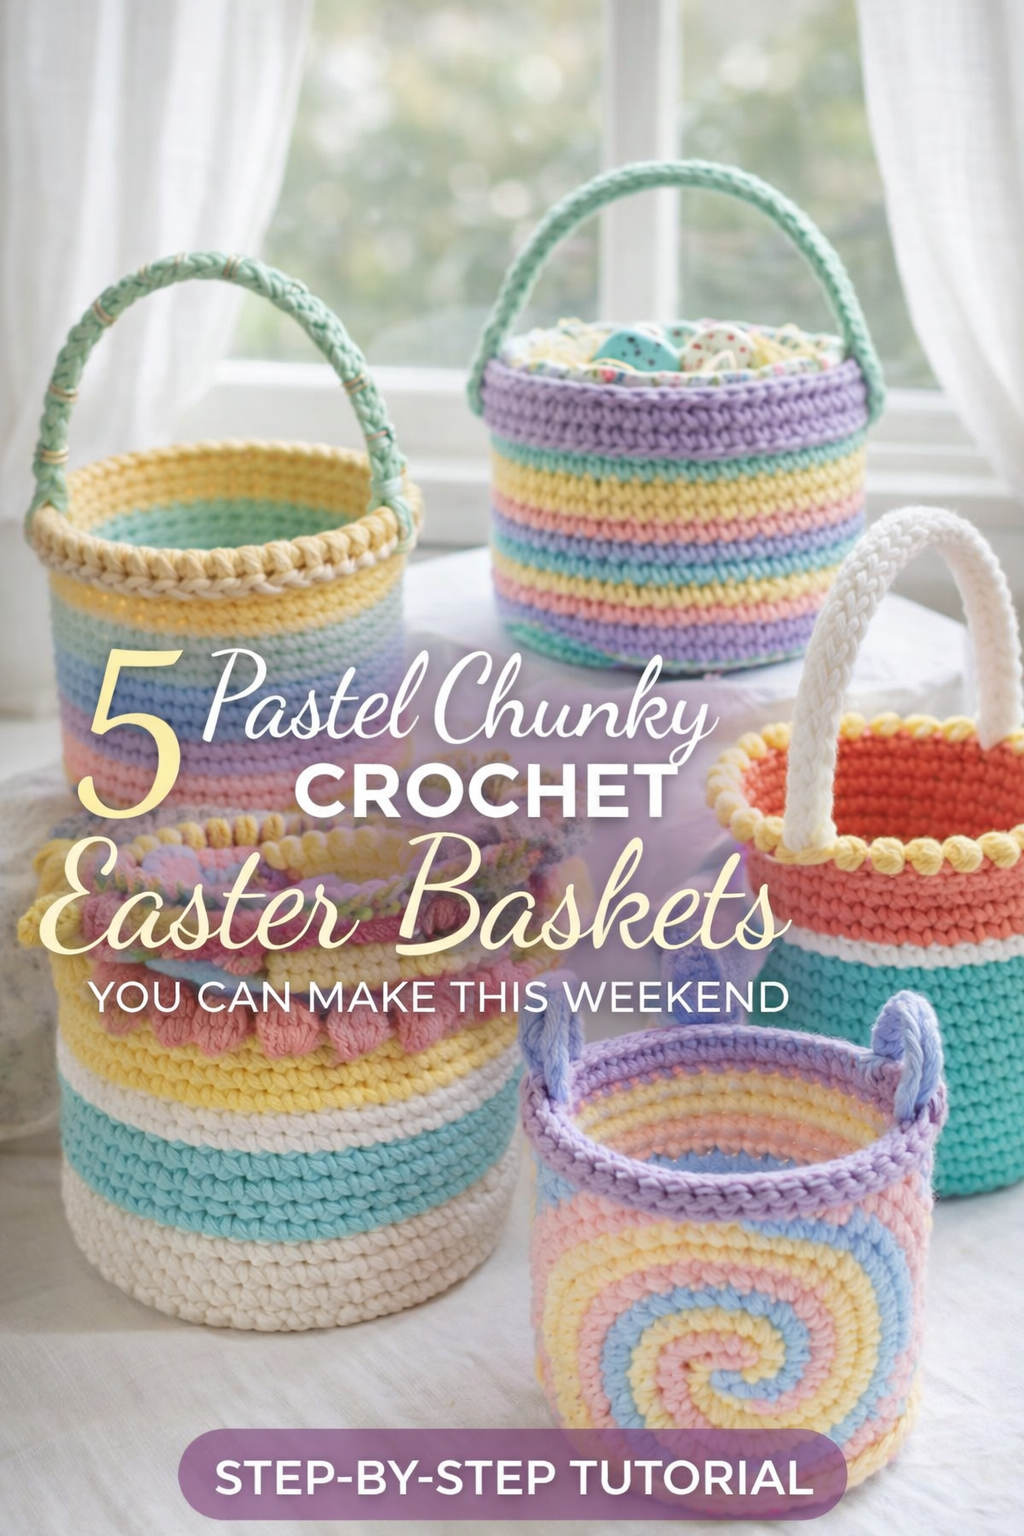
5 Pastel Chunky Crochet Easter Baskets You Can Make This Weekend Step-by-Step Tutorial
More like this
There is something instantly happy about a chunky crochet basket in soft spring pastels. It feels like the handmade version of sunshine through a window, sturdy enough to hold real treasures but cute enough to live on a shelf all season. This post pulls together five distinct basket looks, from clean rainbow stripes with a braided rim to scalloped petal edges and pompom trims, so you can pick the vibe that matches your space or your Easter plans.
Each tutorial is written to help you recreate the exact look in the photos with beginner friendly stitches and smart structure tips. You will see clear checkpoints along the way so you know when your base is flat, your sides are standing tall, and your rim is sitting neat. Choose plush yarn for a soft cozy feel, or cotton rope style yarn for a crisp basket that stands at attention. Either way, you are about to end up with a basket that looks boutique, photographs beautifully, and makes gifting feel extra special.
💡 Pro Tip: Why I Link to Amazon Search Results and Not One Product
In the Shop the Look and Style it With sections under each bikini, I link to Amazon search results, not single products. Here’s why this matters:
Hot bikinis sell out fast. I don’t want you clicking on a dead link to a sold-out item. Search pages stay updated.
You get more options. Love the vibe but want a different color, cut, or price point? The search results give you everything that matches the look and energy.
I curate each search carefully. These aren’t generic. I spend hours crafting keywords that bring up exactly the kind of bikinis I’d wear—or recommend to my hottest friends.
Support with no pressure. If you click a link, browse, and buy something later, I may earn a small commission at no extra cost to you. That helps me keep bringing you curated collections like this one—powerful, seductive, and always fresh.
So dive in. Click through. Try something risky. These aren’t just bikinis—they’re commands, statements, and maybe even your new favorite weapon of choice.
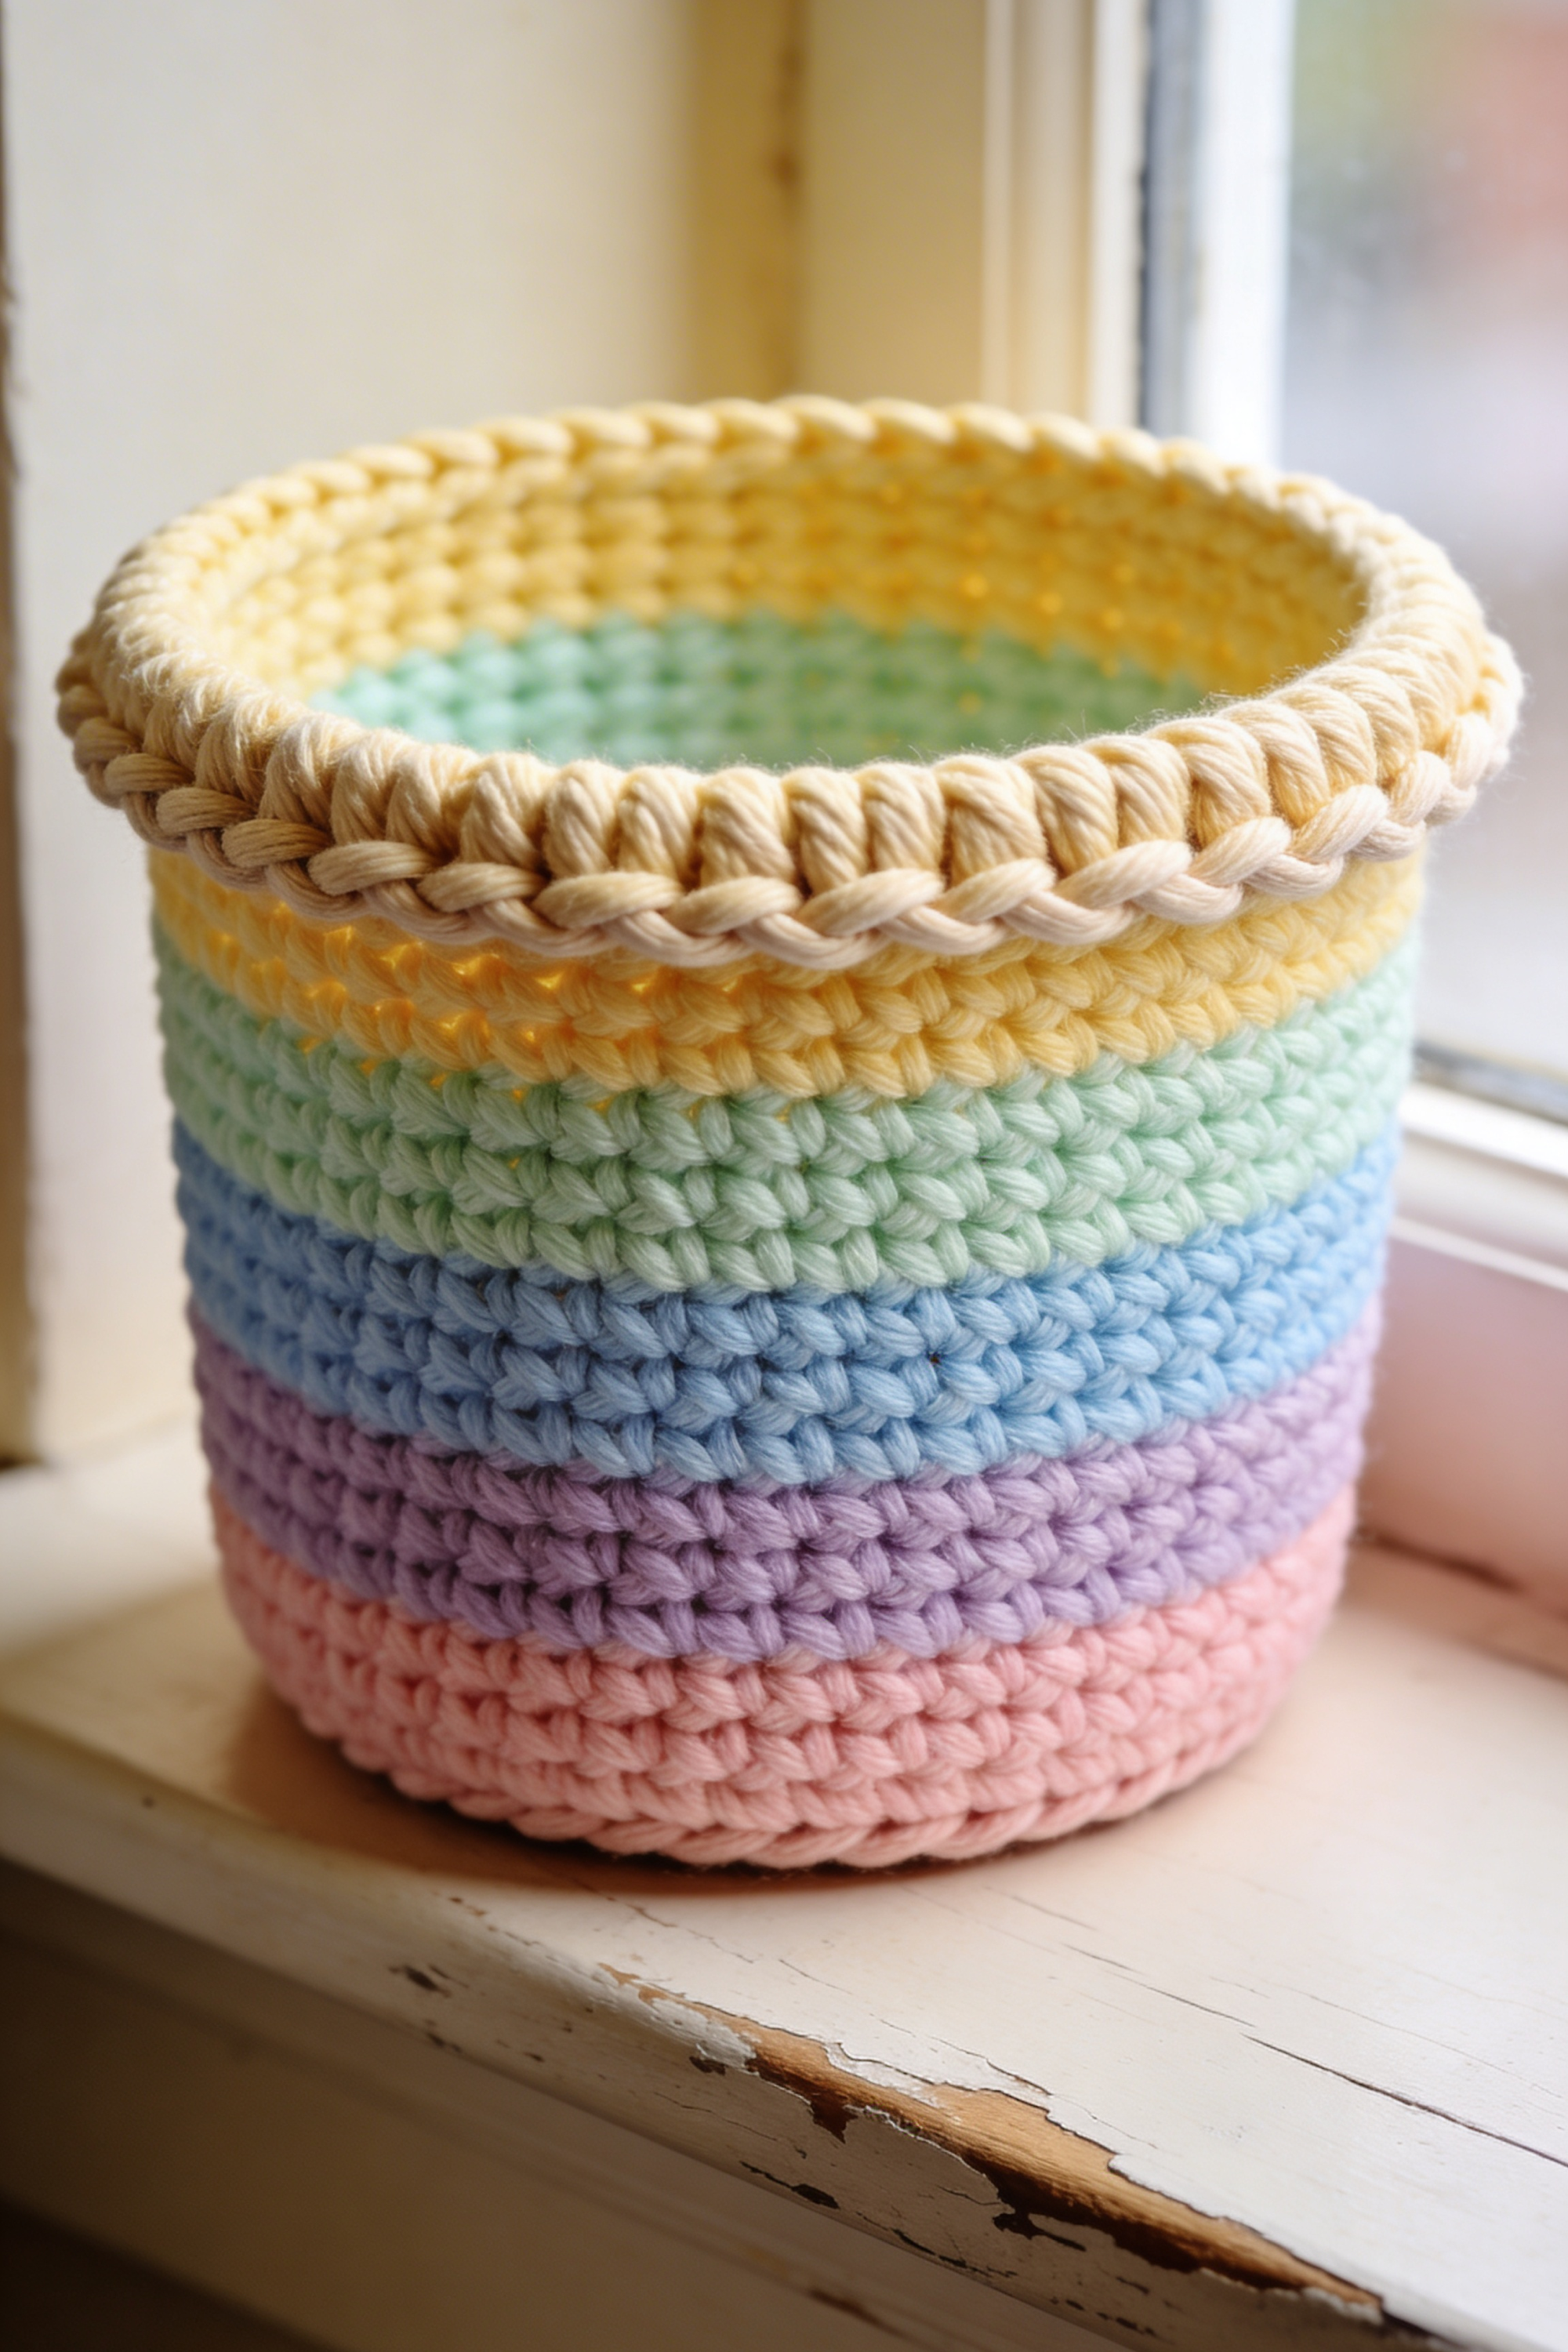
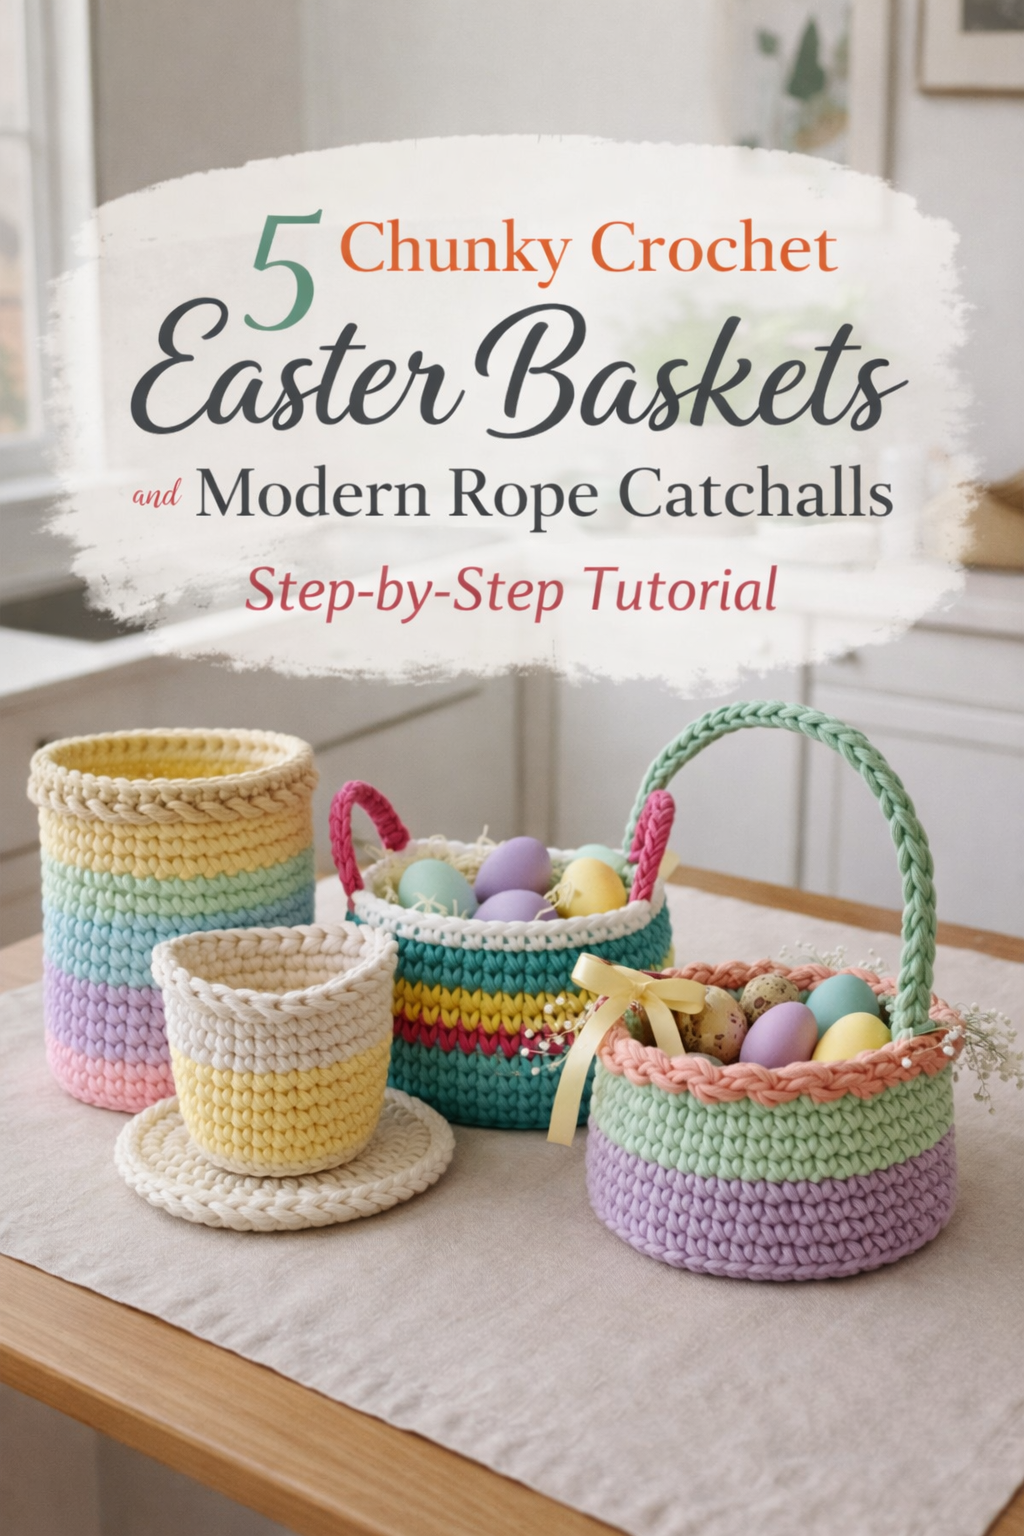
Pastel Rainbow Rope Basket DIY Guide with Braided Rim Step-by-Step Tutorial
What you’re making
This project walks you through a thick, cozy, pastel rainbow basket with clean horizontal color bands and a chunky braided rim that looks polished and store bought. It is the kind of crochet that feels sculptural: sturdy sides, a flat base, and a soft but structured silhouette that sits beautifully on a windowsill or shelf. You will use super chunky yarn and simple stitches to get that plush, oversized texture shown in the photo.
You can keep it as an open storage bin for craft supplies and toys, or size it down for a desk catchall. The braid at the top is the signature detail, and I will show you two safe ways to make it depending on the yarn you choose.
Materials + tools
- Super bulky yarn in 5 colors to match the photo look (cream, butter yellow, mint, sky blue, lavender, blush)
- Option A: super bulky chenille or plush yarn for the squishy look
- Option B: super bulky cotton rope style yarn for maximum stiffness
- Crochet hook size 8 mm to 10 mm (choose what gives tight stitches)
- Stitch markers (at least 2)
- Yarn needle (large eye)
- Scissors
- Optional structure helpers
- Flexible clear craft glue or fabric stiffener
- Plastic canvas sheet or sturdy felt for a base insert
- Cotton lining fabric if you want a clean interior finish
Finished size + customization notes
The basket in the photo reads as a medium tabletop bin. A good target size is about 7 to 8 inches tall and 7 to 8 inches wide. You will adjust size by changing the base diameter and the number of side rounds.
To make it wider, add more increase rounds to the base before you start the sides. To make it taller, add more plain rounds on the sides. If your stitches look more open than the photo, size down your hook or tighten your tension so the basket stands up.
Color placement is part of the style. The photo uses calm pastel bands. Keep each band the same height for a clean, modern stripe effect.
Step-by-step instructions
Notes before you start
This basket uses single crochet in joined rounds or in continuous rounds. The photo texture looks like tight single crochet with visible horizontal rows. Continuous rounds produce a smooth spiral that can look slightly different. Joined rounds give crisp stripes with clean color changes. If you want stripes like the photo, I recommend joined rounds with an invisible join method.
I will write the steps in a way that works either way. You will simply choose one approach and stick with it.
1. Choose your yarn and set your structure goal
Look closely at the photo: the stitches are plump and evenly packed. That means the fabric is dense. For dense fabric, your hook should feel slightly smaller than what the yarn label suggests.
Visual checkpoint: when you crochet a few test stitches, you should not see gaps between stitches when you gently stretch the fabric. If you see daylight, go down a hook size.
2. Make the base center
Start with your first color for the bottom band. In the photo, the bottom band is blush pink, so start with blush.
- Make a magic ring.
- Round 1: work 6 single crochet into the ring. Pull ring tight.
- Mark your first stitch.
Visual checkpoint: you should have a small, tight circle with no hole in the middle. If there is a hole, pull the ring tail tighter and keep tension firm.
3. Increase to a flat circle base
You will increase evenly until the base is the diameter you want. For a medium basket, aim for about 6.5 to 7 inches.
Use this classic single crochet increase sequence:
- Round 2: 2 single crochet in each stitch around (12)
- Round 3: 1 single crochet, increase around (18)
- Round 4: 2 single crochet, increase around (24)
- Round 5: 3 single crochet, increase around (30) Continue adding one more single crochet between increases each round.
Keep going until your base measures the target diameter. Many baskets land around 42 to 54 stitches for this thickness, but your yarn will determine that.
Visual checkpoint: the base must stay flat like a coaster. If it starts ruffling, you are increasing too fast. If it cups, you are not increasing enough.
Fix options:
- If it ruffles, remove one increase round by crocheting one plain round without increases.
- If it cups, add an extra increase round.
4. Create a crisp corner for the sides
This step is what makes the basket stand up. Work one round of single crochet in the back loop only.
- Next round: single crochet in back loop only all the way around.
Visual checkpoint: you should see a clear ridge line forming on the outside of the base. That ridge is your turning point and gives a clean cylinder wall.
5. Build the side walls in stripes
Now you will crochet regular single crochet rounds (both loops) to create height. Change colors in smooth, even bands like the photo.
Stripe plan based on the first basket photo:
- Blush for the bottom band
- Lavender
- Sky blue
- Mint
- Butter yellow
- Cream rim color
To change colors neatly in joined rounds:
- On the last stitch of the round, stop when two loops remain on the hook.
- Yarn over with the new color and pull through to finish the stitch.
- Join with your preferred join or continue in spiral.
Work about 4 to 6 rounds per color band depending on how tall you want the basket. The photo bands look moderately tall, not skinny. Four rounds per color is a good start.
Visual checkpoint: the sides should rise straight, not flare. If they flare outward, your tension may be loose. Size down hook or gently pull yarn a touch tighter.
6. Keep your seam invisible
If you crochet in joined rounds, the seam can show. Two ways to keep it tidy:
- Rotate method: at the end of each round, turn your work and crochet the next round in the opposite direction. This breaks up leaning and seam visibility.
- Invisible join: finish each round with an invisible join and start the next with a standing single crochet.
Pick one. The rotating method is beginner friendly and makes a more balanced basket.
Visual checkpoint: your stripe transitions should look stacked and even, not stair stepped heavily.
7. Shape check and adjust before the rim
When you are about 1 inch shorter than your final height, pause and check the shape.
- If it is too floppy: crochet one or two rounds tighter by switching to a smaller hook for the final rounds.
- If it is too narrow: that usually means tension is too tight. You can wet shape later, but the easiest fix is to relax tension and continue.
Visual checkpoint: the basket should hold itself up when empty, even if it has a slight soft lean. The photo basket stands confidently.
8. Create a clean top edge
Work one final round of single crochet evenly. This creates a stable edge before you attach the braid.
If your stitch count has drifted, you can correct now:
- If the top edge ripples, remove a stitch occasionally by crocheting two stitches together.
- If it pulls inward, add an increase occasionally by working two single crochet into one stitch.
Do this subtly, spread out corrections so it stays smooth.
9. Make the braided rim like the photo
The rim in the photo looks like a thick, ropey braid sitting on top. Here are two safe options.
Option A: Surface braided cord (best match for plush yarn)
- Create a long three strand braid from your cream yarn.
- Cut three strands about 4 times the circumference of your basket.
- Fold each strand in half and twist each strand slightly, then braid loosely.
- Lay the braid along the top rim, centered.
- Use a yarn needle and matching yarn to tack the braid down every 3 to 4 stitches.
- Sew through the underside of the braid and through the top stitches of the basket.
- Keep stitches hidden.
Visual checkpoint: braid should sit evenly all around, not dipping or twisting.
Option B: Crochet a faux braid rim (best match for cotton rope yarn)
- Work one round of slip stitch in the front loop only, fairly tight.
- Work a second round of slip stitch, inserting under the horizontal bar just below the top edge, pulling the stitch slightly tall.
- The stacked slip stitches create a rope braid illusion.
Visual checkpoint: the rim should look thicker than the side stitches and have a distinct rope line.
10. Weave ends and tidy the interior
Weave all tails into the inside of the basket using a yarn needle. For plush yarn, weave in multiple directions so it will not slip out.
Visual checkpoint: inside should look clean with no long tails, and the outside should look uninterrupted.
Troubleshooting
My base is wavy and ruffles
You are increasing too quickly or your stitches are too loose. Undo the last round and redo with fewer increases, or switch to a smaller hook. A flat base is crucial.
My base cups like a bowl
You need more increases. Add an increase round and check again. A cupped base will make your basket narrow and tall.
The sides flare outward
Your tension is loose or your stitch count grew. Make sure you did the back loop only turning round. Then tighten up. A smaller hook for side rounds can fix flare fast.
The sides lean inward
This happens when stitches are too tight. Go up a hook size for a few rounds, or relax tension. You can also wet shape the basket to open it up.
My stripes look jagged
Use joined rounds with invisible join, or change color on the last yarn over of the last stitch. If you crochet in spiral, accept a slight jog and place it at the back.
The rim braid looks lumpy
You may be sewing too tightly in some spots. Remove the tight section and re tack with evenly spaced stitches. Keep the braid relaxed so it lays smooth.
Finishing details
Blocking and shaping
Plush yarn: lightly mist with water and shape by hand. Let dry fully. Cotton rope yarn: you can dampen and shape over a bowl. Let dry completely to set.
Adding stiffness
If you want it to stand extra firm:
- Brush a thin coat of fabric stiffener inside, especially near the base and lower sides.
- Or insert a circle of plastic canvas between the base and an optional lining.
Optional upgrades
- Lining: cut a fabric circle and side strip, sew into a simple bucket lining, then hand stitch it to the inside under the rim braid.
- Label: stitch on a small woven label centered on one stripe for a boutique look.
- Handle tabs: add two small loops inside so you can clip a tag or hang the basket.
- Base insert: add a felt circle inside for a crisp flat bottom.
Shop Similar
- Super bulky pastel yarn bundle for striped crochet baskets
- Chunky cotton rope yarn for sturdy crochet storage baskets
- Large ergonomic crochet hooks 8mm 9mm 10mm set
- Plastic canvas sheets for basket base inserts
- Fabric stiffener for crochet baskets
Style It With
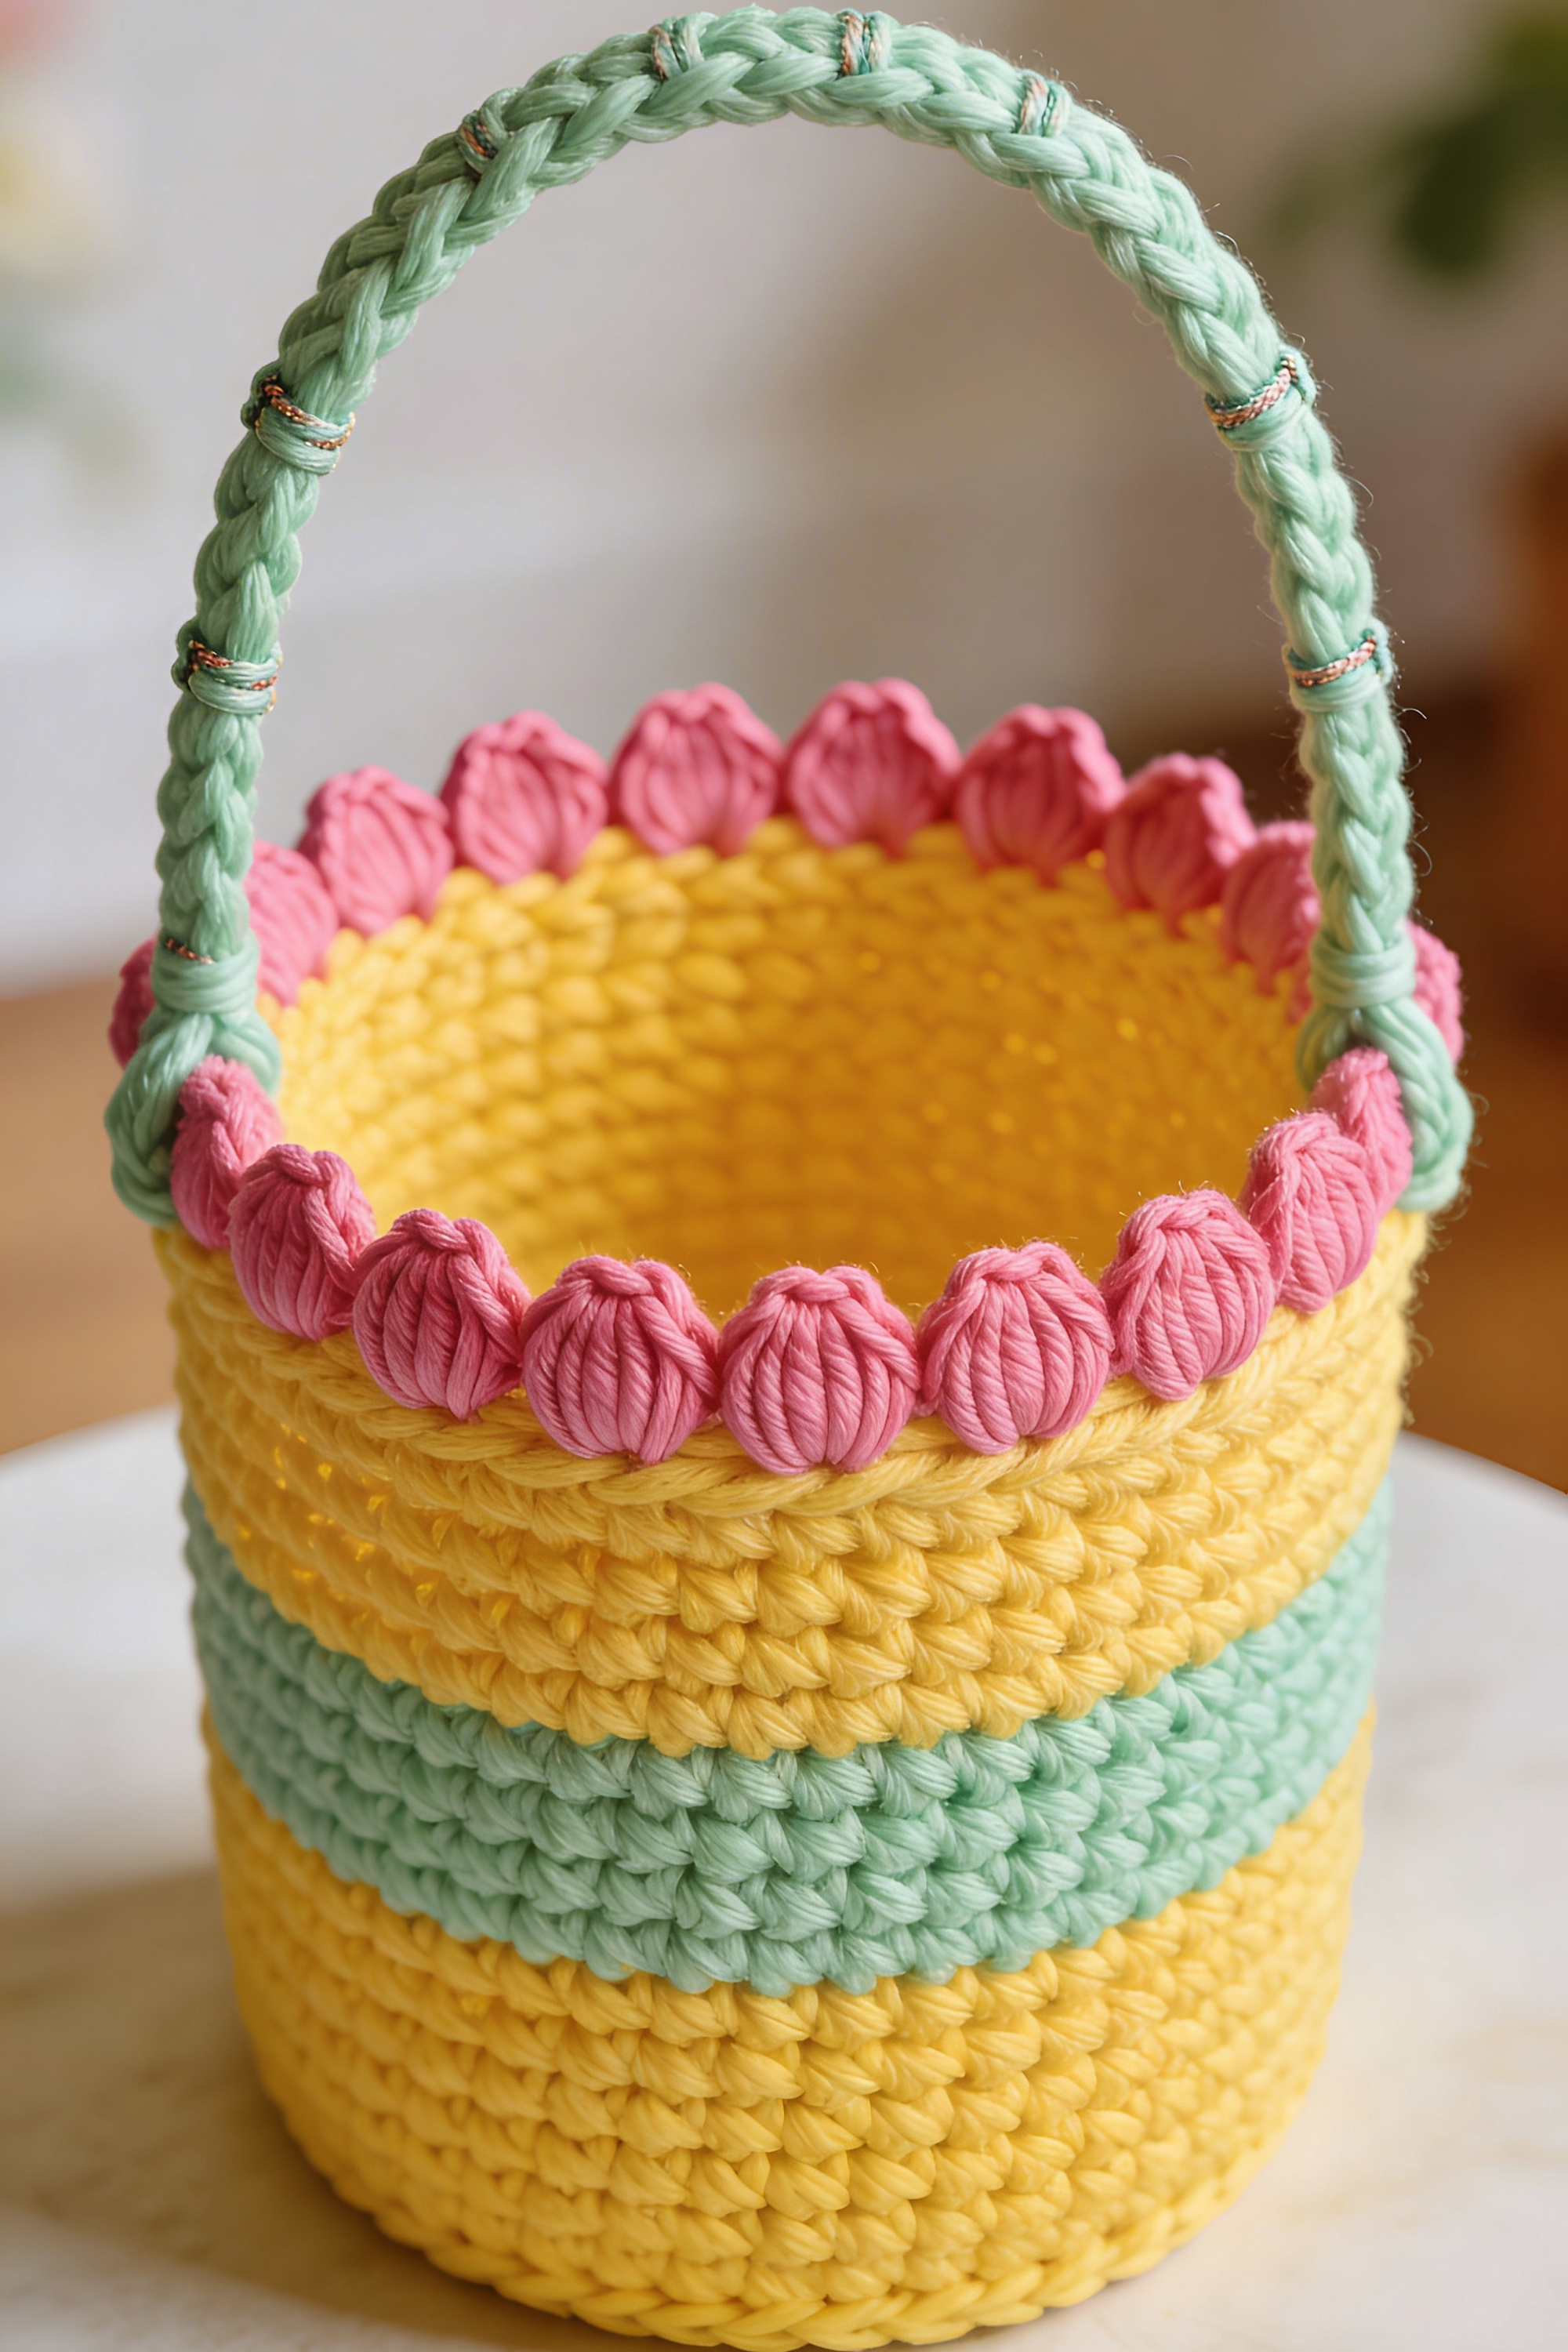
Sunny Daisy Scallop Easter Basket DIY Guide How-To Guide
What you’re making
This tutorial recreates the cheerful yellow Easter basket with a bold scalloped pink rim and a thick braided mint handle. The look is playful and graphic: smooth single crochet walls, a clean color band, then chunky petal like bumps around the top that feel like a flower crown. The handle arches high and sturdy, with small wrap details that make it feel finished and intentional.
You will crochet a structured bucket base, build straight sides, then add the scallop bobble rim and attach a braided handle that matches the photo silhouette.
Materials + tools
- Super bulky yarn in three colors
- Main: sunshine yellow
- Accent: bubblegum pink for the scallop rim
- Handle: mint green
- Optional: thin metallic thread or contrasting embroidery floss for wrap accents
- Crochet hook size 8 mm to 10 mm
- Stitch markers
- Yarn needle
- Scissors
- Optional structure helpers
- Clear drying craft glue or fabric stiffener
- Plastic canvas or thick felt for a base insert
- Floral wire only if you choose to reinforce the handle, fully wrapped and enclosed
Finished size + customization notes
Aim for about 7 inches tall and 7 inches wide. The scallop rim adds visual height, so plan the side wall slightly shorter than you think.
To make a smaller gift basket, stop increasing the base earlier and reduce the number of side rounds. To make it larger, increase the base diameter and keep the same rim formula, just repeat the scallop pattern more times around.
The rim in the photo looks like evenly spaced puffed scallops. You can create this with puff stitches or popcorn stitches. Puff stitches look softer and plush, popcorn stitches look more defined. I will give both options.
Step-by-step instructions
1. Build a firm base
Use yellow yarn.
- Make a magic ring.
- Round 1: 6 single crochet into the ring.
- Round 2: increase in each stitch (12)
- Round 3: 1 single crochet, increase around (18) Continue increasing evenly until your base is about 6.5 to 7 inches across.
Visual checkpoint: base stays flat. If it ruffles, slow down increases. If it cups, add increases.
2. Turn the corner for the sides
Work one round in back loop only.
- Next round: single crochet in back loop only all around.
Visual checkpoint: you should see a ridge on the outside that marks the base to wall transition.
3. Crochet straight side walls
Continue in single crochet rounds with both loops.
Work until the basket wall is about 5.5 to 6 inches tall. Keep tension firm so stitches look packed like the photo. If you find your walls slouch, switch to a smaller hook for a couple rounds.
Visual checkpoint: walls rise straight up. The top edge should be level and smooth.
4. Add the mint accent band
Switch to mint for one band like the photo.
Make a clean color change by switching colors on the final yarn over of the last stitch of the previous round. Work about 3 to 4 rounds in mint.
Switch back to yellow and crochet 1 to 2 rounds to create a yellow buffer before the pink rim.
Visual checkpoint: the mint band reads as a crisp stripe around the center of the basket.
5. Prep the rim foundation
Before you add scallops, you need a stable round to crochet into.
Work one round of single crochet evenly in yellow. This is your rim foundation.
If you want the rim to stand proud like the photo, you can work this foundation round in front loop only to create a slight lip.
6. Create the pink scallop rim
Switch to pink.
You have two safe ways to create the scallops, both will look similar in a photo. Choose based on the yarn behavior.
Option A: Puff scallops (soft, plush, petal look)
Work the rim in a repeating pattern:
- Stitch 1: single crochet
- Stitch 2: puff stitch Repeat around.
How to make a puff stitch for bulky yarn:
- Yarn over, insert hook, pull up a loop tall.
- Yarn over, insert again in same stitch, pull up a loop tall.
- Yarn over, insert again, pull up a loop tall.
- Yarn over and pull through all loops on hook.
- Chain 1 to lock the puff.
Visual checkpoint: each puff should sit like a rounded petal. If your puffs look flat, pull your loops taller before closing.
Option B: Popcorn scallops (more defined bumps)
Pattern:
- Stitch 1: single crochet
- Stitch 2: 5 double crochet in the same stitch, then popcorn them by pulling the first loop through the last. Repeat around.
Visual checkpoint: bumps look like distinct beads. For super bulky yarn, popcorns can get very chunky, so puff may be smoother.
7. Finish the rim edge neatly
After the scallop round, work one round of slip stitch in pink to calm the top edge and lock the rim in place.
Visual checkpoint: rim should look even, with scallops consistently spaced and aligned.
8. Make a braided mint handle
The handle in the photo looks like a thick braid rather than a flat crocheted strap. Here is a simple method that matches.
- Cut 6 long strands of mint yarn, each about 4 times the handle length you want.
- Group into three bundles, each bundle has 2 strands.
- Braid firmly but not so tight that it kinks.
- Tie off ends temporarily.
Optional wrap accents: Use thin metallic thread or contrasting floss to wrap tiny bands around the handle every few inches, like the photo. Secure ends by threading under the wrap.
Visual checkpoint: handle looks round and ropey, with visible braid texture.
9. Attach the handle securely
Decide where you want the handle to attach. The photo places attachments slightly inside the rim line.
- Mark two attachment points opposite each other.
- Thread handle end tails onto a needle.
- Stitch each end down through multiple stitches on the inside and outside, making a strong anchor.
- Wrap the remaining tail around the handle base and sew it down invisibly.
Strength check: Hold the basket by the handle and gently lift. If you see stitches pulling, add more anchoring stitches and spread them over a wider area.
10. Weave in ends and shape
Weave in all tails inside the basket. Shape the basket with your hands so the rim sits level.
If you want more structure, apply fabric stiffener inside along the base and lower walls, keeping it away from the rim scallops so they stay plush.
Troubleshooting
My scallops are uneven sizes
Your puff loops may not be the same height. Focus on pulling each puff loop to the same tall height before closing. For popcorns, keep the same number of double crochet each time.
The rim curls inward
You may have too many tight stitches. Try loosening tension on the scallop round, or add an extra plain single crochet stitch between scallops.
The basket walls slouch
Switch to a smaller hook for the side walls, or choose a less stretchy yarn like cotton rope style. You can also stiffen the inside.
The handle feels floppy
Braid with more strands, or insert a fully wrapped and enclosed support cord inside the braid. Another option is to crochet a narrow tube around the braid for added stiffness.
Color changes look messy
Always change color on the last yarn over of the last stitch of the previous round. For a cleaner seam, use joined rounds and rotate your work each round.
Finishing details
Clean interior option
Add a simple fabric lining. A lining hides tails, prevents small candy from poking out, and makes the basket feel premium.
Base insert for a flat bottom
Cut a plastic canvas circle slightly smaller than the base. Place inside under the lining or tack it to the base with a few stitches.
Optional upgrades
- Add a small felt flower or crocheted leaf to the handle for a springy accent.
- Add a name tag or label at the front.
- Make the rim scallops two tone by alternating pink and yellow puffs.
- Add a drawstring lining for an Easter egg hunt secure closure.
Shop Similar
- Sunshine yellow super bulky yarn for crochet baskets
- Mint green chunky yarn for braided basket handles
- Pink super bulky yarn for puff stitch scallop rim
- Fabric stiffener for crochet storage baskets
- Large eye yarn needles and stitch marker set
Style It With
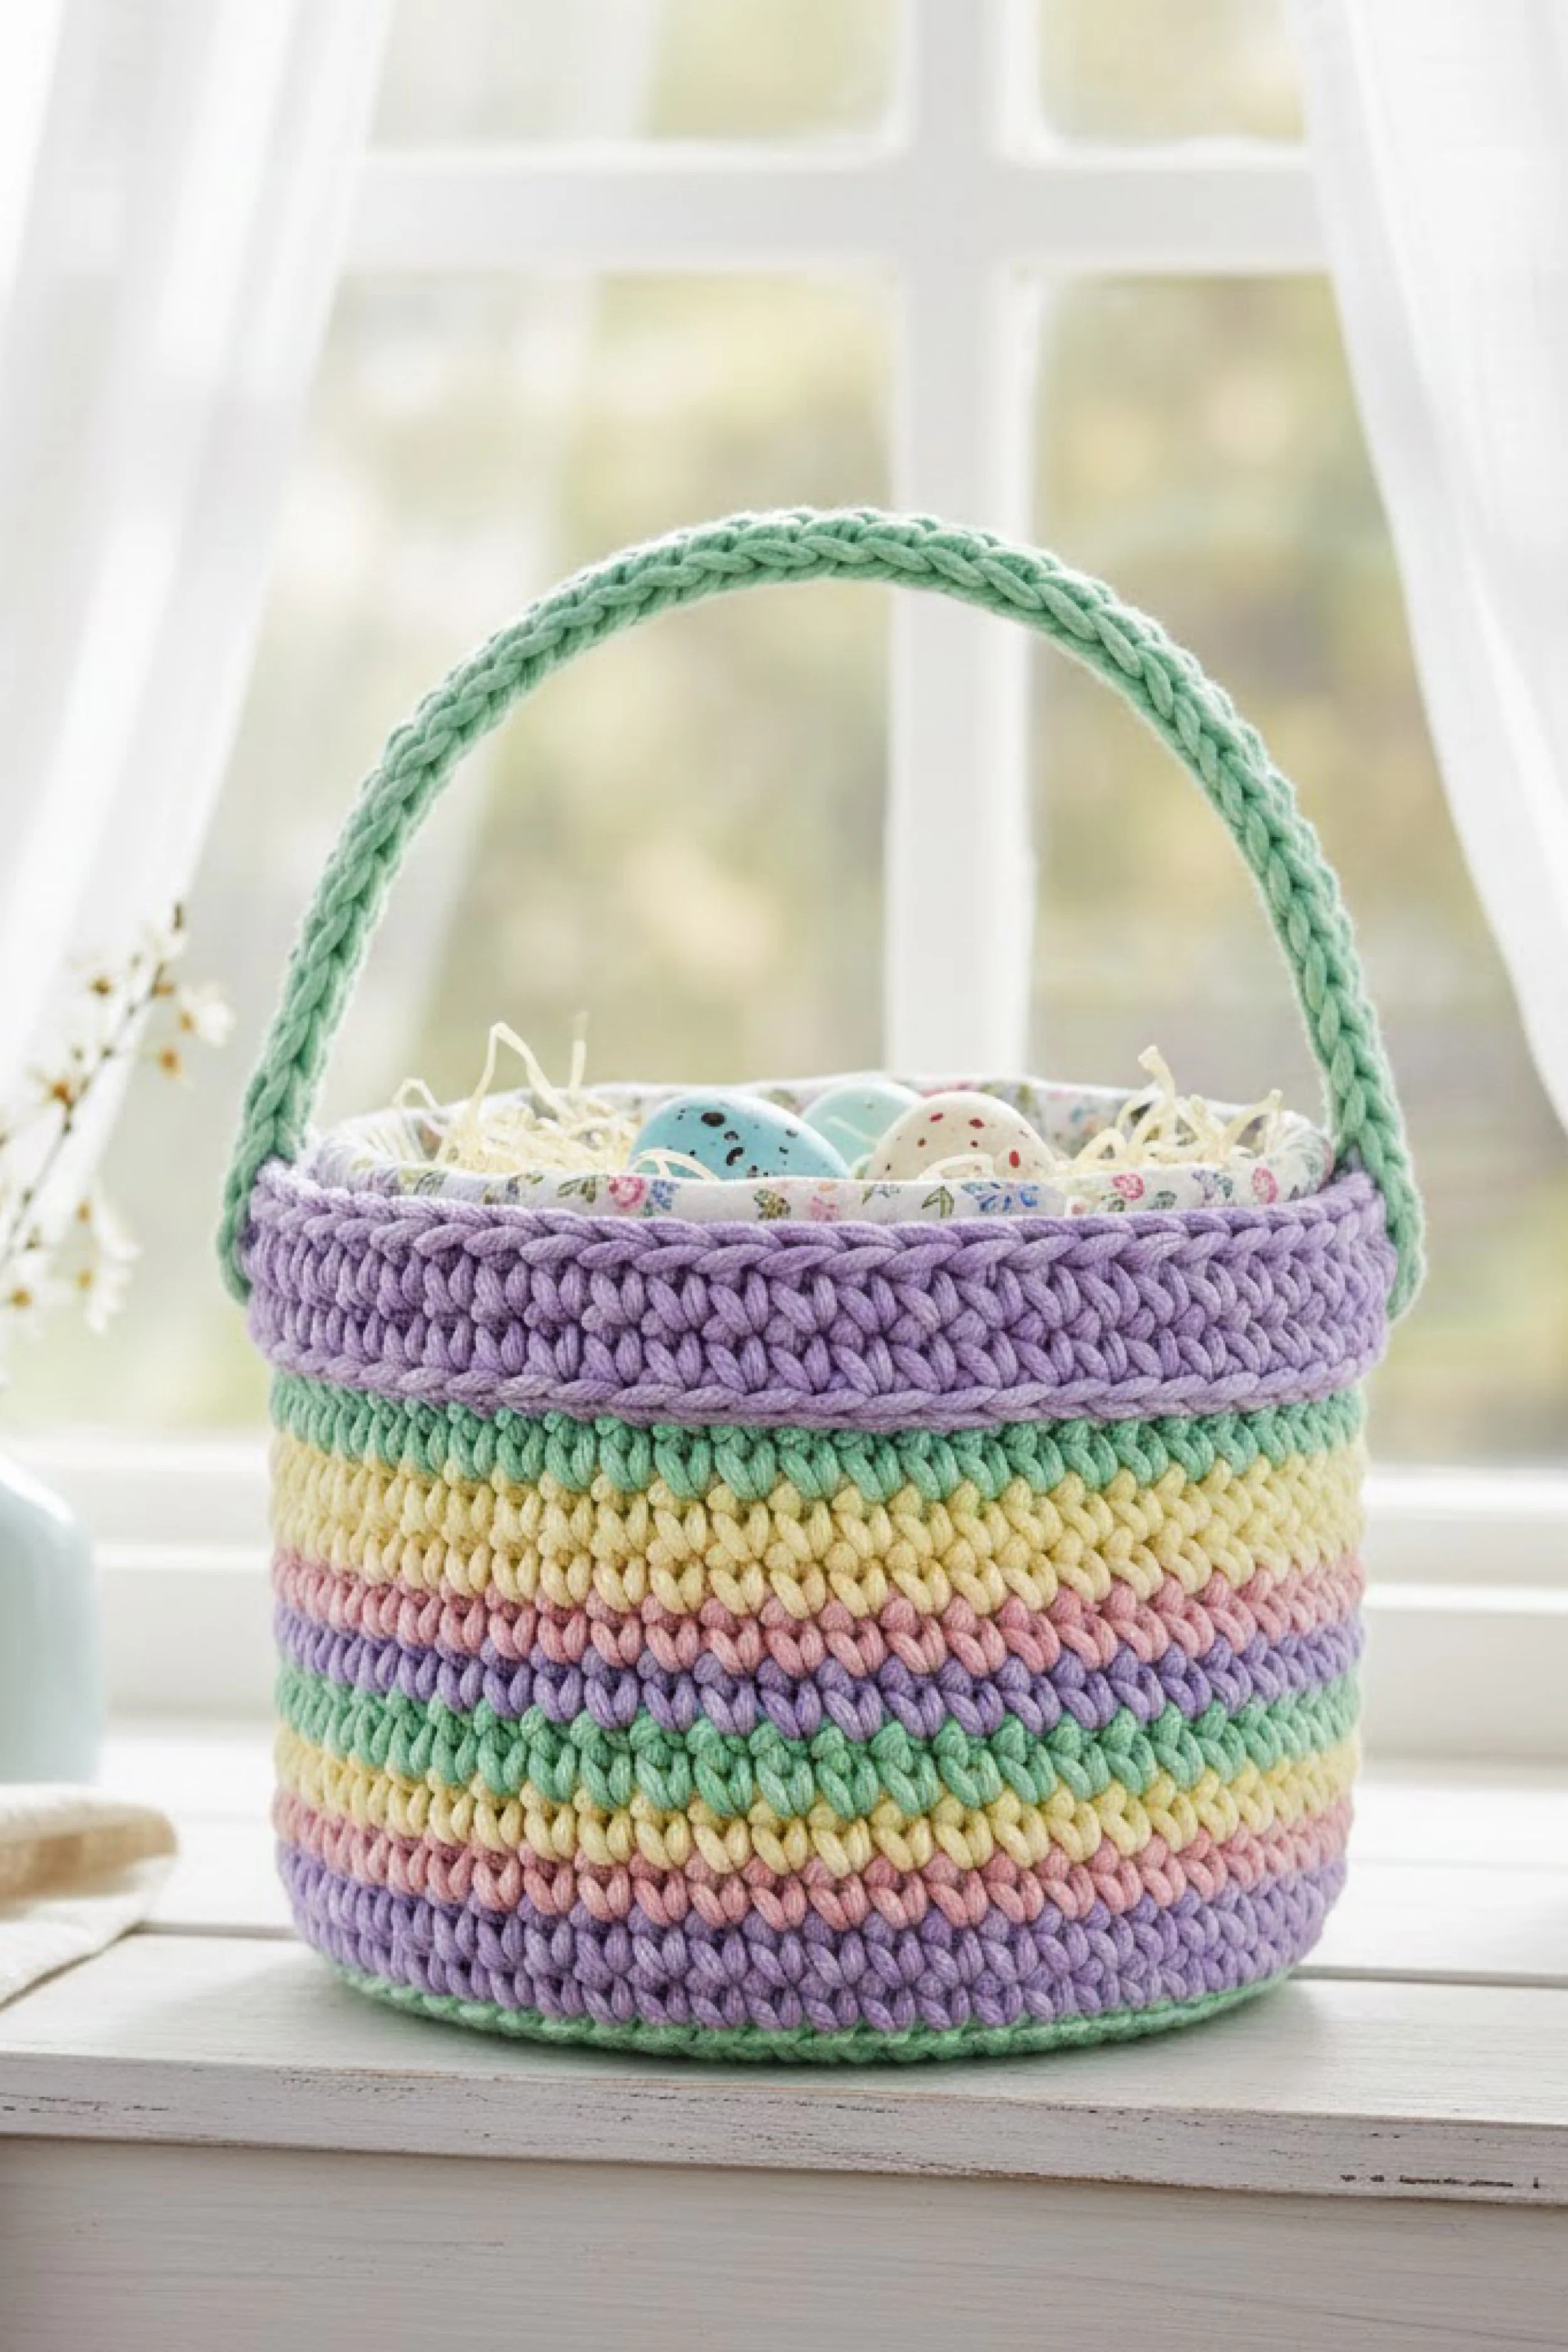
Lined Pastel Stripe Easter Basket Make-It-Yourself Tutorial with Soft Handle
What you’re making
This tutorial recreates the pastel striped Easter basket with a smooth, chunky crochet body, a thick mint handle, and a sweet floral lining peeking at the top. The photo styling includes shredded filler and speckled eggs, and the basket shape is a wide, cozy bucket that feels nostalgic and modern at the same time. The stripes look slightly spiraled, but still neat and intentional, and the handle is a simple, rounded strap that arches gently.
You will crochet a flat base, build tall sides with pastel stripes, add a reinforced handle, then finish with a simple fabric lining for the boutique look.
Materials + tools
- Super bulky yarn in pastel colors (mint, lavender, pale yellow, blush, soft teal or seafoam)
- Option A: chenille plush yarn for extra softness
- Option B: cotton chunky yarn for crisp stitch definition
- Crochet hook size 8 mm to 10 mm
- Stitch markers
- Yarn needle
- Scissors
- Lining supplies
- Cotton fabric with tiny floral print
- Matching sewing thread
- Sewing needle or sewing machine
- Pins or clips
- Optional basket filler and props
- Paper shred grass
- Speckled eggs
Finished size + customization notes
A great finished size for this style is about 8 inches wide and 6.5 to 7.5 inches tall, not counting the handle. The handle arch height can vary. If you want it to look like the photo, keep the handle tall enough to clear the rim by about 5 to 6 inches.
To customize:
- Make it deeper for egg hunts by adding more side rounds.
- Make it wider for decor by increasing the base diameter.
- Make stripes clean or spiraled depending on your preferred method.
Step-by-step instructions
1. Start with a flat base in your first pastel
Choose a color that will appear near the bottom. The photo shows multiple pastel stripes repeating, so you can start with lavender or mint.
- Magic ring.
- Round 1: 6 single crochet into ring.
- Round 2: increase in each stitch (12)
- Round 3: 1 single crochet, increase around (18) Continue increasing until your base is about 7.5 to 8 inches across.
Visual checkpoint: base stays flat and dense. The stitches should look chunky and tightly packed.
2. Turn up the sides with a ridge round
Work one round of back loop only single crochet.
Visual checkpoint: a clear ridge forms and your circle becomes a shallow dish that will become a basket.
3. Build the sides and plan your stripe rhythm
From here, crochet single crochet rounds with both loops. You can work in continuous rounds to create the subtle spiral stripe look seen in the photo. If you prefer cleaner stripes, use joined rounds.
For the photo vibe, use continuous rounds:
- Change colors at the start of a new round, but instead of joining, simply keep going. The color will naturally spiral a bit.
Stripe rhythm suggestion: Work 2 rounds per color, then switch. Repeat this sequence until you reach height.
Color sequence idea inspired by the photo:
- Lavender
- Mint
- Pale yellow
- Blush
- Lavender
- Mint Repeat.
Visual checkpoint: stripes should look evenly spaced and balanced. If one color band looks taller, adjust by doing exactly the same number of rounds per color.
4. Keep the basket stiff with tension control
The photo basket stands up well, which means the fabric is firm. If yours feels soft:
- Size down your hook by 1 to 2 mm.
- Tighten your single crochet slightly.
- Choose cotton chunky yarn instead of stretchy plush.
Visual checkpoint: when you set it down empty, it should not collapse into a puddle. A gentle lean is fine, but it should hold a cylinder shape.
5. Shape the top and prepare for the lining
When you are about 1 inch from the final height, work one round in front loop only single crochet. This creates a tiny ledge inside the basket that helps the lining sit neatly.
Then work one plain round of single crochet to finish the rim.
Visual checkpoint: the rim edge looks smooth and level.
6. Crochet the handle strap
The handle in the photo looks like a thick, rounded strap with a braided texture. You can create that by crocheting a tight cord strap or by braiding. Here is a crochet method that matches and is durable.
Cord handle method:
- Decide handle width. A simple strap 6 to 8 stitches wide works.
- With mint yarn, chain 7.
- Row 1: single crochet in second chain from hook and across.
- Chain 1, turn. Repeat rows until strap is the length you want, about 14 to 16 inches for a medium basket.
To make it rounder: After the strap is made, fold it lengthwise and slip stitch along the edge to create a tubular feel. This adds thickness and prevents stretching.
Visual checkpoint: strap feels sturdy when you tug it. It should not stretch dramatically.
7. Attach the handle firmly
Mark two opposite points on the rim. Attach strap ends with strong stitching.
- Place strap end on inside of the basket about 1 inch down from the rim.
- Stitch through multiple stitches and strap rows, going back and forth several times.
- Repeat on the other side, making sure the handle arch is even.
Strength check: Lift the basket by the handle. If you see distortion, add more stitches and spread the attachment area wider.
8. Make the floral lining
The lining is the detail that makes this basket look elevated. You will make a simple fabric cylinder.
- Measure inside circumference at the rim and the inside height.
- Cut a rectangle: width equals circumference plus seam allowance, height equals basket height plus 1 inch for a fold over at the top.
- Sew the short edges together to form a tube.
- Cut a fabric circle for the base, slightly larger than the basket base.
- Pin circle to tube and sew around to form the lining bucket.
Visual checkpoint: lining should fit inside without bunching. It should sit flat at the bottom.
9. Attach the lining neatly
Fold the top edge of the lining down about 0.5 inch and press or finger crease. Insert lining into basket.
Hand stitch the folded edge to the inside rim ledge you created with the front loop only round. Use small stitches and match thread color.
Visual checkpoint: you should see a pretty floral border at the top, just like the photo. The lining should not sag.
10. Final shaping and styling
Weave in all yarn tails. Shape basket with your hands.
To style like the photo:
- Add paper shred filler.
- Add speckled eggs.
- Sit it in bright window light for photos.
Troubleshooting
My stripes look messy
For continuous rounds, the color change will spiral. Keep changes at the back. If you want clean bands, use joined rounds and change color at the end of the round.
My basket is floppy
Use a smaller hook and keep stitches tight. Add a stiff base insert and consider fabric stiffener inside.
My lining bunches at the bottom
Your lining tube is too wide or your base circle is too large. Trim and resew for a snug fit. The lining should fit like a soft cup.
The handle pulls the rim inward
Widen the attachment area. Stitch the strap across more stitches. You can also add a small reinforcement patch inside under the strap.
My rim edge is uneven
Count stitches and correct with occasional decrease or increase in the final round. Keep corrections spaced out.
Finishing details
Blocking and setting shape
Dampen cotton yarn baskets and shape over a bowl. Let dry. For plush yarn, shape gently and let it air dry.
Optional upgrades
- Add a drawstring lining by sewing a ribbon channel into the lining fold.
- Add a name tag patch on the outside.
- Add a second thinner stripe color for a more complex pastel pattern.
- Add a decorative edge at the rim with crab stitch in a contrasting pastel.
Shop Similar
- Pastel super bulky yarn set for crochet Easter baskets
- Floral cotton fabric quarters for basket lining
- Large crochet hook set 8mm 9mm 10mm for chunky yarn
- Paper shred basket filler in pastel colors
- Speckled decorative eggs for spring basket styling
Style It With
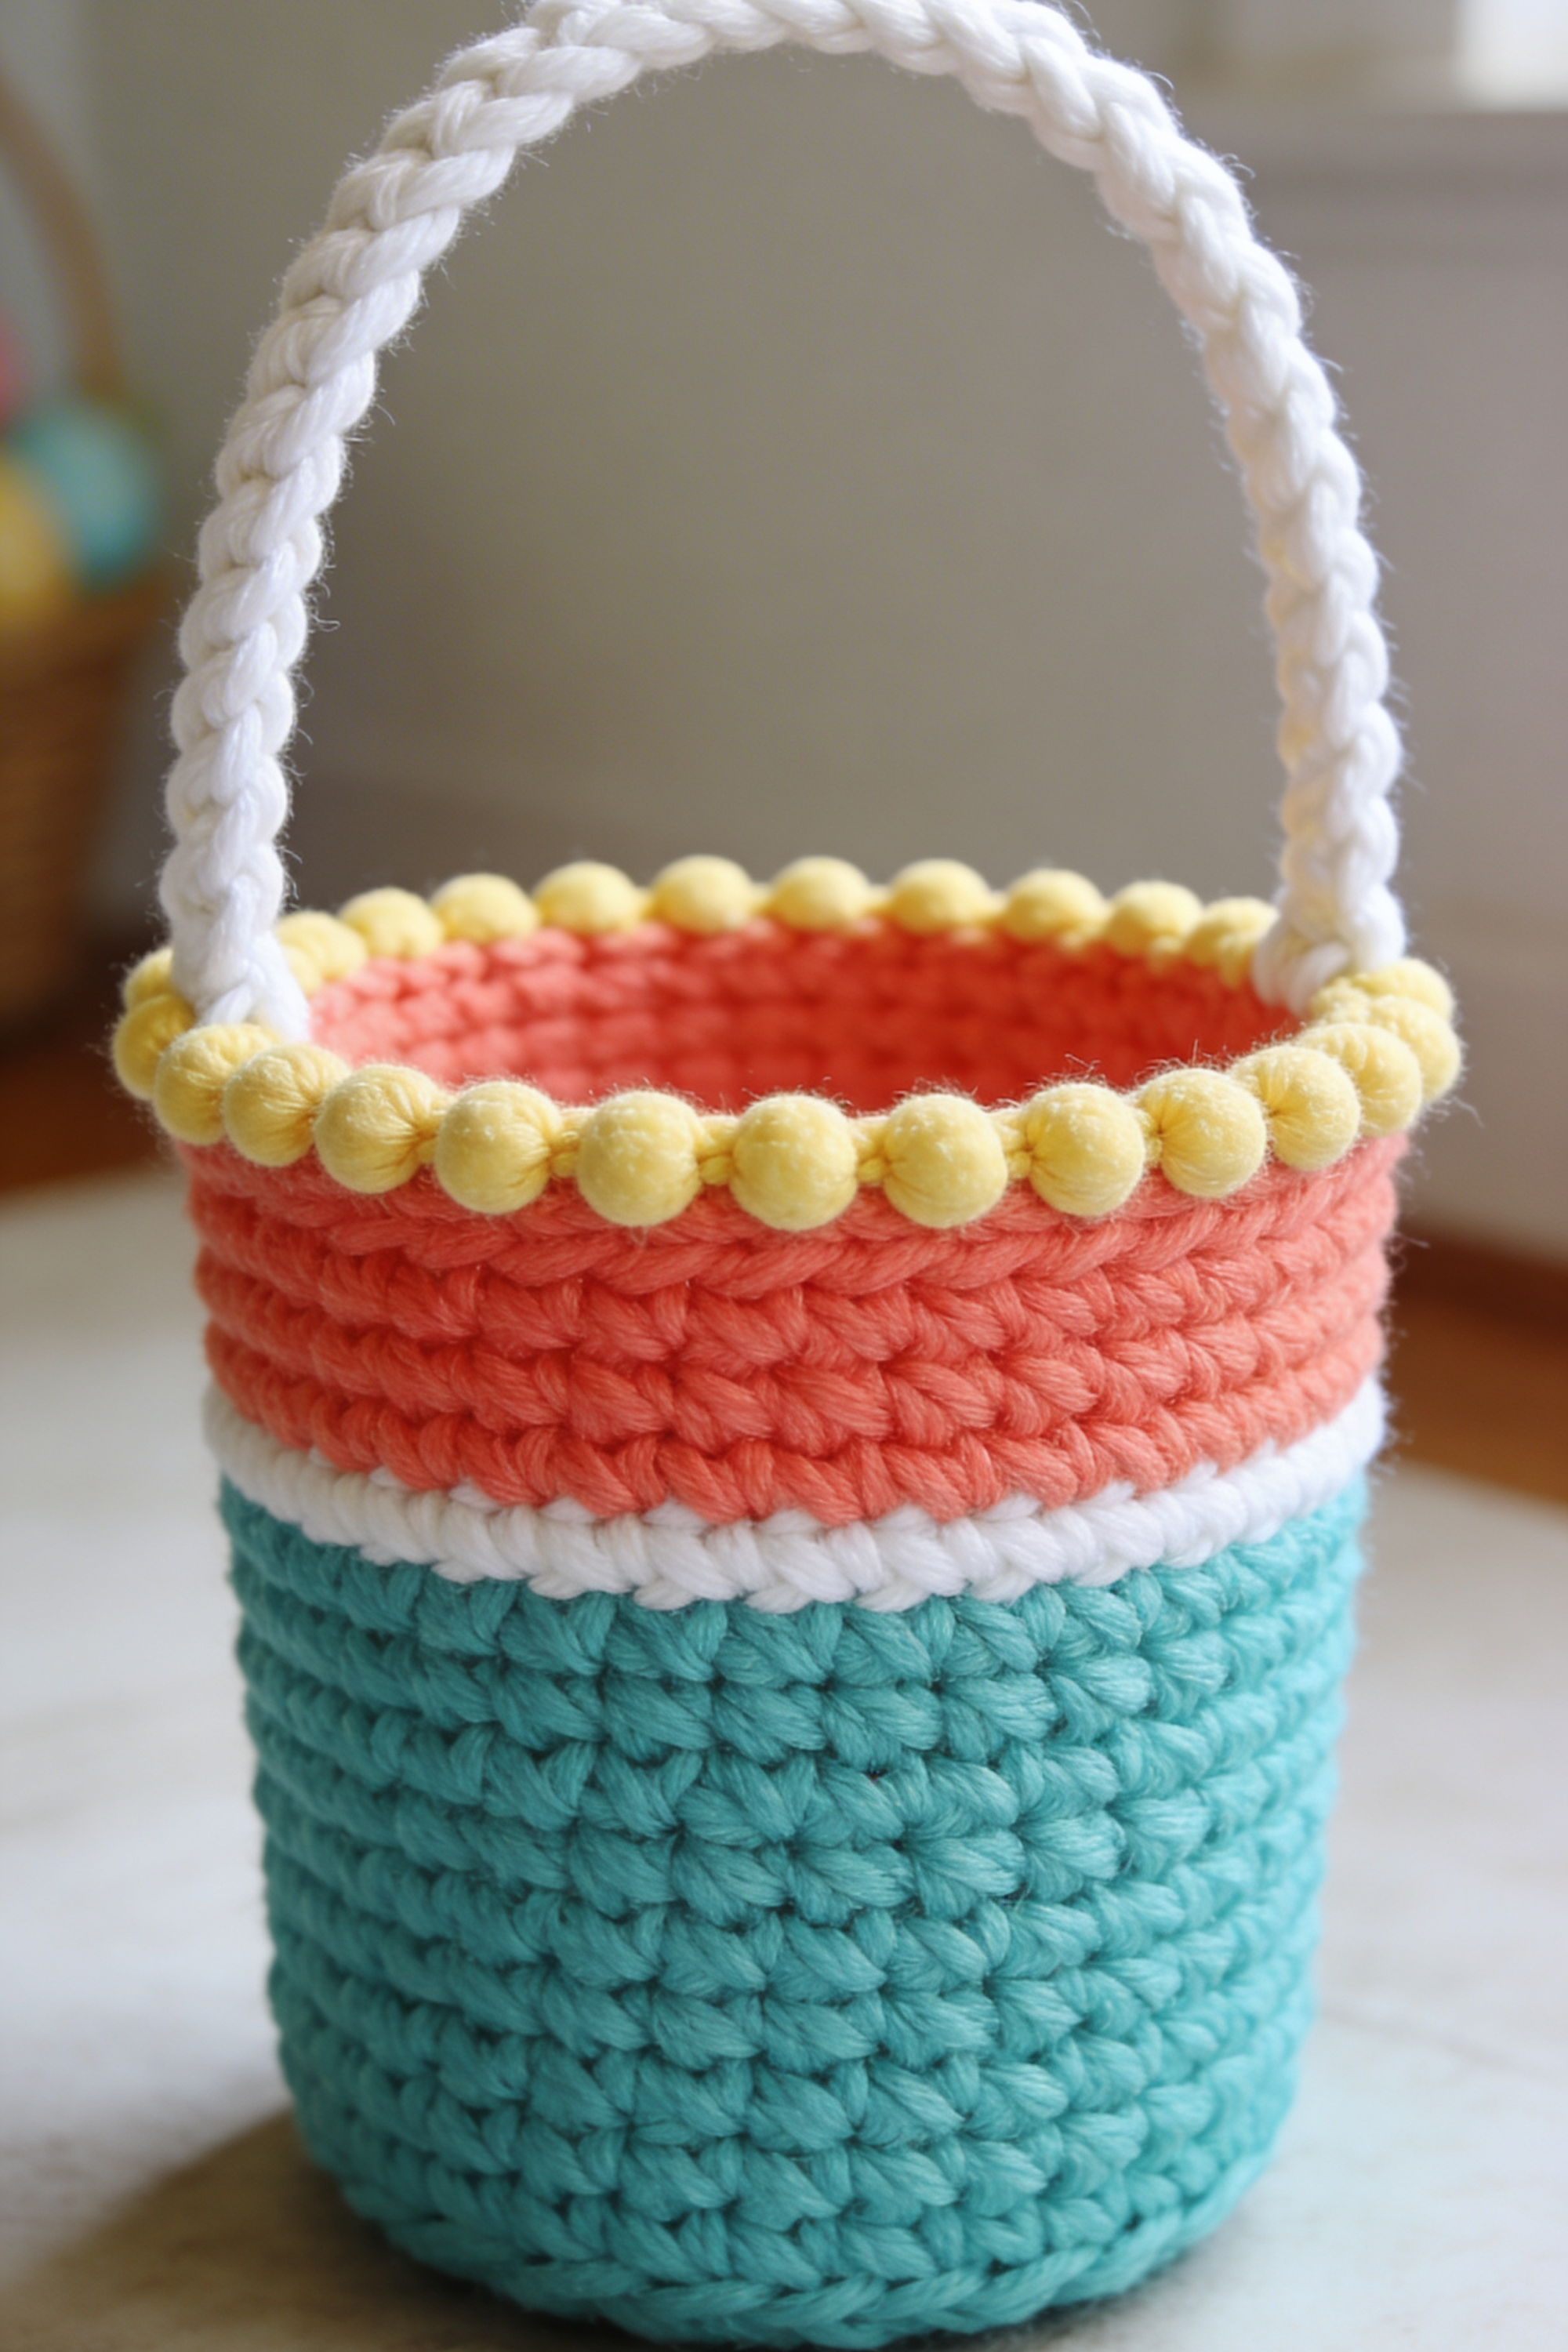
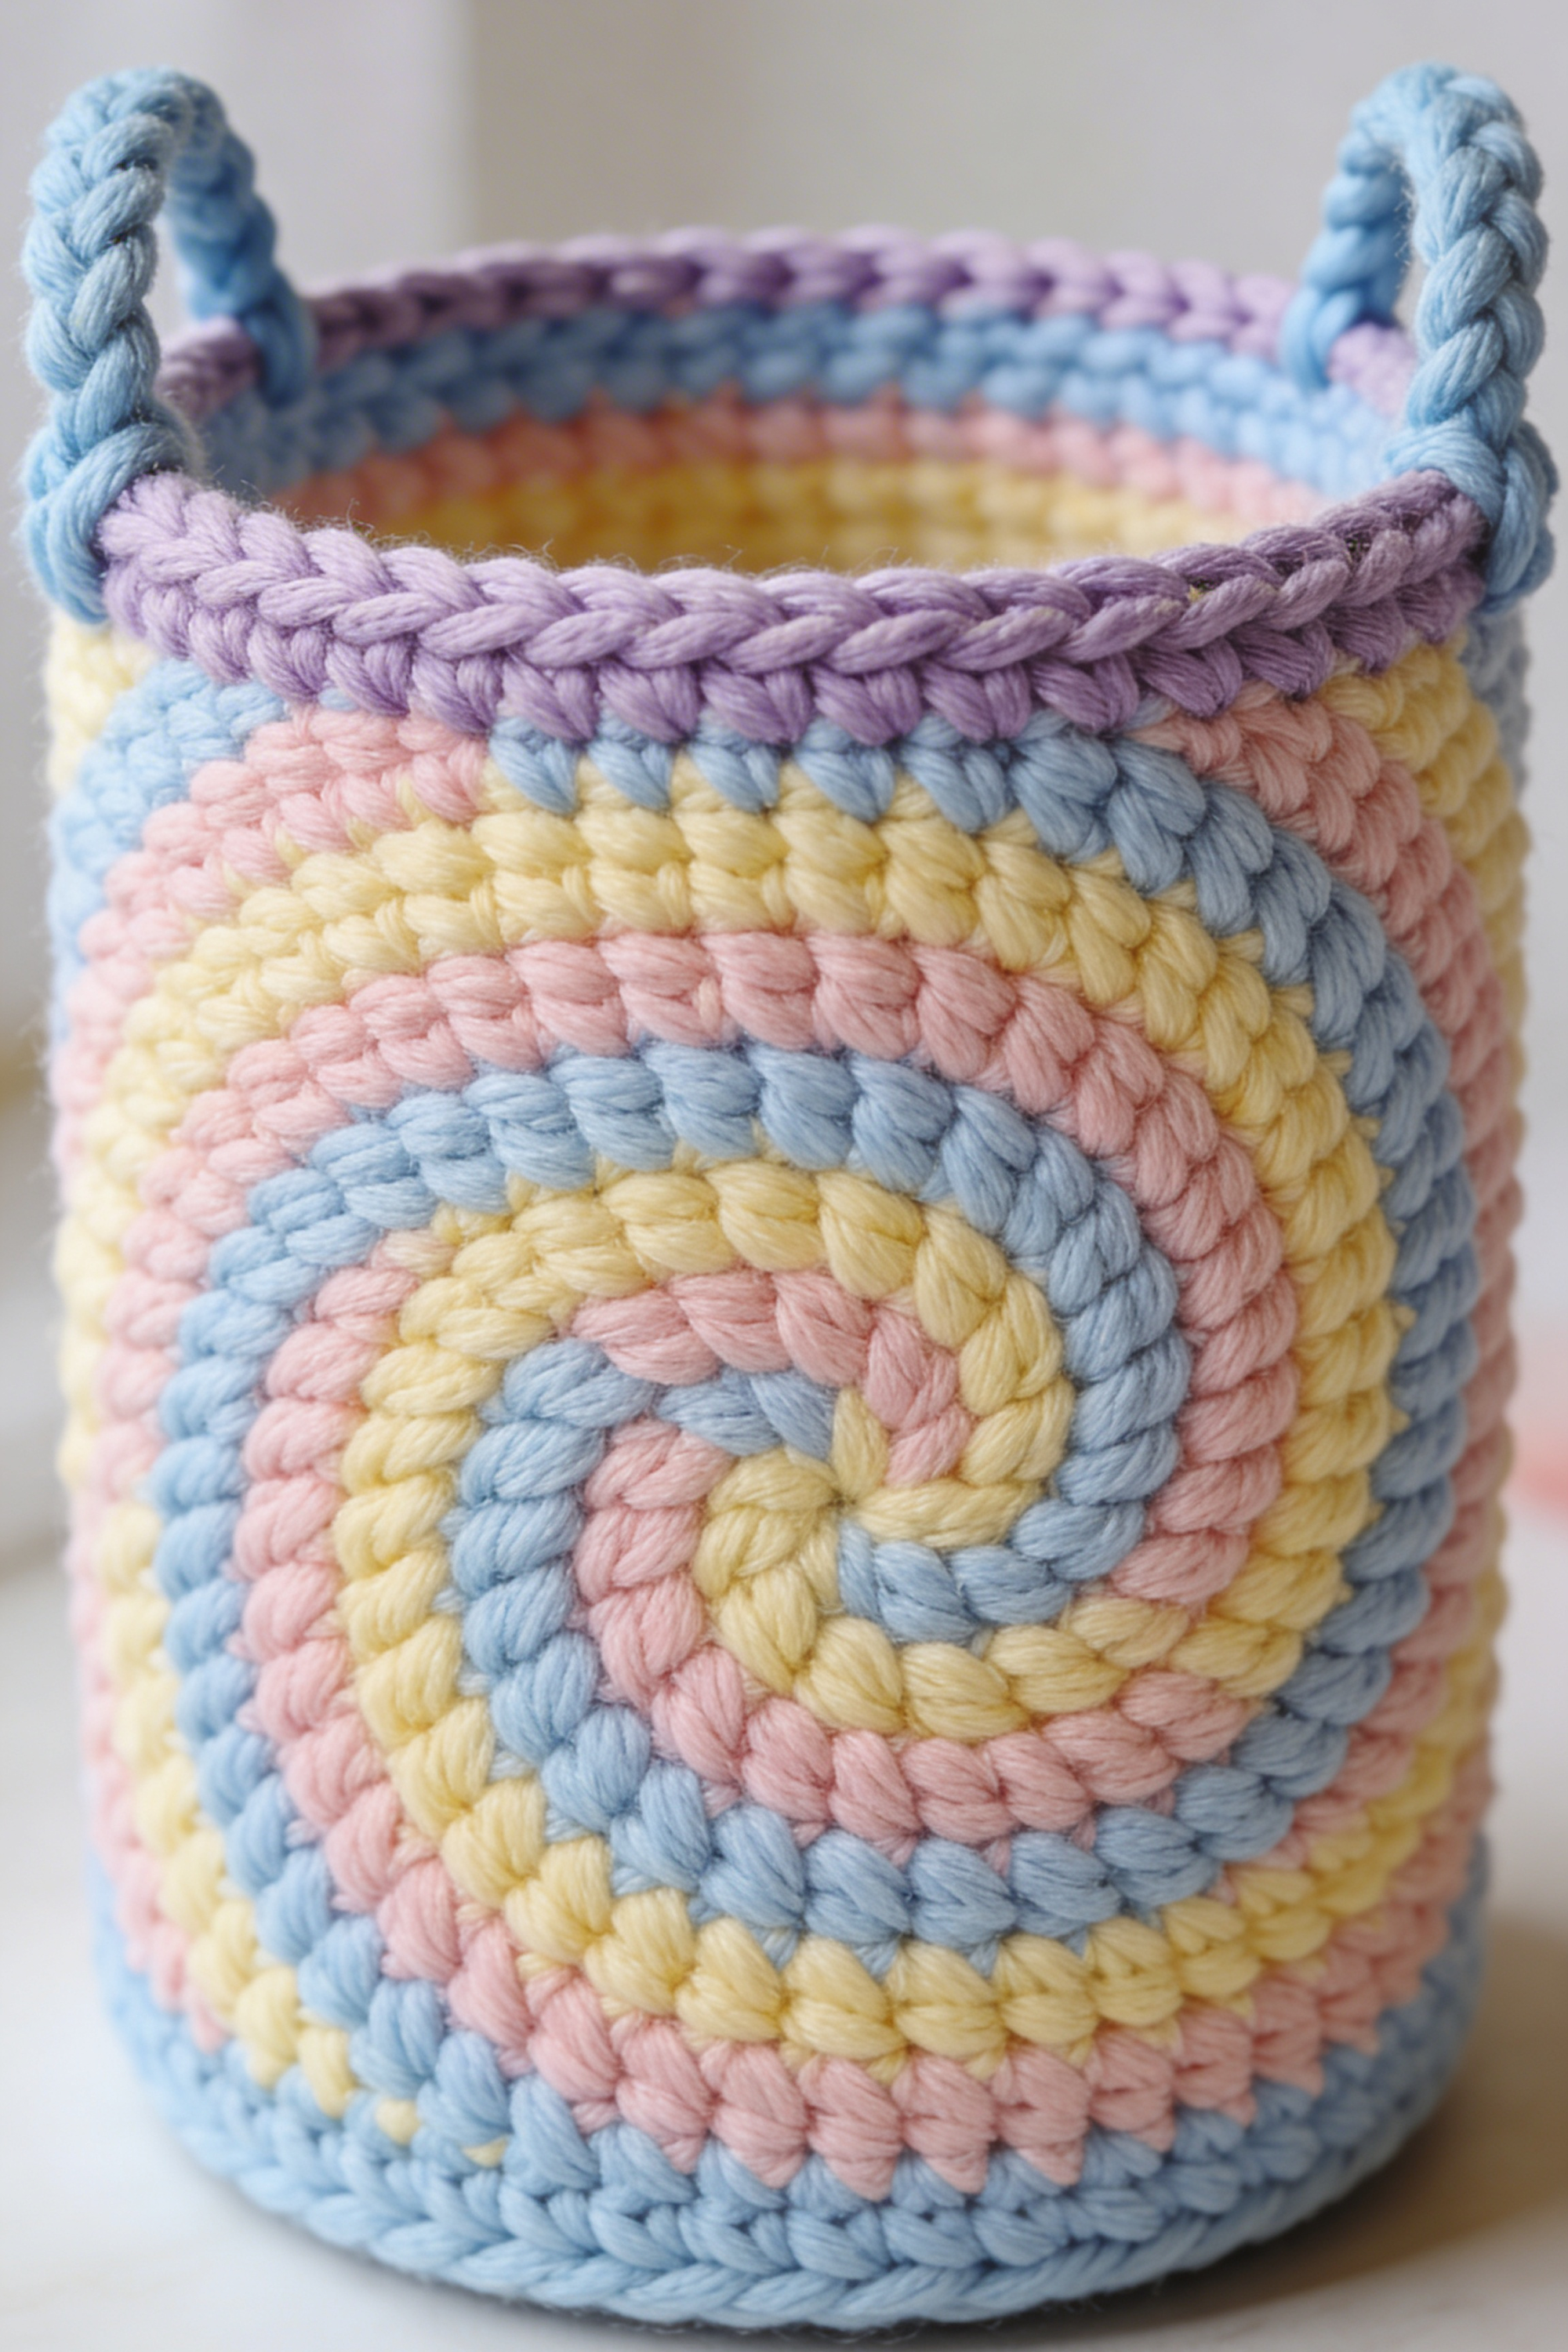
Color Block Bucket Basket DIY Guide How-To Guide with Pompom Rim and Tall Handle
What you’re making
This tutorial recreates the modern color block crochet bucket with a teal body, a crisp white transition stripe, a coral top band, a sunny yellow pom pom rim, and a thick white handle. The silhouette is tall and tidy, like a little tote bucket, and the stitch texture is dense and plush. The pom pom rim is the statement: soft rounded bumps that ring the top like candy beads.
You will crochet a firm base, build straight sides, add clean color changes, create a bobble style rim that reads as pom poms, then attach a sturdy handle.
Materials + tools
- Super bulky yarn in four colors
- Teal for the body
- White for the thin stripe and handle
- Coral for the top band
- Pale yellow for the pom pom rim
- Crochet hook size 8 mm to 10 mm
- Stitch markers
- Yarn needle
- Scissors
- Optional structure helpers
- Fabric stiffener
- Plastic canvas base insert
- Twill tape or sturdy cord to reinforce inside the handle
Finished size + customization notes
Target about 8 inches tall and 6.5 inches wide. The tall handle should rise about 7 to 8 inches above the rim to match the photo.
To make it shorter, reduce teal rounds. To make it wider, increase base diameter. Keep the color placement proportions so it still reads like the photo:
- Teal takes most of the height
- White stripe is thin
- Coral is a bold top band
- Yellow rim is a single statement round
Step-by-step instructions
1. Crochet the base in teal
- Magic ring.
- Round 1: 6 single crochet.
- Round 2: increase around (12)
- Round 3: 1 single crochet, increase around (18) Continue increasing until the base is about 6.5 inches across.
Visual checkpoint: base is flat and dense with no big gaps.
2. Turn up the sides
Work one back loop only round.
Visual checkpoint: a ridge forms around the base edge.
3. Build the teal body height
Continue single crochet rounds in teal. Keep tension firm.
Work until the teal section is about 5 to 5.5 inches tall.
Visual checkpoint: the basket stands and looks like a neat cylinder. If it slouches, size down hook or tighten tension.
4. Add the white stripe
Switch to white for one round only. Change color on the final yarn over of the last teal stitch.
Work 1 round of single crochet in white.
Visual checkpoint: the stripe looks crisp and thin.
5. Add the coral top band
Switch to coral and work 2 to 3 rounds. The photo top band is substantial, so do at least 2 rounds.
Visual checkpoint: coral reads as a bold top section, not a thin line.
6. Create a stable rim foundation
Work one more round in coral, but in front loop only. This creates a ledge that helps the pom pom rim sit nicely.
7. Crochet the yellow pom pom rim
Switch to pale yellow.
The photo rim looks like evenly spaced little balls. You can create this with mini bobbles.
Mini bobble method:
- In the next stitch, work a bobble made of 3 half double crochet closed together.
- Yarn over, insert, pull up loop, yarn over, pull through two loops.
- Repeat that two more times in the same stitch.
- Yarn over and pull through all loops to close.
- Chain 1 to lock the bobble.
- Skip the next stitch.
- Repeat around.
At the end, adjust so spacing stays even. You may need to skip fewer stitches if your stitch count is low, or skip more if your stitch count is high.
Visual checkpoint: the rim should look like a necklace of little puffs. If they look flat, pull loops taller before closing.
8. Lock the rim
Work one round of slip stitch in yellow, placing slip stitches between bobbles. This stabilizes the rim and keeps bobbles upright.
Visual checkpoint: bobbles stay on the outside and look evenly rounded.
9. Crochet the tall white handle
The handle in the photo is thick and rope like. Two methods work well.
Option A: Crocheted cord handle (strong and clean)
- With white yarn, make a long chain about 26 to 30 chains, depending on your basket width and desired height.
- Work single crochet into each chain back toward the start.
- Turn and work another row of single crochet back along the strap.
- For extra thickness, fold strap lengthwise and slip stitch along the edge.
Visual checkpoint: strap feels thick and does not stretch much.
Option B: Braid handle (fast and ropey)
Cut 6 strands and braid into a thick cord. This matches the rope vibe and is very sturdy.
10. Attach the handle securely
Mark two opposite points on the inside rim, centered.
Stitch each handle end down across a wide area:
- Thread yarn tail on needle.
- Sew through strap and basket stitches multiple times, making a rectangle of reinforcement stitches.
Optional reinforcement: Place a strip of twill tape inside the strap fold before stitching closed. This prevents stretching over time.
Strength check: Lift basket by handle and gently shake. No pulling or distortion should happen at the attachment points.
11. Weave ends and shape
Weave in all tails inside the basket.
If you want a crisp photo ready structure:
- Insert a plastic canvas base circle.
- Apply a light coat of stiffener inside, avoiding the yellow bobble rim so it stays plush.
Visual checkpoint: basket stands tall, rim stays level, handle arches smoothly.
Troubleshooting
My bobbles are different sizes
Your loops are not consistent. Pull each half double crochet loop to the same height before closing. Also chain the same amount after each bobble.
The bobble rim is too tight
You may be skipping too many stitches. Reduce skips, or use smaller bobbles like 2 half double crochet closed together.
The rim flares outward
You may be adding too many bobbles without enough spacing. Add a skip stitch between bobbles or switch to a bobble every other stitch.
Color change looks jagged
Change color on the last yarn over of the stitch before the new color. For extra clean lines, use joined rounds and rotate your work each round.
Handle sags
Reinforce with twill tape or a hidden cord inside the strap. Also widen the attachment area so the stress spreads across more stitches.
Finishing details
Clean interior finish
If you want it gift ready, add a lining. A simple fabric tube stitched inside just below the rim will hide ends and add polish.
Bottom protection
Add felt pads or a felt circle stitched to the base to protect surfaces and keep the basket from sliding.
Optional upgrades
- Add a small bow on one side of the handle attachment in yellow to echo the rim.
- Add a monogram tag to the coral band.
- Add a second thin white stripe between teal and coral for extra graphic contrast.
- Add a drawstring liner for secure egg hunts.
Shop Similar
- Teal super bulky yarn for crochet baskets and bowls
- Coral chunky yarn for color block crochet projects
- White super bulky yarn for crochet handles and straps
- Fabric stiffener and shaping spray for crochet baskets
- Twill tape for reinforcing crochet bag handles
Style It With
Once you have your first basket finished, you will realize how addictive these are. The stitches work up fast, the color bands are instantly satisfying, and the finishing details like braided rims, scallops, and linings are where the whole project levels up. If you want your baskets to last year after year, focus on dense stitches, a clean turning ridge at the base, and a reinforced handle attachment that spreads the stress across multiple stitches.
The best part is you can remix any of these five looks with your own palette. Try soft neutrals for a minimalist spring home, bold brights for kid baskets, or keep everything tonal for a modern boutique feel. Fill them with shredded paper, speckled eggs, or tiny wrapped treats, and set one by a sunny window for the prettiest seasonal moment. When you make one, you are not just making decor, you are making a little tradition you will want to bring back every spring.