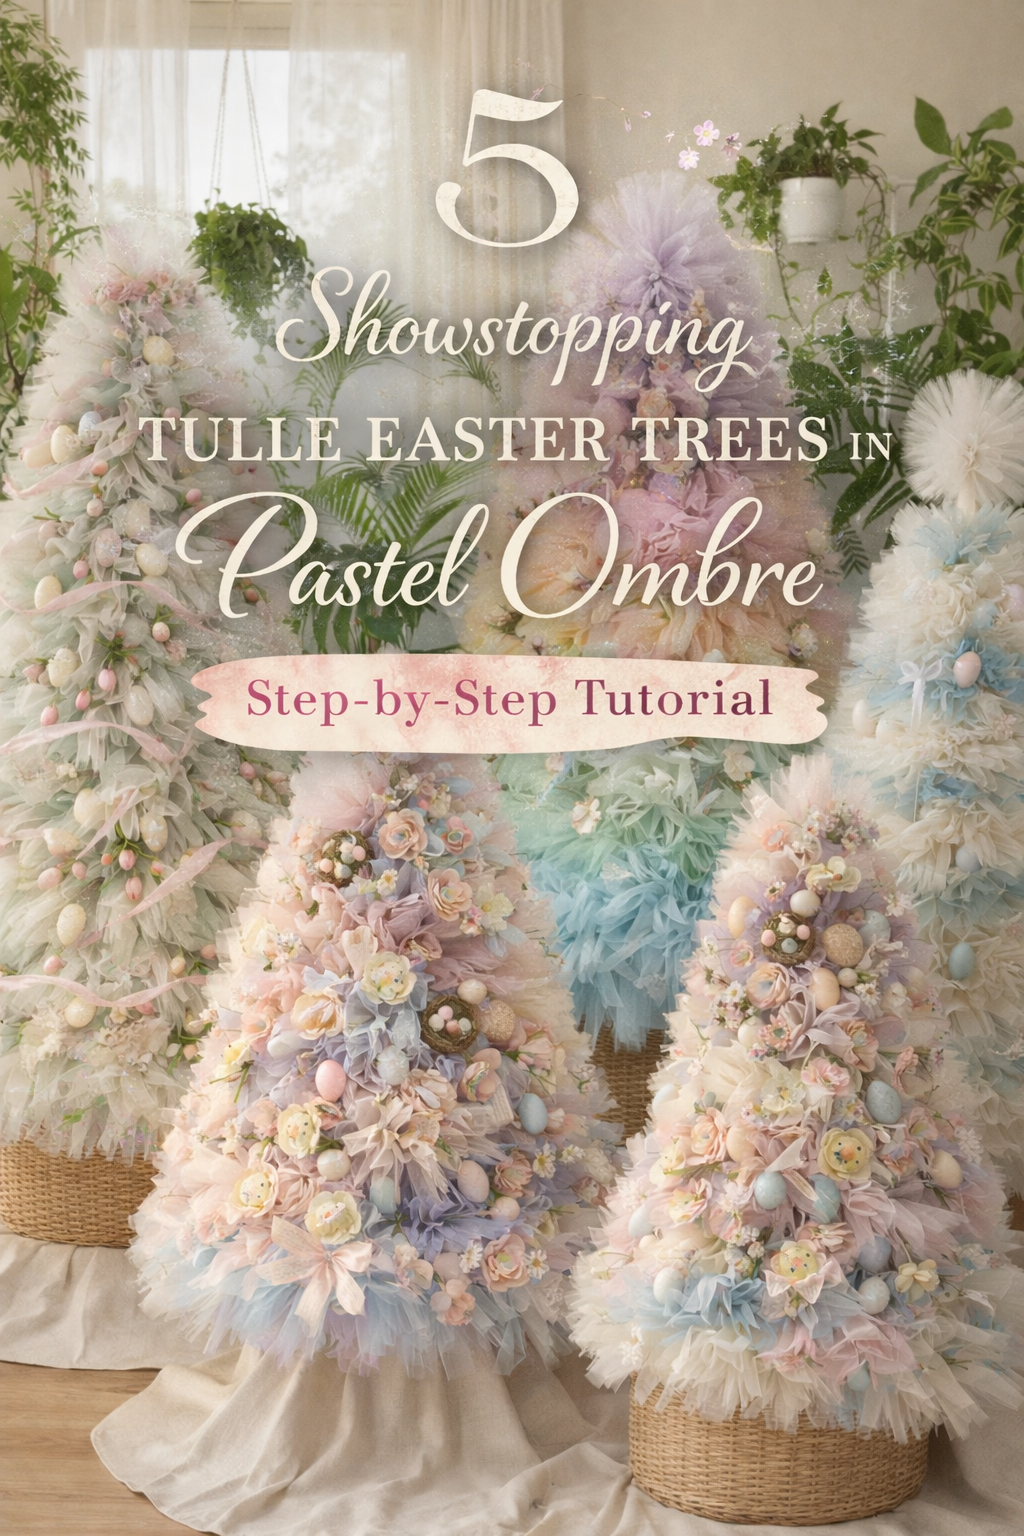
5 Showstopping Tulle Easter Trees in Pastel Ombre — Step-by-Step Tutorial

More like this
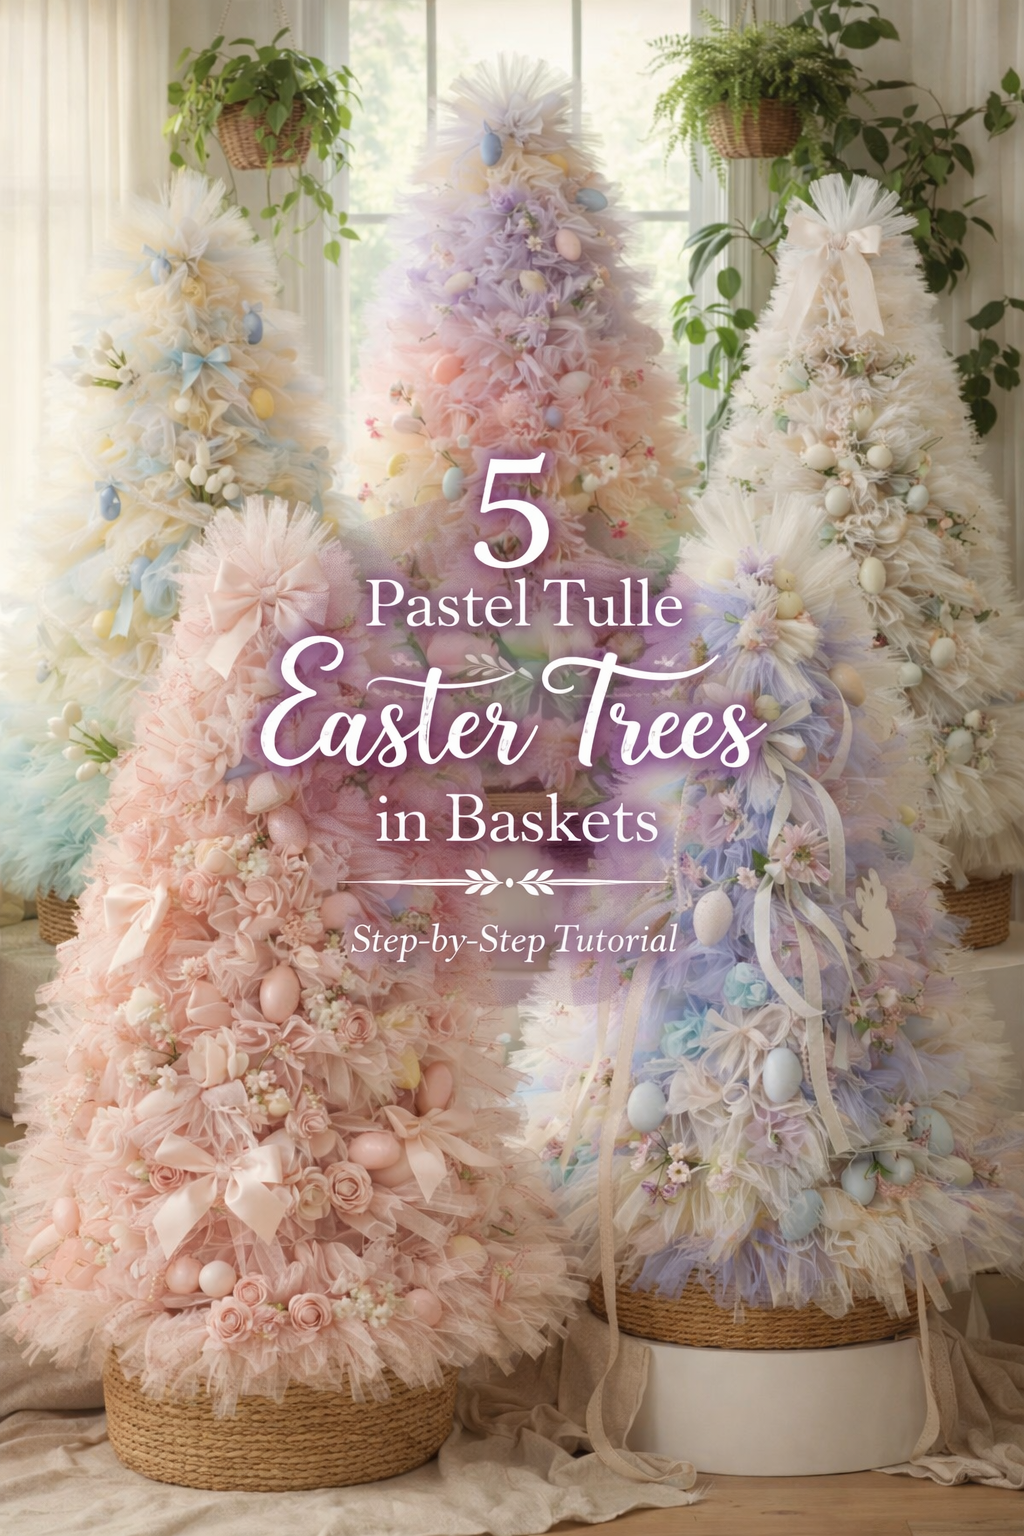
If your Pinterest feed has been whispering about “tulle trees for Easter,” this is the one trend that actually looks even better in real life. Think airy, cloud soft layers of gathered tulle shaped into a towering cone, then finished with pastel eggs, tiny spring blooms, and bows that feel more garden party than holiday aisle. The best part is you can make these look wildly custom without complicated crafting skills. Once you learn the simple tulle bundle method, you can create everything from rainbow ombre drama to greenhouse chic minimalism, all using the same core build.
In this post, you’re getting five distinct Easter tree looks, each designed to match the photos exactly. You will see how to choose the right cone size, how to build that plush ruffled volume without seeing the base, and how to place eggs and florals so they look tucked and editorial, not glued on. I’ll also show you how to control the silhouette so your tree stays cone shaped and balanced, plus easy upgrades like pearl drapes, ribbon garlands, and nest clusters for a styled, boutique finish. Pick one design and go all in, or make a set in coordinating palettes for a spring entryway, sunroom, or brunch backdrop.
💡 Pro Tip: Why I Link to Amazon Search Results and Not One Product
In the Shop the Look and Style it With sections under each bikini, I link to Amazon search results, not single products. Here’s why this matters:
Hot bikinis sell out fast. I don’t want you clicking on a dead link to a sold-out item. Search pages stay updated.
You get more options. Love the vibe but want a different color, cut, or price point? The search results give you everything that matches the look and energy.
I curate each search carefully. These aren’t generic. I spend hours crafting keywords that bring up exactly the kind of bikinis I’d wear—or recommend to my hottest friends.
Support with no pressure. If you click a link, browse, and buy something later, I may earn a small commission at no extra cost to you. That helps me keep bringing you curated collections like this one—powerful, seductive, and always fresh.
So dive in. Click through. Try something risky. These aren’t just bikinis—they’re commands, statements, and maybe even your new favorite weapon of choice.
Rainbow Ombre Tulle Easter Tree in a Woven Basket — Make It Yourself Tutorial
What you’re making
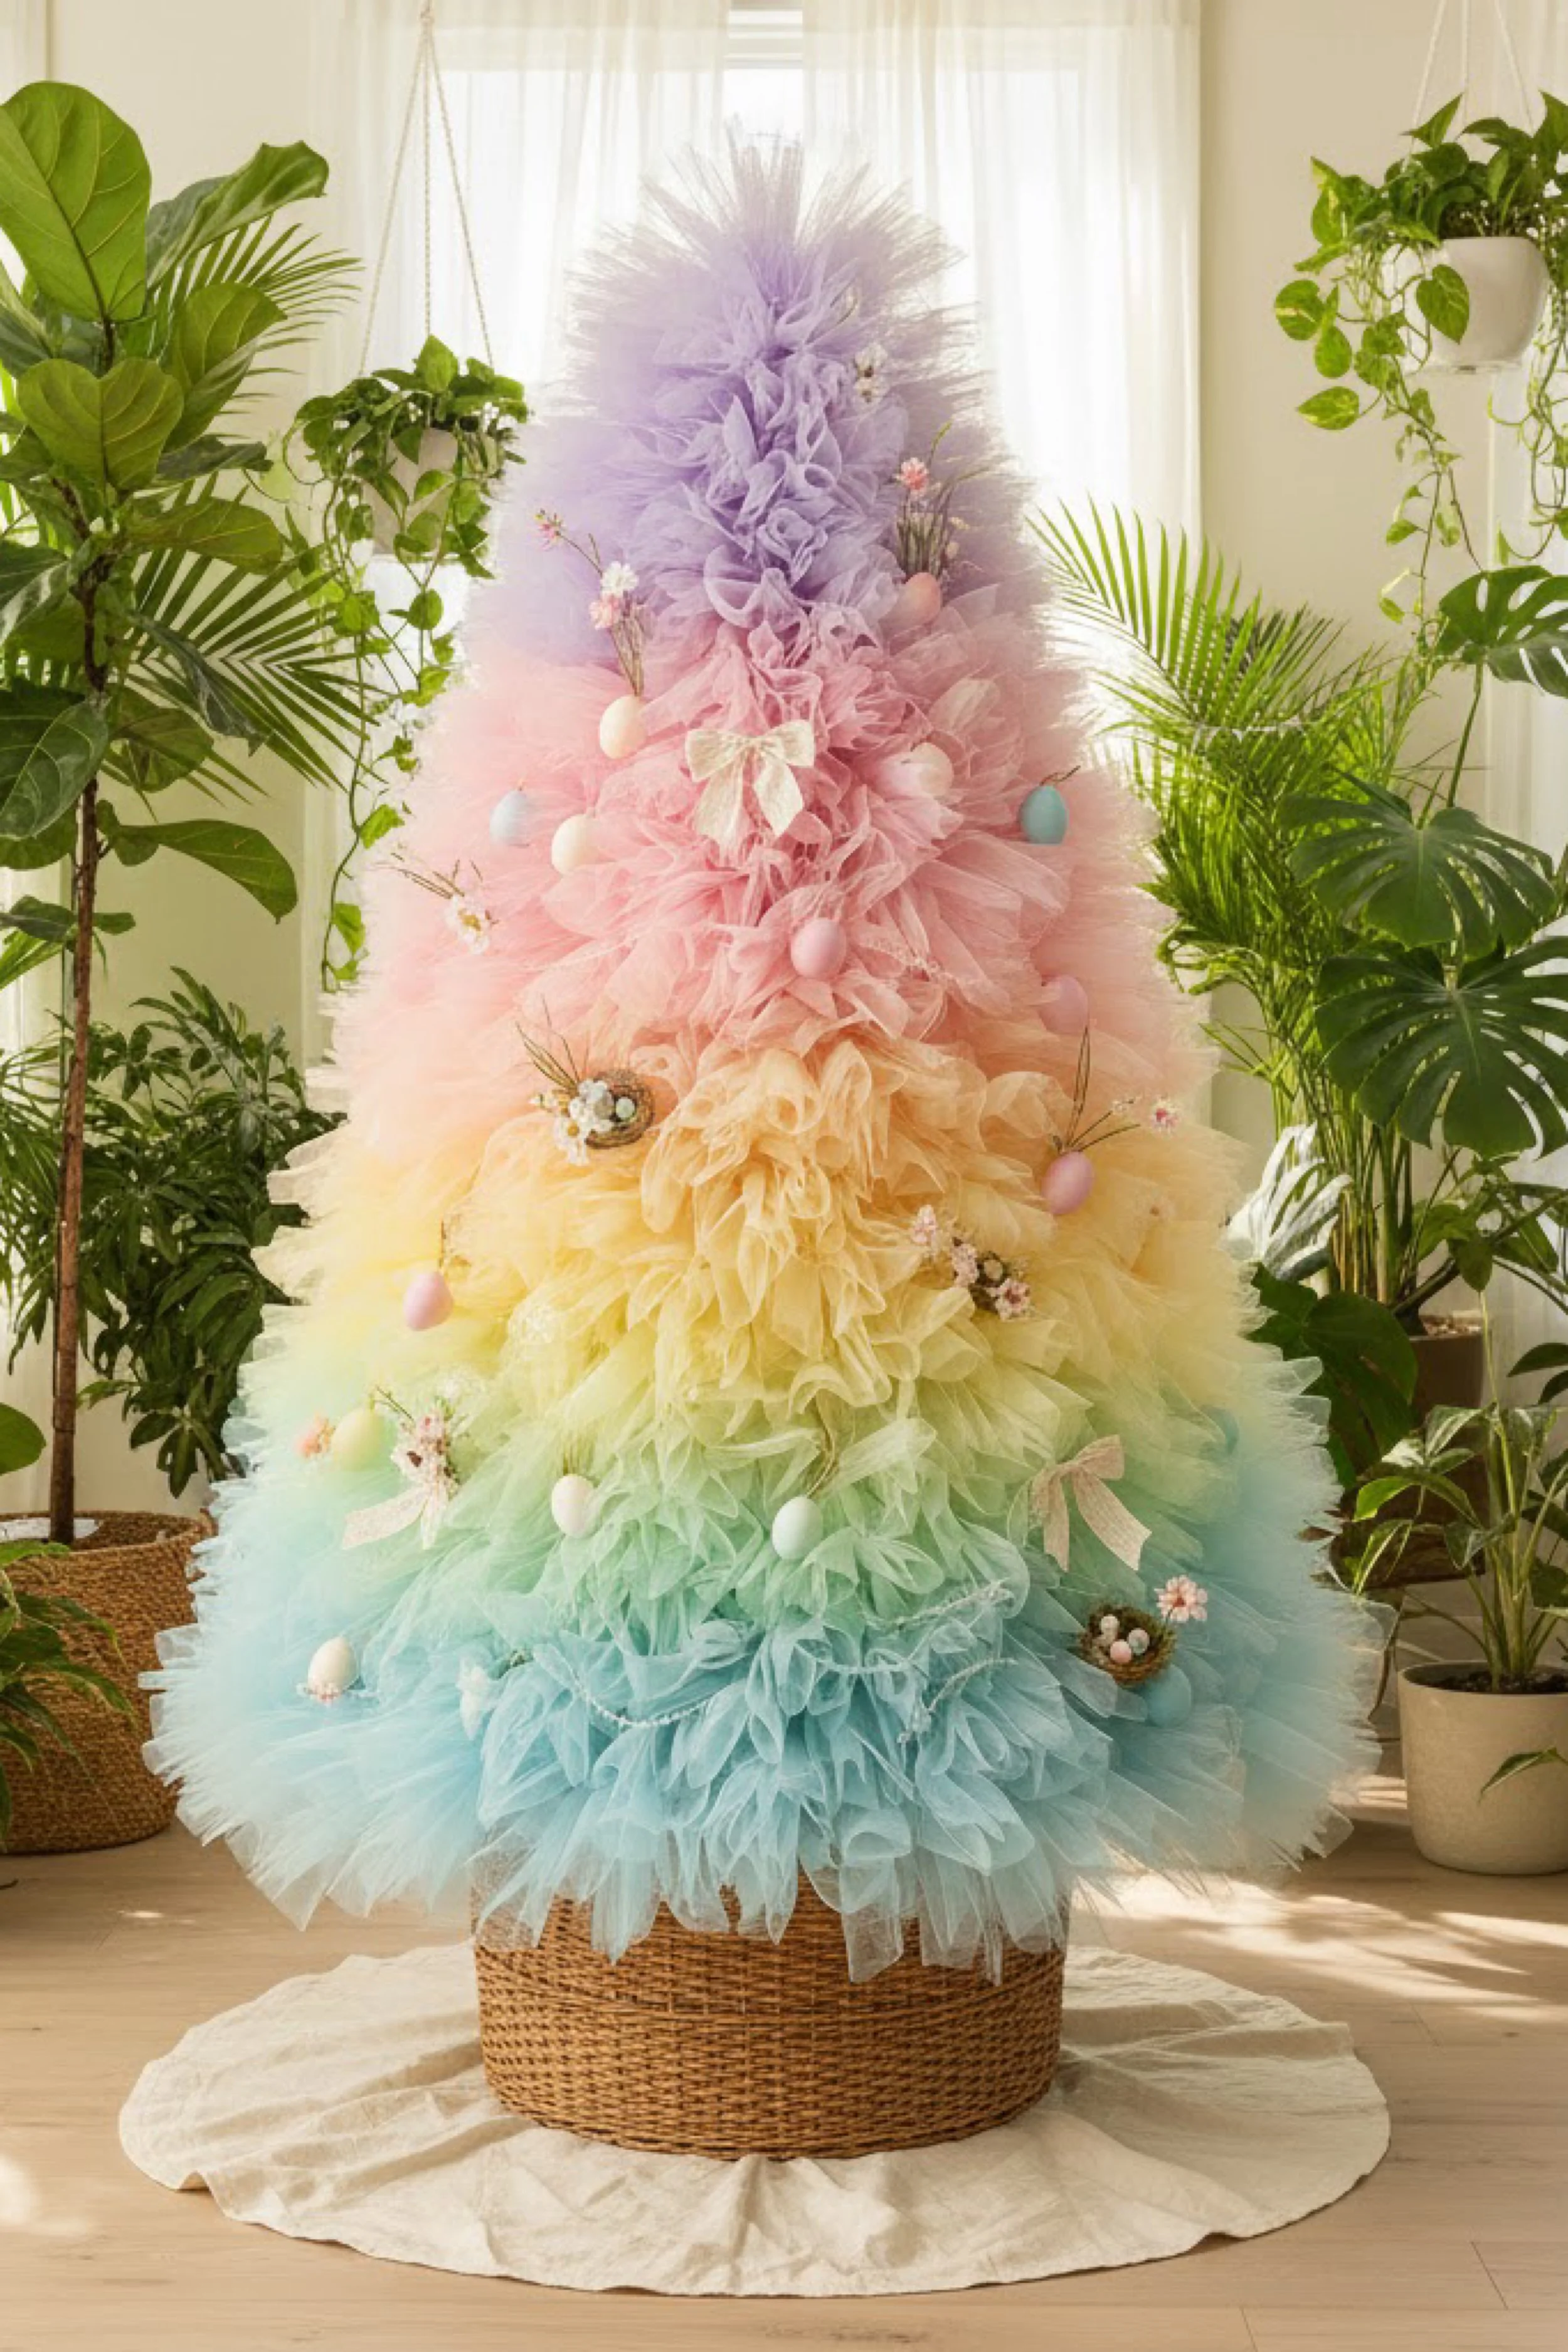
You are creating a tall, cone shaped Easter statement tree built from fluffy gathered tulle, blended in a rainbow ombre from aqua at the base through mint, butter yellow, blush, and lavender at the top. The look is cloud soft and romantic, finished with pastel eggs tucked into the tulle, tiny floral picks, and a few sweet bows. It sits in a wide woven basket, which makes it feel like spring décor instead of a holiday tree.
This tutorial focuses on getting that airy, ruffled texture and a smooth color transition that matches the photo, without the tree looking patchy or lopsided.
Materials and tools
- Cone base options
- Option A: foam floral cone, 24 to 36 inches tall (best for beginners)
- Option B: chicken wire cone over a sturdy center pole (best for very tall trees)
- Large woven basket or wide planter cover to match the photo
- Tulle in 5 colors (aqua, mint, pale yellow, blush pink, lavender)
- 6 inch wide tulle rolls work great
- 12 inch wide also works and builds volume faster
- White tulle for soft blending (optional but very helpful)
- Scissors and measuring tape or a quilting ruler
- Hot glue gun with plenty of glue sticks
- Straight pins or U pins (for foam cones)
- Floral wire or thin craft wire (for eggs and embellishments)
- Lightweight plastic or foam Easter eggs in pastel colors
- Small faux flowers and tiny spring picks (mini blossoms, buds, baby’s breath style)
- Ribbon for bows (sheer, satin, or gingham in a pale neutral)
- Small decorative nests (optional but matches the photo vibe)
- Tree topper base (optional)
- a small tulle pouf, a big bow, or a floral cluster
- Basket weighting materials
- floral foam bricks, crumpled paper, or a hidden sandbag
- Optional finishing helpers
- tacky glue diluted with water in a spray bottle for gentle shaping
- clear fishing line for floating egg placement
- a neutral fabric or linen tree skirt
Finished size and customization notes
A 30 inch cone gives a medium floor statement. A 36 inch cone creates the dramatic height shown in the photo, especially when placed in a wide basket. The basket should be wider than the cone base so the bottom tulle can billow out and look luxurious.
For the smooth rainbow ombre, plan each color zone before you glue. If you want a softer gradient, add a thin band of white tulle between colors and mix a few strips of the next shade into the previous zone.
Step by step instructions
Choose your structure and test fit the basket
Place your cone inside the basket and check the visual height. You want the cone to rise well above the rim so the tulle can drape and still show that airy tree silhouette. If your cone is loose, pack the basket with paper or foam to hold it stable. Visual checkpoint: you should be able to lightly tap the cone and it should not wobble.Mark your color transition zones
Use a pencil or a few tiny pins to mark horizontal bands for each color: aqua at the bottom, then mint, then yellow, then blush, then lavender at the top. Keep the bands slightly uneven and organic so the final look feels fluffy and layered rather than striped. Visual checkpoint: the bottom band should be the largest because the tree is widest there.Cut tulle strips for consistent ruffles
Cut strips 10 to 12 inches long. Shorter strips create tighter ruffles, longer strips create looser cloud folds. For a 30 to 36 inch cone, you will use a lot of strips, so cut in batches and keep stacks separated by color. If you are using 6 inch wide tulle, you can fold each strip once for extra fullness.Create your main ruffle units
Take one strip, pinch the center like a bow tie, then pinch again to make a small gathered bundle. This bundle is what you will glue. If using foam, you can also push a straight pin through the pinched center after gluing for extra hold. Visual checkpoint: each bundle should look like a small tulle puff with two or three soft loops.Start at the bottom with aqua and build outward volume
Begin gluing bundles at the base edge, slightly overhanging to mimic the photo’s dramatic airy skirt. Place bundles close together with minimal gaps. Angle some outward and some upward so the texture feels dimensional. Visual checkpoint: after one full circle, the base should look like a fluffy tutu edge.Fill upward in staggered rows
Work in rows, offsetting each new bundle over the seams of the row beneath it. Think like shingles, but soft. Avoid straight lines. If yours starts looking like stacked rings, rotate the cone as you work and place bundles randomly within the zone. Tip: keep stepping back every 10 minutes to confirm the silhouette stays cone shaped.Blend aqua into mint
When you reach the transition line, add a handful of white bundles, then alternate mint and aqua for a few inches. This keeps the ombre dreamy instead of abrupt. Visual checkpoint: the color should shift gradually, like cotton candy fading.Continue with mint, then blend into pale yellow
Mint should still read cool and airy. Build slightly less overhang than the base, because the tree is narrowing. When blending into yellow, mix in a few mint bundles into the first yellow row and a few yellow bundles into the last mint row.Add blush next for the warm spring center
Blush is the emotional focal point in the photo. Give this zone a touch more fullness by using a few extra bundles per row. If your blush looks too strong, soften with white bundles tucked behind it.Finish with lavender at the top and keep it airy
The top should be light and feathery. Use slightly smaller bundles or shorter strips to keep the cone tip crisp. Visual checkpoint: the top should look like a soft plume, not a heavy ball.Secure and refine the silhouette
Gently fluff the tulle with your hands. If any spots look thin, add bundles by tucking them into gaps. If any spots bulge too far, press them inward and add a small bundle above to redirect the shape.Add eggs in a tucked, floating way
Attach a short piece of floral wire to each egg using hot glue. Let it cool fully. Then insert the wire into the cone between tulle bundles. Aim for eggs that look nestled, not dangling. Place more eggs around the mid section and a few near the base, like the photo. Visual checkpoint: eggs should peek through like pastel surprises.Add tiny floral picks and nests
Use small blossoms and delicate sprigs, spaced lightly. For nests, nestle them deep into the tulle so only the rim and a couple eggs are visible. This creates that whimsical found in the garden feeling. Avoid over covering the ombre, because the color is the star.Tie bows and place them where the eye rests
Use a pale ribbon that reads soft against the tulle. Make two or three bows. Attach with hot glue or wire and tuck into the tulle. Visual checkpoint: bows should look like they grew out of the fluff, not pasted on top.Finish the base styling
Place the cone securely into the basket and add hidden weight inside the basket if needed. Add a linen tree skirt or neutral fabric puddle for that editorial look. If your room is bright, this soft base helps the pastel ombre glow.
Troubleshooting common mistakes and fixes
- My tree looks striped instead of ombre
Add a blending band: mix white bundles plus a few bundles from both colors across a 3 to 5 inch zone. Also scatter a few next color bundles earlier than you think you should. - I can see the cone through the tulle
Your bundles are too far apart or too small. Add more bundles in the gaps, focusing on the darkest visible areas. Foam cones especially need coverage near the seams. - The base looks flat and sad
Overhang is key. Add a row of bundles that extend past the base edge, and angle them outward. Use longer strips at the base for a fuller tutu effect. - Eggs keep falling out
Use wire stems, not just glue. If your cone is foam, you can also insert toothpicks into the egg, glue, then push the toothpick into the foam. - The top looks bulky
Switch to shorter strips and smaller bundles near the tip. Remove one or two overly large bundles and replace with smaller ones. - Hot glue is showing
Hide glue spots by tucking a tiny tulle pinch over the glue while it is still warm, or add a small floral pick to camouflage.
Finishing details
Fluff the tree one last time and rotate it slowly in good light. You want the silhouette to read as a cone from across the room, with a soft ruffled surface up close. For a slightly more sculpted look, lightly mist diluted tacky glue onto the outermost tulle and press gently to shape, then let dry. Keep it subtle so the tulle stays airy.
If you plan to store it, lift it by the cone, not the tulle. Store in a large bag or box so the ruffles do not compress too much.
Optional upgrades that elevate the look
- Add a strand of faux pearl garland tucked deep into the tulle for sparkle without glare.
- Add mini fairy lights hidden inside the cone so the pastel eggs glow at night.
- Add a removable topper bow so you can swap colors each year.
- Line the basket rim with a soft ribbon wrap to make the base feel finished.
Shop Similar
- Pastel tulle rolls in aqua mint yellow pink lavender
- Extra large foam floral cone for a statement tree
- Woven basket planter cover wide round
- Lightweight pastel Easter eggs for decorating
- Mini faux spring flower picks tiny blossoms
- Sheer ribbon for soft bows pale neutral
Style It With
Whisper Mint Tulle Easter Tree with Pink Ribbon Garlands — Step by Step Tutorial
What you’re making
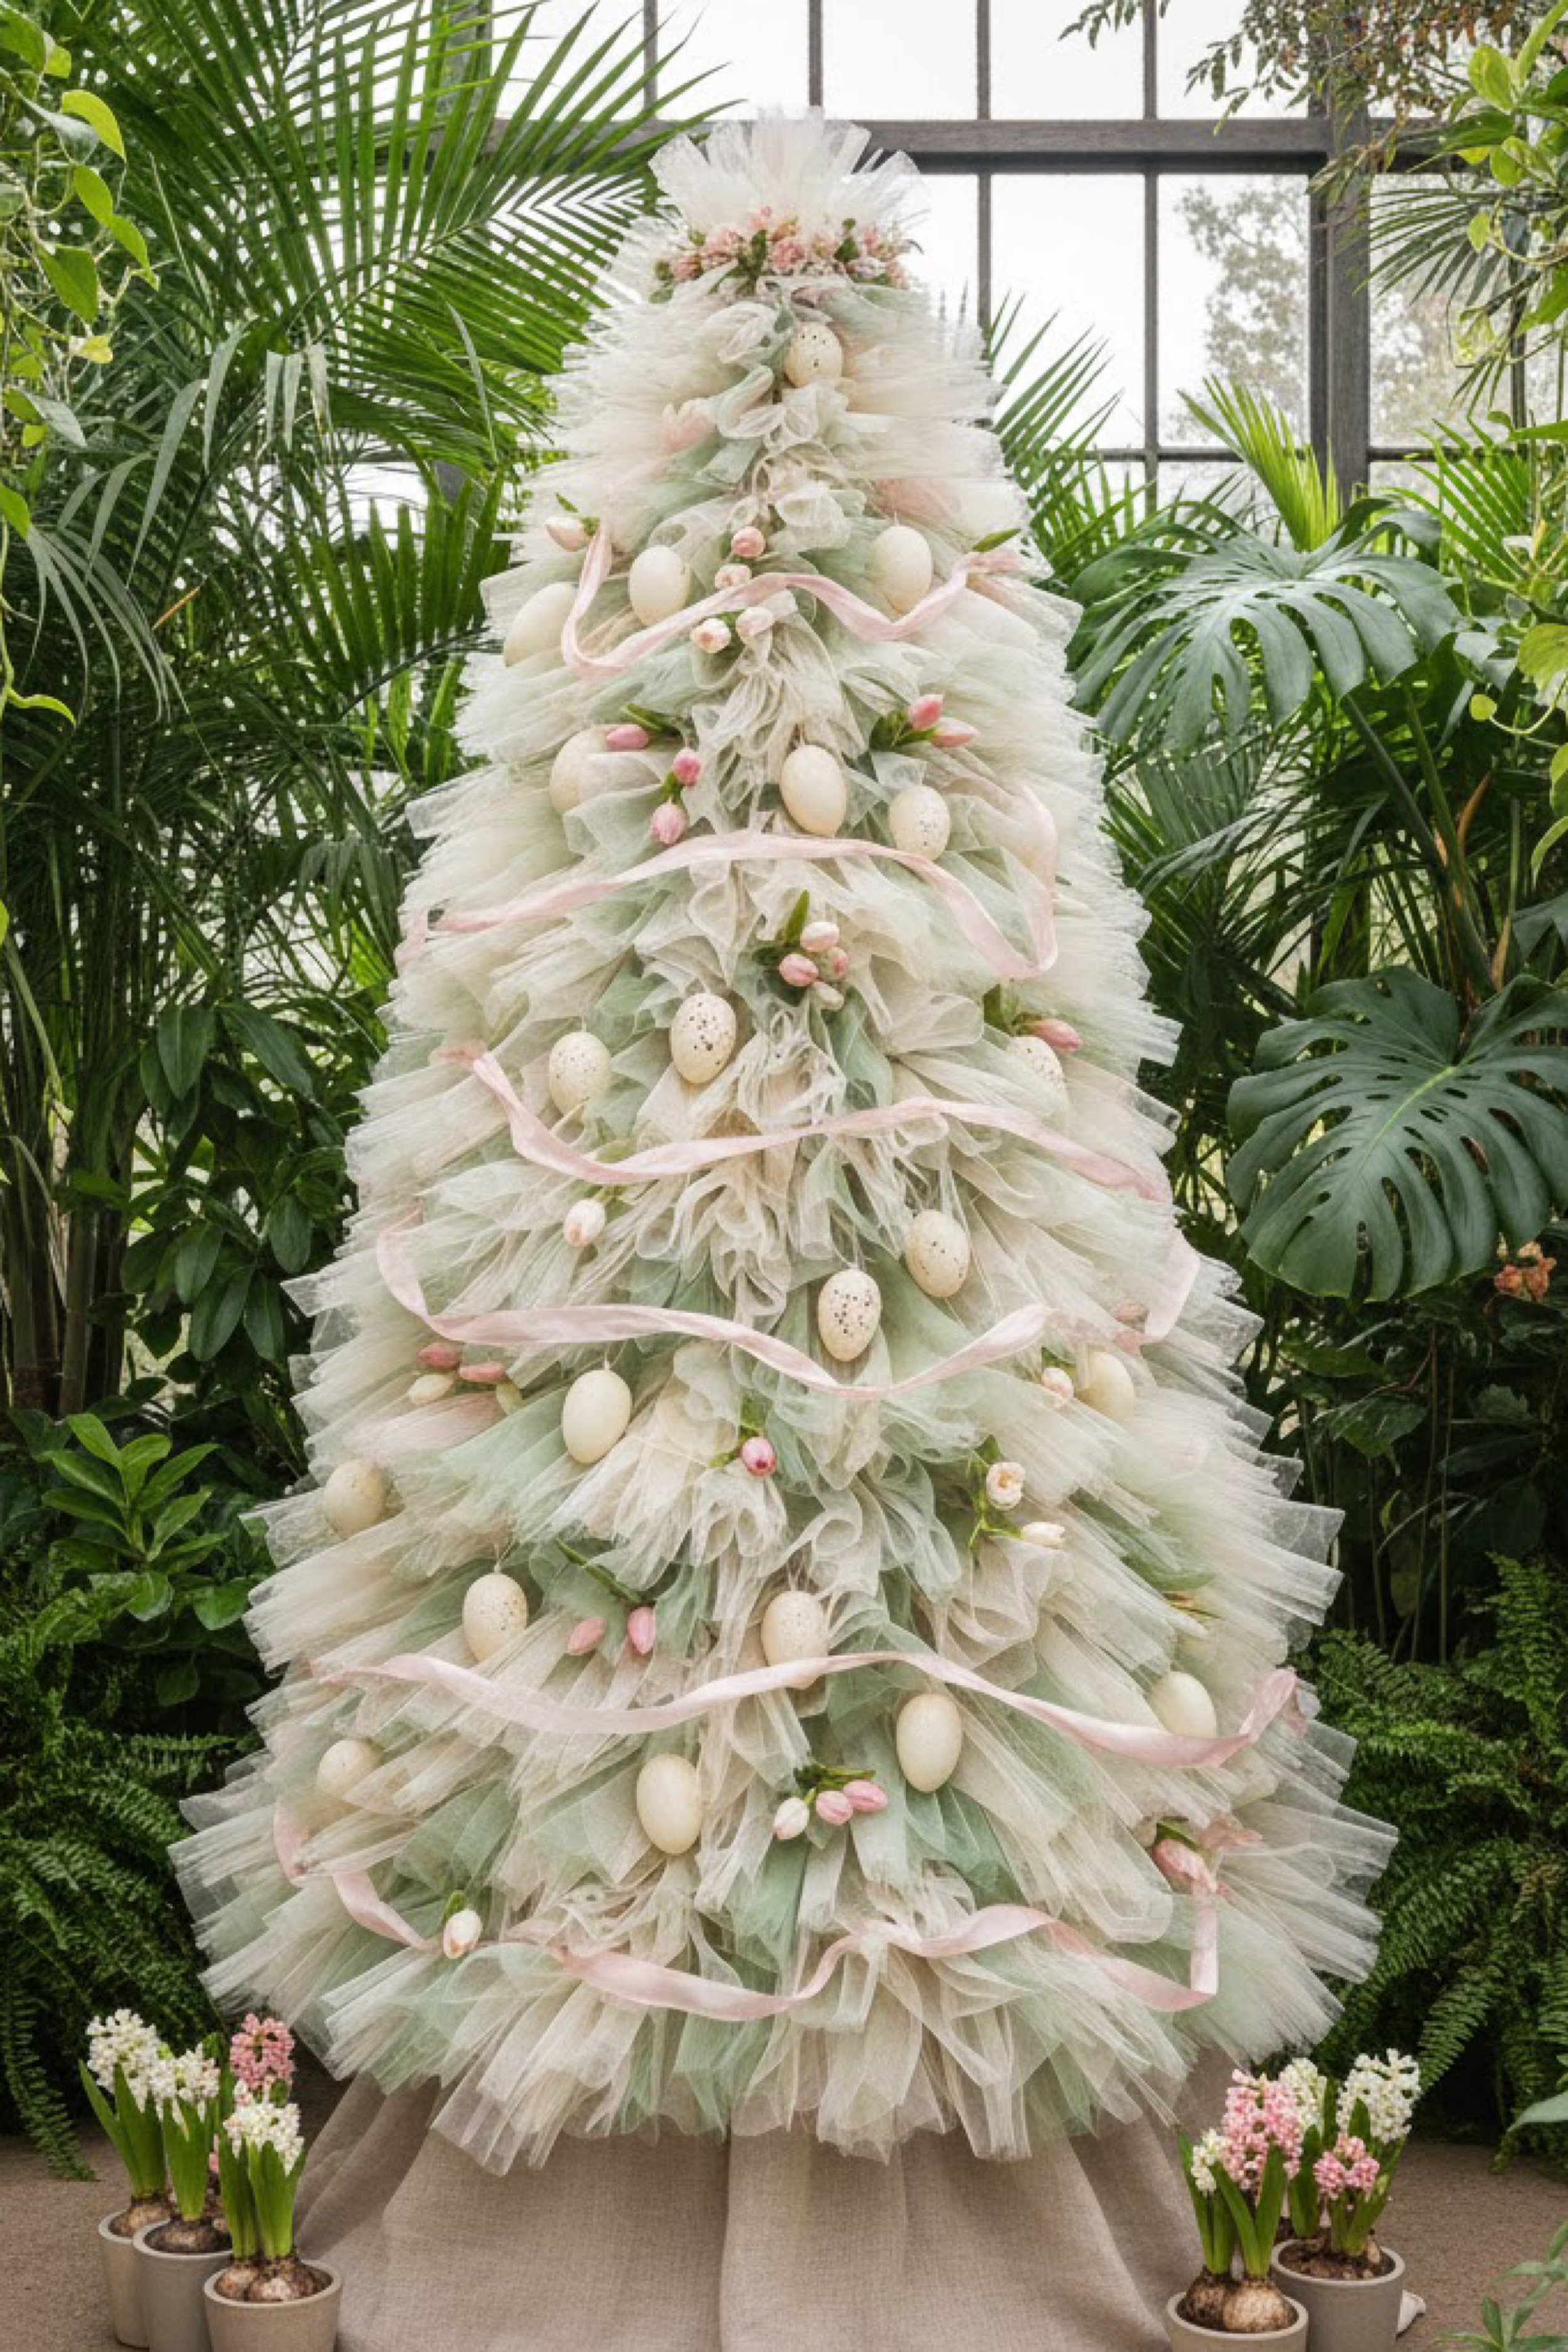
You are making a tall, airy Easter tulle tree in soft mint and ivory, decorated with creamy eggs and blush pink ribbon garlands that swirl around the tree in loose waves. The overall mood is greenhouse spring, light, fresh, and elegant. The magic of this look is the gentle color layering and the ribbon placement that feels effortless, not tight or uniform.
This guide teaches you how to build that fluffy cone, then add garlands and eggs so they look nestled into the tulle, like the photo.
Materials and tools
- Cone base options
- Option A: foam floral cone, 30 to 42 inches tall
- Option B: wire cone frame wrapped with batting or mesh (for extra height)
- Tulle in ivory and pale mint
- 6 inch wide tulle rolls are easiest to handle
- 12 inch wide builds volume faster
- Optional: a small amount of blush tulle for subtle warmth near the top
- Hot glue gun and glue sticks
- Straight pins or U pins (especially if using foam)
- Scissors and measuring tape
- Blush pink ribbon
- satin ribbon for shine
- sheer ribbon for softness
- Lightweight decorative eggs in ivory and speckled cream
- Small faux buds that resemble tulips or spring berry sprigs
- Floral wire or clear fishing line
- Optional topper materials
- small floral cluster
- a tulle puff
- a mini nest
- Basket or base covering
- a simple woven basket
- or a neutral fabric wrap around the cone base
- Optional: pearl bead garland for extra sweetness
Finished size and customization notes
A 36 inch cone gives the dramatic height shown. Because this look is pale and airy, the cone coverage needs to be full so the base does not show through. Plan on extra tulle compared to darker designs.
You can shift the palette warmer by adding a few blush bundles near the top. You can shift it cooler by using more mint and less ivory. Either way, keep the overall effect soft and misty.
Step by step instructions
Stabilize the cone and prep the base
Place your cone in the basket or on its stand. If the basket is taller, pack the inside with foam bricks or paper so the cone sits high and stable. Visual checkpoint: the cone should feel planted, like a floor lamp, not like it will tip.Plan the color layering
This design is not a strict ombre. Instead, it is a misty blend. Mark three zones lightly: lower third mostly ivory with mint peeking, middle third balanced, top third slightly more mint and delicate. Visual checkpoint: when you step back, you should not see obvious stripes.Cut tulle strips
Cut strips 10 inches long for the lower half and 8 inches long for the upper half. Shorter strips near the top keep the silhouette crisp. Keep ivory and mint in separate stacks.Make fluffy bundles
Pinch each strip at the center to create a gathered puff. If you want extra volume, twist the pinch once before gluing. Visual checkpoint: each bundle should look like a tiny cloud.Start at the bottom with a soft ivory foundation
Glue ivory bundles around the base edge, allowing a gentle overhang. Add a mint bundle every 4 to 6 bundles, tucked slightly behind so it reads like shadow and depth rather than a stripe. Visual checkpoint: the bottom should feel creamy and full.Build upward in staggered rows
Continue gluing bundles in offset placement. Avoid lining up the pinches. The goal is a natural ruffled surface. Every few rows, add a mint cluster, not a single mint bundle, so the mint reads as a soft wash.Create the pale mint veil in the middle
In the middle third, alternate two ivory bundles and one mint bundle for a stretch, then switch to three ivory and one mint. This variation prevents patterns. Visual checkpoint: the mint should look like a fog layer, not a checkerboard.Refine fullness before decorating
Step back and look for thin spots. Pale designs show gaps more easily. Add bundles wherever the cone is visible or where the surface looks flat. Tip: focus on the sides that face the room most, but still keep the back decent if it will be seen.Add the blush ribbon garlands in loose waves
Cut long lengths of ribbon. Start near the top and pin the ribbon into the tulle with straight pins or U pins, then drape it in a gentle wave and pin again. Continue spiraling downward, leaving space between swirls. You want the ribbon to appear to float, not to be pulled tight. Visual checkpoint: the ribbon line should look relaxed, like a ribbon caught in a breeze.Secure the ribbon invisibly
Once the placement looks right, add a tiny dot of hot glue at each pin point and press the ribbon into the tulle. Remove pins after glue cools if you want. If you worry about glue showing, tuck a small tulle pinch over each glue point.Place eggs so they look nestled, not hanging
Attach floral wire to eggs with hot glue. Insert the wire into the cone between bundles. Place eggs along the ribbon path so it looks like the ribbon is weaving around them. Mix speckled and solid eggs for depth. Visual checkpoint: eggs should peek out at different depths, some deeper in the fluff.Add small tulip like buds and tiny clusters
Use mini floral picks and tuck them near ribbon turns and egg clusters. Keep it restrained so the tree stays airy. The photo shows delicate detail, not a dense floral tree.Finish the top cluster
Create a small topper by bunching mint tulle into a puff and adding a few buds. Or make a tiny nest with one speckled egg. Place the topper slightly forward so it photographs nicely.Final fluff and silhouette check
Gently fluff the tulle outward, especially around the ribbon line so the ribbon does not sink into the surface. Rotate the tree and confirm it reads cone shaped from every angle.
Troubleshooting common mistakes and fixes
- The tree looks too green or too white
If too green, add more ivory bundles over the surface, especially in the middle. If too white, tuck mint bundles deeper in the layers, then add a few mint bundles on top near the upper third. - Ribbon looks messy or too tight
Remove the ribbon and repin with longer waves. The wave should have a slow curve. If it looks tight, you pinned too frequently. Use fewer anchor points. - Eggs look like they are stuck on
Push them deeper by inserting wire farther in. Then fluff tulle around the egg so it looks cradled. - Cone shows through in bright light
Add a backing layer. You can wrap the cone in a layer of batting or even a layer of ivory tulle before adding bundles. - Top looks blunt
Use shorter bundles near the tip. Add a small vertical puff at the very top to elongate the silhouette.
Finishing details
If you want the greenhouse softness, keep the finish matte. Avoid glitter sprays. For storage, wrap the tree loosely in a large bag so the ribbon does not crease. If ribbon creases happen, gently steam the ribbon away from the tulle, not directly on it, and let it relax.
Optional upgrades that fit this look
- Add a thin pearl garland tucked deep into the tulle, appearing in small peeks.
- Add a few tiny bows at ribbon anchor points for extra sweetness.
- Add a fabric skirt in oatmeal linen for an editorial base.
- Add micro fairy lights inside the cone so eggs glow softly at night.
Shop Similar
- Mint and ivory tulle rolls for a soft spring tree
- Extra tall foam cone for large floor décor
- Blush pink ribbon spool satin or sheer
- Speckled decorative Easter eggs lightweight
- Mini tulip picks and spring bud stems
- Pearl bead garland for decorating trees
Style It With
Champagne Ivory Tulle Easter Tree with Pearls and Eucalyptus — DIY Guide
What you’re making
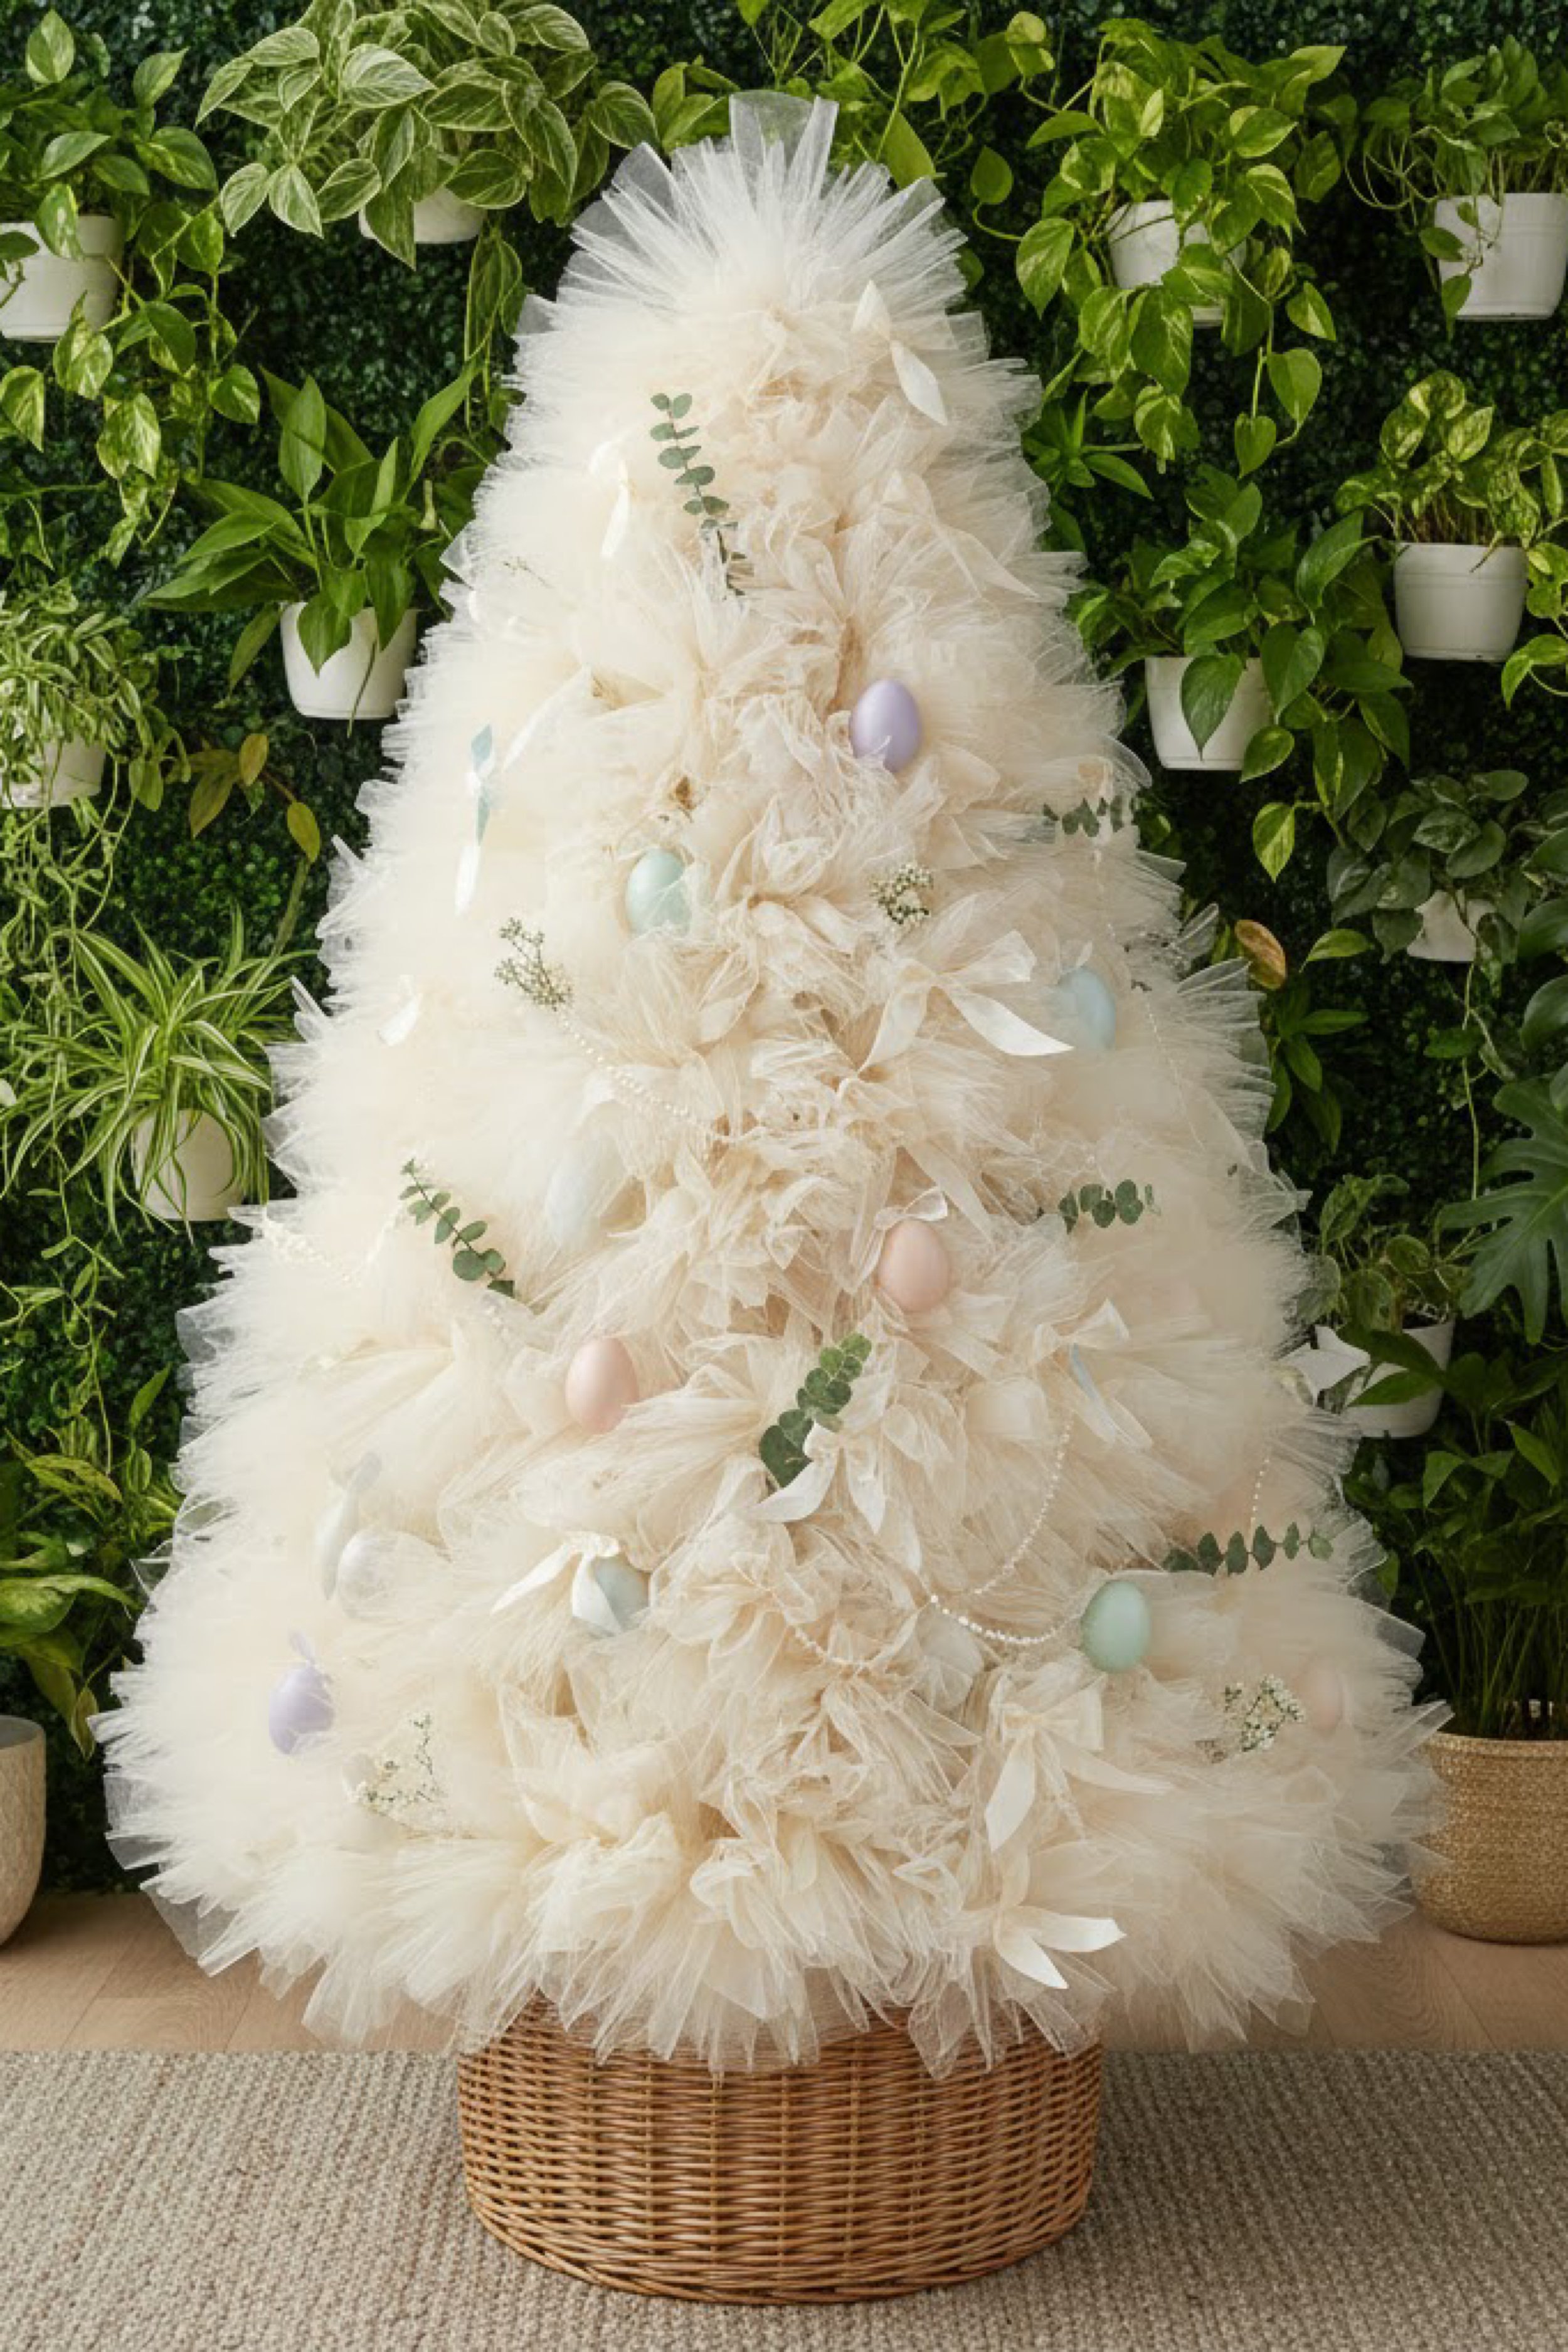
You are crafting a creamy champagne and ivory tulle Easter tree that feels airy, luxe, and neutral, styled against greenery for maximum contrast. The tree is full and feathery, with pastel eggs tucked in like little surprises, plus soft pearl strands and eucalyptus sprigs that add a modern botanical finish. It sits in a woven basket and looks like an editorial spring centerpiece, not a novelty holiday item.
This tutorial is all about building that plush neutral texture without losing the cone shape, then adding pearls and greenery so everything looks integrated, not layered on top.
Materials and tools
- Foam cone, 30 to 42 inches tall, or a sturdy wire cone frame
- Woven basket base or planter cover
- Tulle in ivory and champagne
- a mix of matte and slightly shimmery tulle looks especially rich
- Optional: a small amount of white organza ribbon for subtle loops
- Hot glue gun and glue sticks
- Scissors and measuring tape
- Straight pins or U pins
- Faux eucalyptus sprigs or similar soft greenery
- Lightweight pastel eggs (soft blue, lavender, blush, cream)
- Pearl garland strands or faux pearl bead chain
- Floral wire and wire cutters
- Optional: clear fishing line for floating pearl drapes
- Optional: small sheer bows in ivory
- Optional: a topper puff or small floral cluster
Finished size and customization notes
A 36 inch cone gives the tall silhouette shown. Neutral palettes can read flat if you do not add depth, so plan to mix champagne and ivory throughout rather than separating them into distinct zones. The goal is a creamy blend with subtle variation.
If your room is dim, use more ivory. If your room is bright, champagne will glow and look warm, like the photo.
Step by step instructions
Set up the base and stabilize the cone
Place your cone into the woven basket. Pack the basket with foam bricks or crumpled paper to prevent tipping. If the basket is shallow, add hidden weight. Visual checkpoint: you should be able to gently rotate the cone without the basket sliding.Plan a blended color approach
Instead of bands, think marbling. Decide that the lower third will be slightly more champagne, the upper third slightly more ivory, and the middle mixed evenly. Mark very light guide points so you stay balanced.Cut tulle strips for a feathery texture
Cut strips 9 to 11 inches long. If your tulle is stiff, cut closer to 9 inches. If it is soft, 11 inches is fine. Cut both colors and keep them in separate piles, plus make a mixed pile where you alternate colors every few strips.Create airy bundles that look like petals
Pinch each strip at the center, then fan the ends slightly so the bundle looks like a little flower. This petal like bundle creates the fluffy feather texture shown.Start at the bottom and build a full skirt
Glue bundles around the base edge, letting some extend beyond the cone so the tree looks lush. Use mostly champagne with ivory sprinkled in. Visual checkpoint: the base should already look full before you move upward.Work upward in offset placement
Continue in staggered rows. Alternate colors often. If you do three champagne bundles in a row, do two ivory next. Keep stepping back to confirm the cone silhouette stays clean.Add depth by tucking bundles behind others
Every few rows, glue a bundle slightly deeper, behind the outer surface. This creates shadow and dimension, which is important in a neutral design. Visual checkpoint: when you look at the side, you should see layers, not just a surface.Refine the overall surface before embellishing
Neutral tulle can show glue if you rush. If you see shine spots, cover them now with tiny tulle pinches. If you see the cone, fill it now.Add pastel eggs in an understated way
This look uses eggs sparingly. Attach wire to each egg with hot glue and let it cool. Insert eggs at different depths, some deeper inside the tulle and a few closer to the surface. Keep spacing airy. Visual checkpoint: eggs should feel discovered, not arranged in a pattern.Add eucalyptus sprigs for botanical movement
Cut eucalyptus into small sections. Insert stems between bundles, angled outward slightly so they read like soft branches. Place more near the mid and upper sections. Keep it balanced so one side does not look heavy.Drape pearl garlands like soft jewelry
The pearls should look like they are caught in the fluff. Start by anchoring one end deep in the tulle with hot glue. Then drape the strand in a gentle curve and anchor again. Repeat with one or two strands. If you want a more floating drape, use clear fishing line to suspend the pearls and then tuck the line into the tulle.Add subtle ribbon loops if desired
If your tree needs a little more detail, add a few small loops of white organza ribbon tucked in. Keep it minimal so the pearls stay the hero.Finish the top with a soft plume
Make a small topper puff by gathering a handful of ivory tulle strips into a tight bundle and gluing it at the tip. Add a tiny eucalyptus sprig or one small egg just below it.Final fluff and silhouette pass
Rotate the tree. Gently pull some outer tulle outward to create that cloud edge. If one side is flatter, add 5 to 10 bundles to correct it. Visual checkpoint: the tree should look full from every angle, with pearls glinting softly and eucalyptus giving movement.
Troubleshooting common mistakes and fixes
- It looks like a wedding tulle tree, not Easter
Add more pastel eggs, but keep them tucked. Add one small nest detail near the mid section. The Easter cues should be subtle but clear. - The pearls disappear
Use slightly larger pearl garland, or place pearls closer to the surface in a couple sections. Also ensure your tulle is not too busy where pearls sit. - Greenery looks stuck on
Insert stems deeper and fluff tulle around the entry point. Angle greenery outward so it looks like it is emerging. - The tree looks yellow
Your champagne may be too warm. Add more ivory bundles over the surface and reduce warm lighting near the tree. - The cone shape got lost
Remove a few overly long bundles in the middle, then add smaller bundles above them to guide the shape inward.
Finishing details
For the soft editorial finish, keep everything matte and airy. If the tree will be near a window, you can gently mist diluted tacky glue on the outer surface to hold the fluff in place, but keep it very light so the tulle does not stiffen into hard folds.
For storage, cover pearls and greenery first with tissue paper, then bag the tree so nothing snags.
Optional upgrades that elevate this look
- Add a second tone of greenery, like soft fern tips, for more texture.
- Add micro warm white fairy lights inside the cone for evening glow.
- Add a basket liner in linen for a finished base edge.
- Add one statement bow in ivory near the lower third, then keep the rest minimal.
Shop Similar
- Champagne and ivory tulle rolls for neutral décor
- Large foam cones for tall craft trees
- Faux eucalyptus stems for decorating
- Pearl garland strands for décor draping
- Pastel decorative eggs lightweight set
- Woven basket planter cover natural
Style It With
Pastel Garden Tulle Easter Tree Loaded with Florals and Nests — How To Guide
What you’re making
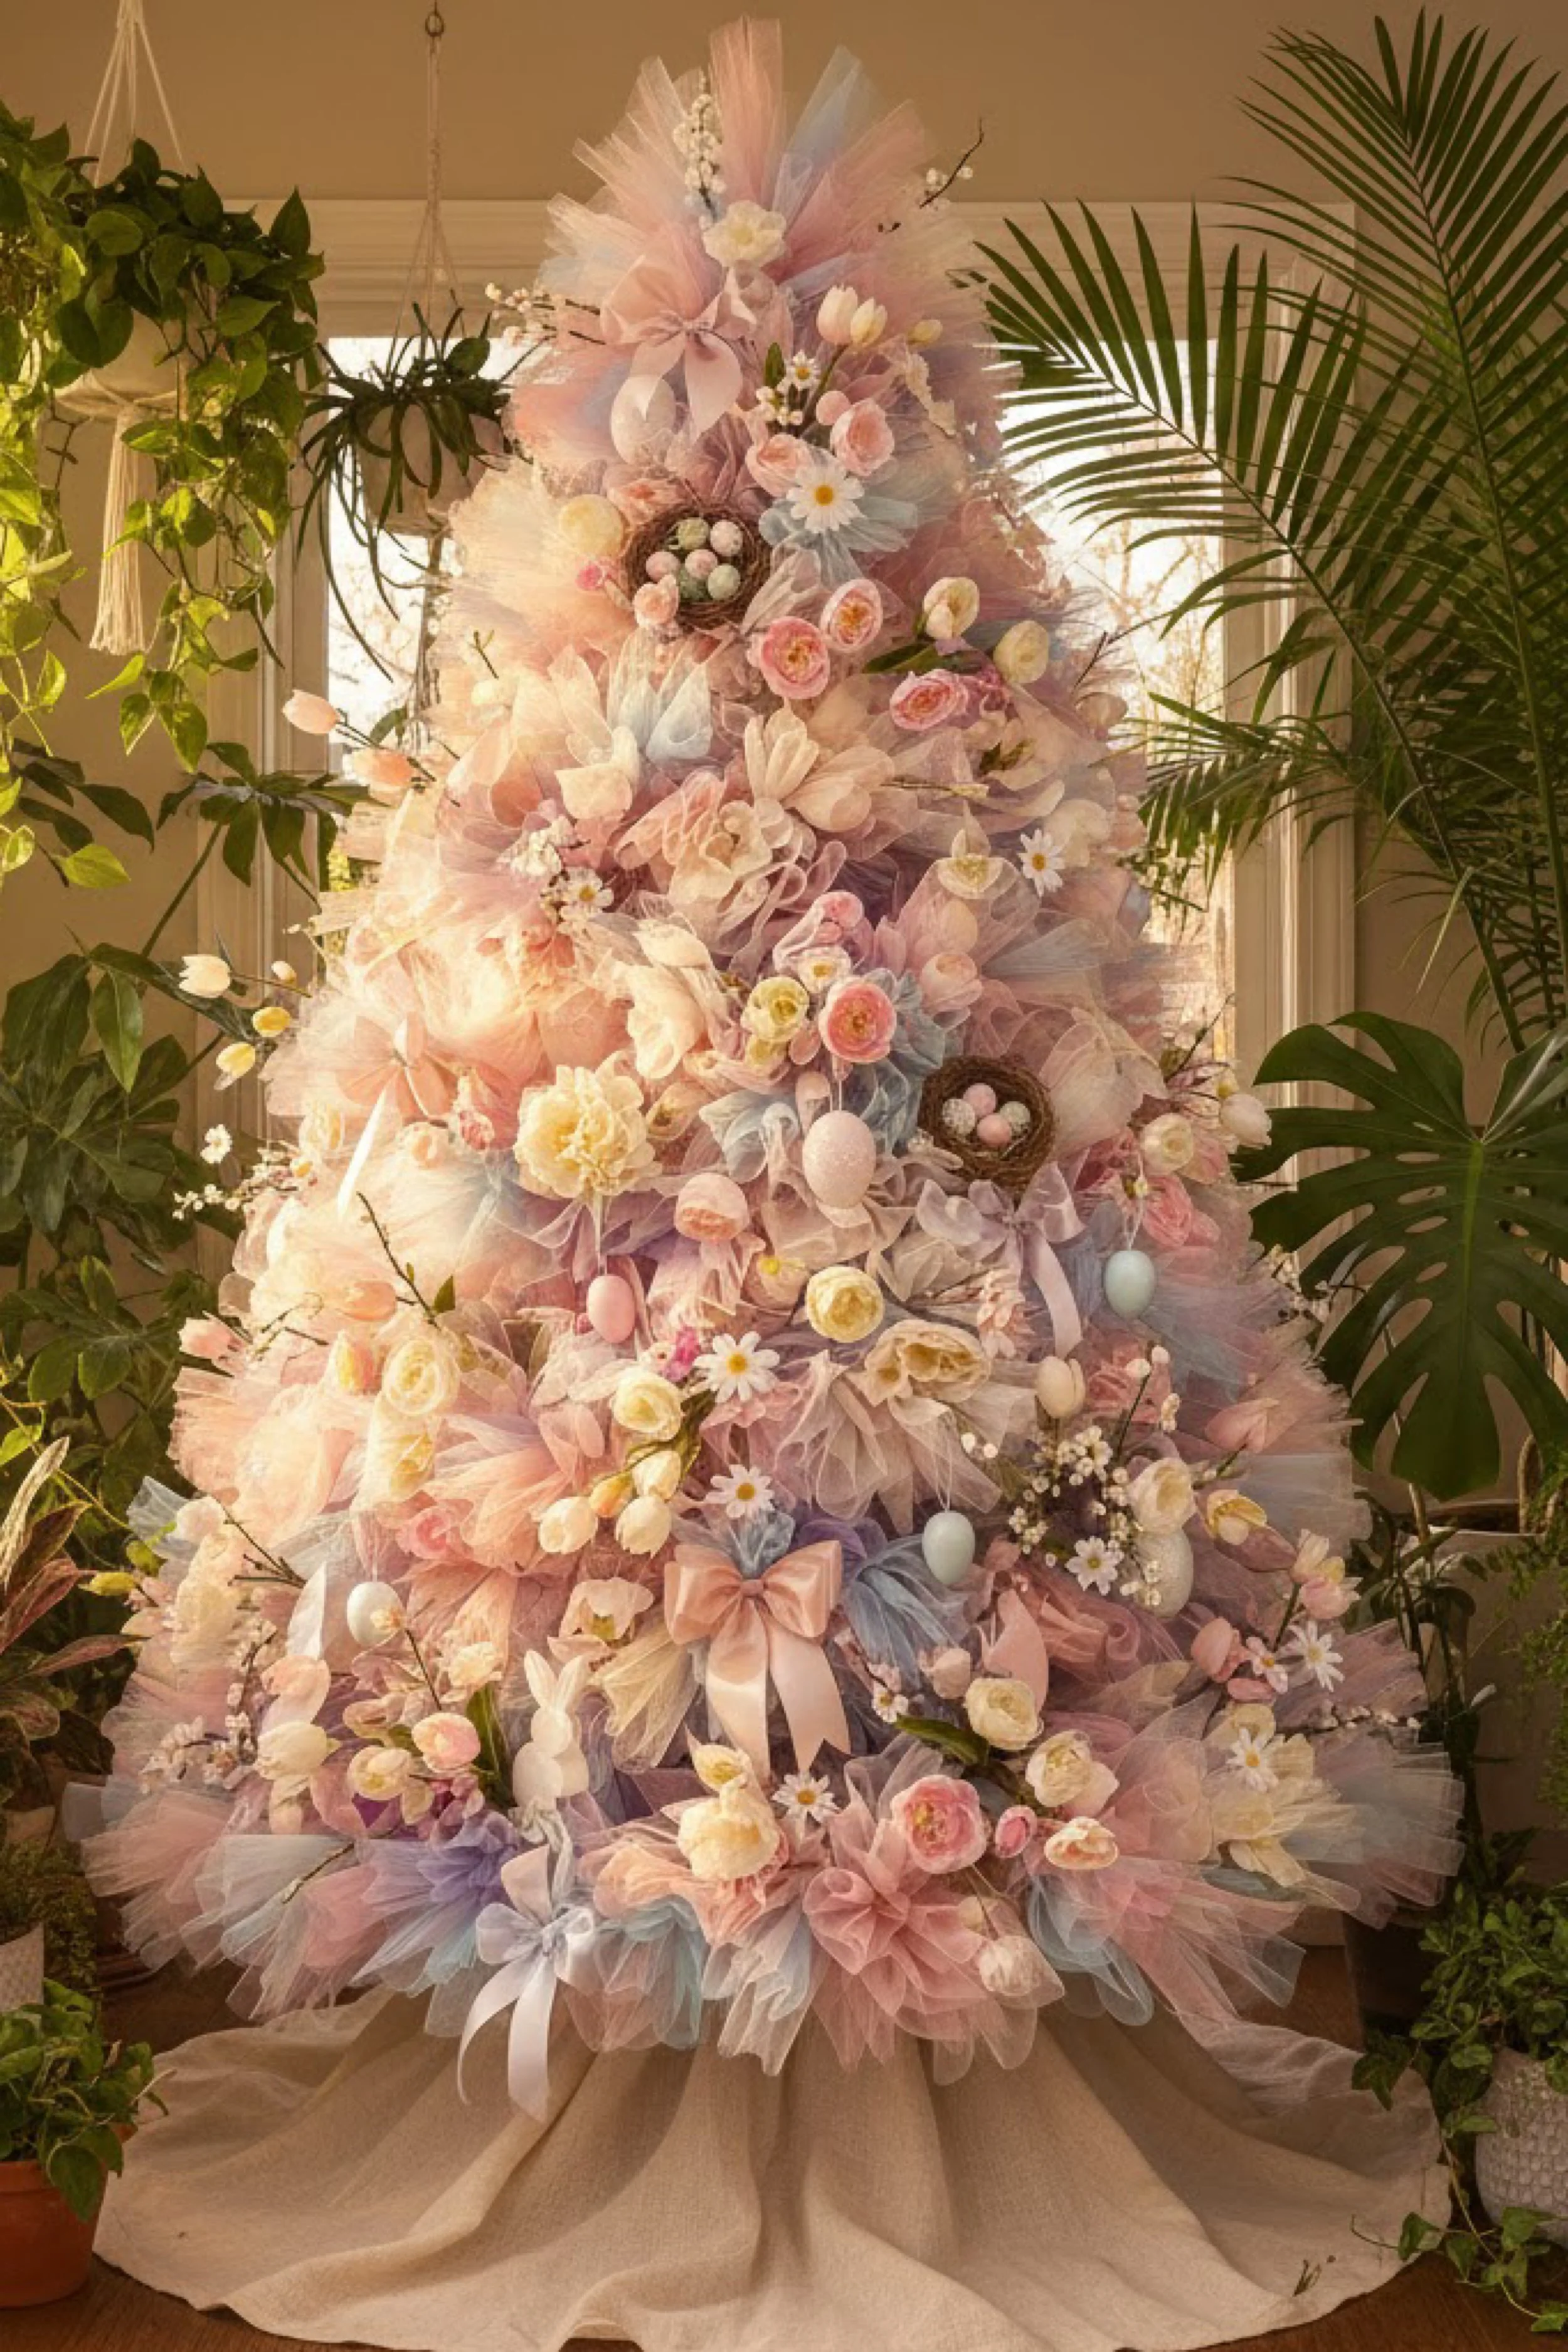
You are building a maximal, dreamy Easter tulle tree that looks like a pastel garden exploded into a cone shaped sculpture. This version is packed with blush, lavender, buttercream, and soft blue tulle, then layered with spring florals, bows, little nests, and pastel eggs. It is romantic, abundant, and intentionally extra, like the photo where every glance finds a new detail.
The key to this look is structure and pacing. You build the tulle first so it can support weight, then you place florals and nests in clusters so it looks lush but still balanced.
Materials and tools
- Cone base
- foam cone 30 to 42 inches tall, or wire cone wrapped in batting
- Basket base plus optional linen fabric drape for the floor
- Tulle in multiple pastel shades
- blush pink, lavender, pale blue, buttercream, soft peach
- optional: a touch of white tulle to soften transitions
- Hot glue gun and lots of glue sticks
- Straight pins or U pins
- Scissors and measuring tape
- Faux florals
- mixed spring blooms, small roses, ranunculus style, daisies
- filler sprigs like baby’s breath style or tiny buds
- Decorative nests in small sizes
- Lightweight pastel eggs
- Ribbon for bows
- satin ribbons in blush and ivory
- optional: sheer ribbon for softer loops
- Floral wire, wire cutters
- Optional: foam floral picks or wooden skewers for heavier embellishments
- Optional: mini bunny or chick accent pieces (keep it subtle)
Finished size and customization notes
This look is best at 36 inches or taller because the volume and detail need room to breathe. If you go shorter, scale down the florals and use fewer nests so it does not feel crowded.
Choose a dominant pastel, then use two supporting pastels, then add small pops. In the photo, blush and lavender feel dominant, with soft blue and buttercream supporting.
Step by step instructions
Stabilize the cone in the basket and add a fabric puddle base
Place the cone into the basket and secure it. Add a linen cloth around the base for that editorial draped look. Visual checkpoint: the basket should look like a planter base, with the fabric acting like a soft stage.Map your pastel placement loosely
This is not an ombre. It is a marbled pastel blend. Decide where you want heavier blush and lavender, and where you want lighter blue and buttercream. Mark a few guide spots.Cut tulle strips for maximum fluff
Cut strips 10 to 12 inches long. For this maximal look, longer strips create bigger ruffles. Cut big piles in each color.Create full bundles and double some for extra depth
Pinch at center and twist slightly to create a fuller puff. For every third bundle, stack two strips together before pinching so some areas become extra plush. Visual checkpoint: you should see a mix of medium puffs and extra full puffs.Build the base with the lightest colors first
Start with pale blue and buttercream around the bottom, letting them overhang. This creates a bright foundation that makes the entire tree glow. Fill the base thoroughly because it will support later decoration weight.Add blush and lavender in large areas, not tiny sprinkles
As you move upward, begin placing blush bundles in clusters and lavender bundles in clusters. This prevents a confetti effect and gives that garden abundance. Visual checkpoint: from five feet away, you should see soft color clouds, not speckles.Layer tulle so it can hold florals
Every few rows, glue a small bundle deeper inside the tulle layers. This creates internal structure where you can tuck stems later. Also add more glue than you think you need at the pinch points for strength.Refine the silhouette before adding décor
This is the most important pause. Step back and ensure the tree is cone shaped. If the middle is bulging, use smaller bundles there and add slightly more above to pull the shape inward. If the top looks thin, add more bundles now. Visual checkpoint: it should look beautiful even with no decorations.Create floral clusters on wire picks
Before placing flowers, make mini clusters. Combine one medium bloom plus two smaller blooms plus a filler sprig. Wrap stems with floral wire. Make 10 to 15 clusters, depending on tree size. Clustering keeps the placement intentional.Place the largest floral clusters first
Insert clusters into the tulle at the upper third and mid section, slightly angled outward. Secure with hot glue at the entry point, then fluff tulle around it. Visual checkpoint: flowers should look like they are growing out of the tulle, not sitting on top.Add nests as focal surprises
Choose 3 to 5 nests. Nestle them deep into the tulle so only the rim shows, then add a few eggs in each nest. Place nests at different heights, not evenly spaced. This creates that storybook feel.Add eggs in between floral moments
Use wire stems on eggs for stability. Place eggs near florals and near ribbon bows so the eye keeps traveling. Do not place eggs in perfect lines. Visual checkpoint: eggs should feel scattered in a curated way.Add bows and ribbon loops to unify the palette
Make a few bows in blush and ivory. Add one larger bow around the mid area, and smaller ones lower. You can also create loose ribbon loops tucked into the tulle to add movement. Secure with glue and a hidden pin if needed.Add delicate filler throughout
Now add tiny daisies, bud sprigs, and baby’s breath style filler. This is what makes the tree feel full and garden like. Keep the filler light and airy. If it starts feeling crowded, stop and step back.Finish the top with a statement cluster
The topper should feel like a bouquet crown. Use a dense floral cluster, a bow, and a small nest if you want. Keep it slightly forward facing for photos.Final fluff and balance check
Rotate the tree. Look for heavy spots where too many florals sit together. If one side is too busy, move a cluster to the opposite side. Visual checkpoint: from the front, you should see a layered mix of tulle, florals, eggs, and bows with no empty voids.
Troubleshooting common mistakes and fixes
- It looks messy instead of lush
Use clustering. Remove scattered single flowers and regroup them into intentional clusters. Also reduce the number of different flower types so it feels curated. - Decorations feel like they are falling out
Use wire. Wrap stems and insert deeper. Add a dot of glue at the entry point, then fluff tulle around it. - The tulle looks flat under the weight
Add more tulle bundles behind and around heavy clusters. For heavy blooms, support with a wooden skewer pushed into foam and glued, then attach the cluster to the skewer. - Color palette feels muddy
Too many mid tones can blur together. Add more pale blue or ivory tulle in a few areas to brighten and separate colors. - Tree looks wide and squat
Your base overhang may be too large. Reduce overhang by tucking some bottom tulle inward, and add a few bundles higher up to elongate the silhouette.
Finishing details
Because this tree is loaded with décor, storage matters. Wrap floral clusters with tissue and store upright if possible. If you must lay it down, support the sides so flowers do not crush. For extra longevity, you can lightly mist the outer tulle with diluted tacky glue to help it hold its airy shape, but avoid soaking.
Optional upgrades that make it even more editorial
- Add micro fairy lights hidden inside for a soft glow through the florals.
- Add a few faux butterfly accents perched near flower clusters.
- Add pearl strands tucked deep in the tulle for subtle sparkle.
- Add a ribbon wrapped basket rim to make the base feel finished.
Shop Similar
- Assorted pastel tulle rolls for extra fluffy décor
- Large foam cone for a tall statement craft tree
- Spring faux flower bundles mixed pastel blooms
- Decorative mini nests for Easter tree styling
- Pastel decorative eggs lightweight variety pack
- Ribbon spools blush ivory satin sheer
Style It With
Minimal Icy Blue and Ivory Tulle Easter Tree with Soft Egg Ornaments — Make It Yourself Tutorial
What you’re making
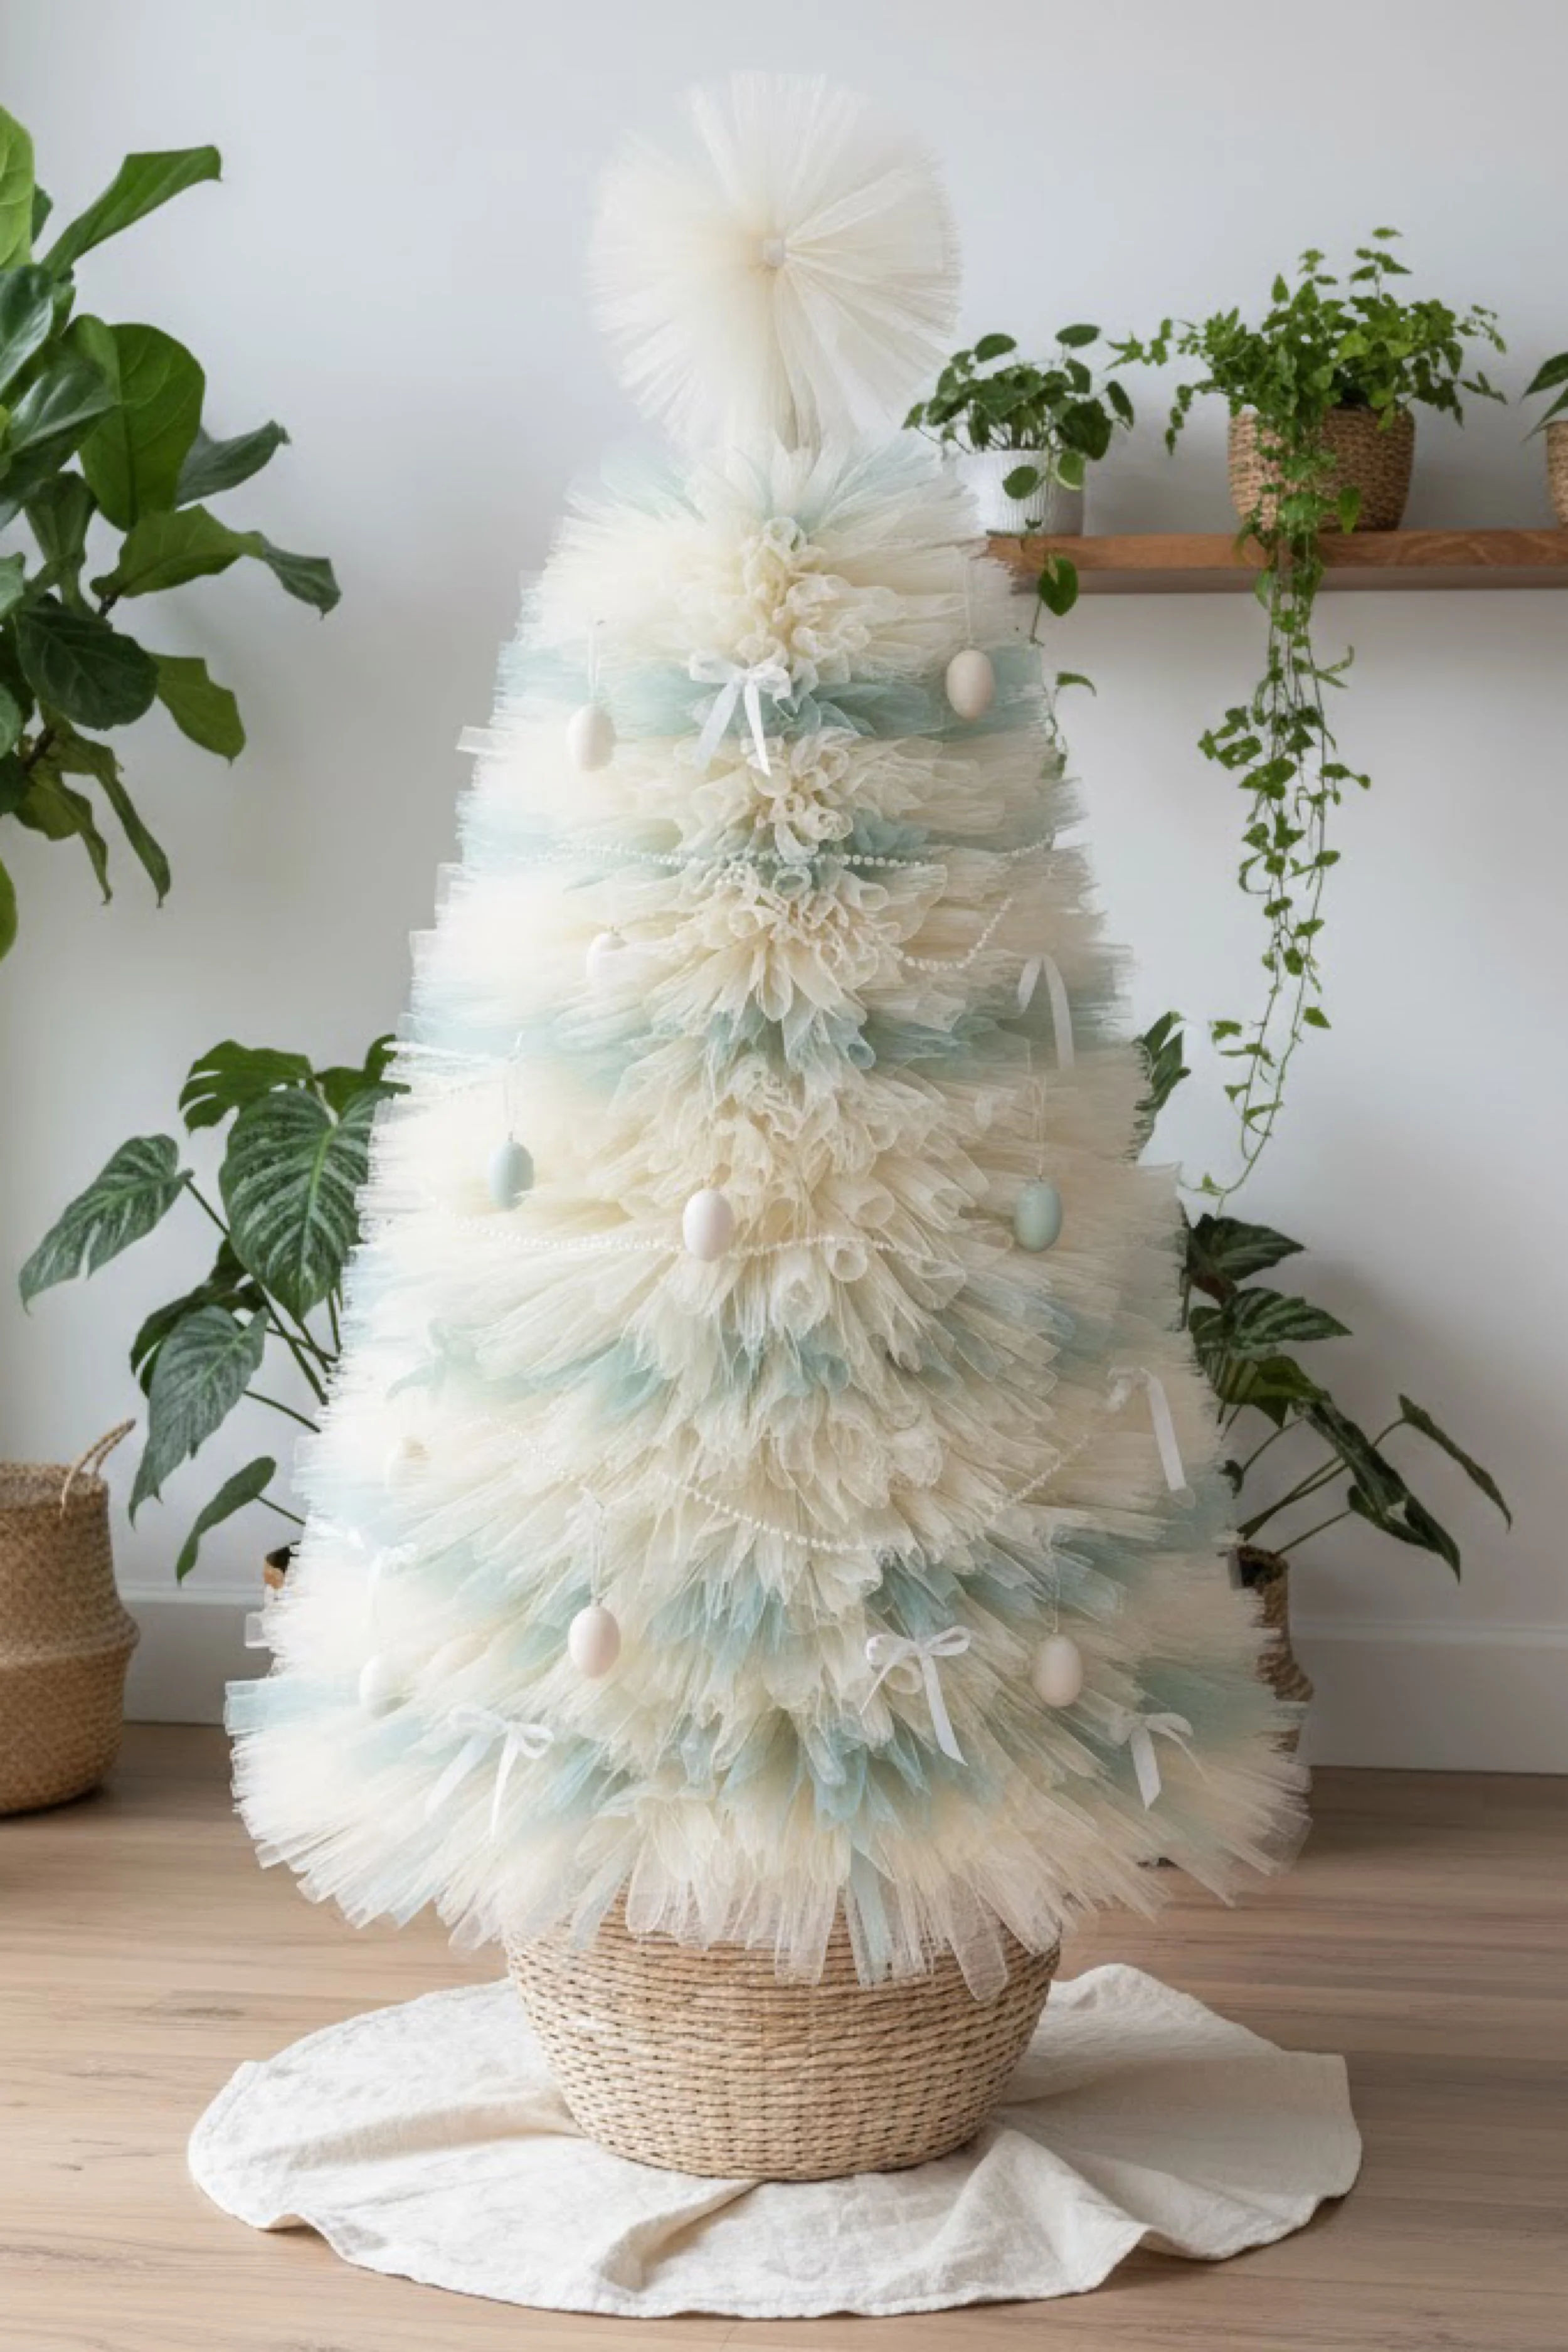
You are creating a clean, minimalist Easter tulle tree in icy pale blue and ivory, with gentle layering that feels modern and calm. The design is intentionally airy with lots of light, finished with a few simple egg ornaments, tiny white bows, and subtle pearl strands. The topper is a soft tulle pom that looks like a fluffy bloom. It sits in a woven basket with a neutral fabric base, giving the whole piece a serene, Scandinavian spring vibe.
This tutorial focuses on achieving that smooth, feather light surface and keeping the decorations restrained so it looks elevated, not busy.
Materials and tools
- Foam cone, 30 to 40 inches tall
- Woven basket planter cover and neutral fabric for the base
- Tulle in ivory and very pale blue
- optional: a hint of mint for extra depth
- Hot glue gun and glue sticks
- Scissors and measuring tape
- Straight pins or U pins
- Lightweight eggs in soft blue and ivory
- Thin ribbon for tiny bows in white or ivory
- Optional: pearl garland strands
- Optional: clear fishing line for a barely there drape
- Basket stabilizing materials
- foam bricks, paper, or hidden weight
Finished size and customization notes
This look works beautifully at 30 to 36 inches tall, but it can scale larger. The key is leaving breathing room between decorations. If you go bigger, do not add more décor just because you can. Keep it sparse so it stays minimalist.
If your pale blue tulle reads too gray, mix in more ivory. If it reads too white, add a little more blue near the middle third.
Step by step instructions
Stabilize the cone and set the base scene
Place the cone into the basket and secure it. Add a neutral fabric cloth around the base for the clean photo ready styling. Visual checkpoint: the cone should be centered and upright.Plan subtle color layering
This is a soft gradient, but very gentle. Decide that the bottom will be mostly ivory, the middle will show more pale blue, and the top returns to mostly ivory. Mark light guide points.Cut tulle strips for a feather edge
Cut strips 8 to 10 inches long. Minimalist designs look best with slightly shorter strips because the texture becomes refined instead of wildly ruffled.Make sleek, small bundles
Pinch the strip at center and keep the bundle compact. Avoid twisting too much. Visual checkpoint: your bundles should look like small fans, not big pom poms.Cover the cone with an ivory foundation
Start at the bottom and glue ivory bundles close together. Keep the overhang subtle, just a soft halo around the base. Visual checkpoint: the base should look full but not tutu huge.Introduce pale blue slowly in the lower third
Add a pale blue bundle every 5 to 7 ivory bundles. Tuck some blue slightly deeper so it reads like shadow. This creates that icy depth without becoming a stripe.Build the middle third with more blue presence
In the middle, switch to one blue bundle for every 2 to 3 ivory bundles. Keep it random so it feels like mist. Visual checkpoint: from five feet away, you should see a soft blue wash in the center.Return to ivory near the top
As you move upward, gradually reduce blue bundles. This creates a quiet, airy crown. Keep bundles smaller near the tip to maintain a clean silhouette.Create the tulle pom topper
Cut 20 to 30 strips of ivory tulle, 12 inches long. Stack them and gather at the center with a tight pinch. Wrap with wire or glue heavily. Fluff into a round pom. Glue it to the tip. Visual checkpoint: topper should look like a soft dandelion puff.Refine surface and fill thin spots
Pale designs need full coverage. Add bundles anywhere you see the cone. Keep the outer surface consistent and feathery.Add eggs sparingly for a floating effect
Use wire stems on eggs. Insert them at different depths. Place only a handful, like the photo. Keep spacing generous. Visual checkpoint: eggs should feel like soft ornaments, not like a busy Easter tree.Add tiny bows as sweet minimal accents
Tie small bows and glue them into the tulle. Use just a few, focusing on the lower half and one near the middle. This keeps the look gentle and intentional.Optional: add a subtle pearl drape
Tuck a pearl strand deep into the tulle so it peeks out in small arcs. If you want it even more minimal, use only one short drape on one side.Final silhouette and styling check
Step back. The tree should feel calm and light. If it feels busy, remove one or two eggs or bows. Minimalism is about restraint.
Troubleshooting common mistakes and fixes
- The tree looks flat, not fluffy
Your bundles are too small or too spaced. Add more bundles and fan the ends outward slightly. Also fluff gently with your hands. - It looks too white, not icy
Add a few more pale blue bundles in the middle third. Tuck some deeper for shadow. - It looks too blue
Layer ivory bundles over the blue areas and move a few blue bundles deeper inside. - Eggs look random in a bad way
Create a loose triangle composition: a few eggs near the lower third, a couple in the middle, one near the upper third. Keep distance between them. - Top looks messy
Use smaller bundles near the tip and keep the topper centered. If the pom is too heavy, reduce strip count and remake it lighter.
Finishing details
For the cleanest finish, trim any glue strings and gently shake the tree to release compressed folds. Store upright if possible. If you store in a bag, do not compress the topper. You can loosely wrap the topper in tissue like a soft hat.
Optional upgrades that keep the minimalist mood
- Add one thin satin ribbon garland in ivory, placed very loosely with only two anchor points.
- Add a few translucent egg ornaments for a modern look.
- Add a basket liner in ivory linen.
- Add hidden micro lights inside the cone for a soft night glow.
Shop Similar
- Pale blue and ivory tulle rolls for airy décor
- Foam cones for tall craft display trees
- Lightweight decorative eggs in soft neutral colors
- Mini ribbon spools for tiny bows white ivory
- Pearl garland strand subtle décor drape
- Woven basket planter cover natural tone
Style It With
By now you’ve got the full blueprint for turning a simple cone and a few tulle rolls into a true statement piece. Whether you went bold with rainbow ombre, soft with mint ribbon garlands, luxe with champagne ivory pearls, maximal with a floral loaded pastel garden tree, or calm and minimalist with icy blue and ivory, the secret is always the same: dense, staggered tulle bundles for coverage and shape, then intentional embellishment placement that looks nestled into the fluff. Take one last slow walk around your tree in natural light, fluff any flat spots, and adjust eggs and florals until the composition feels effortless from every angle.
When you’re ready to style it, treat your finished tree like décor, not a craft. Give it breathing room, add a neutral linen base, and repeat one or two colors nearby through candles, vases, or a small spring arrangement so the whole corner feels curated. Then snap your photos from slightly above eye level for that magazine look and store it upright whenever possible so the ruffles stay airy. This is the kind of spring statement you can bring out every year and refresh with new ribbon, new eggs, or a different topper, and it will still feel fresh, modern, and completely your own.