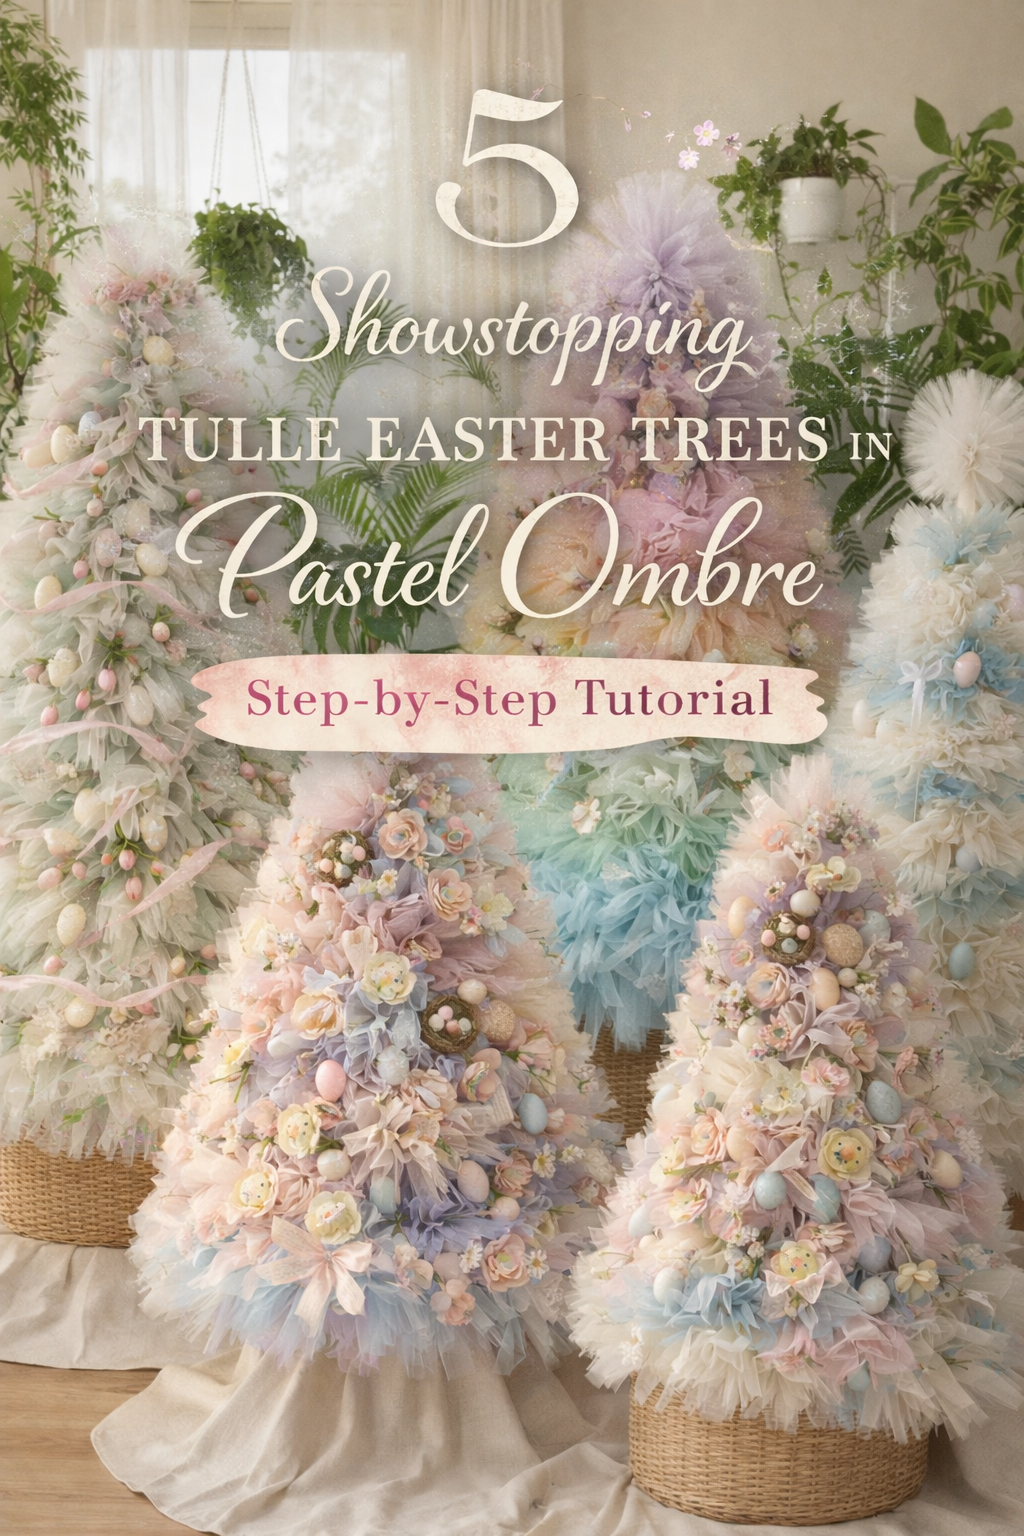
5 Pastel Tulle Easter Trees Step by Step Tutorial For The Viral Spring Tulle Tree Trend

More like this
There is something wildly satisfying about decor that looks like it belongs in a magazine, but is actually made from the simplest ingredients you can buy in a craft aisle. These pastel tulle Easter trees are exactly that. They are fluffy, sculptural, and honestly a little dramatic in the best way, like spring decided to show up in couture. The secret is not complicated technique. It is repetition, texture, and color layering that reads like ombre frosting.
In this post, you are getting five distinct tulle tree looks inspired by the photos. Each one is built on the same sturdy cone foundation, then styled with its own personality, from rainbow ruffles with ribbon roses to a sunroom version sprinkled with tulips and eggs, to a chic cream and aqua moment with pearls and clear ornaments. Pick the one that matches your space, or build a whole little forest of them for an entryway, party backdrop, or spring mantel moment that makes people stop mid scroll.
You do not need advanced crafting skills for this. If you can cut tulle, use hot glue carefully, and step back to check your silhouette, you can absolutely pull off the look. I will show you how to get that plush layered volume, how to blend colors so it looks expensive instead of striped, and how to place embellishments so it feels styled, not cluttered.
💡 Pro Tip: Why I Link to Amazon Search Results and Not One Product
In the Shop the Look and Style it With sections under each bikini, I link to Amazon search results, not single products. Here’s why this matters:
Hot bikinis sell out fast. I don’t want you clicking on a dead link to a sold-out item. Search pages stay updated.
You get more options. Love the vibe but want a different color, cut, or price point? The search results give you everything that matches the look and energy.
I curate each search carefully. These aren’t generic. I spend hours crafting keywords that bring up exactly the kind of bikinis I’d wear—or recommend to my hottest friends.
Support with no pressure. If you click a link, browse, and buy something later, I may earn a small commission at no extra cost to you. That helps me keep bringing you curated collections like this one—powerful, seductive, and always fresh.
So dive in. Click through. Try something risky. These aren’t just bikinis—they’re commands, statements, and maybe even your new favorite weapon of choice.
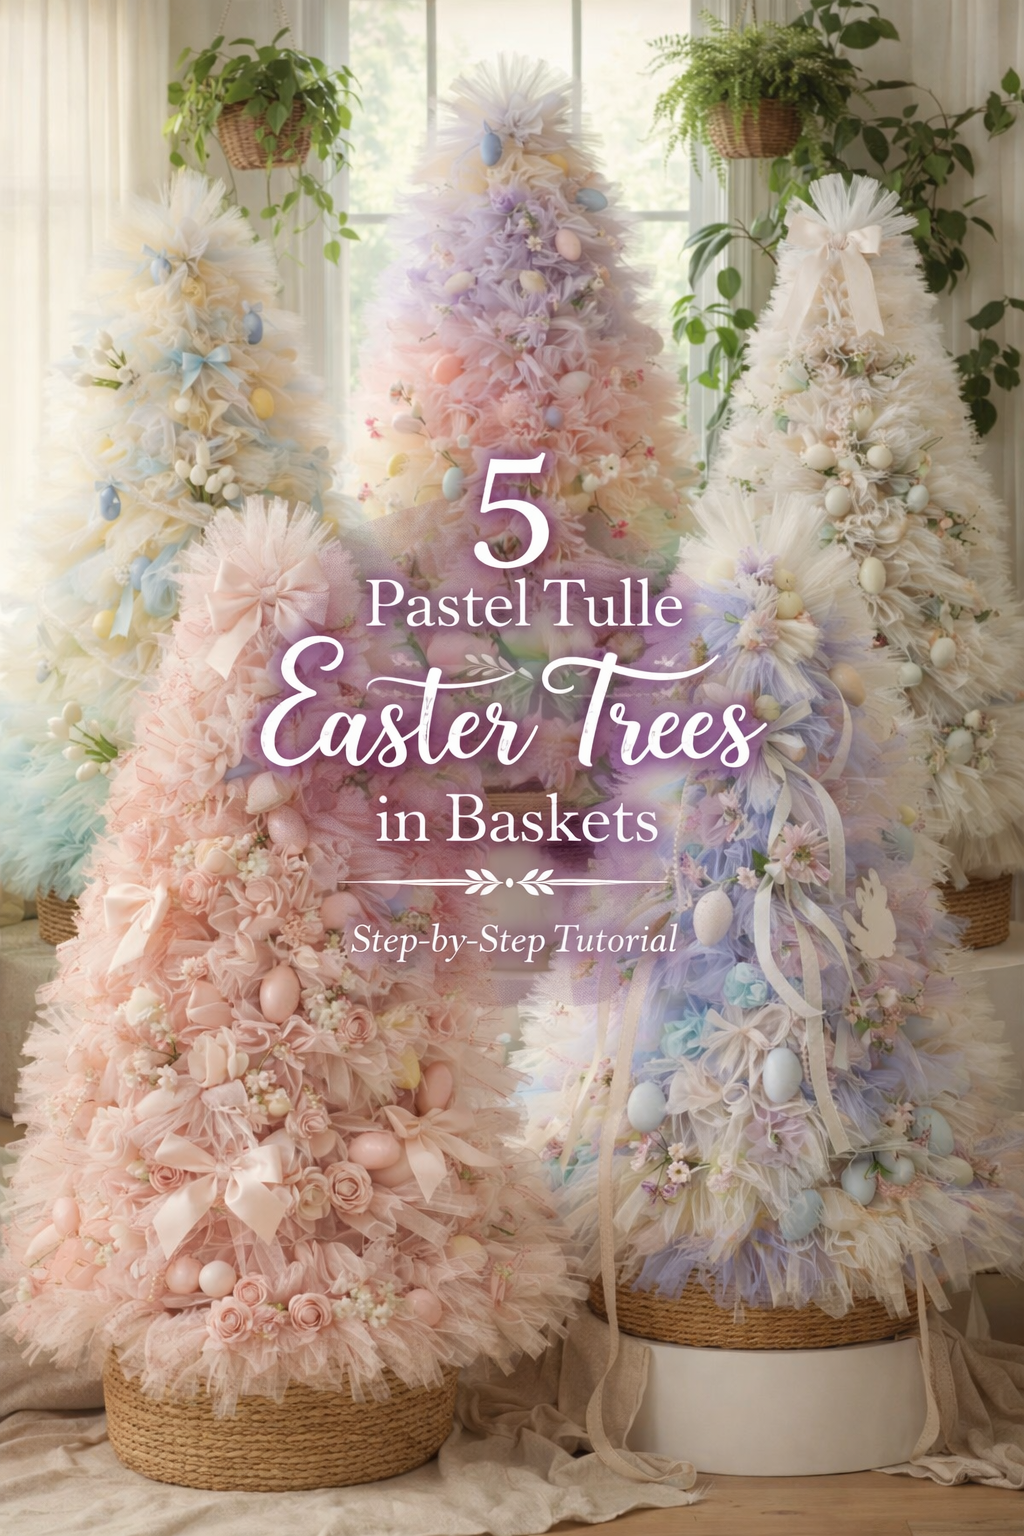
Pastel Ombre Tulle Easter Tree Step by Step Tutorial With Ribbons Roses and Bunny Silhouettes
What you’re making
This tutorial walks you through a dreamy pastel ombre tulle Easter tree that looks like a couture dessert display, only it is soft, airy, and surprisingly lightweight. The finished look is a cone shaped tulle tree built in plush ruffled tiers, with satin bows, tiny bunny accents, and a few rosette details tucked in like Easter candy. It is the kind of piece that makes a room feel instantly spring ready, especially styled near houseplants and bright windows like in the photo.
You can build it tabletop size for a console or go taller for a floor moment. The technique is the same either way: a sturdy cone form, lots of tulle gathered into ruffles, then embellishments placed in a balanced, editorial way.
Materials and tools
- Cone form or DIY cone base options
- Foam cone, paper mache cone, or DIY poster board cone with internal supports
- Tulle in pastel colors
- White or blush, lavender, baby blue, mint, pale yellow, and soft pink
- One wide spool tulle ribbon or bolt tulle both work
- Neutral base fabric for the bottom skirt
- Linen look cloth, muslin, or a soft canvas drop cloth
- Hot glue gun and glue sticks
- Fabric scissors or rotary cutter and mat
- Measuring tape or ruler
- Straight pins or clips
- Optional needle and thread for extra secure gathers
- Satin ribbon for bows
- White and blush look closest to the photo
- Mini embellishments
- Small satin rosettes or ribbon roses
- Bunny silhouettes or bunny ornaments
- Pearls on a strand or beaded garland optional
- Base container
- A woven basket, shallow planter, or decorative pot
- Optional stabilizers
- Floral foam block or weighted filler like stones or sand in a sealed bag
- Wooden dowel if you want extra strength for a taller tree
Finished size and customization notes
A tabletop version like the photo usually lands around 24 to 40 inches tall depending on cone choice. A larger statement version can go 48 to 72 inches tall if you build a reinforced cone and anchor it in a heavier basket.
For the ombre bands, you are choosing soft color zones rather than perfectly even stripes. If you want a stronger rainbow effect, keep each color section more distinct. If you want an airy watercolor look like the photo, blend by overlapping colors for a few inches at each transition.
Tulle options: nylon tulle is fluffy and holds volume. Glitter tulle is pretty but can shed and look harsher on camera, so use it sparingly if at all. If you are undecided between standard and soft illusion tulle, choose soft illusion tulle for the most cloudlike ruffles.
Step by step instructions
Choose your cone and decide your height
Start by choosing a cone form that matches the scale you want. For a quick build, a foam cone is easiest. For a larger tree, build a DIY cone from poster board or thin craft foam sheet wrapped into a cone and taped, then reinforce inside with crumpled paper, cardboard ribs, or a dowel. Visual checkpoint: your cone should stand straight without wobbling when set inside your basket.Anchor the cone into the base basket
Place weight inside the basket so the tree will not tip. A bag of stones or sand works well, or a floral foam block glued into the bottom. Press the cone down into the foam or weight and hot glue around the contact points. If you are using a dowel, glue the dowel into the cone, then anchor the dowel into the basket filler. Visual checkpoint: you should be able to gently tap the top without the base sliding.Plan your color map before cutting
Lay your tulle colors out in the order you want them to appear. For this pastel ombre look, a pretty order is blush and white at the top, then lavender, then baby blue, then mint, then pale yellow, then blush again toward the bottom. You can repeat colors to create soft echoes like the photo. Tip: take a quick phone photo of your planned color stack so you follow it while working.Cut tulle strips for ruffles
The easiest ruffle method uses repeated strips gathered in the center. Cut strips about 6 to 10 inches wide and 18 to 30 inches long for a tabletop tree. For a bigger tree, increase length to 36 to 48 inches. Do not stress about perfect measurements. Slight variation actually makes the ruffles look more organic. Visual checkpoint: when you bunch a strip, it should create a full puff rather than a thin frill. If it looks thin, cut wider strips or double layer them.Make ruffle bundles in batches
Take one strip, accordion fold it loosely, then pinch in the center. Add a dot of hot glue at the pinch and hold for a few seconds. You now have a bow shaped puff. For extra durability, you can wrap the pinch point with thread and tie it off, then glue. Make a pile of puffs in one color before switching colors. This speeds everything up and helps you keep the color bands consistent.Start at the bottom and work upward
Begin at the bottom edge of the cone and work around in a full ring. Place puffs side by side with slight overlap so no cone shows through. Use hot glue directly on the cone, press the pinch point of the puff into the glue, then hold until set. Visual checkpoint: when you look from across the room, you should see a thick soft skirt that hides the cone edge.Build the first tier like a fluffy collar
Continue adding rows above the first ring. Each new row should overlap the row below by about one third to one half of the puff height. This creates that stacked petal look. Rotate your placement so seams do not line up. If yours looks wider than the photo, overlap more. If yours looks sparse, reduce overlap and add more puffs per row.Create the ombre transition zones
When you are ready to change colors, do not stop abruptly. Add a handful of the next color mixed into the last row of the previous color. Then use mostly the new color for the next row, then add a few puffs of the previous color again. This back and forth creates a blended watercolor band. Visual checkpoint: the change should feel like a soft gradient, not a hard stripe.Keep checking the silhouette
Step back every two rows and check the cone shape. You want a clean tree triangle, not a lumpy outline. If you see a bump, add a puff next to it to even out the edge. If a section flares too much, press the puffs slightly upward as you glue so they sit tighter to the cone.Finish the top with a tighter cluster
Near the top, cut smaller strips or fold your strips tighter so the puffs become more compact. This keeps the tree from looking blunt at the tip. You can also glue a small foam ball at the tip to give a place to attach the topper bow.Add satin bows like the photo
Tie several medium bows from satin ribbon. White and blush look especially sweet against the pastels. To match the photo vibe, place bows asymmetrically but balanced: one at the top area, a few in the middle, and several near the bottom. Glue bows by the knot, then fluff the tails. Visual checkpoint: your bows should look like they are floating on the ruffles, not crushed into them.Add bunny silhouettes and rosette accents
The photo includes bunny shapes tucked into the tulle and a few rosette style flowers. Add bunnies in a gentle scattered way, aiming for a few visible from the front. Place rosettes where you want a focal moment, like near the center band. Tip: keep embellishments slightly off center so it looks editorial and not like a perfect store display.Optional pearl drape for extra polish
If you want a subtle luxe layer, add a light pearl strand draped in soft curves around the mid section. Anchor the ends with small dots of glue hidden under tulle puffs. Visual checkpoint: pearls should be gentle accents, not a heavy garland that flattens your ruffles.Create the base skirt
The photo shows a soft neutral fabric puddle around the base. Cut a circle or rough oval of linen look cloth and place it under the basket. You can also wrap the basket with a matching fabric band if your basket is too dark.Final fluff and shaping
Once everything is attached, gently separate tulle layers with your fingers to increase volume. If any glue strings are visible, remove them carefully. Mist lightly with water and shake out if tulle looks static charged.
Troubleshooting common mistakes and fixes
My tree looks patchy and I can see the cone
Add more puffs, especially in the gaps. Also overlap each row more. If you are using very soft illusion tulle, double the strip layers before pinching.The silhouette is lumpy instead of smooth
Step back and identify where the edge bulges. Either compress that area by pressing puffs upward, or fill nearby areas to balance the outline. Do not try to trim tulle, it will look blunt. Add more tulle instead.My ombre bands look like harsh stripes
Blend by mixing colors for two rows at each transition. Also choose closer pastel shades. If your colors are very different, add a white layer between them as a buffer.The tree is tipping forward
Add weight in the basket and secure the cone more firmly. A floral foam block plus extra glue around the base usually solves this. For taller builds, add a dowel.Bows are disappearing into the tulle
Use wired ribbon or add a small felt circle behind the bow knot to create a firm glue point. You can also place bows on top of a slightly flatter ruffle area.
Finishing details
- Blocking and fluffing: tulle does not need blocking, but it benefits from a final fluff. Run your hands through the ruffles and separate layers to get that airy cloud look.
- Securing embellishments: anything heavier than a ribbon bow should be glued to the cone through the tulle, not only onto the tulle itself.
- Storage: store upright in a large box or cover with a tall plastic bag to prevent dust. If compressed, fluff back into shape with your hands.
- Optional upgrades
- Add a tiny battery fairy light strand tucked into the ruffles for a soft glow
- Add a removable topper bow using a clip so you can swap seasonal toppers
- Add a hidden scent sachet inside the base for a subtle spring fragrance
- Add a few matte pastel eggs clustered in one focal area for dimension
Shop Similar
- Pastel tulle fabric rolls for ruffle trees
- Foam cone forms for tabletop trees
- Satin ribbon spools in blush and white
- Mini bunny ornaments and silhouettes
- Pearl bead garland for decorating
Style It With
Sunlit Pastel Tulle Easter Tree DIY Guide With Eggs Tulips and a Giant Sheer Bow
What you’re making
You are making a light filled pastel tulle Easter tree styled like a spring centerpiece, with layered ruffle tiers, scattered pastel eggs, and tiny white tulips tucked into the fluff. The topper is a dramatic sheer bow that makes the whole piece feel like a wrapped gift. In the photo, the tree sits in front of big windows and lush plants, which is perfect because the soft colors glow in natural light.
This build uses the same core technique as a tulle tree skirted cone, but the decoration style is different: instead of lots of bows and rosettes, this one leans into eggs, florals, and airy ribbon swags for an elegant greenhouse vibe.
Materials and tools
- Cone form
- Foam cone, paper mache cone, or DIY poster board cone
- Tulle in pastel tones
- Lavender, baby blue, mint, pale yellow, soft pink, plus a little white
- Wide sheer ribbon for topper and garlands
- Organza ribbon or wired sheer ribbon works best
- Pastel eggs
- Foam eggs, plastic eggs, or lightweight ornaments in matte pastels
- Faux tulips
- Mini tulip stems or tulip picks in white
- Optional airy filler
- Baby’s breath faux sprigs or tiny white floral picks
- Hot glue gun and glue sticks
- Scissors
- Floral wire or thin craft wire
- Wire cutters
- Base container
- Woven basket, planter, or low pot
- Weight for base
- Floral foam block, stones, or a sealed bag of sand
- Optional lighting
- Micro fairy lights, battery powered
Finished size and customization notes
A 30 to 48 inch tree is ideal for the window filled look. Taller is gorgeous too, but make sure to anchor the base heavily. The photo has distinct tier bands with soft color transitions. If you want a more blended ombre, overlap colors more. If you want strong candy stripes, keep each tier color more separate.
Egg choice: matte foam eggs read the most editorial and do not reflect window glare. If you use shiny plastic eggs, place them deeper into the tulle so reflections soften.
Step by step instructions
Build and anchor your cone
Secure your cone into a basket or pot with weight. Press the cone into floral foam or into a weighted center and glue around the base. Visual checkpoint: the tree should not wobble when you gently sway the top.Decide your tier rhythm
This tree looks like it has stacked layers, almost like a tiered skirt. Mark faint guidelines on the cone with a pencil where you want each color band to start and end. Aim for larger tiers at the bottom and smaller tiers near the top. Tip: do not make perfect equal tiers, varied spacing looks more natural.Cut your tulle for ruffles
Cut strips 8 to 12 inches wide and 24 to 36 inches long. For faster coverage, you can cut longer strips and gather them into larger puffs. If you want more delicate ruffles, use shorter strips and make smaller puffs.Make ruffle puffs
Accordion fold each strip loosely and pinch in the center. Add hot glue at the pinch and hold until set. You can also wrap the pinch with a twist of wire for extra security. Make piles by color.Start the bottom tier with extra fullness
The bottom in the photo looks very fluffy. Place puffs around the base edge of the cone in a dense ring. Add a second ring above it, overlapping generously. Visual checkpoint: the bottom should look like a soft tutu, with no cone visible.Build upward in stacked rows
Continue row by row, keeping a consistent overlap. For this tiered look, slightly increase overlap at the edges of each band so the band looks like a ledge. You are basically creating a soft shelf. If yours looks too flat, add an extra row at the band edge.Change colors at your marked guidelines
When you reach a guideline, switch to the next color. To keep the photo look, do a mostly clean change with a small blend row between tiers. Visual checkpoint: you should see distinct pastel layers, but the transitions should still feel soft.Add a sheer ribbon garland between tiers
The photo has a delicate ribbon wrap that lightly separates the layers. Take wide sheer ribbon and loosely spiral it around the tree, placing it along the tier edges. Use tiny dots of glue under the ribbon every 8 to 12 inches. Keep the ribbon tension gentle so it does not compress the tulle.Place eggs in a balanced scatter
Start with your largest eggs and place them first. Press each egg slightly into the tulle so it feels nestled, not perched. Glue the egg on the underside where it touches tulle, or glue a small felt dot to the egg first for a better grip. Visual checkpoint: eggs should appear sprinkled around, with clusters and breathing space.Add tulips like little surprises
Use mini tulip picks or cut faux tulip stems short. Insert them into the tulle layers near eggs, aiming for small groupings of two to three. Secure with a dot of glue near the stem base. Add a few sprigs of baby’s breath for airy texture. Tip: keep florals mostly in the middle and lower tiers, and leave the top cleaner so the bow shines.Build the giant topper bow
Use wired sheer ribbon for the best shape. Make a large multi loop bow, or layer two bows. If you do not have wired ribbon, tie two big bows and fluff them. Attach the bow at the top with hot glue, then add a hidden wire loop around the cone tip to keep it stable. Visual checkpoint: the bow should sit upright and not droop forward.Finish the top tier with tiny ruffles
Make smaller puffs for the top section so it looks tapered. Add a few small eggs or one focal egg just below the bow to echo the theme.Optional subtle lights
If you want a soft evening glow, tuck micro fairy lights into the inner tulle. Keep lights behind the ruffles so the wire is hidden. Use warm white for the most flattering look against pastels.Final fluff and symmetry check
Step back and view from different angles. Adjust egg placement so one side does not feel heavy. Pull out a few tulle layers to increase volume where needed.
Troubleshooting common mistakes and fixes
My tiers are not reading clearly
Add a ribbon separator at each tier edge, or add one extra row of puffs right at the tier boundary to create a ledge.Eggs keep falling off
Use lightweight foam eggs, and glue a felt circle to the egg first. Press the felt into glue on the cone through the tulle. If eggs are heavy, wire them by piercing with floral wire and anchoring into the cone.The ribbon compresses my ruffles
Loosen the ribbon wrap and use fewer glue points. You want the ribbon to float lightly, not cinch.My top looks blunt
Use smaller puffs near the top and concentrate them closer together. Add a small foam ball at the tip under the bow to create a rounded peak.The tree leans toward the window
Add more weight in the base and ensure the cone is centered. If needed, hot glue a small wood disk under the basket to widen the footprint.
Finishing details
- Stabilize florals: any floral pick should be glued at the stem base so it does not wiggle.
- Dust care: tulle collects dust. Use a cool hair dryer setting from a distance or a soft handheld duster.
- Seasonal swap: this tree can convert for other seasons by changing eggs and florals. Keep the topper bow removable with a clip if you want flexibility.
- Optional upgrades
- Add a small nest detail with speckled eggs in one mid tier cluster
- Add a few satin bows, but keep them minimal so eggs remain the focus
- Add a layered ribbon collar under the bow for extra height
- Add a neutral fabric skirt around the basket for a softer base
Shop Similar
- Pastel tulle rolls for layered ruffle trees
- Sheer wired ribbon for giant topper bows
- Matte pastel foam eggs for decorating
- Mini faux tulip picks in white
- Floral foam blocks for anchoring decor
Style It With
Soft Neutral Pastel Tulle Easter Tree How To Guide With Pearl Drapes and Minimal Bows
What you’re making
This project is a soft, airy Easter tulle tree with a gentle neutral palette and the faintest blush and sea glass hints, styled in a calm modern room. The look is less rainbow and more whisper, with creamy tulle, delicate pastel flashes, pearl garland swags, and a few satin bows that feel like tiny couture accents. The overall shape is plush but refined, with ruffles that read like a layered gown.
This is perfect if you want Easter decor that feels grown up, minimal, and photo ready, while still playful and seasonal.
Materials and tools
- Cone form
- Foam cone or DIY poster board cone
- Soft tulle
- Ivory, cream, and white as the main body
- Small amounts of blush, pale mint, and light blue for subtle highlights
- Satin ribbon for bows
- Ivory and blush
- Pearl garland or bead strand
- Lightweight faux pearl string
- Optional small ornaments
- Tiny pastel balls, mini eggs, or floral picks in cream tones
- Hot glue gun and glue sticks
- Scissors
- Measuring tape
- Optional dowel for support
- Base
- Neutral basket, white pot, or wrapped base
- Neutral fabric for a base skirt
- Cream cloth or linen look fabric
Finished size and customization notes
A 36 to 54 inch tree suits the calm, minimalist styling. The key is softness and layering, not bright color. Use mostly ivory tulle, then tuck small pastel puffs in scattered areas so the color looks like a blush of watercolor.
If you want more color, increase pastel puffs in the mid tiers. If you want even more minimal, skip colored tulle and use only ivory plus pearls and bows.
Step by step instructions
Anchor the cone securely
Place your cone into a basket or pot with weight. Use floral foam or a weighted bag so it stays centered. Hot glue the cone base to the anchor. Visual checkpoint: the cone should stand straight and not twist.Choose your tulle texture
For this soft look, choose soft illusion tulle or a very fine mesh tulle that drapes gently. Stiffer tulle can still work, but you will need to fluff more to avoid a crunchy edge.Cut strips for small, airy puffs
Cut strips about 6 to 8 inches wide and 18 to 30 inches long. Because the palette is quiet, the texture does the work. More smaller puffs create a cloud effect.Make your puff bundles
Accordion fold, pinch, then glue at the center. Keep the pinch point small so the puff opens like a soft flower. Make a large pile of ivory puffs first.Cover the cone with ivory in dense rows
Start at the bottom and place puffs in tight rings, overlapping enough that the cone disappears. Work upward row by row. Visual checkpoint: you should see a consistent soft surface with no gaps.Create gentle tier shifts with spacing
This tree has a sense of layered tiers, but subtle. Every few rows, slightly reduce overlap so one row edge becomes more visible. Then increase overlap again. This creates soft ledges without harsh lines.Add pastel highlight puffs sparingly
Mix in blush, mint, and pale blue puffs in small clusters. Place them in areas where light hits, like mid tiers and near the top. Keep them scattered so they look like a watercolor wash. Visual checkpoint: color should feel like a whisper, not a stripe.Add satin bows in a restrained pattern
Tie three to seven bows, depending on tree size. Place one near the top and a few spaced around the mid and lower tiers. Keep them in ivory and blush only. Glue at the knot and let tails drape.Drape pearls in soft swags
Cut pearl garland into lengths that can drape in a curve. Anchor one end with glue hidden under tulle, then drape to the next anchor point. Repeat with two to three swags. Visual checkpoint: pearls should create gentle arcs, not tight lines.Add tiny neutral ornaments or florals
If you want extra detail, add small cream flowers or tiny pastel balls tucked deep in the ruffles. Avoid too many, because the goal is calm.Finish the top with a small bow or tuft
Create a compact tuft of ivory puffs at the top and add a small bow. If you want a cleaner peak, add a small foam ball covered with tulle to round the tip.Build a soft base skirt
Lay cream fabric under the base and let it puddle slightly. This mirrors the photo and makes the tree feel styled, not just placed.Final fluff pass
Gently pull out layers of tulle to increase volume. Adjust any pearl swags that sink too deep.
Troubleshooting common mistakes and fixes
The ivory looks flat
Use more puffs and smaller puffs. The density creates the luxe feel. Also separate layers by hand to add air.Pastel accents look random or messy
Group them in small clusters and repeat the cluster idea at different heights. Think of three soft moments rather than scattered confetti.Pearls keep sliding
Anchor pearls through the tulle to the cone, not only onto tulle. Hide glue dots under nearby puffs.Bows look limp
Use better satin ribbon or slightly wider ribbon. You can also add a tiny dab of glue under each loop to hold shape.The top is too bulky
Switch to smaller puffs near the top and overlap more tightly so it tapers.
Finishing details
- Secure for storage: pearls and bows can be removable if you attach them with small clips. This makes storage easier and prevents tangling.
- Dust protection: cover with a tall bag when not in use.
- Optional upgrades
- Add a soft micro light strand behind the ivory for an evening glow
- Add a small monogram tag at the base for a custom heirloom feel
- Add a narrow velvet ribbon wrap around the base basket
- Add a tiny nest detail tucked into one mid tier for a subtle Easter nod
Shop Similar
- Ivory soft tulle fabric by the roll
- Foam cone craft forms tall
- Faux pearl garland strand
- Ivory satin ribbon wide
- Neutral woven basket planter
Style It With
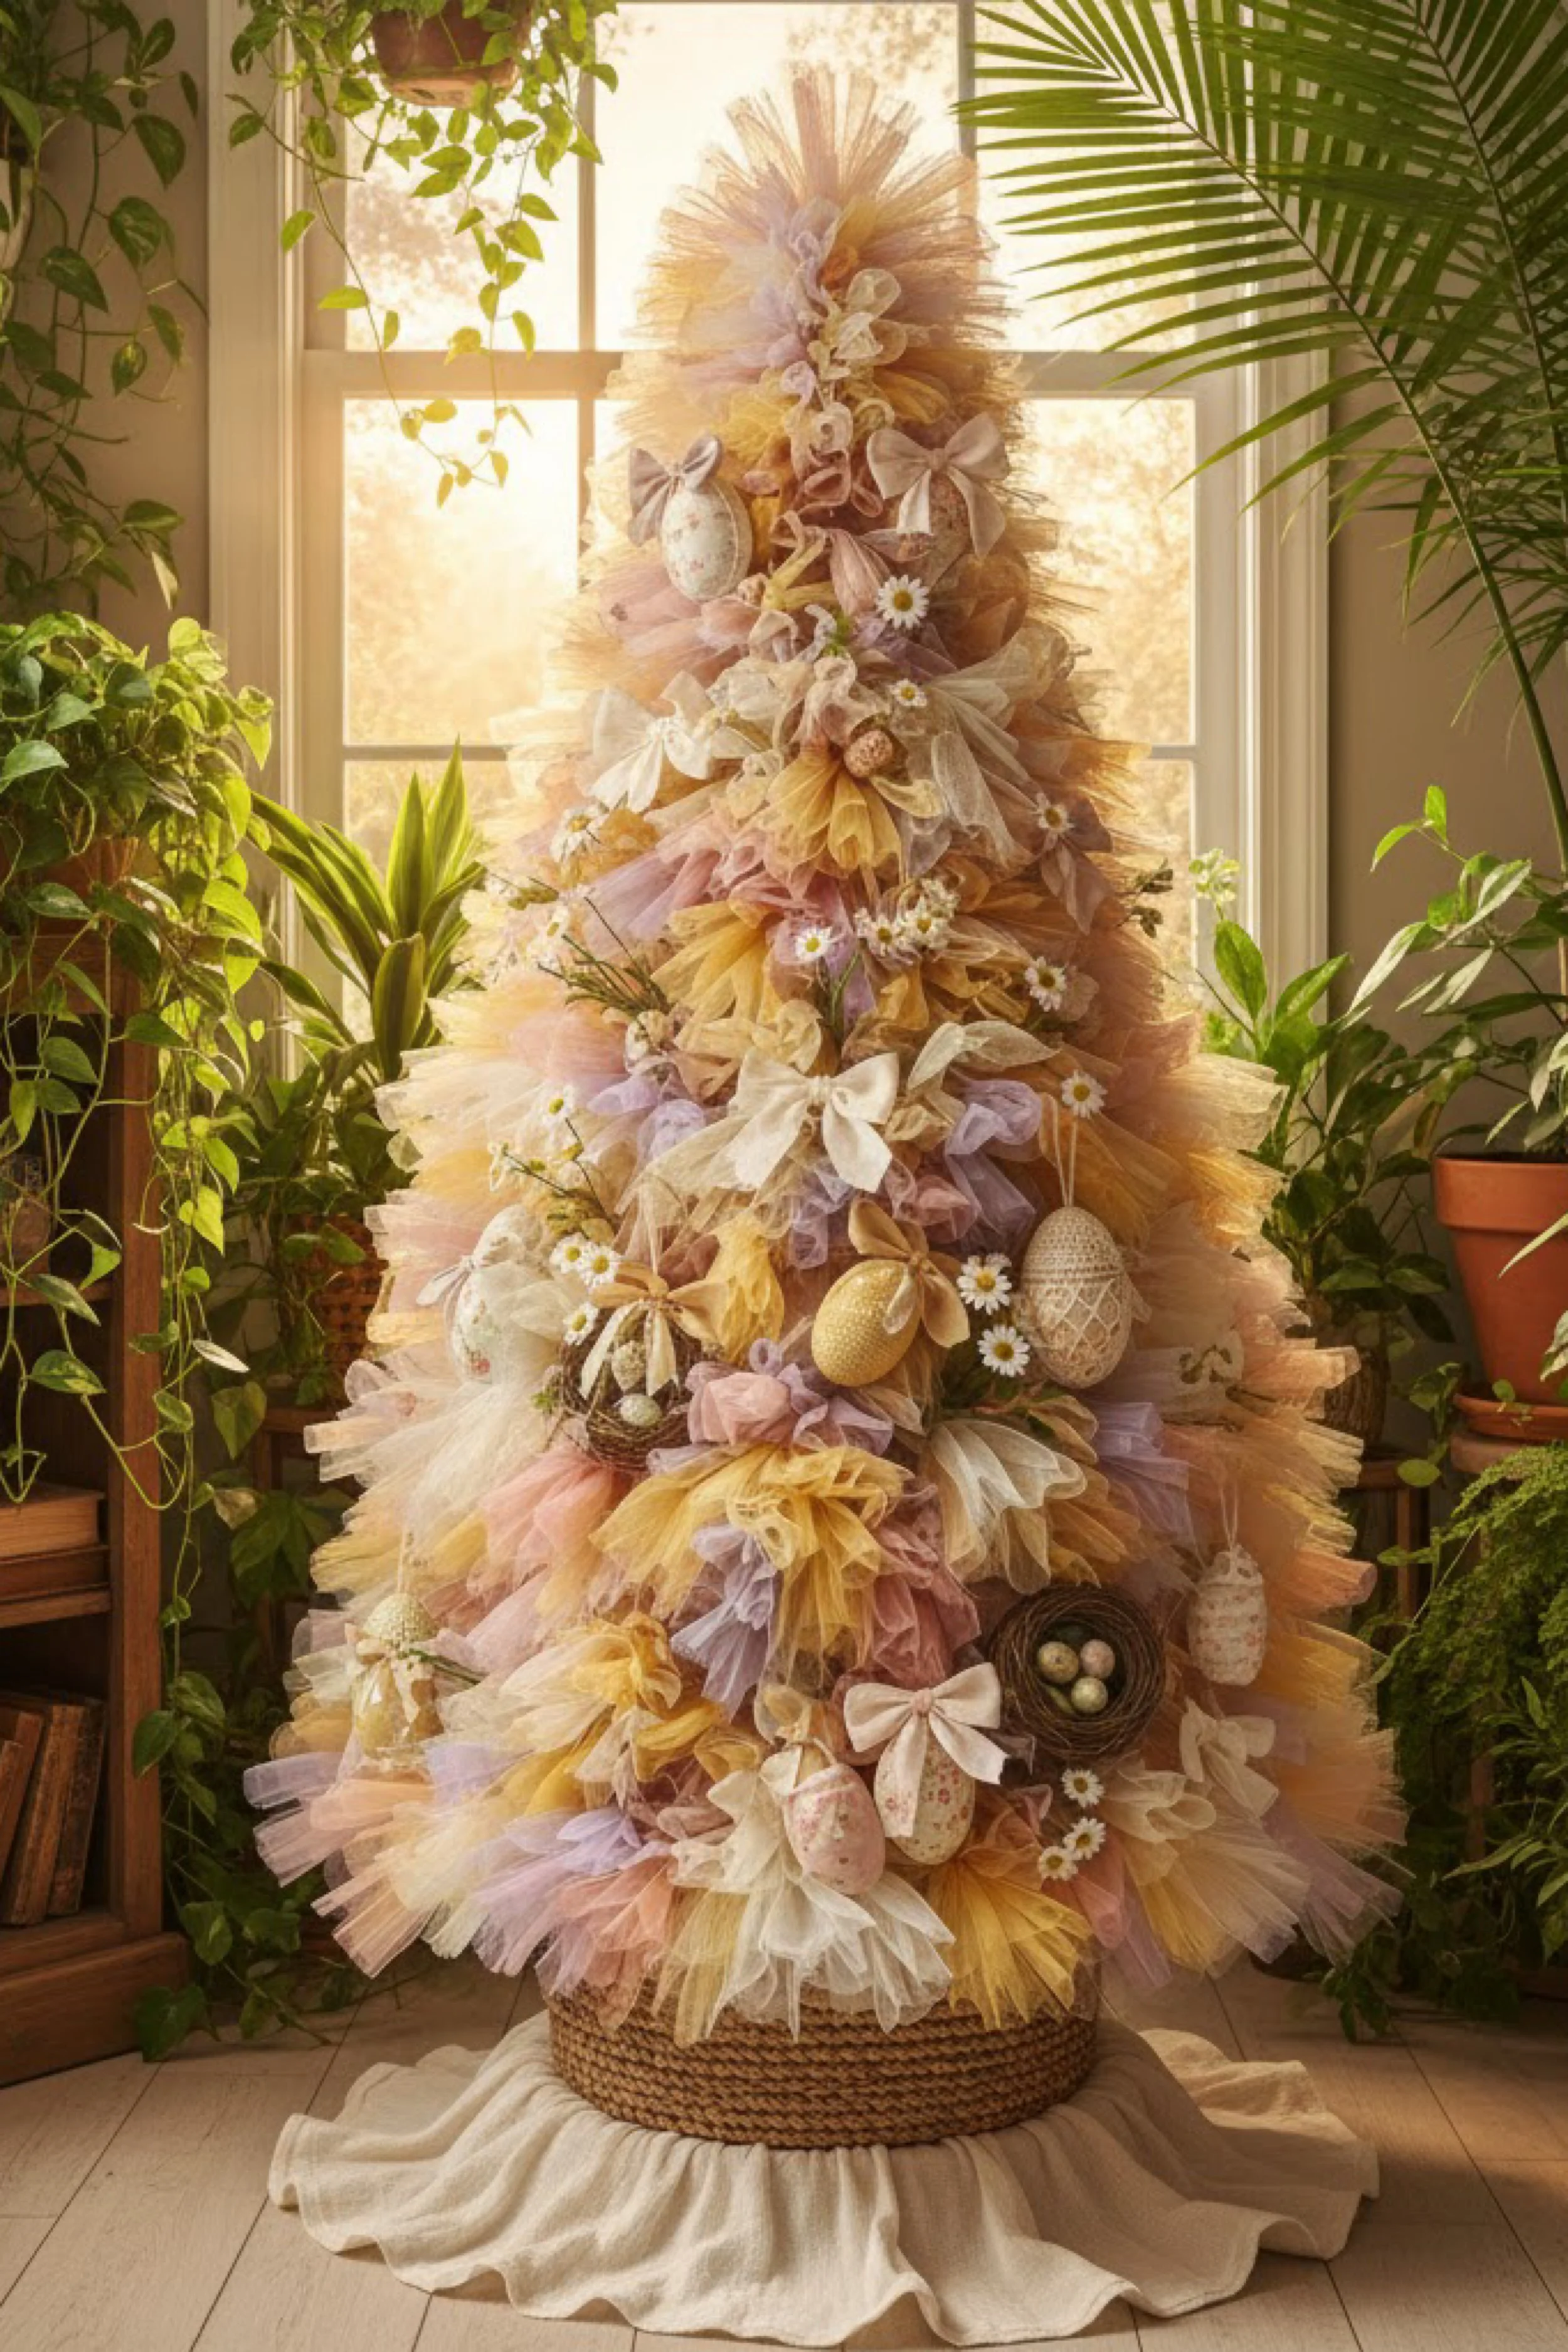
Golden Hour Garden Tulle Easter Tree Make It Yourself Tutorial With Nests Daisies and Speckled Eggs
What you’re making
This tutorial recreates the warm, golden hour Easter tulle tree with a romantic garden vibe. The color story is peach, honey, soft lilac, and cream, with layered ruffles that look like petals in sunset light. The decoration style is whimsical and nature inspired: little nests, speckled eggs, tiny daisies, and bows tucked throughout. In the photo, it is staged in a plant filled room with glowing light, which makes the warm tones feel extra cozy.
The build is a cone based tulle tree, but the magic is in the styling. You will use clusters, repeats, and focal points so it looks curated instead of random.
Materials and tools
- Cone form
- Foam cone or DIY poster board cone
- Tulle in warm spring tones
- Cream, peach, pale apricot, blush, and light lavender
- Satin or cotton ribbon for bows
- Cream or blush
- Faux florals
- Small daisies, tiny wildflowers, and greenery sprigs
- Decorative eggs
- Speckled eggs, matte pastel eggs, and a few patterned eggs
- Mini nests
- Small twig nests or raffia nests
- Optional ornaments
- Hanging egg ornaments or lightweight picks
- Hot glue gun and glue sticks
- Scissors
- Floral wire and wire cutters
- Base basket or pot
- Weight for anchoring
- Floral foam, stones, or sand bag
- Neutral fabric for base skirt
Finished size and customization notes
A 40 to 60 inch tree reads like a true statement piece for a sunroom or entry. Warm colors look best when layered. Use cream as the main body, then add peach and apricot in generous bands. Lavender can be an accent band that breaks up the warmth.
If you want more garden style, add more greenery sprigs. If you want more vintage sweetness, add more bows and patterned eggs.
Step by step instructions
Anchor the cone in the base
Place weight into the basket. Set the cone centered and glue it into place. For taller builds, insert a dowel into the cone and anchor it into the base. Visual checkpoint: no wobble, no tilt.Sketch your color zones
Warm palettes can get muddy if mixed too much. Plan zones: cream and peach at the top, then apricot, then lavender, then peach again, then cream at the bottom. Mark faint guidelines.Cut tulle strips for ruffles
Cut strips 8 to 12 inches wide and 24 to 40 inches long, depending on size. For extra fluffy bands, double layer two strips before folding.Make puff ruffles
Accordion fold and pinch in the center. Glue the pinch point. Make piles by color.Build the base tier
Start at the bottom and create a full ring of cream puffs. Add a second ring overlapping heavily. Visual checkpoint: the base should look like a soft skirt with a clean outer edge.Work upward and keep the silhouette smooth
Add rows of puffs, rotating placement so it does not form vertical lines. Every few rows, step back and check the outline. Adjust by adding puffs where it looks thin.Introduce warm color bands
Add peach and apricot puffs in bands. For this photo look, keep bands visible but not harsh. Blend slightly at transitions with a few mixed puffs.Add lavender as a mood break
Place a lavender band around the mid or lower mid area. Keep it a little narrower than the peach bands so it reads as a highlight. Visual checkpoint: you should see a warm overall glow with lavender peeking through.Build focal clusters for eggs and florals
Before you glue any eggs, plan three focal zones: one upper mid, one lower mid, and one near the base. Each zone will hold a cluster of eggs, a bow, and a few florals. This is how you get the styled editorial feel.Attach nests first
Glue small nests into the focal zones, pressing them into the tulle so they look nestled. Add a dot of glue under the nest rim and another on the side touching tulle. Visual checkpoint: nests should feel embedded, not perched.Add eggs in clusters and singles
Place two to four eggs in or near each nest cluster. Then scatter a few single eggs elsewhere to create rhythm. Use speckled eggs for the most garden look. If eggs are heavy, add a small wire pick through them and anchor into the cone.Tuck daisies and greenery
Add small daisies around the clusters, aiming for airy placement. A few greenery sprigs can trail outward. Keep florals mostly in the mid and lower areas so the top remains light.Add bows to soften and repeat
Tie several bows and place one near each focal zone. Add one or two additional bows between zones to connect the look. Glue at the knot, fluff loops.Add one hanging detail if desired
The photo includes a few hanging egg ornaments. If you want that, attach lightweight ornaments with thin clear thread or ribbon and anchor at the top tier. Keep it minimal so it does not tangle.Finish the top tuft
Create a compact tuft of cream puffs at the top and add a small bow. You want a soft peak, not a flat cut off.Style the base skirt and basket
Add neutral fabric under the basket and let it puddle. If your basket is plain, wrap it with a ribbon band for a finished look.Final edit pass
Step back and look at it like a photo prop. If one side feels busy, move an egg or remove a flower. The goal is balanced clusters with breathing space.
Troubleshooting common mistakes and fixes
Warm colors look muddy
Use more cream as a buffer and keep lavender limited. If peach and apricot blend too much, add a cream row between them.Eggs look like they are floating on top
Push them deeper into the tulle and glue where they touch the cone. Add a small felt circle to the egg first if glue is not grabbing well.Florals fall out
Use floral wire picks or glue the stem base to the cone through the tulle. For heavier stems, cut them shorter.The silhouette is messy
Add puffs along the outer edge where it dips. Do not trim. Add volume to correct shape.The tree feels too busy
Reduce the number of different egg styles. Stick to two main types, like speckled and matte pastel, then repeat.
Finishing details
- Dust care: gently shake or use a soft duster. Avoid snagging florals.
- Storage: remove hanging ornaments and store separately. Cover the tree to protect from dust.
- Optional upgrades
- Add a tiny name tag banner for a spring party
- Add a subtle light strand behind the warm layers for evening glow
- Add a few velvet ribbon tails for texture contrast
- Add a small floral cluster at the top under the bow for a crown effect
Shop Similar
- Peach and cream tulle rolls
- Speckled Easter eggs decorative
- Mini twig nests for crafts
- Small faux daisy picks
- Woven basket planter for base
Style It With
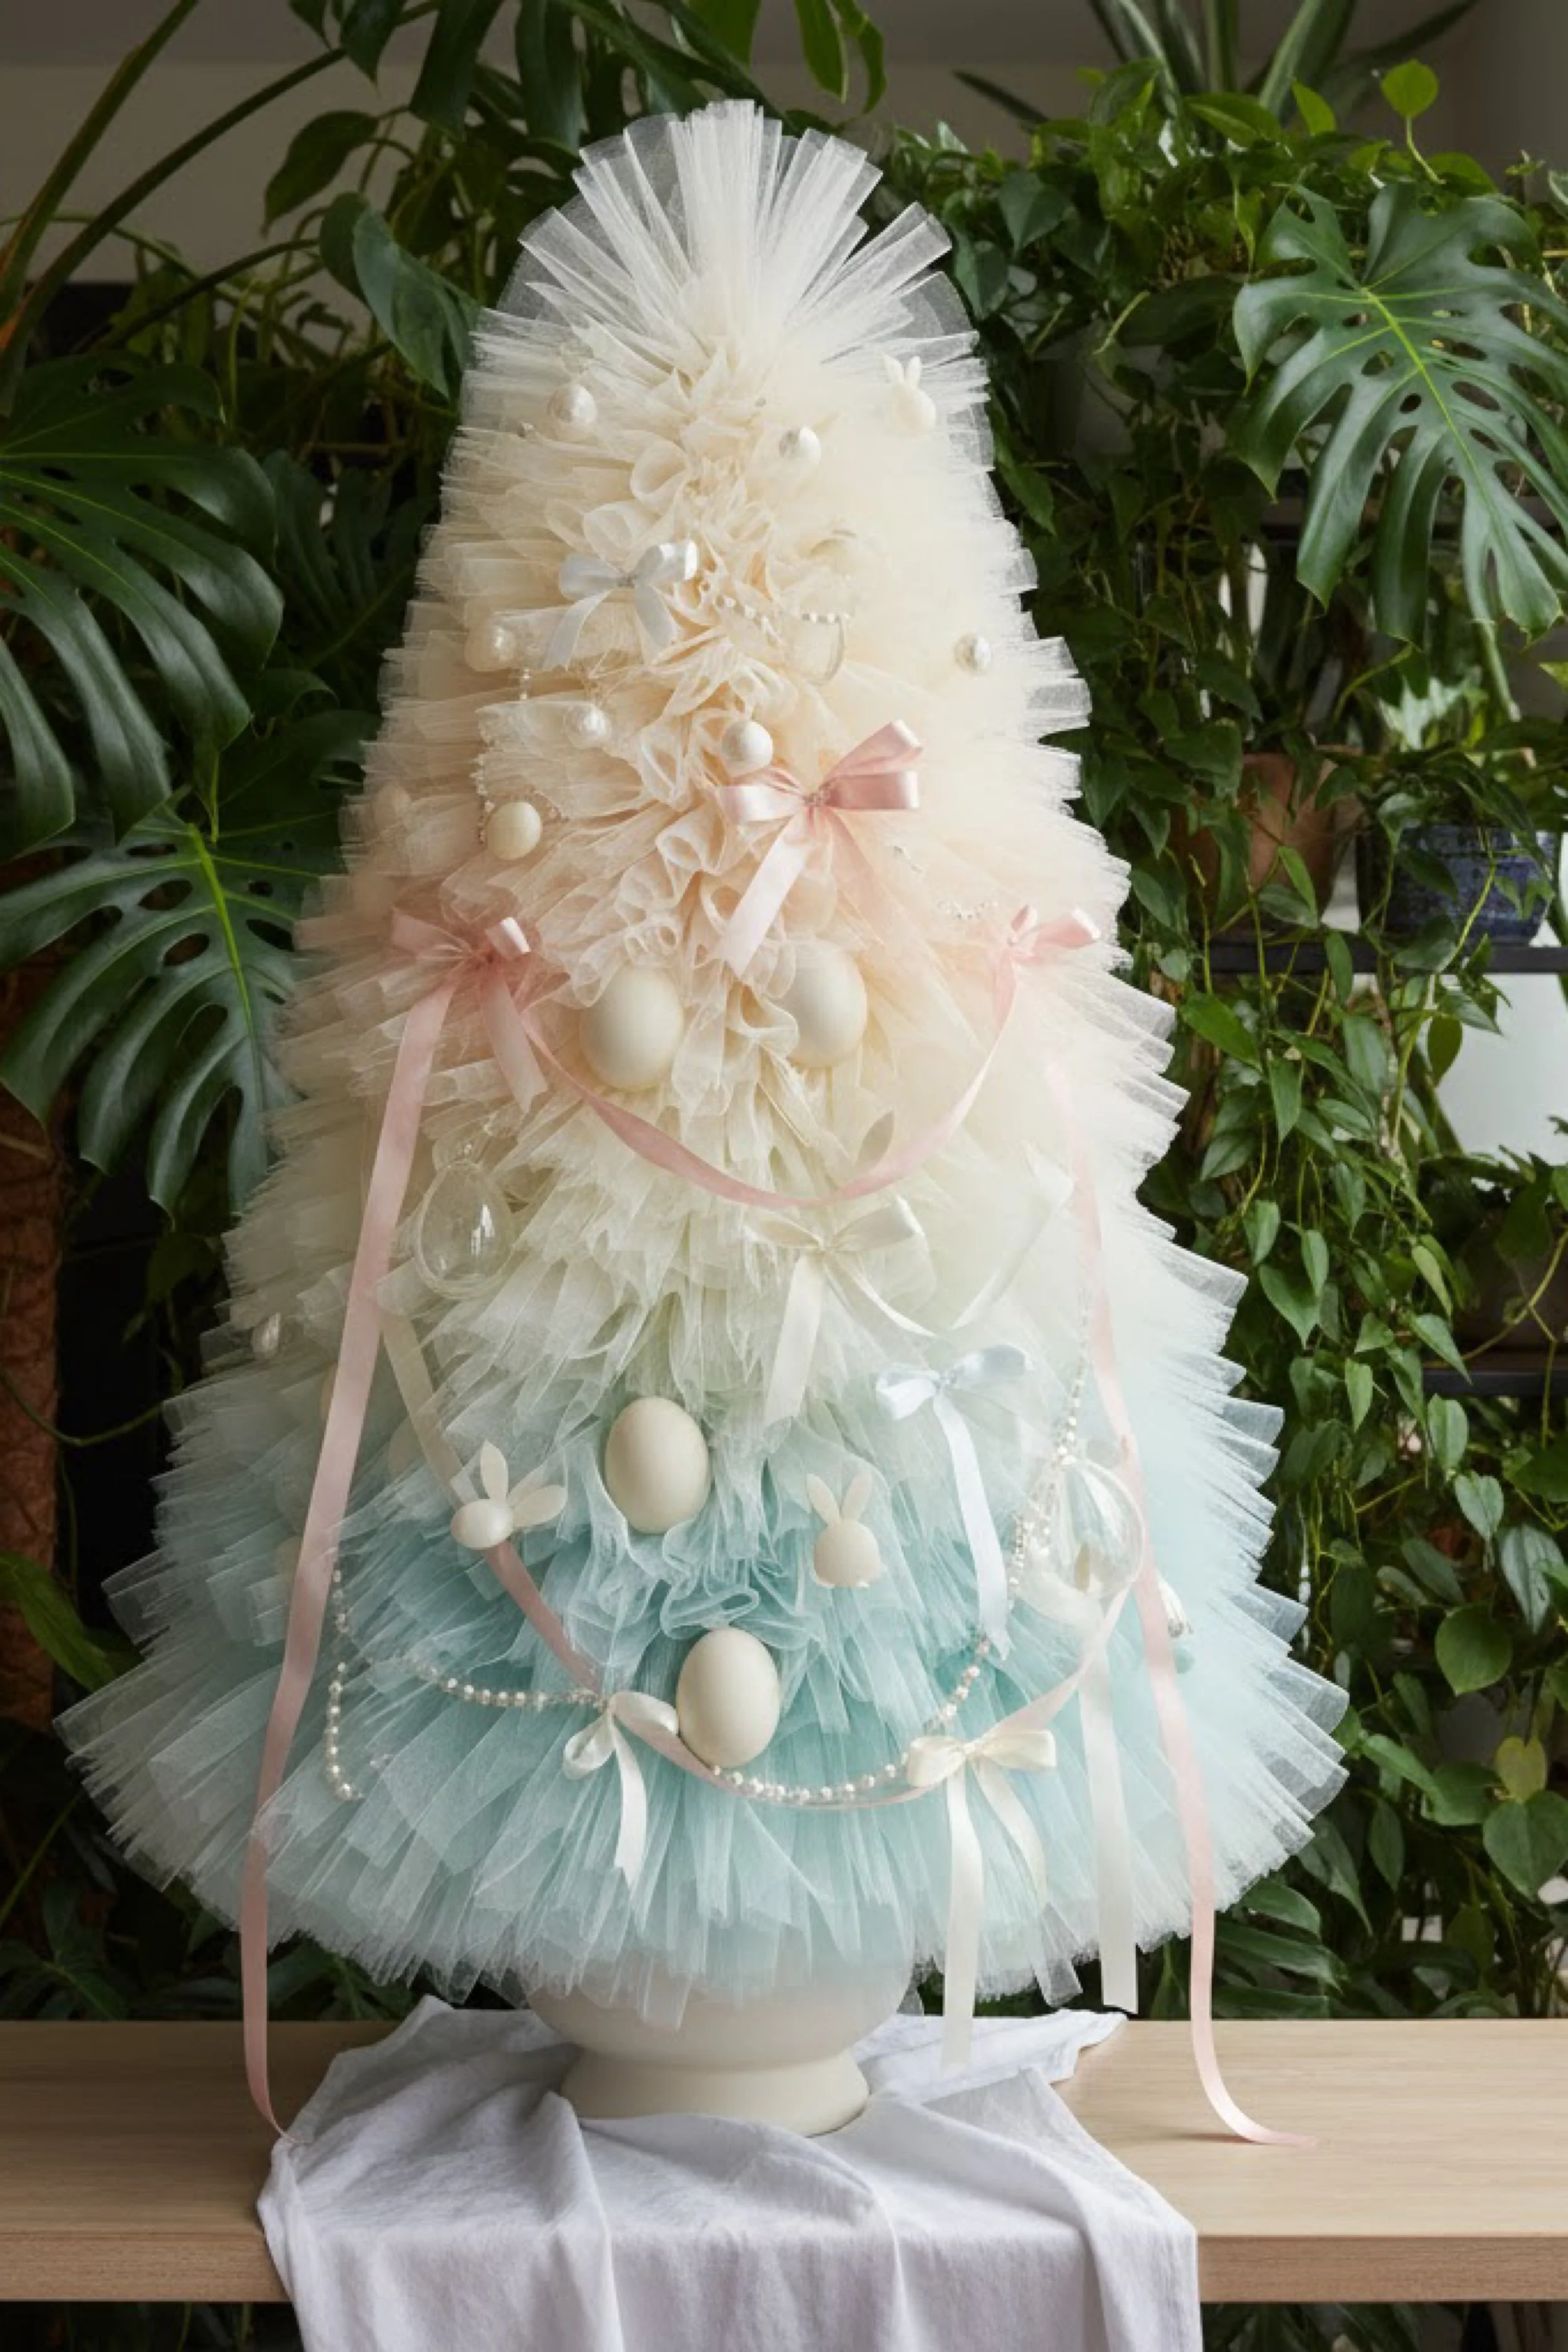
Chic Cream and Aqua Tulle Easter Tree Step by Step Tutorial With Pearls Clear Ornaments and Ribbon Streamers
What you’re making
This tutorial is for the chic cream and aqua tulle Easter tree that feels like a modern boutique window display. The top is creamy ivory, the bottom fades into soft sea glass aqua, and the embellishments are minimal but luxe: pearl garlands, translucent ornaments, and long ribbon streamers in blush and white. It reads airy, sculptural, and very clean, especially against a backdrop of deep green plants like in the photo.
The overall technique is a cone wrapped in gathered tulle, but the finishing details are what sell the look. You will keep the decor light and curated so the ombre and texture stay the main event.
Materials and tools
- Cone form
- Foam cone, paper mache cone, or DIY cone with reinforcement
- Tulle
- Ivory or cream for the top
- Sea glass aqua or pale blue green for the bottom
- Optional white to blend transitions
- Ribbon streamers
- Blush satin ribbon and white satin ribbon
- Optional sheer ribbon for layering
- Pearls
- Faux pearl strand or bead garland
- Clear ornaments
- Lightweight clear baubles, fillable ornaments, or acrylic spheres
- Optional Easter accents
- Small matte eggs in cream
- Tiny bunny shapes if you want a subtle nod
- Hot glue gun and glue sticks
- Scissors
- Wire and wire cutters
- Base pedestal or pot
- White urn planter, pedestal bowl, or basket
- Weight and anchor materials
- Floral foam, stones, sand bag
Finished size and customization notes
This style works beautifully at 24 to 40 inches for tabletop, or 40 to 60 inches as a floor piece. The photo shows a pedestal base, which makes it feel elevated and gallery like. If you do not have a pedestal, use a basket and wrap it with a white cloth.
For the ombre, keep the top mostly cream and let the aqua dominate the bottom half. The transition should be a soft blend zone rather than a hard line.
Step by step instructions
Anchor the cone on a pedestal base
If using a pedestal bowl or urn, place weight inside first. Add floral foam or a sealed bag of stones. Press the cone into the foam and glue around the contact points. Visual checkpoint: the cone should be centered and stable.Prep your ombre plan
Mark where you want the cream to end and the aqua to begin. A nice proportion is top third cream, middle blend, bottom half aqua.Cut tulle strips
For a refined look, cut consistent strips about 8 inches wide and 24 to 36 inches long. Cut more than you think you need. This style looks best when dense and smooth.Make puff ruffles
Accordion fold each strip and pinch in the center, then glue. Make separate piles for cream and aqua, plus a small pile of mixed cream and aqua for blending.Cover the cone bottom first in aqua
Starting at the bottom, place aqua puffs in dense rings. Overlap enough to hide the cone. Work upward until you reach the blend zone. Visual checkpoint: the lower half should look like a fluffy sea glass skirt.Create the blend zone
Mix aqua and cream puffs for two to four rows. Alternate colors within the same row. Then gradually increase cream puffs until you are mostly cream. This gives a smooth fade.Finish the top in cream
Continue rows in cream up to the tip. Use smaller puffs near the top to keep a tapered silhouette.Add pearls in minimal arcs
Choose one to three pearl swags. Anchor one end under a puff, drape gently, then anchor the other end. Keep arcs shallow and elegant. Visual checkpoint: pearls should look like jewelry, not like a heavy garland.Add clear ornaments for airy sparkle
Clear ornaments can disappear beautifully into the tulle, giving a subtle glow. Place a few, mostly in the cream area and blend zone. Press them into the tulle and glue where they touch the cone. If ornaments are fillable, you can leave them empty for the lightest look.Add ribbon streamers
Cut long lengths of blush and white ribbon. Attach near the mid to upper area and let them fall in soft curves. Place a few on each side to frame the tree. Tip: vary lengths so it looks intentional. Visual checkpoint: ribbons should move like soft lines, not like a tangled bundle.Add a small focal bow
The photo includes a blush bow around the mid area. Tie one medium bow and attach it where ribbons begin. This creates a clean focal point and makes the streamers feel anchored.Optional subtle Easter shapes
If you want, add a couple of matte eggs tucked into the aqua area. Keep it minimal so the chic vibe stays intact.Refine the silhouette
Step back and check the outline. This tree should look smooth and sculptural, not overly frilly at the edges. If it flares too much, overlap more in the next row and press puffs upward as you glue.Finish the base styling
If using a pedestal, drape a soft cloth under it like in the photo. If using a bowl base, add a little cloth collar or ribbon wrap so it feels finished.Final fluff and detail check
Remove glue strings. Separate tulle layers where needed. Adjust pearls and ribbons so they arc gracefully.
Troubleshooting common mistakes and fixes
The ombre looks like a sharp line
Add more blend rows with mixed colors. Use white or cream puffs as a bridge.Clear ornaments fall off
Use very lightweight ornaments and glue them to the cone through the tulle. If needed, add a small wire hook and anchor it into the cone.Ribbons look messy
Use fewer ribbons and place them symmetrically. Add one anchor point midway down if they swing too much.Pearls sink into the tulle
Anchor them on top of a slightly flatter area, or add tiny glue dots under the strand every few inches.The base looks unfinished
Add a cloth drape or a ribbon wrap around the base. A clean base makes the whole tree feel premium.
Finishing details
- Longevity: keep it away from direct heat sources so tulle does not warp.
- Dust: cover when not in use, especially if stored near plants.
- Optional upgrades
- Add a tiny micro light strand inside the cone area for a subtle glow through the clear ornaments
- Add a removable topper like a sheer bow or pearl cluster at the tip
- Add a monogram tag tied to one ribbon streamer for a gift like finish
- Add a white bead garland plus a single blush accent bow for extra dimension
Shop Similar
- Sea glass aqua tulle roll
- Ivory soft tulle fabric roll
- Clear fillable ornaments lightweight
- Faux pearl garland strands
- Blush satin ribbon long spool
Style It With
If you made one of these trees, you just created a piece of decor that looks custom, playful, and genuinely high impact without needing a dozen specialty tools. The best part is how flexible the formula is. Once you understand the cone, the ruffles, and the tier rhythm, you can switch the palette and embellishments to match any vibe, airy greenhouse pastels, warm garden gold, minimal pearl couture, or full rainbow candy cloud.
Before you put your supplies away, do one final walk around your tree and check for the three things that make it look pro. A smooth silhouette with no bald spots, soft blended transitions between colors, and a few intentional focal points where bows, eggs, or florals feel balanced. That quick final edit is what takes it from craft project to magazine moment.
Style it near greenery, in front of a bright window, or on a neutral rug or linen drop cloth so the tulle can glow. Then enjoy the compliments, because this trend is viral for a reason. It is joyful, dreamy, and makes your whole space feel like spring arrived with a ribbon tied on top.