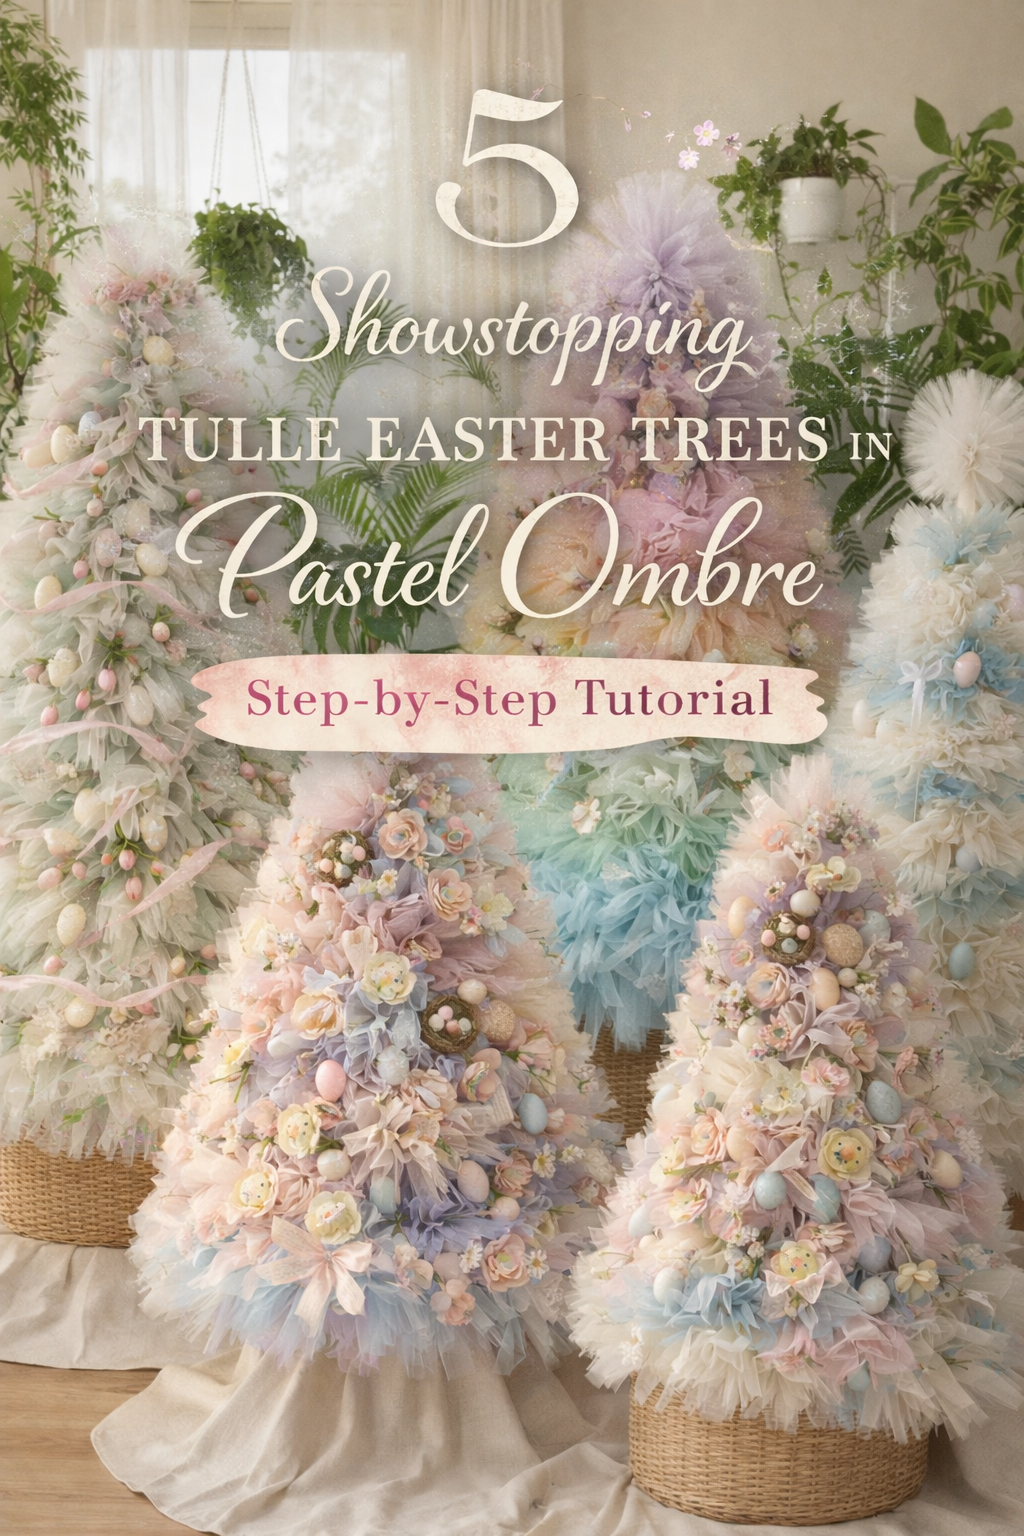
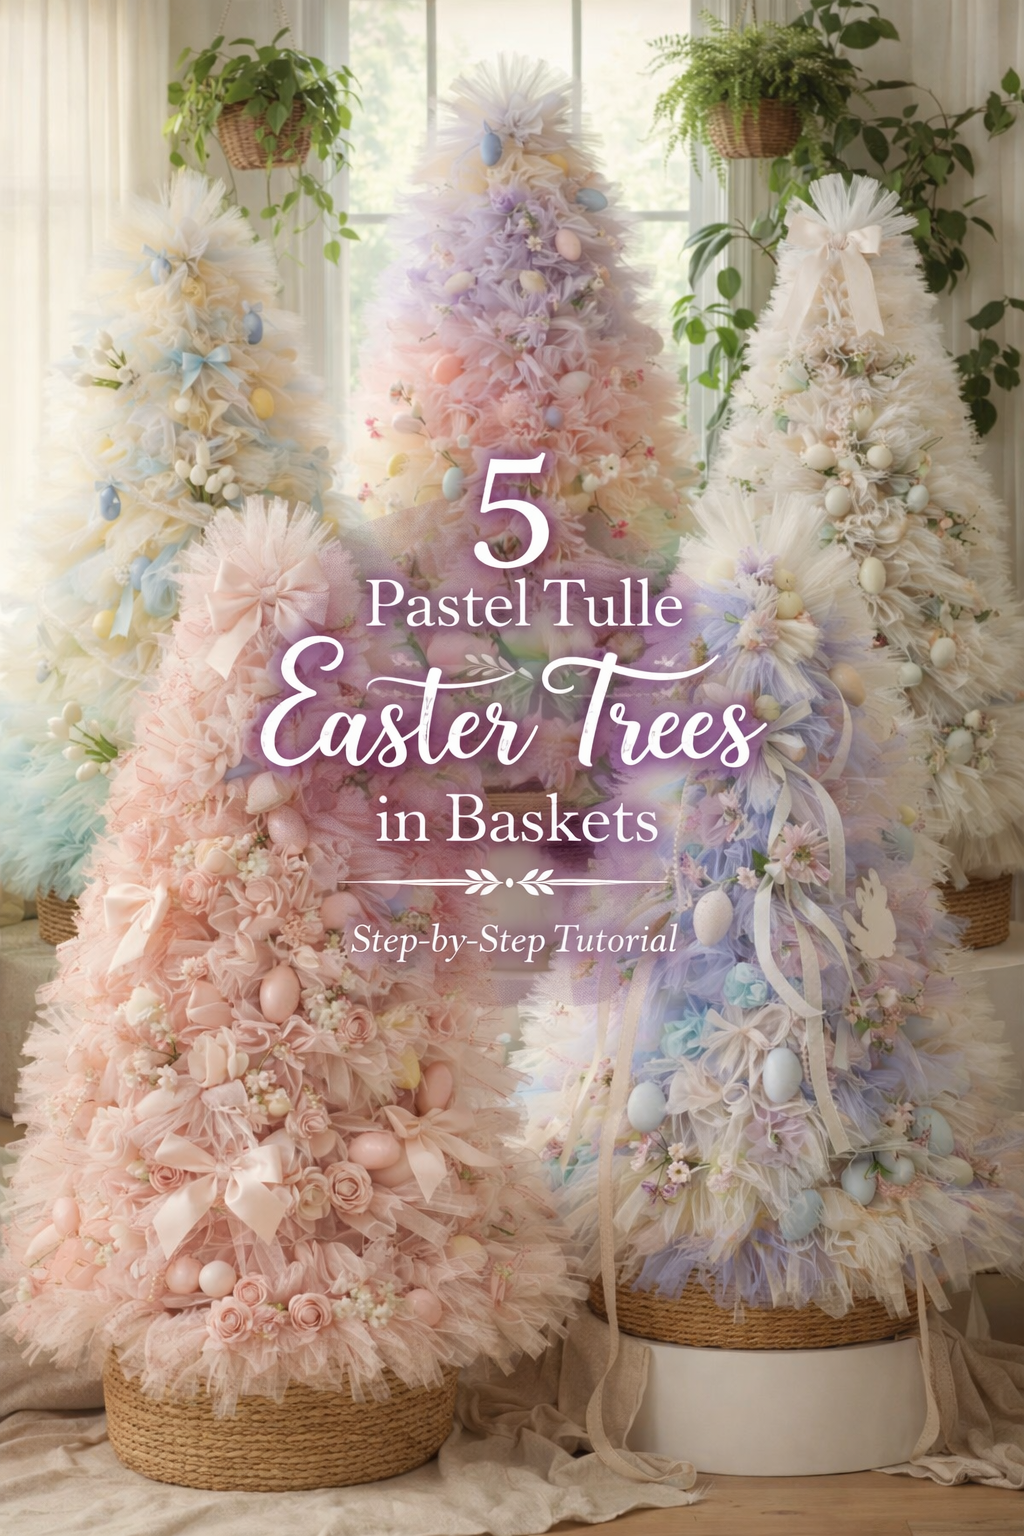
5 Pastel Tulle Easter Trees in Baskets — Step-by-Step Tutorial
More like this
Spring decorating just found its showpiece. These five pastel tulle Easter trees transform simple cone frames and soft mesh into dreamy, couture-inspired seasonal décor. Layered in ombré hues, delicate florals, pearl garlands, bows, and speckled eggs, each tree feels like a romantic centerpiece straight from a styled editorial shoot. Whether you love blush and roses, powder blue and tulips, or airy ivory with greenery, this collection shows how versatile — and stunning — a tulle Easter tree can be.
In this step-by-step tutorial, you’ll learn exactly how to recreate each look, from building a sturdy basket base to blending colors seamlessly and layering embellishments like a pro. Let’s build something beautiful.
💡 Pro Tip: Why I Link to Amazon Search Results and Not One Product
In the Shop the Look and Style it With sections under each bikini, I link to Amazon search results, not single products. Here’s why this matters:
Hot bikinis sell out fast. I don’t want you clicking on a dead link to a sold-out item. Search pages stay updated.
You get more options. Love the vibe but want a different color, cut, or price point? The search results give you everything that matches the look and energy.
I curate each search carefully. These aren’t generic. I spend hours crafting keywords that bring up exactly the kind of bikinis I’d wear—or recommend to my hottest friends.
Support with no pressure. If you click a link, browse, and buy something later, I may earn a small commission at no extra cost to you. That helps me keep bringing you curated collections like this one—powerful, seductive, and always fresh.
So dive in. Click through. Try something risky. These aren’t just bikinis—they’re commands, statements, and maybe even your new favorite weapon of choice.
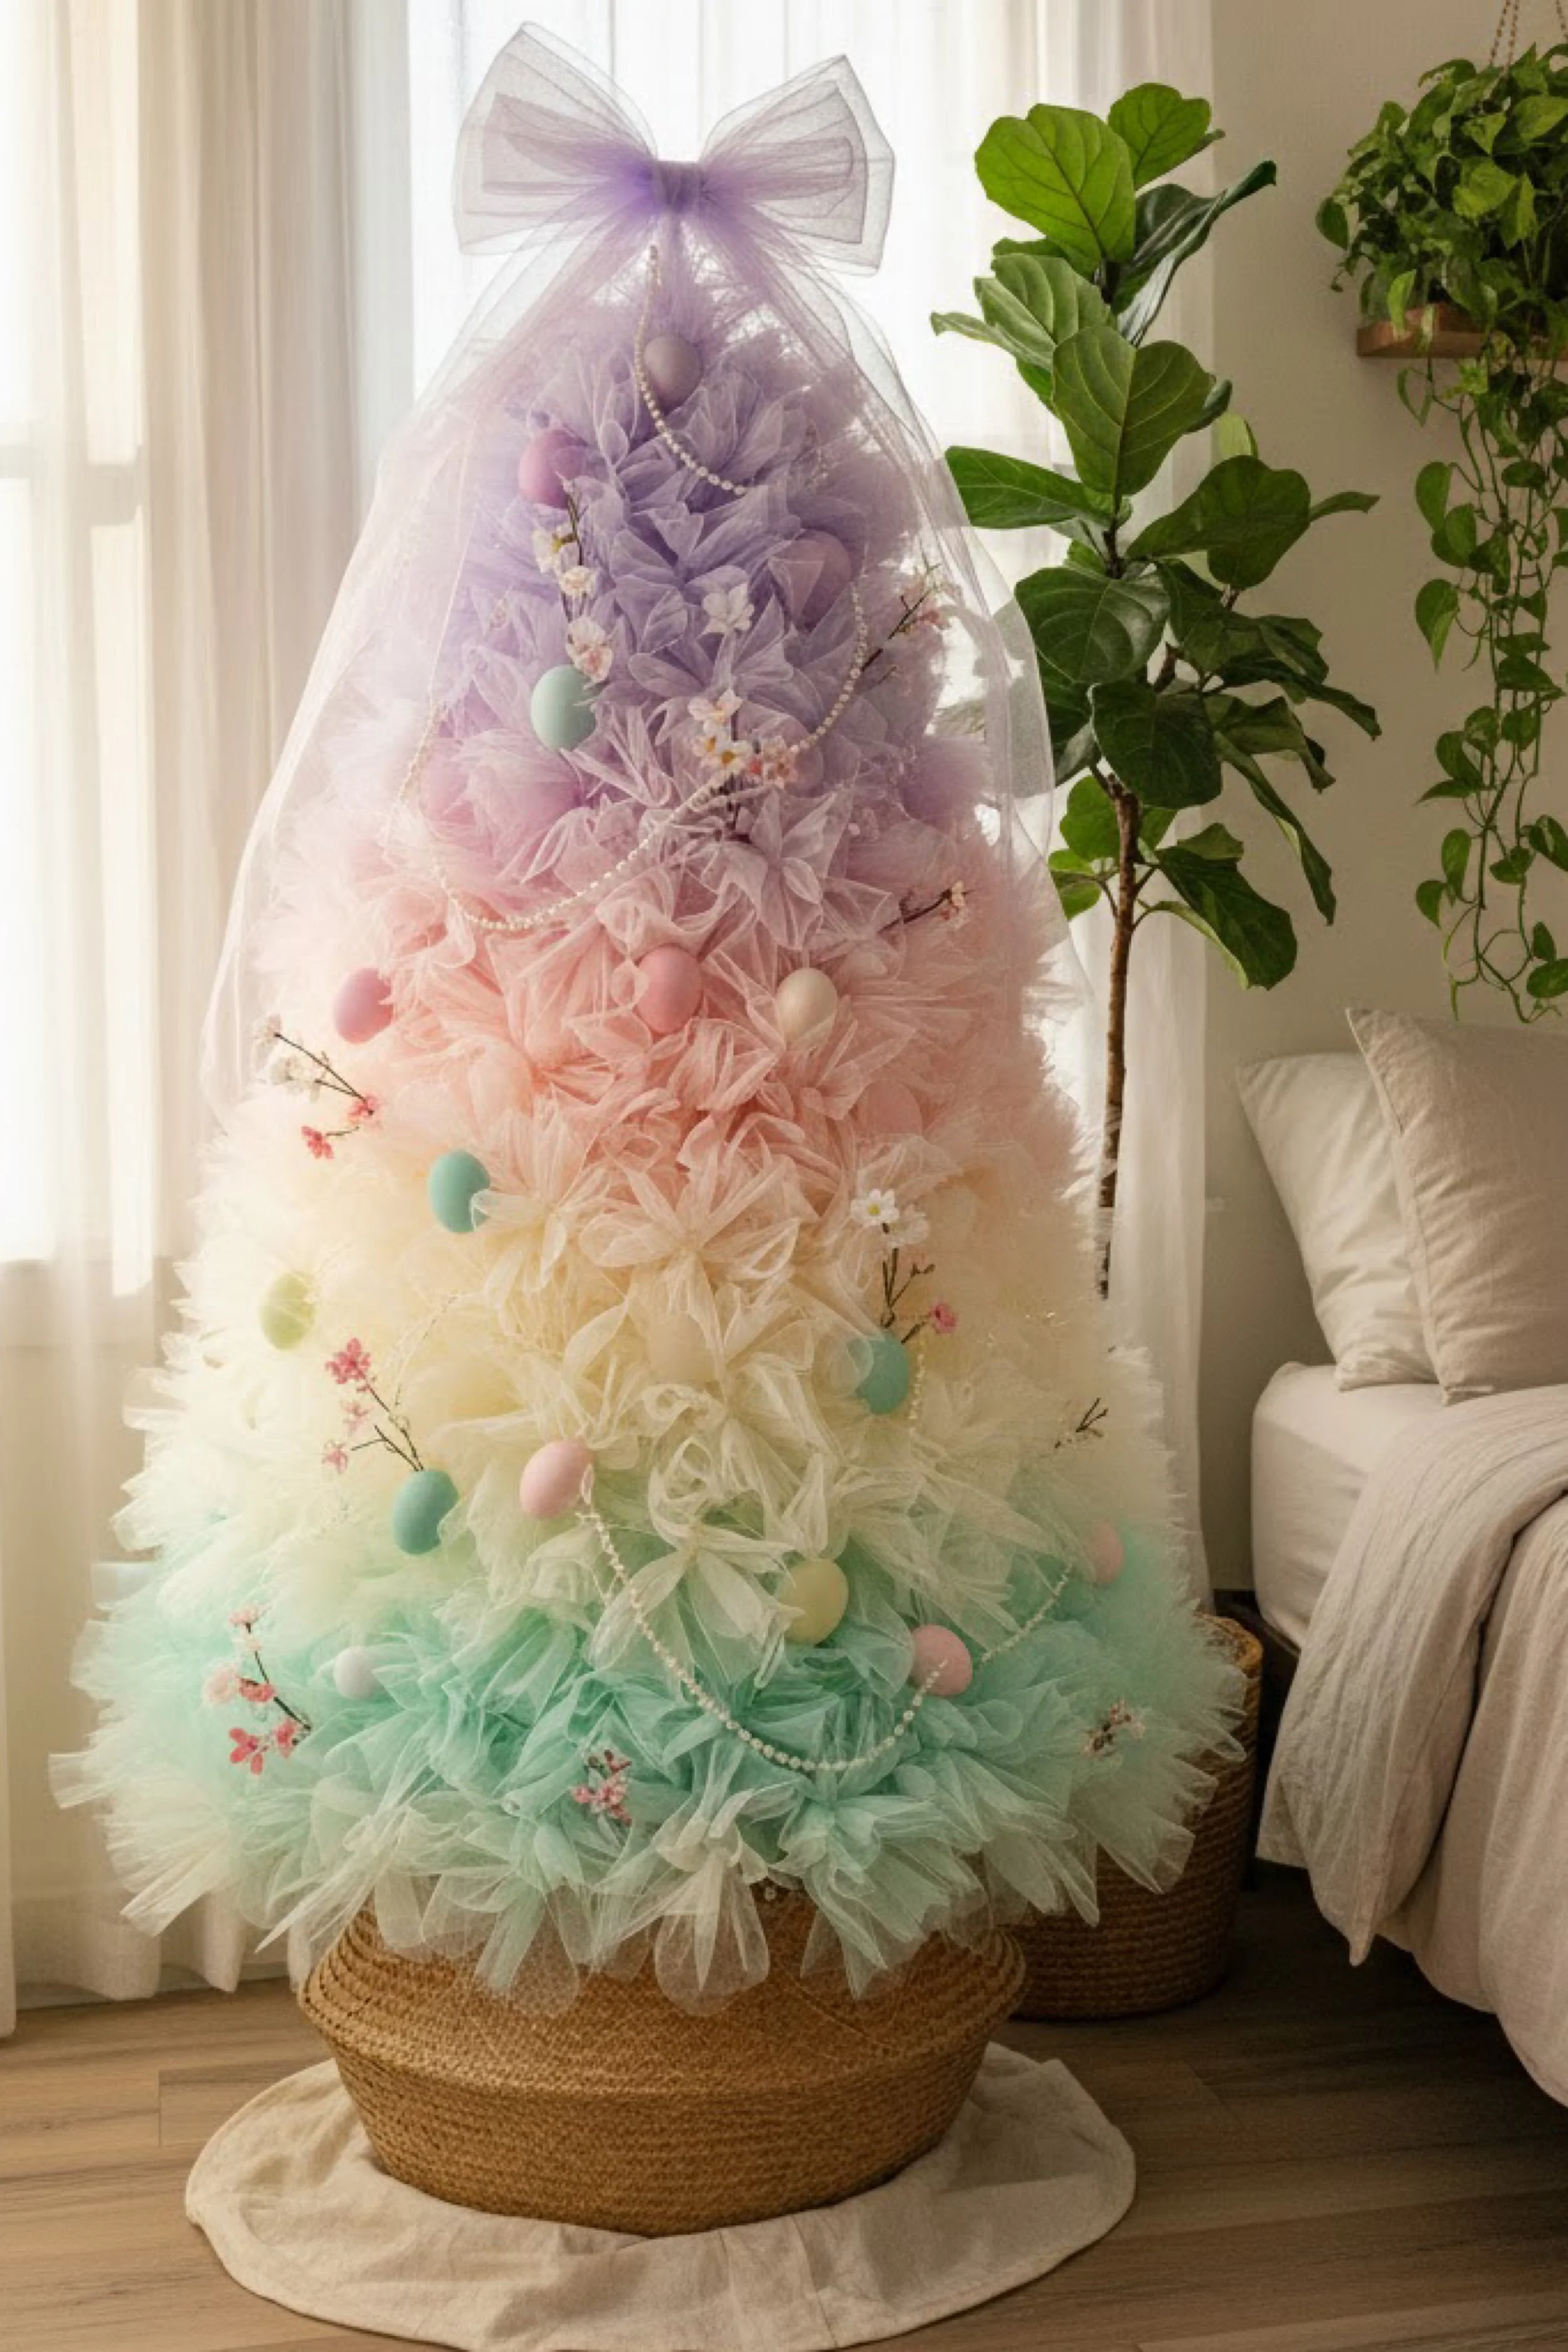
Pastel Ombre Tulle Easter Tree in a Basket — Step-by-Step Tutorial
What you’re making
This project recreates the dreamy pastel ombre tulle tree look with a soft lavender top that melts into blush, buttercream, and mint near the base. The finished tree is fluffy and cloudlike, topped with an oversized sheer bow, and decorated with pastel eggs, delicate spring blossoms, and a draped pearl garland for that romantic, styled home vibe. It sits in a woven basket with a soft fabric skirt, making it feel intentional and “designer” instead of temporary seasonal decor.
You are essentially building a lightweight cone tree, then covering it with layered tulle clusters until it looks like a ruffled pastel confection.
Materials and tools
- Cone frame option 1: wire tomato cage (tall and sturdy)
- Cone frame option 2: foam cone tree form (lightweight, easy to pin)
- Optional stabilizer: wooden dowel or broom handle for a center spine
- Heavy base: woven basket or large planter cachepot (wide enough to prevent tipping)
- Floral foam block or a bag of sand or stones (for weight inside the basket)
- Tulle rolls in pastel shades (lavender, blush, peach, buttercream, mint)
- Extra white or ivory tulle (for soft blending and airy fullness)
- Zip ties (small) and floral wire (thin, green or white)
- Hot glue gun and glue sticks
- Scissors (fabric scissors help a lot)
- Pastel plastic eggs (varied sizes look best)
- Faux blossom picks or small faux florals (cherry blossom style stems are perfect)
- Pearl garland or bead strand
- Sheer ribbon or organza ribbon for the topper bow (lavender or ivory)
- Optional ribbon accents: thin satin ribbon in coordinating pastels
- Optional lights: warm white micro string lights (battery pack)
- Base skirt fabric: linen look cloth, muslin, or soft canvas
- Optional: craft pins if using foam cone
Finished size and customization notes
- The look in the photo reads as a floor standing decorative tree around 3 to 4 feet tall, sitting in a wide basket.
- You can scale it down for tabletop by using a shorter tomato cage or a 24 inch foam cone.
- Color blending tip: keep your darkest or most saturated pastel (lavender) at the top and gradually add lighter tones as you move downward. If your palette looks too “striped,” add a layer of ivory tulle between color transitions to blur the edges.
- If you want a smoother ombre, use more intermediate shades (lavender to lilac to blush to peach to cream to mint). If you want higher contrast, use fewer colors with more dramatic sections.
Step-by-step instructions
Choose your frame and test the silhouette
Set your tomato cage or cone form on the floor and step back. You want a clean cone shape, not too squat and not too skinny. If using a tomato cage, flip it upside down so the wide rings become the base. If the top opening feels too wide, squeeze it slightly and wrap with floral wire to narrow it.
Visual checkpoint: you should see a classic tapered tree outline that looks stable before any tulle is added.Build a stable basket base
Place weight inside your basket first. A bag of sand, a layer of stones, or a heavy floral foam block works well. If using foam, carve a snug hole so the cage legs or dowel can sit inside firmly. Add hot glue around contact points if needed.
Visual checkpoint: you should be able to gently wiggle the frame and the basket stays grounded without tipping.Optional center spine for extra stability
If your tree will be tall, add a wooden dowel in the center. Push it into the foam or weigh it down in the basket. Tie the tomato cage to the dowel using zip ties at two or three points.
Tip: this makes the topper bow and garland placement easier because the top stays centered.Plan the ombre zones before cutting anything
Stand back and mentally divide the tree into sections. For this look, plan: lavender at the top, then blush and peach midsection, then cream, then mint at the bottom. Keep some ivory tulle for blending across every boundary.Cut your tulle into “puff strip” lengths
Tulle can be attached in a few ways, but for this fluffy ruffle look, you want consistent strips you can bunch. Cut strips about 18 to 22 inches long for a 3 to 4 foot tree. Width should be the full roll width.
If your tree is smaller, cut 12 to 16 inch strips.
Tip: stack and cut multiple layers at once to speed up.Create simple tulle clusters
Take one strip, pinch it at the center, and twist once to create a bow like puff. Secure the pinch point with a small piece of floral wire or a tiny zip tie. Repeat.
Make piles by color so you can move quickly while attaching.
Visual checkpoint: each cluster should look like a small airy flower, not a flat ribbon. If it looks flat, twist tighter and fluff the loops.Start at the bottom with mint and cream
Attach your first mint clusters around the base ring of the tomato cage. Use floral wire to wrap the pinch point to the wire frame. Add a dot of hot glue only if needed. Work in a full circle so the base looks even from every angle.
Then add cream clusters slightly above and mixed into the mint so the transition feels soft.
Visual checkpoint: you should now see the lower third looking like a fluffy skirt with no visible frame peeking through.Layer upward and keep rotating the tree
Continue attaching clusters in rows, moving upward. Rotate the tree as you work so one side does not become denser than the other.
Tip: if you notice a “bald” spot, fill it immediately. It is harder to patch later once decorations are added.Blend into peach and blush
As you reach the midsection, shift to peach and blush. The photo has a gentle watercolor vibe, so do not make a hard line. Mix peach with cream first, then gradually add blush, then deepen into lavender.
Visual checkpoint: if you squint at it, the color should look like a gradient, not stripes.Finish the top in lavender and soften with ivory
The top needs to feel airy and light. Use lavender clusters as the main color and add ivory clusters between them to brighten. Keep the very tip slightly less dense so the topper bow can sit neatly.
Tip: if your top looks too bulky, trim a few clusters shorter before attaching.Fluff and shape the silhouette
Before decorating, fluff every cluster. Pull the tulle loops outward to create volume. Step back and check the outline. If one side is wider, add a few clusters to the opposite side or compress the fluffy section slightly by hand.
Visual checkpoint: you should see a clean cone shape with an even, cloudlike surface.Add optional micro lights first
If you want lights, weave the string through the frame now. Tuck the battery pack into the basket. Keep lights subtle so the pastel colors stay the star.Drape the pearl garland
Start near the upper third and drape the pearl strand in gentle swoops. Attach with tiny dots of hot glue or discreet floral wire wraps. Keep the drape loose and elegant, not tight.
Visual checkpoint: the pearls should look like they are floating across the ruffles.Place pastel eggs in a scattered pattern
Push eggs slightly into the tulle so they look nestled, not glued on top. Use hot glue at the back of each egg, then press into the tulle until it grips. Mix colors evenly around the tree.
Tip: vary egg size if you can. Larger eggs read as focal points, smaller eggs fill gaps.Add delicate blossom sprigs
Snip blossom stems into smaller pieces. Tuck them into the tulle at angles, like they naturally grew there. Focus on the lower half and midsection for a balanced look.
Visual checkpoint: blossoms should peek out lightly rather than forming heavy clusters.Create the oversized topper bow
Use sheer organza ribbon. Make a large bow with long tails. Fluff the loops. Attach at the top with floral wire around the frame or dowel, then add a small dot of glue for security.
Tip: if you want the bow to stand tall like the photo, add a small piece of wire inside the ribbon loop to help it hold shape.Style the basket and base skirt
Drape fabric around the base like a soft puddle. If your basket is tall, let the fabric spill out slightly. Tuck the fabric edge under the basket rim so it looks intentional.Final step back and adjust
Walk around the tree. Check for visible frame, uneven density, or clustered eggs. Adjust until every side feels photo ready.
Troubleshooting common mistakes and fixes
- Problem: The frame shows through the tulle.
Fix: add more clusters, especially at the base rings and any vertical supports. Use ivory clusters as filler because they blend with every pastel. - Problem: The ombre looks like stripes.
Fix: add a blending layer of ivory between colors and mix a few clusters of the next color into the previous section. - Problem: The tree leans or feels top heavy.
Fix: add more weight in the basket, widen the base ring if using a cage, or add a center dowel spine tied to the frame. - Problem: Decorations look “stuck on.”
Fix: nest eggs and florals deeper into the tulle, so they look cradled by the ruffles instead of sitting on top. - Problem: The topper bow droops.
Fix: secure with wire first, then glue. Consider using wired ribbon or slipping craft wire into the bow loops.
Finishing details
- Fluffing: give the whole tree a final gentle fluff. Think cloud texture, not flattened ruffles.
- Steam option: if your tulle arrived creased, use a handheld steamer from a distance. Do not press, just relax the fabric.
- Securing: add a few hidden zip ties around the frame where you feel movement.
- Storage: store in a large bag or wrap in a sheet to keep dust off. Avoid crushing the tulle by stacking items on it.
- Optional upgrade: add a lining of kraft paper inside the basket so the base looks tidy when viewed from above.
Shop Similar
- Pastel tulle rolls in lavender blush mint and cream
- Tall tomato cage for cone tree frame
- Woven basket large planter basket
- Pearl garland bead strand for decorating
- Pastel plastic Easter eggs assorted sizes
Style It With
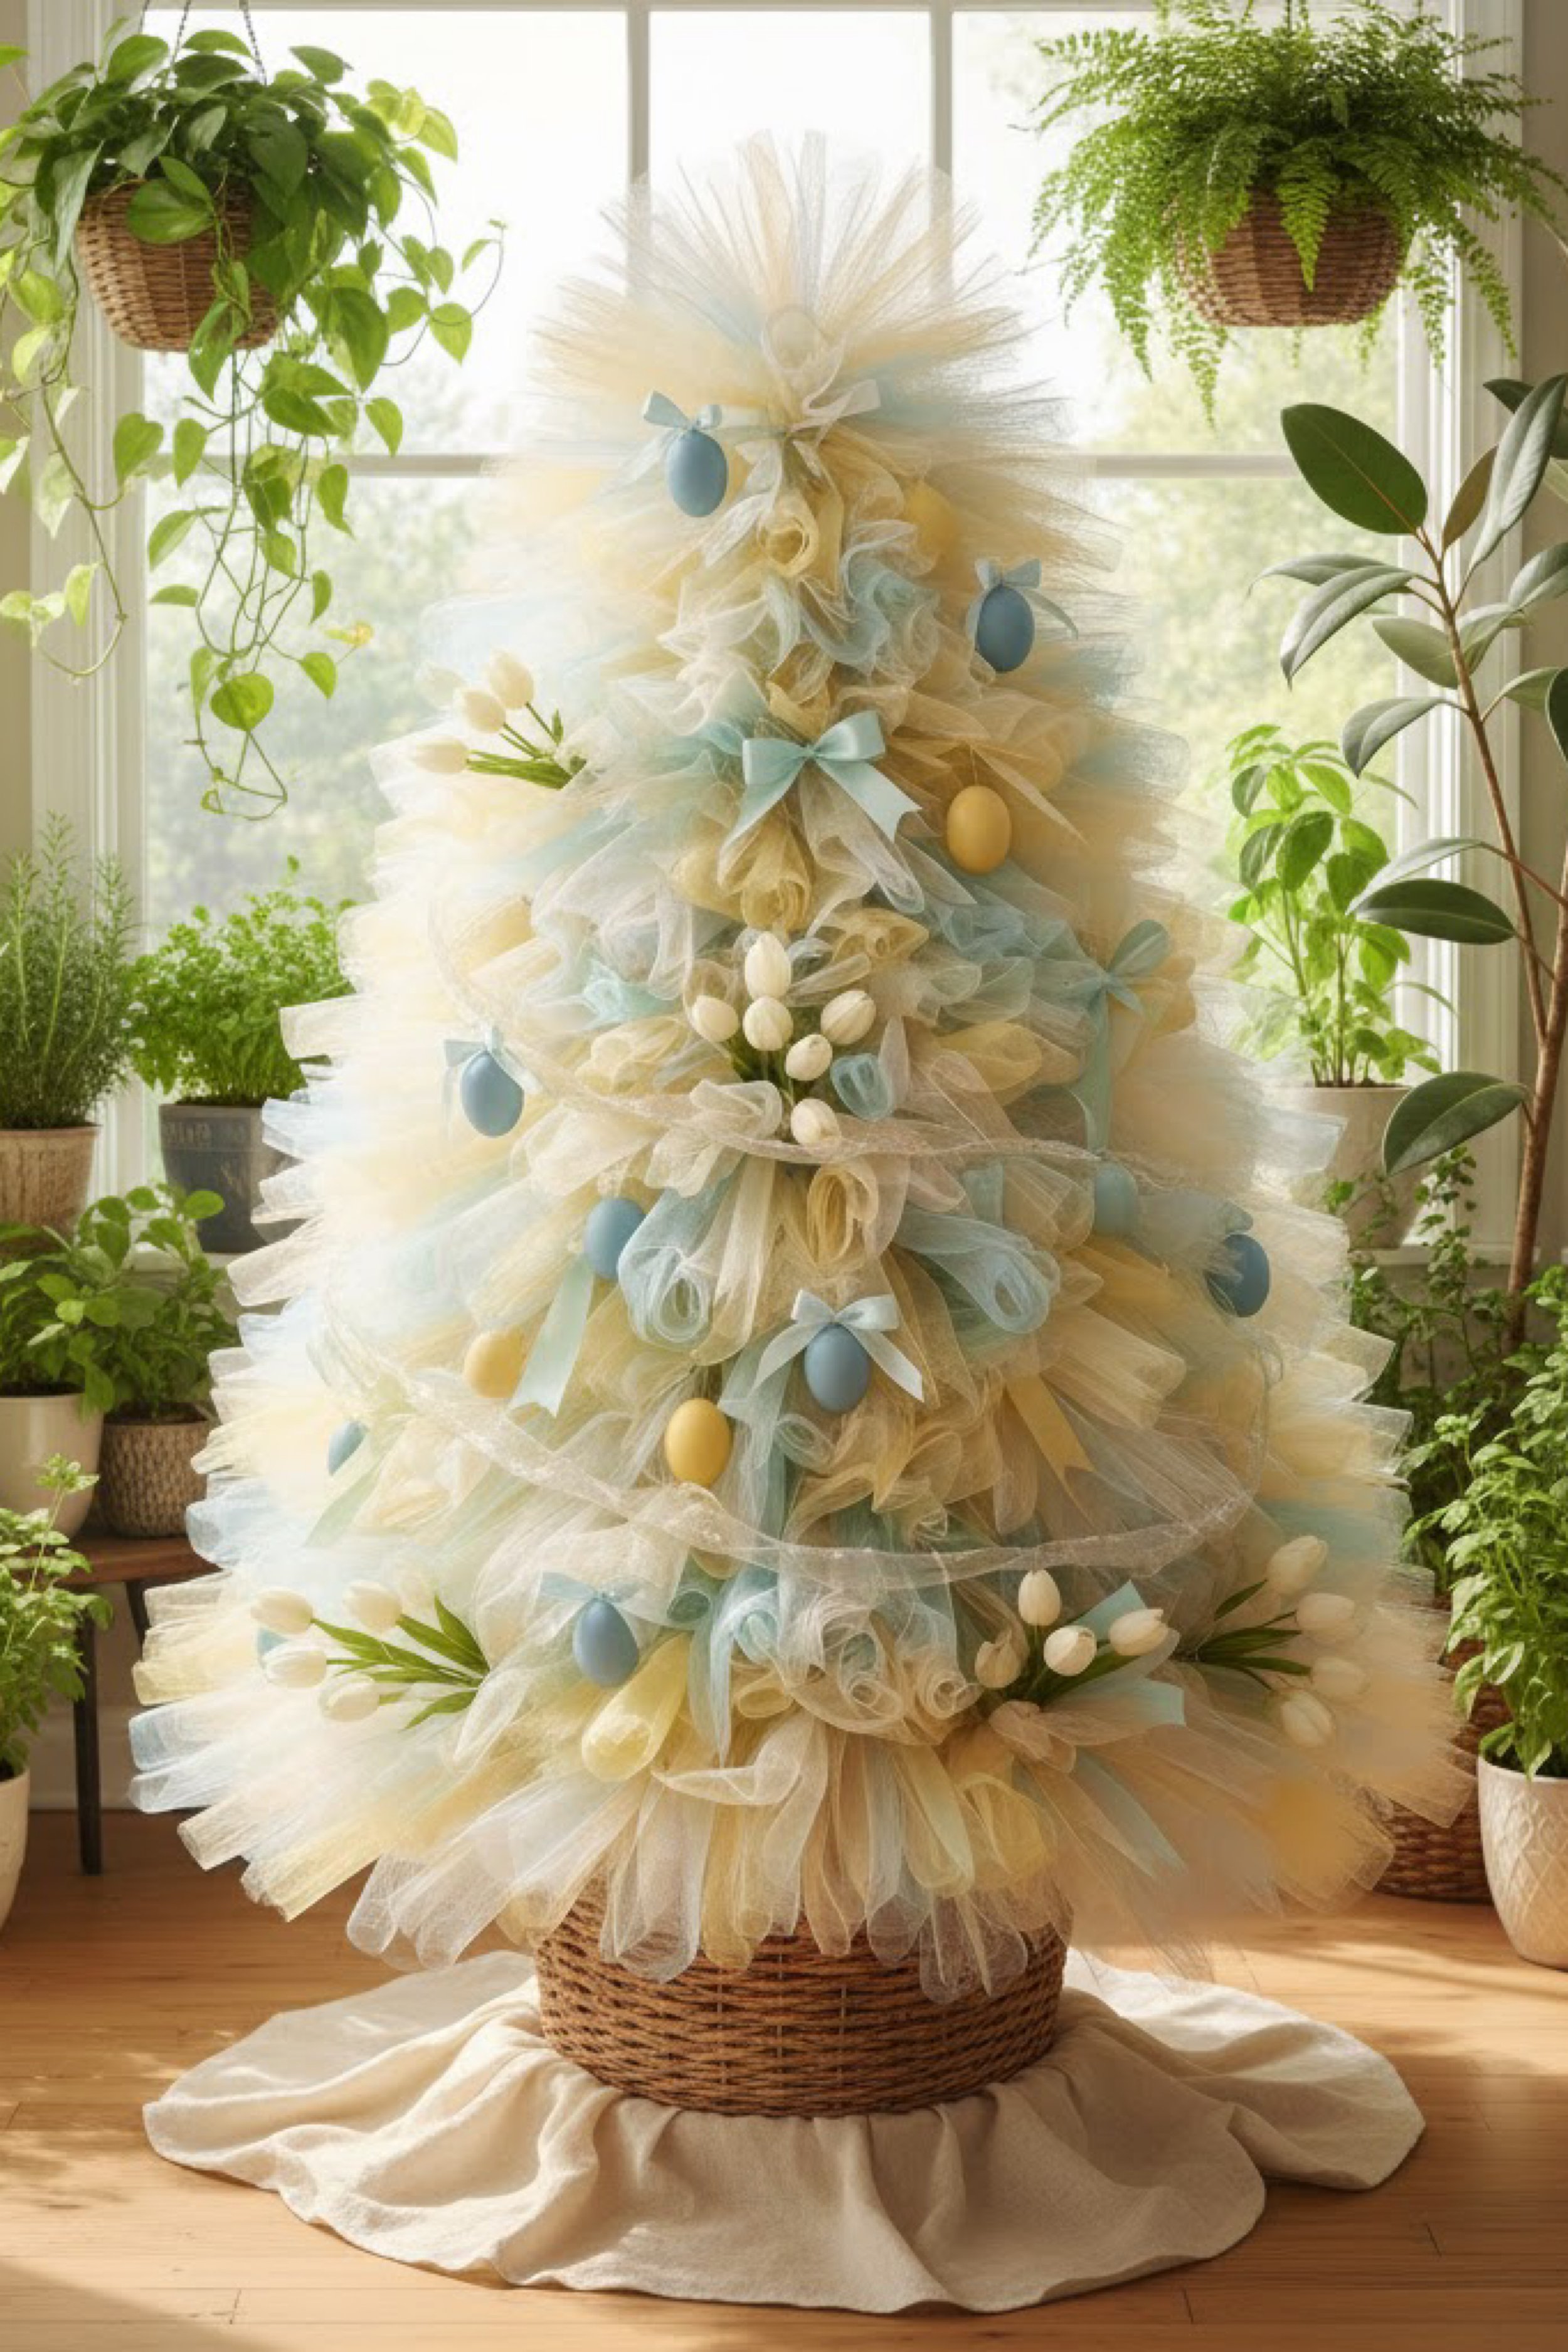
Blue and Buttercream Tulle Easter Tree with Tulip Clusters — DIY Guide
What you’re making
This tutorial recreates the airy, sunlit spring tree made from layers of soft buttercream and pale blue tulle, decorated with pastel eggs, tiny bows, and bright white tulip clusters that feel like a fresh floral moment. The overall effect is light, clean, and greenhouse pretty, like it belongs in front of a big window surrounded by plants.
The key to this look is extra fluffy outer edges and a slightly looser, more “floating” tulle texture so the colors feel like they glow.
Materials and tools
- Cone frame option 1: tomato cage or wire cone tree frame
- Cone frame option 2: foam cone (at least 24 inches for statement size)
- Base: woven basket, round planter, or urn style pot
- Weight: stones, sand, or floral foam
- Tulle rolls: pale blue, buttercream yellow, ivory or white
- Optional accent: a hint of warm beige tulle for depth
- Floral wire and small zip ties
- Hot glue gun and glue sticks
- Scissors
- Pastel eggs: mostly blue and yellow plus a few white eggs
- Small satin ribbon for mini bows (pale blue is perfect)
- Faux tulip bundles or tulip picks (white looks most like the photo)
- Optional greenery picks: soft spring leaves to frame tulips
- Optional micro lights
- Fabric for base drape: cream linen look cloth
Finished size and customization notes
- The pictured tree reads around 3 feet tall, full and fluffy, with a wide skirt.
- Want it taller: use a 54 inch tomato cage and longer tulle strips.
- Want it tighter and more sculpted: use a foam cone and pin clusters instead of wiring them.
- Color balance tip: keep buttercream slightly dominant, with blue as the accent swirl through the middle and lower sections. If your blue takes over, soften with extra ivory clusters.
Step-by-step instructions
Set up your frame and base like a display piece
Place your basket or pot where you want the tree to live, preferably near a window if you want that bright look. Add weight inside first. Insert the cone frame and stabilize it.
Visual checkpoint: you should be able to bump the basket lightly without the frame wobbling.Cut tulle strips for maximum fluff
For a fluffy edge like the photo, cut strips 20 to 24 inches long. Longer strips create bigger ruffles and a softer silhouette.
Make three piles: buttercream, pale blue, and ivory.Make “double puff” clusters for extra volume
Take two strips of the same color, stack them, pinch the center, twist once, and secure with wire. This creates thicker clusters and reduces how many you need overall.
Visual checkpoint: each cluster should look like a small, full pom flower when fluffed.Start with an ivory underlayer
Even if you want yellow and blue to dominate, an ivory underlayer makes the whole tree look lighter and more expensive. Attach ivory clusters at the base ring and work up about a third of the tree. Do not worry if it looks plain right now.Add buttercream as your main body color
Attach buttercream clusters over the ivory, leaving some ivory peeking through. Work in spirals instead of straight rows to avoid striping.
Tip: spiral placement means you move around the tree naturally, keeping density even.Weave pale blue clusters through the middle
Add pale blue clusters in small runs, like gentle waves. Concentrate blue around the midsection and lower third, with a few blue clusters higher for balance.
Visual checkpoint: when you step back, you should see a soft mix, not a hard split between colors.Build a wide skirt at the bottom
The photo has a dramatic fluffy base. Add an extra ring of clusters around the bottom edge, almost like a tutu. This can be mostly ivory with some buttercream.
Tip: if using a tomato cage, attach clusters to the lowest ring and also slightly below it by wrapping wire around the vertical supports.Shape the silhouette by fluffing as you go
Every ten clusters, fluff them. Pull loops outward. Check the cone shape and correct early.
Visual checkpoint: your tree should look evenly full from every angle with no flat spots.Add a soft topper moment
The top looks airy rather than heavily bowed. You can add a small cluster of ivory tulle puff at the very top, then a modest bow, or skip the bow and let tulle be the topper. If you choose a bow, keep it small and delicate.Place eggs in a balanced scatter
Use mostly blue eggs and yellow eggs, plus a few white eggs for calm. Nest each egg into the tulle. Apply glue to the back of the egg, then press it into a pocket of tulle until it grips.
Visual checkpoint: eggs should appear tucked in, not perched on top.Tie small blue bows and place them like accents
Make tiny satin bows and glue them near eggs or on open areas. Keep them evenly spaced. This adds the “sweet” detail that makes the tree feel curated.Create tulip clusters like the photo
The tree has clusters of white tulips grouped together, not single stems everywhere. Trim tulip picks into short bunches of three to five blooms. Create two or three main tulip moments: one in the middle, one lower, and one small one near the base.
Tuck stems into the tulle and glue discreetly.
Visual checkpoint: tulips should feel like little bouquets emerging from the ruffles.Optional ribbon loops for airy movement
If you want a bit more motion, add a few loops of sheer ribbon trailing gently through the middle. Keep it subtle so it stays light and not busy.Add base drape for the greenhouse styling
Place a cream cloth under the basket like a puddled runner. The photo uses a soft neutral drape to make the tree feel styled and editorial.Final balancing pass
Walk around the tree. Add one or two eggs where it feels sparse. Adjust tulip clusters so they are not all on one side. Fluff again.
Troubleshooting common mistakes and fixes
- Problem: It looks too dense and heavy.
Fix: add more ivory clusters, especially on the outer edges. Fluff more aggressively. Consider removing a few clusters from the top third. - Problem: The colors feel muddy.
Fix: separate your blue and yellow moments slightly and add ivory between them. Avoid mixing blue and yellow clusters too tightly in the same exact spot. - Problem: Eggs keep falling out.
Fix: create a deeper tulle pocket by bunching tulle behind the egg, then glue and hold for longer. Lightly score the egg surface with sandpaper so glue grips better. - Problem: Tulips look fake or awkward.
Fix: cluster them and angle them outward slightly. Add a tiny bit of greenery behind the tulips to frame them. - Problem: The base looks unfinished.
Fix: add a fabric drape, and consider tucking a few ivory clusters down near the basket rim to soften the transition.
Finishing details
- Fluffing: this tree should look like a soft cloud. Fluff until you see airy edges and gentle layers.
- Steam: if needed, steam lightly from a distance to relax creases.
- Securing: add hidden wire wraps to lock clusters near the top so they do not slide down.
- Optional upgrade: add a few tiny faux pearl picks near tulips for a subtle shine.
- Storage: cover with a large bag or sheet and avoid compressing the tulip clusters.
Shop Similar
- Pale blue buttercream and ivory tulle rolls
- White faux tulip bundles for spring decor
- Pastel Easter eggs blue yellow white
- Woven basket planter round large
- Micro fairy lights warm white battery
Style It With
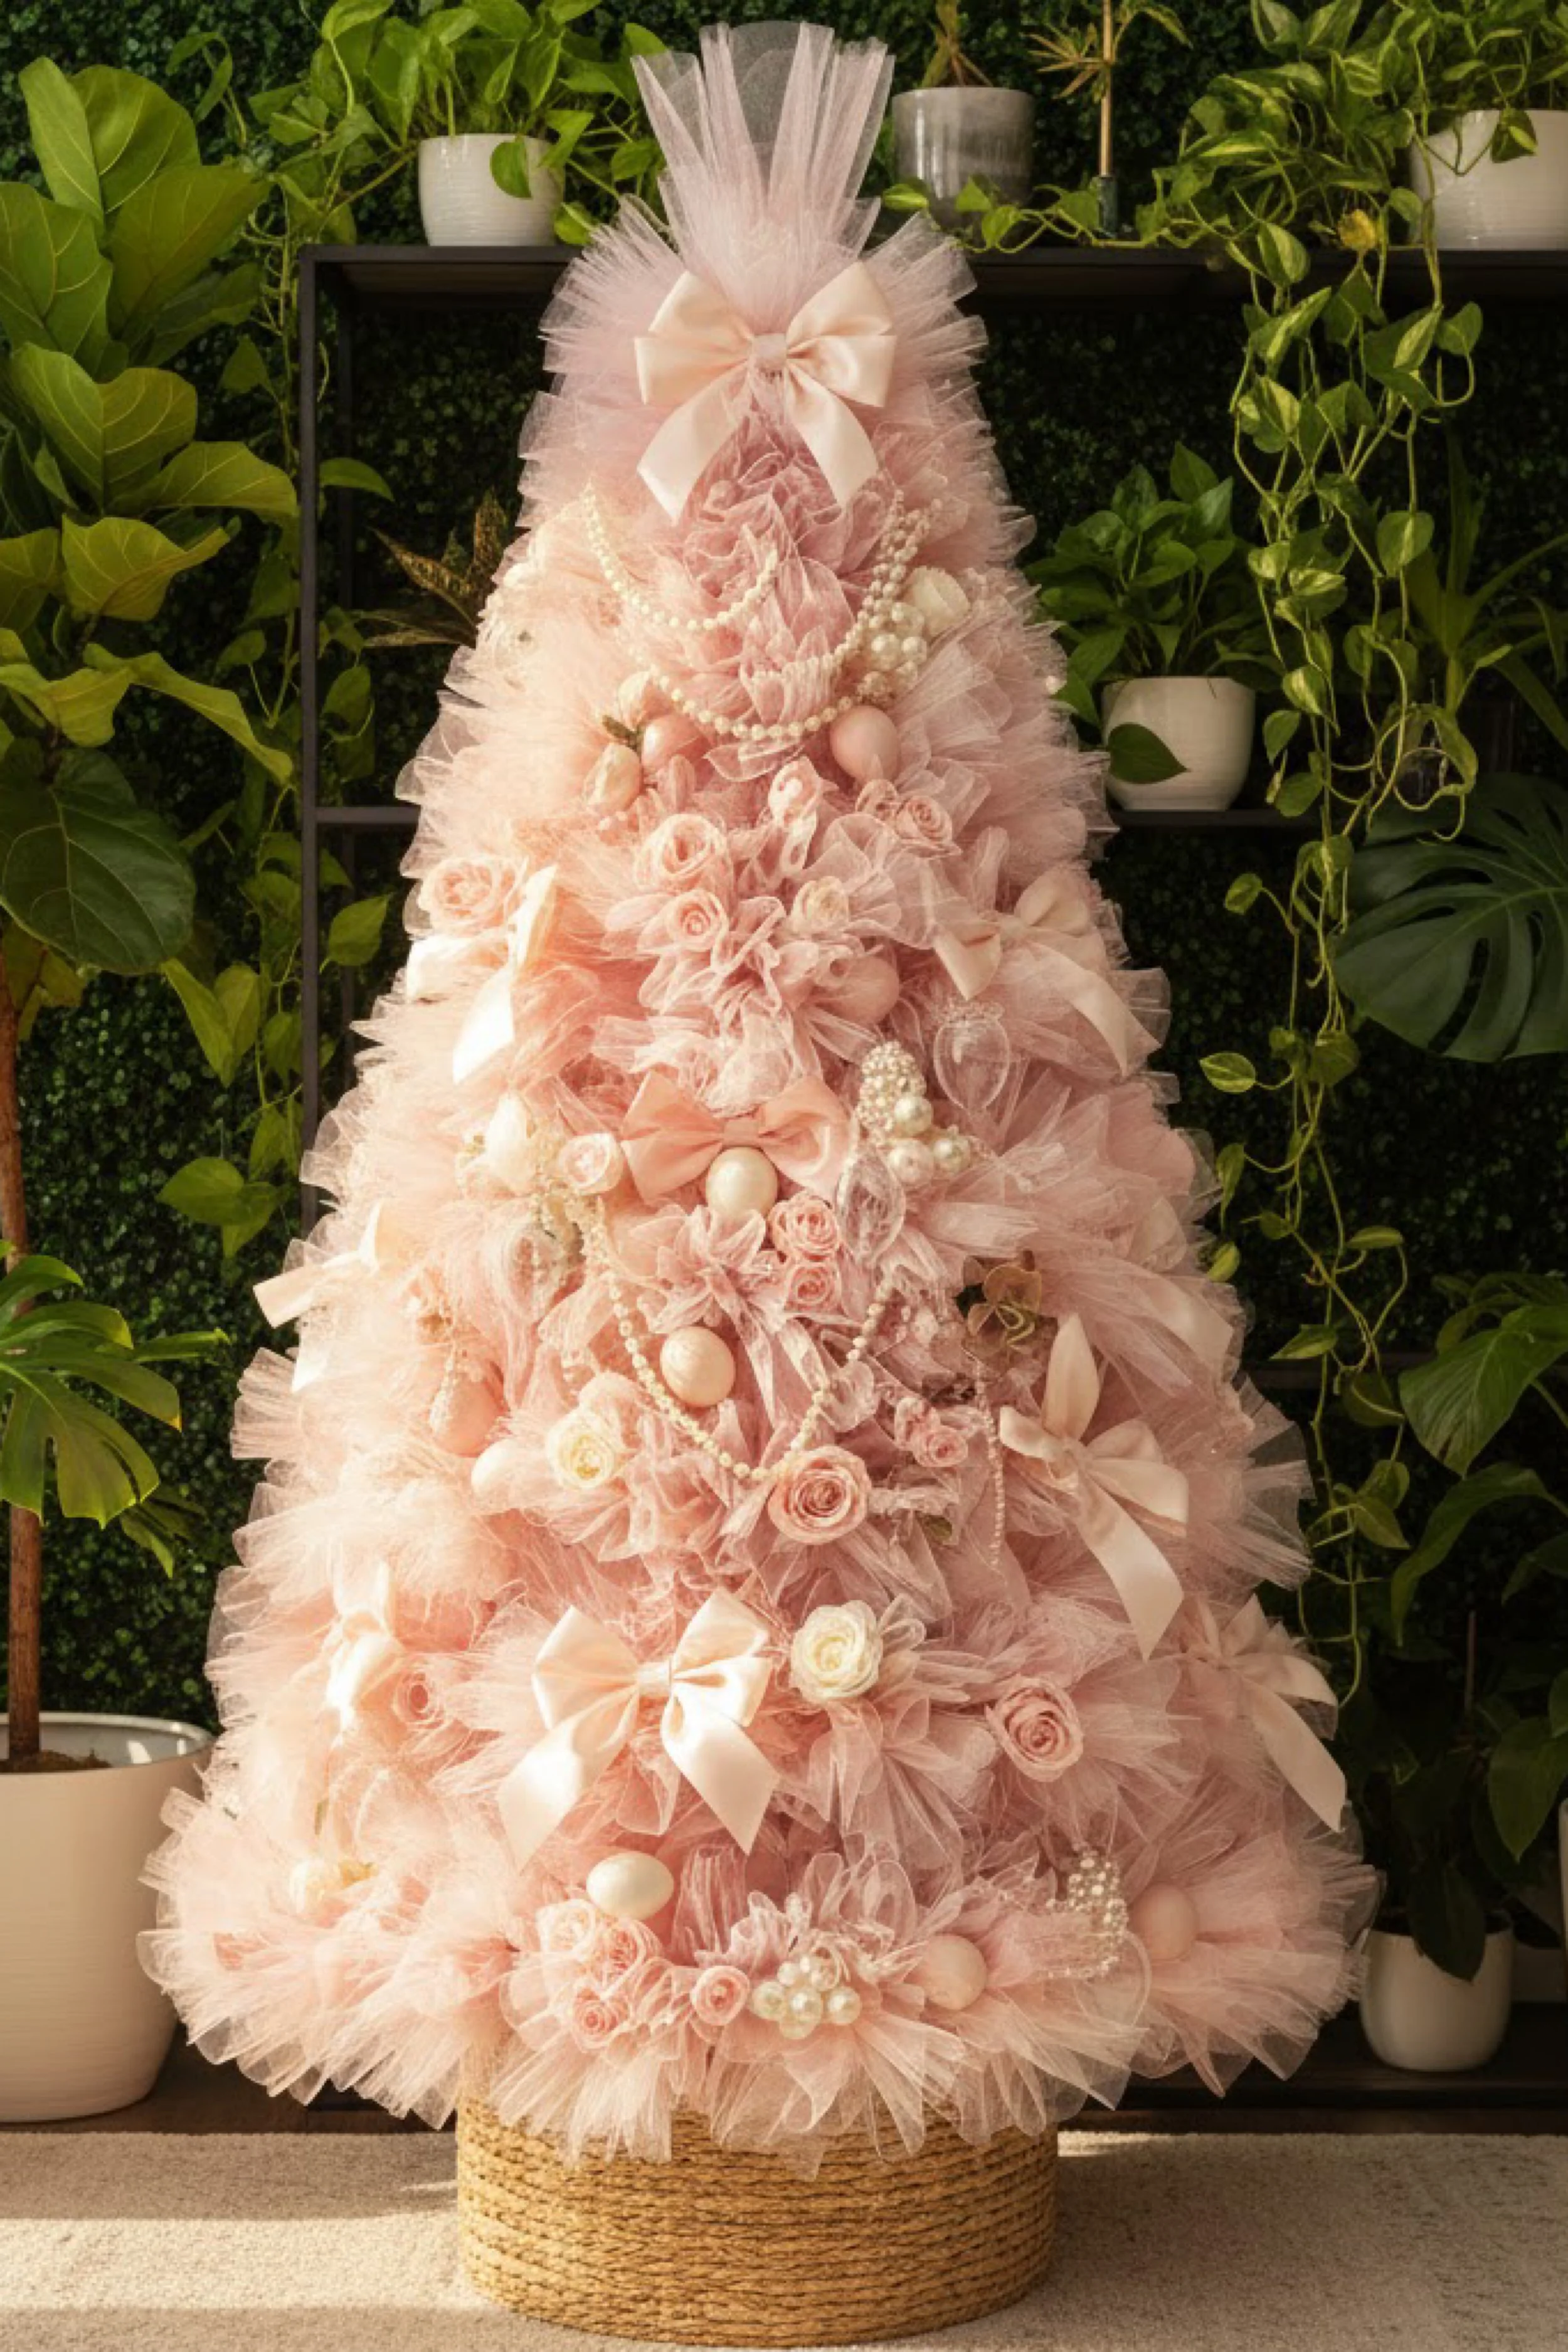
Blush Rose Tulle Easter Tree with Pearls and Bows — How-To Guide
What you’re making
This tutorial recreates the ultra romantic blush pink tulle tree that looks like a bouquet turned into a cone shaped centerpiece. It is packed with soft ruffles, satin bows, pearl garlands, and rose details, plus pale eggs tucked into the layers. The overall look is glamorous but still spring appropriate, especially when styled against greenery for contrast.
The secret here is density: this tree is intentionally full, with many small embellishments layered in so it reads lush and couture.
Materials and tools
- Cone frame: wire cone tree frame or tall tomato cage flipped upside down
- Optional foam cone topper piece to refine the tip
- Heavy base: basket or planter plus weight (stones or sand)
- Tulle rolls: blush pink, dusty rose, and a small amount of ivory
- Optional: a hint of warm peach tulle for dimension
- Floral wire, small zip ties
- Hot glue gun and glue sticks
- Scissors
- Satin ribbon for bows (blush or champagne)
- Pearl garland strands and optional pearl picks
- Faux rose picks or small foam roses (blush and ivory mix)
- Pastel eggs in soft blush and cream tones
- Optional: tiny organza ribbon for extra soft loops
- Optional micro lights
- Fabric for base drape (neutral cream)
Finished size and customization notes
- This look reads around 3 to 4 feet tall with a wide base.
- To make it more petite, use fewer embellishments and keep roses as focal clusters only.
- If you want it more modern, reduce pearls and use just one bow at the top plus a few small bows at mid level.
- Color tip: keep blush dominant, then add dusty rose deeper in the middle for depth. Use ivory only as a highlight so it stays soft, not stark.
Step-by-step instructions
Stabilize the frame and prepare a lush base
Place weight inside the basket or planter. Insert the frame and secure it. For a tall, dense tree like this, stability matters more because embellishments add weight.
Visual checkpoint: frame should feel anchored and upright.Cut tulle into slightly shorter strips for tight ruffles
For a dense rose like texture, cut strips 16 to 20 inches long. Shorter strips create tighter ruffles and more structure.
Sort into blush, dusty rose, and ivory piles.Make compact “rose puff” clusters
Take one strip, pinch the center, twist twice, and secure with wire. The extra twist makes a more compact, rosette like puff. Fluff the loops outward.
Visual checkpoint: clusters should look like little soft flowers, not wide bows.Start at the bottom and pack it in
Attach blush clusters tightly around the base. Overlap clusters so you do not see gaps. Work around the tree in a full circle, then move slightly upward.
Tip: this tree looks best when the outer edge is very fluffy, so let some tulle extend past the base ring.Add dusty rose depth through the middle
Once the lower third is blush, begin blending in dusty rose in the midsection. Place dusty rose clusters closer together in a few zones to create shadow and dimension, then soften with blush again.
Visual checkpoint: you should see gentle depth, like layers in a bouquet.Highlight with small touches of ivory
Add ivory clusters sparingly, mainly near where roses and pearls will sit. Ivory creates sparkle and helps embellishments stand out, but too much will turn the tree pale instead of blush.Refine the top cone and leave space for the topper bow
Pack the top area with blush clusters but keep the very tip slightly less crowded. You want a clean place to attach a large satin bow.Fluff and shape the silhouette
Step back and check the cone shape. This tree should be full but still clearly tapered. If one side bulges, compress the tulle gently and add clusters to the opposite side.Add optional lights before embellishments
If you want lights, weave them through now. Keep them subtle so they glow behind the blush.Drape pearl garlands in layered swoops
This look uses pearls as a major design element. Drape one strand in a soft swoop across the upper third, another across the midsection, and a final strand lower. Attach with wire or discreet glue.
Visual checkpoint: pearls should fall like jewelry across fabric, not like tight string.Create satin bows and place them in a balanced pattern
Make one large satin bow for the top and several smaller bows for the body. Place small bows as “rest points” where your eye lands, especially in areas that feel too monochrome.
Tip: vary bow size slightly so it looks layered and intentional.Add rose clusters like bouquet accents
Group roses in clusters of three to seven. Place one major cluster in the midsection, one lower, and a few smaller clusters around. Nest them into the tulle so petals peek out.
Visual checkpoint: roses should look embedded in the ruffles, not glued flat on top.Nest pastel eggs into the ruffles
Use cream and blush eggs, and keep them slightly hidden so they feel discovered. Glue the back and press into a deep tulle pocket.
Tip: place eggs near rose clusters and bows for a curated look.Add extra pearl picks for sparkle
If you have pearl sprays, tuck a few into rose clusters. This adds dimension and mimics the photo’s jeweled texture.Base styling and drape
Put a neutral cloth under the basket. If your basket rim looks harsh, tuck a few blush clusters near the rim to soften the transition.Final detail pass
Walk around the tree. Make sure bows and roses are evenly distributed. Adjust pearl drapes so they look natural and not too symmetrical.
Troubleshooting common mistakes and fixes
- Problem: It looks messy instead of lush.
Fix: use tighter clusters, fluff evenly, and keep embellishments grouped rather than scattered randomly. - Problem: Pearls slide off the tulle.
Fix: anchor pearls with tiny wire loops around the frame, not only glue to tulle. The frame gives real hold. - Problem: Bows droop or twist.
Fix: use wired ribbon or add a hidden wire tie behind the knot before gluing. - Problem: The tree looks too flat from the side.
Fix: add extra clusters on the thin side, especially at the base and midsection. - Problem: Roses look like separate objects.
Fix: nest them deeper and surround each rose cluster with two or three small tulle puffs as a collar.
Finishing details
- Fluffing: this style needs maximum fluff. Spend time pulling loops and shaping the cone.
- Steam: a light steam pass helps tulle look softer and more cloudlike.
- Secure: add extra wire ties at the top where the bow and pearls add weight.
- Optional upgrade: add a monogram tag or a tiny spring charm near the basket rim for a boutique finish.
- Storage: cover loosely and avoid pressing roses and bows.
Shop Similar
- Blush and dusty rose tulle rolls
- Pearl garland strands for decorating
- Blush satin ribbon wide for bows
- Faux blush roses small bouquet picks
- Cream and blush pastel eggs
Style It With
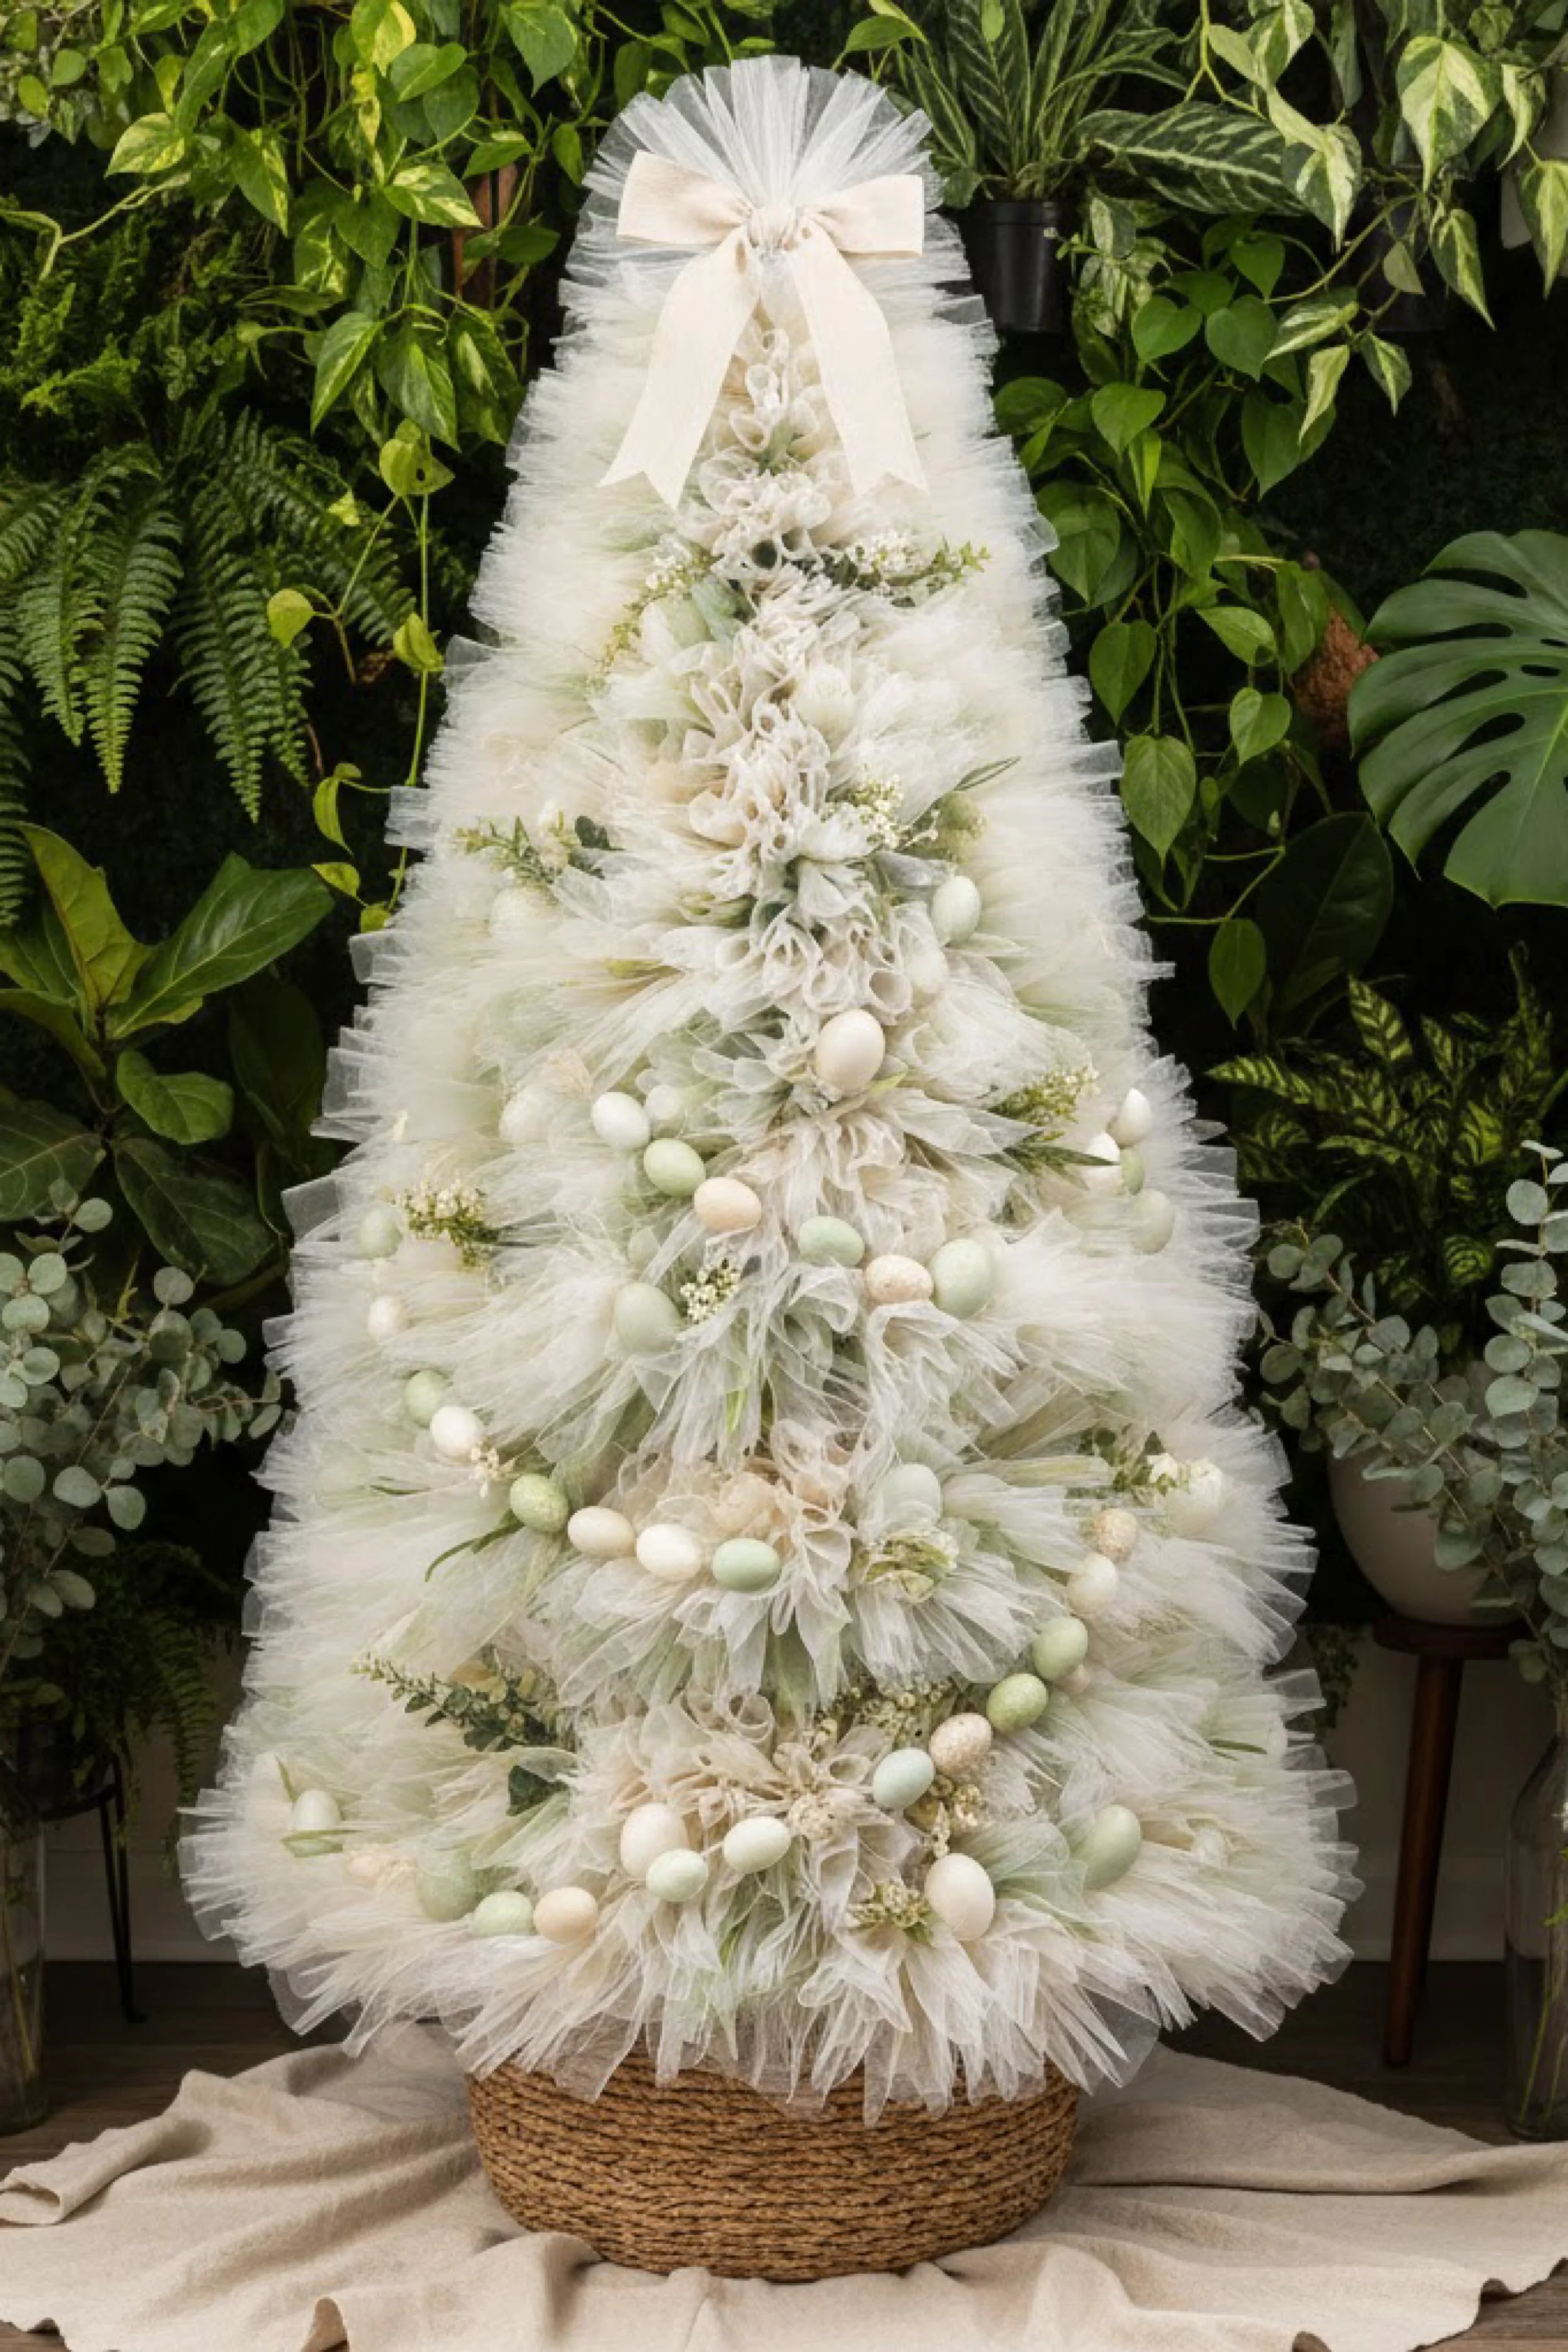
Ivory Tulle Easter Tree with Sage Greenery and Speckled Eggs — Make-It-Yourself Tutorial
What you’re making
This tutorial recreates the elegant ivory tulle tree that feels like spring bridal meets botanical conservatory. It is mostly soft white and ivory ruffles, accented with sage greenery and clusters of speckled pastel eggs in gentle greens and creams. The topper is a long, simple ivory bow that keeps the whole look clean and refined.
This is the easiest palette to make look expensive, because the texture is the main feature and the accents are minimal but intentional.
Materials and tools
- Cone frame: tomato cage, wire cone frame, or foam cone
- Base: woven basket, planter, or urn
- Weight: stones, sand, or floral foam
- Tulle rolls: ivory and white (two shades give depth)
- Optional: a small amount of pale sage tulle for whisper color
- Floral wire and small zip ties
- Hot glue gun and glue sticks
- Scissors
- Faux greenery picks: sage leaves, eucalyptus, or soft spring sprigs
- Speckled eggs: pale green, cream, and light taupe
- Ivory ribbon for topper bow (wired ribbon recommended)
- Optional: baby’s breath picks or tiny white floral sprays
- Optional micro lights
- Neutral cloth for base drape
Finished size and customization notes
- This look reads as tall and narrow, around 3 to 4 feet, with a wide fluffy hem.
- You can do a smaller version by using a 24 inch cone and fewer egg clusters.
- If you want more color, add a few pale green eggs higher up. If you want it even more minimal, cluster eggs only in the lower half and keep the top mostly plain ivory.
Step-by-step instructions
Build a stable base that matches the refined look
Choose a basket or planter in a natural tone. Add weight inside. Insert the frame and secure it.
Visual checkpoint: the tree should stand straight and feel solid.Cut tulle strips and plan your texture
Cut strips 18 to 22 inches long. Use both white and ivory. The slight difference creates depth like layered fabric.
Sort strips into white pile and ivory pile.Make airy clusters with a gentle twist
Pinch the center, twist once, and secure. Fluff lightly. For this look, avoid over twisting because you want softness, not tight rosettes.
Visual checkpoint: clusters should look like soft clouds with visible layers.Start with ivory at the base and build fullness
Attach ivory clusters around the bottom ring. Create a wide hem by letting tulle extend outward. Then add white clusters right above and between ivory clusters.
Tip: alternating shades keeps it from looking flat.Work upward in mixed ivory and white
Continue attaching clusters up the tree. Mix both colors throughout, but keep ivory slightly dominant so the tree reads warm rather than stark.Keep the top clean and slightly less busy
The photo style looks refined, so do not overcrowd the top with embellishments. Build enough tulle to cover the frame, but keep the top third a bit lighter in density.Shape the silhouette and fix gaps
Fluff everything and step back. Fill any visible frame spots with small clusters.
Visual checkpoint: you should see a smooth cone, with a soft feathery edge all around.Optional lights for subtle glow
If you want lights, weave them through now. Keep the battery pack hidden in the basket.Add greenery as soft “branches”
Cut greenery into small sprigs. Tuck them into the tulle at a slight upward angle, like gentle branches. Concentrate greenery in the mid and lower sections, and keep it sparse.
Visual checkpoint: greenery should peek out, not dominate.Place speckled eggs in clusters
This look uses eggs in grouped moments rather than evenly scattered. Create three or four clusters: one near the midsection, one just below it, and two around the lower third. Nest eggs into tulle pockets and glue discreetly.
Tip: mix egg colors inside each cluster so it looks natural.Add tiny white floral sprays if desired
A few small baby’s breath picks tucked near greenery can add softness without adding strong color.Create the long ivory topper bow
Use an ivory ribbon and make a simple bow with long tails. Wired ribbon helps it hold shape. Attach to the top with wire, then add a tiny dot of glue.
Visual checkpoint: the bow should sit centered and the tails should fall neatly down the front.Style the base with a neutral drape
Place a cloth under the basket to soften the floor and give the tree an editorial finish. Keep the drape relaxed and natural.Final refinement pass
Walk around the tree and make sure egg clusters are visible from multiple angles, not all on one side. Adjust greenery so it frames clusters and does not poke out awkwardly.
Troubleshooting common mistakes and fixes
- Problem: The tree looks too white and flat.
Fix: add more ivory clusters and place them in shadow areas. Use two tones consistently. - Problem: Eggs look randomly placed.
Fix: regroup them into clusters and give each cluster a little greenery framing. - Problem: Greenery sticks out harshly.
Fix: trim stems shorter and tuck deeper into tulle so only the leaves show. - Problem: The bow slides.
Fix: wire it to the frame, then glue. If using a foam cone, pin it first, then glue. - Problem: The cone looks uneven.
Fix: fluff and then add filler clusters to the thin side, especially near the base and midsection.
Finishing details
- Fluffing: fluff outward, then lightly pat into a cone shape.
- Steam: a light steam can soften any creases and make tulle look fresh.
- Secure: add a few hidden zip ties around the top where the bow attaches.
- Optional upgrade: add a soft satin ribbon wrap around the basket rim for a polished finish.
- Storage: cover loosely with a sheet to prevent dust, and avoid crushing the bow tails.
Shop Similar
- Ivory and white tulle rolls bulk
- Speckled pastel eggs green and cream
- Sage greenery picks eucalyptus style
- Ivory wired ribbon for long bow
- Wire cone tree frame or tomato cage
Style It With
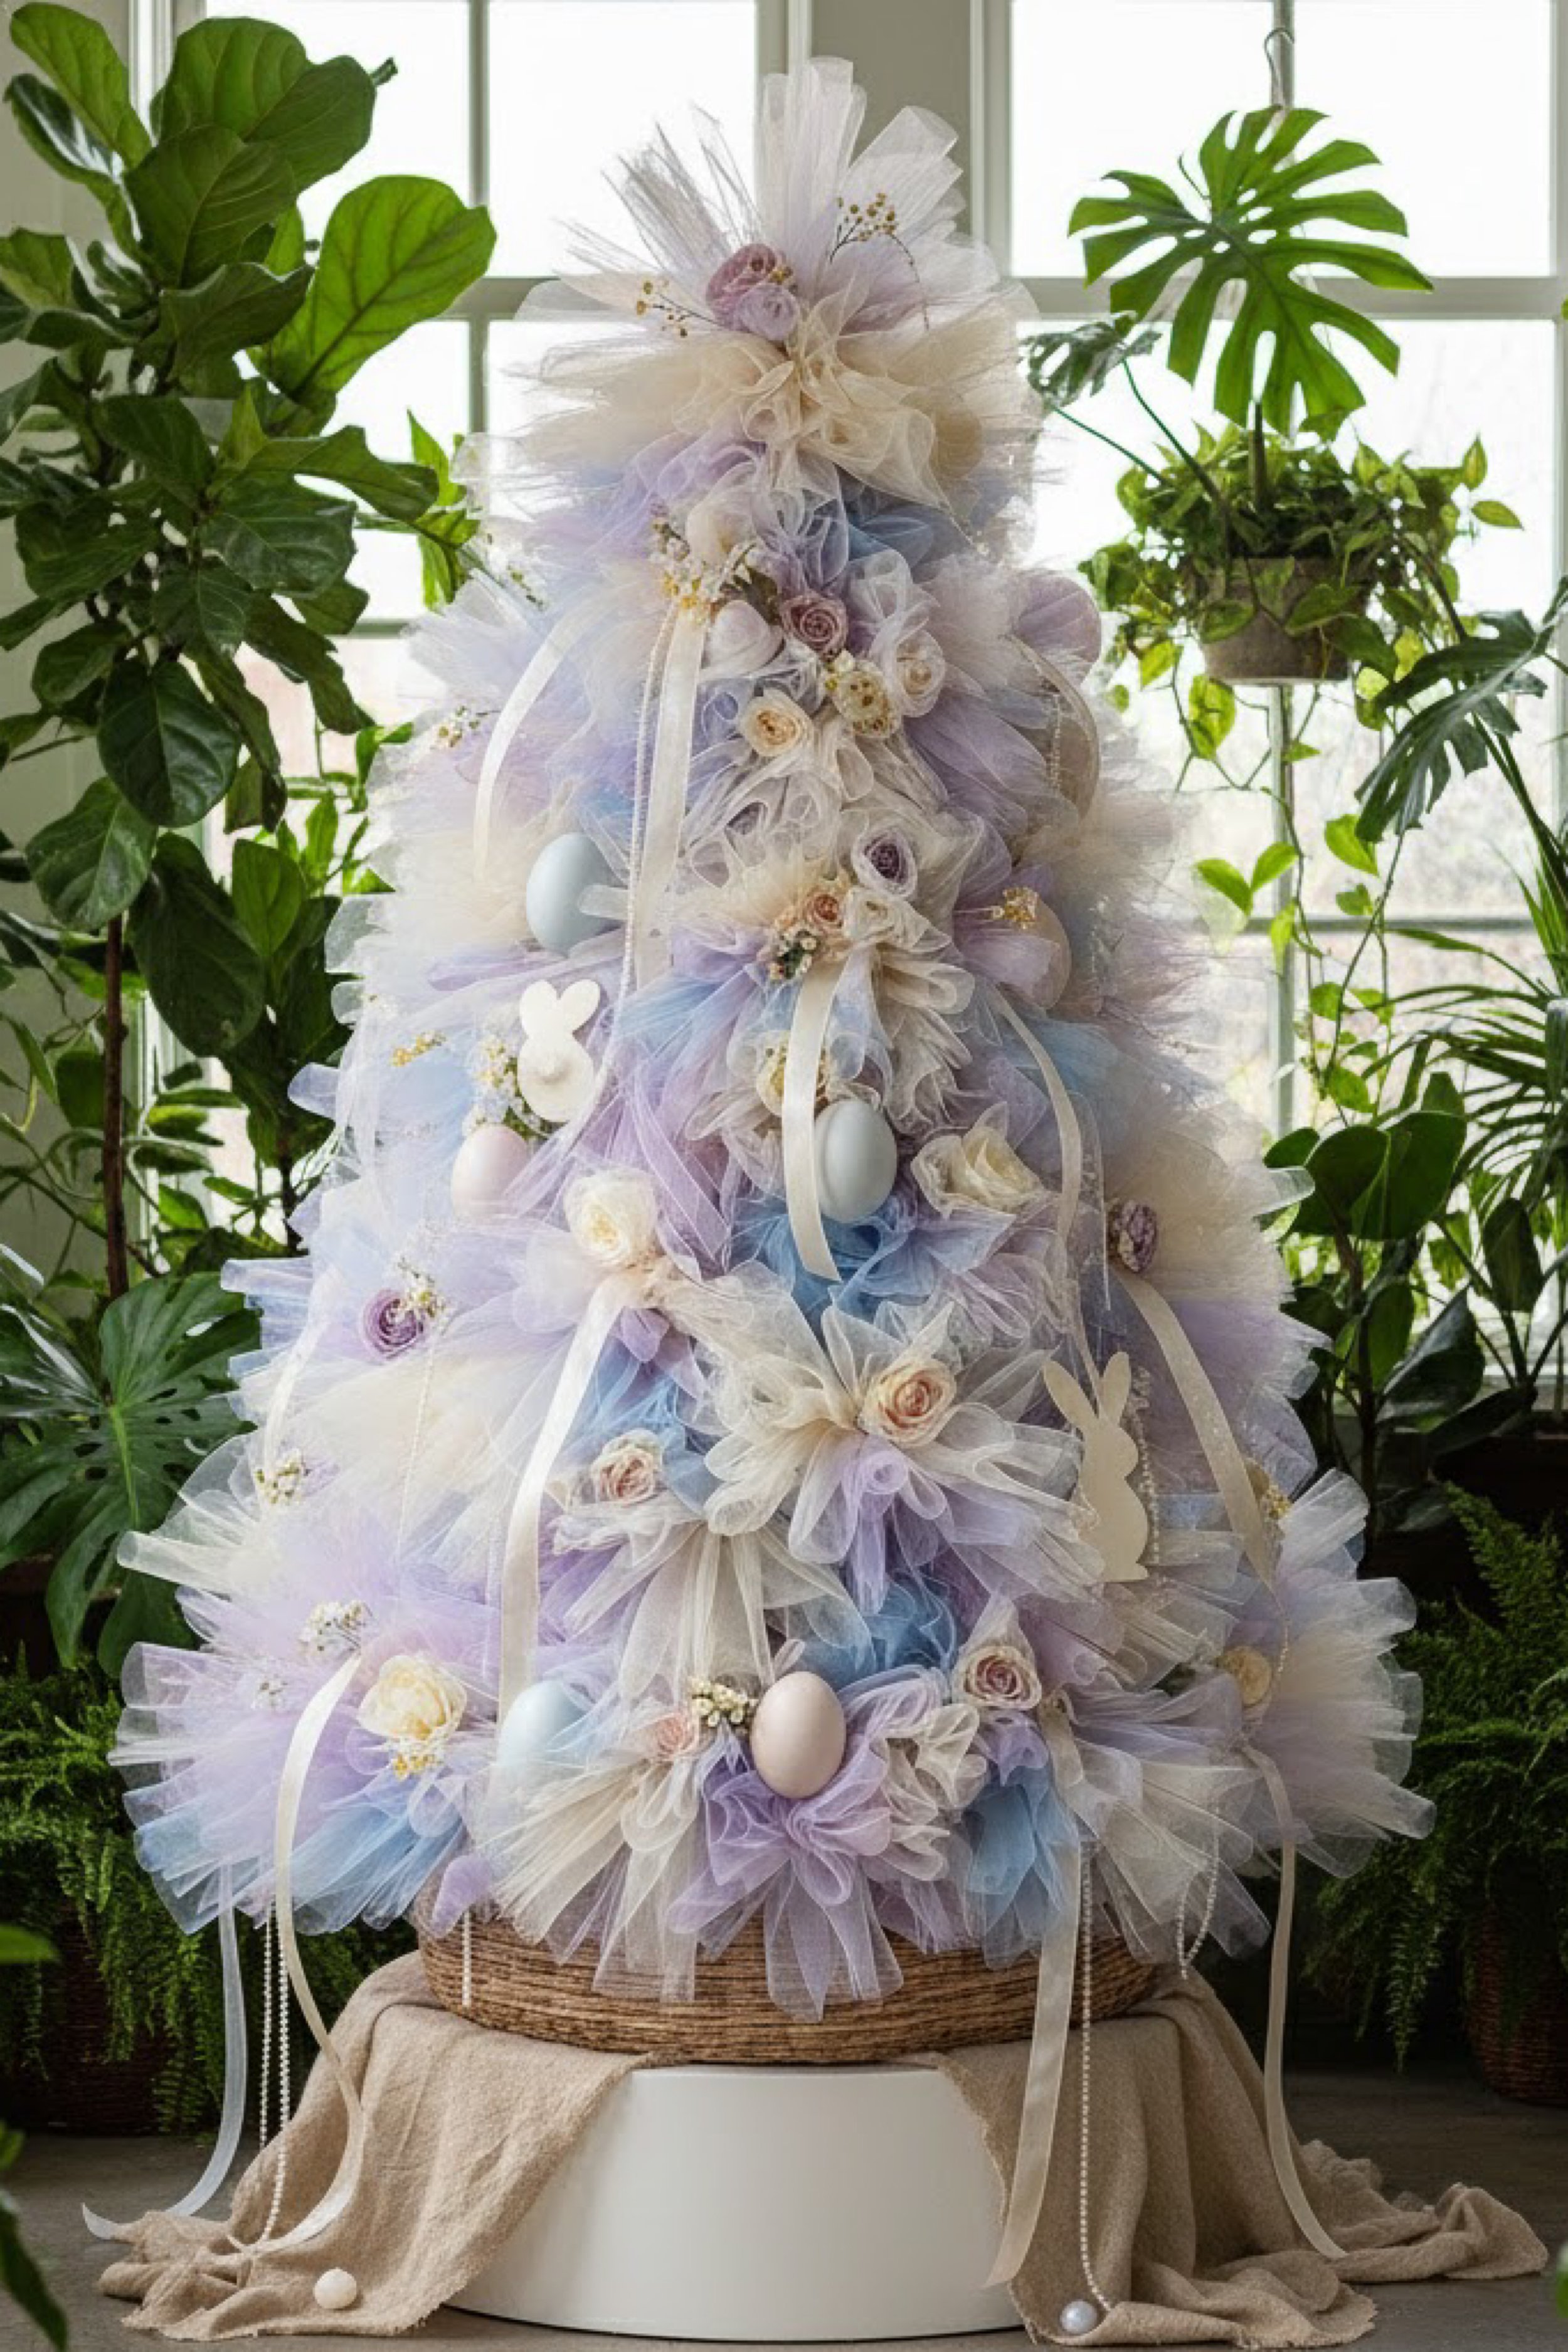
Lilac and Powder Blue Bunny Charm Tulle Easter Tree — Step-by-Step Tutorial
What you’re making
This project recreates the whimsical lilac and powder blue tulle Easter tree with soft ivory accents, ribbon streamers, and bunny silhouette ornaments tucked into the ruffles. It is airy and romantic like a pastel party dress, but it has playful details: eggs nestled in the tulle, tiny rosebuds, and long trailing ribbons that make the whole tree feel styled and storybook.
The key to matching this look is using cool toned pastels (lilac and powder blue) with ivory as the soft neutral, plus a few deliberate “feature zones” where bunnies, eggs, and florals cluster.
Materials and tools
- Cone frame: wire cone frame or tomato cage flipped upside down
- Optional center dowel for stability
- Base: basket, planter, or decorative pedestal pot
- Weight: stones, sand, or floral foam
- Tulle rolls: lilac, powder blue, and ivory
- Optional: a whisper of pale blush for warmth in florals
- Floral wire and small zip ties
- Hot glue gun and glue sticks
- Scissors
- Pastel eggs in soft blue, ivory, and pale lilac
- Bunny silhouette ornaments or cutouts (wood or acrylic style)
- Ribbon streamers: ivory and pale pastel ribbons (mix sheer and satin)
- Small faux rosebuds or miniature florals in blush and ivory
- Tiny filler flowers: baby’s breath style picks
- Optional pearl strands for subtle sparkle
- Neutral cloth for base drape
- Optional micro lights
Finished size and customization notes
- This tree reads as a statement piece around 3 to 4 feet tall.
- You can make it more playful by adding more bunny silhouettes and a few extra eggs.
- You can make it more elegant by limiting bunnies to two or three and adding a pearl strand instead.
- Color blending tip: keep lilac slightly heavier in the top and midsection, then let powder blue show through the lower half. Use ivory evenly everywhere to soften and keep it airy.
Step-by-step instructions
Anchor the frame in the base
Add weight inside the basket or planter. Insert your frame and stabilize it. If using a center dowel, tie the frame to it with zip ties.
Visual checkpoint: the frame should not twist when you rotate it.Cut tulle strips for airy, layered ruffles
Cut strips 18 to 24 inches long. Longer strips create the floating edges seen in the photo.
Create three piles: lilac, powder blue, ivory.Make “light twist” puff clusters
Pinch the center, twist once, and secure with wire. Fluff the loops gently. For this look, you want movement and softness more than tight rosettes.
Visual checkpoint: clusters should look like soft petals with transparent layers.Build the base with powder blue and ivory
Start at the bottom and attach powder blue clusters around the base ring. Mix ivory clusters in between. This makes the bottom feel bright and cloudlike.
Tip: add an extra layer around the base edge to create that fluffy skirt.Move upward and introduce lilac gradually
As you climb into the midsection, add lilac clusters in waves. Keep the mix irregular so it feels organic.
Visual checkpoint: you should see a gentle pastel mix that looks blended when you step back.Top third with lilac dominance
Make the top feel lilac forward, with ivory highlights to keep it light. Leave a small space at the top for a soft topper cluster or ribbon tie.Fluff, shape, and correct the cone
Fluff all clusters outward. Step back and check the silhouette. Add a few clusters to any thin area.
Visual checkpoint: the cone should look even and full from all sides.Optional lights before detailing
If adding lights, weave them through now. Keep the wire hidden behind tulle folds.Create ribbon streamers and anchor points
Cut long ribbons in ivory and pale tones. You want a mix of widths. Tie a few ribbon bundles onto the frame at the upper third and midsection so they trail down. Secure with wire, then tuck the knot into tulle.
Visual checkpoint: ribbons should look like they are emerging from inside the tree, not tied on the surface.Add bunny silhouettes as featured accents
Place bunny shapes in three to five spots, spaced around the tree. Nest each bunny partially into the tulle so it feels integrated. Glue only the back edge and press into a tulle pocket.
Tip: place one bunny slightly higher, one mid, one lower for a balanced storybook rhythm.Nest eggs into the ruffles
Use blue and ivory eggs with one or two lilac eggs. Press eggs into deeper pockets so they look cradled. Keep them visible but not overly exposed.
Visual checkpoint: eggs should look like hidden treasures, not ornaments sitting on top.Add miniature florals for romance
Tuck small rosebuds and tiny filler flowers near bunnies and eggs. Keep these details clustered, so each feature area feels like a little vignette.
Tip: place florals where ribbons begin, so the ribbon tie point looks intentional and pretty.Optional pearl strand for gentle sparkle
If you want a subtle shine, drape a thin pearl strand lightly around the midsection. Keep it minimal so it does not compete with ribbons.Top finishing cluster
You can do a small ivory bow, or a soft tulle puff topper with a few tiny flowers. The photo vibe is airy, so avoid a huge heavy topper unless you want a more dramatic look.Style the base and hide mechanics
Drape a neutral cloth under the base. If your basket rim shows foam or weight, cover the inside with a scrap of fabric or kraft paper.Final walk around and rebalance
Check that bunnies are visible from at least two angles. Make sure ribbon tails do not all fall on one side. Adjust eggs and florals to keep the composition even.
Troubleshooting common mistakes and fixes
- Problem: Ribbons look messy or tangled.
Fix: reduce ribbon count, choose fewer but longer tails, and anchor them at intentional points with floral clusters. - Problem: Bunny shapes fall off.
Fix: wire them to the frame if possible, or glue them into a deeper tulle pocket with a small backing piece of felt for grip. - Problem: The colors feel too cold or washed out.
Fix: add a few ivory or pale blush florals, and increase ivory tulle highlights to brighten. - Problem: The tree looks uneven or lumpy.
Fix: fluff, then add filler clusters to smooth the outline. Do not hesitate to add more tulle, because softness is the whole style. - Problem: Eggs look too exposed.
Fix: push them deeper and surround with two or three tiny tulle puffs as a nest.
Finishing details
- Fluffing: fluff outward, then lightly shape into a cone with your hands.
- Steam: a gentle steam pass relaxes creases and makes tulle look fresh.
- Securing: add hidden ties behind ribbon anchor points so nothing shifts.
- Optional upgrade: add tiny letter charms or a simple tag that says “spring” near the base for a giftable look.
- Storage: tuck ribbon tails inside a loose cover so they do not crease.
Shop Similar
- Lilac powder blue and ivory tulle rolls
- Bunny silhouette ornaments or cutouts
- Pastel Easter eggs blue ivory assorted
- Ribbon assortment ivory sheer satin
- Mini faux rosebuds and baby breath picks
Style It With
These pastel tulle Easter trees are more than seasonal crafts — they are statement pieces that instantly elevate a corner, entryway, or sunlit window. With a simple cone frame, soft layers of tulle, and thoughtfully placed accents, you can create décor that feels custom, luxurious, and completely unique to your style.
The magic is in the texture, the blending of color, and the small details that make each tree feel intentional. Whether you recreate one design exactly or mix elements from all five, your finished piece will feel full, whimsical, and ready for spring.
Now gather your tulle, fluff those layers, and let your creativity bloom.