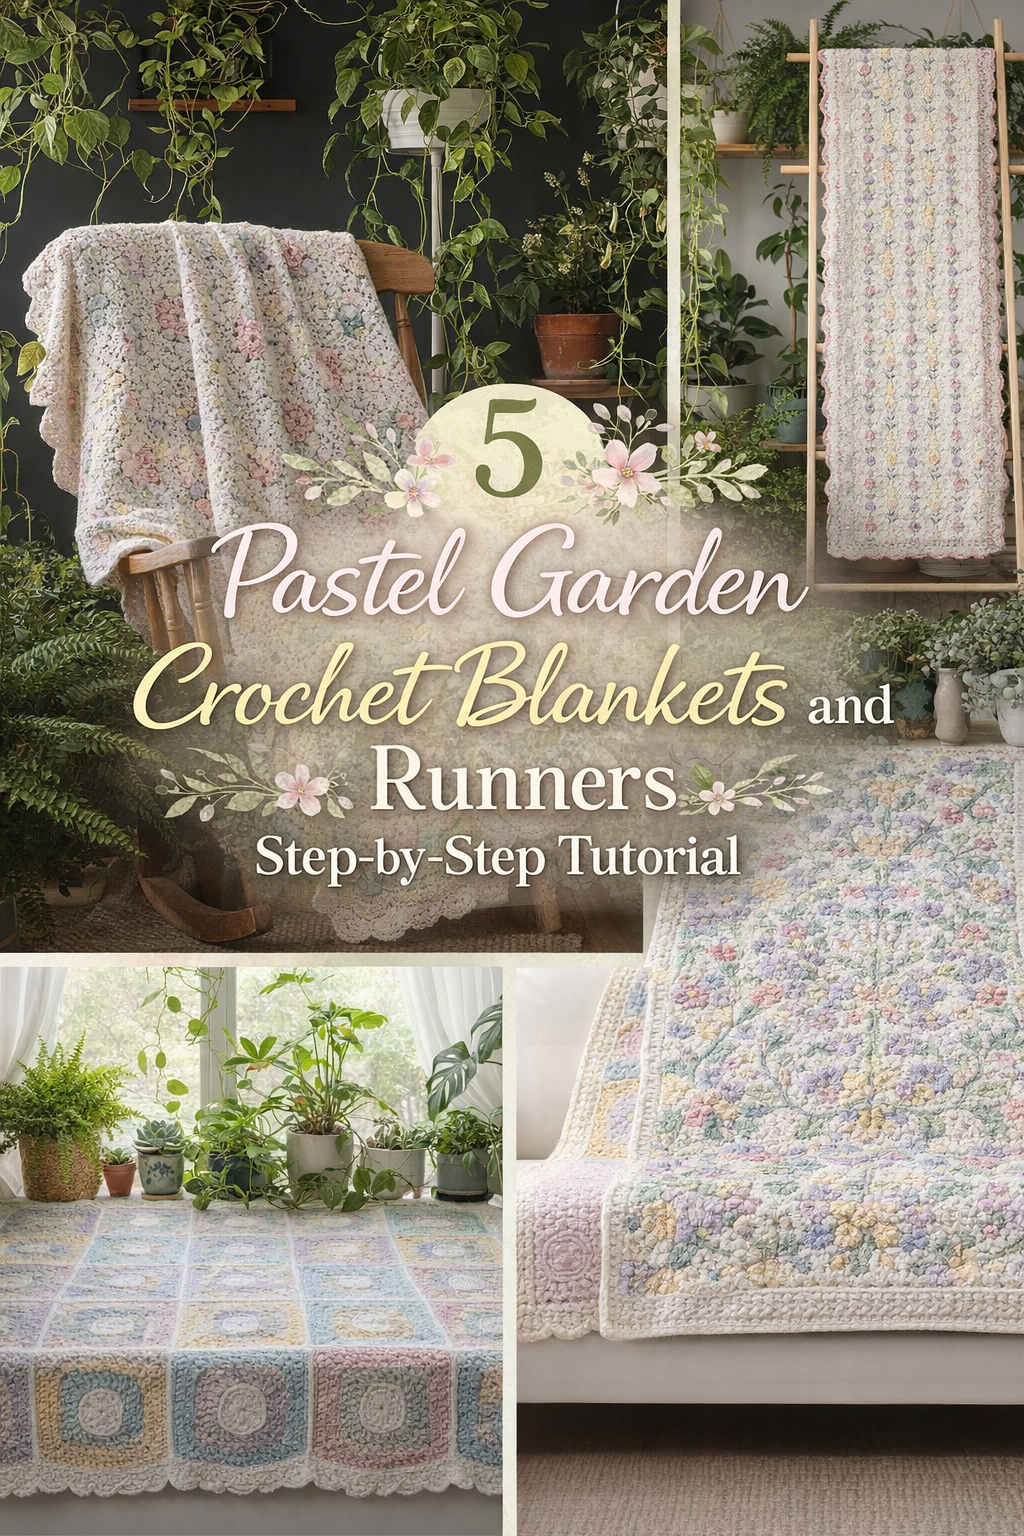
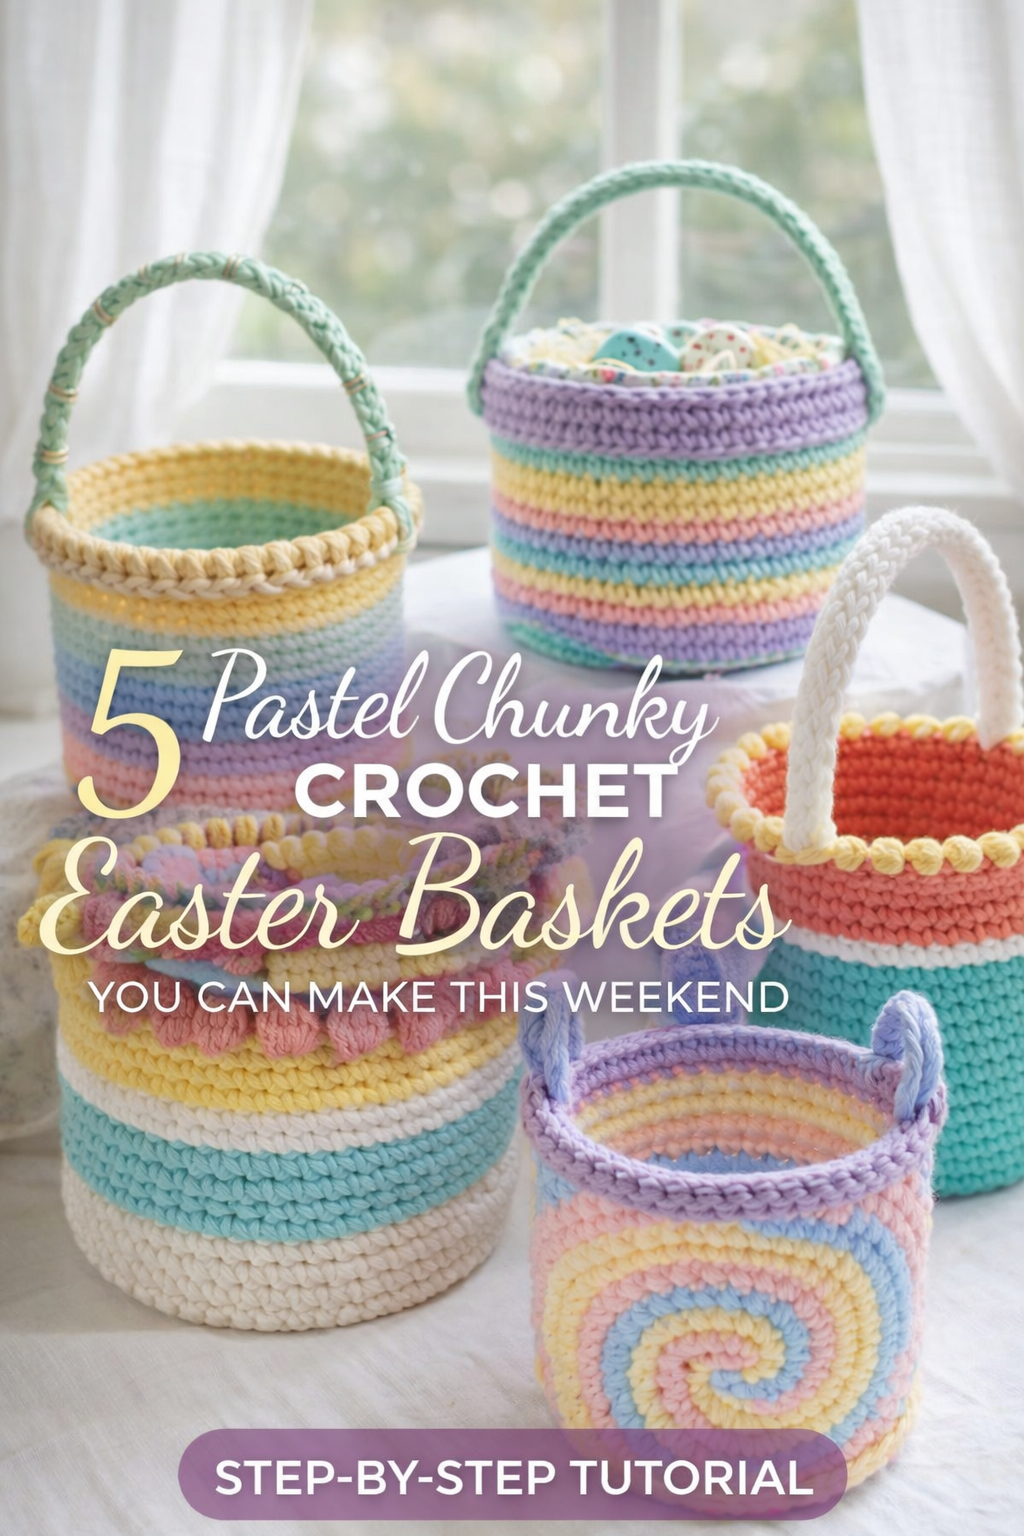
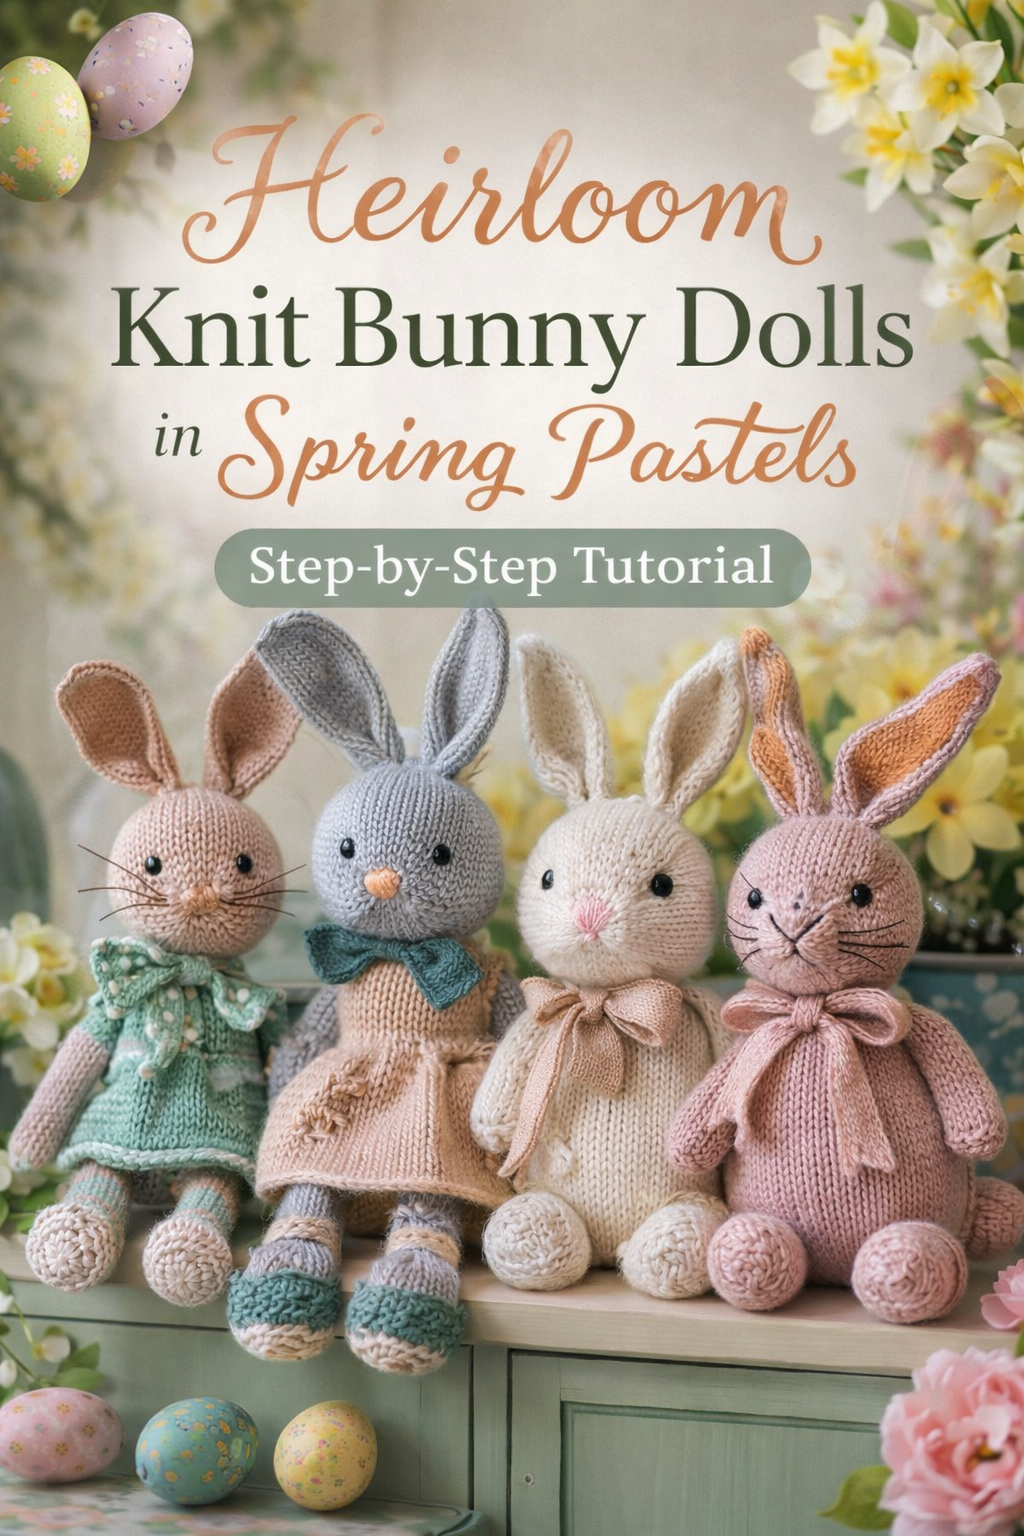
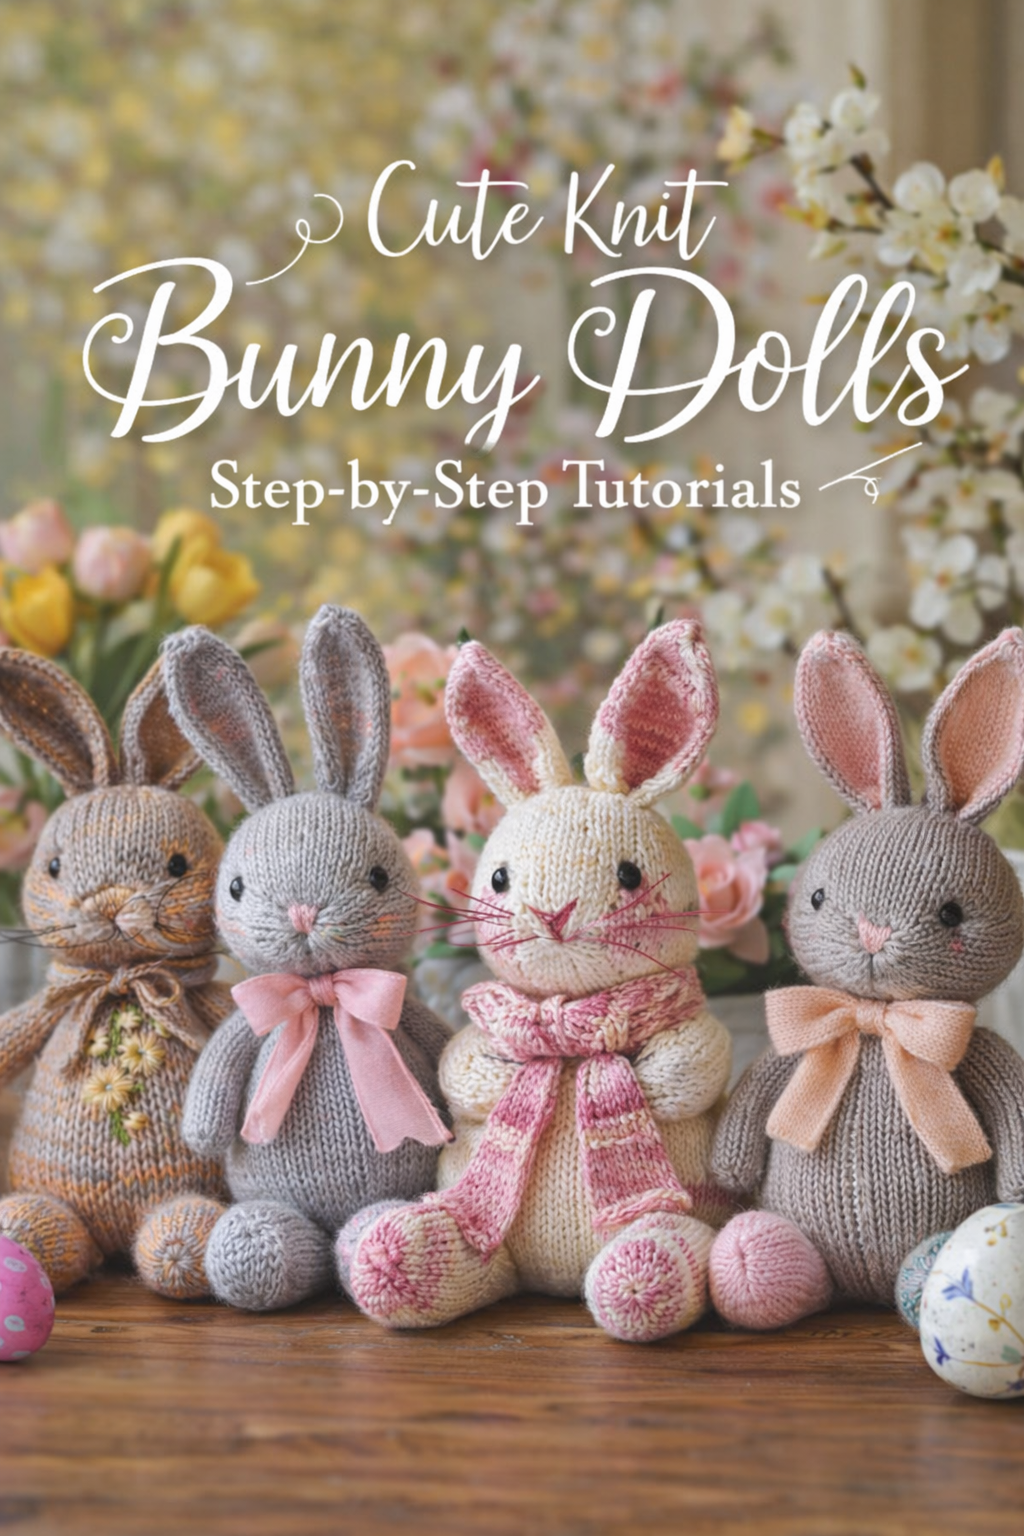
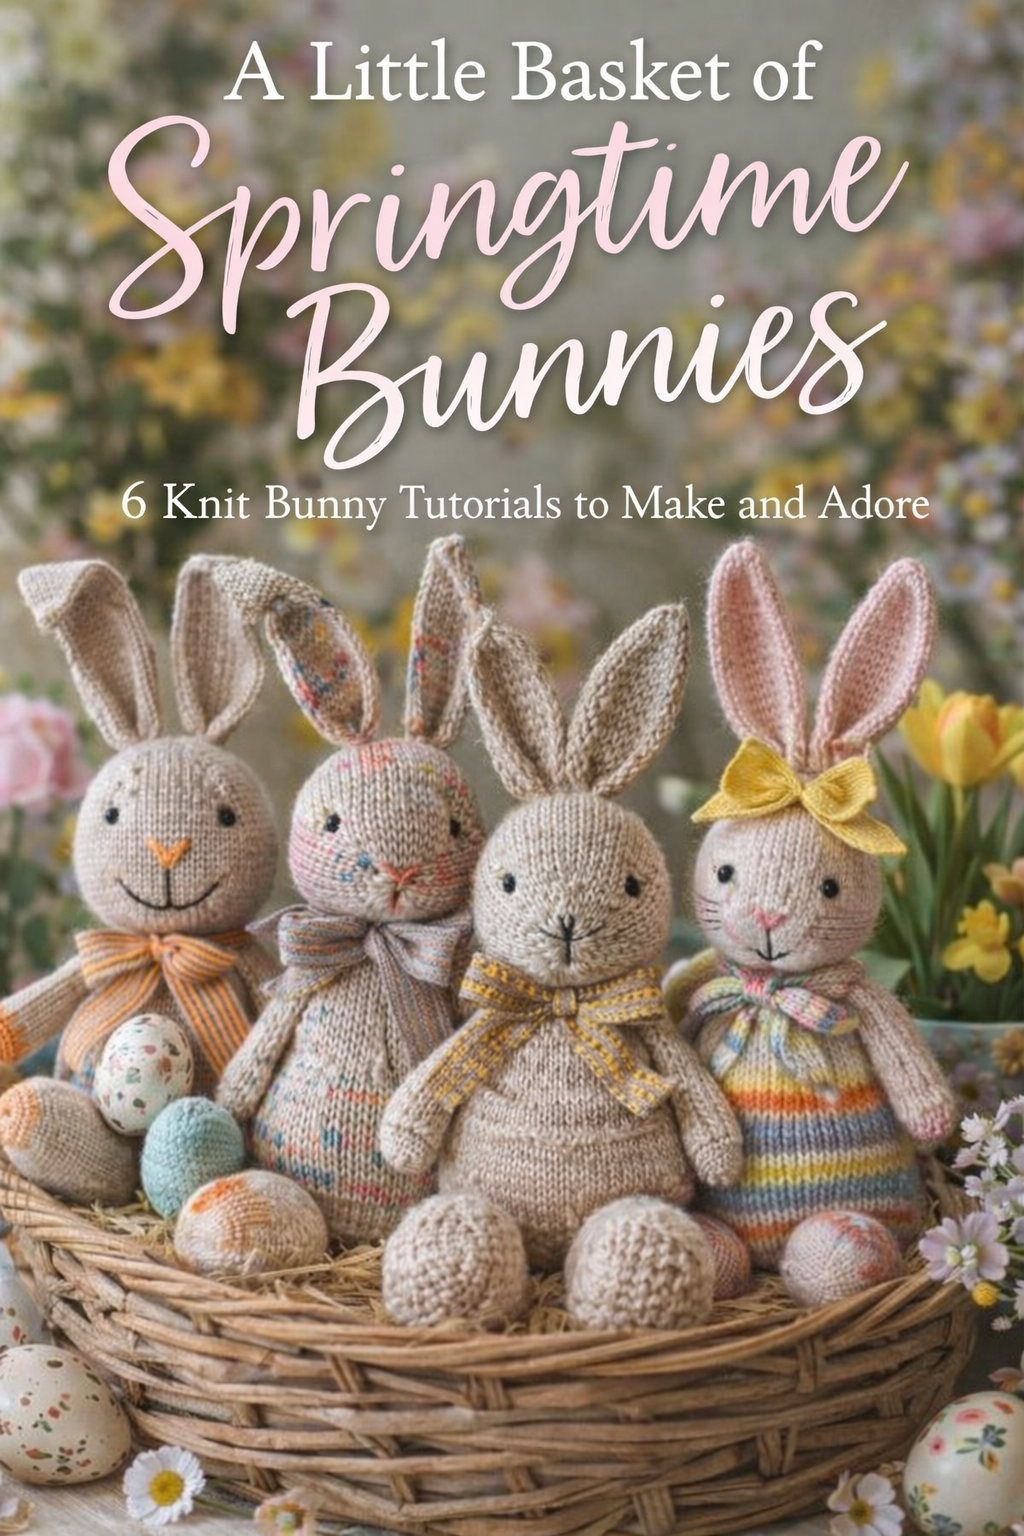
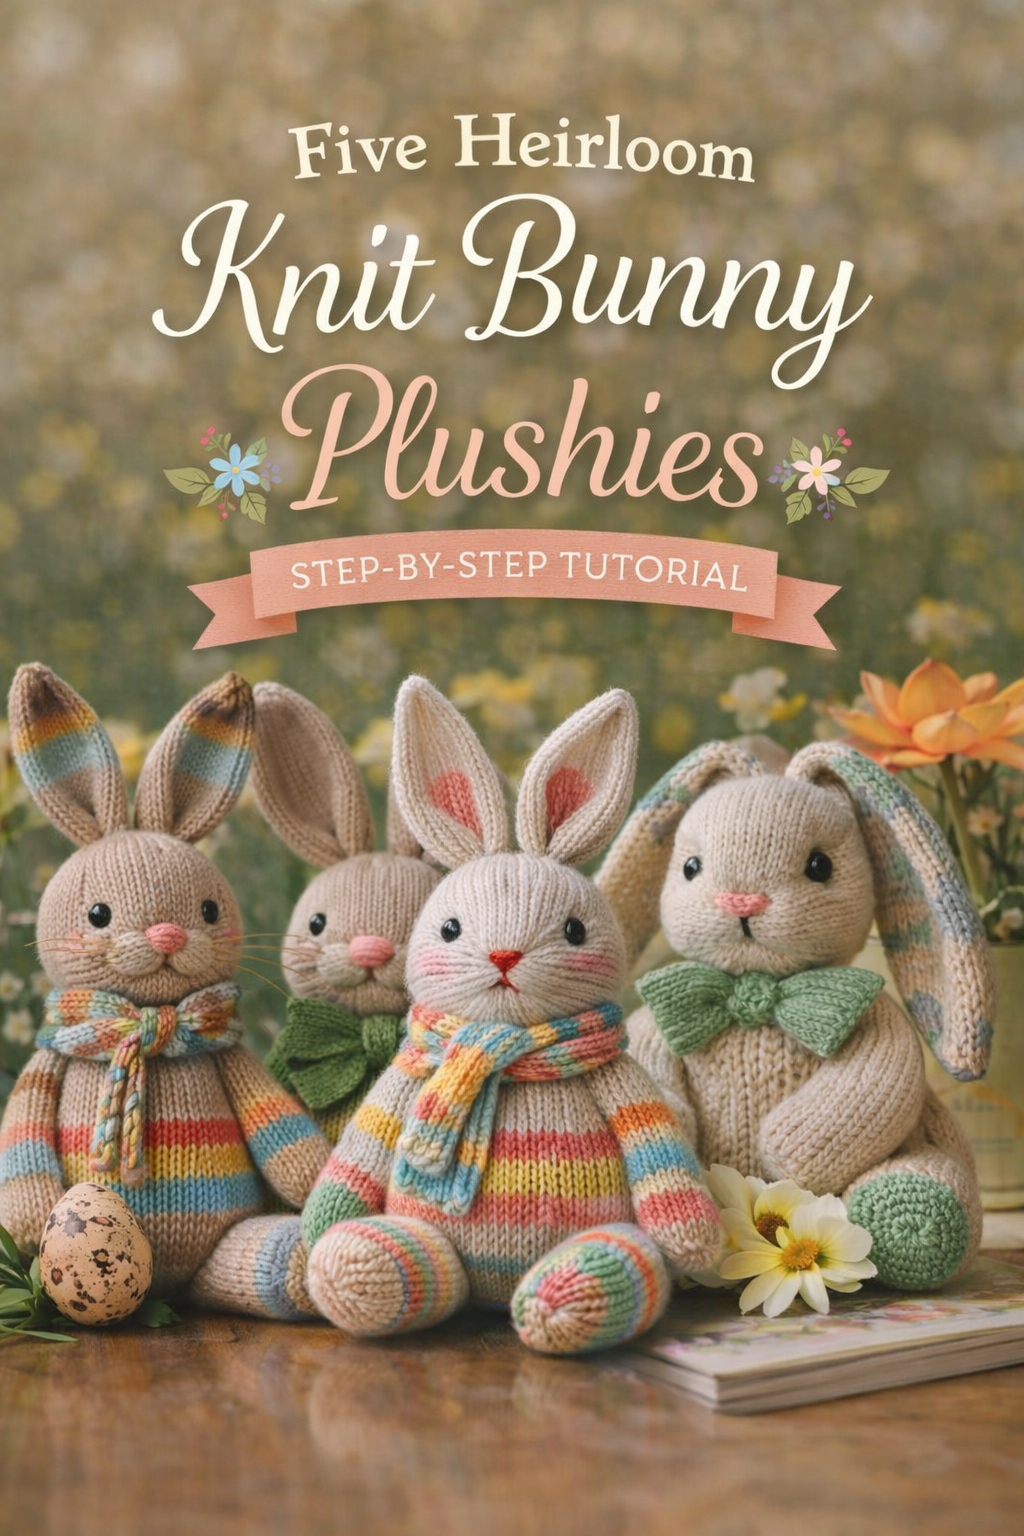
Five Heirloom Knitted Bunny Plushies Step-by-Step Tutorial
More like this
There is something instantly comforting about a knitted bunny. The soft ribbed stitches, the slightly chubby cheeks, the gentle weight in your hands, and that unmistakable handmade personality that makes every single one feel like a tiny heirloom. This collection of five plush bunny looks is all about recreating that cozy storybook vibe, with modern color palettes that feel fresh for spring and adorable styling details like oversized bows, floppy ears, and rainbow striped sweaters.
In this post you will learn how to build the classic bunny shape first, then remix it into five distinct designs by swapping yarn choices, changing stripe placement, and adding accessories that completely transform the mood. Whether you want a neutral bunny with a crisp green bow for a nursery shelf, a pastel rainbow bunny that looks like candy floss, or a scarf wearing striped sweater bunny for the cutest Easter basket gift, you will have a clear path to make the exact look.
Grab your yarn, pick your favorite palette, and let’s knit a lineup of bunnies that look beautiful photographed on a windowsill and even better tucked into someone’s arms.
💡 Pro Tip: Why I Link to Amazon Search Results and Not One Product
In the Shop the Look and Style it With sections under each bikini, I link to Amazon search results, not single products. Here’s why this matters:
Hot bikinis sell out fast. I don’t want you clicking on a dead link to a sold-out item. Search pages stay updated.
You get more options. Love the vibe but want a different color, cut, or price point? The search results give you everything that matches the look and energy.
I curate each search carefully. These aren’t generic. I spend hours crafting keywords that bring up exactly the kind of bikinis I’d wear—or recommend to my hottest friends.
Support with no pressure. If you click a link, browse, and buy something later, I may earn a small commission at no extra cost to you. That helps me keep bringing you curated collections like this one—powerful, seductive, and always fresh.
So dive in. Click through. Try something risky. These aren’t just bikinis—they’re commands, statements, and maybe even your new favorite weapon of choice.
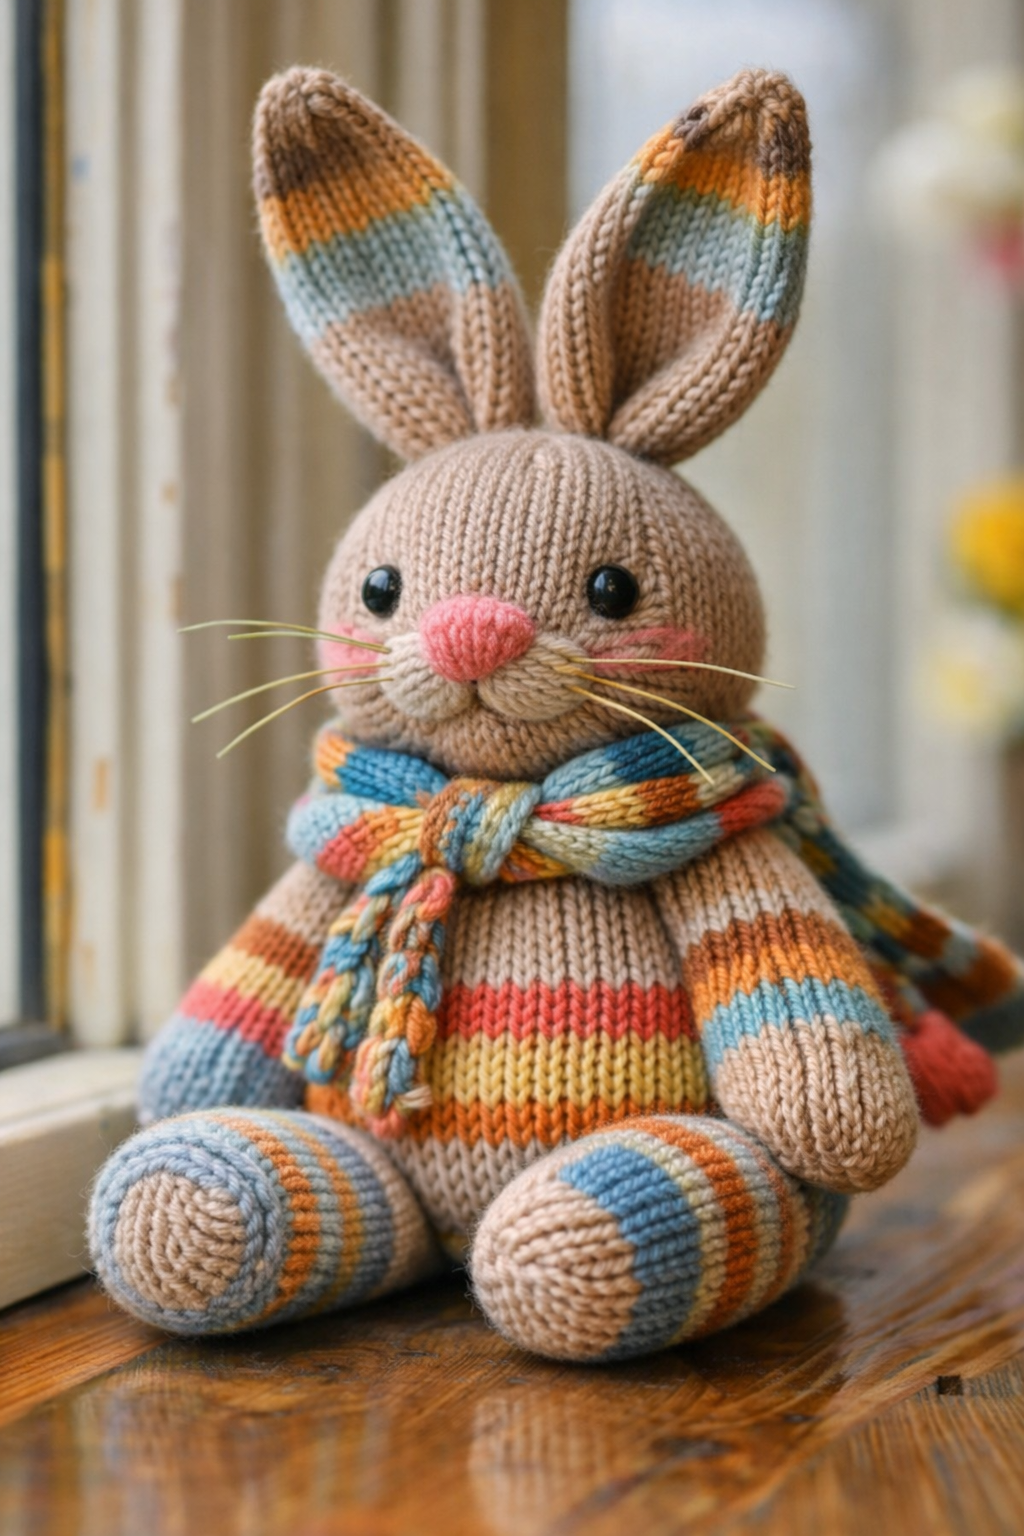
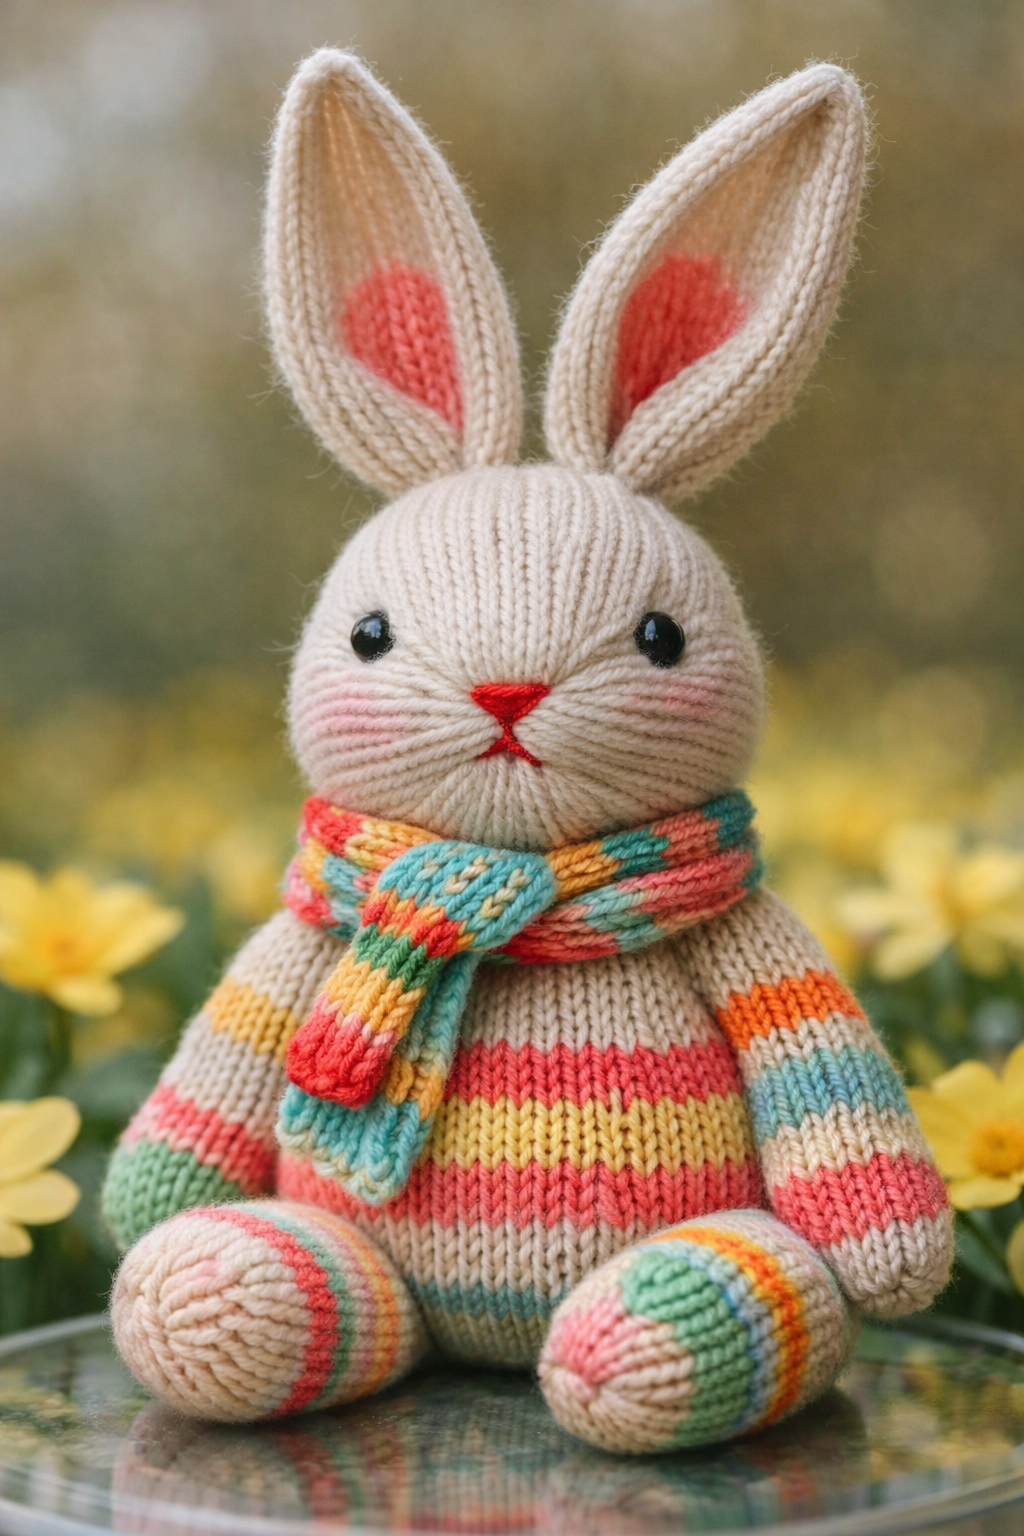
Cozy Striped Scarf Bunny Step-by-Step Tutorial
What you’re making
This tutorial walks you through knitting a soft, sitting bunny plush with tall upright ears, glossy button eyes, and a chunky, multicolor scarf that matches the striped accents on the body and limbs. The finished look is a warm taupe bunny with playful bands of sky blue, amber, coral, and oatmeal, designed to feel like a handmade heirloom toy but with modern color. You’ll knit simple shapes with gentle shaping, then assemble, stuff, and add the facial details for that sweet, slightly chubby cheek look.
Materials + tools
- Yarn: Worsted weight yarn in 1 main color (warm taupe or latte) and 3 to 5 accent colors (sky blue, amber, coral, oatmeal, rust). A self striping worsted can work for the scarf if you want effortless color.
- Needles: US 4 to US 6 (3.5 mm to 4 mm) for a firm fabric. Use double pointed needles or a short circular for small tubes, or knit flat and seam.
- Tapestry needle for seaming and weaving ends
- Stitch markers
- Scissors
- Stuffing (poly fill)
- Safety eyes 10 mm to 14 mm, or sew on buttons if making a display piece
- Scrap yarn in pink for nose and blush, plus ivory or pale cream for muzzle if desired
- Optional whiskers: thin nylon beading cord, stiff embroidery thread, or fishing line
- Optional: small amount of wool felt for blush circles, or use embroidery
- Measuring tape
Finished size + customization notes
A typical worsted version comes out about 9 to 12 inches tall seated, depending on needle size and stuffing firmness. To make it larger, use bulky yarn and larger needles, but keep stitches tight so stuffing does not show. To make it smaller, use DK yarn and smaller needles. Color placement is flexible: you can mirror the photo with a striped mid body band and striped cuffs on arms and legs, plus a thick braided scarf. If your gauge is looser, go down a needle size for a smoother plush surface.
Step by step instructions
Choose your construction method Decide if you will knit in the round or knit flat and seam. In the round gives the smoothest look. Flat knitting is easier if you only have straight needles. Either method works. The key is firm stitches.
Knit the head as a round ball Cast on 24 stitches with the main color. Join in the round, or work flat with the same counts. Increase round: knit 1, make 1, repeat around for 36 stitches. Next increase round: knit 2, make 1, repeat around for 48 stitches. Knit 10 to 14 rounds plain to form the full cheeks. Visual checkpoint: you should now see a smooth tube that is wide enough to cup your palm. Decrease round: knit 2 together, knit 2, repeat around for 36 stitches. Next decrease round: knit 2 together, knit 1, repeat around for 24 stitches. Stuff firmly, shaping the cheeks outward. Decrease every round with knit 2 together until 6 to 8 stitches remain. Thread yarn through remaining stitches and pull tight. Secure and weave in.
Shape the muzzle area for that puffy face With ivory or the main color, pick up stitches across the lower front of the head, about 12 stitches wide, centered under where eyes will sit. Knit 4 to 6 rows flat, then bind off. Sew the sides down gently, leaving a little pocket to add a pinch of stuffing. This creates the rounded muzzle pads. Visual checkpoint: the face should look wider at the bottom front, like a soft peach.
Add the nose and mouth Embroider a small triangle or oval nose in pink at the center top of the muzzle. For this photo look, keep it plump: wrap yarn over the same area many times, then tack edges down so it sits slightly raised. Add a tiny mouth line beneath. If you want a subtle smile, stitch a short line down then two tiny angled stitches.
Place the eyes for the cutest expression Mark eye placement about 5 to 7 rounds down from the top of the head and about 10 to 12 stitches apart, depending on head width. Insert safety eyes now if using them, before the head is fully sealed, or sew on glossy black buttons after. Visual checkpoint: when you hold the head at arm’s length, the eyes should look centered and slightly above the muzzle so the bunny looks gentle, not surprised.
Add blush and whiskers For blush, use a soft pink yarn and make short horizontal stitches on each cheek, just outside the muzzle pads. Keep it light. For whiskers, cut 6 strands of nylon cord, thread through the muzzle sides, and knot inside. Trim evenly. Visual checkpoint: whiskers should flare outward, not droop. If they droop, use a stiffer cord or fewer strands.
Knit the body with a striped belly band Cast on 30 stitches in main color and join. Increase round: knit 1, make 1, repeat around for 45 stitches. Knit 6 rounds plain in main color. Now work a bold stripe band: switch colors every 2 rounds for 8 to 12 rounds total. In the photo look, use warm, vintage leaning stripes like amber, sky blue, coral, and oatmeal. Keep the stripe band centered on the belly area. Switch back to main color and knit 6 to 10 rounds. Decrease round: knit 3, knit 2 together, repeat around for 36 stitches. Knit 2 rounds plain. Decrease round: knit 2, knit 2 together, repeat around for 27 stitches. Knit 2 rounds plain. Stuff firmly, especially around the lower belly to help the bunny sit. Decrease every round with knit 2 together until you can close. Thread through remaining stitches and pull tight. Weave in.
Knit the arms with striped cuffs Make 2. Cast on 16 stitches in main color. Join. Knit 6 rounds main color. Work 4 to 6 rounds of stripes, changing color every 2 rounds, similar to the photo. Return to main color and knit 10 to 14 rounds. Lightly stuff the hand end only. Leave the upper arm soft so it sits naturally against the body. Decrease: knit 2 together around to close, or simply bind off and gather if you knit flat. Leave a long tail for sewing.
Knit the legs with striped ankles Make 2. Cast on 18 stitches in main color. Join. Knit 6 rounds main color for the foot tip. Work 4 to 6 rounds of stripes for the ankle area. Return to main color and knit 12 to 16 rounds. Increase once or twice near the top if you want a chubbier thigh. The photo legs look rounded but not huge. Stuff firmly in the foot and lower leg, then slightly less in the upper leg so it can angle into a seated pose. Close the top with a gather or decreases. Leave a long tail for sewing.
Knit the ears with color tipped inner stripes Make 2. Cast on 10 stitches in main color. Knit flat to create an oval ear. Increase row: knit 1, make 1, knit to last stitch, make 1, knit 1. Repeat increases every other row until you have about 22 stitches. Knit 10 to 14 rows plain. Add the color tip: knit 2 to 4 rows in a warm accent like amber, then 2 rows in sky blue, then 2 rows in main or a darker taupe, matching the photo’s ear banding. Decrease every other row by knitting 2 together at each edge until 10 stitches remain, then decrease each row to 4 stitches and bind off. Fold the ear slightly lengthwise and stitch a small pinch at the base to create the upright cupped shape. Do not stuff ears for this look. Visual checkpoint: ears should stand because the fabric is firm and the base is pinched and stitched.
Assemble the bunny Sew head to body with a strong whip stitch. Before closing completely, add a bit more stuffing at the neck so the head does not wobble. Sew legs on low and forward so the bunny sits. Visual checkpoint: when set down, the body should lean back slightly with feet forward. Sew arms slightly below the stripe band line, angled inward as if hugging the scarf. Sew ears on top of the head, slightly back from center. Angle them outward just a bit.
Knit and style the chunky braided scarf For the photo look, you want a thick, slightly rope like scarf with a loose knot. Option A, simple knit scarf: Cast on 8 to 10 stitches, knit every row for garter stitch. Work in self striping yarn or change colors every 2 rows. Knit until about 18 to 24 inches. Bind off. Option B, braided cord scarf: Cut 6 long strands of worsted yarn, about 40 inches each in mixed colors. Fold in half, secure at the fold, then braid tightly. Tie knots at ends. Wrap around the neck and tie a loose knot front center. Visual checkpoint: the scarf should look chunky and slightly uneven in a cozy way, not perfectly flat.
Final shaping Roll the cheeks gently with your fingers to distribute stuffing. Tug stitches lightly to smooth any ladders. If the bunny leans, adjust leg placement with a few reinforcing stitches.
Troubleshooting
- My stitches show stuffing Use a smaller needle, or switch to a firmer yarn. Stuff with smaller tufts and pack evenly. For plush toys, tight fabric matters more than speed.
- The head wobbles Add more stuffing at the neck seam and use a ladder stitch to cinch the join tighter. You can also insert a small rolled fabric tube inside the neck as support.
- Ears flop instead of standing Make the ear fabric tighter by using smaller needles, and pinch sew the base more firmly. You can also slide a thin pipe cleaner inside the ear edge, but keep ends tucked and secured if used.
- The bunny will not sit The legs may be too high or too far back. Remove and resew slightly lower and more forward. Add extra stuffing to the lower belly and bottom.
- Stripes look messy at color changes Change colors at the side or back of the body, and pull the new color snug on the first stitch. Weave ends inside and tack down.
Finishing details
Weave in all ends inside the body and tack them so they do not shift. If you used safety eyes, ensure the washers are locked. Lightly steam the scarf only, not the stuffed parts. For a more polished plush surface, use a soft brush to fluff fibers and even out any fuzz. If gifting to a child, replace button eyes with embroidered eyes and skip whisker cord. Add a small fabric label at the back seam for a boutique finish.
Shop Similar
- Worsted weight yarn in warm taupe neutrals
- Self striping rainbow yarn for scarves
- Safety eyes 12 mm glossy black
- Poly fill stuffing for plush toys
- Tapestry needles for yarn sewing
Style It With
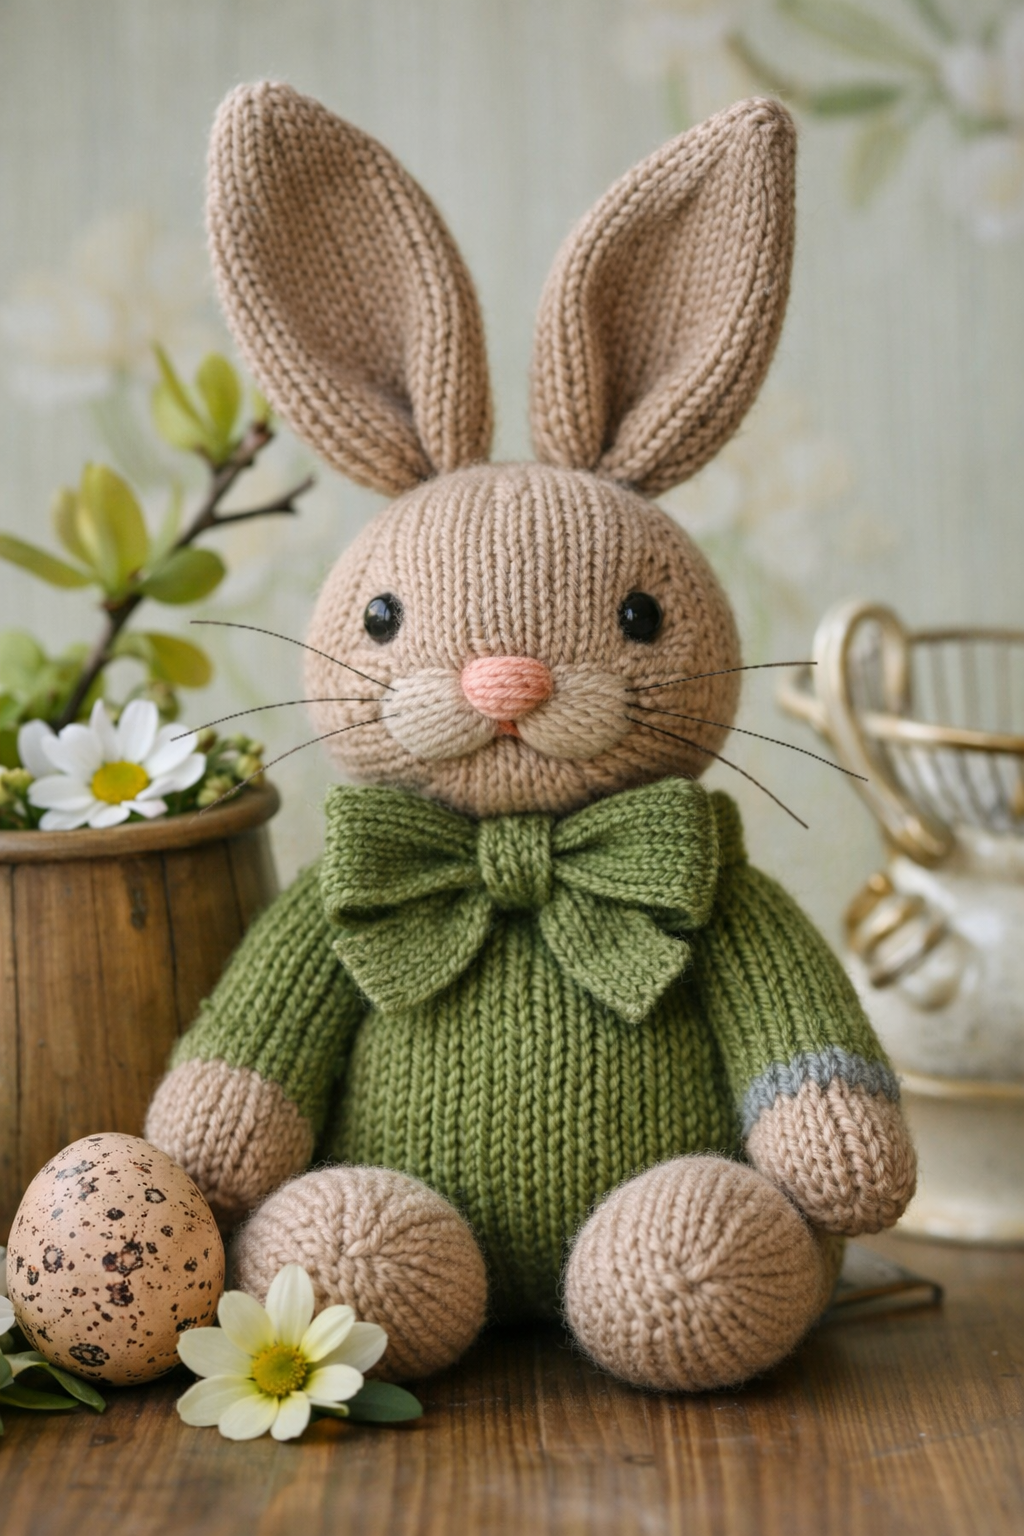
Green Bow Bunny Plush DIY Guide
What you’re making
This guide helps you knit a sweet spring bunny plush with tall ears, a softly rounded snout, and a moss green knit outfit finished with an oversized bow at the neck. The photo look feels calm, garden fresh, and slightly vintage, with clean stitches and a simple silhouette that lets the bow be the star. You’ll build the bunny from classic plush shapes, then add the green sweater body and the structured bow for that dressed up, giftable finish.
Materials + tools
- Yarn: Worsted weight yarn in warm beige for bunny, moss or olive green for outfit, small amount of pale pink for nose and blush, optional gray for tiny cuff detail
- Needles: US 4 to US 6 (3.5 mm to 4 mm) for a firm fabric
- Double pointed needles or short circular, or straight needles for flat pieces
- Stitch markers
- Tapestry needle
- Stuffing (poly fill)
- Safety eyes 10 mm to 14 mm or embroidered eyes for child safe version
- Optional whiskers: thin beading cord or stiff thread
- Scissors
- Measuring tape
Finished size + customization notes
Expect about 9 to 11 inches tall seated in worsted yarn. To match the tidy look in the photo, keep the gauge firm and the stuffing smooth. You can make the outfit as a separate sweater slipped over the body, or knit the body in green and attach beige limbs and head. Both options work. If your bunny looks taller than the photo, shorten the body by 2 to 4 rounds.
Step by step instructions
Plan your color layout The photo look is beige head, beige arms and legs, green torso, and a big green bow at the neckline. There is a tiny gray cuff detail on one arm in the image. You can add that as a 2 round stripe near the wrist, or skip it for a cleaner look.
Knit the head Cast on 24 stitches in beige, join in the round. Increase round: knit 1, make 1, repeat to 36. Increase round: knit 2, make 1, repeat to 48. Knit 10 to 14 rounds plain for a full round head. Decrease round: knit 2 together, knit 2, repeat to 36. Decrease round: knit 2 together, knit 1, repeat to 24. Stuff firmly. Decrease each round until closed. Secure and weave in. Visual checkpoint: the head should look like a smooth sphere with gentle fullness at the lower front.
Add muzzle shaping Pick up about 12 stitches across the lower front of the head in beige or a slightly lighter cream. Knit 4 to 6 rows flat and bind off. Sew edges down and add a pinch of stuffing behind to create the puffy muzzle pads. This step is what gives that plush, friendly face.
Embroider nose, mouth, blush Nose: use pale pink and make a small oval nose centered on the muzzle. Wrap yarn over the same area several times to make it raised. Mouth: add a short vertical stitch under the nose. Blush: add a few light stitches on each cheek, or tiny felt circles sewn on. Optional whiskers: insert 3 whiskers per side through the muzzle area and secure inside. Visual checkpoint: the nose should sit slightly above the midpoint of the muzzle pad, not too low.
Place the eyes Place eyes about 5 to 7 rounds down from the top of the head. Space them so the face looks calm and centered. If using safety eyes, insert now. If sewing on, use glossy black buttons or embroider a small black oval with a white highlight stitch. Visual checkpoint: look straight on. The eyes should be even and slightly above the nose line.
Knit the ears tall and simple Make 2. Cast on 10 stitches in beige and knit flat. Increase every other row at both edges until 22 stitches. Knit 12 to 16 rows plain. Decrease every other row at both edges until 10 stitches. Decrease each row to 4 stitches, bind off. Fold each ear slightly lengthwise and stitch a small pinch at the base so it cups inward. Keep ears unstuffed for a smooth look. If you want extra structure, run a line of invisible stitching up the back edge to keep the ear from twisting. Visual checkpoint: ears should stand up with a gentle inward curve.
Knit the body in green Cast on 30 stitches in green and join. Increase: knit 1, make 1, repeat to 45. Knit 10 to 14 rounds plain. Shape for sitting: decrease round knit 3, knit 2 together, repeat to 36. Knit 2 rounds. Decrease round knit 2, knit 2 together, repeat to 27. Knit 2 rounds. Stuff firmly, packing the bottom for stability. Close with decreases or a gather. Visual checkpoint: body should be round and slightly pear shaped, wider at the bottom.
Knit the arms in beige with optional cuff Make 2. Cast on 16 stitches in beige and join. Knit 10 rounds. Optional cuff detail: switch to gray for 2 rounds, then back to beige for 2 rounds, then continue beige. Or add this near the wrist for the photo hint. Knit 4 to 6 more rounds. Lightly stuff the hand end only. Close and leave a tail for sewing.
Knit the legs in beige Make 2. Cast on 18 stitches in beige and join. Knit 16 to 20 rounds. Stuff firmly in the foot and lower leg. Keep the upper leg softer. Close and leave a tail for sewing.
Assemble the bunny Sew the head to the green body with strong stitches. Add extra stuffing at the neck before fully closing. Sew legs low and forward for a seated pose. The feet should face forward, slightly angled outward. Sew arms to the upper sides of the green body, just under where the bow will sit. Sew ears to the top of the head, slightly back from center. Visual checkpoint: the bunny should sit on its bottom without tipping forward. If it tips, add more stuffing to the back bottom area or adjust leg placement.
Create the oversized green bow This bow is what makes the look. Knit a rectangle: cast on 20 to 26 stitches in green and knit every row for garter stitch until the piece is about 5 to 7 inches long. Bind off. Pinch the center tightly and wrap yarn around the middle many times to form the bow knot. Sew the wrapped center securely. Knit or crochet a small neck band: cast on 10 stitches and knit a strip long enough to wrap around the bunny neck. Or use a ribbon if you want a softer drape. Attach bow to the neck band and tie or sew the band around the bunny neck. Visual checkpoint: the bow loops should puff outward and hold their shape. If they collapse, make the rectangle thicker by using more rows, or insert a hidden line of stitching along the edges to stiffen.
Final polish Smooth the stuffing by rolling the body gently. Use your tapestry needle to tug any uneven stitches into place. Snip whiskers evenly.
Troubleshooting
- The bow looks floppy Use garter stitch for structure and make the rectangle wider. Wrap the center tighter and add a few stitches that tack the bow loops to the center.
- The bunny face looks flat Add the muzzle pad and a little stuffing behind it. This single change makes the plush look much more like the photo.
- The bunny will not sit upright Add more stuffing to the bottom and back, and sew legs more forward. You can also add a small bean bag insert inside the bottom for weight.
- The ears twist Make sure your increases and decreases are symmetrical, and add a single seam line up the back of each ear to control the curve.
- The safety eyes feel loose Always use the washers and press firmly. For a display toy, sewing buttons on tightly can look extra glossy, but avoid for young children.
Finishing details
Weave in ends inside the bunny and tack them down so they do not migrate. Lightly steam the bow rectangle before pinching if your edges curl. If you want a boutique finish, add a tiny stitched label at the back seam of the green body, or embroider a small initial on the underside of the foot. For spring styling, pose the bunny near faux daisies and speckled eggs like the photo vibe.
Shop Similar
- Moss green worsted yarn for plush outfits
- Beige neutral worsted yarn for amigurumi style knitting
- Safety eyes assorted sizes black
- Poly fill premium stuffing
- Beading cord for whiskers
Style It With
Rainbow Stripe Sweater Bunny How-To Guide
What you’re making
You’re knitting a bright, cheerful bunny plush that looks like it stepped out into a field of spring flowers. The bunny has a creamy white head with pink inner ears, rosy cheeks, a tiny red nose, and a cozy sweater body with bold rainbow stripes. A matching scarf wraps the neck, adding that hand knit charm and a little extra color rhythm. The overall finish is smooth, tight, and plush, with rounded limbs and a stable seated pose.
Materials + tools
- Yarn: Worsted weight yarn in cream or off white for head and base, plus multiple stripe colors (coral, soft red, golden yellow, mint, aqua, peach). Small amount of bright red for nose.
- Needles: US 4 to US 6 (3.5 mm to 4 mm) for tight fabric
- Stitch markers
- Tapestry needle
- Stuffing (poly fill)
- Safety eyes 10 mm to 14 mm or embroidered eyes
- Optional: pale pink for blush and inner ears
- Optional whiskers: thin beading cord or stiff thread
- Scissors
- Measuring tape
Finished size + customization notes
Finished size is typically 10 to 12 inches tall seated. To match the photo, aim for a slightly larger head and a cozy, rounded sweater body. If you want more pastel than bright, choose softened versions of each stripe color. If your stripes do not align perfectly, that is fine. The photo look reads handmade and warm, not factory perfect.
Step by step instructions
Pick a stripe plan that feels balanced The body in the photo has horizontal rainbow stripes centered on the belly. Choose 5 to 7 colors. A good rhythm is 2 rounds per color for clean bands. If you want a blended look, use self striping yarn for the body and scarf, but keep the head a solid cream for contrast.
Knit the head in cream Cast on 24 stitches in cream and join. Increase: knit 1, make 1, repeat to 36. Increase: knit 2, make 1, repeat to 48. Knit 12 to 16 rounds. Decrease: knit 2 together, knit 2, repeat to 36. Decrease: knit 2 together, knit 1, repeat to 24. Stuff firmly. Decrease every round until closed. Secure and weave in. Visual checkpoint: the head should be larger than the body opening, like a plush bear head.
Create the puffy cheek muzzle Pick up 12 stitches across the lower front of the head. Knit 5 rows flat. Bind off. Sew edges down and add stuffing behind. This creates the distinct cheek pads seen in the photo.
Add facial details Eyes: place glossy black eyes about 6 rounds down from the top, spaced evenly. Nose: embroider a small red triangle or heart like nose, centered above the mouth. Keep it crisp by stitching over the same line several times. Mouth: stitch a tiny line down, then a subtle split if desired. Blush: use pale pink and add short horizontal stitches on each cheek. Optional whiskers: add 3 whiskers per side, secured inside. Visual checkpoint: the face should look calm and sweet, with the nose sitting just above the cheek pad center.
Knit the ears with pink inner lining Make 2. Cast on 10 stitches in cream, knit flat. Increase every other row at both edges until 22 stitches. Knit 8 rows cream. Switch to pale pink for 6 to 10 rows to create the inner ear blush area seen in the photo. Then switch back to cream for 4 rows. Decrease every other row at both edges until 10 stitches. Decrease each row to 4 stitches and bind off. Fold lengthwise slightly and pinch sew base so ears cup inward. Leave unstuffed. Visual checkpoint: ears should have a soft pink glow inside but remain mostly cream outside.
Knit the sweater body with stripes Cast on 30 stitches in cream and join. Increase: knit 1, make 1, repeat to 45. Knit 4 rounds cream. Begin stripe section: work 2 rounds each color across 10 to 16 rounds total. Place the stripe block at mid body so it shows on the belly. After stripes, knit 6 to 10 rounds cream. Shape bottom: decrease knit 3, knit 2 together, repeat to 36. Knit 2 rounds. Decrease knit 2, knit 2 together, repeat to 27. Knit 2 rounds. Stuff firmly, especially the bottom. Close with decreases and gather. Visual checkpoint: the stripe band should sit like a sweater panel across the belly, not too high near the neck.
Knit the arms with stripe cuffs Make 2. Cast on 16 stitches cream and join. Knit 6 rounds cream. Work 6 to 8 rounds of stripes, 2 rounds per color, matching the body palette. Return to cream and knit 8 to 12 rounds. Stuff the hand lightly and keep upper arm soft. Close and leave tail.
Knit the legs with striped ankles Make 2. Cast on 18 stitches cream and join. Knit 6 rounds cream for foot tip. Work 6 to 8 rounds stripes, matching palette. Return to cream and knit 10 to 16 rounds. Stuff firmly in the foot and lower leg. Close and leave tail.
Assemble the bunny Sew head to body. Add extra stuffing at neck before finishing seam. Sew legs low and forward so the bunny sits. The feet should be visible and slightly rounded. Sew arms to the sides, slightly forward. Sew ears to top of head, angled outward slightly. Visual checkpoint: the bunny should sit with a gentle lean back, like it is resting, not stiff.
Knit the matching scarf Option A garter scarf: cast on 8 stitches using your stripe colors. Knit every row, switching color every 2 rows. Knit 18 to 22 inches. Bind off. Option B tube scarf: cast on 16 stitches, join, knit in the round for a smooth tube. Change colors every 2 rounds. Knit 12 to 16 inches. Close ends with a few stitches. Tie scarf in a simple knot at the front, slightly off center, like the photo. Visual checkpoint: scarf should look cozy and slightly chunky, not thin.
Final touch shaping Pinch cheeks gently to round them. Adjust scarf knot so one tail hangs slightly longer. If the head tilts, add a few hidden stitches at the neck seam to correct.
Troubleshooting
- My stripes jog at the join Place the jog at the back and accept it as handmade charm, or use a simple jogless stripe method by slipping the first stitch after a color change and pulling snug.
- The sweater band looks too wide Use fewer stripe rounds, or make each stripe 1 round instead of 2. If yours looks wider than the photo, shorten the stripe block and add more cream rounds above and below.
- The face looks too pointy Add more stuffing in the cheeks and use the muzzle pad piece. Also avoid pulling the closing seam too tight on the head.
- The bunny tips over Add more stuffing at the bottom or insert a small fabric pouch of rice or pellets inside the body, fully enclosed, then stuff around it.
- Ears flop Use smaller needles, or add a hidden line of stitching down the center back of each ear to add structure.
Finishing details
Weave in all ends inside the body and tack them down. Lightly steam the scarf only to soften it. For a photo ready finish, brush the yarn gently to smooth fibers and remove lint. If making for a child, choose embroidered eyes and skip cord whiskers. You can also add a tiny stitched patch on the sweater back for an extra handmade detail.
Shop Similar
- Rainbow pastel worsted yarn bundle
- Cream worsted yarn for plush toys
- Safety eyes black glossy 12 mm
- Stuffing poly fill for amigurumi
- Small stitch markers for knitting in the round
Style It With

Floppy Ear Bow Bunny Make-It-Yourself Tutorial
What you’re making
This tutorial shows you how to knit a floppy ear bunny plush with a soft cream body, long drooping ears with gentle speckled striping, minty green feet, and a structured green bow tie at the neck. The finished bunny looks extra cuddly because the ears fall to the sides instead of standing upright, and the oversized feet give it a seated, baby plush silhouette. It’s the perfect spring shelf sitter, gift topper, or nursery decor piece.
Materials + tools
- Yarn: Worsted weight yarn in cream for body, sage or mint green for bow and feet, plus small amounts of gray and beige for ear striping
- Needles: US 4 to US 6 (3.5 mm to 4 mm) for firm fabric
- Stitch markers
- Tapestry needle
- Stuffing (poly fill)
- Safety eyes 10 mm to 14 mm or embroidered eyes
- Pink yarn for nose
- Optional black embroidery floss for mouth
- Scissors
- Measuring tape
Finished size + customization notes
Expect about 10 to 12 inches tall seated. To emphasize the floppy ears, knit them a little longer than the upright ear version and avoid stiffening. To make the feet extra round like the photo, stuff them firmly and keep the ankle area slightly narrower. If your bunny looks too skinny, add an extra increase round to the body.
Step by step instructions
Knit the head in cream Cast on 24 stitches, join. Increase: knit 1, make 1, repeat to 36. Increase: knit 2, make 1, repeat to 48. Knit 12 to 16 rounds. Decrease: knit 2 together, knit 2, repeat to 36. Decrease: knit 2 together, knit 1, repeat to 24. Stuff firmly. Decrease to close and weave in. Visual checkpoint: the head should look smooth and slightly oval when gently squeezed, like a plush marshmallow.
Add muzzle shaping for the rounded snout Pick up 12 stitches across the lower front, knit 5 rows flat, bind off. Sew edges down and add a small amount of stuffing behind it. This gives the bunny that softly protruding snout seen in the photo.
Add eyes, nose, and mouth Place eyes about 6 rounds down from top, evenly spaced. Embroider a small pink nose centered on the snout. In the photo, the nose is small and subtle, not bold. Add a short black mouth line beneath. Visual checkpoint: from the side, the nose should sit at the front curve of the snout, not on the chin.
Knit the body in cream with a subtle textured belly panel The photo body reads as simple stockinette with a slight texture at the front. You can mimic this by adding a small rib or seed stitch panel. Cast on 30 stitches cream, join. Increase: knit 1, make 1, repeat to 45. Knit 6 rounds plain. Optional belly panel: for the front 12 stitches, work seed stitch for 10 rounds while keeping the rest stockinette. If knitting in the round, seed stitch is alternating knit and purl by stitch and round. If that feels fussy, skip it and keep the body smooth. Knit 6 more rounds plain. Shape bottom: decrease knit 3, knit 2 together, repeat to 36. Knit 2 rounds. Decrease knit 2, knit 2 together, repeat to 27. Knit 2 rounds. Stuff firmly, packing the bottom. Close and weave in. Visual checkpoint: body should be round and plush, with arms and legs attaching comfortably.
Knit the arms Make 2. Cast on 16 stitches cream, join. Knit 14 to 18 rounds. Stuff lightly in the hand end only. Close and leave tail. Visual checkpoint: arms should be soft and slightly bendable, not stiff logs.
Knit the legs with mint green feet Make 2. Cast on 18 stitches in mint green and join. Knit 6 to 8 rounds for the foot. Switch to cream and knit 12 to 16 rounds for the leg. Stuff foot firmly and shape it into a rounded oval. Stuff leg moderately, leaving top softer. Close and leave tail. Visual checkpoint: you should now see a clear color block foot that looks like a little sock.
Knit the long floppy ears with speckled striping Make 2. Cast on 10 stitches cream and knit flat. Increase every other row at both edges until 22 stitches. Knit 16 to 22 rows, adding gentle speckled striping by switching to gray or sage for 2 row bands every so often. Keep it subtle, like the photo. Decrease every other row at both edges until 10 stitches. Decrease each row to 4 stitches, bind off. Do not pinch the base tightly. Instead, sew the ear base flat to the head so it drapes. Visual checkpoint: when you hold the bunny upright, ears should fall down the sides and frame the face.
Make the green bow tie Knit a garter rectangle: cast on 20 stitches in sage green and knit every row until 5 inches long. Bind off. Pinch center and wrap yarn tightly around middle to form knot. Sew the wrap securely. Knit a small neck band or use a yarn tie: make a strip long enough to go around the neck and tie at the back. Attach bow at front. Visual checkpoint: bow should look structured and crisp, not droopy. Garter stitch helps hold shape.
Assemble Sew head to body, adding extra stuffing at neck. Sew legs low and forward. Make sure feet face outward slightly. Sew arms to upper body sides. Sew ears to the top sides of head, slightly forward so they drape. Tie on the bow tie at the neck seam line. Visual checkpoint: bunny should look like it is wearing a neat bow collar, with ears framing the bow.
Troubleshooting
- Ears do not drape nicely Knit them longer, and avoid tight pinching at the base. Sew the base flatter. If ears still look stiff, use a slightly larger needle just for ears.
- Feet look too small Add 2 more rounds in the mint section and stuff more firmly. You can also increase once in the mint section to widen the foot.
- The bow twists Add a few stitches that tack the bow knot to the body so it stays centered. Also make sure the neck band is snug.
- The body looks lumpy Use smaller tufts of stuffing and pack evenly. Roll the stuffed body between your hands to smooth.
- Face feels uneven Recheck eye placement and make sure muzzle pad is centered. Small shifts in eyes change expression a lot.
Finishing details
Weave in all ends and tack them down. If you want the bow to stay extra crisp, you can lightly steam it flat before pinching the center. Add a tiny stitch at the corners of the bow loops to prevent curling. For spring styling like the photo, place the bunny on a book or floral print surface and add a couple faux blossoms in front.
Shop Similar
- Sage green worsted yarn for bows and accents
- Cream neutral yarn for knitted plush toys
- Safety eyes glossy black assorted sizes
- Poly fill stuffing for handmade dolls
- Knitting needles set small sizes
Style It With
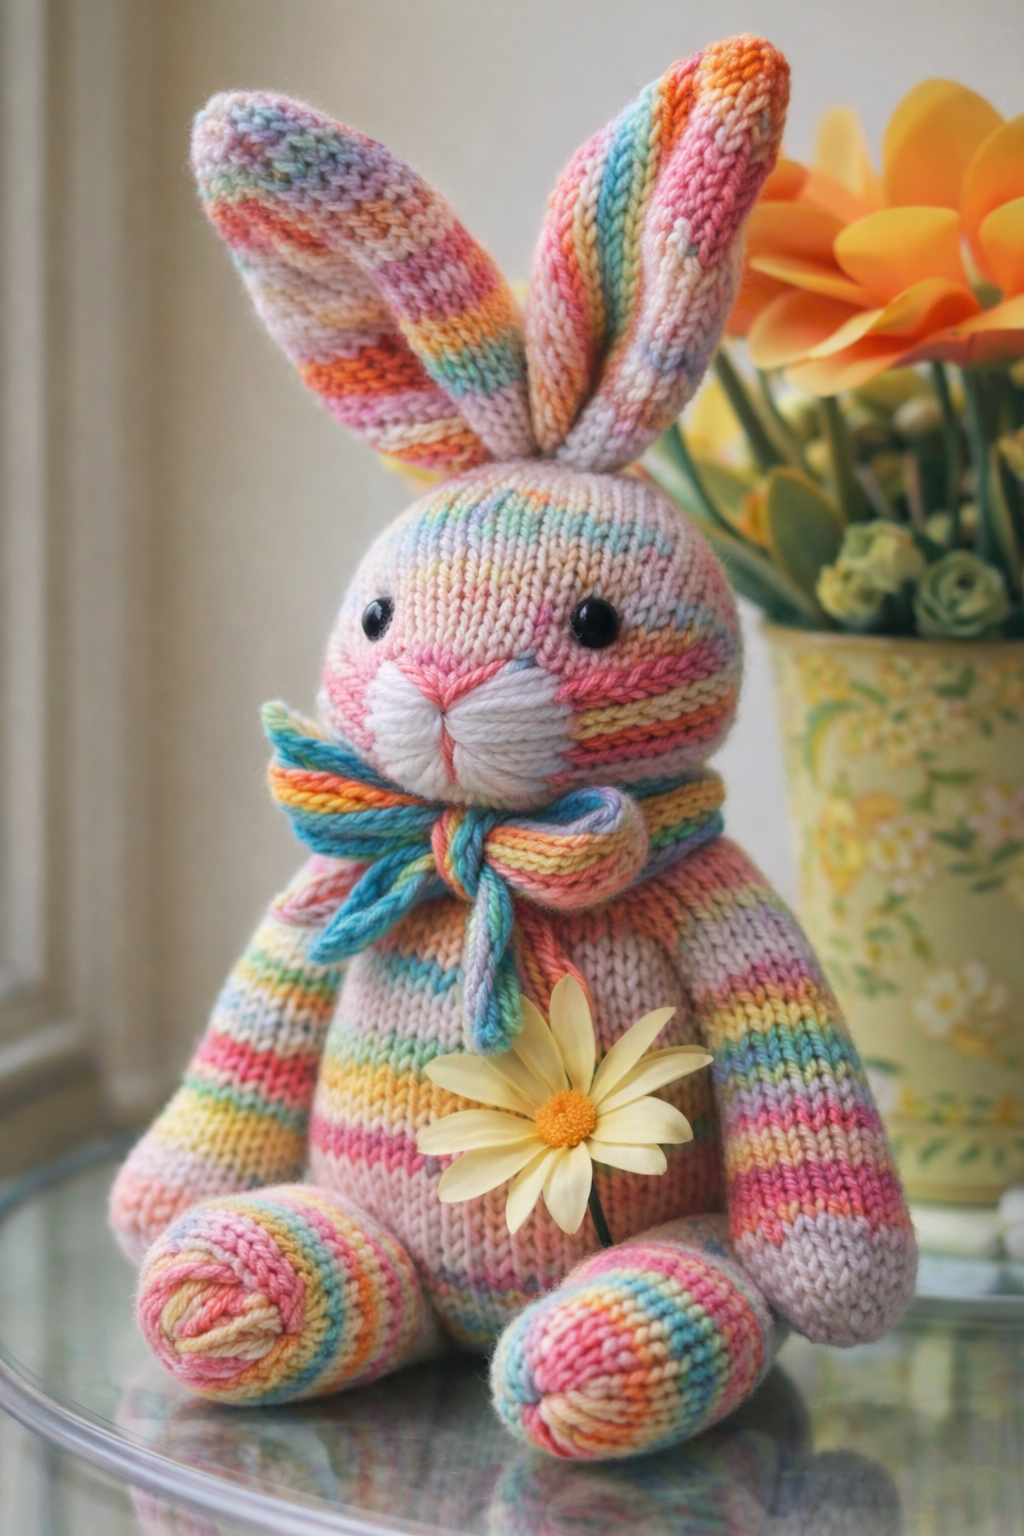
Pastel Rainbow Bunny Plush Step-by-Step Tutorial
What you’re making
This project is a pastel rainbow bunny plush with a softly rounded face, big upright ears, a cozy striped body, and a matching neck scarf tied into a sweet knot. The colorwork in the photo reads like a watercolor wash of pink, peach, mint, and sky blue across the head, ears, limbs, and body. You’ll knit the bunny with a tight plush fabric, then focus on styling details like the scarf knot, cheek embroidery, and a smooth, evenly stuffed silhouette that looks polished and gift ready.
Materials + tools
- Yarn: Worsted weight self striping pastel rainbow yarn for the main bunny, plus small amounts of white or cream for the muzzle and pink for the nose. If you do not have self striping yarn, choose 4 to 6 pastel colors and change every 2 rounds.
- Needles: US 4 to US 6 (3.5 mm to 4 mm) to keep stitches tight
- Stitch markers
- Tapestry needle
- Stuffing (poly fill)
- Safety eyes 10 mm to 14 mm glossy black
- Optional: thin cord for whiskers
- Scissors
- Measuring tape
Finished size + customization notes
With worsted yarn, the bunny will be about 9 to 12 inches tall seated. Self striping yarn makes the look effortless, but stripe control is still possible if you want certain colors on the face or ears. If you want the muzzle to pop like the photo, keep it white or very pale cream even if the rest is rainbow. If your head stripes land differently, it will still look beautiful, like a unique dye lot painting.
Step by step instructions
Decide how you will handle the color changes Option A: use one pastel self striping yarn for all pieces. This gives the smoothest blended look. Option B: use separate pastel colors and change every 2 rounds. Keep the same color order for body, arms, legs, and scarf so it feels coordinated.
Knit the head in pastel rainbow Cast on 24 stitches with pastel yarn and join. Increase: knit 1, make 1, repeat to 36. Increase: knit 2, make 1, repeat to 48. Knit 12 to 16 rounds, letting the yarn stripe naturally. Decrease: knit 2 together, knit 2, repeat to 36. Decrease: knit 2 together, knit 1, repeat to 24. Stuff firmly. Decrease each round until closed. Visual checkpoint: the head should look like a smooth pastel sphere, with color changes flowing horizontally.
Add a white muzzle for contrast The photo has a lighter muzzle area that reads as soft and plush. Pick up 12 stitches across the lower front with white or cream. Knit 5 rows flat and bind off. Sew edges down and add a small pinch of stuffing behind it for puffy cheeks. Visual checkpoint: you should now see a white snout area that sits on top of the pastel face like a little cloud.
Add nose, mouth, blush, whiskers Nose: embroider a pink nose at center top of muzzle. Make it slightly raised by wrapping yarn and tacking down. Mouth: add a short line under the nose, with a tiny split if you want. Blush: use pink and add light cheek stitches that extend slightly outward, like the photo. Whiskers: optional, add 3 per side with thin cord. Visual checkpoint: the face should feel friendly and soft, with the blush not overpowering the pastel yarn.
Place the eyes Place glossy eyes about 6 rounds down from the top. The photo eyes look round and reflective. If you sew on eyes, use black buttons and add a tiny white stitch for highlight. Visual checkpoint: eyes should be symmetrical and slightly above the muzzle, giving a gentle expression.
Knit the ears in pastel rainbow Make 2. Cast on 10 stitches and knit flat. Increase every other row at both edges until 22 stitches. Knit 12 to 16 rows, letting the stripes flow. Decrease every other row to 10 stitches, then decrease to 4 and bind off. Pinch the base slightly and stitch to form an upright ear cup. Keep ears unstuffed. Visual checkpoint: ears should stand with a gentle inward curve. If they twist, add one seam line up the back edge.
Knit the body in pastel rainbow with gentle striping Cast on 30 stitches and join. Increase: knit 1, make 1, repeat to 45. Knit 14 to 18 rounds, allowing stripe changes. Shape bottom: decrease knit 3, knit 2 together, repeat to 36. Knit 2 rounds. Decrease knit 2, knit 2 together, repeat to 27. Knit 2 rounds. Stuff firmly, focusing on the base. Close and weave in. Visual checkpoint: the body should show clear stripe bands and feel round and cuddly.
Knit the arms Make 2. Cast on 16 stitches and join. Knit 14 to 18 rounds. Stuff lightly in the hand end. Close and leave tail. If you want a lighter cuff like the photo vibe, work the last 2 rounds in white before closing.
Knit the legs Make 2. Cast on 18 stitches and join. Knit 18 to 22 rounds. Stuff firmly in the foot and lower leg. Keep top softer. Close and leave tail. Visual checkpoint: legs should be rounded and slightly oversized at the feet for a cute seated look.
Assemble the bunny Sew head to body. Add extra stuffing at neck so it feels stable. Sew legs low and forward so bunny sits. Sew arms slightly forward. Sew ears to top of head, slightly back from center, angled outward. Visual checkpoint: set bunny down. It should sit without tipping. If it tips, add stuffing to base or adjust leg placement.
Knit the matching pastel scarf Option A garter scarf: cast on 8 stitches in pastel yarn and knit every row until 18 to 22 inches. Bind off. Option B braided scarf: cut 6 long strands of pastel yarn, braid tightly, knot ends. Tie a soft knot at the front like the photo, with tails hanging. Visual checkpoint: scarf should look cozy and chunky. If it looks too thin, use more strands in the braid or make the knit scarf wider.
Add the final styling detail If you want the exact photo charm, tuck a faux daisy stem or a single flower under the scarf knot for a styled portrait moment. For an everyday plush, skip the flower and keep the scarf centered.
Troubleshooting
- The pastel stripes look busy Choose a softer self striping yarn with longer color runs, or limit your manual palette to 4 colors. If yours looks more speckled than striped, increase the number of rounds per color.
- My muzzle looks flat Add more stuffing behind the muzzle pad and tack the edges down more firmly so it sits raised.
- The ears flop Use smaller needles, pinch sew the base more tightly, or add a hidden line of stitches up the back center of each ear.
- The bunny leans forward Add more stuffing to the back bottom, or reposition the legs so they support the front.
- Safety eyes show gaps Tighten your gauge and make sure the eye posts sit between stitches cleanly. If needed, stitch around the eye base with matching yarn to snug the fabric.
Finishing details
Weave in ends and tack them down. Brush gently to remove lint and soften the surface. Lightly steam the scarf only. If gifting, consider embroidered eyes and skip cord whiskers for safety. For a polished handmade finish, add a tiny stitched label at the back seam or embroider a small heart on the underside of one foot.
Shop Similar
- Pastel rainbow self striping yarn worsted
- White yarn for plush muzzle details
- Safety eyes black glossy 10mm 12mm
- Stuffing poly fill for plush animals
- Tapestry needle set for knitting assembly
Style It With
Once you finish your bunny lineup, take a moment to enjoy how different each one feels even though they all start from the same simple base. That is the magic of plush knitting. A few intentional changes to stripes, ear shape, and accessories can turn one pattern into a whole collection that looks curated, gift ready, and completely you.
If you are gifting these, add a little tag with the bunny’s name, tie the scarf in a slightly wonky knot for extra charm, and tuck it into a basket with tissue and spring florals. If you are styling for decor, cluster two or three together on a tray with faux flowers and speckled eggs for a soft seasonal moment that reads cozy, whimsical, and elevated.
Save your leftover yarn because the best part is making one more in a new palette. Once you knit the first bunny, the rest come together faster, and you can keep experimenting until you have your perfect signature bunny look.