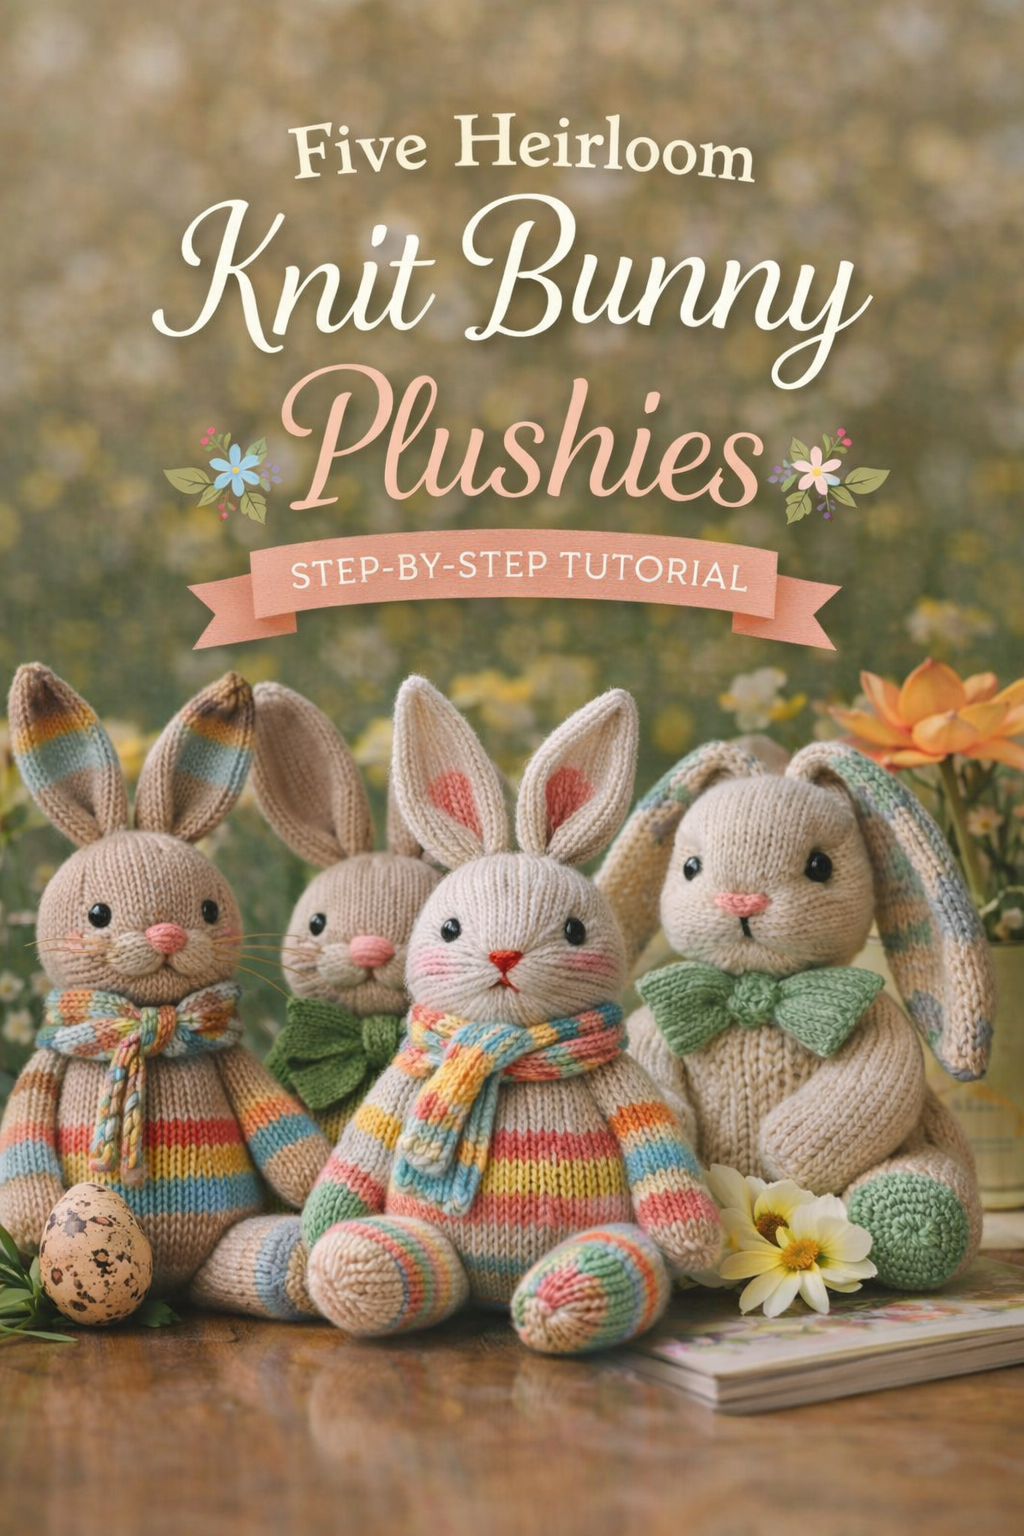
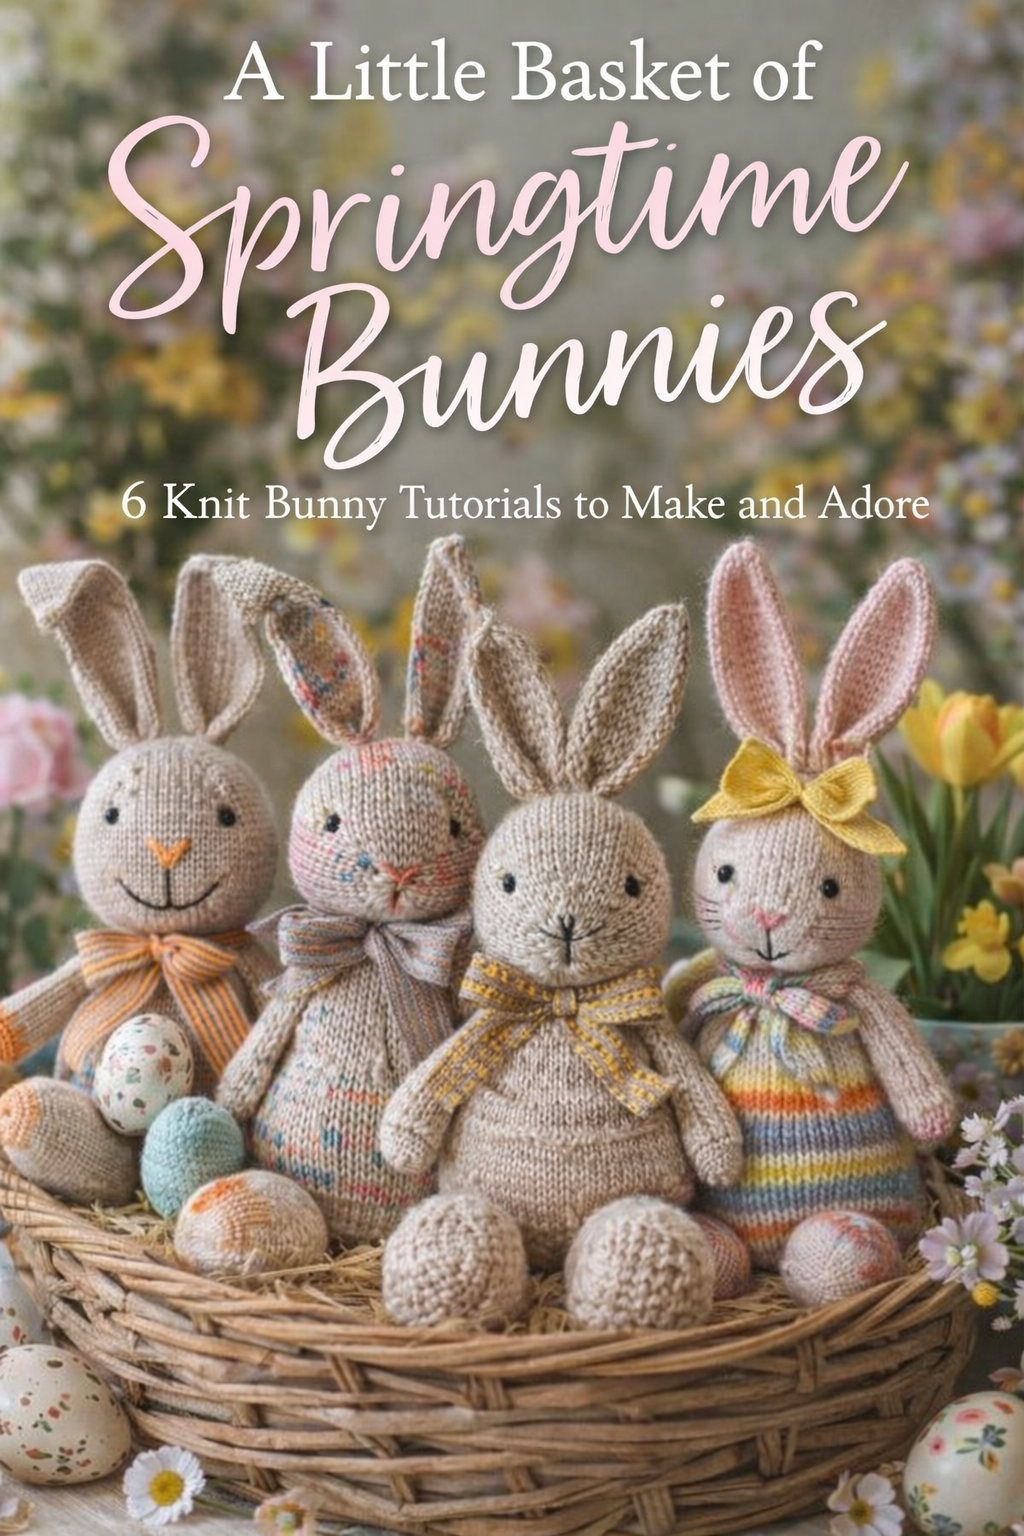
5 Heirloom Knit Bunny Dolls in Spring Pastels — Step-by-Step Tutorial
More like this
There is something about a handmade bunny that instantly softens a room. It is part nostalgia, part springtime ritual, and part quiet flex that says you made a keepsake with your own two hands. In this tutorial roundup, we are recreating five heirloom style knit bunny looks that feel boutique and storybook, from leafy woodland collars and linen bows to blush pastels and marled yarn magic. Each design is built on the same beginner friendly foundation, a tight stockinette fabric, clean shaping, and careful stuffing, then elevated with small styling details that make the finished bunny look intentional and gift ready.
Whether you are knitting for Easter baskets, nursery shelves, or a sweet seasonal vignette on a kitchen hutch, these bunnies are meant to be displayed and loved. Pick one look to start, or make the whole set for a coordinated collection. As you work, look for the visual checkpoints so your shape, posture, and expression stay true to the inspiration photos. By the end you will have a set of soft spring companions that feel timeless, calming, and undeniably handmade.
💡 Pro Tip: Why I Link to Amazon Search Results and Not One Product
In the Shop the Look and Style it With sections under each bikini, I link to Amazon search results, not single products. Here’s why this matters:
Hot bikinis sell out fast. I don’t want you clicking on a dead link to a sold-out item. Search pages stay updated.
You get more options. Love the vibe but want a different color, cut, or price point? The search results give you everything that matches the look and energy.
I curate each search carefully. These aren’t generic. I spend hours crafting keywords that bring up exactly the kind of bikinis I’d wear—or recommend to my hottest friends.
Support with no pressure. If you click a link, browse, and buy something later, I may earn a small commission at no extra cost to you. That helps me keep bringing you curated collections like this one—powerful, seductive, and always fresh.
So dive in. Click through. Try something risky. These aren’t just bikinis—they’re commands, statements, and maybe even your new favorite weapon of choice.
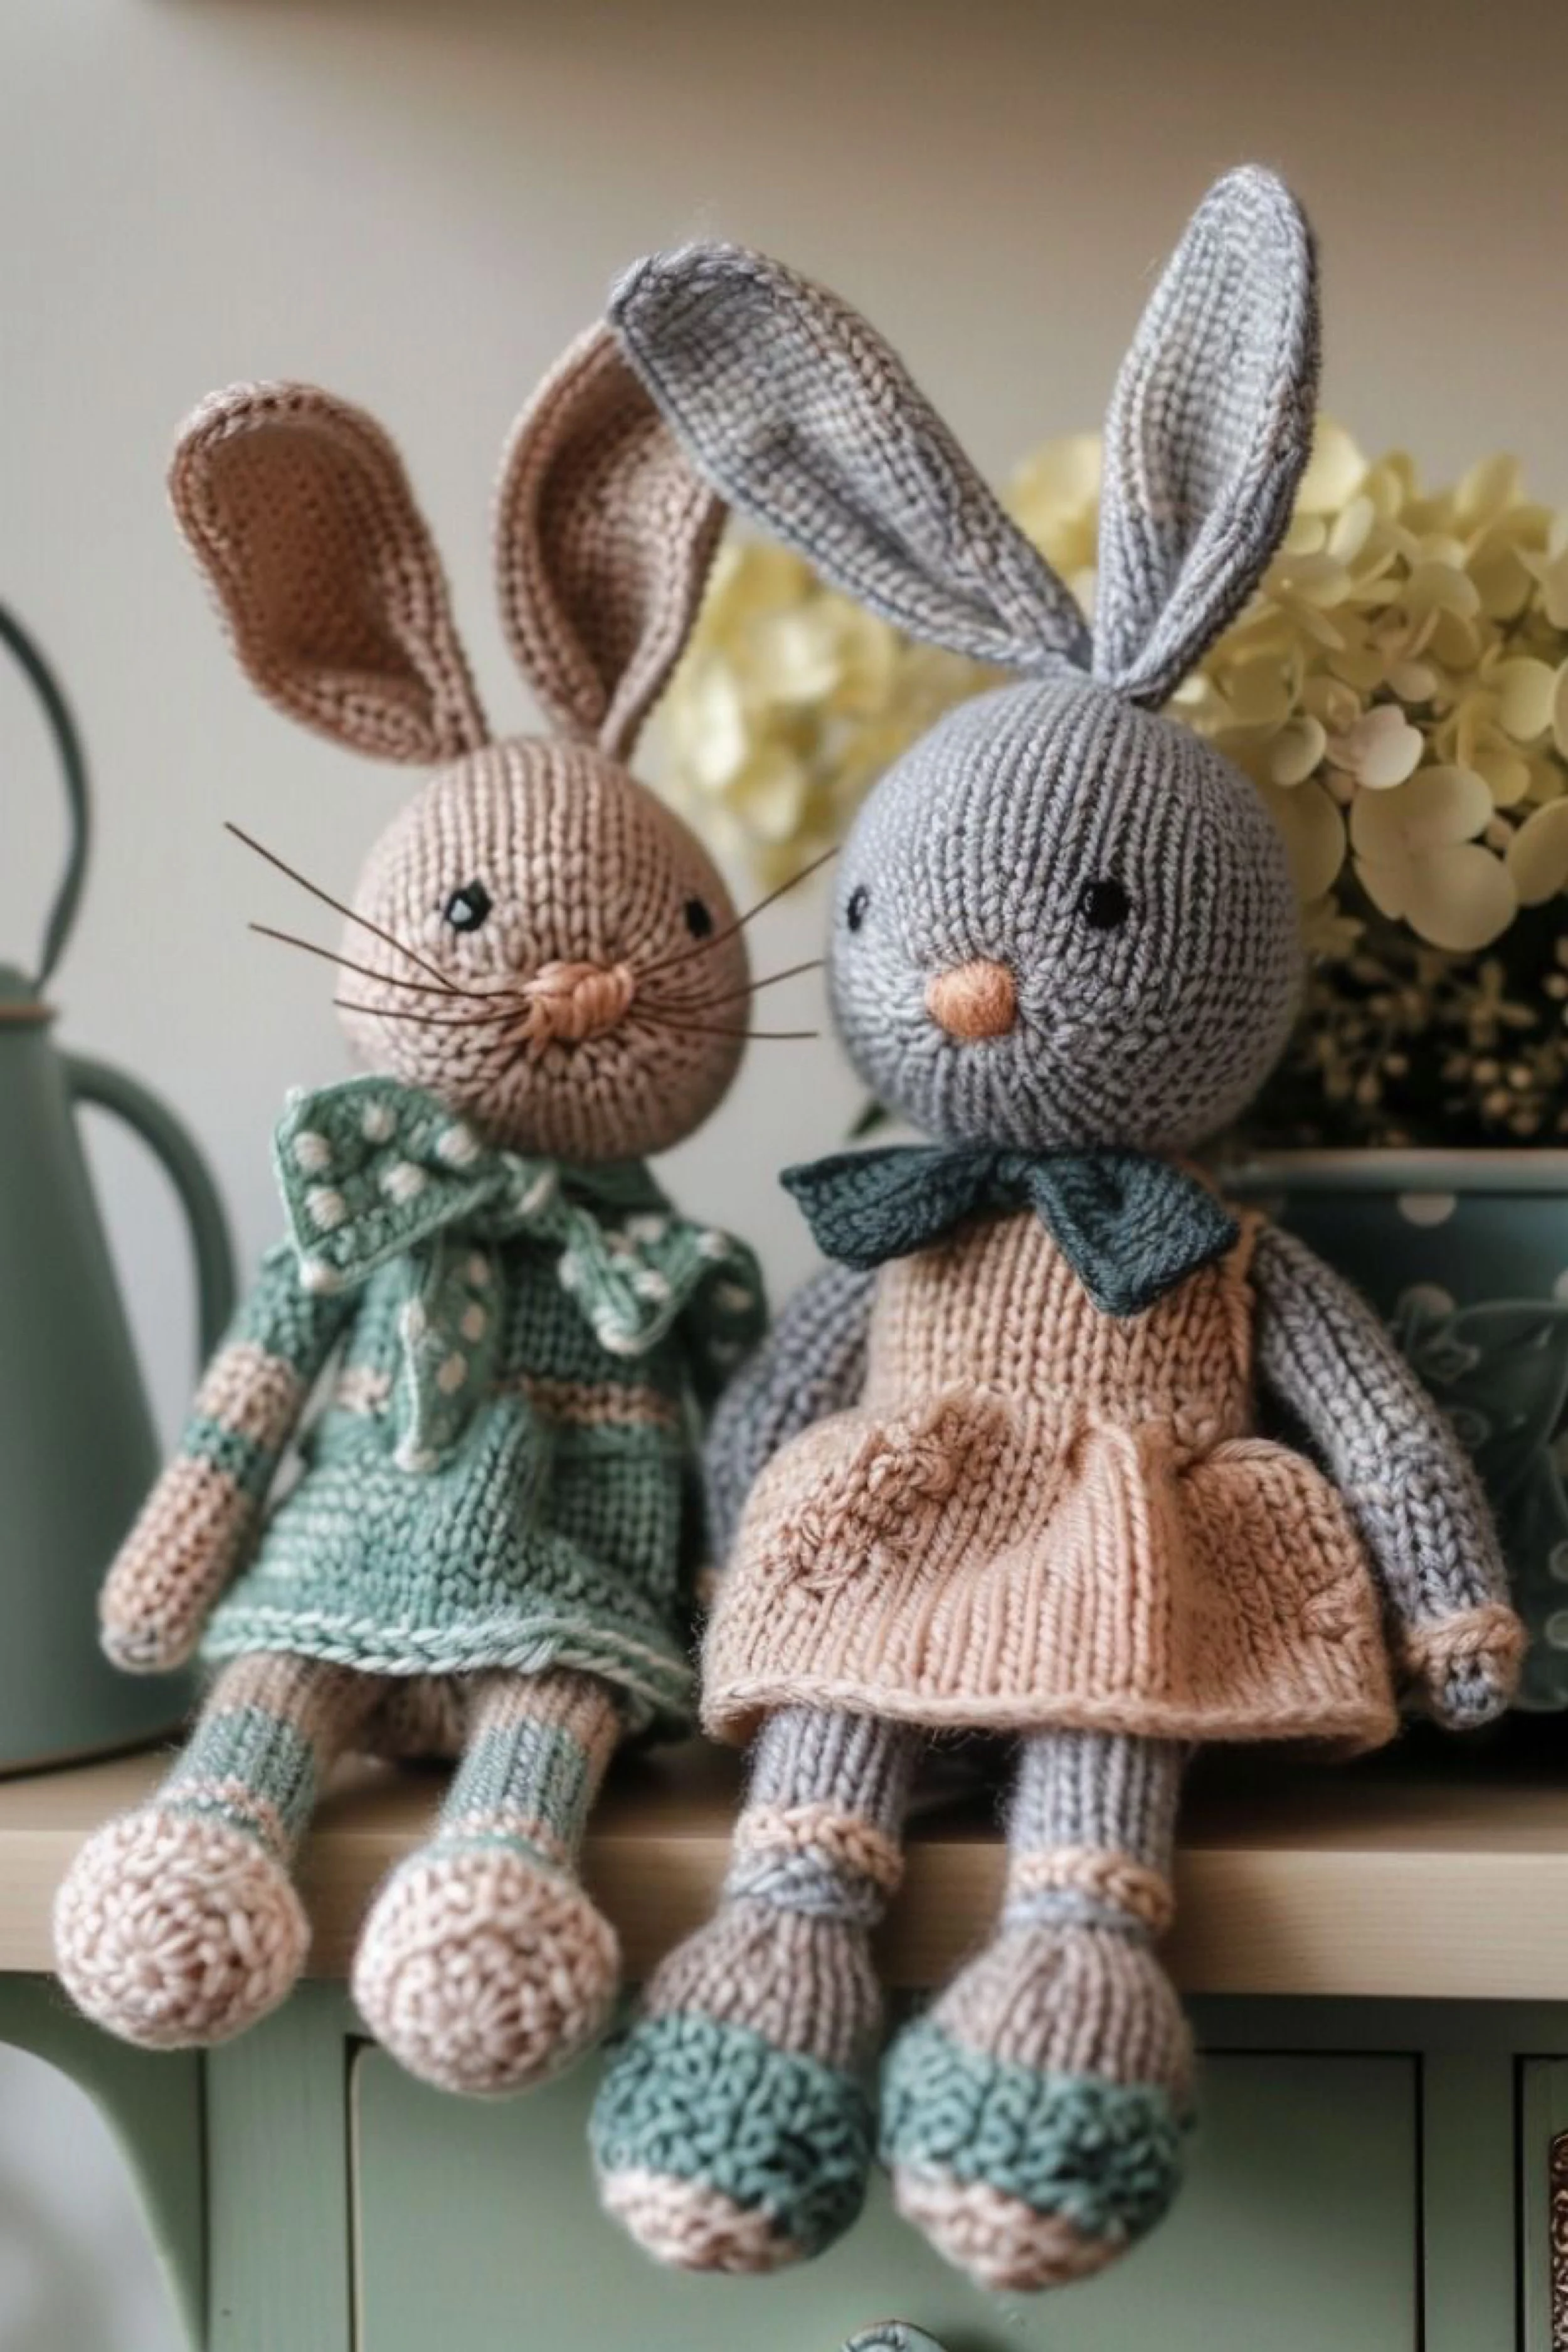
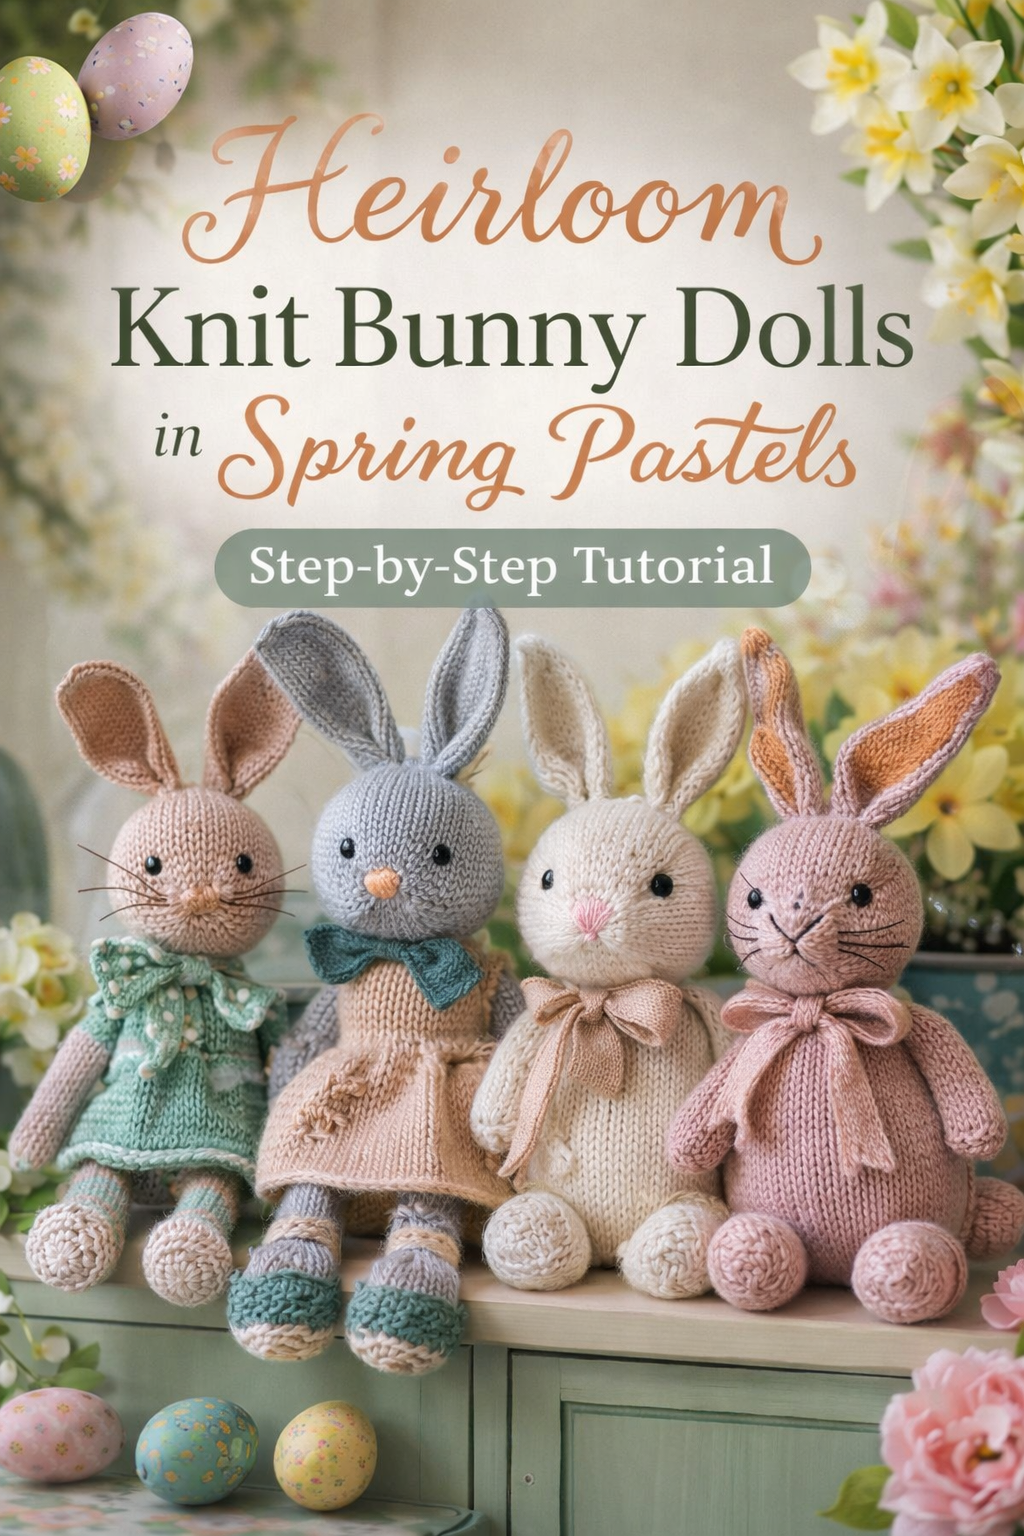
Heirloom Knit Bunny Dolls in Matching Spring Dresses — Step-by-Step Tutorial
What you’re making
You’re making a pair of heirloom style knit bunny dolls with long ears, tiny noses, bead like eyes, and that extra sweet detail you can see in the photo: soft clothing layers that make them feel like collectible keepsakes. One bunny wears a sage green dress with a dotted collar and bow, and the other wears a blush dress with a deep green neck bow and textured hem accents. The overall look is clean stockinette fabric with firm stuffing so the faces stay round and smooth.
Materials + tools
- Worsted or DK weight yarn in bunny tones (taupe, light gray) and clothing tones (sage green, blush, deep green)
- Small amount of contrast yarn for nose embroidery (peach or warm pink)
- Small amount of dark yarn or thread for facial embroidery (brown or charcoal)
- Two 6 mm to 9 mm safety eyes per bunny (or black beads with strong thread)
- Polyester fiberfill stuffing
- Knitting needles to match yarn and achieve a firm fabric (typically 2.75 mm to 3.75 mm, go smaller than the label suggests)
- Double pointed needles or circular needle for small tubes (optional, for ears or arms)
- Tapestry needle
- Stitch markers
- Scissors
- Pins or clips for seaming
- Optional: thin craft wire or fishing line for whiskers, or embroidery floss for stitched whiskers
- Optional: fabric for simple dress lining (thin cotton) if you want extra structure
Finished size + customization notes
Finished size depends on yarn and needle choice. With DK and 3.0 mm needles, expect about 10 to 12 inches tall seated. With worsted and 3.5 mm needles, expect about 12 to 15 inches tall seated. The key to matching the photo is a tight knit fabric so the stuffing does not show through.
Customization ideas:
- Taller ears for a more whimsical look, shorter ears for a baby bunny vibe
- Swap bows for a tiny neck scarf or a peter pan collar
- Add a simple embroidered floral motif on the dress hem
- Make the dresses removable with a back opening and tiny snaps
Step-by-step instructions
Choose your yarn and needle for a dense fabric
The photo shows a smooth, tight knit that holds shape. Knit a small swatch in stockinette. If you can see light through the stitches, go down a needle size.
Visual checkpoint: your swatch should feel firm and slightly stiff, not drapey.Knit the head as a shaped ball (flat or in the round)
Easiest flat method: knit a rectangle and shape with gathering. Best match method: shaped increases then decreases for a rounder head.
Shaped method in the round:- Cast on 6 stitches, join in the round.
- Increase evenly every round until you reach a circumference that matches the photo, usually 48 to 60 stitches.
- Knit straight for several rounds to build the height.
- Decrease evenly until small opening remains.
Stuff as you go so the head stays perfectly round.
Create the face placement before closing the head
Mark eye positions with pins first. In the photo, eyes sit slightly wide and low, giving a gentle expression.
Visual checkpoint: eyes should sit about one third up from the bottom of the head, with a wide, calm spacing.Install safety eyes or sew bead eyes
If using safety eyes, insert now before you fully close the head. If sewing beads, plan to stitch them on after stuffing so you can adjust placement.
Tip: pull thread tight and knot well inside the head so the eyes sit slightly indented like the photo.Embroider the nose and mouth
The noses are small and softly rounded. Use peach or warm pink yarn or embroidery floss.- Make several satin stitches to form a tiny oval.
- Add one small vertical stitch downward.
Keep it minimal for that modern heirloom look.
Add whiskers (two safe options)
Option A, stitched whiskers: use dark embroidery floss and make three short straight stitches on each side.
Option B, fine line whiskers: use fishing line or thin craft wire, stitch through the face, and trim ends evenly.
Visual checkpoint: whiskers should be long but light, not thick ropes.Knit the ears with a clean edge
The ears in the photo are long, gently curved, and slightly thicker along the edge.
A great match is a two layer ear: knit two identical ear shapes, place them together, stitch around edges, then lightly stuff the base only.- Increase to a widest point, knit straight a little, then decrease to a tapered tip.
Tip: if the ear flops too much, add one strand of embroidery thread along the inner edge as a subtle support line.
- Increase to a widest point, knit straight a little, then decrease to a tapered tip.
Attach ears with a slightly forward tilt
Pin ears to the top of the head first. The photo shows ears angled forward and slightly outward.
Visual checkpoint: when you look straight on, the ears frame the face like a soft arch.Knit the body as an egg shape for a seated bunny
The bunnies sit with a rounded torso and plump belly.
In the round: increase from a small cast on, grow to the widest belly, knit straight, then decrease to the neck opening.
Stuff firmly, especially around the base, so the bunny sits without collapsing.Knit arms as simple tubes with rounded ends
Arms are slim and understated.
Knit a small tube, lightly stuff, and stitch closed.
Tip: do not overstuff arms or they will stick out stiffly. The photo shows arms that rest naturally.Knit legs and feet with textured soles
The feet in the photo look slightly textured at the toe, like a tiny knitted spiral or gathered circle.
Two approaches:
Option A: knit foot as a small circle, then knit upward as a tube for the ankle and leg.
Option B: knit a rectangle, seam it, and gather at the toe to create that rounded end.
Visual checkpoint: toes should look like small rounded puffs, not pointed cones.Assemble the bunny body
- Stitch head to body with tight, even whipstitch.
- Attach arms slightly low on the sides.
- Attach legs so the bunny sits with feet forward.
Tip: use pins and test the sitting pose before final stitching.
- Make the dress base (simple A line knit)
The dresses in the photo look like separate knit pieces, not crocheted.
Knit a simple A line skirt:
- Cast on enough stitches to fit around the bunny belly.
- Knit in stockinette or simple textured stitch.
- Increase evenly every few rows to flare slightly.
- Add a small hem detail with ribbing or garter to keep it neat.
Add the bodice and shoulder shaping
Knit upward from the skirt to create a bodice. Use ribbing at the top edge if you want it to hug the bunny.
For a sleeveless look, simply stop at the underarm height and bind off.Create the green dotted collar and bow (photo match detail)
For the dotted collar, use sage yarn and add tiny contrast stitches using duplicate stitch or small embroidered dots.
- Knit a small rectangle, curve it around the neck, and stitch in place.
- Add a bow by knitting or crocheting a small strip and tying it.
Visual checkpoint: the collar should sit wide and soft like a petal shape.
Create the deep green neck bow for the second bunny
Knit a narrow strip, cinch the center, and stitch to the neck area.
Tip: block the bow lightly so it lies flat and looks crisp.Optional upgrades for an even more boutique finish
- Add a thin cotton lining inside the dress to reduce stretch and help it drape like the photo.
- Add a tiny sewn on label at the back of the dress.
- Use a soft blush tint of yarn for inner ears to match the warm palette.
- Add a tiny pocket or embroidered initial on the dress hem.
Troubleshooting
- My stitches look loose and stuffing shows through
Go down one needle size and knit tighter. Use DK instead of worsted if needed. - The head looks lumpy
Add stuffing in small pieces and use your fingers to smooth as you go. Close slowly and reshape. - The bunny will not sit upright
Add extra stuffing at the base of the body and position legs slightly wider apart. - Ears flop too much
Add a second layer ear, add a subtle support thread, or knit with a slightly smaller needle. - Dress rides up or twists
Add a simple waistband ribbing, or stitch the dress lightly to the body at the shoulder points.
Finishing details
Weave in all ends inside the body and clothing so no tails show. Steam lightly from a distance if your fabric needs smoothing, but avoid heavy heat. If you used fishing line whiskers, knot them securely inside the head and dab the knot with fabric glue for extra hold. For the most polished look, gently shape the cheeks and nose area with your fingers after the bunny is fully assembled.
Shop Similar
- DK yarn for heirloom knit dolls
- Worsted yarn in taupe and light gray
- Safety eyes assorted sizes for plush toys
- Polyester fiberfill stuffing
- Embroidery floss set for facial details
- Tapestry needles for sewing knit seams
Style It With
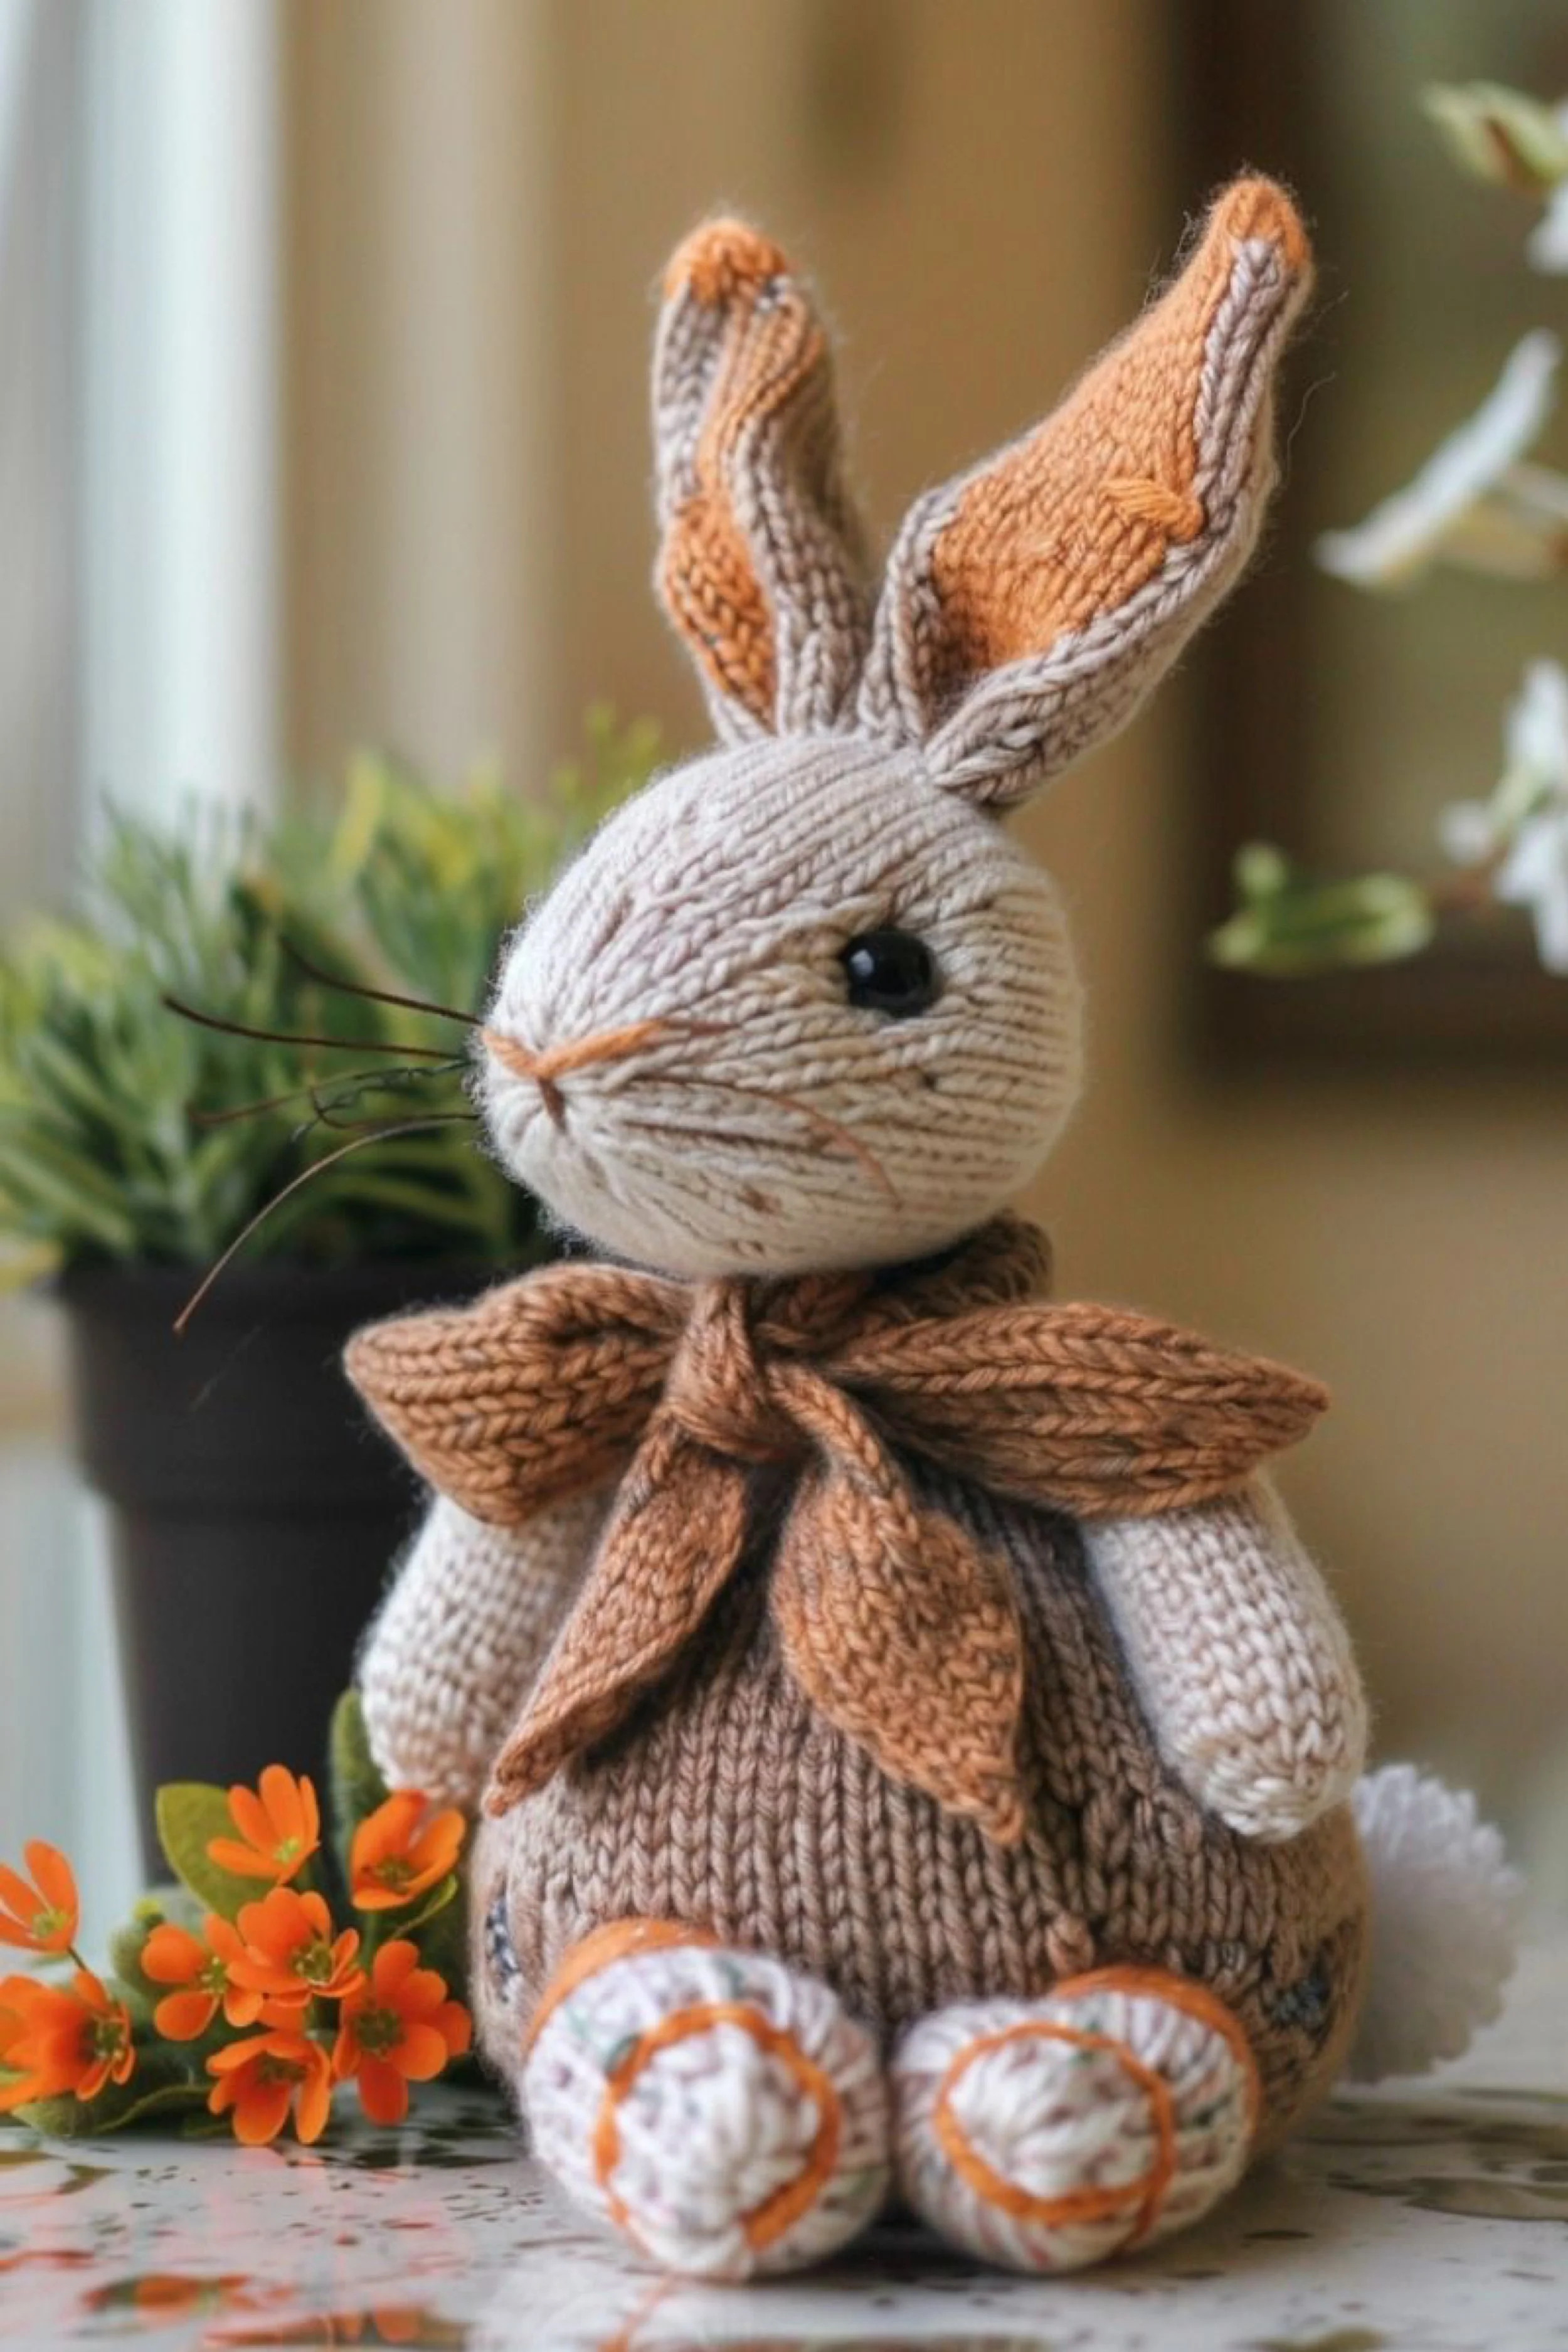
Woodland Leaf Collar Knit Bunny Plush — Make-It-Yourself Tutorial
What you’re making
You’re making a woodland inspired knit bunny plush with a softly rounded head, warm cream and cocoa tones, and the signature detail from the photo: a dramatic leaf like collar tied at the neck. This bunny has a cozy, old world storybook vibe, with slightly oversized ears lined in a warm rust shade and chunky little feet that look hand finished. The goal is a firm, smooth knit surface with gentle shaping, then carefully placed facial details for that calm, collectible expression.
Materials + tools
- DK or worsted weight yarn in cream, light taupe, cocoa brown, and rust orange
- Small amount of dark yarn or thread for eyes if not using safety eyes
- Two safety eyes (about 8 mm to 10 mm) or black beads
- Polyester fiberfill stuffing
- Knitting needles for dense fabric (often 3.0 mm to 3.75 mm)
- Optional: double pointed needles or circular needle for knitting small tubes
- Tapestry needle
- Stitch markers
- Pins or clips
- Scissors
- Optional: embroidery needle and floss for whiskers and nose shaping
- Optional: small pom pom for tail (or make a yarn pom)
Finished size + customization notes
With DK yarn and a small needle, expect about 8 to 11 inches tall seated. With worsted yarn, expect about 10 to 14 inches tall seated.
Customization ideas:
- Swap the leaf collar for a bow, scarf, or peter pan collar
- Add a tiny felt heart patch to the belly
- Make ears longer for a more whimsical look
- Use a mohair strand held together with your main yarn for a fuzzy, vintage finish
Step-by-step instructions
Plan your color placement to match the photo
The bunny is mostly cream and taupe, with rust inside the ears and warm brown in the collar. Set aside small balls of each shade so you can switch cleanly.Knit a dense swatch first
The photo shows a tight, plush fabric. Knit stockinette and stretch it gently. If you see gaps, go down a needle size.
Visual checkpoint: stitches should look like neat little V shapes with minimal space between them.Make the head for a smooth, rounded profile
Best match: knit in the round with increases and decreases.- Start with a small cast on, increase evenly to a wide midsection.
- Knit straight to build height.
- Place eyes and begin stuffing before closing.
Tip: to get that slightly pointed snout profile, add a few short rows at the front or shape the stuffing with a little extra fiber at the muzzle.
Place the eyes for that gentle side glance look
In the photo, the face is in profile and the eye sits slightly back from the nose point. For a front facing bunny, place eyes symmetrically.
Visual checkpoint: from the side, the eye should not sit too close to the nose. Leave a calm amount of space.Embroider the nose and mouth in a warm rust tone
Use rust orange to make a small angled nose line, then a tiny split down. Keep it minimal.
Tip: stitch lightly at first, step back, then add one more pass if you need stronger color.Add whiskers with a soft, natural look
The photo whiskers are thin and long.
Option A: use embroidery floss in brown and stitch three straight whiskers per side.
Option B: use fishing line or thin craft wire for a crisp whisker line. Knot inside the head.Knit the ears with a lined effect
The ears show two tones, with rust inside. Two safe approaches:
Option A: knit two ear shapes, one in cream and one in rust, seam them together around the edge, then turn and lightly shape.
Option B: knit one ear and use duplicate stitch to add the inner rust panel.
Visual checkpoint: inner ear color should sit like a soft triangle, not fill the entire ear.Attach ears with a slight inward curve
Pin first. The ears in the photo rise upright and angle slightly inward at the tips.
Tip: stitch the ear base firmly and add a few hidden stitches along the lower ear edge to encourage the curve.Knit the body as a plump seated shape
Make an egg shaped torso. Increase to a wide belly, knit straight, then decrease at the top for the neck opening.
Stuff firmly so the bunny sits stable.Knit arms as short rounded tubes
The arms are small and understated. Knit a tube, lightly stuff, and stitch to the sides.Knit legs and feet with an extra chunky toe
The feet in the photo look like rounded puffs. Make a small circular toe section, then knit upward for the ankle and leg.
Tip: if the toe looks too pointy, add one extra increase round early on.Assemble the plush
Stitch head to body with tight, even stitching. Attach arms and legs, checking the sitting pose before final knots.
Visual checkpoint: the bunny should sit with feet forward and a rounded belly resting on the surface.Add a tail for storybook charm
The photo shows a soft tail shape behind. Make a small yarn pom or knit a tiny ball and stitch it securely to the back.Create the leaf collar centerpiece
The collar is the star. Make several leaf shapes and attach them around the neck.
Leaf shape method:
- Cast on a small number of stitches.
- Increase one stitch at each edge every other row until you reach leaf width.
- Knit a few rows straight.
- Decrease at each edge every other row until a point forms.
Make 4 to 6 leaves depending on fullness.
Knit or braid the collar tie
Create a long tie cord in brown. You can knit an i cord, braid three strands, or crochet a chain. Tie in a soft knot at the front.Attach collar leaves evenly
Overlap leaf bases around the neck opening and stitch down securely. Add the tie cord at the center front.Optional upgrades to elevate the finish
- Lightly brush the fabric with a soft brush to lift fibers and give a plush look.
- Add a tiny acorn charm or wooden bead at the collar knot.
- Add subtle blush shading to cheeks using a tiny amount of diluted fabric paint or pastel chalk sealed lightly.
Troubleshooting
- My bunny looks stretched or see through
Use smaller needles or switch to a slightly thicker yarn. - Head shape looks eggy instead of round
Add more stuffing to the sides and reduce stuffing at the top. Also knit a few extra straight rounds at the widest point. - Ears will not stand up
Use a lined ear method, stitch more firmly at the base, or insert a subtle support thread along the inner edge. - Collar leaves curl
Block each leaf lightly with steam and pin flat until cool. - Feet are too small compared to the body
Add one more increase round on the foot and knit one extra round before decreasing.
Finishing details
Weave ends inside the plush and clothing elements. Shape the face with your fingers, gently smoothing the stuffing so the muzzle looks clean. If using fishing line whiskers, double knot inside and secure with a small dab of fabric glue. Steam block collar leaves and ears lightly so they sit crisp and intentional.
Shop Similar
- Woodland color yarn set cream taupe rust
- Safety eyes 8 mm 10 mm black
- Polyester fiberfill for stuffed animals
- Knitting needles set small sizes 2.75mm 3.5mm
- Embroidery floss brown rust neutral set
Style It With
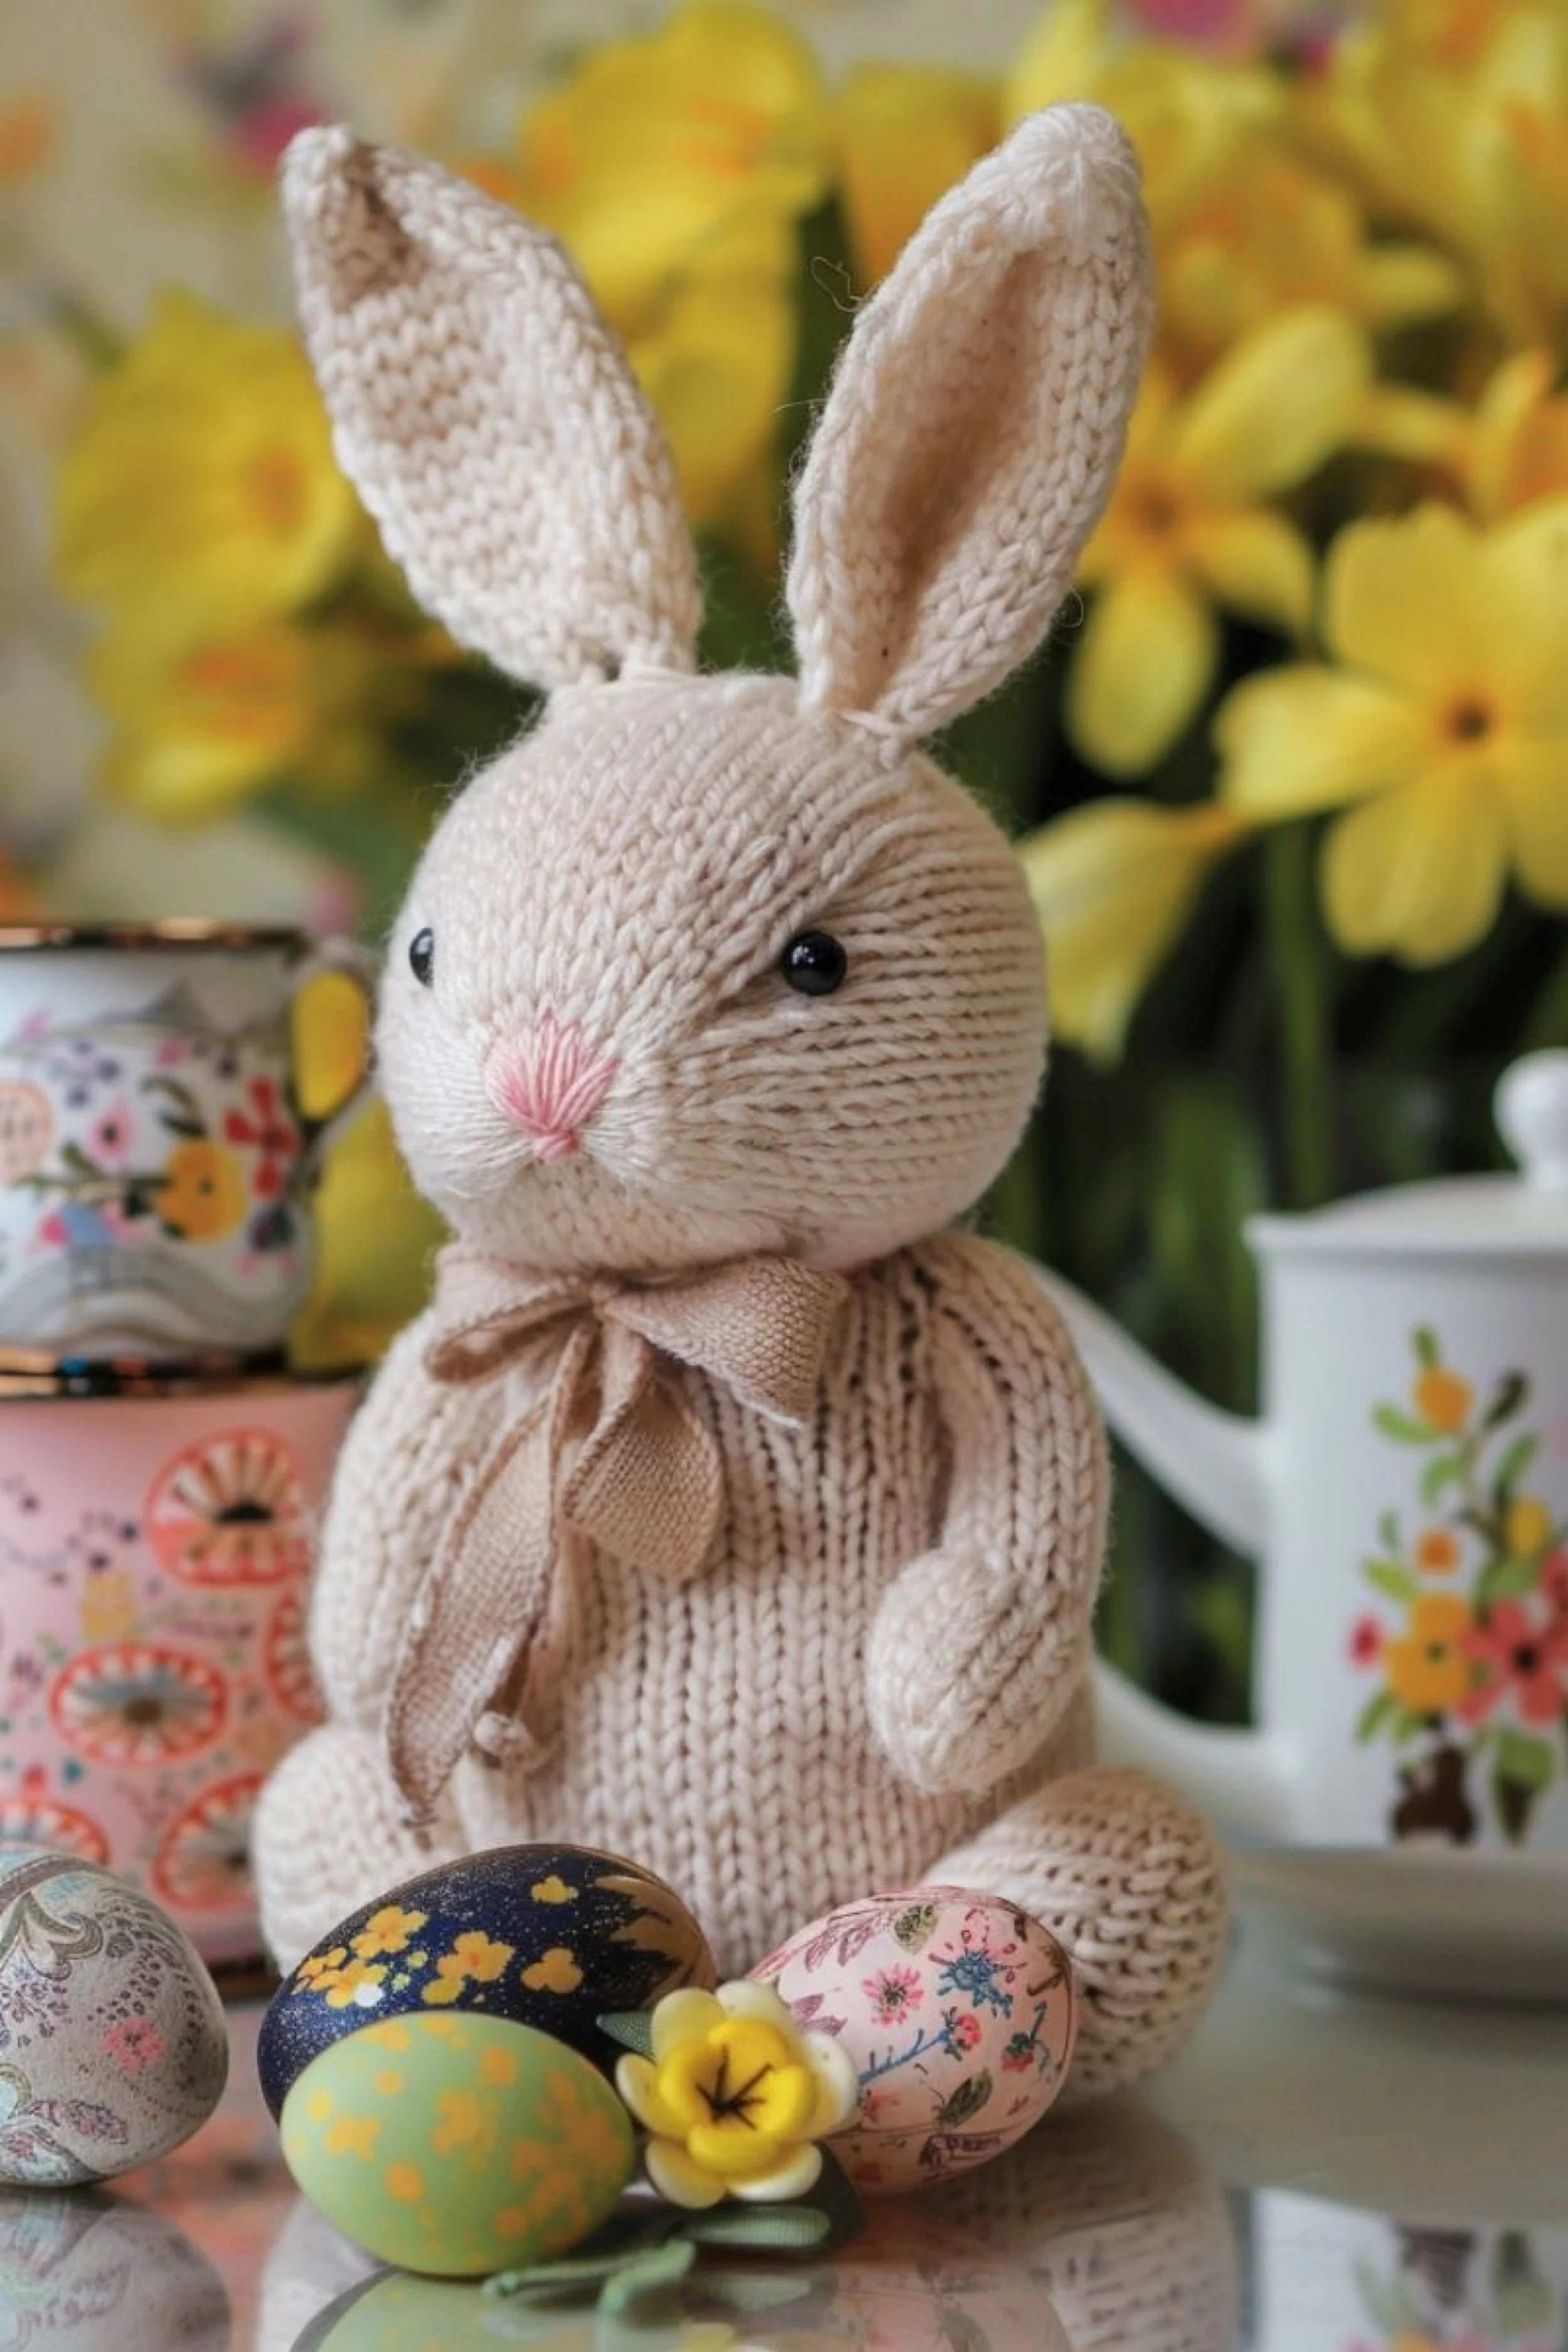
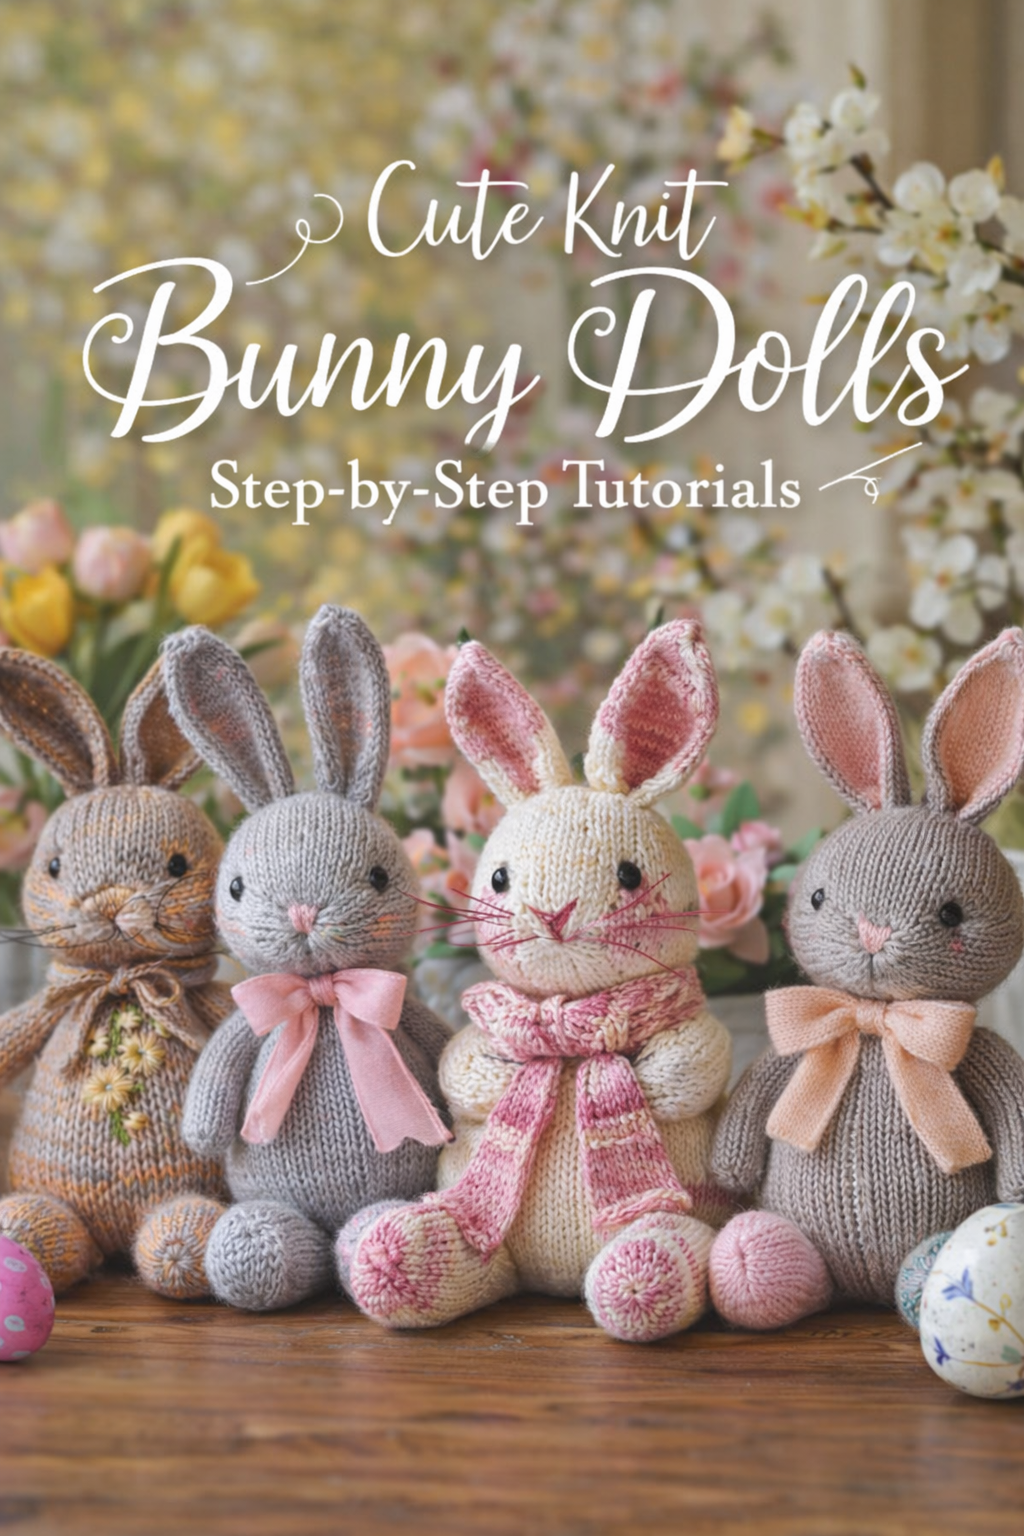
Cottage Cream Knit Bunny with Linen Bow and Easter Eggs — How-To Guide
What you’re making
You’re making a classic cream knit bunny that looks like it hopped out of a spring cottage kitchen. This one is all about clean simplicity: smooth stockinette texture, softly rounded head and belly, upright ears, tiny black eyes, and a linen style bow tied at the neck. Styled with painted eggs and bright daffodil yellow florals, the bunny reads as timeless Easter decor and a keepsake toy.
Materials + tools
- DK or worsted weight yarn in cream or oatmeal
- Small amount of pink yarn or embroidery floss for the nose
- Two safety eyes (about 6 mm to 9 mm) or black beads
- Polyester fiberfill stuffing
- Knitting needles sized down for a tight fabric (often 3.0 mm to 3.75 mm)
- Tapestry needle
- Stitch markers
- Pins or clips
- Scissors
- Optional: fabric ribbon or linen strip for the bow
- Optional: thin cotton fabric to make a bow if you want a true linen look
- Optional: a small bell or wooden bead hidden under the bow
Finished size + customization notes
With DK yarn and small needles, expect around 9 to 12 inches tall seated. With worsted yarn, expect 11 to 15 inches tall seated.
Customization ideas:
- Make the bow oversized like the photo, or make it a neat small knot for a minimalist look
- Add a tiny embroidered monogram on one foot
- Make the ears slightly longer for a sweeter silhouette
- Add a removable scarf for seasonal swaps
Step-by-step instructions
Aim for the right fabric density
The photo shows a smooth, almost tailored knit surface. Knit a swatch in stockinette with your chosen yarn. If it feels drapey, size down needles.
Visual checkpoint: the fabric should feel firm enough that it holds shape when you bend it.Knit the head for a soft round shape
Best match is knitting in the round: increase to a wide middle, knit straight, then decrease.- Start with a small number of stitches and increase evenly until you reach the head width you want.
- Knit several rounds without shaping to build height.
- Begin decreases evenly.
Stuff lightly at first, then more firmly near the end.
Mark and place the eyes
Pin eye positions before installing. In the photo, the eyes are small and set wide, giving a gentle expression.
Visual checkpoint: from the front, the eyes should sit slightly to the sides, not too close together.Install safety eyes or stitch bead eyes
Install before fully closing if using safety eyes. If using beads, stitch them on after stuffing so you can adjust.
Tip: slight indentation around the eyes looks extra professional. Pull the thread firmly through the head and knot inside.Embroider the pink nose
The nose is a tiny pink triangle or rounded stitch cluster. Use pink floss and make several short satin stitches meeting at a point.
Add a tiny vertical stitch down for the mouth start.Knit the ears with a clean outline
The ears are upright and smooth. Knit two ear shapes, seam them together, and keep stuffing minimal or none.
For a more upright ear, knit with a smaller needle or add a very thin support thread along the inner edge.
Visual checkpoint: ears should stand tall without collapsing, and the tips should be softly rounded.Attach ears at the top of the head
Pin ears first. In the photo, they sit fairly upright and slightly angled outward.
Stitch around the base securely, then add a few extra stitches across the center base to anchor them.Knit the body as a seated oval
Knit an egg shape torso with increases to a belly, then decreases at the neck.
Stuff firmly, especially at the base, so it sits stable.
Visual checkpoint: the body should look like a smooth oval with a soft belly curve.Knit arms as simple tubes
Arms are small and rounded. Knit a tube, lightly stuff, close, and attach.
Tip: attach arms slightly forward so they appear to rest on the belly like the photo.Knit legs and feet
The bunny sits with feet forward. Make two legs with rounded feet.
If your feet come out too long, shorten the foot tube before attaching.Assemble the bunny
Stitch head to body. Attach arms and legs with strong thread, checking pose.
Visual checkpoint: bunny should sit naturally without tipping.Make the linen bow (two options)
Option A, real fabric: cut a strip of linen ribbon, tie a bow, and stitch to the neck.
Option B, knit bow: knit a small rectangle, cinch center with yarn, wrap, and stitch down.
The photo bow has a soft, slightly crumpled linen texture, so fabric ribbon is the closest match.Refine the silhouette with gentle shaping stitches
If your muzzle looks too flat, add a small amount of stuffing at the front and use a few hidden stitches to pinch the cheeks slightly.
Tip: tiny shaping stitches make a big difference in an heirloom toy.Optional upgrades for a boutique finish
- Add a soft blush tint to cheeks using pastel chalk.
- Add a small tail pom on the back.
- Add a tiny hidden weight pouch inside the base so it sits perfectly.
- Add a stitched line inside the ear to mimic an inner ear fold.
Troubleshooting
- My stitches look uneven
Block lightly and keep your tension steady. Using a slightly smaller needle often improves stitch definition. - The head looks too big compared to body
Reduce head maximum stitch count or knit fewer increase rounds. Alternatively, add a few more rounds to the body belly section. - The bunny tips backward
Add more stuffing to the lower belly and base, or add a small weight pouch inside. - Ears droop
Use a two layer ear, knit tighter, or add subtle support thread. - Bow looks too stiff
Use softer fabric ribbon or lightly steam the knit bow to relax it.
Finishing details
Weave ends inside the body. Smooth the stuffing by massaging the plush gently, especially around the cheeks and neck. If you used fabric ribbon, stitch it in place in two spots so it stays centered. For photography like the photo, style the bunny near bright spring flowers and add a few painted eggs in front for scale and color.
Shop Similar
- Cream DK yarn for knitted toys
- Small safety eyes for amigurumi and plush
- Fiberfill stuffing premium
- Linen ribbon neutral for bows
- Embroidery floss pink and neutrals
Style It With
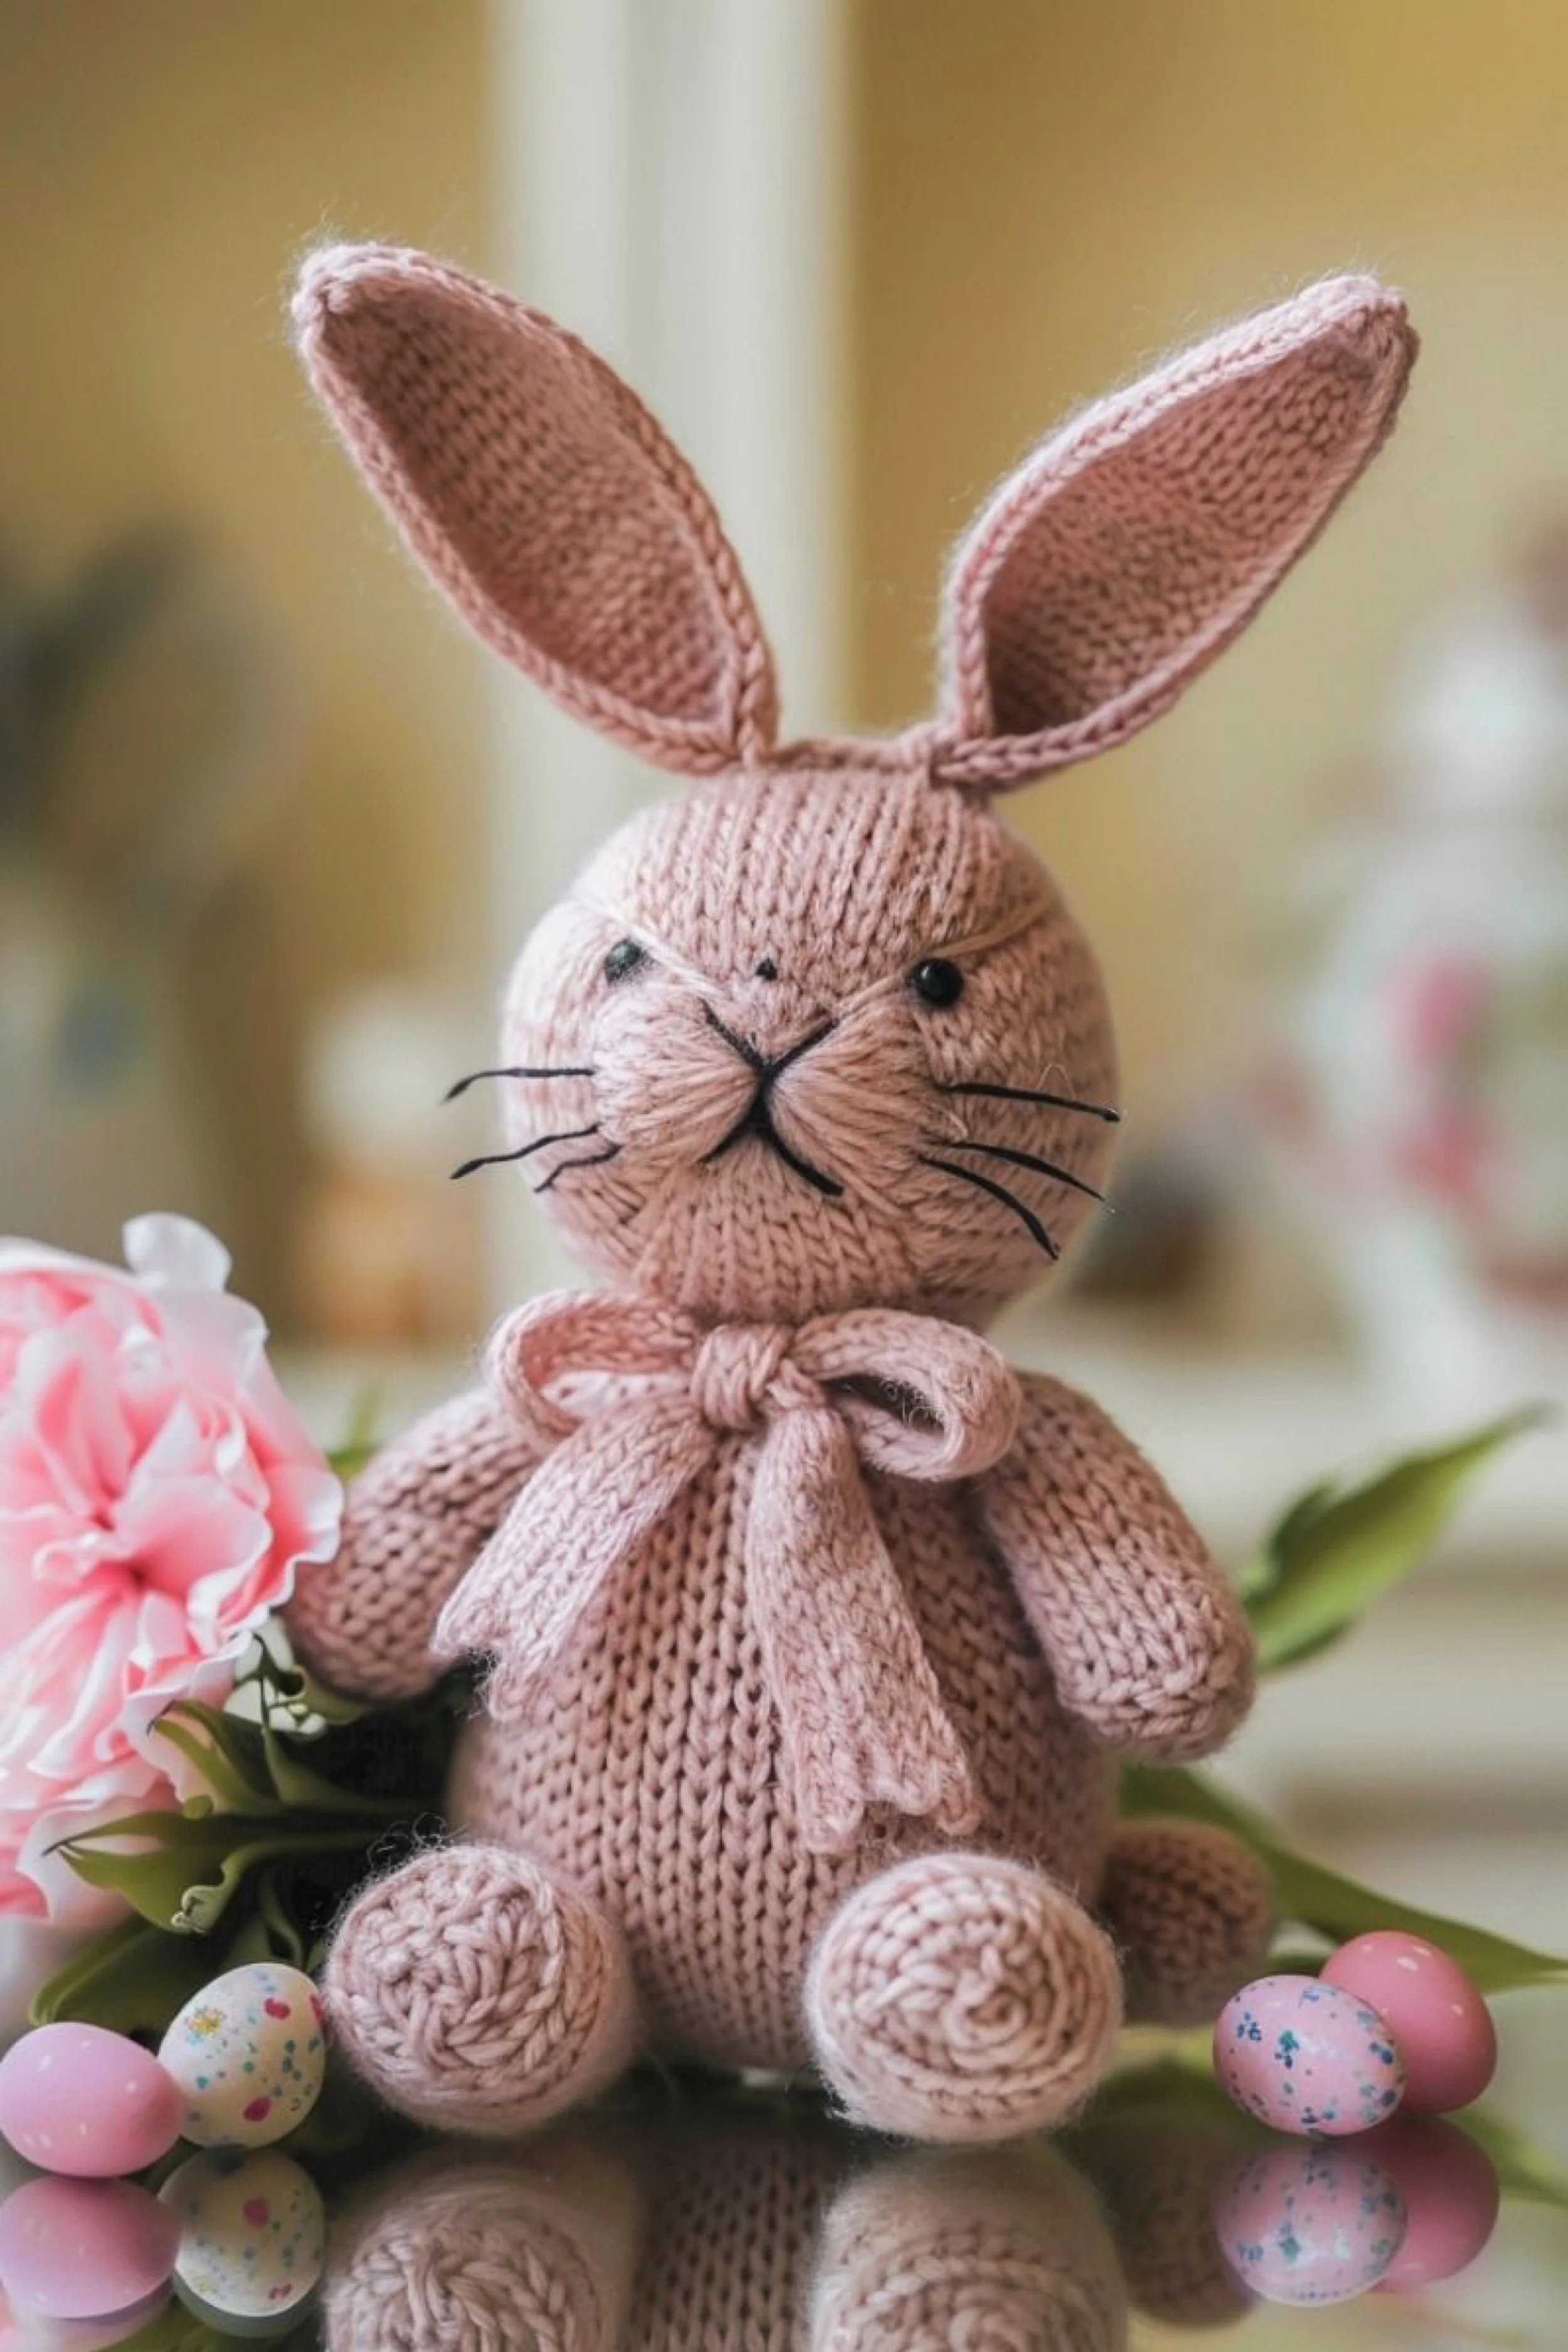
Blush Storybook Knit Bunny with Satin Bow and Egg Nest Styling — DIY Guide
What you’re making
You’re making a blush pink storybook bunny with big upright ears, a softly rounded body, and a sweet, slightly serious face like the photo. The details that sell this look are the stitched whiskers, the simple dark eyes, and the large neck bow that reads like soft satin or a smooth knit tie. This bunny is styled in a spring vignette with pastel eggs and a pink bloom, so the finished plush doubles as Easter decor and a giftable keepsake.
Materials + tools
- DK or worsted weight yarn in blush pink
- Small amount of dark yarn or embroidery floss for mouth and whiskers
- Two safety eyes (about 6 mm to 9 mm) or black beads
- Polyester fiberfill stuffing
- Knitting needles sized down for tight knit fabric (often 3.0 mm to 3.75 mm)
- Tapestry needle
- Stitch markers
- Pins or clips
- Scissors
- Optional: satin ribbon or soft knit strip for the bow
- Optional: blush pastel chalk for gentle cheek shading
Finished size + customization notes
Expect about 9 to 13 inches tall seated depending on yarn weight and needle size.
Customization ideas:
- Make the bow from true ribbon for that smooth sheen, or knit it for a fully handmade look
- Add tiny embroidered eyebrows like the photo for extra expression
- Add a tail pom
- Add a hidden weight pouch so it sits perfectly upright
Step-by-step instructions
Match the plush fabric density
The bunny surface is smooth and not holey. Knit a small stockinette swatch with your blush yarn. If you see gaps, use smaller needles.
Visual checkpoint: stitches should look tidy and compact.Knit the head with a slightly flattened face plane
This bunny has a gentle muzzle but not a sharp snout. Knit in the round: increase to the widest part, knit straight, then decrease.
Tip: for a flatter face, stuff firmly but do not overstuff the very front.Place eyes and test expression before final attachment
Pin where you want the eyes. The photo shows eyes slightly angled with a subtle brow line, giving personality.
Visual checkpoint: place eyes so the face feels centered and calm, not surprised.Install eyes securely
Safety eyes must be locked before stuffing is fully complete. If using beads, stitch through the head several times for strength and knot inside.Embroider the mouth and whiskers (signature detail)
The photo bunny has a stitched X style mouth and long whiskers.- Stitch a small vertical line from nose area down.
- Add a small V or X at the center.
- Add three whisker lines per side, slightly angled.
Tip: use embroidery floss instead of yarn so the lines look crisp and not bulky.
Add tiny stitched brows for extra expression (optional but photo accurate)
Use one short stitch above each eye. Keep it minimal.
Visual checkpoint: brows should be subtle, just enough to suggest expression.Knit the ears tall and neat
Knit two ear shapes, seam together, and keep them mostly unstuffed.
If you need more structure, add a thin support thread inside the ear seam.
Visual checkpoint: ears should stand tall with a soft curve at the tips.Attach ears with an even, symmetrical placement
Pin ears first. In the photo, ears are wide set and tall. Stitch the base securely so they do not wobble.Knit the body as a seated oval
Increase to the belly width, knit straight, then decrease at the neck.
Stuff firmly at the base for stability.
Visual checkpoint: bunny should sit without tipping.Knit arms and legs
Arms are short tubes with rounded ends. Legs are slightly thicker with rounded feet.
Tip: attach legs so the feet face forward and the knees tuck slightly under the belly, like the photo.Assemble carefully and check posture
Stitch head to body. Attach arms and legs using strong stitches.
Visual checkpoint: bunny should look balanced, with feet evenly placed.Make the oversized bow (two safe options)
Option A, ribbon bow for smooth finish: use satin ribbon in blush, tie a bow, stitch it down.
Option B, knit bow: knit a rectangle, cinch center, wrap, stitch.
The photo bow looks soft and full, so choose a wider ribbon or knit a larger rectangle.Refine the face with gentle shaping stitches
If the muzzle looks too round, use a few stitches from cheek to cheek to create a slight indentation under the eyes. This creates that plush character face.Optional upgrades
- Add a tail pom at the back.
- Add blush shading on cheeks with pastel chalk.
- Add a tiny felt paw pad circle to the feet for contrast.
Troubleshooting
- Whiskers look too thick
Use embroidery floss instead of yarn, and stitch fewer strands. - Face looks lumpy
Add stuffing in tiny pieces and smooth with your fingers. Adjust with shaping stitches. - Ears lean outward
Add extra stitches at the ear base toward the center to tilt them inward. - Bow slides around
Stitch it in two spots, left and right, not just at the center knot. - Bunny will not sit
Add more stuffing to the lower belly and base, or add a small weight pouch.
Finishing details
Weave ends inside the body and knot securely. Steam lightly from a distance if the stockinette needs smoothing. For the most photo ready finish, fluff the bow, adjust whiskers evenly, and pose the bunny with pastel eggs and one large bloom tucked to the side.
Shop Similar
- Blush yarn for knitted plush toys
- Safety eyes small black for stuffed animals
- Satin ribbon blush wide for bows
- Embroidery floss dark brown black
- Stuffing fiberfill for plush
Style It With
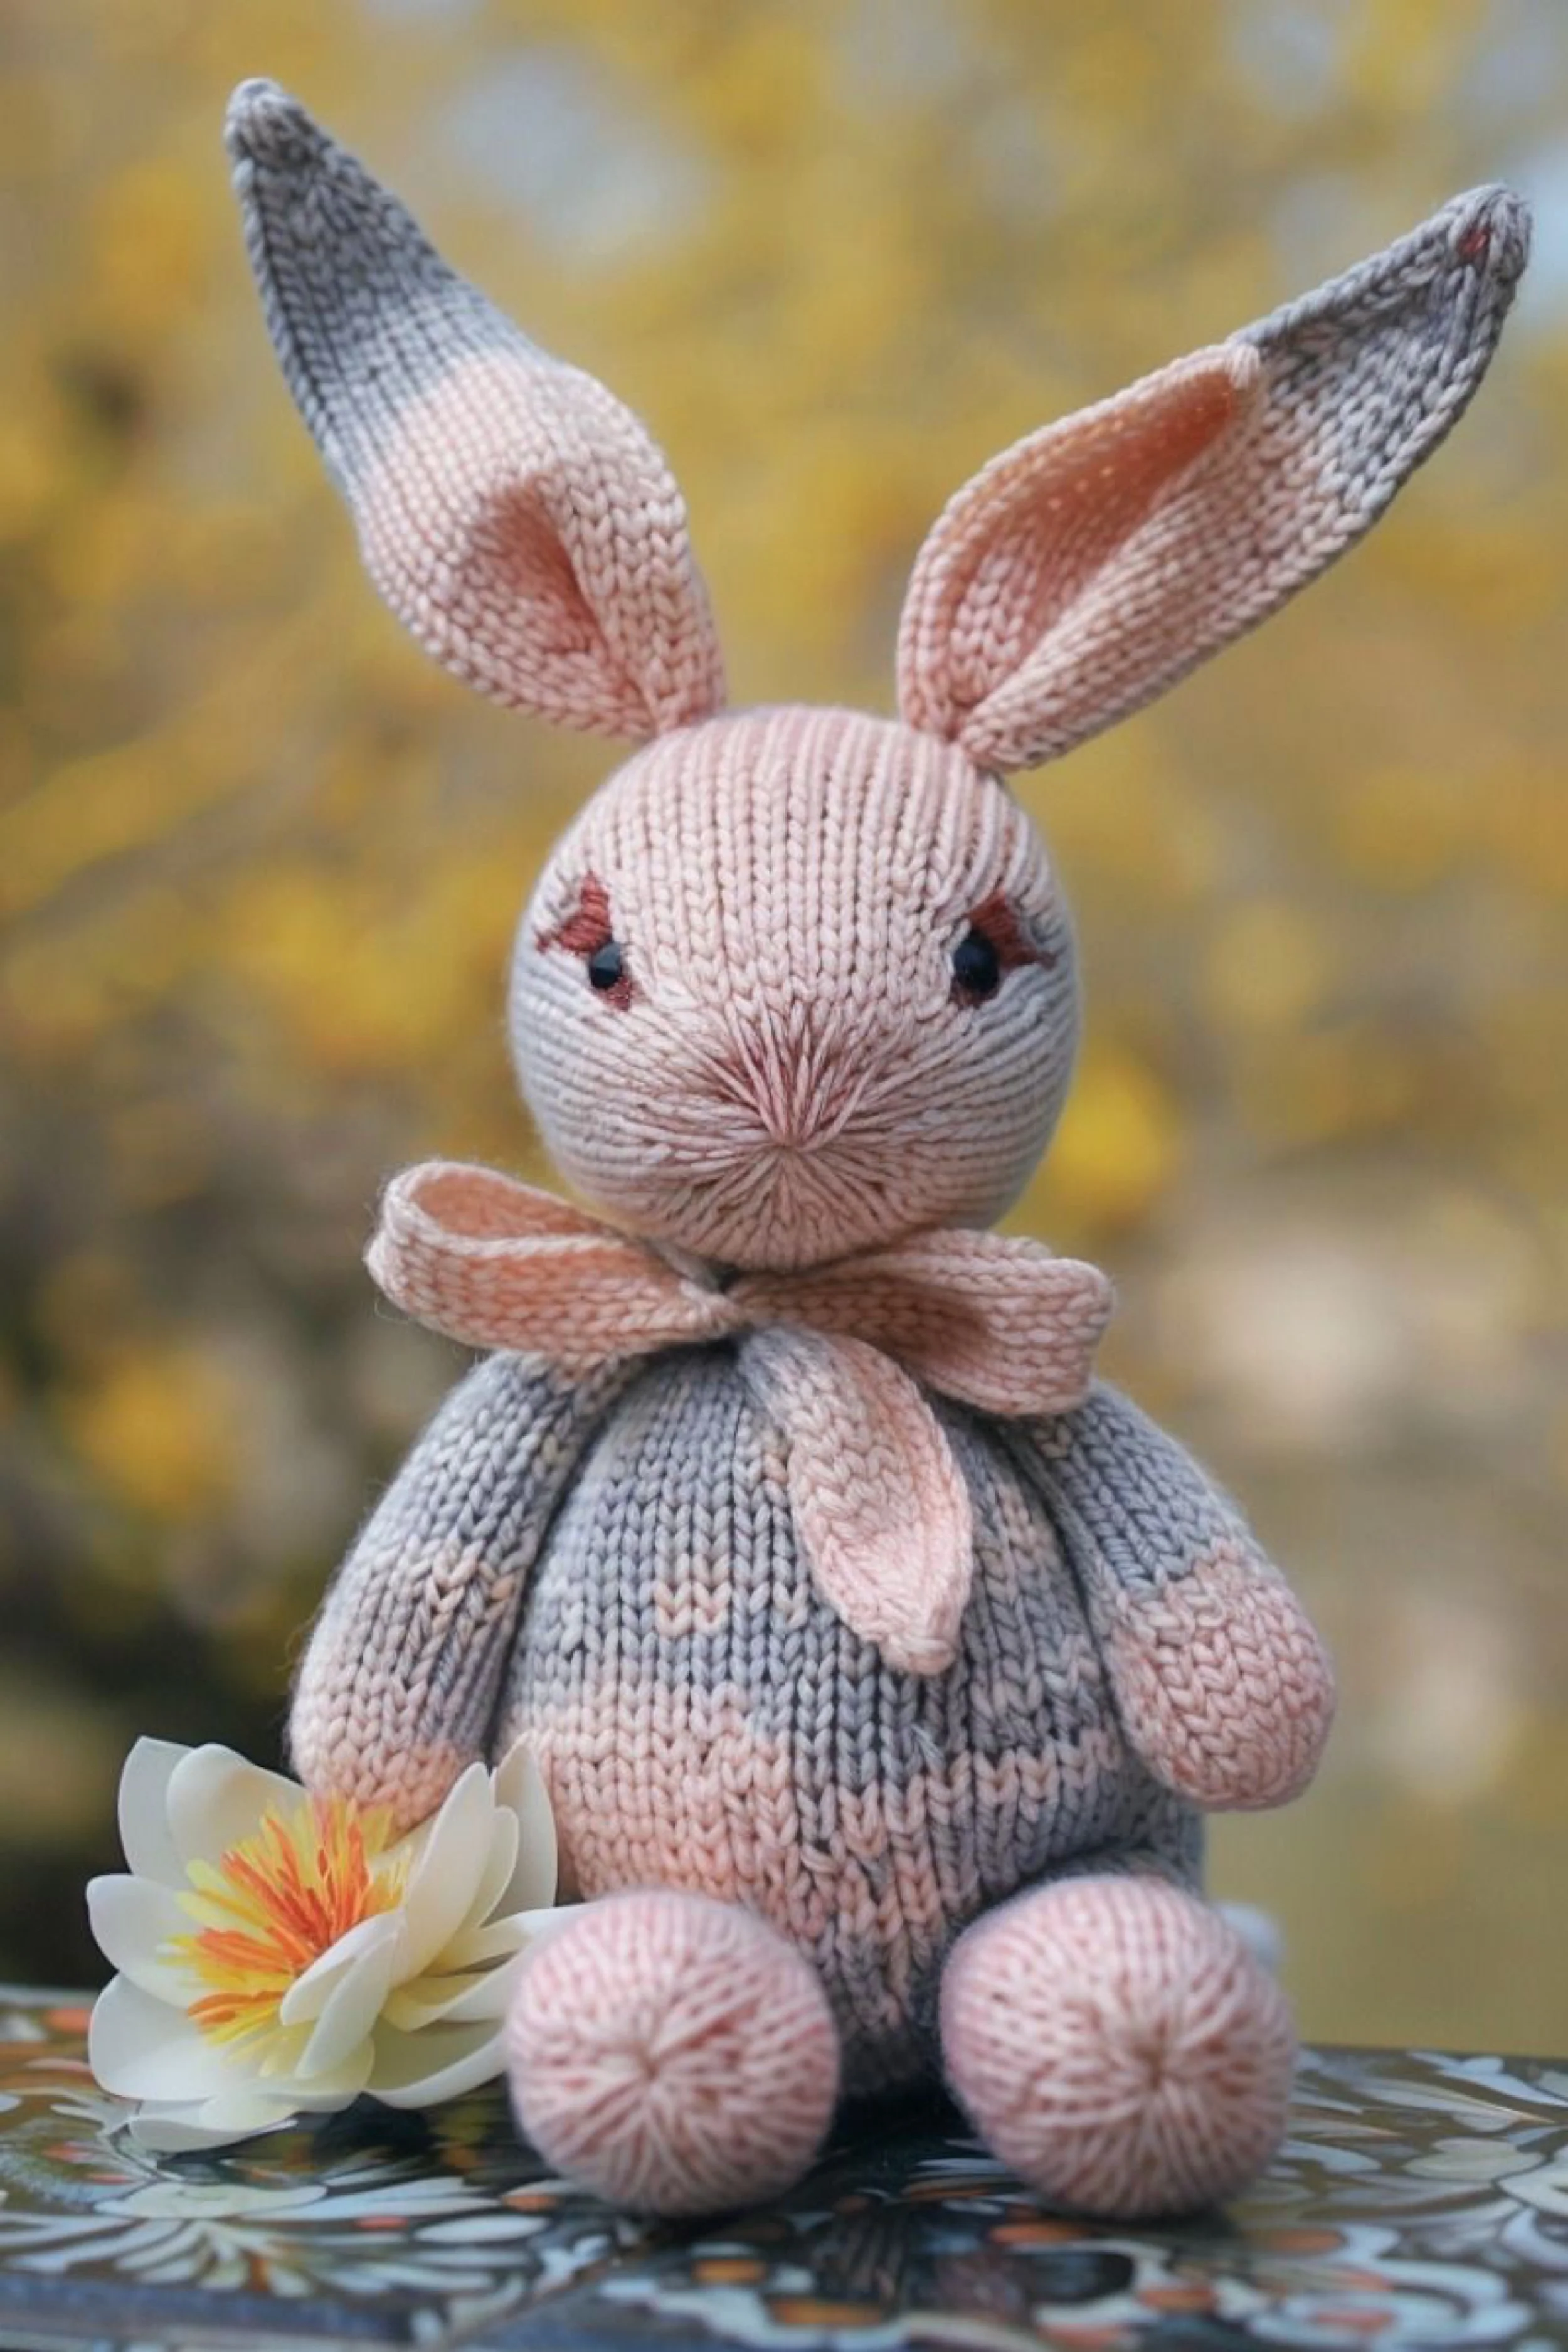
Pastel Marled Knit Bunny with Oversized Ears and Soft Bow — How-To Guide
What you’re making
You’re making a pastel marled knit bunny with a dreamy, cloud like color blend and extra oversized ears that frame the head dramatically. The photo bunny has a softly stuffed, rounded body, a tiny embroidered nose area with radiating stitches, subtle eye accents, and a pale bow tied at the neck. This is the kind of plush that looks handmade in the most elevated way, perfect for spring shelves, nursery styling, or a gentle Easter gift.
Materials + tools
- DK or worsted weight yarn in a pastel marled blend (gray, blush, cream mixed) or two strands held together (one gray, one blush)
- Small amount of blush yarn for inner ear and bow if needed
- Small amount of darker yarn or floss for eye detailing
- Two small safety eyes or black beads
- Polyester fiberfill stuffing
- Knitting needles sized down for a dense fabric (often 3.0 mm to 3.75 mm)
- Tapestry needle
- Stitch markers
- Pins or clips
- Scissors
- Optional: embroidery needle for finer facial stitching
- Optional: lightweight interfacing or thin felt to support ears if you want them extra upright
Finished size + customization notes
With DK yarn and small needles, expect around 9 to 12 inches tall seated. With worsted yarn, expect 11 to 15 inches tall seated. Oversized ears increase the visual height.
Customization ideas:
- Make ears even larger for a whimsical statement
- Add inner ear color blocks like the photo, with soft blush
- Swap bow for a collar or scarf
- Add a tiny heart motif on the belly using duplicate stitch
Step-by-step instructions
Create the marled look (two easy methods)
Method A: use a single marled yarn skein.
Method B: hold two strands together, one light gray and one blush. This creates that blended look seen in the photo.
Visual checkpoint: your yarn should read as softly blended, not striped.Knit a swatch and lock in your needle size
Because marled yarn can be bouncy, knit a tight swatch. If it feels loose, size down needles.
Visual checkpoint: stuffing should not show through when you stretch the fabric gently.Knit the head as a smooth ball
Knit in the round for best shaping. Increase evenly to the widest point, knit straight, then decrease.
Tip: the photo bunny face looks very smooth, so spend extra time stuffing in small pieces and smoothing as you go.Place the eyes and test the expression
The eyes are small and set wide. Mark placement first.
Optional detail: add a tiny stitched accent above each eye in a slightly darker shade, like a soft eyelid or brow line.
Visual checkpoint: expression should feel calm and slightly sleepy, not surprised.Embroider the nose with radiating stitches (photo accurate detail)
The photo shows a nose area with stitched rays coming outward, almost like a starburst.
To recreate:- Choose a blush tone.
- Stitch several straight stitches radiating from a central point on the muzzle.
- Keep it symmetrical and delicate.
Tip: use embroidery floss for cleaner lines.
Knit oversized ears with inner blush panels
These ears are large, with blush inner sections. Two safe options:
Option A: knit ears in two layers, outer in marled yarn, inner in blush, seam together around edges.
Option B: knit the full ear in marled yarn, then add the inner blush panel using duplicate stitch.
Visual checkpoint: inner blush should sit like a soft teardrop shape.Help oversized ears hold shape
If your ears flop, choose one support method:- Knit with smaller needles for the ear pieces
- Add a thin strip of felt inside the ear seam near the base
- Add a subtle support thread along the inner edge
The photo ears stand tall and proud, so a little structure is welcome.
Attach ears high and wide
Pin ears first. The photo shows ears placed wide apart and angled outward slightly. Stitch around the base firmly.Knit the body as a plump seated oval
Increase to the belly width, knit straight, then decrease at the neck. Stuff firmly at the base.
Visual checkpoint: the body should look like a soft rounded pebble shape, not long and narrow.Knit arms and legs
Arms are simple tubes. Legs are rounded with puff feet.
Tip: keep limbs lightly stuffed so they look soft and cuddly, not stiff.Assemble and pose check
Stitch head to body. Attach arms and legs while checking posture.
Visual checkpoint: bunny should sit stable, with feet forward and arms resting naturally.Make the soft bow
The bow in the photo is pale and simple. Knit a small rectangle in blush, cinch center, wrap, stitch to neck.
If you prefer a more airy look, use a thin fabric ribbon.Optional upgrades for an elevated heirloom finish
- Add a tiny tail pom on the back.
- Add a hidden weight pouch inside the base for perfect sitting.
- Add subtle cheek blush with pastel chalk.
- Add a tiny stitch star on one foot as a signature detail.
Troubleshooting
- Marled fabric looks too busy
Choose two strands closer in value, like pale gray and pale blush, rather than high contrast. - Ears will not stand
Add a felt support strip inside the seam or knit ear pieces with a smaller needle. - Nose embroidery looks messy
Switch to embroidery floss and stitch fewer rays, spacing them evenly. - Bunny tips forward
Add more stuffing to the back base or add a small weight pouch. - Seams show too much
Use mattress stitch for stockinette seams and match yarn color carefully.
Finishing details
Weave ends inside the plush. Gently steam ears and bow from a distance to smooth stitches without flattening texture. Shape the face by smoothing stuffing with your fingers. If you add eye accents, keep them light so they read as soft shading rather than heavy lines.
Shop Similar
- Marled yarn pastel blend for knitting
- DK yarn light gray blush
- Safety eyes black assorted sizes
- Fiberfill stuffing for stuffed animals
- Embroidery needle and floss set
Style It With
Once you finish your first bunny, you will notice something addictive about this style of project. The basic shapes come together quickly, but the personality lives in the details, the ear tilt, the eye spacing, the bow size, and the way the body sits on a shelf. Use the five looks in this post as a mix and match toolkit. Swap collars between bunnies, change the dress color palette, or add a tiny monogram or pocket to make each one feel custom. If you want the most photo ready finish, take a few extra minutes to smooth the stuffing with your hands, steam the bows and collars lightly, and pin ears into the perfect curve as they cool.
For styling, keep it simple and springy: a cluster of painted eggs, a bud vase of daffodils, a floral teacup, or one pretty bloom tucked beside your bunny makes the whole scene feel curated. And if you are gifting, add a soft ribbon tag and a little note about the yarn and date, it turns a sweet toy into an heirloom. However you use them, these knit bunnies are the kind of handmade decor that comes out every spring and never stops feeling special.