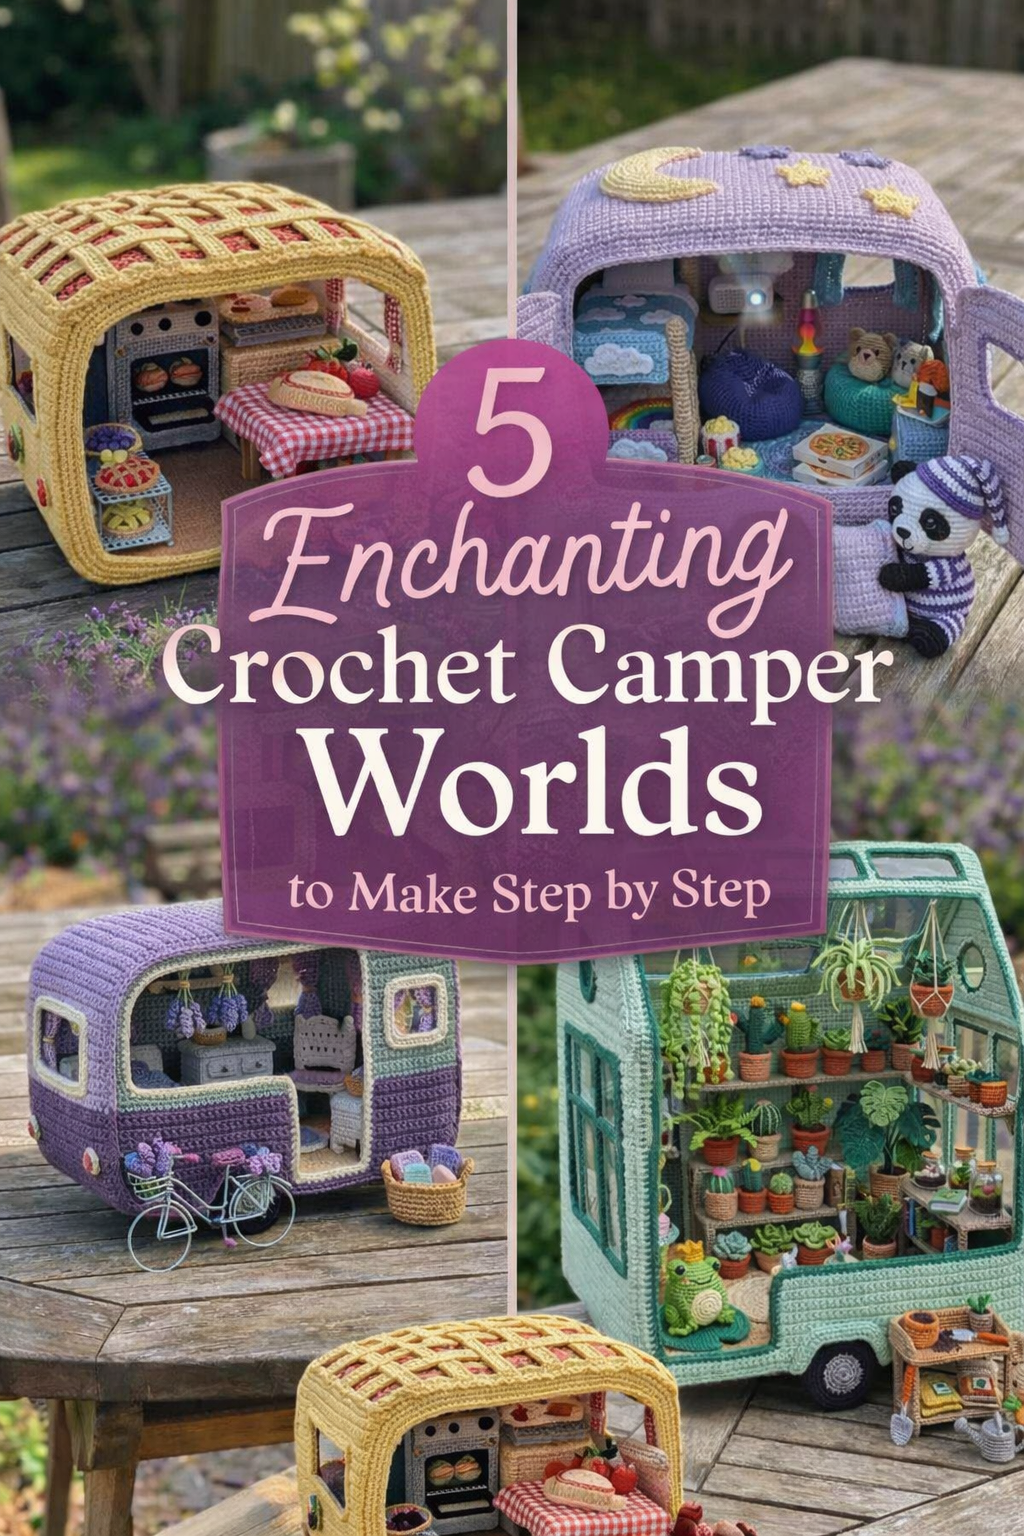
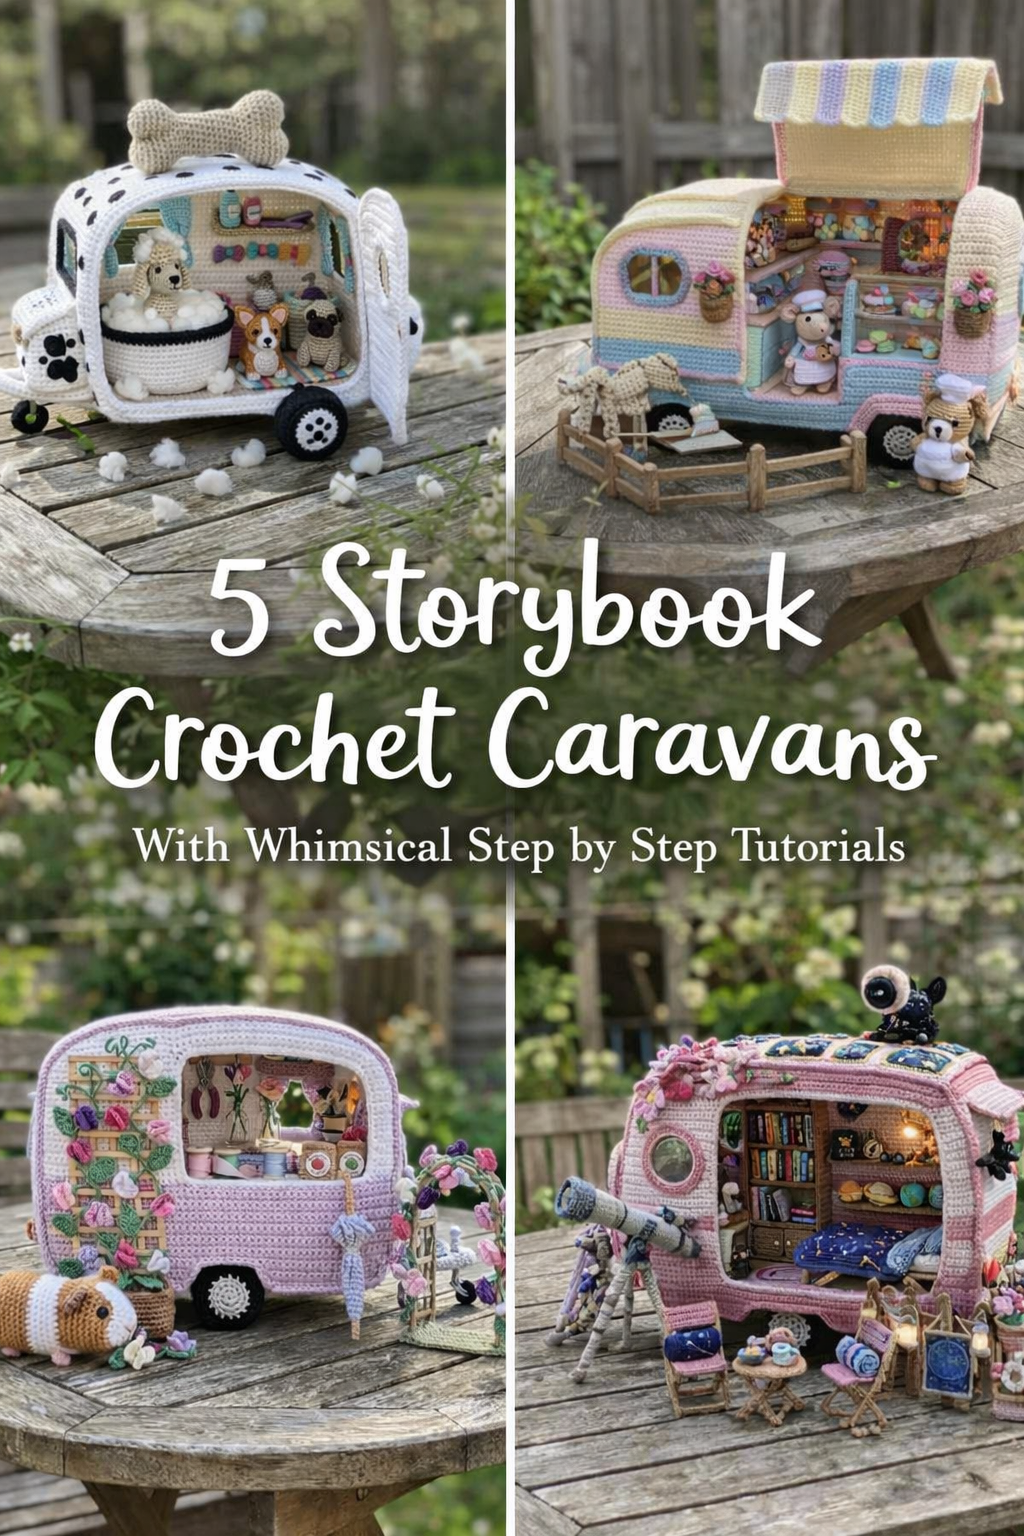
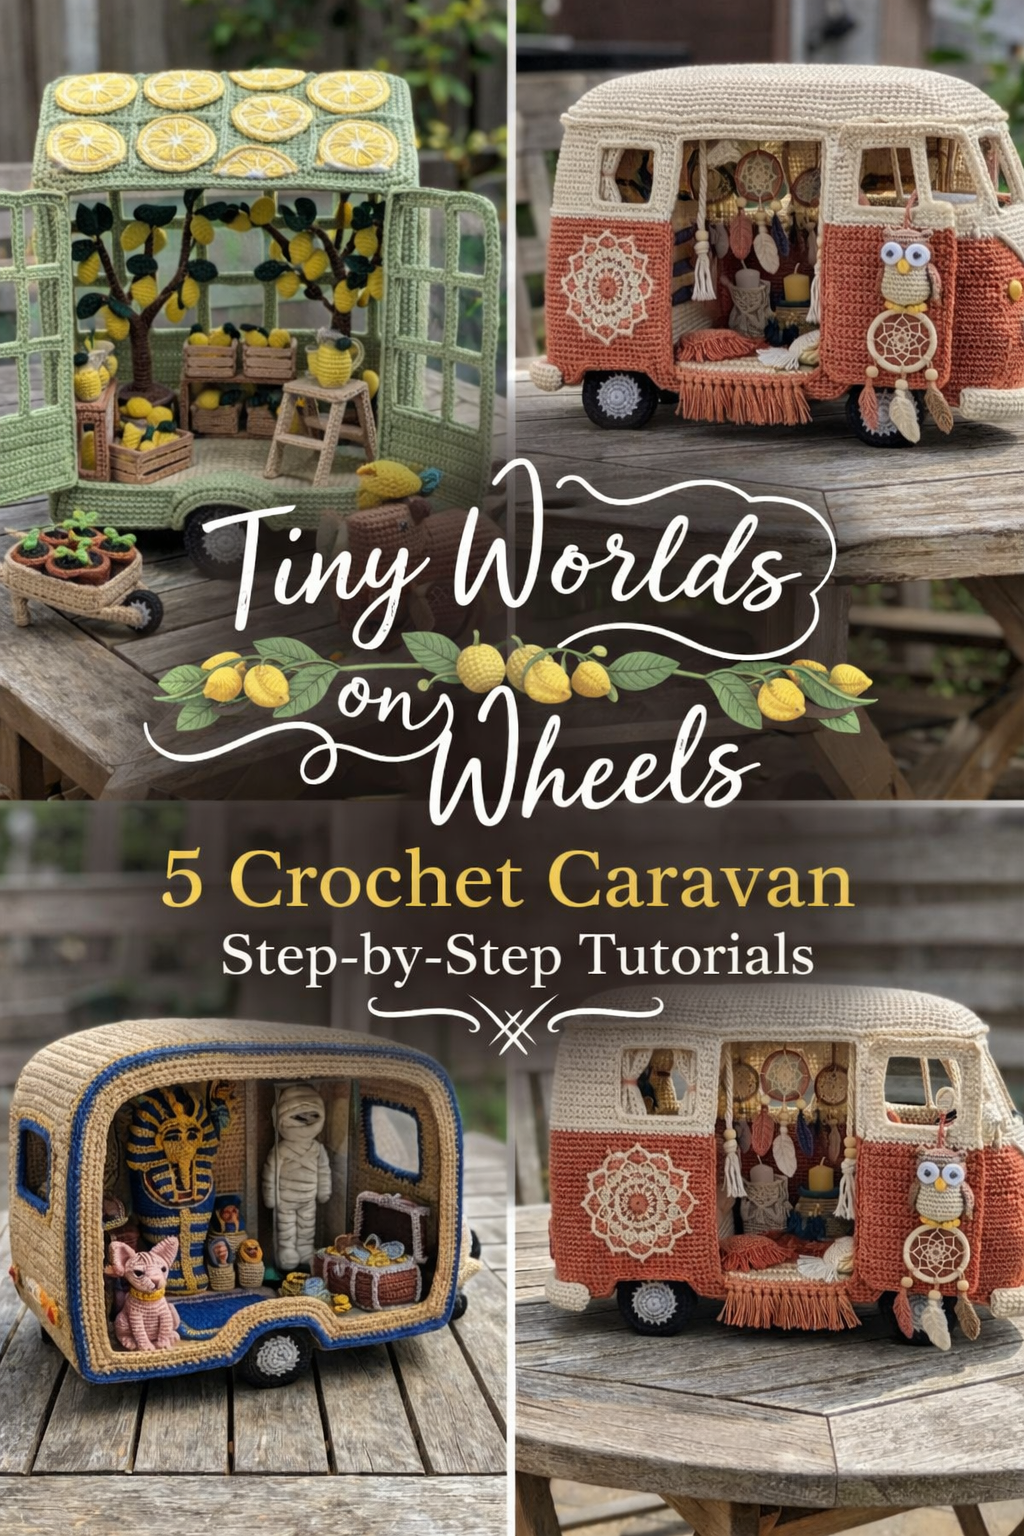
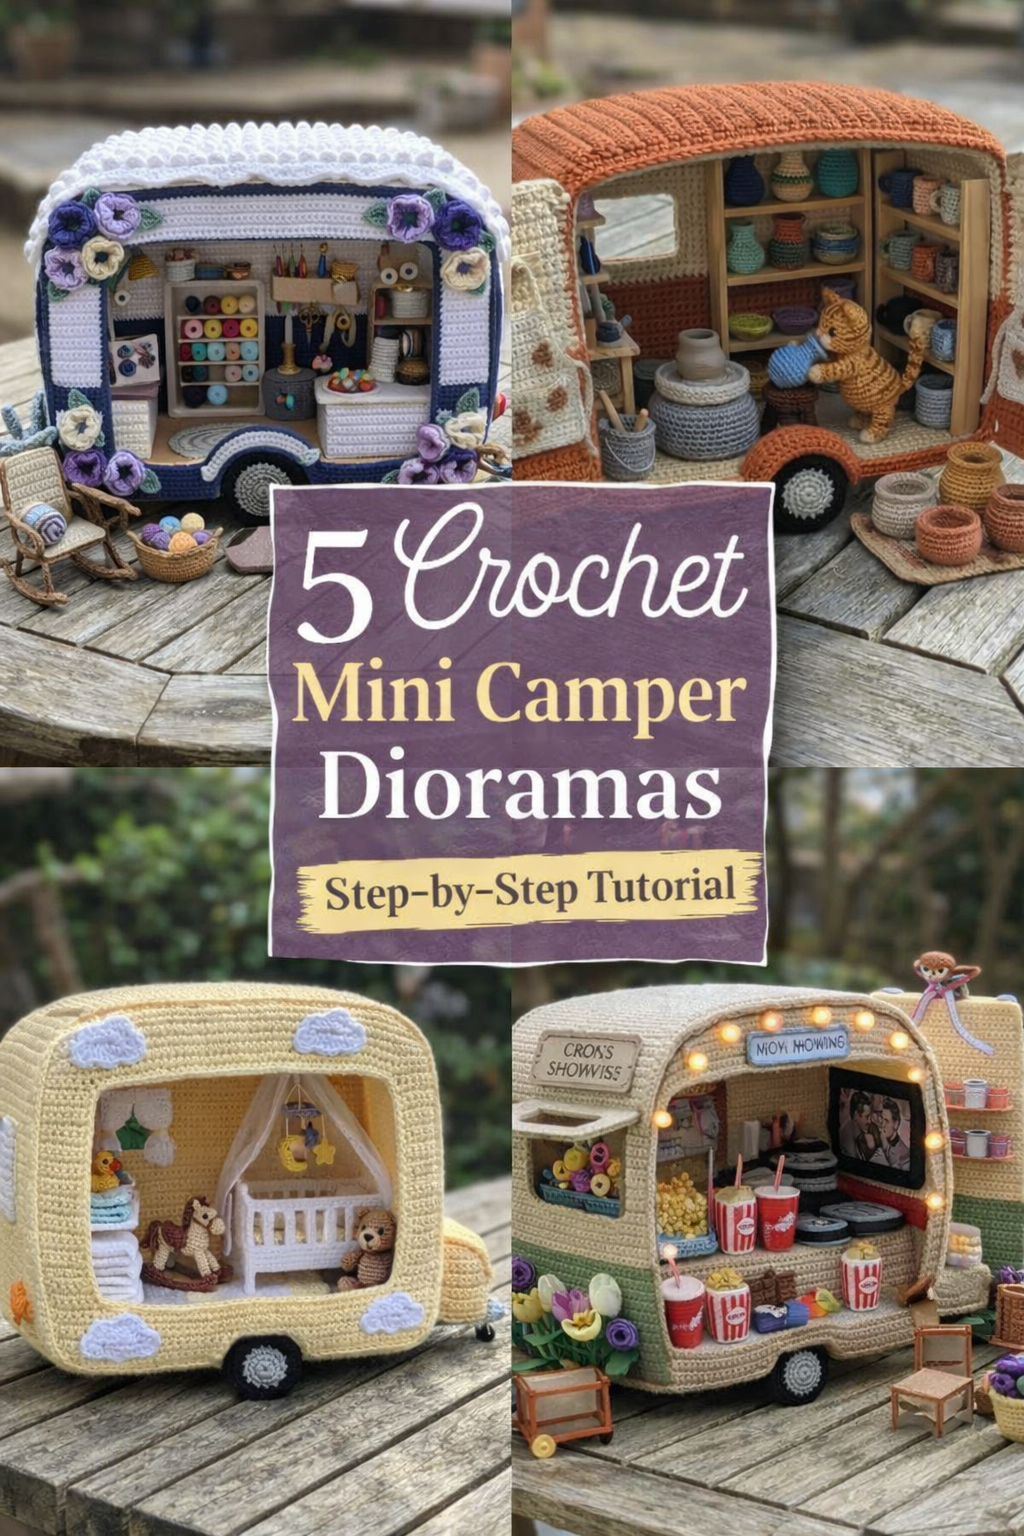
5 Crochet Mini Camper Dioramas Step-by-Step Tutorial
More like this
Welcome to the World of Mini Crochet Camper Dioramas
There is something undeniably magical about miniature worlds, especially when they are built entirely from yarn. In this collection of five crochet mini camper dioramas, we are stepping inside tiny rolling spaces that tell full, heartwarming stories. From a cozy craft studio and rustic pottery workshop to a glowing movie night snack bar, a dreamy nursery, and a blooming spring florist stall, each camper captures a completely different mood while sharing the same charming silhouette.
These projects are more than simple amigurumi builds. They are structured display pieces designed to stand upright, hold their shape, and showcase intricate details that make people lean in for a closer look. You will learn how to construct sturdy camper shells, create dimensional interiors, and batch produce tiny props that bring each scene to life. Whether you are an experienced crocheter looking for your next showpiece or a confident beginner ready to stretch your skills, this guide will walk you through every step with clarity and creative encouragement.
Get ready to build tiny stories, one stitch at a time.
💡 Pro Tip: Why I Link to Amazon Search Results and Not One Product
In the Shop the Look and Style it With sections under each bikini, I link to Amazon search results, not single products. Here’s why this matters:
Hot bikinis sell out fast. I don’t want you clicking on a dead link to a sold-out item. Search pages stay updated.
You get more options. Love the vibe but want a different color, cut, or price point? The search results give you everything that matches the look and energy.
I curate each search carefully. These aren’t generic. I spend hours crafting keywords that bring up exactly the kind of bikinis I’d wear—or recommend to my hottest friends.
Support with no pressure. If you click a link, browse, and buy something later, I may earn a small commission at no extra cost to you. That helps me keep bringing you curated collections like this one—powerful, seductive, and always fresh.
So dive in. Click through. Try something risky. These aren’t just bikinis—they’re commands, statements, and maybe even your new favorite weapon of choice.
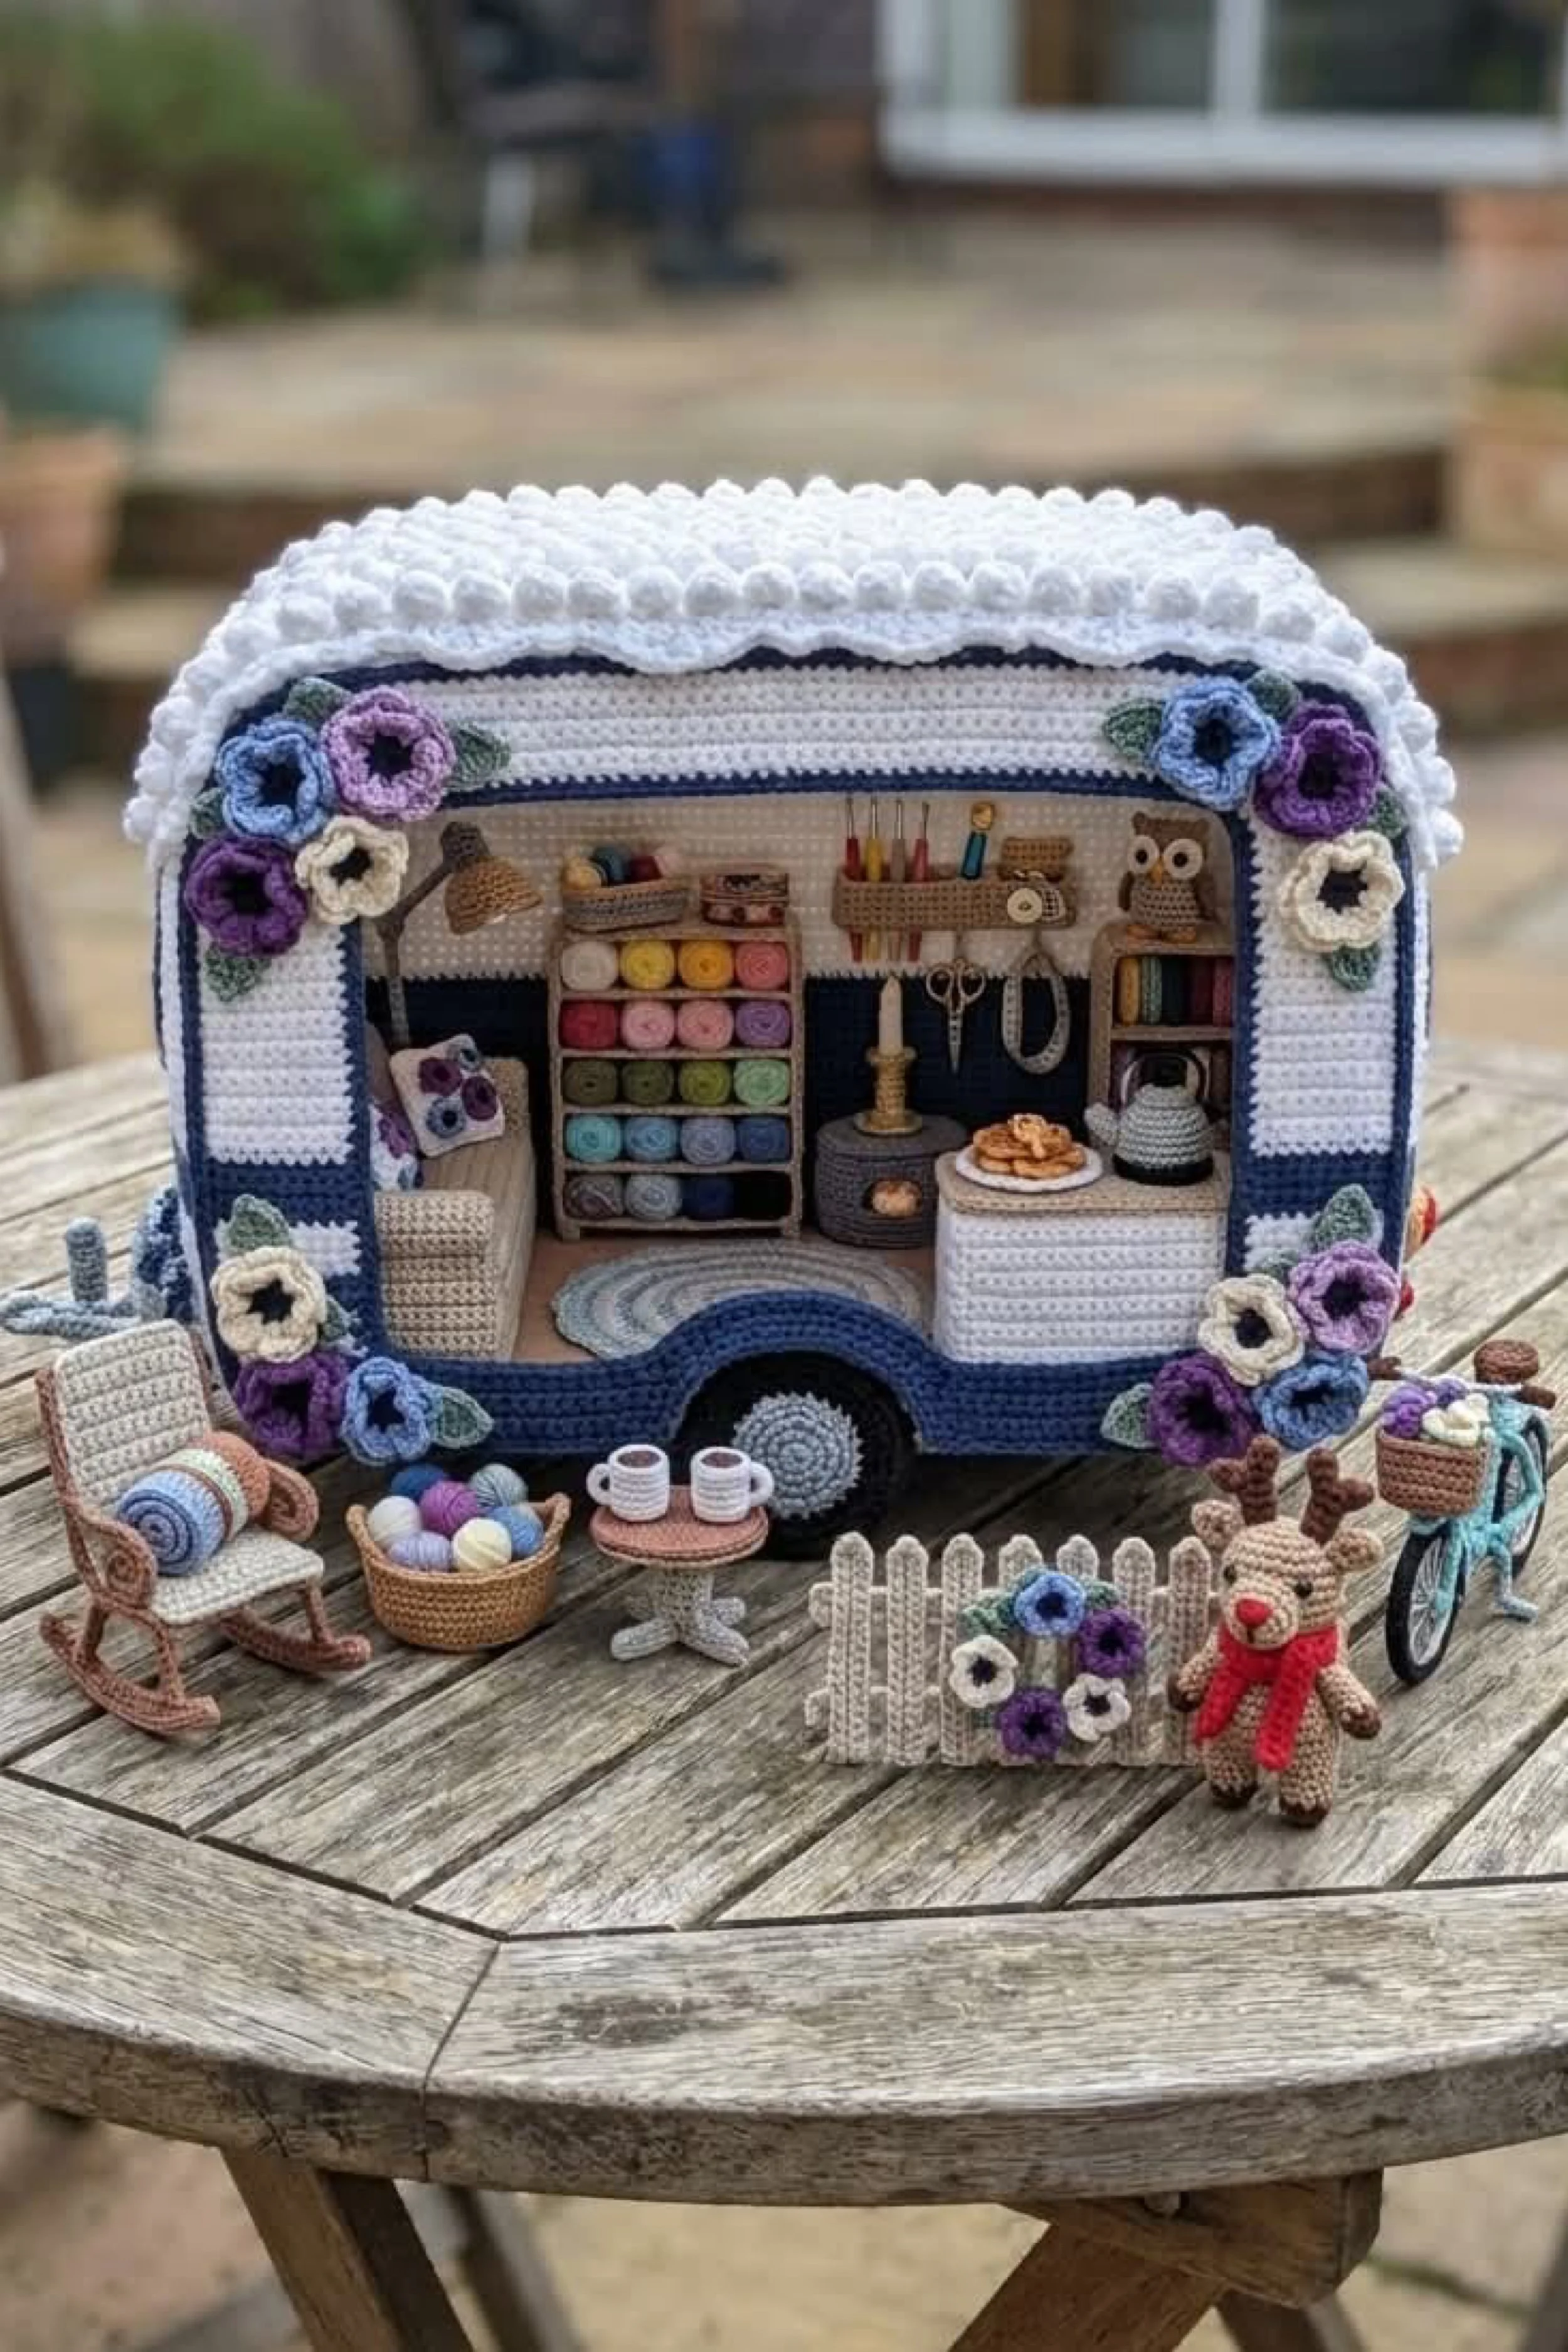
Crochet Craft Studio Camper Diorama Step-by-Step Tutorial
What you’re making
You’re crocheting a miniature open side camper trailer that looks like a tiny rolling craft studio, complete with striped interior walls, a bobble textured roof, floral corner garlands, and a fully styled outdoor scene. The finished look is cozy and storybook with miniature shelves of yarn, a workbench, teeny tools, and sweet accessories that make the whole scene feel alive. It’s the kind of display piece that stops people mid scroll because every inch has something charming to discover.
This guide focuses on recreating the exact vibe in the photo: navy and white structure, puffy white roof, purple and blue flowers, and a tidy creative workspace inside. We’ll build the camper as a sturdy shell first, then layer the interior set pieces, and finally add the outdoor mini props.
Materials and tools
- Yarn in sport to DK weight in: white, navy, light gray, beige or sand, lavender, purple, periwinkle blue, sage green, and small amounts of black
- Optional accent yarn in cream for flowers and trim
- Crochet hooks: 2.25 mm to 3.0 mm (pick what gives you tight stitches)
- Stitch markers
- Yarn needle
- Scissors
- Polyester fiberfill (small amount for soft details)
- Strong structure insert options (choose one):
- Plastic canvas sheets
- Thin foam board
- Craft felt layered with cardstock
- Fabric glue or tacky glue (optional but helpful)
- Thin craft wire or pipe cleaners (for lamp arm and small support pieces)
- Small beads or tiny buttons (for knobs and details)
- Embroidery floss or thin yarn for hanging tools
- A small piece of clear plastic (packaging) for “window” details if you want them
- Optional stiffener: fabric stiffener spray or diluted glue and water
- Optional mini props: tiny wooden shelves, mini dowels, toothpicks, thin cardboard for shelves and pegboard
Finished size and customization notes
- A common finished size for this style is about 8 to 11 inches wide and 6 to 8 inches tall, depending on yarn weight and hook size.
- If yours is coming out larger than the photo, drop one hook size or switch from DK to sport weight yarn.
- If you want it smaller, use crochet thread size 3 or 5 with a 1.75 mm hook and build with the same stitch counts.
- The outdoor accessories can be simplified. The core “look” is the camper shell with striped interior, floral corners, and the craft studio shelving.
Step by step instructions
1. Choose your structure method and make a template
The clean shape in the photo comes from an internal support. Before crocheting, decide what you will use inside.
- Plastic canvas gives a flexible but firm structure and is great for crocheted shells.
- Foam board makes crisp edges and stands up nicely for display.
Make a simple template on paper:
- Side opening: a large rounded rectangle window shape that takes up most of the side.
- Back wall: rectangle.
- Floor: rectangle with a curved wheel arch cutout.
- Roof: rectangle that will curve over the top.
Visual checkpoint: your template should look like a little shoebox with one big side cut out.
2. Crochet the floor panel
With beige or light gray yarn, chain enough to reach your desired floor length (for many builds this is 45 to 60 chains in sport to DK).
- Row 1: single crochet in second chain from hook and across.
- Rows 2 onward: chain 1, turn, single crochet across until you have a firm rectangle floor.
To create the wheel arch opening:
- Mark the center area where the wheel will sit.
- In the next row, single crochet to the first marker, chain a small number (like 6 to 10), skip the same number of stitches, then single crochet to the end.
- On the following row, single crochet into the chain space to form a neat arch.
Tip: keep stitches tight. If gaps appear, your hook is too large.
3. Crochet the back wall panel
In navy and white, we want the “striped interior” look.
- Start with white.
- Work a rectangle in single crochet to match the width of the floor and the desired wall height.
- Add navy stripes by switching colors every few rows.
For clean stripes:
- On the final yarn over of the last stitch in the row, pull through the new color.
- Carry the unused color up the side if stripes are frequent, or cut and weave if you prefer ultra neat edges.
Visual checkpoint: you should now see crisp horizontal stripes like the camper interior in the photo.
4. Crochet the front frame with big opening
This is the most important piece for the photo look: a thick white frame around the open side.
- Crochet a large rectangle in white that matches the full side size of your camper.
- Create the big window opening by working rows to a marker, chaining, skipping stitches, then continuing, similar to the wheel arch technique but larger.
- Add several rounds of single crochet around the entire opening to thicken the frame.
Tip: each round around the opening makes it look more “built in.” Aim for 3 to 6 rounds.
5. Crochet the interior side stripes and assemble the box
You can either:
- Crochet a full “inside wall” panel in stripes and attach it behind the open frame, or
- Crochet the open frame in stripes and then add a white outer border.
To assemble:
- Place your structure inserts inside each crocheted panel.
- Whip stitch or single crochet seam panels together: floor to back wall, floor to front frame, then join the top edges.
Visual checkpoint: at this stage you should have a sturdy open side camper shell that stands on its own.
6. Create the bobble roof texture
The photo roof is plush and dotted. The easiest way to replicate is a bobble stitch roof cover.
- Crochet a roof rectangle in white that fits from one side over the top to the other side.
- Use bobbles: in a single stitch, yarn over, insert, pull up a loop, yarn over, pull through 2, repeat several times, then yarn over and pull through all loops.
Work bobbles every other stitch or in a grid pattern. Then attach the roof cover to the camper top edges using whip stitch.
If bobbles feel too time consuming:
- Use a puff stitch roof instead, or
- Use chunky yarn and simple single crochet for a plush effect.
7. Add the navy outer trim and rounded edges
To get that polished outline:
- Work single crochet rounds around the camper opening and outer edges in navy.
- Add an extra round in white if you want a crisp layered trim.
Tip: in corners, add 2 or 3 single crochets in one stitch to prevent curling.
8. Make the wheel and arch detail
Wheel:
- With black, crochet a flat circle: start with magic ring, 6 single crochet, increase each round until you reach the desired diameter.
- Add a gray hub circle and sew it centered.
- Stitch the wheel to the wheel arch area.
Visual checkpoint: the wheel should sit snug in the arch and look slightly inset, not floating.
9. Build the interior craft studio set pieces
Now the fun part: the tiny room.
Yarn shelf
- Crochet a small rectangle for the shelf backing.
- Make tiny “skeins” by wrapping yarn around two fingers, tying in the middle, and trimming.
- Stack skeins in rows like the photo’s rainbow wall.
Pegboard and tools wall
- Crochet a small dark panel (navy or charcoal).
- Add loops of embroidery floss for hanging tools.
- Make tiny scissors from felt or a small metal charm if you have one.
- Add a needle holder and small hooks as stitched details.
Workbench
- Crochet a rectangular block in light gray.
- Add a top in beige.
- Place a tiny “cake plate” and treat made from a crocheted circle or felt cutout.
Lamp
- Use wire for the arm.
- Crochet a tiny cone shade and stitch to the wire.
Visual checkpoint: inside your camper should read instantly as a craft studio even if you simplify the tiny details.
10. Crochet the floral corner garlands
The photo uses purple, lavender, blue, and cream flowers with green leaves. Simple flower:
- Magic ring.
- Work 5 petals: (slip stitch, chain 3, double crochet, chain 3, slip stitch) repeated into the ring.
- Pull tight, stitch the center closed.
Leaves:
- Chain 6.
- Single crochet, half double crochet, double crochet, half double crochet, single crochet, then slip stitch into the base.
Make several flowers in different colors and cluster them:
- Two to four flowers per corner cluster.
- Stitch leaves behind them.
- Sew clusters to the top corners and lower corners of the camper frame.
Tip: add one tiny bead in the center of a flower for extra pop.
11. Create the outdoor scene props
To match the photo, add a small vignette in front.
Rocking chair
- Crochet a small seat rectangle.
- Add arms and back as thin strips.
- Make curved rockers by crocheting a chain and working single crochet around it, then stiffen.
Basket of yarn
- Crochet a small bowl: magic ring, increase rounds, then stop increasing and build sides.
- Add mini yarn balls by crocheting tiny spheres or wrapping yarn into balls.
Mini table with mugs
- Crochet a small round top and a stem.
- Mugs can be tiny cylinders with a stitched handle.
Fence with flowers
- Use plastic canvas strips wrapped in yarn, or crochet flat posts and stitch together.
- Add small flower motifs attached to the fence.
Cute character and bicycle If you want a small amigurumi:
- Use a simple sphere head, cylinder body, and tiny arms and legs.
- Add a scarf in red for that cozy pop. For the bicycle:
- Build two circles for wheels and connect with a crocheted chain frame, stiffened with glue.
Option: if you want to keep it simpler, make only the fence and one or two props. The camper itself is the hero.
12. Final shaping and stiffening
If any pieces flop:
- Lightly mist with fabric stiffener and shape with pins.
- Or brush a thin mixture of glue and water on the underside of props, then let dry.
For the camper shell:
- Insert the structure, then gently steam block from a distance if you used acrylic yarn.
- If using cotton, you can wet block lightly and dry fully before adding tiny items.
Troubleshooting common mistakes and fixes
- Camper walls look wavy or saggy: your stitches are too loose. Go down a hook size and consider plastic canvas inserts.
- Roof won’t curve smoothly: the roof panel is too narrow. Add a few stitches to the width or seam with slightly looser tension.
- Stripes look jagged: switch colors on the last pull through of the final stitch, and keep your tension consistent.
- Flowers look flat or limp: use a smaller hook for flowers or add a second layer of petals for dimension.
- Tiny props unravel while handling: weave ends aggressively and add a dot of fabric glue inside.
Finishing details
- Weave in every end, then tug gently on seams to check security.
- Add a lining strip of felt inside the roof to hide structure edges.
- If your camper is meant for display only, glue some props in place so the scene stays photo ready.
- Consider adding a tiny name plate or “studio” sign stitched onto the frame for an extra custom touch.
Optional upgrades
- Add a tiny battery tea light inside for cozy glow.
- Stitch a mini curtain along the top inside edge.
- Add a faux wood floor by stitching brown lines into the base panel.
- Add a handle or hitch piece so the camper can “attach” to another mini.
Shop Similar
- Mini crochet hooks 2.25 mm to 3.0 mm set
- Sport and DK cotton yarn bundle neutrals and navy
- Plastic canvas sheets for crochet structure
- Fabric stiffener spray for crochet props
- Mini wooden shelves and dollhouse accessories
- Tiny beads for flower centers
Style It With
Mini Crochet Pottery Studio Camper DIY Guide
What you’re making
This project is a warm, earthy mini camper turned pottery studio, styled like a tiny ceramic workshop on wheels. The look in the photo is all about terracotta and cream tones, chunky ribbed roof texture, wooden shelving packed with little pots, and an adorable crocheted cat helper holding a sky blue vase. It feels handcrafted, calm, and slightly rustic, like a slow studio afternoon.
You’ll build the camper shell first, then create the shelves and pottery pieces, and finally add the character details that sell the scene. The goal is a sturdy display diorama with tight stitches and crisp edges, not a floppy toy.
Materials and tools
- Yarn in sport to DK weight in: terracotta, cream, beige, light gray, charcoal, black, plus small amounts of teal and sky blue
- Crochet hooks: 2.25 mm to 3.0 mm
- Stitch markers
- Yarn needle
- Scissors
- Polyester fiberfill (small amount)
- Structure insert options:
- Plastic canvas
- Thin foam board
- Stiff craft felt plus cardstock
- Glue (tacky glue recommended) for wood shelves if you use wood
- Mini wood pieces for shelving (optional) or crochet shelf parts
- Toothpicks or thin dowels for tools
- Small piece of felt for tiny details
- Optional stiffener for tiny bowls and pots
Finished size and customization notes
- Typical finished size is about 8 to 10 inches wide for a DK build.
- To match the dense, tidy stitch texture in the photo, aim for a firm fabric with no holes.
- Your interior shelves can be real mini wood shelves for a sharp look, or crocheted shelves for a fully yarn build.
- The cat can be swapped for a bunny, bear, or even a tiny human figure if you want a different story.
Step by step instructions
1. Build the floor with wheel arch
With beige or light gray, crochet a sturdy rectangle in single crochet to your desired floor size. Create a wheel arch opening the same way as the previous camper:
- Crochet to the center zone, chain and skip stitches, then crochet across.
- Next row, crochet into the chain space.
Visual checkpoint: your floor should sit flat on the table and not curl.
2. Crochet the back wall and interior side wall
In cream for the top and terracotta for the bottom, crochet the back wall panel:
- Work several rows in terracotta to create the lower wall band.
- Switch to cream for the upper wall.
For the interior side wall (the open side frame):
- Crochet a large rectangle with a big window opening.
- Add an extra border round to thicken the window frame.
Tip: if your opening edge looks wavy, work one round of slip stitch around the opening to tighten it.
3. Assemble the camper shell with inserts
Cut your inserts to match:
- Floor insert
- Back wall insert
- Front frame insert
- Roof insert
Insert them into the crocheted pieces and seam together with whip stitch or single crochet seams. Make sure the open side stays crisp and symmetrical.
Visual checkpoint: you should now have a stable open side camper body that stands upright.
4. Create the ribbed terracotta roof
The roof in the photo looks ribbed and plush. Easiest method:
- Crochet a rectangle in terracotta using back loop only half double crochet. Back loop only creates that raised rib effect.
Sizing:
- The roof rectangle should be wide enough to curve over the top with a little drape. Attach the roof to the top edges of the camper with whip stitch.
Tip: if the roof looks too flat, add one extra row and seam slightly tighter so it domes.
5. Add the side flap doors (optional but very “photo accurate”)
On the left and right edges in the photo, there are soft “doors” that hang open. Make two panels in cream:
- Crochet rectangles that match the side height.
- Add a few terracotta spots or small squares for texture if you want that speckled look. Attach at the top edge only so they hang like flaps.
6. Crochet the wheel and base trim
Wheel:
- Black circle, then a gray inner circle.
- Add a thin terracotta arch strip above the wheel to match the exterior.
Base trim:
- Single crochet around the lower edge in terracotta for a clean outline.
7. Make the pottery shelves
To match the photo, the shelves look like light wood with many pots. Option A: mini wood shelves
- Use small unfinished wood shelf pieces or cut popsicle sticks.
- Glue into a simple shelf unit shape.
Option B: crochet shelves
- Crochet a rectangle for the shelf back.
- Crochet long strips for shelves.
- Stitch shelves onto the back at equal spacing.
Pro tip: even spacing matters more than perfect stitch counts. Mark shelf lines with stitch markers before sewing.
Visual checkpoint: your shelf unit should look like a miniature bookcase with 3 to 4 shelves.
8. Crochet mini pots and bowls in batches
This scene comes to life from quantity. Make many tiny pots in different colors. Basic mini pot:
- Magic ring, 6 single crochet.
- Increase to 12, then 18 (depending on size).
- Stop increasing and crochet a few rounds to build walls.
- Add a rim round in slip stitch for a crisp edge.
For bowls:
- Increase wider, then only 1 or 2 wall rounds.
For vases:
- Build walls higher, then decrease slightly near the top.
Make a mix:
- 6 to 10 small bowls
- 6 to 10 pots
- 3 to 5 taller vases
Tip: if the pots collapse, add a tiny circle of felt inside or stiffen with diluted glue.
9. Add the pottery wheel and studio tools
Pottery wheel base:
- Crochet a squat cylinder in gray.
- Make a flat top circle in light gray.
- Place a tiny clay pot on top.
Tools bucket:
- Crochet a tiny cylinder in gray.
- Insert toothpick “tools” wrapped in yarn.
Add a few scattered pieces:
- A tiny lump of “clay” made from a small crocheted ball
- A mini sponge square of felt
Visual checkpoint: you should now see a believable studio workstation area, not just shelves.
10. Crochet the cat helper
The cat is the personality moment. Body:
- Crochet an oval or cylinder in orange. Head:
- Crochet a sphere. Ears:
- Two small triangles stitched on top. Arms:
- Two short tubes sewn forward to hold the vase. Tail:
- A thin tube, slightly curved.
Face:
- Stitch eyes with embroidery floss or use tiny safety eyes (only if this is not for small children).
- Add a small stitched nose and whiskers.
Vase:
- Crochet a small blue pot and stitch into the cat’s arms.
Tip: to make the cat stand, stitch the feet flat and tack them to the floor panel.
11. Arrange and secure the interior
Before gluing anything, do a dry arrangement:
- Place the shelf units at the back wall.
- Put larger pots on bottom shelves, smaller on top.
- Place the pottery wheel slightly left of center.
- Place the cat in the center holding the vase.
Visual checkpoint: when you look at it from the front, your eye should go to the cat first, then the shelves.
12. Finish edges and add small realism touches
Add a tiny “window” rectangle on the side wall by stitching a border in a contrasting color. Add a little hanging loop or shelf bracket stitch details. If you used wood shelves, hide glue points with small yarn wraps.
Optional upgrade: add a tiny studio sign stitched onto the exterior.
Troubleshooting common mistakes and fixes
- Roof won’t sit smoothly: your roof panel is too small. Add rows or stitch it on with slightly looser tension so it can curve.
- Shelves look crowded and messy: stick to a color palette. The photo uses earthy tones with a few blue accents. Group colors by shelf.
- Mini pots look uneven: add a final slip stitch rim round and weave ends inside for structure.
- Cat falls forward: add a small felt or plastic canvas base under the feet or stitch the tail to act as a third support point.
- Walls bow outward: your insert is too soft. Switch to plastic canvas or add a second layer of cardstock.
Finishing details
- Weave in all ends, then gently press the camper shape with your hands to square it.
- If using cotton yarn, lightly wet block the shell before placing interior items.
- Stiffen the tiny pottery pieces if they’re meant to be handled.
- Add a tiny felt “rug” on the floor to make the scene feel finished.
Optional upgrades
- Add a tiny hanging apron on the wall.
- Add faux glaze jars and paintbrushes.
- Add mini string lights inside for cozy studio glow.
- Add an extra shelf unit on the side wall.
Shop Similar
- Terracotta and neutral yarn pack for mini crochet
- Plastic canvas sheets for sturdy crochet dioramas
- Mini wood shelves for dollhouse scenes
- Tiny safety eyes and embroidery floss set
- Fabric stiffener for crochet bowls and baskets
- Small crochet hook set 2.0 mm to 3.5 mm
Style It With
Crochet Mini Movie Night Camper How-To Guide
What you’re making
You’re making a miniature open side camper that doubles as a tiny movie theater snack bar, complete with glowing marquee bulbs, popcorn tubs, striped soda cups with straws, stacked “film reels,” candy, and a mini screen playing an old school film still. The vibe is cozy cinema nostalgia, but in crochet, with a clean tan exterior and a burgundy interior that feels like theater seats.
This tutorial recreates the photo’s exact storytelling elements: the “NOW SHOWING” sign on top, warm round bulbs framing the opening, and a snack counter packed with popcorn and treats. The secret is building the camper shell sturdy first, then adding the light frame and snack props last so everything stays crisp.
Materials and tools
- Yarn in sport to DK weight in: tan, cream, burgundy or deep red, charcoal, black, gray, bright red, white, and tiny amounts of yellow and green for candy
- Crochet hook: 2.25 mm to 3.0 mm
- Stitch markers
- Yarn needle
- Scissors
- Polyester fiberfill (optional)
- Structure insert options:
- Plastic canvas
- Foam board
- Mini warm white LED light option:
- Tiny battery fairy light string with small bulbs
- Or faux bulbs made from beads if you prefer no electronics
- Glue or sewing thread to secure bulbs and screen
- Small piece of printed paper or fabric for the “screen” image
- Thin plastic sheet (optional) for the popcorn machine window
Finished size and customization notes
- Most builds land around 7 to 10 inches wide.
- If adding real lights, leave a hidden path for wiring along the inside roof edge.
- If you want a fully yarn build, use faux bulbs and skip electronics.
- You can swap the movie theme: holiday movie night, spooky cinema, kids matinee. Keep the same structure and props.
Step by step instructions
1. Crochet the floor and back wall
Floor:
- With tan or light gray, crochet a firm rectangle in single crochet.
- Create a wheel arch opening at the center with a chain and skip method.
Back wall:
- With tan, crochet a rectangle panel.
- Add a burgundy “seat” band by switching to burgundy for the bottom third.
Visual checkpoint: the back wall should already feel like a theater interior with that red band.
2. Crochet the open side frame and assemble the shell
Open side frame:
- Crochet a large rectangle in tan.
- Create a big window opening.
- Work 3 to 5 rounds around the opening in single crochet for thickness.
Assemble:
- Insert structure pieces.
- Seam floor to back wall and floor to open side frame.
- Add a roof insert and seam roof edges.
Tip: keep your seams tight and even. The opening should look symmetrical and smooth.
3. Add interior wall texture
The photo shows a subtle ribbed look on the roof and clean horizontal stitch lines. To mimic:
- Work one round of slip stitch along the inside edges for a tidy finish.
- Add a burgundy side wall strip inside by sewing a crocheted strip along the interior lower wall.
Visual checkpoint: inside your camper should look like a little theater booth, not plain.
4. Make the wheel and base trim
Wheel:
- Crochet black circle and add gray hub. Base trim:
- Single crochet around lower edge in tan or slightly darker beige.
5. Create the marquee bulb frame
This is the signature. Option A: real lights
- Crochet a thin tube or cord in tan to act as a casing around the opening.
- Lay the fairy light string behind it and tack it in place.
- Position bulbs evenly around the opening.
Option B: faux bulbs
- Use small cream beads or crochet tiny bobbles.
- Sew them evenly around the opening edge.
Spacing tip:
- Count your stitches around the opening.
- Mark evenly spaced points with stitch markers.
- Attach bulbs at those points.
Visual checkpoint: your bulbs should look evenly spaced like a classic marquee, not clustered.
6. Crochet the “NOW SHOWING” sign
Make a small rectangle plaque in gray.
- Crochet a rectangle in single crochet.
- Add a border round.
- Embroider “NOW SHOWING” with black floss, or stitch simple block letters.
Attach centered at the top inside edge.
Tip: if lettering feels intimidating, cut a tiny piece of fabric with the text and stitch it onto the plaque.
7. Build the snack counter
The counter in the photo is a tan block with a darker base.
- Crochet a rectangular box shape: top, sides, and front.
- Stuff lightly or insert a small foam piece for firmness.
- Sew the counter to the floor so it does not slide.
Add “cabinet doors” by stitching vertical lines on the front.
Visual checkpoint: from the front, the counter should sit slightly left of center and feel like a concession stand.
8. Crochet popcorn tubs and soda cups
Popcorn tub:
- Crochet a small cylinder in white.
- Add red stripes by surface stitching or color changes.
- Crochet a yellow popcorn top: small bobbles clustered on a circle.
Soda cup:
- Crochet a small cylinder in red.
- Add white stripe band.
- Straw: a tight chain in light pink or white, stitched into the cup.
Make several:
- 2 to 4 popcorn tubs
- 2 to 3 soda cups
Tip: keep props slightly oversized compared to the camper interior. It reads better in photos.
9. Make the popcorn machine and snack items
Popcorn machine:
- Crochet a small rectangular box in gray.
- Add a clear plastic “window” on the front if you want realism.
- Fill the inside with loose yellow yarn bits or tiny popcorn bobbles.
Candy:
- Make tiny rectangles in bright colors.
- Stitch them onto a small tray.
Film reels:
- Crochet flat gray circles with darker rings.
- Stack them at the back like the photo.
Visual checkpoint: when you look inside, you should see layers: reels at the back, snacks in the middle, cups in front.
10. Add the mini screen
Screen frame:
- Crochet a rectangle in black.
- Insert a small stiff rectangle behind it.
- Attach a printed grayscale image or draw a simple film still on paper. Sew the screen to the right interior wall.
Tip: keep the screen slightly angled inward for a realistic theater look.
11. Final arrangement and securing
Arrange:
- Popcorn machine on left.
- Cups and tubs on the counter and floor area.
- Candy at the front edge.
- Film reels stacked behind.
- Screen on right.
Once you love the composition, tack pieces down with a few stitches or a dot of glue.
Visual checkpoint: your scene should look busy but organized, like a curated display rather than a pile of props.
12. Optional: add a hitch wheel and back details
The photo shows a small hitch wheel on the right.
- Crochet a tiny black wheel.
- Attach with a stiff yarn arm or wire wrapped in yarn.
Add two small red tail lights on the back edge with stitched circles.
Troubleshooting common mistakes and fixes
- Bulbs look uneven: measure spacing by stitch count and mark placements before attaching.
- Opening edge curls: add one round of single crochet around the opening with 2 stitches in each corner curve.
- Props fall over: stitch props to the floor or add tiny felt bases.
- Screen looks too small: scale it up. In mini dioramas, slightly oversized screens read better.
- Counter looks soft: insert foam or plastic canvas inside before closing.
Finishing details
- Weave in ends, then gently press the camper into shape.
- If you used real lights, secure the battery pack behind the camper or under the base.
- Add a felt base under the whole camper if you want it to sit quietly on a shelf without sliding.
- Lightly stiffen the popcorn tubs and cups to keep them photo ready.
Optional upgrades
- Add mini “tickets” on the counter.
- Add a tiny menu board.
- Make a removable “marquee title” strip under the sign.
- Add a mini curtain along the top interior edge.
Shop Similar
- Warm white mini fairy lights battery for crafts
- Tan and burgundy yarn for miniature crochet projects
- Plastic canvas for crochet structure inserts
- Tiny beads for faux marquee bulbs
- Mini craft scissors and dollhouse accessories
Style It With
Crochet Baby Nursery Camper Make-It-Yourself Tutorial
What you’re making
This is a dreamy little nursery on wheels: a soft pastel yellow mini camper with a wide open side, puffy cloud appliqués, a tiny white crib with a sheer canopy, a moon and star mobile, and sweet nursery props like folded blankets, a rubber duck, a rocking horse, and a teddy. The overall mood is gentle and bedtime cozy, like a portable storybook nursery scene.
We’ll build a sturdy camper shell in pale yellow, then create the crib and canopy as the hero interior element, then add the supporting nursery props to match the photo’s composition. The key to this look is clean stitching, soft rounded edges, and delicate white details that pop against the buttery yellow.
Materials and tools
- Yarn in sport to DK weight in: pale yellow, white, cream, light gray, brown, beige, black, and tiny amounts of pastel accents
- Crochet hooks: 2.25 mm to 3.0 mm
- Stitch markers
- Yarn needle
- Scissors
- Polyester fiberfill (small amount)
- Structure insert options:
- Plastic canvas
- Foam board
- Sheer fabric or tulle scrap for the canopy (optional but very photo accurate)
- Thin craft wire or pipe cleaner for canopy hoop and mobile support
- Small beads (optional) for mobile detail
- Fabric glue or tacky glue (optional)
- Felt scraps (optional) for mattress and tiny details
Finished size and customization notes
- The nursery camper typically finishes around 8 to 10 inches wide in DK.
- If you want it more plush and toy like, use softer acrylic yarn and a slightly larger hook, but you will need stronger inserts.
- If you want a very crisp display look like the photo, cotton yarn and tight stitches work best.
- Cloud appliqués can be stitched or crocheted as separate pieces.
Step by step instructions
1. Crochet the floor panel and wheel arch
With pale yellow, crochet a firm rectangle in single crochet. Create the wheel arch opening in the center zone using chain and skip.
Visual checkpoint: the arch should be centered and smooth, like a gentle smile shape.
2. Crochet the back wall and open side frame
Back wall:
- Crochet a rectangle panel in pale yellow to match floor width and desired height.
Open side frame:
- Crochet a large rectangle in pale yellow.
- Create a big window opening.
- Add 3 to 5 rounds of single crochet around the opening to thicken the frame.
Tip: add extra increases at rounded corners so the opening edge stays flat.
3. Assemble the camper shell with structure inserts
Cut inserts and place them behind the crocheted panels. Seam floor to back wall, then attach the open side frame. Add the roof insert and seam top edges.
Visual checkpoint: you should have a stable open side camper that sits upright without collapsing.
4. Add roof shaping and edge trim
The roof in the photo is smooth, not textured.
- Crochet a roof cover rectangle in pale yellow in single crochet.
- Attach it over the top, seam carefully so it curves smoothly.
Add a thin outline in light gray or white around the opening if you want a crisp framed look.
5. Crochet and attach the cloud appliqués
Cloud motif:
- Chain 12.
- Work single crochet along the chain.
- Add small “bumps” by working half double crochet and double crochet clusters along the top edge.
- Finish with a clean single crochet edge.
Make 4 clouds:
- Two on the roof corners
- Two on the lower body corners
Stitch them on with white yarn.
Visual checkpoint: clouds should look puffy and soft, not like flat ovals. Add extra bump stitches if needed.
6. Make the wheel
Crochet a black circle and add a gray hub. Attach centered under the opening.
7. Crochet the crib frame
The crib is the centerpiece. Base:
- Crochet a rectangle in white for the crib mattress platform. Sides:
- Crochet two long strips in white. Bars: Option A: crocheted bars
- Chain small lengths and stitch evenly along the side strip. Option B: yarn wrapped bars
- Use a small plastic canvas strip and wrap yarn around for evenly spaced bars.
Attach sides to the base, then add a back rail.
Tip: the bars do not need to be perfect. Even spacing is what reads.
Visual checkpoint: when viewed from the front, it should clearly look like a crib with vertical slats.
8. Add the canopy and sheer drape
Canopy frame:
- Form a small hoop from craft wire or a pipe cleaner.
- Wrap it with white yarn.
Drape:
- Cut a small rectangle of sheer fabric or tulle.
- Gather it slightly at the top and secure to the hoop.
- Stitch the hoop to the camper ceiling area above the crib.
If you prefer all crochet:
- Crochet a very open mesh triangle (chain spaces) and stitch it above the crib as a canopy.
9. Make the moon and star mobile
Mobile arm:
- Wrap a pipe cleaner with yarn or crochet a tight tube around a wire.
- Attach to the ceiling area.
Moon:
- Crochet a small crescent by making a circle then stitching a smaller circle behind and trimming shape with stitching.
Stars:
- Crochet tiny 5 point stars or cut from felt.
Hang the shapes with embroidery floss.
Visual checkpoint: the mobile should hang slightly above the crib and feel delicate and airy.
10. Crochet the folded blankets and pillow stack
Blankets:
- Crochet small rectangles in white and pale blue.
- Add a simple border round. Stack them on the left like the photo.
Rubber duck:
- Make a tiny yellow oval body and a smaller head bump, add a tiny orange beak stitch.
11. Crochet the rocking horse and teddy
Rocking horse:
- Body: small oval stuffed lightly.
- Legs: short tubes.
- Head: small sphere with stitched ears.
- Rocker base: crocheted chain strip stiffened.
Teddy:
- Head sphere, body cylinder, small arms and legs.
- Embroider a simple face.
Tip: for mini figures, tight stitches matter. Use the smallest hook you can comfortably manage.
12. Arrange the interior to match the photo
Placement:
- Crib on the right with canopy.
- Teddy near the crib.
- Rocking horse in the center left.
- Blanket stack and duck on the far left.
Secure with a few stitches or tiny glue dots so nothing shifts.
Visual checkpoint: the crib should be the focal point, with everything else supporting it.
13. Final edge cleanup and shaping
Work one final round of slip stitch around the opening edge for a polished finish. Gently shape the camper by pressing corners and smoothing the roof curve.
If anything looks floppy:
- Add an extra insert layer.
- Or stitch a hidden reinforcement strip inside the top edge.
Troubleshooting common mistakes and fixes
- Crib bars look uneven: mark bar placement with stitch markers before attaching, and count spaces.
- Canopy droops: use a firmer hoop and attach at two points, not one.
- Clouds curl: add a border round in single crochet with extra stitches around tight curves.
- Camper body bows: your insert is too thin. Double the cardstock or switch to plastic canvas.
- Mini toys look messy: simplify faces and rely on silhouette. In mini scale, shape reads more than details.
Finishing details
- Weave in all ends and check for loose stitches around the opening.
- Lightly stiffen the crib sides if they lean.
- Consider adding a tiny felt “mattress” inside the crib for realism.
- Add a soft “night light” detail by stitching a small circle on the wall.
Optional upgrades
- Add tiny bunting flags along the top edge.
- Add a mini book stack with embroidered spines.
- Add a small crochet rug circle on the floor.
- Add a name plate on the camper exterior.
Shop Similar
- Pastel yellow and white yarn for miniature crochet
- Plastic canvas sheets for crochet structure
- Tulle fabric for miniature canopy crafts
- Small crochet hook set 2.0 mm to 3.0 mm
- Embroidery floss set for tiny details
Style It With
Crochet Crocus Spring Florist Camper Step-by-Step Tutorial
What you’re making
This is a spring florist shop on wheels, styled as an open side mini camper filled with crocus blooms in purples, yellows, and whites. The photo’s magic is in the abundance: flower buckets on the ground, flower crates inside, a tidy little work table with rolled wrapping papers, and sweet shop details like signage, shelving, and a tiny shopkeeper character. The palette is fresh and garden bright with a green lower exterior band and a cream upper body, like a cheerful market stall.
You’ll crochet the camper shell, then build the florist interior fixtures, then mass produce crocus flowers in small batches so the scene looks overflowing and abundant just like the photo.
Materials and tools
- Yarn in sport to DK weight in: cream, sage green, medium green, light gray, purple, lavender, bright yellow, white, and tiny accents for details
- Crochet hooks: 2.25 mm to 3.0 mm
- Stitch markers
- Yarn needle
- Scissors
- Polyester fiberfill (small amount)
- Structure insert options:
- Plastic canvas
- Foam board
- Small wood pieces for table and shelves (optional)
- Thin cardboard or plastic canvas for flower crates
- Embroidery floss for tiny labels
- Optional craft wire for flower stems
- Optional stiffener for flowers and buckets
Finished size and customization notes
- Finished camper often lands around 8 to 11 inches wide.
- If your flowers look too large, switch to sport weight yarn and a 2.0 mm hook for petals.
- The crocus look comes from pointed petals and a small contrasting center.
- You can swap crocuses for tulips, daisies, or wildflowers while keeping the same shop layout.
Step by step instructions
1. Crochet the floor with wheel arch
With light gray or cream, crochet a tight single crochet rectangle. Add the wheel arch opening at the center using chain and skip.
Visual checkpoint: the arch should be centered and the floor should sit flat.
2. Crochet the back wall with cream and green band
Back wall:
- Start with green for the bottom band.
- Switch to cream for the upper section.
This color blocking is important because it matches the photo’s exterior story.
3. Crochet the open side frame with window and optional front awning
Open frame:
- Crochet a large rectangle in cream.
- Create a big side opening.
- Add several rounds around the opening to thicken the frame.
Optional awning flap:
- Crochet a small rectangle flap on the exterior top edge of the opening.
- Attach at the top so it flips outward like a shop window display.
Visual checkpoint: your camper should already read like a little storefront.
4. Assemble the camper with structure inserts
Insert plastic canvas or foam board and seam panels together. Add a roof insert and seam the roof edges.
Tip: florist scenes look best when the camper holds shape perfectly because the flower display is so detailed.
5. Add roof curve and edging
Crochet a roof cover in cream, attach smoothly. Add a thin outline in gray around the opening for definition if you want a crisp “frame” like the photo.
6. Crochet the wheel and hitch
Wheel:
- Black outer circle, gray hub. Hitch wheel:
- Tiny black and gray wheel on the right.
- Attach with a stiff yarn arm or wire wrapped in yarn.
7. Make the interior fixtures: flower crates, counter, shelves
Flower crates
- Crochet rectangular baskets in gray or blue gray.
- Build a box: base circle or rectangle, then sides.
- Add a rim round and optional handle loops.
Display counter
- Crochet a slanted front bin like a market display.
- Make two or three layers so flowers can be “stacked” like the photo.
Shelves
- Use small wood pieces or crochet a shelf unit.
- Add tiny tags and tools hanging on the wall using embroidered loops.
Visual checkpoint: before adding flowers, your interior should look like a shop with places for inventory.
8. Crochet crocus flowers in batches
Crocus petals need a pointed oval shape. Simple crocus flower:
- Make 6 petals per flower. Petal:
- Chain 6.
- Work single crochet, half double crochet, double crochet, half double crochet, single crochet back down the chain.
- Slip stitch at base.
Center:
- Use a tiny yellow or orange strand folded into a small tuft.
Assembly:
- Stitch 6 petals together around the center.
- Attach to a green base.
Leaves:
- Long thin leaves: chain 10 to 14, slip stitch back for a firm blade.
Stems: Option A: no wire
- Stitch flowers directly into the crate and add leaves to fill. Option B: wire stems
- Wrap wire with green yarn, stitch flower to the top.
Batch plan:
- 12 to 20 purple flowers
- 8 to 14 yellow flowers
- 8 to 14 white flowers with yellow centers
Tip: make flowers assembly line style. All petals first, then all centers, then assembly.
Visual checkpoint: a single crate should look full and fluffy, not sparse. Add extra leaves if it looks empty.
9. Crochet flower buckets and pots for the outdoor scene
Buckets:
- Crochet small cylinders in gray or pastel blue.
- Add a rim and a base.
- Fill each with a cluster of crocuses and leaves.
Pots:
- Crochet small brown pots and add a few flowers for variety.
Arrange several on the ground like the photo to create abundance.
10. Create the wrapping station table and accessories
Wrapping table:
- Crochet a simple rectangle tabletop and four legs, or use mini wood. Rolled wrap papers:
- Roll thin felt or paper into tubes in pastel colors.
- Tie with tiny yarn loops.
Add scissors:
- Use a small charm or felt cutout.
Visual checkpoint: the table should sit in front and read as a florist workbench instantly.
11. Add signage and shopkeeper character
Sign:
- Crochet a small sign panel in cream and stitch letters with black floss. If lettering is too hard, stitch simple lines and add a small printed label.
Shopkeeper:
- Crochet a small body and head in beige.
- Add hair with brown yarn loops.
- Add a green apron dress to match the shop palette.
- Stitch a tiny watering can accessory.
Tip: keep facial features minimal. Two tiny stitches for eyes is enough.
12. Arrange the full scene and secure
Place:
- Flower crates inside first.
- Counter with flowers next.
- Shelves and wall accessories.
- Shopkeeper near the counter.
- Outside buckets clustered around the camper.
- Add a small chair and cart if you want to match the photo’s extra charm.
Once arranged, secure key pieces with stitches or glue dots.
Visual checkpoint: when you step back, the scene should look like a florist stall overflowing with crocuses, not a single bouquet.
Troubleshooting common mistakes and fixes
- Flowers look like blobs, not crocuses: sharpen petals by using a smaller hook and tighter stitches, and make petals longer with a longer starting chain.
- Scene looks empty: add more leaves. Leaves fill space and add realism fast.
- Crates collapse: insert a small cardboard rectangle inside each crate.
- Colors look too loud: limit bright yellow to accents and balance with purple and white like the photo.
- Camper leans: strengthen the base insert and check seam tension along the floor.
Finishing details
- Weave in ends and trim fuzzy fibers so details look crisp.
- Lightly stiffen flowers and buckets if they’ll be handled.
- Add a tiny felt “ground mat” under the outdoor buckets for a styled photo ready look.
- If you want long term display, add a clear cover box to keep dust off the flowers.
Optional upgrades
- Add tiny price tags on crates.
- Add a mini cash register block on the counter.
- Add a small hanging ribbon spool rack.
- Add a spring garland on the exterior edge.
Shop Similar
- Purple yellow and white yarn bundle for spring crochet
- Mini crochet hook set for tight amigurumi stitches
- Plastic canvas sheets for crochet structure
- Mini wooden dollhouse furniture shelves and table
- Fabric stiffener for crocheted flowers
- Embroidery floss set for tiny signs and labels
Style It With
A Handmade World Worth Displaying
By the time you finish these mini camper dioramas, you will have more than just adorable crochet pieces. You will have tiny, self contained stories that feel alive with personality and detail. Each camper becomes a conversation piece, a shelf display, or even a heartfelt handmade gift that reflects the care and creativity behind every stitch.
The beauty of this collection is its flexibility. Once you master the camper structure, the possibilities are endless. You can design holiday campers, seasonal markets, traveling bookstores, coffee bars, or any miniature world your imagination can dream up. The shell becomes your canvas, and the interior becomes your storytelling space.
Take your time, enjoy the small details, and do not rush the finishing touches. In miniature crochet, precision and patience create magic. When you step back and see your tiny camper glowing with personality, you will understand why these little worlds are so irresistible.
Keep stitching. Keep imagining. And most importantly, keep creating.