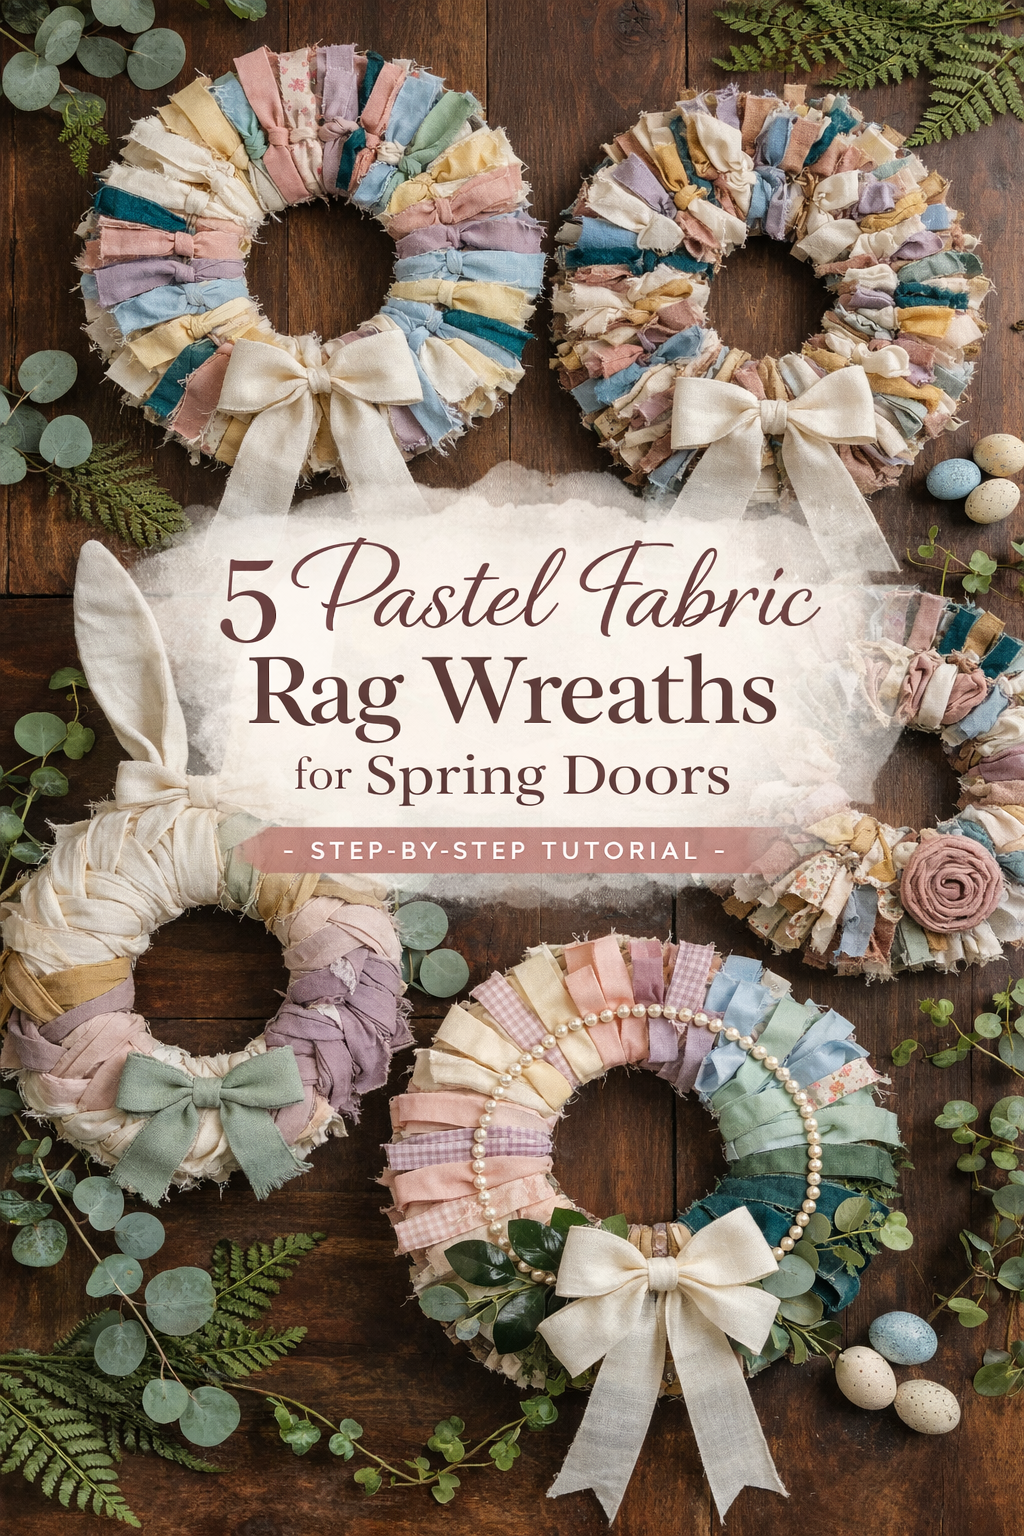
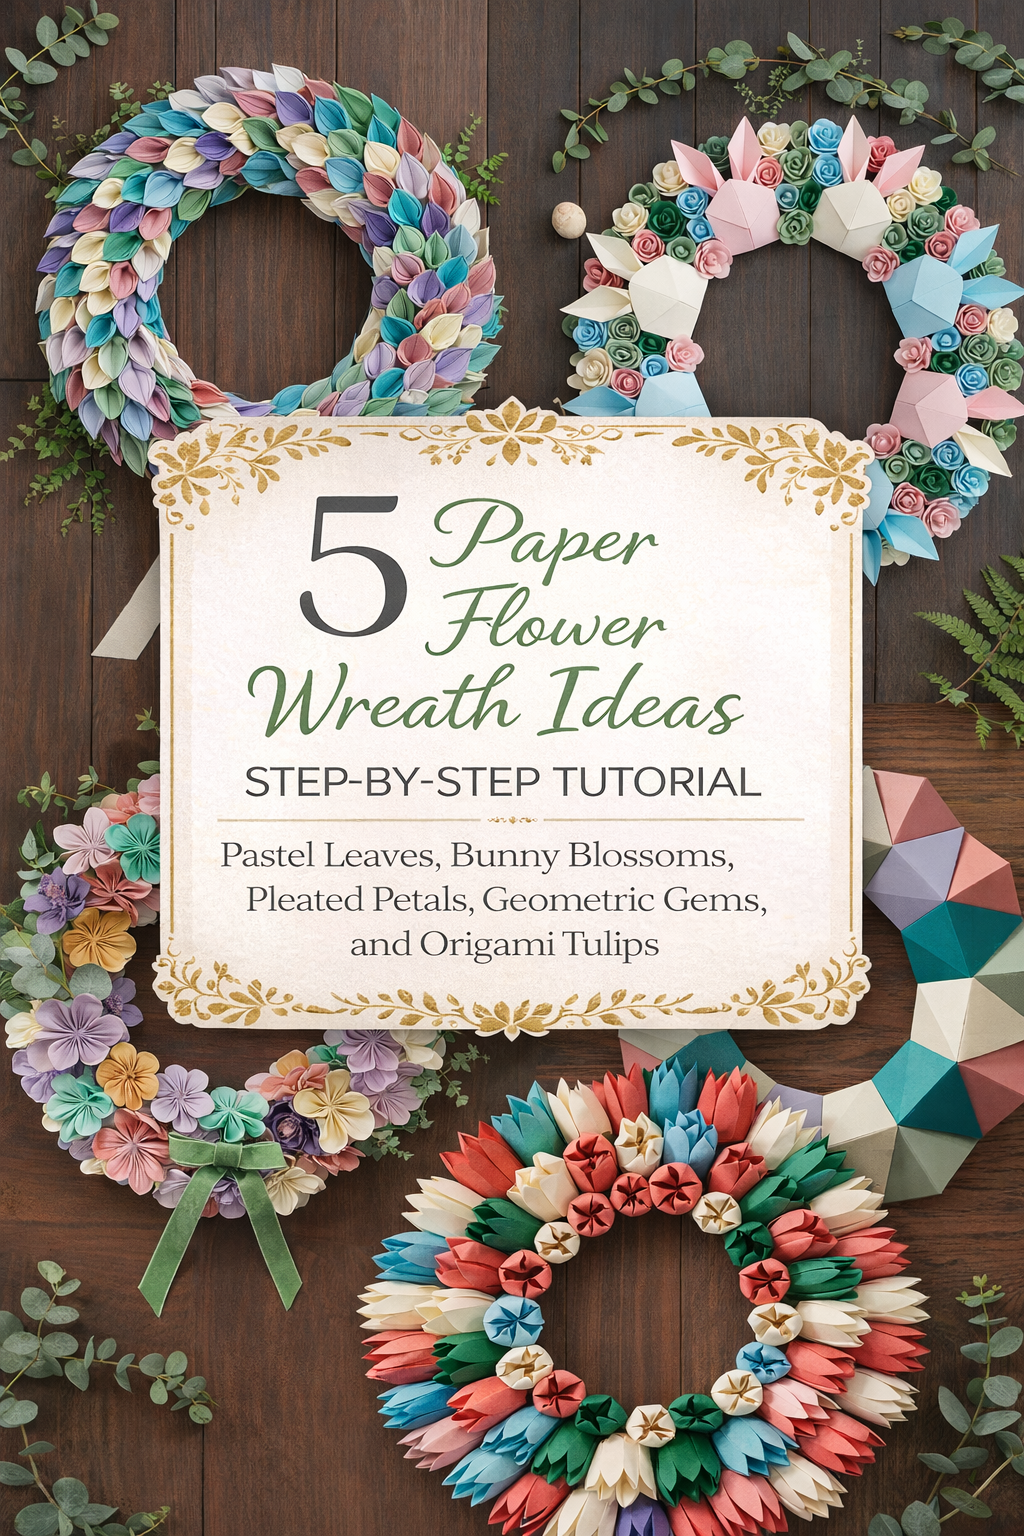
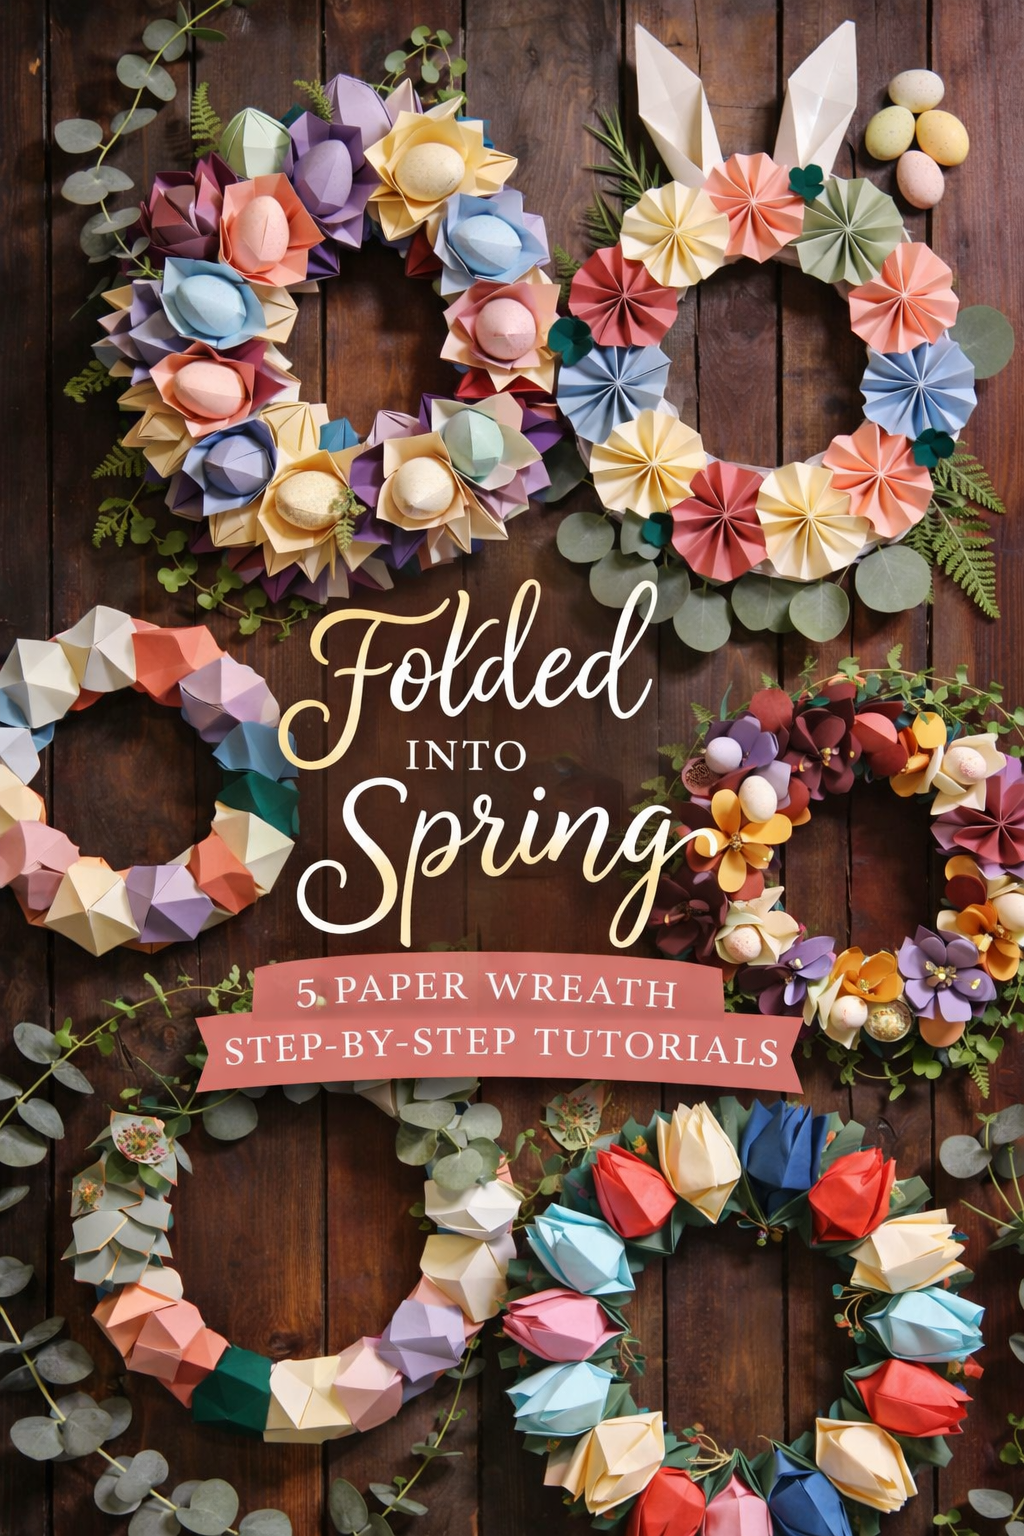
5 Modern Origami Easter Wreaths in Pastel Paper and Greenery Step-by-Step Tutorial

More like this
Welcome to a fresh take on spring decorating where paper meets sculpture and pastel meets modern design. In this collection, we are stepping beyond traditional florals and diving into five distinct origami inspired Easter wreaths that feel architectural, artistic, and undeniably elevated. Each design transforms simple cardstock into dimensional petals, faceted eggs, folded rosettes, and sculptural carrots, all layered with greenery for that styled editorial finish.
What makes these wreaths special is the balance of softness and structure. Crisp folds catch the light, muted pastels create harmony, and touches of eucalyptus and ivy bring life and movement. Whether you lean minimalist, playful, or lush and romantic, there is a wreath in this lineup that will feel completely at home on your front door, mantel, or gallery wall.
Think of this as your modern Easter blueprint. We are not just crafting decorations. We are building statement pieces that look boutique worthy yet are entirely handmade. Gather your cardstock, warm up your glue gun, and get ready to fold, shape, and style your way into a spring refresh that feels creative, intentional, and beautifully unexpected.
💡 Pro Tip: Why I Link to Amazon Search Results and Not One Product
In the Shop the Look and Style it With sections under each bikini, I link to Amazon search results, not single products. Here’s why this matters:
Hot bikinis sell out fast. I don’t want you clicking on a dead link to a sold-out item. Search pages stay updated.
You get more options. Love the vibe but want a different color, cut, or price point? The search results give you everything that matches the look and energy.
I curate each search carefully. These aren’t generic. I spend hours crafting keywords that bring up exactly the kind of bikinis I’d wear—or recommend to my hottest friends.
Support with no pressure. If you click a link, browse, and buy something later, I may earn a small commission at no extra cost to you. That helps me keep bringing you curated collections like this one—powerful, seductive, and always fresh.
So dive in. Click through. Try something risky. These aren’t just bikinis—they’re commands, statements, and maybe even your new favorite weapon of choice.
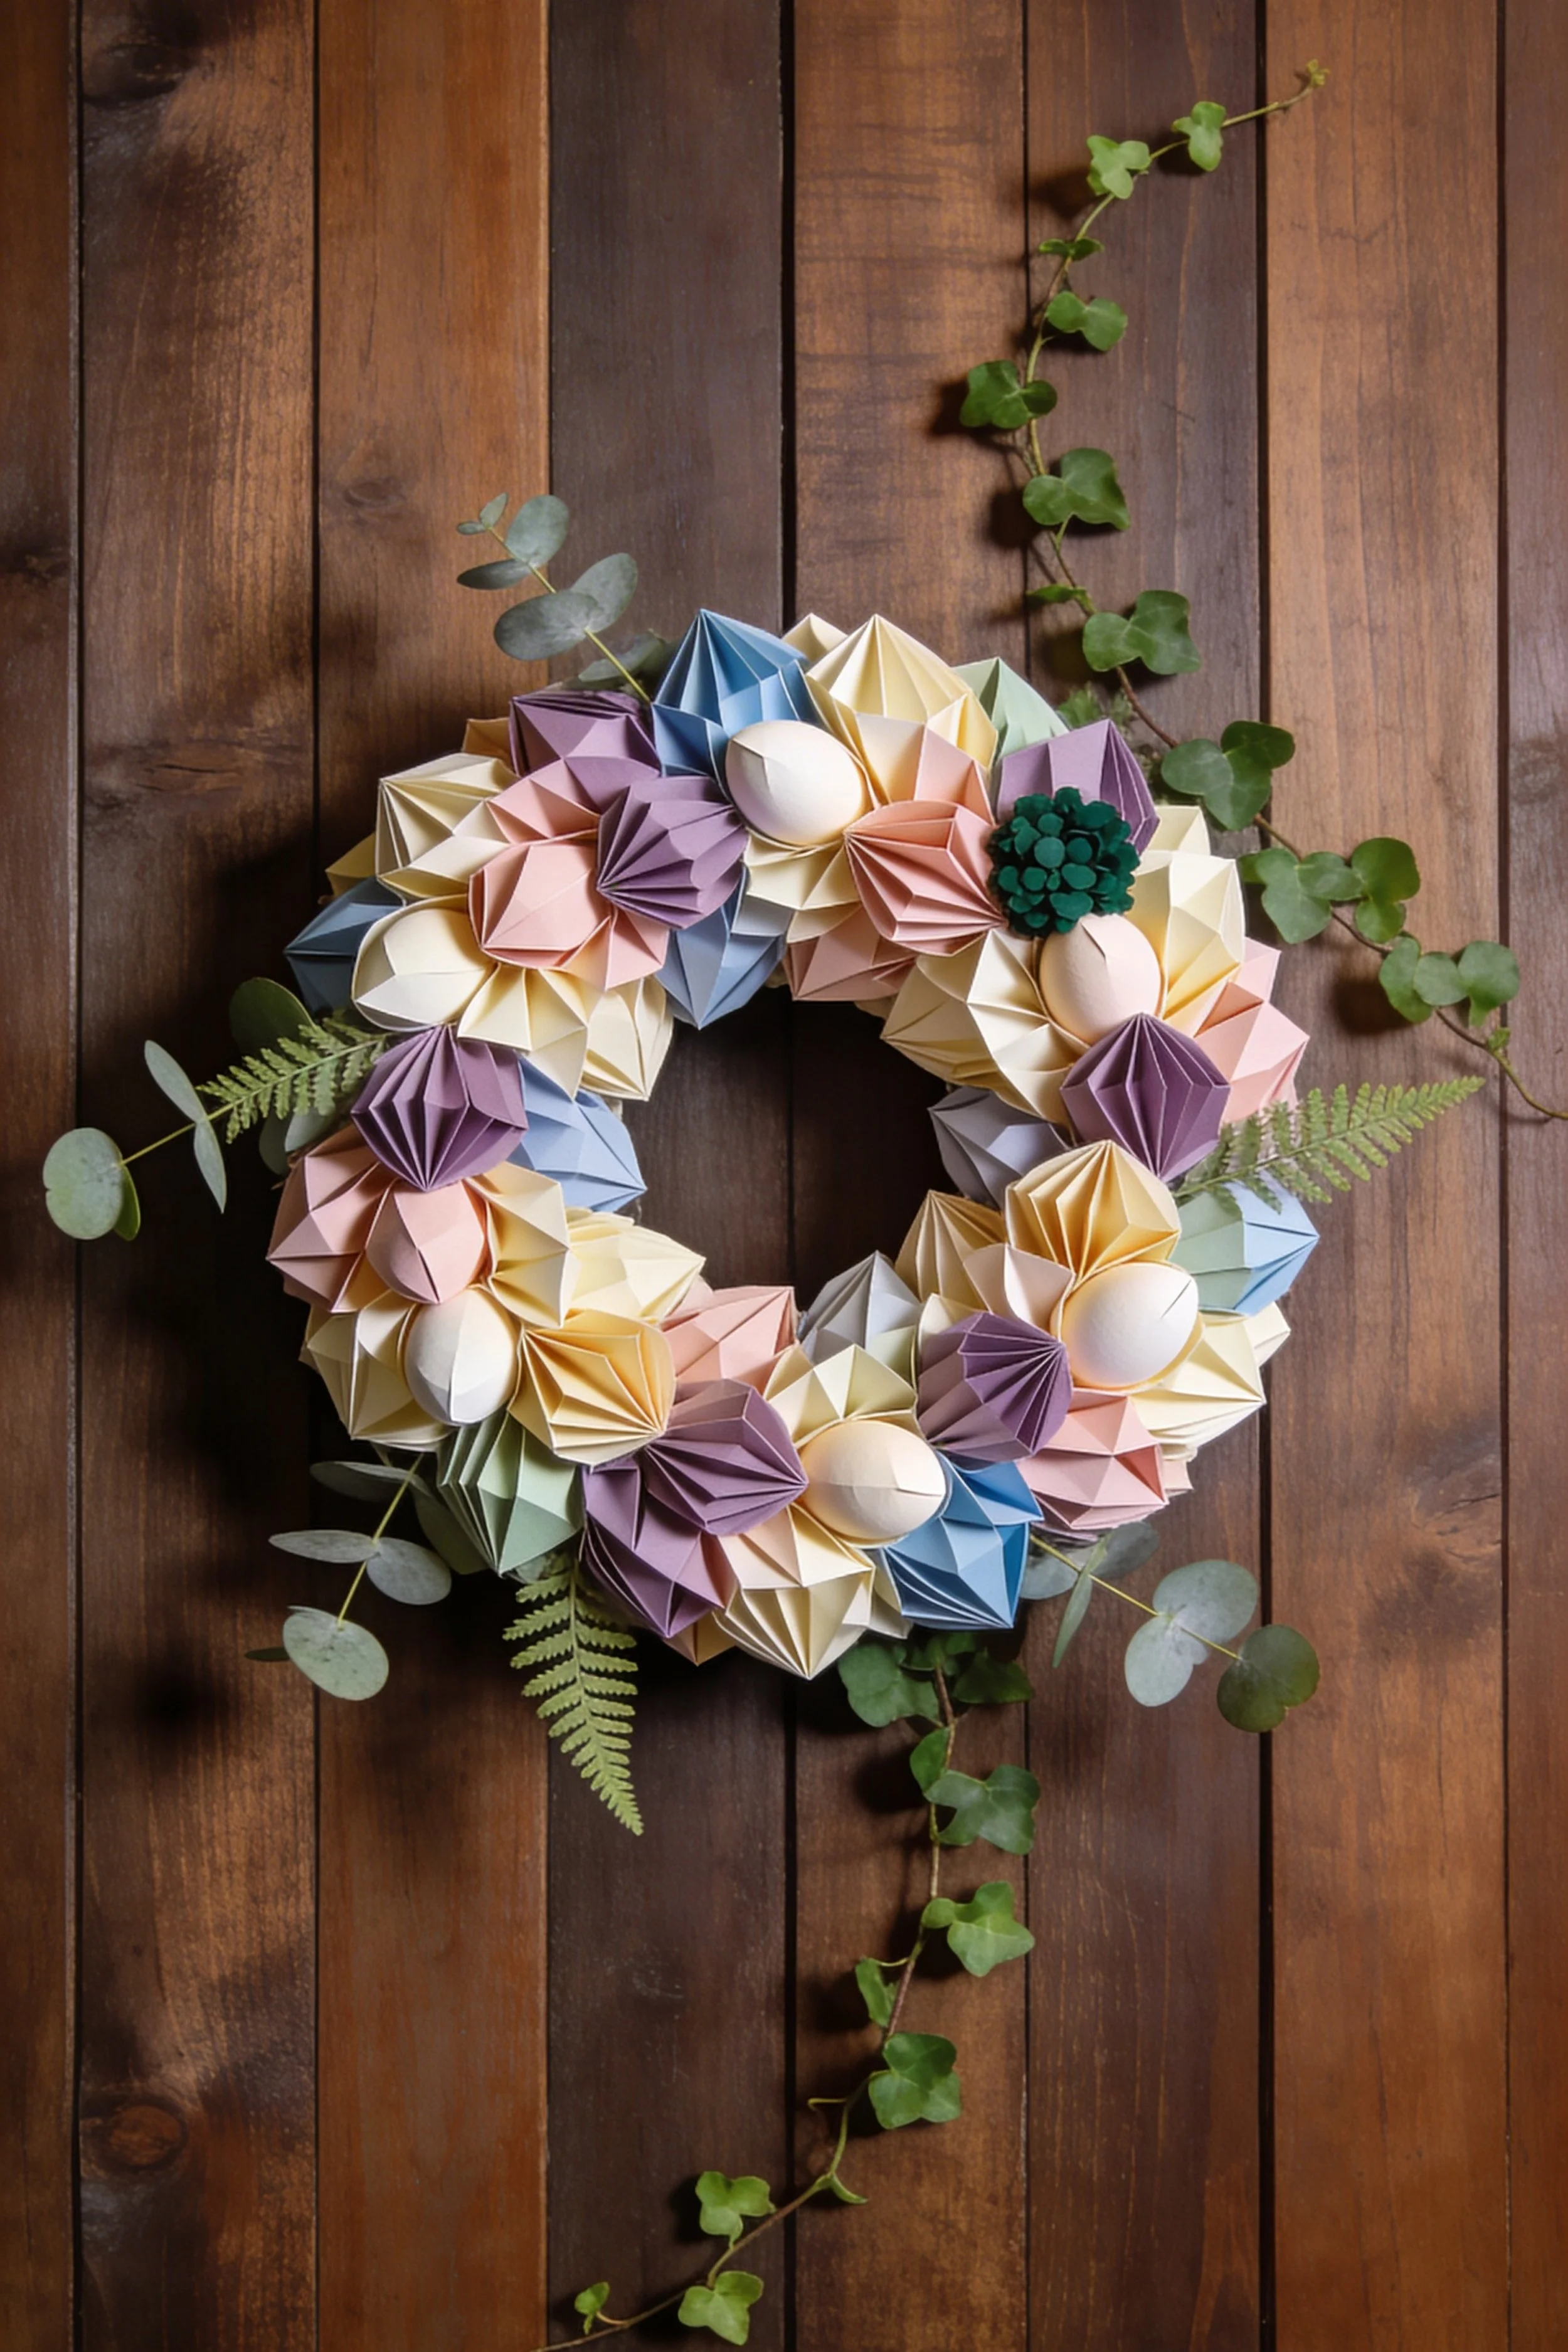
Pastel Paper Rosette Egg Wreath Step-by-Step Tutorial
What you’re making
You’re creating a full, sculptural pastel paper wreath that looks like a modern spring bouquet, but it’s entirely folded from cardstock. The finished look is a ring packed with fan folded rosettes and softly faceted egg shapes in blush, buttercream, lilac, pale blue, sage, and ivory, with a few sprigs of faux eucalyptus, fern, and trailing ivy for that styled, editorial finish. It reads like Easter without being kitschy, and the layered folds give it real shadow and dimension on the door.
Materials and tools
- Cardstock in pastel tones (medium weight, about 176 to 216 gsm, matte looks most like the photo)
- Optional accent cardstock in deep teal or forest green for a small focal bloom
- A wreath base (12 inch foam ring, straw ring, or grapevine ring)
- Hot glue gun and glue sticks
- Craft glue or tacky glue (for slower, cleaner seams)
- Scissors
- Craft knife and cutting mat (helpful for crisp edges)
- Ruler
- Pencil
- Bone folder or scoring tool (even an old gift card works)
- Small binder clips or mini clothespins (to hold folds while glue sets)
- Floral wire or thin paddle wire
- Faux eucalyptus stems
- Faux fern sprigs
- Faux ivy vine or trailing greenery
- Optional double sided tape (useful for pre holding folds)
- Optional paper crimper or scoring board (nice but not required)
Finished size and customization notes
A 12 inch base typically finishes around 14 to 16 inches wide once the paper elements puff out, like the photo. If you want a tighter, more minimal ring, use fewer large rosettes and more smaller eggs. If you want extra drama, make a few oversized rosettes and let them sit slightly above the ring for a more sculptural crown. Color wise, stick to a soft palette with one deeper accent, the photo uses a small dark bloom that acts like a visual anchor.
Step-by-step instructions
Choose your base and plan your “big shapes” first
Lay your wreath base on your work surface and lightly mark quarters with a pencil. This gives you a simple map so your colors feel balanced. You should now see four light reference marks that will help you distribute lilac, blue, and blush evenly instead of accidentally clustering one color.Prep your cardstock palette into a repeatable set
Pick 6 to 8 pastel colors plus ivory. Cut a few strips and squares from each so you can batch fold without stopping. A good starter batch for a 12 inch base is:- 10 to 12 fan rosettes in mixed sizes
- 10 to 14 faceted eggs in mixed sizes
- 1 accent bloom in deep teal or dark green
If yours looks sparse at the end, you can always add two or three more small rosettes to fill gaps.
Make the fan folded rosette units (the “paper flowers”)
These rosettes are the folded fan shapes you see throughout the wreath. They look like small pleated shells or pinwheel petals once opened.- Cut rectangles, start with 4 inches by 6 inches for medium rosettes. For smaller ones, try 3 inches by 4.5 inches.
- Score along the long direction every 0.5 inch. If you want chunkier folds, score every 0.75 inch. Either works, smaller spacing looks more refined like the photo.
- Fold along the score lines accordion style, mountain then valley, until you have a tight fan. Use a bone folder to press each fold sharp.
Visual checkpoint: the strip should compress into a neat stack that holds its shape when you pinch it.
Lock the fan into a rosette shape
There are two easy methods, choose based on your comfort level. Option A, classic rosette circle:- Bring the two ends of your accordion strip together to form a ring and glue the seam. Hold with a clip until set.
- Press the ring down into a flat circle, it will naturally want to open.
- Cut a small cardstock circle, about 1.25 inch wide, and glue it to the center underside to hold the rosette open.
Option B, “half rosette” clusters like the photo: - Do not make a full ring. Instead, fold the accordion in half and glue the center crease so it fans into a semicircle.
- Make a second semicircle and glue them together at the flat edges to form a full flower, or keep them as singles for more varied texture.
Visual checkpoint: you should now see crisp pleats radiating from a center point, like a folded paper seashell.
Shape the rosettes so they look soft, not stiff
Gently curl the outer edges forward with your fingers. Do not crush the pleats, just coax the tips so they catch light. If yours looks too flat compared to the photo, pop the center slightly upward by pressing from underneath, then re glue the backing circle if needed.Make the smooth, faceted egg forms
The wreath in the photo mixes pleated rosettes with smooth, geometric egg domes. The simplest way to replicate this look is a two piece egg shell made from scored segments.- Cut two identical egg silhouettes from cardstock, about 3.5 inches tall for medium eggs. You can draw one template and trace it.
- Score each egg from top to bottom in 6 to 8 vertical sections, like orange slices. Do not cut through.
- Gently curve each section by running the bone folder along the score lines.
- Glue the two egg pieces together along the edge, but only glue one section at a time so you can align cleanly.
- Before closing the last seam, stuff lightly with a small scrap of paper to keep it puffed.
Visual checkpoint: you should now see a rounded egg with subtle panel lines, not a flat cutout. If yours looks boxy, add more score sections next time.
Add a few “open bloom” cups for variety
The photo includes some flower like forms that look more like layered petals than fans. You can mimic this by making a simple petal cup.- Cut a circle, 4 inches wide.
- Cut a spiral from the outside toward the center, about 0.5 inch wide.
- Roll the spiral into a cone rose shape, glue the base.
- Slightly flare the top edge outward.
Make 2 to 4 of these, especially in blush, peach, or ivory, so the wreath reads floral, not purely geometric.
Build one small accent bloom
That deeper green focal flower acts like jewelry. Make it simple:- Cut a 1 inch circle and fringe it all the way around with tiny snips.
- Roll it tightly into a bud and glue.
- Add a second fringed strip around it for fullness.
Place this accent off center, not at the top, so it feels styled rather than symmetrical.
Prep your greenery
Cut eucalyptus into smaller sprigs, 4 to 6 inches long. Pick 2 fern pieces and one ivy vine. Dry fit them behind your wreath base so they peek out at the left and lower right like the photo.
Visual checkpoint: greenery should frame and soften, not dominate. If you see more green than paper from a distance, trim.Start attaching the largest paper pieces first
Plug in your hot glue gun. Begin with the biggest eggs and biggest rosettes. Place them around the ring, slightly angled outward so the wreath looks full. Glue each piece with a generous bead directly onto the base, then hold for a few seconds.
Tip: If you are using foam, press gently so the glue bonds without melting a crater.Create clusters, not a perfect alternating pattern
The photo feels organic because colors and shapes repeat in loose clusters. Build mini groupings of 3:
- One egg
- One fan rosette
- One small rosette or cup bloom
Then repeat this rhythm around the ring, changing colors each time.
Visual checkpoint: step back every 5 pieces. You should now see a balanced pastel mix with no single color taking over one side.
Fill gaps with small rosettes and “leaf shadows”
Any visible base should be covered. Use smaller fan rosettes in lilac and ivory to tuck into gaps. If you still see holes, glue in a couple of small cardstock leaves behind pieces to create depth. Simple leaves can be almond shapes with a center score line.Integrate greenery in three points
Slide eucalyptus under the paper elements at the left side and glue. Add fern tips at the lower left and lower right. Tuck the ivy vine so it trails upward on the right side like the photo. Use floral wire if you want extra security, but hot glue is usually enough for indoor doors.
Visual checkpoint: greenery should look like it is emerging from behind the paper, not sitting on top.Add your focal accent bloom last
Place the deep teal bloom where the eye naturally lands, usually around 2 o clock or 4 o clock. Glue firmly. This is your finishing dot, so treat it like the final styling move.Final shaping pass
With everything glued, gently adjust angles. Pull a few rosettes outward, push a few eggs inward, and vary heights. This “hand styling” is what makes it look like the photo. If yours looks too uniform, intentionally tilt three or four pieces so they catch light differently.
Troubleshooting
- My rosettes keep popping open
Use a larger backing circle and more glue, then hold with a clip until fully cool. If your cardstock is very stiff, score deeper so it folds cleanly. - My eggs look flat
Add more score sections and curve each panel before gluing. Lightly stuff the egg with a scrap of paper before closing. - The wreath looks lopsided
Step back and look for color clumps. Add one or two pieces of the dominant color to the opposite side to balance. - Hot glue strings are showing
Let the glue cool slightly before pressing pieces down, and remove strings with a quick pass of a warm, dry finger or tweezers. - I can still see the base
Make a few tiny filler rosettes and tuck them in, or add cardstock leaves behind gaps.
Finishing details
If your wreath will hang outdoors or on a storm exposed door, spray it lightly with a matte clear sealer suitable for paper crafts, using thin coats. For indoor use, this is optional. To keep the wreath looking crisp, store it in a large box with tissue cushioning, and avoid pressing on the rosettes. If any piece loosens over time, re glue and hold until fully set. For an even more premium finish, glue a felt backing strip on the back of the wreath where it touches the door, it prevents scuffing and helps it hang flatter.
Shop Similar
- Pastel cardstock pack for folded paper flowers
- Foam wreath rings 12 inch set
- Hot glue gun with mini glue sticks
- Bone folder and scoring tool set
- Faux eucalyptus stems for wreath making
- Faux fern sprigs greenery picks
Style It With
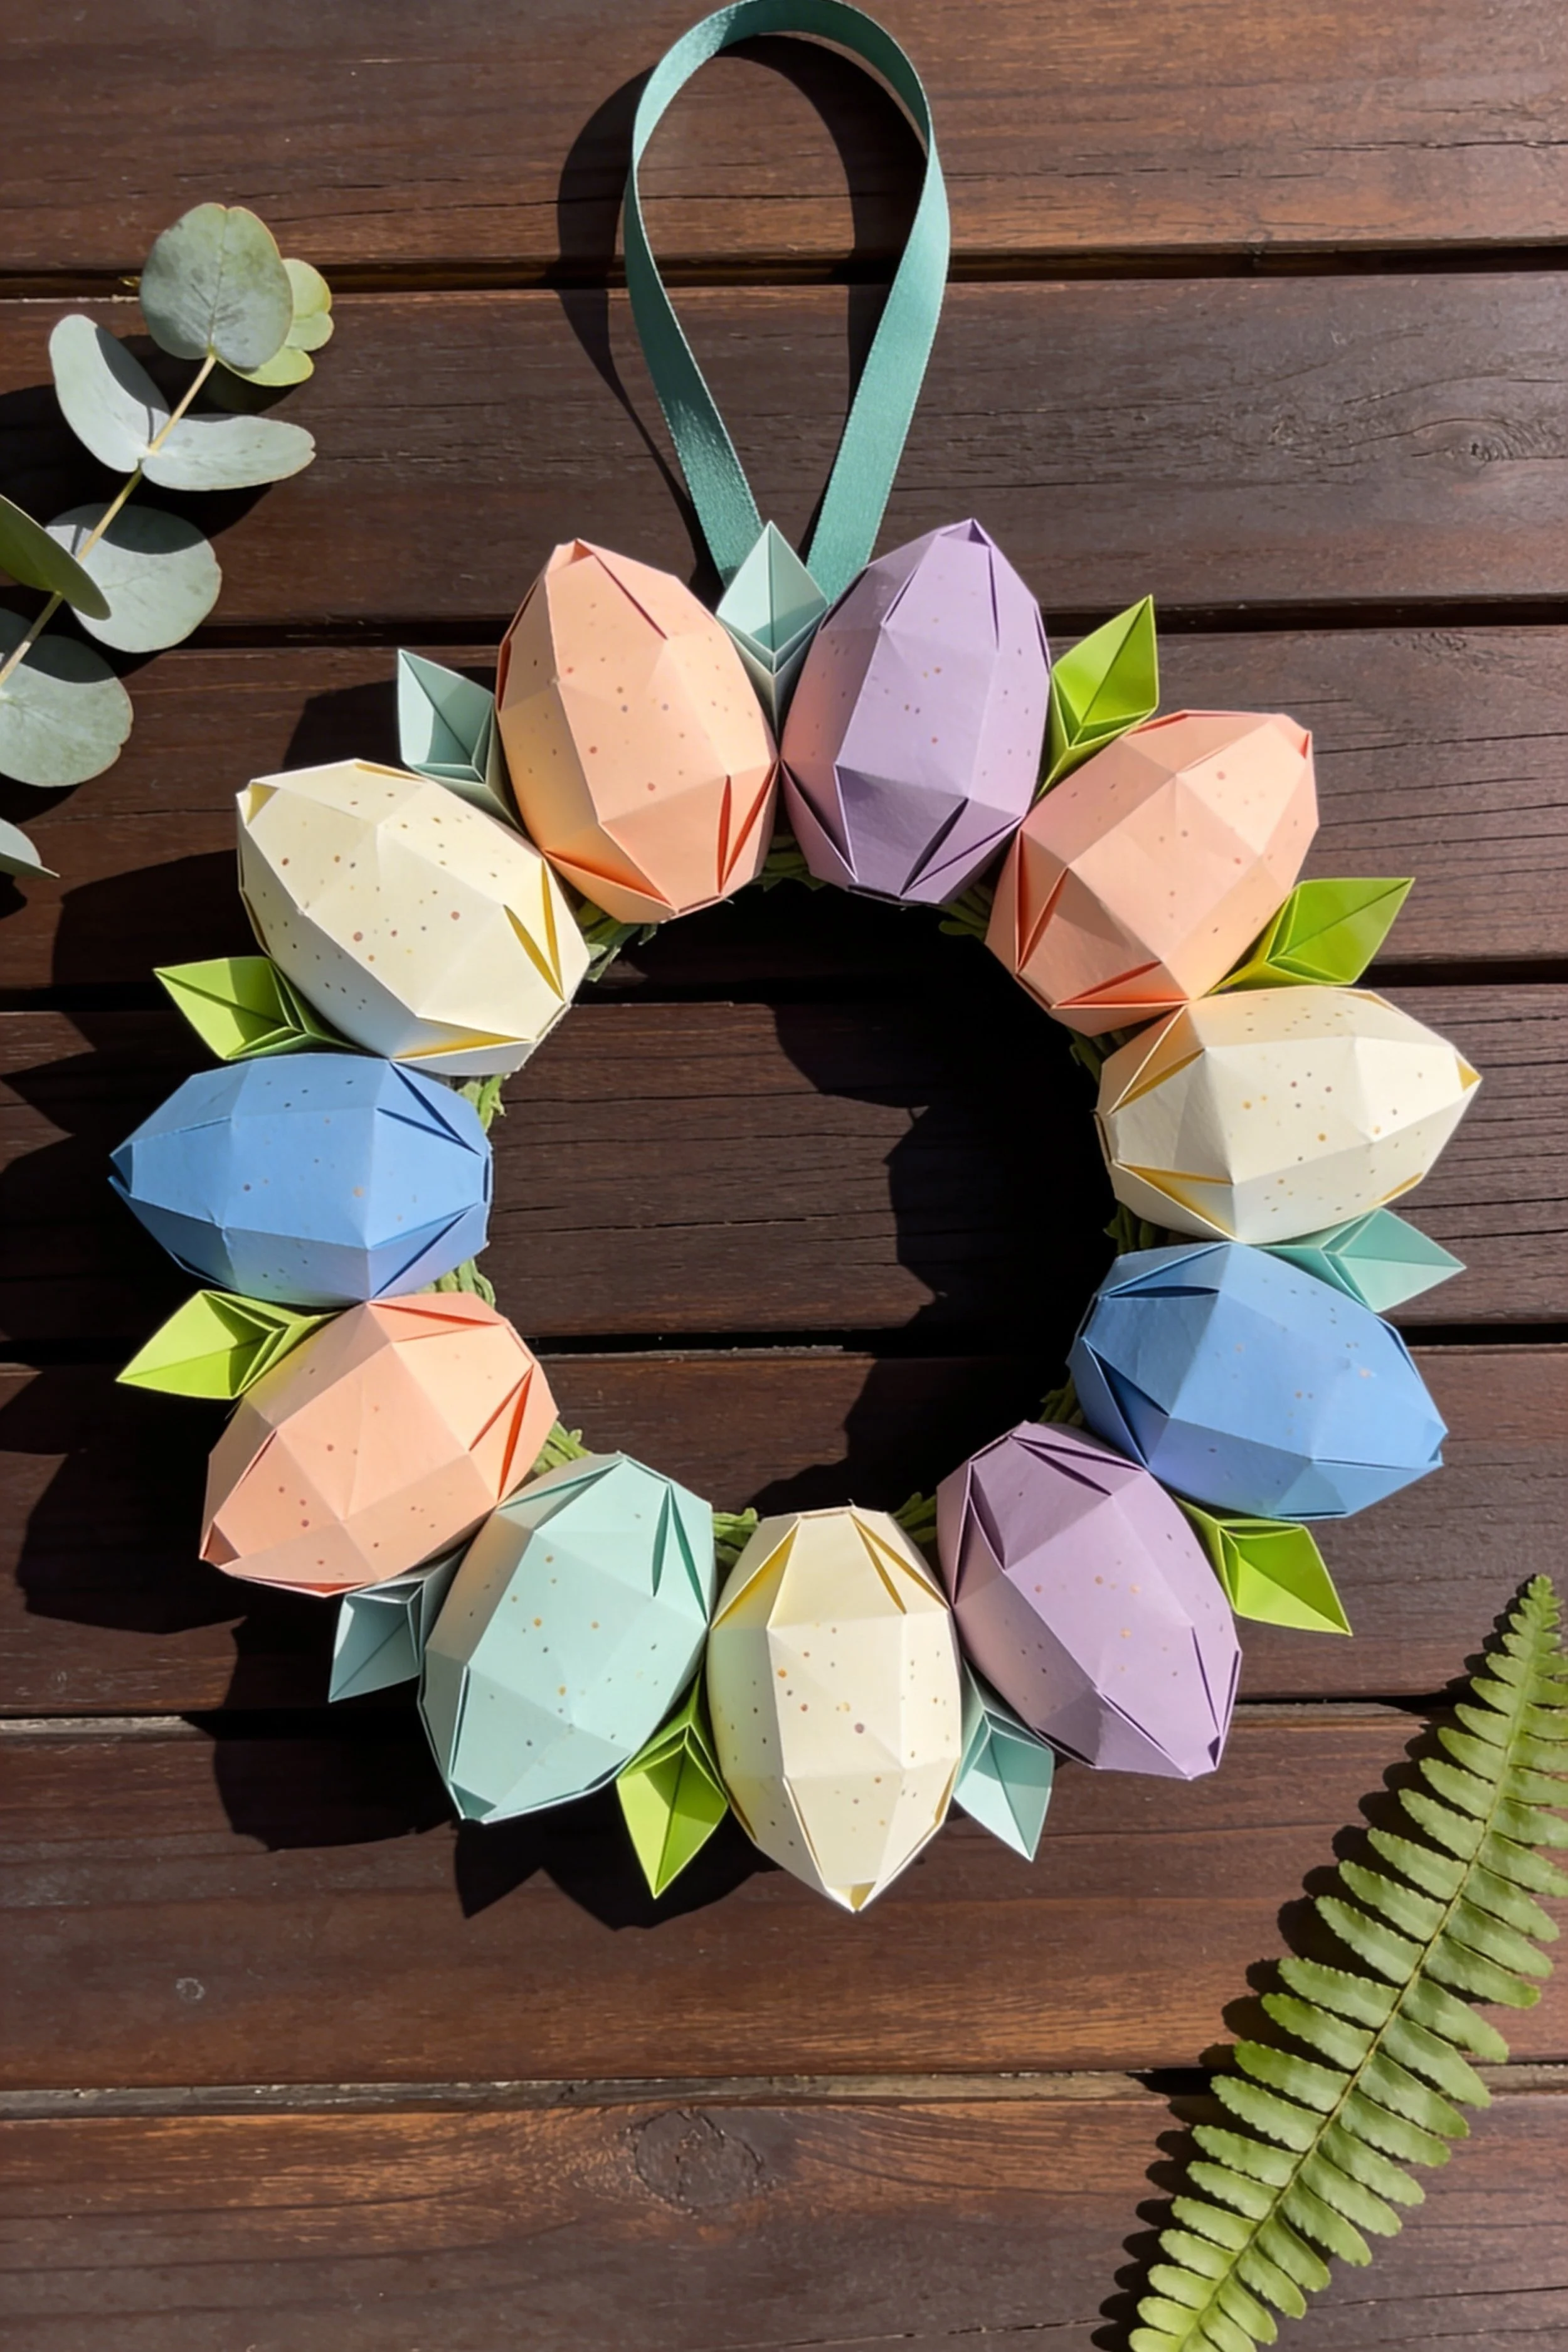
Geometric Origami Egg Wreath DIY Guide
What you’re making
This project recreates the clean, modern wreath made of faceted origami style eggs with tiny folded leaves, arranged around a simple ring and finished with a soft hanging ribbon. The eggs are pastel and lightly speckled in the photo, which makes them feel hand made and springy without looking childish. The overall look is crisp, minimal, and graphic, perfect for a front door or indoor wall.
Materials and tools
- Pastel cardstock (medium weight, matte) in cream, peach, lilac, pale blue, mint
- Optional speckle paint markers or a stiff brush and watered acrylic paint for freckles
- Green cardstock for folded leaves
- Wreath base (10 to 12 inch foam ring or wrapped cardboard ring)
- Ribbon for hanger (sage green looks like the photo, 1 to 1.5 inch wide)
- Hot glue gun and glue sticks
- Craft glue or tacky glue
- Scissors
- Craft knife and cutting mat
- Ruler
- Pencil
- Bone folder or scoring tool
- Binder clips or clothespins
- Optional circle punch (for neat tabs)
- Optional floral tape (to wrap base in green for hidden gaps)
Finished size and customization notes
A 10 inch base finishes around 12 to 14 inches with the eggs attached. For a fuller look, use 12 to 14 eggs, for a more minimal look like the photo, use 10 to 12. You can scale eggs by adjusting your template height, 3.5 to 4 inches tall reads best on a medium wreath.
Step-by-step instructions
Decide on egg count and spacing
The photo wreath uses evenly spaced eggs that almost touch. For a 10 inch ring, plan 10 to 12 eggs. Dry fit by placing paper cutouts around the ring before building the 3D forms.
Visual checkpoint: you should see a consistent rhythm with no huge gaps and no overcrowding.Make a reusable egg template
Draw an egg silhouette on cardstock or thin cardboard, about 3.75 inches tall and 2.75 inches wide at the widest point. Cut it out. This template keeps your eggs consistent, which is key to the geometric, tidy look.Cut the egg panels
Each faceted egg is easiest as a two piece shell with scored facets.- Trace and cut 2 egg silhouettes for each egg.
- On each silhouette, draw 7 vertical facet lines from top to bottom, evenly spaced.
- Score along those lines with a bone folder and ruler.
Tip: if your cardstock is very thick, score firmly so folds are crisp.
Curve the facets for a domed shape
Hold one egg silhouette and gently curve it over your fingers, pressing the score lines so the egg starts to cup. Repeat for the second silhouette.
Visual checkpoint: each piece should look like a shallow bowl shape rather than a flat cutout.Glue the egg shell together cleanly
Glue the two silhouettes together along the outer edge, one facet section at a time. Work slowly.- Apply a thin bead of tacky glue on one section edge.
- Align and press, then move to the next section.
- Before the last seam closes, add a tiny paper scrap inside to keep volume.
- Close the final seam and hold with your fingers until stable.
If you prefer faster, use hot glue, but use tiny amounts so it does not create bumps.
Add the pointed “origami” detail lines
The photo eggs have crisp angular edges. You can mimic that by adding a simple fold seam.- On the front of each egg, lightly score a vertical line down the center.
- Fold it just enough to create a ridge, then reopen slightly so it reads as a facet.
Visual checkpoint: your egg should now catch light in planes, not as a smooth oval.
Speckle the eggs for that artisan finish
This step is optional, but it makes the wreath look exactly like the photo. Option A, paint marker speckles:- Use a fine tip paint marker in tan or light brown and dot randomly, clustering slightly near the bottom.
Option B, splatter method: - Dip a stiff brush into watered down acrylic paint.
- Flick tiny specks onto the eggs from a distance.
Let dry completely before handling.
Visual checkpoint: speckles should be subtle, if they look bold, blot with a paper towel while still wet.
- Use a fine tip paint marker in tan or light brown and dot randomly, clustering slightly near the bottom.
Fold the small green leaves
The wreath uses tiny folded leaf shapes that sit between eggs.- Cut diamonds, about 1.5 inches long.
- Score down the center and fold to create a crease.
- Pinch the base slightly so the leaf has a little lift.
Make 16 to 24 leaves depending on how leafy you want it.
Prep the wreath base
If your base is foam or cardboard, wrap it in green floral tape or green paper so any peek through gaps looks intentional. If you are using foam, you can also paint it a similar green.Attach the ribbon hanger first
Cut ribbon about 18 to 22 inches long. Loop it and glue the ends to the back top of the wreath base. Reinforce with an extra strip of tape or a small cardstock patch over the ribbon ends.
Visual checkpoint: hold the wreath up by the ribbon and make sure it hangs centered.Glue eggs onto the ring with consistent tilt
Place eggs around the ring and adjust spacing until even. Then glue one at a time.
- Add hot glue to the back of an egg along the center ridge area.
- Press to the ring and hold 5 seconds.
- Repeat, keeping eggs angled slightly outward so they appear dimensional.
Tip: Keep the “center ridge” facing outward on all eggs, it creates a cohesive geometric language.
Fill the gaps with leaves
Tuck two leaves between each pair of eggs, angled outward like little collars. Glue at the base only, so tips float. Visual checkpoint: you should now see a balanced ring of eggs with green pops that make the pastels feel fresher.Do a color balancing check
Step back and look for repeats. If two lilac eggs sit next to each other and it looks heavy, swap one with a cream egg. Because the wreath is symmetric, small swaps make a big difference.Optional, add a single greenery sprig
The photo includes a tiny eucalyptus element off to one side. If you want that same styled touch, glue a small eucalyptus sprig at the upper left or lower right so it feels like a natural accent, not a full botanical wreath.Final press and clean up
Remove visible glue strings. If any egg seam is gaping, add a tiny dot of glue and pinch closed. Let the wreath rest flat for 10 minutes so everything sets.
Troubleshooting
- My eggs look uneven in size
Use a template and trace every egg, do not freehand. If some are already made, place the larger eggs on opposite sides for balance. - My seams look messy
Use tacky glue and work section by section. If using hot glue, apply less and press quickly. - Speckles look too heavy
Switch to a lighter paint color, or use a dry brush with almost no paint. Practice on scrap first. - Wreath looks flat on the door
Angle eggs outward more, and add a couple of extra leaves behind eggs to create depth. - Ribbon hanger is pulling off
Reinforce with a cardstock patch on the back and add more glue. If you want maximum strength, staple the ribbon ends to a cardboard base and cover with felt.
Finishing details
For a crisp professional finish, add a felt backing circle on the back top area where ribbon attaches, it hides glue and strengthens the join. If you want the eggs to be more durable, mist the finished wreath with a matte clear spray sealer suitable for paper. Store flat in a box, do not hang where rain can soak it. If you must use it on an exterior door, hang it on the inside of a glass storm door.
Shop Similar
- Speckled pastel cardstock for paper eggs
- Sage green ribbon wide for wreath hanger
- Foam wreath ring 10 inch
- Scoring board and bone folder set
- Green cardstock for folded leaves
- Matte clear spray sealer for paper crafts
Style It With
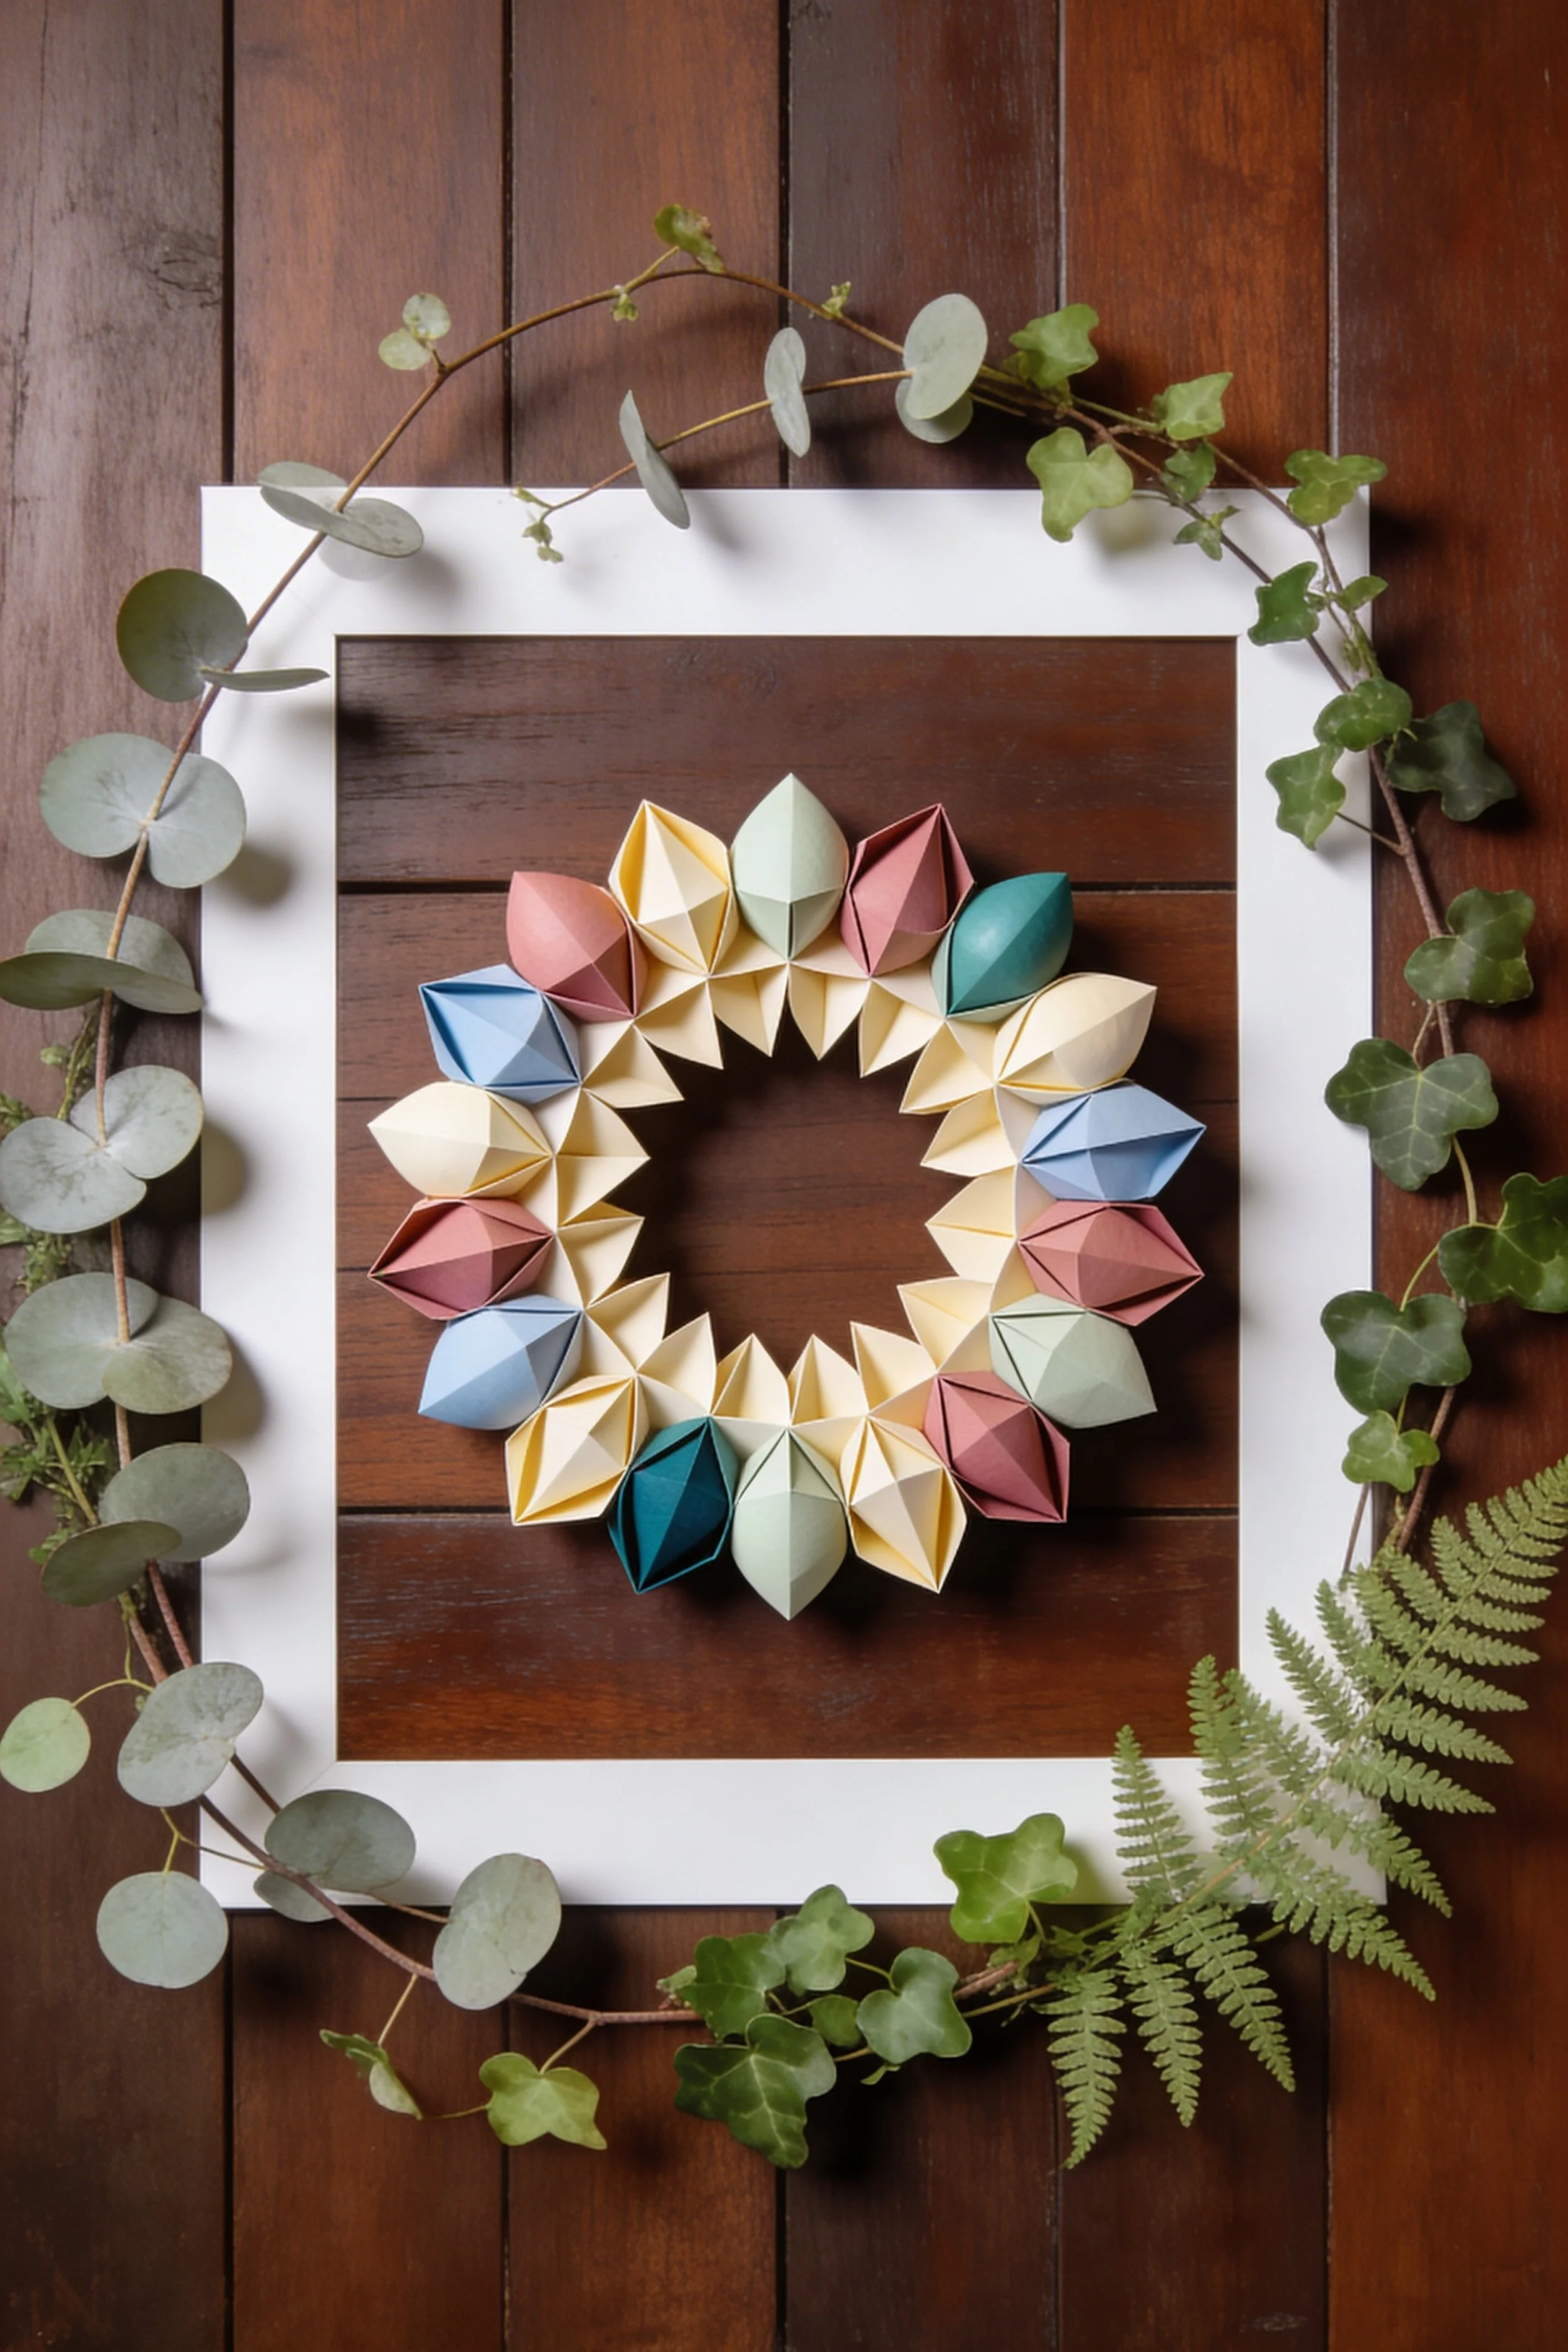
Framed Origami Petal Wreath How-To Guide
What you’re making
You’re recreating the graphic “wreath inside a frame” look, a modern wall piece where a small ring of origami petal modules sits centered inside a clean white square frame. The petals alternate soft pastels and warm neutrals, and the whole piece is styled with eucalyptus, ivy, and fern around the frame edges. It feels like a spring art print, but it is dimensional and hand crafted.
Materials and tools
- White square frame with a wide mat or wide border (shadow box style is ideal)
- Cardstock in pastel tones and warm neutrals (buttercream, blush, terracotta, pale blue, mint, teal)
- Hot glue gun and glue sticks
- Craft glue or tacky glue
- Ruler
- Pencil
- Bone folder or scoring tool
- Scissors
- Craft knife and cutting mat
- Optional double sided tape
- Faux eucalyptus stems
- Faux ivy vine
- Faux fern sprigs
- Optional foam dots or small foam strips (for floating dimension)
- Optional backing paper in warm wood tone or brown (if your frame backing is not pretty)
Finished size and customization notes
A 12 inch frame with an 8 inch inner opening looks closest to the photo. The wreath itself is smaller than the frame opening, leaving breathing room so it looks like art. If your frame is larger, simply scale up the wreath ring by adding more petal modules.
Step-by-step instructions
Choose a frame with enough depth
A shadow box frame makes this easiest because the wreath sits slightly above the backing and casts a gentle shadow like the photo. If you only have a flat frame, you can still do it, just add foam dots behind the wreath.Create the inner background
The photo has warm wood behind the wreath. If your frame backing is plain, cover it with a sheet of brown kraft paper or a wood print paper. Cut to size and secure with double sided tape.Plan the wreath diameter inside the opening
Measure your frame opening. Aim for a wreath that fills about 60 percent of that width. For an 8 inch opening, make a wreath around 5 inches wide. Lightly pencil a circle guide on the backing so you know where to place modules.
Visual checkpoint: you should now see a faint circle centered in the opening.Make the origami petal module template
Each module looks like a simple folded diamond petal.- Cut squares, start with 2.5 inch squares for a 5 inch wreath.
- Fold the square in half diagonally to form a triangle. Crease sharply.
- Fold the left and right corners of the triangle up toward the top point, creating a diamond shape.
- Flip and fold the side flaps inward slightly to clean the edges.
- Open the top layer a little so it forms a petal cup.
Visual checkpoint: the piece should look like a pointed oval petal with a small hollow, not a flat triangle.
Batch fold 18 to 24 modules
The photo wreath looks dense and consistent. For a 5 inch wreath, 20 modules is a good start. Use colors in a repeating, balanced order:- Buttercream as your base neutral
- Pops of terracotta and blush
- Accents of pale blue and mint
- One or two teal pieces for depth
Keep the palette calm and avoid too many saturated brights.
Create a hidden ring base for the modules
Cut a cardstock ring, about 5 inches outer diameter and 3 inches inner diameter. This ring is the “skeleton” that you will glue petals onto. If you want extra strength, cut two rings and glue together.Glue modules onto the ring in a consistent direction
Start at the top and work around.- Apply hot glue to the base of one petal module.
- Press it onto the ring so the point faces outward.
- Continue, slightly overlapping each module so the ring disappears.
Visual checkpoint: you should now see a flower like ring with points radiating outward and a clean hole in the center.
Add a second layer if you want more depth
The photo wreath has a bit of thickness. If yours looks too flat, add a second layer of petals on top of the first, offsetting them so points land between the first layer points.Test placement inside the frame
Place the wreath on the penciled circle guide. Adjust so it sits perfectly centered. Use a ruler to confirm equal spacing to the frame opening edges.
Visual checkpoint: the wreath should look like it is floating in the center, not touching the frame.Attach the wreath with removable support if desired
If you want to swap seasonal wreaths later, use removable mounting squares. If you want permanent, hot glue works.
- Add foam dots behind the wreath at 4 points, top, bottom, left, right.
- Press onto backing.
The foam gives the shadow that makes it feel high end.
- Style greenery around the frame edges
The photo uses eucalyptus and ivy as a styled border, not part of the wreath itself.
- Lay eucalyptus along the left and top edges of the frame.
- Curve ivy around the top right and down the right side.
- Add fern at the lower right corner.
Secure with small dots of hot glue behind the frame border so glue is hidden.
Balance the greenery like a photo prop set
Keep the greenery heavier on one side and lighter on the other, it looks more editorial. If yours looks too symmetrical, remove one sprig and let negative space breathe.Seal and close the frame
Once everything is glued, close the frame. If any greenery is bulky, trim stems so the backing can close properly. Hang and step back.
Troubleshooting
- My modules do not look crisp
Score and crease firmly, and use a bone folder. Soft folds look messy on geometric designs. - The wreath looks too small
Add more modules and expand the ring diameter, or build a second layer to increase visual weight. - The wreath is not centered
Use a penciled guide circle and measure edges. Small misalignment looks obvious in a frame. - Greenery keeps popping off
Use glue in small dots and hold until fully cool. If stems are stiff, anchor with a small piece of floral wire taped to the back. - My frame will not close
Trim stems and keep bulky clusters outside the frame depth. A shadow box frame solves this easily.
Finishing details
For the cleanest result, add a strip of white felt to the back edge of the frame where glue blobs might show, especially if you plan to gift it. If the paper petals are handling wear, mist lightly with matte sealer. Display away from direct sunlight to prevent fading, pastel cardstock can shift over time.
Shop Similar
- White shadow box frame square
- Pastel cardstock assortment matte
- Foam mounting dots for crafts
- Faux eucalyptus stems realistic
- Faux ivy vine garland
- Faux fern picks greenery
Style It With
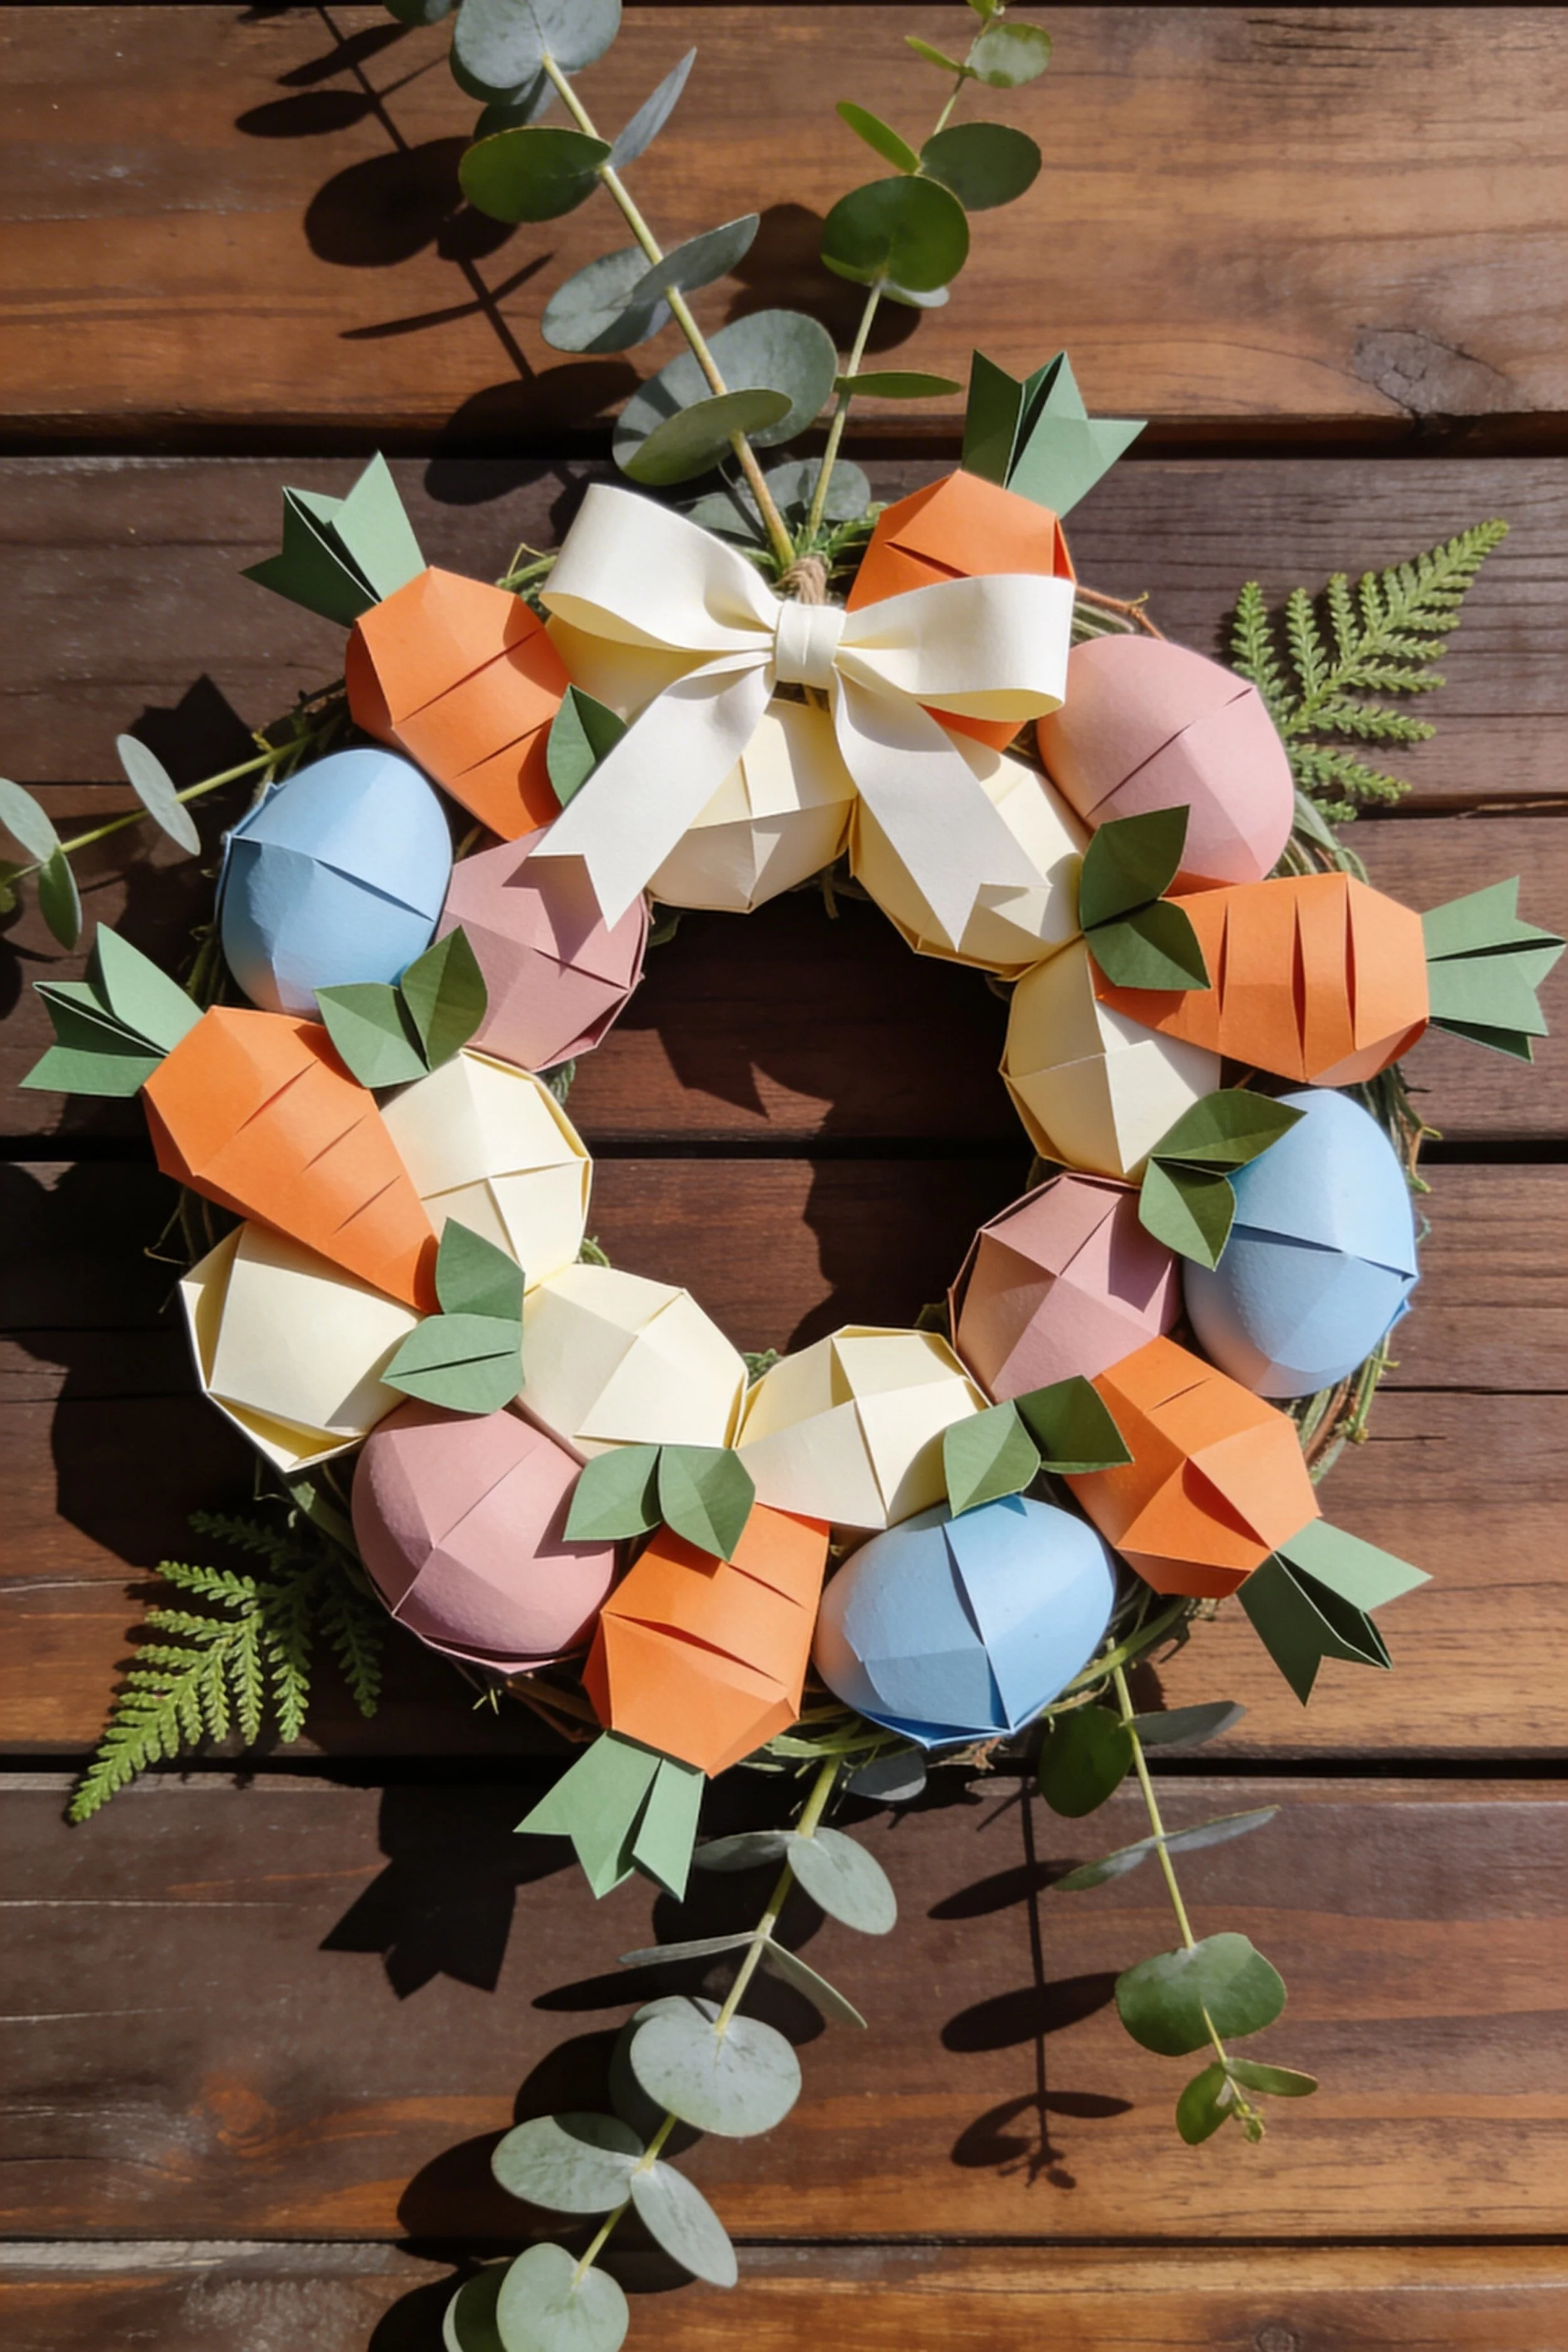
Carrot and Pastel Egg Paper Wreath Make-It-Yourself Tutorial
What you’re making
This is the playful spring wreath with paper carrots, soft pastel eggs, and a large cream bow on a natural grapevine base. The shapes are still clean and modern, not cartoonish, because the carrots are faceted and the eggs are smooth, and the palette stays muted. Eucalyptus and fern soften the ring so it looks styled and premium, like the photo.
Materials and tools
- Grapevine wreath base (12 to 14 inch)
- Cardstock in orange, cream, blush, pale blue, and soft pink
- Green cardstock for carrot tops and small leaves
- Wide cream ribbon for the bow (wired ribbon makes shaping easier)
- Hot glue gun and glue sticks
- Craft glue or tacky glue
- Scissors
- Craft knife and cutting mat
- Ruler
- Pencil
- Bone folder or scoring tool
- Optional floral wire (for attaching bow and greenery securely)
- Faux eucalyptus stems
- Faux fern sprigs
- Optional moss or raffia (to fill and soften gaps)
Finished size and customization notes
A 12 inch grapevine base finishes around 14 to 16 inches once the carrots and eggs add volume. You can make it more Easter by adding a few speckles to eggs, or more spring neutral by keeping eggs solid and using mostly cream with only a couple of blush and blue accents.
Step-by-step instructions
Prep the grapevine base
Shake loose debris and trim stray twigs. Decide which side is the top, then test hang it. Grapevine often has a natural “heavier” side, use that at the bottom so it hangs flat.
Visual checkpoint: the base should sit stable without wobbling.Plan your feature placement
The photo has the bow at the top and carrots spaced around the ring. Lightly mark top center and bottom center with pencil dots on the vine. Plan 6 to 8 carrots and 6 to 8 eggs depending on fullness.Build faceted paper carrots
The carrots look like geometric capsules. Here is a simple faceted construction:- Cut a rectangle of orange cardstock, about 4.5 inches by 6 inches for medium carrots.
- Score vertical lines every 0.75 inch across the 6 inch width.
- Roll into a tube and glue the seam, keep it slightly tapered by overlapping more at one end.
- Pinch one end closed and glue, creating a pointed tip.
- On the wider end, pinch gently into a soft square and glue a small circle cap inside to keep shape.
Visual checkpoint: you should see subtle facet planes and a tapered carrot form, not a smooth cylinder.
Add carrot detail cuts
Cut three short diagonal slits on each carrot body, like the photo. Use a craft knife for clean lines. Keep them shallow and evenly spaced.Make carrot tops
Cut green rectangles, about 2 inches by 3 inches. Fringe one long edge into thin strips. Roll the uncut edge into a tight tube and glue, then flare the fringe outward. You can also add a few folded green leaf blades for a more graphic look.
Glue the carrot top into the open end of the carrot and reinforce with a bead of hot glue.Make the paper eggs
Use the same two piece faceted method as earlier:- Cut two egg silhouettes per egg, about 3.5 inches tall.
- Score 6 to 8 vertical facet lines on each.
- Curve and glue edges together.
- Lightly stuff with scrap paper before closing.
Make eggs in cream as your anchor, then add blush and pale blue for pops.
Optional, soften the eggs with matte shading
If you want a more realistic pastel look, lightly rub a bit of chalk pastel or eyeshadow near the bottom edge, then seal with matte spray. This is optional and should stay subtle.Create the bow
Cut ribbon long enough for a full bow, about 30 to 36 inches depending on width.- Make two loops and a center pinch.
- Wrap the center with a small ribbon strip and glue or wire.
- Fluff and shape tails. Wired ribbon holds the sculptural bow like the photo.
If you use non wired ribbon, add a little double sided tape to help loops hold shape.
Attach the bow securely to grapevine
Grapevine is bumpy, which helps. Use hot glue plus floral wire if you want it to last.- Glue the bow center to the vine at top center.
- Wrap floral wire around the bow center and vine, twist tight at the back, then hide the twist under greenery.
Add greenery first
Place eucalyptus and fern behind where carrots and eggs will sit, so it peeks out like the photo.
- Tuck eucalyptus at top left and lower right.
- Add fern at lower left and right edges.
Glue stems to vine, and if needed, wire them in for strength.
Attach the largest pieces next
Place carrots evenly around the ring, not perfectly alternating, but balanced. Start with four carrots at approximate quarter points, then fill in with two or four more depending on fullness.
Visual checkpoint: step back, you should now see carrots distributed so no side looks heavier.Add eggs between carrots
Glue cream eggs first to create a calm base, then insert blush and blue eggs as accents. Angle eggs slightly outward so they look dimensional.Fill gaps with small green leaves
Cut simple leaf shapes from green cardstock and fold down the center. Tuck them behind carrots and eggs to create depth and echo the carrot tops.Add a touch of texture if needed
If the base shows through, tuck a small bit of moss or raffia into gaps. Keep it minimal, the photo stays clean and styled.Final styling pass
Tilt a few carrots and eggs for natural variation. Pull greenery tips outward slightly. Remove glue strings. Hang and check balance from a distance.
Troubleshooting
- Carrots collapse or look dented
Use heavier cardstock or double layer the paper by gluing two rectangles together before scoring. You can also stuff carrots lightly with scrap paper. - Carrot tops look messy
Fringe thinner and roll tighter. If fringe is too wide, it reads chunky. Use a bone folder to curl the fringe outward. - Bow will not hold shape
Choose wired ribbon, or add a hidden pipe cleaner inside the loop edge to give structure. - Wreath looks too busy
Reduce colors. Use mostly cream eggs with only two blush and two blue, and keep carrots as the main statement. - Pieces fall off the grapevine
Add a small cardstock base tab behind each piece and glue the tab to the vine, it creates more surface area for adhesive.
Finishing details
For durability, especially if the door gets bumped, wire the bow and at least two greenery stems to the grapevine. If you want a cleaner back, glue a strip of felt to the back where wires twist, it prevents scratching the door. Store in a box with tissue so carrots do not get crushed. A light matte sealer can reduce scuffing, but do not overspray, too much moisture can warp paper.
Shop Similar
- Grapevine wreath base 12 inch
- Orange and pastel cardstock pack
- Wide cream wired ribbon for bows
- Faux eucalyptus stems for wreath
- Faux fern greenery picks
- Floral wire paddle wire assortment
Style It With
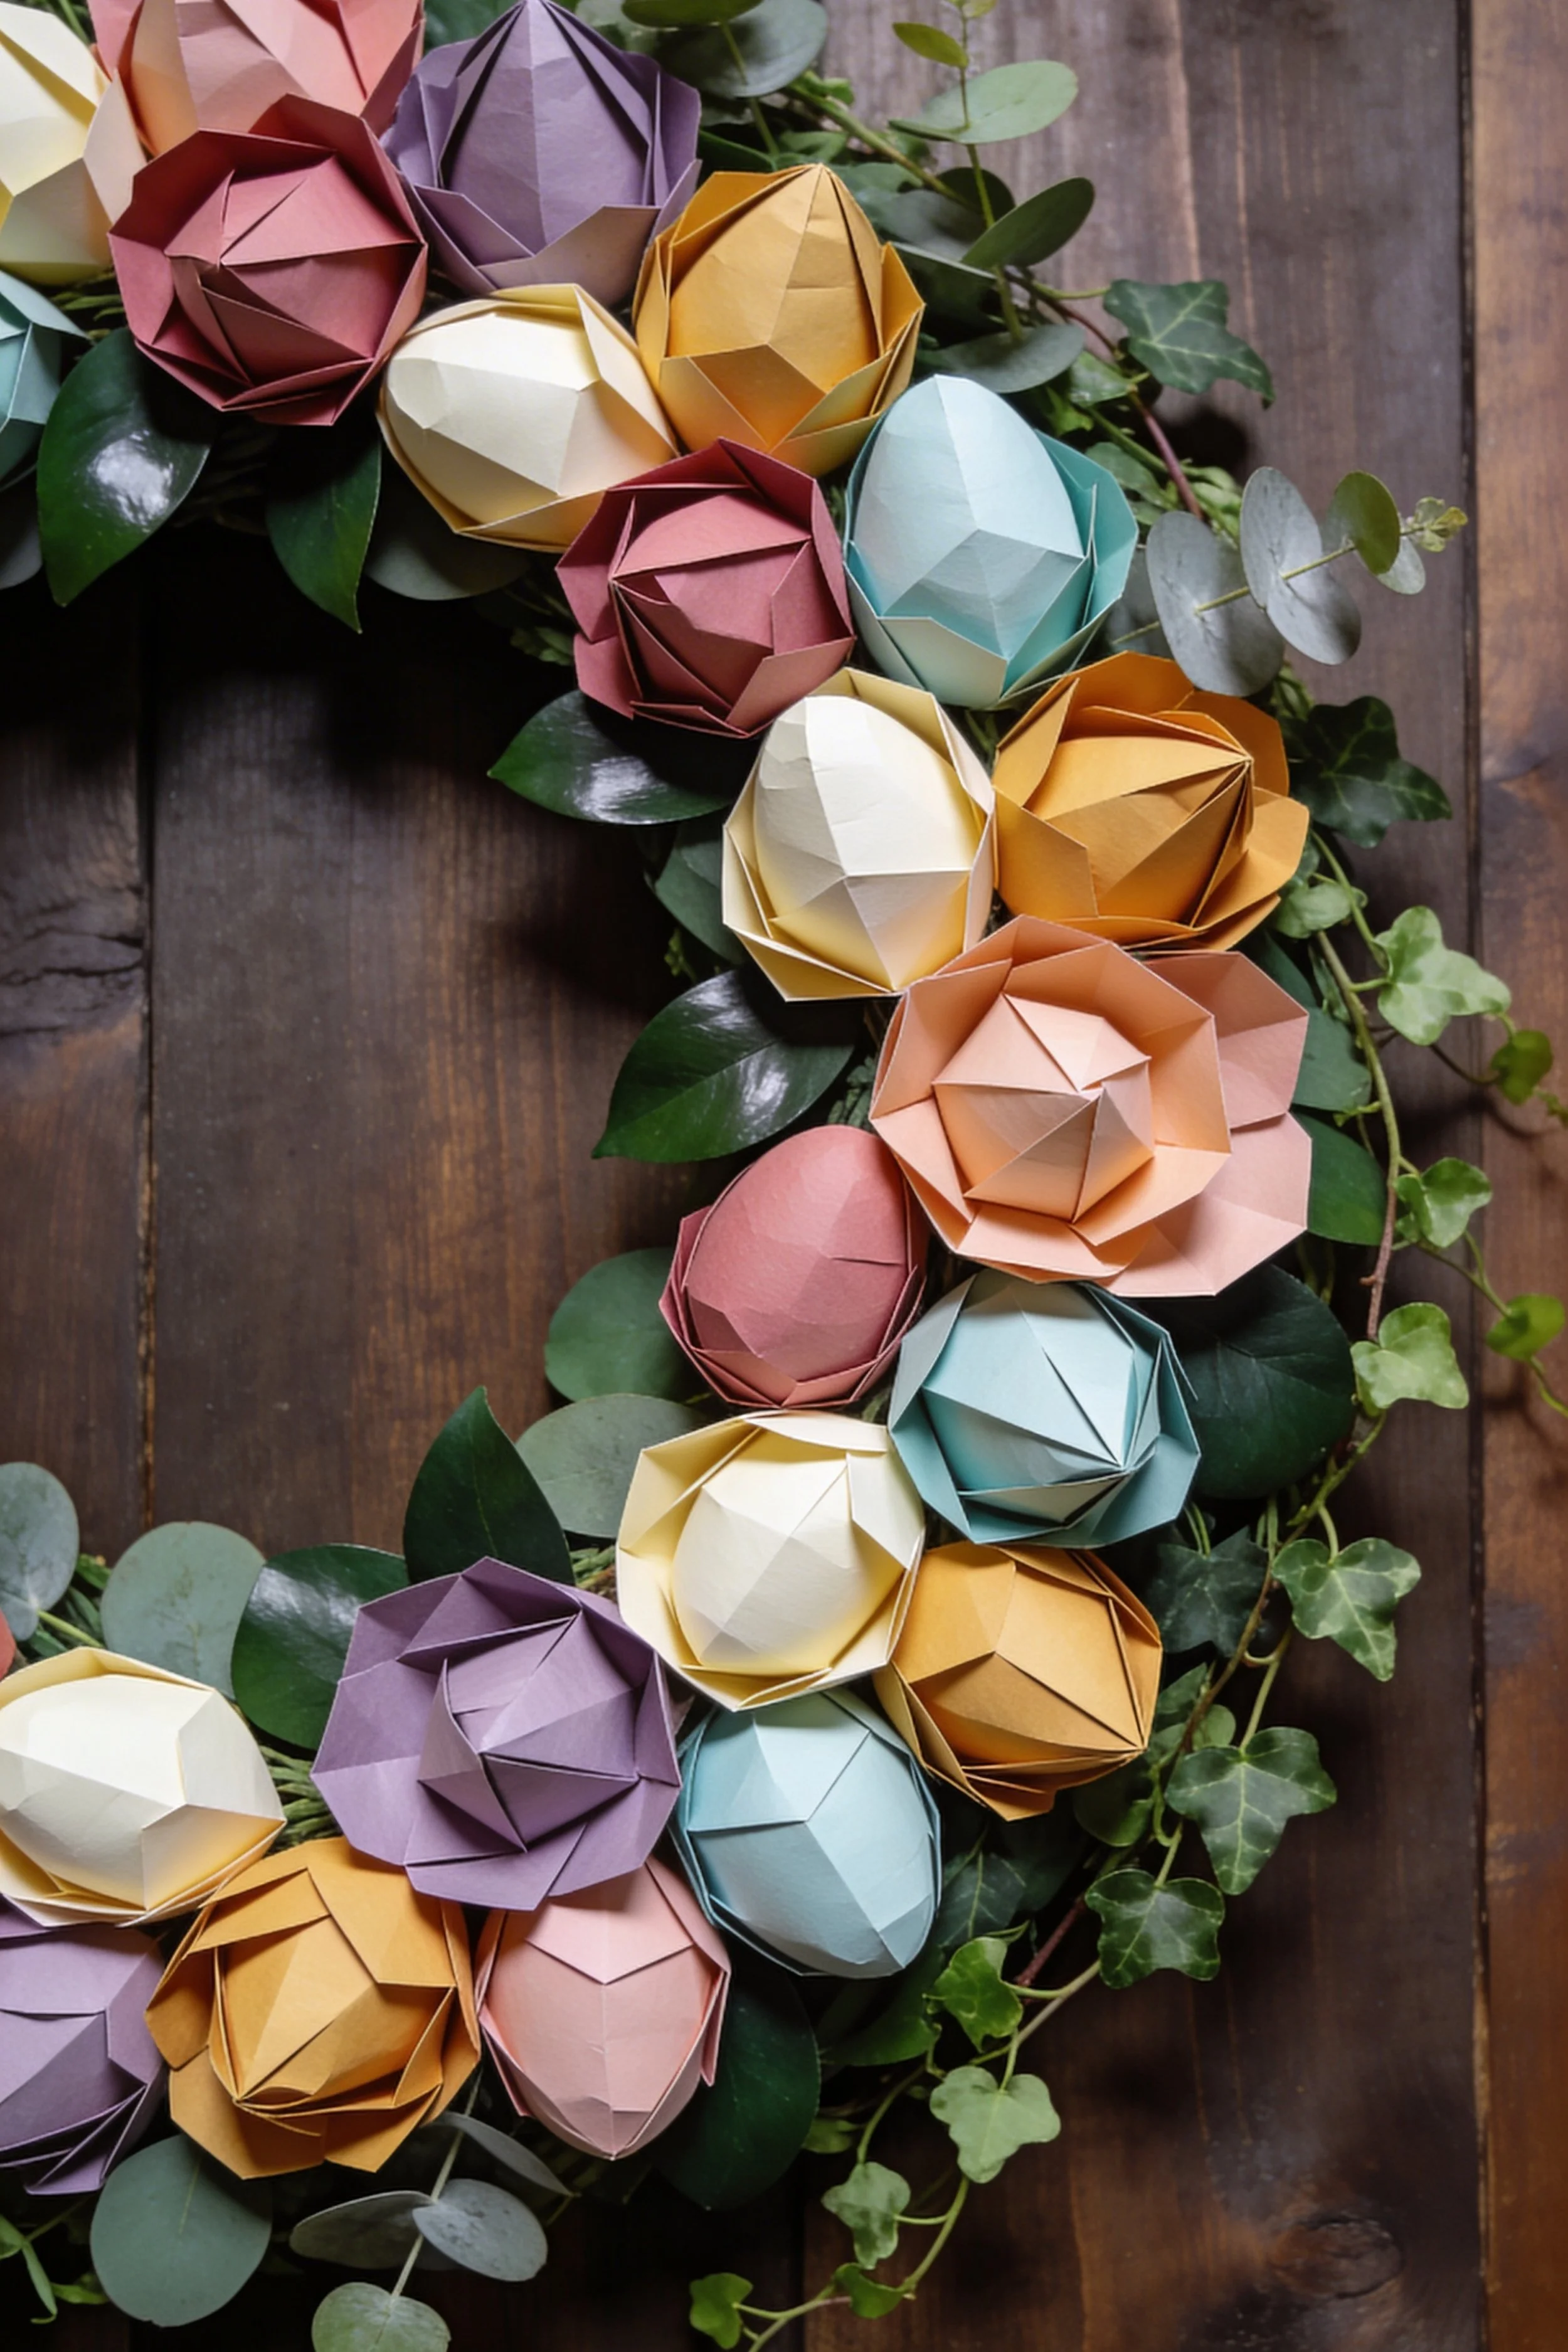
Lush Paper Rose and Faceted Egg Wreath Step-by-Step Tutorial
What you’re making
This is the luxe, close up style wreath that mixes folded paper roses and faceted paper eggs in rich, muted spring tones, layered into glossy greenery and trailing ivy. It looks like a florist wreath at first glance, but the blooms and eggs are all paper, which is why the edges look crisp and sculptural. The color story leans elevated, dusty rose, mauve, warm ochre, ivory, pale aqua, and muted teal, with deep green leaves that make everything feel expensive.
Materials and tools
- Wreath base (12 to 14 inch grapevine or foam ring)
- Cardstock in dusty rose, mauve, terracotta, warm ochre, ivory, pale aqua, muted teal, lilac
- Green cardstock (optional, for extra paper leaves)
- Faux greenery base, boxwood, salal, or glossy leaves
- Faux ivy vine
- Faux eucalyptus sprigs
- Hot glue gun and glue sticks
- Tacky glue
- Scissors
- Craft knife and cutting mat
- Ruler
- Pencil
- Bone folder
- Optional quilling tool (helps roll roses)
- Optional matte clear sealer spray
Finished size and customization notes
This wreath looks best full and asymmetrical, with a heavier cluster on one side and a lighter trail on the other. A 12 inch base can finish around 16 inches at the widest point if you add lush greenery underneath. If you want it more pastel, swap the ochre for buttercream and use more pale blue and lilac.
Step-by-step instructions
Build a green foundation first
The photo wreath is lush, which means the paper elements sit on a bed of greenery, not directly on the base.- If using grapevine, glue sections of faux greenery around at least half the ring.
- Create a “crescent” cluster that covers about 60 percent of the wreath, leaving the remaining 40 percent lighter.
Add ivy trailing out of the cluster edge.
Visual checkpoint: you should now see a green crescent that already looks like a wreath even before paper flowers.
Decide your focal area
Pick the thickest part of the greenery crescent as your focal zone. This is where the largest paper roses and brightest eggs will sit. Mark that spot mentally so you do not spread statement pieces too evenly.Make paper roses that look like the photo
The roses in the image look like layered, folded petals rather than loose spirals. Here is a reliable method that stays crisp.- Cut 5 petal sizes from cardstock, about 6 petals each size. Petals are teardrop shapes.
- Curl the top edges slightly around a pencil.
- For each petal, pinch the bottom to create a small pleat, then glue the pleat so the petal cups.
- Start with a tight center, roll one small petal into a bud and glue.
- Add petals around the bud, overlapping and rotating as you go.
- Continue adding larger petals until the rose is about 3 inches wide.
Make 4 to 6 roses in mixed colors, dusty rose, mauve, terracotta, and one warm ochre.
Add a “facet” edge to some roses for extra geometry
To match the crisp look, fold a tiny ridge down the center of a few petals before attaching. It catches light and makes the rose look modern rather than vintage.Make faceted eggs in coordinating tones
Create 6 to 10 eggs using the two piece scored shell method.- Cut two egg silhouettes per egg.
- Score 8 vertical facets for a more refined look.
- Curve, glue, and lightly stuff.
Use ivory and pale aqua as highlights, and teal or lilac as depth.
Add a couple of “bud” shapes
The wreath includes some smaller spherical forms that read like buds.- Cut a small circle, snip spiral, roll into a tight bud, glue base.
- Or make a small faceted egg at half size.
These small forms fill gaps and keep the cluster dense.
Dry fit your cluster before gluing
Place roses and eggs on the greenery crescent without glue first.- Put the largest rose slightly off center.
- Place two eggs near it to create a triangle.
- Add a second rose lower or higher to create movement.
Visual checkpoint: you should now see a flowing arrangement that feels like a florist design, not a perfect ring.
Glue the largest flowers first
Glue the big roses into the greenery base, pressing into leaves so they nest. Hold until set. If you are gluing onto faux greenery, use more glue than you think, plastic leaves can resist adhesion.Add eggs as bright “jewels”
Place ivory and pale aqua eggs where you want highlights. Put darker teal or lilac eggs slightly deeper in the greenery so they read as shadowy depth.Fill gaps with smaller roses and buds
Add smaller roses near the edges of the cluster, then tuck buds in between eggs and roses.Add eucalyptus and ivy for movement
Tuck eucalyptus behind the paper elements so it peeks out between roses. Let ivy trail along the outer edge of the cluster, and add one eucalyptus sprig that extends outward, it gives that styled, editorial line.Check your color balance
Step back and squint. If one color is screaming, add one small rose or egg of that color on the opposite side of the cluster. The photo feels balanced but not symmetrical.Secure any heavy pieces with hidden anchors
If a rose is heavy, glue a small cardstock tab to its back and glue the tab into the wreath base. This increases surface area and prevents drooping over time.Clean edges and refine petals
Gently pull petals outward to open roses. Rotate a few eggs so seams face inward and facets face outward. This tiny styling step is what makes it look intentional.Let cure fully before hanging
Lay the wreath flat for at least 20 minutes so glue sets. Then hang and check that nothing shifts.
Troubleshooting
- My roses look like spirals, not layered blooms
Switch to individual petals rather than a spiral strip. Pinch the base of each petal to create a cup, that is what builds the rose structure. - Petals keep popping off
Use tacky glue for petals and let it grab, or use tiny dots of hot glue and press quickly. Too much hot glue can create lumps. - Eggs look too large compared to roses
Make eggs about half the width of your largest rose. If roses are 3 inches wide, eggs around 3.5 inches tall works well. - The cluster looks heavy and messy
Reduce pieces, then rebuild in layers. Large pieces first, medium pieces next, small fillers last. - Greenery overwhelms the paper
Trim back leaves that cover too much of the paper elements. The greenery should frame, not hide.
Finishing details
If you want the wreath to last through a full season, mist it lightly with matte clear spray sealer, especially on the roses and eggs. Keep spray light and dry between coats to avoid warping cardstock. Add a soft felt backing patch where the wreath touches the door to prevent scuffs. Store in a box with tissue supports under the cluster so petals do not crush.
Shop Similar
- Dusty pastel cardstock set muted tones
- Grapevine wreath base 14 inch
- Faux boxwood greenery wreath picks
- Faux salal leaves and greenery stems
- Faux ivy vine garland realistic
- Quilling tool and paper flower kit
Style It With
As you finish these wreaths and step back to admire the folds, layers, and subtle shadows, you will notice something special. Paper has a way of transforming under your hands. What begins as flat cardstock becomes sculptural blooms, geometric eggs, and dimensional forms that rival store bought decor in texture and presence.
These five designs are meant to inspire experimentation. Swap color palettes, exaggerate the folds, add more greenery, or simplify the composition for a cleaner silhouette. Once you master the core folding techniques, the possibilities multiply quickly. A change in paper weight, a deeper crease, or a different ribbon can completely shift the mood.
Display them proudly through the season, knowing every pleat and petal was shaped by you. Handmade decor carries intention, and that intention shows in the final piece. Here is to spring styling that feels personal, artful, and refreshingly modern. Keep folding, keep layering, and keep creating something beautiful.