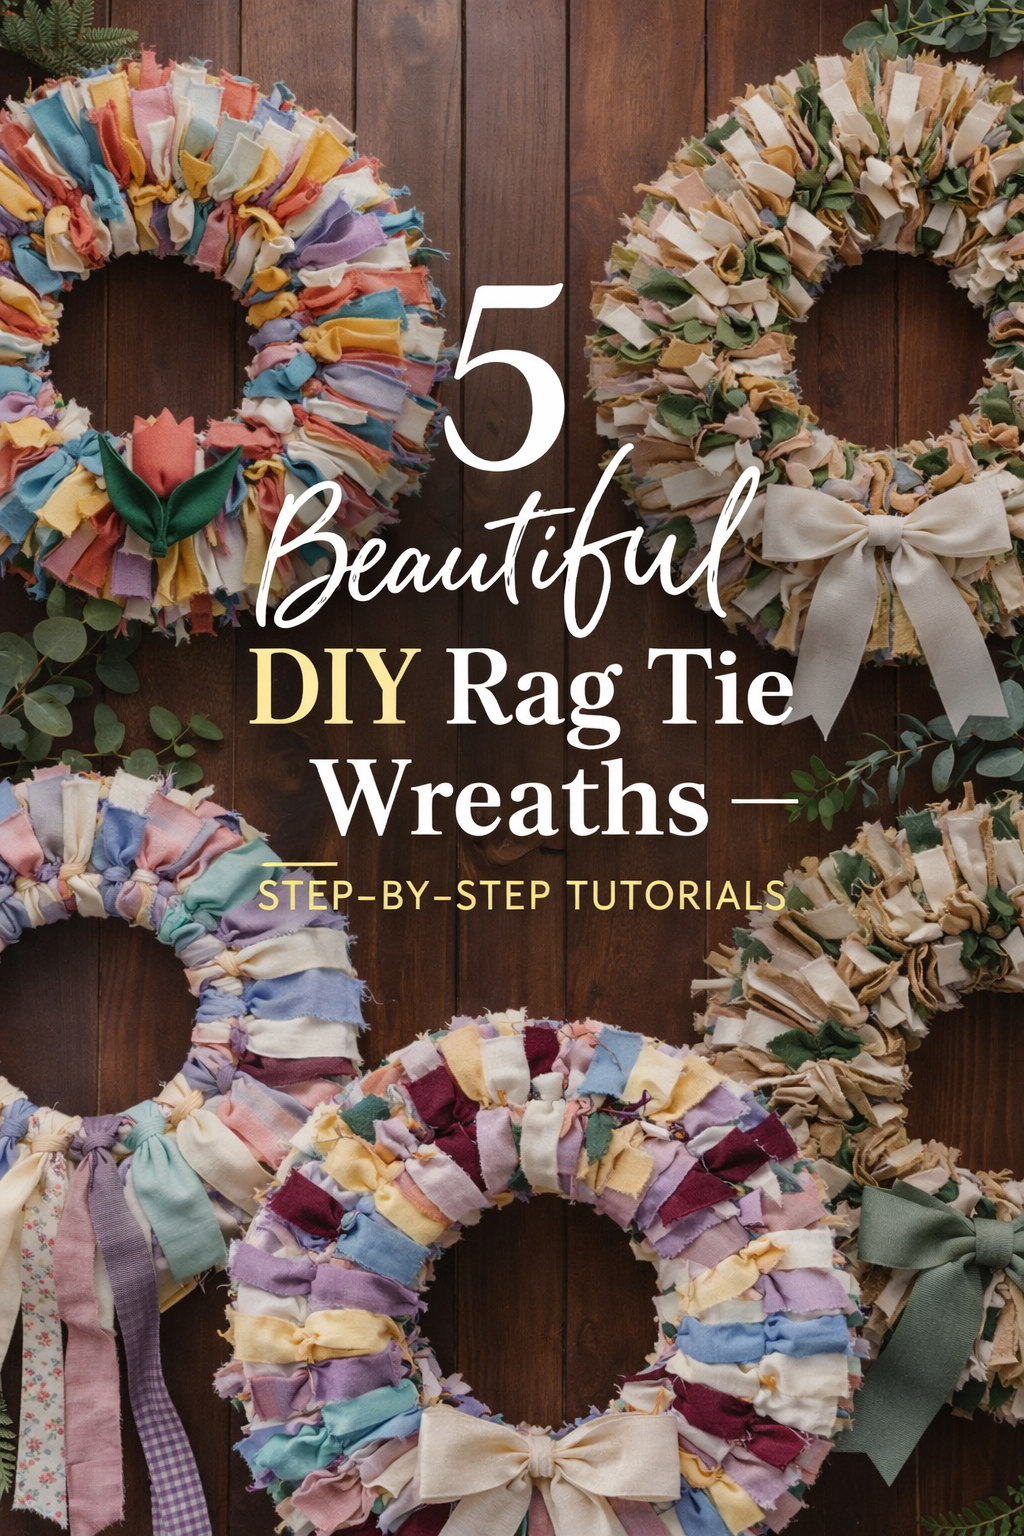
5 Pastel Fabric Rag Wreaths for Spring Doors — Step-by-Step Tutorial

More like this
There’s something irresistibly charming about a fabric rag wreath. It feels soft and welcoming, like your front door just changed into its spring outfit. The best part is how forgiving the process is. You do not need perfect bows, matching fabrics, or a huge craft stash. A few pretty scraps, a simple wreath form, and a calm color palette are enough to create that plush, layered look you see in the photos.
In this tutorial, you will learn how to recreate five pastel fabric rag wreath styles, from tidy tied bows and extra fluffy scrap textures to a braided wrap design with bunny ears and a dressed up version with pearls and greenery. Each one is beginner friendly, customizable, and designed to look elevated on a door, above a mantel, or as a sweet seasonal gift. Grab your softest scraps and let’s build something that looks like spring, feels like home, and photographs beautifully.
💡 Pro Tip: Why I Link to Amazon Search Results and Not One Product
In the Shop the Look and Style it With sections under each bikini, I link to Amazon search results, not single products. Here’s why this matters:
Hot bikinis sell out fast. I don’t want you clicking on a dead link to a sold-out item. Search pages stay updated.
You get more options. Love the vibe but want a different color, cut, or price point? The search results give you everything that matches the look and energy.
I curate each search carefully. These aren’t generic. I spend hours crafting keywords that bring up exactly the kind of bikinis I’d wear—or recommend to my hottest friends.
Support with no pressure. If you click a link, browse, and buy something later, I may earn a small commission at no extra cost to you. That helps me keep bringing you curated collections like this one—powerful, seductive, and always fresh.
So dive in. Click through. Try something risky. These aren’t just bikinis—they’re commands, statements, and maybe even your new favorite weapon of choice.
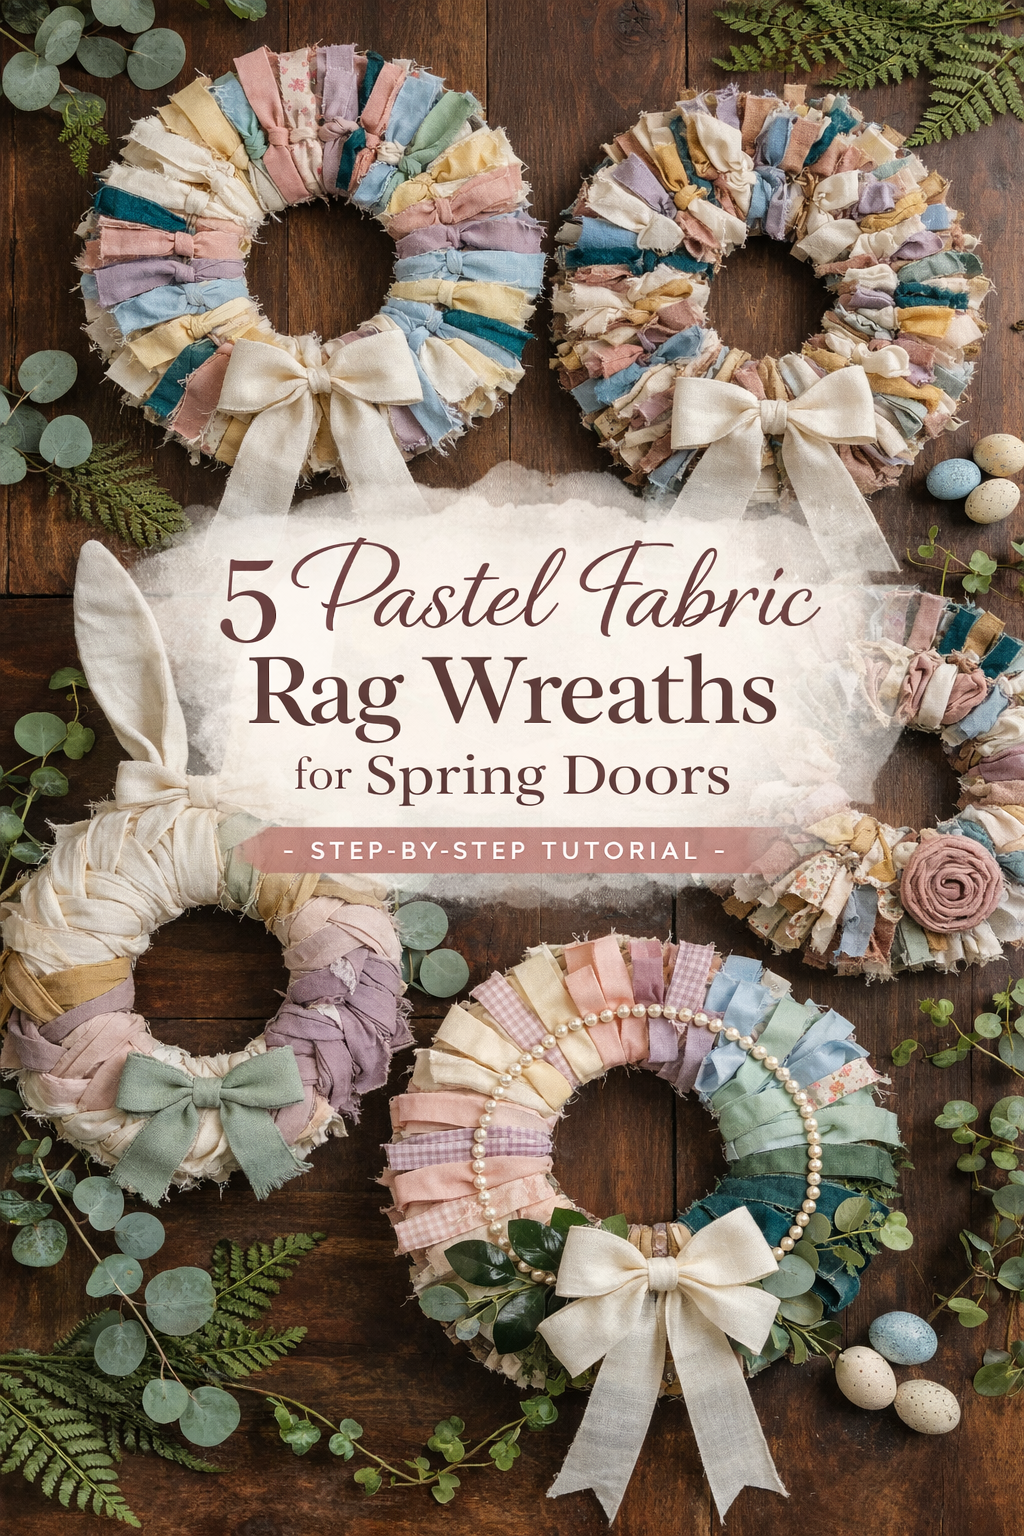
Pastel Scrap Fabric Wreath Step-by-Step Tutorial — Soft Tied Bows With a Linen Statement Ribbon
What you’re making
This project recreates the airy pastel wreath in the photo: chunky, soft fabric strips tied into tidy little bows all the way around a round base, finished with an oversized creamy linen bow that reads classic, clean, and spring ready. The look is plush without being messy, with frayed edges that feel relaxed and handmade rather than perfectly pressed. You will build volume by knotting fabric bundles closely together, then shape the surface so the wreath looks evenly full from every angle.
Materials + tools
- One round wreath form, 12 to 14 inch finished size (wire form, straw form, or foam form all work)
- Fabric scraps in soft spring tones (cream, butter yellow, blush, lavender, powder blue, mint, sage, and a deeper teal for contrast)
- Optional: a few linen or cotton strips for extra texture
- Scissors or rotary cutter and mat
- Ruler or cutting guide
- Optional: pinking shears for extra fray control
- Hot glue gun and glue sticks
- Floral wire or thin craft wire
- Twine or jute for hanging loop
- One wide linen ribbon for the large bottom bow (2 to 3 inch wide)
- Optional: fray check or clear fabric glue
- Optional: small binder clips or clothespins to hold placement while you work
Finished size + customization notes
- Finished size in the photo reads like a 14 inch wreath with a 6 to 7 inch inner opening.
- Strip width controls the vibe: 1.5 to 2 inches looks plush and modern, 1 inch looks daintier and more cottage.
- Strip length controls the bow tails: 8 to 10 inches gives tidy tails, 10 to 12 inches gives longer movement like the photo.
- If your fabric is thick flannel, go shorter. If it is thin quilting cotton, go a bit longer for volume.
- You can swap the large linen bow for a trailing ribbon, or make it removable for season changes.
Step-by-step instructions
Choose your wreath base and plan your fullness
A wire wreath form is easiest for tying, but a straw or foam form works too with a little glue support. Hold the form up and decide where your large bow will sit. In the photo, the big bow is centered at the bottom. Mark that spot with a small piece of tape.Build a color recipe that matches the photo
Lay out your fabric scraps in a calm pastel gradient. The photo uses a creamy base with bursts of yellow, blush, lavender, powder blue, mint, and occasional deeper teal. Aim for about half neutrals, one third pastels, and a smaller amount of deep accent. This ratio keeps it soft, not rainbow loud.Cut your fabric strips
Cut strips about 1.5 to 2 inches wide and 10 to 12 inches long. If you want the frayed edge look, cut with regular scissors and do not hem. If you want cleaner edges, use pinking shears.
Visual checkpoint: You should now have a pile of strips that feel consistent in size, like a stack of ribbon pieces.Prep for fray control without losing the handmade look
If your fabric frays aggressively, run a tiny line of fray check along the very ends only, or dab clear fabric glue and let it dry. Do not seal the long edges because the fray is part of the softness.Start tying bundles around the wreath
Take one strip, fold it in half loosely so you find the center. Wrap it around one ring section of the wire form and tie a simple knot, then tie one more time to secure. You are essentially tying it like a shoe lace knot but tighter.
If using straw or foam, tie around the form and add a small dot of hot glue under the knot for grip.
Visual checkpoint: The strip should sit like a little bow with two tails, and the knot should be centered and snug.Pack the ties close together for a plush look
Slide each tied strip right up against the previous one so the base is hidden. The photo looks fully covered with almost no gaps. Work in small sections, rotating colors so you do not cluster one color in a block unless you are intentionally creating a gradient.Create the bow effect intentionally
After tying, gently tug the two tails so the knot sits tight, then pinch the tails near the knot to create a slight bow shape. You can also twist each tail slightly so the frayed edge faces outward. This small styling step is what makes the wreath look like intentional bows rather than random rags.Work around the wreath in a steady rhythm
Repeat tie, slide, fluff. Every 10 to 12 ties, step back and look at your color balance. If you see too much teal on one side, add a few cream and yellow pieces nearby to soften it.Fill the inner edge and outer edge evenly
For wire forms, you can choose to tie on the inner ring, outer ring, or both. For the fullest look like the photo, alternate inner and outer so the surface looks rounded.
Visual checkpoint: When you look from the side, you should see a puffy donut shape rather than a flat ring.Fix gaps as you go instead of at the end
If you can see the base peeking through, add one or two extra ties right there. It is easier now than later. If the wreath starts to look lumpy, loosen one knot and reposition.Add a hanging loop
Cut a piece of twine about 8 to 10 inches. Tie it to the top of the wreath form, or for straw and foam, push a loop of wire into the back and twist it tight. Hide the knot under a few fabric ties by fluffing them over it.Make the large linen bow
Cut two long tails about 18 to 22 inches each and one shorter piece about 8 inches for the center wrap. Form a classic bow with two loops and long tails. Wrap the center piece around the middle and secure at the back with hot glue or a few hand stitches.Attach the large bow securely
Place the bow at the bottom center. Use floral wire to anchor it through the wreath base if possible. If not, use a generous amount of hot glue and hold until set.
Visual checkpoint: The big bow should sit slightly forward and cover the bottom center area like the photo, with tails hanging straight down.Final fluff and shaping
Hold the wreath at arm’s length and rotate it. Fluff any crushed strips by pulling the tails outward. If one area looks wider, compress a few ties and spread them more evenly.
If yours looks wider than the photo, you likely used longer strips or spaced them farther apart. Compress and add a few more ties to build density rather than width.
Troubleshooting
- My wreath looks patchy and I can see the base
Add more ties. The fix is density. Focus on the spots where the base shows, not the entire wreath. - The knots slide around on a straw or foam form
Add a small dot of hot glue under each knot, or wrap the form first with twine so the fabric grips better. - The fraying is out of control and looks messy
Trim the ends slightly and dab fray check only on the tips. Choose thicker cotton or linen for a calmer fray. - The colors look chaotic instead of soft
Increase the number of cream strips and place them between brighter colors like buffers. - The big bow droops
Use wire to anchor it, or make the bow loops smaller so they hold shape better.
Finishing details
- Fluffing: Use your fingers to separate layers and twist tails so the frayed edges face outward.
- Securing: Add hidden glue dots only where needed so the wreath still feels fabric soft, not stiff.
- Storage: Store flat in a box, or hang it with tissue paper stuffed around the surface to prevent crushing.
- Optional upgrade 1: Add a tiny tag at the bow center with a spring greeting.
- Optional upgrade 2: Add a few sprigs of faux eucalyptus tucked behind the big bow.
- Optional upgrade 3: Make the large bow removable by wiring it on instead of gluing.
- Optional upgrade 4: Add a thin inner ring of ribbon for a more tailored look.
Shop Similar
- Wire wreath form 14 inch
- Assorted pastel fabric fat quarters bundle
- Linen ribbon wide ivory
- Hot glue gun and glue sticks
- Floral wire thin green
Style It With
Cottage Rag Wreath Step-by-Step Tutorial — Ultra Fluffy Scrap Layers With a Soft Neutral Bow
What you’re making
This tutorial recreates the extra fluffy rag wreath in the photo: a dense halo of short fabric scraps packed tightly so the surface looks shaggy, cozy, and perfectly imperfect. The palette leans muted and earthy with dusty teal, blush, wheat, lavender, and lots of cream, then finishes with a simple neutral bow that keeps the look polished. The key to matching the photo is using shorter strips, packing them close, and fluffing outward so the wreath reads like a cloud of fabric.
Materials + tools
- One round wreath form, 12 to 16 inch (wire form is easiest)
- Fabric scraps in muted tones (cream, tan, blush, dusty teal, soft blue, lavender, ochre)
- Optional: a few knit jersey strips for extra puff
- Scissors or rotary cutter and mat
- Ruler or cutting guide
- Hot glue gun and glue sticks
- Floral wire or thin craft wire
- Twine for hanging loop
- Wide neutral ribbon for the bow (linen, cotton, or canvas)
- Optional: small faux greenery sprigs
- Optional: small decorative eggs (as shown in the photo styling)
Finished size + customization notes
- The photo reads like a 14 to 16 inch wreath with a very dense outer edge.
- Strip length is shorter than the tied bow wreath: 6 to 8 inches is ideal.
- Strip width can be 1 to 1.5 inches. Narrower strips give a tighter shag texture.
- If you want more structure, use mostly quilting cotton. If you want extra plush, mix in a few jersey or flannel strips.
Step-by-step instructions
Pick the right base for the shag look
A wire wreath form lets you tie quickly and pack tightly. If using straw or foam, plan to add glue support because the short strips can loosen over time.Cut a mountain of short strips
Cut strips about 1 to 1.5 inches wide and 6 to 8 inches long. You will need more than you think. For a 14 inch wreath, plan for several hundred strips depending on how tightly you tie.Sort by tone, not by color
To match the muted, editorial look, sort into light, medium, and deep piles. Cream and tan are your light base. Blush, lavender, soft blue are your mid tones. Dusty teal and ochre are your deep accents.
Visual checkpoint: When you glance at the piles, it should feel calm and cohesive, not like a bright rainbow.Start tying on the inner ring first
Tie your first strip around an inner section of the wire form with a double knot. Short strips can look stubby if you tie them too tight, so tighten the knot but keep tails free to puff.Pack each knot directly against the last
Slide knots together until the wire disappears. This is the foundation of the fluffy look. If you leave space, the wreath will look sparse instead of plush.Alternate rings for a rounded profile
To build that thick donut shape, alternate tying on the inner and outer sections as you move along. This pushes fabric outward and creates depth.Use cream strips as spacing
Every few knots, add a cream or tan strip. In the photo, the neutrals knit the palette together and keep the wreath from looking too busy.Create purposeful clusters
The wreath still has a pleasing rhythm: a little teal here, a little ochre there, a soft lavender moment, then back to cream. Work in micro clusters of 3 to 5 strips, then switch colors.Fluff as you go
After each small section, run your fingers through the fabric tails and pull them outward. Short strips tend to tuck inward, so fluffing keeps the texture alive.
Visual checkpoint: The wreath should start to look like a soft brush around the outside edge.Fix flat spots immediately
If one area looks compressed, add a few extra strips right there. Short strips hide the base well, but they can create dents if your density is uneven.Add a hanging loop before you finish
Tie twine to the top of the form. Hide the knot under fabric tails by fluffing.Create the neutral bow
Use a wide neutral ribbon to make a medium bow with simple tails. The photo bow is understated, not huge. Secure the center with wire or glue.Attach the bow
Place it at the bottom center. Wire it through the form if possible, then add a small amount of glue for stability.Optional greenery and styling extras
If you want the styled look from the photo, tuck fern or eucalyptus sprigs to the sides and add a few small speckled eggs nearby in your photo styling. Keep the wreath itself simple so it stays timeless.Final shaping
Hold the wreath up and gently pat it into an even circle. Pull any fabric tails that got trapped toward the front.
If yours looks thinner than the photo, add more strips, especially on the outer ring.
Troubleshooting
- My wreath looks messy instead of fluffy
Your strips may be too long or too wide. Shorten to 6 to 8 inches and keep widths closer to 1 inch. - I can see the wire form
Add density. Tie additional strips in the gaps, then fluff forward. - The palette looks muddy
You may have too many medium tones. Add more cream strips to brighten and separate colors. - Knots keep loosening on straw or foam
Add glue under each knot, or wrap the form with twine first for grip. - The bow looks lost
Use a slightly wider ribbon, and keep the bow loops crisp by creasing the folds with your fingers.
Finishing details
- Fluffing: Finger comb the tails outward, then lightly press the surface to shape the circle.
- Securing: Add tiny glue dots only where needed so the wreath keeps its soft fabric movement.
- Storage: Store in a shallow box and fill with tissue paper to protect the fluffy surface.
- Optional upgrade 1: Add a tiny fabric label at the bow center for a handmade signature.
- Optional upgrade 2: Add a few textured strips like linen or chambray for depth.
- Optional upgrade 3: Add a removable seasonal charm tied to the bow.
- Optional upgrade 4: Add a subtle inner ring wrap of twine for extra rustic contrast.
Shop Similar
- Wire wreath form 16 inch
- Muted pastel fabric bundle quilting cotton
- Neutral linen ribbon wide
- Fern greenery stems faux
- Speckled decorative eggs set
Style It With

Bunny Ear Wrapped Ribbon Wreath Step-by-Step Tutorial — Braided Fabric Layers With a Sage Bow Accent
What you’re making
This project recreates the bunny themed wreath in the photo: a thick wreath form wrapped in wide fabric strips that crisscross like a soft braid, topped with tall linen bunny ears and finished with a petite sage bow at the bottom. The palette is gentle and earthy: cream, blush, taupe, dusty lavender, and warm beige, with a quiet sage moment that makes it feel modern. The wrapped technique is clean and sculptural, so it photographs beautifully and looks polished on a door.
Materials + tools
- One wreath form, 12 to 14 inch (foam, straw, or grapevine with padding)
- Muslin, linen, or cotton fabric cut into long strips (about 1 to 1.5 inch wide)
- Optional: pre cut fabric ribbon strips
- Scissors or rotary cutter and mat
- Hot glue gun and glue sticks
- Straight pins or T pins (helpful for foam)
- Floral wire or thin craft wire
- Twine for hanging loop
- Fabric for bunny ears (linen or cotton in ivory)
- Small piece of felt or interfacing for ear structure
- Needle and thread or fabric glue
- Ribbon or fabric for the bottom bow (sage green)
- Optional: faux greenery to frame the wreath in styling photos
Finished size + customization notes
- The photo reads like a 12 to 14 inch wreath with a thick, padded profile.
- The wrap style is best on a padded base. If you have a wire form, wrap it first with batting and secure with tape or twine.
- Strip width changes the weave look: 1 inch gives more crossings, 1.5 inches gives broader bands like the photo.
- Bunny ear height in the photo looks about 8 to 10 inches above the wreath.
Step-by-step instructions
Prep your base for a smooth wrapped surface
If using foam or straw, you can wrap directly. If using grapevine, fill gaps with a bit of batting or moss and secure so the surface feels rounded. If using wire, add batting around the ring and wrap with twine to hold it in place.Cut long wrapping strips
Cut strips 1 to 1.5 inches wide and 40 to 60 inches long. You can piece shorter strips together with glue on the back side, overlapping by about an inch. The goal is long continuous wrapping so the braid looks seamless.Choose your palette placement
In the photo, cream dominates, with blush and beige moving around the wreath, then a deeper lavender zone on the lower right. Decide where you want your deeper color moment so it feels intentional.Anchor your first strip on the back
Hot glue the end of the first strip to the back of the wreath. Wrap it around to the front and begin your diagonal crossing. Keep the strip flat and smooth.Create the braided crisscross pattern
Wrap on a diagonal, then cross back in the opposite diagonal, overlapping slightly each time. Each wrap should cover the edge of the previous wrap so the base never shows.
Visual checkpoint: You should now see a tidy X pattern forming, like a woven ribbon wrap.Maintain consistent tension
Pull the strip snug but not so tight that it dents the foam. If your wrap puckers, your strip may be too stretchy. Switch to linen or quilting cotton for cleaner lines.Change colors smoothly
When you want to switch colors, glue the end of the current strip on the back. Glue the new strip end nearby and continue the same wrap direction so the braid pattern stays consistent. Hide all joins on the back.Build a balanced composition
Rotate through cream, blush, and beige often, then place lavender in a stronger cluster to match the photo. Add a small sage strip section near the bottom so it ties into the bow color.Secure the final wrap
When the wreath is fully covered, glue the end securely on the back and press until set.Create the bunny ears
Cut two ear shapes from ivory linen, about 10 inches tall and 3 inches wide at the base, tapering to a rounded point. Cut two matching shapes from felt or interfacing for stiffness. Sandwich the stiffener between the linen layers. Stitch around the edges or use fabric glue, leaving the bottom open. Turn if needed so seams are hidden.
Visual checkpoint: The ears should stand softly upright, not floppy.Add an ear base wrap
Gather the bottom of each ear slightly so it narrows. Wrap a small strip of linen around the base to create a clean band.Attach ears to the wreath top
Place ears at the top center. Use floral wire to anchor through the base if possible. For foam, push wire through the back and twist tight. Add glue for extra security.Make and attach the sage bow
Create a small bow from sage fabric or ribbon. The photo bow is petite and tidy. Glue or wire it at the bottom center.Add a hanging loop
Attach twine to the back top center behind the ears. Make sure it is hidden from the front view.Final styling and shaping
Smooth any wrinkles in the wrap by gently tugging the fabric diagonals. If yours looks less woven than the photo, your overlaps may be too wide. Reduce overlap so the X shapes read clearly.
Troubleshooting
- My wrap keeps slipping and exposing base
Increase overlap slightly and use more glue at the back anchoring points. - The braid pattern looks uneven
Your tension or angle is changing. Keep the diagonal angle consistent and check every few wraps. - My ears flop
Add a stiffer interfacing layer or a thin craft wire inside the ear edge before closing. - I see bulky seams where colors change
Keep joins on the back, and trim strip ends so overlaps are small and flat. - The wreath looks too busy
Increase cream coverage and limit the number of colors. The photo feels calm because cream is the main tone.
Finishing details
- Sealing: If you used raw edge strips, you can leave them slightly frayed for softness or dab fray check on the ends only.
- Clean back: Cover the back with felt if you want a boutique finish. Glue a felt circle and cut a small slot for the hanger.
- Optional upgrade 1: Add a tiny floral sprig at the bow for spring.
- Optional upgrade 2: Add a removable mini tag that says Hello Spring.
- Optional upgrade 3: Add subtle blush inner ear lining fabric for extra charm.
- Optional upgrade 4: Add a thin ribbon tail behind the bow for movement.
Shop Similar
- Foam wreath form 14 inch
- Linen fabric ivory yard
- Fusible interfacing stiff
- Sage green linen ribbon
- Floral wire craft
Style It With

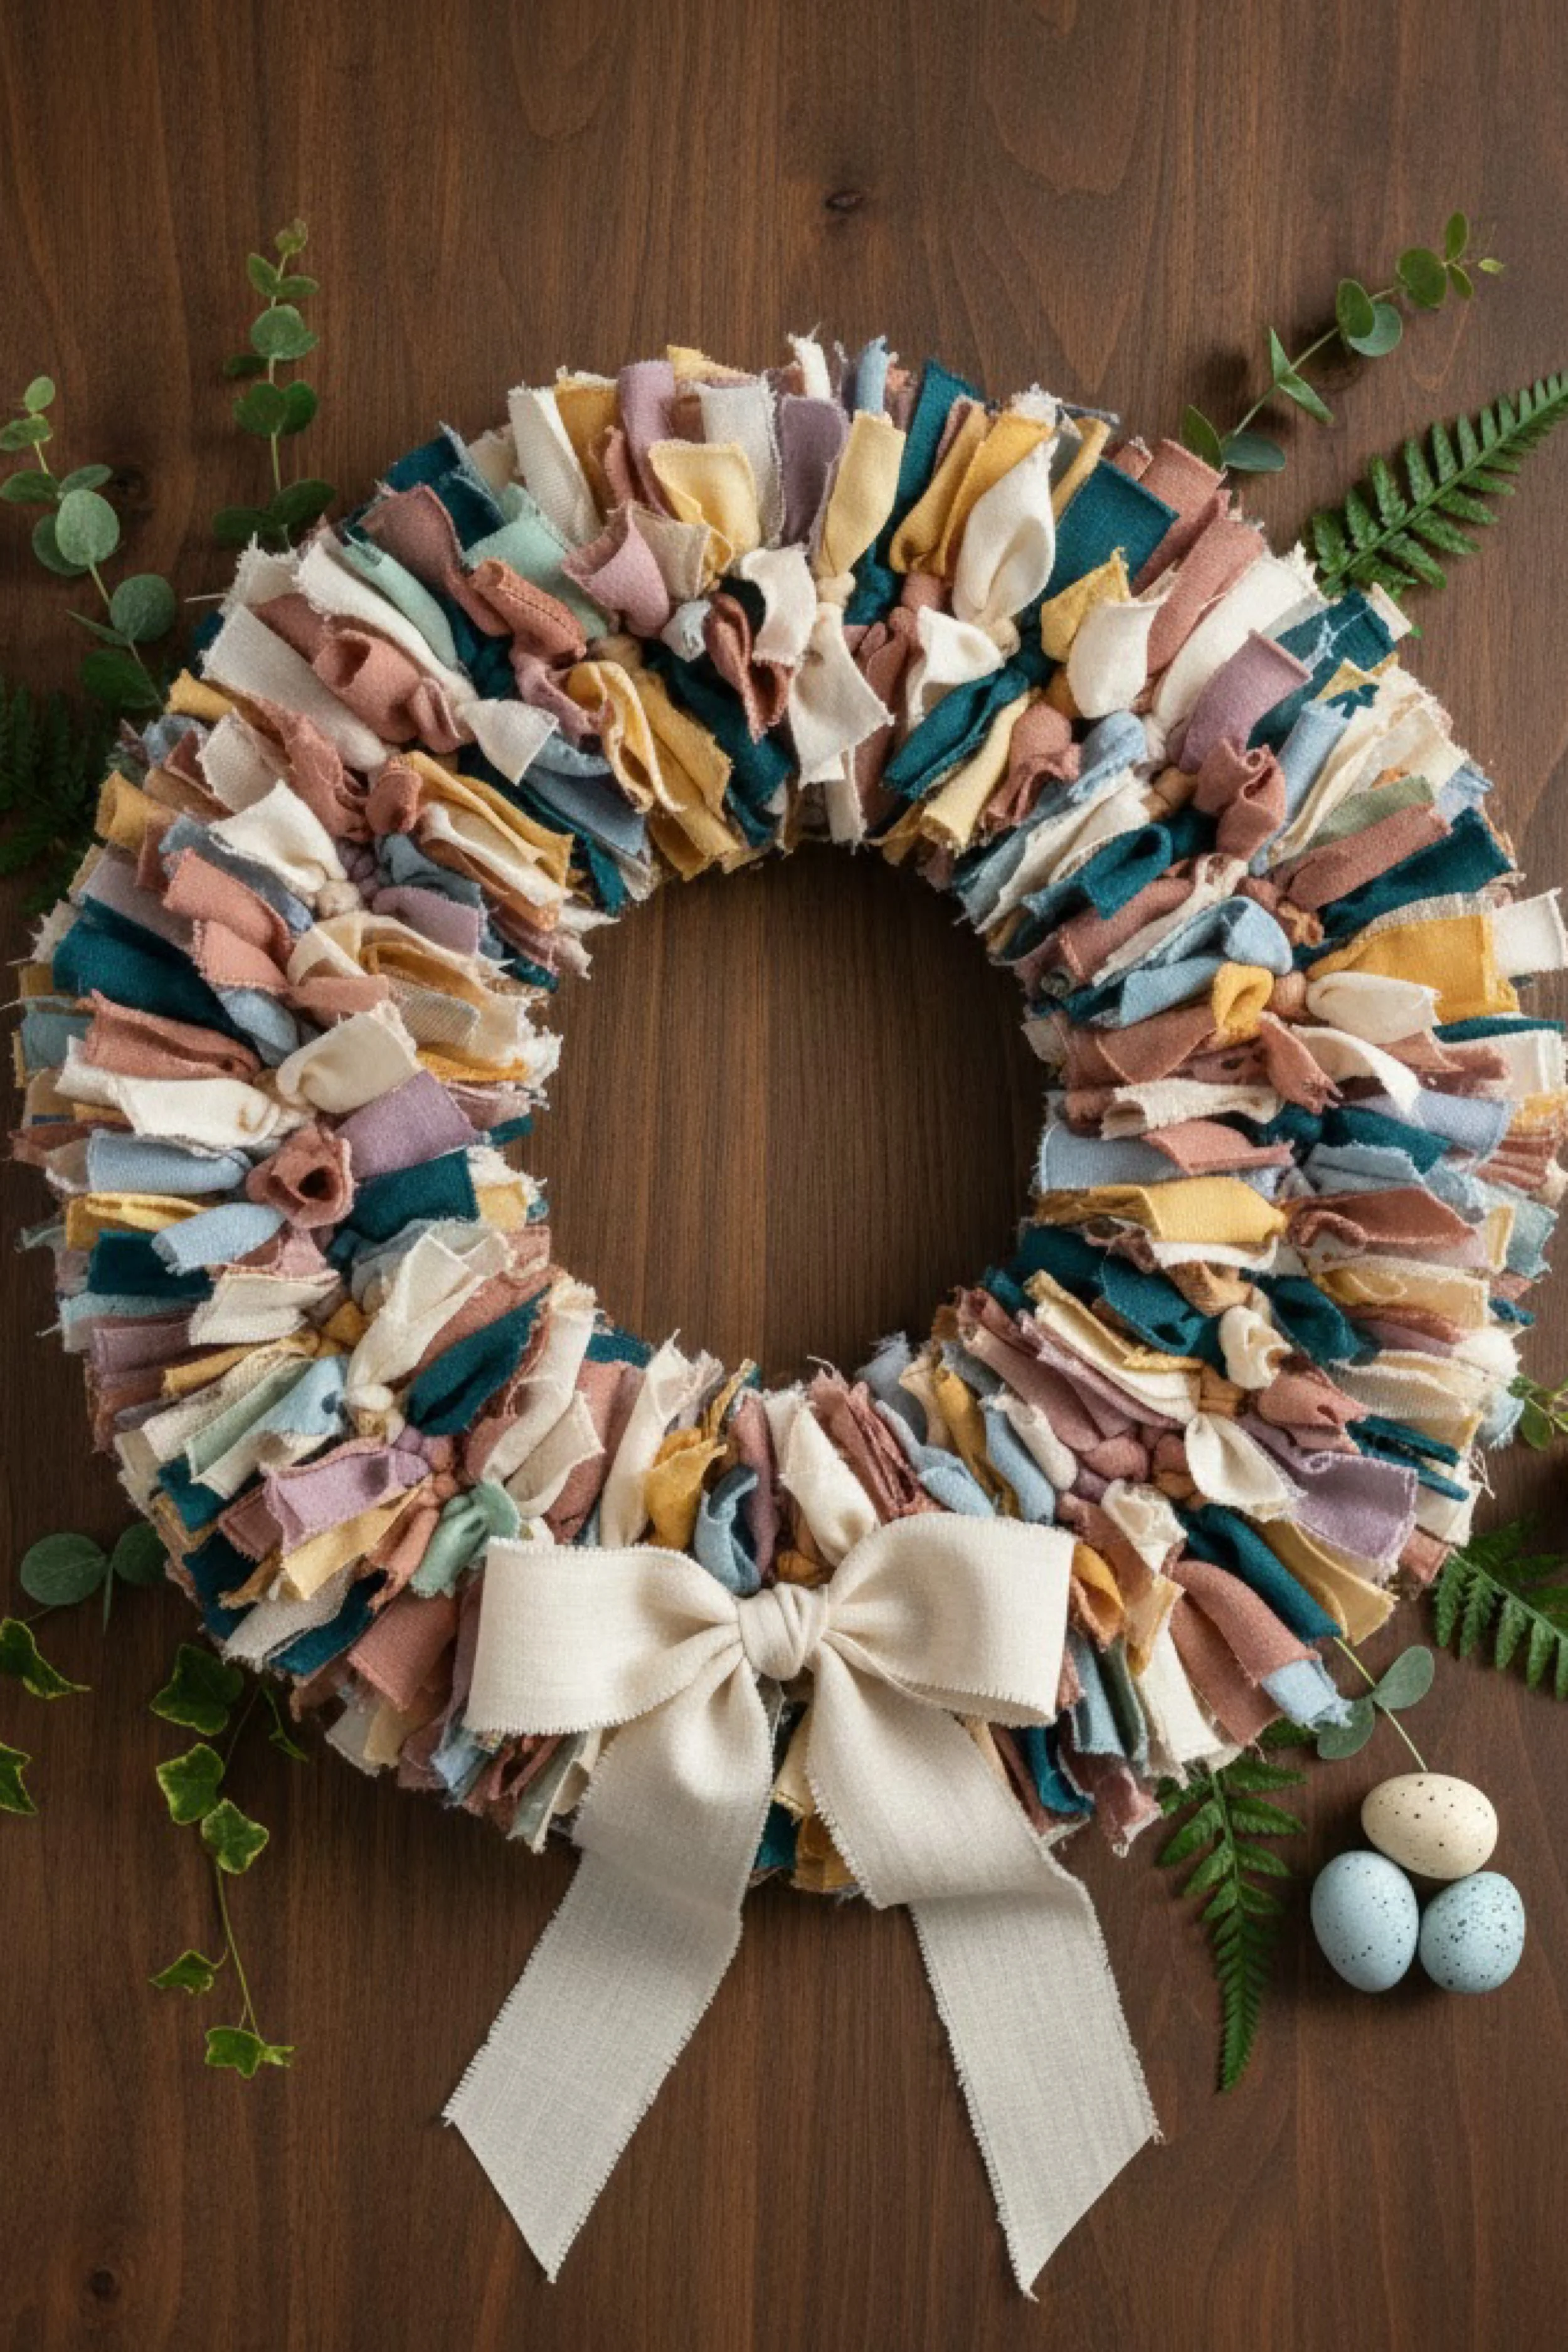
Floral Scrap Rag Wreath Step-by-Step Tutorial — Mixed Pattern Fabric Tufts With a Rolled Rosette Accent
What you’re making
This tutorial recreates the rag wreath in the photo with a slightly more rustic, mixed textile vibe: short fabric strips tied densely around the form, including solids and tiny floral prints, plus a rolled fabric rosette accent on one side. The palette is soft and vintage inspired with dusty rose, powder blue, cream, sage, and a warm mustard pop. The magic detail is the rosette, which adds a focal point without needing faux flowers.
Materials + tools
- One wreath form, 12 to 14 inch (wire preferred)
- Fabric scraps in solids and small prints (floral, ditsy, gingham, or vintage calico)
- Colors: dusty rose, cream, powder blue, sage, warm mustard
- Scissors or rotary cutter and mat
- Hot glue gun and glue sticks
- Needle and thread or fabric glue for the rosette
- Floral wire or thin craft wire
- Twine for hanging loop
- Optional: felt circle to finish the back
- Optional: small faux fern sprig for photo styling
Finished size + customization notes
- The photo reads like a 12 to 14 inch wreath with dense tufts.
- Strip length: 7 to 9 inches.
- Strip width: about 1 to 1.5 inches.
- Pattern mixing tip: keep prints small scale so the wreath still reads soft and cohesive.
Step-by-step instructions
Plan your pattern balance
Separate solids and prints. Use prints as accents, not the majority. The photo uses prints sprinkled throughout, which makes it feel curated.Cut strips
Cut strips 1 to 1.5 inches wide and 7 to 9 inches long. Keep them mostly consistent so the tufts look even.Start tying at the top
Tie each strip with a double knot onto the wire form. Slide each knot tight against the next.Build density quickly
The wreath looks full because there are very few gaps. Tie strips tightly packed, alternating colors so the palette feels blended.Add prints like seasoning
Every 5 to 8 solid strips, add one printed strip. Place a few prints near the rosette area so the focal point feels integrated.Create subtle color zones
The photo has moments of dusty rose and powder blue that drift around rather than strict sections. Aim for soft zones, not hard blocks.Keep the inner opening clean
As you tie, occasionally pull tails outward so they do not crowd into the center hole too much. You want fluff, but you also want the inner circle to read as open.Add the hanging loop
Tie twine to the top of the form early, then hide it under tufts as you finish around.Finish the wreath surface
Once you complete the circle, fluff and shape. Add extra strips where the base shows.Make the rolled fabric rosette
Cut a long strip of fabric about 1.5 inches wide and 18 to 24 inches long. Fold it in half lengthwise with the fold as the top edge. Roll the end tightly to form the center. Then continue wrapping, twisting slightly every inch so it creates petal like folds. Secure the base with stitches or glue as you wrap.
Visual checkpoint: You should now see a rose shape with layered folds and a flat base.Attach the rosette
Place it on the lower right side like the photo. Use glue plus a few hidden stitches or wire to secure. If your wreath is very fluffy, nestle the rosette into the tufts so it looks anchored, not perched.Optional: add a tiny leaf or two
You can tuck a small fabric leaf or a tiny sprig behind the rosette for dimension, but keep it minimal.Final fluff and trim
Trim any tails that are excessively long. Pull printed strips forward if they got buried so the mix reads intentional.
Troubleshooting
- My rosette looks like a spiral, not a flower
Twist the strip slightly as you wrap and vary tension so folds form petals. - The wreath looks uneven
Add strips to thin areas and compress overly thick zones by pushing knots closer together. - Prints look too loud
Add more cream solids around them to soften. Choose smaller scale prints. - The base shows through
You need more strips. Tie extra in gaps, especially on the outer edge. - The rosette falls off
Use a combination of glue and a stitch or wire anchor for long term hold.
Finishing details
- Back finish: Glue a felt circle to the back for a clean boutique look and to protect your door.
- Fray control: If your strips shed threads heavily, trim stray strings but keep the soft fringe.
- Optional upgrade 1: Add a small tag tied near the hanger for a giftable look.
- Optional upgrade 2: Add a thin ribbon bow opposite the rosette for balance.
- Optional upgrade 3: Add a few pearl pins in the rosette center for subtle shine.
- Optional upgrade 4: Make seasonal rosettes you can swap out with a hidden clip.
Shop Similar
- Wire wreath form 12 inch
- Ditsy floral fabric bundle
- Dusty rose fabric quarters
- Craft felt sheets neutral
- Fabric glue clear
Style It With
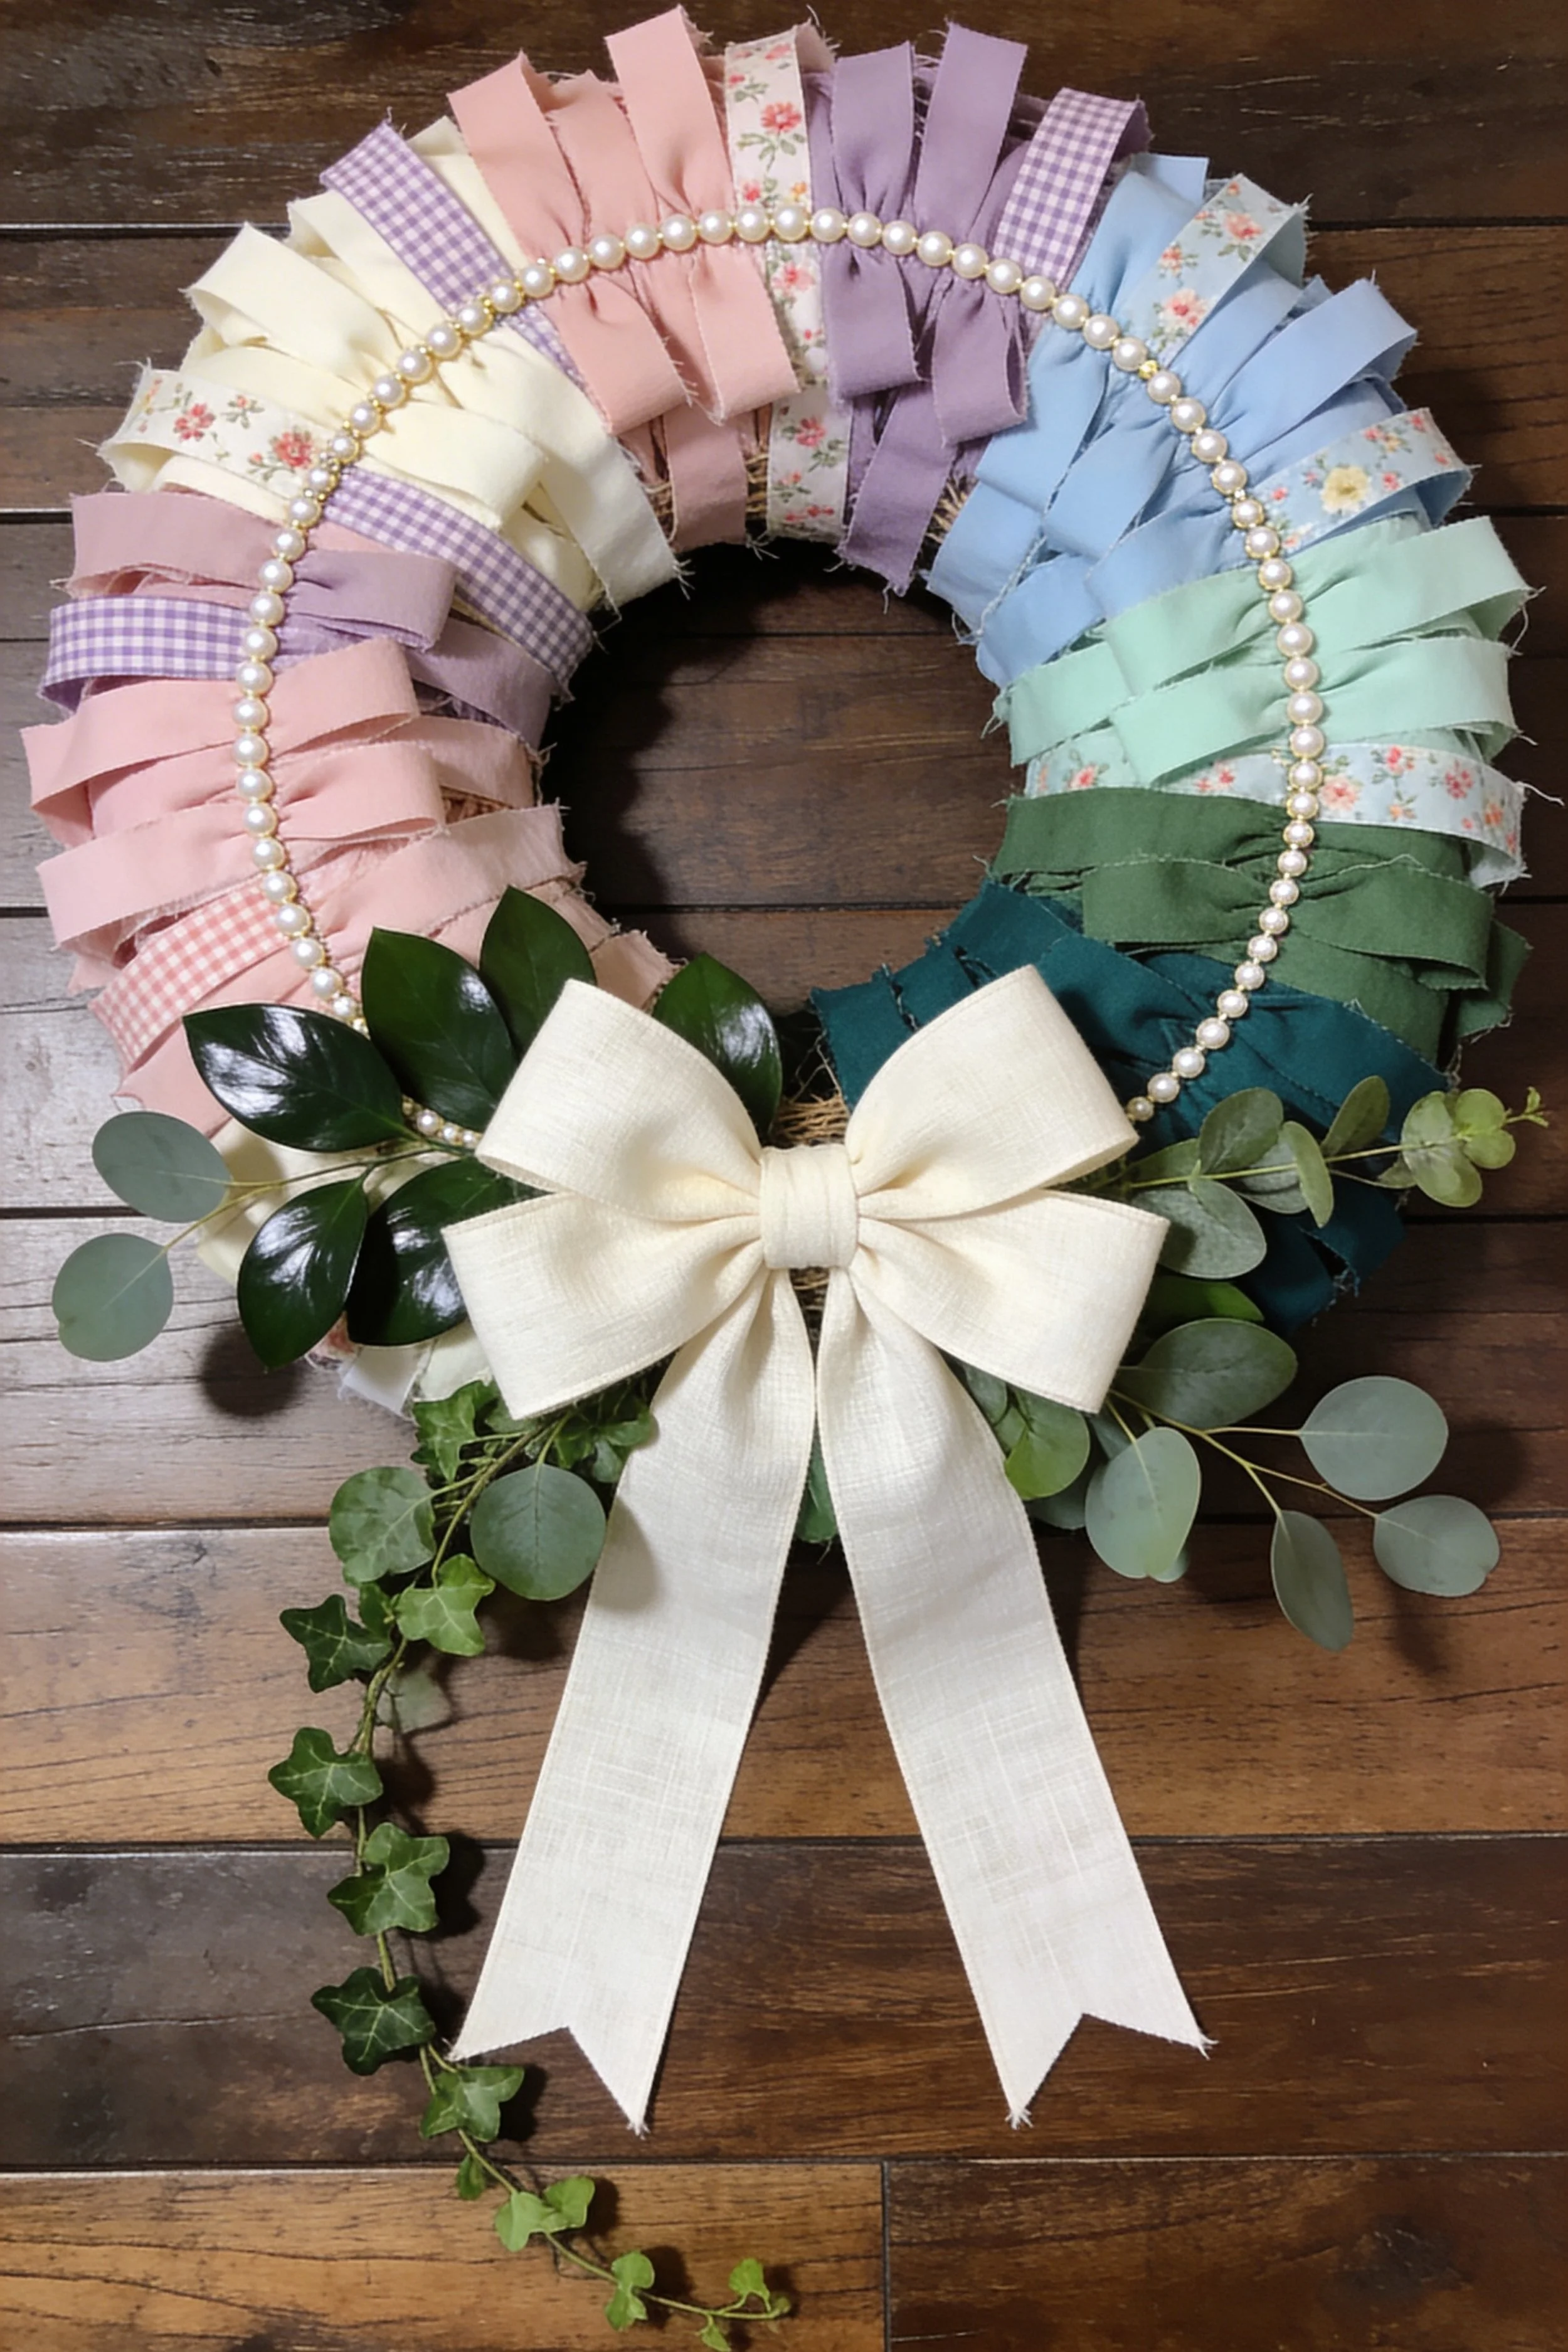
Pearl Ring Pastel Ribbon Wreath Step-by-Step Tutorial — Color Block Loops With Greenery and an Oversized Bow
What you’re making
This project recreates the most dressed up wreath in the set: a pastel ribbon loop wreath arranged in clean color blocks around a round form, finished with a statement ivory bow, fresh looking greenery accents, and a pearl ring detail that frames the inner opening like jewelry. The palette moves through blush, cream, lavender, powder blue, mint, and deeper green tones, with a few patterned ribbons mixed in. The result is polished and editorial, perfect for spring, Easter, or a soft cottage entry.
Materials + tools
- One round wreath base, 12 to 14 inch (foam or straw recommended for pinning)
- Ribbon or fabric strips in pastel solids and small prints (2 to 3 inch wide looks closest to photo)
- Optional: gingham ribbon, floral print ribbon
- Hot glue gun and glue sticks
- Straight pins or T pins (essential if using foam)
- Scissors
- Floral wire or thin craft wire
- Faux greenery stems (eucalyptus, ivy, glossy leaves)
- Twine for hanging loop
- Pearl garland strand or faux pearl bead trim
- Needle and thread or craft wire for attaching pearls
- Wide ivory linen ribbon for the large bow
Finished size + customization notes
- The wreath reads like a 14 inch size with a tidy inner opening and a pearl ring around it.
- Ribbon width: 2 to 3 inches creates bold, structured loops like the photo.
- Loop depth: deeper loops feel plush, shallow loops feel more minimal.
- You can skip pearls for a simpler version, but the pearl ring is the signature detail of this look.
Step-by-step instructions
Prep the wreath base for pinning and gluing
Foam is easiest because you can pin ribbon loops quickly. If using straw, you can pin with floral pins and reinforce with glue. If using wire, you will rely more on tying and glue, which can be done but is slower.Plan the color block layout
The photo has distinct sections: blush on the left, cream and lavender toward the top, powder blue on the right, mint and greens toward the lower right, deeper green at the lower center, then back to blush. Lay ribbon pieces around the wreath before attaching so the flow feels intentional.Cut ribbon pieces for loops
Cut ribbon into pieces about 6 to 8 inches long. Each piece becomes one loop. If your ribbon is stiff, 6 inches is enough. If soft, go closer to 8 inches for fullness.Make your first loop and anchor it
Fold a ribbon piece into a loop with ends overlapping at the base. Pin the overlap point into the wreath form and add a dab of glue to lock it. The loop should stand up, not collapse.
Visual checkpoint: You should now see a single loop like a soft petal pointing outward.Layer loops tightly
Add the next loop right beside the first, slightly overlapping at the base so there are no gaps. Continue around in small sections, keeping loop size consistent.Mix in patterned ribbon sparingly
The photo uses pattern like little accents. Every 6 to 10 solid loops, add one gingham or floral loop. This keeps it elevated rather than craft store busy.Build height and dimension
Add a second row of loops slightly in front of the first, especially on the outer edge, so the wreath looks thick and lush. Foam makes this easy because you can pin at different angles.Keep the inner opening clean
Angle loops outward so the center hole stays open. If the center feels crowded, shorten loop pieces slightly for the inner edge.Secure everything with glue reinforcement
Once a section is pinned, lift each loop base slightly and add a small dab of glue so it holds over time.Add the pearl ring detail
Measure the inner opening circumference. Cut pearl garland to fit. Attach it around the inner circle using small dots of glue or wire stitches. The photo looks like pearls sitting slightly raised, so do not smash them flat.
Visual checkpoint: You should now see a delicate pearl halo framing the center.Add greenery accents
Place glossy leaves near the bottom left and eucalyptus near the bottom right, like the photo. Tuck stems under loops and secure with wire or glue. Keep greenery low and hugging the wreath, not sticking out wildly.Make the oversized ivory bow
Use a wide linen ribbon and make a generous bow with long tails. Keep it soft and drapey. Secure the center with a wrap piece.Attach the bow at the bottom center
Wire it through the wreath base if possible. Then add glue. The bow should cover the lower center and overlap the greenery slightly.Add a hanging loop
Attach twine at the top back. Hide it behind loops.Final shaping and editorial polish
Rotate the wreath and check for gaps. Pull loops outward for symmetry. If yours looks uneven, your loop lengths may vary. Replace a few loops to match size rather than trying to tug them into shape.
Troubleshooting
- My loops collapse and look flat
Your ribbon is too soft or your loops are too long. Shorten to 6 inches and pin with a stronger angle, or choose a stiffer ribbon. - I can see the base between loops
Add more loops. Overlap bases more tightly and add a second row. - The pearl ring keeps popping off
Use wire stitches or a stronger glue, and attach at several points rather than one continuous glue line. - Greenery looks random
Limit greenery to two clusters, one on each side of the bow, and keep stems tucked low. - The bow looks too small
Increase ribbon width and loop size. The photo bow is a true statement, not a tiny accent.
Finishing details
- Clean back: Add felt backing if you want a finished look and door protection.
- Long term hold: Reinforce pins with glue once placement is correct.
- Optional upgrade 1: Add a tiny monogram tag at the bow center.
- Optional upgrade 2: Swap pearl ring for wooden beads for a rustic version.
- Optional upgrade 3: Add a removable mini wreath charm for holidays.
- Optional upgrade 4: Add subtle battery fairy lights tucked behind loops for evening glow.
Shop Similar
- Foam wreath form 14 inch
- Pastel ribbon set wide
- Pearl garland strand
- Floral pins for wreath making
- Ivory linen ribbon 3 inch
- Faux eucalyptus and ivy picks
Style It With
Once you make one fabric rag wreath, it is hard not to make three more. The technique is simple, but the results look boutique because the texture does all the work. Swap colors to match your home, add a different bow, tuck in a few sprigs of greenery, or keep it purely fabric and let the palette be the statement. The same base can even carry you through the seasons with quick ribbon and accent changes.
If you try one of these pastel fabric rag wreath looks, style it on your door with a clean neutral bow and a little greenery nearby, then step back and enjoy the instant mood lift. Soft, handmade, and perfectly imperfect is the whole point. Your wreath does not need to be identical to the photo to be beautiful. It just needs to feel full, balanced, and like you made it on purpose. Happy crafting and happy spring styling.