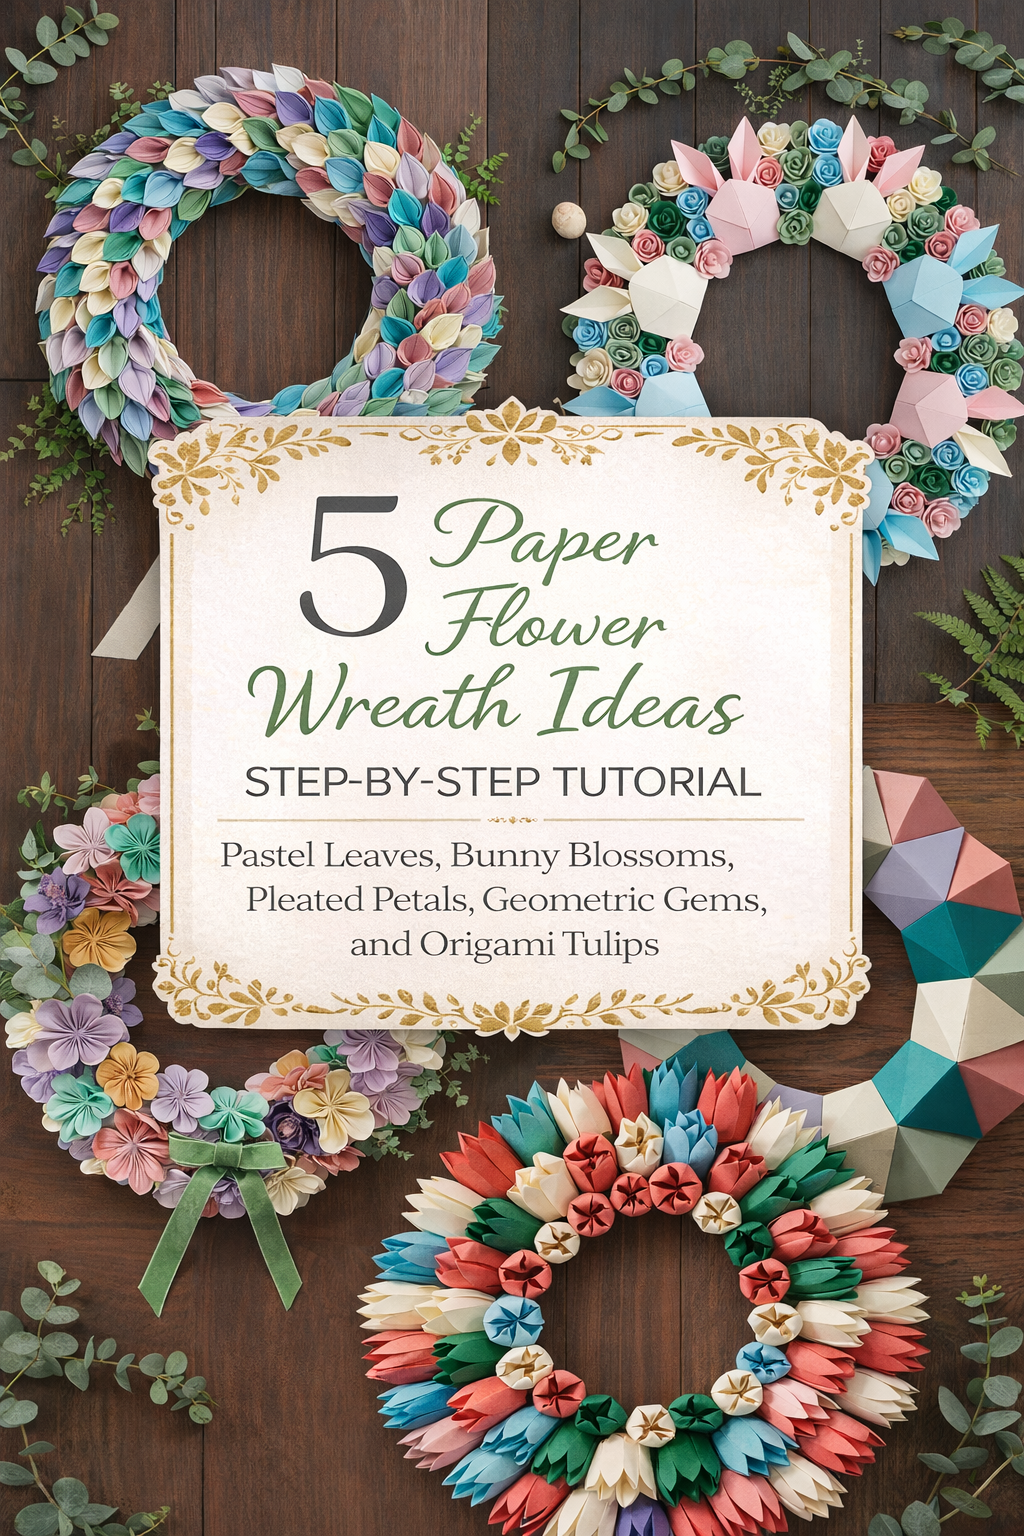
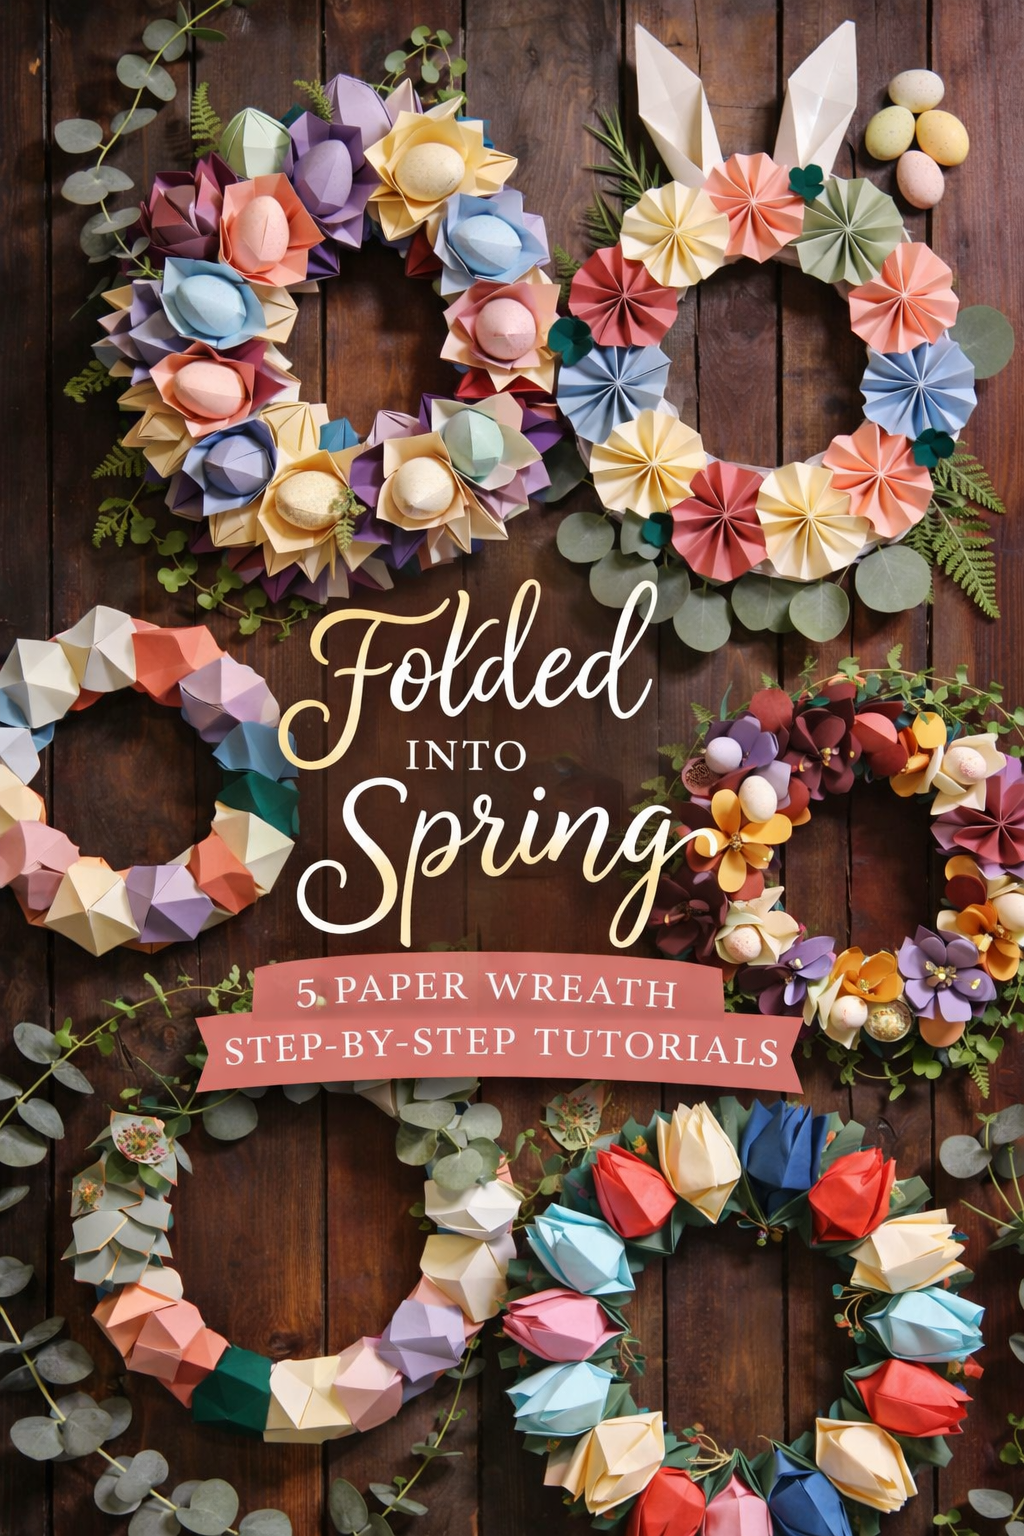
Folded Into Spring: 5 Paper Wreath Step by Step Tutorials
More like this


💡 Pro Tip: Why I Link to Amazon Search Results and Not One Product
In the Shop the Look and Style it With sections under each bikini, I link to Amazon search results, not single products. Here’s why this matters:
Hot bikinis sell out fast. I don’t want you clicking on a dead link to a sold-out item. Search pages stay updated.
You get more options. Love the vibe but want a different color, cut, or price point? The search results give you everything that matches the look and energy.
I curate each search carefully. These aren’t generic. I spend hours crafting keywords that bring up exactly the kind of bikinis I’d wear—or recommend to my hottest friends.
Support with no pressure. If you click a link, browse, and buy something later, I may earn a small commission at no extra cost to you. That helps me keep bringing you curated collections like this one—powerful, seductive, and always fresh.
So dive in. Click through. Try something risky. These aren’t just bikinis—they’re commands, statements, and maybe even your new favorite weapon of choice.
There’s something quietly magical about paper crafts that feel both intricate and effortless at the same time. These wreaths capture that balance perfectly, turning simple folded shapes into something that reads like handmade sculpture. Each design in this collection leans into a different mood of spring, from soft pastel florals to structured geometric forms and playful origami blooms.
What makes this series especially satisfying is how approachable it is. You’re not chasing perfection or complicated techniques. You’re building something piece by piece, fold by fold, watching it come together into a finished piece that looks far more elevated than the materials suggest. The contrast of crisp paper against natural wood, soft greenery, and seasonal accents gives each wreath a designer feel without requiring specialty tools or advanced skills.
Whether you’re decorating a front door, refreshing a living space, or simply looking for a creative project that produces something worth displaying, these five wreaths offer a range of styles you can tailor to your own taste. Think of this as your spring reset in craft form. Clean lines, fresh color, and just enough detail to feel intentional without ever becoming overwhelming.
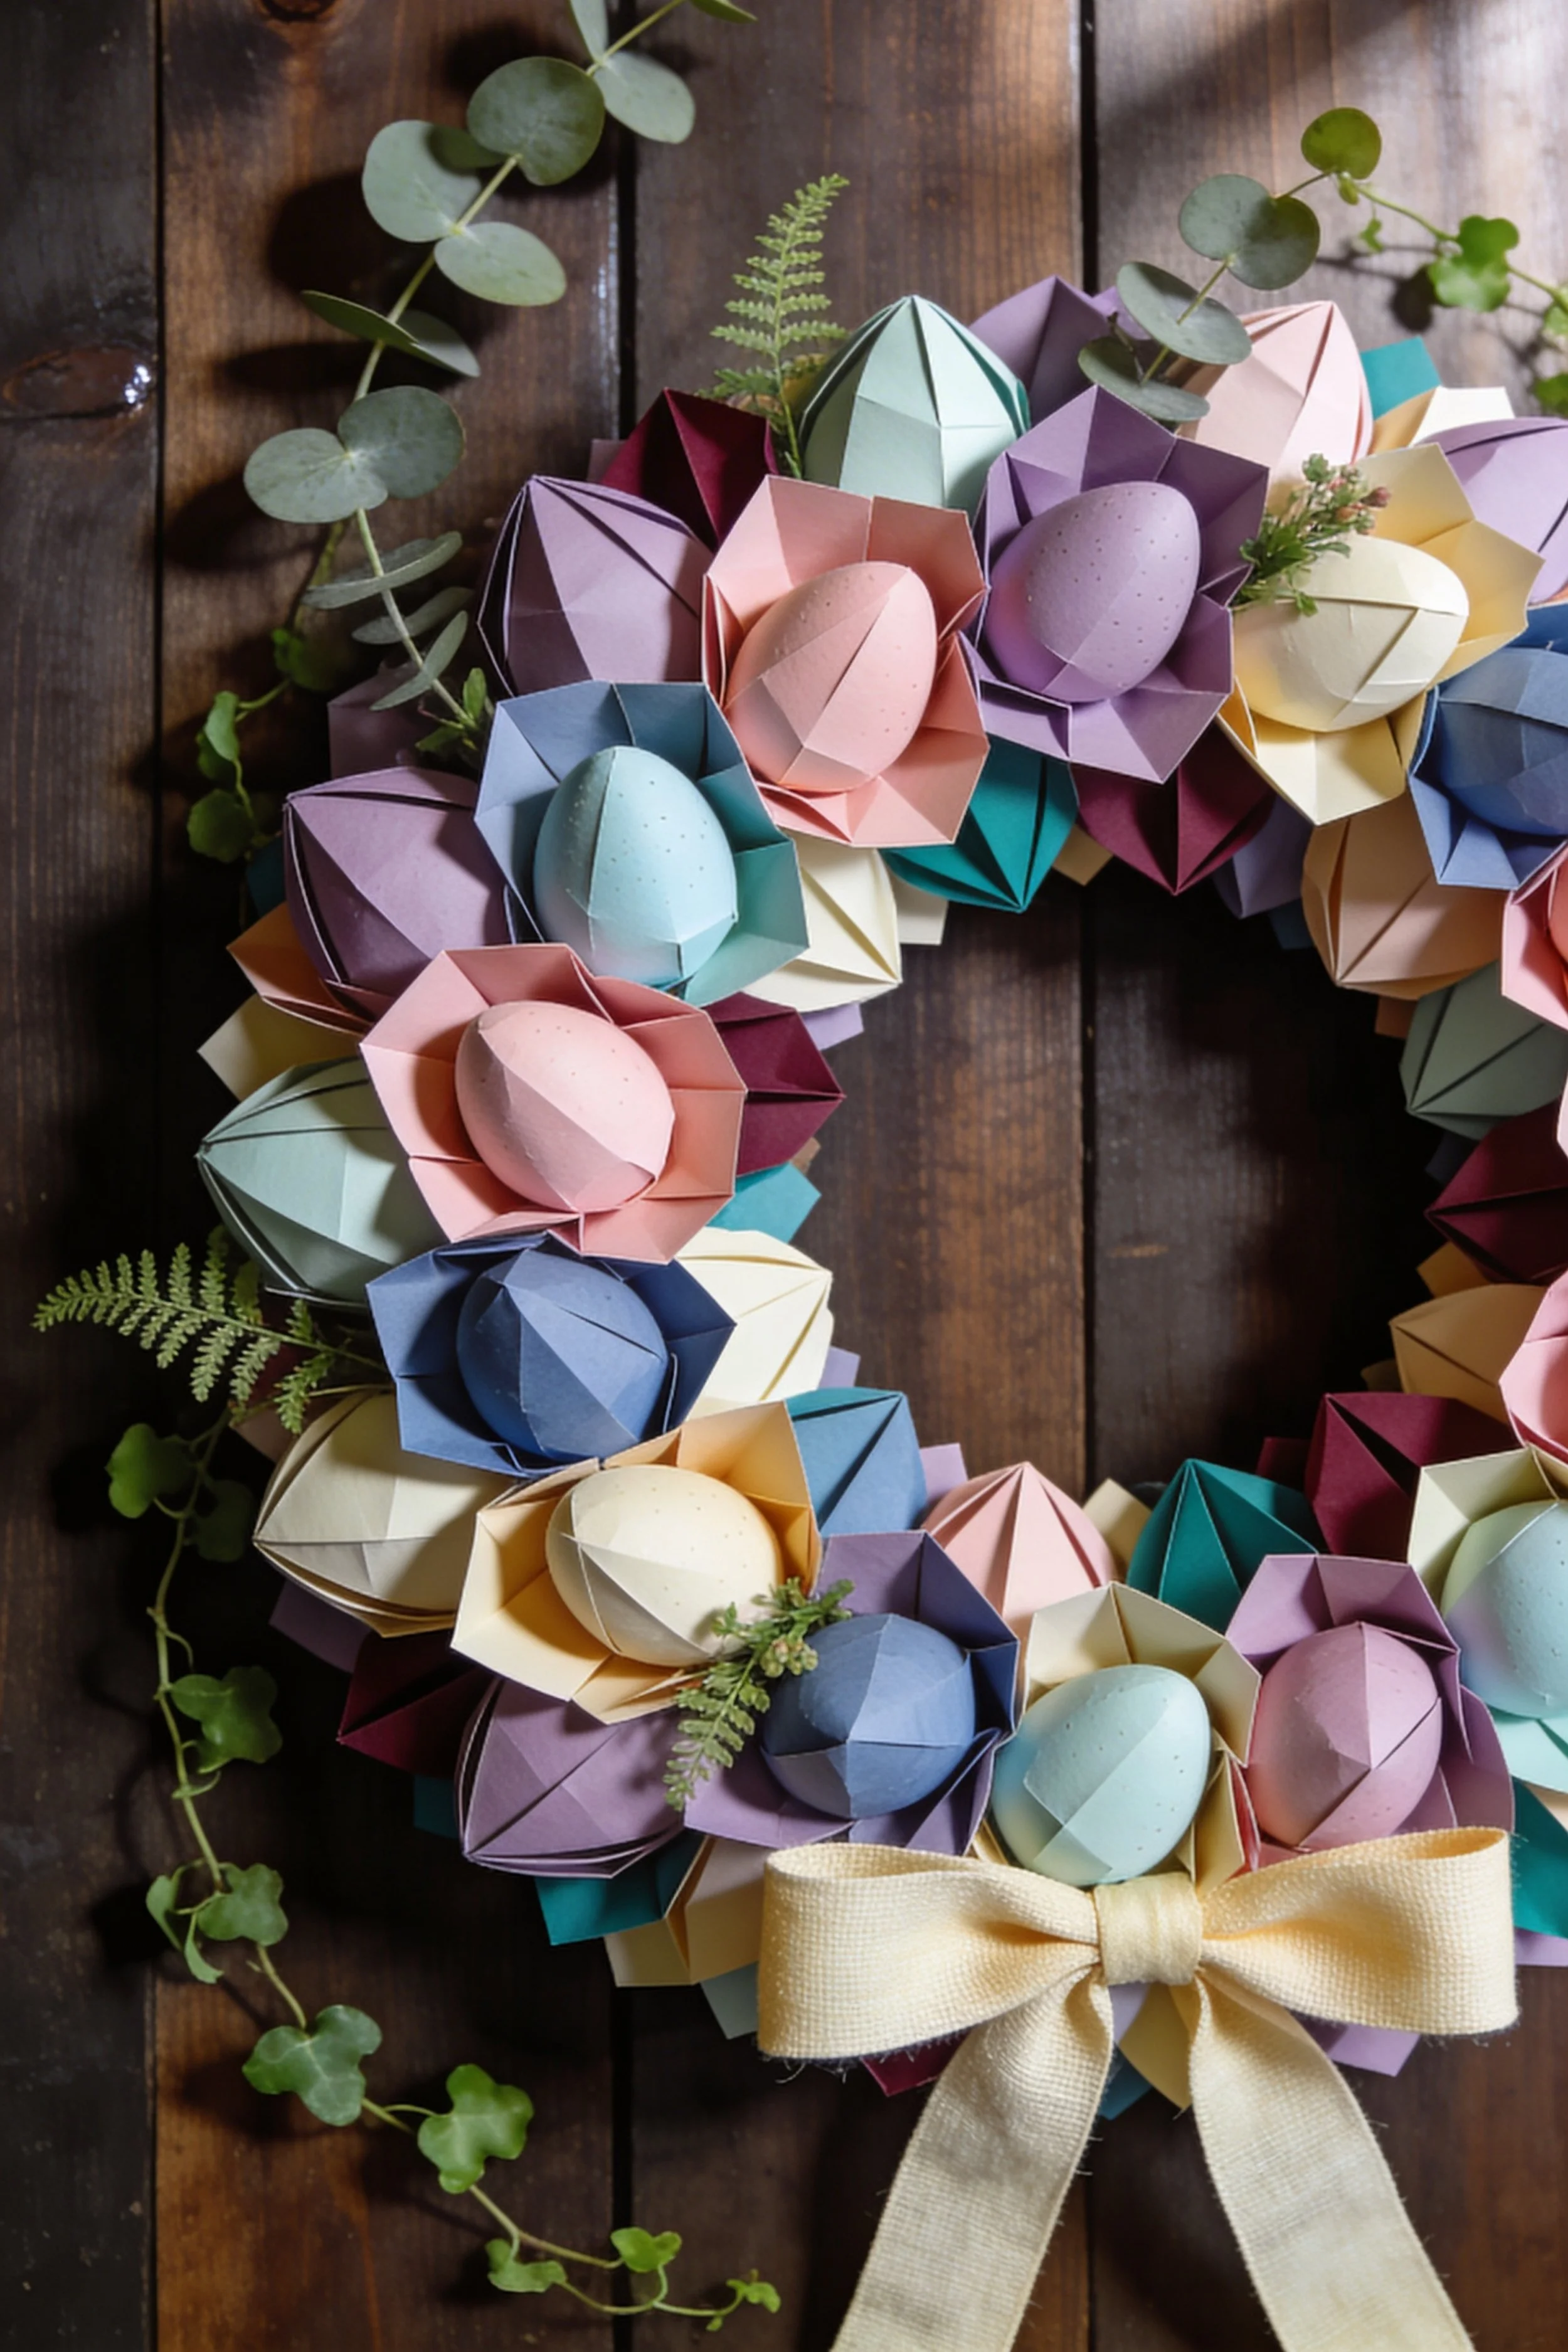
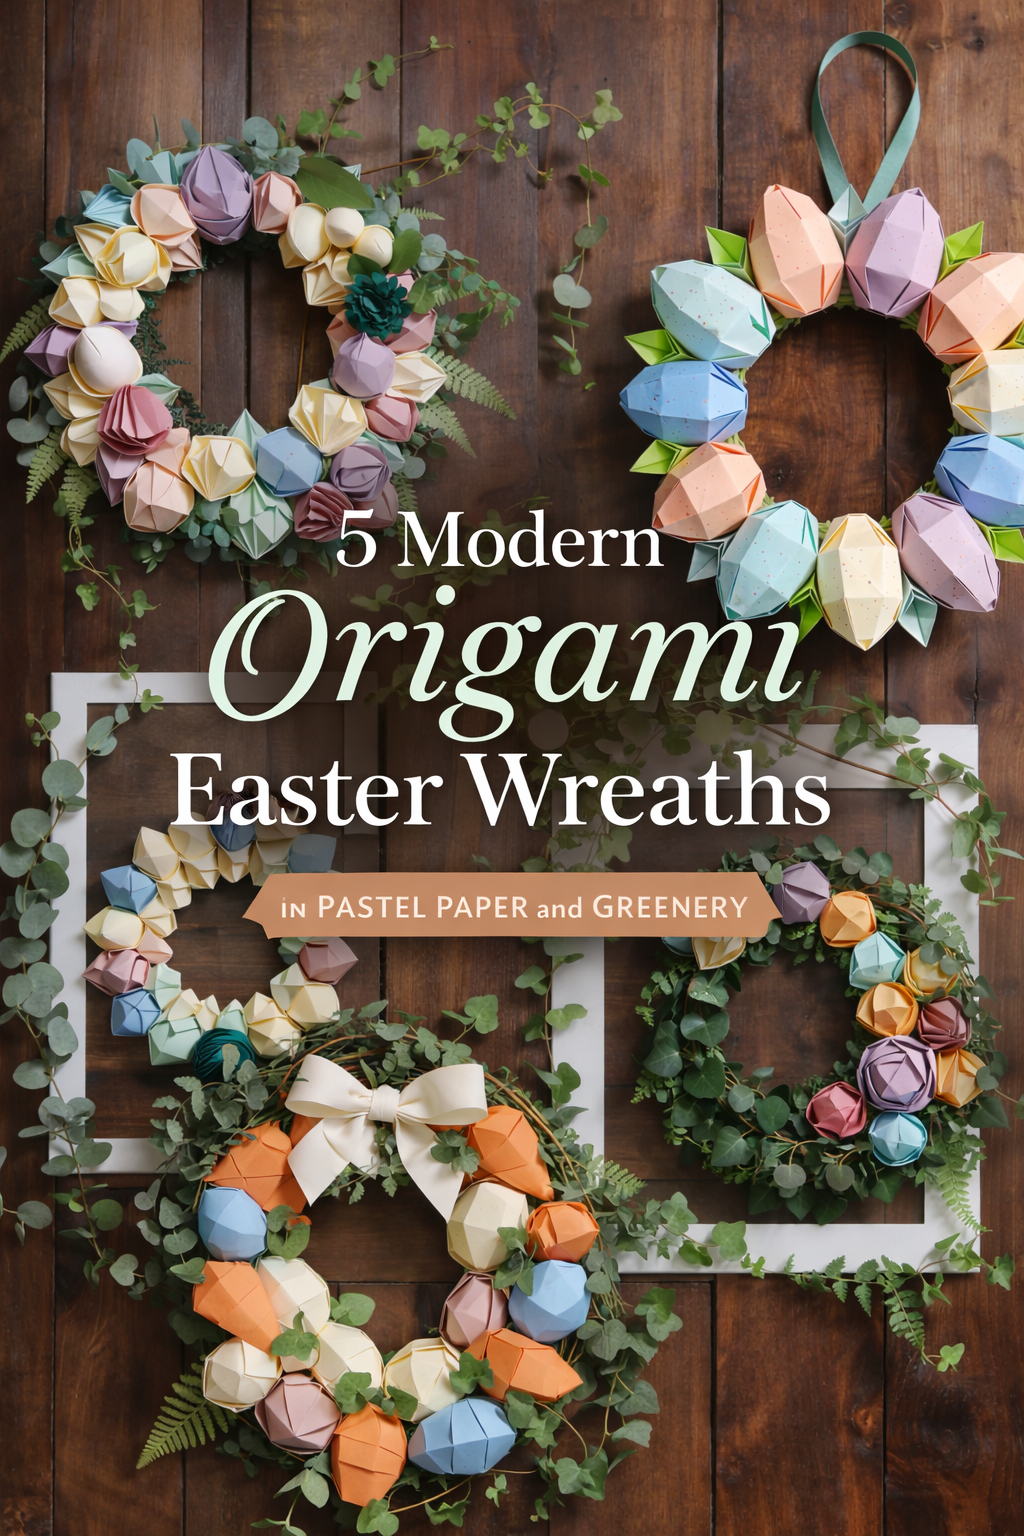
Pastel Origami Egg Wreath Step-by-Step Tutorial
What you’re making
You’re making a lush pastel paper wreath built from folded egg shapes and open origami blossoms arranged around a circular base. The finished look feels soft, springy, and slightly heirloom, with lots of dimension, gentle color contrast, and a pretty ribbon finish that makes the whole piece feel ready for a front door, pantry door, or styled wall vignette. This version is all about abundance, so the goal is not a flat, sparse wreath. You want a full ring where folded paper forms overlap slightly and create that layered, petal packed texture you see in the inspiration image.
This project is beginner friendly if you are patient and like repetitive folding. None of the individual folds are especially difficult, but accuracy matters. Crisp creases, consistent paper sizing, and thoughtful placement will make the difference between a wreath that looks craft room simple and one that looks polished enough for a styled photo.
Materials + tools
- 12 inch to 14 inch foam, straw, or chipboard wreath form
- Cardstock in pastel pink, lavender, butter yellow, robin’s egg blue, soft teal, cream, sage, and dusty plum
- Optional accent cardstock in burgundy or deeper berry for contrast
- Lightweight speckled craft eggs or paper eggs
- Glue gun with low temp glue sticks
- Craft glue or tacky glue
- Bone folder or the back of a butter knife for crisp folds
- Paper trimmer or scissors
- Metal ruler
- Pencil
- Double sided tape
- Cream or natural ribbon for a bow
- Floral pins or straight pins for testing placement
- Faux eucalyptus sprigs
- Faux fern tips or delicate spring greenery
- Twine or ribbon loop for hanging
- Cutting mat
- Small binder clips or paper clips
Finished size + customization notes
A 12 inch form usually finishes at about 16 to 18 inches wide once the folded eggs and flowers extend beyond the base. A 14 inch form can finish closer to 18 to 20 inches. If you want the same full, generous look as the photo, use medium scale folded pieces rather than tiny ones. Aim for folded flowers that land around 2.5 to 3.5 inches across and eggs around 2.5 to 4 inches tall.
You can customize this wreath by changing the color story, using only eggs, using only flowers, or adding more greenery. If you want a lighter, more minimal look, reduce the number of layers. If you want it to look richer and closer to the inspiration, build in three depth levels: base layer, middle filler layer, and top feature layer.
Step by step instructions
Choose your palette before cutting anything.
Lay out your cardstock and decide on your dominant colors and your accent colors. In the inspiration wreath, the palette is pastel first, with a few deeper notes that keep the wreath from looking washed out. A good formula is about 60 percent soft pastels, 25 percent pale neutrals, and 15 percent deeper tones. You should now see a palette that feels balanced rather than random. If one color jumps out too aggressively, remove a few sheets before you start folding.Prepare your wreath base.
If your wreath form is bright green foam or rough straw, wrap it lightly with ribbon, crepe paper, or strips of neutral cardstock. This gives glue a cleaner surface and prevents any gaps from showing. Attach a hanging loop at the top back now, because once the wreath is full it is much harder to do. Check that the loop is centered by holding the form up. If it tilts, reposition it before moving on.Cut squares and rectangles for your flowers and eggs.
For open blossom units, cut squares between 4 and 5 inches. For elongated egg forms, cut rectangles around 3 by 5 inches or 3.5 by 5.5 inches. Make several test pieces before batch cutting. The goal is to have enough variety that the wreath looks organic but not messy. If yours looks wider than the photo, your flower squares may be too large. If it looks too tight and busy, your pieces may be too small.Fold your first open origami blossom.
Start with a square. Fold it in half vertically, unfold, then horizontally, unfold. Fold corner to corner both ways to create diagonal guides. Bring the sides inward using the creases so the square collapses into a smaller base. Then shape the outer flaps into pointed petal like openings. There are many ways to reach a flower effect, so consistency matters more than perfection. Make one finished blossom and use it as your model for all the others. You should now see a geometric flower cup with clean angles and an open center.Repeat the blossom fold in several colors.
Make at least 10 to 16 blossom units for a full wreath. Vary the colors so two strong colors are not clustered too heavily in one area. Stack finished blossoms in color families as you go. Use binder clips if needed to hold stubborn folds while glue sets. If a blossom keeps springing open unevenly, reinforce one hidden seam with a tiny dab of tacky glue and let it dry flat before shaping again.Create dimensional paper eggs.
For the egg shapes, cut matching egg silhouettes or use a folded construction method with repeated oval panels. An easy method is to cut six identical egg shapes from cardstock, fold each in half lengthwise, then glue the halves together in a round stack so the egg opens into a dimensional form. Another option is a faceted origami egg using folded rectangles. Both work for this look. Choose the rounded panel method if you want softer eggs. Choose the faceted method if you want the crisp sculptural look seen in the photo.Speckle or shade the eggs if desired.
The eggs in the inspiration have a gentle, realistic feel because they are not just flat color. Flick on tiny speckles with watered down brown paint or use a fine marker very lightly. Keep it subtle. Too many marks can make the eggs look dirty rather than delicate. Test on scrap paper first. You should now see eggs that feel more special and less like plain paper props.Build more pieces than you think you need.
The biggest mistake on wreaths like this is under making. A full wreath needs abundance. Make at least 20 to 28 eggs and 10 to 16 flowers for a richly covered 12 inch base. You will probably use most of them. Keep a few extra pieces for the final balancing stage. If your stack feels excessive on the table, you are probably close to the right amount.Dry arrange the largest pieces first.
Place your biggest blossoms and eggs around the wreath without glue. Think of them as anchors. Space them evenly, but not in a rigid repeating pattern. Aim for visual rhythm. A pale blue egg might balance a pale yellow blossom across from it, while a darker plum fold can be echoed lower down on the opposite side. Pin pieces temporarily if needed. Step back often. You should now see the wreath starting to look full even before smaller fillers are added.Establish three depth levels.
Add a base layer directly on the wreath form, a middle layer that fills gaps, and a top layer of prettiest eggs and blossoms that sit slightly proud. This layered build is what gives the inspiration piece its luxurious texture. If everything is glued flat in one plane, the wreath will lose drama. If yours looks sparse from the side, you need more depth rather than just more surface coverage.Glue the base layer.
Start by gluing less showy pieces first. These are your support shapes that create volume underneath. Press each piece firmly into place for a few seconds. Work in sections rather than gluing the whole wreath at once. Keep checking the hole in the center of the wreath. It should stay open and clean. If the inner circle starts closing too much, angle pieces outward more strongly.Add the hero elements.
Now glue on the prettiest blossoms and most dimensional eggs. Tuck some eggs into open flower cups to recreate that nested, sculptural look from the image. Let a few flower edges overlap slightly. This is one of the most important visual checkpoints in the project. You should now see little moments where one shape frames another, instead of every unit reading as separate and disconnected.Balance color intentionally.
Before the glue fully locks your layout, scan for color clumps. Do you have three lavenders in one quadrant and almost none elsewhere. Move one. Is one dark burgundy element making the top feel heavy. Shift it lower or mirror it with another deep tone across the wreath. Good wreath design is often just smart color distribution.Fill awkward gaps with smaller folded units.
Cut a few smaller squares and fold mini blossoms or use partial petals tucked between bigger forms. Tiny filler pieces can rescue bare spots without making the whole wreath bulky. This is also a good time to tuck in a few folded leaves if the arrangement feels too round and needs sharper points.Add greenery sparingly.
The inspiration image uses eucalyptus and delicate fern pieces as a soft natural contrast to the precise paper geometry. Tuck short sprigs around the outside and a few toward the inner edge. Do not overdo it. The greenery should frame the paper, not compete with it. If yours looks more botanical than paper focused, pull half the greenery back out.Make and attach the bow.
Use natural ribbon or soft cream ribbon for a gentle finish. Tie a simple, slightly oversized bow with decent tails. Attach it near the bottom center or slightly off center if your wreath composition is asymmetrical. A bow that is too small will disappear. A bow that is too stiff will feel formal and fight the softness of the pastels.Check the silhouette.
Hang the wreath at eye level and study the outer edge. The best wreaths have a pleasing silhouette with small ins and outs rather than a perfect blunt circle. Trim glue strings, rotate any crooked elements, and add one or two extra pieces only where truly needed. If the wreath feels too heavy on one side, add a medium piece rather than several tiny ones.Secure delicate folds.
Some origami units loosen over time, especially if displayed on a door that moves. Reinforce hidden seams with tiny dots of glue. Press gently so you do not crush the folds. Make sure the dimensional eggs are attached in more than one place if they project outward.Photograph or style before hanging permanently.
These paper wreaths look beautiful against dark wood, pale painted doors, pantry shelves, or above a console with candles and eggs. Style it briefly before final placement so you can judge whether it needs one more accent color or a slightly longer ribbon tail.Hang and make peace with tiny irregularities.
Handmade folded paper always has little personality. Slightly different petal openings and subtle egg angle changes actually make the wreath feel more premium and less mass produced. If you kept your folds crisp and your color layout thoughtful, those small variations will read as charm.
Troubleshooting
My folded flowers keep popping open.
Use heavier cardstock, sharpen your creases with a bone folder, and add a tiny hidden glue dot at the most stubborn seam.
My wreath looks flat.
You probably glued everything in one layer. Add a second tier of pieces on top and angle some outward from the base.
The colors look messy instead of balanced.
Limit the palette and repeat each color at least two or three times around the wreath so nothing feels accidental.
My eggs look homemade in a bad way.
Use templates so all the panels match, and make sure center seams line up cleanly. Subtle speckling also helps.
The wreath is getting too heavy.
Switch to a lighter chipboard or wrapped cardboard base and use tacky glue for some paper pieces instead of only hot glue.
Finishing details
Trim every glue string you can find. Paper crafts instantly look more polished when the finish is clean. If any folded edges have softened, pinch them back into shape with your fingers. Add a final hidden hanging loop reinforcement on the back if the wreath feels heavy. This project does not need blocking, but it does benefit from being stored flat in a deep box between seasons. Keep it away from direct rain, strong wind, and damp porches since paper can warp. For a more durable version, use double sided cardstock or mist the finished paper pieces lightly with a matte clear sealer before assembly. You can also line the back inner ring with felt or ribbon for a neater reverse side.
Optional upgrades for this wreath include adding a few pearl headed pins at flower centers, using torn chiffon ribbon instead of structured ribbon, nesting faux quail eggs among the paper folds, or adding a small name tag or spring word banner tucked subtly into the bottom cluster.
Shop Similar
- Pastel cardstock paper pack for folded spring wreaths
- 12 inch wreath forms for paper craft door decor
- Bone folder and paper scoring tools for crisp origami folds
- Speckled decorative craft eggs for spring wreath styling
- Cream ribbon for soft rustic wreath bows
- Artificial eucalyptus stems for wreath filler
Style It With
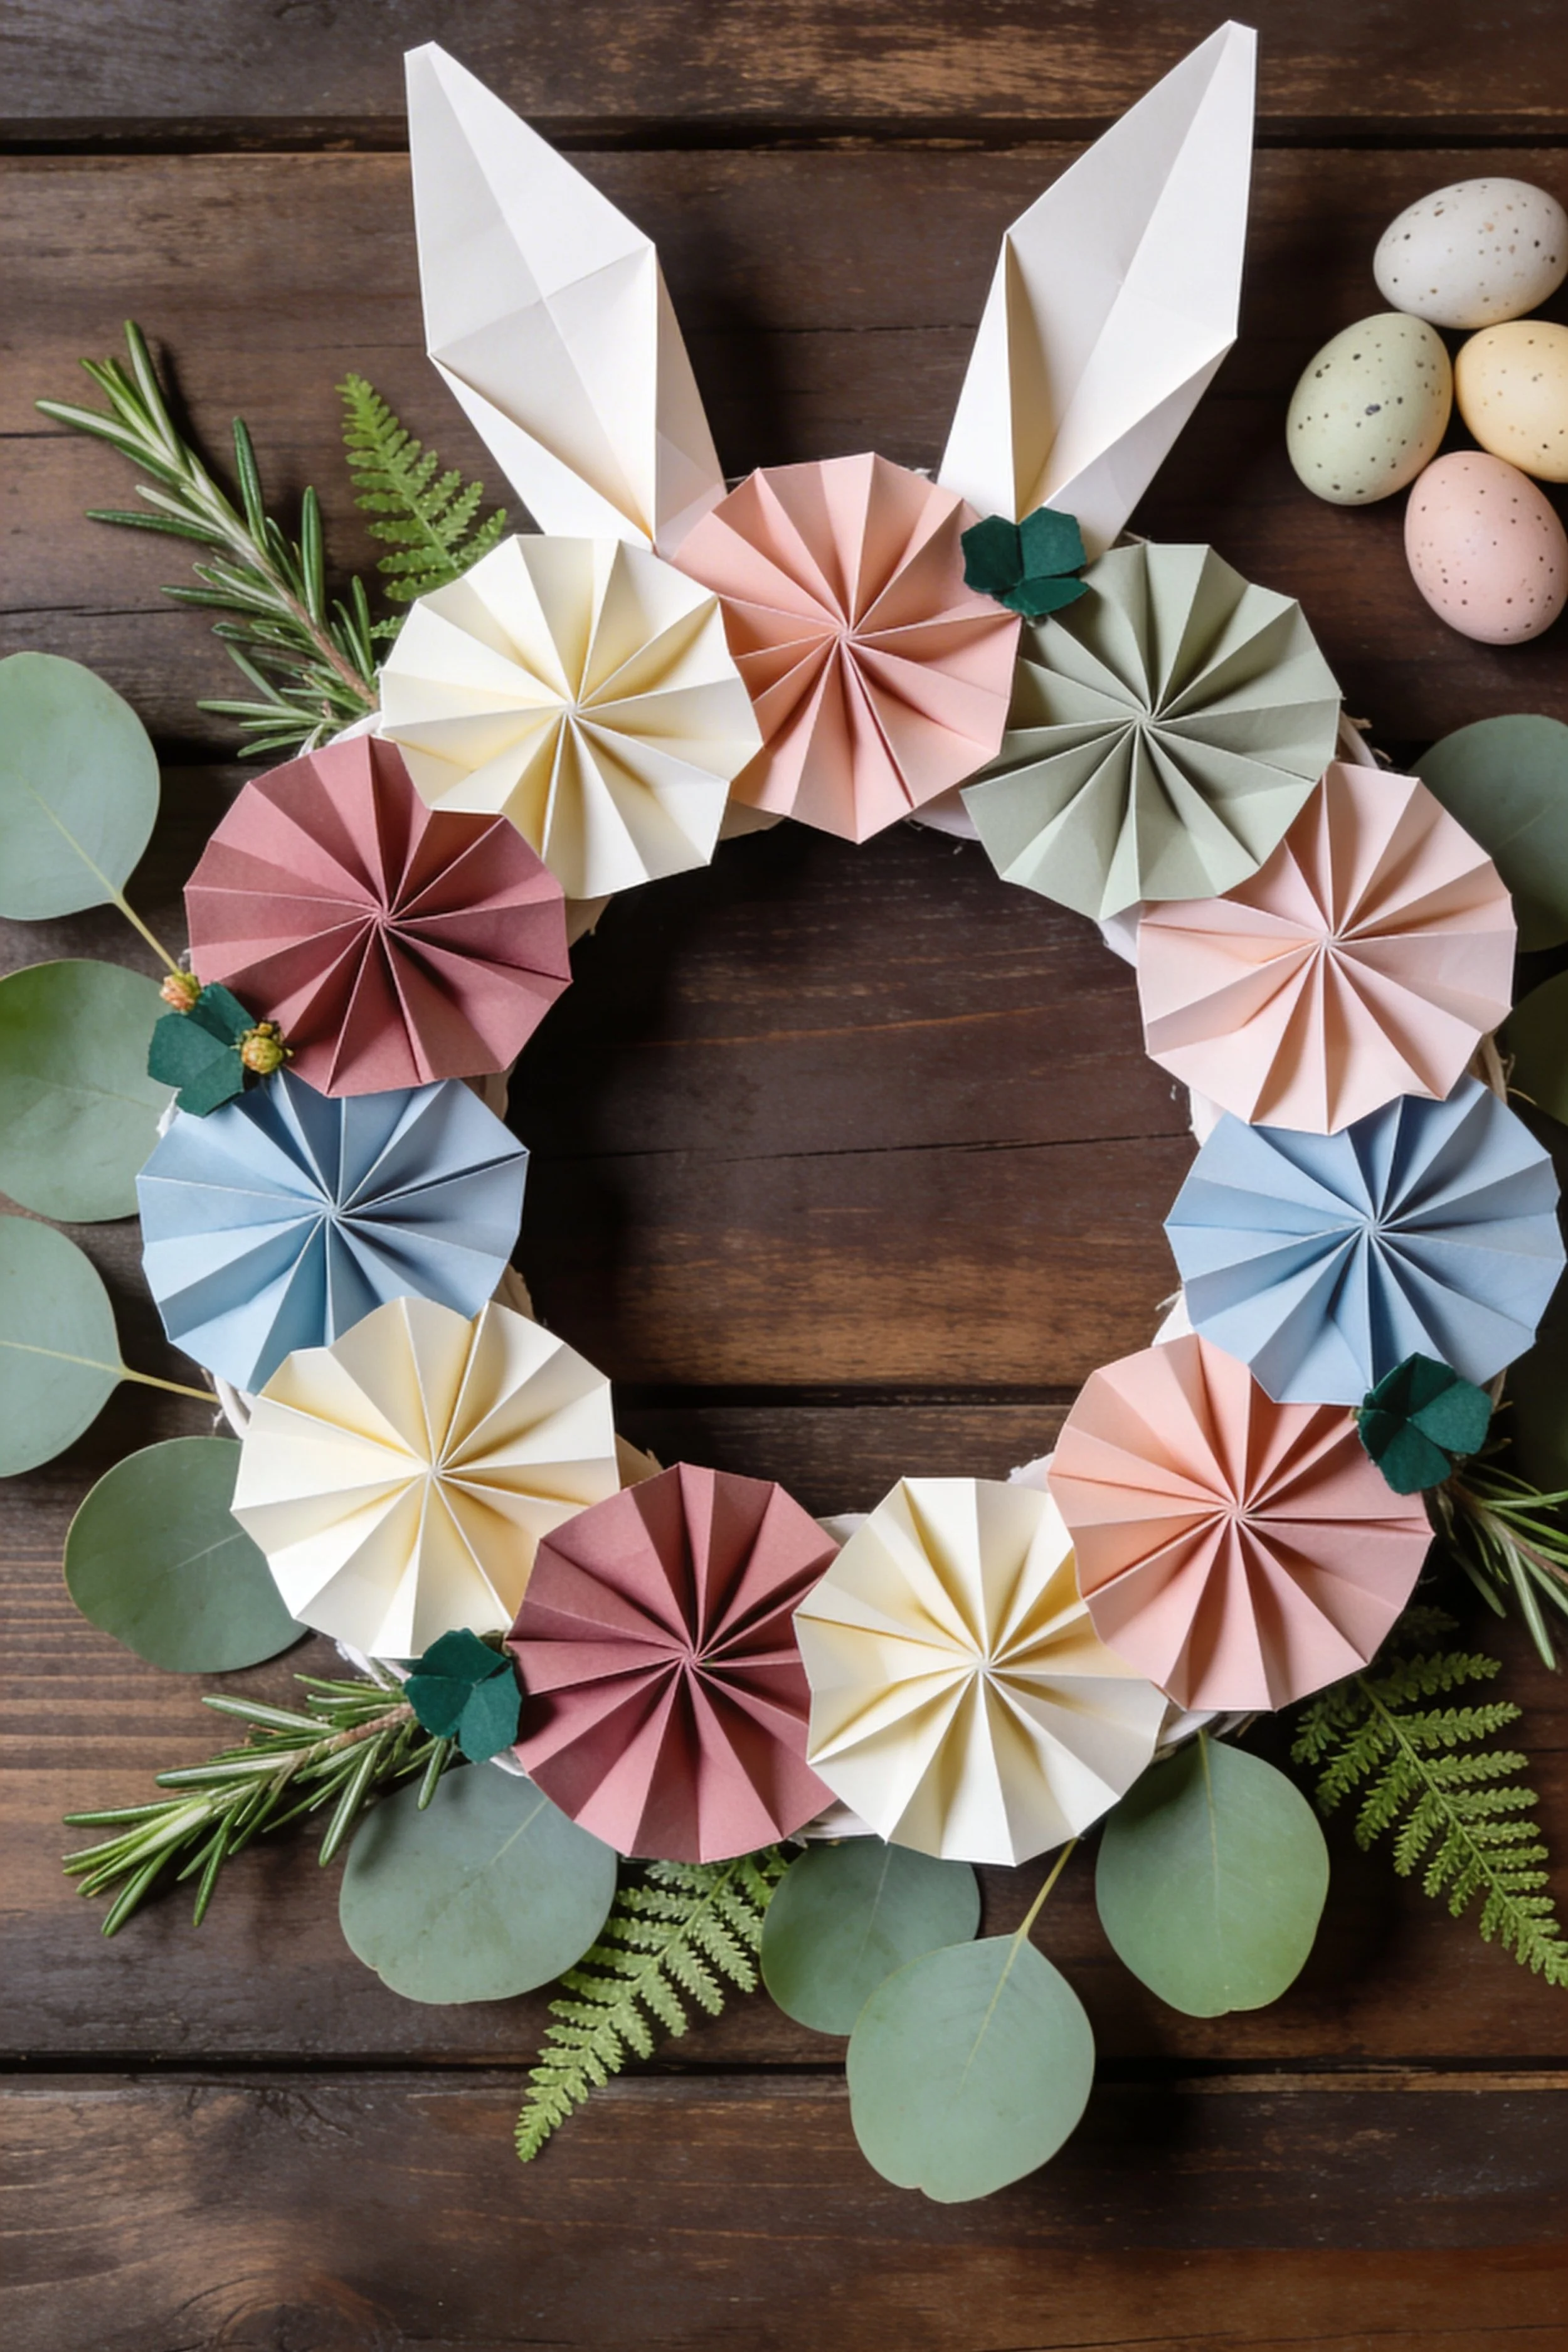
Bunny Ear Rosette Paper Wreath DIY Guide
What you’re making
You’re making a sweet paper Easter wreath with fan folded rosettes, tall bunny ears, and soft botanical accents arranged on a round base. The look is cleaner and more graphic than the first wreath, with repeated circular paper medallions creating a tidy ring and the ears turning the whole piece into an unmistakably spring themed statement. It feels charming and playful, but still refined enough to style against dark wood, in a mudroom, or over a mantel.
This project is especially good for beginners because fan folded rosettes are straightforward once you understand the pattern. The real secret is careful sizing and symmetry. You want the wreath to feel balanced, with the ears centered, the rosettes evenly spaced, and the greenery working like a soft frame around the paper shapes.
Materials + tools
- 10 inch to 12 inch wreath form made from foam, cardboard, or wrapped chipboard
- Cardstock in blush, dusty rose, pale blue, cream, sage, and soft peach
- White cardstock for bunny ears
- Glue gun with low temp glue sticks
- Double sided tape
- Tacky glue
- Scissors or paper trimmer
- Scoring board or ruler and bone folder
- Pencil
- Hot glue finger protectors or silicone mat
- Faux eucalyptus leaves
- Faux fern sprigs
- Faux rosemary or narrow greenery picks
- Small green paper scraps or felt for leaf accents
- Twine or ribbon for hanging
- Optional pastel speckled eggs for styling the background if photographing
Finished size + customization notes
A 10 inch base generally becomes a 13 to 15 inch finished wreath once rosettes are attached. A 12 inch base can finish around 15 to 17 inches. This style looks best when the rosettes are fairly uniform, so do not vary the sizes too much. Keeping most rosettes between 3 and 4 inches across will preserve the polished look from the image.
You can customize the wreath by changing the ear height, adding a bow, using floral centers in the rosettes, or shifting the palette toward brighter spring candy colors or quieter farmhouse tones. If you want a less Easter specific version, skip the ears and make it a classic rosette wreath.
Step by step instructions
Plan the shape and symmetry first.
Lay the empty wreath form on your table and imagine a clock face. The bunny ears will rise from about 11 o’clock and 1 o’clock, leaving the rest of the ring for evenly spaced rosettes. This mental map helps keep the wreath centered and clean. If you start gluing without a plan, the ears can end up crooked and the wreath will always look slightly off.Wrap the base if needed.
If your base is rough, bright, or visually distracting, wrap it in strips of cream paper, ribbon, or even torn neutral fabric. This gives you a clean foundation and also helps the greenery and rosettes adhere better. You do not need perfect coverage, but any parts likely to peek through should be hidden.Cut strips for the rosettes.
Each rosette is made from accordion folded paper strips. For medium rosettes, cut strips about 2 inches wide by 12 inches long. Larger rosettes can use longer strips or be joined from two strips. Score every half inch for a neat folded fan. A scoring board helps a lot here, but a ruler and bone folder work fine. The more accurate your scoring, the more even your finished medallions will be.Accordion fold the strips.
Fold back and forth on every score line to create a tight fan. Press the folds sharply with your bone folder. Repeat for all your colorways. You should now see neat stacked strips that spring open like tiny accordions. If your folds are drifting, slow down and realign the strip before moving forward. Uneven accordion folds can create lopsided rosettes later.Join strips into circles.
Glue or tape the short ends of each folded strip together to create a ring. If you want a fuller rosette, join two strips first and then connect the ends. Flatten the ring downward so it spreads into a circle. Press the center toward the table until the rosette opens. Glue a small cardstock circle to the center back to lock the shape. Then add another small circle to the front if you want a finished look or a place to add embellishment.Make enough rosettes for the ring.
For a wreath like the inspiration, make 10 to 14 rosettes. Keep the color placement balanced and soft. Too many different tones can make the design feel busy. Repeat cream, blush, dusty rose, sage, and blue in a gentle pattern. You should now have a little stack of finished medallions that already looks cohesive.Create the bunny ears.
Use white cardstock or double layers of white paper for structure. Draw two tall tapered ear shapes, each around 6 to 8 inches tall depending on your wreath size. Fold or score a slight center crease so each ear has dimension and can stand upright instead of looking flat. If you want a more finished ear, cut an inner ear shape from blush or very pale pink and glue it inside, though the inspiration keeps the ears crisp and minimal.Strengthen the ears.
Tall paper ears need support. Glue a second identical ear behind the first with a floral wire or thin strip of cardstock sandwiched between them. This keeps the ears upright and prevents sagging. Hold them against the wreath and check proportion. If they look cartoonishly huge, trim them down a little. If they disappear visually, make them taller.Dry fit the entire wreath before gluing.
Place the rosettes around the ring and tuck the ears at the top. Add a few eucalyptus leaves and fern pieces at the edges. Step back. You should now see a balanced spring wreath with clear bunny ear definition. If the wreath looks too empty between rosettes, either add one or two more medallions or make a couple slightly larger. If it looks crowded, remove one and let the greenery do a little more work.Glue the ears first.
Attach the bunny ears securely to the back top of the wreath, slightly angled away from each other. Make sure they are centered. Hold the wreath upright for a quick check. This is one of the most important checkpoints. If the ears are leaning oddly or one sits higher than the other, fix it now before the rosettes go on.Attach the main rosettes.
Start at the bottom and work upward on both sides to maintain symmetry. Alternate colors as you go, making sure no one section becomes too dark or too pale. Slight overlap is good. You want a continuous ring, not widely separated circles. Press each rosette firmly until the glue grabs. Be careful not to crush the accordion folds.Fill minor gaps with smaller rosettes or leaves.
If you see awkward spaces between medallions, use small paper leaves, mini folded fans, or clipped greenery. This style rewards restraint. The filler should polish the ring, not clutter it. If you find yourself adding filler everywhere, your rosettes are probably too small or too few.Add eucalyptus and fern for softness.
Tuck eucalyptus rounds near the outer curve and a few fern or rosemary sprigs around the lower half and sides. The greenery should soften the paper geometry and echo the natural spring styling in the photo. Keep the longest stems pointing outward so the center hole stays open and clean.Add tiny green leaf accents.
The inspiration includes little clustered green details that help the rosettes feel less flat. Cut tiny leaf shapes from green paper or felt and glue them where rosettes meet. These miniature accents act like visual punctuation and make the wreath feel more finished.Check the center opening.
Because rosettes are circular, it is easy to accidentally crowd the inner ring and shrink the center hole too much. Hang the wreath and study the inside edge. You should now see a clean central opening that feels intentional. If it looks too narrow, carefully angle one or two rosettes outward.Refine the color rhythm.
Look for repeated color spacing. Ideally, blush appears in at least three places, cream in several, and the blue is echoed top to bottom. Good rhythm makes handmade work look designed. If a single blue rosette is isolated with no visual partner, move another blue element across the wreath.Secure loose folds and centers.
Rosettes can relax over time if their centers are not anchored well. Add a tiny circle of cardstock to the back of any soft medallion and a little glue at the center pinch. This reinforces the shape without changing the front appearance.Add a hanging loop to the back.
If you did not do this at the start, glue and tape a ribbon or twine loop behind the ears. Test the hanging point by lifting the wreath. It should hang level. If it pulls forward, move the loop slightly lower on the back.Style your surface thoughtfully.
This wreath looks especially beautiful against darker wood because the pale paper and greenery stand out. It also pairs well with speckled eggs, ceramic bunnies, or a little basket nearby. Styling is optional, but it helps you see the wreath as part of a spring scene rather than a standalone paper project.Make peace with minor differences.
Even if you measure carefully, a few rosettes will open a little wider or narrower than others. That is normal. The overall composition matters more than identical perfection. Crisp folds, centered ears, and balanced color will carry the whole design.
Troubleshooting
My rosettes will not stay open.
Use a stronger center back circle and hold each medallion flat until the glue fully cools or dries.
The bunny ears flop over.
Add an inner support layer with cardstock or floral wire and reduce the ear height slightly.
The wreath looks too childish.
Tone down the pink, add more cream and sage, and keep the greenery elegant and sparse.
My wreath feels empty.
You likely need either two more rosettes or slightly larger ones. Small additions make a big difference.
The center hole looks off center.
One side probably has bulkier pieces. Shift those outward and lighten the opposite side with a filler sprig.
Finishing details
Trim any exposed glue threads and check that the rosette edges are not bent. If some folds opened too far, pinch them back gently. For cleaner long term storage, place tissue between the ears and the main wreath body so nothing gets crushed. Since this is paper, keep it indoors or in a covered entry. You can lightly spray the finished wreath with a matte craft sealer to help it resist minor humidity, but test first because some papers darken. Optional upgrades include adding pearl centers to a few rosettes, a soft velvet bow at the bottom, or pale pink inner ear inserts for more sweetness. You could also weave a strand of micro fairy lights around the base if the wreath is purely for indoor display.
Shop Similar
- Pastel cardstock for accordion folded paper rosettes
- Scoring board and bone folder set for paper crafts
- Round wreath forms for lightweight spring projects
- Artificial eucalyptus stems for wreath making
- Decorative fern picks for spring wreath filler
- White cardstock sheets for bunny ear templates
Style It With
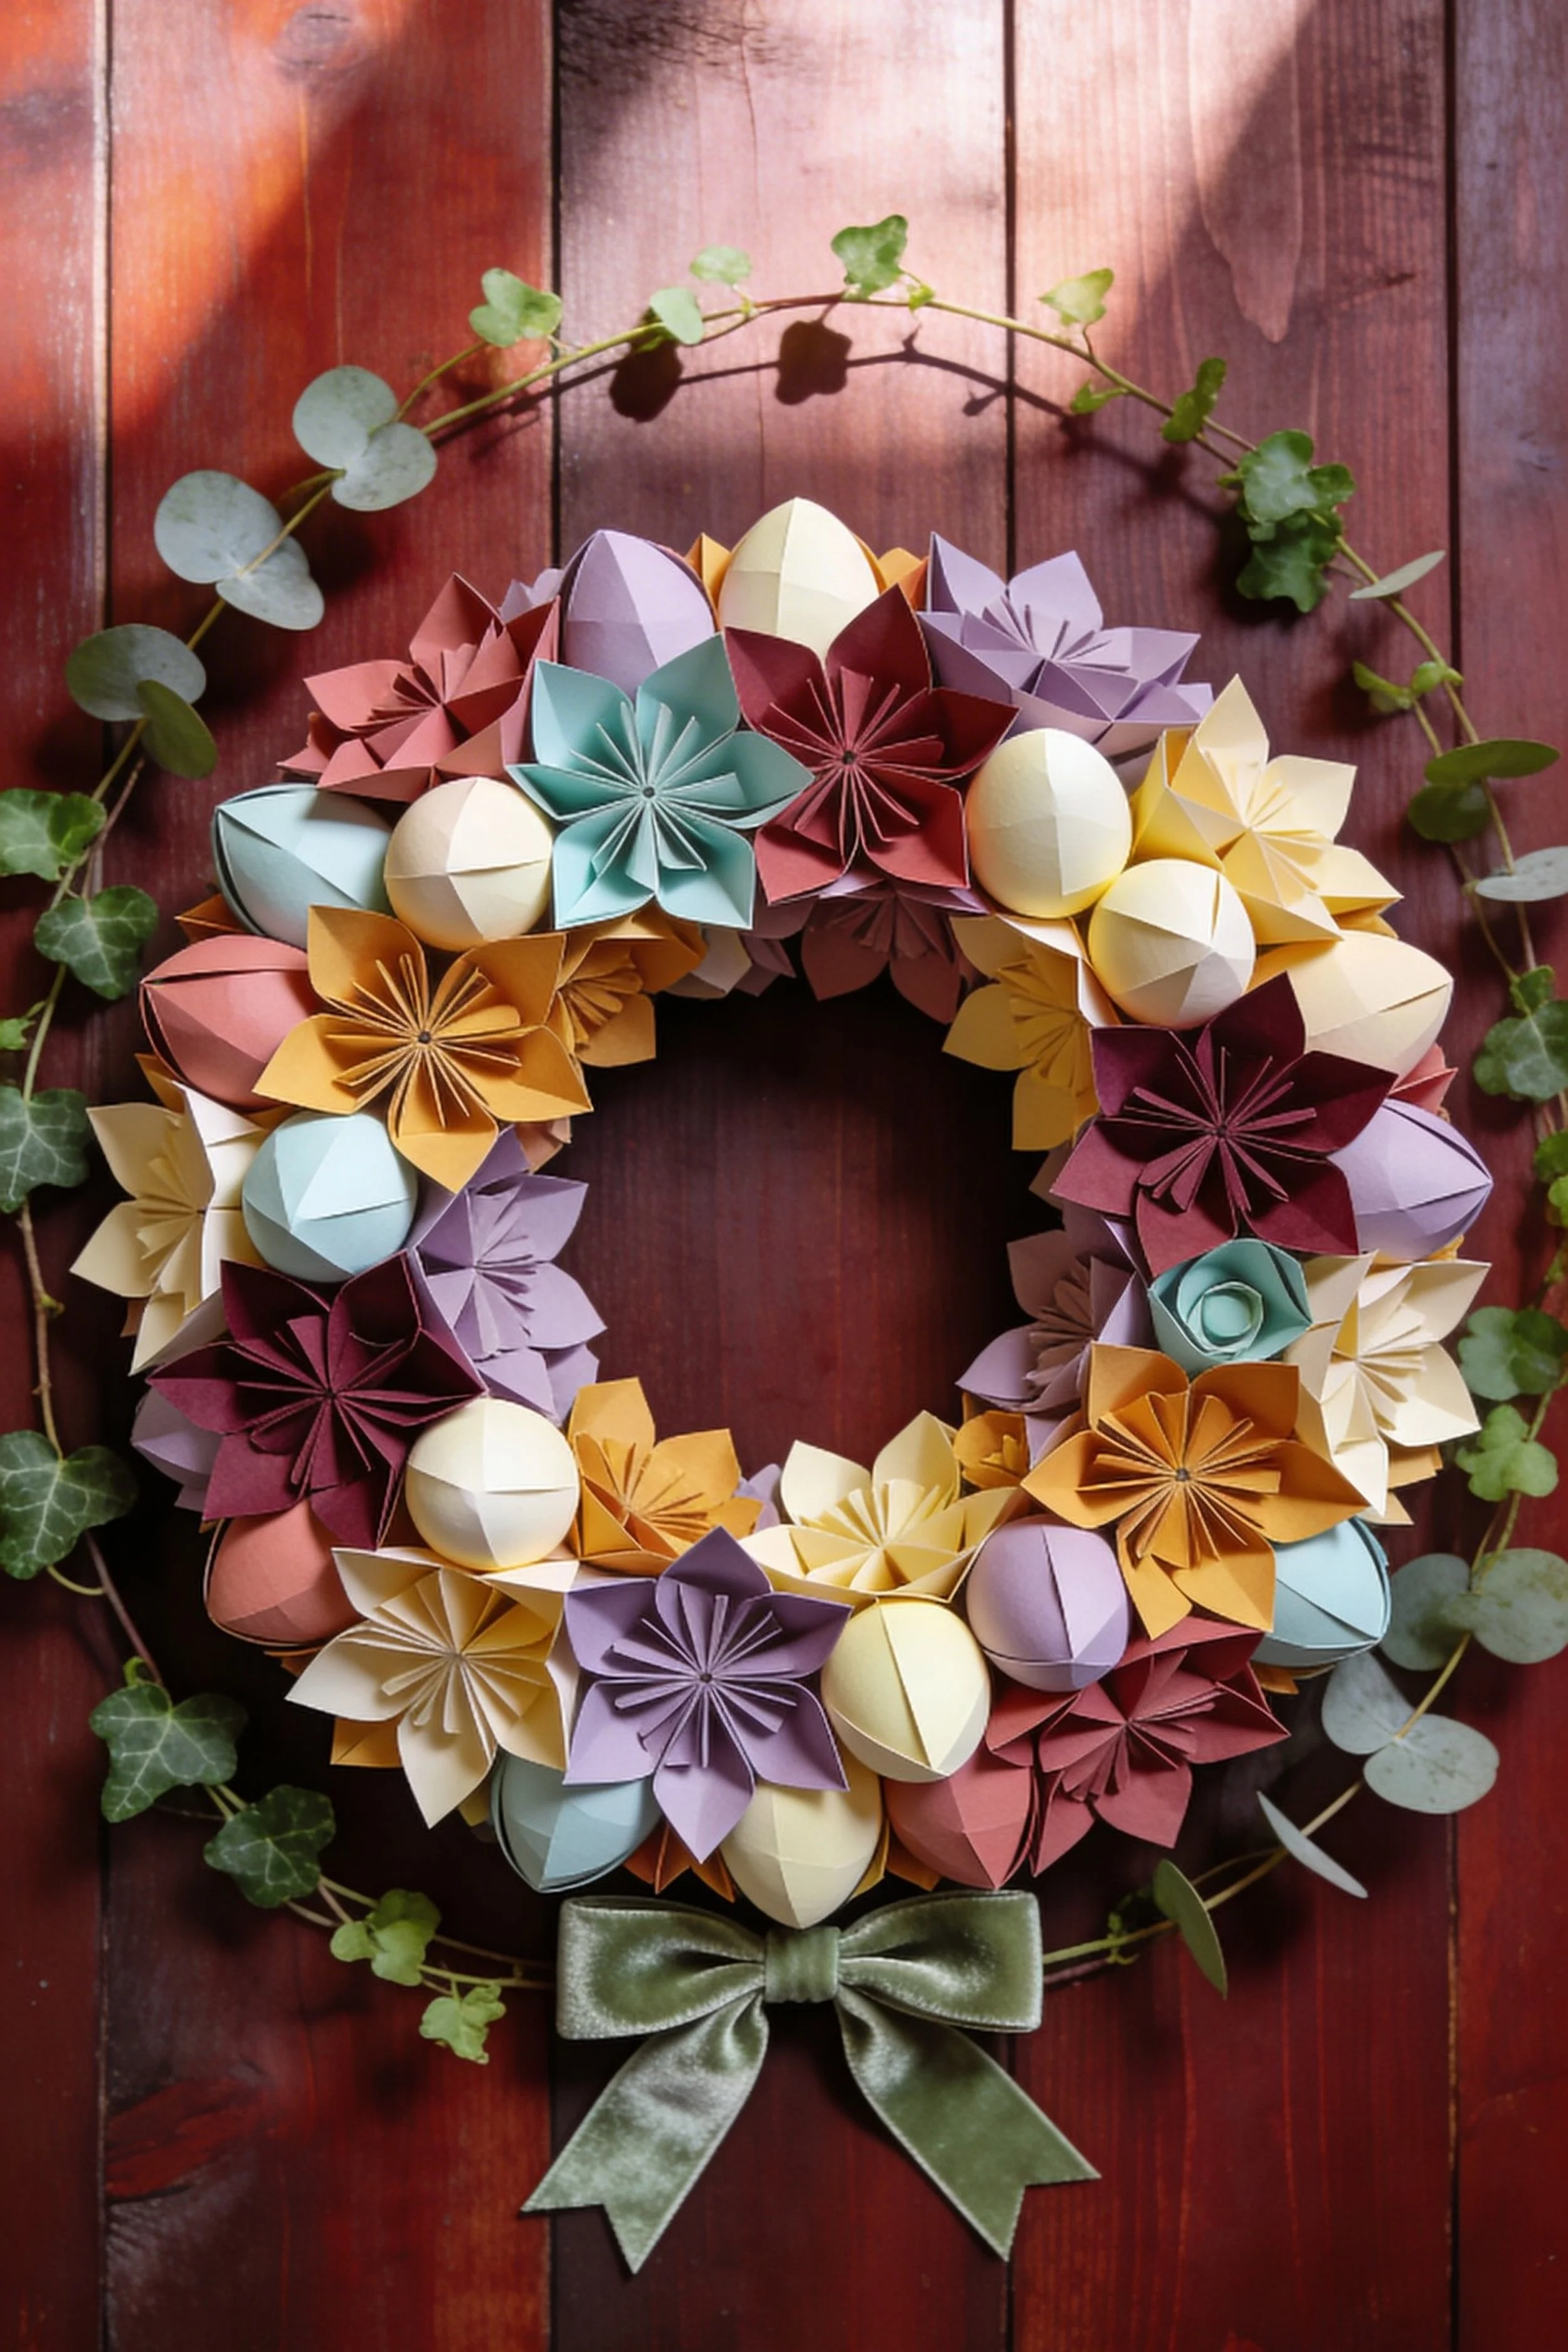
Folded Paper Spring Bloom Wreath How-To Guide
What you’re making
You’re making a richly layered spring paper wreath that mixes folded blossoms and dimensional egg forms into one dramatic ring. Compared with the softer pastel egg wreath, this version leans a little warmer and moodier, using buttery yellow, dusty mauve, soft lavender, muted aqua, and deeper berry notes to create a floral look that feels sculptural and artistic. The finished wreath has strong petal definition and a slightly more botanical personality because the flower forms are more obvious.
This is a wonderful project for someone who loves origami inspired craft work but wants something decorative rather than tiny and technical. The folds are still important, but the composition is what really sells the look. You are aiming for fullness, contrast, and a rhythm of flowers and eggs that feels intentional from every angle.
Materials + tools
- 12 inch to 14 inch circular wreath base
- Medium weight cardstock in lavender, mustard, buttercream, dusty rose, mauve, burgundy, aqua, pale mint, and cream
- Additional cardstock for leaf shapes if desired
- Dimensional paper eggs or lightweight faux eggs
- Hot glue gun and glue sticks
- Tacky glue
- Paper trimmer
- Scissors
- Bone folder
- Ruler
- Pencil
- Floral wire or thin craft wire
- Faux ivy or eucalyptus vine for framing
- Velvet or satin ribbon for a bow
- Small floral fillers or faux tiny blossoms
- Clips for holding folds while drying
- Hanging loop or twine
Finished size + customization notes
With a 12 inch form, plan for a finished wreath around 16 to 18 inches. With a 14 inch form, the finished piece can be close to 20 inches depending on how far your flowers project. This design thrives on medium to large folded blooms. If you make everything too small, the wreath loses its editorial presence.
For customization, you can make this look warmer with more mustard and mauve, softer with more lavender and cream, or more classic Easter with extra pastel eggs. You can also skip the bow if you want a more modern art piece feel, but the soft ribbon helps ground the design beautifully.
Step by step instructions
Study the balance of the inspiration before you start.
This wreath is not just random flowers around a ring. It has areas of strong blossom clustering, eggs tucked between petals, and color repeated in a way that keeps the eye moving. Spend a minute identifying three things: your main flower style, your egg style, and your accent color family. That simple planning step will keep your wreath cohesive.Prep your base and hanging loop.
Wrap the wreath form in a neutral material if necessary. Attach the hanging loop first, then decide where your bottom will be. If you plan to add a bow, mark the bottom lightly with pencil on the back so you know where to leave room.Choose one primary flower fold and one secondary flower fold.
This wreath looks most successful when not every bloom is identical. Make one larger pointed petal flower as your main form and a second smaller rosette or star fold as your supporting bloom. Doing this creates richness without visual chaos. Test one of each before batch production.Cut paper for the large pointed flowers.
Squares around 4.5 to 5 inches work well for medium large blooms. You can create a six petal or eight petal flower depending on the fold you prefer. The main goal is sharp petal edges and enough depth in the center that the flower casts shadow. You should now see a flower that looks sculptural even when sitting alone on the table.Cut paper for the secondary blossoms.
These can be smaller star flowers, accordion rosettes, or simpler pinwheel folds. Use squares or strips depending on the fold type. Keep them around 2.5 to 3.5 inches across finished. Their role is to bridge gaps and add variety, not steal focus from the bigger flowers.Make a full batch of large flowers first.
Produce at least 8 to 12 main flowers. Use your palette thoughtfully. Spread your strong warm colors, your cool note colors, and your pale neutrals evenly. Do not make all the cream flowers first and all the burgundy last. Mixing as you work helps you visualize the wreath better.Create the dimensional eggs.
Use either folded faceted eggs or assembled layered eggs from multiple identical silhouettes. The eggs in this style can be more graphic than realistic. Their job is to bring rounded form among the angular flowers. Make about 10 to 14 eggs in cream, soft yellow, pale peach, lavender, and light blue.Test a mini composition on the table.
Before assembling the full wreath, place three flowers, two eggs, and a small filler bloom together on the table. Does it look balanced. Does one style dominate too much. This little test cluster often tells you if you need more contrast or if the pieces are too similar in scale.Map the ring with anchor flowers.
Place 5 or 6 of the largest blossoms around the wreath first. These should define the major rhythm of the design. Leave some spaces intentionally wider than others, because eggs and smaller blooms will bridge them later. If everything is equally spaced in a perfect pattern, the wreath can feel static.Insert your first eggs between blossoms.
Tuck eggs into the spaces between large flowers, sometimes nestling them slightly behind petals and sometimes letting them sit forward. This overlap is essential. The inspiration image feels lush because the elements are interlocked, not merely placed side by side.Glue in layers, not piece by piece at random.
Work one section at a time and build from back to front. First a background flower or filler. Then an egg. Then a more dramatic top flower. This approach creates true depth. You should now start seeing shadows and overlapping edges that make the wreath feel dimensional from across the room.Use the secondary flowers to soften transitions.
Where two large blossoms meet awkwardly, tuck in a smaller flower. Where an egg seems isolated, frame it with a supporting bloom. Secondary flowers are visual glue. They help the wreath read as one complete design.Balance strong color with pale color.
The deeper berry or mustard flowers should be spread around the ring so no area feels visually heavy. Likewise, the palest pieces should not all gather in one corner. Step back every few minutes and squint. If one side appears darker, adjust it before the glue fully cools.Add vine or greenery around the outer edge.
A trailing eucalyptus or ivy vine behind the wreath softens the geometry and gives the whole piece that styled, photographed look. Attach it lightly so it peeks out rather than dominating. You do not need a full green halo. A few arcs and loops are enough.Check the inner circle often.
Large flowers can accidentally eat up the center opening. Keep the inner ring visible and reasonably even. If yours is collapsing inward, rotate a few flowers outward or tuck the eggs deeper into the body of the wreath instead of at the inner edge.Create one or two visual moments.
The best wreaths have little focal clusters. Maybe one mustard flower sits beside a pale egg and a tiny aqua bloom. Maybe a lavender flower balances a berry bloom across from it. These little composed moments make the wreath feel designed rather than merely filled.Attach the bottom bow.
Use a soft olive, sage, cream, or muted ribbon depending on your palette. Tie a bow with moderate tails and attach it firmly at the bottom. The bow should feel like a finish, not a distraction. If it steals too much attention, choose a less shiny ribbon or make it smaller.Refine with tiny fillers.
Add a few tiny rolled centers, mini petals, or clipped floral fillers in the most obvious gaps. The point is to polish the silhouette. You should now see a wreath that looks full without being jammed packed.Do a hang test in natural light.
Flat lay views can hide imbalance. Hang the wreath against a door or wall and study it. Sometimes a piece that looked perfect on the table droops when vertical. Reinforce or reposition anything that suddenly feels awkward.Finish the back neatly.
Cover exposed glue lumps or wire ends with felt, ribbon, or cardstock strips on the back side. Neat finishing matters, especially if the wreath will hang somewhere visible from multiple angles.
Troubleshooting
My flowers look crushed.
Your cardstock may be too thin, or you may be holding them too hard while gluing. Use a slightly heavier paper and glue from the base rather than pressing on the petals.
The wreath has no focal point.
Cluster one stronger color with two supporting pieces in one area and echo that idea softly across the ring.
It feels too busy.
Remove two or three small filler pieces. Often the issue is not the main elements but too many little extras.
My eggs are disappearing.
Let more of them sit forward or use slightly paler colors so they contrast with the flower petals.
The bow looks wrong.
If the wreath is already visually rich, choose a simpler matte ribbon in a muted tone.
Finishing details
Once everything is secure, trim glue strings and gently reopen any flower petals that got flattened during assembly. Store the wreath upright in a deep box with tissue supporting the most projecting pieces. Avoid humid outdoor conditions unless the wreath is on a protected covered door. Optional upgrades include adding tiny pearl centers, dusting the edges lightly with iridescent craft spray for a soft shimmer, weaving in micro greenery, or swapping the bottom bow for a velvet ribbon hanger at the top. For a more upscale finish, back the entire wreath with a thin wrapped ring of linen ribbon so the reverse side looks as beautiful as the front.
Shop Similar
- Mixed pastel cardstock for origami flower wreaths
- Paper craft scoring tools for crisp floral folds
- Round wreath bases for spring door decor
- Decorative ribbon in muted velvet and satin tones
- Artificial ivy and eucalyptus vines for wreath accents
- Lightweight craft eggs for paper wreath projects
Style It With
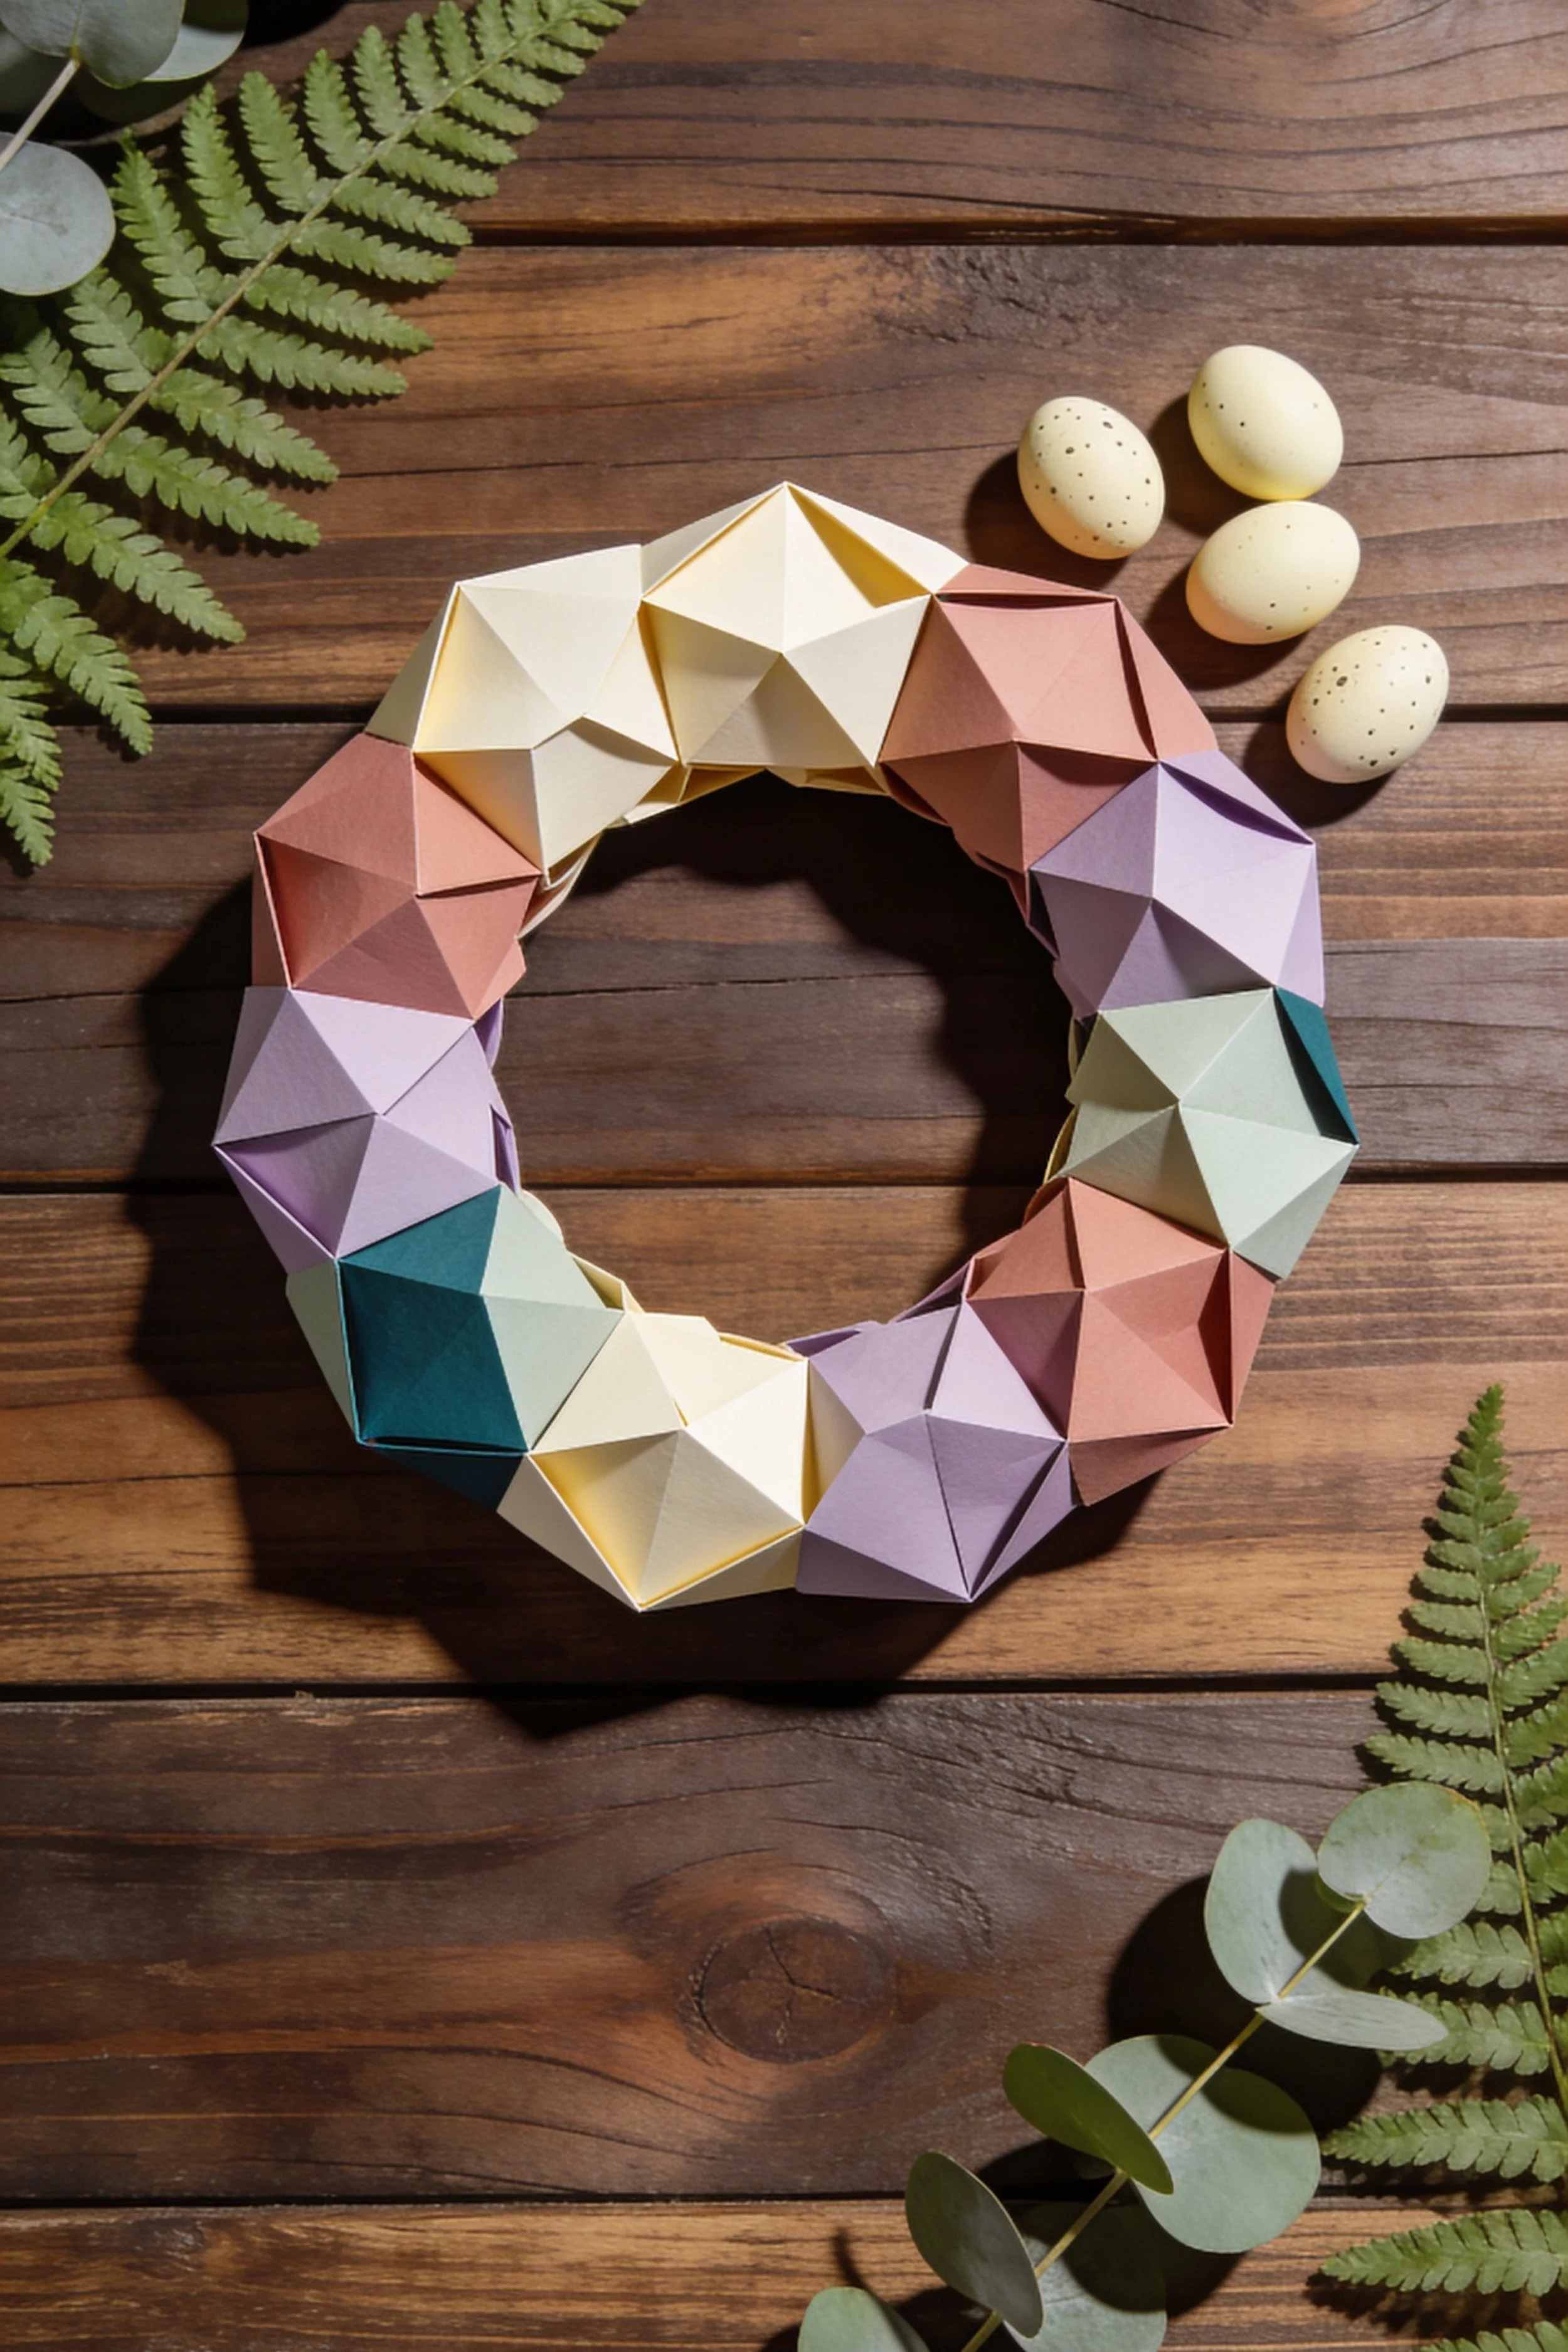
Geometric Paper Egg Wreath Make-It-Yourself Tutorial
What you’re making
You’re making a modern geometric wreath built entirely from folded faceted paper units arranged into a clean circular ring. Unlike the fuller floral wreaths, this one is more restrained and architectural. The beauty comes from repeating the same folded shape in soft spring colors so the light catches the facets and creates subtle shadow and structure. It feels minimalist, but still seasonal thanks to the egg inspired palette and the styled greenery around it.
This is a great project if you like order, repetition, and a calmer finished look. Because the design is simpler, precision matters even more. Every fold needs to be crisp, every unit needs to be close in size, and the circle needs to feel even. The result is a wreath that looks modern and thoughtful rather than overly busy.
Materials + tools
- 10 inch to 12 inch wreath ring or sturdy cardboard ring
- Heavy cardstock in cream, pale yellow, blush, lavender, soft mint, and deep teal
- Paper scoring board or ruler and scoring tool
- Bone folder
- Craft knife or scissors
- Low temp glue gun
- Tacky glue
- Double sided tape
- Pencil
- Template for polygon or faceted fold unit
- Chipboard backing ring if extra support is needed
- Hanging ribbon or twine
- Faux eucalyptus stems
- Faux fern stems
- Decorative speckled eggs for surrounding styling if desired
- Cutting mat
Finished size + customization notes
A minimalist wreath like this usually finishes only a little larger than the base because the folded units are tucked closely together. A 10 inch base may finish around 12 to 13 inches, while a 12 inch base may finish around 14 to 15 inches.
You can customize the look by keeping the palette super soft and tonal, adding one bold accent color, or enlarging the units slightly for a chunkier sculptural ring. For the cleanest result, limit yourself to five or six colors total. Too many shades can weaken the elegant geometric effect.
Step by step instructions
Decide on the exact unit shape.
The inspiration shows repeated faceted forms that feel like a cross between folded gems and abstract eggs. You can achieve this by folding square or slightly rectangular pieces into raised polygon blocks. Before cutting a whole batch, make one successful unit and keep it nearby as your master sample. That sample becomes your standard for every future fold.Create a template and use it consistently.
This project depends on consistency. Draw or print one accurate template, then trace it for all your pieces. If the fold lines shift from unit to unit, the wreath will look bumpy instead of elegant. Score all fold lines before you assemble. You should now see flat templates with clear mountain and valley fold guides.Choose your color placement before assembly.
Because the units are similar in shape, color becomes the main design variable. Lay the cut pieces out around the empty ring and test the rhythm. Soft yellow beside blush, then lavender, mint, cream, and a single deeper teal can create a beautiful calm pattern. You want repetition, not randomness.Fold each unit carefully.
Use the bone folder to sharpen every crease. Fold slowly and accurately, then glue the final seam to create a puffed geometric shape. Hold each unit until the seam is stable. If one side caves in or bulges more than the others, open it gently and refold while the glue is still flexible. Crisp faceting is what makes this wreath special.Make more units than you think you need.
A clean wreath often needs more repetition than expected. Prepare at least 16 to 24 units depending on size. Extra units are useful for testing balance or replacing one that ends up slightly misshapen.Prepare the backing ring.
Use a bought wreath ring or cut a ring from sturdy cardboard or chipboard. If your paper units are fairly large, a chipboard ring covered in matching cardstock works well because it stays lightweight. Wrap or paint the base in a neutral tone close to your lightest paper color. That way, any tiny glimpses between the pieces will disappear visually.Dry arrange the units around the ring.
Place the units side by side without glue, curving them around the form. Decide whether you want them aligned in the same direction or gently rotated for a more organic effect. The inspiration feels ordered but not rigid, so a slight change in angle from piece to piece is nice. You should now see the wreath taking shape even before attachment.Check the circle from all sides.
Lay the ring flat and make sure the thickness looks even around the whole wreath. If one area feels visually heavy, swap in lighter colors there or use one fewer unit and spread the others a bit more evenly. Minimal designs show imbalance quickly, so do not rush this step.Attach the first four anchor units.
Glue one unit at top, one at bottom, one left, and one right. These anchors define the circle. Once they are in place, fill the gaps between them. This method keeps the ring more even than simply working around in one direction.Continue building with close, neat spacing.
Attach the remaining units edge to edge or with tiny overlaps, depending on your chosen look. Keep checking that the inner ring remains round. If a unit juts inward too much, trim or reposition it. You are aiming for a clean wreath silhouette with subtle facet changes.Blend the color transitions.
If your sequence suddenly jumps from cream to deep teal too abruptly, move a blush or lavender between them. Smooth transitions help the wreath feel deliberate and premium. Repeating one color every few units also creates a pleasing rhythm.Reinforce from the back if necessary.
If a few units are only attached by a narrow seam, add little cardstock bridges on the back where they meet the ring. These hidden tabs make the wreath sturdier without changing the clean front view.Do a light shadow check.
Hold the wreath under side light. You should now see lovely dimensional shadows across the facets. If one unit looks oddly flat or collapsed, replace it. In a simple wreath, one weak unit stands out.Add a hanging loop.
Glue or staple a ribbon or twine loop to the back top. Test the balance before covering the attachment point. The wreath should hang straight. If it tilts, shift the loop slightly.Keep embellishments outside the ring if possible.
The inspiration styling includes fern fronds, eucalyptus, and speckled eggs around the wreath rather than integrated heavily into it. That is part of what keeps the wreath modern. If you want added greenery, attach just a couple small sprigs at the back outer edge so the paper remains the hero.Refine the edges.
Look for glue squeeze out, crooked seams, or flattened corners. Use your fingers to gently sharpen edges again. Sometimes simply pinching along a fold line restores the geometric clarity.Consider whether you want total symmetry or soft asymmetry.
A perfectly repeated sequence gives a more Scandinavian modern look. A softly irregular sequence feels more handmade and organic. Either works, but decide intentionally and adjust your unit placement to match that choice.Style it in a clean way.
This wreath looks especially pretty with a few natural elements nearby rather than a lot attached to it. Think wood, pale eggs, simple greens, and sunlight. If you overload it with florals or ribbon, it loses the sculptural charm.Make a final front and side inspection.
From the front, the circle should look clean. From the side, you should see enough depth to catch light but not so much that the wreath looks bulky. This is your last chance to swap a weak unit for a better one.Store with structure in mind.
Because the units are faceted, do not stack heavy items on top. Place the wreath flat in a shallow box or hang it from a hook inside a closet between seasons.
Troubleshooting
My units are not matching in size.
Use one template only and score every fold before assembly.
The wreath looks sloppy.
Minimal projects reveal inconsistency. Replace the weakest units and clean all glue strings.
I cannot get a true circle.
Set four anchor points first and fill in between them rather than working around randomly.
The units collapse when glued.
Use slightly heavier cardstock and allow seams to set fully before pressing them onto the ring.
The color arrangement feels dull.
Add one deeper or cooler accent color like teal or slate blue to wake up the palette.
Finishing details
This wreath benefits from very clean finishing. Remove all visible adhesive strings and wipe away pencil marks before hanging. If you want more durability, use double sided cardstock or laminate your templates lightly with matte spray before folding. Optional upgrades include mixing in metallic vellum for one or two highlight units, adding a tiny linen bow at the bottom, or placing a slim hoop frame around the outside for a gallery style presentation. Keep the add ons restrained so the faceted paper remains the focus.
Shop Similar
- Heavy pastel cardstock for geometric paper wreaths
- Paper scoring board for accurate fold lines
- Bone folder set for crisp origami style creases
- Chipboard rings and wreath forms for paper decor
- Decorative eucalyptus stems for minimalist styling
- Speckled faux eggs for spring tabletop accents
Style It With
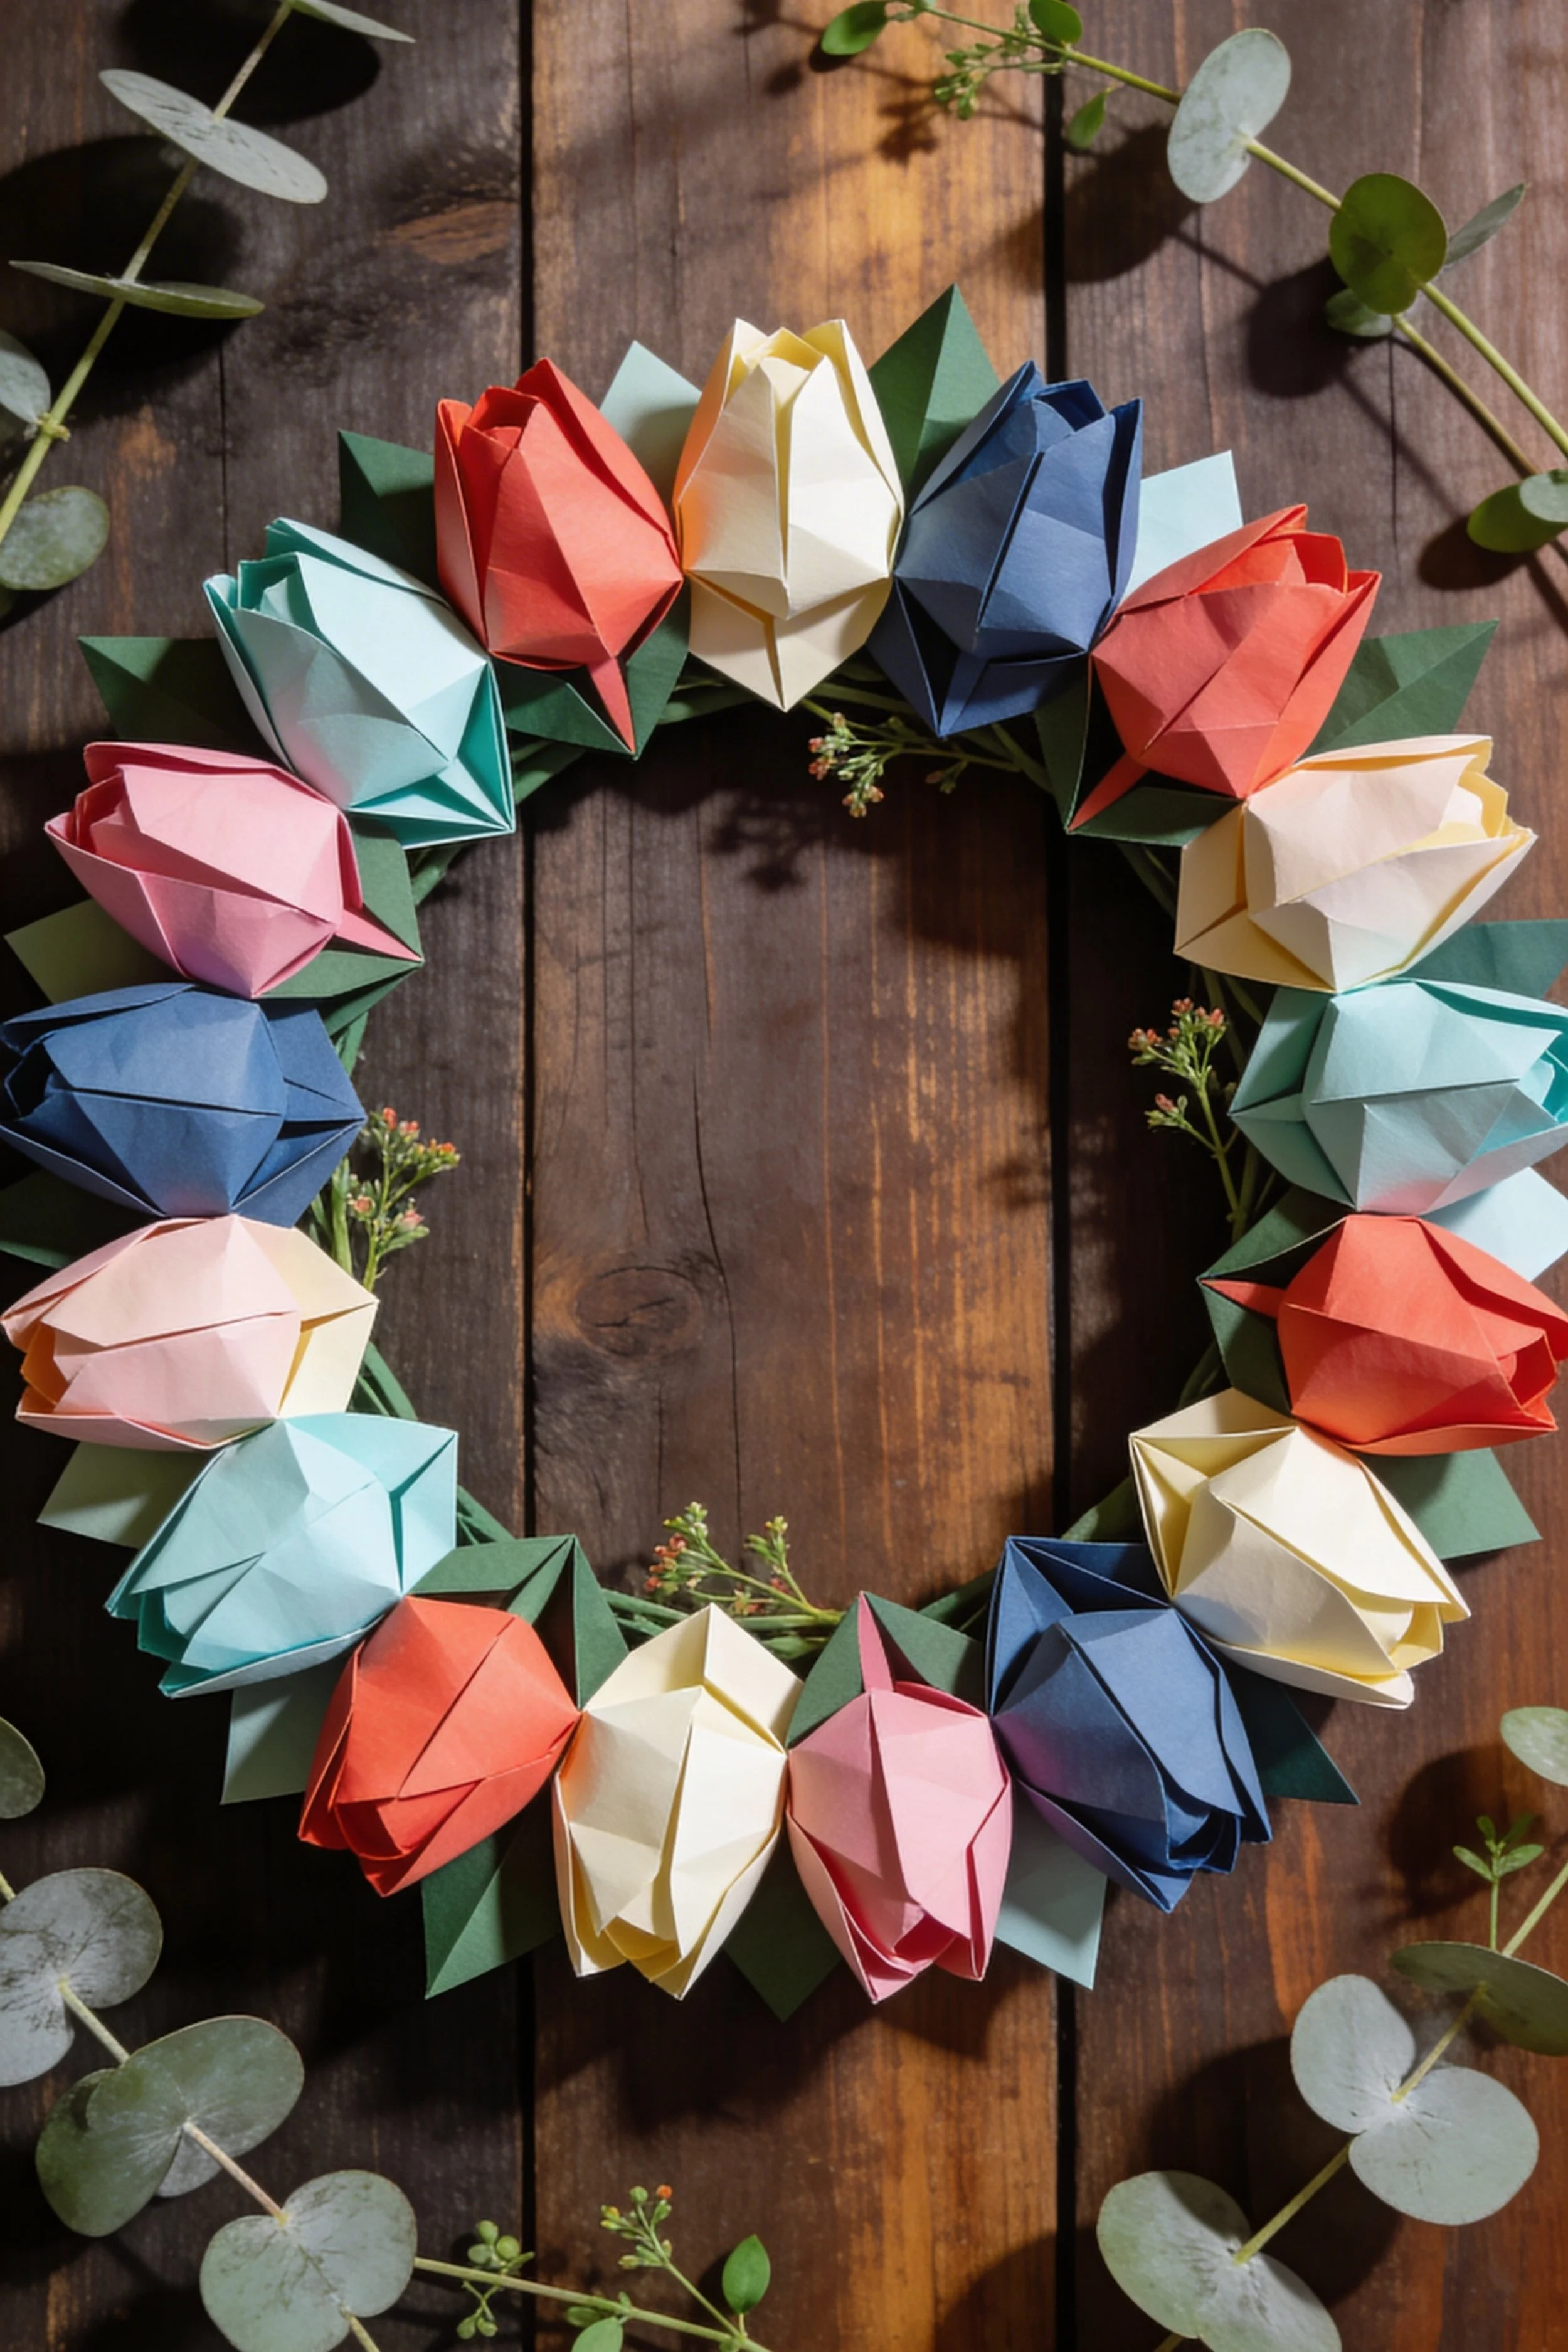
Origami Tulip Wreath Step-by-Step Tutorial
What you’re making
You’re making a clean, sculptural paper wreath built from folded origami tulips in a cheerful spring palette, arranged around a circular base for a fresh, modern floral look. This version has the charm of real blooms but keeps the crisp geometry and layered edges that make paper crafts feel especially elegant on a front door, entry wall, mantel, or kitchen nook.
The look in the photo is simple but polished: soft coral, blush pink, buttercream, pale aqua, and deep navy tulips spaced evenly around a green wreath base, with pointed folded leaves peeking behind each flower. The overall effect is bright, balanced, and slightly Scandinavian in mood, with just enough color contrast to feel playful without becoming busy.
Materials + tools list
- Cardstock or heavy origami paper in tulip colors:
- blush pink
- coral
- butter yellow
- pale aqua
- navy blue
- ivory or cream
- Green cardstock for folded leaves
- A wreath base, about 10 to 12 inches across:
- grapevine wreath works well
- foam ring wrapped in crepe paper also works
- thin cardboard ring wrapped in green paper is the budget option
- Hot glue gun and glue sticks
- Craft glue stick for paper folds if needed
- Bone folder or the back of a butter knife for crisp creases
- Paper trimmer or scissors
- Ruler
- Pencil
- Clothespins or binder clips for holding glued pieces briefly
- Floral wire or twine for hanging
- Optional eucalyptus stems, faux greenery, or tiny filler sprigs
- Optional matte spray sealer for durability if displaying on a covered door
Finished size + customization notes
A wreath like the one in the photo looks best at around 14 to 18 inches finished diameter once the tulips are attached. The inner opening should stay fairly open and round so the flower shapes remain the star.
To customize it, change the palette, make the tulips larger or smaller, or cluster one color more heavily for a moodier designer look. If you want a closer match to the photo, keep the tulips medium sized and evenly spaced, with every flower angled slightly outward rather than lying flat against the ring.
Step by step instructions
1. Plan the palette and overall layout
Before you cut or fold anything, decide how many tulips you want. For a wreath like the one in the photo, aim for 14 to 18 tulips depending on the size of your ring and how full you want it to feel. Count out your colors first so you do not accidentally place all your dark tones on one side.
A balanced mix for this look would be:
- 3 coral
- 3 blush
- 3 aqua
- 3 navy
- 3 cream or butter yellow
- 2 extra mixed accent flowers
Lay the colors in a rough circle on your table. Alternate light and dark shades so the wreath feels intentional. You should now see a pleasing color rhythm rather than one heavy block of navy or coral in a single area.
2. Prepare your paper squares
Most origami tulips start with square paper, so cut your cardstock or origami sheets into equal squares. For medium flowers like the ones shown, 5 by 5 inch squares are a great starting point. If you want a fuller wreath for a larger door, go up to 6 by 6 inch squares. If you want a delicate indoor version, use 4 by 4 inch squares.
You will need:
- one square per tulip bloom
- one to two green pieces per flower for leaves, depending on how lush you want it
Keep your cuts precise. Uneven squares make folded flowers look twisted. Stack two or three sheets at a time if using a trimmer, but do not overstack or the corners can drift. If yours looks slightly off after cutting, trim the whole batch to the smallest clean size so all blooms match.
3. Fold the tulip blooms
There are many tulip folds, but for the look in the image, use a closed cup style bloom with pointed top petals. Start with one square colored side down if your paper is one sided.
Fold one diagonal, then unfold. Fold the other diagonal, then unfold. Turn the paper and fold it in half horizontally, then vertically, and unfold again. These crease lines help the paper collapse into a clean base.
Bring the sides inward so the paper collapses into a triangle base. From there, fold each flap upward toward the top point, forming a diamond like tulip body. Then fold side edges inward to shape the petals and create a rounded but pointed bloom.
Depending on the exact tulip method you use, you may either tuck tabs into pockets or glue a tiny hidden seam inside. The goal is a plump flower with visible angular planes, not a flat star. You should now see a tulip form with a narrow base and gently pointed petal tips.
Tip: cardstock gives a crisper, architectural tulip, while lighter origami paper makes softer petals. If your folds keep springing open, run a bone folder along each crease and add a dot of glue only where the paper resists.
4. Open and shape each flower
Once the basic tulip is folded, gently puff the center so it feels dimensional. Press lightly from the bottom and coax the petals outward without flattening the edges. This is where the project begins to look like the photo rather than a simple folded shape.
Each bloom should feel similar in size, but not machine perfect. Tiny differences make the wreath feel handmade in a good way. If one flower looks much shorter or wider than the others, check whether one fold was made too deeply. Open it and refold now rather than hoping it disappears later.
Visual checkpoint: set five finished blooms side by side. They should all have similar height, crisp points, and enough body to cast little shadows on your table.
5. Fold the leaves
The photo shows folded green backing elements that read like stylized tulip leaves. Cut green cardstock into rectangles around 3 by 5 inches for medium blooms. Fold them diagonally or into long kite shapes with a central crease. You want each leaf to be pointed and slightly stiff, not floppy.
A simple method is:
- Fold the paper in half lengthwise.
- Open it.
- Fold both long edges inward to the center crease.
- Press flat to create a long, pointed leaf.
Make one or two leaves per flower. One leaf gives a cleaner, more minimal wreath. Two leaves behind alternating flowers gives more fullness. If your wreath base is very visible, extra leaves will help cover it.
6. Build or wrap the wreath base
If you are using a grapevine base, you can leave it mostly as is and tuck the tulips into the twigs. If you are using foam or cardboard, wrap it with green crepe paper, green ribbon, or strips of green cardstock first. This helps any tiny gaps blend in.
For a cardboard version, cut two circles:
- outer circle about 12 inches
- inner circle about 7 inches
Glue them together for strength if needed, then wrap or cover the ring. Keep the base sturdy but not bulky. The flowers in the photo sit close together, so a slim base is easier to disguise.
Hold the ring up from a distance. You should now see a clean circle that will not visually compete with the tulips.
7. Dry arrange before gluing
This step matters more than most beginners think. Arrange all tulips around the ring without glue first. Tuck a leaf or two behind each flower and rotate the blooms so the petal tips angle slightly outward. The flowers should not all point exactly the same direction. A little variation makes it feel alive.
Alternate colors as you go. Place navy across from navy rather than side by side. Do the same with cream and coral. Leave a tiny amount of overlap between blooms so the wreath looks continuous and lush.
The photo has a fairly even distribution with no giant empty breaks. If yours looks sparse, either add more flowers or angle the blooms closer together so they cover more of the ring. If yours looks wider than the photo, your flowers may be sitting too far out from the center. Pull them inward a bit to tighten the silhouette.
Take a phone photo of the dry layout. Problems show up faster in a picture than in real life.
8. Glue the leaves first
Once the layout feels right, begin by gluing the leaves to the base rather than the flowers. This creates a hidden framework and makes the finished wreath look layered instead of pasted on. Work in small sections of three to four flowers at a time.
Place the leaf tips pointing outward. Allow some leaves to peek between tulips. Do not let every leaf show the same amount. Some should be more visible, others nearly hidden. This creates depth.
If you are using hot glue, press each leaf into place for a few seconds until secure. If working with delicate origami paper, keep the hot glue on the base rather than directly on the flower wherever possible so you do not wrinkle the paper.
9. Attach the tulips
Now glue the tulips over the leaves. Add adhesive to the back lower portion of the bloom, not the petal tips. Nestle each flower slightly over the previous one so the ring looks continuous. Keep checking the spacing from arm’s length.
For the image look, avoid flattening the blooms hard against the wreath. Instead, let the top half of each flower project outward just a little. That shadow and lift is what makes the wreath feel dimensional and high end.
Rotate colors as planned. A strong sequence might go coral, cream, navy, pink, aqua, cream, coral, navy, and so on. The exact order matters less than maintaining visual balance around the circle.
Visual checkpoint: after half the flowers are attached, the wreath should already look round and full, with no obvious base showing through the front.
10. Fill small gaps with greenery
The featured look includes subtle natural accents around the wreath. Add short clipped pieces of faux eucalyptus, tiny filler stems, or flat green shapes tucked between a few tulips. Keep this minimal. The tulips are the hero.
Place greenery in uneven intervals, maybe every third or fourth flower, rather than behind every bloom. If you overload it, the clean origami look gets lost. If you are going for the exact feel of the photo, use greenery like punctuation, not wallpaper.
A few tiny berry sprigs or soft wildflower fillers can also work. Choose accents that do not distract from the folded structure.
11. Reinforce the back
Turn the wreath over and inspect the back. Add extra glue where blooms feel loose. If any flower is attached only by one corner, secure it now. This is especially important if the wreath will hang on a door that opens and closes often.
Glue a loop of floral wire, ribbon, or twine to the top back. If the wreath is heavy, thread the hanger through the base rather than gluing it only to paper.
Hold it up vertically before calling it done. Nothing should flop forward. If a bloom tilts oddly, add a hidden glue point behind it using a scrap of cardstock as a bridge.
12. Adjust the final shape
This last shaping step is where the wreath becomes polished. Fluff petals gently, pull a few blooms forward, press a few leaves back, and make sure the center opening looks evenly round. Straighten any tulip that points too far inward or outward.
You should now see a bright spring wreath with crisp, sculptural flowers, balanced color placement, and enough depth to feel handcrafted and intentional. It should look fresh and airy against dark wood, white walls, or a painted door.
Troubleshooting section
My tulips keep unfolding
Your paper may be too stiff, too slippery, or not sharply creased enough. Use a bone folder on every fold and add the tiniest amount of glue inside hidden tabs. Lighter origami paper is easier to shape, while cardstock needs firmer creasing.
My wreath looks sparse
You likely need either more blooms or more overlap. Before making extra flowers, try shifting the existing ones closer together and adding a few more leaves behind them. A wrapped green base also helps disguise gaps.
The colors look random instead of balanced
Lay the wreath flat and look at it like a clock. Make sure darker shades appear in at least three separated places. Spread your strongest colors around the ring rather than bunching them together.
My flowers look crushed
This usually happens if you press them down too hard while gluing. Let the glue cool slightly before attaching, and hold the flower at the base only. Re puff the petals gently with your fingers after the glue sets.
The wreath base shows through
Add more leaves first, not more flowers immediately. Leaves are the easiest way to cover exposed spots without making the wreath too bulky.
My tulips do not match
Slight variation is fine, but major differences usually come from uneven paper size or inconsistent fold depth. Use a ruler and cut all squares together. Refold any outlier before gluing.
Finishing details section
For indoor use, your wreath is finished once the shapes are crisp and the back is secure. For a covered front door or porch, mist lightly with a matte paper sealer from a safe distance so the paper resists humidity a bit better. Do not soak it or the folds will soften.
You can also upgrade the wreath in a few beautiful ways:
- Add a soft ribbon bow at the bottom in cream, sage, or blush for a more romantic entryway look
- Tuck in mini speckled faux eggs for an Easter version
- Use metallic paper for two or three accent tulips if you want a dressier spring brunch or shower decoration
- Back the entire wreath with a hidden second ring of lightweight chipboard if you want extra stability for storage year after year
To store it, place it in a shallow box and support the petals with tissue paper around the edges rather than stacking anything on top. This is one of those crafts that stays beautiful when handled gently.
Shop Similar
- Pastel origami paper pack for spring wreath colors
- Heavy cardstock paper in blush coral blue and cream tones
- Small grapevine wreath forms for paper floral crafts
- Mini hot glue gun and glue sticks for paper crafts
- Bone folder and paper creasing tool set
- Faux eucalyptus stems for spring wreath decorating
Style It With
Once you’ve worked through even one of these wreaths, you’ll start to see how flexible the process really is. Change the color palette and the entire mood shifts. Adjust the scale and it becomes either delicate and minimal or bold and statement making. Add more greenery, a ribbon, or small seasonal accents and suddenly it feels tailored to a specific moment or holiday.
That’s the quiet strength of this kind of craft. It doesn’t lock you into one final look. It gives you a foundation you can revisit and reinterpret again and again. Over time, you may find yourself mixing techniques from different wreaths in this collection, layering folded flowers with geometric shapes or blending structured designs with softer elements.
Display them on doors, above mantels, along shelves, or even grouped together as a seasonal wall feature. However you use them, they carry that unmistakable handmade quality that instantly warms a space. Not loud, not overly decorative, just thoughtful and beautifully composed.
And once you’ve made one, it’s hard not to make another.