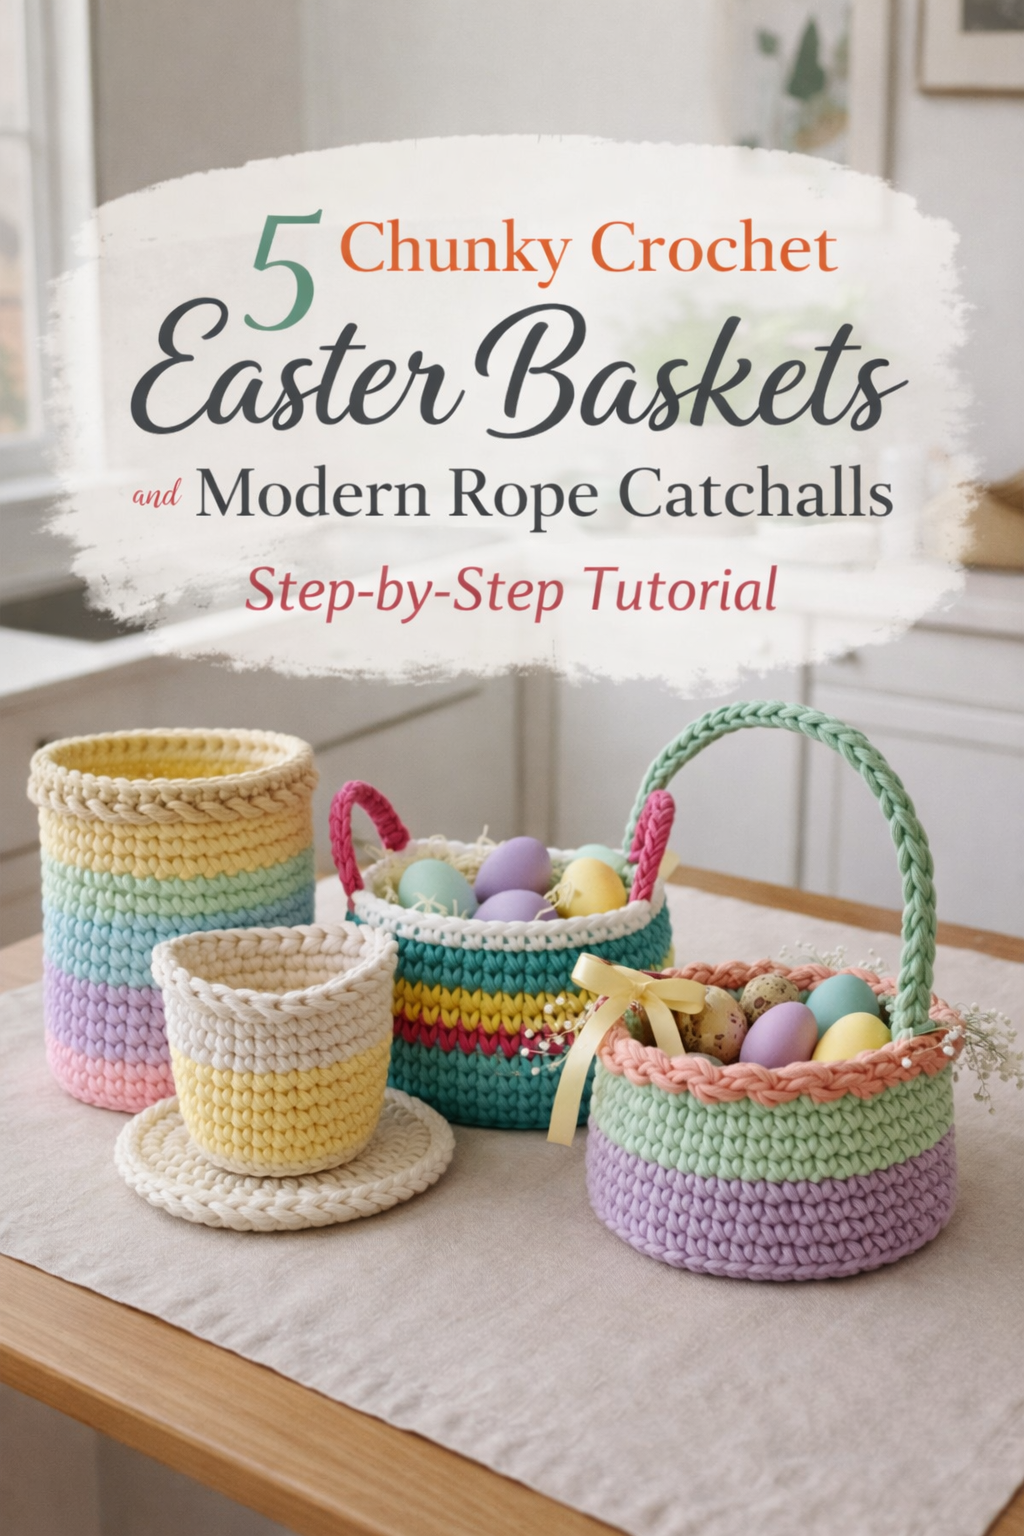
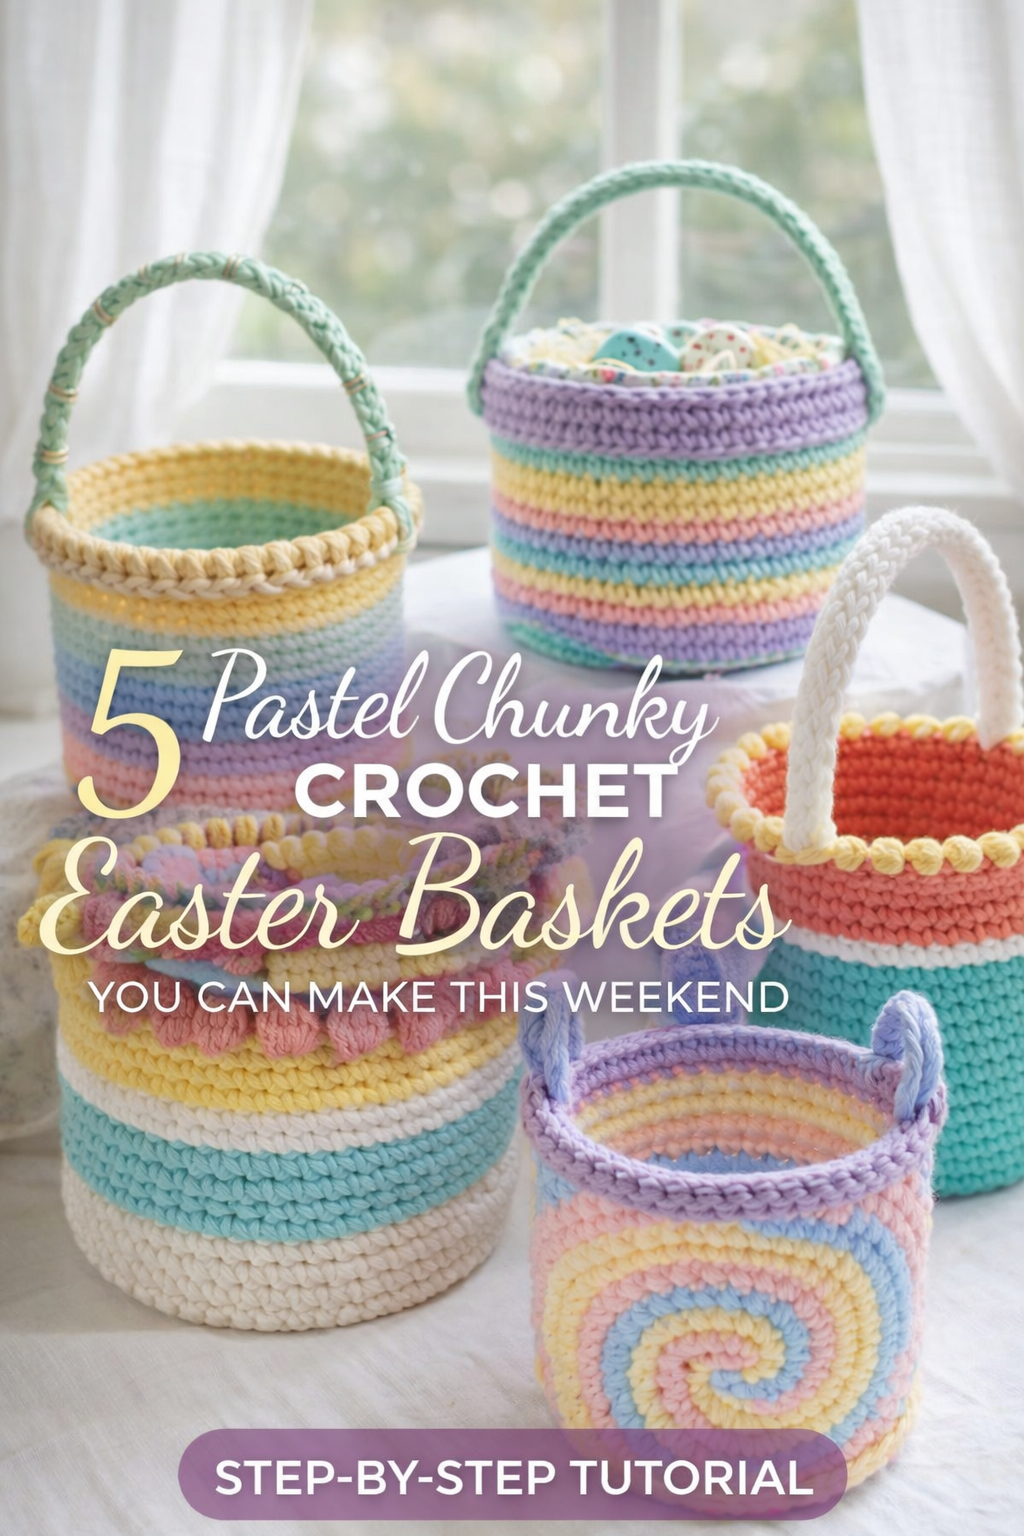
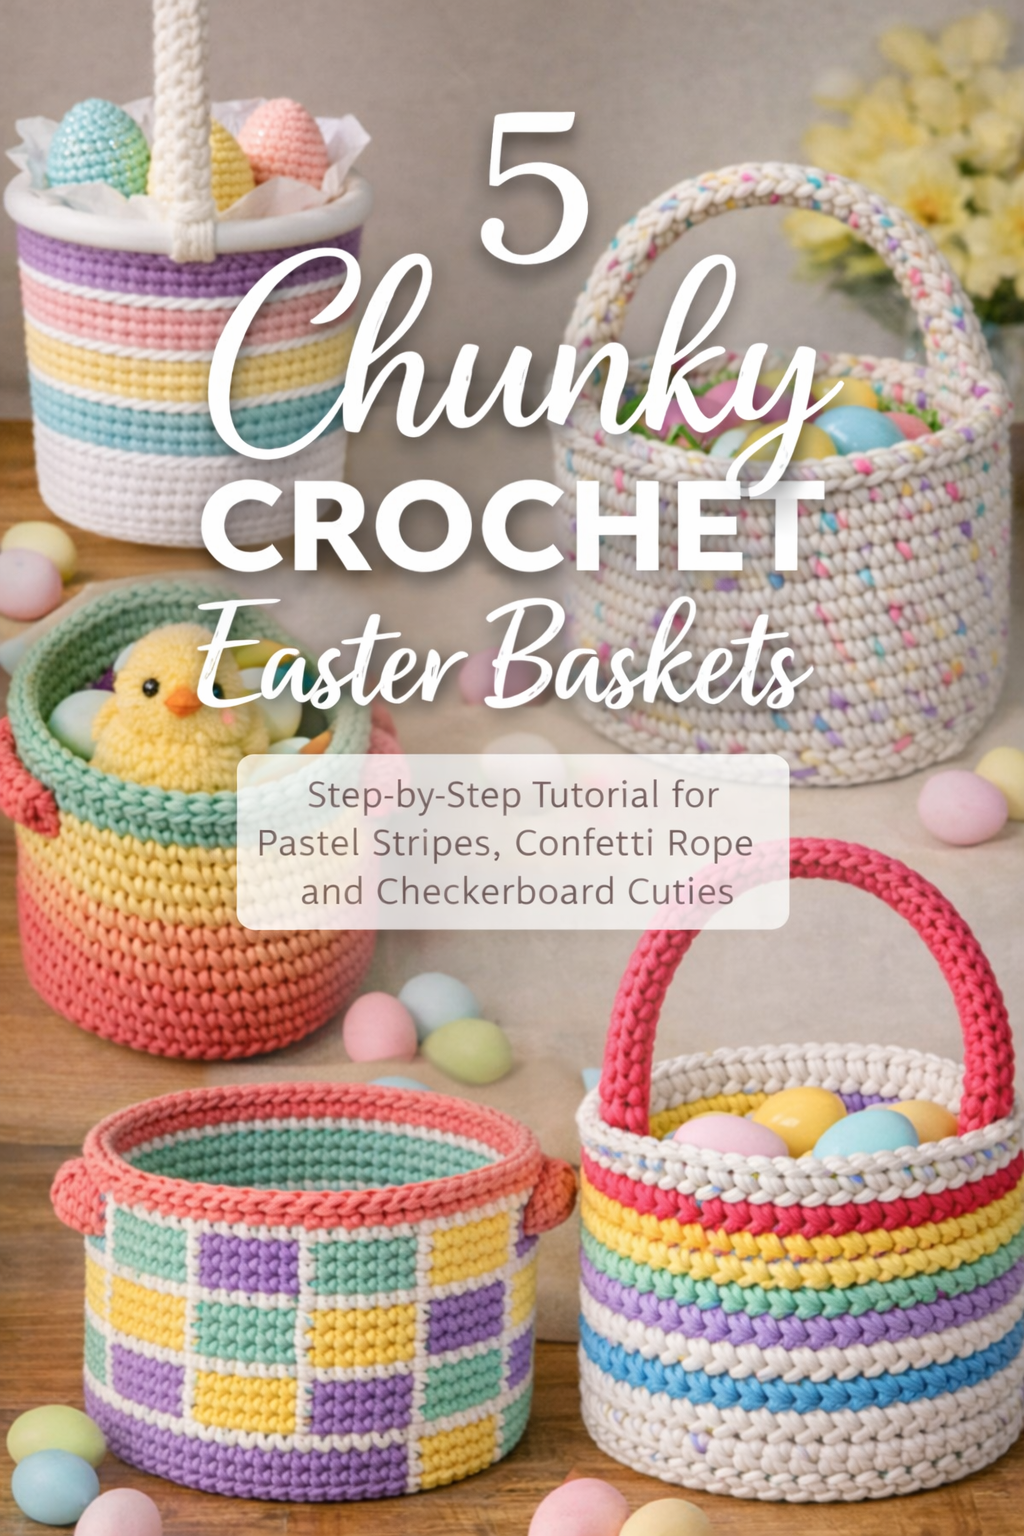
5 Chunky Crochet Easter Baskets Step-by-Step Tutorial for Pastel Stripes, Confetti Rope, and Checkerboard Cuties
More like this
Spring is officially in session and nothing says Easter like a basket that looks handmade, happy, and unbelievably photo ready. This roundup is all about chunky crochet baskets that work up fast, hold their shape, and look polished enough to live on your kitchen counter all season. You will get five distinct looks from pastel stripes and confetti rope to a bold rainbow handle moment and a graphic checkerboard that feels like a tiny quilt in basket form.
Each basket is designed to be beginner friendly with clear checkpoints so you always know if yours matches the vibe in the photos. You will learn how to build a stable base, turn crisp sides, keep your rounds even, and finish with a rim that stays smooth and structured. Pick one design for a quick weekend win or make the full set and style them together for the cutest Easter spread ever. Let’s grab our chunkiest yarn, make those stitches tight and tidy, and crochet a basket lineup that feels like pure spring.
💡 Pro Tip: Why I Link to Amazon Search Results and Not One Product
In the Shop the Look and Style it With sections under each bikini, I link to Amazon search results, not single products. Here’s why this matters:
Hot bikinis sell out fast. I don’t want you clicking on a dead link to a sold-out item. Search pages stay updated.
You get more options. Love the vibe but want a different color, cut, or price point? The search results give you everything that matches the look and energy.
I curate each search carefully. These aren’t generic. I spend hours crafting keywords that bring up exactly the kind of bikinis I’d wear—or recommend to my hottest friends.
Support with no pressure. If you click a link, browse, and buy something later, I may earn a small commission at no extra cost to you. That helps me keep bringing you curated collections like this one—powerful, seductive, and always fresh.
So dive in. Click through. Try something risky. These aren’t just bikinis—they’re commands, statements, and maybe even your new favorite weapon of choice.
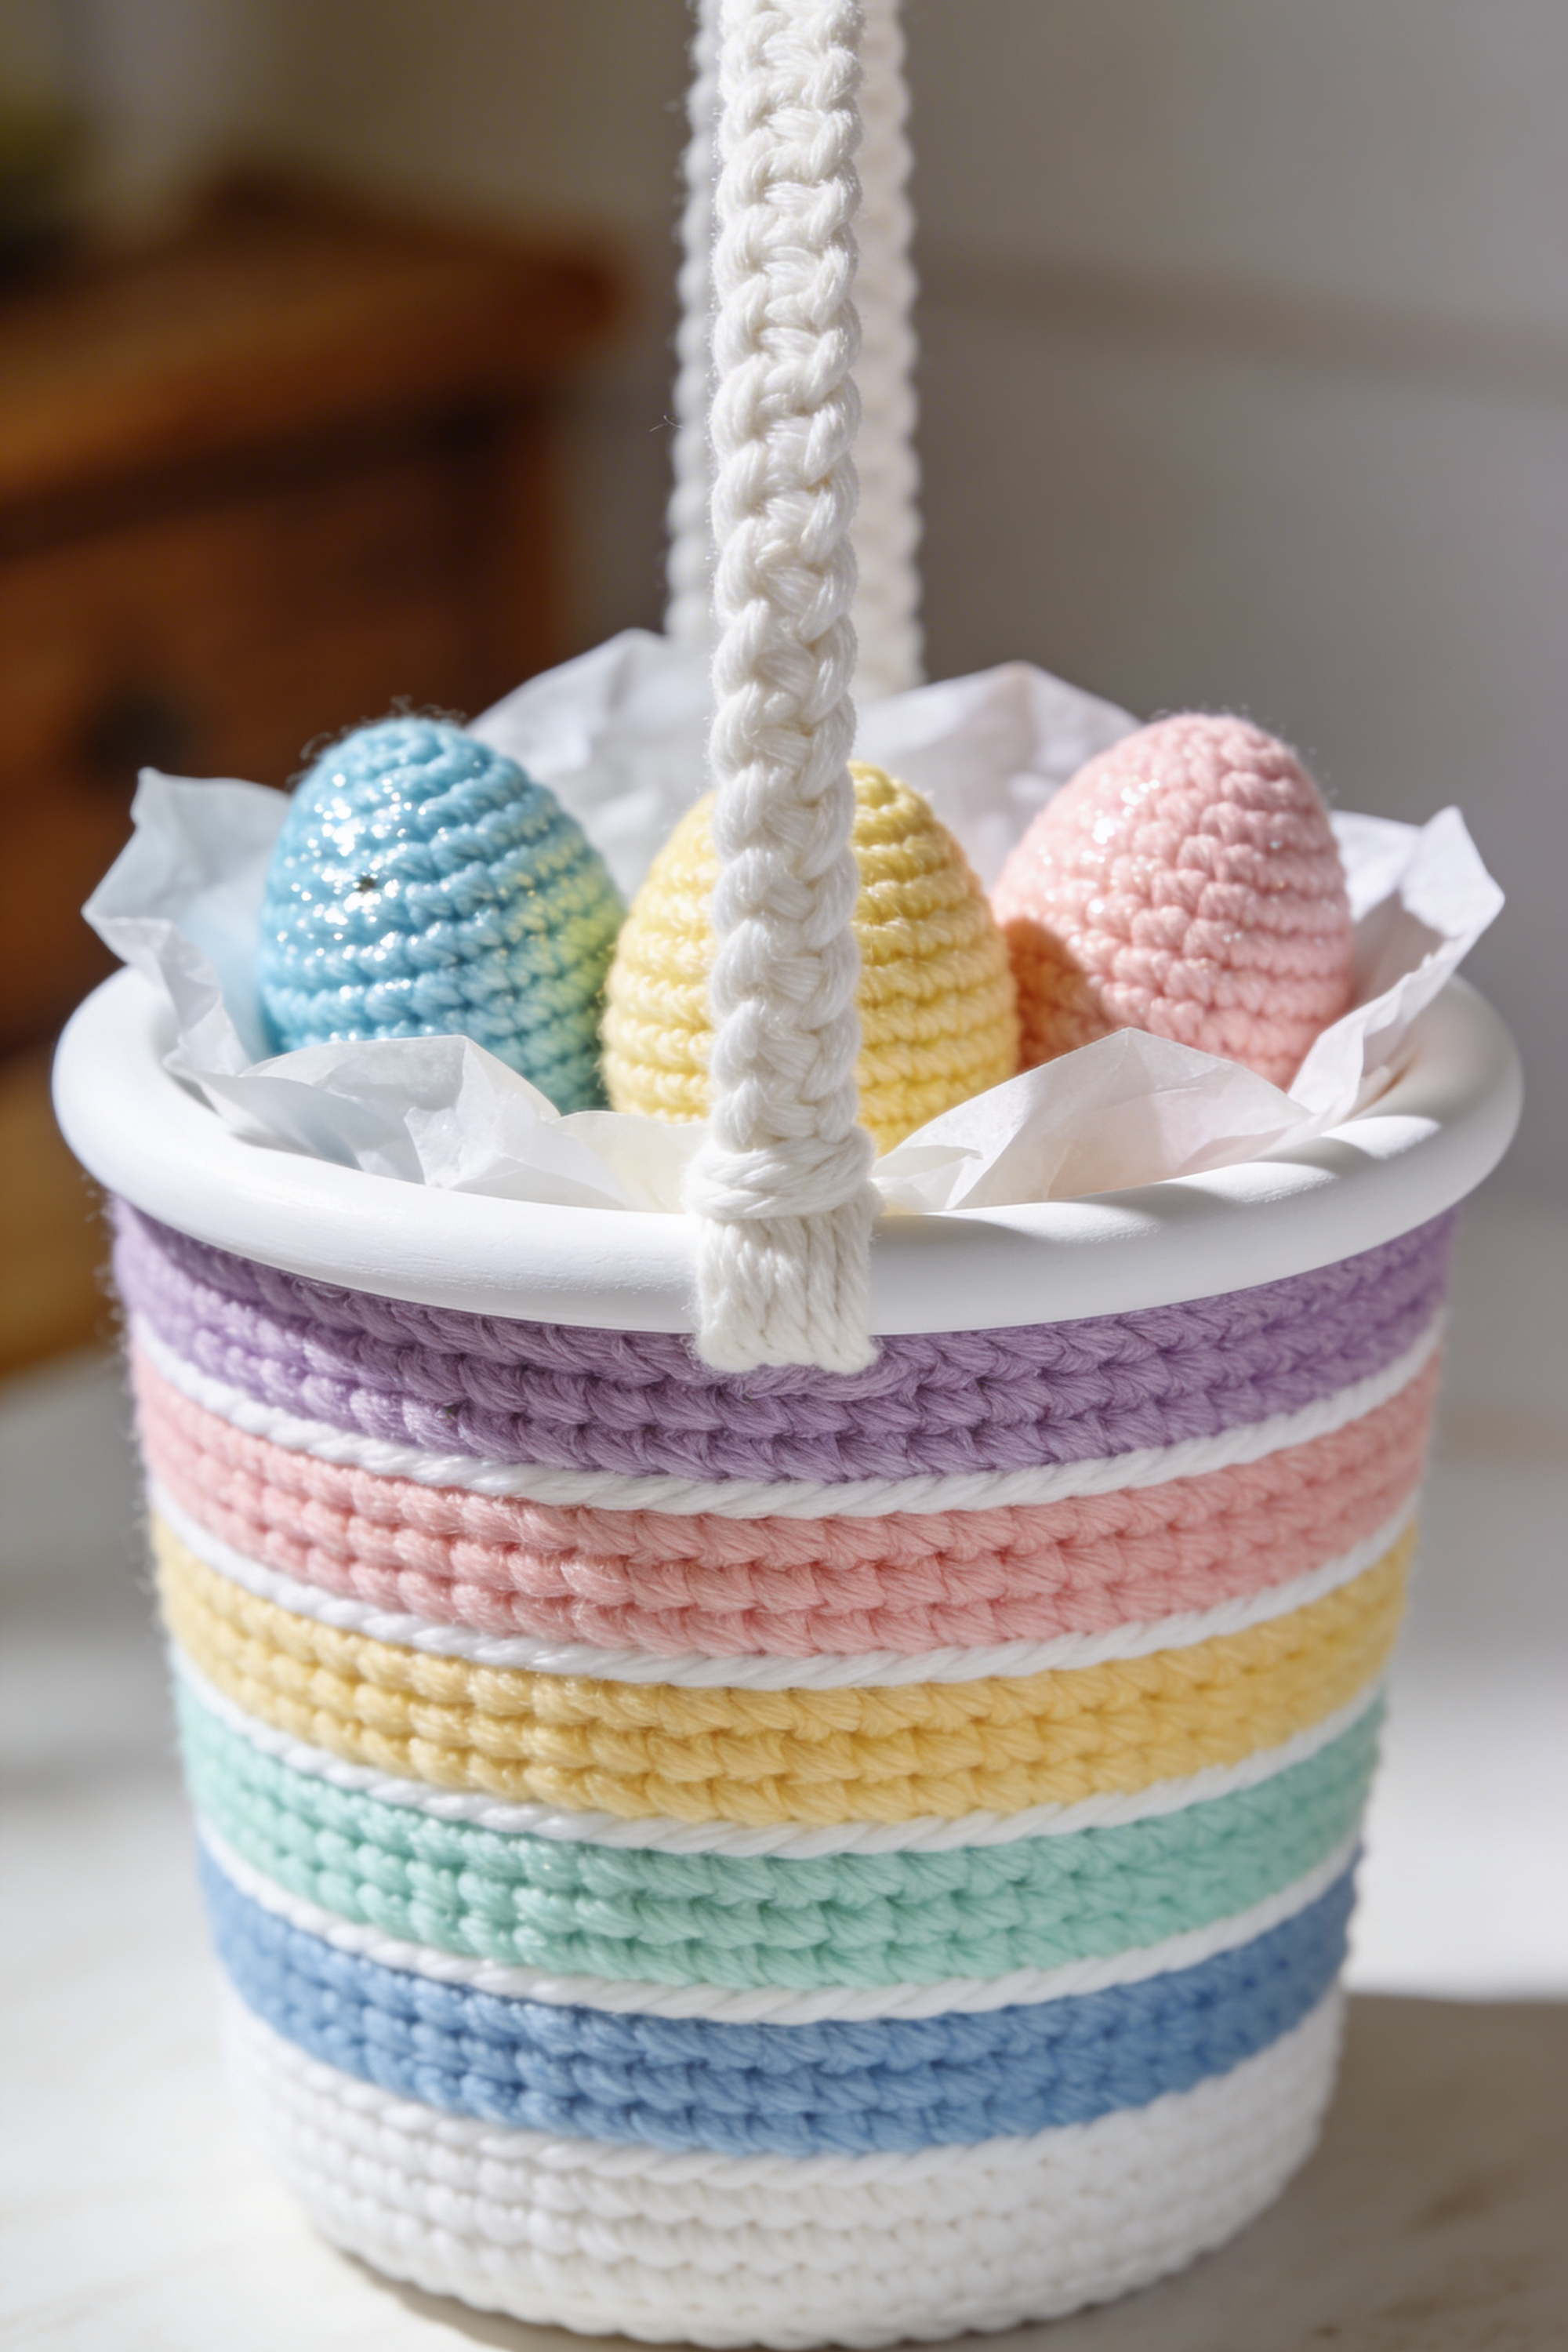
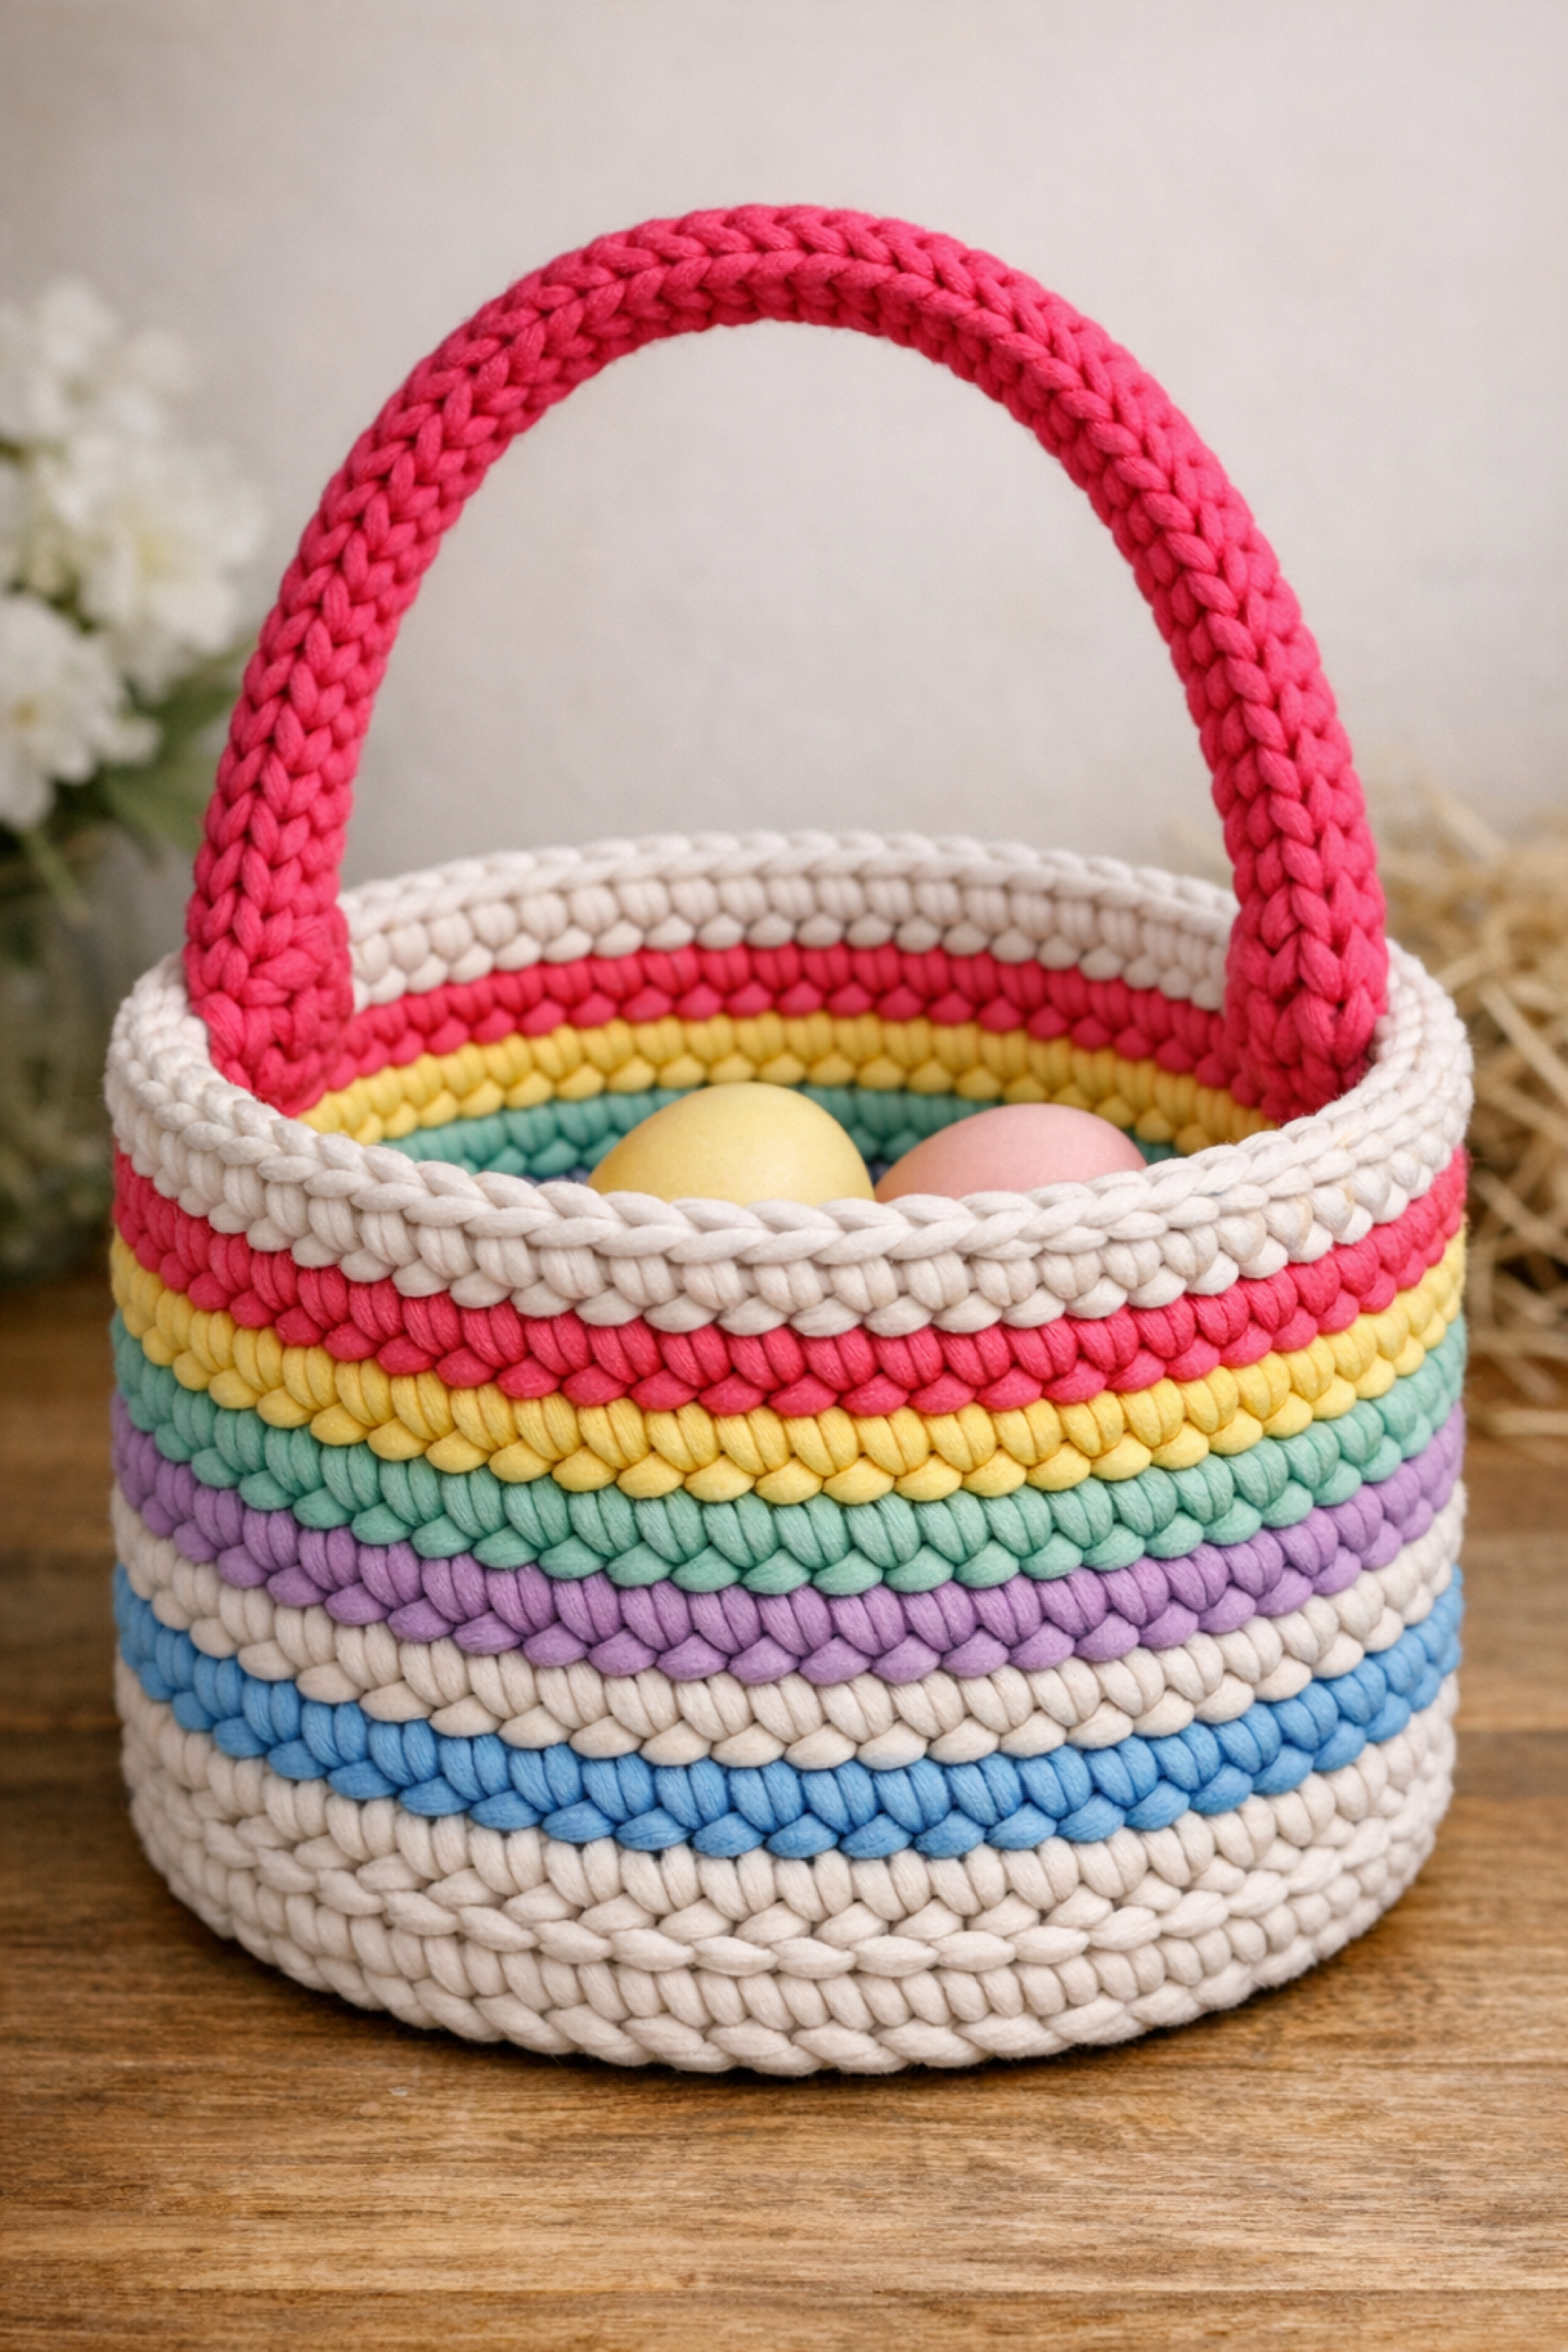
Pastel Rainbow Crochet Easter Basket with Braided Handle Step-by-Step Tutorial
What you’re making
This is a sweet, modern Easter basket with clean pastel stripes, a sturdy braided style handle, and a crisp rim that holds its shape like the photo. The look is “classic bucket” but upgraded, with tight stitches, neat color changes, and a structured top edge that stays perfectly round. You can make it as a fully crochet basket, or crochet a fitted sleeve around a small plastic pail for extra stability if you want the same ultra smooth rim vibe.
Materials + tools
- Super bulky cotton cord or tube yarn in pastel shades plus white (great for structure), or bulky cotton yarn held double
- Colors to match the photo: white, lavender, blush pink, butter yellow, mint, sky blue (swap any pastels you love)
- Large crochet hook sized for your cord or yarn (common range: 6 mm to 10 mm)
- Stitch markers (at least 2)
- Yarn needle for weaving ends
- Scissors
- Optional: small plastic pail or plastic craft bucket insert for a firm rim and perfectly upright sides
- Optional: plastic canvas sheet or felt for a hidden stiff base
- Optional: white tissue paper and Easter grass for styling
Finished size + customization notes
- Photo look: small tabletop basket, roughly 5 to 7 inches tall and 6 to 8 inches wide.
- To make it wider: increase the base circle rounds before you build the sides.
- To make it taller: add more straight side rounds, repeating stripes as desired.
- For cleaner stripes: change colors at the end of a round with an invisible join option, or crochet continuous rounds and shift the seam to the back.
Step by step instructions
Choose your structure plan
- Option A: Fully crochet basket (most common)
You will crochet a sturdy base, then build tight sides with single crochet and a reinforced rim. - Option B: Crochet sleeve over a plastic pail (closest to the ultra crisp rim feel)
You crochet the fabric to fit snugly, then secure it at the rim and base. This gives the “perfect ring” look similar to the photo’s smooth top edge.
- Option A: Fully crochet basket (most common)
Make a tight magic ring base
- With white cord, make a magic ring.
- Round 1: 6 single crochet into the ring. Pull tight.
- Place a marker in the first stitch.
Increase into a flat circle Use standard circle math. Keep your tension firm so the base feels dense and supportive.
- Round 2: 2 single crochet in each stitch (12)
- Round 3: (1 single crochet, 2 single crochet in next) repeat (18)
- Round 4: (2 single crochet, 2 single crochet in next) repeat (24)
- Round 5: (3 single crochet, 2 single crochet in next) repeat (30)
- Round 6: (4 single crochet, 2 single crochet in next) repeat (36) Continue until your circle matches the basket width you want. For a small basket like the photo, 36 to 48 stitches total is common depending on cord thickness.
Visual checkpoint: Your base should lie flat and feel thick. If it ripples, your tension is too loose or you added too many increases. If it bowls upward too soon, add one more increase round.
Create a crisp turning edge This step makes the sides stand up cleanly.
- Next round: single crochet in the back loop only of each stitch around. This creates a sharp corner and helps the basket walls rise straight.
Visual checkpoint: You should now see a defined ridge around the base, like a fold line.
Build the white bottom band
- Work 2 to 4 rounds of single crochet in both loops, no increases. Keep stitches stacked directly above each other.
Tip: If you want extra firmness, use the yarn under single crochet method. It creates tighter, more square stitches, which adds stiffness.
Plan your pastel stripe sequence The photo shows slim white separators between thicker pastel bands. A great stripe recipe is:
- 1 round white separator
- 2 rounds color
- 1 round white separator Repeat with lavender, blush, yellow, mint, blue.
If you want chunkier bands, do 3 to 4 rounds per color.
Change colors neatly For clean transitions:
- On the last stitch of the round, stop when you have two loops on hook.
- Pull through with the new color to finish the stitch.
- Chain 1 only if you are joining rounds. If you crochet continuously, do not chain.
Visual checkpoint: The color switch should look like a tidy stitch, not a knot.
Work the pastel rounds
- Continue crocheting single crochet rounds with your chosen stripe order.
- Keep checking the shape every few rounds.
If yours looks wider than the photo: You may be accidentally increasing. Count stitches occasionally to confirm you stayed the same number. If yours leans outward: Your tension may be too loose. Go down a hook size or switch to yarn under single crochet.
Optional upgrade: hidden stiff base insert If you want a basket that stands perfectly even when empty:
- Cut a circle of plastic canvas or stiff felt slightly smaller than the base.
- Slide it inside before you close the top rim. This keeps the bottom perfectly flat.
Create the smooth top rim look The photo’s rim looks very clean and slightly thicker. Try one of these approaches:
- Rim option 1: Single crochet plus slip stitch edge
Work 1 round single crochet, then 1 round slip stitch in the front loop only. This creates a firm corded edge. - Rim option 2: Folded rim (extra structured)
Work 2 rounds single crochet, then fold the rim inward and single crochet through both layers to lock it. Add a piece of plastic craft hoop inside the fold for a super crisp ring. - Rim option 3: Plastic insert method (if using a pail)
Stretch your crochet sleeve over the pail. Fold the top edge over the pail rim and stitch it down using a whip stitch with matching yarn.
Visual checkpoint: The top should look even and hold a circle without flopping.
- Make the braided look handle The handle in the photo reads like a braided chain. You can mimic that with a corded handle technique:
- Chain the length you want (for a small basket, 25 to 40 chains).
- Row 1: single crochet into the back bump of each chain. This makes a thick cord.
- Row 2: slip stitch back across to tighten further, or single crochet again if you want it thicker. If you want an even more braid like texture, crochet a foundation single crochet strap, then work a round of slip stitches along the edges.
- Attach the handle securely
- Mark two opposite points on the basket rim.
- Sew the handle ends onto the rim using multiple passes.
- Anchor the stitching through several stitches and into the folded rim layer if you used one.
Tip: For a clean attachment like the photo, stitch the handle end to look like a neat tab, then sew the tab flat to the rim.
- Hide and weave ends
- Thread a yarn needle and weave each tail through at least 2 inches of stitches.
- Split the tail and weave in opposite directions for extra security.
- Style the basket like the photo
- Add white tissue paper, gently crumpled.
- Nest pastel eggs inside.
- If you want crochet eggs, make small oval shapes and lightly stuff them, then place them as decor.
Troubleshooting
- Basket walls collapse or feel floppy
Use thicker cord, tighten tension, go down a hook size, or switch to yarn under single crochet. Add a folded rim or plastic hoop insert. - Base ripples like a ruffle
Too many increases. Remove the last increase round and redo with fewer stitches. - Base bowls upward too much
Too few increases or tension too tight. Add one increase round or go up a hook size. - Stripes look jagged at the seam
Try joining rounds with an invisible join, or keep your seam aligned at the back and use consistent color change technique. - Handle stretches over time
Crochet a shorter strap than you think, or thread a thin cord, ribbon, or strong yarn through the handle core and secure at the ends.
Finishing details
- Blocking: Lightly steam block if using cotton yarn, shaping the rim into a perfect circle.
- Stiffening: If you want a firm standing basket, brush on a light coat of fabric stiffener inside only, let dry over an upside down bowl.
- Lining: Cut a simple fabric circle and strip, stitch into a tube, and hand tack inside for a polished look.
- Edge polishing: A final round of slip stitch in white can make the rim look extra clean and photo ready.
Shop Similar
- Pastel super bulky cotton cord for basket crochet
- Large crochet hooks set for chunky cord projects
- Plastic craft hoops for stiff basket rims
- Plastic canvas sheets for basket base inserts
- Fabric stiffener for crochet baskets
Style It With
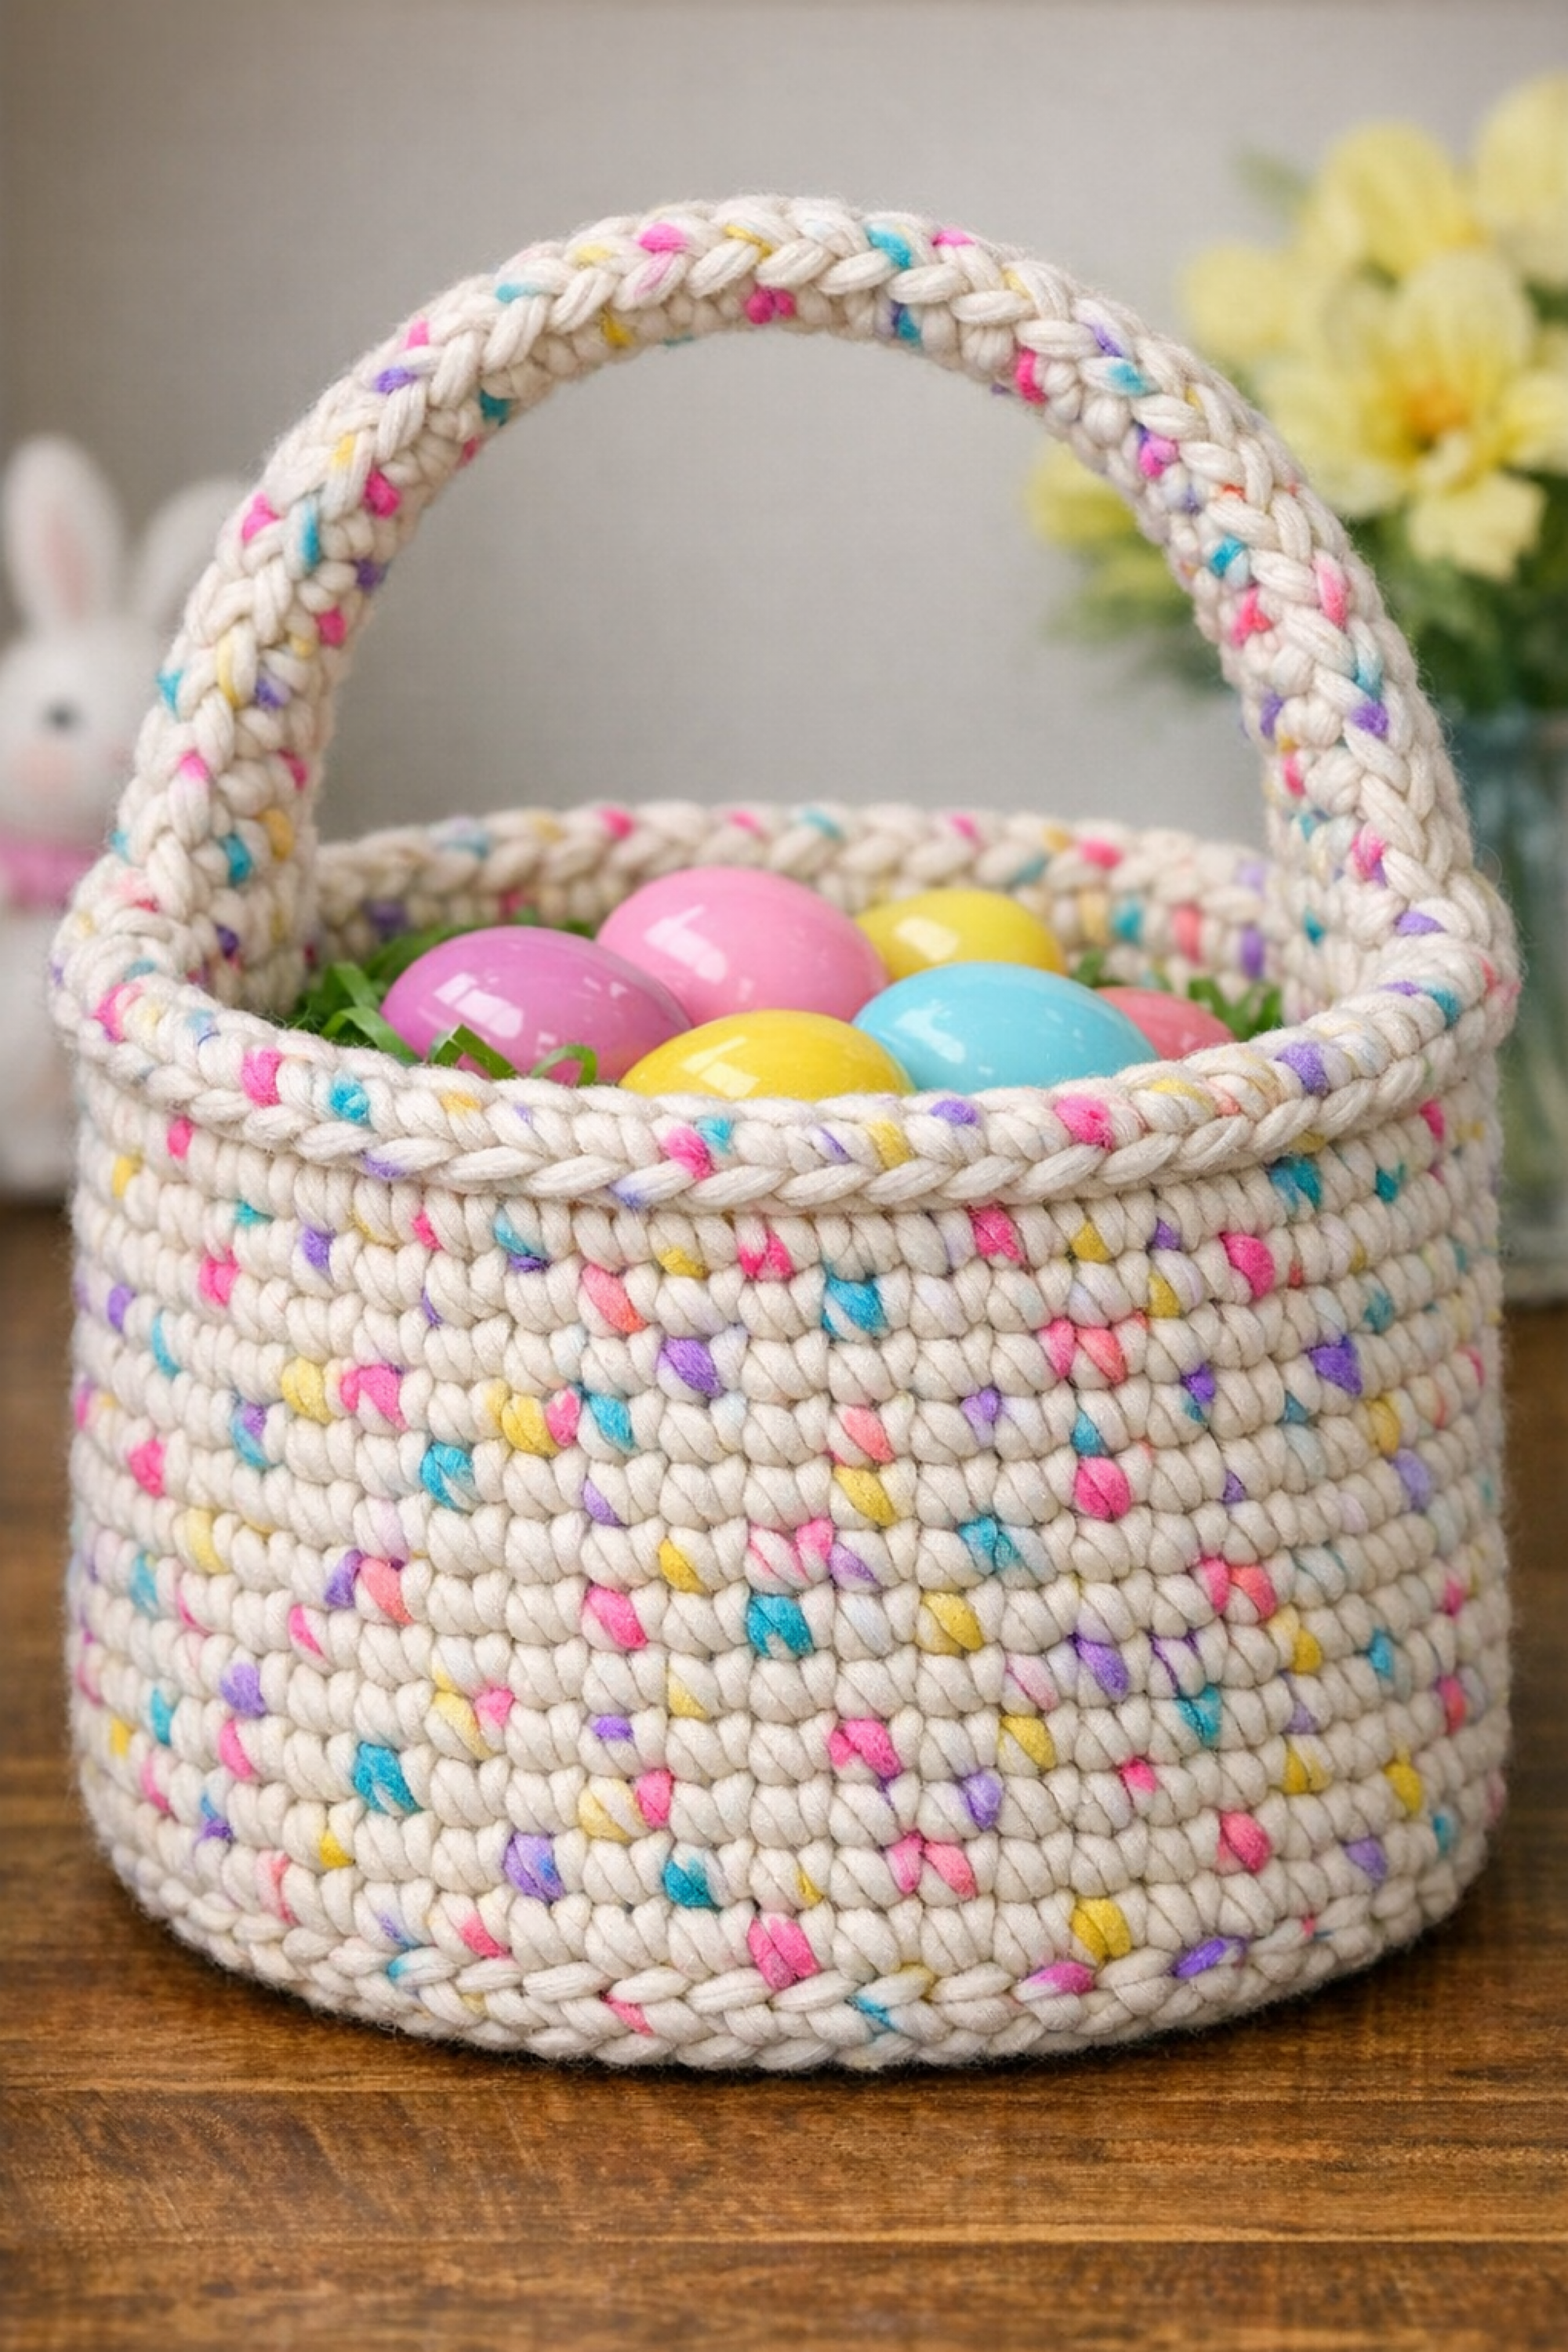
Confetti Speckle Rope Crochet Easter Basket DIY Guide
What you’re making
This is a thick, modern rope crochet Easter basket with a confetti speckle effect, a rounded rectangle silhouette, and a sturdy arched handle like the photo. The stitches are big and plush, the sides stand up on their own, and the rim looks softly braided. It is the kind of basket that feels substantial in your hands, perfect for eggs, treats, or a spring centerpiece.
Materials + tools
- Super bulky cotton rope or cotton cord, speckle or confetti style (or white cord plus a speckle carry along strand)
- Optional: matching solid cord for the handle if you want it less speckled
- Large crochet hook (common range: 8 mm to 12 mm depending on rope thickness)
- 2 stitch markers
- Yarn needle (large eye, for rope)
- Scissors
- Optional: stiff felt circle or plastic canvas for base support
- Optional: fabric tape measure
- Optional: faux grass for styling like the photo
Finished size + customization notes
- Photo look reads like a medium basket, about 8 to 10 inches wide and 5 to 7 inches tall.
- To make it wider: add base increase rounds.
- To make it taller: add more side rounds.
- Rope baskets grow fast. Measure every few rounds so you do not overshoot.
Step by step instructions
Pick your rope and hook pairing A rope basket succeeds when stitches are dense and slightly tight. If your hook feels too big and the holes look open, go down a size. If your hands fight the rope, go up one size but keep tension firm.
Visual checkpoint: You want chunky stitches that sit close together, not airy gaps.
Start the base You can make a round base like a bowl, or an oval base for a more basket like footprint. The photo reads slightly oval, so use the oval method.
Oval base foundation chain
- Chain 18 for a small basket, 22 for medium, 26 for larger.
- Single crochet in second chain from hook and across until the last chain.
- In the last chain, work 3 single crochet to turn.
- Continue along the underside of the chain, single crochet in each chain space.
- In the last chain space, work 2 single crochet to complete the oval. Place a marker in the first stitch of the round.
Visual checkpoint: You should have an oval that lies flat, with rounded ends.
Increase the oval base Keep increases only at the two rounded ends.
- Round 2: single crochet around, and at each end cluster increase evenly so the ends stay rounded. A simple method is to place 3 increases at each end, spaced across the curve.
- Round 3 and onward: repeat, adding one extra stitch between increases each round.
Practical counting tip: If counting feels annoying with thick rope, mark the center stitch of each rounded end. You will increase around those markers each round. The straight sides remain plain single crochet.
If yours ripples: too many increases. Remove one increase on each end. If yours bowls: too few increases. Add one extra increase on each end.
Optional base insert When the base is the size you want, trace it onto stiff felt or plastic canvas and cut it slightly smaller. Set aside to insert later.
Turn up the sides Crochet one full round in the back loop only. This makes the base edge crisp and helps the basket stand.
Visual checkpoint: You should see a clear ridge that looks like a built in fold line.
Build tall, structured walls
- Continue in single crochet rounds, no increases.
- Keep your stitches stacked and your tension even.
Rope crochet tends to spiral naturally, which looks great and hides seams. If you want the seam at the back, place a marker at the center back and occasionally adjust by adding a slip stitch once in a while.
Create the braided rim effect The rim in the photo looks thick and slightly rope braided. Use a two round rim:
- Rim round 1: single crochet around normally.
- Rim round 2: slip stitch around in the front loop only. Pull each slip stitch snug. This creates a corded top edge that reads like a braid.
Add a clean handle foundation The handle is thick and curved, attached directly to the rim.
First decide where the handle attaches:
- Fold the basket in half and mark two opposite points with stitch markers.
Make the handle strap Rope handles need thickness and reinforcement to avoid stretching.
- Chain a length that arches nicely (for medium basket, start with 30 to 40 chains).
- Row 1: single crochet into the back bump of the chain across. This makes a strong corded strap.
- Row 2: single crochet back across.
- Optional Row 3: slip stitch across for a tighter, smoother finish.
Visual checkpoint: The strap should feel like a dense rope band, not flat lace.
- Attach the handle like the photo
- Position one end of the strap at a marker point.
- Sew it down with multiple passes, stitching through the rim and at least two rows below the rim for strength.
- Repeat on the other side.
Extra strength upgrade: Thread an inner cord or nylon string through the handle core before final stitching, then tie it off inside the basket. This prevents long term sagging.
- Insert your base support if using
- Slip the felt or plastic canvas oval into the bottom.
- If it shifts, tack it down with a few small stitches.
Weave in ends neatly Rope ends can be bulky. Weave through the thickest parts of stitches and trim close. If needed, dab a tiny bit of fabric glue on the trimmed end inside only.
Style with eggs and grass Fill with faux grass or shredded paper filler. Add pastel eggs on top.
Troubleshooting
- Sides flare outward instead of going straight up
Your stitches are too loose. Go down a hook size, or tighten tension. Also confirm you stopped increasing after the base turn round. - Basket leans or twists
This can happen with spiral crochet. It is normal. Keep the seam at the back by occasionally adding a slip stitch and continuing. Blocking lightly can also help. - Handle feels floppy
Add another row to thicken it, or thread an inner cord. Also sew the handle down deeper into the basket wall, not just the rim. - Rim looks uneven
Count your stitches around and confirm you did not skip or add. A slip stitch rim round usually tightens everything and hides small inconsistencies. - Bottom is not flat
Use a base insert, and double check your base increases.
Finishing details
- Blocking: Shape the basket over a bowl or container while slightly damp, then let fully dry.
- Stiffening: If your rope is soft, paint fabric stiffener on the inside lower half only, let dry with the basket stuffed with towels to hold shape.
- Lining: A simple drop in fabric liner can make it feel gift ready and hides any inner ends.
- Edge polish: One extra slip stitch round in the same loop direction can make the rim even more defined.
Shop Similar
- Confetti cotton rope for crochet baskets
- Super bulky cotton cord for rope crochet
- Extra large crochet hooks for rope projects
- Yarn needles for chunky cord and rope
- Plastic canvas base sheets for baskets
Style It With
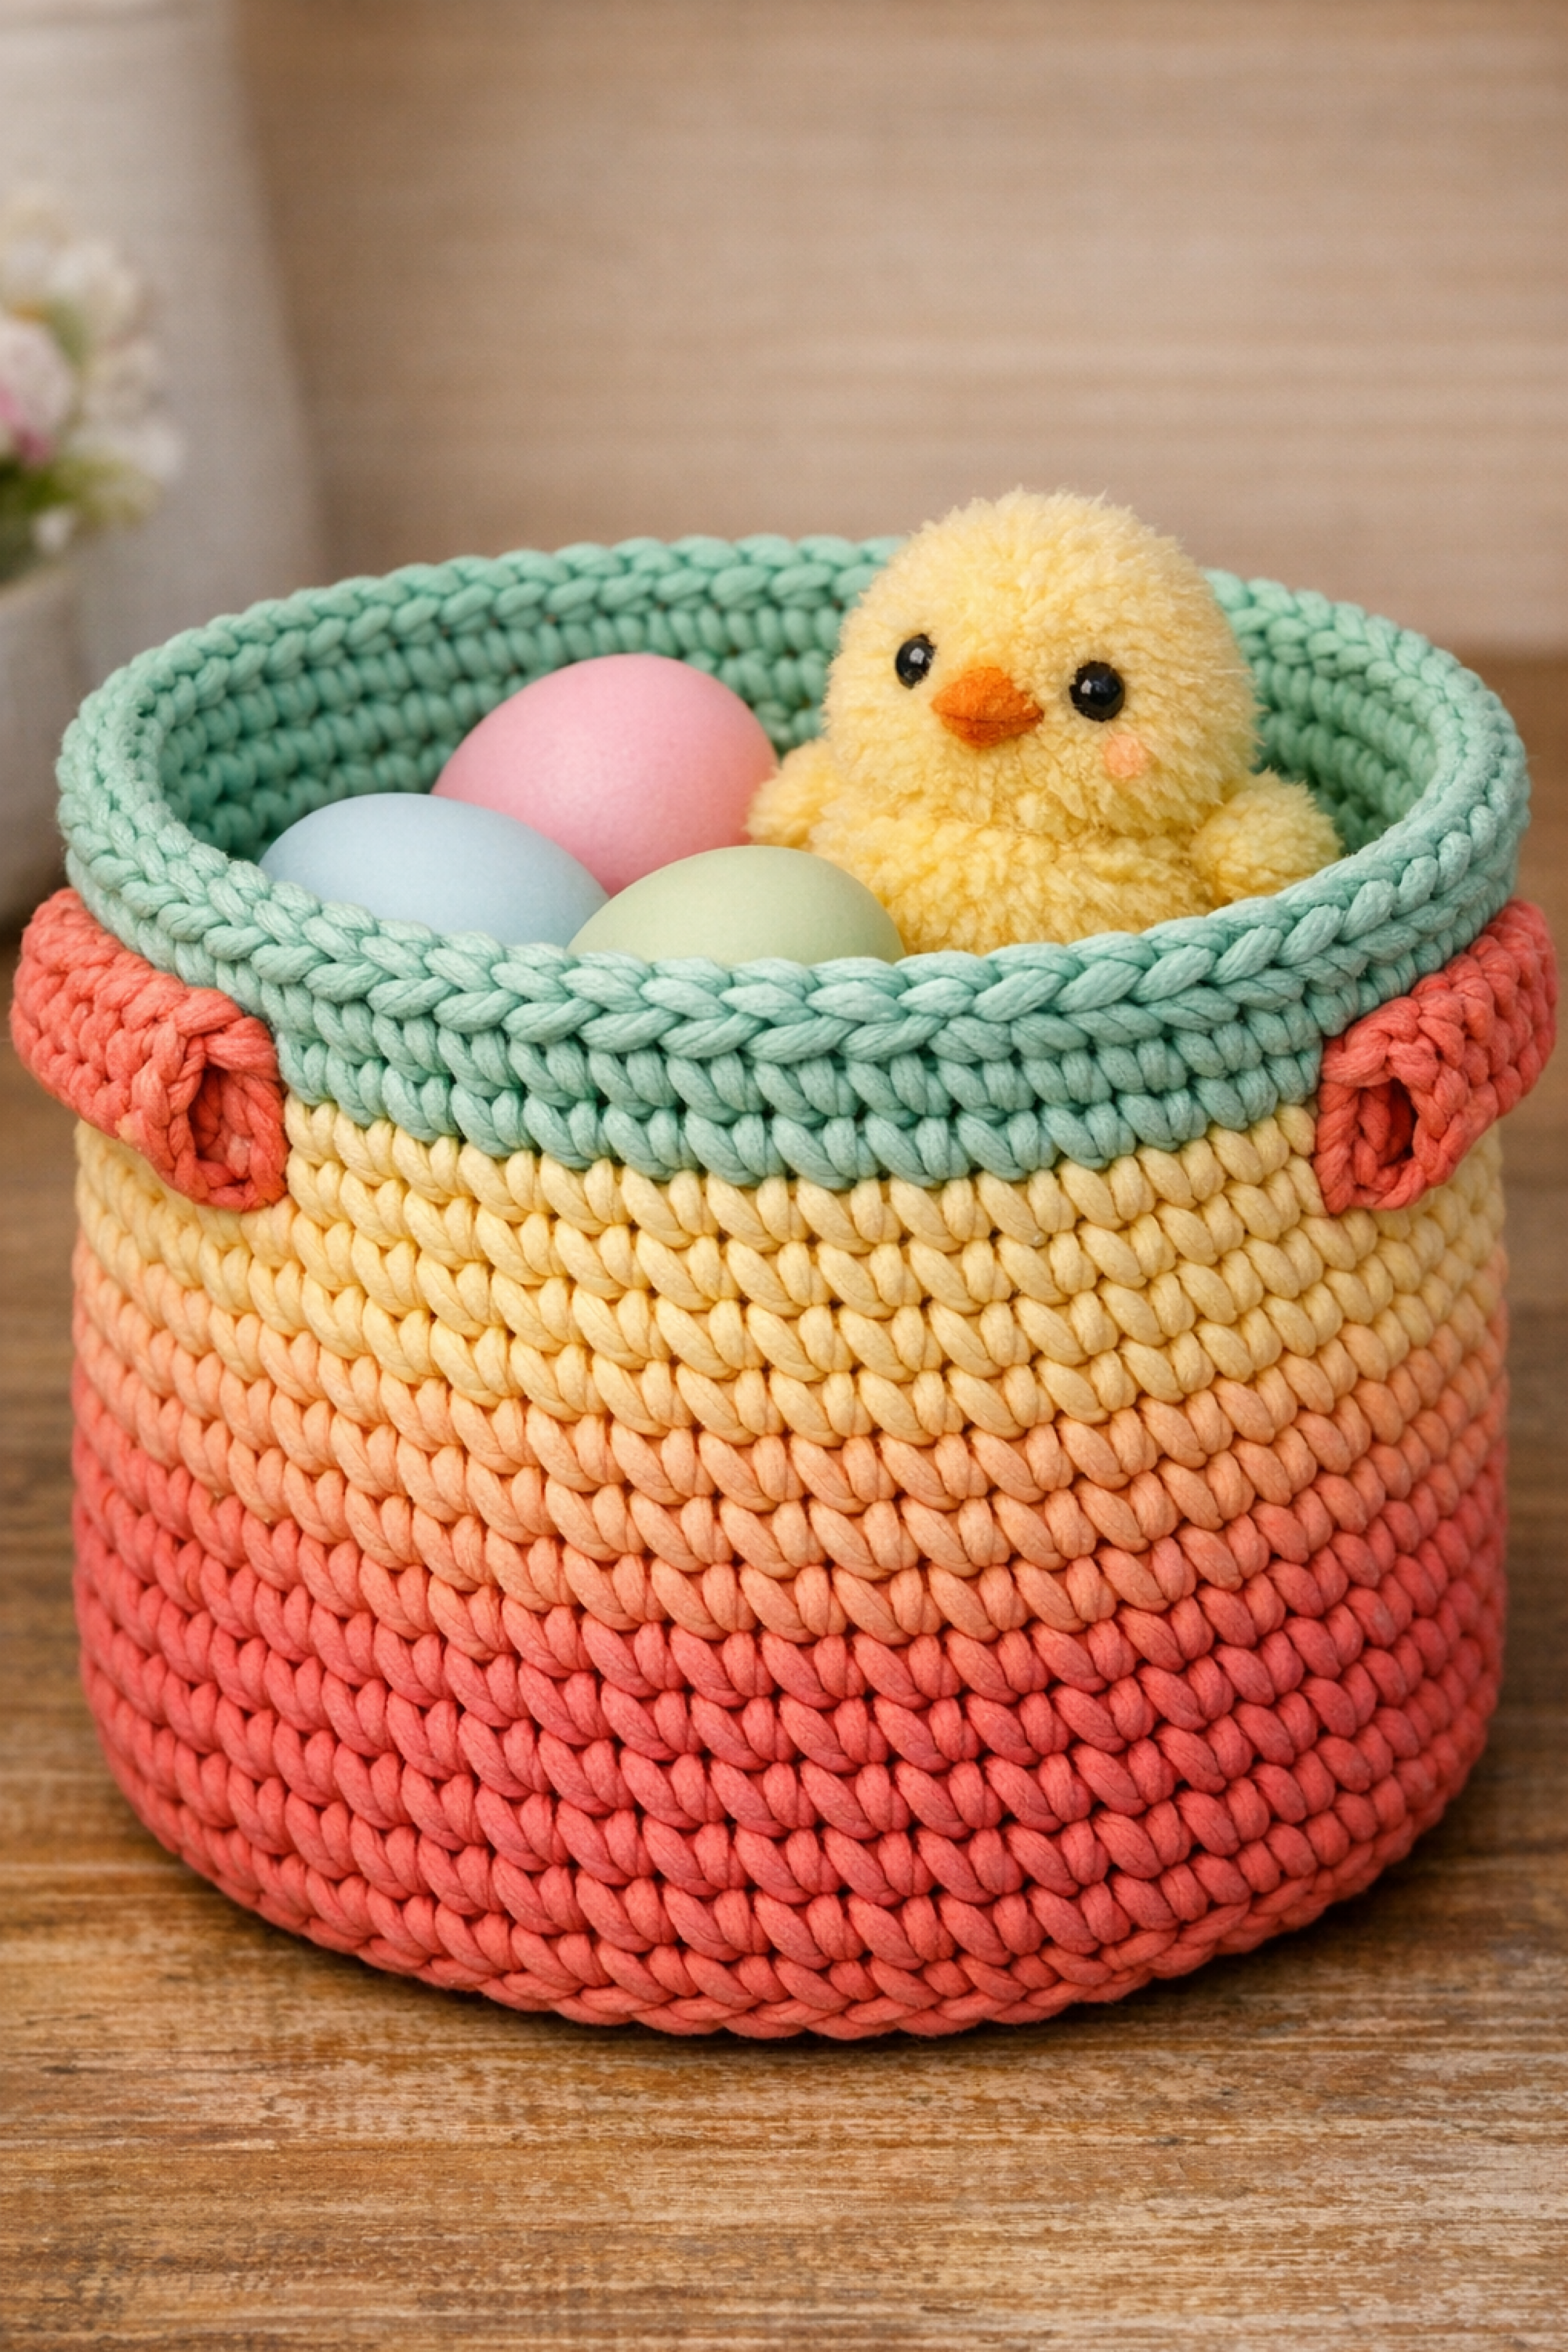
Chunky Ombre Easter Basket Bowl How-To Guide with Braided Rim and Side Tabs
What you’re making
This is a chunky, modern Easter basket bowl with thick horizontal color bands and a wide braided rim, finished with two small side tabs that read like soft handles. The stitches are oversized and plush like the photo, and the shape is a low cylinder that stands open and stable. It is perfect for pastel eggs and a tiny plush chick or spring centerpiece styling.
Materials + tools
- Super bulky tube yarn or super bulky cotton cord in coral, peach, butter yellow, mint (or seafoam), plus optional matching for the rim
- Large crochet hook (commonly 9 mm to 12 mm)
- Stitch markers
- Yarn needle
- Scissors
- Optional: stiff felt or plastic canvas circle for the base
- Optional: fabric stiffener if your yarn is very soft
- Optional: small plush chick for styling
Finished size + customization notes
- Photo look: wide bowl, roughly 9 to 11 inches across and 5 to 6 inches tall.
- Make it taller by adding more side rounds before the rim.
- Make it wider by increasing the base more.
- If you want a tighter, basket like texture, crochet with yarn under single crochet or use a smaller hook.
Step by step instructions
Get the stitch look right The photo shows very thick, clean rows. Single crochet with super bulky yarn will match this best. If your stitches look too tall, use a tighter hook. If your rows look too tight to pull through, go up one hook size.
Start the base circle
- With coral (or your bottom color), make a magic ring.
- Round 1: 6 single crochet into the ring.
- Round 2: 2 single crochet in each stitch (12)
- Round 3: (1 single crochet, 2 single crochet in next) repeat (18)
- Round 4: (2 single crochet, 2 single crochet in next) repeat (24) Continue increasing until the base is the width you want, often 48 to 60 stitches for a wide bowl with chunky yarn.
Visual checkpoint: The circle should lie flat and feel thick.
Optional base support insert Trace the base onto stiff felt or plastic canvas and cut slightly smaller. Set aside.
Turn the sides upward Crochet one round in the back loop only. This creates the crisp base edge and helps the walls rise.
Work straight sides
- Continue single crochet rounds with no increases.
- Crochet 2 to 4 rounds in your first color band.
Create the soft ombre banding The photo has stacked warm tones moving into mint at the top. A clean band plan:
- Coral: 3 rounds
- Peach: 2 rounds
- Butter yellow: 3 rounds
- Mint: 3 rounds Adjust to your height.
Color change tip: Change colors on the last pull through of the final stitch of a round for a neat transition.
Check your cylinder shape Every few rounds, place the basket on a table.
- If it flares, your tension is loose. Tighten tension or switch to a smaller hook.
- If it pulls inward, your tension is very tight. Go up a hook size or relax your grip.
Build the braided rim The rim in the photo reads as thick, rounded, and slightly braided. Use a two part rim construction.
- Rim round 1: single crochet around in the top color (mint).
- Rim round 2: reverse single crochet around (also called crab stitch). This creates a twisted rope edge. If crab stitch feels tricky with bulky yarn, do slip stitch around in the front loop only, pulling snug.
Visual checkpoint: You should see a raised rope like edge that frames the opening.
Add the side tabs The small side tabs look like soft handles.
- Choose two opposite side points and mark them.
- At one marker, join yarn.
- Tab row 1: single crochet 6 to 8 stitches across.
- Turn and single crochet back for 2 to 3 rows.
- Finish with slip stitches around the tab edge for a rounded look. Sew the tab down at the sides so it sits like a small loop.
Repeat on the other side.
Tip: If you want the tab to stand out more, make it in the coral color like the photo.
Secure and weave ends Weave ends through the thickest inner stitches. Split the yarn tail and weave in two directions to lock.
Insert base support Slip your base insert in now. Tack it down with a few stitches if needed.
Optional stiffening If your yarn is soft and the bowl droops:
- Apply fabric stiffener lightly inside only, especially the lower half.
- Dry with the basket stuffed with towels so it holds its shape.
- Style the bowl Add pastel eggs and a small plush chick. Let eggs peek above the rim like the photo.
Troubleshooting
- Rows look uneven or messy
Use a stitch marker in the first stitch and count occasionally to avoid accidental increases. - Basket does not stand up
Tighten tension, use thicker cord, add a base insert, or stiffen the interior. - Rim curls inward
Your rim round is too tight. Use regular single crochet for the last round instead of crab stitch, or go up a hook size for the rim only. - Tabs look floppy
Add one more row to the tab, and stitch the base of the tab down more securely to the basket wall.
Finishing details
- Blocking: Shape over a bowl while slightly damp, then air dry.
- Edge polish: One last slip stitch round can even out the rim.
- Lining: Add a simple fabric liner if you want a gift ready finish.
- Label upgrade: Add a small faux leather label centered between tabs for an elevated look.
Shop Similar
- Super bulky tube yarn for chunky crochet baskets
- Chunky cotton cord for basket crochet
- Large crochet hooks 9mm to 12mm
- Plastic canvas circle for basket base
- Fabric stiffener for crochet decor
Style It With
Bright Rainbow Stripe Chunky Crochet Easter Basket Make-It-Yourself Tutorial
What you’re making
This is a bold, cheerful chunky crochet Easter basket with crisp rainbow stripes, a thick white rim, and a dramatic hot pink handle arching high like the photo. The body is a wide cylinder, the stitches are plush and even, and the handle looks firmly anchored so the basket stays practical, not just cute. It is perfect for a modern Easter moment that still feels nostalgic.
Materials + tools
- Super bulky tube yarn or super bulky cotton cord in: white, hot pink, red or deep coral, yellow, mint, lavender, sky blue
- Large crochet hook (9 mm to 12 mm)
- Stitch markers
- Yarn needle
- Scissors
- Optional: nylon cord or ribbon for reinforcing the handle
- Optional: stiff felt or plastic canvas circle for the base insert
- Optional: fabric stiffener for added structure
Finished size + customization notes
- Photo look: medium basket, roughly 9 to 11 inches wide and 5 to 7 inches tall.
- Wider basket: add more increase rounds in the base.
- Taller basket: add more straight side rounds before the rim.
- If your yarn is softer than the photo, use a smaller hook or reinforce with a base insert.
Step by step instructions
Start with a firm base
- With white, make a magic ring.
- Round 1: 6 single crochet into ring.
- Round 2: 2 single crochet in each stitch (12)
- Round 3: (1 single crochet, 2 single crochet in next) repeat (18) Continue increasing in the round until your base matches your desired width. With super bulky yarn, 54 to 66 stitches is a common range for a medium wide basket.
Visual checkpoint: Flat circle, no waves.
Optional base insert Cut a matching circle from stiff felt or plastic canvas, slightly smaller. You will insert it later.
Turn up the sides Crochet one round in the back loop only.
Visual checkpoint: A sharp ridge appears at the base edge.
Build the white lower band Crochet 2 to 3 rounds of single crochet in white with no increases.
Plan the rainbow stripes The photo shows thick, clean horizontal bands. A great sequence:
- White (already done)
- Blue: 2 rounds
- White: 1 round
- Lavender: 2 rounds
- White: 1 round
- Mint: 2 rounds
- Yellow: 2 rounds
- Hot pink or red band: 2 rounds
- White rim: 2 to 3 rounds
Adjust band thickness to match your yarn.
Change colors cleanly On the last stitch of the round, finish the stitch with the new color. Carrying yarn can add bulk, so for the cleanest look, cut yarn at each stripe and weave ends later.
Keep the cylinder straight As you crochet, keep checking the walls.
- If it flares out: tighten tension or go down a hook size.
- If it pulls inward: relax tension or go up a hook size.
Visual checkpoint: The sides should look like stacked rings, not a bell shape.
Create the thick white rim Finish with 2 to 3 rounds in white. For a braided top edge, add one final round of slip stitch in the front loop only, pulling snug.
Make the hot pink handle A handle like the photo needs thickness plus reinforcement.
- With hot pink, chain 35 to 55 depending on how tall you want the arch.
- Row 1: single crochet into the back bump of each chain across.
- Row 2: single crochet back across.
- Row 3: slip stitch across for a tight, polished surface, optional but helpful.
Visual checkpoint: The handle should feel like a padded band, not a thin strap.
Reinforce the handle Optional but recommended for a tall arch:
- Thread nylon cord, ribbon, or strong yarn through the center of the handle, then secure at both ends. This prevents sagging.
- Attach the handle
- Fold basket in half and mark two opposite points on the rim.
- Sew one handle end to one mark, using multiple passes.
- Repeat on the other side.
- Stitch through the rim and at least one row below the rim for strength.
Tip: The photo handle looks cleanly integrated. You can sew the handle end as a neat tab, then stitch the tab flat to the basket.
Insert base support Place your felt or plastic canvas circle into the bottom and tack it down with a few stitches.
Weave in all ends Because stripes create many tails, weave them neatly inside, following the direction of stitches so the ends disappear.
Optional stiffening For a firm display basket:
- Brush fabric stiffener on the inside only, focusing on the bottom half.
- Let dry while stuffed with towels.
- Style with eggs Add pastel eggs so they sit just below the rim, like the photo.
Troubleshooting
- Stripe joins look jagged
Join rounds consistently at the same spot and keep color changes tight. You can also rotate where you join to hide the seam at the back. - Basket feels too soft
Use thicker cord, smaller hook, yarn under single crochet, add base insert, or stiffen interior. - Handle twists
Crochet into the back bump of the chain for row 1, and keep edges even. Slip stitch edging also reduces twist. - Rim waves
Too loose or too many stitches. A tight slip stitch round often fixes it. - Basket leans
Spiral crochet can drift. This is normal. Block lightly to correct.
Finishing details
- Blocking: Shape the basket opening into a perfect oval or circle, then dry fully.
- Edge polish: A final slip stitch rim in white gives a clean, rope like finish.
- Lining: A simple fabric liner in white or gingham makes it gift ready and hides ends.
- Embellishment upgrade: Add a small bow, a name tag, or a simple crocheted flower near one handle attachment point.
Shop Similar
- Super bulky tube yarn rainbow colors
- Chunky cotton cord for crochet basket making
- Large crochet hook set for super bulky yarn
- Nylon cord for reinforcing crochet handles
- Fabric stiffener for crochet baskets
Style It With
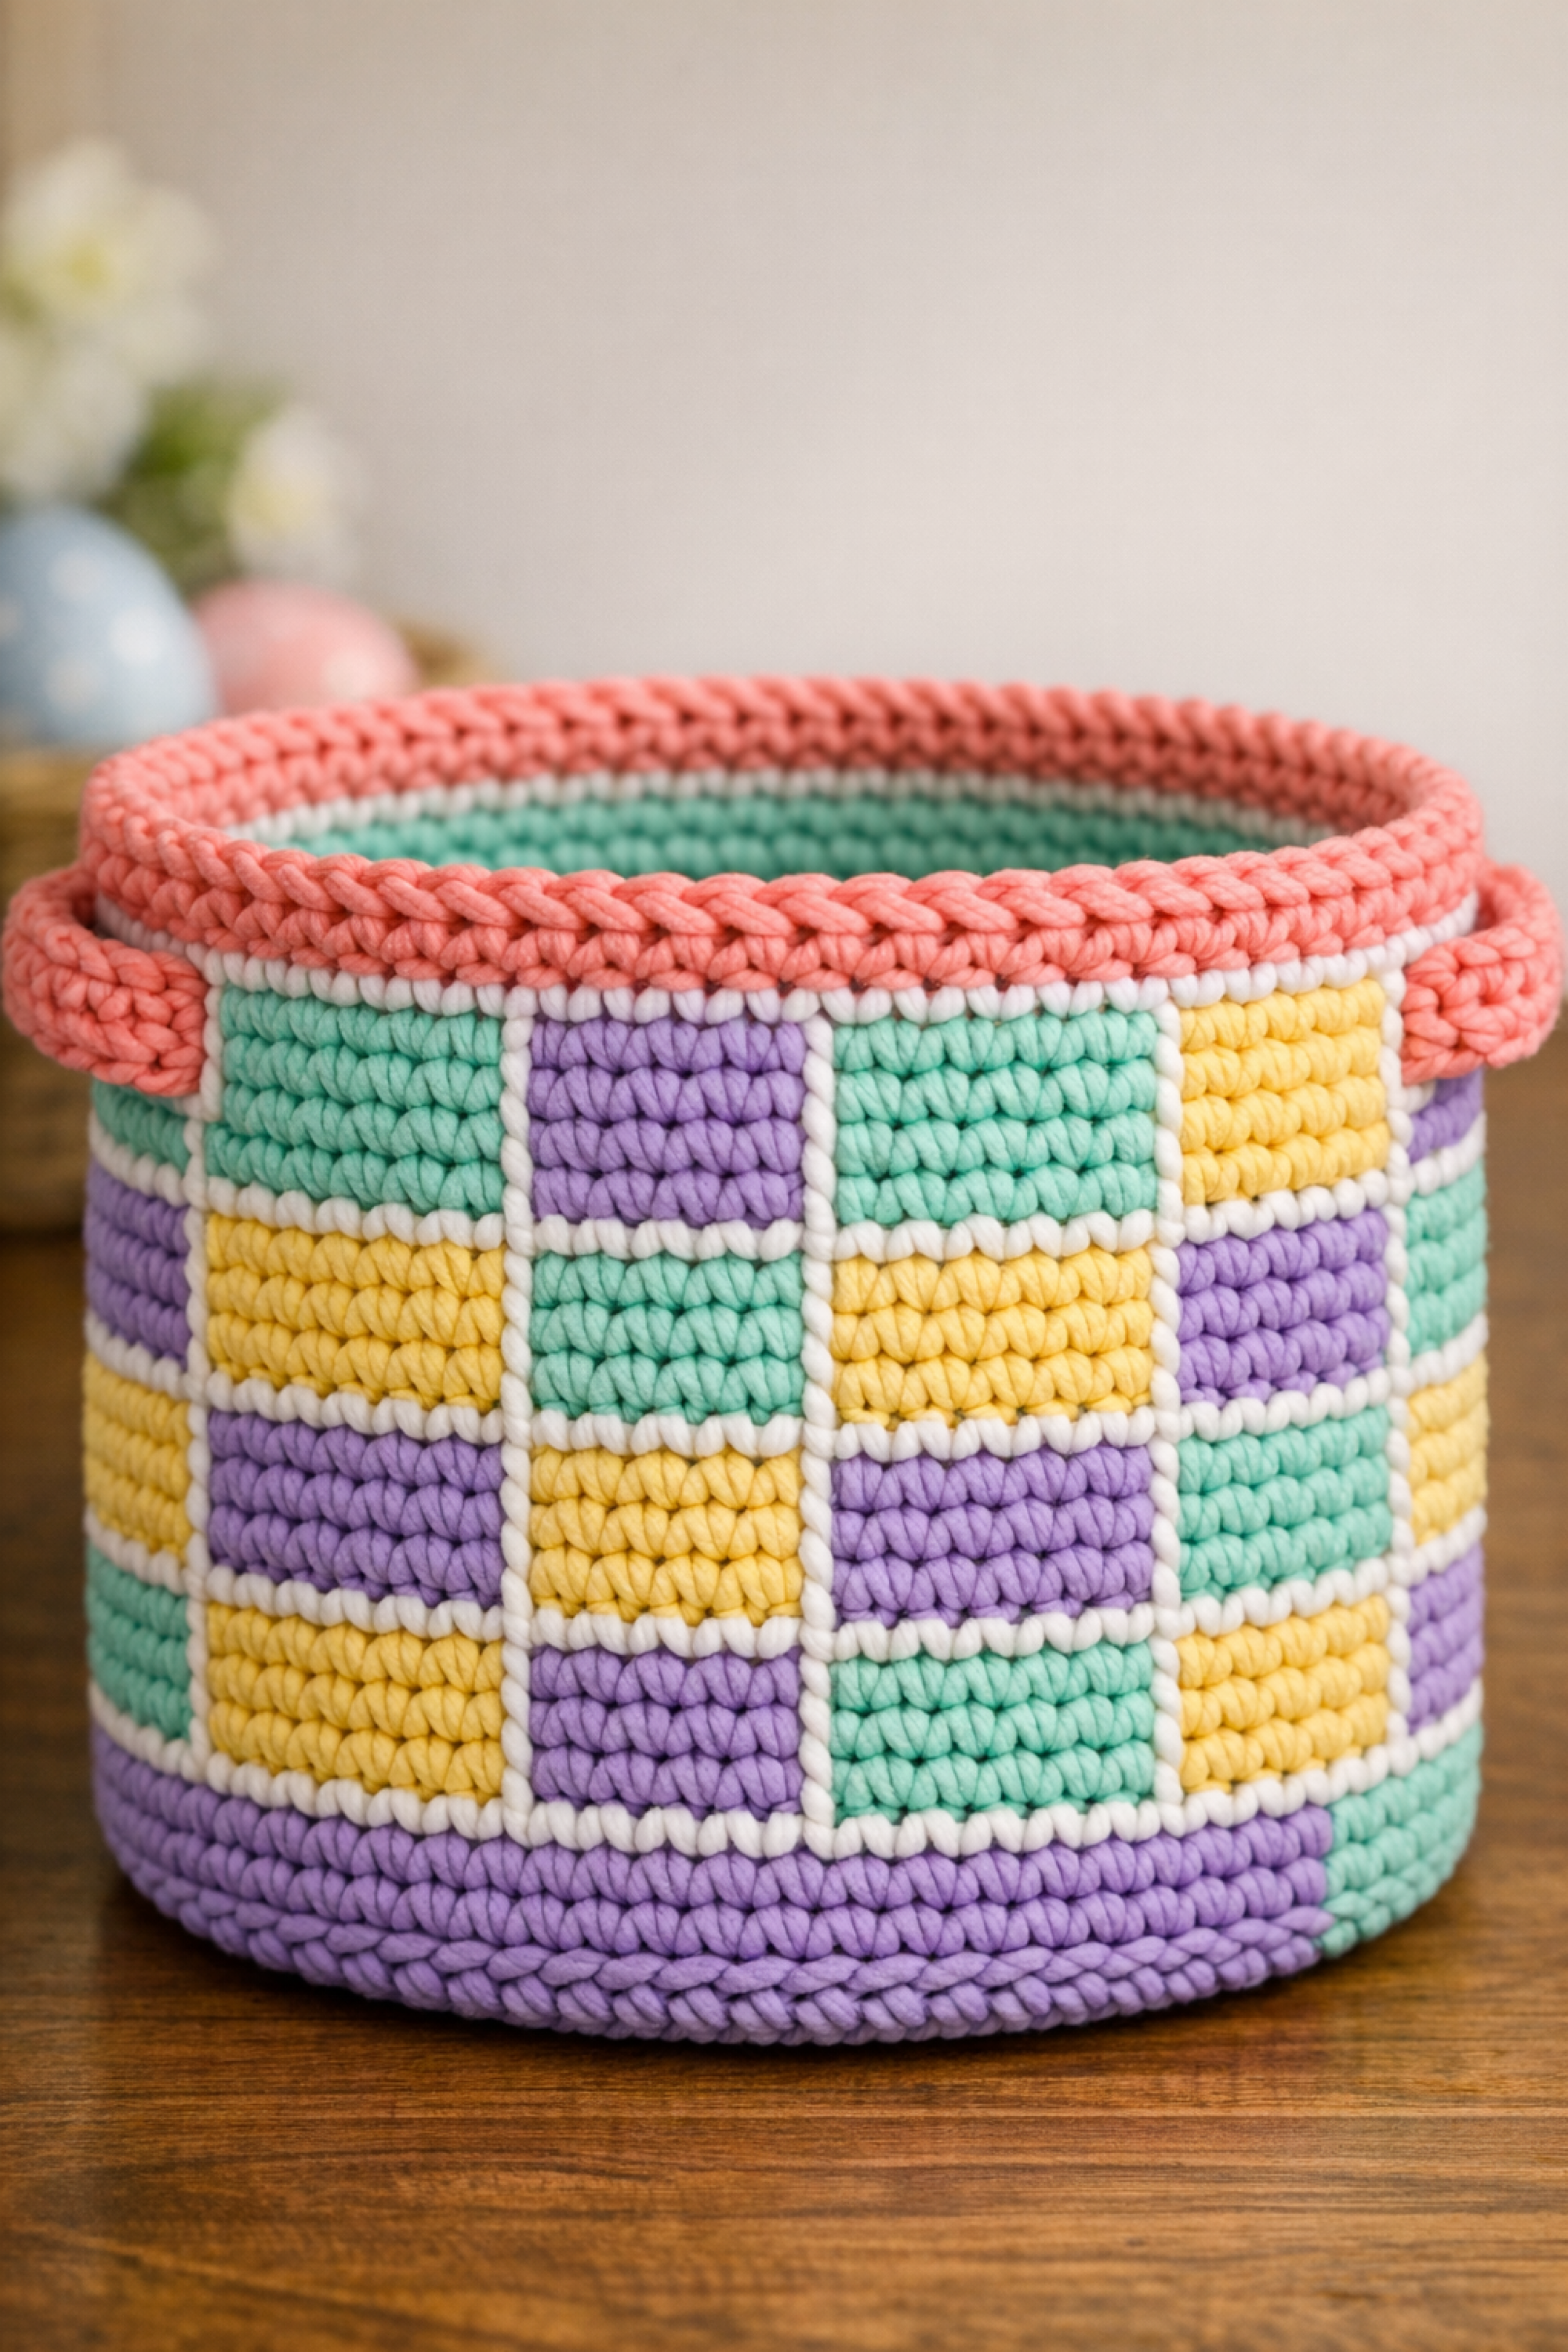
Pastel Checkerboard Crochet Storage Basket Step-by-Step Tutorial
What you’re making
This is a structured pastel checkerboard crochet storage basket with tidy white outlines between color blocks and small side handles, just like the photo. The body looks like a grid of squares in lavender, mint, and butter yellow, framed by white lines that make the pattern pop. The rim is thick and coral, giving a clean, modern finish that still feels playful and spring ready.
Materials + tools
- Super bulky tube yarn or super bulky cotton cord in: white, lavender, mint, butter yellow, coral
- Large crochet hook (9 mm to 12 mm)
- Stitch markers
- Yarn needle
- Scissors
- Optional: plastic canvas or stiff felt base insert
- Optional: fabric stiffener for extra structure
Finished size + customization notes
- Photo look: medium storage basket, roughly 9 to 11 inches wide and 6 to 8 inches tall.
- You can change the checker scale by changing how many rows each color block is tall.
- For sharper blocks: keep tension firm and color changes tight.
- If you want a perfect cylinder: count stitches and keep increases only in the base.
Step by step instructions
Understand the checkerboard construction The photo shows horizontal rows with vertical white “columns” that outline blocks. The easiest way to recreate this look with chunky yarn is to crochet the basket in continuous rounds, and use surface crochet or slip stitch overlays in white to draw the grid lines.
This gives the cleanest, most graphic look, and it matches the white borders in the photo.
Crochet a sturdy base With white or lavender (either works since the base is hidden), make a magic ring.
- Round 1: 6 single crochet
- Round 2: 12
- Round 3: 18 Increase evenly until the base is the width you want. For a medium basket with super bulky yarn, 54 to 66 stitches is common.
Visual checkpoint: Flat, dense circle.
Optional base insert Cut a stiff felt or plastic canvas circle slightly smaller than the base. Set aside.
Turn up the sides Crochet one round in the back loop only. This creates a crisp corner.
Build the lower solid band The photo has a solid lavender band at the bottom.
- Work 2 to 3 rounds in lavender with no increases.
Crochet the main body in color blocks You will alternate mint and yellow blocks, with lavender blocks appearing in the grid. The blocks look like small rectangles stacked.
A simple chunky grid plan:
- Each block is 3 stitches wide and 2 rounds tall.
- White vertical lines will be added later, so you do not need to crochet white between blocks now.
Choose a stitch count divisible by 6 or 12 so blocks repeat evenly.
Example planning:
- If your basket circumference is 60 stitches, you can do 20 blocks of 3 stitches around.
Work the block rounds For each 2 round block height:
- Round A: (3 single crochet in Color 1, 3 single crochet in Color 2) repeat around.
- Round B: Repeat the same sequence, keeping colors stacked above themselves.
Rotate colors in a pattern that feels like the photo:
- One block in lavender appears periodically among mint and yellow.
- You can place lavender every third or fourth block to create a balanced grid.
Visual checkpoint: You should see clean color columns forming, even before the white lines go on.
Keep color changes tidy With super bulky yarn, carrying unused yarn inside can create lumps. For the cleanest look:
- Cut yarn at each change and rejoin.
- Weave ends as you go, tucking them inside the basket wall.
If you prefer fewer ends:
- Carry yarn behind stitches, but keep it loose so it does not cinch the basket.
Add height Continue the 2 round block repeats until the basket height matches the photo, often 6 to 10 rounds of block pattern depending on yarn.
Create the thick coral rim The rim in the photo is coral and looks slightly raised.
- Crochet 2 rounds in coral single crochet.
- Add one final round of slip stitch in the front loop only for a corded edge.
- Add the side handles The handles are small loops integrated near the rim.
- Mark two opposite sides.
- Join coral yarn at one mark.
- Row 1: single crochet 6 to 8 stitches across.
- Row 2: single crochet back across.
- Fold the piece outward to form a loop and sew the ends down to the basket wall. Repeat on the other side.
Visual checkpoint: Handles should sit like soft tabs, not floppy wings. If floppy, add a third row before sewing down.
- Create the white grid lines This is what makes the basket look like the photo. Use surface crochet slip stitches in white:
- Insert hook from outside to inside between stitches, pull up white yarn, and slip stitch across the surface.
You will add:
- Horizontal white lines between each 2 round block section
- Vertical white lines between block columns
Horizontal lines:
- At the boundary between block heights, surface slip stitch around the basket in white, following the “groove” between rounds.
- Keep stitches snug and even.
Vertical lines:
- Choose your vertical spacing, such as every 3 stitches.
- Surface slip stitch straight down from rim toward base, following the stitch columns.
- Repeat around.
Tip: Use stitch markers to keep your vertical lines straight. Mark the columns you plan to outline before you start.
Visual checkpoint: The basket should now look like a tidy pastel quilt grid, with white piping between squares.
Insert base support Place the felt or plastic canvas circle inside and tack down with a few stitches.
Weave in ends This style has many color joins and surface crochet tails. Weave all ends inside, splitting tails and weaving in opposite directions for security.
Optional stiffening If you want the basket to stand very firm:
- Apply fabric stiffener to the inside only.
- Dry stuffed with towels to hold shape.
Troubleshooting
- Blocks look uneven sizes
Your tension may change at color joins. Pull the first stitch of each new color snug, and keep the same hook angle throughout. - Surface crochet lines pucker the basket
You are pulling too tight. Surface slip stitches should sit on top, not cinch. Redo with looser tension. - Vertical lines drift diagonally
Spiral crochet can shift columns. Counter this by placing markers and following the true stitch column visually rather than counting blindly. - Handles sag
Make them shorter, add an extra row, and sew down deeper into the basket wall. - Rim waves
Slip stitch the final rim round snugly, or reduce hook size for the rim only.
Finishing details
- Blocking: Lightly steam block and shape the rim perfectly round.
- Lining: Add a simple fabric liner in white or gingham to hide interior ends and make it feel boutique.
- Label upgrade: Add a small label centered between handles for a polished look.
- Care: Spot clean with mild soap and air dry.
Shop Similar
- Super bulky tube yarn pastel colors
- Chunky cotton cord for crochet storage baskets
- Large crochet hook set 9mm 12mm
- Plastic canvas sheets for basket base support
- Fabric stiffener for crochet home decor
Style It With
You now have five basket styles you can mix and match for every kind of Easter moment from treat hunts and kids tables to soft spring shelf styling and gift giving. The real secret to getting that high end look is simple: dense stitches, consistent tension, and a confident rim finish. If you want your basket to feel extra sturdy, add a base insert, reinforce your handle, and do a quick shape check every few rounds so the sides stay straight and the opening stays perfectly round.
Once your basket is finished, style it like the photos with tissue paper, pastel eggs, and a little pop of greenery or a tiny plush detail. These baskets also make the sweetest reusable gift wrap, and they are cute enough to keep using long after Easter as catchalls for keys, craft supplies, or cozy shelf storage. Save your favorite pattern, make a second one in a new color palette, and build your own signature basket collection for spring.