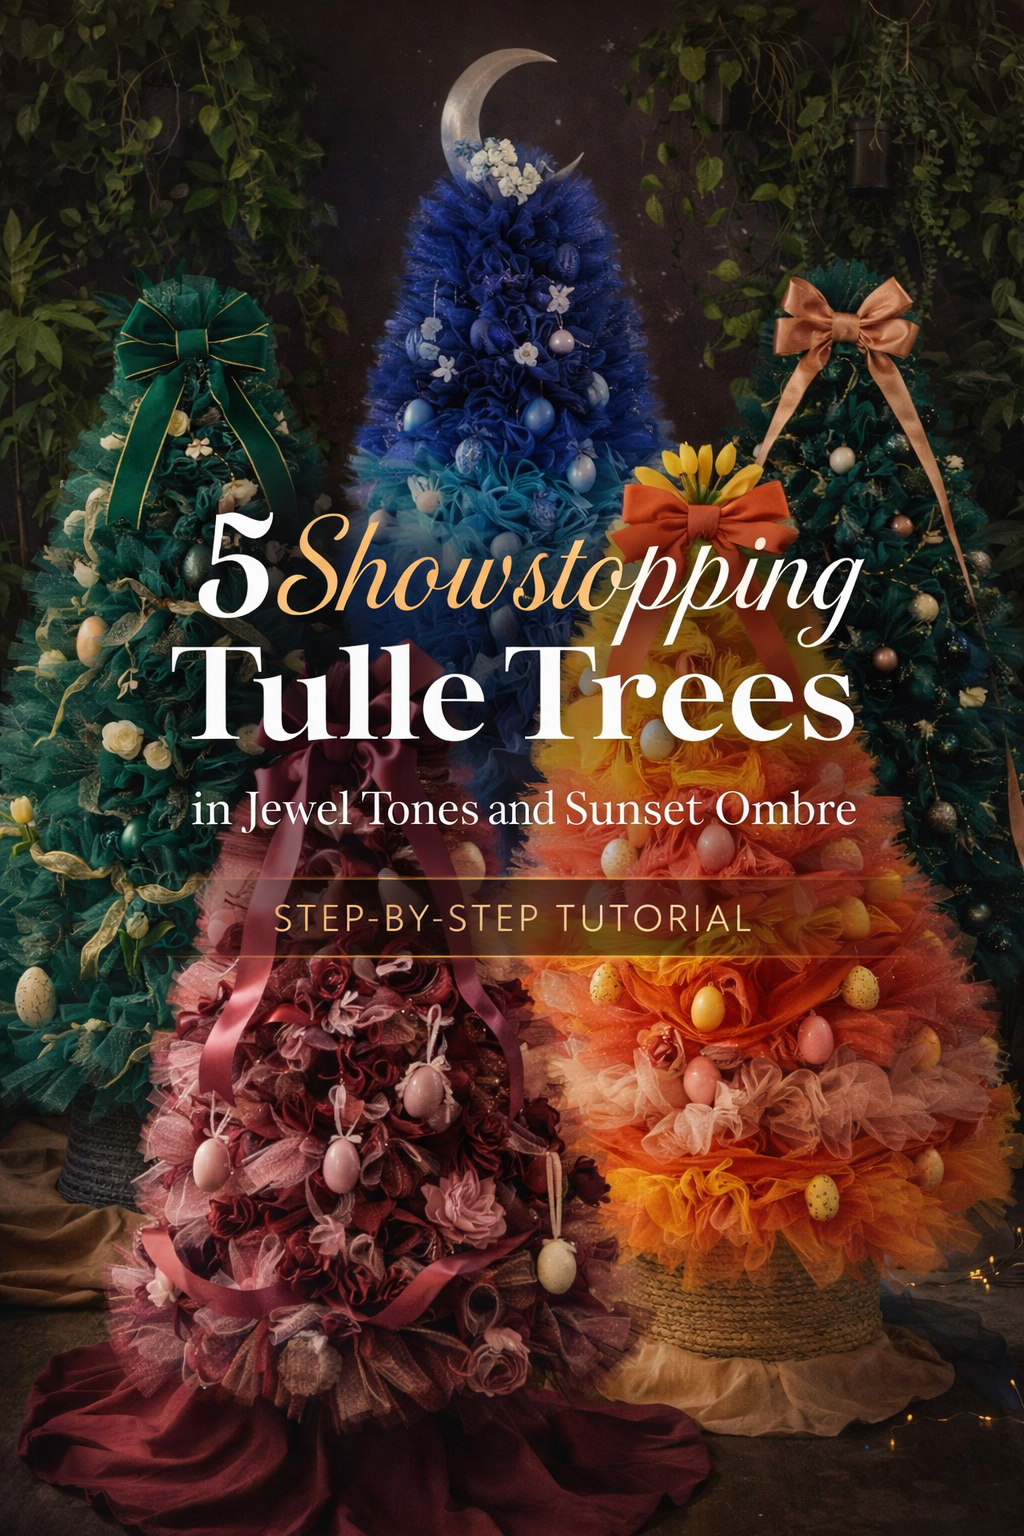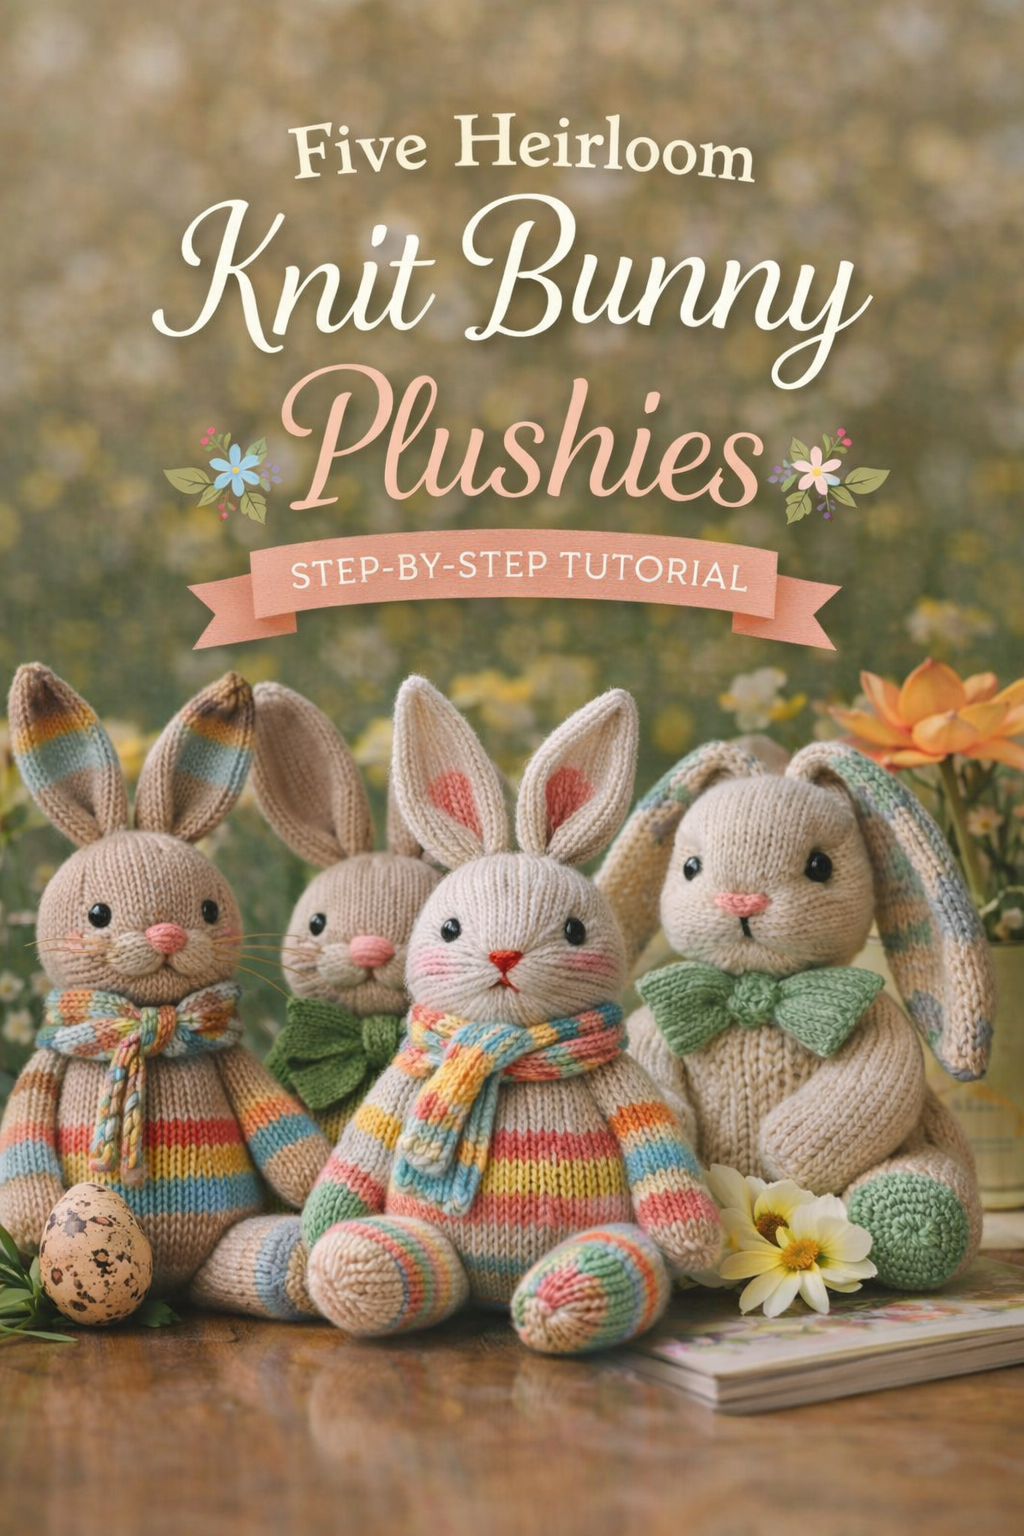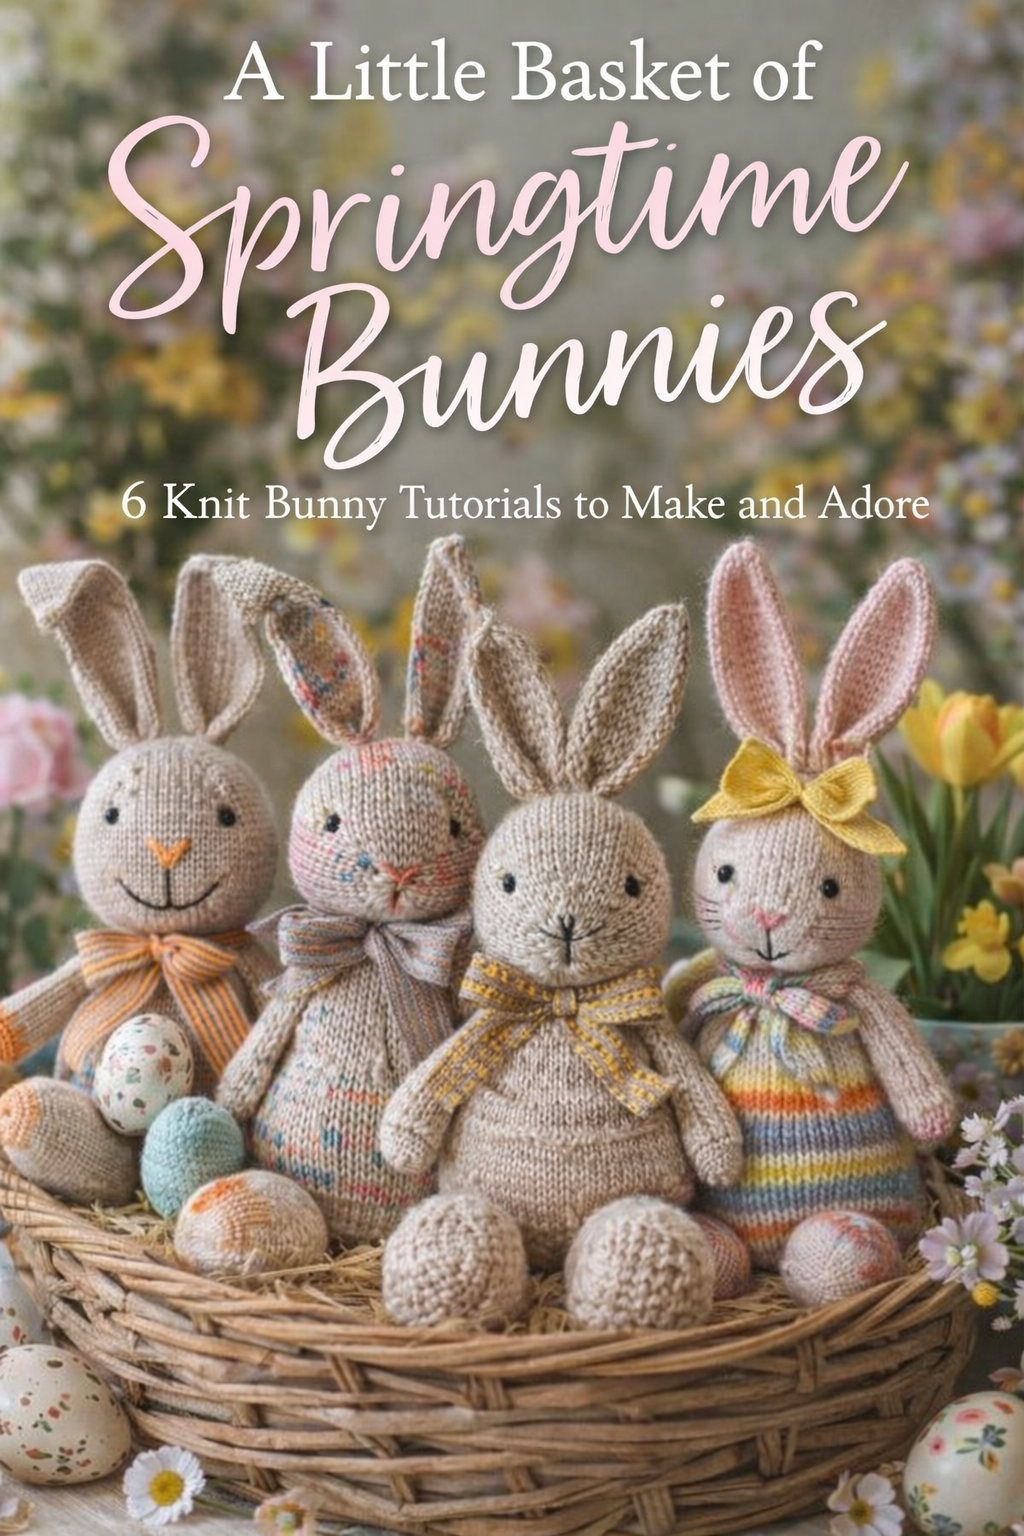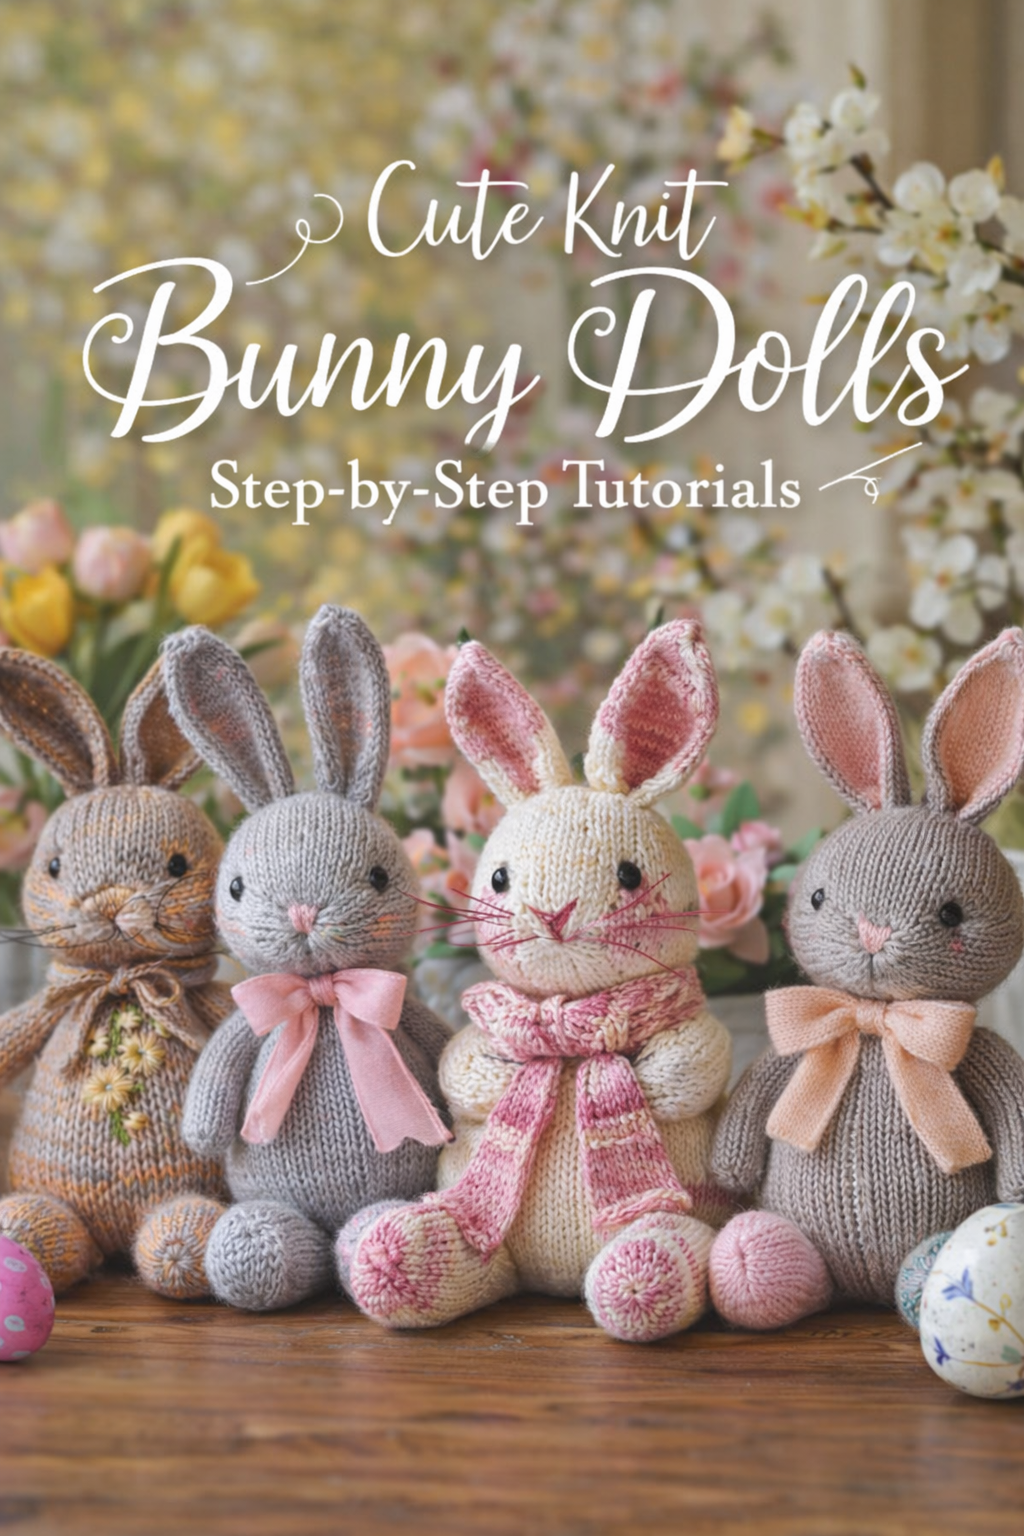
Heirloom Speckled Daffodil Bunny Doll Step by Step Tutorial

More like this
Welcome to the kind of spring craft that instantly makes a room feel softer. These knit bunny dolls are the perfect mix of heirloom and playful, with round little bellies, tall ears, and those tiny details that make them look like they belong in an Easter basket or on a nursery shelf. In this post you will learn how to recreate the look from the photos, from choosing yarn that gives that smooth plush texture, to shaping ears that stand just right, to stitching faces that feel sweet and modern instead of cartoonish. Whether you make one bunny as a gift or knit a whole family in different colorways, this is a project that feels calm, cozy, and genuinely satisfying from the first round to the final bow.
💡 Pro Tip: Why I Link to Amazon Search Results and Not One Product
In the Shop the Look and Style it With sections under each bikini, I link to Amazon search results, not single products. Here’s why this matters:
Hot bikinis sell out fast. I don’t want you clicking on a dead link to a sold-out item. Search pages stay updated.
You get more options. Love the vibe but want a different color, cut, or price point? The search results give you everything that matches the look and energy.
I curate each search carefully. These aren’t generic. I spend hours crafting keywords that bring up exactly the kind of bikinis I’d wear—or recommend to my hottest friends.
Support with no pressure. If you click a link, browse, and buy something later, I may earn a small commission at no extra cost to you. That helps me keep bringing you curated collections like this one—powerful, seductive, and always fresh.
So dive in. Click through. Try something risky. These aren’t just bikinis—they’re commands, statements, and maybe even your new favorite weapon of choice.
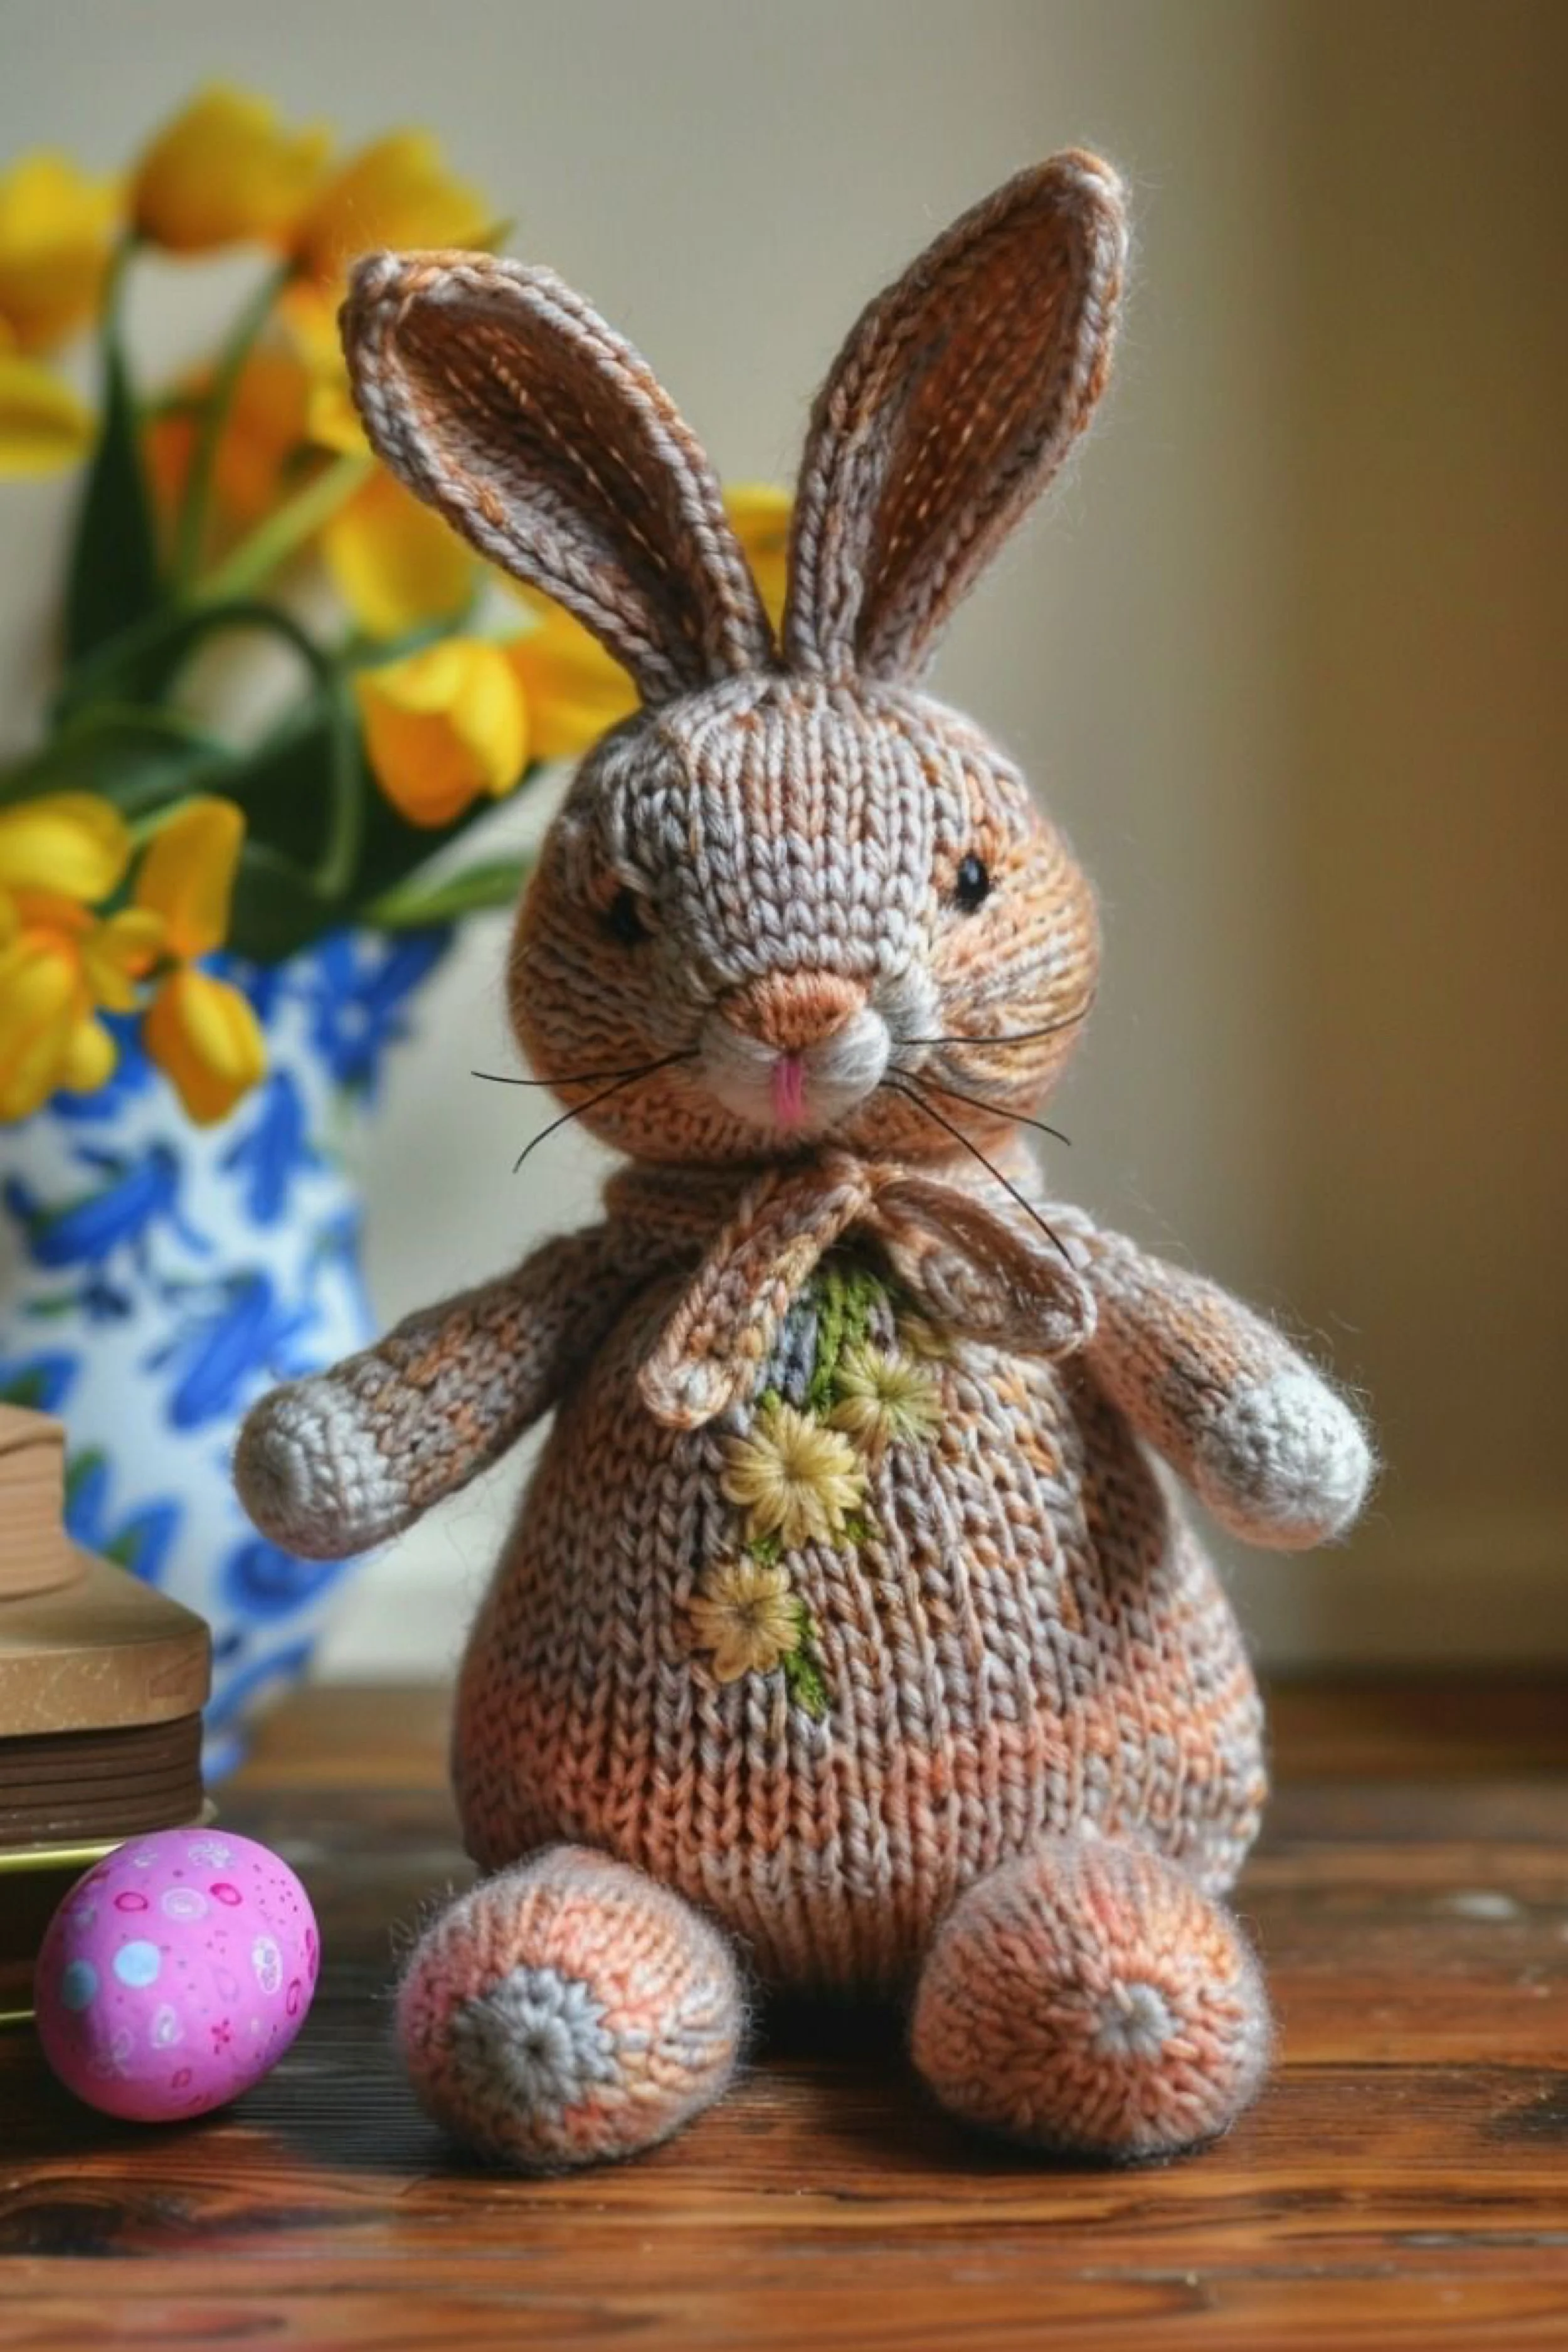
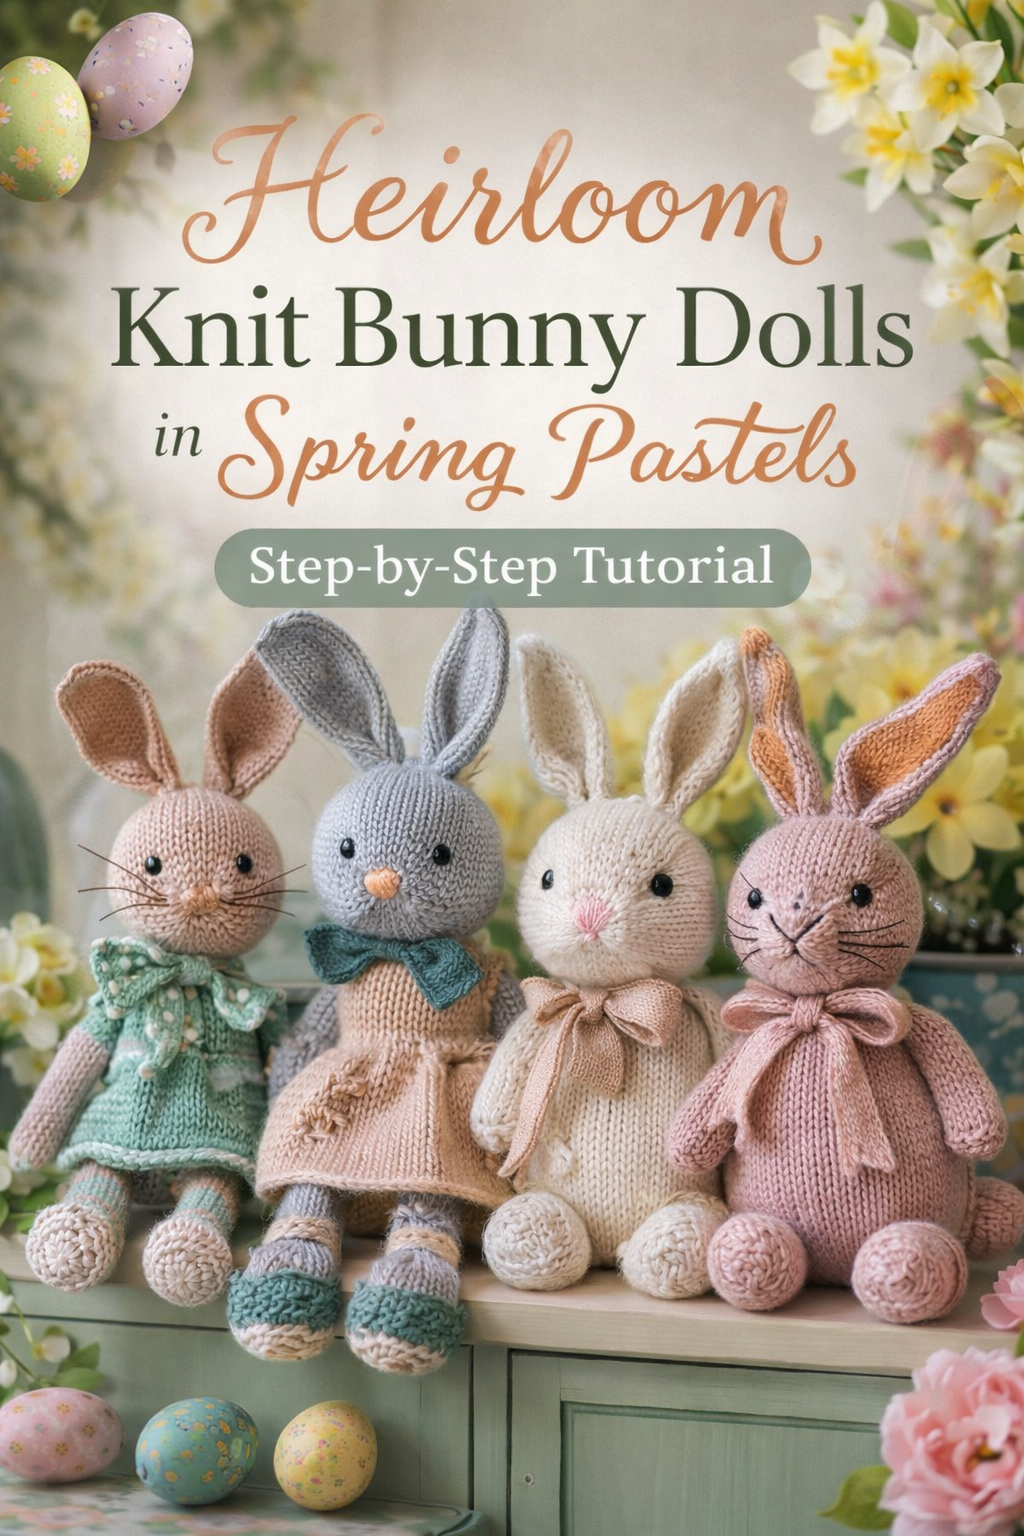
Heirloom Speckled Daffodil Bunny Doll Step by Step Tutorial
What you’re making
You’re knitting a soft, round, heirloom style bunny plush with tall, shaped ears, a gently weighted body, and a sweet springy face. This version matches the warm speckled caramel and oatmeal tones in the photo, finished with tiny embroidered daisy blooms and a simple twine bow at the neck for that farmhouse Easter vibe.
Materials + tools
- DK or light worsted yarn in speckled caramel brown for the main body
- DK or light worsted yarn in pale oatmeal or soft gray for paws and muzzle accents
- Small amounts of olive green and butter yellow embroidery floss or fingering yarn for the daisy stems and petals
- One set US 3 to US 5 double pointed needles or a long circular for magic loop (choose the size that makes a firm fabric)
- Stitch markers (at least 2)
- Tapestry needle for seaming and embroidery
- Toy stuffing (polyfill)
- Two small black safety eyes (about 6 mm to 8 mm) or black embroidery thread for stitched eyes
- Thin black craft cord or stiff embroidery thread for whiskers
- Optional pink embroidery floss for a tiny tongue detail
- Scissors
- Optional: a small amount of fusible interfacing scrap or felt for ear structure
- Optional: round of cardboard or a fabric circle for a base insert
Finished size + customization notes
A DK version typically lands around 7 to 9 inches tall sitting. A light worsted version can push it closer to 9 to 11 inches. If your fabric feels loose and you can see stuffing through the stitches, go down a needle size. If you want a taller bunny like the photo, knit the ears longer and stuff them lightly only at the base. For a more rounded belly, increase a little more aggressively at the widest point and add a tiny weighted pouch inside the base.
Step by step instructions
Choose your gauge on purpose. Knit a small swatch in stockinette in the round. You want a dense fabric that feels almost like a windbreaker when stretched. If it stretches open, drop a needle size. This is the single biggest difference between a pro looking plush and a floppy one.
Knit the body and head as one piece (top down).
Cast on 6 stitches and join in the round. Place a marker for the start of round.
Round 1: Knit.
Round 2: Increase in every stitch (12).
Round 3: Knit.
Round 4: Increase every other stitch (18).
Round 5: Knit.
Round 6: Increase every third stitch (24).
Keep alternating a knit round with an increase round until you reach about 42 to 54 stitches, depending on how plump you want the bunny.
Visual checkpoint: you should now see a neat little bowl shape, like the top of a tiny beanie.Shape the head height.
Knit straight for 16 to 22 rounds. The head in the photo is rounded and slightly tall, not squashed.
Visual checkpoint: the piece should look like a short cylinder sitting on a rounded cap.Add subtle cheeks by placing increases.
For the soft cheeky face in the photo, work two rounds where you add a few increases on the front half only. You can do this by placing a second marker opposite the start marker.
Knit to the front half, then work 3 evenly spaced increases across that front half. Knit the rest plain. Do this twice with a plain round between.
Tip: This creates that gentle “hamster cheek” effect without changing the whole body width.Transition into the neck.
Work one decrease round to bring the stitch count down by about 6 to 10 stitches. Then knit 4 to 6 rounds straight.
Visual checkpoint: you should see a clear neck pinch.Build the belly.
Work increase rounds again until you are back to your widest stitch count, or slightly wider. Knit straight for 18 to 26 rounds.
If you want a very round belly like the photo, add one extra increase round early, then knit straight longer.
Tip: A longer straight section equals a more egg shaped body.Begin stuffing as you go.
Add stuffing to the head first. Use small tufts and pack firmly, especially around the cheeks and muzzle area. Continue stuffing the body as it grows.
Visual checkpoint: the head should feel springy but not squishy. It should hold its shape when you gently squeeze.Shape the base and close.
Work decrease rounds: decrease evenly spaced around the round, then knit one round, repeating until about 12 stitches remain. Stuff the base firmly. If using a base insert, slip it in now.
Cut yarn leaving a long tail, thread through remaining stitches, pull tight, and weave in securely.Knit the ears (two).
Cast on 10 to 14 stitches. Knit flat in stockinette, slipping the first stitch of every row for a neat edge.
For shaping, decrease one stitch at each end every 6th row until you have a tapered ear. Knit a few rows straight at the tip, then bind off.
Make a second ear to match.
Optional lining: Knit a smaller inner ear in a slightly lighter shade, or use a soft felt piece.
Visual checkpoint: ears should be long, slightly curved, and not too wide. If yours look paddle shaped, taper sooner.Seam and shape the ears.
Fold each ear lengthwise, right sides together, and seam the long edge leaving the base open. Turn right side out. Press lightly with your fingers.
If you want the ear to stand, add a tiny felt strip inside or stitch a small inner “spine” seam to encourage a curve.Knit the arms (two).
Cast on 10 stitches with the paw color. Join in the round. Knit 4 rounds for a cuff. Switch to body color and knit 10 to 14 rounds. Lightly stuff only the paw end.
Decrease to close, or leave open for a flatter arm and seam closed.
Visual checkpoint: arms should be small and soft, with a clear light colored paw like the photo.Knit the legs (two).
Cast on 12 stitches with the paw color. Knit 5 rounds. Switch to body color and knit 10 to 16 rounds. Stuff the foot more firmly than the upper leg so it sits nicely. Close the top.
Tip: The photo shows a sitting bunny with round feet. A firm stuffed foot helps that pose.Create the muzzle and nose.
With the lighter yarn, stitch a small oval muzzle area using duplicate stitch or satin style embroidery. Add a tiny triangle nose in a warm peach tone.
Optional tongue: a single short stitch of pink straight down.Add the eyes.
If using safety eyes, place them symmetrically slightly above the muzzle, about 5 to 7 stitches apart. If stitching eyes, use small horizontal stitches and keep them minimal for that modern heirloom look.
Visual checkpoint: the face should look calm and sweet, not startled. If it looks surprised, move eyes slightly closer or lower.Add whiskers.
Cut three short lengths of thin black cord per side. Insert from inside the head and anchor with knots on the inside. Trim evenly.
Tip: If your whiskers droop, use a stiffer thread or dab a tiny bit of fabric glue at the base.Embroider the daisy cluster.
On the front of the belly, stitch 2 to 4 small daisies with yellow petals and green stems. Use lazy daisy stitches for petals and a small knot for the center.
Visual checkpoint: keep the flowers slightly off center like the photo, and cluster them vertically for that sweet spring bouquet feel.Attach ears, arms, and legs.
Pin first. Ears sit close together at the top center of the head. Stitch firmly with repeated passes.
Arms attach slightly below the neck line. Legs attach low and forward so the bunny sits.
Tip: If yours tips backward, move legs slightly forward and add more stuffing to the belly.Finish with the twine bow.
Wrap twine around the neck, tie into a soft bow, and trim. You can also use a thin ribbon if you want a softer look.
Troubleshooting
- Stuffing shows through stitches: Use smaller needles or a slightly thicker yarn. Plush knitting needs dense fabric.
- Head looks lumpy: Stuff in tiny layers and push stuffing into corners with a blunt tool. Add more around cheeks for a smooth curve.
- Ears flop: Reduce ear width, add an inner lining, or sew a hidden center seam to give structure.
- Bunny will not sit: Firmly stuff feet, shift leg placement forward, and consider adding a small weighted pouch in the base.
- Face looks uneven: Mark eye positions with pins before committing. Step back and check symmetry in a mirror.
Finishing details
Weave in all ends deep inside the plush so nothing pokes out. If you want an extra polished look, steam the fabric lightly from a distance, do not press, then smooth with your fingers. For a more sculpted face, you can add gentle “needle sculpting” by taking a long thread from inside the head, catching a few stitches near the eye, and pulling slightly to create a subtle socket.
Shop Similar
- Speckled DK yarn in caramel and oatmeal tones
- Double pointed needle set for small plush knitting
- 6 mm to 8 mm black safety eyes for stuffed animals
- Polyfill toy stuffing for knit dolls
- Embroidery floss set for tiny floral details
Style It With
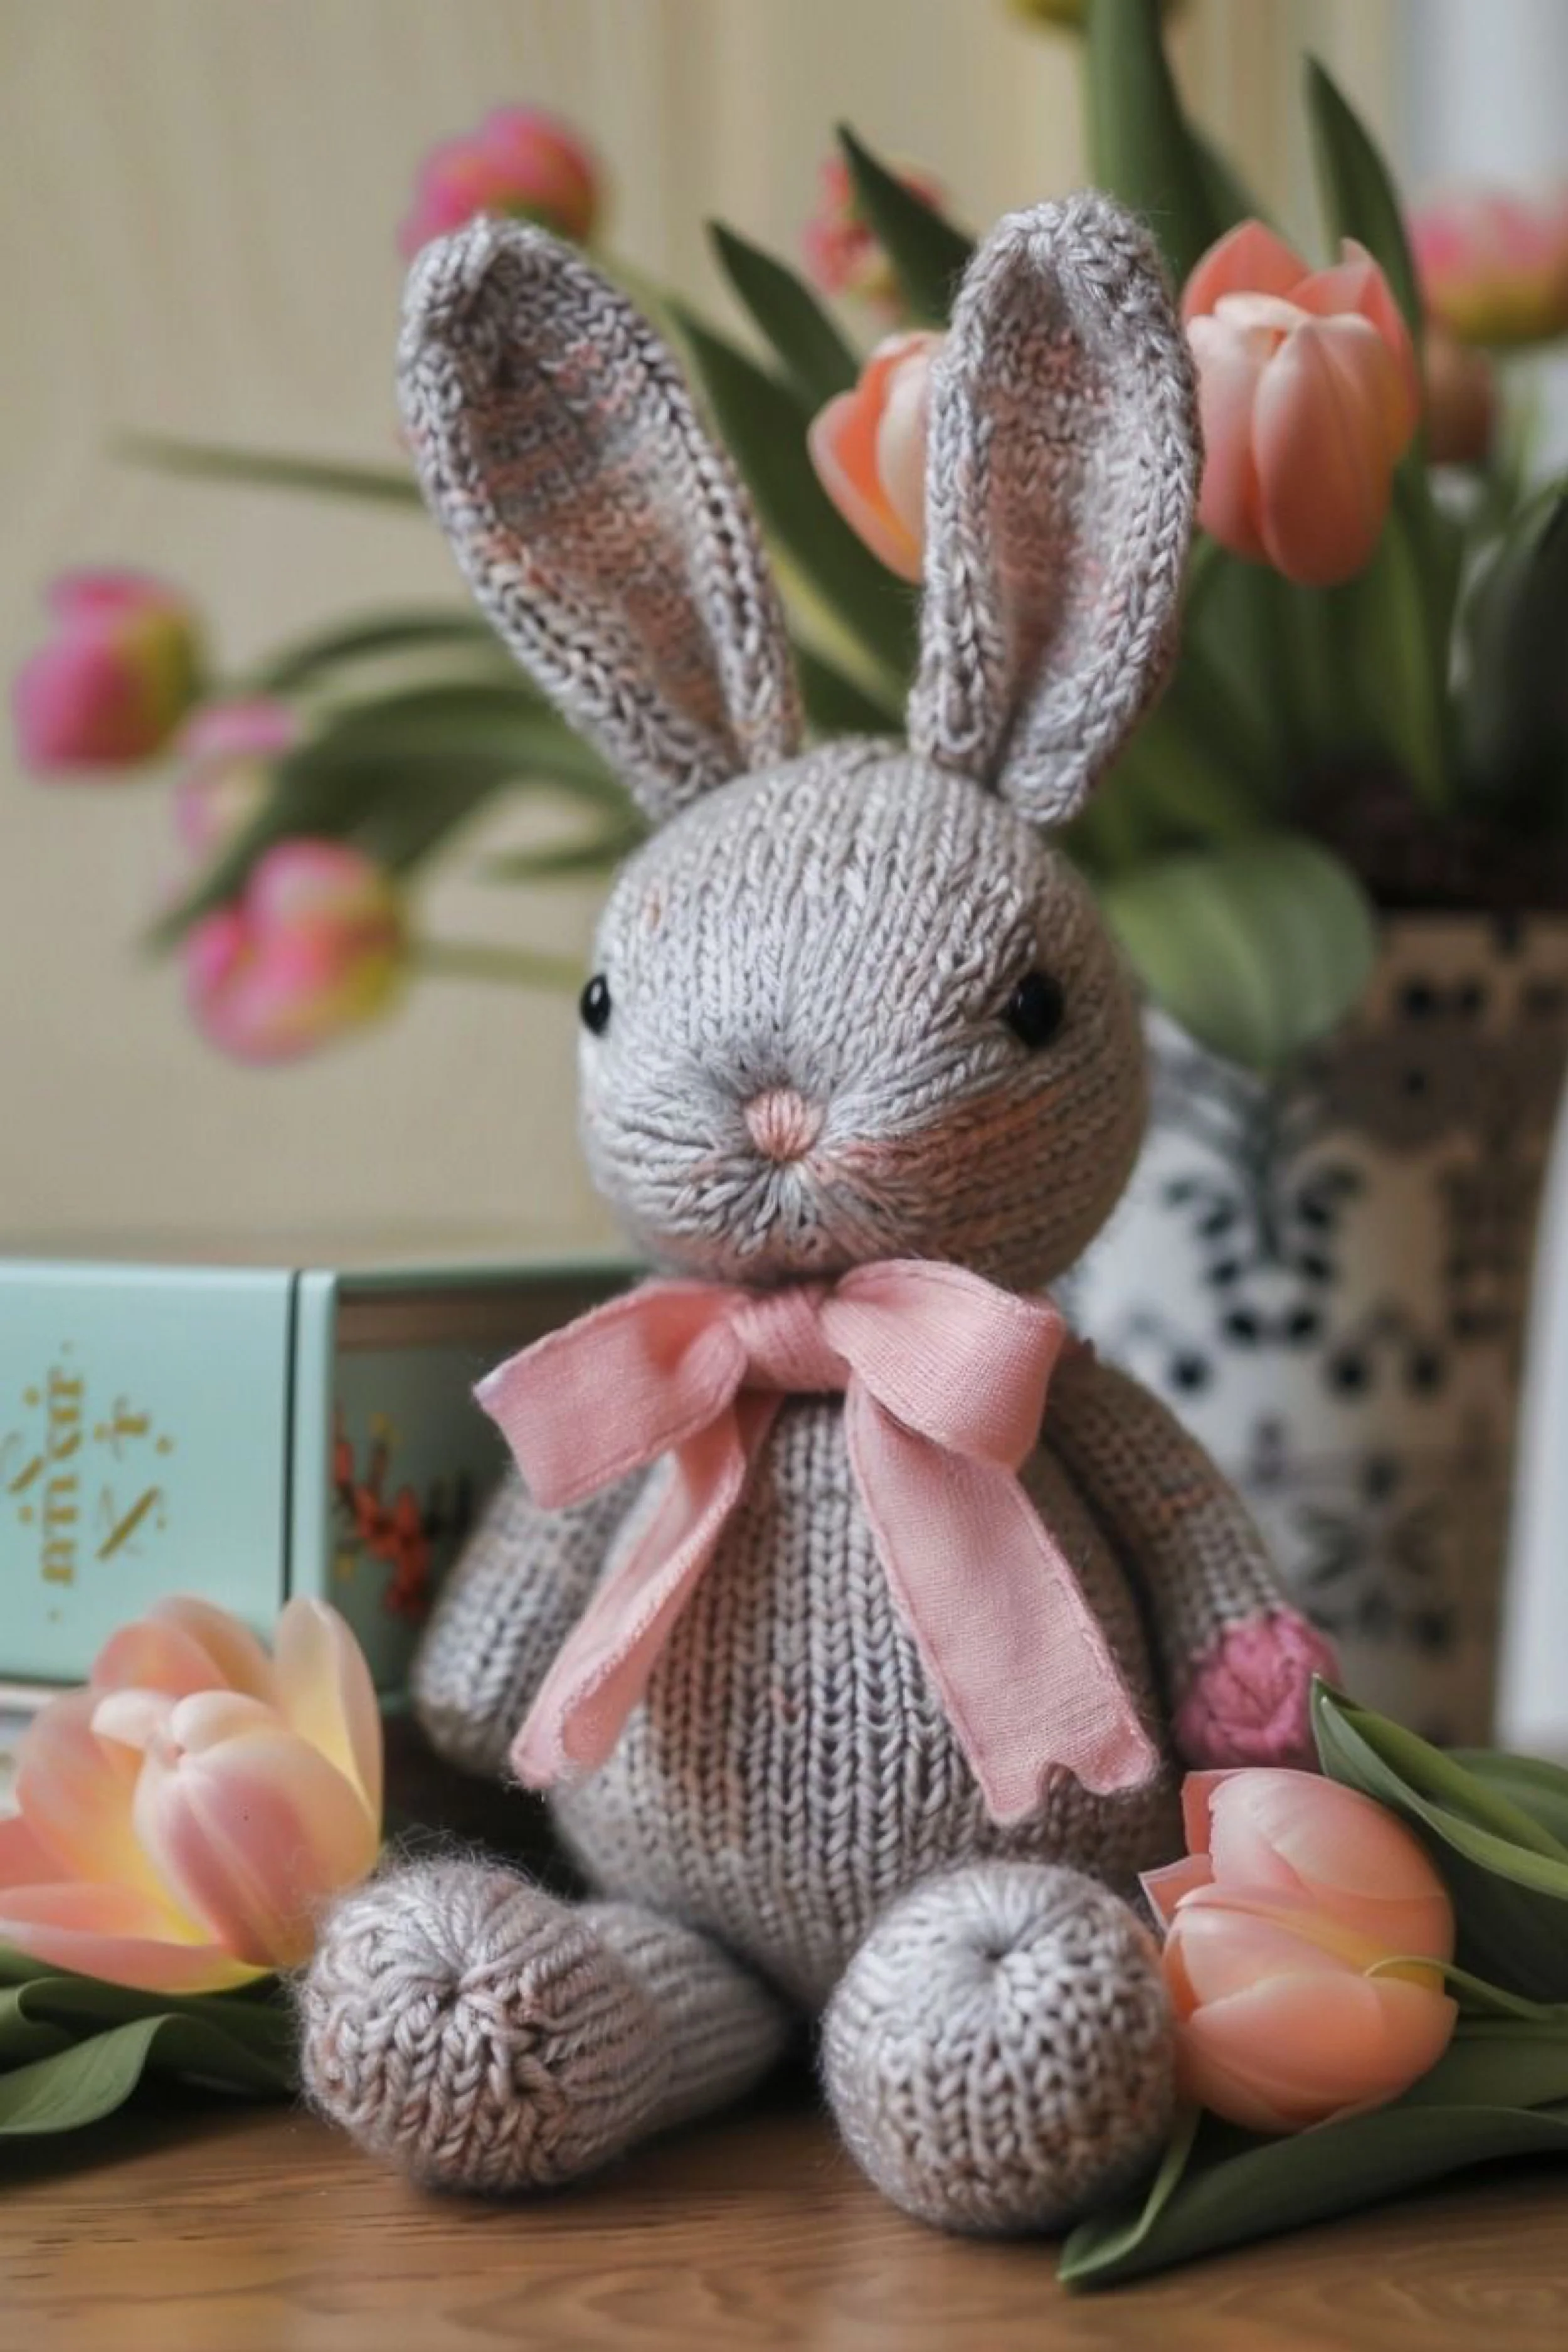
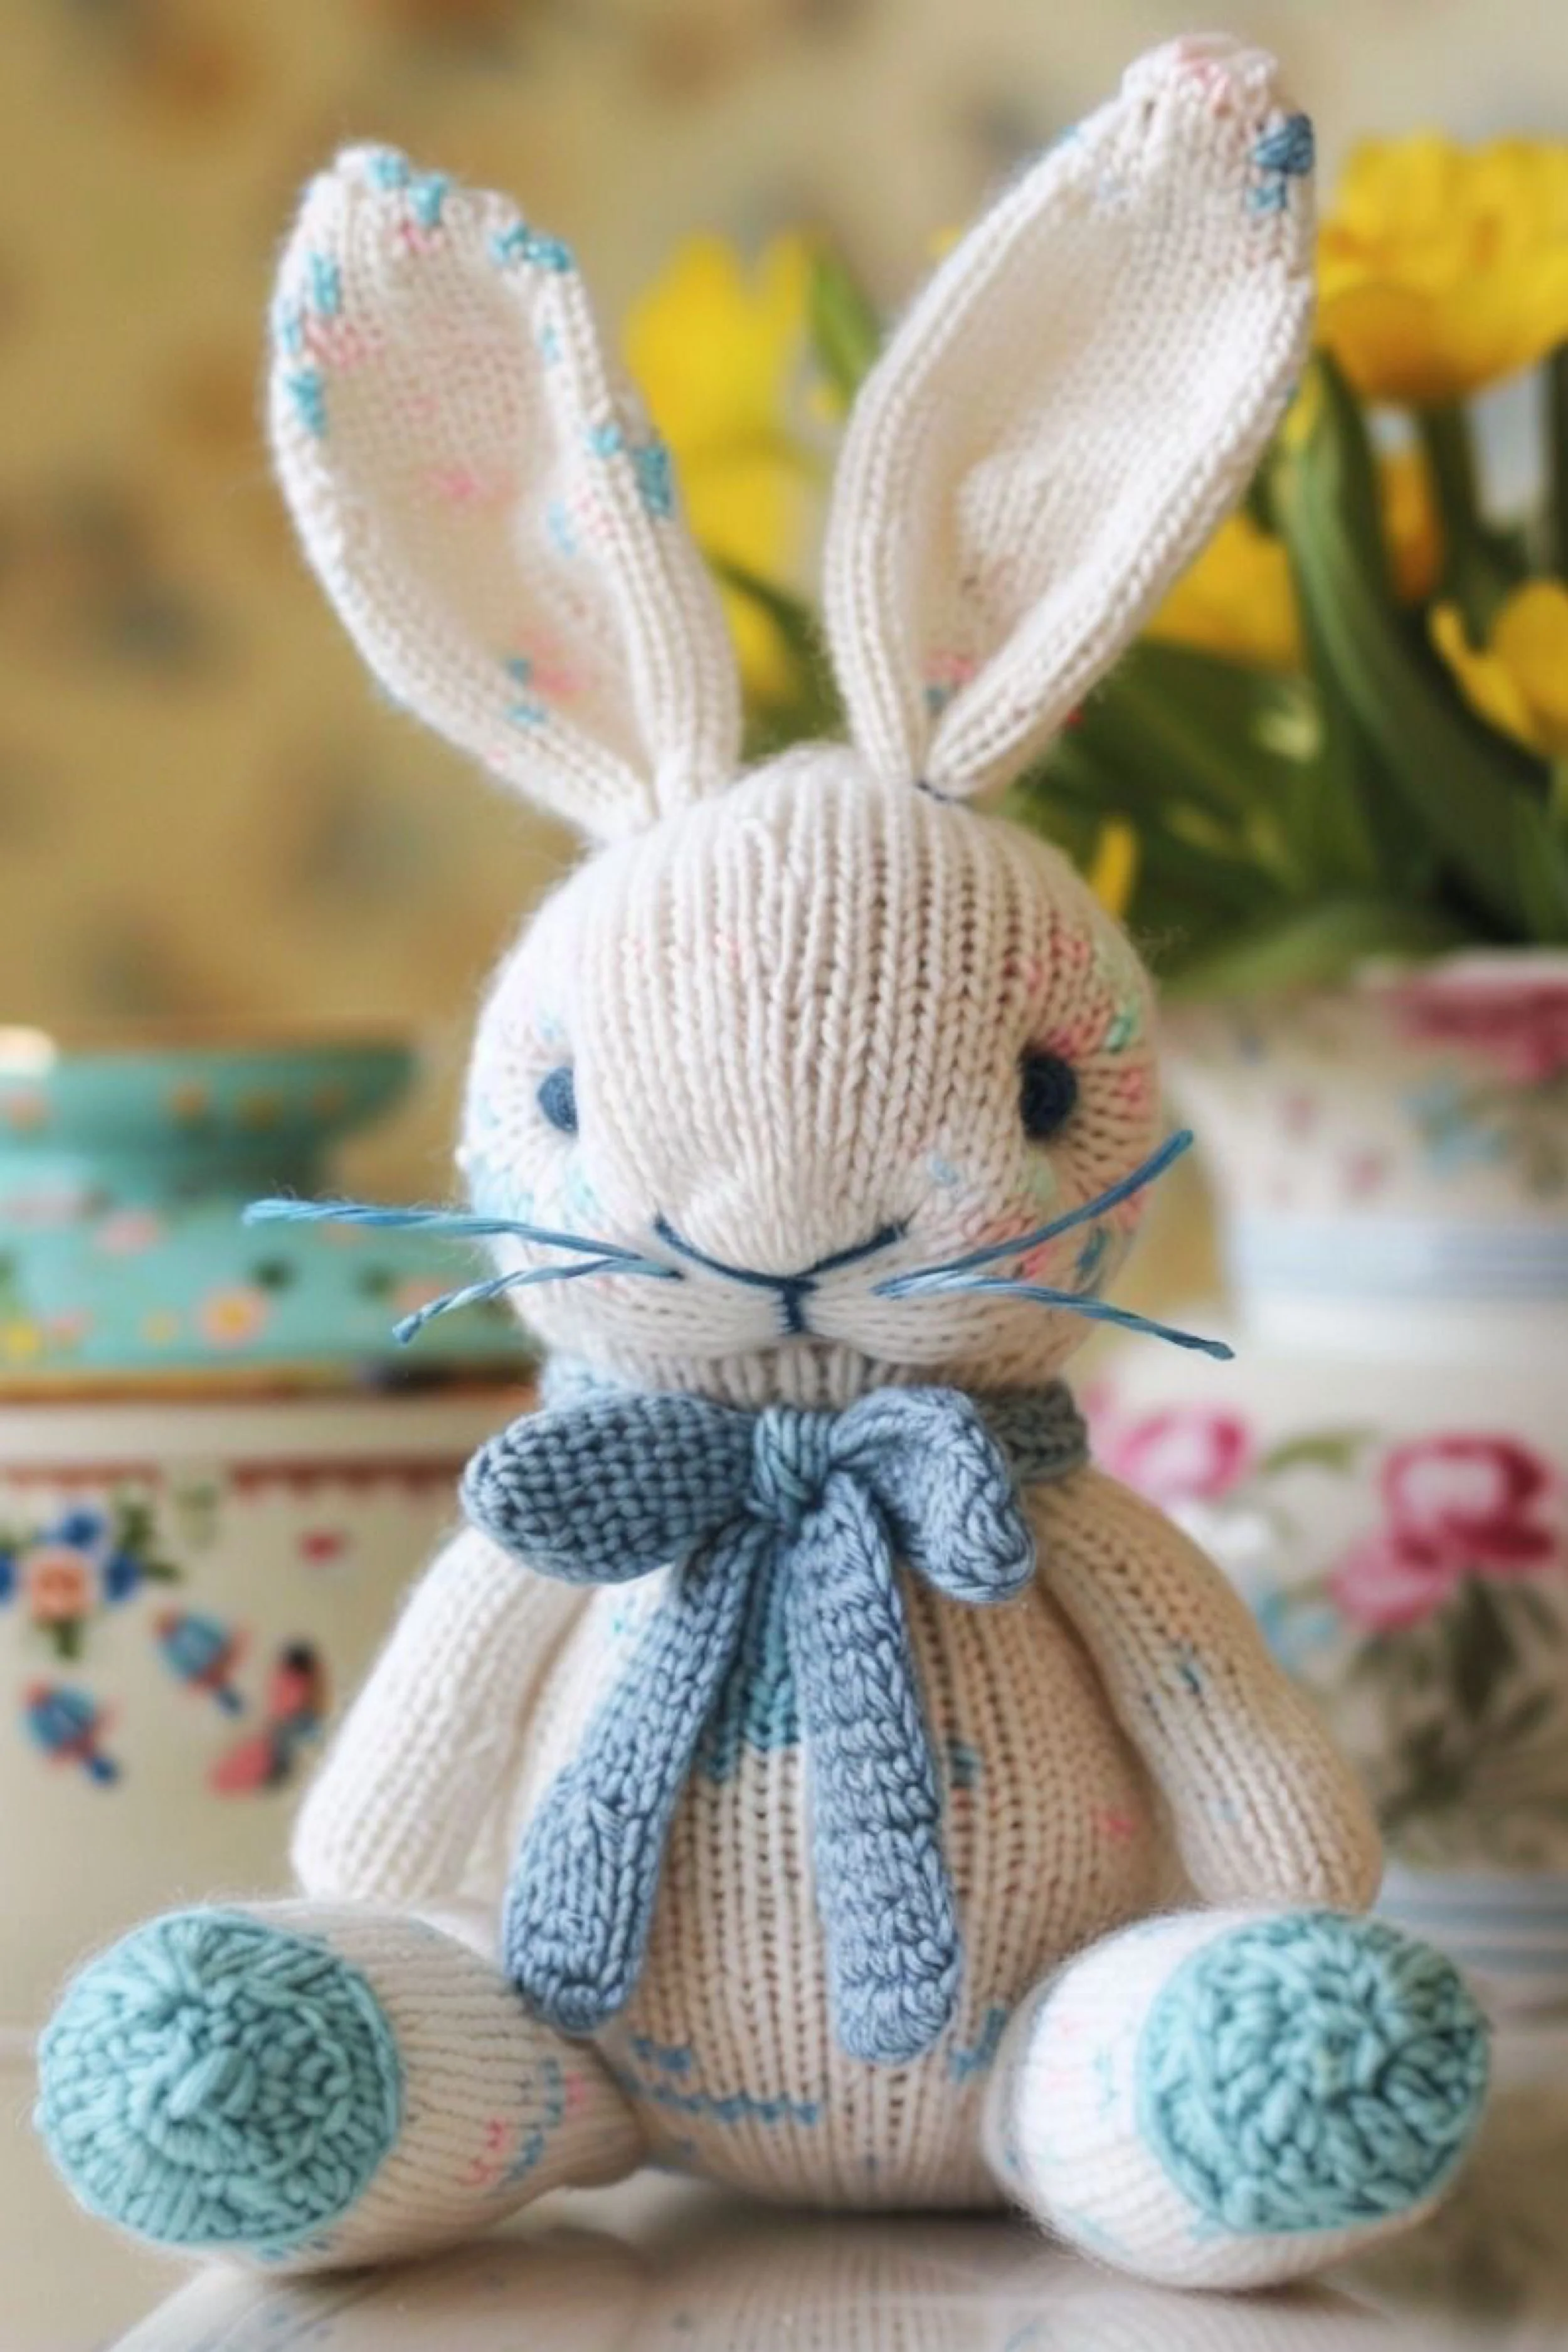
Soft Gray Bunny Doll DIY Guide With Satin Bow and Spring Tulips
What you’re making
You’re knitting a classic soft gray bunny plush with clean lines, tall ears, and that perfectly simple sitting shape that reads instantly “heirloom.” This one is all about the minimal face, rounded tummy, and a blush satin bow that makes it feel gift ready, especially for Easter baskets or nursery shelves.
Materials + tools
- DK or worsted yarn in soft heather gray for the main body
- Optional: tiny amount of pale pink yarn or embroidery floss for the nose
- Two black safety eyes (6 mm to 8 mm) or black thread for stitched eyes
- US 3 to US 5 needles for in the round knitting (double pointed or magic loop)
- Stitch markers
- Tapestry needle
- Toy stuffing
- Satin ribbon in blush pink, about 1 inch wide
- Scissors
- Optional: small bell or charm for inside the bow knot (remove for baby use)
Finished size + customization notes
With DK yarn, expect about 8 to 10 inches tall sitting. With worsted, expect 10 to 12 inches. If you want the bunny to look exactly like the photo, keep the body simple and the ears tall but not overly wide. For a more modern look, use stitched eyes. For a more classic look, use safety eyes.
Step by step instructions
Plan for a firm plush fabric.
Knit a quick swatch in the round. Your stitches should be tight and even. If you can poke a finger through the fabric easily, go down a needle size.Knit the head and body as one piece.
Cast on 6 stitches and join in the round.
Increase rounds: increase evenly until you reach 42 to 48 stitches. Knit one plain round between increase rounds.
Visual checkpoint: a smooth dome forms with no puckers.Knit the head height.
Knit straight for about 18 to 22 rounds. The photo bunny has a longer head, not a squashed ball.Shape the neck.
Decrease evenly around one round to reduce by about 8 stitches. Knit 4 to 6 rounds straight.Widen into the belly.
Increase evenly around one round to return to the wider count. Knit straight for 20 to 28 rounds.
Tip: The longer you knit here, the more egg shaped the body becomes.Stuff as you go.
Stuff the head firmly, especially under the face area. Add stuffing to the belly in small layers.
Visual checkpoint: when you press the belly, it should spring back and hold a rounded silhouette.Close the base.
Decrease evenly, alternating with plain rounds, until 12 stitches remain. Stuff firmly. Close by threading the tail through remaining stitches and pulling tight.Knit the ears (two).
Cast on 12 to 14 stitches and knit flat in stockinette, slipping the first stitch each row. Knit for 18 to 26 rows. Taper by decreasing at each end every 6th row until the ear tip looks gently rounded. Bind off.
Seam, turn, and lightly shape with your fingers.
Visual checkpoint: ears should look tall and softly curved inward, like the photo.Knit the arms (two).
Cast on 10 stitches, knit in the round for 12 to 16 rounds. Lightly stuff. Close.
Tip: Keep arms smaller than you think. Oversized arms make the bunny look cartoonish.Knit the legs (two).
Cast on 12 stitches, knit 6 rounds, then knit 12 to 18 rounds more. Stuff feet firmly and upper legs lightly. Close.Attach ears.
Pin ears on top of head close together. Stitch firmly with repeated passes so they stay upright.Attach arms and legs.
Legs attach low and slightly forward so the bunny sits. Arms attach just below the neck. Use ladder stitch for neat joins.
Visual checkpoint: set the bunny down and check the sit. If it tips, adjust leg angle before finishing knots.Add the face.
Place eyes slightly above the midpoint of the head, spaced evenly. Add a small pink nose with a few stitches.
Optional mouth: one tiny vertical stitch below the nose and two short angled stitches for a soft smile.Tie the satin bow.
Wrap ribbon around the neck and tie a full bow with long tails. Trim at a diagonal or straight, matching the photo’s clean finish.
Troubleshooting
- Bunny looks too skinny: Add one extra increase round before the belly section, or knit more belly rounds.
- Bunny looks too wide: Stop increasing earlier and rely on stuffing for roundness.
- Ears twist: Make sure both ears are knitted with the same orientation and seam on the back edge.
- Sits poorly: Stuff the feet more firmly and move legs slightly forward.
- Safety eyes wobble: Ensure washers are fully snapped and fabric is dense enough to hold them.
Finishing details
Weave ends inside and tug gently to lock. Lightly steam from a distance to relax any curl in the ear edges. If gifting, stitch the bow to the neck with a few hidden tacks so it stays centered. For nursery safety, use embroidered eyes and skip small removable parts.
Shop Similar
- Soft gray yarn for heirloom knit toys
- Blush satin ribbon wide for plush bow
- Safety eyes set for stuffed animals
- Stuffing for knit plush dolls
- Long circular needles for magic loop small projects
Style It With
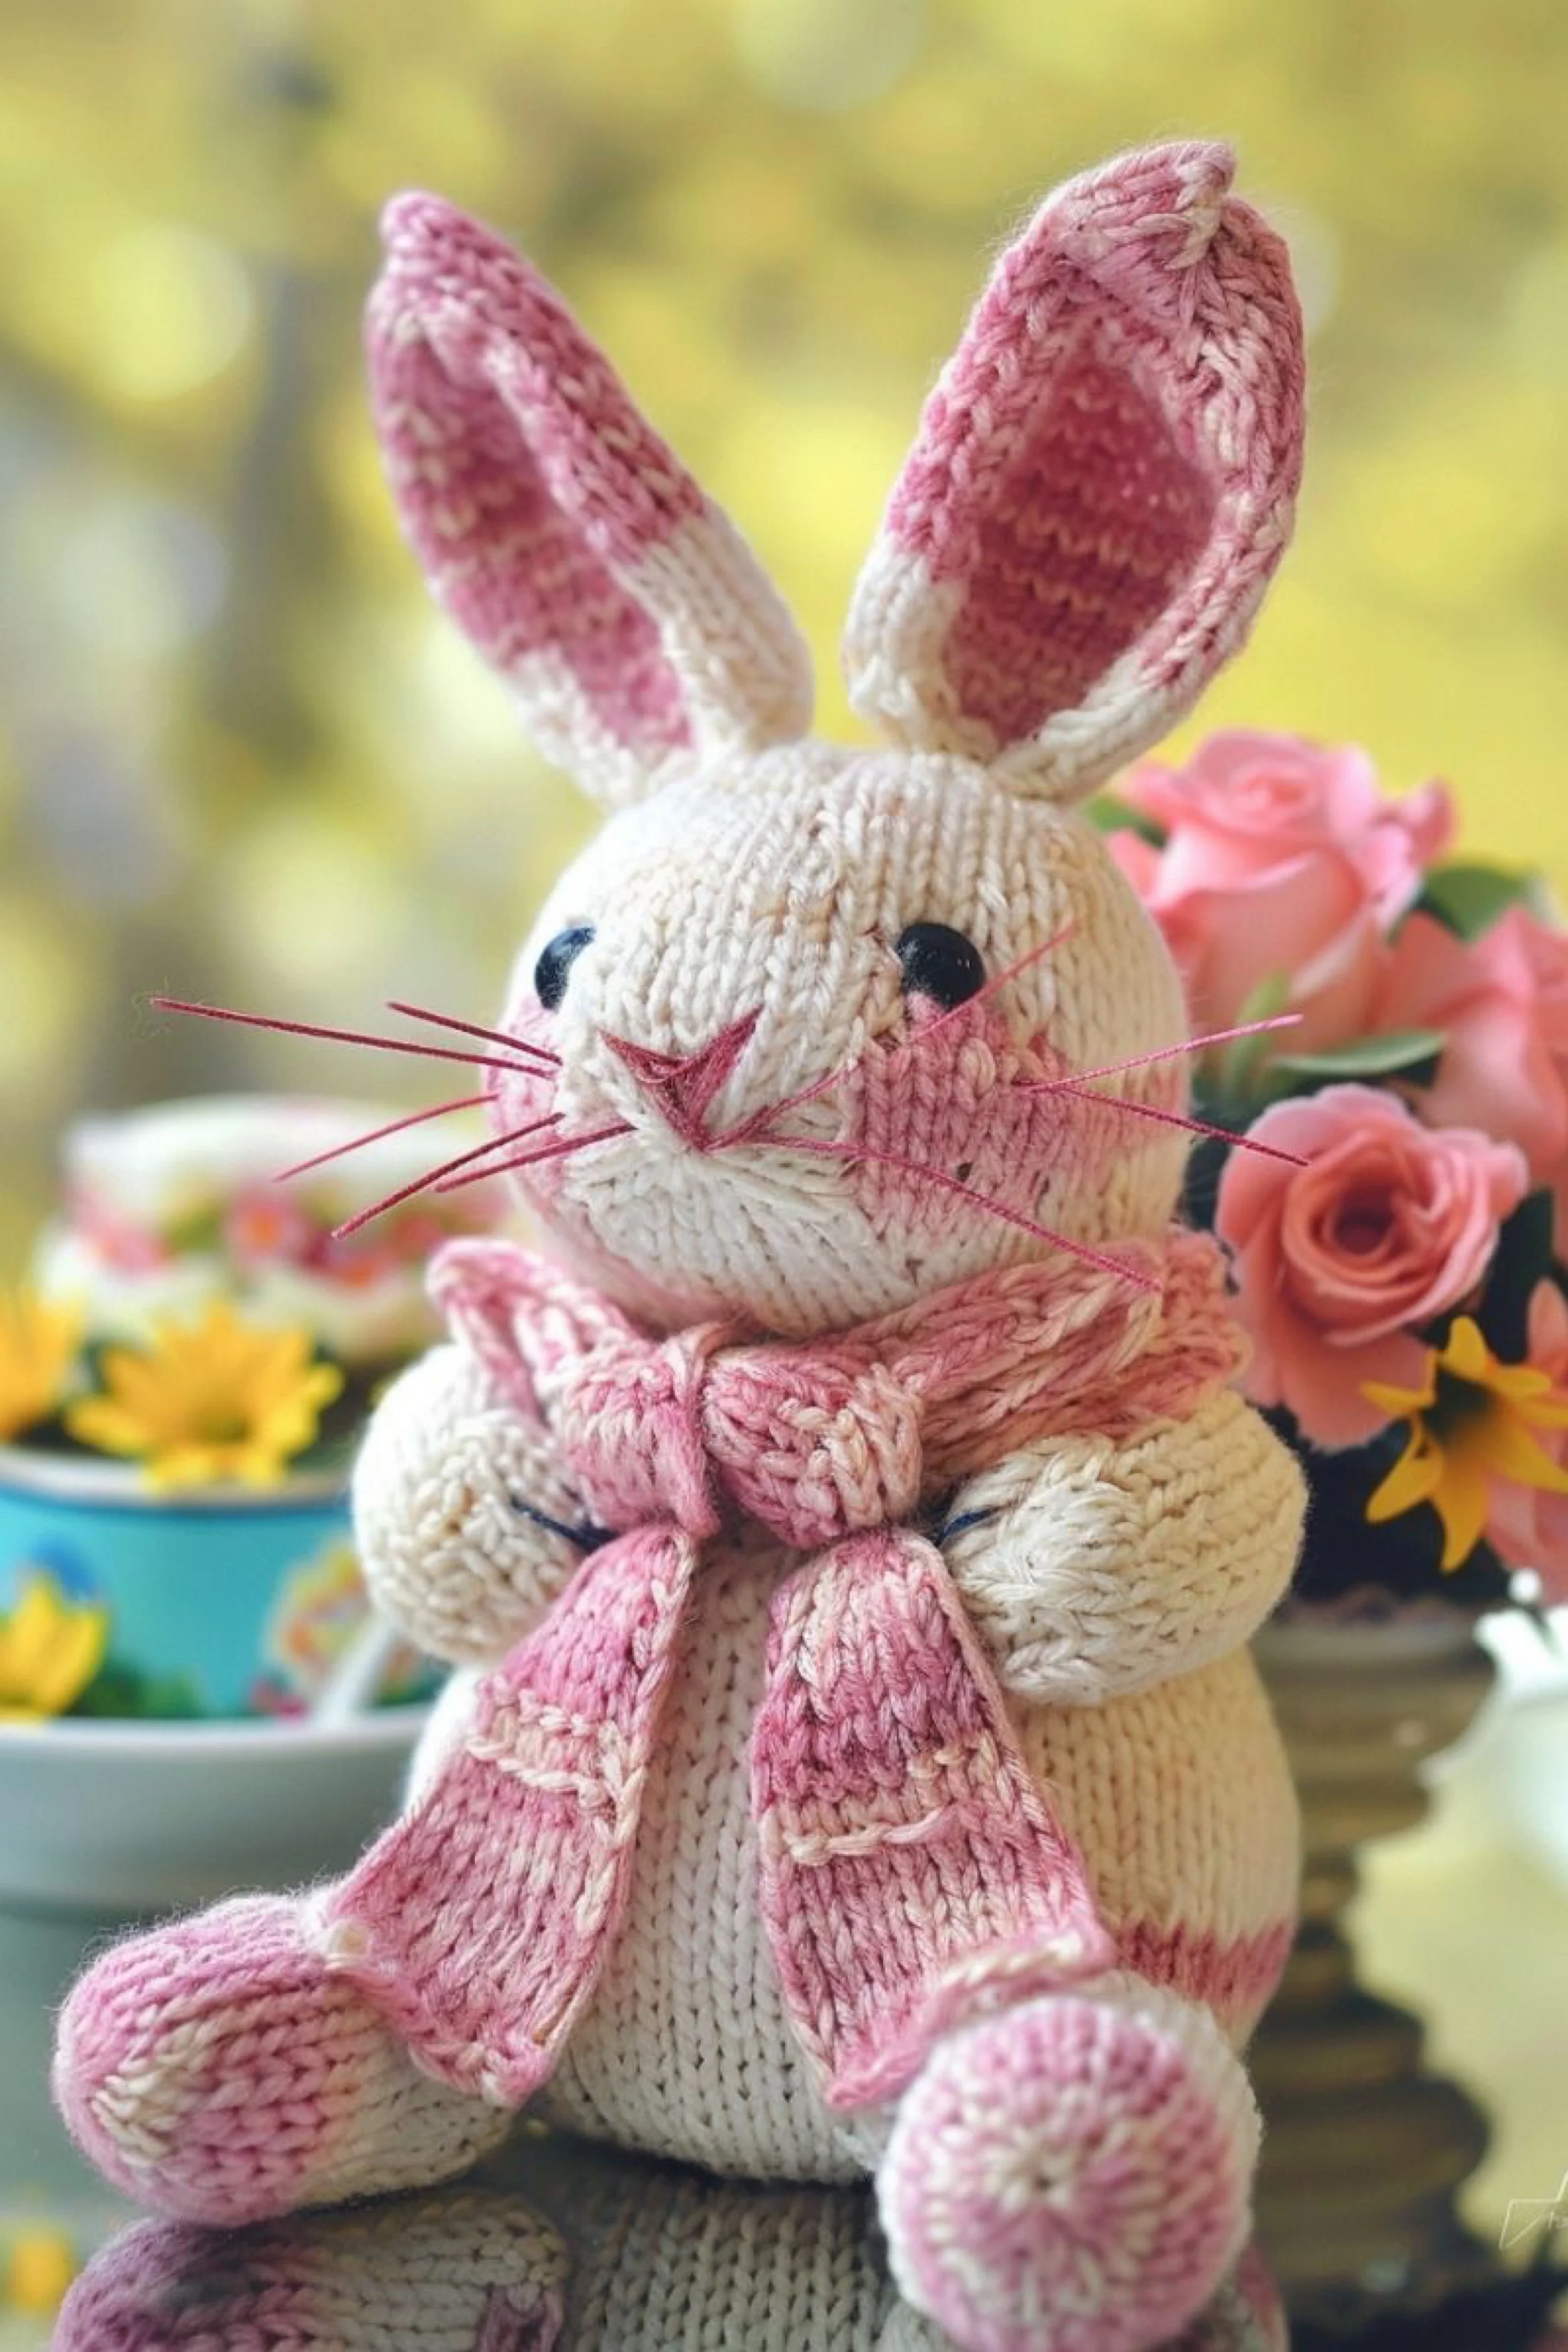
Pink Dip Dye Bunny Plush How To Guide With Cozy Knit Scarf
What you’re making
You’re knitting a cheerful cream bunny with rosy pink dip dye details on the ears, cheeks, paws, and scarf, finished with playful whiskers and a sweet stitched smile. The look is bright, springy, and slightly storybook, like it belongs next to a tea cup and a vase of roses.
Materials + tools
- DK or worsted yarn in creamy off white for the main body
- DK or worsted yarn in medium pink for dip dye accents and scarf
- Two black safety eyes or black thread for stitched eyes
- Pink embroidery floss for nose and whiskers
- US 3 to US 6 needles (size depends on yarn, aim for dense fabric)
- Stitch markers
- Tapestry needle
- Toy stuffing
- Optional: a small amount of rosy blush yarn for cheeks
- Optional: pipe cleaner pieces for ear shaping (skip for baby use)
Finished size + customization notes
Expect 8 to 12 inches tall depending on yarn weight. For the dip dye effect, you can either switch yarn colors at certain rounds or use duplicate stitch shading after knitting. If you want the soft blended look from the photo, use gentle color changes with two rounds of alternating stitches between cream and pink where the transition happens.
Step by step instructions
Decide your dip dye method.
Option 1: Color change knitting, simplest and clean.
Option 2: Blended transition, alternate colors for two rounds at the change line.
Tip: The photo looks softly blended, so the alternating rounds approach is perfect.Knit head and body top down.
Cast on 6 stitches, join in the round. Increase evenly until 48 to 54 stitches. Knit plain rounds between increases.
Knit head height 18 to 22 rounds.Add cheek shaping and color.
For cheeks, you can do one of these:
Option 1: After knitting, add blush with duplicate stitch in pink.
Option 2: Knit two short rows of pink on the face area.
For beginners, duplicate stitch is easiest and looks very close to the photo.Neck shaping.
Decrease evenly around to reduce by about 8 stitches. Knit 4 to 6 rounds.Belly section.
Increase back to wider count. Knit 20 to 30 rounds. Start stuffing the head firmly and the body in layers.Close base.
Decrease evenly until 12 stitches remain. Stuff firmly and close.Knit ears with pink tips.
Cast on 12 stitches, knit flat. Start with pink for the first 8 to 12 rows, then blend to cream by alternating pink and cream every other stitch for two rows, then continue cream for the remaining ear length.
Taper at ends every 6th row. Bind off. Seam and turn.
Visual checkpoint: ear tips should read pink first, then soften into cream like a dipped marshmallow.Knit arms and legs with pink paws.
Arms: cast on 10 stitches. Knit 4 rounds in pink, blend 2 rounds, then knit cream for 10 to 14 rounds. Lightly stuff. Close.
Legs: cast on 12 stitches. Knit 6 rounds in pink, blend 2 rounds, then knit cream for 12 to 18 rounds. Stuff feet firmly. Close.Knit the scarf.
Cast on 6 to 10 stitches in pink and knit a simple garter stitch strip long enough to wrap around the neck twice with short tails. Bind off.
Optional texture: knit a small rib scarf by alternating knit and purl columns for extra dimension.Assemble.
Attach ears close together on top of the head. Attach legs low and forward. Attach arms slightly below the neck.Add face details.
Insert eyes. Stitch a small triangle nose in pink. Stitch a small smile with a simple V shape.
For whiskers, stitch three straight lines per side using pink embroidery floss.
Visual checkpoint: whiskers should be playful but not too long. If they overpower the face, trim and restitch shorter.Add cheek blush.
Use duplicate stitch to add a soft patch of pink on each cheek. Keep it subtle and rounded.Tie on the scarf.
Wrap and knot loosely in front like the photo. You can tack stitch the knot so it stays centered.
Troubleshooting
- Color change line looks harsh: Add two blending rounds where you alternate stitches between colors.
- Pink bleeds into cream in the wrong spot: Keep your color changes at the back of the head or on the inner ear seam line for the cleanest look.
- Scarf feels bulky: Use a lighter yarn weight for the scarf or cast on fewer stitches.
- Whiskers look messy: Use fewer strands of floss or a single strand and keep stitches straight and even.
- Bunny face looks too crowded: Move eyes slightly wider and keep whiskers shorter.
Finishing details
Weave all ends inside. Smooth the fabric with your hands and gently shape the cheeks with stuffing from the inside. If you want the ears to stand a bit more, add a tiny hidden tack at the base of each ear to angle them inward.
Shop Similar
- Cream yarn for heirloom bunny plush
- Pink yarn for dip dye accents and scarf
- Embroidery floss pink for whiskers and nose
- Safety eyes black small for knit toys
- Polyfill stuffing for plush toys
Style It With
Confetti Speckle Bunny Make It Yourself Tutorial With Blue Knit Bow
What you’re making
You’re knitting a clean white bunny plush sprinkled with tiny confetti speckles, finished with a dusty blue knit bow and matching foot pads. The shape is smooth and modern, with tall ears and a calm little face that feels perfect for a baby shower gift, a spring mantel, or a sweet Easter basket centerpiece.
Materials + tools
- DK or worsted yarn in white with pastel speckles (confetti style) for the main body
- DK yarn in dusty blue for bow and whiskers
- DK yarn in soft teal for foot pads
- Two small safety eyes or black embroidery thread for eyes
- US 3 to US 6 needles for tight in the round knitting
- Stitch markers
- Tapestry needle
- Toy stuffing
- Optional: pale pink embroidery floss for tiny nose
- Optional: soft felt circle for base stability
Finished size + customization notes
DK yarn makes an 8 to 10 inch bunny. Worst ed makes a 10 to 12 inch bunny. The photo look is crisp and smooth, so aim for even tension and a dense fabric. If your speckles are subtle, you can add extra confetti effect by duplicate stitching a few tiny specks with leftover pastel yarn.
Step by step instructions
Pick the right yarn texture.
A confetti yarn with small colored flecks gives the exact look. If you only have solid white, you can still get close by adding small speckles later with embroidery.Knit head and body as one.
Cast on 6 stitches and join. Increase evenly to 48 stitches, knitting a plain round between increases.
Knit head height 18 to 22 rounds.Neck shaping.
Decrease evenly by about 8 stitches. Knit 4 to 6 rounds.Body shaping.
Increase back to wider count. Knit 20 to 28 rounds.
Stuff head firmly and body in layers.Close base.
Decrease evenly until 12 stitches remain. Stuff firmly and close.Knit ears (two) with inner speckles.
Cast on 12 stitches. Knit flat stockinette, slipping first stitch each row. Knit for 22 to 28 rows. Taper with decreases at each end every 6th row until the ear tip is rounded. Bind off.
Seam and turn.
Visual checkpoint: ears should look tall and clean, with a slight inward curve.Knit arms (two).
Cast on 10 stitches, knit in the round for 12 to 16 rounds. Lightly stuff and close.Knit legs (two).
Cast on 12 stitches, knit 16 to 22 rounds. Stuff feet firmly, upper legs lightly. Close.Add foot pads in teal.
For the turquoise foot pads, you can do one of these:
Option 1: Knit small circles in teal and sew onto the bottom of each foot.
Option 2: Duplicate stitch a teal circle on the foot base.
The knit circle applique looks closest to the photo.
Knit circle: cast on 6 stitches, increase to 18, knit 2 rounds, then decrease back to 6 and close. Flatten and stitch to foot bottom.Attach ears, arms, legs.
Pin first. Ears sit close together. Legs sit low and forward. Arms sit slightly below neck.Face details.
Add eyes. Add a tiny nose in pale pink or blue, depending on your vibe. Add a minimal mouth with one short stitch below the nose.
Add blue whiskers by stitching thin straight lines from the muzzle outward.
Visual checkpoint: whiskers should read airy and sweet, not heavy.Knit the blue bow.
Knit a small rectangle in dusty blue, about 2 to 3 inches wide and 4 to 5 inches long in garter stitch. Gather the center tightly with yarn to form a bow shape.
Knit a small strip to wrap around the center and sew in place.
Stitch the bow to the neck with a few hidden tacks.Final shaping.
Smooth the stuffing and gently roll the bunny between your hands to round it. Adjust ear angle with a few stitches at the base if needed.
Troubleshooting
- Speckles look random and messy: Choose a yarn with tiny flecks, not large color blobs. If adding speckles by embroidery, keep them tiny and spaced.
- Bow droops: Knit the bow in a slightly tighter gauge or tack the bow loops to the body with hidden stitches.
- Foot pads look off center: Mark the bottom center of the foot with a pin before stitching the applique.
- Bunny leans: Add more stuffing to the belly and feet, and check leg placement symmetry.
- Ears curl at edges: Lightly steam and finger press, or add a simple single stitch crochet edge in matching yarn for stability.
Finishing details
Weave ends in deeply. If gifting, add a small fabric tag or stitched initial on the bottom. For extra stability, insert a felt circle inside the base before closing, then stuff around it.
Shop Similar
- Confetti speckle white yarn for plush toys
- Dusty blue yarn for bows and details
- Teal yarn for applique foot pads
- Safety eyes small black for knit dolls
- Needle set for knitting small toys in the round
Style It With
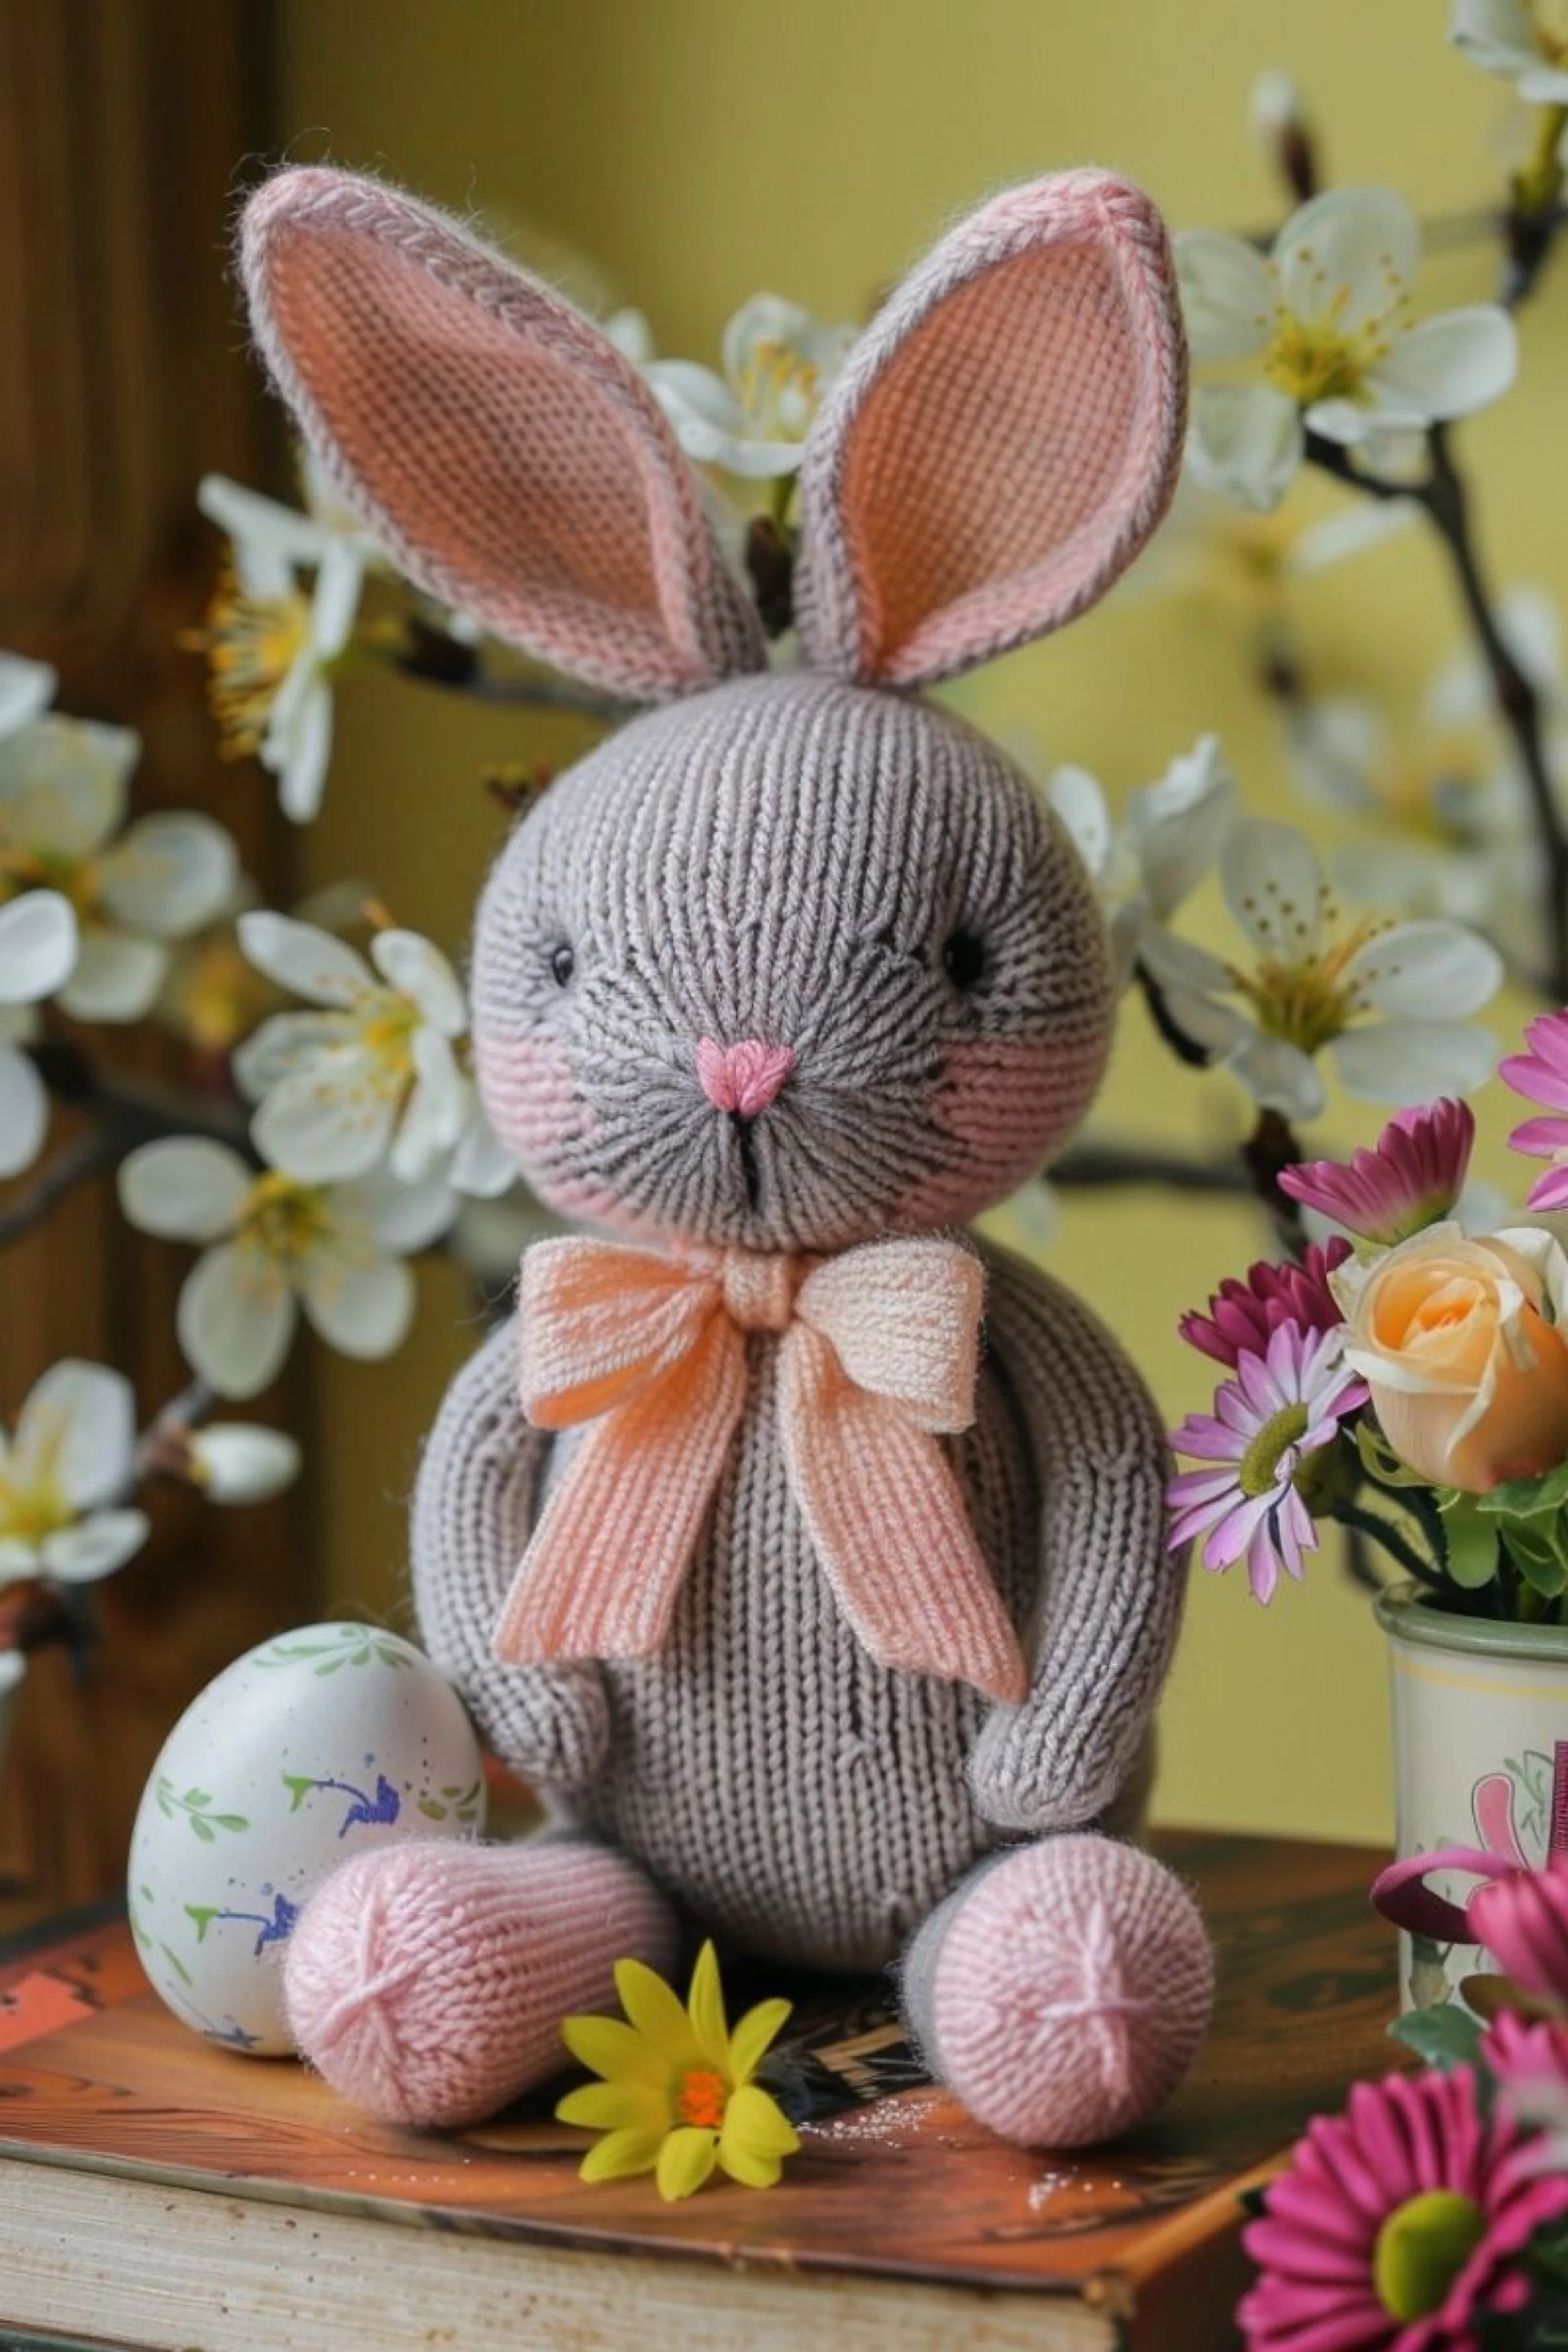
Blush Eared Taupe Bunny Doll Step by Step Tutorial With Peach Bow
What you’re making
You’re knitting a sweet taupe bunny plush with a smooth rounded head, tall ears with a blush pink inner ear, and a soft peach bow that feels like spring sunshine. The face is minimal and calm, with rosy cheeks and a tiny pink nose, styled exactly like the photo with florals and an Easter egg nearby.
Materials + tools
- DK or worsted yarn in warm taupe or mushroom gray for the main body
- DK yarn in blush pink for inner ears and cheek tint
- DK yarn in peach for the bow
- Two black safety eyes or black thread for stitched eyes
- Pink embroidery floss for nose
- US 3 to US 6 needles for firm plush fabric
- Stitch markers
- Tapestry needle
- Toy stuffing
- Optional: thin felt for ear lining support
- Optional: small pouch of weighted beads sealed in fabric (skip for baby use)
Finished size + customization notes
Expect about 8 to 12 inches sitting. The defining details here are the very smooth face shaping and the inner ear color. To match the photo, keep the muzzle subtle and rely on tiny embroidery for expression. If you want the bow to sit crisp, knit it in a slightly tighter gauge than the body.
Step by step instructions
Set yourself up for smooth knitting.
Choose needles that create tight, even stitches. Plush looks best when the fabric is dense and the stuffing stays hidden.Knit the head and body in one piece.
Cast on 6 stitches, join in the round. Increase evenly to 48 stitches, with plain rounds between increase rounds.
Knit 18 to 22 rounds for head height.Shape a soft muzzle.
For a gentle muzzle, do a single round where you add 2 increases on the front half only, then knit 2 plain rounds. This creates a subtle forward curve without an obvious snout.
Visual checkpoint: the face should look softly rounded, not pointed.Neck shaping.
Decrease evenly by about 8 stitches. Knit 4 to 6 rounds.Belly shaping.
Increase back to the wider count. Knit 22 to 30 rounds for that plump seated body.
Stuff head firmly, then stuff body in layers as you knit.Close base.
Decrease evenly, alternating with plain rounds, until 12 stitches remain. Add optional weighted pouch at the base, then finish stuffing. Close.Knit the arms (two).
Cast on 10 stitches. Knit 12 to 16 rounds in the round. Stuff lightly and close.
Tip: Keep arms slightly tapered by decreasing 2 stitches once near the top if you want a slimmer upper arm.Knit the legs (two).
Cast on 12 stitches. Knit 18 to 24 rounds. Stuff feet firmly so the bunny sits like the photo. Close.Knit the ears (two) with blush inner ear.
Outer ear: cast on 12 stitches in taupe, knit flat stockinette for 22 to 28 rows, taper with decreases at ends. Bind off.
Inner ear: knit a smaller matching shape in blush pink, about 2 stitches narrower and a few rows shorter.
Layer: place inner ear on outer ear piece, stitch around the edges with small whip stitches.
Seam ear lengthwise, turn right side out.
Visual checkpoint: the inner ear should sit neatly inside with a clean border.Attach ears.
Pin ears close together at the crown. Stitch firmly. Add a couple of anchoring stitches at the base to angle them slightly outward like the photo.Attach arms and legs.
Legs attach low and slightly forward. Arms attach just below neck.
Visual checkpoint: when you set the bunny down, it should naturally sit upright without leaning.Face details.
Add eyes. Add a tiny pink nose with a few stitches. Add a simple mouth with one short stitch down and two tiny angled stitches.
Add blush cheeks by lightly duplicate stitching blush pink on each cheek area. Keep it soft and rounded.Knit the peach bow.
Knit a rectangle in peach, about 2 to 3 inches wide and 5 to 6 inches long, in garter stitch. Gather the center tightly and wrap with a small strip. Stitch to the neck.
Tip: To mimic the photo, keep bow tails medium length and slightly tapered at the ends.Final shaping and smoothing.
Roll the head gently between your hands to round it. Push stuffing into the cheeks from inside if needed.
Troubleshooting
- Inner ears look wrinkled: Make inner ear slightly smaller and stitch it down evenly, smoothing as you sew.
- Bunny face looks too flat: Add a touch more stuffing in the muzzle area and do one extra front half increase round early.
- Bow twists: Tack the bow center to the body with two extra stitches, one on each side.
- Bunny wobbles: Add more stuffing to the feet and a small base insert. Also check leg placement symmetry.
- Seams look bulky: Use mattress stitch and avoid pulling too tight. Even tension makes the seams disappear.
Finishing details
Weave ends deep inside. If you want a truly heirloom finish, add subtle needle sculpting: run a thread from the back of the head to the cheek area and pull gently to create a soft dimple, then secure inside. Keep it subtle so the bunny stays calm and modern.
Shop Similar
- Taupe yarn for knit bunny plush
- Blush pink yarn for inner ears and cheeks
- Peach yarn for knitted bow detail
- Safety eyes for stuffed bunny dolls
- Polyfill stuffing for knit plushies
Style It With
If you make these bunnies, let them become part of your spring ritual. Tuck one into a basket with tissue and painted eggs, perch one on a stack of books with fresh tulips behind it, or wrap one in ribbon and gift it like a tiny handmade keepsake. The magic is in the small choices, a slightly tighter gauge, a softer cheek blush, a bow that matches your flowers, a pair of ears angled just so. Save your notes as you go so the next bunny is even better, and do not be surprised if this turns into the kind of pattern you come back to every year when spring starts showing off.