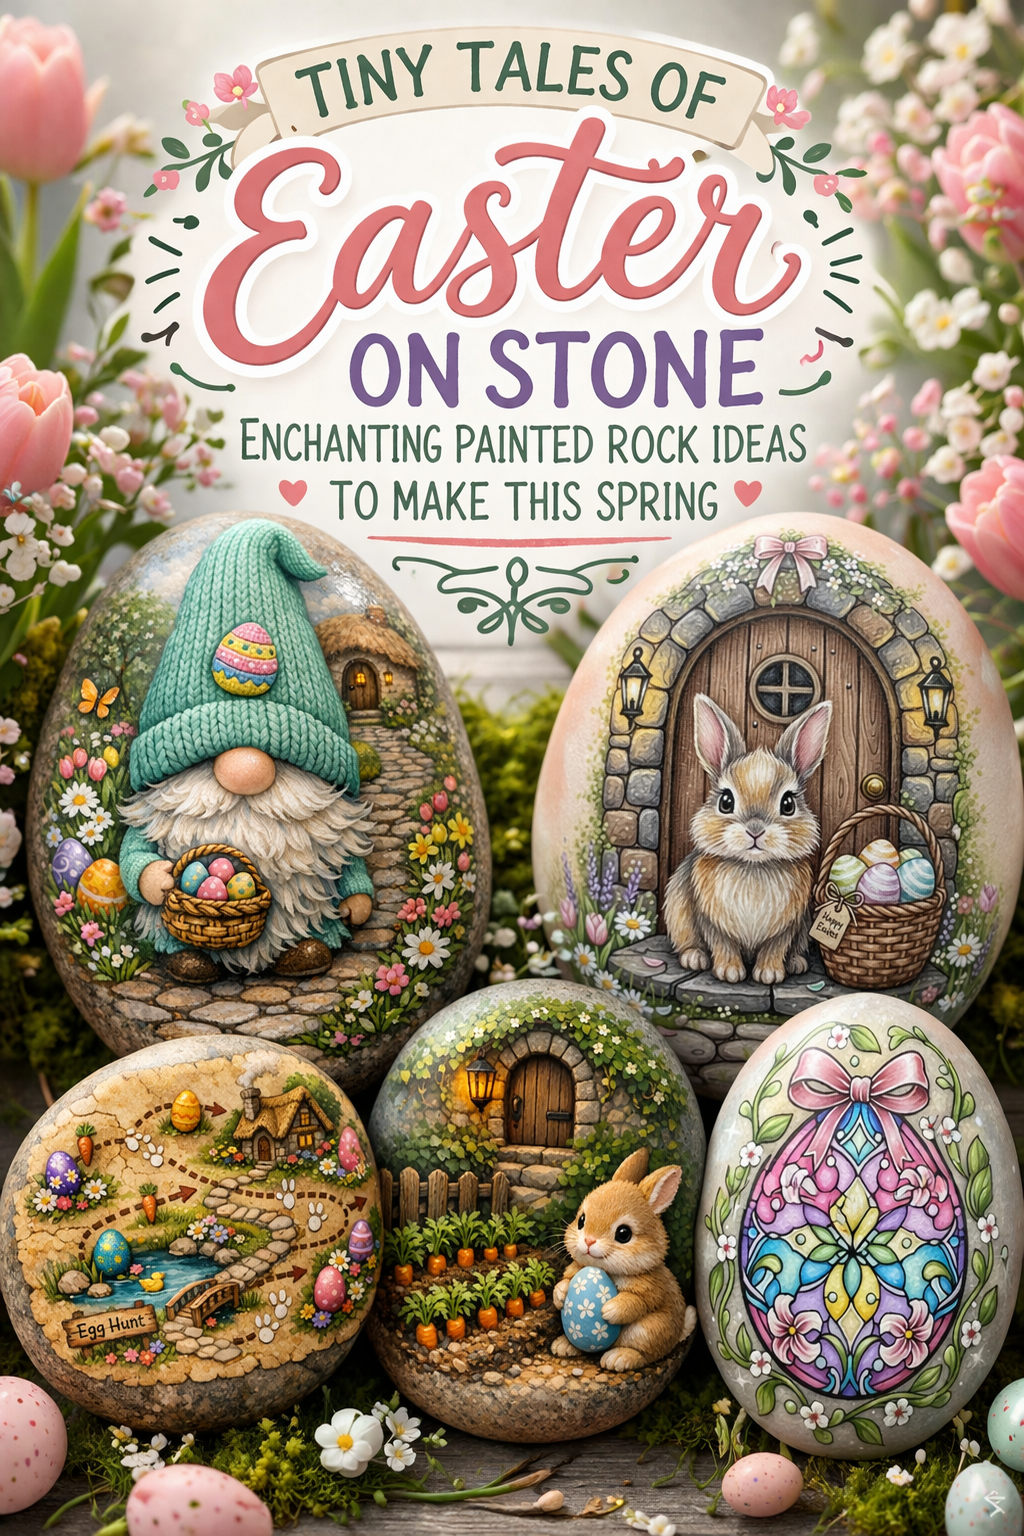
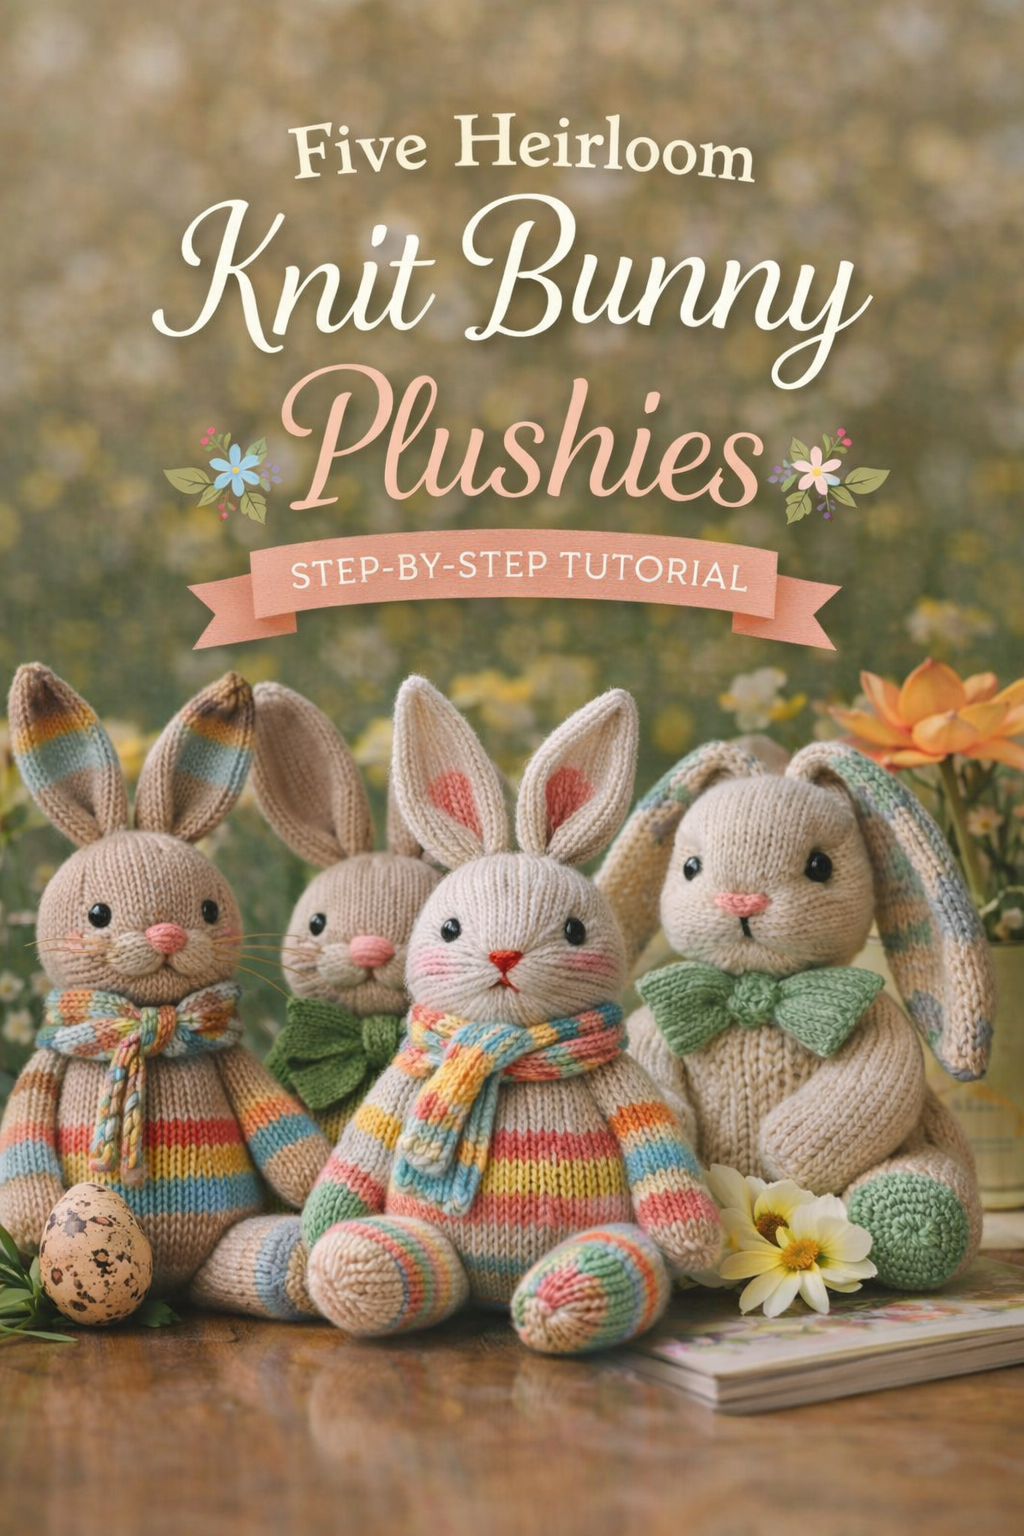
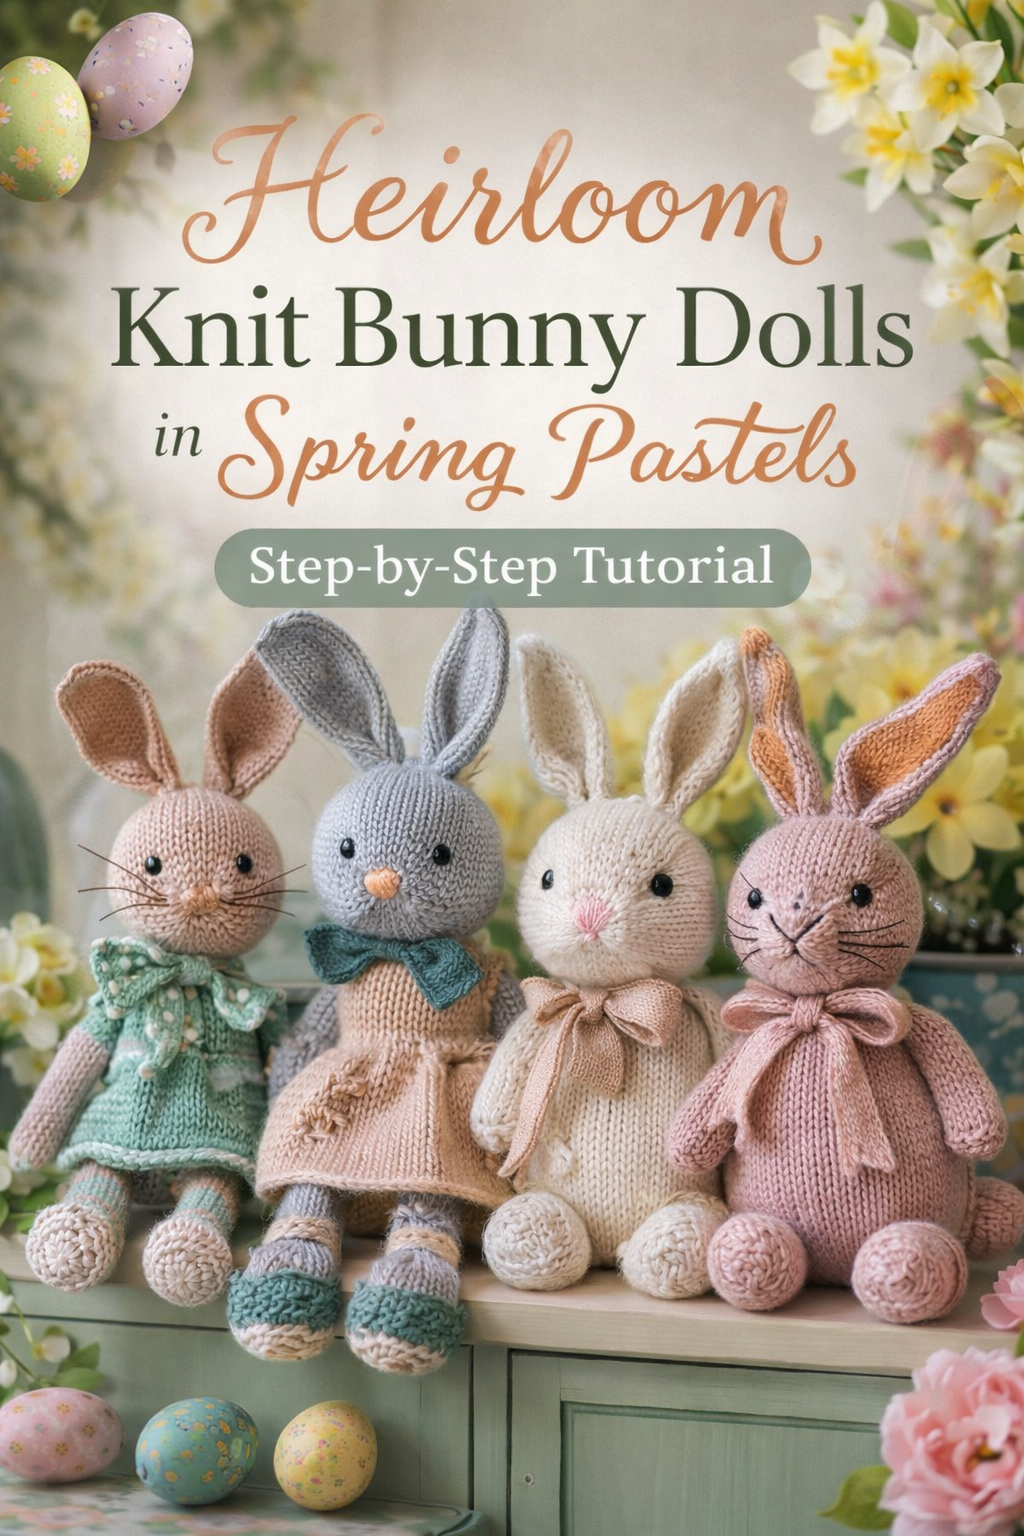
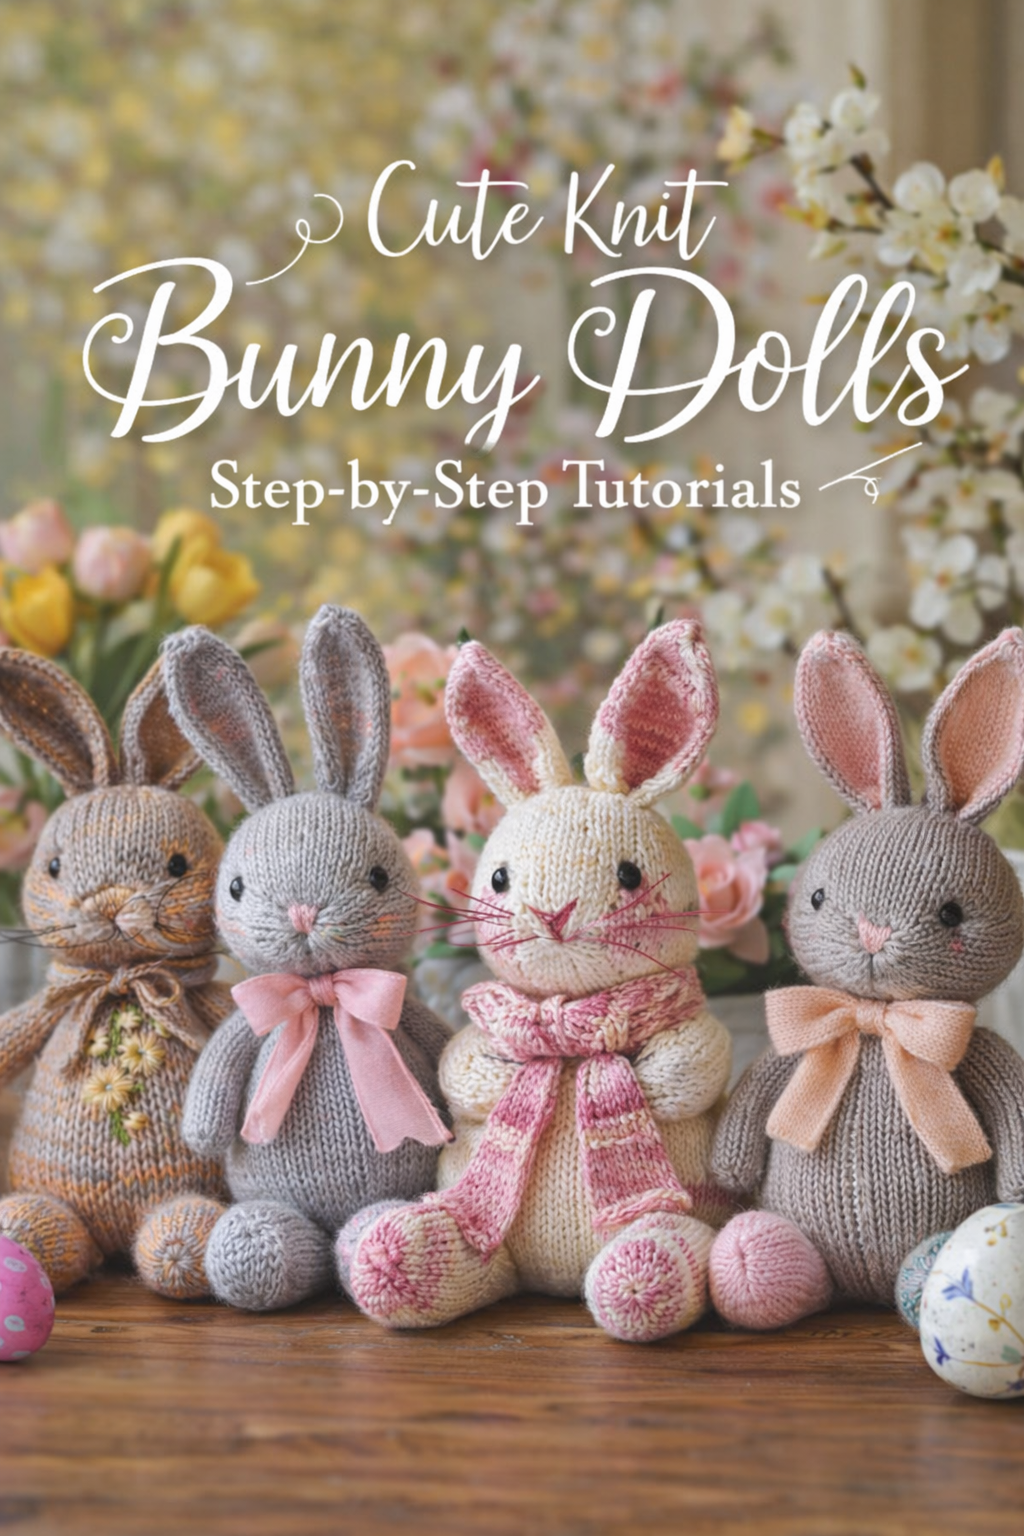
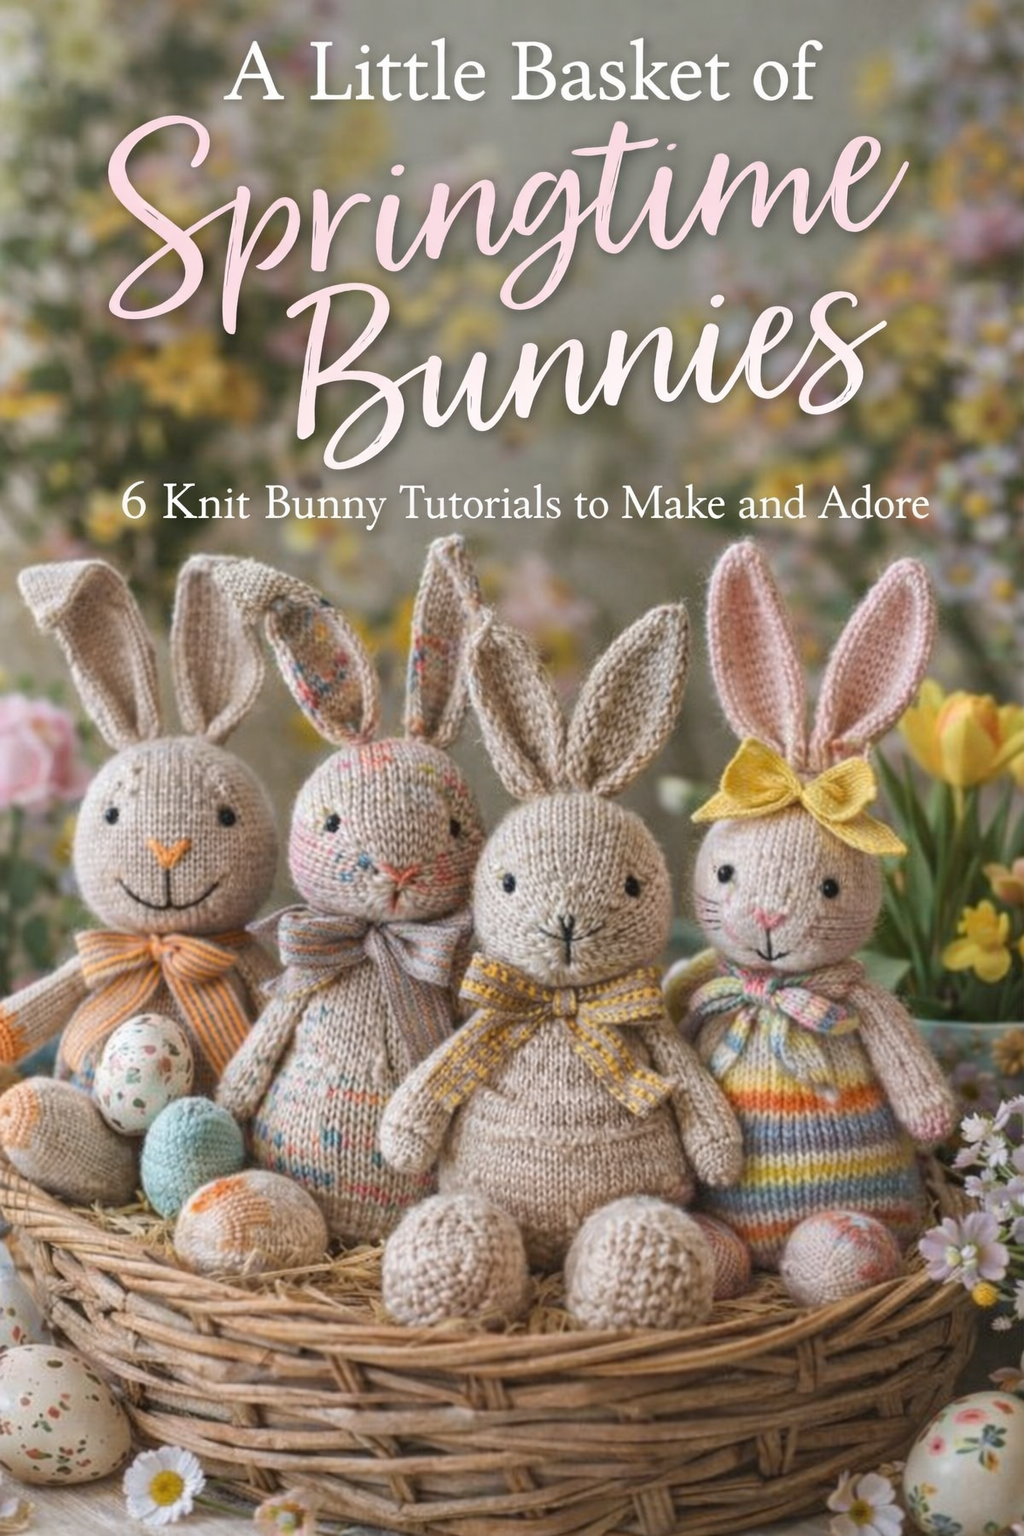
A Little Basket of Springtime Bunnies: 6 Knit Bunny Tutorials to Make and Adore
More like this

💡 Pro Tip: Why I Link to Amazon Search Results and Not One Product
In the Shop the Look and Style it With sections under each bikini, I link to Amazon search results, not single products. Here’s why this matters:
Hot bikinis sell out fast. I don’t want you clicking on a dead link to a sold-out item. Search pages stay updated.
You get more options. Love the vibe but want a different color, cut, or price point? The search results give you everything that matches the look and energy.
I curate each search carefully. These aren’t generic. I spend hours crafting keywords that bring up exactly the kind of bikinis I’d wear—or recommend to my hottest friends.
Support with no pressure. If you click a link, browse, and buy something later, I may earn a small commission at no extra cost to you. That helps me keep bringing you curated collections like this one—powerful, seductive, and always fresh.
So dive in. Click through. Try something risky. These aren’t just bikinis—they’re commands, statements, and maybe even your new favorite weapon of choice.
There is something quietly magical about a knitted bunny. It lives somewhere between a toy and a keepsake, soft enough to hold, but beautiful enough to display long after the season has passed. These are the pieces that find their way onto spring tables, tucked into Easter baskets, or resting beside fresh flowers on a windowsill catching morning light.
In this collection, you are stepping into a small world of handcrafted charm. Each bunny carries its own personality, from softly speckled yarns that feel like painted eggs to clean minimalist silhouettes that lean almost sculptural. Some are dressed in delicate bows and pastel stripes, others stay simple and timeless in warm neutral tones. Together, they create a full story of spring, one that feels gentle, nostalgic, and beautifully intentional.
Whether you are knitting for décor, for gifting, or simply for the quiet joy of making something with your hands, these tutorials are designed to guide you all the way through. Take your time with each one. The details matter here, and the reward is a finished piece that feels as special as it looks.
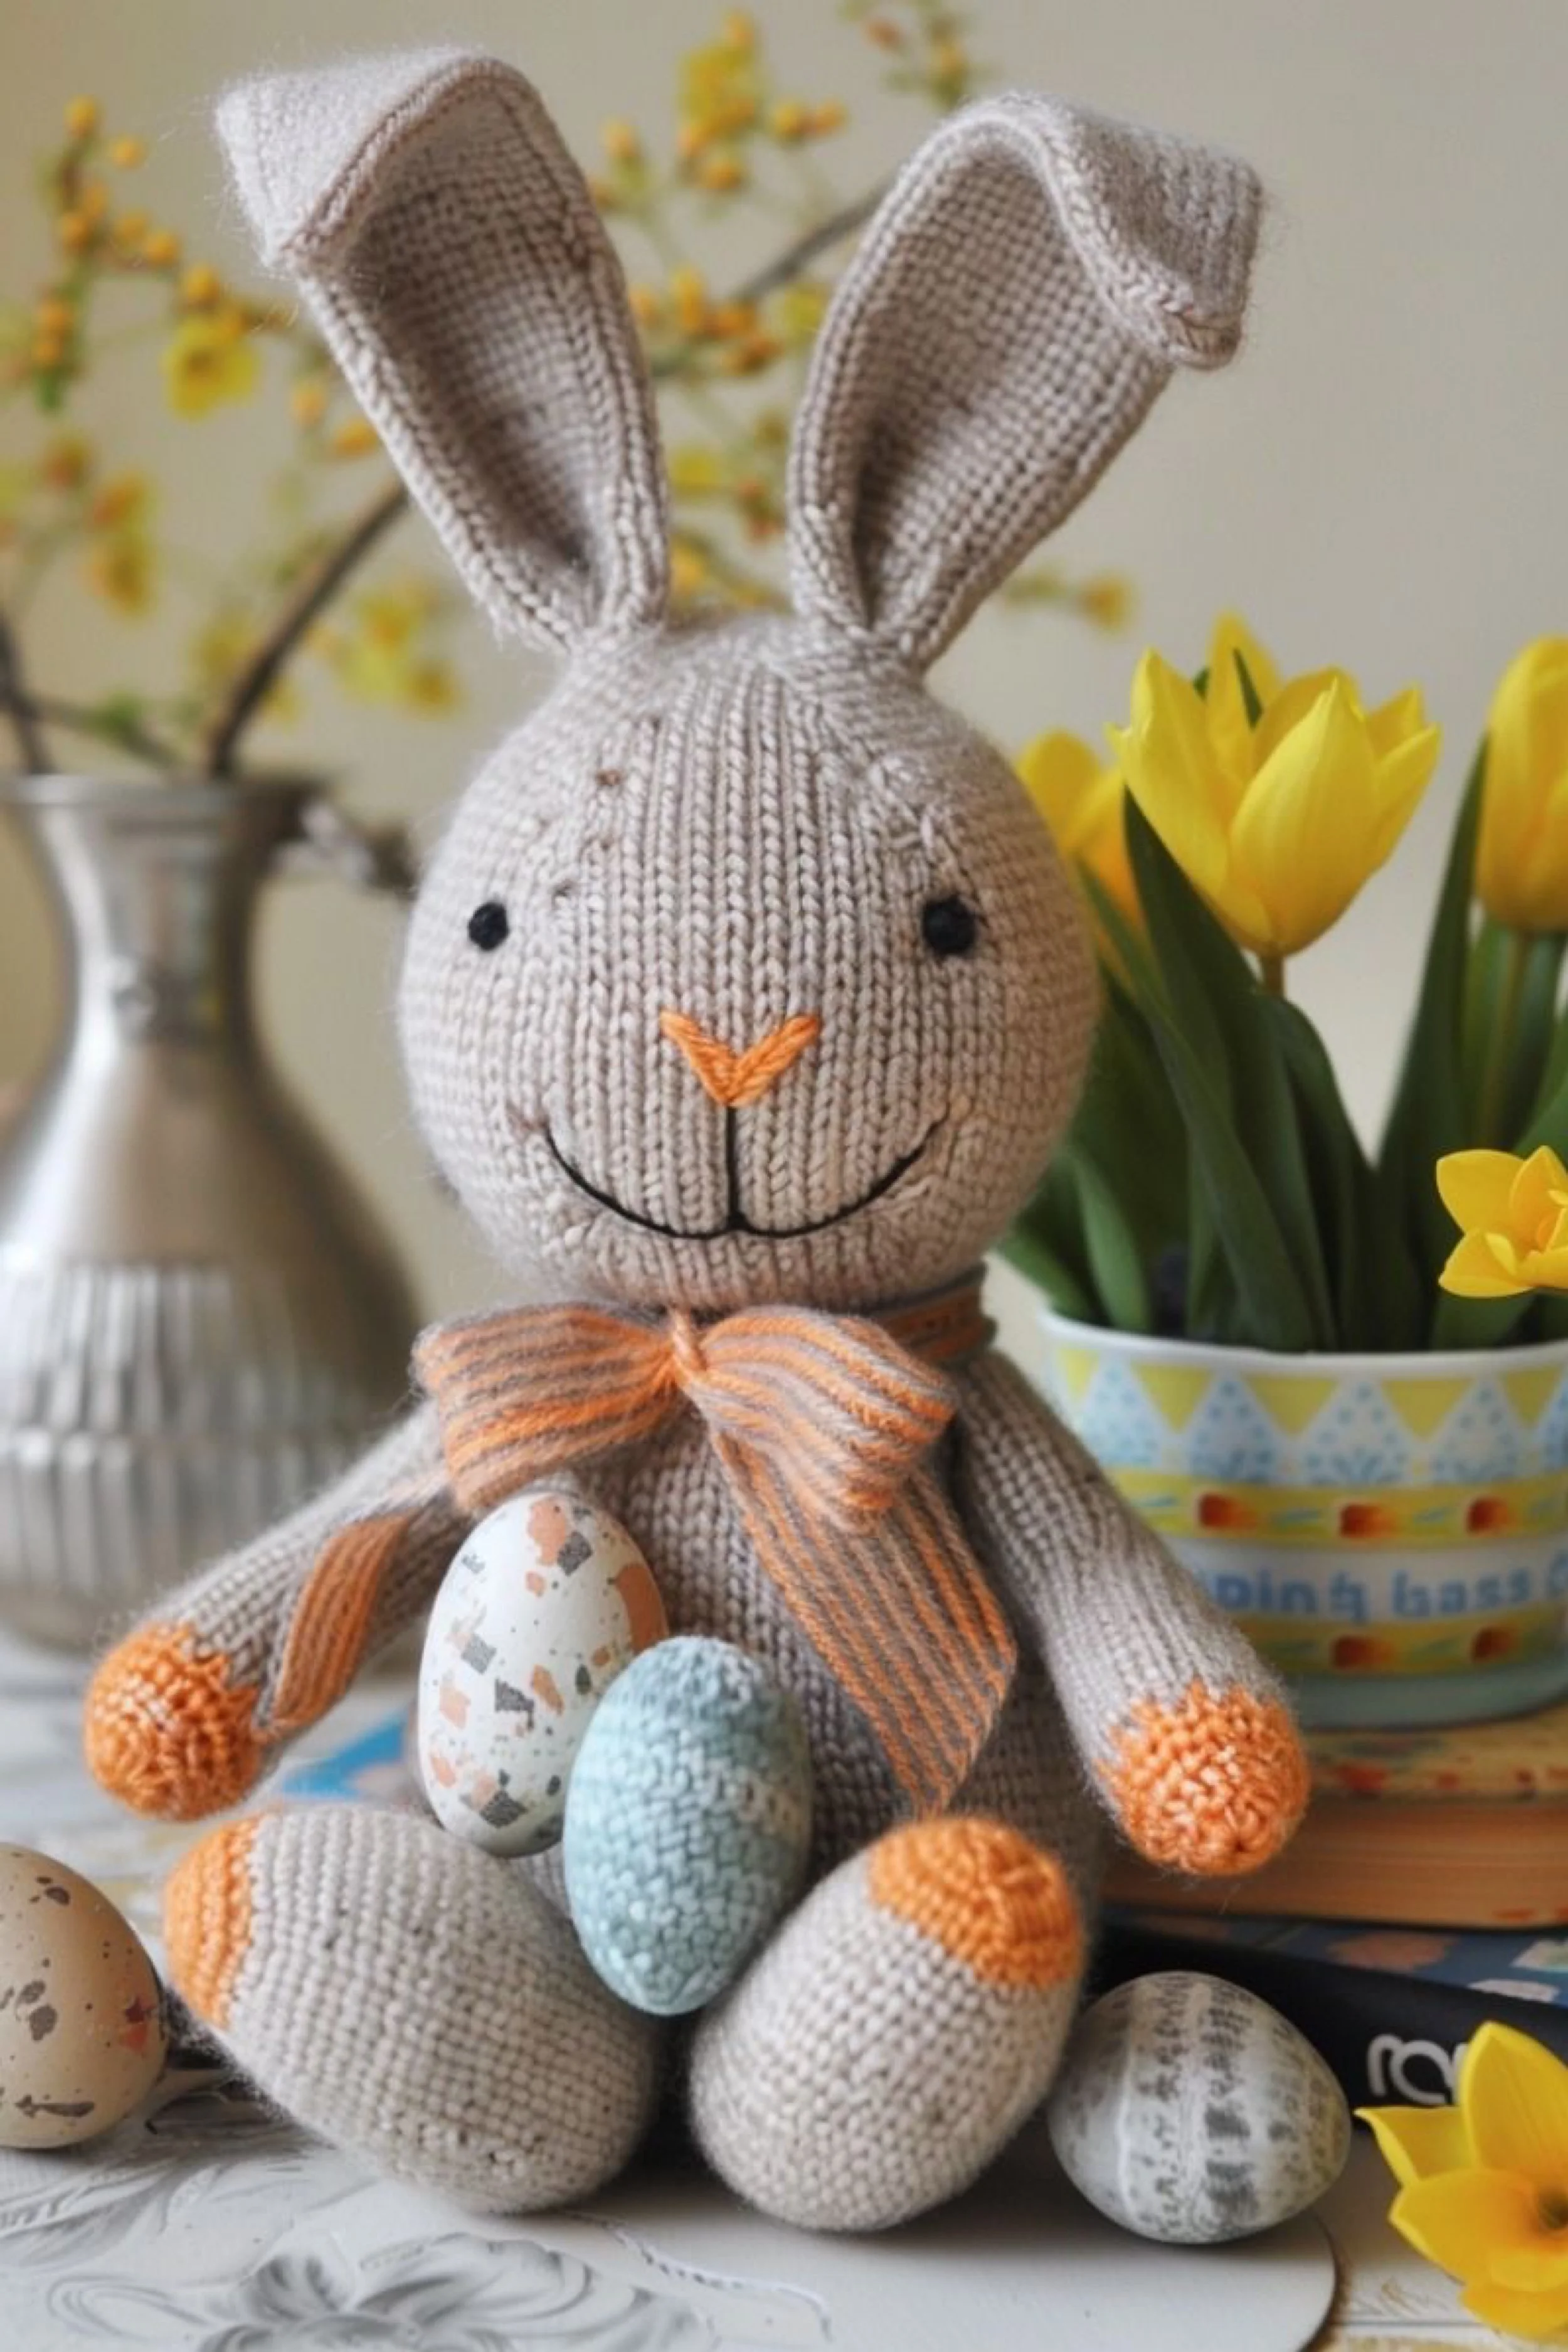
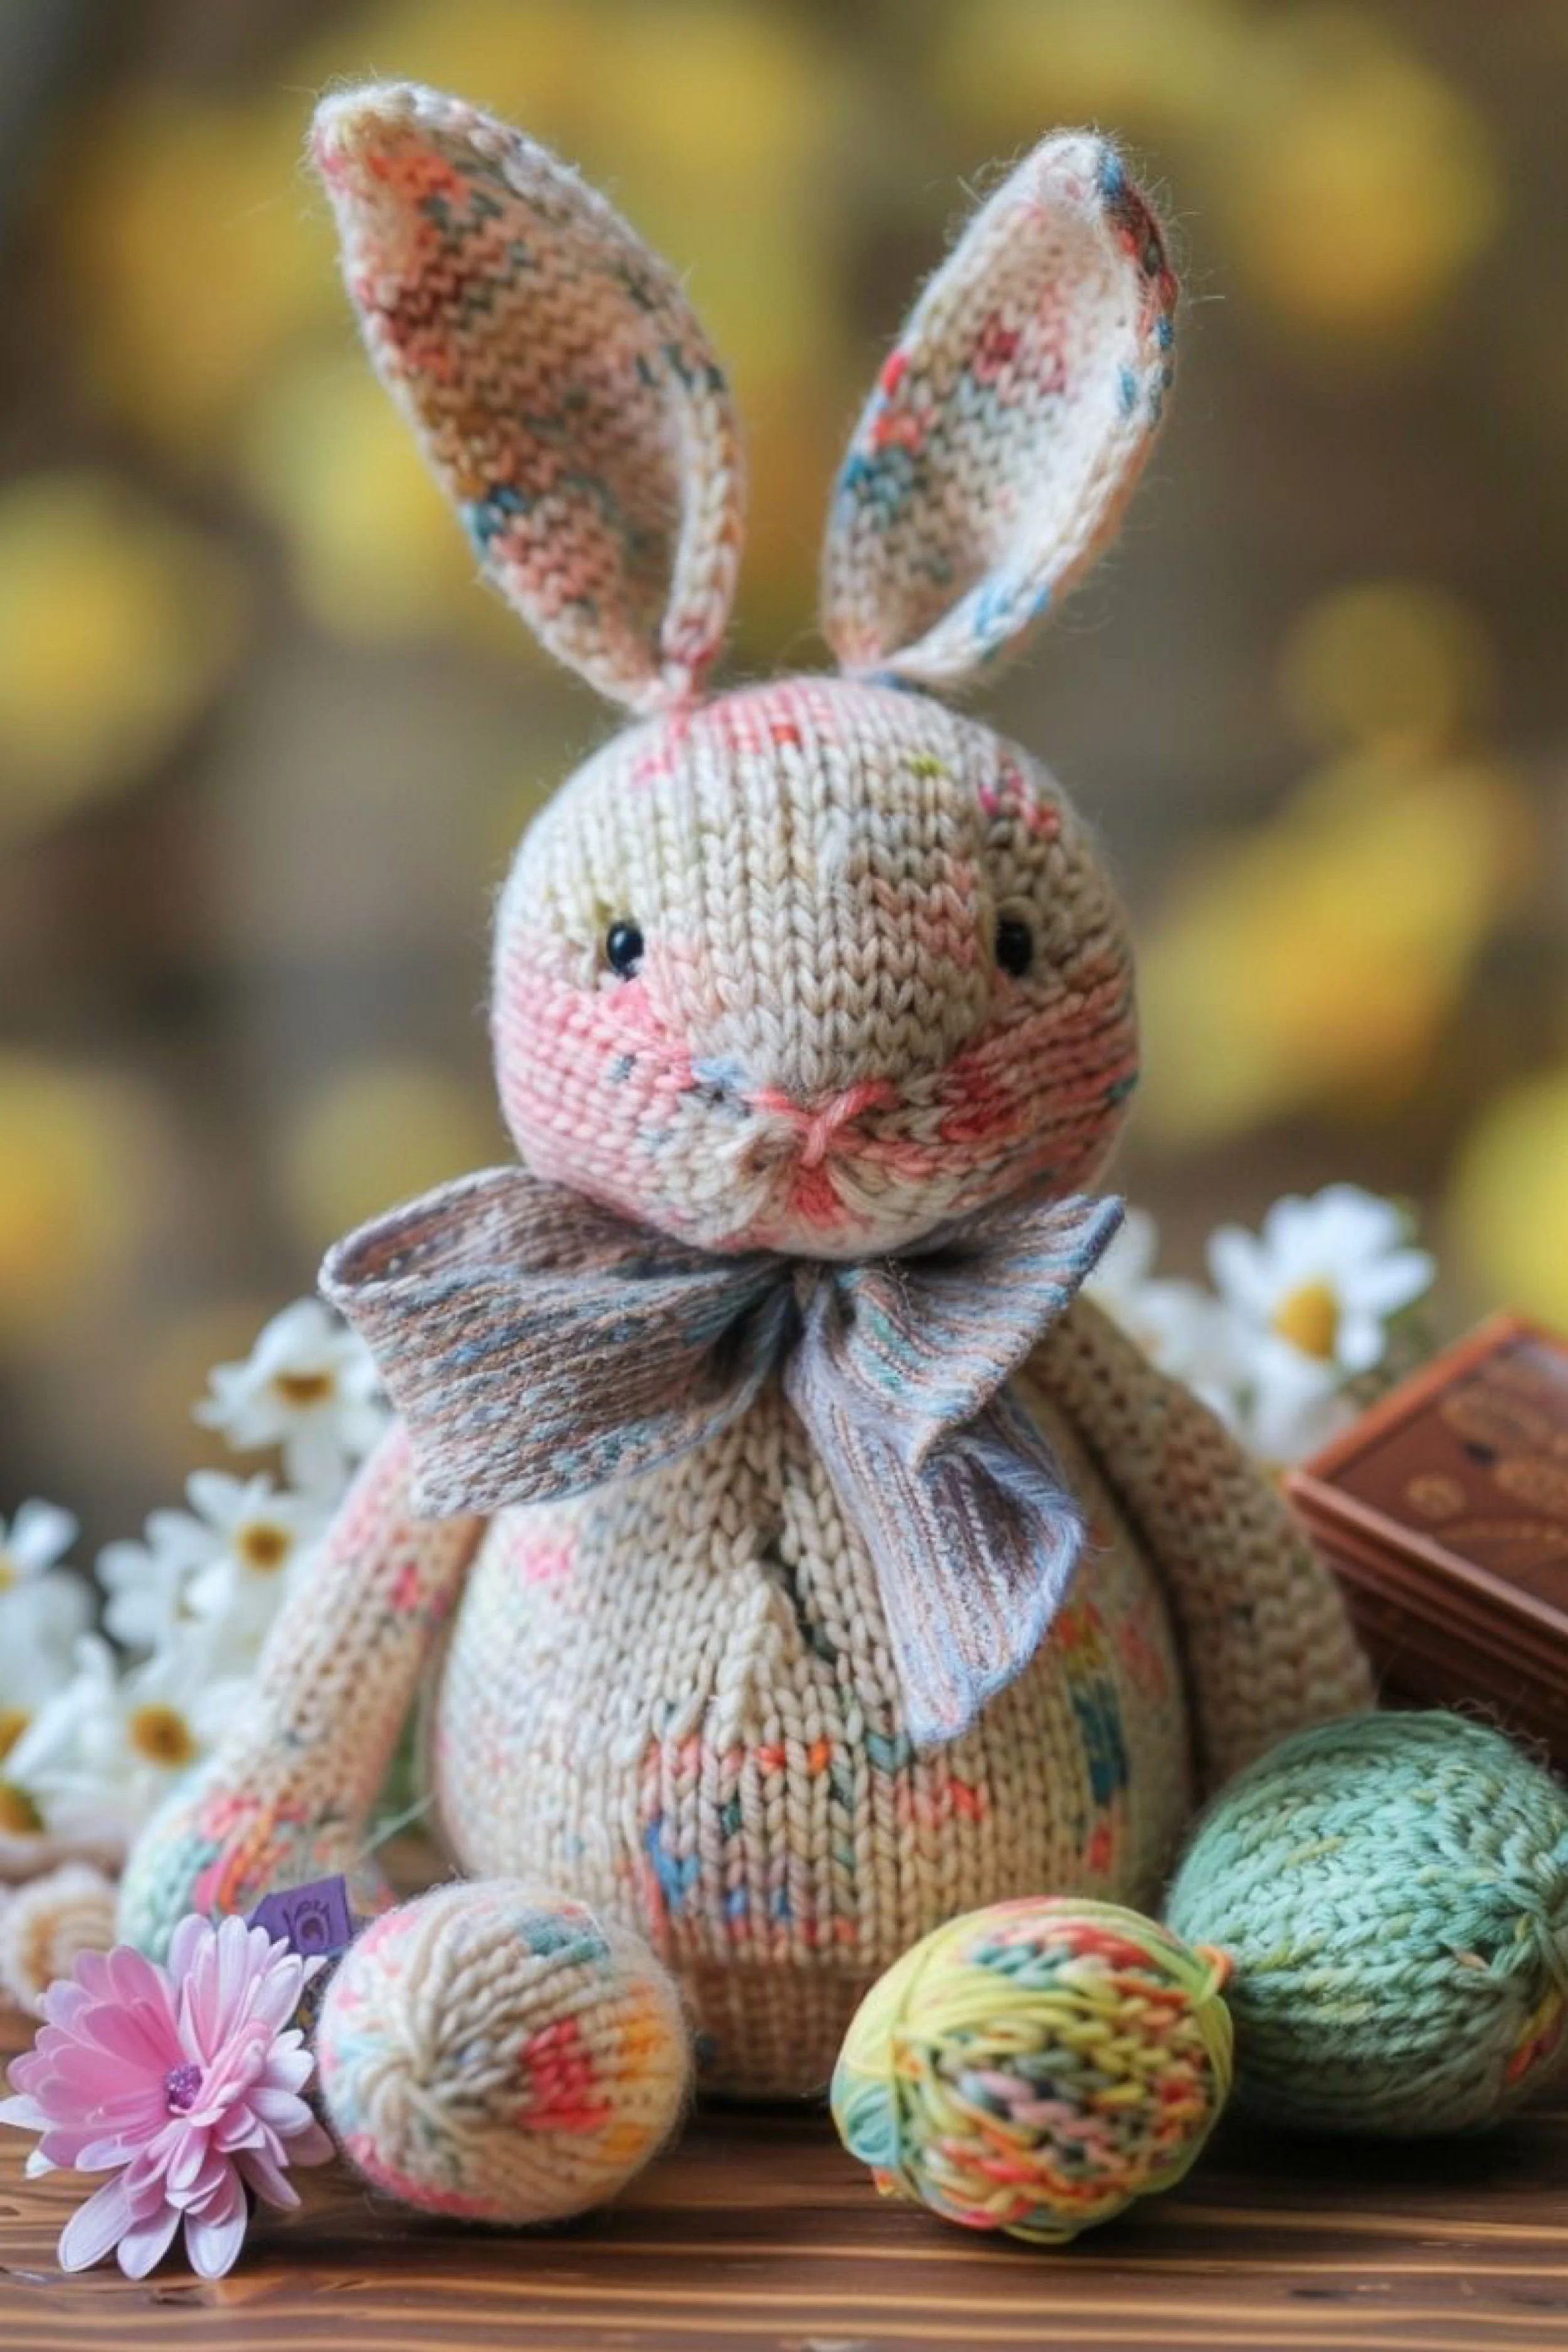
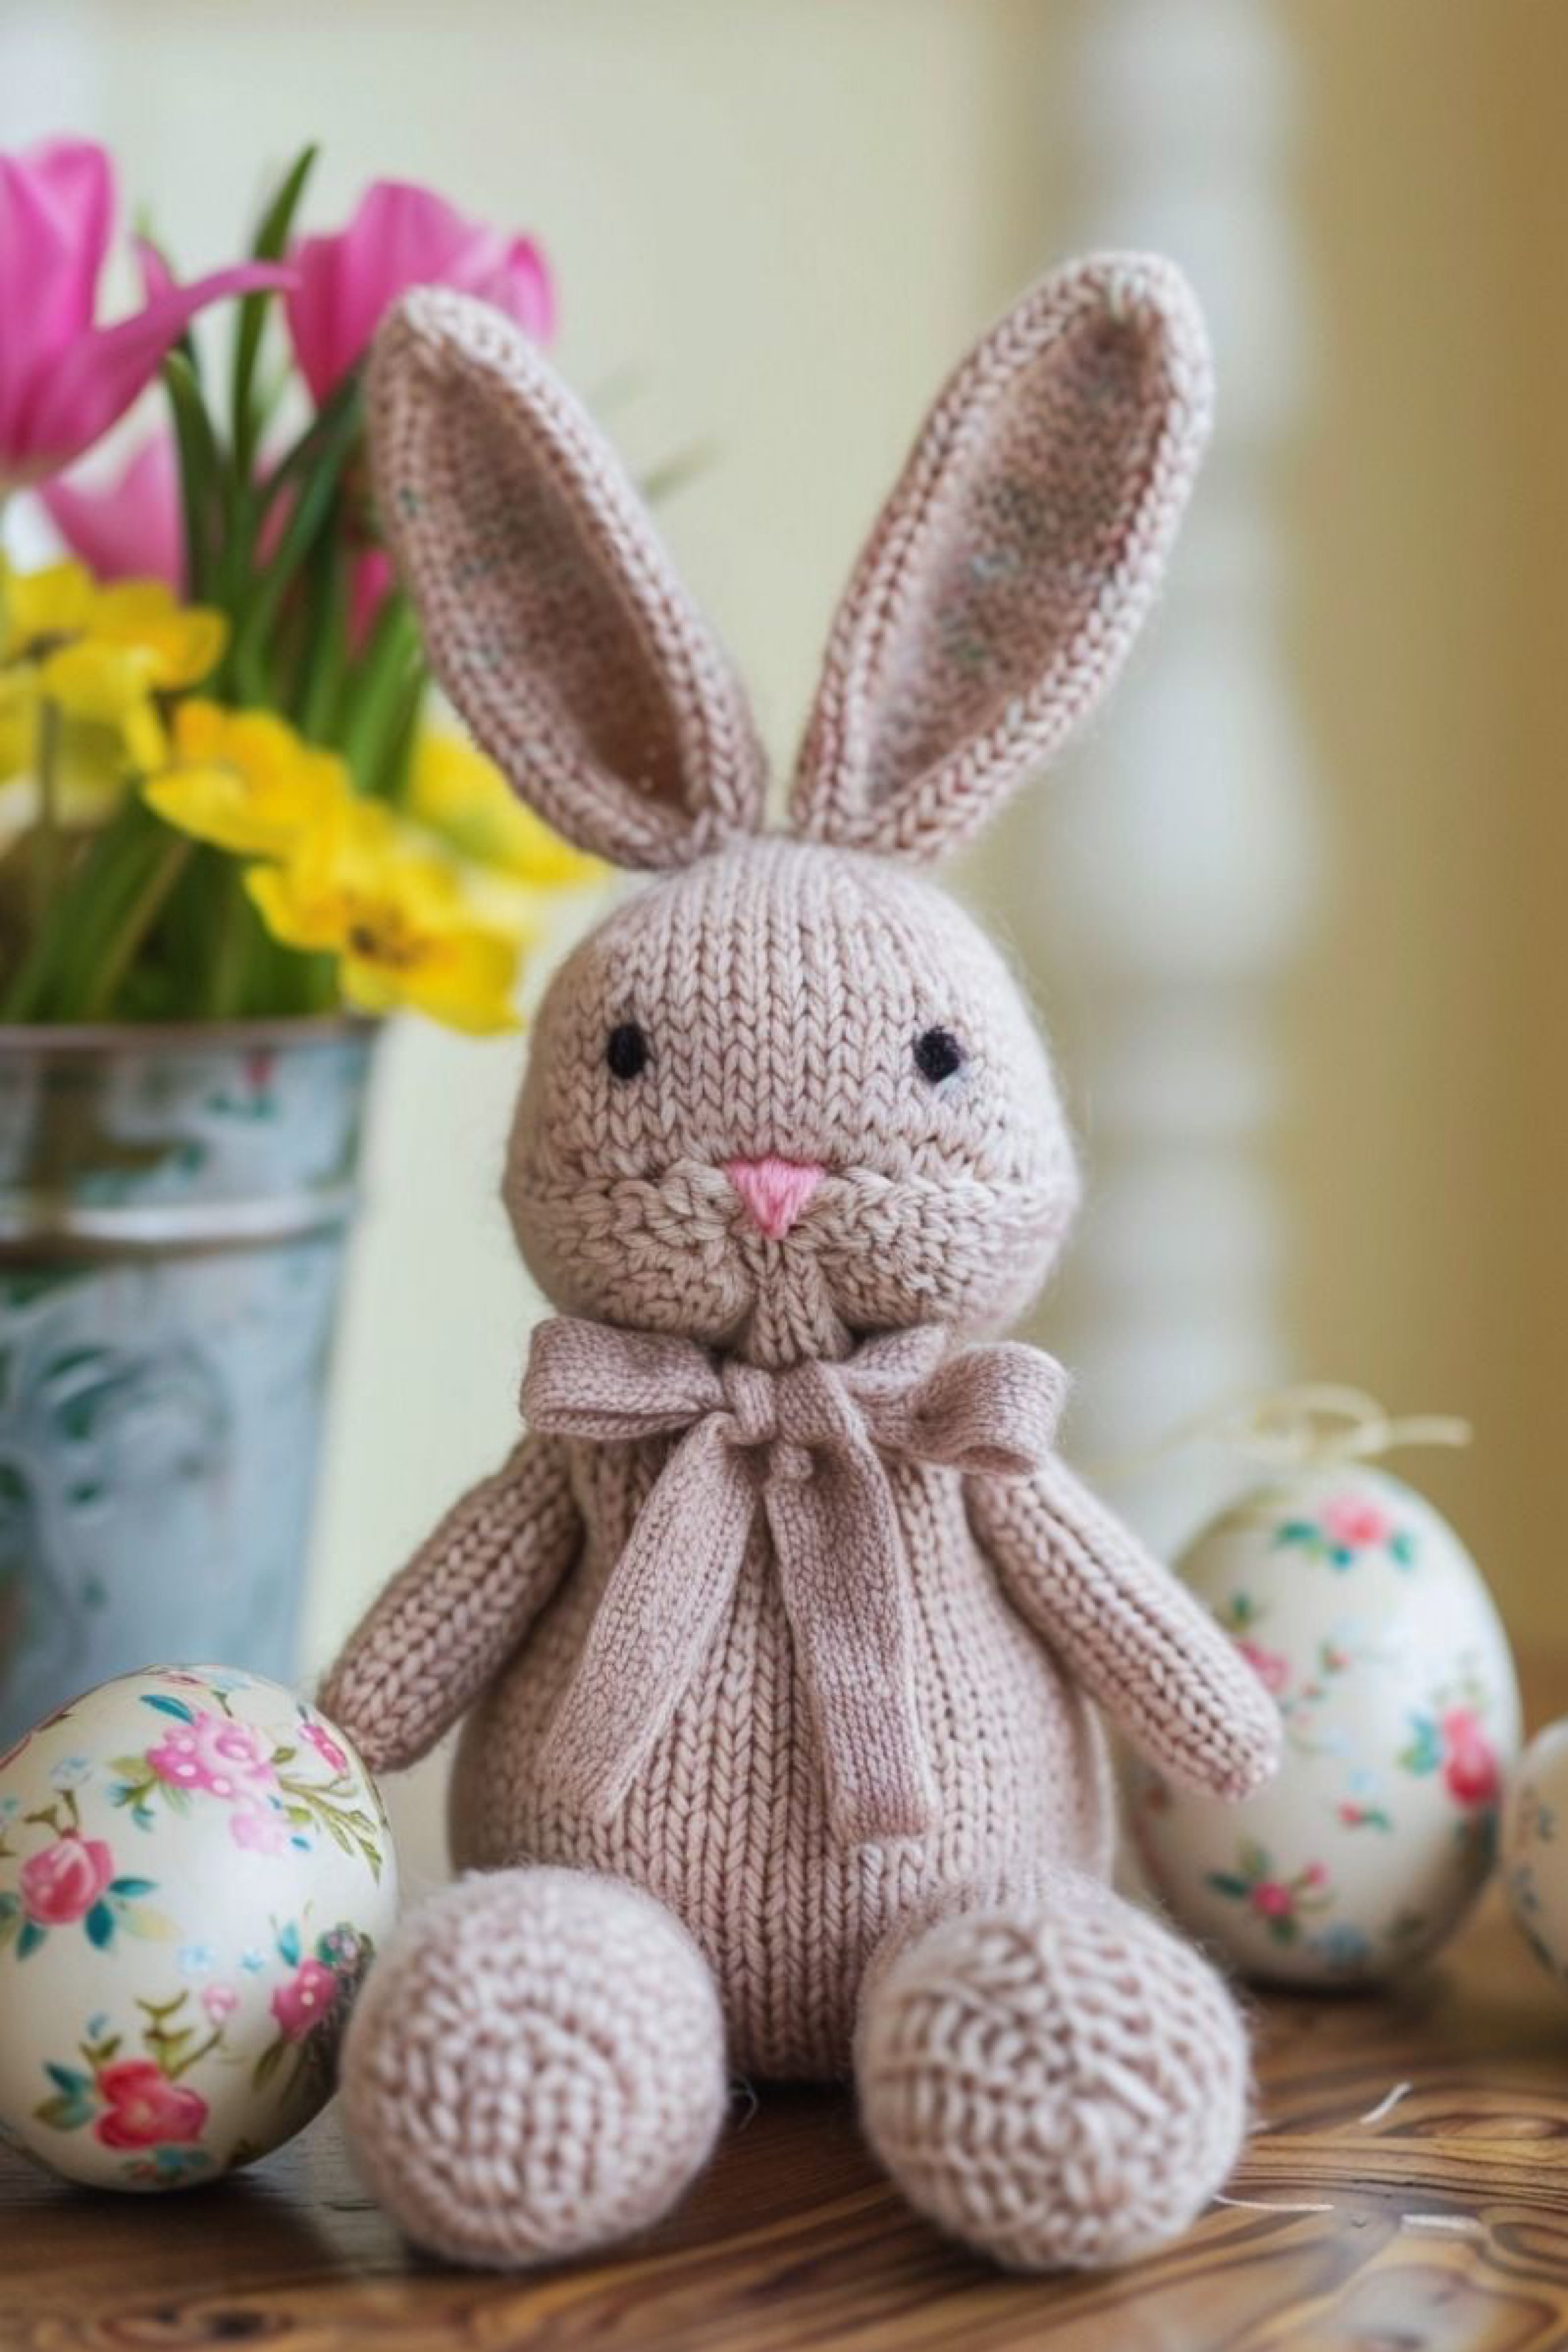
Heirloom Neutral Knit Bunny Doll Step by Step Tutorial
What you’re making
You’re making a soft, heirloom style knit bunny with a rounded head, plump seated body, long upright ears, simple embroidered face, and a striped scarf that gives the finished piece that gentle spring storybook look. The version in the photo is worked in a warm oatmeal beige with apricot accents on the paws, feet, nose, and scarf, so it feels classic, calm, and just a little bit cheerful.
This bunny is ideal for spring decorating, Easter shelf styling, nursery décor, or gifting. The shape looks polished because the pieces are smoothly stuffed, the ears are structured with subtle shaping, and the face is kept very minimal. If you are comfortable knitting basic shapes in the round or flat and seaming them neatly, you can absolutely recreate this look.
Materials + tools
- DK or light worsted weight yarn in soft oatmeal beige
- Small amount of apricot or muted carrot orange yarn
- Small amount of black embroidery floss or fine yarn for the mouth
- Polyester toy stuffing
- Pair of 6 mm to 8 mm black safety eyes or black French knots if making this for décor only
- Knitting needles suited to your yarn, usually 3.0 mm to 4.0 mm
- Double pointed needles or a small circular needle for knitting small tubes
- Tapestry needle
- Stitch markers
- Scissors
- Row counter or notepad
- Optional floral wire for ears if you want a firmer pose
- Optional lightweight fusible interfacing or felt for inside the ears
- Optional blocking mat and pins
Finished size + customization notes
Aim for a finished bunny around 10 to 14 inches tall seated, not including ear height. To make yours larger, move up one yarn weight and one needle size while keeping the same shaping proportions. To make it smaller, use fingering yarn and tighter needles.
For the closest look to the photo, keep the body neutral and use color only as accents. You can swap the scarf for blush, butter yellow, sage, or dusty peach and still keep the same heirloom feel.
Step by step instructions
1. Plan the proportions before you cast on
This bunny has a very specific silhouette. The head is large and round, the body is slightly pear shaped, the arms are narrow and relaxed, the feet are oversized ovals, and the ears are long and softly architectural. Before you begin, sketch or note these target relationships:
- Head is slightly wider than the neck
- Body is about the same visual width as the head at its widest point
- Legs angle forward in a seated pose
- Ears are long and stand up, but still feel soft
- Face is tiny compared with the head
That last detail matters a lot. The charm of this bunny comes from restraint. You should now see the design mentally as a round toy with minimal facial features rather than a cartoon character.
2. Knit the head
Cast on using your beige yarn. You can knit the head in the round from the top down or bottom up. The cleanest result for this style is often bottom up in stockinette so the vertical stitch columns stay very visible on the face.
Increase evenly until you have a smooth sphere. Work several plain rounds through the widest section, then decrease gradually. Leave a long tail for closing and shaping. Stuff firmly, but not rock hard. The head in the image is very smooth, with no hollow cheeks or lumpy stuffing.
Visual checkpoint: your head should look nearly spherical, with the fabric stretched enough to define the knit stitches but not so tight that stuffing shows through. If yours looks squarish, add a few more plain rounds through the center. If it looks too tall, reduce the plain center rounds next time.
3. Add light face shaping
Before closing the head fully, use strong matching yarn to create very gentle sculpting. One light pull around the muzzle area can help create the subtle cheek fullness visible in the photo. Do not over sculpt. This is not a deeply shaped toy. The face should stay smooth and calm.
Place the eyes lower than you might expect, with plenty of forehead above them. The nose sits between and below the eyes in a small V or heart like shape worked in apricot yarn. The smile is a simple stitched curve in black.
Visual checkpoint: you should now see a sweet face that reads almost childlike and handmade, not highly detailed. If the eyes look too close together, move them outward. If the mouth looks too high, lower it slightly.
4. Knit the body
The body is a softly tapered seated form. Start at the base or neck end, whichever method you prefer, and shape it into an egg or pear. The lower half should be slightly fuller so the bunny can sit nicely when styled with decorative eggs.
Stuff as you go to keep the shaping even. Make the neck small enough that the head looks prominent, but not so narrow that it collapses once assembled. Finish with a long tail for sewing.
Visual checkpoint: set the body under the head before seaming. You should now see the classic proportions from the photo, where the head feels large and expressive while the body feels stable and rounded.
5. Knit the legs and feet
The legs in this design are not long visible limbs. Instead, they read as attached soft forms ending in oversized rounded feet. Knit two foot pieces in beige, adding apricot on the toe area for the accent seen in the image. You can do this with simple color blocking on the last rounds, or embroider duplicate stitch details afterward if you prefer cleaner tension.
Make each foot oval and fairly plump. The soles should be broad enough to support a seated pose. Attach the legs slightly forward on the lower body.
Visual checkpoint: when the bunny sits, the feet should angle toward the camera and feel intentionally oversized. If yours look tiny, remake them a bit wider. The feet are one of the visual anchors of this look.
6. Knit the arms
Knit two slender tube shaped arms. Add the apricot accent at the paw end. Stuff lightly. The arms in the image are soft and relaxed, not stiff. Sew them into the side body seam slightly below the neck.
You can curve the arms gently while seaming by adding a tiny bit more stuffing near the paw and less near the shoulder. This keeps them from sticking out rigidly.
Visual checkpoint: the arms should hang softly at the sides and frame the torso. If yours sit too high, the bunny will look shrugged. If they sit too low, the upper body loses definition.
7. Knit the ears
These ears create the whole personality of the bunny. Work each ear in an elongated oval or leaf shape. You can knit them flat in two layers and seam them together, or knit a single piece and fold it. For the photo look, a double layer ear gives the best clean edges and gentle thickness.
Shape the base slightly narrower so it joins neatly to the head. The top can be softly rounded or subtly pointed. Keep the ears long enough that they feel elegant. If using wire or felt inside, insert it only after blocking and before final assembly.
Visual checkpoint: hold both ears above the head before attaching. You should now see a tall, symmetrical outline with enough height to feel whimsical. If the ears flop too much for the photo look, add a lining of felt or a very light hidden wire.
8. Make the scarf
This scarf is an essential finishing detail. Knit a long narrow rectangle in beige and apricot stripes. Use a rib or simple knit purl texture so the scarf has body and a cozy hand. Steam lightly so it lies flat but still feels soft.
Tie the scarf into a generous bow at the front. The loops should be full, not tiny. The bow softens the shape and draws attention to the face.
Visual checkpoint: once the scarf is tied, the bunny should immediately look more polished and seasonal. If the scarf overwhelms the face, make it narrower. If it disappears, make it longer or give it a few extra rows.
9. Assemble carefully
Sew the head to the body first, making sure the face is centered over the belly. Add the legs, then arms, then ears last. Ears should sit fairly close together at the top center of the head.
Take your time with the ear angle. In the image, both ears rise high with a slight outward tilt. That creates openness and charm. If they point sharply inward, the bunny can look worried. If they splay too wide, it can lose that tidy heirloom look.
10. Refine the face embroidery
Use apricot for the tiny nose and black for the mouth. Keep the mouth line thin and neat. Less is more. Do not enlarge the features trying to make them more visible. The understated face is what makes this doll feel expensive and handcrafted.
Optional detail: add a few tiny stitched freckles in a matching beige or soft taupe if you love the subtle handmade texture visible in the photo.
11. Stuff and shape the final silhouette
Once assembled, massage the stuffing around with your fingers. This matters more than many beginners realize. Smooth any lumps, especially in the head and feet. Pinch the cheeks lightly to keep the face soft. Adjust the feet so the bunny sits balanced.
You should now see a rounded seated bunny with very calm proportions, long sculptural ears, and a soft spring palette.
12. Style it like the photo
Place your finished bunny among painted eggs, yellow tulips, and a neutral tabletop vignette. The styling helps the bunny feel like an editorial object rather than only a toy. Set it slightly forward, angle the feet outward, and let the scarf bow rest naturally.
Troubleshooting
My head looks lumpy
Use smaller tufts of stuffing and add them gradually. After stuffing, roll the head gently in your hands to distribute the fill.
My ears collapse
Use tighter gauge, double layer construction, or insert a piece of soft felt inside each ear. A hidden floral wire along the center also helps.
My bunny tips backward
The lower body is probably too narrow or under stuffed. Add weight low in the body with more stuffing or a small fabric pouch of pellets if this is a décor item.
My face looks off
Before securing safety eyes, place pins first and check from several angles. Tiny movements completely change expression.
My scarf looks bulky
Use finer yarn than the body yarn or reduce the scarf width by a few stitches.
Finishing details
Lightly steam block the ears and scarf before assembly. Avoid over steaming the stuffed body. Weave in all ends securely and bury them inside the toy with your tapestry needle. If the bunny is for display, you can add a tiny bit of diluted fabric stiffener inside the ears only. For gifting, skip stiffener and keep the texture soft. A linen ribbon loop hidden at the back of the neck can turn it into an ornament or basket accent.
Optional upgrades for this version include a lined ear interior in pale floral cotton, a tiny embroidered monogram on one foot, a weighted bottom for better shelf sitting, or a removable scarf in a second seasonal color.
Shop Similar
- Soft oatmeal DK yarn for heirloom toy knitting
- Apricot and peach accent yarn for bunny paws and scarf
- Black safety eyes for knitted stuffed animals
- Premium polyester toy stuffing for knit dolls
- Double pointed knitting needles for small toy limbs
Style It With
Speckled Spring Bunny Knit DIY Guide
What you’re making
You’re making a softly rounded knit bunny in a speckled pastel yarn palette with a plump body, tiny face, long ears, and a silky bow at the neck. This version has a more whimsical handmade look than the first bunny because the yarn itself carries the color story, giving the face and body a watercolor speckled effect that feels perfect for spring.
The finished piece looks especially charming beside decorative eggs, daisies, and wood tones. Its construction is simple, but the success of the design depends on choosing the right speckled yarn, keeping the shaping smooth, and making the facial features very minimal so the yarn can do the visual work.
Materials + tools
- Speckled fingering, sport, or light DK yarn in cream with pastel flecks
- Coordinating soft gray, taupe, or dusty lavender yarn for the neck bow
- Small amount of pink yarn for nose shaping if desired
- Black safety eyes or black embroidery thread
- Polyester stuffing
- Knitting needles appropriate to yarn, usually 2.75 mm to 3.5 mm
- Double pointed needles or magic loop setup
- Tapestry needle
- Stitch markers
- Small scissors
- Optional felt for ear inserts
- Optional floral wire for posing
- Optional fabric ribbon if you prefer a woven bow instead of a knit one
Finished size + customization notes
This bunny looks lovely at about 9 to 12 inches tall seated. Because the yarn has speckles, a smaller scale often works best so the color shifts stay delicate. If you use thicker yarn, keep the face features very small or the bunny can lose its dainty feel.
You can customize the palette in two directions. For a brighter spring look, choose yarn with pink, mint, yellow, and coral speckles. For a more heirloom version, choose oatmeal with faded blush and sage flecks.
Step by step instructions
1. Choose the yarn first and let it set the mood
This bunny is defined by the yarn more than any other single detail. Look for a base color that is creamy or warm ivory with scattered pastel speckles. Avoid yarn that stripes boldly. The photo look depends on irregular flecks rather than strong bands.
If you cannot find the perfect yarn, choose a pale neutral yarn and add duplicate stitch accents afterward in pink, soft green, peach, and sky blue. That gives a similar painterly effect.
Visual checkpoint: lay the yarn against a white surface. You should see a mostly soft neutral impression with gentle pops of spring color, not a loud rainbow.
2. Knit the head as a smooth rounded sphere
Work the head in stockinette, increasing evenly and then decreasing after a short center section. Because speckled yarn can make stitch direction visually busy, keep the shape very simple. Smooth shaping is the luxury detail here.
Stuff the head firmly and evenly. The photo bunny has a round face with slightly full cheeks and a tiny mouth area, not a pointed muzzle. Place the eyes slightly far apart for a softer expression.
Visual checkpoint: you should now see a smooth ball with the speckles scattered naturally. If the stuffing makes the flecks stretch into little dashes, your fabric may be too tight.
3. Build gentle cheeks with thread sculpting
This bunny has subtle cheek fullness that gives it sweetness. Use a length of strong matching thread or yarn and pull lightly from one side of the lower face to the other. Anchor it invisibly. Do not pull hard. The goal is only a hint of shape.
Embroider or insert the eyes. Add a tiny center nose in blush or coral pink and keep the mouth minimal. The muzzle can be suggested with two faint curves or left nearly plain.
Visual checkpoint: the face should feel tiny and centered. If the features start competing with the yarn pattern, reduce them.
4. Knit the torso
The body is a rounded pear shape, fuller low and narrower toward the neck. Work in the same speckled yarn so the whole bunny reads as one soft object. Stuff firmly enough to hold shape but leave a slight give when squeezed.
To match the photo, keep the torso slightly taller than it is wide. This version feels a touch more upright and doll like than the neutral bunny.
5. Knit the feet
The feet are round and plush. They do not need a contrasting toe for this version because the yarn itself already provides interest. Shape each foot as an oval ball with a slightly flatter base. Attach them so they splay outward a little when the bunny sits.
Visual checkpoint: if the feet point straight forward, the bunny will look formal. If they angle gently outward, it looks relaxed and charming.
6. Knit the arms
Make two lightly stuffed tube arms. Keep them narrow and a little shorter than you think. Shorter arms make the body look sweeter and more compact, which suits this design. Sew them at shoulder height so they angle softly downward.
7. Knit the ears
These ears are long but a bit softer and narrower than the first bunny. Knit each ear in two pieces or as a folded piece. Because the yarn is speckled, the inner ear becomes a lovely little field of color once it is opened.
Shape the tips into a soft point rather than a full oval if you want the closest match to the image. The ears should stand upright with a slight inward lean.
Visual checkpoint: you should now see ears that feel delicate and a little woodland inspired. If they are too broad, the bunny can look heavy.
8. Make the neck bow
The bow in the photo looks smooth and silky compared with the knitted body. You have two good options. Option one is to knit a narrow strip in a soft gray lavender yarn and tie it into a bow. Option two is to use ribbon with a similar sheen.
To keep it from slipping, tack the knot to the neck with a few small stitches. Let the tails angle down and away from the body.
9. Assemble the bunny
Attach head to body first. Make sure the speckling on the face looks balanced from the front. Then add feet, arms, and ears. Ears should sit close together at the top center and rise high above the head.
Take photos as you pin each piece in place before sewing. Sometimes what looks right in your hand looks off on camera. This little pause saves a lot of re sewing.
10. Add the tiny face and final shaping
The simplest face usually looks best with speckled yarn. Use black eyes, a petite pink nose, and almost no smile line. If you add too much mouth detail, the piece starts looking busy.
Massage the stuffing after full assembly. Push a little fill upward from the lower head into the cheeks if needed. Turn the bunny around and check that the back seam looks tidy and centered.
11. Consider tiny spring accents
Because this bunny already has beautiful color in the yarn, optional extras should stay subtle. A little fabric tag near one foot, a faded floral ribbon, or a miniature stitched heart on the back can all work. Keep the palette muted.
12. Style for the finished look
Set your bunny against warm wood, blurred florals, and soft spring eggs. The photo has a cozy tabletop scene with daisies and pastel egg shapes, which helps the bunny feel nostalgic and collectible.
You should now see a rounded spring bunny with painterly flecks, tiny features, and a soft bow that feels part handmade doll and part seasonal heirloom.
Troubleshooting
The speckled yarn looks messy
Choose a yarn with sparse speckles rather than dense variegation. If you only have a bolder yarn, use it for the ears, feet, or accessories and keep the main body neutral.
My face disappeared into the speckles
Use slightly darker eye beads or a more defined nose color. Keep the features tiny but not invisible.
The ears twist
Block the ears flat before attaching. A light steam and pinning session makes a huge difference.
The bow looks stiff
Use fewer stitches, finer yarn, or switch to ribbon. The bow should drape softly.
The bunny will not sit well
Make the base of the torso wider or flatten the bottoms of the feet slightly before sewing them on.
Finishing details
Steam block ears and bow separately. Weave in ends inside the toy and secure them well. If this is strictly décor, you can add a few pellets in a little fabric pouch at the bottom of the body for weight. For a more artisanal finish, brush the yarn very lightly with a clean toothbrush to raise a soft halo, but do this carefully and only if your fiber can handle it.
Optional upgrades include floral cotton inner ears, a tiny lace collar under the bow, weighted feet, or a hidden loop at the back for hanging on a spring branch display.
Shop Similar
- Speckled pastel yarn for knitted bunny dolls
- Soft gray ribbon and bow materials for heirloom toys
- Mini safety eyes for hand knitted animals
- Fine knitting needles for small stuffed animals
- Premium toy stuffing for soft plush knitting projects
Style It With
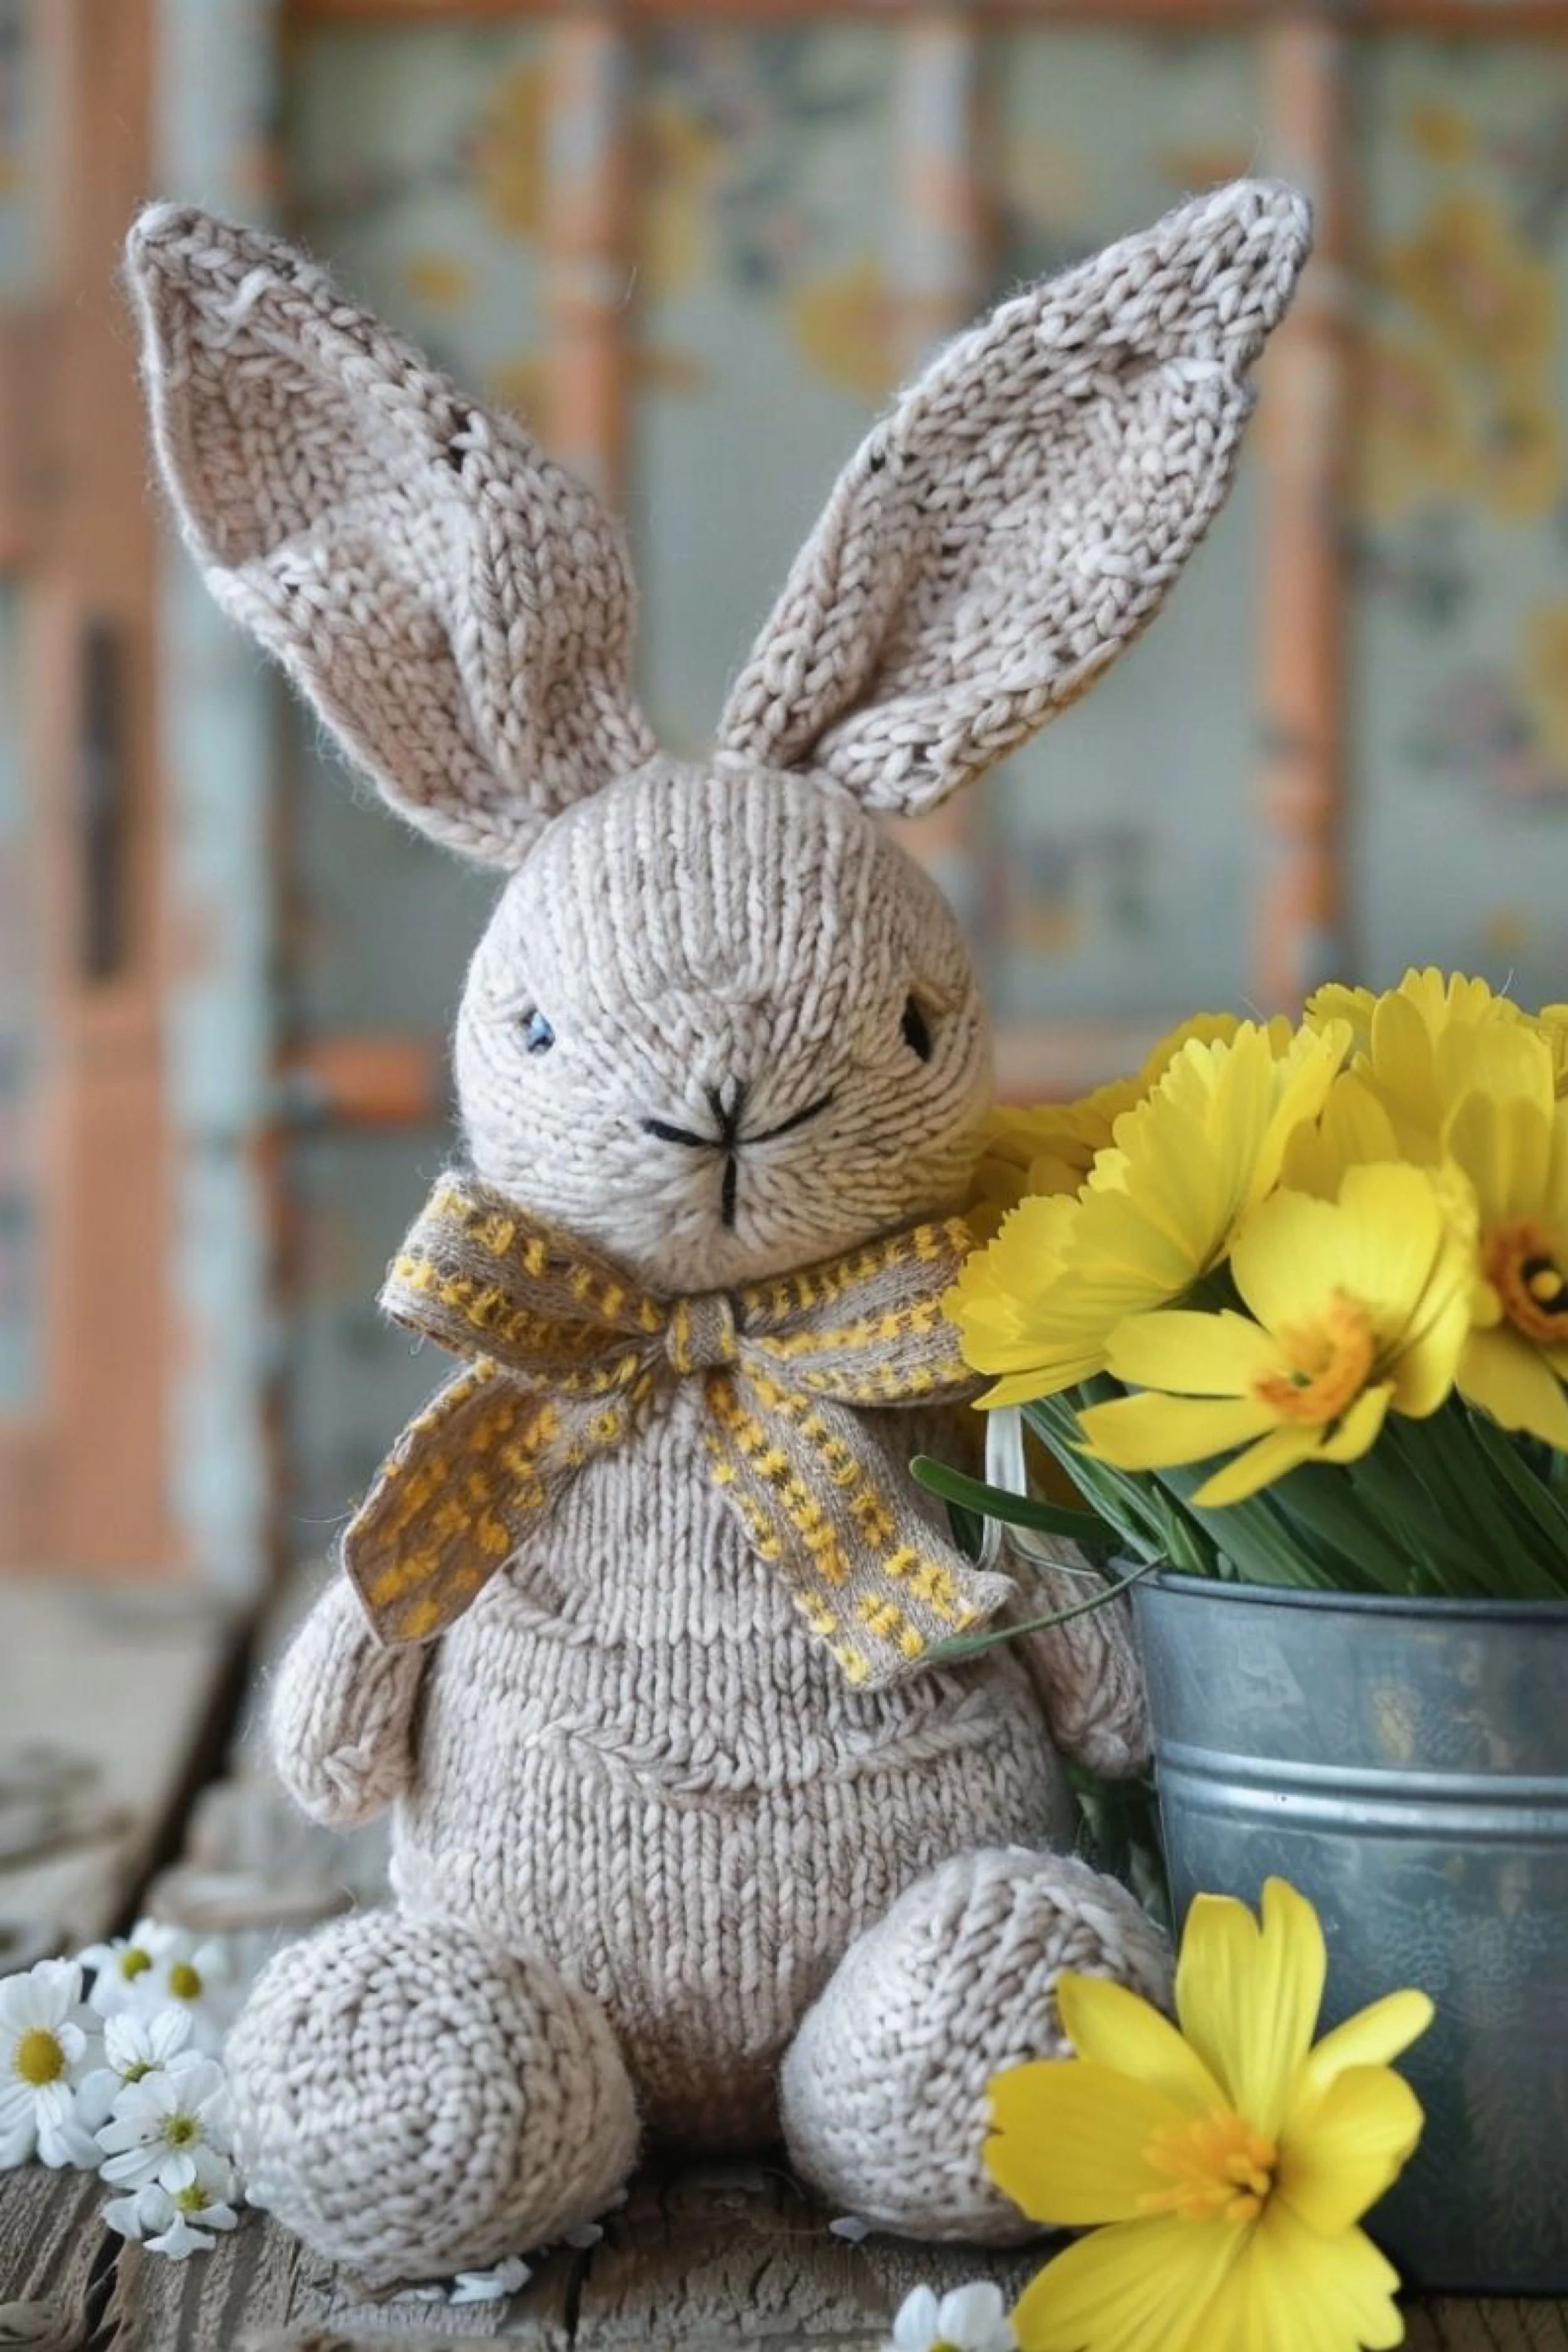
Rustic Farmhouse Bunny Knitting How To Guide
What you’re making
You’re making a rustic farmhouse style knit bunny with textured ears, a softly tapered body, small stitched face, and a mustard patterned scarf that gives it a homespun spring look. Compared with the rounder, sweeter bunnies in the other photos, this one has a slightly more primitive silhouette, which makes it perfect for cottage interiors and natural spring displays.
The beauty of this bunny is in the texture contrast. The body is simple and smooth, while the ears feel more rugged and hand formed. The scarf adds just enough color and pattern to make the neutral yarn feel warm and layered.
Materials + tools
- Beige, flax, or oatmeal worsted yarn
- Small amount of mustard yellow yarn for scarf details
- Small amount of black yarn or floss for face
- Polyester stuffing
- Knitting needles in a size that creates dense fabric, usually 3.5 mm to 4.5 mm
- Double pointed needles or magic loop setup
- Tapestry needle
- Stitch markers
- Scissors
- Optional felt or interfacing for ear support
- Optional tea stained cotton ribbon for extra trim
- Optional blocking mat
Finished size + customization notes
This bunny works beautifully at 11 to 15 inches tall seated. The rustic style can handle a slightly chunkier yarn and still look right. If you want a more delicate version, drop down to DK yarn and use smaller needles.
For the exact image mood, keep the yarn matte and natural looking. Avoid high sheen fibers. Wool blends, cotton blends, or wool acrylic blends all work as long as they hold shape.
Step by step instructions
1. Understand the silhouette
This bunny has a more vertical body and slightly smaller head than the very round versions. The ears are large and textured, with a handmade irregularity that adds character. The face is extremely minimal, almost folk art in feeling.
Before starting, decide whether you want the rustic effect to come from yarn texture, stitch texture, or both. A smooth yarn with seed stitch ears works well. A heathered yarn with stockinette ears can also work.
2. Knit the body first
Working the body first helps you judge scale for the rest of the pieces. Shape it like a soft pear with a flat enough base to sit securely. The lower body should be fuller, but not dramatically so. This bunny is more upright and tidy than cuddly.
Stuff firmly, especially around the base. Check balance early. You want the bunny to sit beside a bucket of flowers without slumping.
Visual checkpoint: you should now see a neat body form that can stand visually on its own even before limbs are added.
3. Knit the head
Shape the head as a rounded form, but keep it slightly smaller than the widest part of the body. This shift is important. It creates the more rustic storybook proportion seen in the image.
Keep the fabric smooth on the front because the face is stitched directly on top. Stuff well and close carefully. A centered top closure helps the vertical knit lines look elegant down the forehead.
4. Add the face
Place the eyes fairly close to the side edges of the face rather than centered. Use black yarn to stitch a tiny nose and a very short downward line beneath it. This face is not smiling broadly. It is calm, almost contemplative.
Visual checkpoint: if the bunny looks stern, soften it by lowering the eyes a little. If it looks too babyish, reduce the size of the nose embroidery.
5. Knit the feet
The feet here are rounded and simple, without contrast color. Work them as plush ovals and attach them low and forward. Their scale should feel substantial, but not oversized. Think sturdy farmhouse bunny rather than playful nursery bunny.
Flatten the bottom slightly with your fingers while stuffing. This helps the bunny sit steadily.
6. Knit the arms
These arms are short and understated. Knit narrow tubes, stuff lightly, and sew them near the upper side body. Keep them angled down. Their job is mostly to complete the silhouette without drawing attention from the scarf and ears.
7. Knit textured ears
The ears are the signature of this version. Use a little more texture than stockinette. Moss stitch, seed stitch, or even subtle purl patterning can work. Make them broad at the base and softly pointed at the tip.
For extra structure, knit two ear pieces for each ear, then seam with wrong sides together or insert felt inside. Because these ears are large, support matters.
Visual checkpoint: hold the ears against the head. You should now see a slightly weathered, handcrafted charm. If the ears look too polished and perfect, a little texture is your friend.
8. Attach ears with intention
Place them fairly far apart compared with the round bunnies, but still balanced. One ear may lean slightly more outward than the other to create a relaxed look. Small asymmetry can be beautiful here.
Sew securely around the base so the ear does not flop from a single point. The attachment area should be a small oval, not a dot.
9. Knit the scarf
This scarf has a homespun striped pattern in beige and mustard. Work a narrow rectangle with alternating rows, slipped stitch patterning, or simple color bands. The scarf should look hand knit, not sleek.
Tie it in a loose front knot or bow and stitch it in place. Let the ends rest naturally on the chest. The scarf should warm up the neutral palette without overpowering it.
Visual checkpoint: if the scarf disappears into the body, increase the mustard content. If it looks too bright, switch to ochre or muted gold.
10. Assemble and adjust posture
Sew head to body, then legs, arms, and ears. Sit the bunny on a flat surface and adjust the feet until it feels grounded. A rustic bunny should look steady and comfortable in a vignette.
Massage stuffing into the lower belly if needed. Sometimes a bit of extra fill at the front base helps the seated shape.
11. Keep embellishment minimal
Do not add too many extras to this bunny. Its appeal is quiet. A tiny tail, an interior ear lining, or a few hidden stitches to pinch the muzzle are enough. More than that and it starts to lose the primitive farmhouse charm.
12. Style it for the photo look
Place the bunny beside bright yellow daffodils, a galvanized bucket, and weathered wood. The contrast between rougher materials and soft knitting creates the exact image mood. Let the flowers sit slightly higher than the bunny so the ears frame them.
You should now see a rustic spring bunny with a calm face, textured ears, and a homespun scarf that feels ready for a cottage entry table or mantel.
Troubleshooting
My bunny looks too modern
Use more texture in the ears or scarf, switch to a heathered yarn, and reduce facial detail.
The head looks too big
For this design, a slightly smaller head works better. Remove a few center rounds next time.
The ears bend forward
Insert felt or knit more tightly. Textured stitches can also make ears sturdier.
The scarf looks too neat
Choose a more matte fiber or add subtle irregular striping.
The bunny leans
Widen the base with more stuffing or reposition the feet slightly outward.
Finishing details
Steam block the scarf and ears lightly. Avoid flattening the body too much. Weave all ends deep inside the stuffing. If you want the rustic look to feel even more handcrafted, gently rub the finished piece with your hands to soften the stitches rather than making it perfectly crisp. Optional upgrades include a tiny pom tail, tea stained fabric tag, weighted bottom, or floral cotton ear lining in faded yellow.
Shop Similar
- Natural oatmeal worsted yarn for farmhouse toy knitting
- Mustard yellow accent yarn for knit scarves
- Dense toy stuffing for seated stuffed animals
- Small knitting needles for firm amigurumi style knitting
- Galvanized farmhouse bucket for spring styling
Style It With
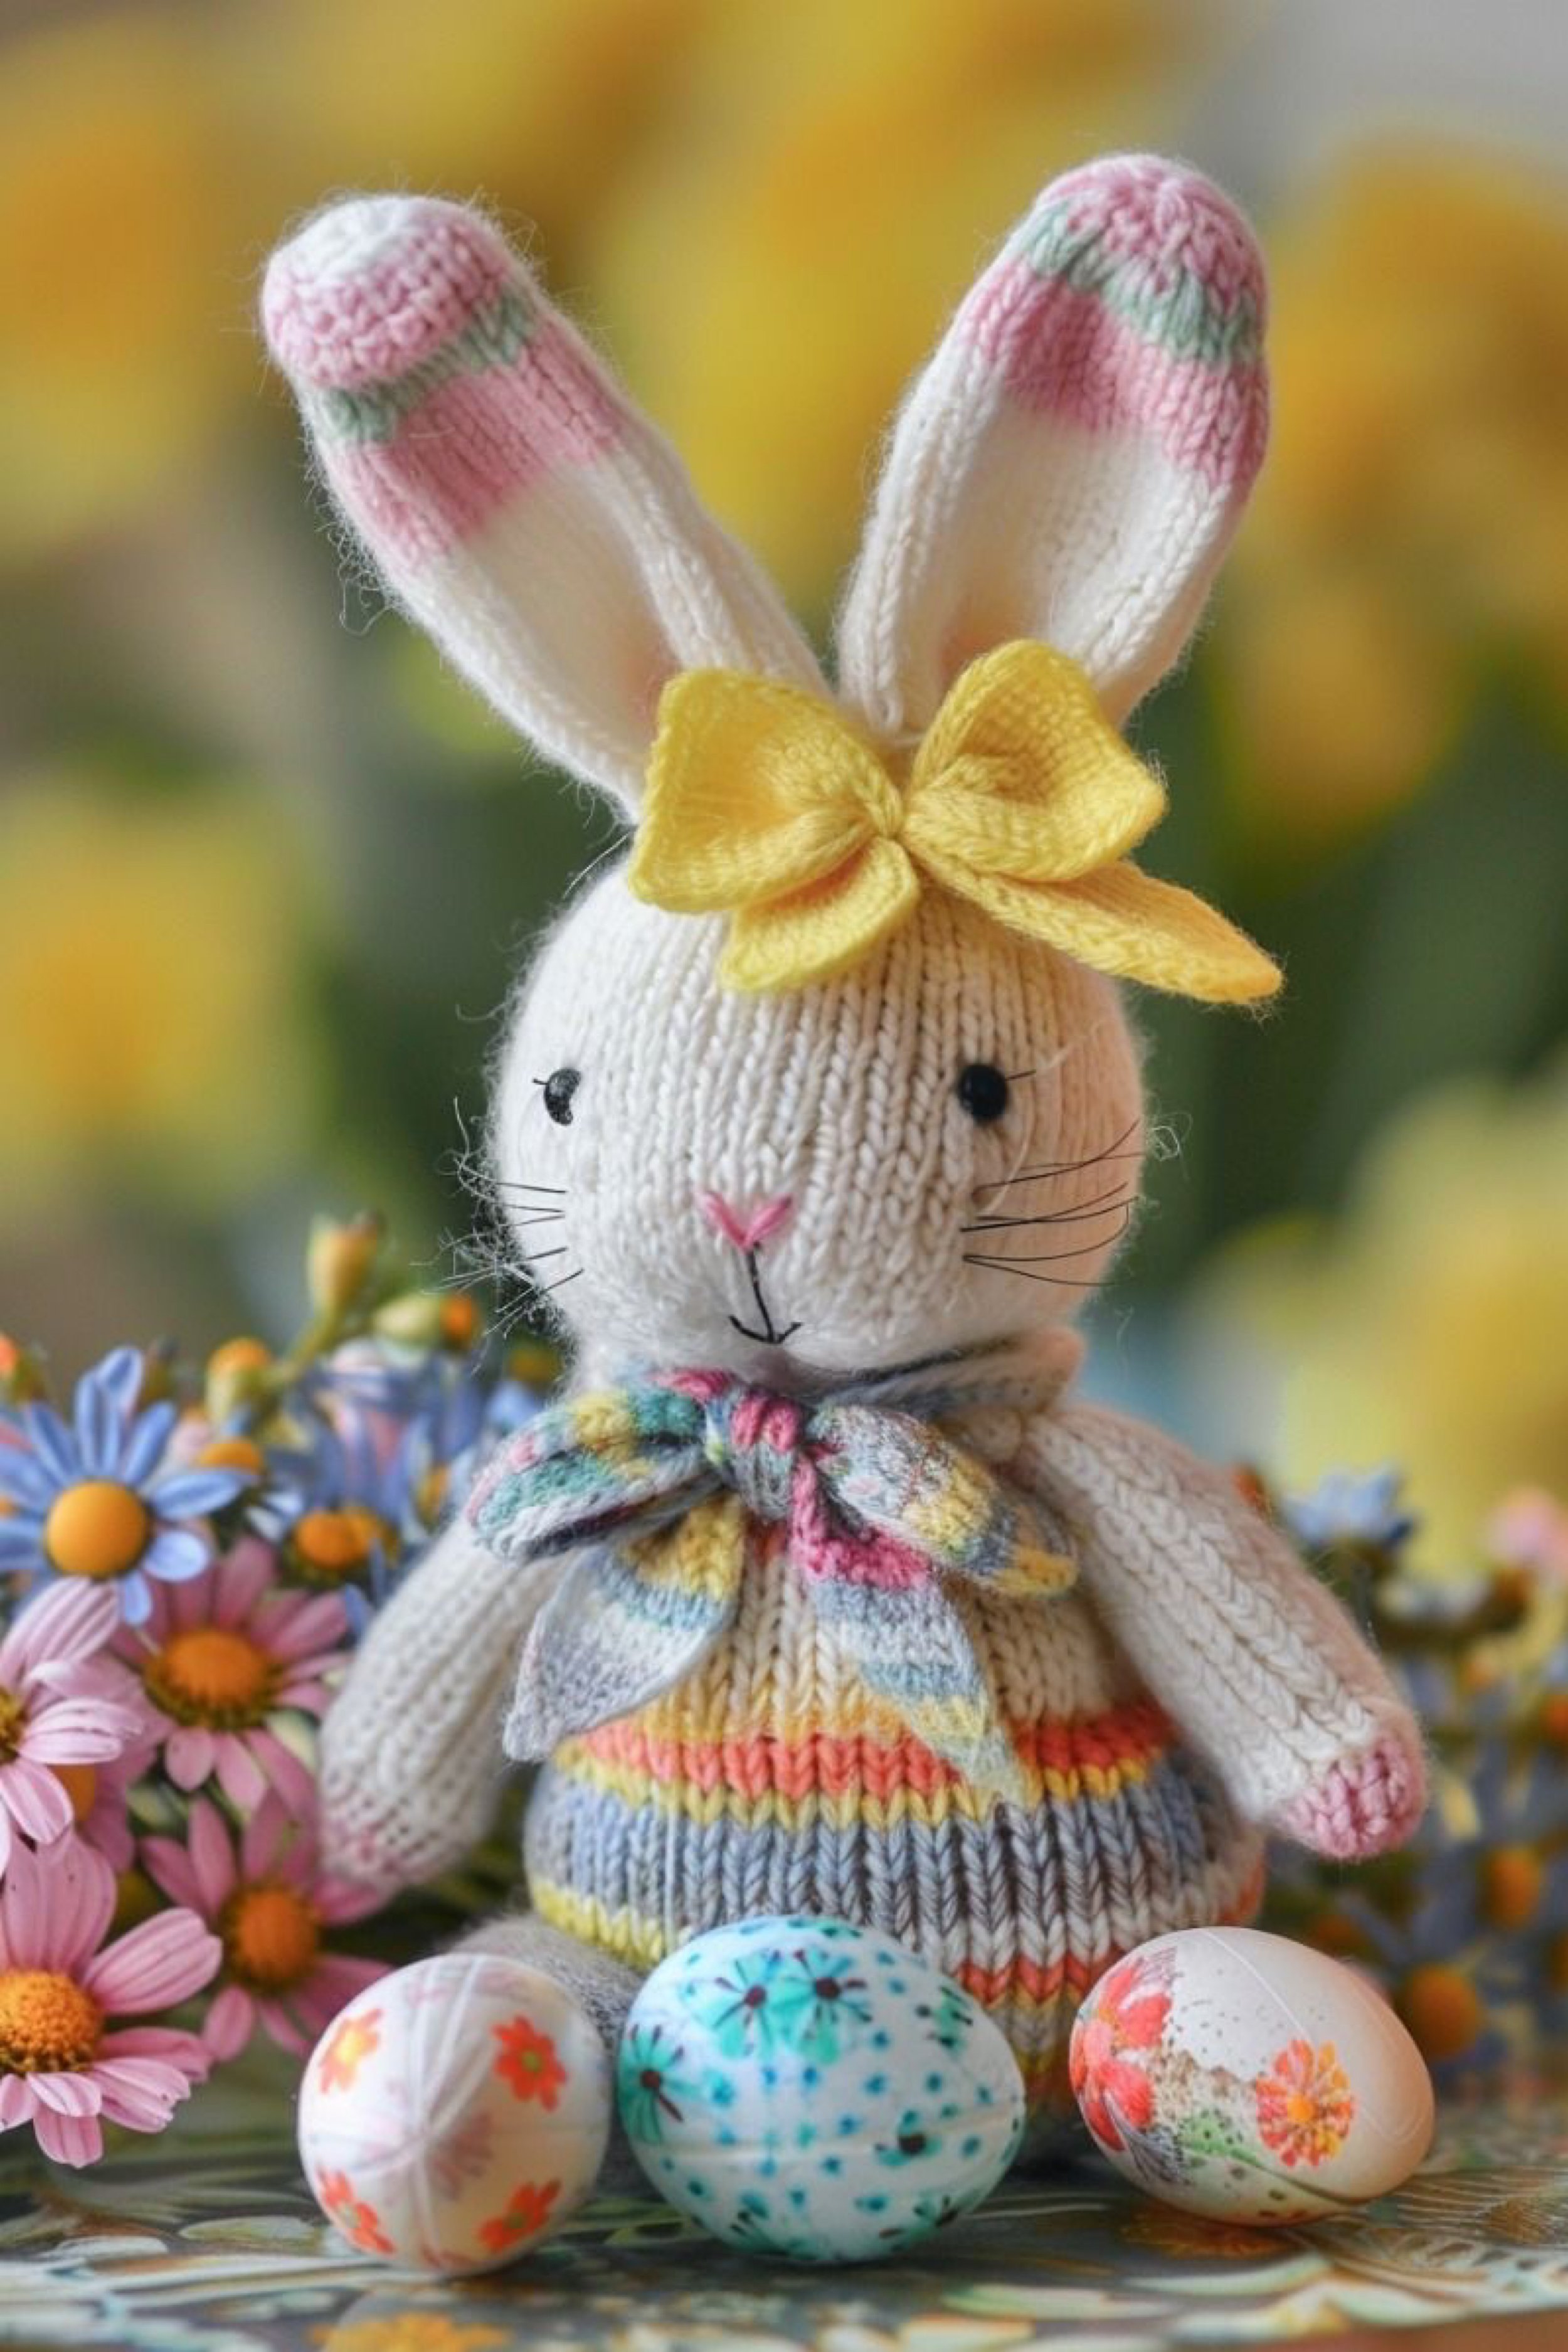
Pastel Dress Bunny Make It Yourself Tutorial
What you’re making
You’re making a sweet spring knit bunny dressed in soft rainbow pastel stripes with a floral bow scarf and a large butter yellow head bow. This version feels especially nursery inspired and playful, but it still keeps that handmade heirloom quality because the face is simple and the knitting remains neat and softly stuffed.
What makes this bunny special is the clothing effect built directly into the body. Instead of a separate removable dress, the lower torso is knitted in stripe bands that create the look of a little spring frock. It is a wonderful choice if you want a more decorative Easter bunny with extra personality.
Materials + tools
- Cream or pale ivory DK yarn
- Small amounts of pastel pink, lemon yellow, sky blue, lavender, mint, and coral yarn
- Yellow yarn or ribbon for the head bow
- Black embroidery thread or safety eyes
- Pink yarn for nose
- Polyester stuffing
- Knitting needles appropriate to yarn, usually 3.0 mm to 3.5 mm
- Double pointed needles or magic loop setup
- Tapestry needle
- Stitch markers
- Scissors
- Optional floral wire for ears
- Optional fabric for floral style scarf if not knitted
Finished size + customization notes
This bunny looks wonderful between 9 and 12 inches tall seated. The striped dress area shows best when your gauge is even and the bunny is not too tiny. If you want a smaller ornament version, simplify the number of stripe colors.
To customize, keep the body ivory and shift only the dress and accessories. You can also make the head bow smaller for a more understated version, but the large bow is part of the exact look shown in the image.
Step by step instructions
1. Map the color story before knitting
This bunny uses color in three places: the ear tips, the lower dress area, and the neck scarf. Write out your stripe sequence before you begin so it looks intentional. A good order for the dress area is soft pink, lemon, pale blue, coral, and gray blue, repeated in narrow bands.
The key is softness. Avoid saturated neon shades. You want sugared pastel, not bold rainbow.
Visual checkpoint: line up your yarn balls together. They should look airy, springy, and gentle next to the ivory base color.
2. Knit the head
Work the head in cream or pale ivory. Keep the shape smooth and oval round. This bunny has a slightly longer face than some of the rounder versions, which helps the head bow stand out.
Place the eyes low and wide. Embroider a tiny pink nose and a delicate mouth line. Add fine whisker stitches if you like the photo’s tiny extra facial detail, but keep them light.
Visual checkpoint: the face should look sweet and open. If the bow later covers too much of the forehead, lower the eye placement slightly so the face still feels centered.
3. Knit the body with built in dress stripes
Start the body at the base and work upward. Begin with your pastel stripe sequence for the lower section, then transition to cream for the upper torso. This creates the illusion of a dress without adding bulk from separate clothing.
When changing colors, keep your tension even and twist yarns neatly at the back to avoid holes. Stuff the lower body well so the stripes display smoothly.
Visual checkpoint: you should now see a softly rounded lower body with neat horizontal bands that read like a spring dress. If the stripes jog or pull, loosen your color change slightly.
4. Knit the legs and feet
Use cream for the main feet and add a tiny touch of pink at the very toe if you want the extra sweetness visible in the image. Keep the feet rounded and plush. Because the bunny wears a striped body, the legs should stay simple so the design does not feel crowded.
Attach the feet low and forward so the bunny sits prettily among eggs and flowers.
5. Knit the arms
Make short cream arms with a tiny pink cuff at the wrist if desired. Stuff only lightly. These arms should be narrow and soft, not sculptural. Sew them at the shoulder so they hang slightly outward.
6. Knit the ears with pastel tips
The ears are one of the most charming details in this version. Knit them mostly in cream, then add pastel pink with a touch of mint at the tip area. This should look like dipped color, not a big stripe.
Double layer ears give the cleanest finish. Sew them to the head slightly angled inward. If they flop too much, add a thin felt insert.
Visual checkpoint: you should now see ears that echo the body colors without matching too literally. If the ear tip color feels too loud, reduce the depth of the contrast section.
7. Make the large yellow bow
This bow is dramatic in the best way. Knit a narrow yellow strip, wrap the center, and shape it into a bow, or use a premade ribbon in soft knit or grosgrain texture. The photo bow sits between the ears rather than around the neck, which gives the bunny a dressed up spring party feel.
Stitch it securely to the head. Keep the bow broad and visible from the front.
8. Make the floral scarf
Work a tiny scarf in pastel variegated yarn or use a floral fabric ribbon. Tie it at the neck in a small knot or soft bow. Because the head bow is already large, the neck scarf should be lighter and airier.
Visual checkpoint: once both bows are added, the bunny should feel festive but still balanced. If the two bows compete, make the neck scarf narrower.
9. Assemble the bunny
Sew head to body, then add feet, arms, ears, neck scarf, and head bow. Check everything from the front before final stitching. Symmetry matters more on dressed bunnies because the accessories draw the eye.
10. Keep the face petite
Do not enlarge the nose or mouth just because the accessories are playful. The contrast between tiny face and colorful styling is exactly what makes this bunny look polished rather than cluttered.
11. Add optional skirt fullness shaping
If you want the lower striped area to look a bit more dress like, add one extra increase round near the lower torso and then work straight. This creates a very gentle bell shape without needing a separate garment.
12. Style the finished bunny
Set the bunny among painted eggs and pastel flowers. This version loves color, so bring in pinks, blues, yellows, and floral prints. A patterned tray or floral table covering suits it beautifully.
You should now see a spring party bunny with a soft knit body, sweet dress stripes, and cheerful bows that feel handmade and joyful.
Troubleshooting
My stripes look uneven
Use a row counter and keep the stripe bands consistent. Narrow stripes often look cleaner than wide bands on small toys.
The head bow flops
Use a firmer yarn, add a little felt between bow layers, or tack both loops to the head.
The bunny looks too busy
Simplify one element. Either use fewer dress colors, a plainer scarf, or a smaller head bow.
The ears twist
Block them before attaching and match row counts exactly on both sides.
The face looks too plain
Add tiny embroidered lashes or whiskers, but do not overwork it.
Finishing details
Steam block accessories before sewing them on. Weave ends carefully inside color change areas so no contrasting yarn peeks through. For a cleaner finish, line the back of the head bow with felt. Optional upgrades include a removable dress overlay, floral inner ears, a pom tail, or tiny bloom embroidery on the lower stripe section.
Shop Similar
- Pastel DK yarn set for knitted toy dresses
- Soft yellow ribbon or yarn for bunny bows
- Cream yarn for heirloom style bunny knitting
- Mini safety eyes and embroidery supplies for toy faces
- Toy stuffing for small decorative plush animals
Style It With
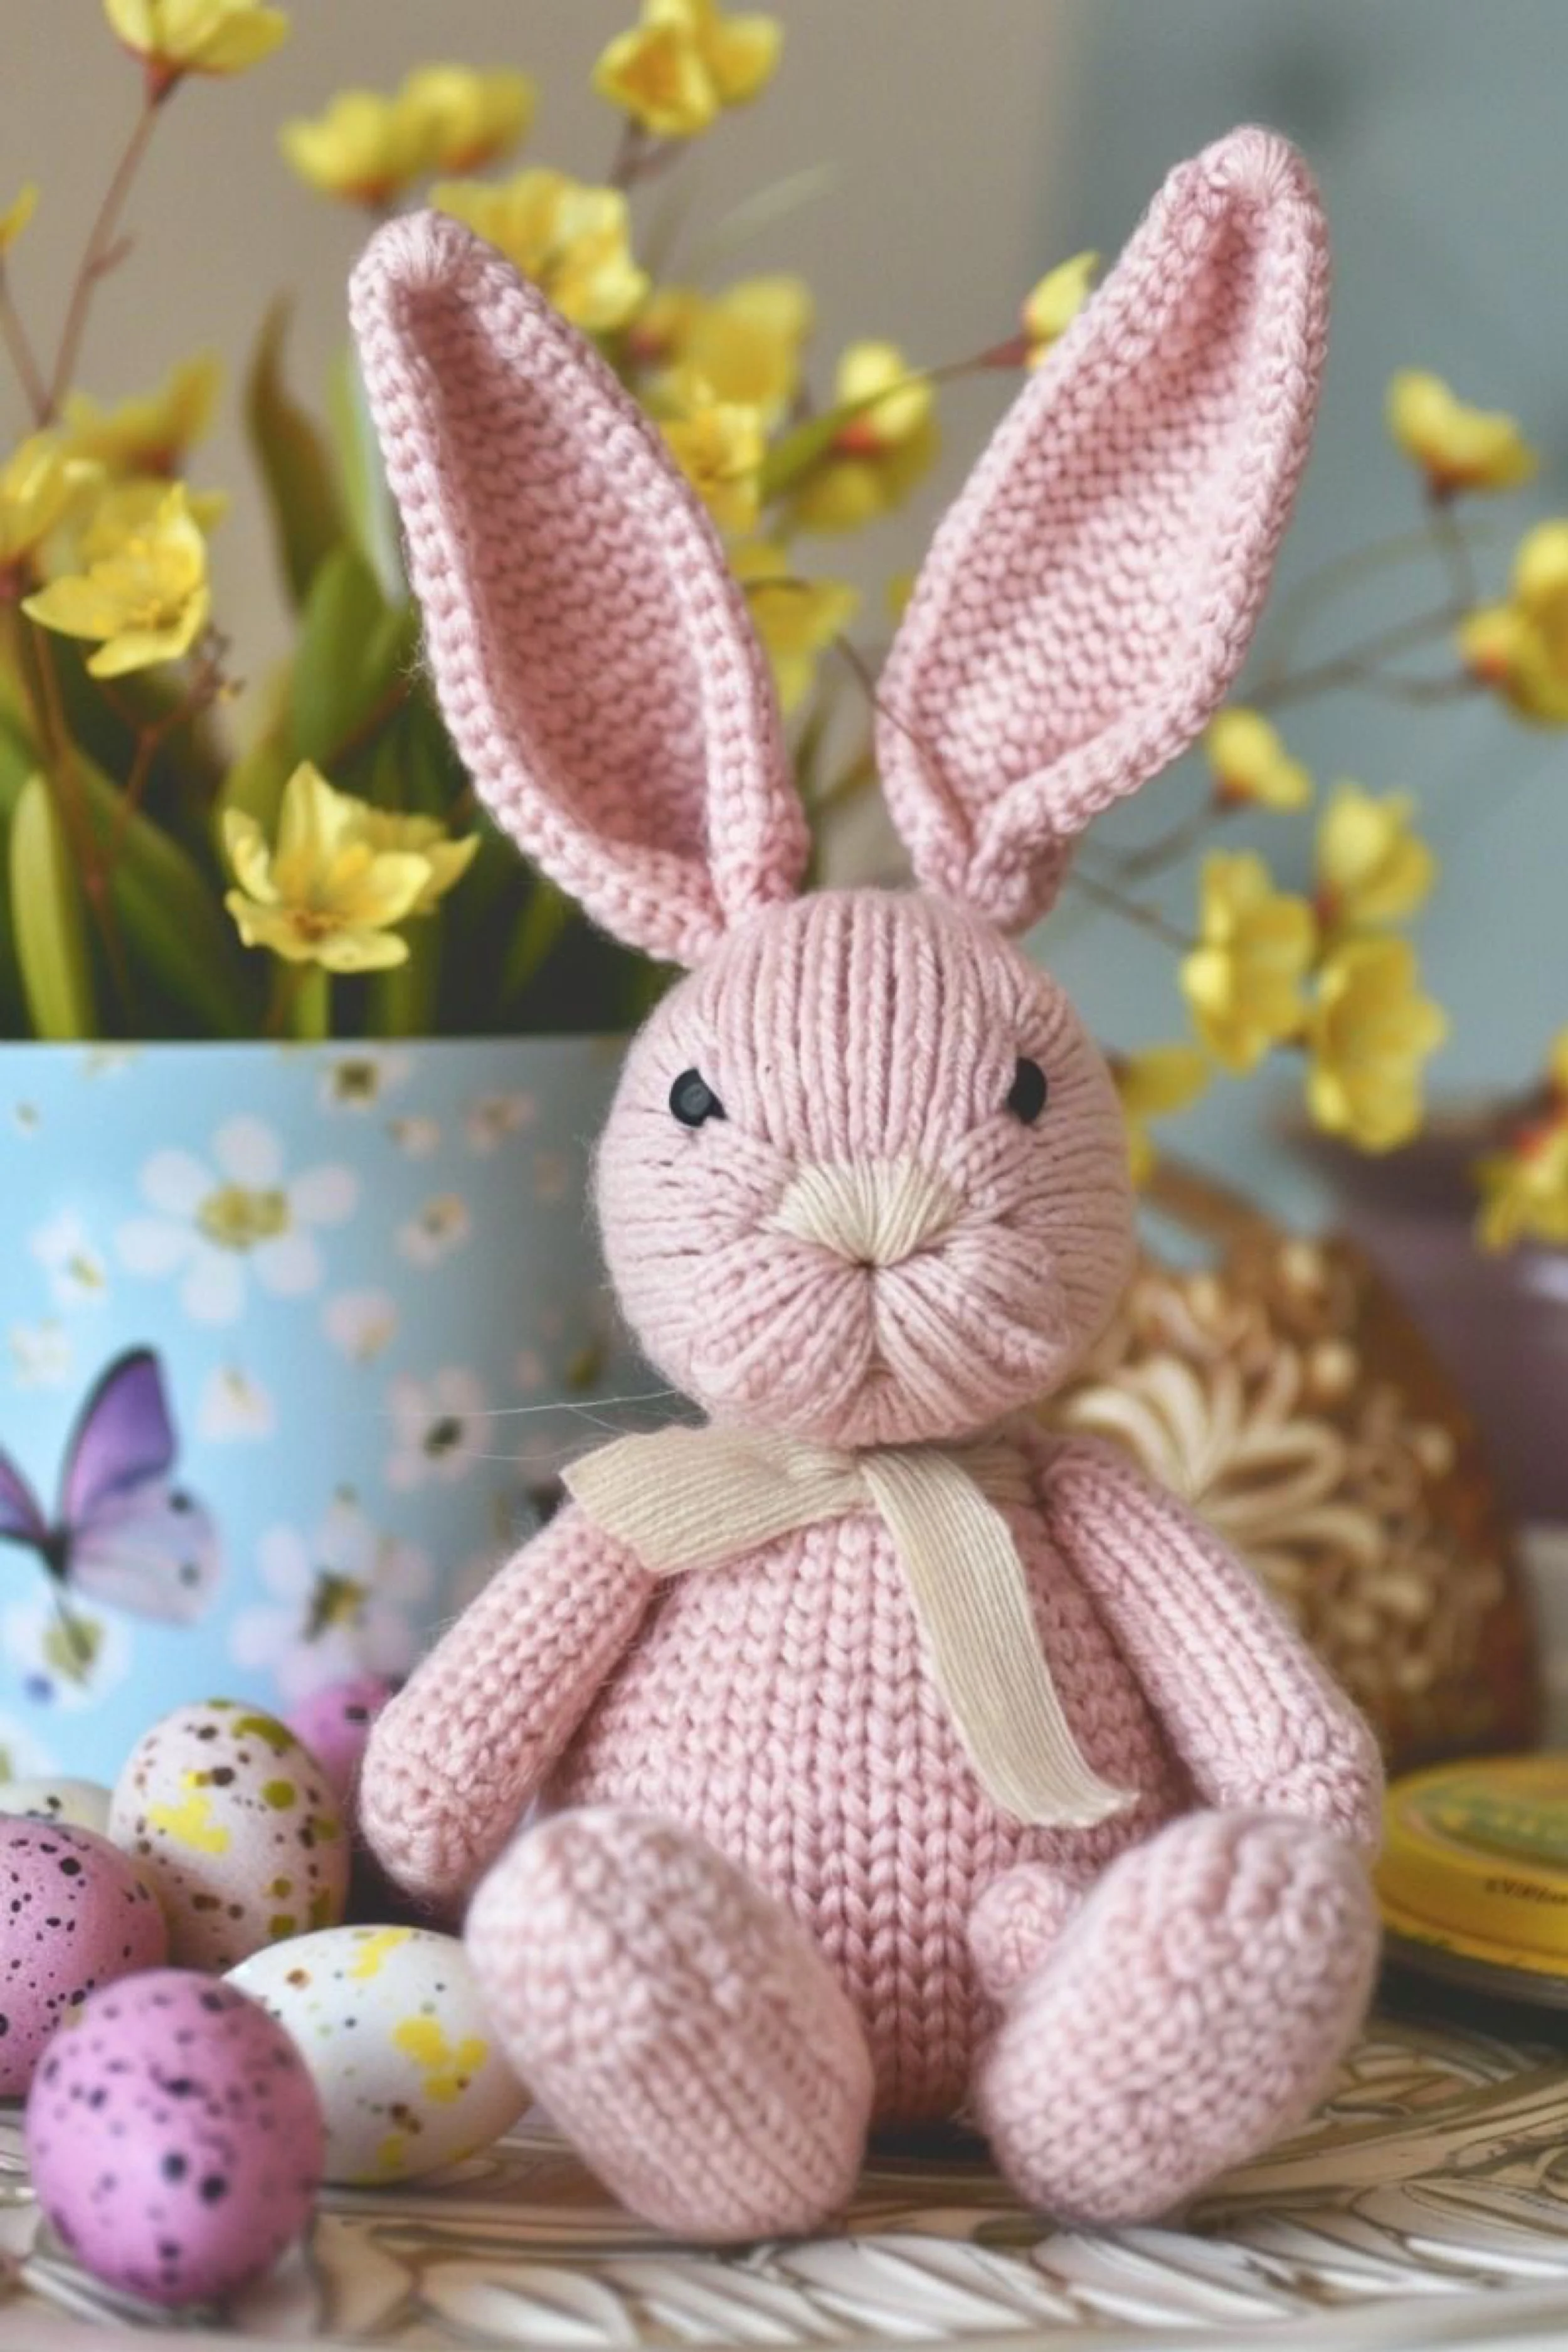
Blush Minimal Bunny DIY Guide
What you’re making
You’re making a minimalist blush pink knit bunny with tall open ears, a softly gathered muzzle, tiny black eyes, and a simple cream ribbon scarf. This version is extremely clean and modern while still feeling sweet and handmade, which makes it a beautiful option for spring shelves, baby gifts, and pastel cottage décor.
The charm of this bunny is all in the simplicity. There is almost no visible embellishment, so every stitch, seam, and shaping choice matters. The pastel pink body, pale nose area, and long ears create a look that is airy, soft, and quietly elegant.
Materials + tools
- Blush pink DK or light worsted yarn
- Small amount of cream yarn for muzzle and scarf if knitting them
- Black safety eyes or black yarn for embroidered eyes
- Polyester stuffing
- Knitting needles suited to your yarn, usually 3.0 mm to 4.0 mm
- Double pointed needles or magic loop setup
- Tapestry needle
- Stitch markers
- Scissors
- Optional cream ribbon instead of knitted scarf
- Optional felt or interfacing for ears
- Optional stuffing pellets for weight if using as décor
Finished size + customization notes
A finished seated height of 10 to 13 inches works beautifully here. This style looks especially good at a medium size because the smooth pink fabric and long ears read clearly from across a room.
To customize, you can switch blush pink to dusty mauve, pale apricot, buttercream, or soft lavender. Keep the scarf and muzzle area pale for the same calm contrast.
Step by step instructions
1. Focus on clean fabric
This bunny depends on smooth, even knitting more than colorwork or accessories. Choose a yarn that gives excellent stitch definition and knit at a slightly firm gauge. The photo shows a surface where the stitches are visible but tidy.
Before beginning, swatch in stockinette. If the fabric feels loose, go down a needle size. Loose fabric will make the stuffing show and ruin the clean minimal look.
2. Knit the head
Work the head in blush pink, shaping it into a rounded form with a small gathered muzzle area. This gathered muzzle is one of the key details. It can be created by lightly thread sculpting the center front after stuffing, drawing the stitches inward toward the cream nose section.
Stuff smoothly and evenly. Keep the top closure centered. The eyes should be set wide apart and low.
Visual checkpoint: the face should look tiny and serene. You should now see a lot of forehead and cheek area with only small points of expression.
3. Add the cream muzzle and nose
There are two good ways to get this look. Option one is to embroider the nose and softly satin stitch a small cream nose patch. Option two is to use a few wrapped stitches in cream to pull the center of the face inward and create a gathered little muzzle.
Add a tiny vertical center line below the nose if desired, but keep it very short. This bunny does not need a large smile.
4. Knit the torso
Shape the body into a gentle pear with a narrow neck and rounded base. Unlike the dressed bunny, this one should remain monochrome and smooth. Stuff firmly at the lower half and slightly lighter at the upper torso.
Visual checkpoint: set the head on the body before sewing. The proportions should look airy and elegant, with the long ears expected to add most of the height.
5. Knit the feet
Work two oval feet in blush pink. Keep them rounded and simple. A minimalist bunny benefits from balanced proportions, so the feet should be noticeable but not cartoonishly large. Flatten the base slightly to help the toy sit.
6. Knit the arms
Make slim, lightly stuffed arms. Sew them neatly at the side body. They should hang close to the torso. Too much outward angle will make the silhouette feel messy.
7. Knit the ears
These ears are tall, open, and cleanly shaped. Work each ear in two layers for the best edge finish. They are fairly wide at the base and narrow gently toward a rounded tip. Keep the inner ear open and unlined for the pure knit look, unless you need extra structure.
Because the body is so simple, the ears must be crisp. Block them flat before attachment.
Visual checkpoint: once pinned to the head, the ears should frame the face like elongated petals. If they lean too far forward, adjust the base seam.
8. Attach the ears
Place them high and fairly close together. This makes the bunny look younger and more delicate. Stitch securely around the base and reinforce with a second pass inside the head if needed.
9. Make the scarf
The scarf is narrow and understated. Knit a slim cream strip in garter or rib or use a soft cream ribbon. Tie once at the neck and let the ends fall naturally. This is not a showy bow. It is more like a neat finishing wrap.
Visual checkpoint: the scarf should lighten the neckline without stealing attention from the pink body.
10. Assemble with extra care
Sew head to body, then feet, arms, ears, and scarf. Because the toy is so minimal, crooked seams will show immediately. Use lots of pins and step back several times while assembling.
11. Shape the muzzle after assembly
Sometimes the gathered muzzle effect works best once the head is fully attached. If so, add a few discreet stitches now, pulling the center face in slightly and wrapping cream yarn around the nose area. This creates the cute little puffed muzzle visible in the image.
12. Style the finished bunny
This bunny pairs beautifully with pink and speckled eggs, pale florals, ceramic containers, and soft gold accents. It has a very polished pastel look, so avoid cluttered styling. A few coordinated spring items are enough.
You should now see a blush pink bunny with long ears, a tiny centered muzzle, and a refined, clean silhouette that feels modern but still handmade.
Troubleshooting
My pink yarn shows stuffing
Go down a needle size or use more stuffing in smaller pieces so the tension stays even.
The muzzle looks too pinched
Loosen the sculpting stitches. The effect should be soft and rounded, not puckered tightly.
My bunny looks plain instead of elegant
Check your proportions. Often the ears need to be a little longer or the scarf a little narrower.
The ears lean outward
Sew a wider base seam and block the ears before attachment.
The scarf looks bulky
Use finer yarn or ribbon and tie it more simply.
Finishing details
Steam the ears and scarf lightly. Weave all ends invisibly. If the bunny is for display, a weighted pouch at the bottom helps it sit beautifully. Optional upgrades include a tiny pom tail, floral fabric ear lining, a monogram stitched on one foot, or a removable ribbon set for seasonal changes.
Shop Similar
- Blush pink yarn for knitted bunny dolls
- Cream ribbon and trim for heirloom toy scarves
- Small black safety eyes for pastel plush animals
- Fine toy stuffing for smooth knitted animals
- Knitting needles for dense stuffed animal fabric
Style It With
Classic Cottage Bunny Step by Step Tutorial
What you’re making
You’re making a classic cottage style knit bunny in soft beige with rounded feet, a petite pink nose, long upright ears, and a floppy neutral neck bow. This version is one of the most timeless of the set because it uses almost no contrast color and relies instead on beautiful proportions and a gentle, sweet expression.
It feels right at home beside floral eggs, tulips, vintage tins, and polished wood. If you want a bunny that looks calm, refined, and versatile enough to display all spring long, this is an excellent version to make.
Materials + tools
- Soft beige or mushroom colored DK yarn
- Small amount of pink yarn for nose
- Black yarn or safety eyes
- Matching beige yarn for neck bow
- Polyester stuffing
- Knitting needles appropriate to yarn, usually 3.0 mm to 3.5 mm
- Double pointed needles or magic loop setup
- Tapestry needle
- Stitch markers
- Scissors
- Optional felt inserts for ears
- Optional weighting pellets in a fabric pouch
Finished size + customization notes
Aim for 10 to 13 inches tall seated. This bunny looks especially nice in a smooth medium gauge with visible stitch lines. You can make it in dusty rose, pale sage, or warm ivory, but beige gives the closest cottage look to the photo.
The neck bow can be made larger for a more decorative display piece or smaller for a simpler nursery toy feel.
Step by step instructions
1. Start with the head proportions
This bunny has a rounded head with a slightly fuller muzzle than some of the others. The face sits low on the head and the ears rise straight upward from the crown. Begin by knitting a rounded head in stockinette, keeping the increases and decreases evenly spaced.
Stuff firmly and smooth the fill with your fingers before closing. The front center should be neat because the vertical stitch lines help create that lovely handcrafted face.
Visual checkpoint: you should now see a soft round head that feels balanced, neither too tall nor too wide.
2. Shape the muzzle
Use thread sculpting or a few gathered stitches to create a fuller little muzzle area. Embroider a small pink triangular nose and a subtle mouth beneath. This bunny’s mouth is minimal and tidy. The eyes are small and black, placed fairly wide apart.
Visual checkpoint: from the front, the face should look serene and balanced. If the muzzle sticks out too much, loosen the shaping stitches slightly.
3. Knit the body
Work the body in a softly tapered pear shape. Keep the base full enough for sitting, but not extremely wide. The upper body narrows into the neck smoothly. Stuff as you go.
This bunny should feel cohesive and clean, so avoid dramatic shaping shifts. Think gentle curves all the way down.
4. Knit the feet
The feet are large enough to ground the bunny but still proportional. Knit two rounded oval feet in beige. Stuff them fully and sew them at the lower front body. Let them rest side by side with a small gap.
Visual checkpoint: when the bunny sits, the feet should help it look stable and cozy, not stiff.
5. Knit the arms
Make two slim arms and stuff them lightly. The arms in the photo hang close to the body, creating a narrow silhouette through the torso. Sew them slightly forward if you want the bunny to look more cuddly.
6. Knit the ears
These ears are long, smooth, and relatively narrow. Use a double layer construction or fold a single ear piece for a clean edge. The ears should rise upright with a slight inward angle.
Block them before sewing to avoid curling. If your yarn is soft and drapey, add a felt insert inside each ear.
Visual checkpoint: once pinned, the ears should frame the head symmetrically and make the bunny look alert but gentle.
7. Make the neck bow
Knit a long narrow strip in the same beige yarn. Use garter or rib so it ties easily. Tie it into a soft loose bow and tack it at the center. This monochrome bow is part of what makes the bunny feel classic and calm.
8. Assemble the bunny
Attach head to body first, then feet, arms, and ears. Sew the neck bow last. Check alignment constantly. On a simple design like this, even a slight tilt is noticeable.
Sit the bunny near your styling props as you work. Sometimes seeing it in context helps you decide whether the ears should be closer, the bow fuller, or the feet wider apart.
9. Refine the stuffing
Push stuffing downward into the lower body and slightly outward into the feet. Add a bit more to the cheeks if needed. Use your fingers to smooth all surfaces. The photo bunny looks softly stuffed, not tightly packed.
10. Keep the details subtle
Avoid adding eyelashes, blush, or decorative patches if you want the exact look. This bunny’s beauty comes from understatement. The pink nose is enough to add warmth.
11. Add optional tail or lining
A tiny pom tail at the back works beautifully if you want more dimension. You can also line the ears with a faded floral fabric for a hidden surprise, though the original photo keeps things very clean and monochrome.
12. Style the bunny for spring
Place it near floral eggs, tulips, and warm wood surfaces. The neutral palette lets it fit beautifully into almost any spring display. You should now see a timeless cottage bunny that feels sweet, soft, and quietly elegant.
Troubleshooting
My bunny looks too stiff
Reduce stuffing in the arms and upper body. Keep the lower body firmer than the top.
The ears droop
Block them, double them, or add felt. This design needs ears that rise clearly.
The face feels too plain
Make the nose a touch larger or deepen the muzzle shaping slightly, but stay subtle.
The bow will not sit nicely
Use garter stitch or ribbon instead of stockinette. Stockinette curls too much for some yarns.
The feet look too small
Increase a few extra stitches in the center rounds so they feel more grounded.
Finishing details
Steam block ears and bow lightly. Secure all ends deep inside the body. Optional upgrades include a weighted base, a hidden hanging loop, a tiny tail, or interchangeable seasonal bows. For a refined finish, brush the surface very gently if your yarn has natural halo and you want a softer heirloom appearance.
Shop Similar
- Soft beige DK yarn for classic bunny knitting
- Pink embroidery yarn for toy noses
- Small black eyes for handmade knitted animals
- Premium stuffing for heirloom plush projects
- Double pointed needles for toy knitting patterns
Style It With
When you place these finished bunnies together, something subtle happens. They begin to feel less like individual projects and more like a collected moment, a little spring vignette that tells a story of texture, color, and care. A soft neutral bunny beside a pastel dressed one, a speckled yarn version paired with fresh flowers, each one adding its own quiet voice to the scene.
These are the kinds of pieces that return year after year. They do not feel trendy or temporary. They settle into your space, becoming part of how you welcome the season, how you decorate, how you remember small, thoughtful details.
If you make even one of these, you will understand the appeal. If you make several, you will have something even better. A handmade collection that feels personal, warm, and unmistakably yours.