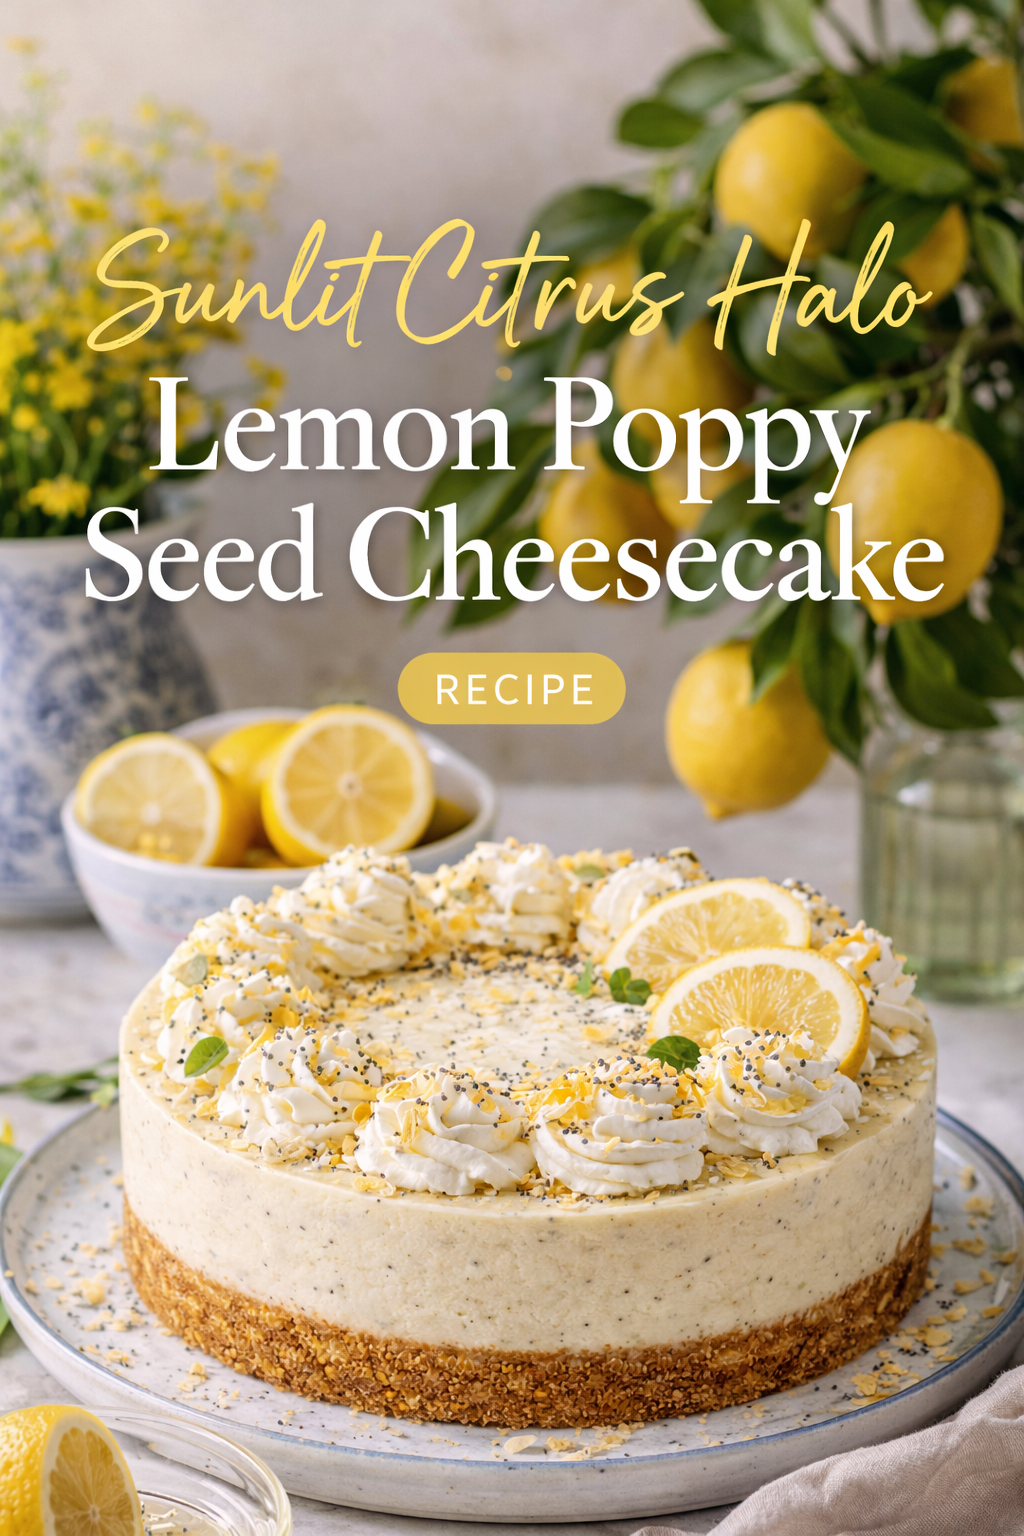
Sunlit Silence Lemon Curd Cheesecake
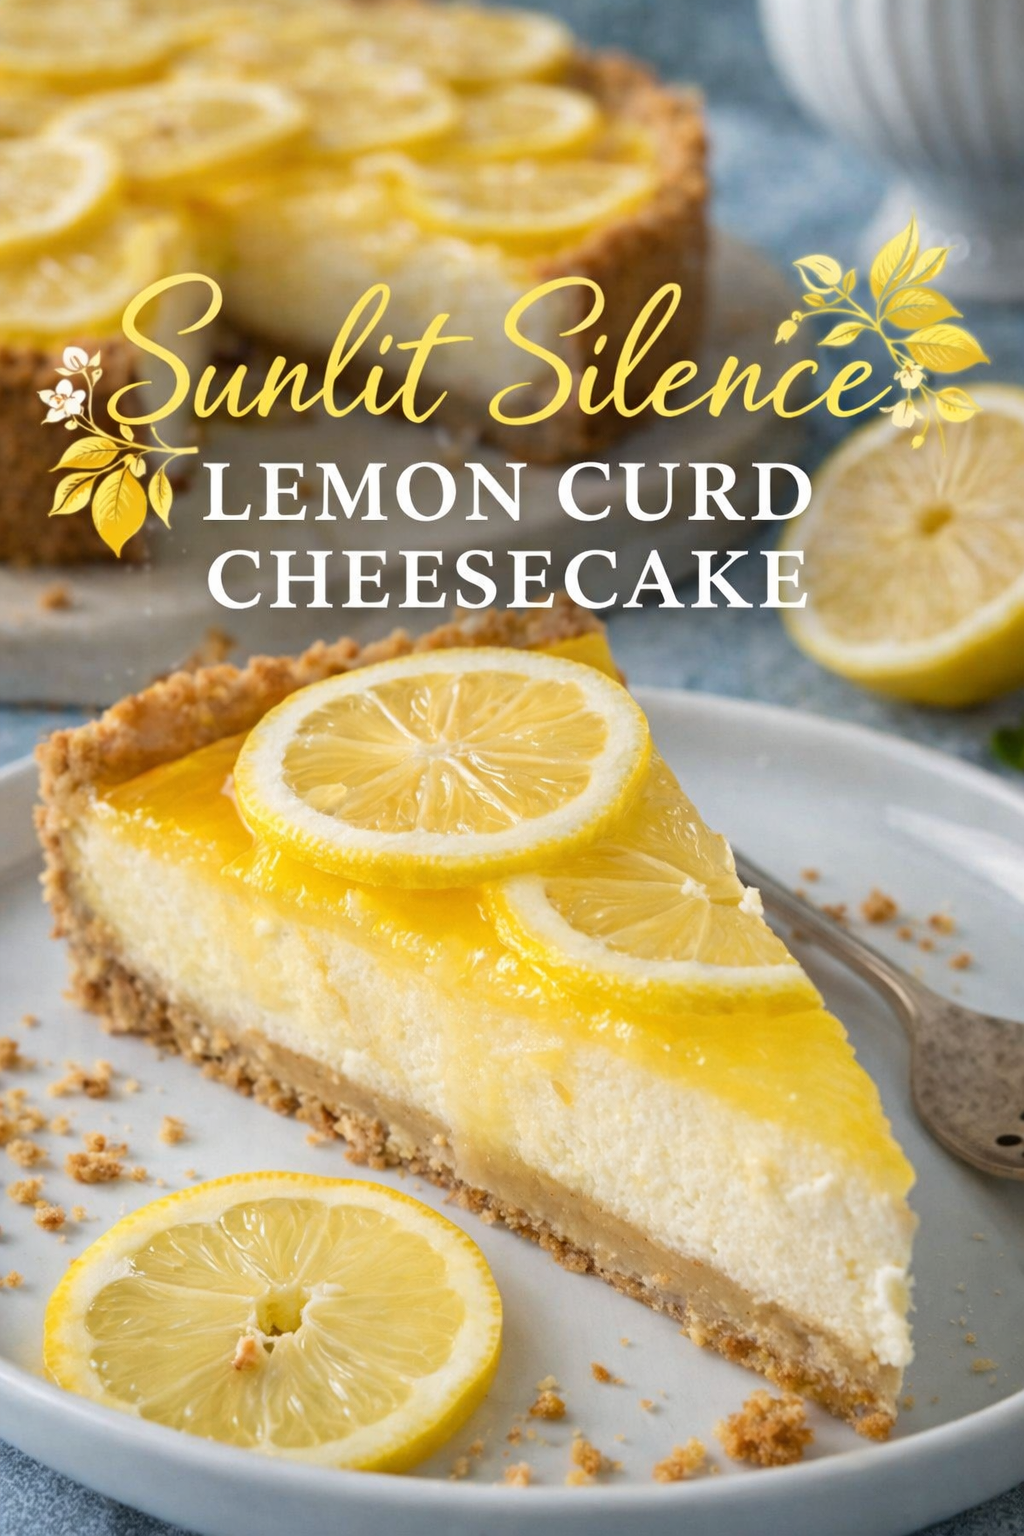
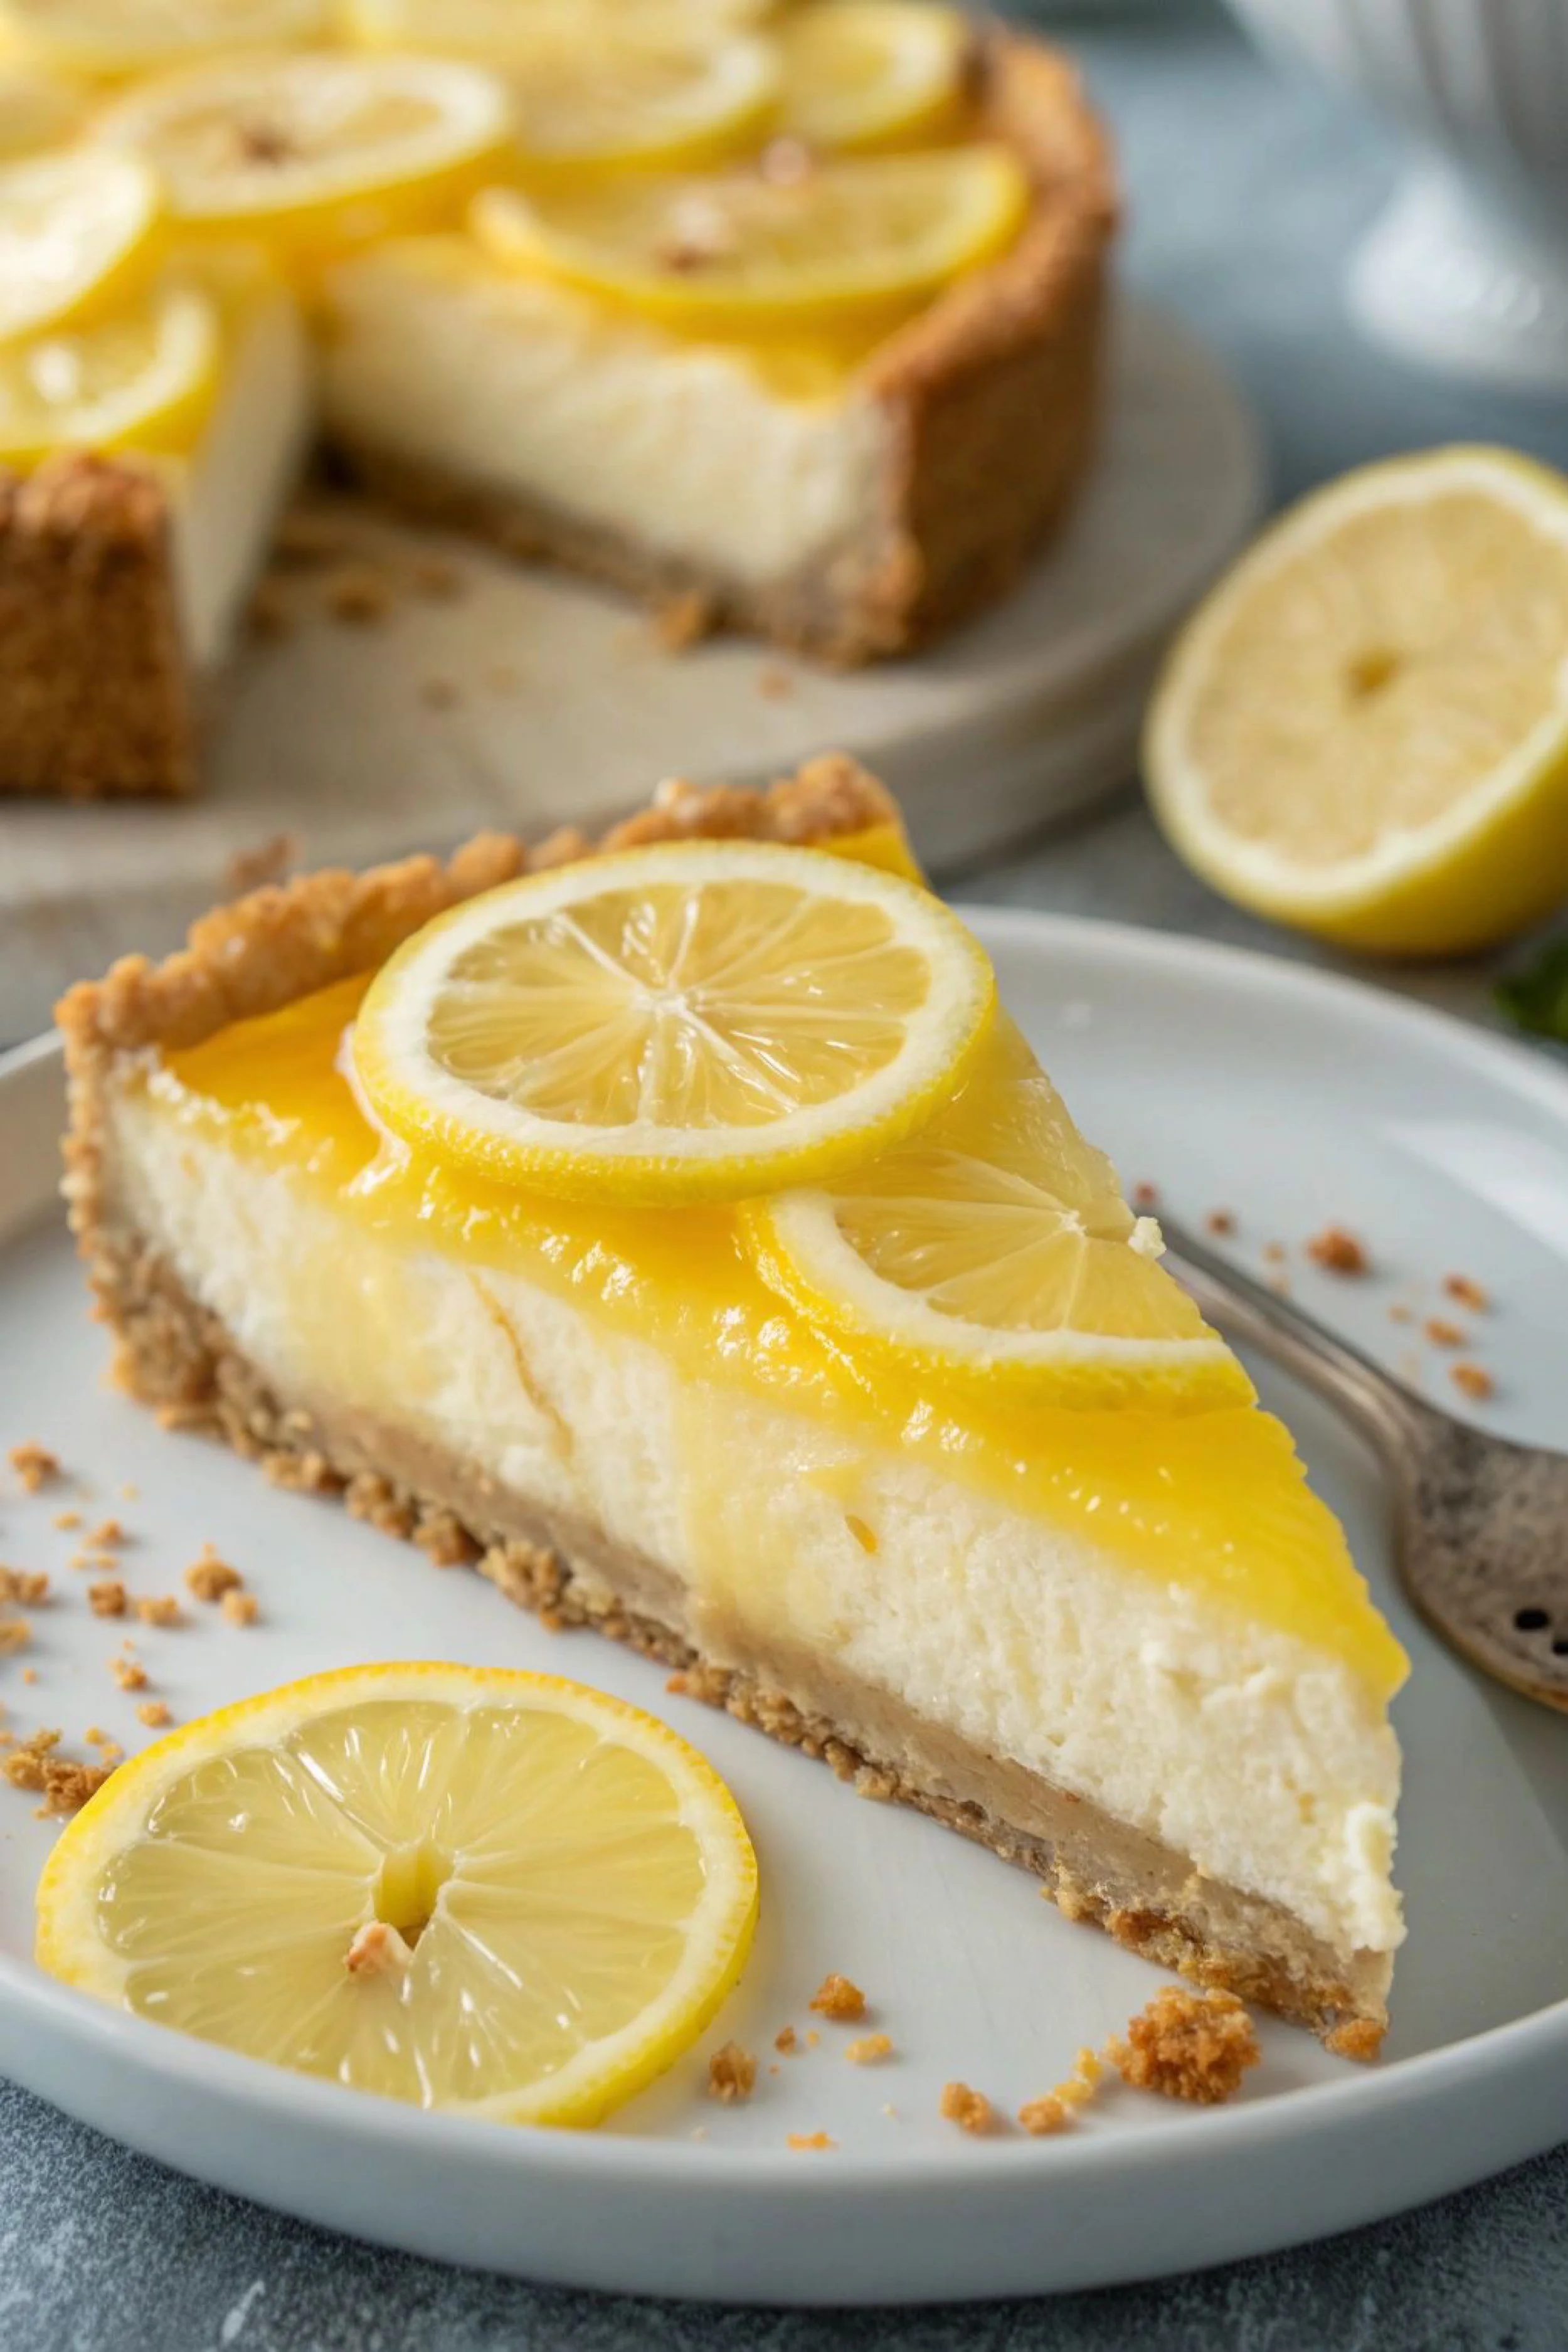
The first thing you notice is the sheen—an impossibly glossy layer of lemon that catches the light like lacquer on glass. It sits over the pale, cloud-soft body of cheesecake, bright as a fresh squeeze, with thin lemon rounds laid on top like little stained-glass windows. The slice on the plate feels both generous and precise: a clean wedge with a crust that looks deeply toasted at the edges, crumbs scattered like evidence of a crisp bite. Everything about it reads calm and confident, the kind of dessert that doesn’t need a flourish because its color is already a mood.
There’s a particular kind of quiet that arrives when something sweet is this sharp. Lemon isn’t shy—lemon wakes you up. It’s the scent that rises when you twist a peel between your fingers, the immediate spark on your tongue, the way your mouth wants another bite before you’ve finished the one you’re chewing. Paired with cheesecake, that brightness becomes even more dramatic: cool, dense creaminess meeting a citrus top note that feels like sunshine through a window at the exact hour the day turns soft.
The scene suggests a kitchen that knows what it’s doing. The background is blurred, but you can almost feel the counter under your palms—cool stone, a faint dusting of crumbs, a fork resting nearby as if someone meant to “just taste” and got caught in the moment. It’s the sort of dessert that turns a weekday into a small celebration, the kind you slice carefully even though you’re already planning a second piece.
Cheesecake can be fussy, but this one looks like it was handled with patience. That smooth interior hints at a batter mixed gently, poured into a waiting crust, baked with steady heat, and cooled without rushing. The lemon layer looks thick enough to hold a spoon mark, yet glossy enough to slide cleanly across the top—like a curd or lemon topping that was cooked until it turned silky and then spread while still lush. If you’ve ever wanted that restaurant-style finish, the kind that looks tailored rather than improvised, the secret is rarely mystery—more often it’s the right texture, the right tools, and the willingness to let time do its work.
The tools don’t have to be complicated, but they do matter. A reliable springform pan creates those crisp, vertical sides that make slices look so tidy, and using a well-reviewed 9-inch springform pan can make the whole process feel calmer from the first step. A smooth top often starts before the oven, too—when cream cheese is truly softened and blended without whipping in extra air. A sturdy mixer helps, whether you use a stand mixer or a hand mixer, and a powerful hand mixer with multiple speeds keeps the batter creamy without turning it foamy.
And then there’s lemon—the kind of ingredient that’s simple until you actually want it to taste like something. Fresh zest carries perfume, fresh juice carries bite, and both together feel alive. Having a sharp microplane zester turns that moment of zesting into something effortless, the fragrant oils releasing in seconds. For juice, a sturdy citrus juicer saves your hands and catches seeds without drama, leaving you with clean, bright liquid that tastes like the color yellow.
What makes this dessert feel so “finished” is the contrast: the warm crunch of the crust against the cool, creamy center, the clean cut of lemon against dairy richness. That crust looks like classic graham—crumbled cookies, butter, maybe a whisper of sugar—pressed firm and baked just long enough to toast. A good press matters; an even bottom means a slice that holds together instead of collapsing. Something as simple as a flat-bottom measuring cup set for pressing crumbs can help create that compact, bakery-style base.
The lemon topping is the crown, and it’s where the dessert turns from “cheesecake” into a statement. Whether you make a homemade curd or use a quality prepared lemon curd, the goal is the same: a top layer that tastes bright, sets softly, and shines. If you love the idea of leaning into the citrus, even adding a little extra zest to the topping can intensify that perfume without increasing the sourness. The garnish—thin lemon wheels—feels like a quiet promise: this is going to be vivid, clean, and a little addictive.
There’s also a feeling here of temperature and timing. Cheesecake rewards patience like few desserts do. It wants a slow bake and an even slower cool, the kind that happens while the kitchen lights dim and the day settles. Once chilled, it becomes something sliceable and elegant, the texture turning from warm softness to cool, velvety structure. It’s the dessert you make ahead on purpose, the one that waits in the refrigerator like a secret you get to reveal.
When it’s finally served, the slice speaks for itself. The lemon layer hits first—sweet-tart and glossy—then the cheesecake follows, creamy and calm, and the crust finishes with a buttery crunch that keeps everything grounded. It tastes like a bright day you can eat, like clean linens and open windows and a moment that doesn’t ask you to hurry. Even the crumbs on the plate feel right, like proof that something crisp gave way to something tender.
If you’ve ever wanted a dessert that looks composed but tastes joyful, this is it. A lemon curd cheesecake doesn’t shout; it glows. It sits on the table and makes everything around it feel a little more intentional, even if the only plan was to cut one slice and see what happens next.
Lemon Curd Cheesecake Recipe
A classic baked cheesecake finished with a glossy lemon curd layer and fresh lemon slices—bright, creamy, and cleanly sliceable.
Ingredients
For the crust
- 2 cups graham cracker crumbs
- 2 tbsp granulated sugar
- 1/2 tsp fine salt
- 7 tbsp unsalted butter, melted
For the cheesecake
- 24 oz cream cheese, softened
- 1 cup granulated sugar
- 1 tbsp lemon zest (from 2–3 lemons)
- 2 tbsp lemon juice (fresh)
- 1 tsp vanilla extract
- 3 large eggs, room temperature
- 3/4 cup sour cream, room temperature
- 2 tbsp all-purpose flour (optional, for extra stability)
- Pinch of salt
For the lemon topping
- 3/4 to 1 cup lemon curd (homemade or prepared)
- Thin lemon slices, for garnish (optional)
Method / Instructions
- Prep the pan: Heat oven to 325°F. Grease a 9-inch springform pan and wrap the outside with heavy-duty foil.
- Make the crust: Combine crumbs, sugar, salt, and melted butter. Press firmly into the bottom (and slightly up the sides if desired). Bake 10 minutes, then cool.
- Mix cheesecake: Beat cream cheese and sugar until smooth. Mix in zest, juice, vanilla, and salt. Add eggs one at a time on low speed. Fold in sour cream (and flour if using) until just combined.
- Bake: Pour batter over crust. Place pan in a roasting pan and add hot water halfway up the sides (water bath). Bake 55–75 minutes until edges are set and the center jiggles slightly.
- Cool gently: Turn oven off, crack the door, and let cheesecake sit 45–60 minutes. Remove, cool to room temp, then chill at least 6 hours (overnight best).
- Finish: Spread lemon curd over the chilled cheesecake. Garnish with lemon slices. Slice with a warm, clean knife.
Cheesecake has a reputation for being dramatic, but the truth is it’s mostly a test of restraint: mix gently, bake steadily, cool slowly, and let the refrigerator do the final work. The image you’re chasing—clean slice, creamy interior, glossy lemon top—comes from understanding what each step is trying to accomplish and refusing to rush the transitions.
Start by setting yourself up for calm. A springform pan is non-negotiable for neat edges, and using a trusted 9-inch springform pan makes unmolding painless. Wrap the exterior with foil before you even think about batter; the water bath is your insurance policy against cracks and dry texture. If you’ve struggled with leaks, doubling up with extra-wide heavy-duty aluminum foil is the quiet fix that prevents a soggy crust.
Step 1: Build a crust that slices cleanly
The crust is structure, not just flavor. Melted butter should coat every crumb so the mixture presses like damp sand. When you press it into the pan, focus on density. Loose crumbs lead to crumbling slices, while a firmly packed base cuts like a cookie. A flat-bottom tool helps you compress evenly—something like a flat-bottom measuring cup set works perfectly. Pre-baking the crust matters because it sets the butter and toasts the crumbs, giving you that golden edge and a crisp bite that doesn’t turn soft under the filling.
Troubleshooting:
If your crust is greasy, you likely added too much butter or didn’t measure crumbs tightly. If it’s dry and sandy, it needs a touch more butter or a firmer press. A pinch of salt is small but essential—it keeps the crust from tasting flat against the tangy lemon top.
Step 2: Mix for silky texture, not air
The smooth, dense look of the cheesecake in the photo comes from low air incorporation. Cream cheese must be fully softened—cool but pliable—so it blends without lumps. Mix the cream cheese and sugar until smooth, then stop. Overmixing at this stage whips in air, and air expands in the oven, creating bubbles that can crack or sink.
Zest is where lemon flavor really lives, so take your time. A good zester makes this effortless; a sharp microplane zester pulls bright zest without bitter pith. Add zest early so its oils perfume the entire batter, then add lemon juice for that clean acidity. Vanilla is optional but helpful—it rounds the edges so the lemon tastes vivid rather than harsh.
When it’s time for eggs, turn the mixer to low. Add them one at a time, mixing only until the yellow disappears. Eggs are emulsifiers; they also carry structure. But beating them hard adds air and encourages cracking. Sour cream goes in last for tang and tenderness. If you like extra insurance for sliceability, a small amount of flour helps stabilize, especially if your fridge runs warm or you’re serving outdoors.
Troubleshooting:
Lumps in batter usually mean the cream cheese was too cold. If that happens, let the bowl sit 10 minutes and mix gently again. Avoid “fixing” it by whipping fast—you’ll trade lumps for bubbles.
Step 3: The water bath is about even heat
A cheesecake bakes best when it’s insulated from harsh temperature swings. A water bath surrounds the pan with gentle steam, reducing the chance of cracks and keeping the texture creamy instead of bready. Set the foil-wrapped pan into a roasting pan, pour in hot water halfway up the sides, then bake at a moderate temperature.
The doneness cue is movement: the edges should look set, but the center should still jiggle like set custard. If it waves like liquid, it’s underbaked. If it doesn’t move at all, it may be overbaked, which can lead to a dry mouthfeel. Checking with a thermometer is a pro move; the center is typically done around 150°F. A quick-read tool like a digital instant-read thermometer takes the guesswork out of it without cutting into the cake.
Troubleshooting:
Cracks usually come from heat shock (too hot, too long, or cooled too fast). A sunken center can come from underbaking or overmixing (too much air). A grainy texture often points to overbaking.
Step 4: Cooling is half the recipe
The most overlooked step is the slow cool. When the cheesecake finishes baking, turn the oven off, crack the door, and let it sit. This gradual temperature drop prevents the top from contracting too quickly, which is a common crack trigger. After that, cool to room temperature before refrigerating. Putting a hot cheesecake into the fridge traps steam and can create condensation, which softens the top and can make the lemon layer slide.
Chilling is what transforms the interior into that clean, velvety slice. Six hours is the minimum; overnight is the sweet spot. If you want the neatest cuts, chill longer and slice cold.
Step 5: The lemon top should be glossy and balanced
That shiny yellow layer is your finishing move. Lemon curd can be homemade or prepared; either way, the goal is a smooth, spreadable consistency. If your curd is very thick, let it sit at room temperature for 10–15 minutes so it glides instead of tearing the cheesecake surface. Spread gently from the center outward using an offset spatula, and if you don’t have one, an offset icing spatula is a small tool that makes a big difference in getting that sleek, even finish.
Want more intensity? Stir a little fresh zest into the curd before spreading. Want a softer tartness? Mix a spoonful of sour cream into the curd to mellow it. If you’d like the top to set a touch firmer for warm-weather serving, chill again for 30–60 minutes after topping.
Step 6: Slice like a bakery
The slice in the image is clean because the knife is warm and wiped between cuts. Dip a long knife in hot water, wipe dry, cut straight down, then wipe again. Repeat. For ultra-neat plating, use a long stainless chef’s knife rather than a short serrated blade, which can drag and crumble the crust.
Garnish is optional, but those lemon slices do something important visually: they echo the flavor promise and make the cake feel styled without being fussy. If you do add lemon slices, pat them dry first so they don’t weep moisture onto the curd.
Variations and substitutions that still behave well
- Gingersnap crust: Swap graham crumbs for gingersnap crumbs for a warm spice note against the lemon.
- Vanilla wafer crust: Slightly sweeter, softer crunch, very classic.
- No water bath: You can bake without it, but expect a higher chance of cracks and a slightly drier edge. If skipping, bake at 300°F and consider placing a pan of hot water on the rack below for humidity.
- Gluten-free: Use gluten-free cookie crumbs and skip flour in the filling (or use a gluten-free blend).
- Extra lemon-forward: Add an additional teaspoon of zest and replace vanilla with a small splash of lemon extract—go light so it stays natural.
Common issues and quick fixes
- Cracked top: Cover with lemon curd (it’s the best disguise). Next time, lower heat, avoid overmixing, and cool slowly.
- Soggy crust: Better foil wrap, and ensure the crust is pre-baked and fully cooled before filling.
- Runny center after chilling: It was underbaked. Chill longer first; if still too soft, bake time needed more. A thermometer helps prevent this.
- Dense, dry texture: Overbaked or baked too hot. Pull earlier when the center still jiggles.
When you get it right, the payoff is exactly what the image promises: a slice that holds its line, a filling that feels like velvet on the tongue, and a lemon top that tastes bright enough to make the whole dessert feel lighter than it is. It’s the kind of cheesecake that looks composed on the plate—crumbs scattered, fork waiting—while still tasting like something you’d happily eat straight from the refrigerator in the quiet of the kitchen.