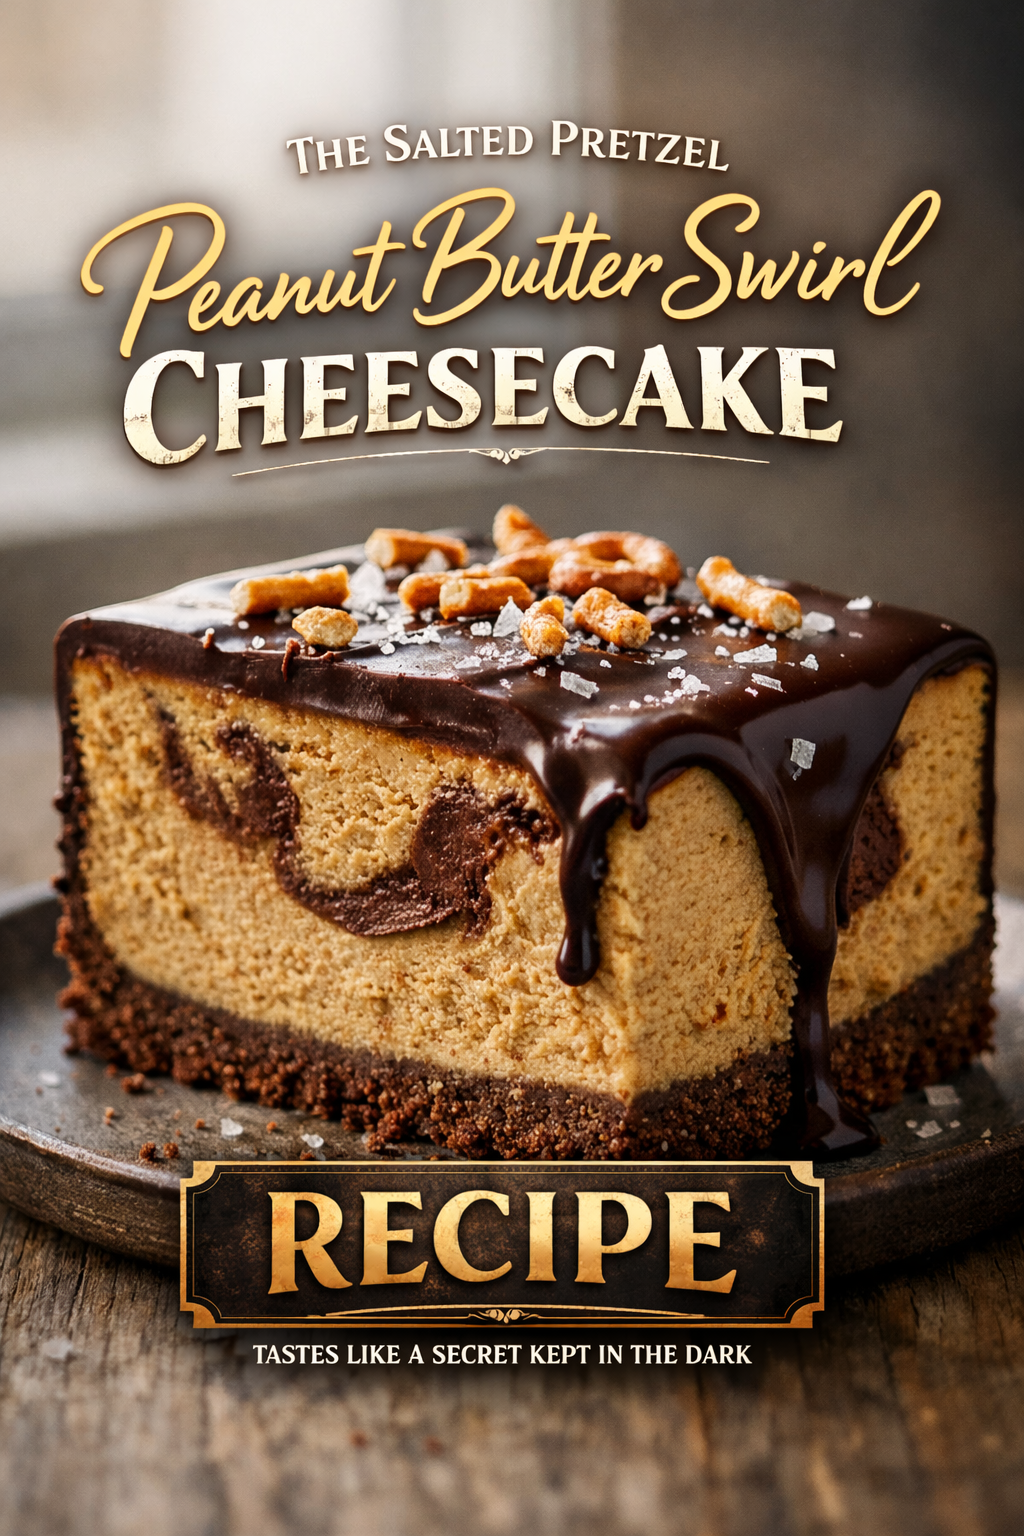
The Swirl That Steals the Room: Salted Biscoff Cookie Butter Cheesecake
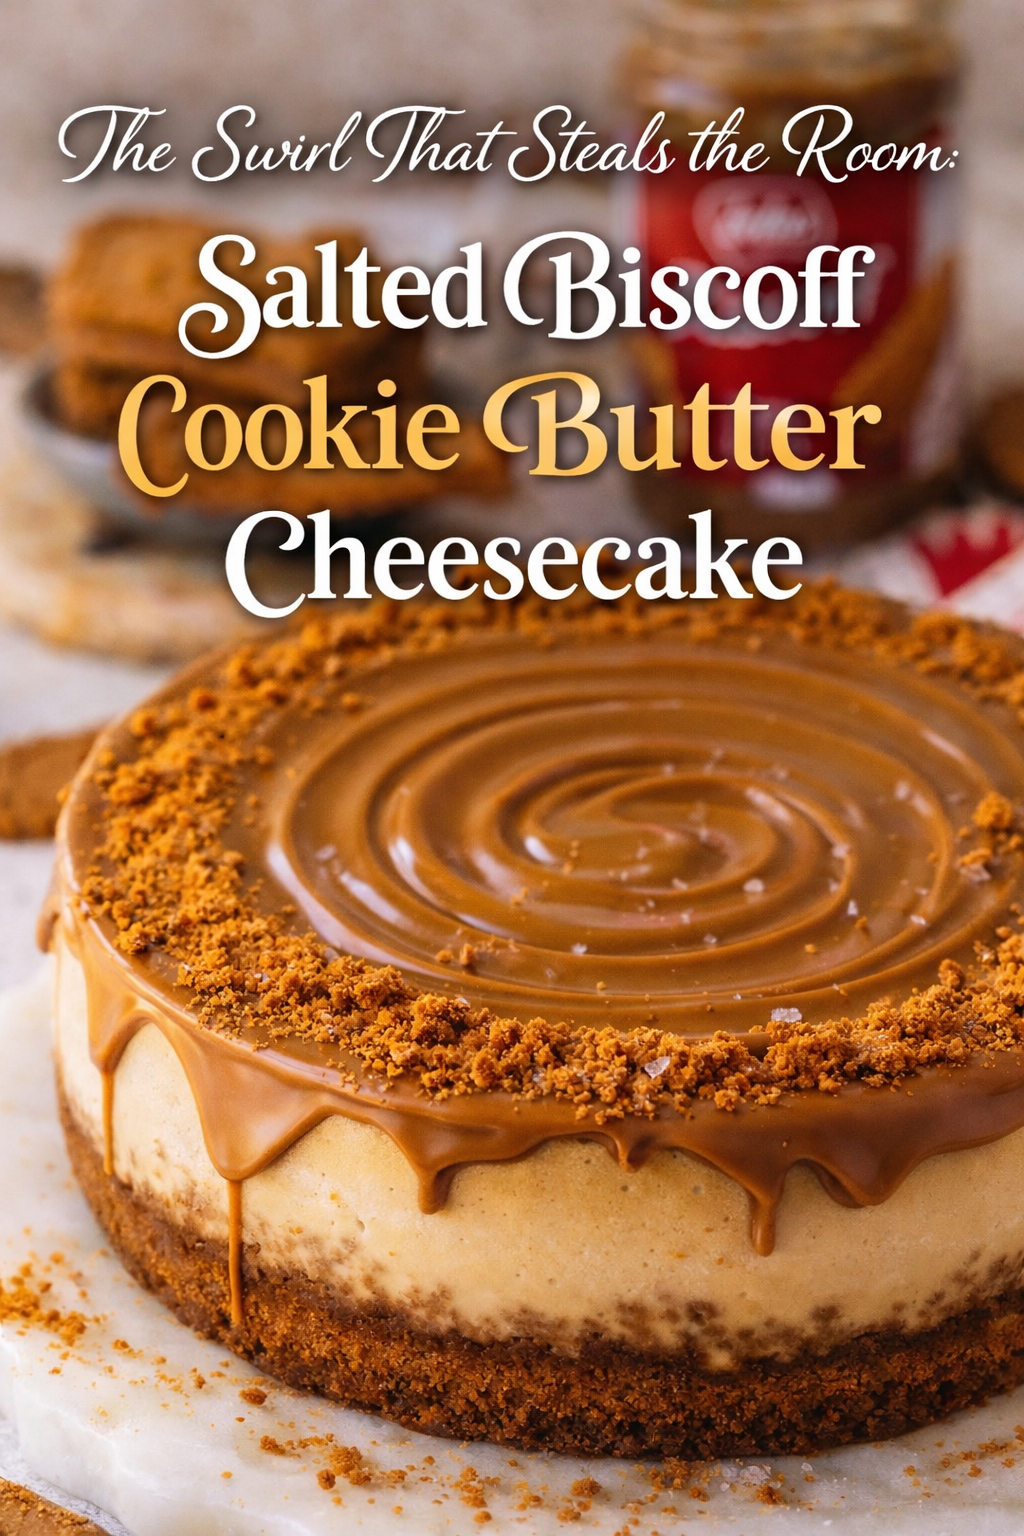
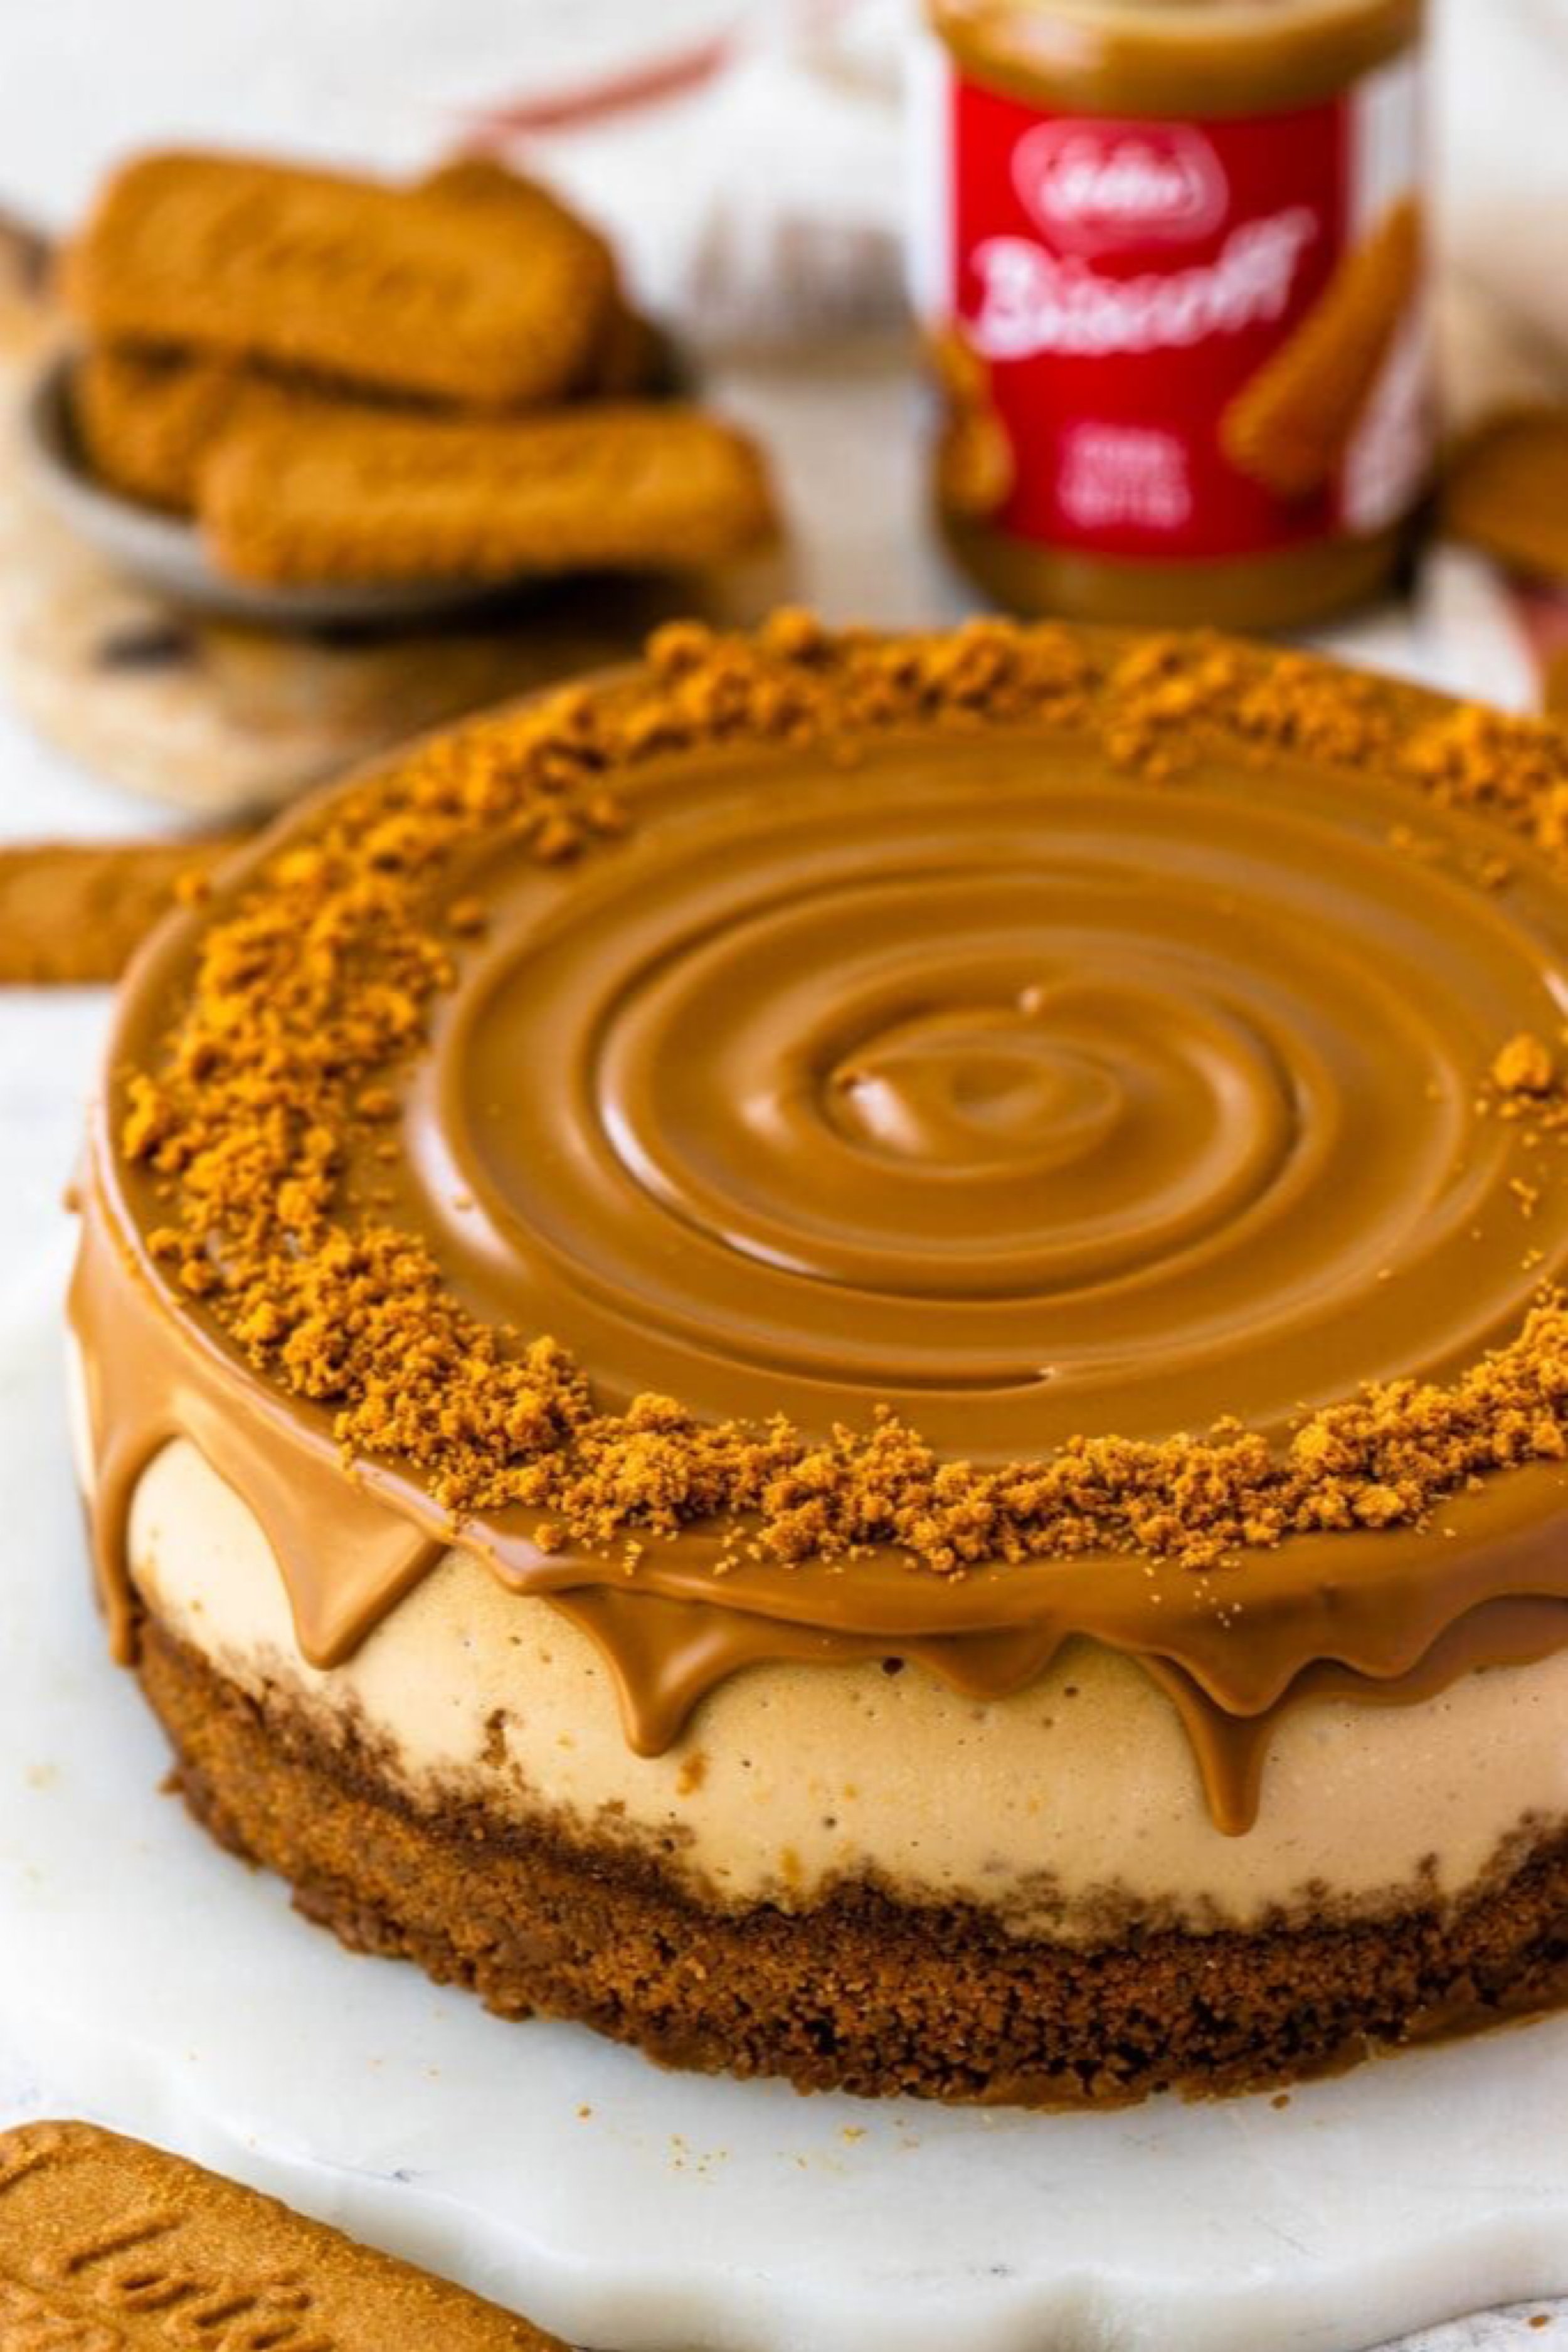
The first thing you notice is the gloss—an amber lake of cookie-butter glaze pooling into a perfect spiral, as if it was stirred in slow motion and then told to hold that pose forever. Light catches the surface and turns it molten, not quite caramel, not quite honey, but something warmer and deeper, the color of late-afternoon sun slipping through kitchen curtains. Around the edge, a rough halo of crushed cookies clings like a sugared shoreline, promising crunch before you even lift a fork. The drip is deliberate: thick ribbons sliding down the sides in soft curves, stopping just short of the plate as if the cake knows exactly how dramatic it’s allowed to be.
Beneath that glossy crown, the cheesecake itself is pale and plush—tinted ever so slightly by the cookie butter folded into the batter. It looks dense in the way a luxury blanket feels heavy: comforting, substantial, and absolutely not apologizing for it. The crust is a darker band at the base, pressed and packed with fine crumbs that read as toasted and spiced even before you taste them. It’s the kind of dessert that doesn’t just sit on the counter; it occupies the room, turning an ordinary afternoon into an occasion.
In the background, the scene hints at the ritual behind the beauty: a jar of spread waiting like a secret weapon, and a small stack of cookies that feel both nostalgic and mischievous—snackable on their own, but even better when crushed into something celebratory. You can almost hear the quiet sounds of making: the low hum of a mixer, the soft thud of a pan on the counter, the tap-tap of crumbs falling where they please. There’s a particular satisfaction in desserts that look composed but feel generous, and this one lives exactly there—polished enough for a dinner party, intimate enough for a fork-straight-from-the-fridge midnight moment.
Cookie butter has a way of pulling you into memory without giving you a single clear story. It tastes like spice cupboards and bakery air, like cinnamon drifting into brown sugar, like toasted wheat and vanilla. It’s sweet, yes, but it’s also warmly spiced, with a faint edge of salt and toast that keeps it from becoming one-note. When it meets cheesecake—cool, tangy, and creamy—it turns the whole experience into contrast: the brightness of cream cheese against the deep, toasty sweetness of cookies; the snap of crust against the hush of filling; the glossy glaze against the matte softness of the cake underneath.
If you’ve ever wanted a dessert that feels like a signature without demanding professional-level stress, this is the one to keep in your back pocket. It rewards patience more than talent, and it’s built on a few simple moves done carefully: a crust pressed tight, a batter mixed gently, a bake that finishes slowly, and a chill that does the final magic. Even the tools feel like part of the mood—your trusty springform pan, a sturdy bowl, a mixer that doesn’t mind working a little, and a spatula that makes you feel like you know what you’re doing. If your kitchen could use a small upgrade before you start, a few smart staples make everything smoother—like a reliable springform pan set for cheesecakes, parchment rounds that line pans cleanly, and an instant-read thermometer for perfect doneness.
There’s also something quietly luxurious about the way this cheesecake holds its shape. That comes from the structure: enough fat and protein to set firm, enough gentle heat to avoid curdling, enough cooling time to let everything settle into itself. It’s the kind of dessert that slices with confidence—clean wedge, defined layers, a little sheen on the knife. You can dress it up or keep it simple. Add extra crumbs for texture. Finish with flaky salt to sharpen the sweetness. Or lean into the drama with a thicker glaze that drips like a curtain call.
The best part is how it tastes the next day. The spices bloom. The filling tightens into that ideal texture—creamy but not loose, rich but not cloying. The crust stays crisp enough to contrast, especially if you baked it briefly and sealed it with fat before filling. It becomes the dessert you keep thinking about while you’re doing other things: answering texts, folding laundry, rinsing a coffee mug. One more bite. One more sliver. Just enough to reset the day.
And that’s what this cheesecake really is: a reset. A warm-spiced, chilled, glossy-topped reminder that comfort can still look stunning. The swirl on top isn’t just decoration—it’s a promise that something soothing is waiting, already finished, already perfect, already ready to be shared. If you want that kind of certainty in your fridge, gather your ingredients, clear a little counter space, and let the kitchen go quiet. The rest is just rhythm—crumb, press, mix, pour, bake, chill—until the swirl becomes the moment everyone remembers.
For an extra-smooth finish that feels bakery-level, it helps to start with the right basics: full-fat cream cheese bricks for rich texture, a good vanilla extract that reads warm and real, and cookie butter spread for that signature flavor. Add in a few smart supports—like a stand mixer or hand mixer with strong power and a sturdy roasting pan for a water bath—and the whole process feels calm, controlled, and oddly soothing.
Because when the final chill is done and you release the pan, there’s a particular kind of satisfaction: the clean edge, the set center, the glossy top that looks like you planned it weeks ago. You didn’t. You just followed the steps, trusted the slow moments, and let the swirl do what it does best—steal the room.
A chilled, warmly spiced cheesecake with a cookie-crumb crust and a glossy cookie-butter topping—rich, sliceable, and built for clean wedges.
Ingredients
Crust
- 2 1/4 cups speculoos-style cookie crumbs (about 26–30 cookies)
- 6 tbsp unsalted butter, melted
- 2 tbsp brown sugar
- 1/4 tsp fine salt
Filling
- 24 oz full-fat cream cheese, room temperature
- 1 cup cookie butter spread
- 3/4 cup granulated sugar
- 1/2 cup sour cream, room temperature
- 2 tbsp heavy cream
- 1 tbsp vanilla extract
- 3 large eggs, room temperature
- 1 tbsp cornstarch
- 1/4 tsp fine salt
Topping
- 3/4 cup cookie butter spread
- 2–4 tbsp heavy cream (to loosen)
- 1/3 cup cookie crumbs for the rim (optional)
- Flaky salt (optional)
Method
- Heat oven to 325°F. Wrap the outside of a 9-inch springform pan with foil (for water bath insurance). Line the bottom with parchment.
- Make crust: mix crumbs, melted butter, brown sugar, and salt. Press firmly into the bottom and slightly up the sides. Bake 10 minutes. Cool.
- Make filling: beat cream cheese smooth, then blend in cookie butter and sugar. Mix in sour cream, heavy cream, vanilla, cornstarch, and salt. Add eggs one at a time on low, mixing just until combined.
- Pour batter over crust. Bake in a water bath (pan set inside a larger pan with hot water) for 60–75 minutes, until edges are set and center still gently wobbles.
- Turn oven off, crack door, and rest cheesecake 45 minutes. Cool to room temp, then chill at least 6 hours (overnight best).
- Make topping: warm cookie butter and whisk in enough cream to make it pourable. Spread over chilled cheesecake. Finish with a crumb rim and a pinch of flaky salt if desired.
1) Build a crust that stays crisp
Start by turning cookies into fine crumbs. A food processor makes it effortless, but you can also crush them in a zip-top bag with a rolling pin—just aim for an even, sandy texture so the crust packs tightly. If you want the fastest route to uniform crumbs, a compact food processor for cookie crusts is one of those small tools that pays for itself quickly.
Melt your butter and stir it through the crumbs with brown sugar and salt until everything looks like damp beach sand. The key is pressure: press the mixture into the pan firmly, especially around the edges, so it doesn’t crumble when sliced. A flat-bottomed measuring cup works perfectly as a tamper. Lining the bottom with parchment rounds that release cleanly makes transferring slices and serving feel tidy and confident.
Bake the crust briefly. That ten minutes does two things: it sets the butter so the crust holds, and it toasts the crumbs so the flavor deepens. Let it cool while you mix the filling.
2) Mix for silk, not fluff
Cheesecake texture comes down to air control. You want a batter that’s smooth and cohesive, not whipped. Begin with room-temperature cream cheese—cold cream cheese forces you to overmix, which traps air bubbles and can lead to cracking. If you’re planning ahead, set the bricks out for an hour. For the creamiest base, use full-fat cream cheese bricks rather than tub-style spreads.
Beat the cream cheese just until smooth, scraping the bowl often. Then add cookie butter. It will look luxurious immediately—thicker, darker, and deeply aromatic. If your cookie butter is extra firm, warm it for a few seconds so it blends without effort. This is where a dependable mixer helps; even a strong hand mixer can handle it, and a sturdy 5-speed hand mixer gives you control to slow down when it matters.
Add sugar, then sour cream, a splash of heavy cream, vanilla, cornstarch, and salt. The cornstarch is quiet insurance: it helps the cheesecake set with a slightly more stable structure, reducing the odds of weeping or over-soft slices. The vanilla matters more than people think—choose something you actually like the smell of, because it threads through every bite. A good option is simply pure vanilla extract.
Finally, add the eggs one at a time on low speed. Stop mixing the moment each egg disappears. Overmixing at this stage is the most common reason cheesecakes rise too high, puff, then fall. You’re aiming for a batter that pours like satin.
3) The water bath is your calm, even heat
A gentle bake is everything. Cheesecake hates harsh temperature swings. A water bath buffers the heat so the edges don’t overcook before the center sets. Wrap your springform pan in heavy foil (or double-wrap standard foil), then place it in a larger roasting pan. Pour hot water into the roasting pan until it comes about halfway up the sides of the springform.
If you don’t have a roasting pan, this is a great excuse to grab one you’ll use forever—a deep roasting pan that fits a water bath makes the whole process steadier and less stressful. Carefully slide everything into the oven at 325°F.
Bake until the edges are set and the center still has a gentle wobble—think “Jell-O shimmy,” not liquid slosh. Depending on your oven and pan, that’s usually 60–75 minutes. If you want precision, the center should land around 150°F. Using an instant-read thermometer takes the guesswork out and helps you avoid overbaking, which is the fastest route to dryness.
4) Cool slowly to prevent cracks
When the timer hits your target, turn the oven off and crack the door. Let the cheesecake rest inside for about 45 minutes. This gradual cooldown prevents the dramatic contraction that can split the top. After that, move it to the counter and cool completely at room temperature.
Resist the urge to chill it early. Trapping steam under refrigeration while it’s still warm can create condensation and a gummy top. Once it’s fully cool, refrigerate at least 6 hours—overnight is ideal. That long chill is where the texture becomes slice-perfect.
5) Make the glossy cookie-butter glaze
The topping should pour, not glop. Warm cookie butter gently until it’s fluid, then whisk in heavy cream a tablespoon at a time until it ribbons off the spoon. Different brands vary in thickness, so let the texture guide you. If you’re stocking up, cookie butter spread is worth having on hand for both baking and emergency spoonfuls.
Pour the glaze onto the cold cheesecake and use an offset spatula to guide it toward the edges. Want that dramatic drip? Push a little extra glaze near the rim and let gravity do the styling. If you love neat finishing touches, a small offset spatula makes the top look intentional without scraping or tearing.
Press cookie crumbs around the edge for that textured halo. Finish with a pinch of flaky salt if you like the sweet-salty contrast—it makes the spices pop and keeps each bite from feeling too sweet.
6) Slicing like a bakery case
For clean wedges, use a long knife warmed under hot water, then wiped dry. Slice straight down—no sawing—and wipe the blade between cuts. This tiny habit is what makes your slices look composed. Serve cold for sharpest structure, or let it sit 10 minutes for a softer, creamier mouthfeel.
Variations that keep it exciting
- No-water-bath approach: Bake at 300°F and place a pan of hot water on the rack below to add humidity. Texture may be slightly less silky, but still excellent.
- Extra spice: Add 1/2 tsp cinnamon to the filling for a warmer profile.
- Tangier finish: Increase sour cream to 3/4 cup and reduce heavy cream to 1 tbsp.
- Thicker topping: Use less cream so the glaze sits higher and drips slower.
Troubleshooting, fast
- Cracks: Usually overbaked or cooled too quickly. Next time, stop earlier and cool slower in the oven.
- Gritty batter: Cream cheese was too cold. Let it fully soften before mixing.
- Soft center after chilling: It likely needed 5–10 more minutes of bake time, or your fridge wasn’t cold enough. A thermometer check at 150°F solves this reliably.
When it’s done right, you’ll get exactly what the image promises: a cookie-crumb crust that snaps, a filling that tastes like warm spice wrapped in cream, and a glossy swirl on top that looks like it was poured with intention—because it was.