How to Build a Pollinator Patch in a Small Space (That Bees and Butterflies Actually Use)
How to Build a Pollinator Patch in a Small Space (That Bees and Butterflies Actually Use)
Hook + Why It Matters
A pollinator patch doesn’t need a meadow-sized yard to feel alive. Even a modest corner—along a fence, beside a patio, or around a tiny path—can become the kind of place where bees zig-zag with purpose and butterflies drift in like they’ve been invited. The trick isn’t “more plants.” It’s smarter plants, timed blooms, and a layout that makes pollinators want to stay.
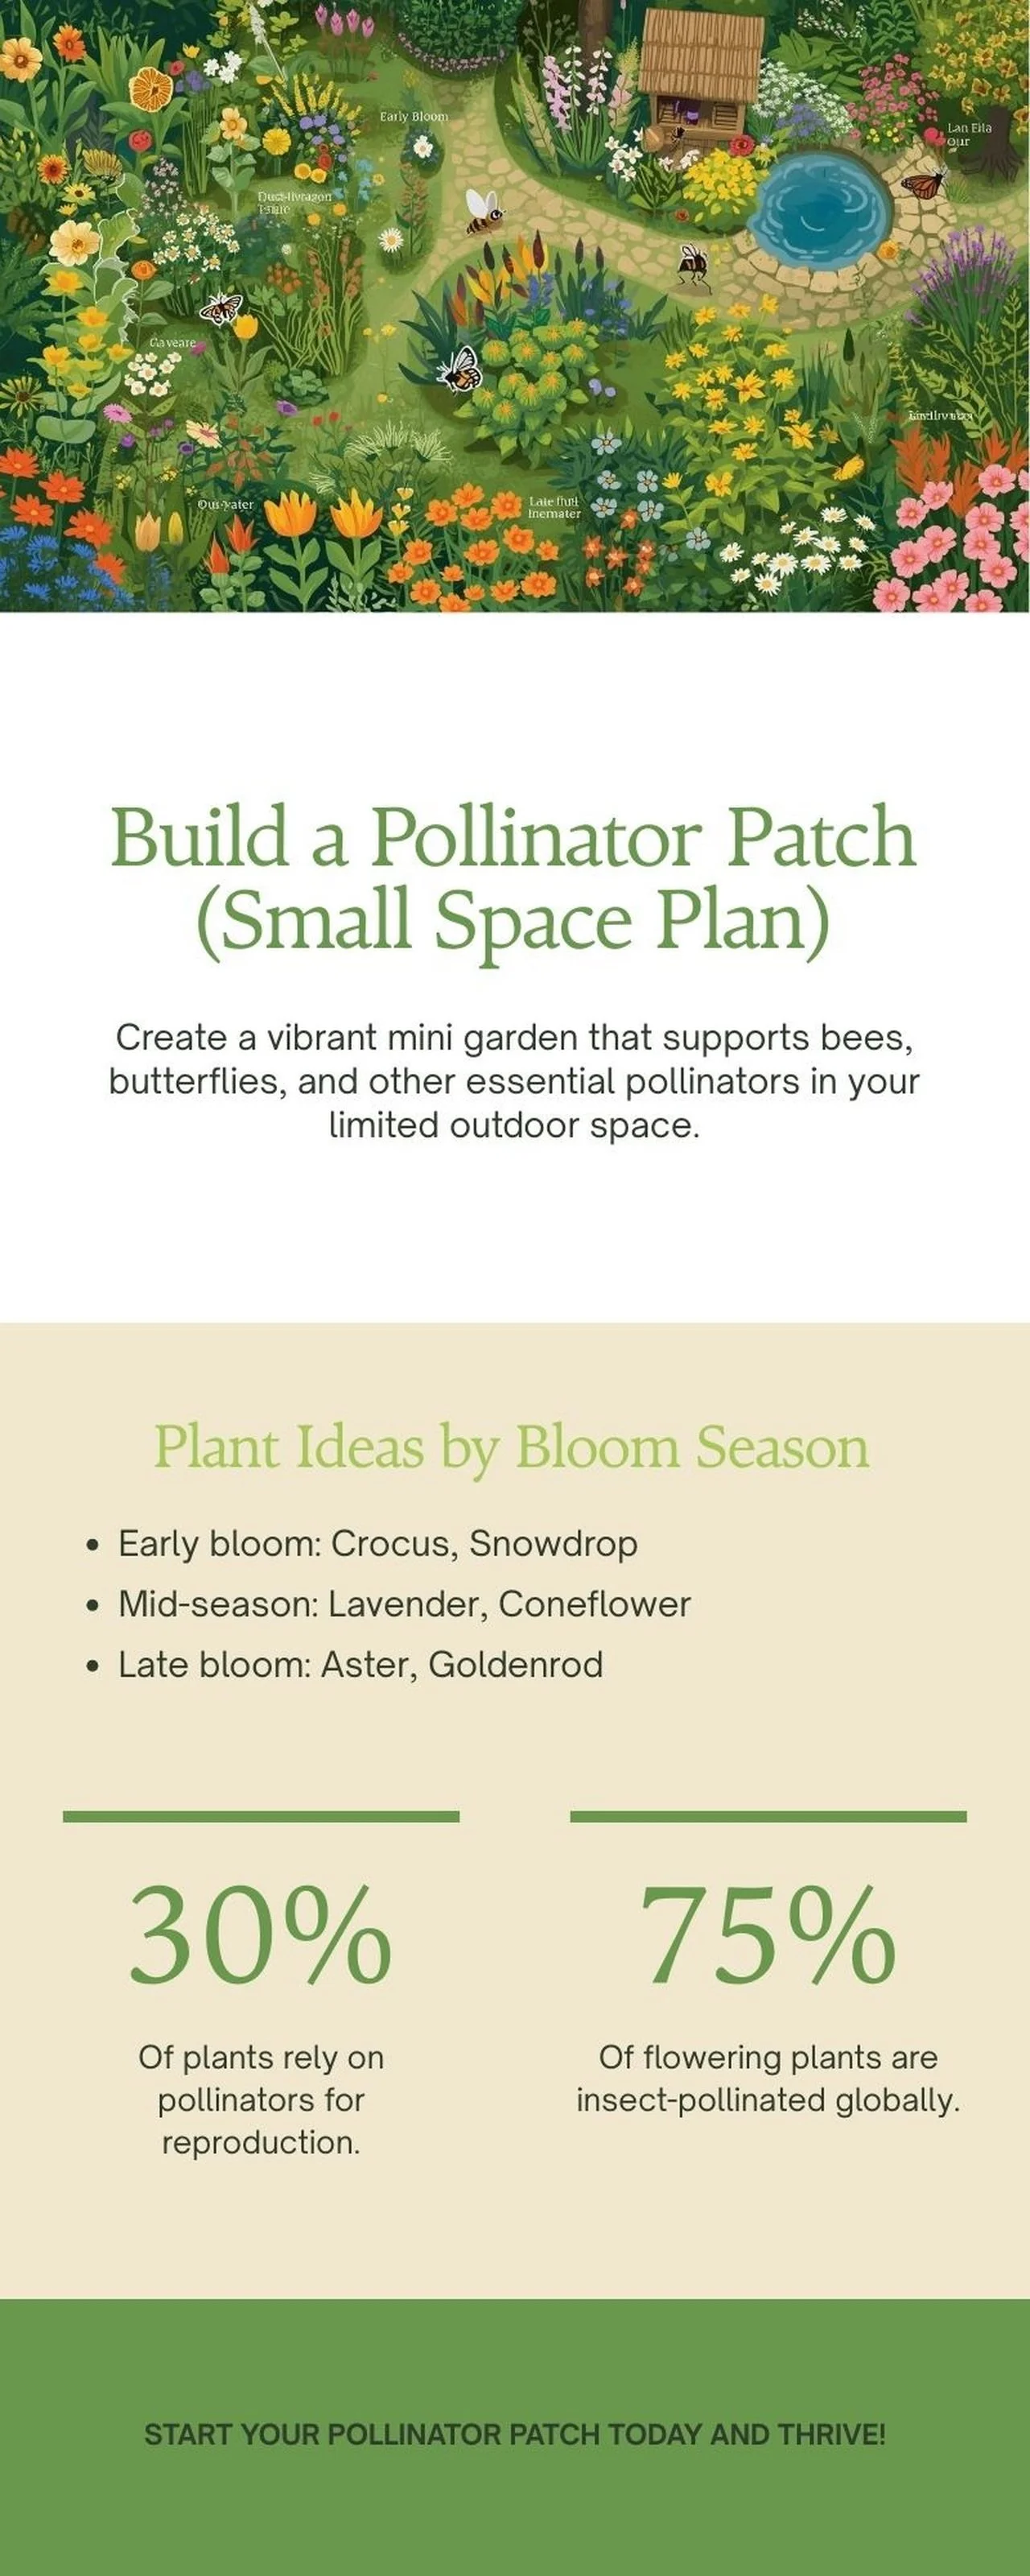
The stakes are bigger than curb appeal. This infographic highlights two simple realities: 30% of plants rely on pollinators for reproduction, and 75% of flowering plants are insect-pollinated globally. When pollinators have reliable food in your space, your garden becomes more resilient, more productive, and more vibrant—season after season. The best part? A small-space plan can be incredibly effective because every plant is intentional. You’re not guessing. You’re building a tiny habitat on purpose.
At-a-Glance Summary
- You can build a mini pollinator garden in limited outdoor space.
- The key is bloom coverage across early, mid, and late season.
- Early bloom: Crocus and Snowdrop get your patch started.
- Mid-season: Lavender and Coneflower carry the “main show.”
- Late bloom: Aster and Goldenrod extend support into the back half of the season.
- Plant in clusters, not scattered singles, so pollinators can feed efficiently.
- Design the patch like a mini destination—layered planting + a small access path.
- Pollinators are essential: 30% of plants rely on them for reproduction.
- Globally, 75% of flowering plants are insect-pollinated.
Plant Ideas by Bloom Season (Your Simple “Always Blooming” Plan)
The infographic’s smartest takeaway is also the easiest to execute: choose plants by bloom season. In a small space, you don’t win by cramming in variety—you win by making sure something is blooming at all times.
Early Bloom: Crocus + Snowdrop
Early flowers are the “open sign” for your patch. When the season is just waking up, these blooms stand out because there’s less competition.
What the infographic is telling you
- Use Crocus and Snowdrop as your early-season starters.
What to do next
- Plant them in tight clumps so they read as a real food source.
- Tuck them near your edge or path so you can enjoy the first color of the year.
- Think “repeatable pockets” rather than a thin scatter across the whole bed.
Common mistakes to avoid
- Planting bulbs one-by-one instead of in groups.
- Spreading them too far apart (it looks sparse and doesn’t help foraging efficiency).
- Treating early bloomers as optional—this is how you extend the season.
A dedicated bulb planting tool makes it much easier to plant neat clusters quickly without tearing up your whole bed.
Mid-Season: Lavender + Coneflower
Mid-season is when your patch becomes a destination. These are the plants that make the space look lush, and they’re consistent performers for pollinators.
What the infographic is telling you
- Use Lavender and Coneflower as your mid-season backbone.
What to do next
- Plant in clusters (multiple of the same plant together).
- Repeat those clusters in 2–3 spots so your patch looks cohesive.
- Give coneflowers room to fill in—mid-season anchors look better with time.
Common mistakes to avoid
- Mixing everything evenly like confetti (busy-looking and less effective).
- Planting one lavender “as an accent” and expecting big impact.
- Overwatering lavender—aim for consistent moisture, not soggy soil.
You’ll keep lavender tidy and blooming better with a sharp pair of garden pruning shears for quick snips and cleanup.
Late Bloom: Aster + Goldenrod
Late bloomers are the move that separates a “cute summer flower bed” from a true pollinator patch. When other gardens fade, your patch keeps feeding visitors.
What the infographic is telling you
- Finish strong with Aster and Goldenrod.
What to do next
- Place them toward the back or center so they can add height without crowding the edge.
- Let them carry the late-season color so the patch stays relevant longer.
- Resist the urge to cut everything down early—late blooms are part of the plan.
Common mistakes to avoid
- Stopping after mid-season plants and calling it done.
- Cutting back too early and losing late-season flowers.
- Planting late bloomers too far away from the rest of the patch (keep it compact).
If you want a budget-friendly way to expand your late-season section, try starting with aster seeds and building up the patch year over year.
Design the Patch Like a Mini Habitat (Not Just “Some Flowers”)
The infographic’s illustrated layout has a few subtle cues that make it feel magical: dense planting, layered height, and a little path that invites you in. That’s not just aesthetic—access matters, because small spaces need simple maintenance.
What the infographic is showing you
- A compact garden that feels like a tiny destination, complete with a winding path and dense blooms.
What to do next
- Add a simple access line: stepping stones, a narrow mulch strip, or a small curved path.
- Plant in layers: shorter flowers in front, taller toward the back.
- Keep open pockets so you can water and weed without stepping on plants.
Common mistakes to avoid
- Leaving no access and then crushing plants during upkeep.
- Planting everything the same height (it looks flat and smaller).
- Leaving too much bare soil (dries out faster and looks unfinished).
A small set of garden stepping stones can instantly give your patch that “mini garden walk” feel without a big hardscape project.
Plant in Clusters and Repeat (The Small-Space Secret to “Vibrant”)
Small beds get chaotic fast. Repetition is how you keep it vibrant without turning it into visual noise—and it also helps pollinators forage efficiently.
What the infographic implies
- The illustrated garden is made of distinct pockets of flowers, not a single mixed row.
What to do next
- Pick one early bloomer, two mid-season anchors, and one late bloomer.
- Plant each in clusters and repeat the clusters in a few spots.
- Let mid-season plants do most of the visual heavy lifting.
Common mistakes to avoid
- Buying one of everything (it becomes a “sample pack” garden).
- No repetition (the patch looks random from a distance).
- Planting single stems and expecting a “patch” effect.
If you’re mapping a small bed, garden plant labels save you from the mid-season mystery of “what did I plant here again?”
Keep It Pollinator-Friendly With Simple, Practical Care
Pollinators show up when the patch is reliable. Your job is consistency—steady blooms, reasonable moisture, and minimal disruption.
What the infographic emphasizes
- This patch is meant to support bees, butterflies, and other essential pollinators—so it’s about function as much as beauty.
What to do next
- Water thoughtfully during dry stretches, especially while plants establish.
- Avoid turning the bed into a constant “redo” project—pollinators like stability.
- Maintain blooms by light pruning and tidy deadheading where appropriate.
Common mistakes to avoid
- Letting the patch repeatedly dry to dust (blooms suffer and visitors move on).
- Overwatering lavender and drowning roots.
- Going too big too fast—start tight, then expand.
For gentle, targeted watering that won’t flatten blooms, a watering wand is a small upgrade that makes a big difference in tiny spaces.
Quick Start Checklist
- Choose your early bloomers: Crocus and/or Snowdrop
- Choose your mid-season anchors: Lavender and Coneflower
- Choose your late bloomers: Aster and/or Goldenrod
- Plant everything in clusters, not scattered singles
- Repeat your strongest plants in 2–3 pockets
- Add a simple access strip or stepping stones
- Water consistently while plants establish
- Let late blooms run longer into fall when possible
FAQ
How small can a pollinator patch be and still work?
Very small. What matters most is continuous blooms (early → mid → late) and clustered planting so pollinators can feed efficiently.
Do I need all three bloom seasons?
If you want the patch to actually function as a pollinator resource, yes. The infographic’s plant list is built specifically to provide coverage across the season.
Should I plant single flowers or groups?
Groups. Clusters are easier for pollinators to forage and they make a small patch look fuller and more intentional.
What’s the easiest way to make a small patch feel bigger?
Add a simple path or access line and plant in layers. That creates depth, structure, and a “garden room” feel even in tight spaces.
Can I do this in a narrow strip along a walkway?
Absolutely. A strip can work beautifully if you repeat plants and prioritize bloom timing instead of stuffing in too many varieties.
When should I start?
Start as soon as you can plant for the next bloom window. Early bloomers kick off the season, mid-season anchors build the main show, and late bloomers extend the patch’s usefulness.
What if I only want a few plants total?
Choose one from each season group and repeat them. A simple set (early + mid + late) can outperform a crowded mix that only blooms for a short window.
Conclusion + Next Step
A small-space pollinator patch is one of the simplest ways to make your garden feel alive while supporting essential pollinators. Follow the infographic’s clean blueprint—early blooms (Crocus, Snowdrop), mid-season anchors (Lavender, Coneflower), and late-season finishers (Aster, Goldenrod)—and you’ll get a patch that stays relevant across the season, not just for a few weeks. The next step is easy: pick your “one-per-season” plant set, plant in clusters, and create one small access path so you can maintain it effortlessly. Start your patch today—and let it thrive.