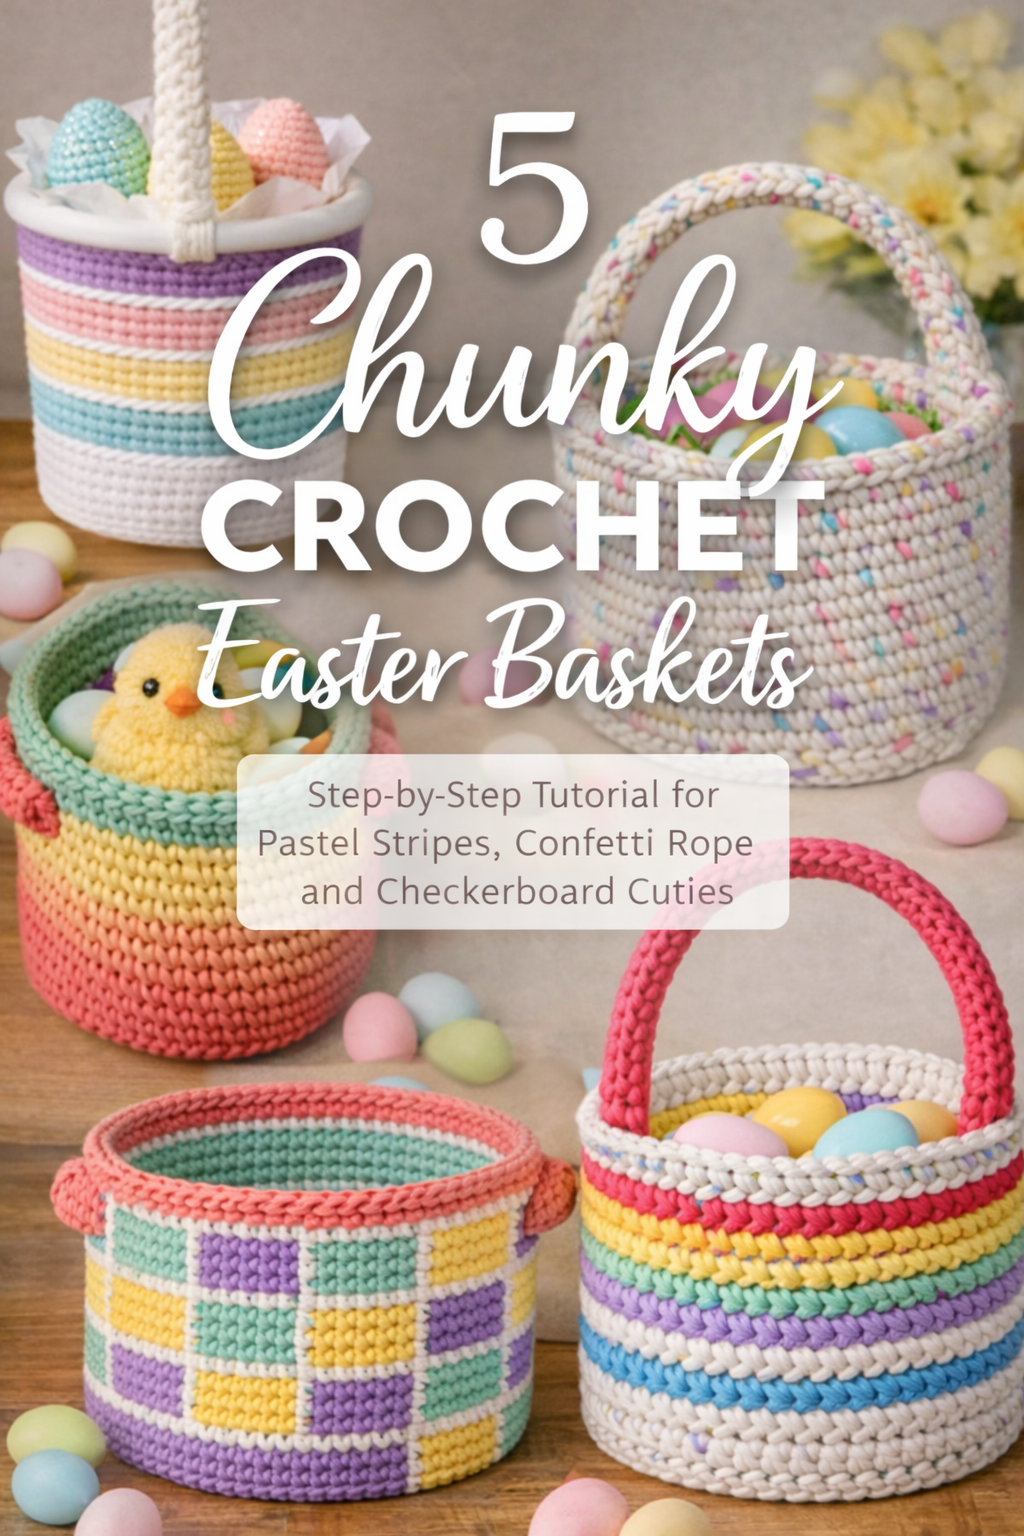
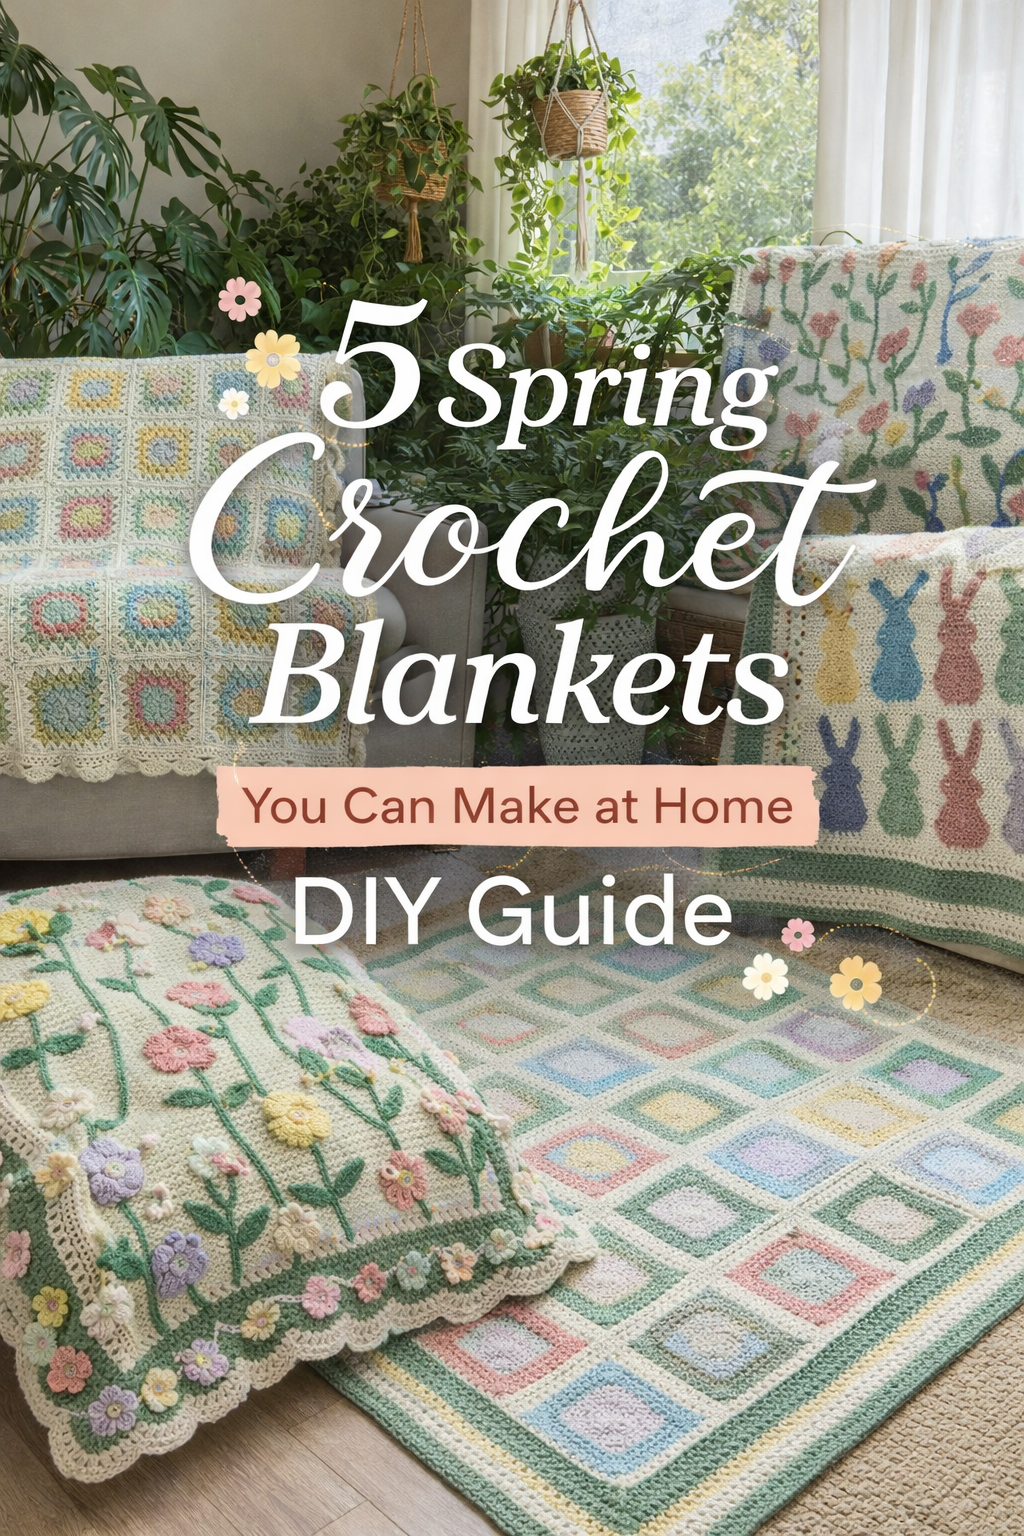
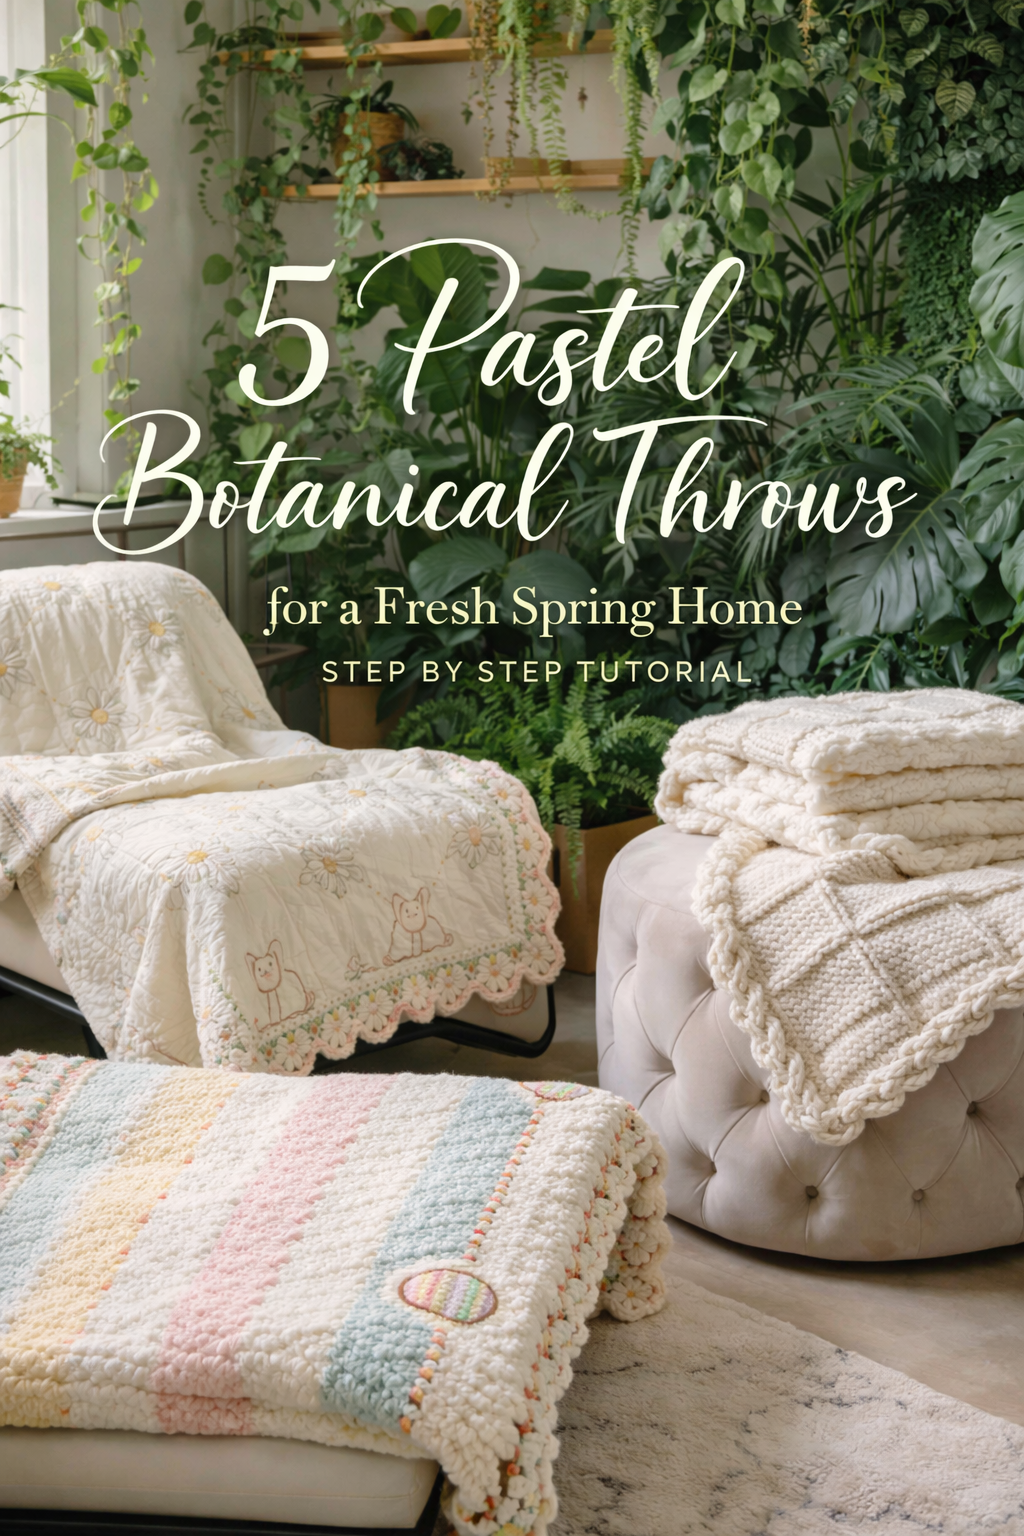
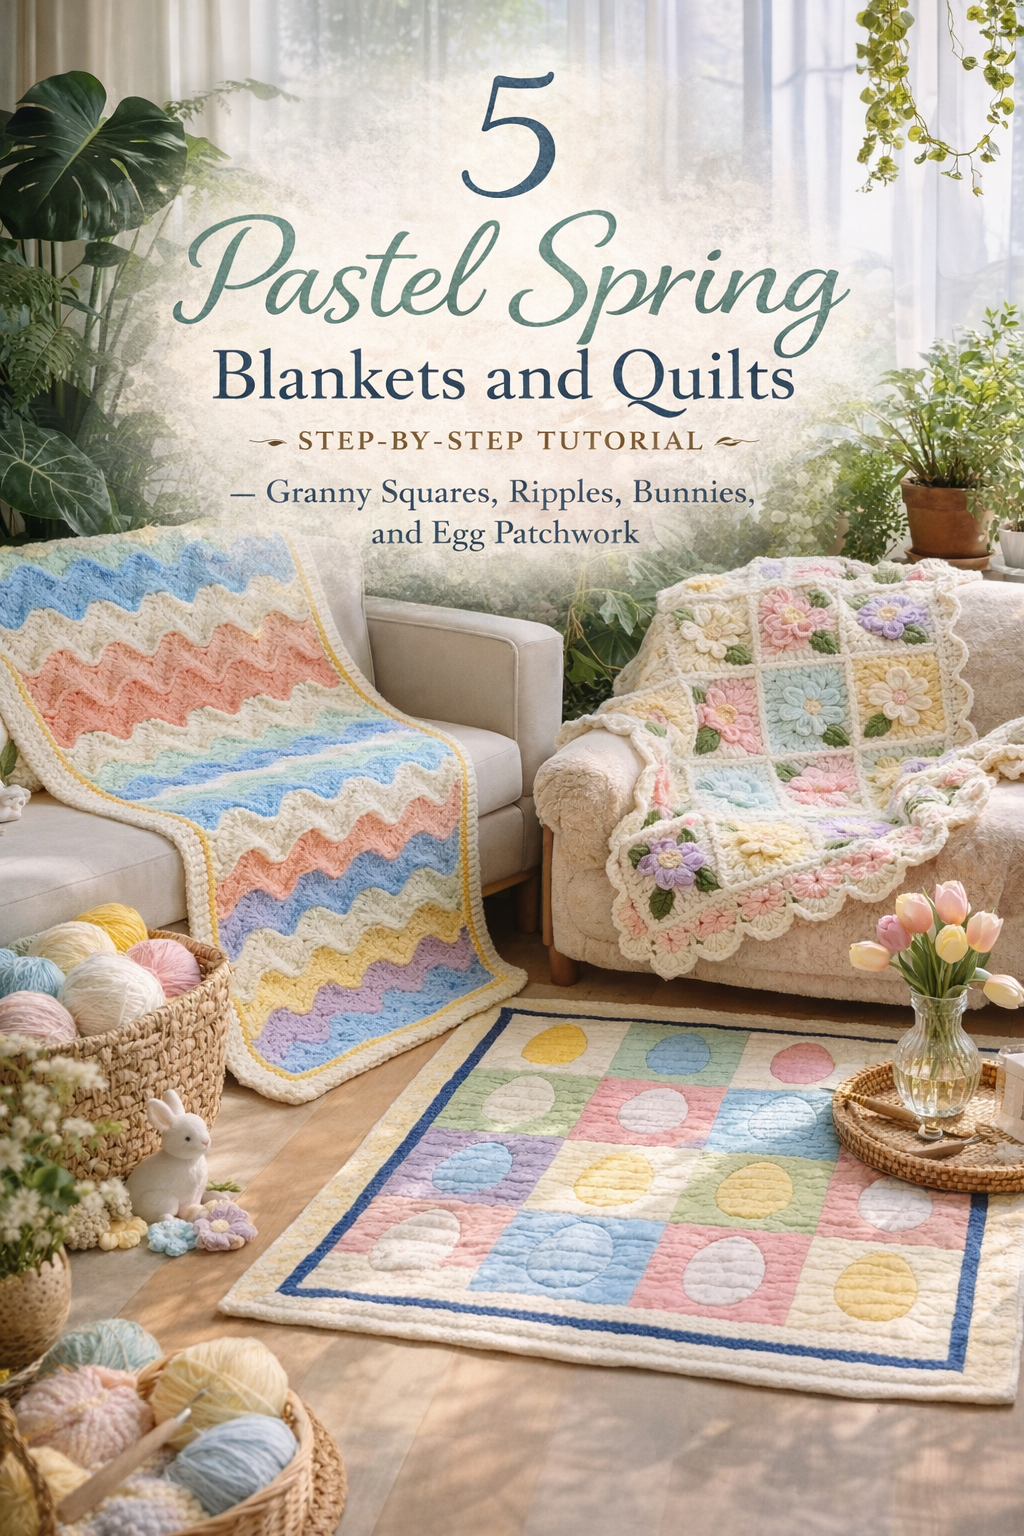
5 Pastel Spring Blankets and Quilts Step-by-Step Tutorial — Granny Squares, Ripples, Bunnies, and Egg Patchwork
More like this
There is something quietly magical about spring color in yarn and cloth. The light pastels, the creamy borders, the soft scallops that look like little waves or petals. These blankets are the kind of projects that make a room feel instantly kinder, like you just opened a window and let the season in. Whether you are team granny square, team ripple, or you love a clean patchwork quilt moment, each design in this set was chosen for one reason: it delivers that fresh, heirloom look without requiring a million complicated techniques.
In the five tutorials ahead, you will recreate the exact vibes you see in the photos. A garden tile throw with tulip embroidery and a scalloped edge. A sunlit ripple blanket with perfectly even waves and a thin accent border that makes it feel finished, not homemade in the best way. A bold bunny and egg patchwork that reads instantly Easter but still looks elevated on a bed. A plush 3D flower granny square blanket that feels like a bouquet you can actually snuggle. And a simple, graphic egg block quilt that works as a play mat, wall quilt, or spring floor piece.
As you work, focus on two things that make these projects look high end: consistency and finishing. Consistent square sizing, tidy joins, clean borders, and a confident block or stitch rhythm. Blocking and weaving ends are not the boring parts, they are the glow up. Pick your palette, settle into the repetition, and let the project become your little seasonal ritual. By the end, you will have a piece that looks like it belongs in a sunroom full of plants, styled casually, and somehow still perfect.
💡 Pro Tip: Why I Link to Amazon Search Results and Not One Product
In the Shop the Look and Style it With sections under each bikini, I link to Amazon search results, not single products. Here’s why this matters:
Hot bikinis sell out fast. I don’t want you clicking on a dead link to a sold-out item. Search pages stay updated.
You get more options. Love the vibe but want a different color, cut, or price point? The search results give you everything that matches the look and energy.
I curate each search carefully. These aren’t generic. I spend hours crafting keywords that bring up exactly the kind of bikinis I’d wear—or recommend to my hottest friends.
Support with no pressure. If you click a link, browse, and buy something later, I may earn a small commission at no extra cost to you. That helps me keep bringing you curated collections like this one—powerful, seductive, and always fresh.
So dive in. Click through. Try something risky. These aren’t just bikinis—they’re commands, statements, and maybe even your new favorite weapon of choice.
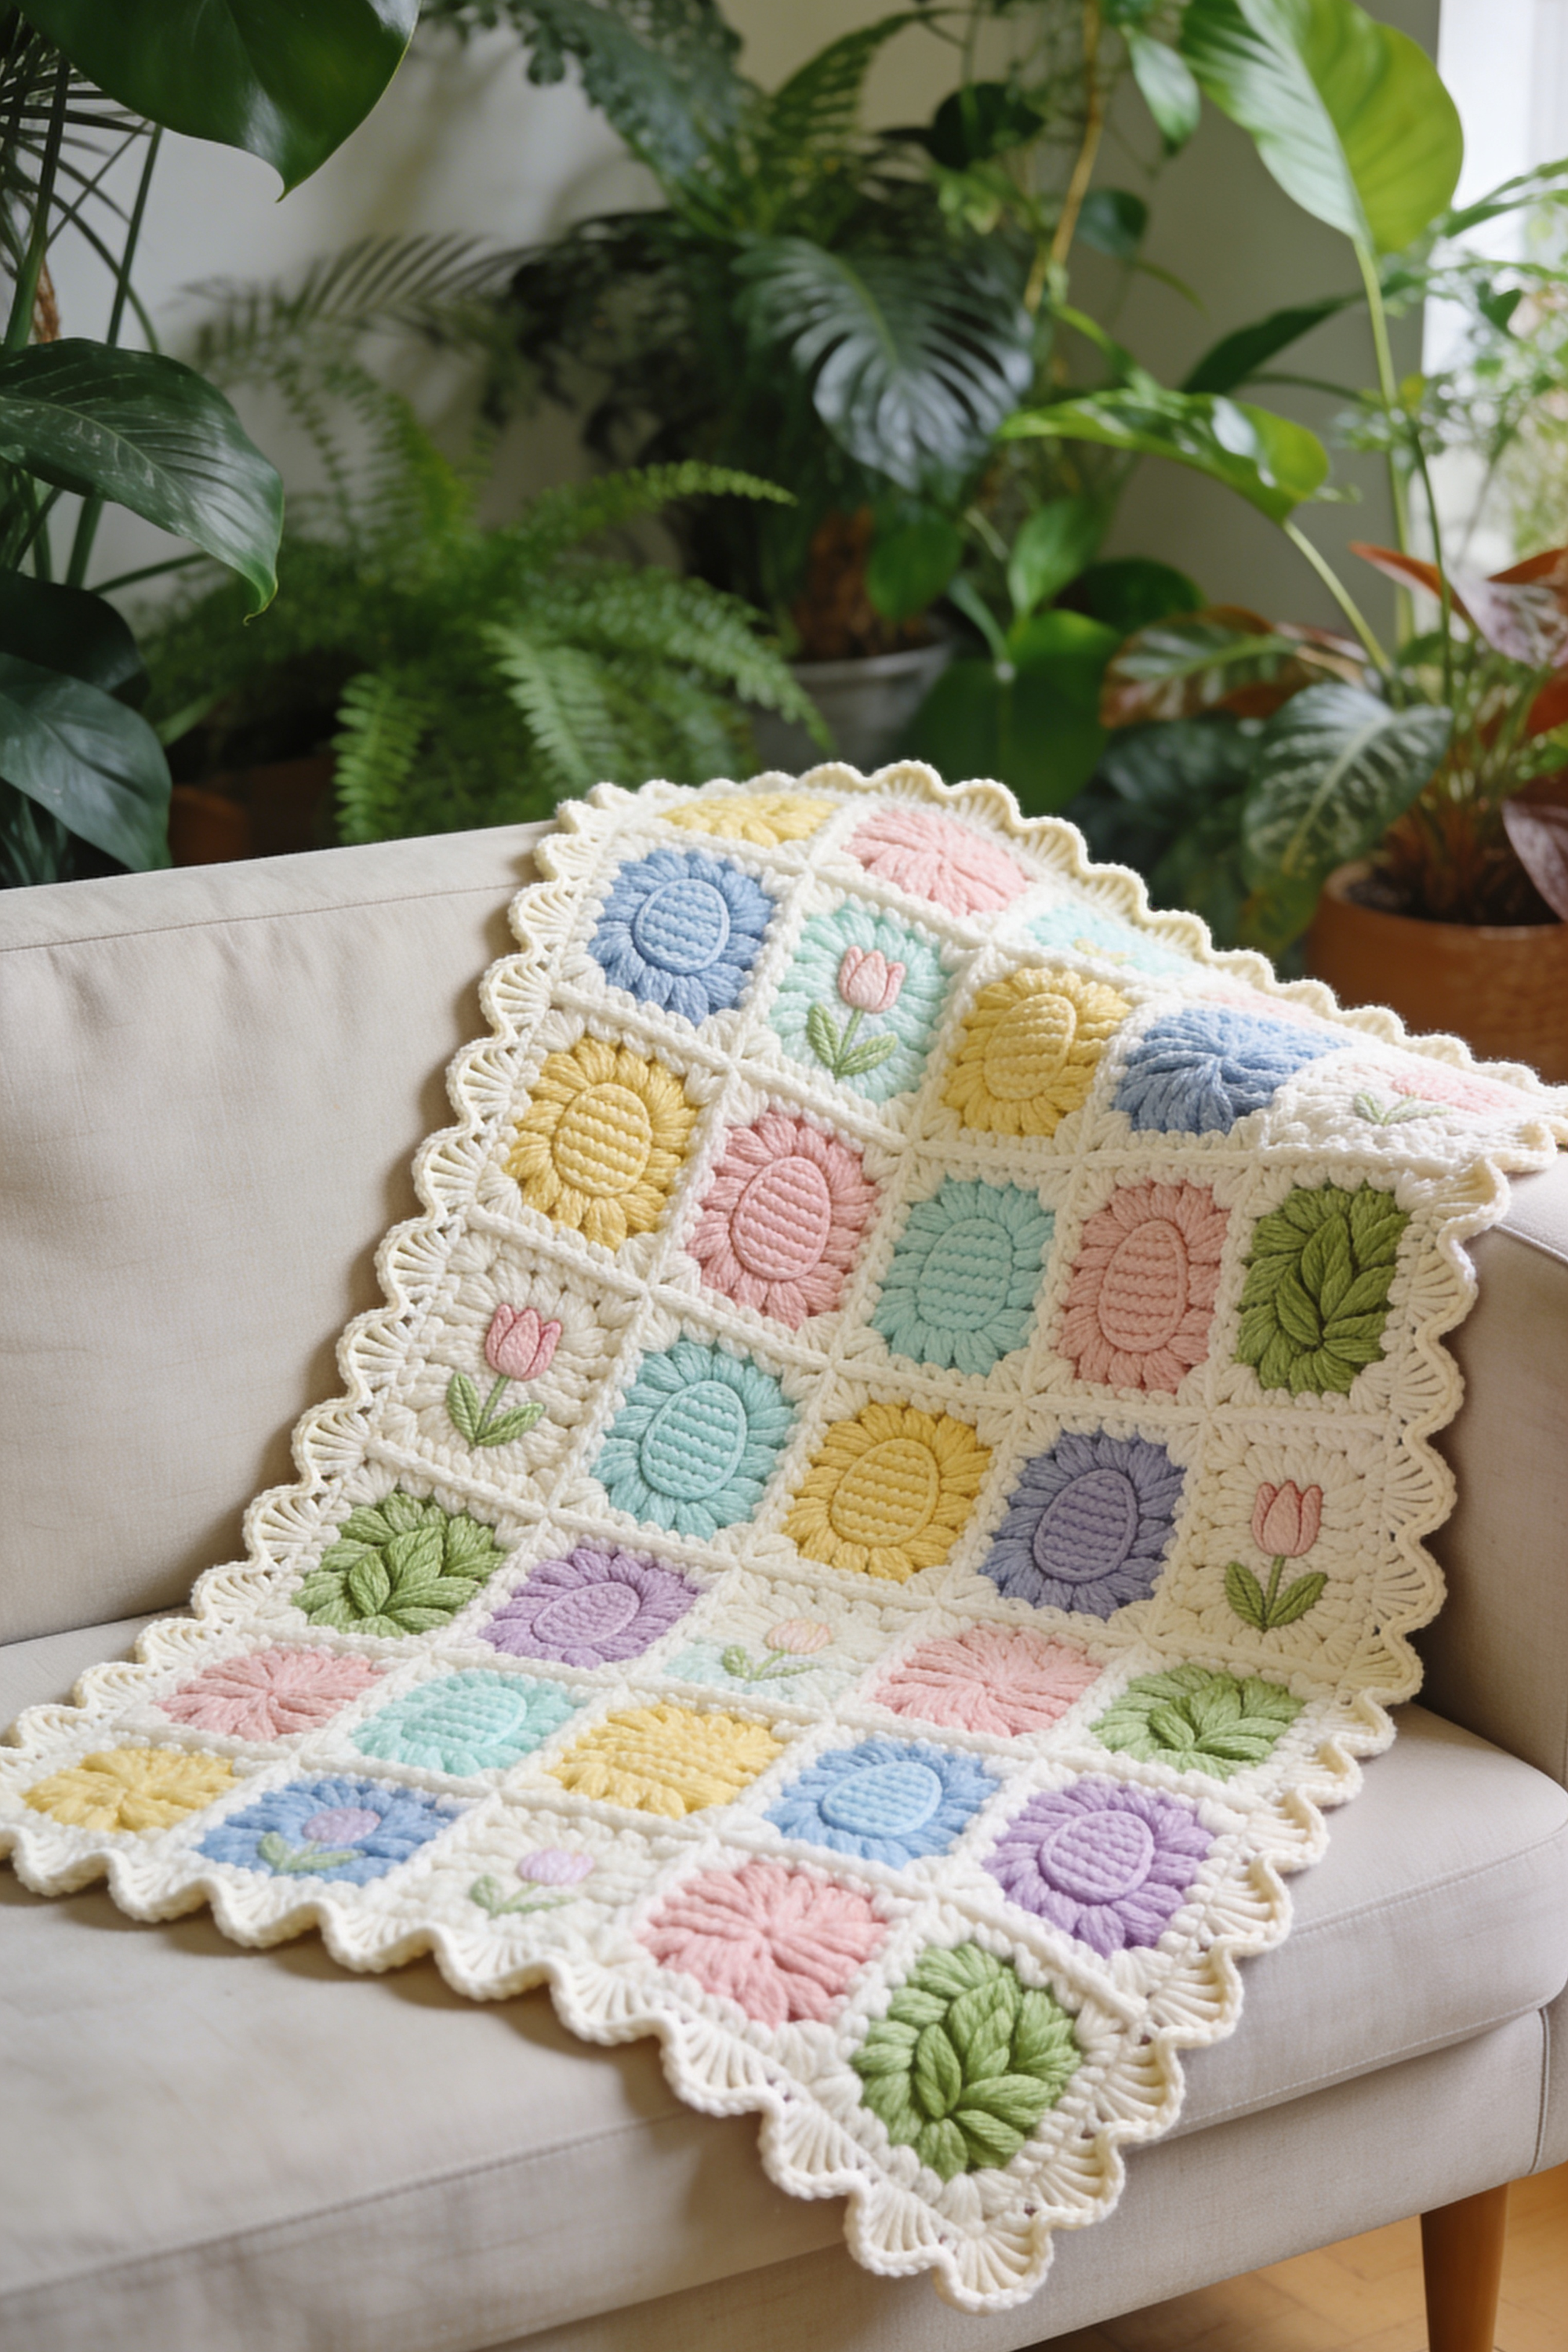
Pastel Garden Granny Square Throw Step-by-Step Tutorial — Tulips, Daisies, and Scalloped Edge
What you’re making
This project recreates the sweet, heirloom look of the photo: a pastel patchwork throw built from textured granny squares featuring sunburst daisies and tiny embroidered tulips, all joined with creamy joins and finished with a soft scalloped border. It reads like springtime on a sofa, with gentle color blocks, raised flower centers, and just enough vintage charm to feel collectible. You can make it as a baby blanket, stroller throw, or a full couch sized throw by changing the number of squares.
Materials + tools
- Worsted weight yarn (or light bulky for a chunkier look) in cream plus 6 to 10 pastel shades (butter yellow, blush pink, sky blue, mint, lilac, soft sage)
- Small amount of green yarn for tulip stems and leaves
- Crochet hook size 5.0 mm for worsted (or 6.0 mm for light bulky)
- Tapestry needle for weaving ends and embroidery
- Stitch markers
- Scissors
- Measuring tape
- Blocking mats and pins (recommended)
- Optional: fabric backing and sewing supplies for lining
- Optional: spray starch or light stiffener for extra crisp scallops
Finished size + customization notes
The blanket in the photo looks like a small throw, roughly 36 by 48 inches, made from medium squares. A great starting square size is 7 to 8 inches finished.
- Baby blanket: 20 squares (4 by 5)
- Stroller or lap throw: 30 squares (5 by 6)
- Couch throw: 42 squares (6 by 7)
If your squares feel smaller than the photo, go up a hook size or add one more cream round to each square. If they feel floppy, go down a hook size and block firmly.
Step-by-step instructions
1) Plan your palette like the photo
Choose a cream for all borders and joining so the pastels pop. Pick 4 main pastels and 2 to 4 supporting shades. In the photo, colors repeat in a relaxed pattern rather than strict rows. Lay your yarns out and decide on two square types:
- Daisy sunburst squares with a raised center
- Tulip motif squares where the tulip is embroidered on a flatter pastel square
Visual checkpoint: When your palette is right, every pastel looks “milky” rather than neon, and the cream looks warm, not stark white.
2) Make the textured daisy sunburst square (raised center look)
You will crochet a sunburst style motif, then square it off with cream.
Round 1: With the flower center color, make a magic ring. Chain 2, work 11 double crochet into the ring. Join. (12 stitches)
Round 2: Chain 2, 2 double crochet in each stitch around. Join. (24 stitches)
Round 3 (petal texture): Switch to a second shade (or keep same for subtle texture). Chain 2. In the same stitch, work a puff stitch. A puff stitch here can be: yarn over, insert, pull up, yarn over, insert, pull up, yarn over, insert, pull up, yarn over, pull through all loops, chain 1 to lock. Skip 1 stitch, puff in next. Continue around. Join.
Option if you want flatter “corded” petals like the photo: Replace puff stitches with front post double crochet clusters. Work a 3 double crochet cluster into every other stitch and use front post stitches in the next round to create ribbing.
Round 4 (define the petals): Switch to cream or a coordinating pastel. Work chain spaces between petals and add height with half double crochet and double crochet so the flower looks slightly raised but tidy.
Round 5 (square it off): Switch to cream. In each chain space, build corners with (2 double crochet, chain 2, 2 double crochet). Fill sides with double crochet, using a chain 1 between side groups if needed to keep it flat.
Visual checkpoint: Your flower should sit slightly proud of the square and the cream round should look crisp, not ruffled. If ruffled, remove chain spaces or reduce stitch count on the sides.
3) Make the tulip motif square (flat pastel panel with embroidery)
These squares in the photo look like a simple textured granny base with an embroidered tulip in the center.
Round 1: With pastel color, magic ring. Chain 2, 11 double crochet into ring. Join.
Round 2: Chain 2, 2 double crochet in each stitch around. Join.
Round 3: Chain 2, (1 front post double crochet around the next stitch, 1 double crochet in the next stitch) repeat around. Join. This creates a ribbed, plush look similar to the photo.
Round 4: Continue in pattern or switch to half double crochet to keep it flatter. Join.
Round 5: Switch to cream and square off exactly like the daisy square.
Option if you want a more “woven oval” texture under the tulip: Work rows of half double crochet back loop only for two rounds before squaring.
Visual checkpoint: The pastel center should look cushy and softly ribbed, and the cream border should frame it like a tile.
4) Embroider the tulips
Use a tapestry needle and small lengths of yarn. Keep stitches smooth and slightly raised.
Tulip bud: Use pink or blush yarn. Make three vertical satin stitches for the center petal, then two smaller satin stitches on each side. Add a tiny horizontal stitch at the base to widen the bud slightly.
Stem: Use green. Use a simple stem stitch down from the bud.
Leaves: Add two angled lazy daisy stitches for leaves, one on each side.
Option for the simplest look: Skip leaves and stitch only bud and stem.
Visual checkpoint: Your tulip should look centered and about one third the height of the square’s inner panel, not too tall.
5) Make enough squares for your size
Aim for consistent tension. Block squares as you finish a batch of 6 to 10. This prevents joining fights later.
Tip: If your edges vary, add one more cream round to the smaller squares only, then block all to the same measurement.
6) Arrange the layout to match the photo’s casual patchwork
On the floor, arrange squares with daisy squares sprinkled evenly and tulip squares appearing like little surprises. Avoid placing the same color next to itself more than once.
Visual checkpoint: Step back and squint. You should see a gentle pastel mosaic with no harsh clumps.
7) Join the squares with a raised cream join
The photo looks like a slightly raised join, similar to a flat slip stitch seam or a join as you go with slip stitches.
Option A: Join as you go
- Crochet the final cream round of a square and join to neighboring squares with slip stitches through both loops at the joining points.
Option B: Mattress style crochet join - Place squares right sides up. Use a slip stitch join through the back loops only, creating a neat ridge on the front.
Visual checkpoint: The join lines should look like creamy pathways between tiles, not tight puckers.
8) Add the scalloped border
The border in the photo is a soft, shell scallop.
Border setup round: With cream, work a round of single crochet evenly around the blanket. In corners, work (single crochet, chain 2, single crochet).
Scallop round: Work (skip 1, 5 double crochet in next stitch, skip 1, slip stitch in next) around. In corners, place one full shell centered on the corner and add a chain 1 on each side if it pulls.
Option if you want a deeper, more vintage scallop: Use 7 double crochet shells instead of 5.
Visual checkpoint: The scallops should sit like little waves, even and not cupped.
9) Weave ends like a perfectionist
Weave each end through at least 3 direction changes. On textured stitches, weave under posts for invisibility. Trim only after tug testing.
10) Block for the “photo finish”
Pin the blanket to measurements on mats. Steam lightly or mist with water, then dry flat. This sharpens the tiles and makes the scallops behave.
Optional upgrade: Add a soft flannel backing
- Cut backing fabric 1 inch larger than the blanket on all sides, fold edges under, and hand stitch to the back. Keep stitches invisible from the front.
Optional upgrade: Add a label
- Stitch a small handmade tag near one corner on the underside.
Optional upgrade: Add subtle quilting lines
- If backed, add a few hand stitched quilting lines between squares to prevent shifting.
Troubleshooting
- My squares are ruffling: You have too many stitches or chain spaces. Remove chain spaces on sides, or switch double crochet to half double crochet on the last round. Block firmly.
- My squares are cupping: Your tension is tight or you need more stitches. Go up a hook size for the center rounds or add one more increase round before squaring.
- My joins look wavy: Your squares are different sizes. Block each square to the same measurement before joining.
- My scallops flip or curl: Add a setup round of single crochet, and make sure you are not skipping too many stitches between shells.
- My embroidery looks messy: Use shorter strands, keep stitches parallel, and pull gently so yarn lays flat, not tight.
Finishing details
- Block first, then do a final trim of ends.
- If you want the scallops to look extra crisp, mist lightly with starch and shape the scallops with your fingers while drying.
- Wash gently in cool water and lay flat to dry to protect texture and embroidery.
Shop Similar
- Pastel worsted yarn bundle for patchwork blankets
- Cream worsted yarn for joining and borders
- Crochet hook set with 5.0 mm and 6.0 mm hooks
- Blocking mats and rust resistant pins for crochet
- Tapestry needle set for yarn embroidery
Style It With
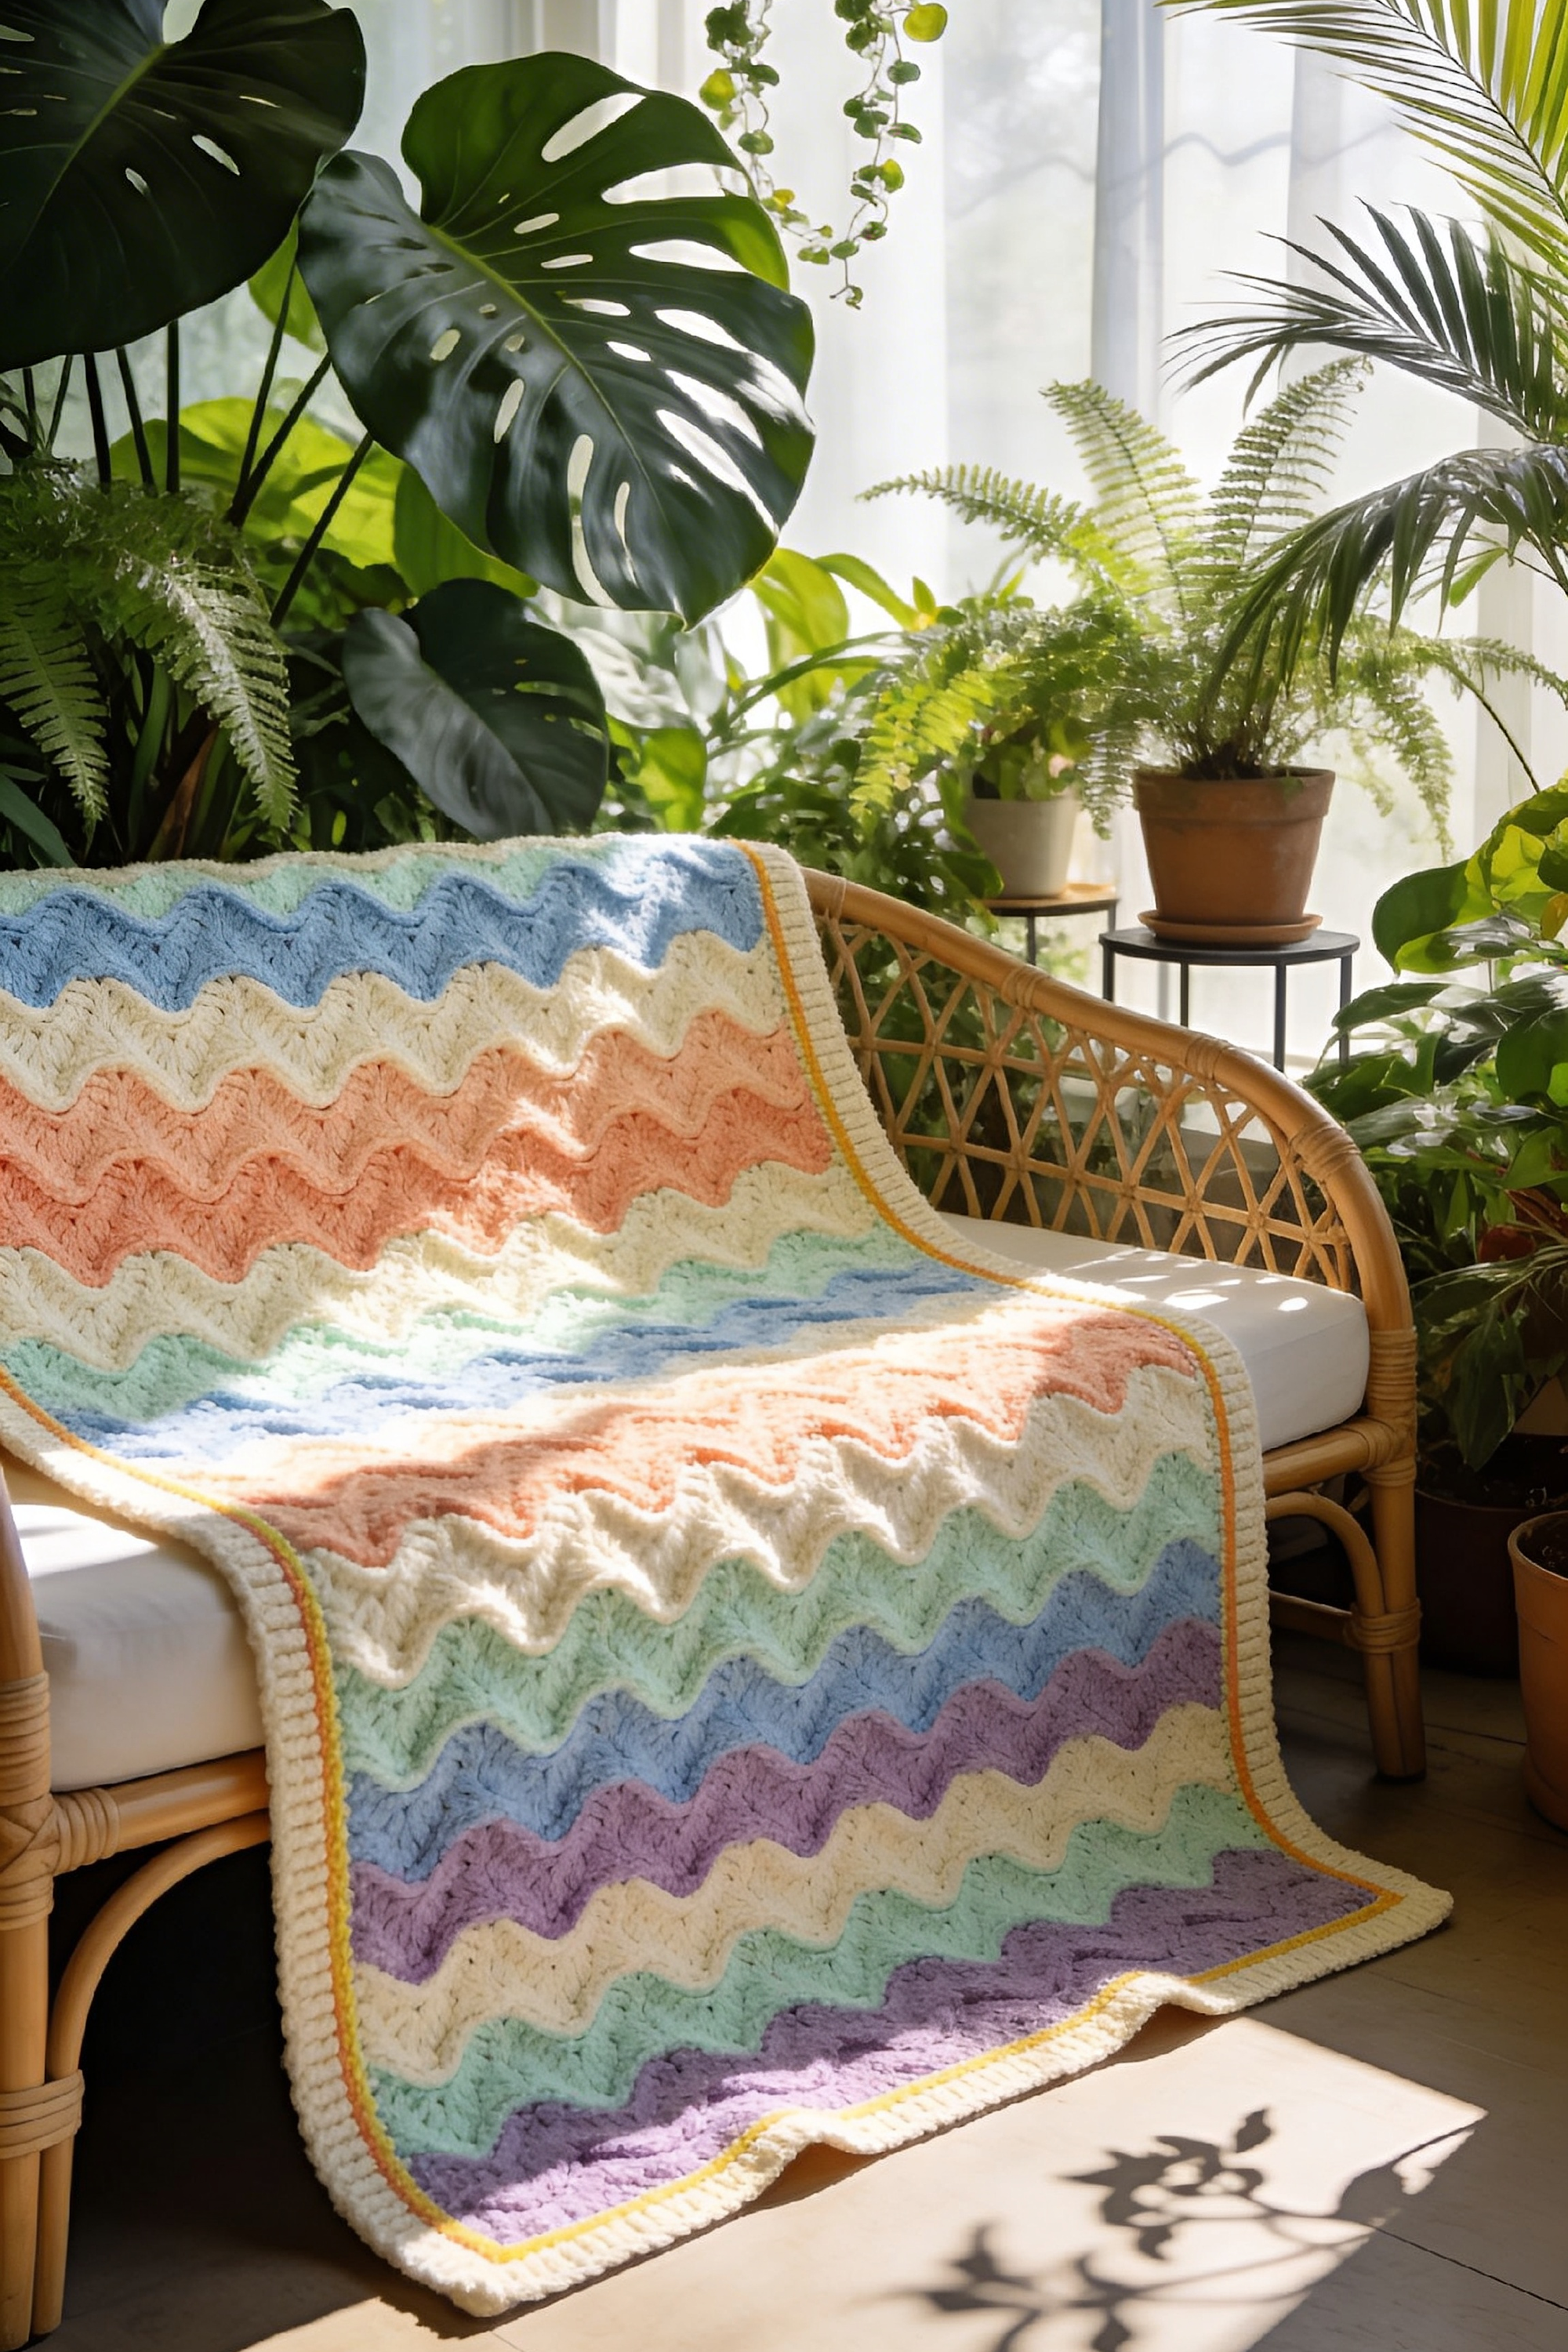
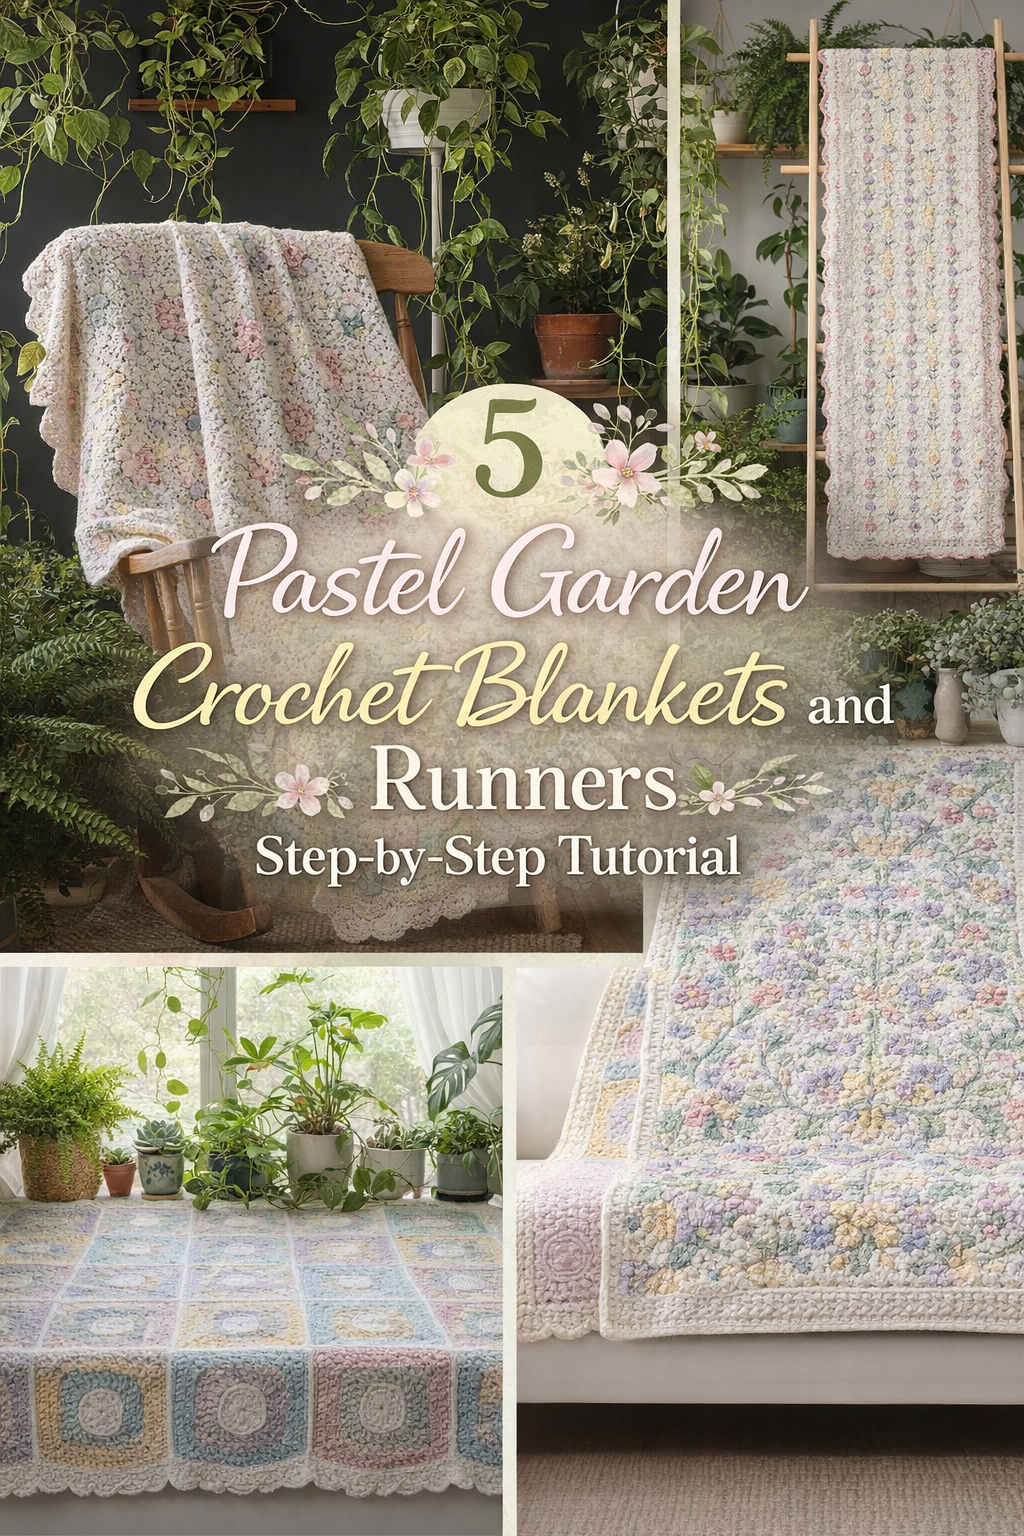
Sunlit Pastel Ripple Blanket DIY Guide — Vintage Waves with a Bright Piped Border
What you’re making
This tutorial recreates the breezy ripple blanket in the photo: wide, wavy chevron rows in soft pastel stripes, anchored by creamy sections and finished with a clean border that has a thin, sunny contrast line. The overall vibe is airy and nostalgic, like a beach house heirloom, and it drapes beautifully over a chair. The stitch texture reads as gentle ridges, with consistent peaks and valleys that look polished even from across the room.
Materials + tools
- Worsted weight yarn in cream plus pastel shades (sky, mint, blush, lilac, peach, butter)
- Small amount of golden yellow yarn for the thin accent edge
- Crochet hook size 5.5 mm or 6.0 mm for a soft drape
- Tapestry needle
- Stitch markers (helpful for marking peaks)
- Scissors
- Measuring tape
- Optional: blocking mats and pins
Finished size + customization notes
The blanket in the photo looks like a lap throw, roughly 40 by 55 inches. Ripple blankets are easy to resize: you only need a starting chain that fits the ripple repeat.
- For a baby blanket, aim for 30 to 36 inches wide
- For a couch throw, aim for 50 to 60 inches wide
If your ripples look too tight and tall, increase hook size. If they look mushy and flat, decrease hook size.
Step-by-step instructions
1) Choose a ripple stitch that matches the photo
The photo shows a classic chevron ripple with textured ridges. That often comes from working double crochet in the back loop only, or alternating front and back post stitches every few rows.
You will use a simple repeat:
- Peaks: three double crochet worked into one stitch
- Valleys: three stitches worked together (a double crochet three together)
Visual checkpoint: When you lay the first few rows flat, you should see smooth waves, not sharp zigzags.
2) Build the foundation chain to your width
Most classic ripples repeat over a multiple of 14 plus a small offset. If you prefer not to calculate, use this method:
- Chain until it measures your desired width
- Make sure your chain count allows an even number of peaks across
Safe option A: Use a ripple pattern based on multiples of 14 plus 2.
Safe option B: Use a ripple pattern based on multiples of 12 plus 3.
Either will give a similar wave look, so choose the one that matches your favorite ripple recipe.
Tip: Make your foundation chain with a larger hook size to avoid a tight bottom edge, then switch back for row 1.
3) Row 1: Establish the wave rhythm
Work into the chain with double crochet. Create peaks by placing 3 double crochet in one stitch, and create valleys by skipping or decreasing at the low points.
A classic method:
- Work 1 double crochet in each stitch until you reach a peak point
- At the peak point, work 3 double crochet in the same stitch
- Continue 1 double crochet in each stitch
- At the valley point, work a double crochet three together across three stitches
Visual checkpoint: Your first row should already ripple slightly. If it lies perfectly straight, your peak and valley placements are off.
4) Row 2 and beyond: Add texture like the photo
To mimic the photo’s gentle ridges, work double crochet back loop only for every row. This creates horizontal lines that catch the light and make the wave look sculpted.
Row 2:
- Chain 3 and turn
- Work double crochet back loop only in each stitch
- At peaks, work 3 double crochet back loop only into the center stitch of the peak
- At valleys, work double crochet three together back loop only across the three valley stitches
Repeat this row for the entire blanket, changing colors every two rows for bolder stripes, or every four rows for wider stripes like the photo.
Visual checkpoint: You should see clean, stacked ripples, with each stripe sitting neatly above the last.
5) Stripe planning to match the photo
The blanket shows alternating cream and pastel bands, with some pastels repeating softly. A strong formula:
- 4 rows cream
- 4 rows pastel
- 4 rows cream Repeat, cycling through your pastel shades.
If you want a more blended look:
- Use 2 rows per color and rotate more often.
Tip: Change colors on the last yarn over of the last stitch of the row, so the new color starts cleanly.
6) Keep your edges straight
Ripple blankets can lean if the first and last stitches are inconsistent. Use stitch markers in the first and last stitch of each row for the first 10 rows.
If your sides begin to curve inward:
- You are losing stitches at the edges. Add one extra double crochet at the end before turning.
If your sides flare outward:
- You are adding stitches. Confirm you are not accidentally making peaks at the edge.
Visual checkpoint: Fold the blanket in half lengthwise. Both long edges should match.
7) Add the clean border base
Once your blanket reaches the desired length, finish with a cream row. Then crochet a border to give it the tailored look in the photo.
Border round 1:
- Work single crochet evenly around the entire blanket
- Place (single crochet, chain 2, single crochet) in each corner if working around a rectangle Along the ripple top and bottom edges, place stitches evenly so it lies flat. A good guide is one single crochet per stitch, but at deep valleys you might skip one to prevent ruffling.
Visual checkpoint: The border should lie flat without waves.
8) Add the thin sunny accent line
The photo shows a subtle golden line just inside or just outside the edge. You can recreate this in two easy ways.
Option A: Surface slip stitch line
- With golden yarn, insert hook through the border stitches and slip stitch a line around, one stitch at a time.
Option B: One round of single crochet in golden yarn
- Work one round of single crochet evenly around.
Option A looks cleaner and thinner, closer to piping.
Visual checkpoint: The golden line should read as a crisp outline, not a thick band.
9) Finish with a final cream edge for structure
Work one last round in cream:
- Half double crochet around for a softer edge
- Or single crochet around for a crisp edge
If you want the border to look slightly raised, use front post half double crochet around the previous round.
10) Weave in ends without bumps
Because ripples have ridges, ends can hide beautifully:
- Weave under the back loop ridges along a cream stripe
- Change direction two times
- Tug test and trim
11) Block for drape and even waves
Lay flat, gently tug peaks and valleys into uniform waves, and mist lightly. Let dry completely.
Optional upgrade: Add a fabric backing A simple flannel backing makes it feel luxe and prevents stretching. Hand stitch around the edges on the back side only.
Optional upgrade: Add tassels at corners Keep tassels short and neat in cream or golden yarn for a coastal look.
Optional upgrade: Add a label A small tag stitched to the border makes it gift worthy.
Troubleshooting
- My waves look too pointy: You are peaking too aggressively. Reduce the peak to 2 double crochet in one stitch, or space peaks farther apart.
- My blanket is curling: Your foundation chain is tight. Restart with a larger hook for the chain, or add a stabilizing border.
- My ripple edge border is ruffling: Too many stitches. Skip stitches in valleys and avoid adding extra stitches at peaks.
- My stripes look uneven: Count rows per stripe and keep color changes consistent, especially if you alternate two and four row bands.
- My sides are slanted: You are missing the turning chain or the last stitch. Mark the last stitch each row until it becomes automatic.
Finishing details
- Wash gently and lay flat to dry to keep the stitch definition.
- If you want extra crisp ridges, block with pins pulling gently at each peak and valley.
- For an extra tailored edge, add one more cream round after blocking.
Shop Similar
- Pastel yarn set for ripple crochet blankets
- Cream worsted yarn for classic chevron throws
- Golden yellow yarn for a thin accent border
- Ergonomic crochet hooks 5.5 mm 6.0 mm
- Yarn needle set for weaving ends
Style It With
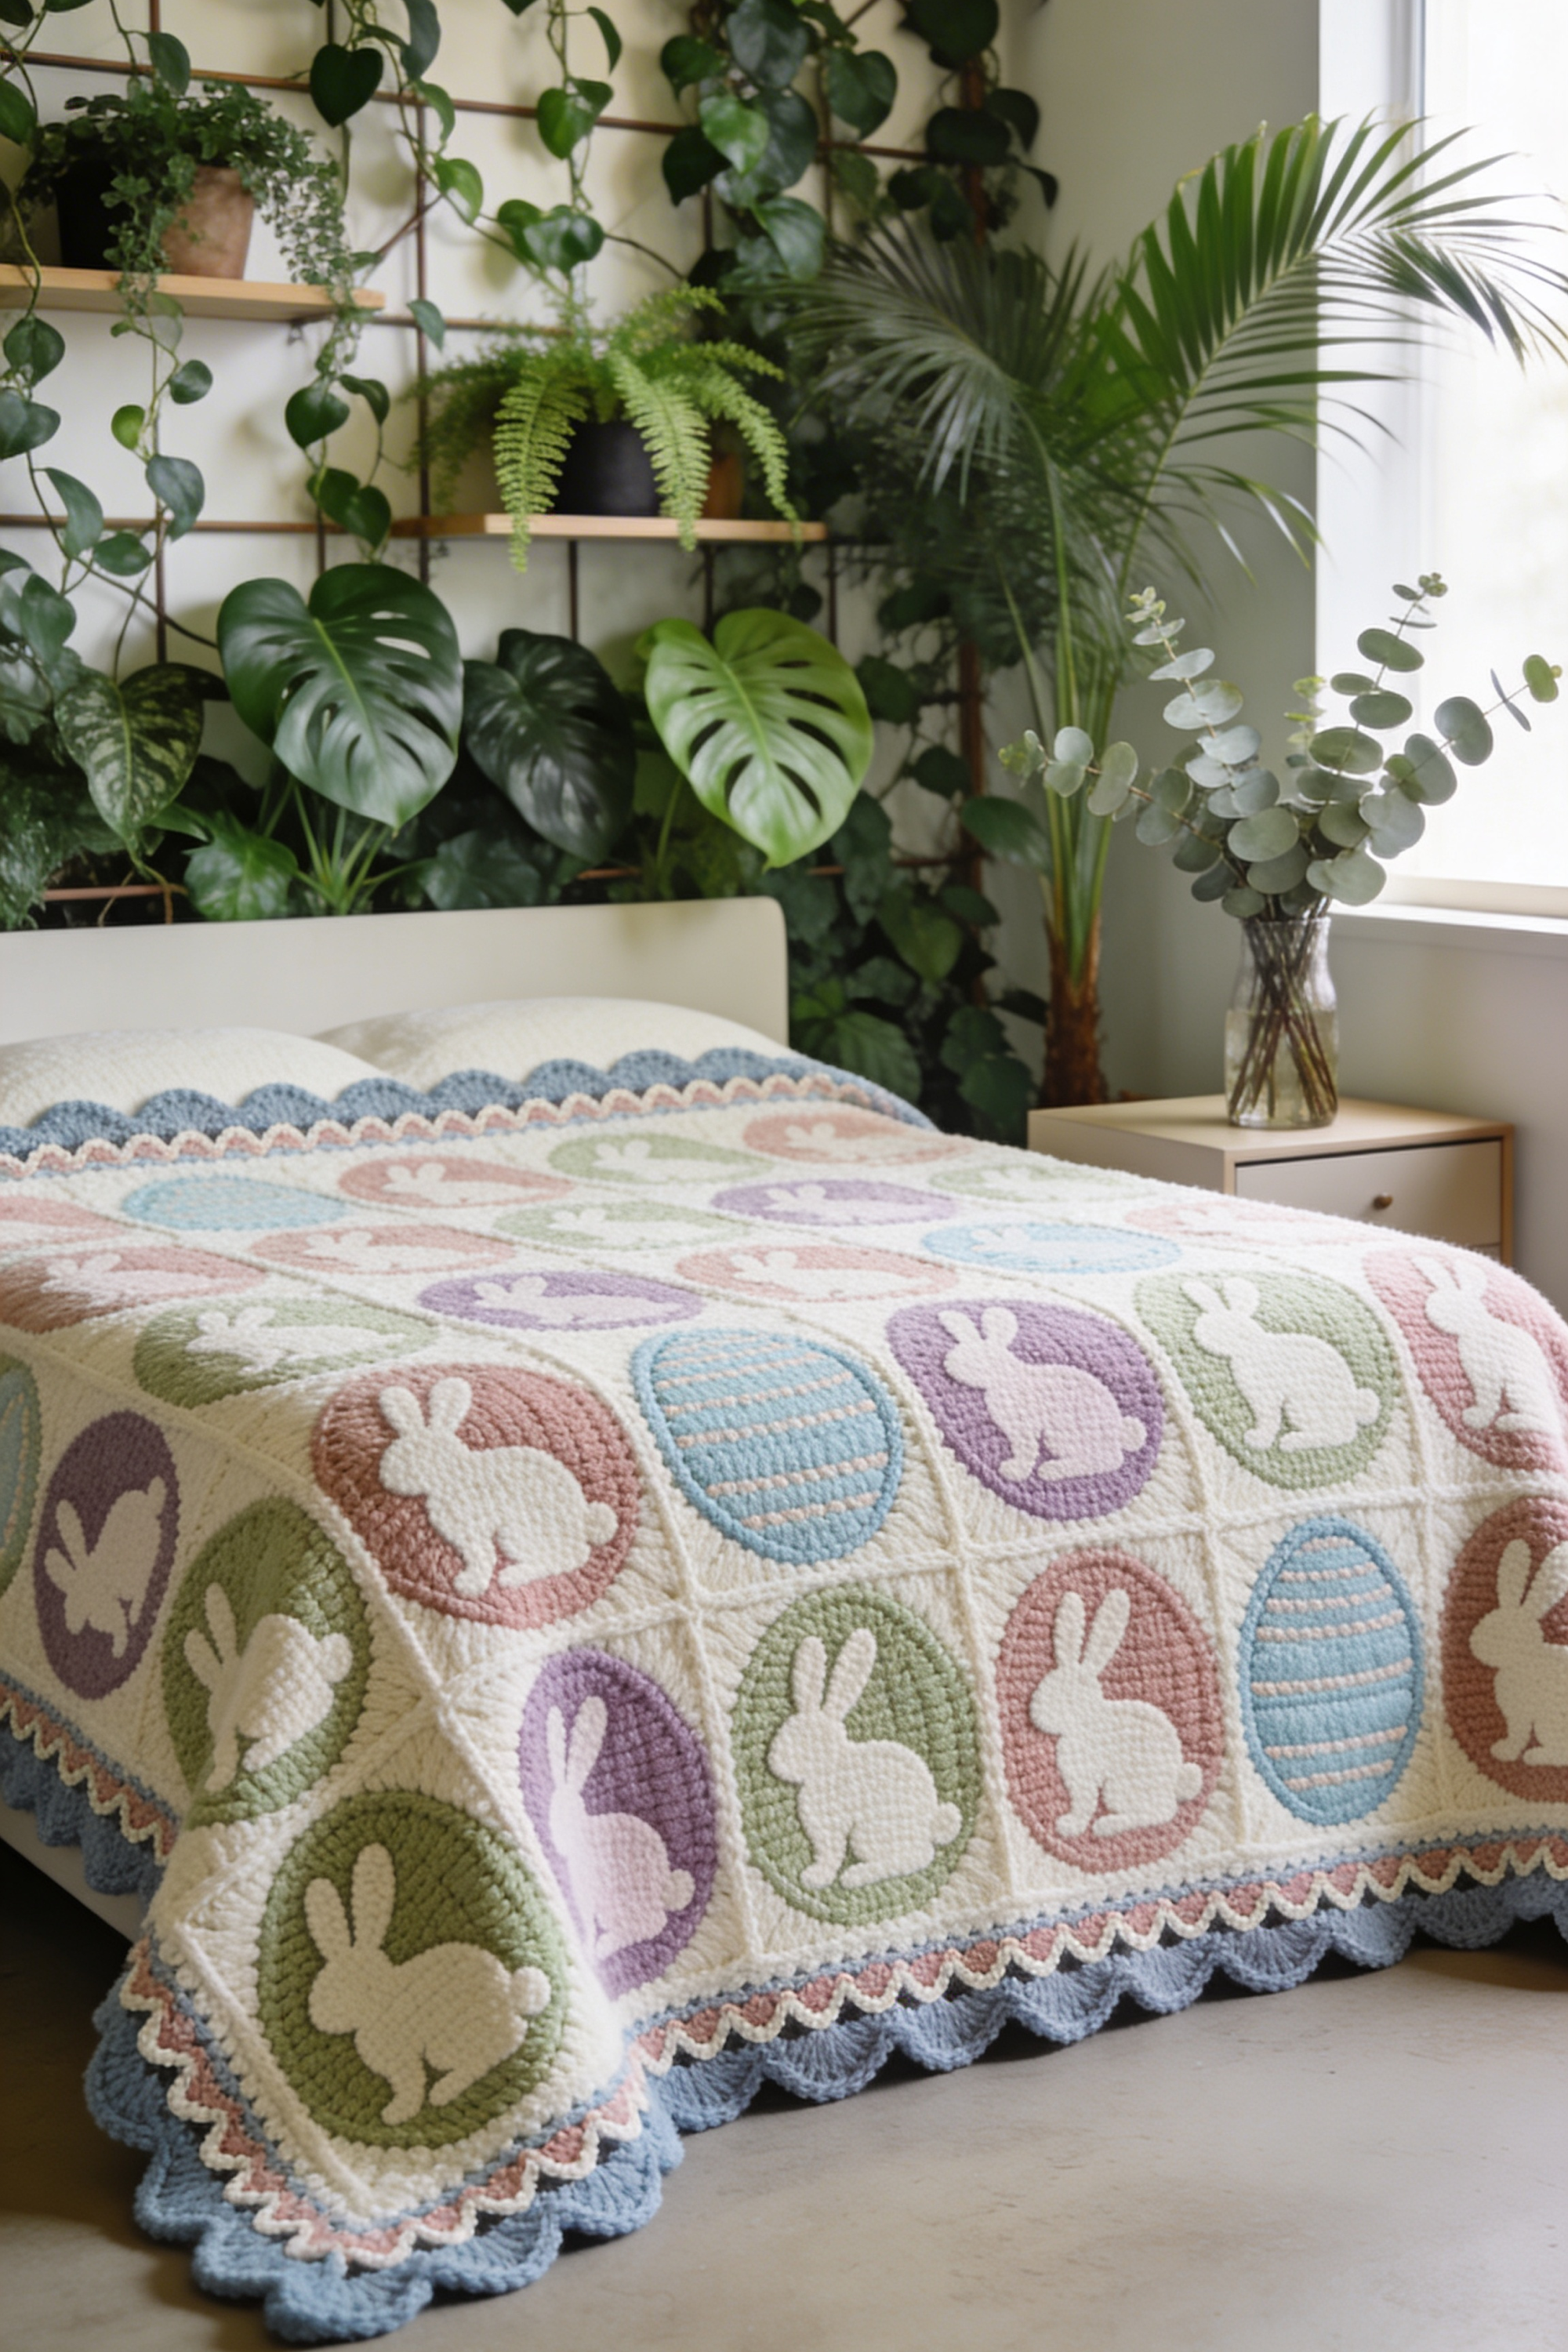
Easter Bunny Patchwork Blanket How-To Guide — Silhouette Squares with a Scalloped Trim
What you’re making
This tutorial recreates the bold Easter statement blanket in the photo: a patchwork grid of rounded oval motifs featuring bunny silhouettes and striped eggs, all set into creamy framing squares and finished with a dramatic scalloped edge. The look is graphic but still soft, thanks to plush yarn texture and pastel blocks. It’s perfect as a seasonal bed throw, nursery blanket, or an Easter living room accent.
Materials + tools
- Worsted weight yarn in cream for the framing and joining
- Pastel yarn colors for the oval backgrounds (sage, blush, lavender, sky, soft teal)
- White yarn for bunny silhouettes and light egg details
- Optional: a deeper accent color for the scalloped edge base (the photo shows a soft blue scallop)
- Crochet hook size 5.0 mm to 5.5 mm
- Tapestry needle
- Stitch markers
- Measuring tape
- Blocking mats and pins (recommended)
- Optional: fabric backing for extra stability
Finished size + customization notes
The blanket in the photo is bed throw sized, roughly 60 by 80 inches, but you can scale it easily:
- Baby blanket: 20 squares (4 by 5)
- Throw: 42 squares (6 by 7)
- Bed throw: 56 squares (7 by 8)
Each square looks about 8 to 10 inches finished, with the bunny oval centered inside.
Step-by-step instructions
1) Decide your motif system
You will make two square types:
- Bunny silhouette oval squares
- Striped egg oval squares Then you will join them with cream and add a scalloped border.
The key to matching the photo is high contrast: pastel oval background, white bunny or egg, cream framing.
Visual checkpoint: From a few feet away, you should instantly read bunny, egg, bunny, egg across the grid.
2) Crochet the oval background (solid pastel oval)
You can crochet an oval in rounds, then applique the bunny on top, or crochet the bunny as an applique and stitch it to the oval. The photo looks like the bunny is a separate white applique on a pastel oval.
Oval base method:
Round 1: Chain 12. Work 1 half double crochet in the second chain from hook and in the next 9 chains. Work 5 half double crochet in the last chain. Turn the work and continue on the underside of the chain: 1 half double crochet in the next 9 chains, then 4 half double crochet in the last chain. Join.
Round 2: Chain 1. Work half double crochet around, increasing at both ends so the oval grows evenly. Join.
Round 3: Repeat, keeping increases only at the curved ends.
Keep going until the oval is about 5 to 6 inches tall for an 8 to 10 inch square.
Visual checkpoint: Your oval should be smooth with no corners. If it looks pointed, add increases at the ends.
3) Make the bunny silhouette applique
The bunny in the photo is a simple sitting silhouette. You can crochet it as a flat piece and sew it down.
Simple bunny silhouette approach:
- Crochet a body oval and a head circle in white
- Crochet two long ears as narrow ovals
- Sew the head to the body, then ears to the head
- Add a tiny pom tail as a small bobble stitch or a tiny circle
Body: Chain 10, work an oval similar to the background but smaller.
Head: Magic ring, 6 single crochet, increase to 12, then 18, then stop and fasten off.
Ears: Chain 10, work single crochet up one side, 3 single crochet in the end, then down the other side, fasten off.
Option if you want a cleaner silhouette: Skip separate head and crochet one continuous bunny shape using short rows. The layered method is easier and reads well in plush yarn.
Visual checkpoint: Place the bunny on the oval. It should fill most of the oval height, leaving a neat margin all around.
4) Make the striped egg applique
The egg squares in the photo have simple stripe texture. Make an egg applique in a pastel and add thin contrast stripes with surface slip stitch.
Egg applique:
- Chain 10
- Work an oval for two rounds, then taper the top by reducing stitches slightly so it feels egg shaped
- Sew to the oval background
Stripes:
- Use a tapestry needle to embroider thin horizontal lines
- Or use surface slip stitch with a smaller hook
Visual checkpoint: The egg should look centered and slightly taller than wide, like a classic Easter egg.
5) Attach applique to oval background
Use whip stitch around the edges of the bunny and egg pieces with matching white yarn. Keep stitches small and even.
Tip: Pin first so it does not drift.
6) Turn the oval motif into a square
Now you need the creamy square frame. You can do this by crocheting a round of stitches around the oval, building corners with chain spaces.
Round for squaring:
- With cream, join at the side of the oval.
- Work single crochet evenly around the oval.
- At four evenly spaced points, create corners with (single crochet, chain 2, single crochet).
- On the next round, work double crochet with corners (2 double crochet, chain 2, 2 double crochet).
You may need two or three rounds to reach your desired square size.
Visual checkpoint: The square should sit flat. If it ruffles, reduce stitch count around the oval. If it cups, add a few extra stitches around the curves.
7) Make all squares and block them
Block each square to the same measurement. This is non negotiable for a crisp grid like the photo.
8) Arrange a pleasing Easter layout
Alternate bunny and egg squares. Distribute colors evenly. The photo uses repeating pastel ovals across the blanket.
Visual checkpoint: No color should cluster in one corner. Your eye should travel smoothly.
9) Join squares with a clean cream join
Use a slip stitch join through back loops only, right sides up, to create a subtle raised line.
Alternative: Use single crochet join for a thicker, more defined grid.
10) Add the scalloped border like the photo
The photo shows a bold scallop, likely in a soft blue, with a decorative trim above it.
Border plan:
- Round 1: Cream single crochet evenly around
- Round 2: Optional decorative round in a pastel accent (like a tiny picot or a simple chain pattern)
- Round 3: Scallop round in blue
Scallop round: Work (skip 1, 7 double crochet in next stitch, skip 1, slip stitch in next) around. In corners, place one full shell centered at the corner and add a chain 1 on each side if needed.
Visual checkpoint: The scallops should look like rounded waves and should not pull the corners inward.
11) Weave ends and tidy the back
Because appliques add bulk, weave ends along the square frames rather than behind the bunny. This keeps the front smooth.
12) Optional upgrades for a premium finish
Upgrade 1: Add a soft backing
Hand stitch a flannel backing to the back side to hide join lines and add weight.
Upgrade 2: Add a name or date panel
Crochet one extra square in cream and embroider a name, then place it near a corner.
Upgrade 3: Add a hanging sleeve
If you want to display it seasonally, add a sleeve along the top back edge.
Upgrade 4: Add subtle shading
Use one darker pastel for the oval background on a few squares to add depth.
Troubleshooting
- My ovals are lumpy: Increase evenly at the ends only, and keep stitch tension consistent. Blocking helps.
- My bunny does not read clearly: Make the applique larger and keep the shape simple. Bigger ears help readability.
- My squares are different sizes: Block each square and consider adding one extra cream round to smaller squares.
- My border ruffles: Too many stitches. Skip stitches in valleys and do not add extra at peaks.
- My scallops curl: Add a setup round of single crochet and ensure you skip the correct number between shells.
Finishing details
- Block the entire blanket after the border is complete.
- If you add backing, stitch after blocking so the front remains crisp.
- Wash cool and lay flat to preserve shape and prevent stretching.
Shop Similar
- Pastel yarn pack for Easter crochet blankets
- Soft cream yarn for joining patchwork crochet squares
- Light blue yarn for scalloped crochet edging
- Blocking mats and pins for granny square blankets
- Flannel fabric for blanket backing
Style It With
3D Flower Granny Square Blanket Make-It-Yourself Tutorial — Puffy Petals and a Blossom Border
What you’re making
This tutorial recreates the ultra dimensional floral blanket in the photo: granny squares with raised, layered petals in pastel shades, joined with creamy borders, then finished with a playful edge that echoes tiny blossoms. It looks like a bouquet you can cuddle, with soft puff petals, leafy accents, and a gentle scalloped outline. The texture is the star here, so the goal is plush and sculptural rather than flat.
Materials + tools
- Worsted weight yarn in cream for borders and joining
- Pastel yarn shades for flowers (butter, blush, mint, lilac, soft peach)
- Green yarn for leaves
- Crochet hook size 5.0 mm (go down to 4.5 mm if your petals feel loose)
- Tapestry needle
- Scissors
- Stitch markers
- Blocking mats and pins
- Optional: fabric backing to protect petals from catching
- Optional: felt circles for reinforcing flower centers on the back
Finished size + customization notes
Each square in the photo looks about 8 inches finished, including the cream frame. A cozy throw can be 30 squares (5 by 6) or 42 squares (6 by 7).
Customization ideas:
- Make every flower the same color for a monochrome “wedding cake floral” vibe.
- Mix two greens for more realistic leaves.
- Add a second petal layer for extra height.
Step-by-step instructions
1) Understand the 3D flower square structure
You will crochet:
- A center ring
- A first petal round worked into front loops or chain spaces
- A second petal round anchored behind the first to create layering
- Leaves in the corners or between petals
- A cream squaring round to frame everything
Visual checkpoint: When finished, your flower should look like it sits on top of the square, not printed into it.
2) Crochet the center ring
With center color (often a pale yellow in the photo), make a magic ring.
Round 1: Chain 1, work 12 single crochet into ring. Join.
Round 2: Chain 1, increase in each stitch around (2 single crochet in each). Join. (24 stitches)
If you want a slightly larger center, do one more round increasing every other stitch.
3) Create anchor points for petals
You need chain spaces to attach petals.
Round 3:
- Chain 2
- Work (double crochet, chain 1) in each stitch around This creates small chain spaces between posts.
Visual checkpoint: You should see a neat halo of chain spaces, evenly spaced.
4) First petal layer (soft rounded petals)
Switch to a petal color.
In each chain space, work:
- Slip stitch to join
- Chain 2
- 3 double crochet
- 1 half double crochet
- Chain 2 and slip stitch back into the same space
This makes a rounded petal.
Repeat in each chain space.
Tip: Keep petals consistent by counting carefully. If you want chunkier petals like the photo, replace the double crochet with treble crochet.
5) Second petal layer (the “puffy bouquet” effect)
To layer petals, you need to work behind the first layer. There are two safe options.
Option A: Back loop only base round
Before the first petal layer, create a round where you leave back loops available, then use those loops to attach the second petal layer.
Option B: Crochet a second set of chain spaces behind petals
After the first petal layer, flip the work slightly and stitch around the base with slip stitches and chain spaces between petals.
Layer method:
- Join new petal color behind the first layer at the base of a petal
- Chain 3
- Skip to the next base point and slip stitch Repeat to create chain spaces behind the first petals
Then in each new chain space, crochet a slightly larger petal:
- Chain 2
- 4 double crochet
- 1 treble crochet
- 4 double crochet
- Slip stitch to close
Visual checkpoint: The second layer should peek out between petals like a fuller bloom.
6) Add leaves for the photo look
The photo shows leafy accents, especially near corners.
Leaf method: Join green yarn at the base between petals. Chain 8. Work single crochet back along the chain, increasing slightly at the tip with 3 single crochet in one stitch, then continue down the other side. Slip stitch back to base. Make two leaves per square, positioned opposite each other for balance.
Option for smaller leaves: Chain 6 instead of 8.
Visual checkpoint: Leaves should sit flat and angle outward like little sprigs.
7) Square off with cream
Now turn the flower into a square.
Round 1 around the motif:
- Join cream in a gap between leaves or petals
- Work single crochet evenly around, skipping bulky spots if needed
- At four points, build corners with (single crochet, chain 2, single crochet)
Round 2:
- Work double crochet around
- In corners: (2 double crochet, chain 2, 2 double crochet)
If you need more size, add one more cream round of half double crochet to stabilize.
Visual checkpoint: The square should lie flat. If it waves, you have too many stitches around the petals. Skip a few at the fullest points.
8) Make all squares and block them
Block with petals facing up and gently shape petals with your fingers. Pin the square corners to measurement.
9) Arrange the layout like a pastel garden
The photo uses cream as the consistent frame and mixes pastel flowers evenly. Place similar colors diagonally rather than in clusters.
10) Join squares with a low profile join
Because petals can catch, use a flatter join:
- Mattress stitch with yarn needle through back loops
- Or slip stitch join through back loops only
Avoid a tall join that could snag.
Visual checkpoint: The seams should disappear behind the flowers, letting blooms be the focus.
11) Crochet a flower inspired border
The blanket in the photo has a border that feels like tiny blossoms and scallops.
Border base:
- One round of single crochet in cream around the blanket
Blossom edge round: Work a repeat:
- Slip stitch
- Chain 3
- 3 double crochet in the same stitch
- Chain 3
- Slip stitch in the next stitch This creates a small petal cluster.
For a bigger scallop:
- Use 5 double crochet shells instead.
Add tiny accent flowers: Every few clusters, switch to a pastel for one blossom, then back to cream.
Visual checkpoint: The edge should feel like a soft garland, not a rigid frame.
12) Weave ends and protect the texture
Weave ends along the cream frames. Avoid weaving through petals.
Optional upgrade: Add a backing A backing prevents petals from catching on furniture. Stitch backing on after blocking.
Optional upgrade: Reinforce flower centers If your centers feel loose, sew a small felt circle behind the center on the back side.
Optional upgrade: Add a third petal layer Make one extra round of smaller petals for a super plush look.
Optional upgrade: Add corner tassels Keep tassels short so they do not compete with flowers.
Troubleshooting
- My petals look floppy: Go down a hook size for petals or use a slightly stiffer yarn blend.
- My square will not lie flat: Reduce stitches around the motif, especially where petals overlap, and block aggressively.
- My joins feel bulky: Use mattress stitch instead of crocheted join.
- Leaves curl: Work leaves with tighter tension or add a second round of slip stitches around the edge of the leaf.
- The border ripples: Too many stitches. Reduce shell size or skip more stitches between clusters.
Finishing details
- Block once after joining, then again after the border.
- Shape petals while damp so they dry with a natural curl.
- Store folded with tissue between layers if you want to protect the 3D texture.
Shop Similar
- Pastel yarn for 3D flower granny squares
- Cream yarn for joining and framing floral blankets
- Green yarn for crochet leaves
- Blocking board set for granny squares
- Felt sheets for reinforcing crochet flower centers
Style It With

Patchwork Easter Egg Floor Quilt Step-by-Step Tutorial — Soft Pastels with a Bold Contrast Frame
What you’re making
This tutorial recreates the floor quilt style piece in the photo: a tidy patchwork rectangle made from pastel blocks, each with a centered egg shape, surrounded by a warm cream margin and finished with a bold, darker contrast frame. It looks like a spring play mat, nursery quilt, or a cheerful seasonal rug topper. The stitching lines add gentle texture, and the simple geometry makes the eggs feel modern and graphic.
Materials + tools
- Quilting cotton in pastel solids (pink, blue, mint, lavender, butter, sage)
- Quilting cotton in cream or warm white for sashing and outer border
- Dark navy or deep indigo cotton for the contrast frame
- Batting (cotton or cotton blend) sized slightly larger than the top
- Backing fabric (cream, pastel, or a subtle print)
- Egg appliqué fabric in lighter coordinating tones (or use the same pastel but a shade lighter)
- Sewing machine and basic sewing kit
- Rotary cutter, cutting mat, quilting ruler
- Fabric scissors
- Pins or clips
- Iron and ironing board
- Washable fabric marker or chalk
- Optional: walking foot for even quilting
- Optional: fusible web for easier appliqué
Finished size + customization notes
The piece in the photo looks like a small floor quilt, roughly 24 by 36 inches. A great block size is 8 inches finished, with a 4 to 5 inch egg centered.
To scale up:
- Nursery quilt: 3 by 4 blocks (about 36 by 48 inches)
- Throw quilt: 4 by 5 blocks (about 48 by 60 inches)
If you want it to behave more like a rug, choose a slightly thicker batting and quilt more densely.
Step-by-step instructions
1) Decide your block grid
The photo shows a clean grid with repeated egg motifs. A simple plan is 3 blocks wide by 4 blocks tall.
Cut list example for 3 by 4 blocks with 8 inch finished blocks:
- 12 pastel squares cut at 8.5 inches each (includes seam allowance)
- 12 egg shapes cut to about 4 by 5.5 inches
- Cream inner border strips
- Navy frame strips
- Backing and batting cut at least 2 inches larger than the quilt top on all sides
Visual checkpoint: Lay your pastel squares on the floor. The palette should feel balanced, with no single color dominating one side.
2) Cut your egg templates
Make a paper template for a classic egg:
- Fold paper in half, draw half an egg curve, cut, then unfold for symmetry.
Trace eggs onto your egg fabric. You can cut eggs in a lighter version of each block color, or you can use one consistent pale egg color for a subtle look.
Option A: Fusible appliqué
Use fusible web on the back of egg fabric, then cut eggs cleanly.
Option B: Needle turn appliqué
Cut eggs with a small seam allowance and turn edges under while stitching by hand.
Visual checkpoint: Each egg should look centered and smooth, not too skinny.
3) Appliqué the eggs to the pastel squares
Center each egg on a pastel square. Use a ruler to align:
- Measure half the square and mark the center
- Place egg with its widest point centered
Attach eggs:
- If using fusible web, fuse with an iron following the product instructions.
- Stitch around the edge with a tight zigzag, satin stitch, or a clean straight stitch very close to the edge.
The photo looks like a soft, stitched edge rather than a bold zigzag, so a narrow straight stitch near the edge is a good match.
Visual checkpoint: All eggs should sit at the same height on their squares, with consistent spacing around them.
4) Piece the patchwork top
Sew squares into rows:
- Sew 3 squares together for each row, press seams open or to one side
- Sew rows together, nesting seams for alignment
Press carefully so the top lies flat.
Visual checkpoint: The grid lines should be straight and corners should meet cleanly.
5) Add the cream outer border
The photo shows a warm cream margin around the patchwork before the navy frame.
Cut cream strips:
- Measure the quilt top width, cut two strips to that length, sew to top and bottom
- Measure the new height, cut two strips, sew to sides
Press seams toward the border.
Tip: Always measure the quilt top and cut border strips to match actual size, not theoretical size, to avoid waves.
6) Add the bold navy frame
Cut navy strips wide enough to read clearly, about 2 inches finished.
Attach in the same way as the cream border:
- Top and bottom first
- Then sides
Visual checkpoint: The navy frame should look like a crisp outline, making the pastels feel intentional and gallery like.
7) Prepare the quilt sandwich
Layer:
- Backing fabric right side down
- Batting on top
- Quilt top right side up
Smooth each layer, then pin or clip across the surface.
8) Quilt to match the photo’s soft texture
The photo shows gentle quilting lines, likely straight line quilting.
Easy quilting plan:
- Quilt vertical lines spaced 2 inches apart
- Quilt horizontal lines spaced 2 inches apart This creates a grid that keeps everything tidy.
For a softer, more organic look:
- Quilt diagonal lines across each block to create subtle diamonds.
Use a walking foot if you have one for smooth feeding.
Visual checkpoint: After quilting a few lines, the quilt should stay flat without puckers. If puckers appear, reduce speed and smooth the fabric more often.
9) Trim and bind the quilt
Trim the quilt sandwich edges square.
Binding options:
Option A: Cream binding for a soft edge
Option B: Navy binding to match the frame
The photo reads as a light outer edge beyond the navy, so cream binding is a good match.
Make binding:
- Cut 2.5 inch strips, sew into a long strip, press in half lengthwise
- Attach to front with machine, then fold to back and stitch by hand or machine
Miter corners for a crisp finish.
Visual checkpoint: Corners should look like neat triangles, not bulky lumps.
10) Optional upgrades for a more luxe finish
Upgrade 1: Add extra quilting around the egg shapes
Stitch a faint echo line around each egg for dimension.
Upgrade 2: Add a non slip backing
If using as a floor mat, add a removable non slip layer beneath.
Upgrade 3: Add a hanging sleeve
If you want to display it, sew a sleeve on the back near the top.
Upgrade 4: Add label and date
A small corner label makes it feel heirloom.
Troubleshooting
- My eggs look uneven: Use a single template and mark centers on every square before fusing or pinning.
- My quilt top is wavy after borders: Borders were cut too long. Measure the quilt top, cut borders to exact length, and pin evenly while sewing.
- I have puckers while quilting: Use more pins, baste carefully, and quilt from the center outward. A walking foot helps.
- My corners do not match: Nest seams by pressing alternating directions and pinning intersections.
- Binding looks bulky: Trim seam allowances and press binding carefully before stitching.
Finishing details
- Give the quilt a final press from the back side to avoid flattening the quilting texture too much.
- Wash gently and air dry flat for best shape retention.
- If you want it to look extra crisp like the photo, press the navy frame sharply and use a light spray starch on the borders only.
Shop Similar
- Pastel quilting cotton fabric bundle solids
- Fusible web sheets for fabric appliqué
- Cotton quilt batting crib size
- Rotary cutter mat and ruler quilting set
- Quilt binding fabric strips or bias tape
Style It With
If you made it this far, you now have five different ways to bring spring into your space with nothing but yarn, fabric, and a little patience. And the best part is that every one of these projects is endlessly adjustable. Make a smaller version for a baby shower gift, scale it up into a couch throw that lives in your reading corner, or keep a couple as seasonal statement pieces you rotate in when the light starts changing. These patterns are not just cute, they are the kind of handmade staples that people keep for years because they feel personal.
Before you call it done, give your piece the finish it deserves. Block your crochet so the tiles look crisp and the scallops sit like they were meant to be there. Press your quilt borders so the frame looks sharp and intentional. Weave ends in a way that survives real life. Those last steps are what turn a fun project into an heirloom look, the kind you drape over a chair and immediately want to photograph.
And if you are already dreaming up the next one, lean into that. Swap the pastels for soft neutrals, go monochrome, add a lining, or stitch in a tiny tag with a name and date. Make it yours while keeping that same fresh, sunlit mood. However you style it, these spring blankets have one job: to make your home feel lighter, softer, and a little more alive. Happy making, and may your scallops be even and your ends always disappear.