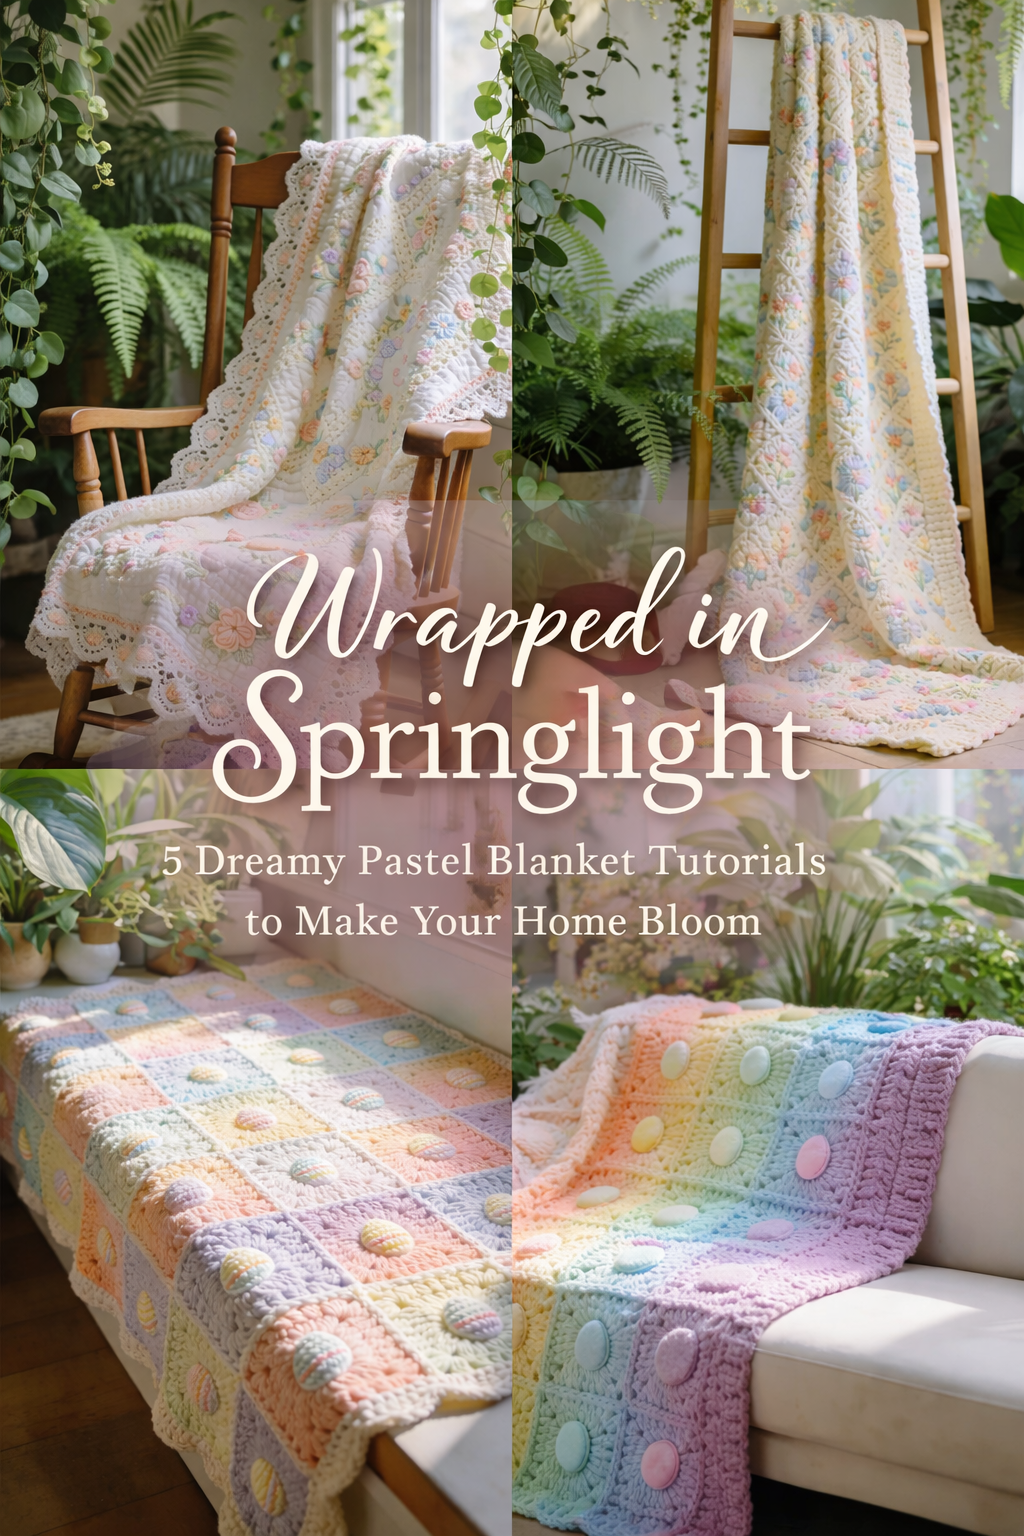
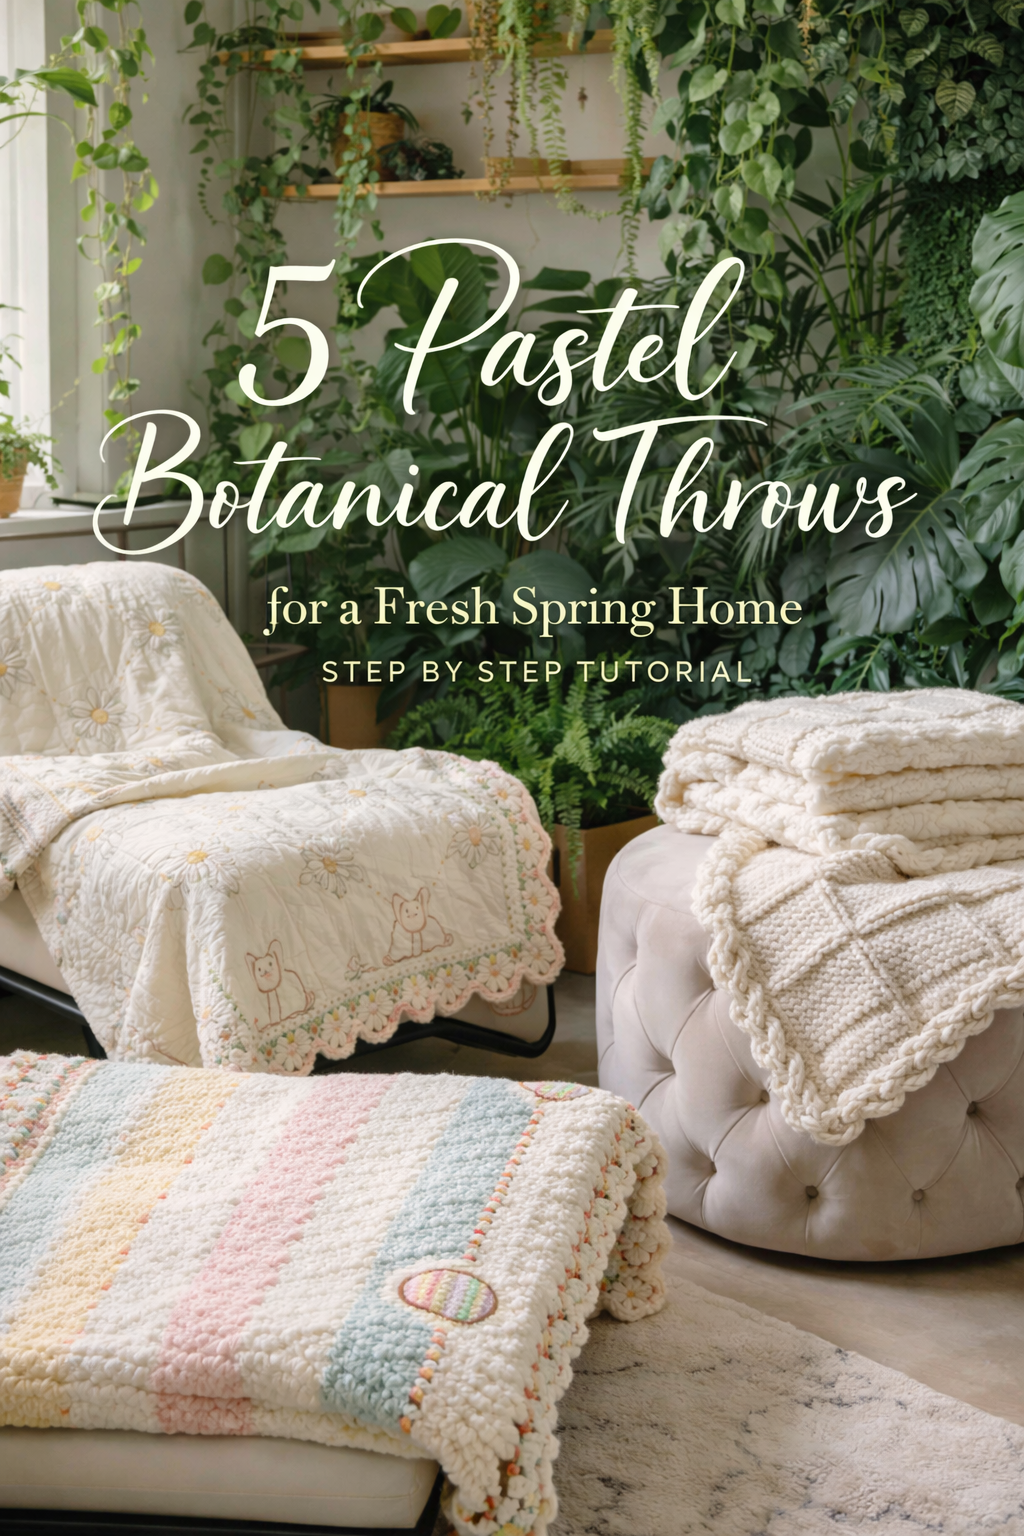
5 Pastel Botanical Throws for a Fresh Spring Home Step by Step Tutorial
More like this
Spring has a way of making every corner of the house feel ready for a refresh, and nothing flips the mood faster than a soft throw that looks like it belongs in a sunlit greenhouse. This post is a five piece lineup of pastel botanical blankets that feel equal parts cozy and curated. Think creamy bases, gentle candy colors, sweet Easter motifs, and textures that look boutique even when you are making them at your own pace. Each design is broken down with clear steps, beginner friendly options, and little visual checkpoints so you can match the look you fell in love with and actually enjoy the process.
💡 Pro Tip: Why I Link to Amazon Search Results and Not One Product
In the Shop the Look and Style it With sections under each bikini, I link to Amazon search results, not single products. Here’s why this matters:
Hot bikinis sell out fast. I don’t want you clicking on a dead link to a sold-out item. Search pages stay updated.
You get more options. Love the vibe but want a different color, cut, or price point? The search results give you everything that matches the look and energy.
I curate each search carefully. These aren’t generic. I spend hours crafting keywords that bring up exactly the kind of bikinis I’d wear—or recommend to my hottest friends.
Support with no pressure. If you click a link, browse, and buy something later, I may earn a small commission at no extra cost to you. That helps me keep bringing you curated collections like this one—powerful, seductive, and always fresh.
So dive in. Click through. Try something risky. These aren’t just bikinis—they’re commands, statements, and maybe even your new favorite weapon of choice.
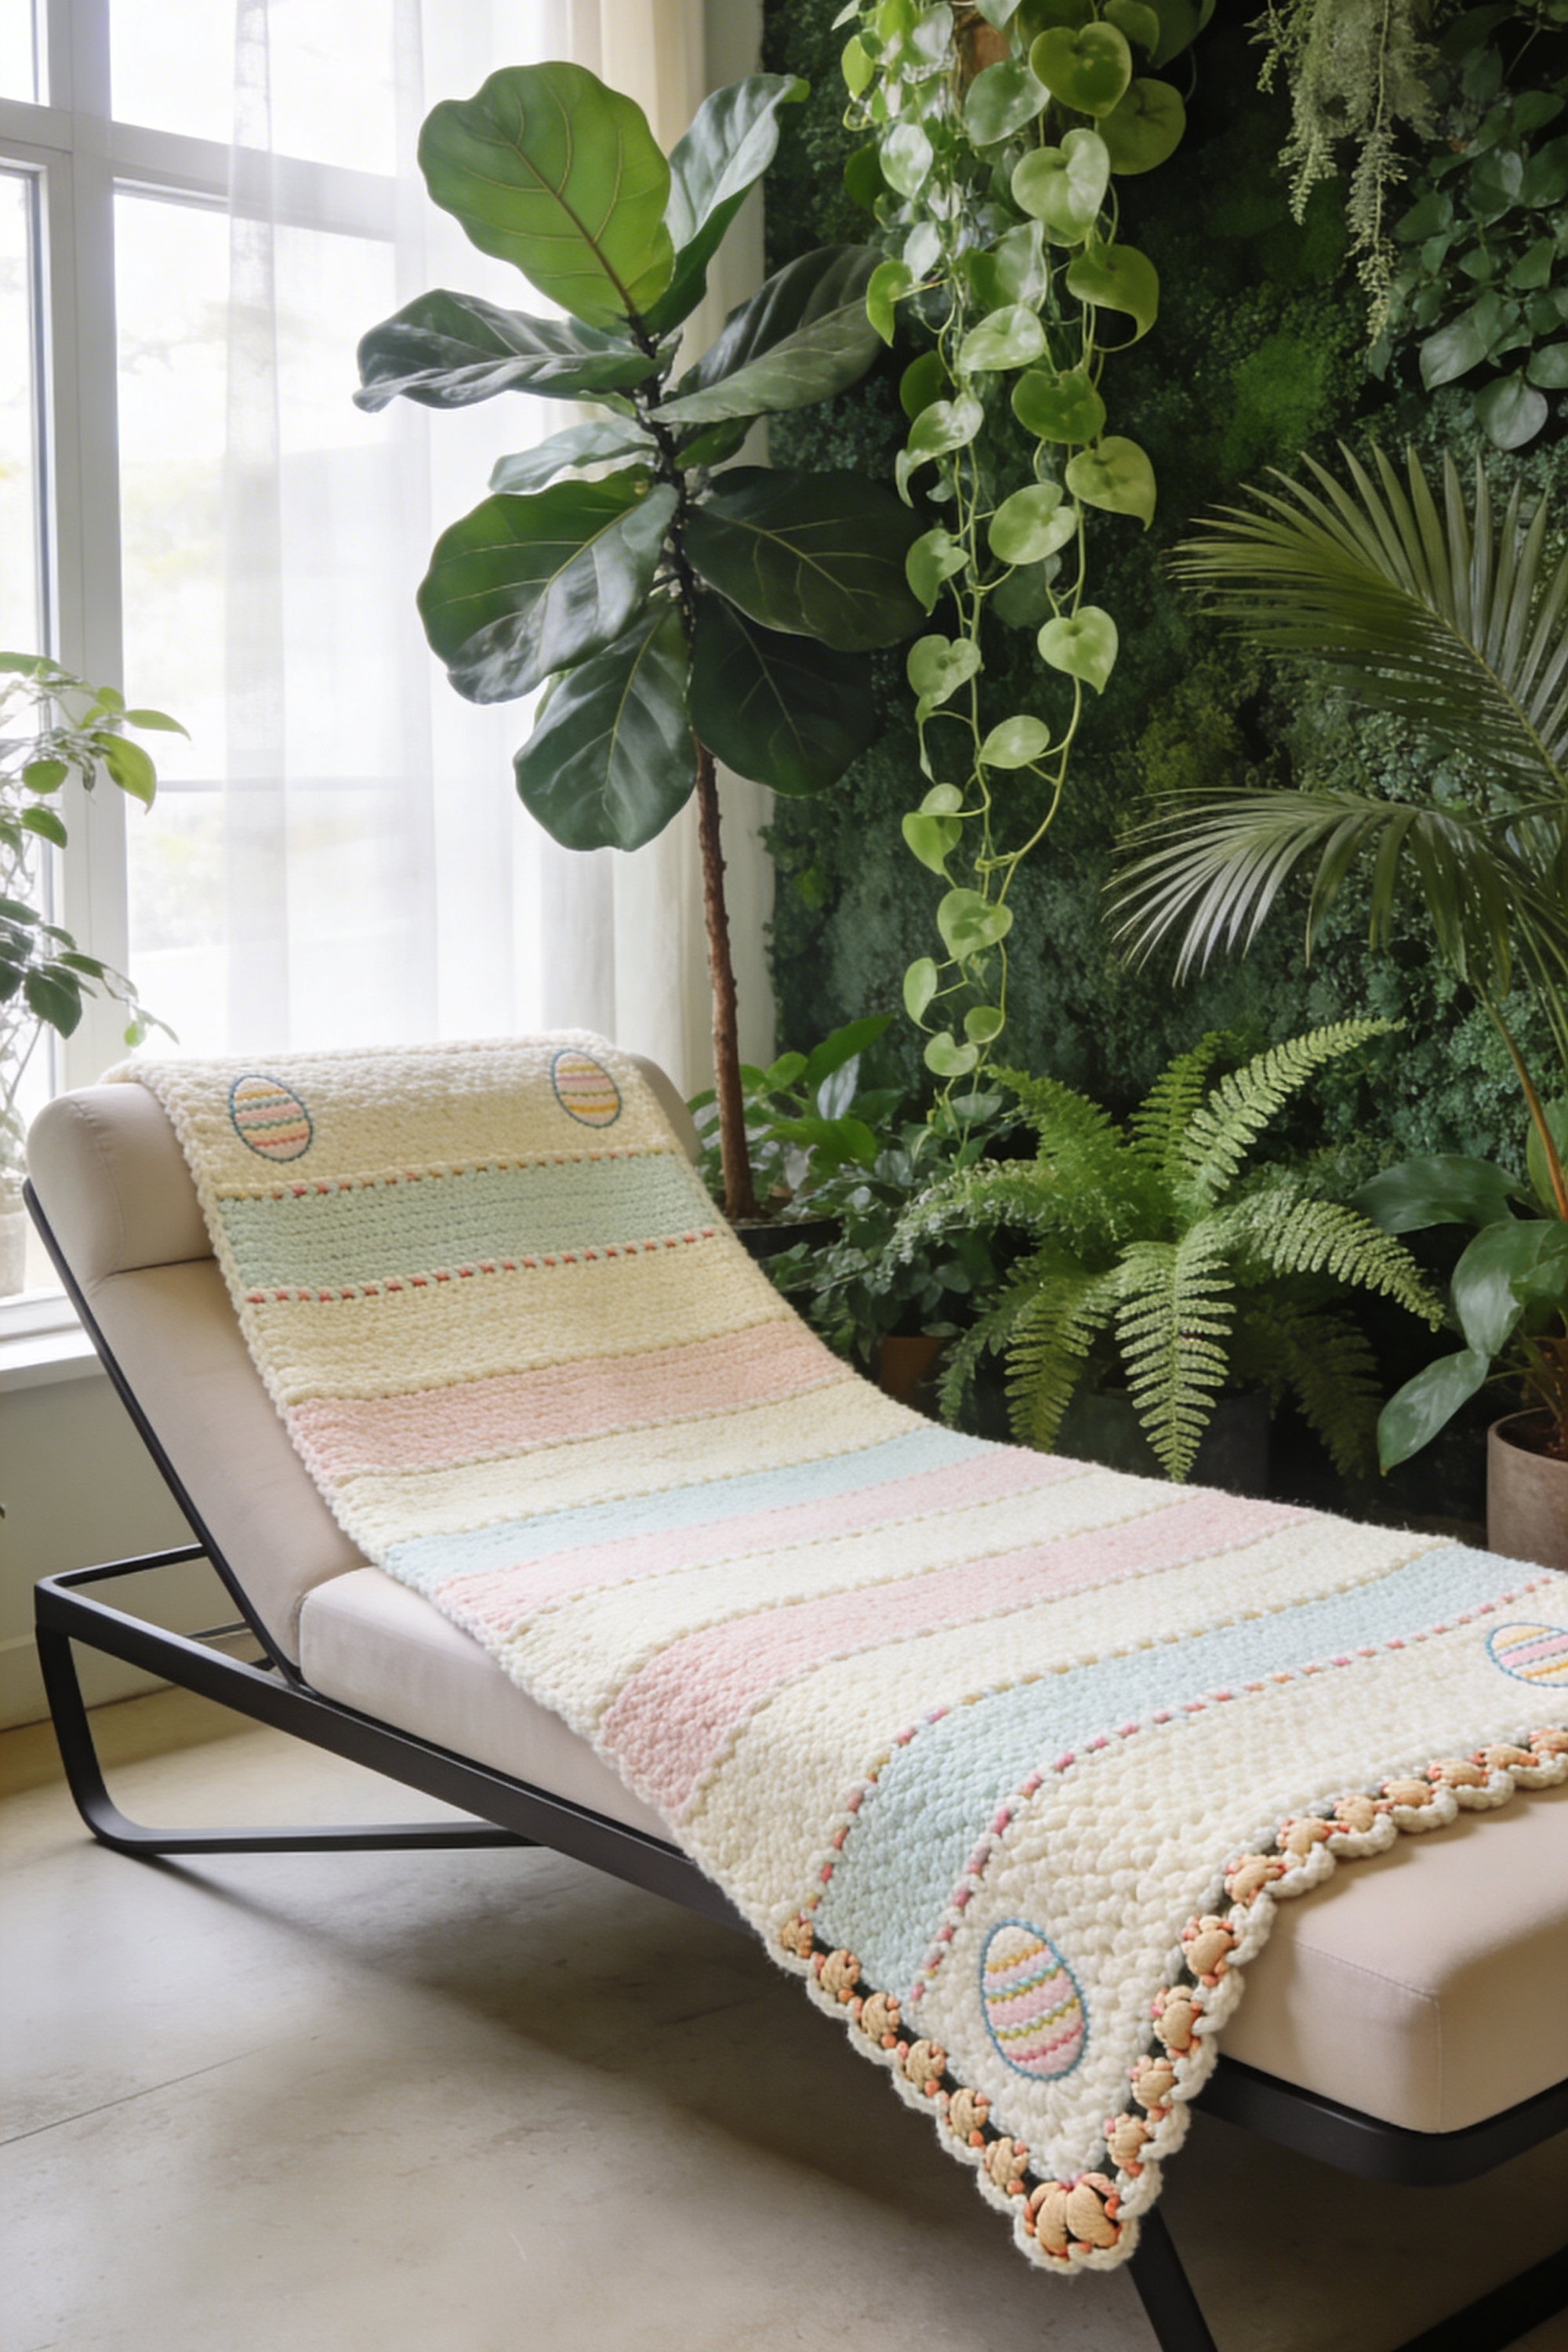
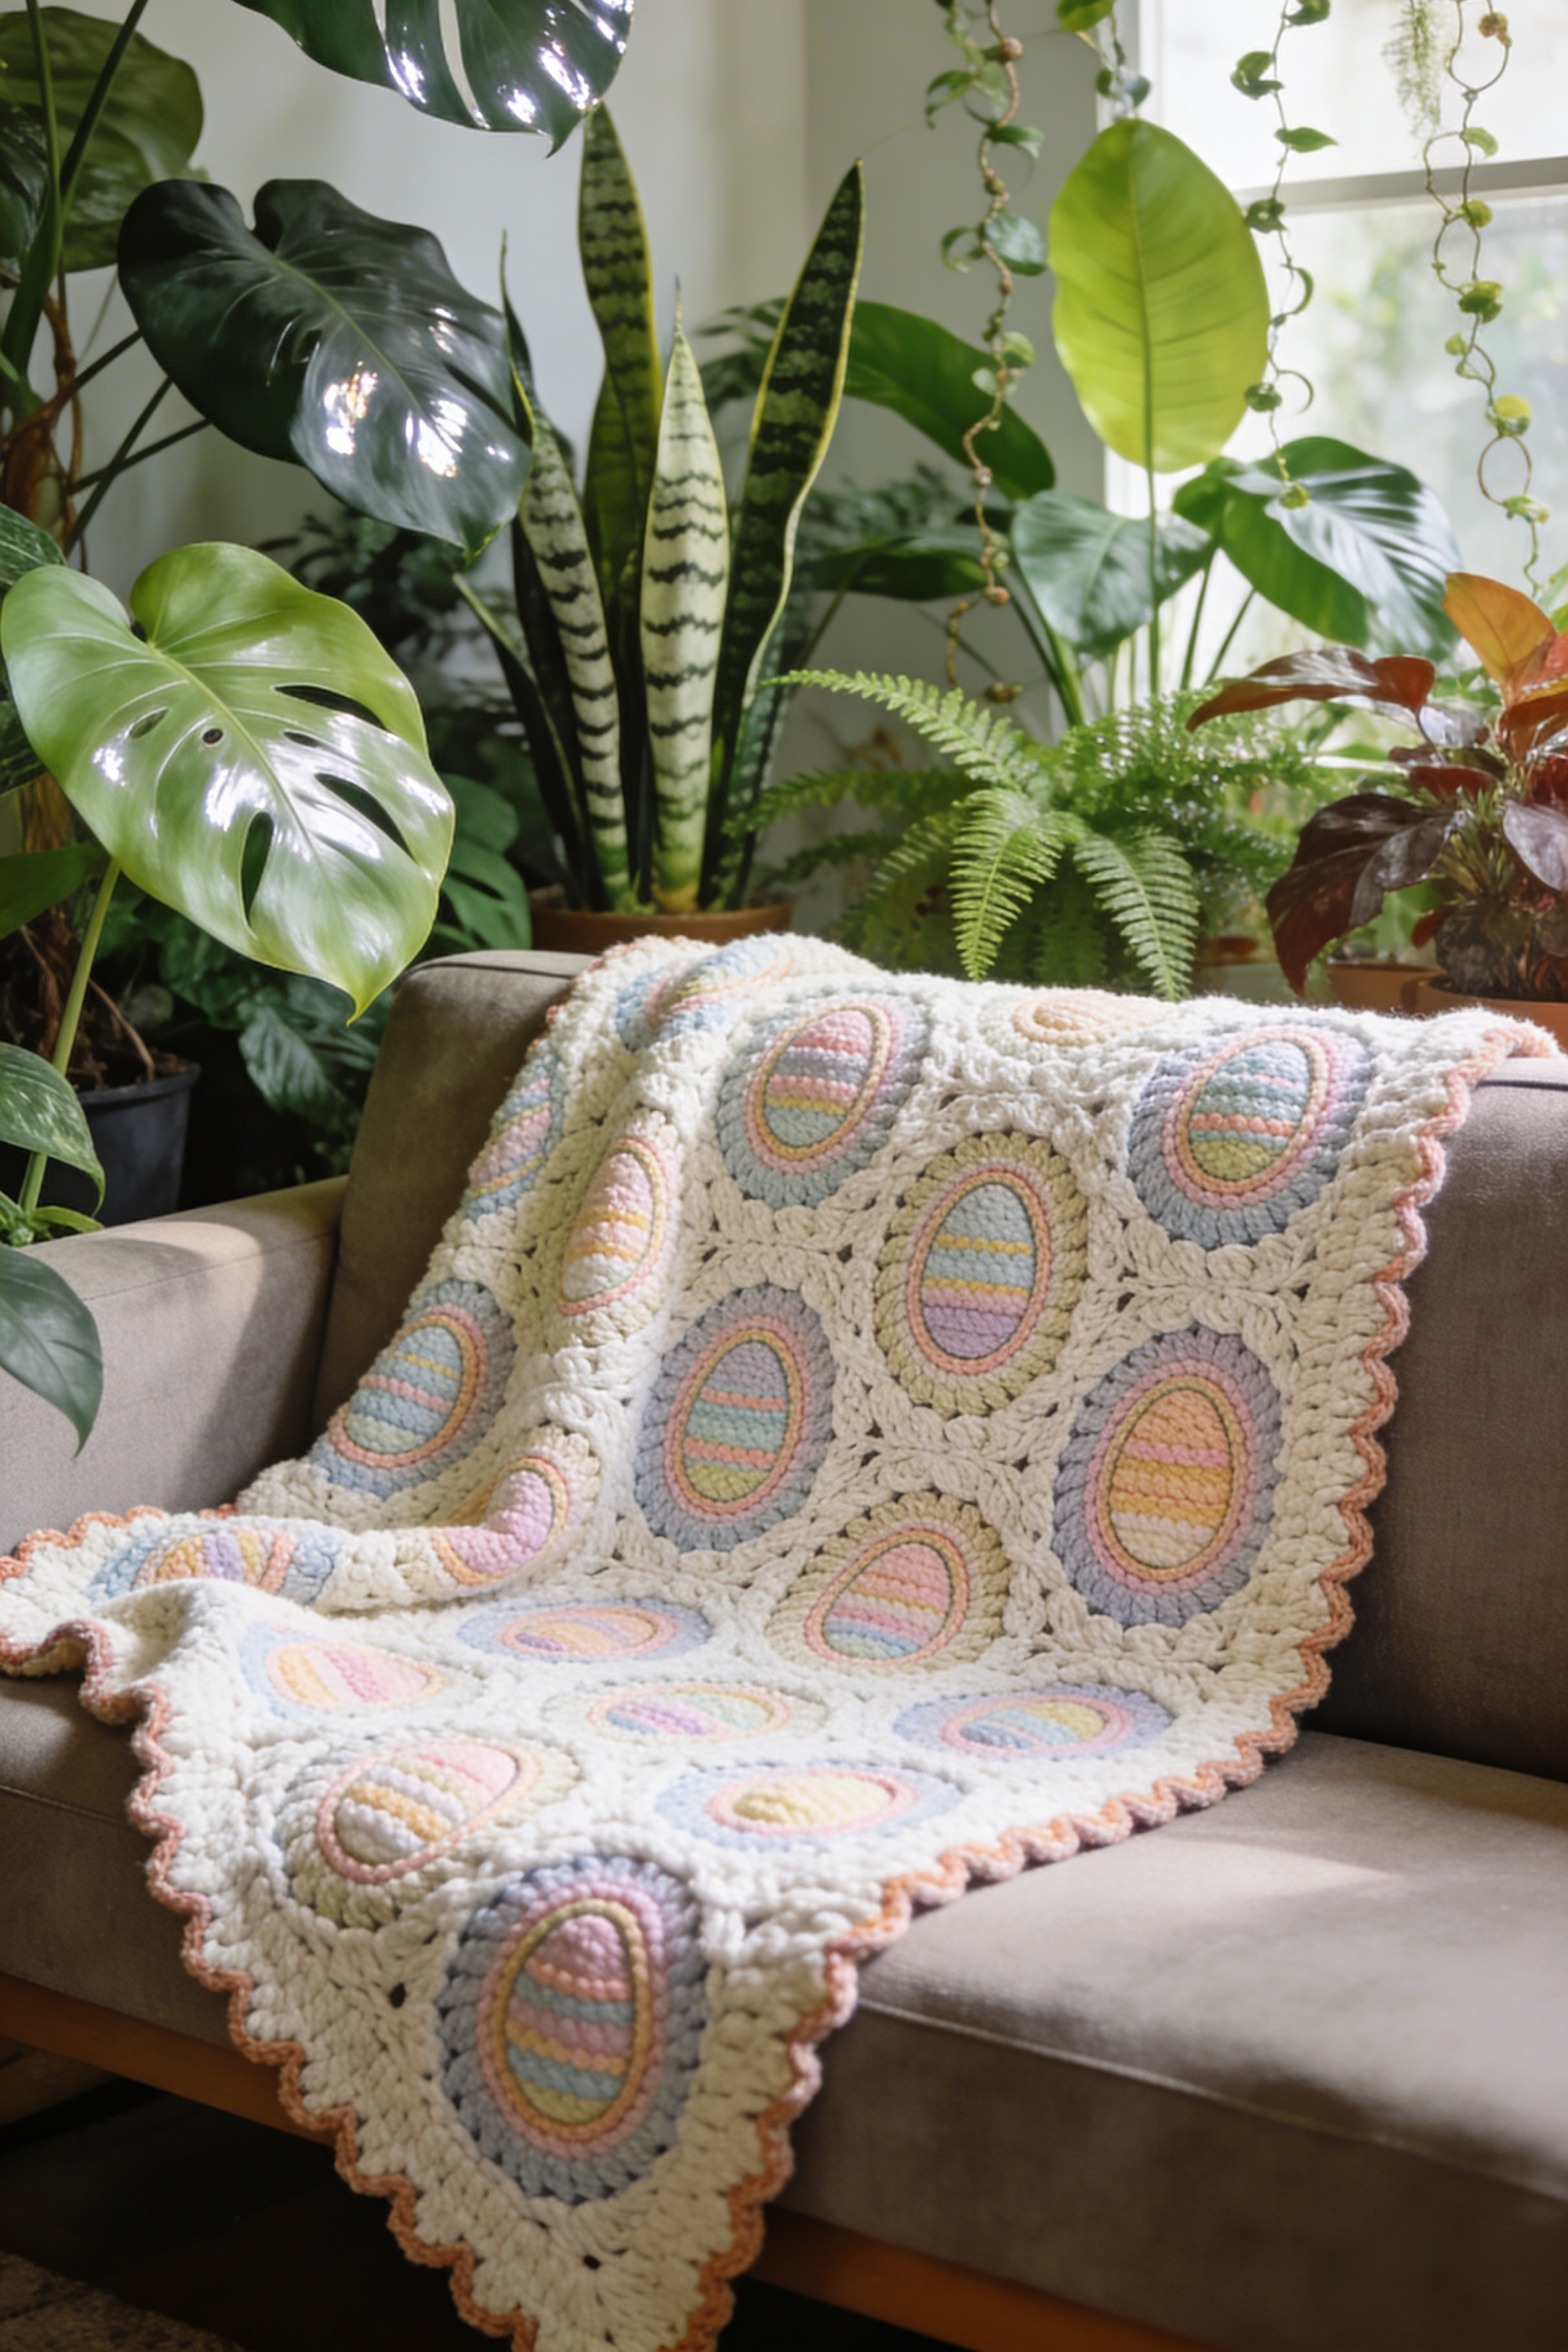
Pastel Striped Easter Egg Lounger Blanket Step by Step Tutorial
What you’re making
This is a soft, oversized crochet throw that drapes beautifully over a chaise, daybed, or sofa, with wide pastel stripes and sweet little Easter egg appliqués stitched near the corners. The look in the photo is plush and slightly nubbly, like a cozy “cloud” texture, with simple color banding that reads modern, not fussy. A playful edging finishes it off so the blanket feels intentional and heirloom at the same time.
You can make it as a lap throw, a couch throw, or a bed runner. The striped body is beginner friendly, and the eggs are quick add ons that instantly make it seasonal.
Materials and tools
- Super bulky yarn or bulky yarn held double (cream, blush pink, soft mint, pale sky blue, buttery pastel yellow)
- Small amount of contrast yarn for egg stripes (peach, lavender, pale coral, butter yellow, soft aqua)
- Crochet hook size that matches your yarn (typically 8 mm to 10 mm for super bulky, or 6 mm to 8 mm for bulky held double)
- Stitch markers
- Scissors
- Tapestry needle for weaving ends and sewing appliqués
- Measuring tape
- Optional, blocking mats and rust proof pins
- Optional, thin flannel or cotton backing fabric if you want extra structure
Finished size and customization notes
- Photo look reads like a long throw or lounger blanket, approximately 24 to 30 inches wide and 60 to 72 inches long.
- For a couch throw, aim for about 50 by 60 inches.
- For a bed runner, aim for 20 to 24 inches wide and as long as your bed.
- If your blanket looks airier than the photo, go down a hook size. If it looks stiff, go up a hook size.
- You can swap the order of stripe colors, but keep a creamy base as the dominant color to match the light, airy vibe.
Step by step instructions
Choose your yarn weight and decide your texture stitch.
The blanket in the photo has a plush, pebbly surface that looks like a beginner friendly textured stitch. Two great options are half double crochet in the third loop (gives a ridged knit look) or the lemon peel stitch (alternating single crochet and double crochet). If you want maximum softness and speed, half double crochet in rows is the easiest and still matches the cozy look.Make a swatch to lock in your hook size and stripe width.
Crochet a small swatch about 6 inches wide and 6 inches tall in your cream yarn. Measure how many stitches make 4 inches. Write that number down. Visual checkpoint: your stitches should look full and slightly puffy, not loose and lacy.Plan your finished width and calculate your starting chain.
Decide the width first. For a 28 inch wide lounger blanket, take your stitches per 4 inches, convert to stitches per inch, then multiply by 28. Round to the nearest even number if you are using lemon peel. If you are using simple half double crochet, any number works. Add 1 extra chain for turning if you are doing single crochet based rows, or 2 for half double crochet.
Visual checkpoint: your starting chain should reach the width of the chair seat area, plus a little overhang.Foundation row for a straighter edge.
If you struggle with tight chains, use foundation half double crochet instead of a chain. This helps the blanket lie flat like the photo. If you prefer a chain, make it loosely, then work the first row into the back bumps of the chain to create a clean edge.Work the first cream section to set the base.
Crochet 6 to 10 rows in cream, depending on how thick your yarn is. The photo shows cream as a major part of the design, so start strong with a generous cream band.
Visual checkpoint: the blanket should already feel plush and structured, not curling at the sides.Start the stripe rhythm.
Change to pastel mint. Work 4 to 8 rows, then switch back to cream for 2 to 4 rows, then blush for 4 to 8 rows, then cream again. Continue rotating soft colors with cream separators. Keep your stripe heights consistent so the finished look feels clean and modern.
Tip: change colors at the end of the last stitch of the row. Pull the new color through the final yarn over so the edge looks crisp.Carry yarn or cut yarn based on your preference.
For wide stripes, it is usually cleaner to cut the yarn and weave ends later. If you hate weaving ends, you can carry the cream up the side whenever cream repeats. Just keep the carry loose so it does not pucker. Since the photo has a tidy edge, cutting and weaving ends usually looks best.Keep your edges straight with a simple edge rule.
Always place the last stitch of each row into the top of the turning chain or the final stitch, depending on your stitch choice. Use a stitch marker in the first and last stitch of each row for the first 10 rows until your edges are perfect.
Visual checkpoint: the sides should look like straight columns, not wavy.Crochet until you reach your desired length.
For the lounger look, aim for long enough to run from the head of the chaise to beyond the foot. If you are making a couch throw, stop at about 60 inches. End with a cream section to mirror the beginning.Add the small dotted detail lines between stripes if you want the exact photo vibe.
The photo shows tiny raised dots like a simple surface accent line. You can replicate that by doing one “accent row” where you insert a contrasting color every few stitches as a surface slip stitch or as a row of bobbles.
Easy option: after finishing a stripe section, use a tapestry needle and a contrast yarn to embroider a running stitch along the stripe seam. Keep stitches small and evenly spaced.
Visual checkpoint: you should see a neat dotted line that feels playful but not busy.Make the Easter egg appliqués.
Use a small hook that matches your yarn so the eggs look firm and defined.
Egg base, simple oval:
- Chain 6.
- Work 2 single crochet in second chain from hook, single crochet in next 3, 3 single crochet in last chain.
- Continue on the other side of the chain: single crochet in next 3, 2 single crochet in last stitch. Join.
- Next round: increase at both ends to keep an oval shape.
- Continue 2 to 4 rounds until the egg is about 3 to 4 inches tall.
Add stripes by switching colors for one round at a time, or embroider stripes with a needle for cleaner lines.
Visual checkpoint: the egg should be slightly taller than it is wide, with smooth curves.
Outline the eggs for a polished “appliqué” look.
Use a slightly darker pastel outline, like soft coral or lavender. Work a round of slip stitches or single crochet around the egg. This makes it pop against the cream blanket like in the photo.Place the eggs on the blanket before sewing.
The photo shows eggs near the corners rather than centered. Lay your blanket flat and place one egg near one corner and another near the opposite corner, about 4 to 8 inches from the edge. Pin them in place.
Visual checkpoint: when you step back, the eggs should feel like little surprises, not dominating the design.Sew the eggs on invisibly.
Thread a tapestry needle with matching cream or the egg outline color. Use small whip stitches around the edge of the appliqué, catching only the top loops of the blanket stitches so the sewing does not show on the back.Crochet the playful edging.
The photo edge looks like a soft, bouncy trim. A great match is a simple scallop edge.
- Work one round of single crochet evenly around the blanket. Put 3 single crochet in each corner to turn smoothly.
- Next round, scallops: skip 2 stitches, work 5 double crochet in next stitch, skip 2 stitches, slip stitch in next. Repeat.
If you want a chunkier, more modern edge, use half double crochet scallops instead of double.
Visual checkpoint: the edging should ripple gently, not ruffle dramatically.
- Add optional tiny bobble accent on the edge.
If you want the exact playful feel, add a mini bobble every few scallops using a contrast pastel. Keep it subtle. Too many will look busy.
Troubleshooting
My blanket edges are wavy.
This usually means you accidentally added stitches at the ends. Count your stitches every few rows until your edges stabilize. Also check that you are not working into the side of the turning chain in addition to the last stitch.My stripes look uneven in height.
Measure your rows per stripe and write it down. If one color section is taller, unravel and redo it now, because the finished blanket reads “striped” only when the bands feel consistent.My appliqué eggs curl or cup.
Your increases are probably uneven. Add one more increase at the narrow ends and fewer along the sides. Blocking the egg appliqués flat before sewing also helps.The blanket feels stiff compared to the photo.
Go up one hook size or switch to a softer yarn. Some super bulky yarns are ropey and create stiffness. A plush chenille style yarn can match the pillowy look better, but be sure it is easy to crochet with.The scallop border is ruffling too much.
Your scallops are too dense. Try skipping 3 stitches instead of 2 between scallops, or use half double crochet for the scallop cluster.
Finishing details
- Weave in ends patiently and neatly. For a striped blanket, weaving ends is what makes it look expensive. Use a needle to run ends through multiple stitches, change direction once, then trim.
- Light blocking helps the stripes lie flat. Gently steam block or mist block and pat into shape. Avoid heavy stretching because you want the plush texture to stay puffy.
- Optional upgrade, add a lightweight lining. If you want the blanket to sit perfectly on a chaise, sew a thin cotton or flannel backing. Attach it with a simple whip stitch around the edge, then crochet your border through both layers.
- Optional upgrade, add a personalized tag. A small fabric label sewn into one corner looks boutique.
Shop Similar
- Super bulky chenille yarn in pastel colors
- Bulky yarn bundle in cream blush mint blue
- Large crochet hook set 8mm 10mm
- Tapestry needles and stitch markers kit
- Blocking mats and rust proof pins
Style it With
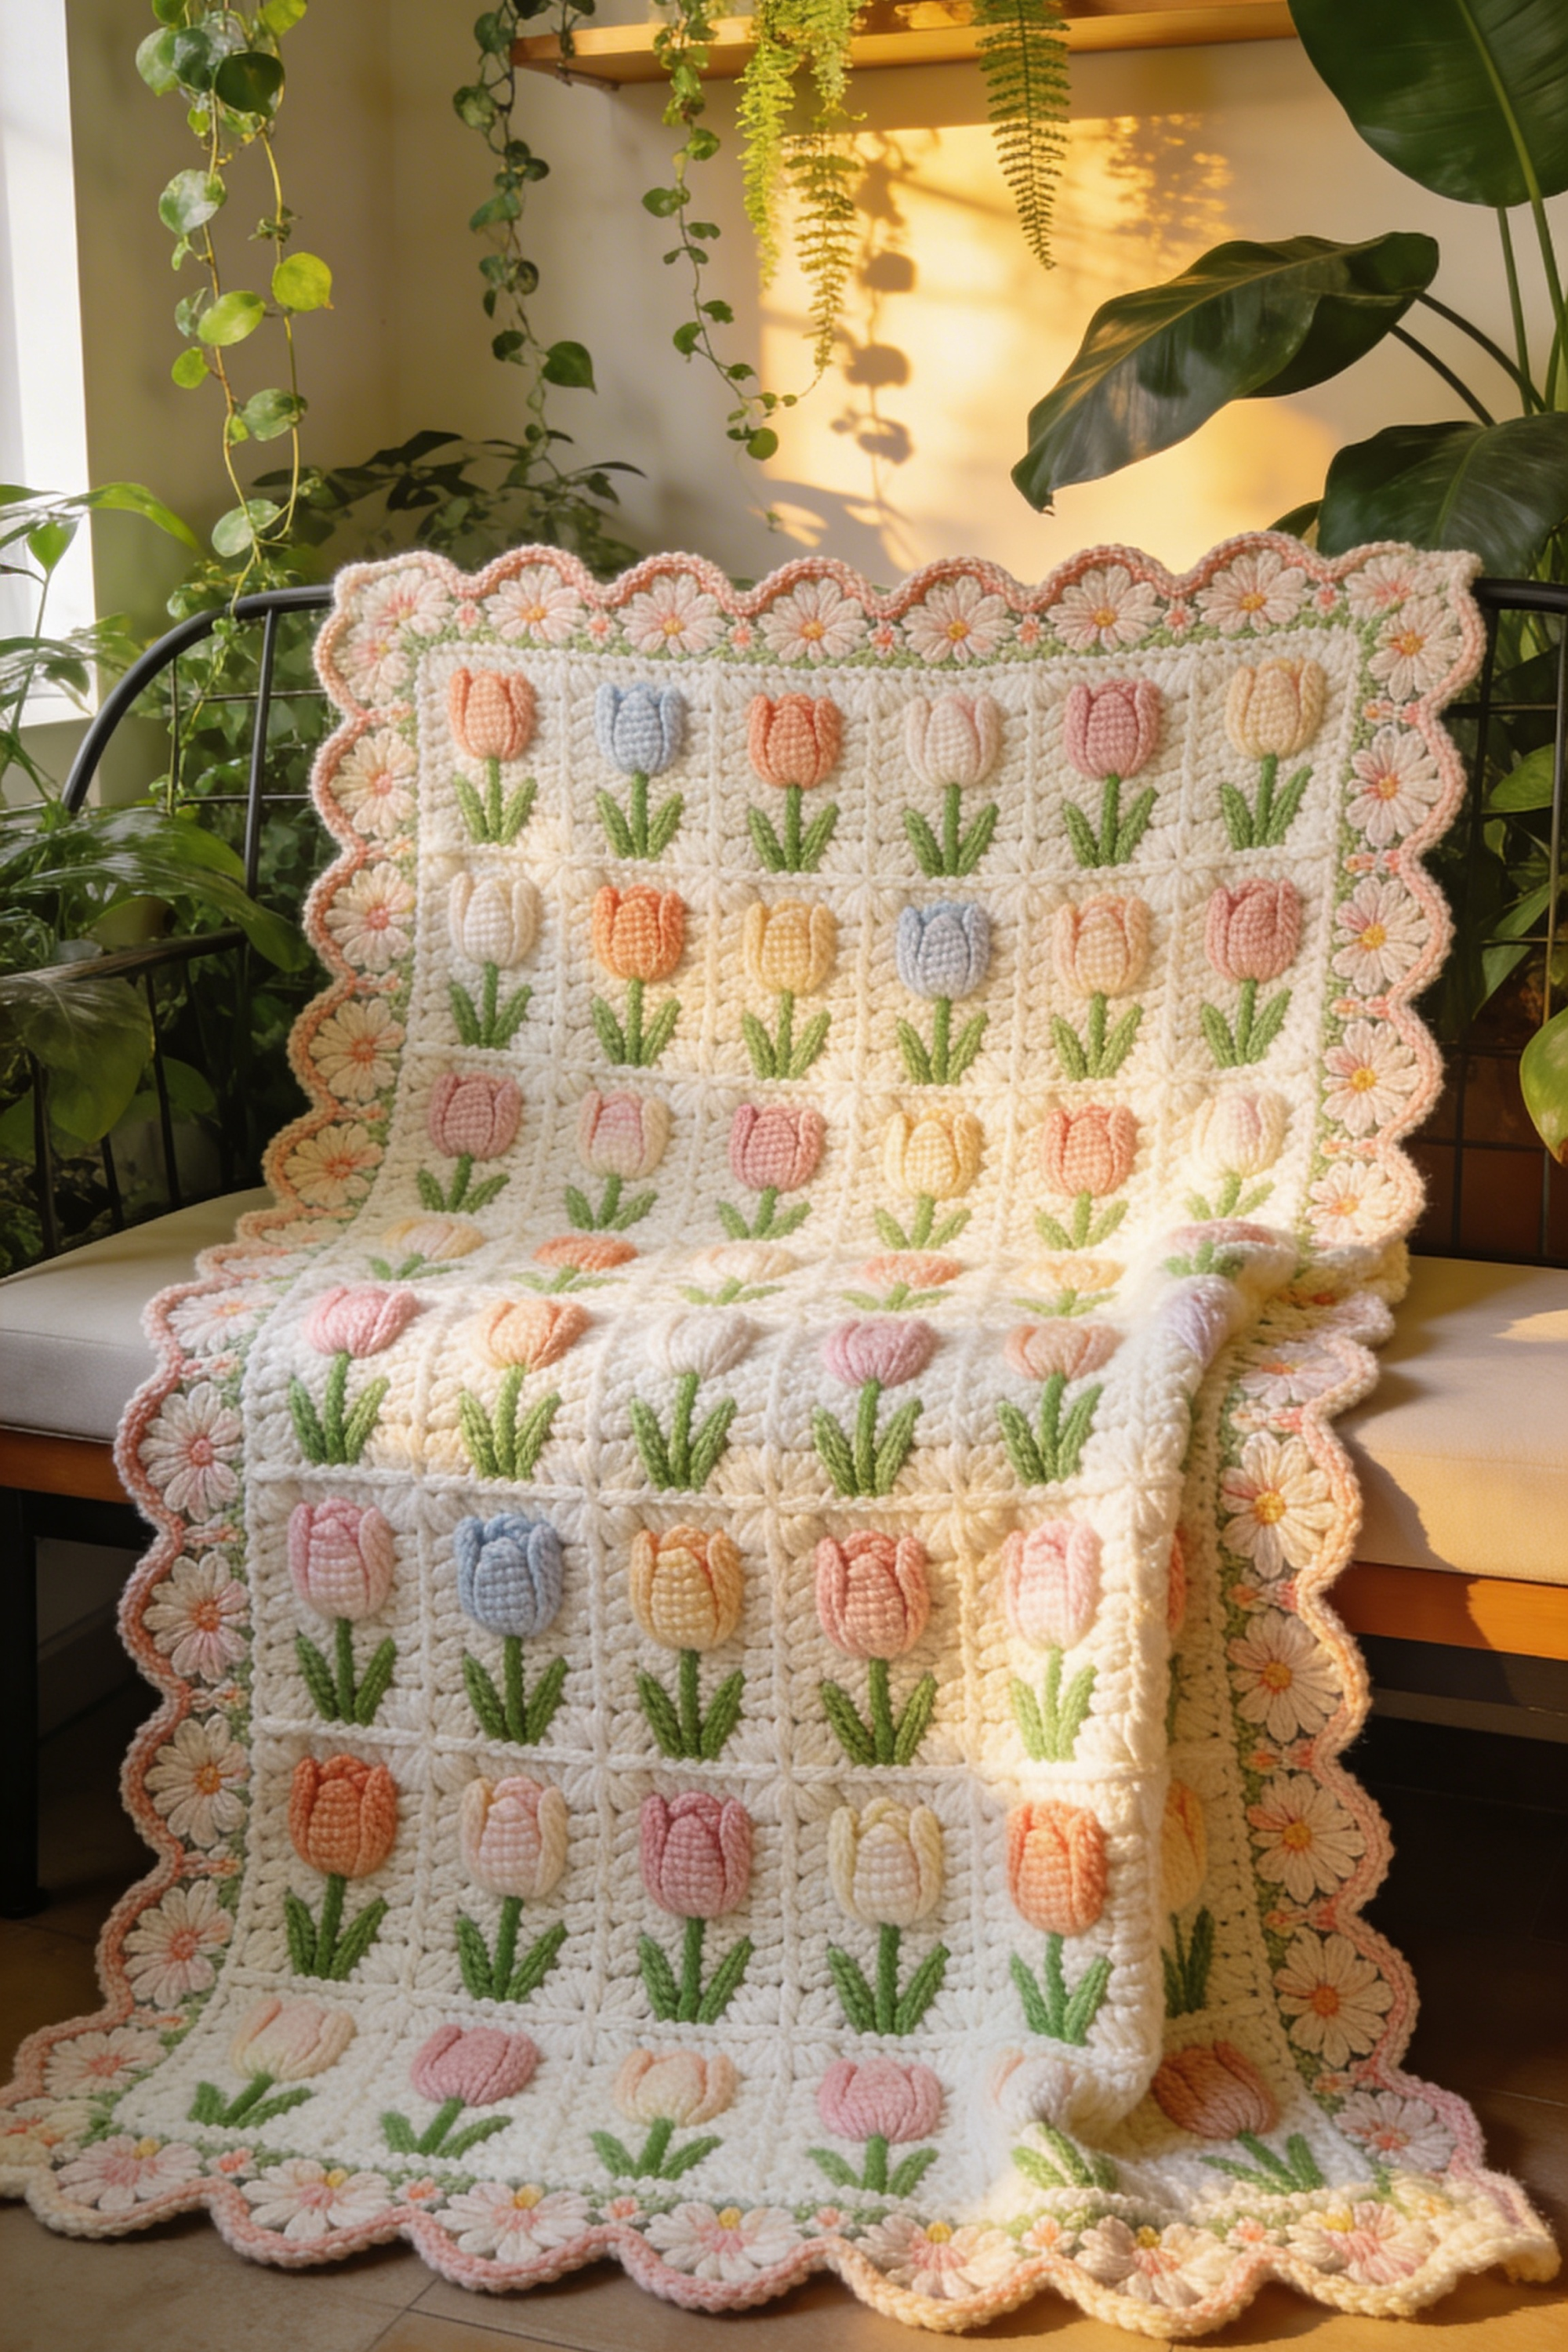
Tulip Garden Granny Square Blanket DIY Guide
What you’re making
This blanket is a full on spring statement: a grid of creamy granny style squares, each with a puffy tulip motif in soft pastel petals and green stems, finished with a wide scalloped daisy border. The photo look is plush, dimensional, and charming without feeling childish. It reads like a botanical quilt, but it is crochet, with each tulip sitting slightly raised from the background for that irresistible texture.
The build is modular, which means you can make a few squares at a time, join them, then treat yourself to the fun floral border at the end.
Materials and tools
- Worsted weight yarn or light bulky yarn (cream for background, green for stems and leaves, pastel peach, blush, butter yellow, soft blue, pale coral, and soft pink for tulips)
- Crochet hook 5 mm to 6.5 mm depending on yarn and your tension
- Stitch markers
- Scissors
- Tapestry needle
- Measuring tape
- Optional, blocking mats and pins
- Optional, fabric for backing if you want a quilt like finish
Finished size and customization notes
- The photo blanket looks like a generous throw, approximately 45 to 55 inches wide and 55 to 65 inches long.
- Each square appears about 6 to 8 inches. If you make 6 inch squares, an 8 by 10 grid gives about 48 by 60 inches before border.
- You can make it baby blanket size by doing 5 by 6 squares, or a couch throw by doing 8 by 10.
- Keep the background cream consistent for that clean, elevated look.
Step by step instructions
Decide your square size and choose a join style.
The photo has crisp square definition, which suggests either whip stitch join on the back or a flat slip stitch join on the front. If you want the cleanest look, use a flat slip stitch join with the same cream yarn so the grid lines blend in.Make one test tulip square first.
You are going to repeat it a lot, so you want it perfect. Your square should be plush and slightly thick. If it feels floppy, go down a hook size.Crochet the square background foundation.
Start with a classic granny square base in cream, but keep the center relatively solid, not too holey.
Option A, solid granny square: build with clusters but add chain 1 only at corners.
Option B, solid double crochet square: chain 4, join, then work solid rounds with corners formed by 2 double crochet, chain 2, 2 double crochet.Add the tulip motif using surface crochet or an inset motif panel.
The tulips in the photo look raised, like they are appliquéd or worked in bobble stitches. Two safe options:
Option 1, appliqué tulip: crochet a small tulip shape separately, then sew it on. This gives the puffiest look.
Option 2, bobble tulip: work bobbles in tulip colors directly into the square as you crochet a motif panel, then continue the square around it.Appliqué tulip method, petals.
- With tulip color, chain 6.
- Work single crochet, half double crochet, double crochet, double crochet, half double crochet across to form a rounded top.
- Make a second identical petal piece, then stitch them together at the base so the tulip looks full.
Visual checkpoint: your tulip top should look like a soft cup, not a flat circle.
Appliqué tulip method, stem and leaves.
- With green, chain 10 to 14 depending on your square size.
- Slip stitch back down for a neat cord stem.
- For leaves, chain 6, then work slip stitch, single crochet, half double crochet, double crochet, half double crochet, single crochet back down the chain.
Make two leaves per tulip.
Place the tulip on the square.
Center it visually, but slightly lower than dead center so there is room for the daisy border later. Pin the petals first, then position the stem and leaves.Sew the motif pieces with tiny stitches.
Use matching yarn colors and catch only the top loops of the square stitches. This keeps the back tidy.Repeat the square, but vary tulip colors.
The photo alternates pastel tulips, creating a soft rainbow garden. Keep greens consistent and rotate petal colors. A pleasing rhythm is to make rows of mixed colors rather than strict patterns.Block each square before joining.
This matters. Blocking makes the squares perfectly same sized, so your finished blanket looks polished. Mist with water, pin to size, let dry.Join the squares into rows.
Lay them out in your final arrangement. Join across one row at a time with a flat slip stitch join. Then join the rows together.
Visual checkpoint: you should see clean grid lines, and the tulips should line up nicely.Add a joining stability round.
Once the full panel is joined, crochet one round of single crochet in cream around the entire blanket. Put 3 single crochet in each corner. This gives you a solid base for the decorative border.Crochet the daisy border round.
The photo border is filled with daisy motifs and scalloped edges. You can mimic this by making a daisy granny border.
Daisy round concept: work small daisy motifs spaced evenly along the edge, with petals created by chain loops and slip stitches.
If you prefer an easier look, crochet a round of puff stitch petals in cream with yellow centers, then add a green accent round.Build the wide floral border.
Aim for 3 to 6 rounds total, depending on your yarn thickness. Keep the border colors soft and consistent: cream base, green accents, pastel flower touches, and a blush scallop outer edge.Create the scalloped outer edge.
Work a scallop round in blush or peach: skip 2 stitches, 5 double crochet in next stitch, skip 2, slip stitch in next. Adjust skipping as needed so it lies flat.
Visual checkpoint: the scallops should form gentle waves, not tight ruffles.Final tidy up and optional backing.
Weave all ends. If you want a quilted feel, add a soft backing fabric and hand stitch it on, then crochet one more cream edging round through both layers.
Troubleshooting
My squares are different sizes.
Block them. If one is still larger, your tension changed. Use the same hook and count rounds carefully. You can also add or remove a border round on a single square to match.My appliqués look flat.
Use a slightly smaller hook for the tulip pieces or choose a yarn with more body. Sewing the petals only around the edges and leaving the center slightly loose creates lift.The border is rippling.
Too many stitches. Remove the last round and try skipping more stitches between scallops, or switch scallops to half double crochet.Joining looks bulky.
Use a flat slip stitch join and do not pull too tight. A tight join can make the blanket pucker.
Finishing details
- Steam block lightly to relax joins, but do not smash the tulip appliqués.
- Trim any fuzzy ends and tuck in any loose motif threads.
- Optional upgrades:
- Add a fabric label in one corner.
- Add a simple hanging loop on one corner if you want to display it as a wall blanket.
- Add a solid cream backing for extra warmth and a clean underside.
- Add a thin pastel piping ribbon along the back edge for a boutique finish.
Shop Similar
- Worsted yarn set in spring pastels
- Crochet hook set 5mm 6mm ergonomic
- Blocking mats and pins for granny squares
- Stitch markers tapestry needles kit
- Soft cotton backing fabric for blankets
Style it With
Pastel Easter Egg Granny Square Throw How To Guide
What you’re making
This is a crochet granny square style throw covered in oval Easter egg motifs, each egg filled with soft pastel stripes and framed by a creamy textured square. The overall vibe is light and cozy, with a scalloped edge that adds a gentle, vintage sweetness without looking frilly. In the photo, the blanket sits in an indoor plant filled space, which makes the pastels look modern and fresh.
The magic is in the repeat: one egg square made many times, then joined into a throw, then finished with an easy scallop border.
Materials and tools
- Worsted weight yarn or light bulky yarn (cream for background, pastel stripe colors like blush, mint, baby blue, lavender, butter yellow, pale peach)
- Crochet hook 5 mm to 6 mm
- Stitch markers
- Scissors
- Tapestry needle
- Measuring tape
- Optional, blocking mats and pins
Finished size and customization notes
- The pictured throw reads as a couch throw, around 45 to 50 inches square or slightly rectangular.
- Each square appears about 7 to 8 inches.
- A 6 by 6 layout makes a cozy lap throw. A 7 by 8 layout makes a full couch throw.
- Keep the cream background consistent so the eggs pop.
Step by step instructions
Choose your egg technique, appliqué or colorwork.
The eggs in the photo look smooth and clearly striped, which can be achieved two ways:
Option 1, crochet the egg separately with color changes and sew it on. This gives crisp stripes and a slightly raised look.
Option 2, crochet the egg as part of the square using color changes in the round. This is faster but can look less defined unless your tension is consistent.Make a test egg appliqué.
Use your pastel colors and do one egg. Place it on a cream swatch to see if it pops.
Visual checkpoint: the egg should be about palm sized, not tiny. It needs to read from across the room.Crochet the egg appliqué base.
- With pastel color A, chain 7.
- In second chain from hook: 2 single crochet. Single crochet in next 4 chains. In last chain: 4 single crochet.
- Continue on the other side of the chain: single crochet in next 4, 2 single crochet in last. Join.
- Round 2: increase at both ends to lengthen the oval, and add one increase on each side to widen it slightly.
- Round 3 and 4: continue shaping until it is about 3.5 to 4.5 inches tall.
Add the striped fill.
For the cleanest stripes, switch colors every round. For a softer look, switch every two rounds. Keep stripe order varied so squares do not feel repetitive.
Tip: carry yarn behind the work only if you are comfortable. Otherwise, cut and weave ends into the back of the egg.Add an outline round.
Use cream or a slightly deeper pastel outline. Work slip stitches around the edge to frame the egg like in the photo.Crochet the square background.
Work a cream square that will hold the egg. A solid square looks best because it supports appliqué stitching.- Chain 4, join.
- Round 1: 12 double crochet into ring, join.
- Round 2: build into a square by adding corner chains and clusters.
Or use a solid double crochet square with corners formed by 2 double crochet, chain 2, 2 double crochet.
Sew the egg onto the center of the square.
Center it. Pin, then sew around the edge using small stitches.
Visual checkpoint: the egg should sit flat with no curling edges.Add a decorative background texture around the egg.
The photo shows a soft, textured cream surface. You can mimic that by adding a round of puff stitches or bobbles around the egg area before squaring off. If you want it simple, stick to solid stitches and let the eggs be the star.Repeat for the number of squares you need.
Make a color plan: mix pastel stripe palettes so each egg feels unique. A good rule is to keep one stripe color consistent across all eggs, like butter yellow, and rotate the others.Block squares to size.
Blocking is what makes this blanket look high end. Wet block or mist block each square to the same measurement.Arrange your layout.
Lay the squares out on the floor. Alternate eggs so similar stripe palettes do not touch.
Visual checkpoint: step back and you should see a soft, balanced pastel scatter.Join the squares.
Use a flat slip stitch join in cream for a clean grid. Join squares into rows first, then join rows together.Add a stabilizing border round.
Single crochet around the blanket in cream. Add 3 single crochet at each corner.Crochet the scalloped edge.
Use a peach or blush yarn like the photo edging.
- Skip 2 stitches, 5 double crochet in next, skip 2, slip stitch in next.
Adjust to skip 3 stitches if your scallops ripple.
Optional, add a second scallop round.
If you want a fuller edge, add another scallop round in cream on top of the pastel scallops.Final finishing.
Weave in ends. Light steam block the edges so the scallops relax into gentle waves.
Troubleshooting
My egg stripes look messy.
Try embroidering stripes instead of crocheting them. Crochet the egg in one pastel, then use a needle to stitch straight horizontal stripes.My eggs are not centered.
Use stitch markers to find the exact center stitches of the square before sewing.The blanket is pulling at joins.
You joined too tightly. Rejoin with looser tension, or use whip stitch join on the back for a softer seam.Scallops are ruffling.
Skip more stitches between scallops or switch the 5 double crochet cluster to 5 half double crochet.
Finishing details
- Keep appliqué backs tidy by weaving ends into the egg before sewing it down.
- If you want extra durability, add a hidden line of sewing thread around the egg edge in a matching color.
- Optional upgrades:
- Add a small bow appliqué to a few eggs for variety.
- Add a fabric backing so the underside looks clean.
- Add corner tassels in cream for a relaxed modern finish.
- Add a label and date for heirloom vibes.
Shop Similar
- Pastel yarn bundle for crochet blankets
- Cream worsted yarn for granny squares
- Crochet blocking board and pins
- Tapestry needle set for weaving ends
- Ergonomic crochet hook set 5mm 6mm
Style it With
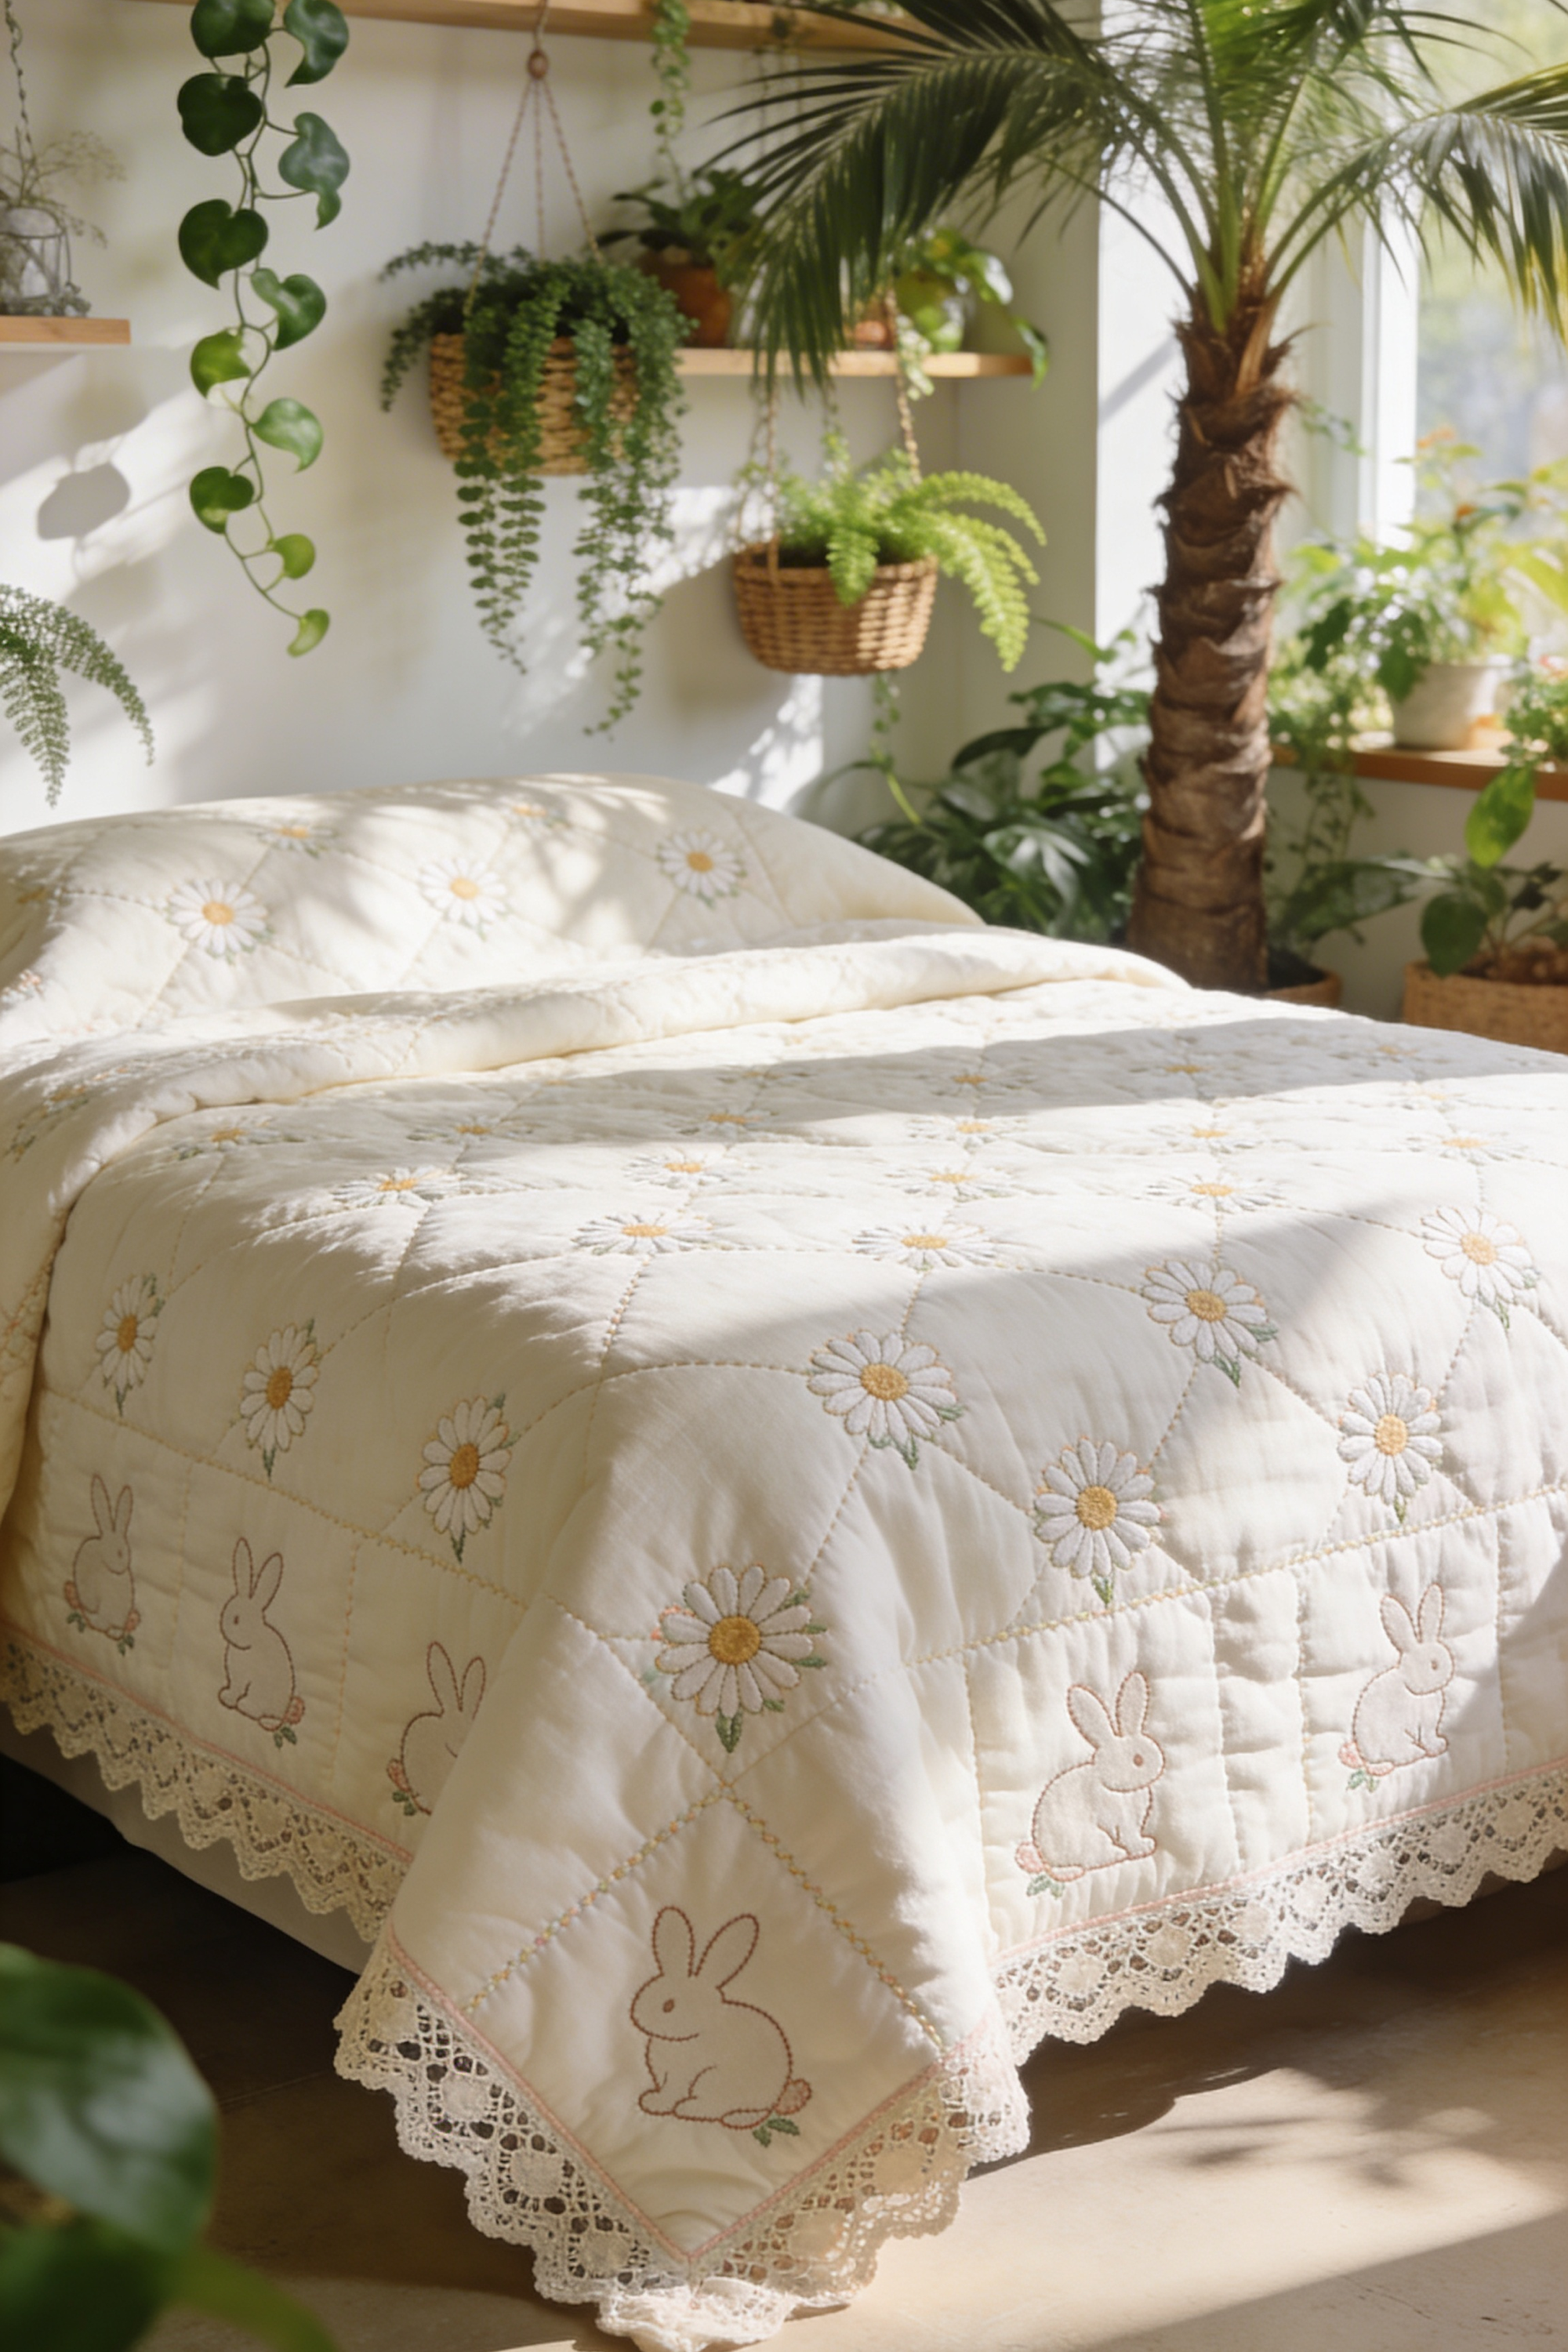
Daisy Quilt With Bunny Corner Panels Make It Yourself Tutorial
What you’re making
This is a soft, sunlit spring quilt that feels like a breath of fresh air: creamy fabric, scattered embroidered daisies, and sweet bunny motifs along the border, finished with a lace trim. The photo look is gentle and classic, with that “vintage nursery meets airy plant filled bedroom” feeling. The quilting lines form a subtle diamond grid that makes the daisies feel evenly sprinkled, and the lace edge adds a delicate finishing touch.
This is a sewing project, not crochet, and it is perfect if you want a seasonal quilt that can live on the bed all spring and still look timeless.
Materials and tools
- Quilt top fabric, cream or warm ivory cotton (enough for your quilt size)
- Quilt backing fabric, soft cotton in a coordinating cream or pale pastel
- Batting, cotton or bamboo blend for a breathable loft
- Embroidery floss in white, soft yellow, and green for daisies
- Embroidery floss in soft brown or taupe for bunny outlines
- Lace trim, wide scalloped lace like the photo
- Sewing machine
- Quilting foot or walking foot
- Rotary cutter, ruler, and cutting mat
- Pins or quilting clips
- Fabric marking pen or chalk
- Embroidery needle and hoop
- Iron and ironing board
- Measuring tape
- Optional, pre made bunny embroidery patches if you want a shortcut
Finished size and customization notes
- The photo reads like a full or queen bed quilt, but you can scale it. Common sizes:
- Throw: about 50 by 60 inches
- Twin: about 68 by 86 inches
- Full: about 82 by 90 inches
- Queen: about 90 by 95 inches
- The border bunnies can be placed only on corners, or repeated along the lower edge like the photo.
- Use a cream base fabric with a soft sheen for the most elevated look.
Step by step instructions
Decide your quilt size and calculate fabric needs.
Add at least 4 inches extra on all sides for quilting and trimming. For a queen size top, you often piece fabric widths together. If you want a seamless look, use extra wide backing and a wide top fabric if available.Choose your batting loft.
The quilt in the photo has a soft puff but not a thick comforter loft. A cotton batting around 1 eighth to 1 quarter inch loft is ideal. Bamboo blends drape beautifully too.Pre wash and press your fabrics.
Cream fabrics can shrink and show puckers if you skip this step. Wash, dry, then press smooth.Cut your quilt top and backing.
Cut the top panel to your final size plus 4 inches extra each direction. Cut backing the same, or slightly larger.Plan the daisy placement.
The photo shows daisies scattered evenly across the quilt, not clustered. Draw a light grid with chalk to guide placement. A simple approach is to place one daisy roughly every 8 to 12 inches in a staggered pattern.Embroider the daisies on the quilt top before quilting.
This is important. Embroidery after quilting is harder because the layers are thick.
Daisy method:- Use lazy daisy stitches for petals in white.
- Use French knots or satin stitch for yellow centers.
- Use a simple stem stitch for tiny green leaves.
Visual checkpoint: each daisy should look delicate, not chunky. Keep petals small and consistent.
Create the bunny border motifs.
The bunnies in the photo look like simple line embroidery. Place them along the bottom edge and at corners.
Bunny method:- Trace a bunny outline with a washable marker. Keep it minimal, just ears, head, body, and tail circle.
- Stitch the outline with backstitch in soft taupe.
- Add a tiny tail circle with a few satin stitches or a small puff of thread.
Visual checkpoint: bunnies should feel subtle and sweet, not cartoonish.
Add a thin accent line above the bunnies.
The photo shows a gentle border line that frames the bunny strip. Stitch a straight line with your sewing machine or embroider a running stitch.Build the quilt sandwich.
Lay backing right side down, then batting, then quilt top right side up. Smooth each layer carefully. Pin or baste heavily to prevent shifting.Mark your quilting grid.
The quilt has a diamond grid. Use a chalk line or a washable marker to mark diagonal lines about 6 to 10 inches apart, then mark the opposite diagonal direction to form diamonds.Quilt with a walking foot.
Quilt along one direction first, then the other. Start in the center and work outward.
Visual checkpoint: the quilt should stay smooth with gentle puff between lines, not bunching.Trim the quilt edges square.
Use a large ruler. Trim evenly so your border finishes clean.Bind the quilt.
You can bind traditionally with bias binding in cream or pale blush. If you want the lace edge like the photo, you can add lace as the final trim instead of or on top of binding.Attach the lace trim.
Align lace scallops so they hang evenly past the quilt edge. Stitch the lace to the quilt edge with the sewing machine, then fold binding over the lace seam so the attachment looks neat. If you are skipping binding, sew lace to the edge, then zigzag or serge the raw edge under the lace so it does not fray.Add corner details.
The photo has bunnies near corners and the lace is crisp. Reinforce corners by stitching slowly, pivoting carefully, and trimming bulky seam allowance under lace.Final press and drape test.
Press lightly with steam. Lay it on the bed and adjust lace so it falls evenly.
Visual checkpoint: the quilt should look airy, smooth, and softly structured, with bunnies visible along the bottom edge.
Troubleshooting
My embroidery puckers the fabric.
Use an embroidery hoop and do not pull stitches too tight. Press from the back with steam and a pressing cloth.Quilting lines are wavy.
Mark more clearly, use a walking foot, and slow down. Also make sure your quilt sandwich is well basted.Lace trim looks uneven.
Pin the lace every few inches before sewing. Measure from scallop tip to quilt edge to keep it consistent.Fabric looks dingy instead of creamy.
Choose warm ivory instead of stark white. The photo reads warm and soft, not bright white.
Finishing details
- Wash gently on cold and tumble dry low to create that soft quilted crinkle.
- Add a small corner hanging loop if you like to store it on a hook.
- Optional upgrades:
- Add a thin pastel binding under the lace for a layered heirloom look.
- Add a monogram or date embroidery on one corner.
- Add extra daisies only on the top third for a more minimal modern version.
- Add a lightweight linen backing for a slightly more elevated drape.
Shop Similar
- Cream quilting cotton fabric yardage
- Cotton quilt batting queen size
- Wide scalloped lace trim for quilting
- Embroidery floss set neutral pastel
- Walking foot quilting foot for sewing machine
Style it With
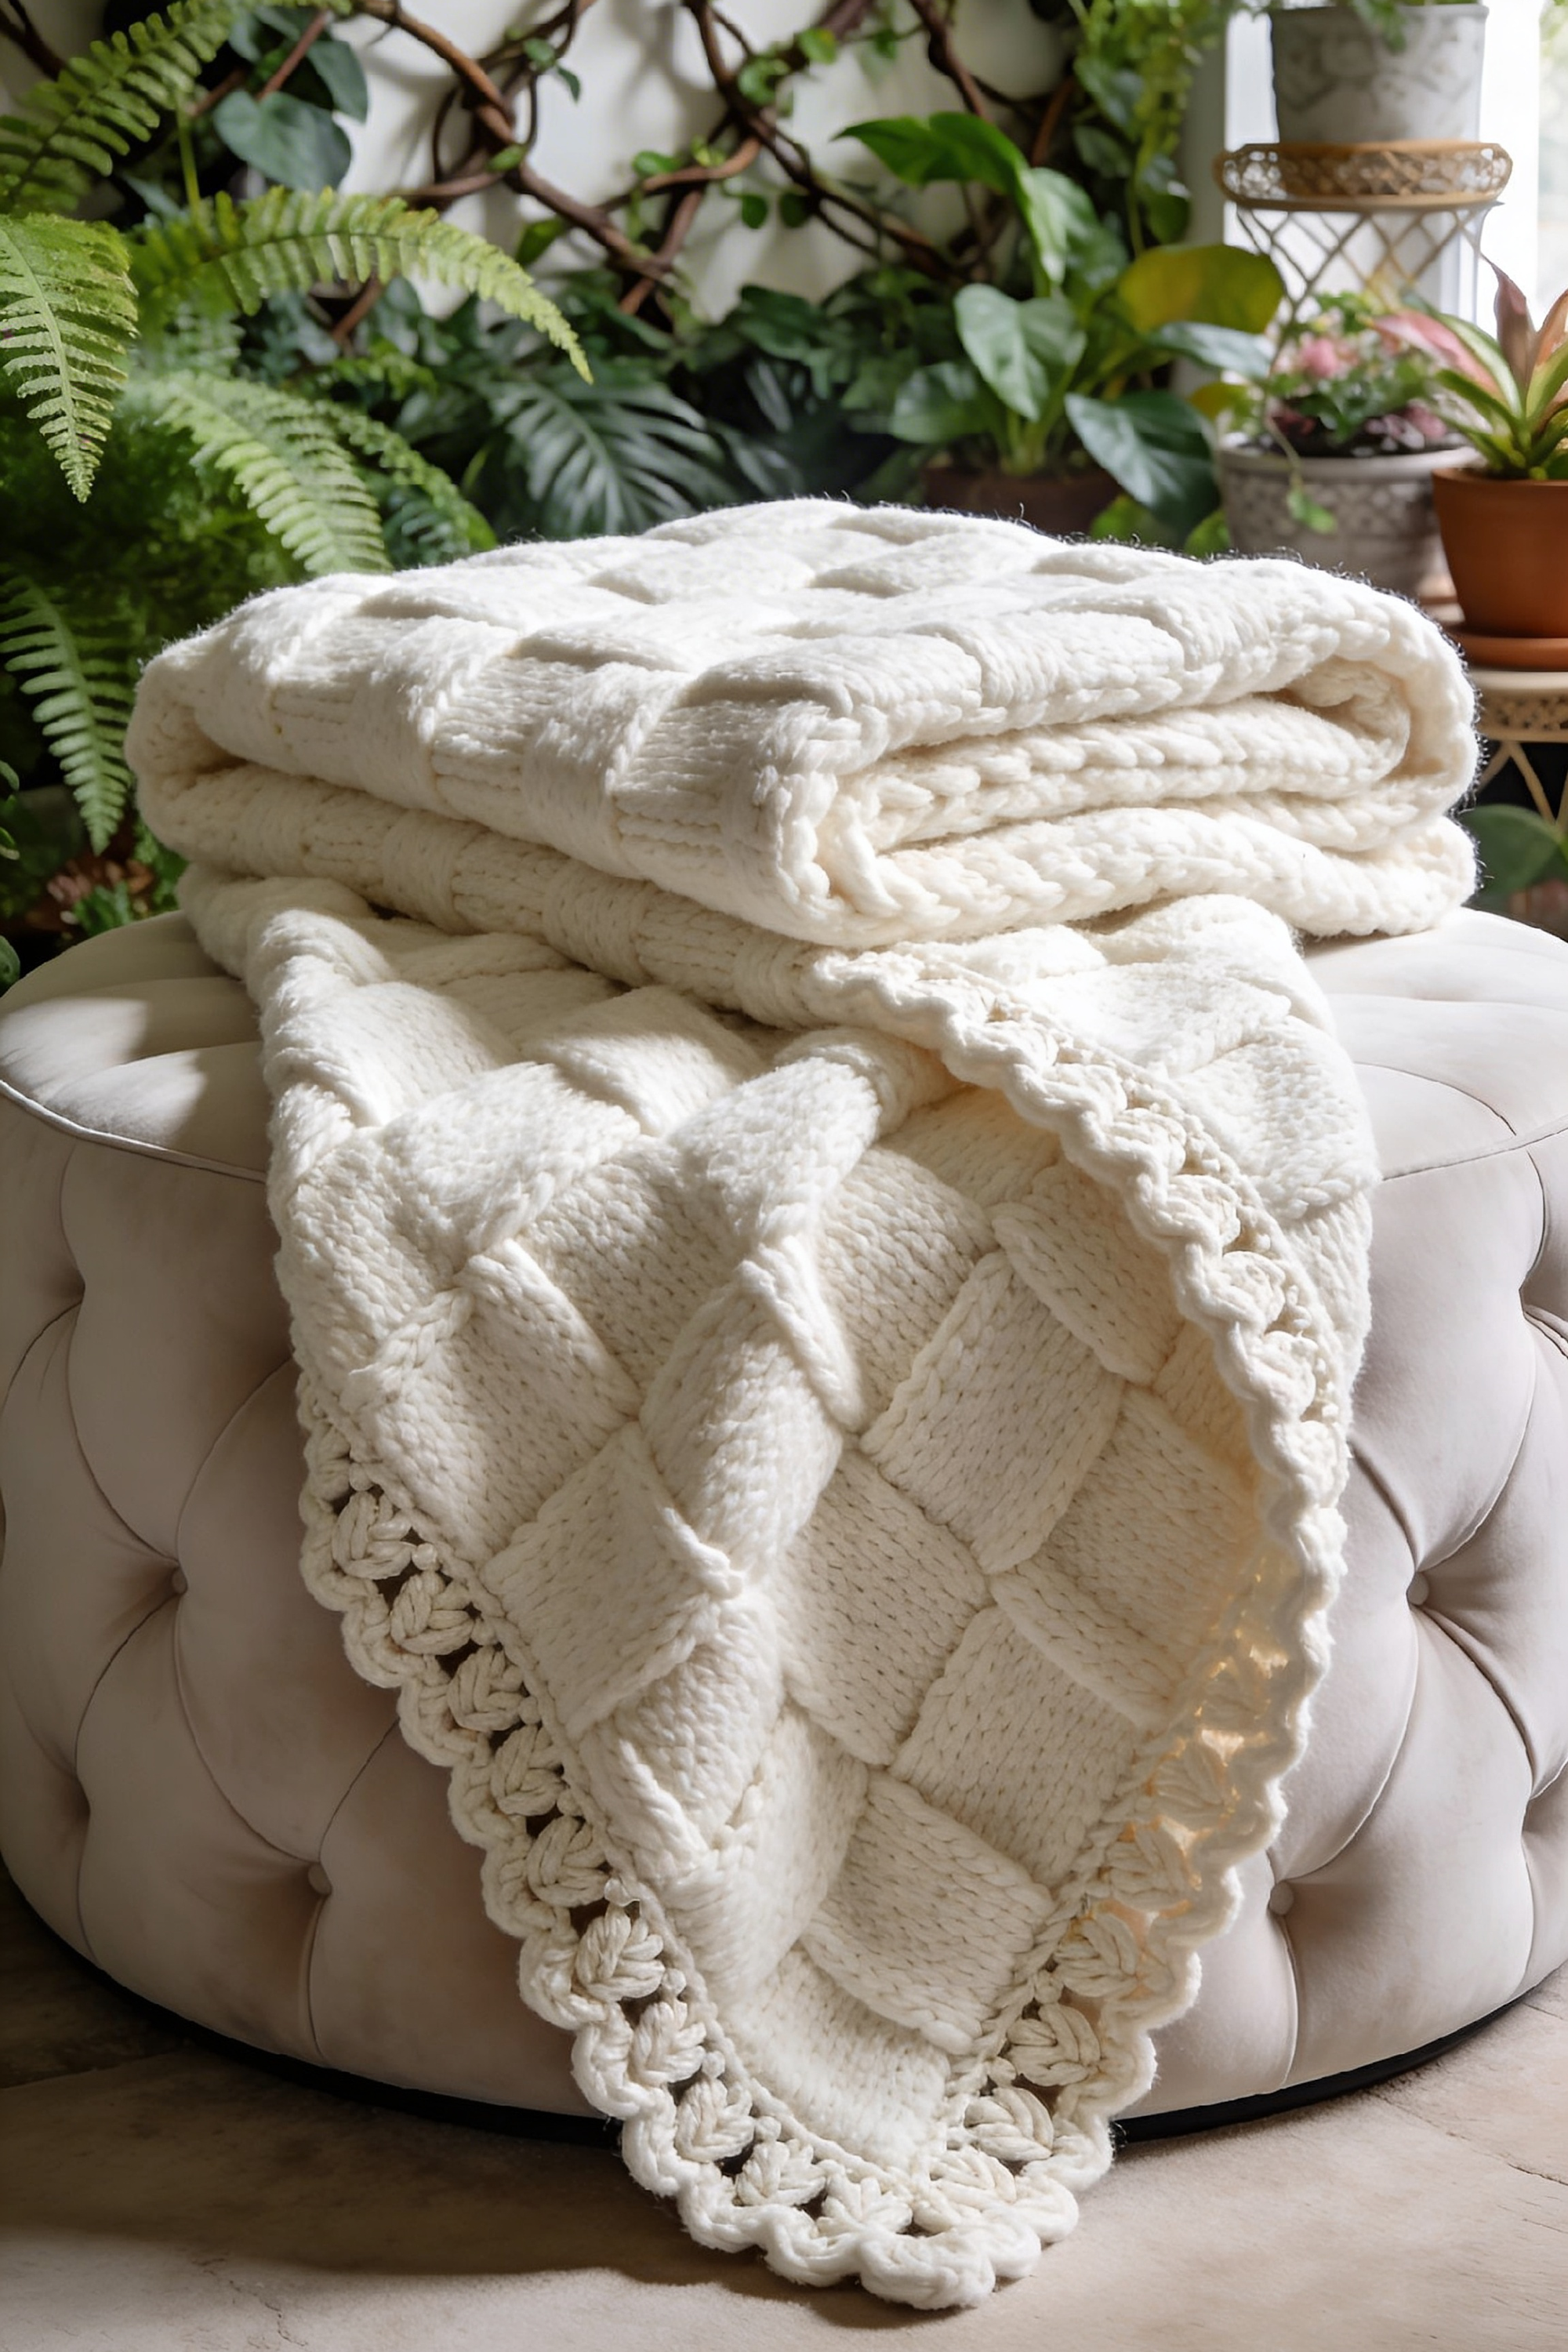
Chunky Basketweave Knit Throw DIY Guide
What you’re making
This is a thick, creamy knit throw with a bold basketweave texture and a soft, chunky braided edge that makes it feel extra plush and tailored. In the photo, it is folded on a tufted ottoman, which shows off the raised squares and the cozy loft. The overall look is modern, neutral, and expensive, like a boutique hotel throw that still feels handmade.
You can knit it flat in panels of basketweave, then add a simple edge treatment that mimics the braided trim in the image.
Materials and tools
- Super bulky yarn in cream or warm ivory (or bulky yarn held double)
- Knitting needles in the size recommended for your yarn (often 10 mm to 15 mm for super bulky)
- Tapestry needle
- Scissors
- Measuring tape
- Stitch markers
- Optional, circular needles for comfort if the throw is wide
- Optional, crochet hook for edging if you prefer crocheted trim
Finished size and customization notes
- The photo throw looks like a medium throw, about 45 to 50 inches wide and 60 inches long, but it is folded so it could be larger.
- Basketweave looks best when it is not stretched too tight, so choose a needle size that creates a soft fabric.
- If you want a smaller accent throw, aim for 40 by 50 inches.
- If you want a bed throw, aim for 50 by 70 inches.
Step by step instructions
Choose your yarn and test for softness.
The photo looks plush and cozy, not ropey. Choose a super bulky yarn with a soft hand. If your yarn is scratchy, it will not match the inviting look.Make a basketweave swatch.
Basketweave is made by alternating blocks of knit and purl stitches. Swatch at least 20 stitches wide and 20 rows tall.
Visual checkpoint: you should see raised squares that look like woven tiles.Pick your basketweave repeat size.
A classic basketweave uses 4 stitch by 4 row blocks or 6 stitch by 6 row blocks. The photo looks like a larger block, so 6 by 6 is a great match.Plan your cast on.
Choose a stitch count that fits your desired width and matches your block repeat plus a border.
Example for 6 by 6 blocks: you can do a 6 stitch seed stitch border on each side, then a center repeat of 12, 18, 24 stitches depending on width.
Visual checkpoint: your cast on edge should be flexible, not tight. Use a long tail cast on or a stretchy cast on.Knit a tidy border first.
Work 6 rows of seed stitch or garter stitch to prevent curling. This also helps the throw lie flat like the photo.Start the basketweave pattern.
Basketweave 6 by 6 concept:- For 6 rows, knit 6 stitches, purl 6 stitches across the row, repeating.
- For next 6 rows, purl 6 stitches, knit 6 stitches across the row, repeating.
Keep a seed stitch or garter stitch border on both sides every row to frame the pattern.
Visual checkpoint: after 12 rows, you should see a checkerboard of raised knit blocks.
Keep your tension even.
Basketweave can pull tighter in purl sections. Loosen your purl slightly so the squares stay the same size. If your purl blocks look smaller, consciously relax your hands during purl rows.Continue knitting until your throw reaches length.
Measure from the cast on edge. The photo throw looks thick and drapey, so do not stretch it when measuring. Let it rest on a flat surface.Finish with a matching border.
Work 6 to 10 rows of seed stitch or garter at the end, then bind off loosely. A loose bind off is crucial so the edge does not pull.Block lightly for shape.
Some super bulky yarns do not love heavy blocking. Instead, mist the throw, pat it into shape, and let it dry flat.
Visual checkpoint: the squares should look crisp and even, and the edges should be straight.Create the braided edge look.
The photo edge looks like a chunky rope braid. You can mimic it two ways:
Option 1, crochet rope edge: use a large crochet hook and work a round of slip stitches, then a round of single crochet with a twisted cord effect by working in the back loop only.
Option 2, i cord edge sewn on: knit a long i cord strip, then stitch it around the throw edge.Crochet rope edge method.
With the same yarn, pick up stitches evenly around the throw edge using a crochet hook. Work one round of single crochet. Then work a second round where you do a slip stitch in each stitch, keeping tension slightly firm. This creates a raised cord.
Visual checkpoint: you should see a defined rope line framing the throw.I cord edge method.
Knit i cord: cast on 3 stitches. Knit 3, do not turn the work, slide stitches to the other end of the needle, pull yarn tight across the back, knit 3 again. Continue until you have enough length to go around the throw.
Sew the i cord along the edge with mattress stitch or whip stitch.Add corner fullness.
For a plush corner like the photo, slightly ease extra cord length at corners rather than pulling tight. This creates a rounded, soft corner.Weave in ends invisibly.
Run ends through the purl bumps on the back side and change direction once to lock them in.Drape test and final fluff.
Fold it like the photo. The basketweave should hold shape with soft loft.
Troubleshooting
My basketweave looks flat.
Your yarn may be too thin or your needles too large. Try going down a needle size or using a thicker yarn.My edges are curling.
Add a wider garter or seed stitch border. Basketweave alone can curl.My purl blocks look tighter.
Relax your purl tension. You can also use a slightly larger needle for purl rows, but most knitters prefer simply loosening the purl.My rope edge looks wavy.
You picked up too many stitches. Reduce the pickup rate, especially along long sides. A good guideline is pick up 3 stitches for every 4 rows on garter edges, but adjust based on your fabric.
Finishing details
- Spot clean or gentle wash depending on yarn label.
- Store folded to preserve the basketweave texture.
- Optional upgrades:
- Add a small leather look label on one corner.
- Add a second rope edge round for a thicker frame.
- Knit it oversized and use it as a bed end throw.
- Add subtle tonal striping by alternating cream and warm ivory yarns every few blocks.
Shop Similar
- Super bulky yarn cream for chunky knit throw
- Large knitting needles set 12mm 15mm
- Circular knitting needles for bulky yarn
- Row counter stitch markers knitting kit
- Blocking mats for knits and crochet
Style it With
If you make one of these, let it be the one that fits your space first. A lounger throw for your reading chair, a floral granny square blanket for the sofa, a quilt style piece for a bedroom reset, or a chunky neutral knit that works all year. The best part is you can keep the palette soft and springy now, then reuse the same pattern later with moodier colors for fall or winter. Finish it neatly, give it a gentle block, and style it where you will see it every day. That is how a simple make turns into a whole room feeling warmer.