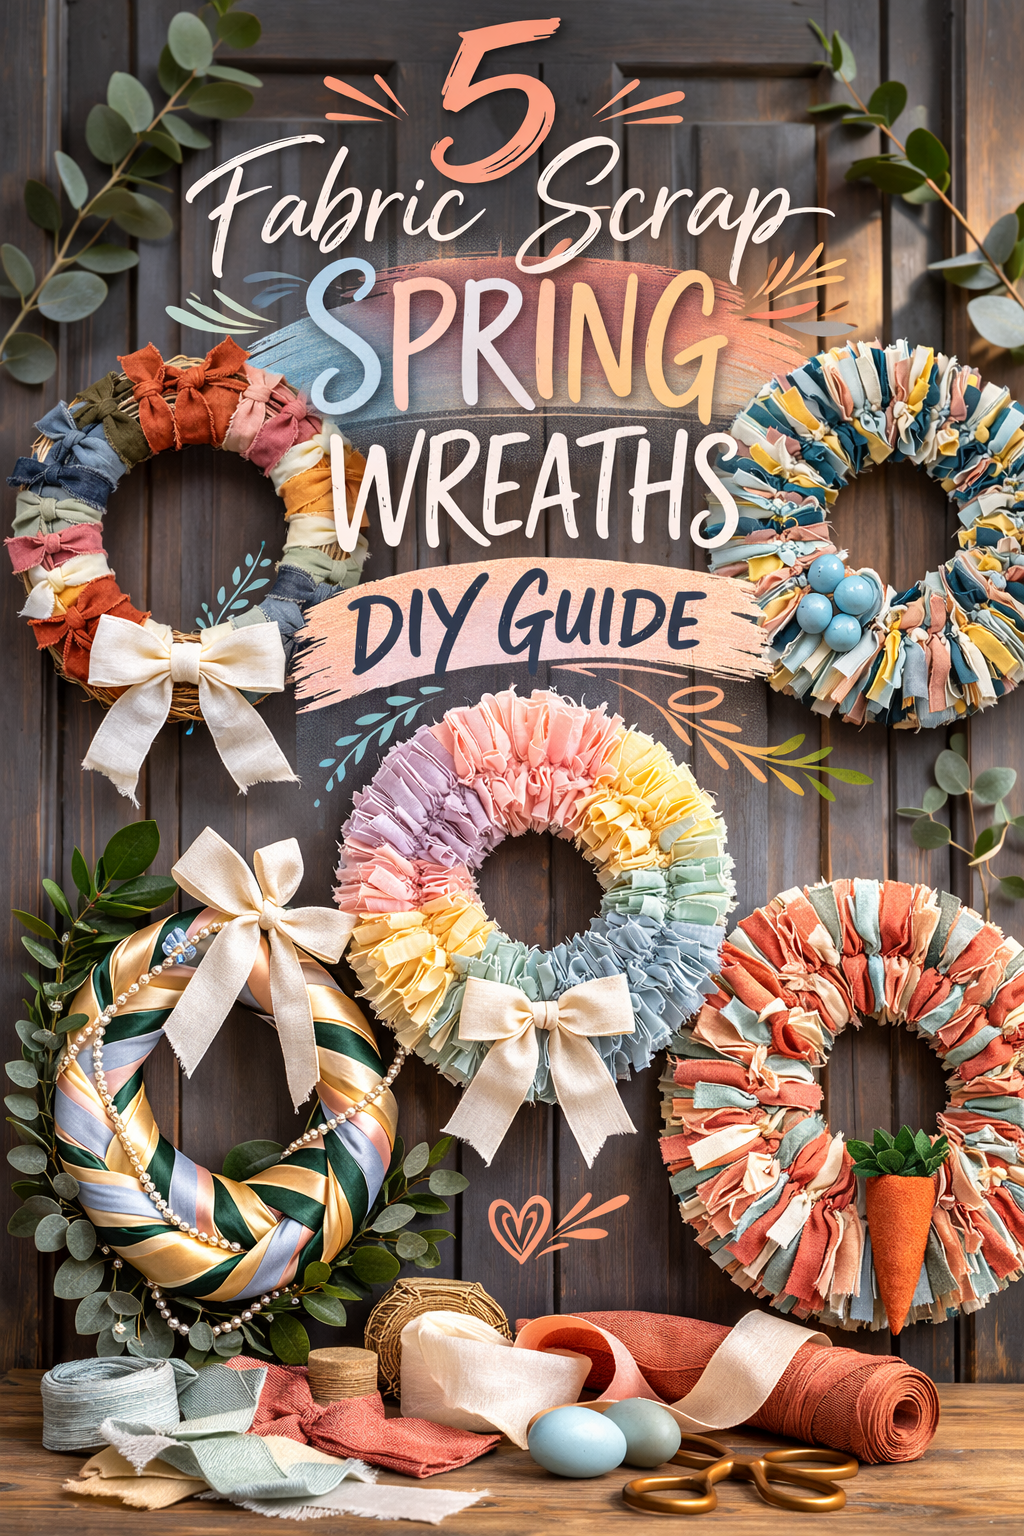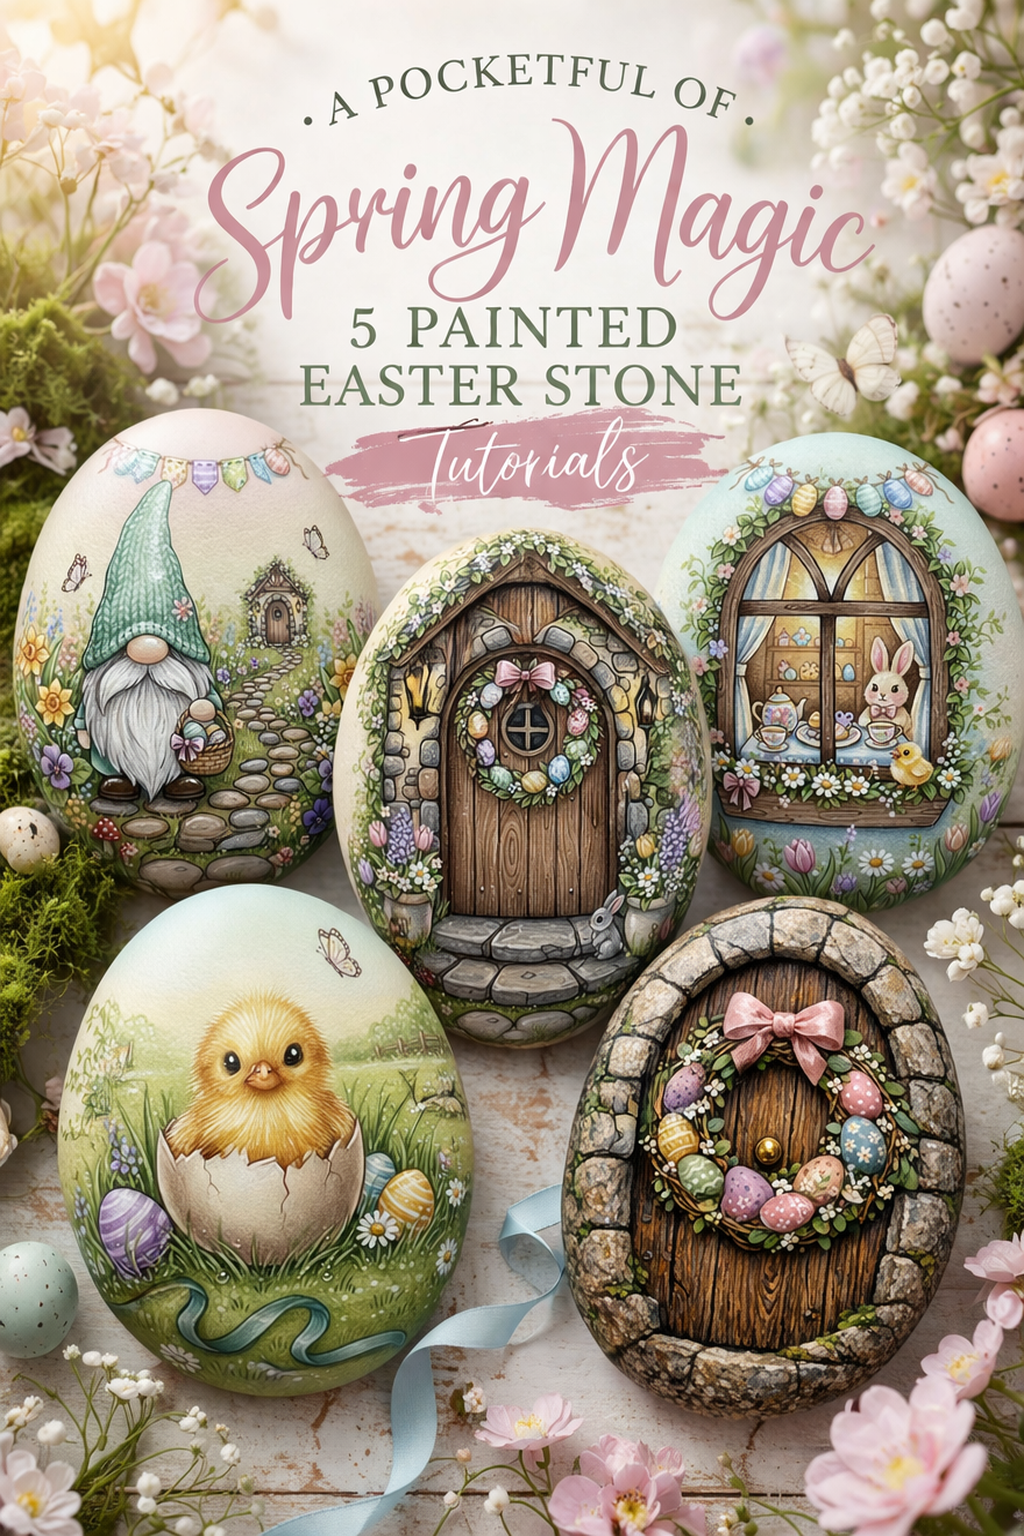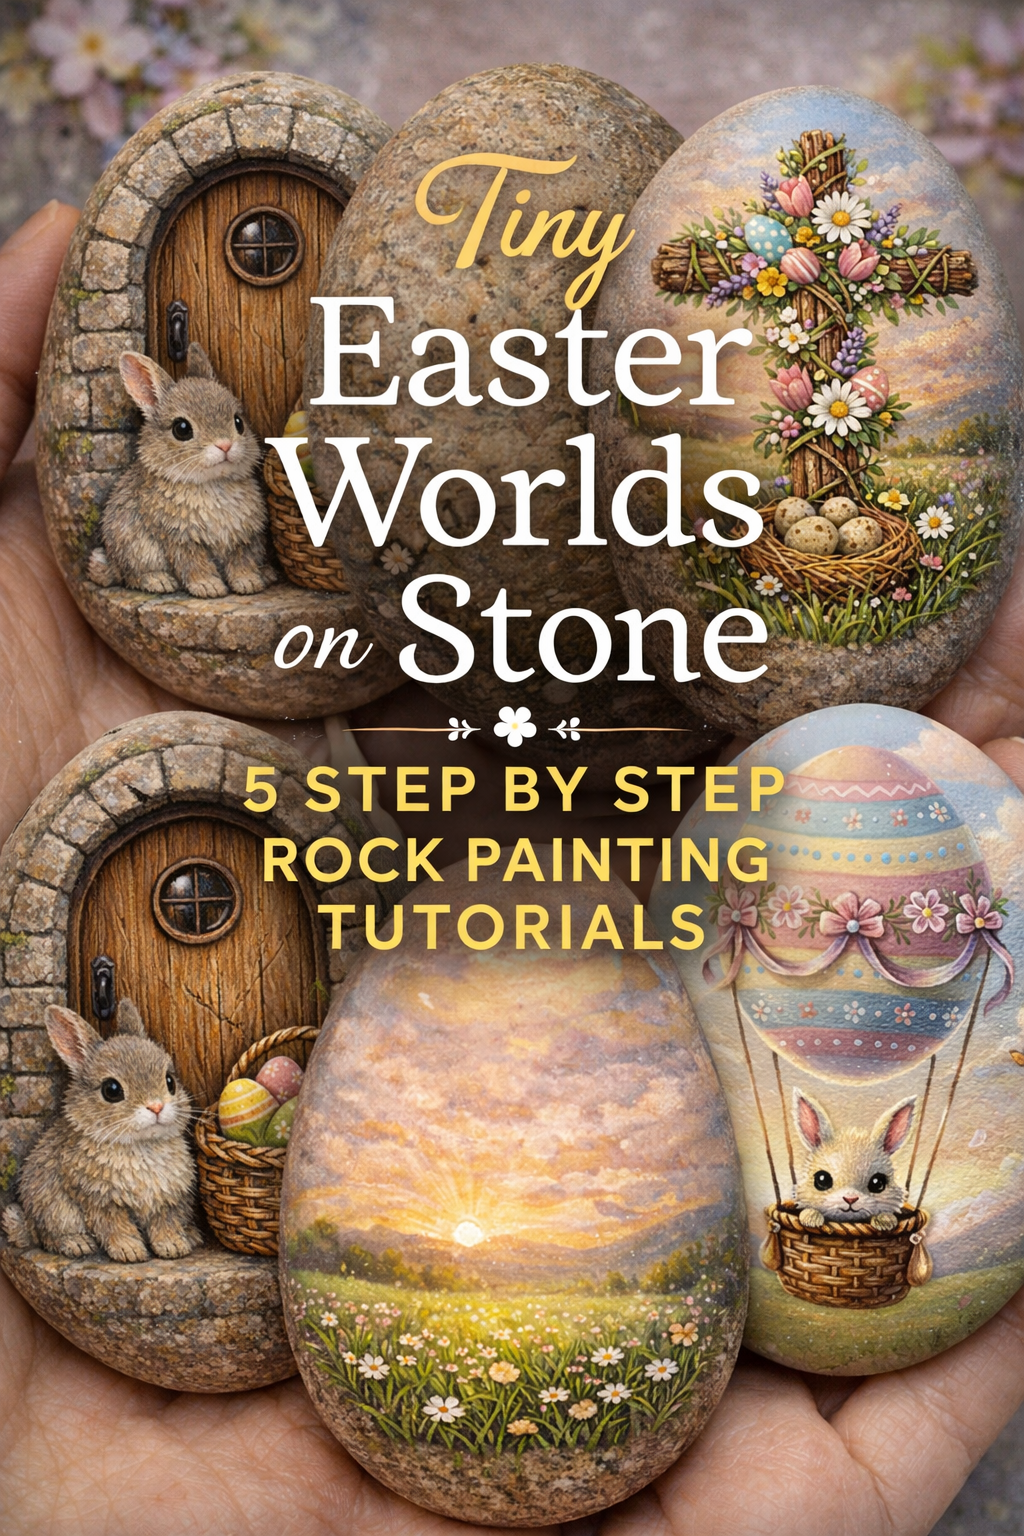
5 Storybook Easter Painted Rocks DIY Guide

More like this
Welcome to the sweetest little spring project. Today we are making five storybook Easter painted rocks that look like tiny worlds you can hold in your hand. Think fairy cottage doors with glowing lanterns, a wildflower meadow cross with pastel eggs, and a bunny drifting by in an egg balloon. These designs look detailed, but they are built in simple layers, so you can absolutely do this even if you are new to rock painting.
Set yourself up with a smooth rock, a small brush, and a cozy cup of something warm, then paint along one scene at a time. The best part is that you can keep the exact vibe of the set while still making each rock your own. Change the flowers, shift the colors, add extra vines, brighten the lantern glow, or write a tiny name and date on the back. When you finish, you will have a full little collection that is perfect for Easter baskets, spring tiered trays, planter decor, or gifting to someone who needs a bit of soft magic right now.
💡 Pro Tip: Why I Link to Amazon Search Results and Not One Product
In the Shop the Look and Style it With sections under each bikini, I link to Amazon search results, not single products. Here’s why this matters:
Hot bikinis sell out fast. I don’t want you clicking on a dead link to a sold-out item. Search pages stay updated.
You get more options. Love the vibe but want a different color, cut, or price point? The search results give you everything that matches the look and energy.
I curate each search carefully. These aren’t generic. I spend hours crafting keywords that bring up exactly the kind of bikinis I’d wear—or recommend to my hottest friends.
Support with no pressure. If you click a link, browse, and buy something later, I may earn a small commission at no extra cost to you. That helps me keep bringing you curated collections like this one—powerful, seductive, and always fresh.
So dive in. Click through. Try something risky. These aren’t just bikinis—they’re commands, statements, and maybe even your new favorite weapon of choice.
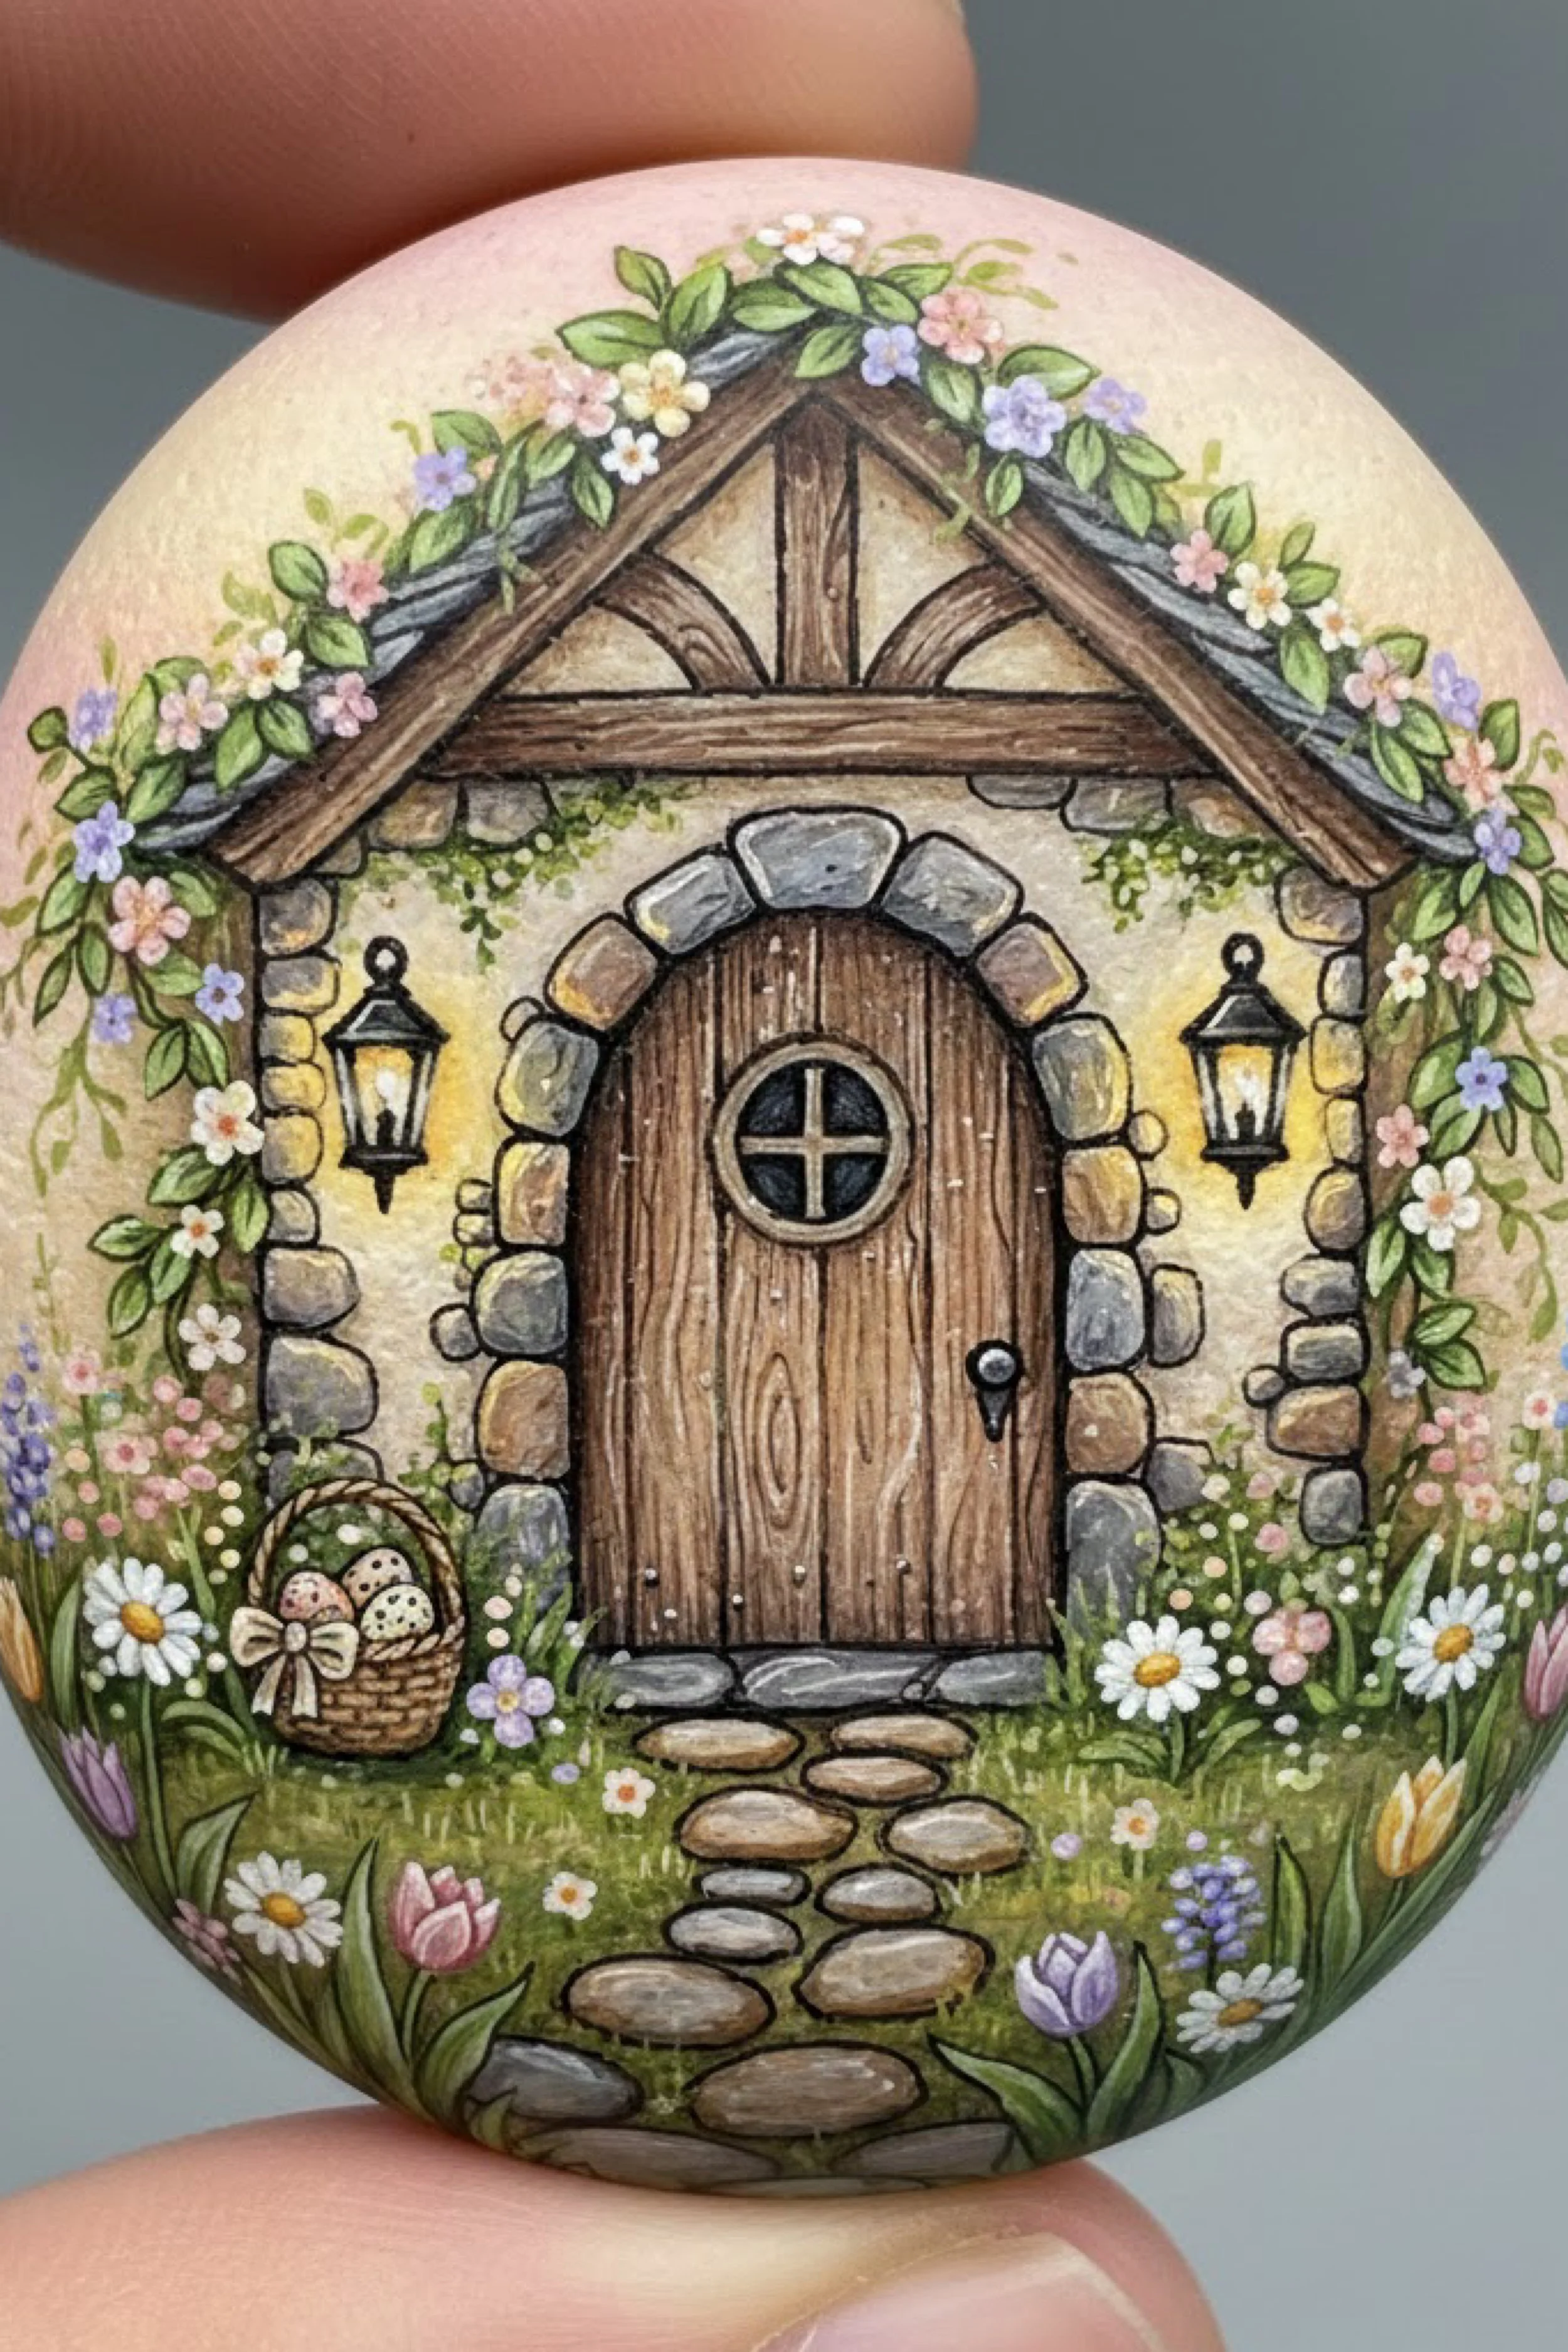
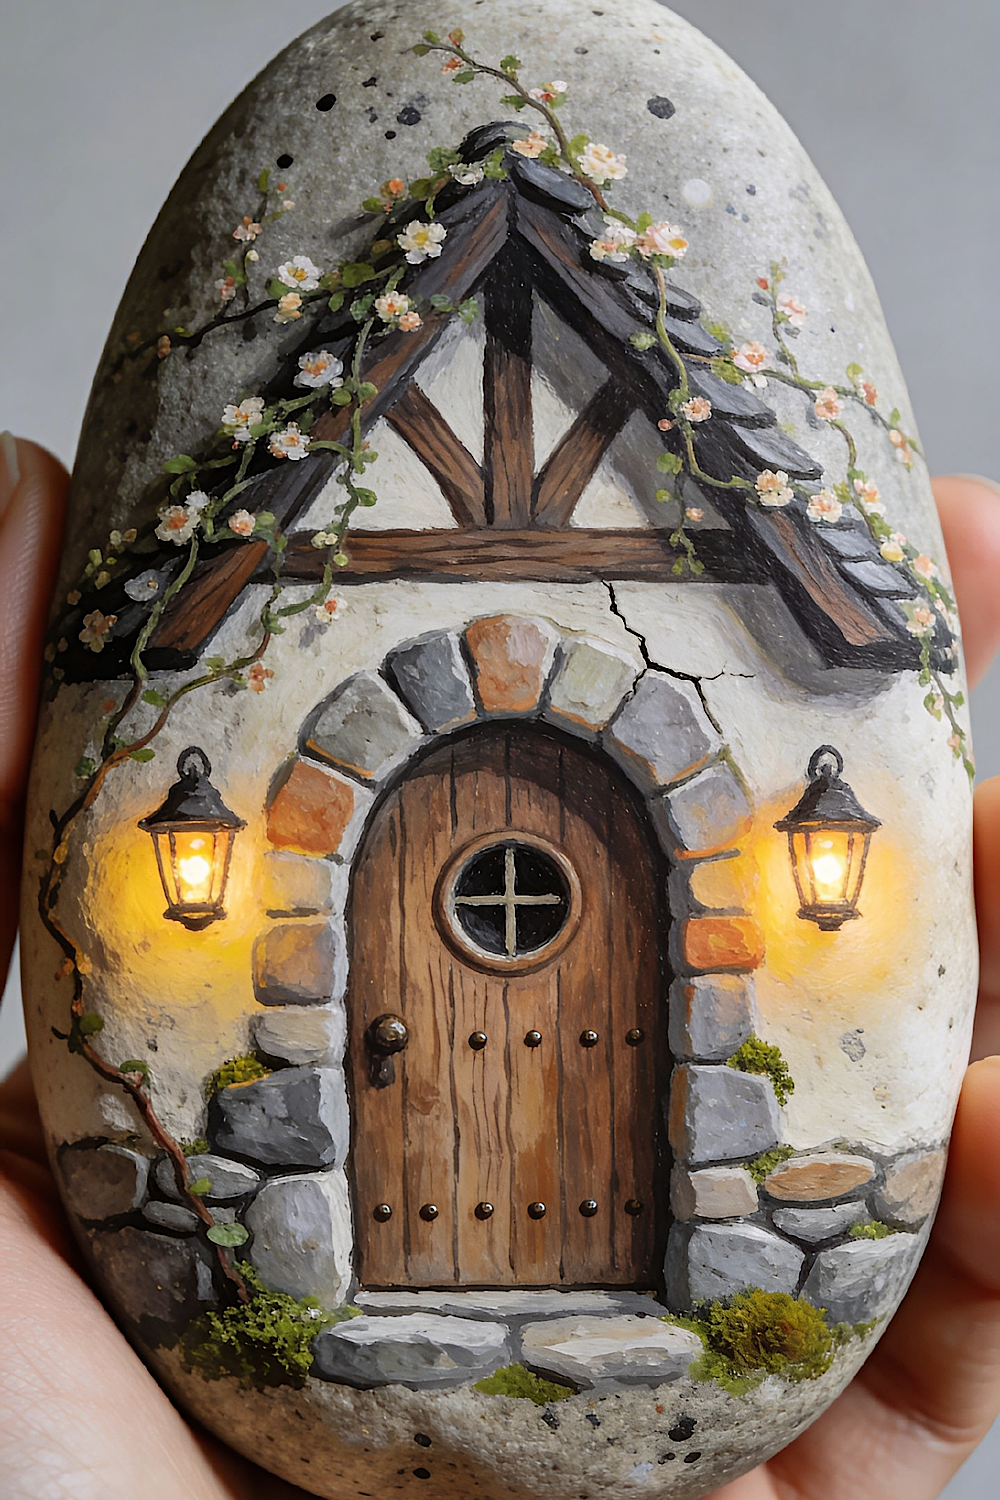
Painted Fairy Cottage Door Rock Art Step-by-Step Tutorial for a Spring Garden Scene
What you are making
You are painting a tiny fairy cottage doorway on a smooth oval rock, complete with a stone arch, rustic timber roof beams, climbing vines, and a spring garden full of daisies and tulips. The look is soft and storybook with gentle pastel glow at the edges, crisp linework, and layered shading that makes the stones and wood feel dimensional. When finished, it becomes a palm sized seasonal decor piece that looks charming on a shelf, tucked into a planter, or displayed as part of an Easter vignette.
Materials and tools
- Smooth oval river rock, about 2 to 4 inches tall, washed and fully dry
- Acrylic paint, white, warm cream, blush pink, pale yellow, light gray, medium gray, dark gray, tan, warm brown, dark brown, leaf green, sage green, lavender, soft pink, black
- Small flat brush, about 4 to 6 mm
- Round brushes, sizes 1 and 2
- Detail liner brush, very fine
- Pencil for light sketching, optional
- White gel pen or white paint pen for tiny highlights, optional
- Palette, water cup, paper towels
- Matte acrylic sealer spray or brush on varnish
Finished size and customization notes
Your finished size is the size of your rock. A taller oval gives you more roof space and room for trailing vines like the reference. A rounder rock still works, just reduce roof height and enlarge the garden and path. If you want a softer pastel atmosphere, blend blush into cream around the outer edges and keep the wall light. If you want more drama, keep the wall neutral and increase contrast in stone shadows and door shading. For flowers, daisies and tulips match the photo, but tiny forget me nots or miniature roses also suit the cottage vibe.
Step by step instructions
Prep the rock for paint
Wash the rock with warm soapy water and scrub away any dust or grit. Rinse and let it dry completely. If the surface is glossy, lightly scuff with a fine sanding sponge and wipe clean. This prevents paint from beading and helps your layers stay smooth.
Base coat for bright pastels
Paint one thin coat of white or very pale cream on the painting face. Let dry, then add a second thin coat if the stone still shows through.
Visual checkpoint: the front should look evenly light, with no blotchy gray stone patches.Light sketch the layout
With pencil or a very thin pale tan paint line, mark a centered arched door. Leave space above for a small triangular roof and below for a stepping stone path and garden. Mark two lantern spots to the left and right of the door, slightly above the midpoint of the door height.
Create the soft background glow
Mix warm cream with a hint of blush. Using the small flat brush, blend this color across the background wall area. Keep the center behind the door slightly lighter and deepen blush toward the outer edges. Add a faint pale yellow haze where lantern glow will go, but keep it subtle for now.
Visual checkpoint: you should see a gentle halo effect, light in the center and softly deeper near the edges.Block in the door base color
Paint the door with medium warm brown. While still slightly damp, pull a few vertical darker brown strokes to suggest wood grain. Keep the grain soft and uneven, like real wood. Add a darker outline around the door edge so it will separate cleanly from the stone arch later.
Add the round window and knob
Paint a small circular window near the upper center of the door. Fill the inside with dark gray or black, then add a thin lighter ring to suggest the frame. Paint a simple cross inside the circle. Add a small knob on the right side, dark gray with a tiny highlight dot.
Paint the stone arch shapes
Using medium gray, paint irregular stone blocks around the door in an arch. Vary size and shape, and include a few warmer stones in tan or soft ochre for variety. Keep stones slightly larger than you think so the arch reads clearly at a glance.
Shade and highlight the stones
Add darker gray shadow along the lower edge of each stone and in the gaps where stones meet. Then add a pale gray highlight along the upper edges. This creates a raised carved stone look.
Visual checkpoint: the arch should begin to look dimensional, with stones that pop forward.Paint the cottage wall texture
Revisit the wall color around the stones using warm cream. With a nearly dry brush, stipple lightly to create a plaster texture. Keep it delicate so it does not compete with the door and stones.
Build the roof beams
Paint two roof edges forming a triangle above the doorway. Add timber beams inside the triangle. Use warm brown as the base, then add darker brown shading along one side of each beam. Add a few thin grain lines to suggest rustic wood.
Add a subtle shingle band
Along the roof edge, paint a narrow dark gray strip and add small angled strokes to suggest shingles. Keep it understated, it mainly supports the vine garland.
Paint lanterns and the warm glow
Paint simple lantern shapes on both sides of the arch using black. Inside each lantern, add warm yellow. Now glaze a thin warm yellow halo onto the wall around each lantern, strongest nearest the lantern and fading outward.
Visual checkpoint: the wall should look softly lit, not painted solid yellow.
Add climbing vines and leaves
With a liner brush, paint thin vine lines draping from the roof peak and running along the roof edges. Add leaf pairs in sage green and leaf green. Shade a few leaves with darker green on the underside and add tiny highlights on top edges.
Dot in tiny blossoms
Paint small blossoms along the vines using soft pink, lavender, and white. Add tiny yellow centers on a few blossoms. Keep flowers varied, some single and some clustered, so it feels natural.
Create the garden base
Paint the lower area with layered greens for grass. Add daisies with small white petal strokes and yellow centers. Add tulip buds in soft pink and lavender. Add tiny dot flowers to fill gaps and make the garden feel lush.
Paint the stepping stone path
Paint flat oval stones leading away from the door in grays and warm taupes. Shade the bottom edge of each stone and highlight the top edge. Make stones slightly larger near the door and slightly smaller toward the bottom for simple perspective.
Add the tiny Easter basket detail
In the lower left, paint a small basket in tan. Add curved weave lines in darker brown and a pale bow. Dot a few tiny eggs inside and add speckles. This is a small accent, so keep it crisp and simple.
Refine edges and add micro highlights
Clean up the door outline, stone separations, lantern shapes, and a few vine stems with a fine liner brush. Add tiny white highlights on lantern glass, a small highlight on the knob, and a few bright flower petal dots.
Seal for durability
Let the rock dry thoroughly, ideally overnight. Apply two to three thin coats of matte sealer, letting each coat dry. If this will sit outdoors, use an outdoor rated sealer and refresh seasonally.
Troubleshooting
My paint looks streaky
Use thinner coats and let each layer dry. A solid light base coat fixes most streaking issues.
My stones look flat
Increase contrast, deeper shadows in gaps and stronger highlights on top edges.
My vines look messy
Let them dry, then paint the wall color around them to sharpen edges. Redraw vine lines thinner.
My flowers look like blobs
Once dry, add tiny petal dots around the center to define blossoms. A white paint pen can help.
My lantern glow looks like a hard circle
Glaze wall color over the outer edge to soften, and keep the brightest yellow close to the lantern.
Finishing details
For a polished look, add one last set of micro highlights after sealing, then seal again. Display the rock in a small dish, a faux moss bowl, or beside an Easter centerpiece. You can also paint a name and date on the back for gifting.
Shop Similar
- Smooth river rocks for painting
- Acrylic paint set in pastel colors
- Mini detail paint brush set
- White paint pen fine tip
- Matte acrylic sealer spray
Style It With
Glowing Lantern Stone Cottage Rock Painting DIY Guide for a Cozy Nighttime Look
What you are making
You are painting a cozy cottage doorway on a speckled stone, with a chunky stone arch, rustic roof framing, delicate flowering vines, and two lanterns that cast a warm golden glow. This design leans more dramatic and realistic than the pastel version, with stronger shadows, richer browns, and light that looks like it is actually shining on the wall. The result feels like a tiny enchanted entrance tucked into a hillside.
Materials and tools
- Speckled gray oval rock, washed and dry
- Acrylic paint, warm cream, white, black, medium gray, dark gray, tan, terracotta, warm brown, dark brown, moss green, sage green, soft peach, pale pink, warm yellow, a touch of orange
- Small flat brush
- Round brushes sizes 1 and 2
- Detail liner brush
- Optional sponge scrap for plaster texture
- Palette, water cup, paper towels
- Matte or satin sealer
Finished size and customization notes
A taller rock gives room for the roof peak and vine drape. This look benefits from leaving some natural stone speckling visible. If your rock is lighter, deepen the shadows around the doorway to keep the glow effect convincing. You can add extra moss at the base, subtle cracks in the plaster, or a few more vines for an older cottage mood.
Step by step instructions
Prep and plan
Clean and dry the rock. Decide orientation so the tallest point becomes the roof peak area. Lightly sketch the door, the arch stones, the roof triangle, and lantern placements.
Lay a thin plaster wash
Instead of full white, paint a thin warm cream wash over the wall area, allowing speckles to show through. Keep the edges of the rock darker for a natural vignette.
Visual checkpoint: you should still see stone speckles through the wall, especially near the edges.Paint the timber roof frame
Paint the roof triangle beams in warm brown. Add darker brown shading along one side of each beam and a few lighter streaks for grain. Keep edges crisp because the roof frame anchors the composition.
Add a darker shingle edge
Paint a charcoal band along the roofline and add short overlapping strokes to suggest shingles. Keep it heavier and darker than the beams.
Build the stone arch
Paint chunky irregular stones around the doorway using medium gray. Add a few warm stones in tan and terracotta to make the arch feel natural. Place a slightly larger keystone stone at the top center.
Shade and highlight stones for depth
Add deeper shadows in the gaps between stones and under the arch stones. Add lighter highlights on upper edges where lantern light would catch. This makes the glow feel believable.
Add plaster texture and age
Use a sponge or dry brush stipple to add subtle mottling to the wall. Paint one or two fine cracks with a thin dark line, then soften parts of the crack with wall color so it looks embedded, not drawn on top.
Paint the wooden door
Block in the door with mid warm brown. Add dark brown vertical grain lines and deepen shadow along the door edge. Dry brush a lighter tan on raised areas to mimic worn wood.
Add round window and studs
Paint a circular window near the top of the door, dark interior, lighter ring frame, and a cross. Dot small studs across the door with dark brown. Add tiny highlights on a couple studs for realism.
Paint lanterns
Paint lantern frames in black. Fill the glass area with warm yellow. Add a touch of orange near the center for intensity. Add a small white highlight line on the glass.
Create the glowing wall halo
Mix warm yellow with a little cream to make a glaze. Apply in a soft circle around each lantern, strongest closest to the lantern and fading outward. Add a second thinner pass near the lantern for a richer glow.
Visual checkpoint: the wall should look lit, not like a flat yellow patch.
Add base stones and moss
Paint a few flat stepping stones at the base of the door. Stipple moss green in crevices and at the base of the arch. Add tiny yellow green dots for fresh highlights.
Paint vine drape and blossoms
With a liner brush, paint thin vines from the roof peak and down the sides. Add leaf pairs in green. Dot tiny blossoms in pale peach and soft pink, keeping them delicate and not too dense so the moody contrast remains.
Strengthen contrast for the final look
Step back and check values. Deepen shadows under roof shingles, inside the doorway edge, and behind a few stones. Add a few crisp highlights where lantern light would catch stone edges and the door rim.
Seal
Let dry thoroughly. Seal with satin for richer glow or matte for rustic stone feel. Use thin coats.
Troubleshooting
Lantern glow looks like a blob
Use thinner glazes and build in layers. If too strong, glaze wall color over the outer edge to soften.
Stones look cartoonish
Reduce harsh outlines and focus on shadow transitions. Use dark gray, not pure black, for most lines.
Door looks flat
Increase contrast in grain lines and add a lighter dry brush highlight strip on one side.
Vines look shaky
Let dry, paint wall color to clean edges, then redraw thinner vines on top.
Finishing details
Add a soft shadow just inside the stone arch opening to suggest depth. Add a tiny reflection highlight on the door window frame. If you want extra charm, paint a tiny wreath or a miniature potted plant beside the door.
Shop Similar
- Speckled river rocks for crafts
- Detail liner brush set
- Acrylic paint set earth tones
- Warm yellow acrylic paint
- Satin clear sealer for crafts
Style It With
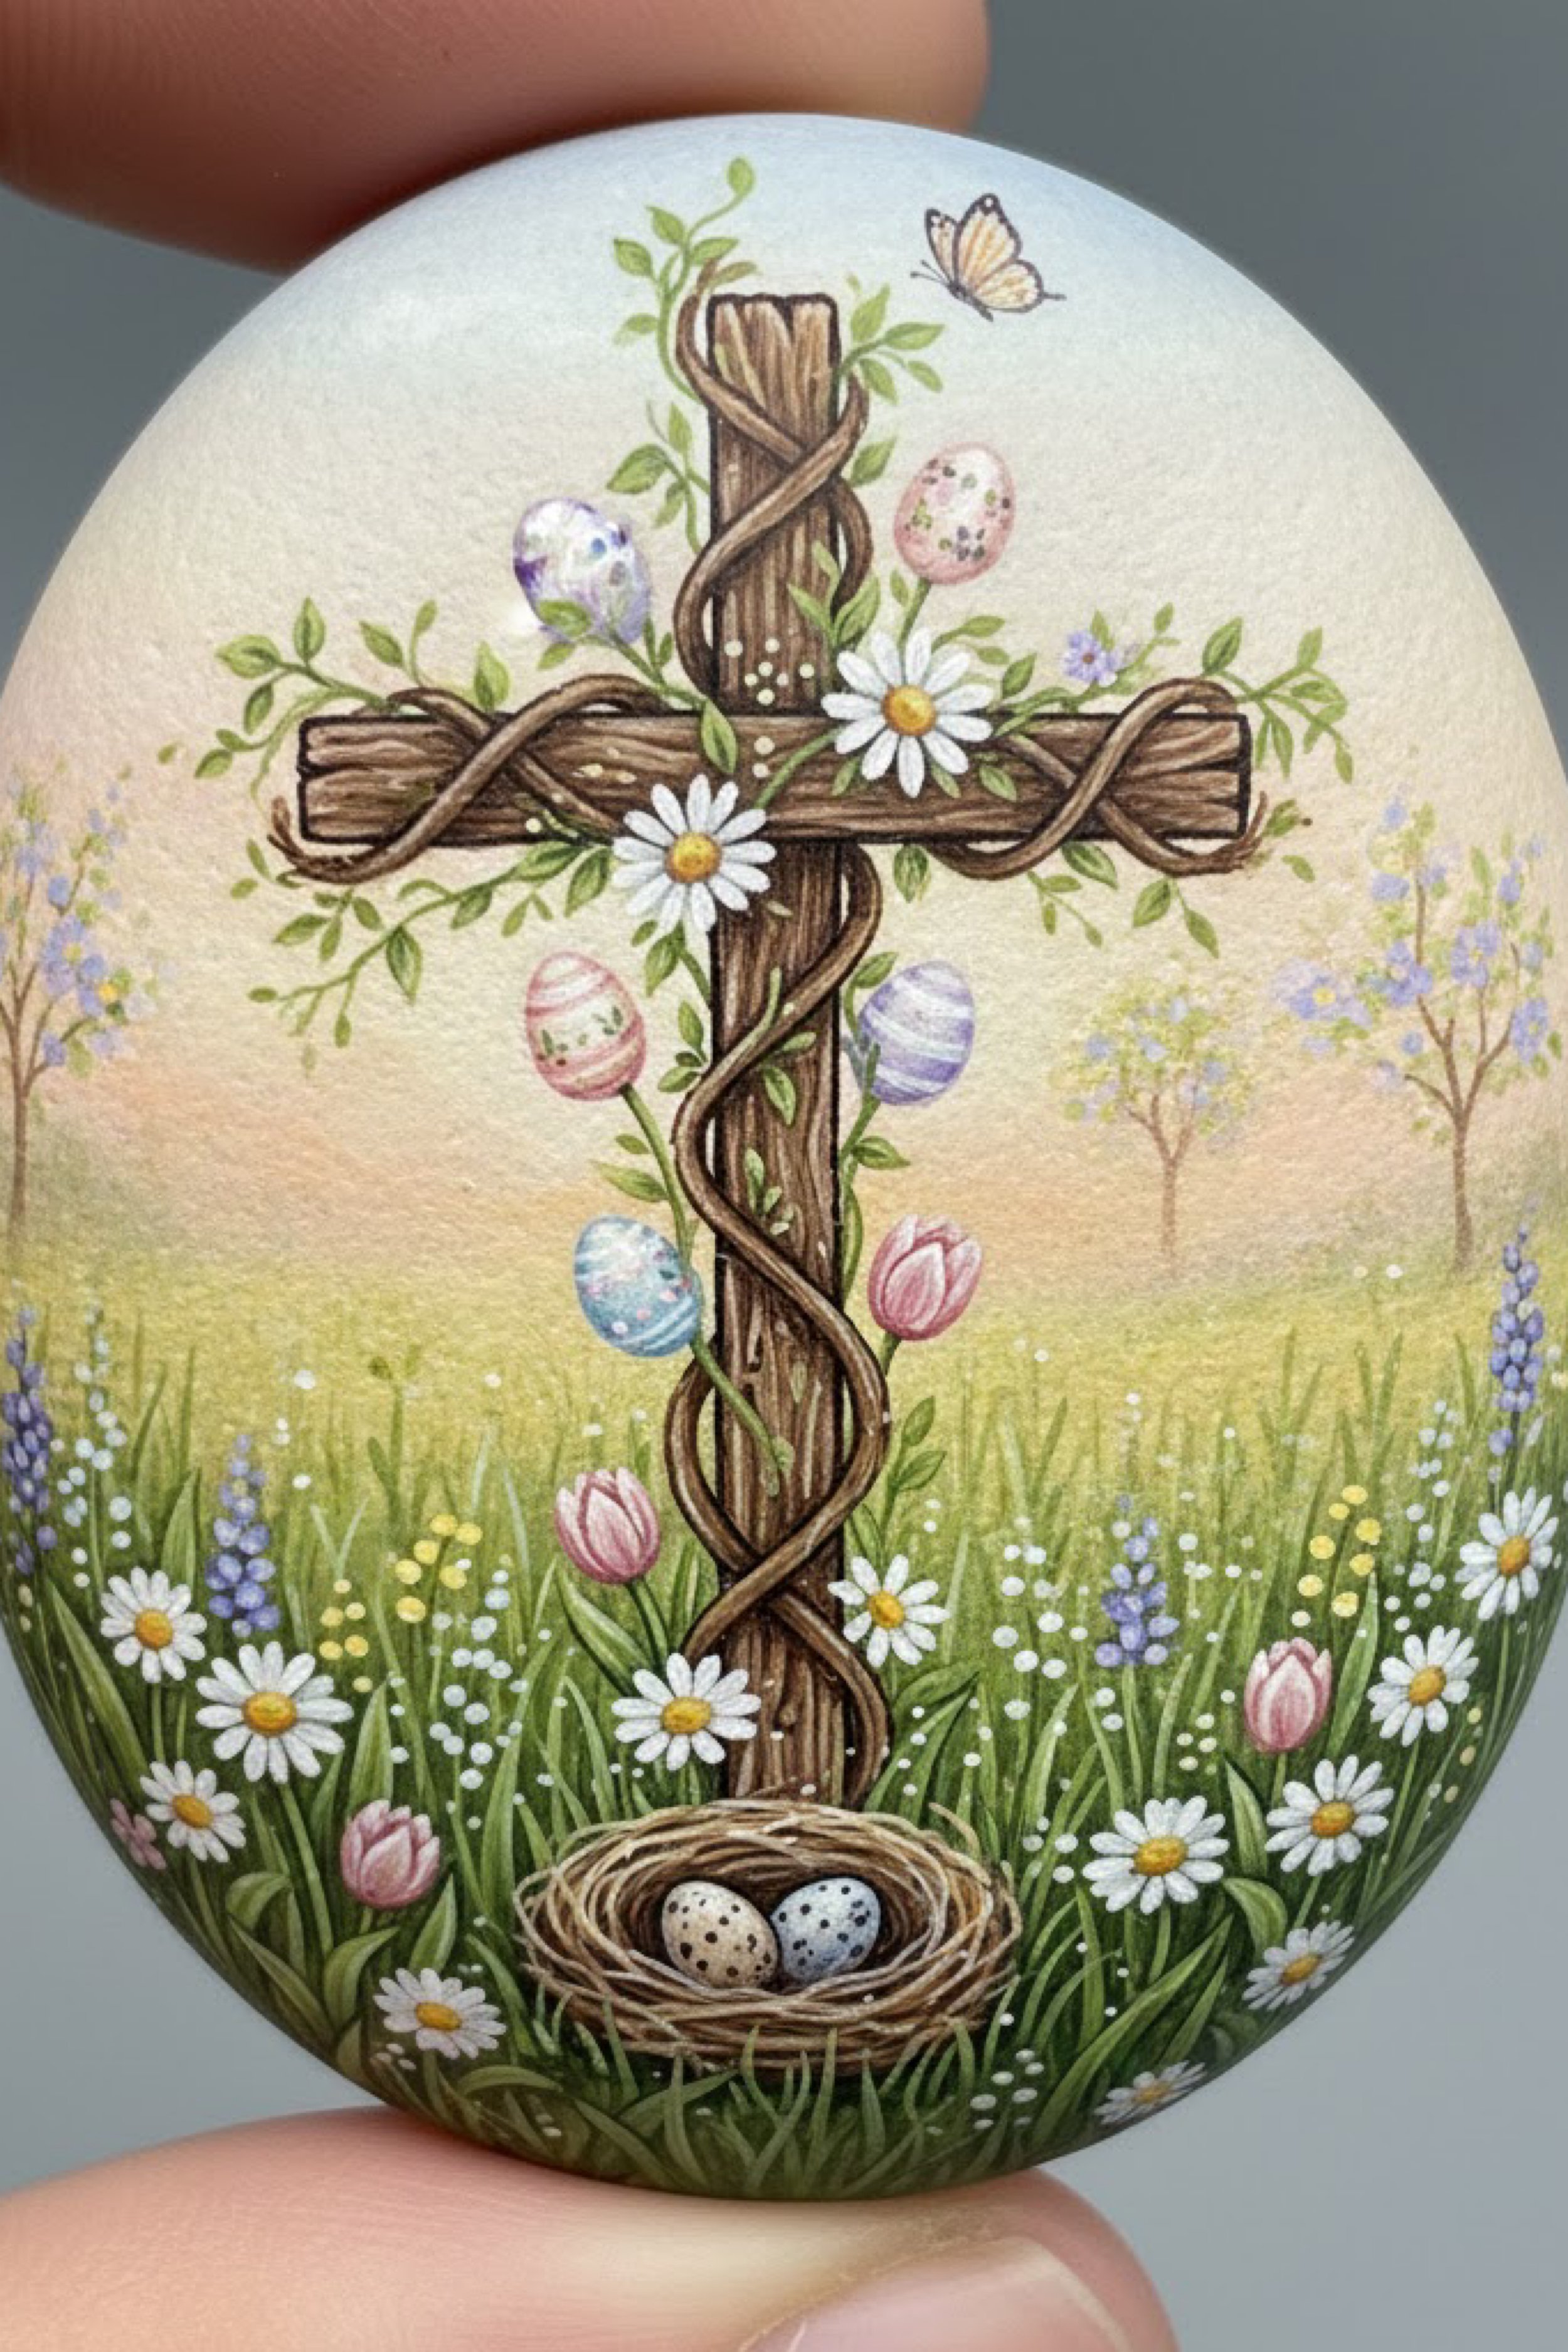
Easter Meadow Cross Rock Art How To Guide with Painted Eggs and Wildflowers
What you are making
You are painting a rustic wooden cross rising from a spring meadow, wrapped with twisting vine, tiny leaves, and daisies, plus pastel Easter eggs nestled among the greenery. The background is a soft sunrise haze that fades from pale blue to warm cream to gentle yellow near the horizon. The finished rock feels peaceful and bright, with enough detail to be special while still being beginner friendly.
Materials and tools
- Smooth oval rock, 2.5 to 4 inches tall
- Acrylic paint, white, cream, pale blue, pale yellow, light green, medium green, dark green, warm brown, dark brown, pink, lavender, pastel teal, soft peach, black
- Small flat brush for sky blending
- Round brushes sizes 1 and 2
- Detail liner brush
- Optional white gel pen for tiny dots
- Palette, water cup, paper towels
- Matte sealer
Finished size and customization notes
This design adapts to almost any rock shape. If your rock is wider, make the cross slightly shorter and widen the meadow. If your rock is taller, elongate the cross and add more sky. You can replace eggs with butterflies for a less seasonal look, or add a small nest at the base for extra Easter symbolism.
Step by step instructions
Prep the rock
Wash and dry the rock. If the stone is very dark, add a thin white base coat to the painting face so the sky stays bright.
Blend the sunrise sky
Using the flat brush, paint pale blue at the top. Blend into warm cream in the middle, then into pale yellow near the horizon. Work while paint is wet so the transitions stay soft.
Visual checkpoint: the sky should look like a gentle gradient, not stripes.Paint the meadow base
Paint the lower third in light green. Add a slightly warmer yellow green near the horizon line to suggest sunlit distance.
Lightly sketch the cross
Mark a centered vertical post and a horizontal arm a bit below the top third. Keep the cross slightly taller than it is wide.
Paint the wood base color
Paint the cross with warm brown. Add dark brown shadows along one side of the vertical post and one side of the horizontal arm so it looks dimensional. Add lighter tan streaks to suggest grain.
Add twisted vine wrapping
With a liner brush, paint a thin vine spiraling around the cross. Add a second vine line beside it in a slightly lighter green brown to suggest thickness. This creates the illusion of a wrapped vine without perfect precision.
Visual checkpoint: the vine should appear to move in front of and behind the wood.Add leaves
Paint small leaf pairs along the vine. Use medium green as the base and deepen a few leaves with dark green shadow. Add tiny highlights with a lighter green mix.
Paint daisies on the cross
Add a few daisies where the vine crosses the horizontal arm. Use small white petal strokes and a warm yellow center. Add a tiny shadow under one side of a petal cluster with a pale gray glaze for lift.
Add pastel eggs
Paint small egg shapes around the vine and near the cross, in pastel pink, lavender, teal, and pale yellow. Add simple stripes or dots. Add a small highlight on one side of each egg so they read as rounded.
Add distant meadow softness
With watered paint, dot faint flower specks and pale grass suggestions near the horizon. This creates depth and keeps the focus on the cross.
Layer foreground grass
Use medium green to paint upward grass strokes from the bottom edge. Add darker green near the base for shadow. Leave some lighter green showing through so it feels layered.
Visual checkpoint: the grass should have visible layers, not one flat field.
Add wildflowers
Paint small daisies in the foreground and a few tulip buds in soft pink and lavender. Add tiny white dot flowers to fill gaps.
Add a peaceful haze glaze
Lightly glaze warm cream near the horizon and over parts of the meadow to unify colors. Keep it thin so you do not lose detail.
Sharpen the focal edges
Darken a few wood grain lines on the cross and refine vine edges. Add a few crisp leaf stems and brighten flower centers.
Final highlight dots
Add tiny white dots in the grass for sparkle and a few small highlights on egg patterns and flower petals.
Seal
Let dry fully, then seal with matte for a soft illustrated look.
Troubleshooting
Sky looks streaky
Use thinner paint and blend while wet. If it dried, add a glaze layer of the middle transition color and feather.
Cross looks flat
Add deeper shadow on one side and a lighter highlight strip on the other. Contrast creates wood form.
Grass looks messy
Glaze a thin light green layer to calm it, then add fewer cleaner grass strokes on top.
Eggs look like circles
Make them slightly taller than wide and add a shadow and highlight to create volume.
Finishing details
If gifting, paint a name and date on the back. For display, prop the rock on a small easel or nestle it in faux moss among pastel eggs and spring florals.
Shop Similar
- Painting rocks smooth stones
- Pastel acrylic paint set
- Fine tip paint brush set
- White gel pen for highlights
- Matte clear sealer spray
Style It With
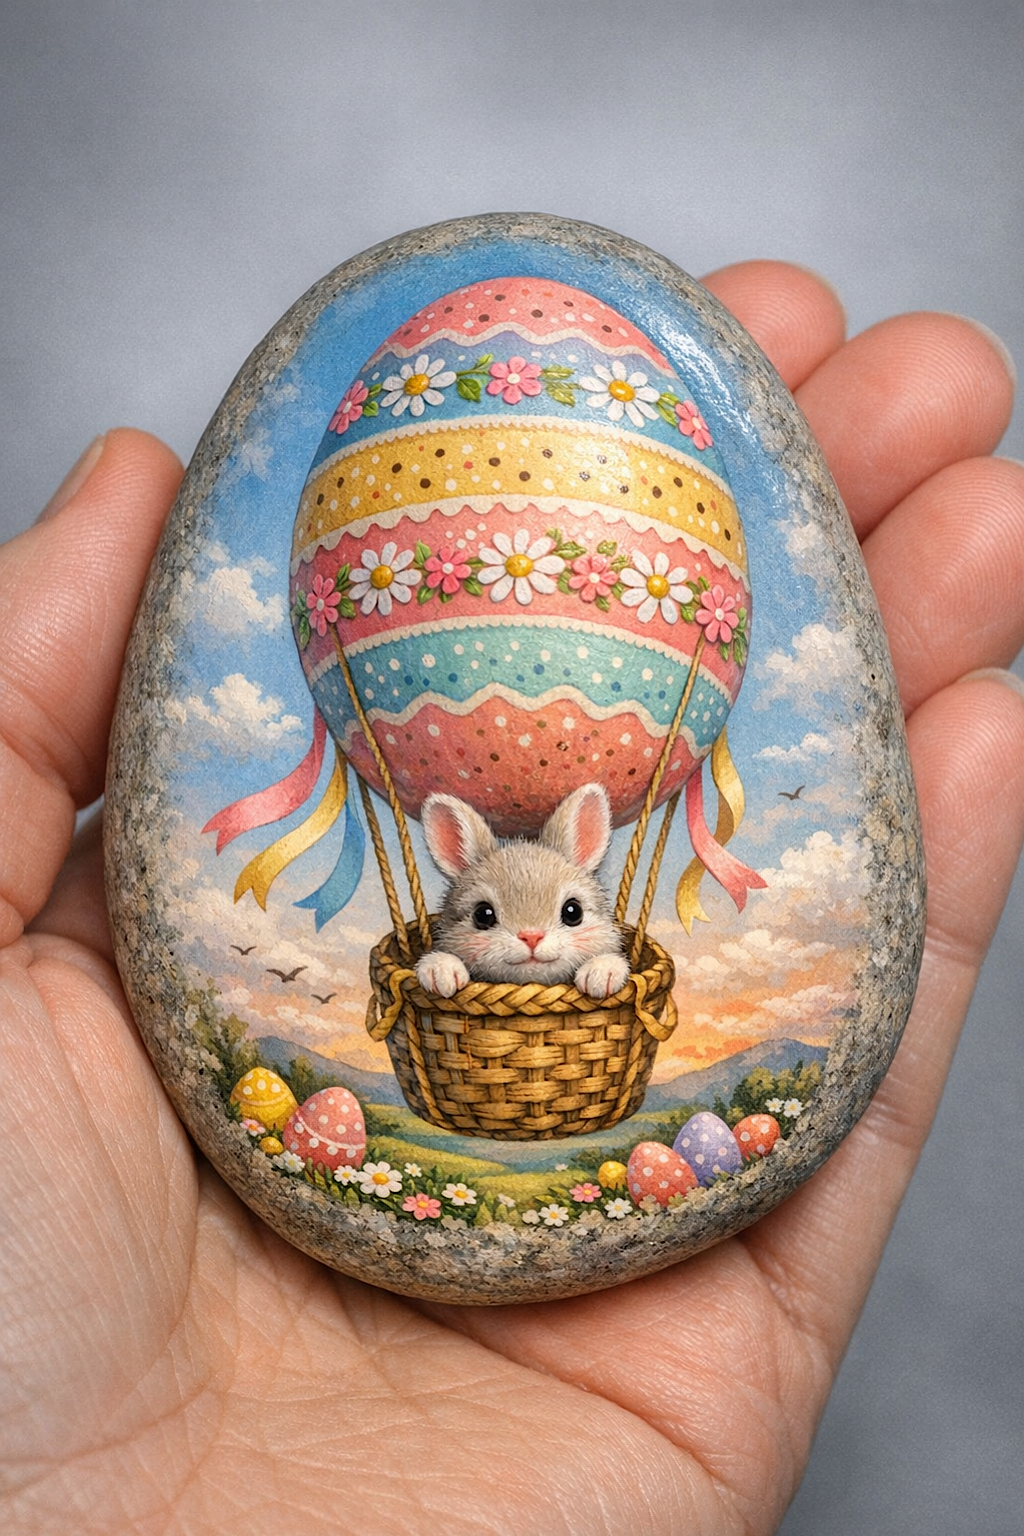
Bunny in a Hot Air Balloon Rock Painting Make It Yourself Tutorial for Easter Whimsy
What you are making
You are painting an adorable bunny peeking over a woven basket while floating beneath a giant Easter egg hot air balloon, complete with ribbon streamers and a dreamy sky landscape. The style is bright, cheerful, and softly shaded so the bunny feels plush and the balloon looks rounded. This is a perfect spring gift rock, an Easter basket surprise, or a standout piece for a tiered tray scene.
Materials and tools
- Large smooth oval rock, washed and dry
- Acrylic paint, white, cream, beige, warm gray, black, pink, coral, sky blue, pale peach, yellow, pastel teal, lavender, green, brown, tan
- Small flat brush for sky blending
- Round brushes sizes 1 and 2
- Detail liner brush
- Optional dotting tool or toothpick
- Palette, water cup, paper towels
- Matte or satin sealer
Finished size and customization notes
This design is easiest on a larger rock so the bunny face stays clean and cute. If your rock is smaller, simplify the landscape and reduce the number of ground eggs. You can swap the balloon stripe colors to match your palette, or add more floral bands for a sweeter cottage feel. Satin sealer makes the balloon look slightly glossy, while matte keeps it illustrated.
Step by step instructions
Prep and base coat
Wash and dry the rock. Paint the front face with a white base coat so the sky and pastels stay bright. Add a second thin coat if needed.
Sketch the main shapes
Lightly mark the egg balloon at the top center. Draw the basket below it with space for the bunny head inside. Add ribbon streamers flowing from the balloon sides and thin cords connecting balloon to basket. Add a horizon line for the distant landscape.
Paint the sky
Blend sky blue at the top into pale peach near the horizon. Add soft white clouds with a dry brush. Keep cloud edges fluffy, not hard.
Visual checkpoint: the sky should feel airy and bright with gentle transitions.Paint distant hills
Add soft green hills along the horizon. Keep them slightly blurred and lighter than the foreground so the bunny remains the focus.
Block in the balloon base colors
Paint the egg balloon with a base pastel such as blush or coral. Add horizontal bands in yellow, teal, and pink. Add a floral band by painting tiny daisies across one stripe. Keep borders smooth and clean.
Add balloon shading and highlight
Shade the lower sides of the balloon with slightly darker versions of each band color. Add a highlight arc on the upper left area using a lighter tint. This creates the rounded balloon illusion.
Paint ribbon streamers
Paint ribbon tails in pastel colors. Add a shadow line along one edge and a highlight line along the other so they look like folded ribbon, not flat strips.
Paint the basket base
Paint the basket in tan. Add a darker brown shadow along the bottom curve. Paint a rim at the top and darken the inside opening to show depth.
Add basket weave texture
Paint curved horizontal lines across the basket and add alternating small vertical marks to suggest woven strands. Keep the weave simplified. Add a few lighter tan highlights on raised areas.
Paint the bunny face and paws
Paint the bunny head and paws in warm cream. Add warm gray shading along the sides of the face, under the chin, and under the paws where they touch the basket rim. Paint inner ears pale pink.
Add bunny eyes, nose, and expression
Paint large dark eyes. Add a tiny white highlight dot on each eye in the same corner so they look glossy. Paint a small pink nose and a simple mouth line. Glaze faint pink blush on cheeks for sweetness.
Add cords from balloon to basket
Paint thin cords in warm tan connecting balloon to basket. Add a darker line on one side for depth. Keep cords straight and evenly spaced.
Paint ground eggs and flowers
At the bottom, paint scattered pastel eggs and small daisies. Add tiny white dot flowers and green sprigs to fill space without crowding.
Add small birds and extra sky detail
Add tiny bird silhouettes in the distance. Keep them small. Add a faint warm glow near the horizon if you want a sunrise feel.
Refine edges and add micro highlights
Sharpen balloon band borders, basket rim, and bunny ear edges with a liner brush using slightly darker versions of the same colors. Add tiny highlights on balloon stripes, ribbons, basket weave, and bunny nose.
Seal
Let dry fully and seal. Use satin if you want richer color and a slight sheen, matte if you want a soft illustrated finish.
Troubleshooting
Bunny looks cross eyed
Paint eye placement lightly first, then enlarge evenly. If one eye is off, paint over with bunny fur color and redraw.
Basket weave looks chaotic
Glaze a thin tan layer to soften, then add fewer clearer weave lines on top.
Balloon looks flat
Increase shading on lower sides and strengthen the highlight arc.
Ribbons look stiff
Add a gentle curve and a shadow edge to suggest folds.
Colors look dull
A white base coat helps. Sealer also deepens color slightly once dry.
Finishing details
Add a name and year on the back for gifting. Display on a mini easel, or place in a spring tray with faux moss and pastel eggs. This also looks adorable tied to a gift with ribbon as a keepsake tag.
Shop Similar
- Large smooth rocks for painting
- Pastel acrylic paint set for crafts
- Detail brush set for rock painting
- Dotting tools for painting
- Clear coat sealer for painted rocks
Style It With
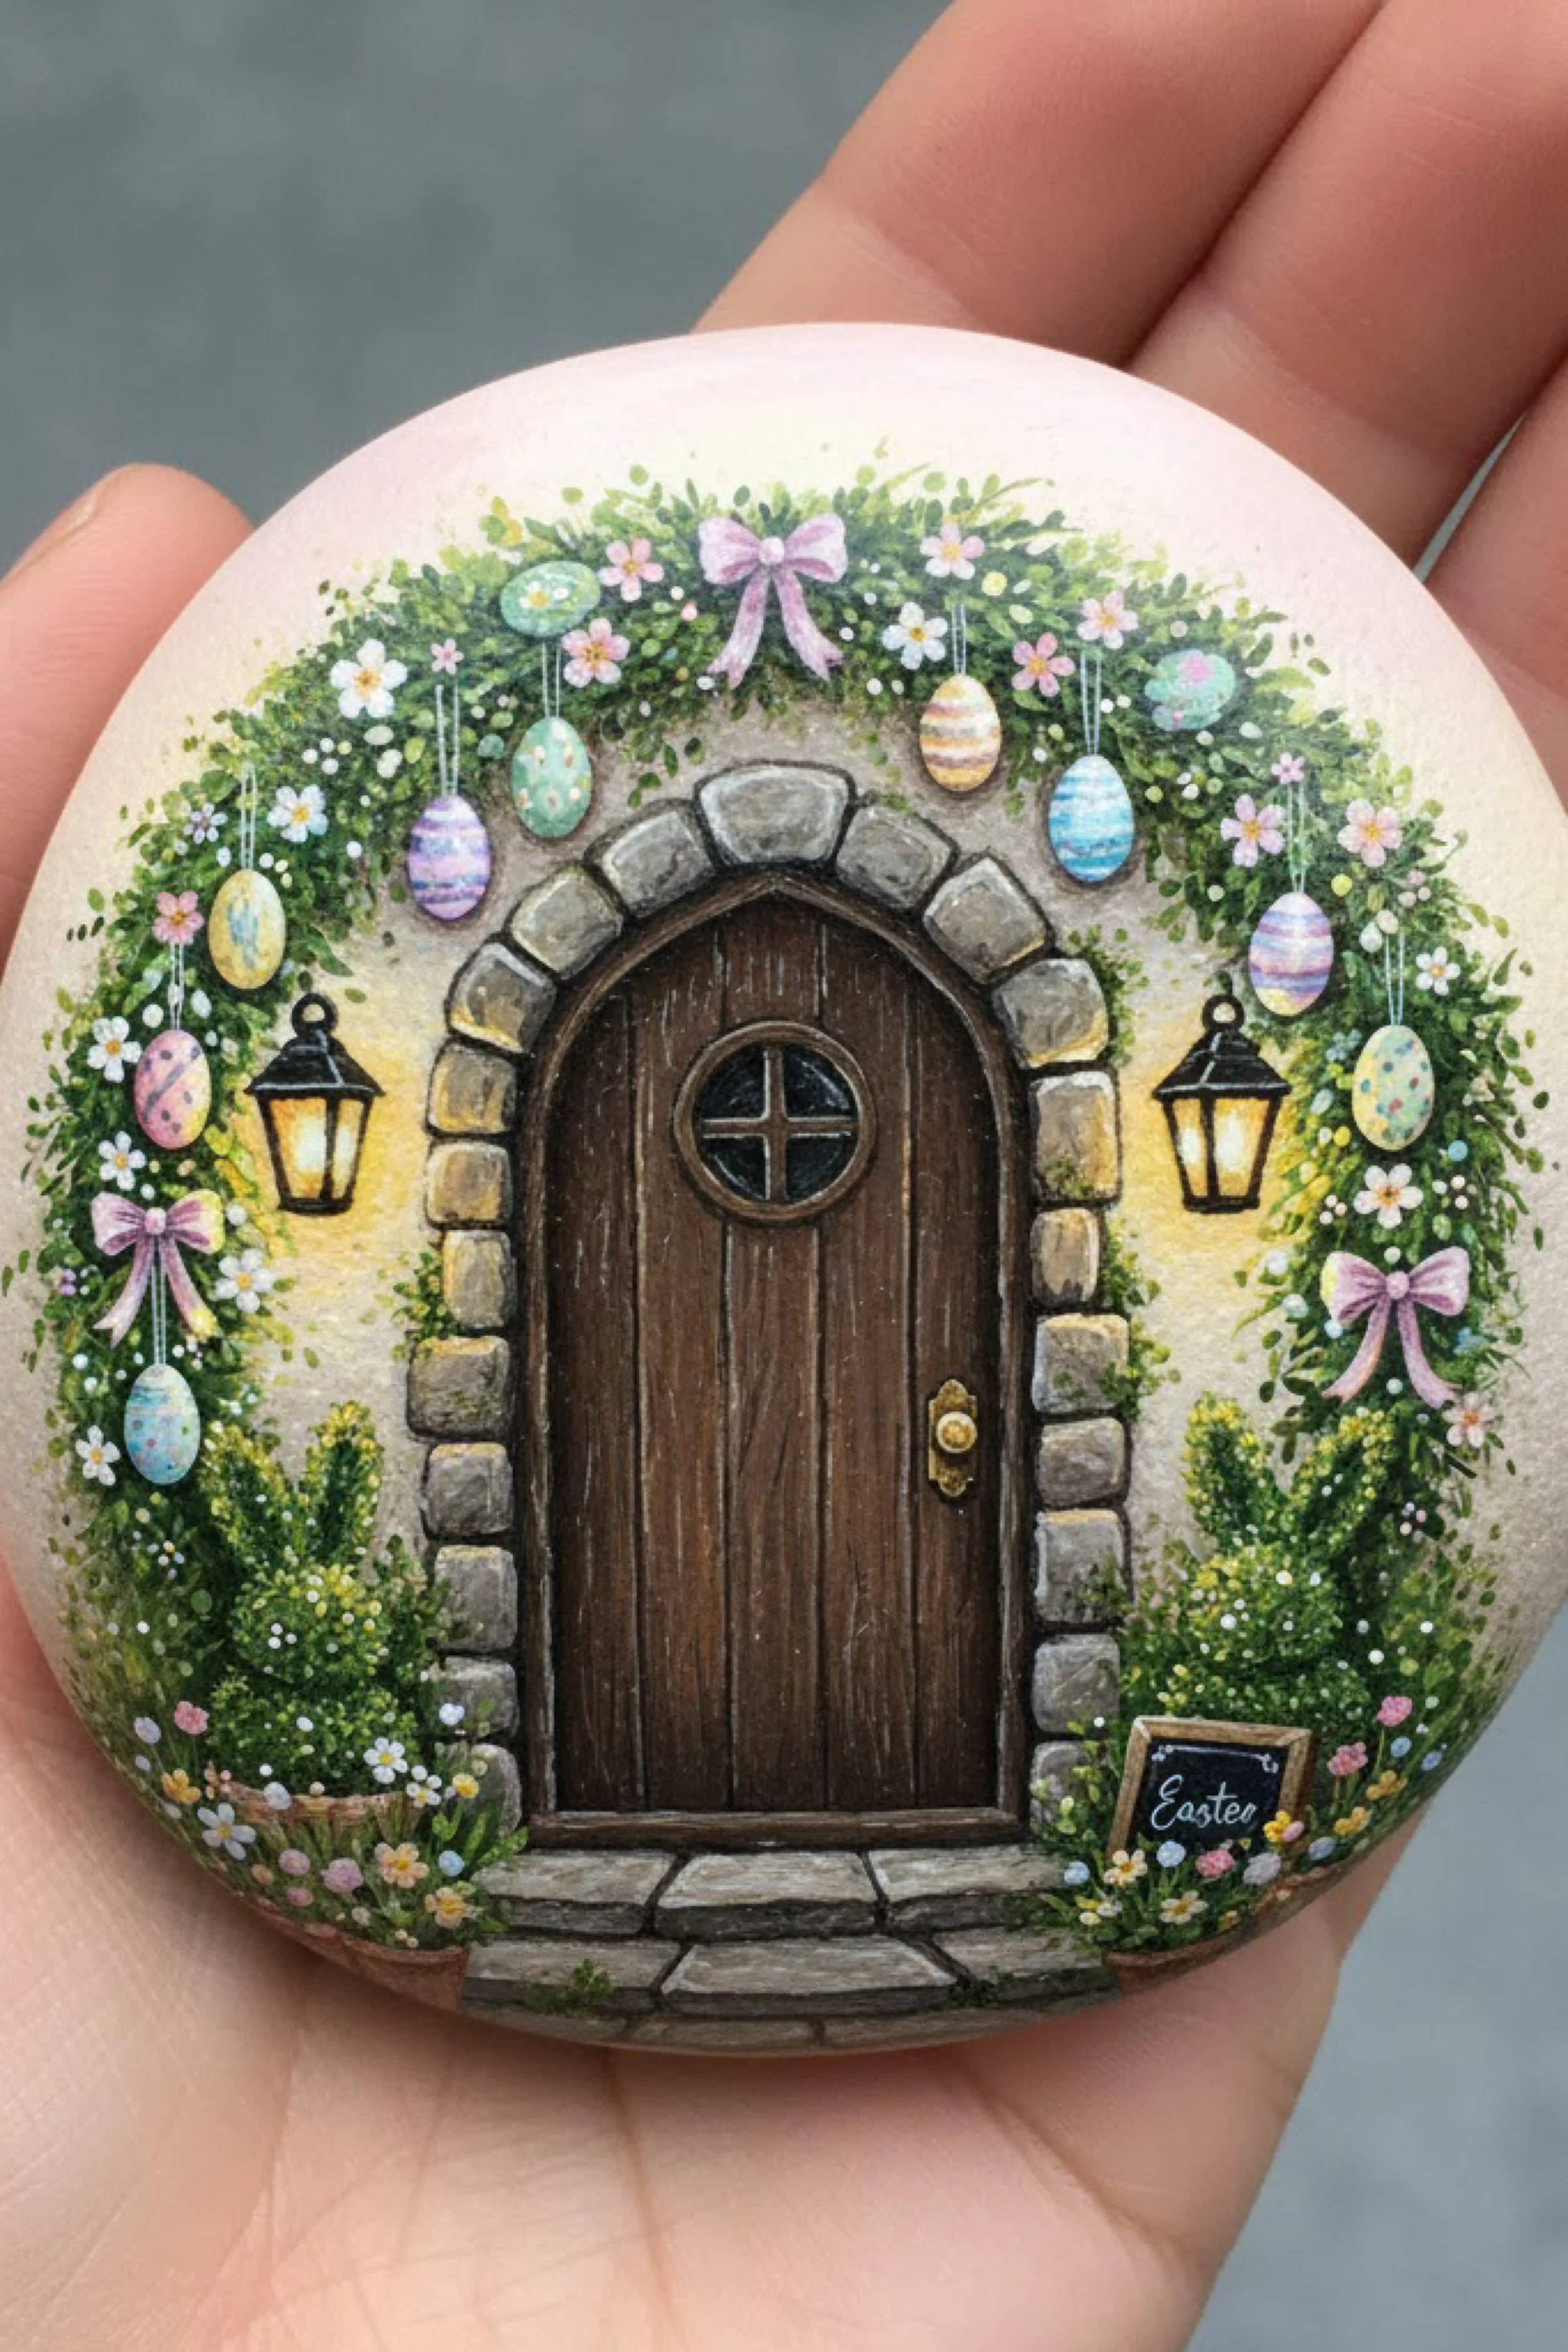
Easter Egg Garland Fairy Door Rock Painting Step by Step Tutorial with a Garden Arch
What you are making
You are painting a fairy garden doorway framed by a stone arch and lush greenery, decorated with a garland of hanging pastel Easter eggs and tiny bows. Warm lanterns glow on both sides of the door, and the garden base is filled with spring greens and small flowers. The overall feel is welcoming and festive, like a miniature Easter village entrance.
Materials and tools
- Smooth oval rock, washed and dry
- Acrylic paint, white, warm cream, light gray, medium gray, dark gray, black, deep brown, tan, moss green, leaf green, sage green, pink, lavender, pastel blue, pastel yellow, soft peach
- Round brushes sizes 1 and 2
- Small flat brush
- Detail liner brush
- Optional white paint pen for tiny highlights
- Palette, water cup, paper towels
- Matte sealer
Finished size and customization notes
This composition works beautifully on a rounder rock because the greenery arch wraps around the door like a wreath. On a taller rock, extend the greenery upward and leave more wall above the lanterns. You can swap the hanging eggs for tiny flowers to make a spring version that is not holiday specific.
Step by step instructions
Prep and base coat
Wash and dry the rock. Paint the front face with a thin white base coat. Add a second thin coat if needed so your pastel colors stay bright.
Sketch the main shapes
Lightly sketch a centered arched door. Mark the stone arch around it, lanterns on both sides, and a large greenery arch framing the door. Mark where the hanging eggs will dangle near the top of the greenery.
Paint the background wall
Paint the wall with warm cream. Keep the center slightly lighter behind the door. Add faint pale yellow haze where lantern glow will go, but keep it subtle for now.
Paint the door base
Paint the door in deep brown. Add vertical wood grain lines in slightly lighter brown and deepen shadow along one side edge to create depth. Add a thin darker outline around the door edge so it separates from the stones.
Add the round window and hardware
Paint a small round window near the upper portion of the door with a dark interior and a lighter ring. Add a cross inside the circle. Paint a small knob plate in warm tan and add a highlight dot to the knob.
Build the stone arch
Paint irregular stones around the door using medium gray with a few warm tan stones for variation. Keep stones large enough to read clearly. Add darker gray separation lines in the gaps.
Shade and highlight stones
Add shadows beneath stones and where stones meet. Add pale highlights on upper edges. This is what makes the arch look carved and dimensional.
Paint the doorstep stones
Paint a few flat stones at the base of the door. Add shadows beneath and a few thin separation lines.
Paint lanterns
Paint lantern frames in black. Fill the glass area with warm yellow. Add a tiny white highlight line on the glass.
Add lantern glow on the wall
Glaze warm yellow mixed with cream around each lantern, strongest close to the lantern and fading outward. Keep glow controlled so it does not overwhelm the greenery.
Paint the greenery arch
Paint the large foliage arch around the door using mid green as a base shape. Add leaf clusters in lighter and darker greens. Create depth by leaving darker pockets between clusters and adding lighter leaf tips on top.
Visual checkpoint: the greenery should look layered, not like one flat green band.
Add tiny flowers in the greenery
Dot small white and pale pink flowers across the greenery. Add tiny yellow centers on some. Keep them scattered with a few clusters near the top corners.
Add bows
Paint small bows in soft lavender or pale pink along the greenery. Add a darker shadow under the bow loops and a lighter highlight on top.
Paint the hanging eggs
Paint small egg ornaments hanging from the greenery. Use pastel blue, lavender, pink, yellow, and peach. Add simple stripes or dot patterns. Add a small highlight on one side of each egg. If desired, add a tiny thin string line above each egg.
Add garden base details
Paint small shrubs and flowers along the bottom edge. Add tiny dot flowers and a few sprigs of grass. If you want a tiny sign accent, paint a small signboard near the lower right with a simple word and tiny flowers around it.
Refine focal edges
Sharpen the door outline, window frame, stone separations, lantern edges, and select leaf edges with a fine liner brush. Avoid outlining everything, focus on the places that need clarity.
Add final highlights
Add tiny white highlights on lantern glass, the knob, and a few eggs. Add a few sparkle dots in the greenery and along the garden flowers.
Seal
Let dry fully, then seal with matte for a soft storybook finish. Apply multiple thin coats.
Troubleshooting
Greenery looks like a blob
Add darker pockets between clusters, then add lighter leaf tips. Contrast creates leaf definition.
Hanging eggs look too large
Paint over with greenery color, then repaint smaller eggs. They should be accents, not the main focal point.
Lantern glow is too strong
Glaze wall color over the outer edge and keep the brightest yellow close to the lantern.
Stones look messy
Simplify by repainting the stone base, then add only clean shadows and highlights.
Door disappears into stones
Deepen the outline shadow around the door opening to separate planes.
Finishing details
Paint the back a solid pastel with a tiny flower corner motif for a finished gift look. For display, place on a small easel or nestle into faux moss with pastel eggs and spring florals.
Shop Similar
- Smooth river stones for painting
- Acrylic paint set spring pastels
- Detail brush set fine tip
- Matte sealer for acrylic crafts
- White paint pen extra fine
Style It With
That is your full set of five storybook Easter painted rocks, finished and ready to display. Let the final sealer dry completely before you handle them a lot, and if you plan to place them outdoors, refresh the protective coat once in a while so the colors stay bright through the season. For a simple display, group the rocks in a shallow bowl with faux moss and a few pastel eggs, or tuck one into a potted plant like a hidden fairy door.
If you want to take these up a notch, paint the backs in solid coordinating pastels, add a tiny signature, and include the year. These make adorable keepsakes, and they look incredible as a set. Save your favorite color mixes so you can recreate the same soft palette next spring, or turn it into a tradition and add a new rock scene each year.