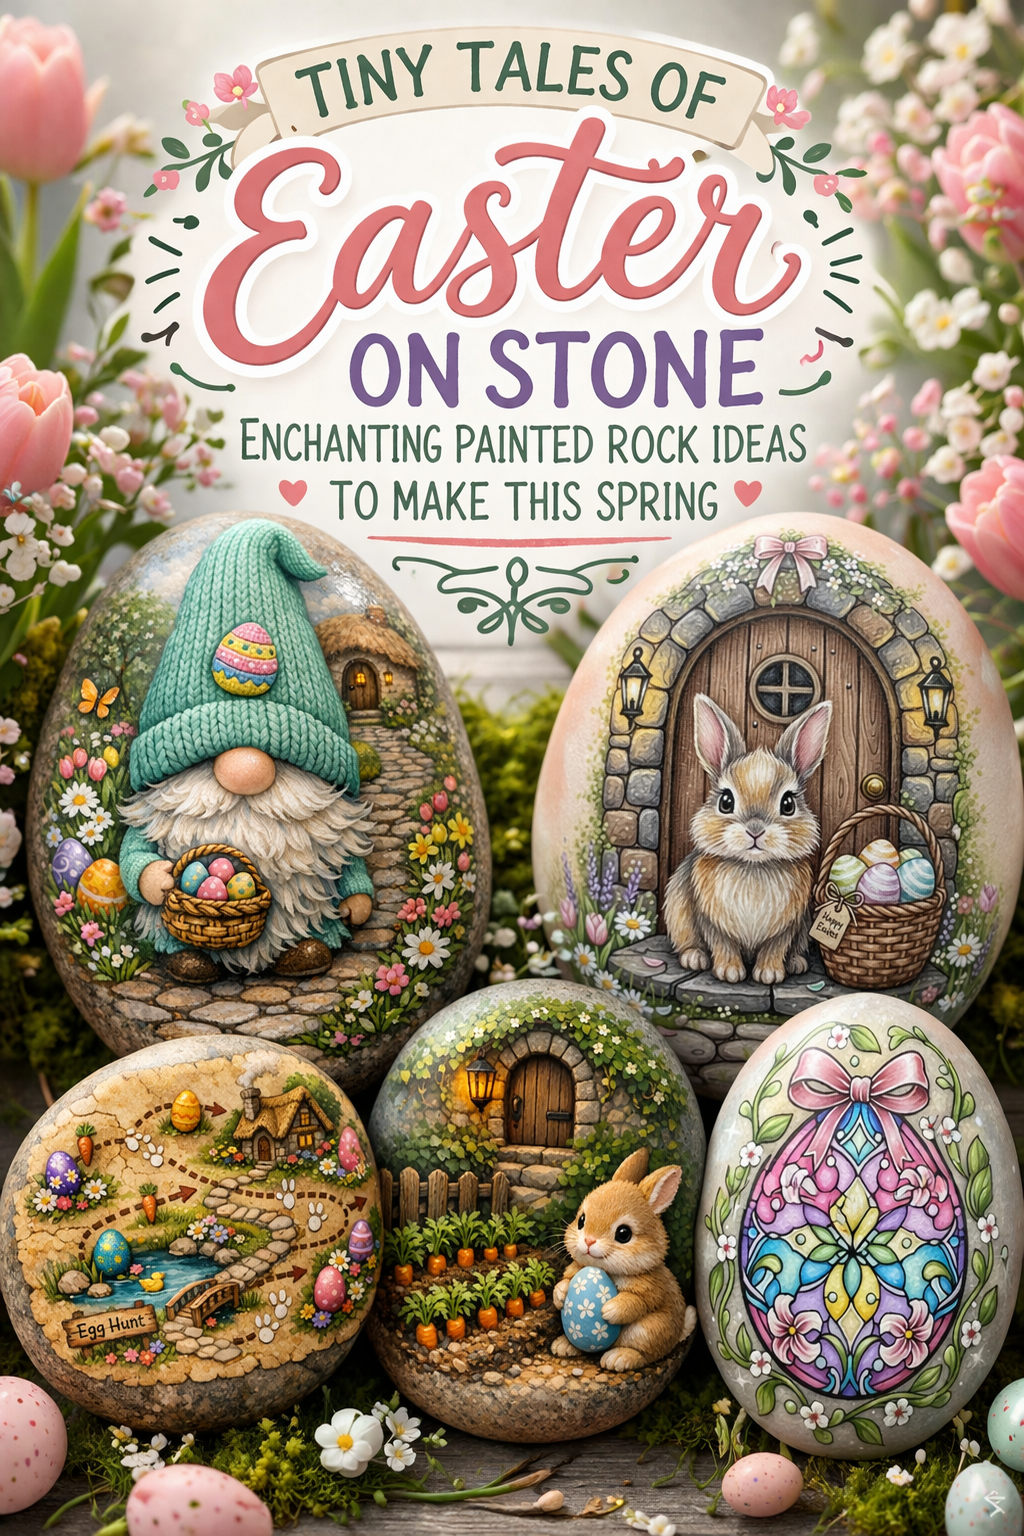
Tiny Tales of Easter on Stone: Enchanting Painted Rock Ideas to Make This Spring
More like this
💡 Pro Tip: Why I Link to Amazon Search Results and Not One Product
In the Shop the Look and Style it With sections under each bikini, I link to Amazon search results, not single products. Here’s why this matters:
Hot bikinis sell out fast. I don’t want you clicking on a dead link to a sold-out item. Search pages stay updated.
You get more options. Love the vibe but want a different color, cut, or price point? The search results give you everything that matches the look and energy.
I curate each search carefully. These aren’t generic. I spend hours crafting keywords that bring up exactly the kind of bikinis I’d wear—or recommend to my hottest friends.
Support with no pressure. If you click a link, browse, and buy something later, I may earn a small commission at no extra cost to you. That helps me keep bringing you curated collections like this one—powerful, seductive, and always fresh.
So dive in. Click through. Try something risky. These aren’t just bikinis—they’re commands, statements, and maybe even your new favorite weapon of choice.
There is something especially magical about painted rocks at Easter. Maybe it is the way a smooth stone already feels a little treasure like in your hand, or maybe it is how easily a tiny spring world can bloom across such a small surface. In this collection, Easter becomes miniature and storybook sweet, with cottage doors, garden paths, pastel eggs, bunnies, gnomes, and stained glass inspired details all tucked onto stone in ways that feel both whimsical and surprisingly elegant.
What makes these ideas so charming is their range. Some lean cozy and narrative, like little scenes pulled from a spring fairy tale, while others are more decorative and graphic, perfect for anyone who loves soft color, clean pattern, and collectible handmade details. Together, they create a painted rock roundup that feels imaginative, giftable, and deeply seasonal without being complicated to enjoy. Whether you are painting for your own home, filling baskets, styling a spring table, or simply looking for a creative weekend project, these tiny Easter worlds offer plenty of inspiration and a beautiful excuse to slow down and make something lovely.
Whimsical Easter Gnome Painted Rock Step by Step Tutorial
What you’re making
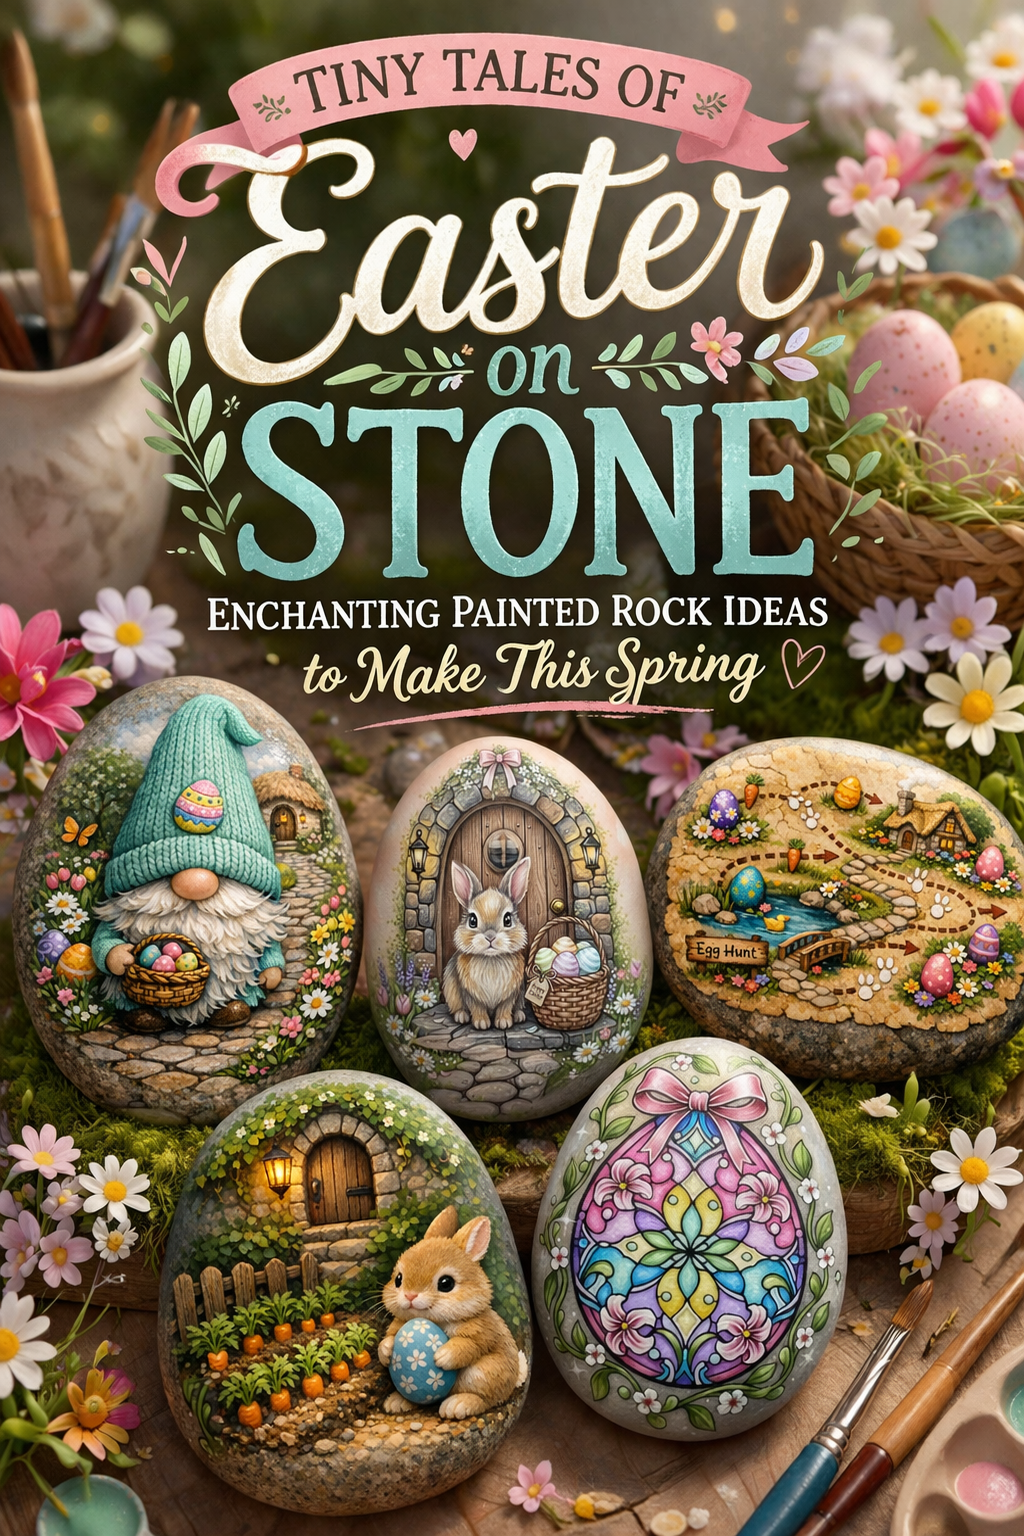
You’re painting a storybook style Easter gnome on a smooth egg shaped rock, complete with a mint hat, fluffy beard, tiny basket of pastel eggs, and a flower lined cottage path in the background. The finished look feels richly illustrated and almost dimensional, even though it is created with careful layering, shading, and fine detail work. This is a wonderful project for spring décor, Easter basket fillers, mantel styling, or gifting to someone who loves cottagecore charm.
The magic of this design comes from contrast. The rock itself stays visible around the border, while the painted scene glows in the center with soft florals, warm stonework, and a textured knit effect on the hat. If your painting skills are beginner to intermediate, don’t be intimidated by the detail. You can build this piece in simple stages, from big shapes to tiny highlights, and the design becomes manageable very quickly.
Materials and tools
- Smooth egg shaped rock, about 3 to 5 inches tall
- Mild soap and an old toothbrush for cleaning the rock
- Acrylic paints in white, black, burnt umber, raw sienna, gray, mint, teal, blush pink, pastel yellow, pastel blue, lavender, orange, grass green, olive green, and cream
- Matte acrylic paint for base coating if your rock is very dark
- Fine tip paintbrushes in sizes 0, 00, and liner
- Small round brush for filling shapes
- Flat brush for priming or large areas
- Dotting tools or the end of a paintbrush
- White gel pen or acrylic paint marker for tiny highlights
- Graphite transfer paper or white transfer pencil, optional
- Pencil for sketching on the rock
- Palette or ceramic plate
- Water cup and paper towel
- Magnifier lamp, optional but helpful
- Matte or satin varnish for sealing
- Optional gloss varnish only for small glowing details like windows
- Optional stylus or embossing tool for tracing the design
Finished size and customization notes
A rock around 4 inches tall gives you enough room for the gnome, basket, path, flowers, and cottage. Smaller stones can still work, but you may want to simplify the garden and reduce the number of eggs in the basket. If yours is wider than the photo, expand the flower beds and make the path curve more dramatically. If yours is taller and narrow, elongate the hat and keep the beard more tapered.
You can also customize the palette. Mint gives the exact soft spring feeling shown here, but pale blue, lavender, or buttery yellow can create the same storybook mood. For a simpler version, paint fewer flowers and use a plain pastel oval on the hat instead of a detailed Easter egg badge.
Step by step instructions
1. Clean and study the rock
Wash the rock thoroughly with soap and warm water, scrubbing away dust and grit with an old toothbrush. Let it dry completely. Turn it in your hand and find the most flattering front face. You want the broadest, smoothest surface for the design, with the natural egg shape supporting the gnome silhouette.
Visual checkpoint: you should now see a clear front side that feels like a natural frame for the artwork. If one side has pits or cracks, keep those toward the back.
2. Base coat only if needed
If the rock is very dark or heavily speckled, paint a thin off white or pale gray oval in the center where the scene will go. Let the natural stone show around the edges. If the rock is already a nice neutral tone like the sample, you may skip a full base coat and paint directly on it.
This partial base keeps the design bright without losing the charm of the stone border. Two thin coats are better than one thick one.
Tip: do not cover the entire rock unless you want a more polished illustration look. The raw stone edge is part of what makes this project feel special.
3. Sketch the major composition
Lightly draw the gnome first because it is the anchor of the whole piece. Start with a tall cone hat centered slightly left of the middle, then a folded brim, a round nose, a large flowing beard, short sleeves, tiny hands, and boots. Add a small basket in one hand. Sketch a curved cobblestone path coming from the bottom foreground and leading up toward a tiny cottage on the right. Then add loose masses for flower beds and greenery around the edges.
Keep the proportions sweet and slightly oversized. The hat should be large enough to hide the eyes entirely. The beard should feel generous and soft.
Visual checkpoint: the composition should already read clearly as a gnome standing on a path in a garden. If yours looks cramped, reduce the width of the beard or move the cottage a little higher and smaller.
4. Block in the background first
Paint the sky in a muted blue gray with a few soft cloudy patches. Use a small round brush and feather the edges so it blends softly into the garden. Next paint the dark green tree mass on the upper left and the cottage shape on the upper right. Block in the stone path with warm gray beige stones separated by darker lines.
Do not worry about detail yet. At this stage, the goal is simply to create clear background zones so the gnome will pop forward.
Tip: keep the background slightly softer and less saturated than the main figure. That helps create depth.
5. Paint the hat and outfit base
Mix a minty teal shade and fill in the hat, brim, and sleeves. Use two thin coats for an even finish. While that dries, paint the badge on the hat as a simple oval. Fill the egg with horizontal pastel bands in pink, yellow, and blue.
If you want the knit effect to show beautifully later, keep the base coat smooth and opaque. Any bumps here will make the texture harder to paint neatly.
Visual checkpoint: the hat should now dominate the design. If yours looks too short compared with the reference, extend the tip upward and curve it over before moving on.
6. Build the beard shape
Base coat the beard in a warm ivory, not stark white. Then mix a light gray beige shadow and paint it underneath the hat brim, around the sides of the nose, and deep in the layered beard sections. Use long curved strokes that follow the direction of the beard. After that, return with a lighter cream and pull brighter strands over the shaded sections.
This layered brushwork is what creates the feathery, carved look. Work in sections instead of trying to finish the entire beard all at once.
Tip: if your strands start looking muddy, let the area dry and then go back with cleaner, brighter strokes on top.
7. Add the knit texture on the hat
This is the showpiece detail. With a slightly darker mint, paint narrow vertical V shaped knit columns from the top of the hat down toward the brim. Then use a lighter mint and add highlight lines on one side of each column. On the brim, make the knit loops chunkier and more horizontal so it looks folded and plush.
Take your time here. The texture does not need to be mathematically perfect. It just needs to be consistent. If the stitches wobble slightly, that often makes it look more handmade and charming.
Visual checkpoint: you should now see the hat change from a flat mint shape into something that looks almost fabric like. If yours looks striped instead of knitted, add tiny angled joins to create more of a looped V impression.
8. Paint the face, hands, and boots
Use a peachy beige for the nose and hands. Shade gently underneath each rounded form with a soft warm tan. Add a tiny highlight dot to the nose for a polished finish. Paint the boots in mottled brown with a little warm gray to tie them into the stone path.
Because the eyes are hidden, the nose becomes the emotional center of the face. Make it soft, rounded, and slightly glowy.
9. Paint the basket and eggs
Base coat the basket in a warm golden brown. Then create the woven look by painting alternating horizontal and vertical bands, adding darker lines between them. Paint the handle with a twisted rope look using a dark base and lighter highlight curves. Fill the eggs with pastel pink, blue, yellow, and mint, then dot or stripe them with tiny patterns.
If your basket looks flat, deepen the lower rim and the inside edge with darker brown. That shadow gives it depth quickly.
Visual checkpoint: the basket should now look like a little separate object sitting in front of the beard. If it disappears into the beard, darken the beard shadow directly behind it.
10. Bring the cottage to life
Paint the cottage walls in warm beige gray, the roof in straw like tan, and the door in rich brown. Add a dark line around the door opening and tiny yellow orange windows to create the warm glow. Use lighter strokes on the roof to suggest thatch texture. Then paint the stepping stones leading up to the door.
Small glowing windows add instant magic. A tiny dot of deeper orange near the center of each window plus a faint pale yellow highlight near the edge makes them feel lit from within.
11. Add the flowers and garden
Use dark green first to place the foliage shapes. Then layer lighter leaf tones over the top. Paint daisies with white petals and sunny centers, tulips in soft pink and yellow, and tiny filler blossoms in blush and pale lavender. Scatter them around the base and edges to frame the gnome.
Work from larger flowers to smaller flowers. A few carefully placed blooms look better than too many identical ones. The sample has a dense garden feel, but it is still organized in clusters.
Tip: use the tip of a liner brush or dotting tool for miniature flower centers and tiny petal marks.
12. Add the butterfly and final whimsy
Paint a small orange butterfly on the left side, keeping it simple. Two upper wings, two smaller lower wings, a narrow body, and a few darker edge accents are enough. This tiny detail balances the cottage side and adds motion to the scene.
You can also add a few extra white flower dots in the greenery to create sparkle and visual texture.
13. Define the cobblestone path
Return to the foreground path and outline individual stones with a soft dark gray brown. Highlight the tops of some stones in pale cream to suggest light catching the uneven surfaces. Vary the stone shapes so they do not look stamped.
If yours looks wider than the photo, narrow the path visually by darkening the outer edges and placing more flowers along the border. If it looks too thin, brighten the center stones to pull it forward.
14. Deepen shadows and add highlights
Now step back and look at the whole rock. Add darker shadows beneath the hat brim, under the beard, between beard layers, beneath the basket, and around the boots. Then add your lightest highlights on the hat texture, beard tips, egg patterns, window glow, flower centers, and upper edges of the path stones.
This stage makes the design feel finished. Without these contrasts, even detailed work can look flat.
Visual checkpoint: you should now see a strong focal point at the hat, nose, beard, and basket, with the cottage and flowers supporting the scene instead of competing with it.
15. Seal the rock
Let the painting dry completely, ideally overnight. Apply thin coats of matte or satin varnish, allowing each coat to dry before the next. Two to three coats are usually enough for indoor display. Add a tiny touch of gloss only on the cottage windows if you want extra glow.
Troubleshooting
My knit hat looks messy
Make the stitches larger and more deliberate. Tiny, crowded marks can blur together. Paint darker stitch columns first, then add only a few lighter highlights.
The beard looks like a blob
Break it into layered sections with curved shadows first. Then pull lighter strand strokes over the top. Think in feathered clumps, not individual hairs at the start.
The background is too busy
Tone it down with a thin glaze of gray blue or olive. The gnome should remain the brightest and most detailed part of the composition.
My flowers look stiff
Vary the size, angle, and spacing. Mix open daisies, upright tulips, and small dot blossoms. Even a tiny shift in petal direction helps.
The basket does not look woven
Darken the spaces between the strips and add highlights only on the upper edges of the weave. Contrast is what creates the illusion.
Finishing details
Once sealed, display the rock on a tiny plate stand, tuck it into a spring shelf display, or rest it beside a potted plant for a hidden garden feel. If you want the design to last outdoors in a sheltered spot, use an outdoor rated sealer and bring it in during heavy rain or hard sun. A soft felt dot on the underside can keep it from scratching delicate surfaces.
Optional upgrades for this design include adding a tiny name on the basket tag, painting metallic accents on the egg badge, dotting fairy lights around the cottage windows, or using an ultra fine brush to add even more beard texture. You could also personalize the egg badge with initials or a tiny floral motif instead of stripes.
Shop Similar
- Smooth egg shaped river rocks for painting
- Fine detail acrylic paint brush set
- Pastel acrylic paint set for rock art
- Matte sealer for painted rocks
- Dotting tools for miniature painting
Style It With
Storybook Bunny Door Painted Rock DIY Guide
What you’re making
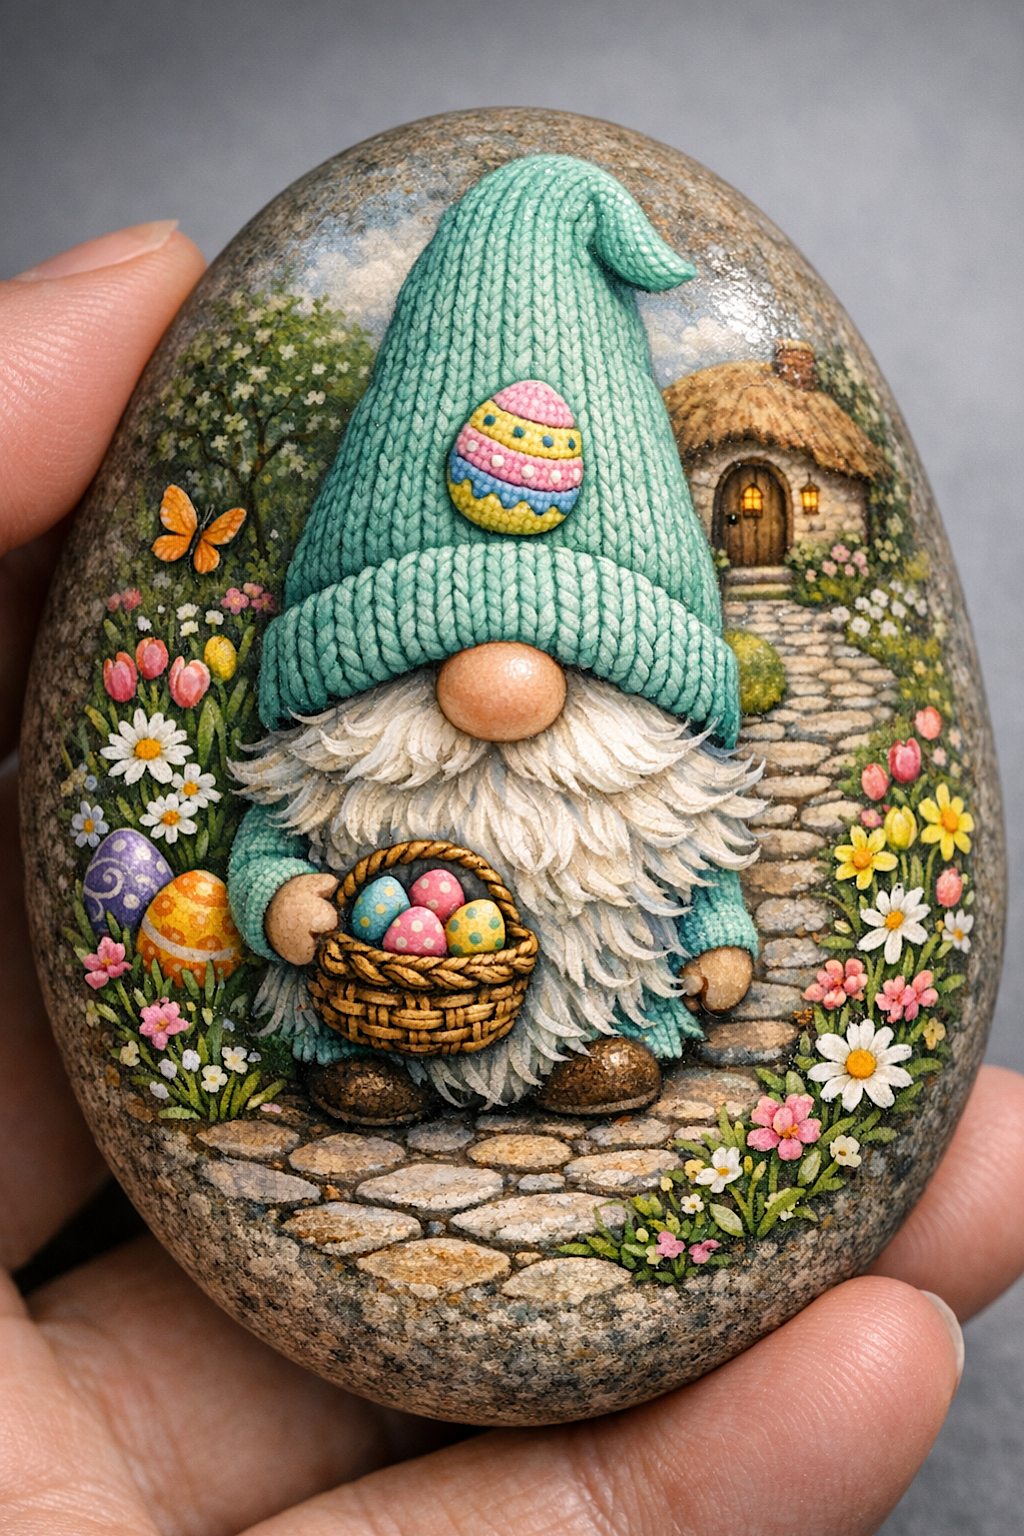
You’re creating a soft, sweet Easter painted rock featuring a baby bunny sitting in front of a stone cottage door, with a woven basket of pastel eggs, lanterns, little daisies, and a pink bow overhead. The finished design feels gentle and polished, almost like a nursery book illustration painted onto a smooth oval pebble. It is especially lovely for spring décor, tiered tray styling, place settings, or Easter basket gifts.
This design looks intricate, but it is built from very friendly shapes. A rounded arch, simple bunny body, basket oval, and clusters of flowers do most of the work. The softness comes from careful shading, thin line work, and a warm pastel palette, so even if you are newer to detail painting, you can still get a beautiful result by moving slowly from large forms to tiny finishing marks.
Materials and tools
- Smooth oval rock, ideally 3 to 4 inches wide
- Soap, water, and a soft brush for cleaning
- Acrylic paints in warm white, ivory, black, medium gray, stone gray, tan, brown, burnt umber, blush pink, sage green, light green, lavender, pastel yellow, pastel blue, and pastel mint
- Fine detail brushes in round and liner sizes
- Small round brush for base shapes
- Pencil or transfer paper for sketching
- White gel pen or fine paint marker
- Palette and water cup
- Paper towel or lint free cloth
- Optional magnifier lamp
- Matte varnish or satin varnish
- Optional micro detail pen for the bunny whiskers and tiny lettering on the basket tag
Finished size and customization notes
A wider oval stone works especially well here because the door arch needs room to frame the bunny. If your stone is smaller, simplify the stone arch and use fewer flower types near the base. If your rock is taller and narrower, make the door more elongated and tuck the basket closer to the bunny’s side.
You can also shift the mood by adjusting the colors. Warm neutrals with blush and sage create the exact look of the sample, but powder blue instead of blush or a lavender ribbon can feel equally springlike. For a more rustic look, use deeper browns and more weathered stone tones.
Step by step instructions
1. Prep the rock and plan the layout
Wash and dry your rock thoroughly. Turn it until you find the most balanced front surface. Lightly sketch a large arched doorway centered on the rock, with the bunny sitting just in front of it. Place the basket to one side, lanterns on both sides of the arch, and a floral garland with a bow above. Then sketch simple flowers and stepping stones along the bottom edge.
Keep the bunny centered and slightly low on the stone. That gives the door enough presence without crowding the top.
Visual checkpoint: the design should read clearly even in a pencil sketch. If the basket feels too large, reduce it now before painting.
2. Base the background
If your rock is dark, apply a thin pale warm cream base where the illustration will go. If the stone is already light and smooth, you may work directly on it. Keep the outer edge of the rock visible if you want a natural, storybook pebble look.
A soft ground helps pastel paint colors stay luminous. Let the base dry well before sketching again if your first lines disappear.
3. Paint the stone arch and door
Start by painting the wood door in mid brown. Add a circular little window, a darker shaded edge around the door, and a brass colored knob. Then paint the surrounding stones in varied grays, taupes, and warm beige. Make each stone slightly different in shape and tone so the arch feels natural.
Leave thin dark lines between stones for definition. These mortar lines are small, but they make the whole doorway feel structured and believable.
Tip: keep the inner edge of the arch a little darker so the bunny stands out against it.
4. Add lanterns and the top bow
Paint two black lantern shapes on either side of the door. Fill the inside with creamy yellow and deeper golden shading so they look softly lit. Above the door, paint a pale pink bow with ribbon tails. Then add a leafy garland around the top arch using olive and sage green.
The bow is delicate, so build it in layers. Start with a mid pink shape, then add darker creases and pale highlights to the loop edges. Even simple shading makes it look satiny.
Visual checkpoint: you should now have a cottage entryway that already feels charming, even without the bunny.
5. Paint the bunny’s base shape
Use a warm tan beige for the bunny body and a lighter cream for the chest, muzzle, and inner ear areas. Keep the body shape rounded and compact. The eyes should sit low enough to feel cute and forward facing, with the ears reaching up into the lower door area without covering important details.
At this stage, do not try to paint individual fur strands. Focus on smooth, soft base shapes.
6. Shade the bunny for softness
Add deeper brown gray shadows under the chin, between the ears, around the sides of the face, and beneath the body. Then layer lighter cream and ivory over the forehead, cheeks, chest, and paw tops. Use tiny short strokes around the edges to begin suggesting fur.
The key is softness, not sharpness. Avoid harsh black outlines around the bunny. Let the form be shaped by gentle value changes.
Tip: large glossy eyes make the bunny feel alive. Paint the eyes dark brown or black, then add one or two bright white highlight dots once dry.
7. Paint the basket and pastel eggs
Create the basket using a woven oval shape in medium brown. Add darker weave shadows underneath the top rim and around the base. Then paint the eggs in pale pastel stripes, swirls, or simple bands. Blue, pink, mint, and yellow work beautifully here.
A tiny tag hanging off the basket adds storybook charm. Paint it in kraft brown and, if your brush control allows, add a tiny greeting in dark paint.
Visual checkpoint: the basket should look tucked beside the bunny, not floating. If needed, add a shadow beneath it and slightly behind it.
8. Bring out the wood grain in the door
Return to the door and paint soft vertical wood grain lines in a slightly darker brown. Add a darker edge around the circular window and a faint highlight on one side of the knob. These subtle details make the entire scene feel finished and cozy.
If the door looks too flat, glaze a thin transparent brown over parts of it and then pull a few lighter lines back in while still slightly damp.
9. Define the flowers and grass
Paint small daisies, tiny pink blossoms, and lavender spikes along the bottom corners and around the doorway. Start with green leaf clusters, then add the blooms on top. Daisies can be made with five to seven quick petal strokes and a warm yellow center dot.
Vary the height of the stems and the direction of the blooms. This prevents the floral border from looking like wallpaper.
10. Add stepping stones and ground
Paint little rounded stones at the bunny’s feet in warm gray beige. Use soft darker lines between them and lighter upper highlights. Add tiny bits of grass and moss between the stones to blend them into the floral border.
The stepping stones create a nice base that grounds the whole design and keeps the bunny from looking pasted onto the rock.
11. Refine the bunny’s face
This is where the painting comes to life. Add a tiny pink nose, a delicate mouth line, lighter fur around the muzzle, and a few very fine whiskers. Deepen the eye rims just slightly, then brighten the eye highlights if needed. Paint the inner ears with pale blush and soften them into the fur.
Visual checkpoint: you should now see a sweet expression looking directly out from the rock. If the bunny seems too stern, make the lower face slightly lighter and soften any overly dark lines near the eyes.
12. Add tiny details for polish
Place little white flower dots in the greenery, subtle highlights on the lantern glass, and tiny brighter accents on the pastel eggs. You can also add little petal pieces on the ground to create movement. Keep these marks controlled and intentional.
The sample design is neat and refined, so fewer high quality details will look better than covering every inch with decoration.
13. Balance values across the design
Step back from the rock. If the bunny blends too much into the door, darken the doorway immediately behind it. If the basket steals too much attention, mute it slightly with a soft glaze. If the floral border feels too weak, brighten only a few petals instead of all of them.
This balancing step is what turns a cute craft into a polished miniature artwork.
14. Seal the finished piece
Once everything is fully dry, seal with two or three thin coats of matte or satin varnish. Satin gives a lovely gentle glow without making the painted surface look plastic. If you want the lanterns to appear extra luminous, add the tiniest dot of gloss to the glass sections after the matte sealer has dried.
Troubleshooting
My bunny looks flat
Increase the contrast between the face highlights and side shadows. Add short fur strokes only along the edges and around the cheeks rather than everywhere.
The arch stones look too uniform
Vary their colors more. Add warmer beige stones, cooler gray stones, and slightly irregular outlines so the arch feels built from different pieces.
My basket is crooked
Use the top rim as your guide. Paint that ellipse first, then build the body downward. A clean rim makes the whole basket read better.
The flowers overwhelm the bunny
Tone them down with a thin glaze of pale gray green or cream. The bunny should be the main focal point.
I cannot paint tiny lettering on the tag
Skip the words and add a simple dark line or tiny heart. It still reads as a tag.
Finishing details
This painted rock looks beautiful nestled into faux moss, stood upright on a little easel, or placed beside a spring candle vignette. If you are gifting it, wrap it in tissue with a handwritten tag and it instantly feels special. For a slightly more heirloom finish, line the back with a date and signature in paint pen before sealing.
Optional upgrades include adding a monogram to the basket tag, painting a tiny wreath on the door, using pearlized paint for subtle egg shimmer, or adding a soft speckled effect to the stone arch for extra realism. You could also turn this into a series by changing the animal at the doorway while keeping the same cottage setting.
Shop Similar
- Smooth oval painting stones for crafts
- Mini detail paint brushes for rock painting
- Pastel acrylic paints for miniature art
- Satin varnish for painted rock crafts
- Magnifier lamp for detailed painting
Style It With
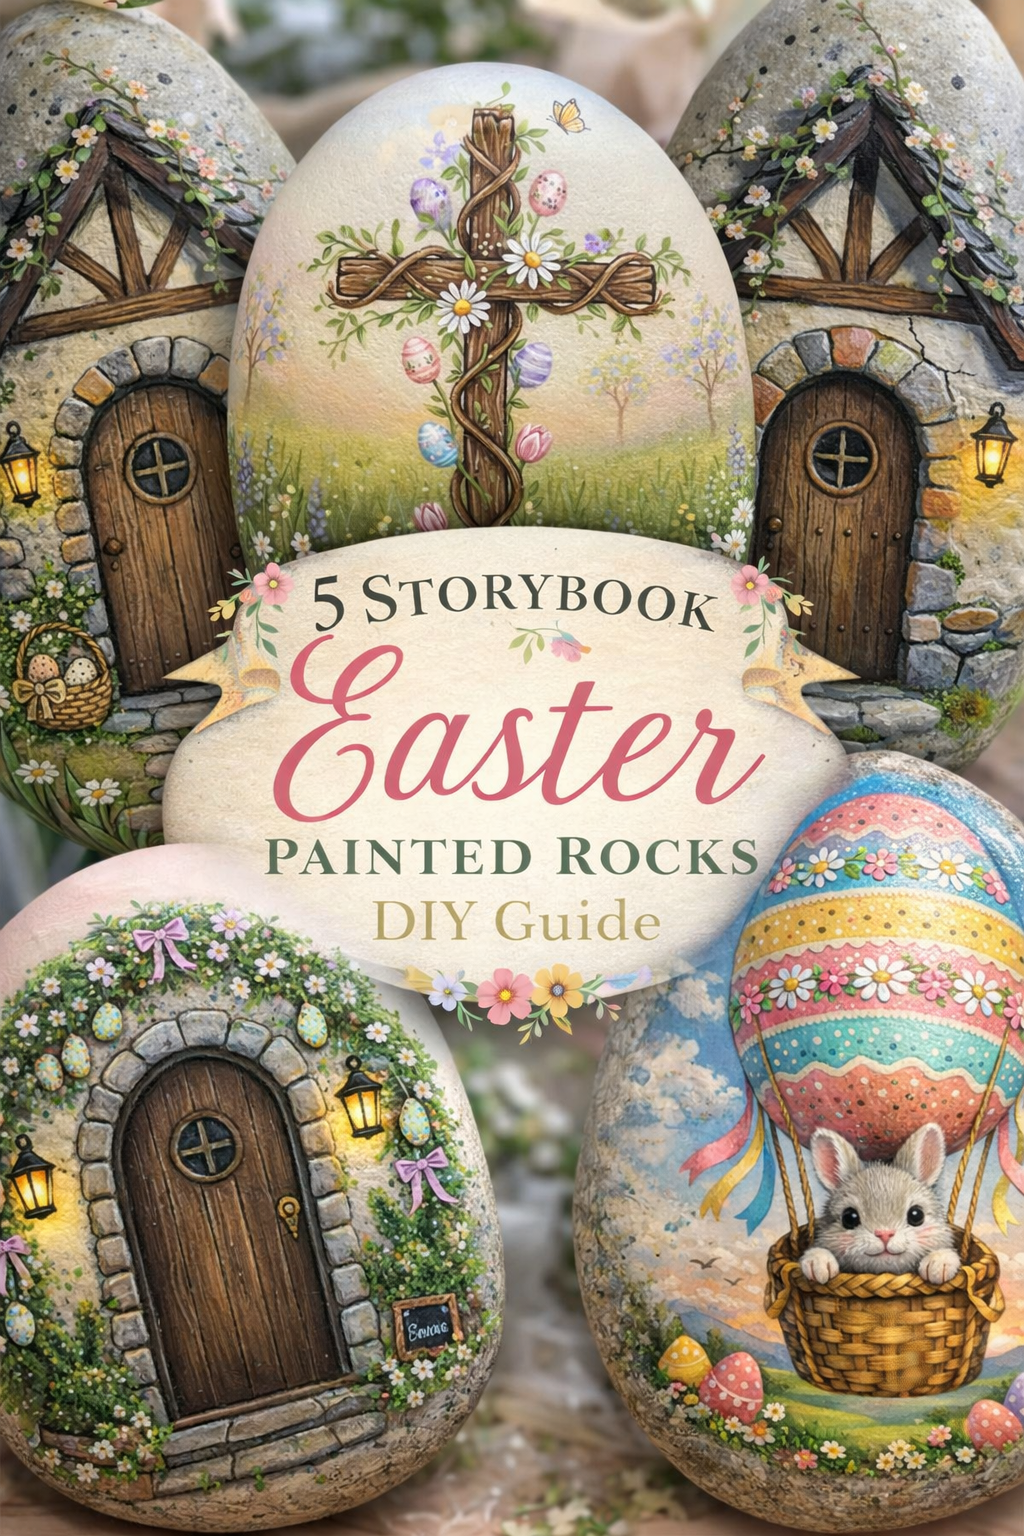
Easter Egg Hunt Map Painted Rock Make It Yourself Tutorial
What you’re making
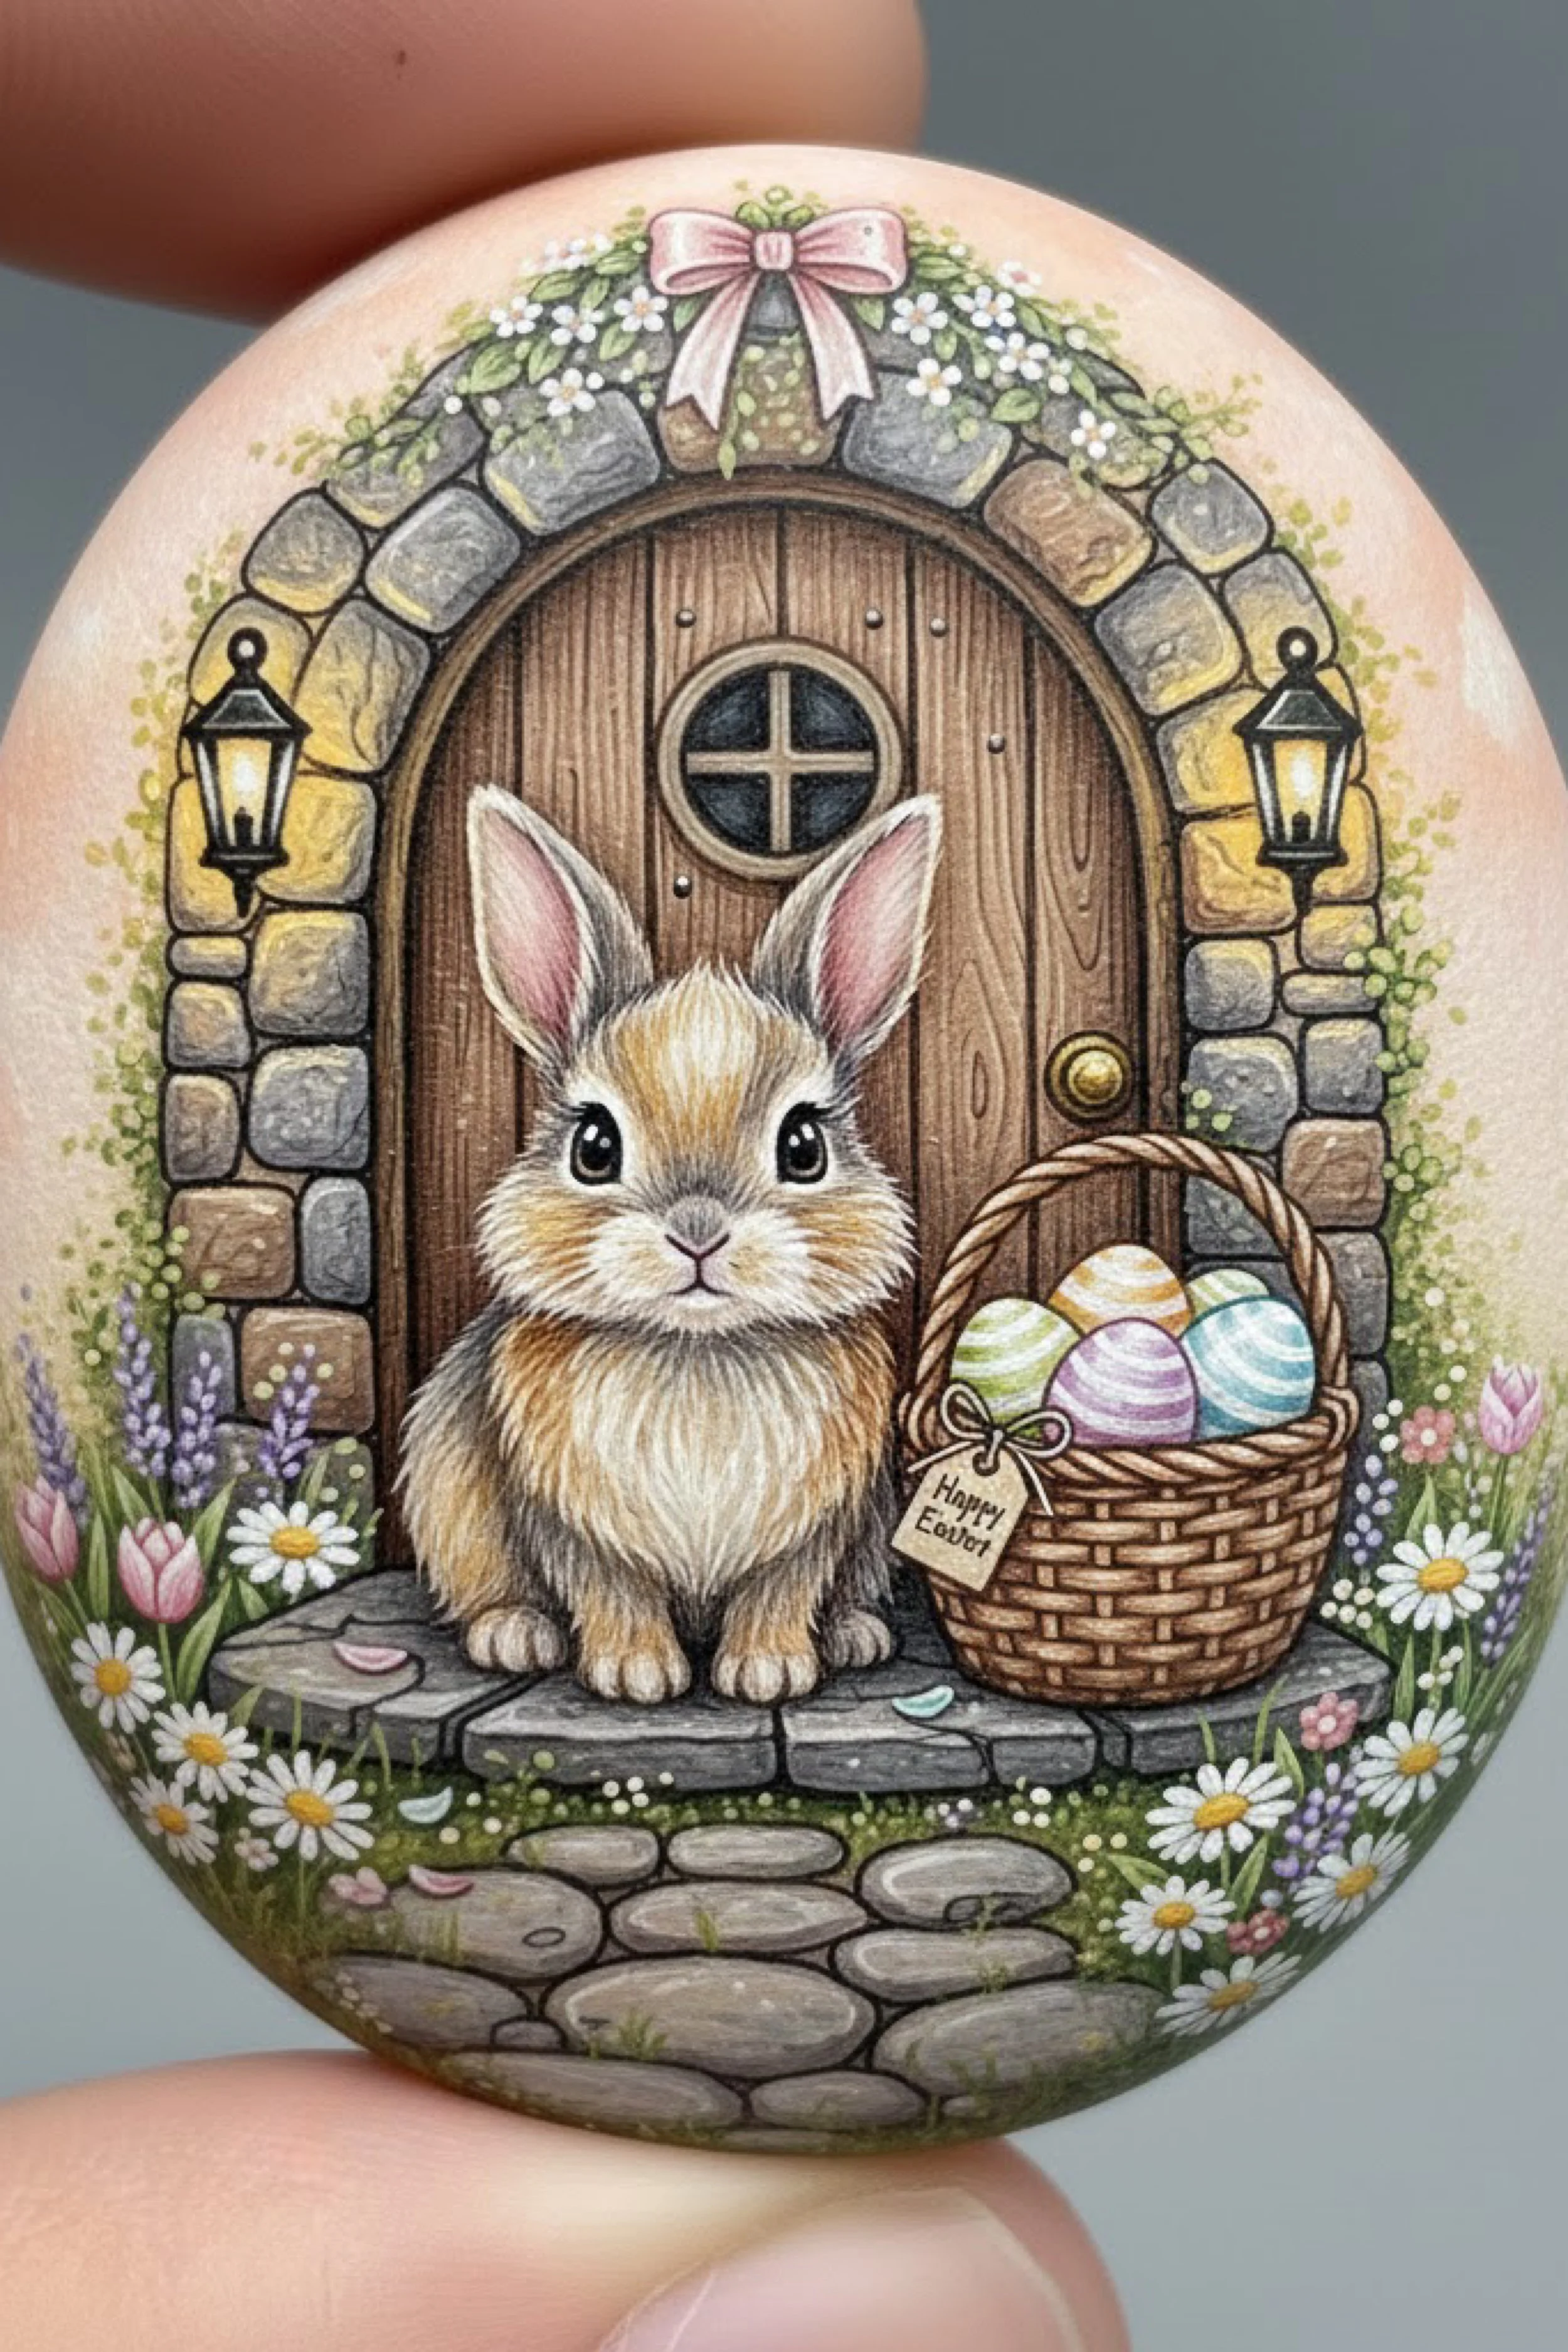
You’re painting a miniature Easter treasure map on a flat stone, complete with winding dotted paths, colorful eggs, carrots, bunny footprints, a tiny bridge over water, and a cozy cottage destination. This design has a playful vintage map feeling, but the soft florals and pastel eggs keep it firmly in spring territory. It is a perfect project for Easter table favors, scavenger hunt décor, basket gifts, or seasonal shelf styling.
What makes this rock especially fun is that it reads like a full scene from a distance and rewards close inspection with lots of little discoveries. Because it is flatter and wider than the other painted rocks in the set, the composition works best as a horizontal landscape with a parchment style map center framed by the natural stone border.
Materials and tools
- Flat smooth river rock, roughly palm sized
- Soap and soft brush for cleaning
- Acrylic paints in parchment beige, cream, black, white, burnt umber, tan, gray, soft blue, teal, grass green, olive green, pastel pink, pastel yellow, purple, orange, and warm brown
- Fine liner brush
- Small round detail brush
- Flat brush for base shape
- Pencil or transfer paper
- White paint pen or gel pen
- Dotting tool or stylus
- Matte varnish
- Optional sponge for subtle textured parchment effects
Finished size and customization notes
A wider rock is ideal for this design because you need room for the winding pathways and little destinations. If your stone is smaller, simplify the layout to one main path with two or three egg clusters instead of many stops. If your rock is taller than wide, tilt the map vertically and let the bridge and pond sit lower while the cottage sits high near the top.
You can personalize the map by changing the sign text, adding initials near the cottage, or adjusting the route to reflect a real egg hunt path in your yard. This project also works beautifully as a child’s keepsake if you include a date on the back.
Step by step instructions
1. Prepare the rock and decide on orientation
Clean the rock thoroughly and let it dry. Lay it horizontally in your hand and confirm that the wide direction feels natural. This design depends on a landscape layout, so choose the side that gives you the broadest uninterrupted center space.
Visual checkpoint: you should now see a natural frame for a little map scene. If the rock feels too upright, rotate it before sketching.
2. Paint the parchment map area
In the center of the rock, paint an irregular parchment shaped area in warm beige. Leave the natural stone showing around the outer edge. While the paint is still slightly damp, dab in a touch of cream and a touch of deeper tan to create a softly aged paper texture. Keep the border uneven and organic.
This light central panel makes the painted details easier to read and creates the illusion that an old map is laid over the stone.
Tip: if you want cracked parchment character like the sample, add a few thin irregular fracture lines later with a very fine brush and diluted tan brown paint.
3. Sketch the route and landmarks
Lightly draw the main winding path first. Let it begin near the lower left, curve past a pond and bridge, snake through eggs and carrot markers, and lead to a tiny cottage near the upper right. Add dotted arrows along the route and small bunny footprints beside some of the path turns. Sketch flower clusters around the egg stops so the whole design feels lush rather than empty.
Keep the path flowing. Avoid sharp angles unless they feel playful and intentional.
Visual checkpoint: the map should already feel readable. If it looks crowded, remove one egg stop now.
4. Paint the pond and bridge
Start with the pond because it anchors the lower left area. Paint the water in layered soft blues with a darker edge and lighter center. Add a few stones around it and a tiny yellow duck if you want that extra whimsical detail. Then paint the curved bridge in warm brown with darker underside shading and a few lighter top highlights.
A small water feature gives the map wonderful visual contrast against all the beige and floral detail.
5. Paint the path stones
Use warm gray and beige to paint the stepping stones that wind toward the cottage. Outline a few key stones with a darker gray brown, but do not over outline everything. Add lighter cream highlights on the top edge of some stones so they appear rounded and worn.
If yours looks too stiff, vary the size and spacing of the stones. A hand painted map should feel charming, not mechanical.
6. Paint the cottage destination
At the top right, paint the tiny cottage with stone walls, a warm brown door, and a golden thatched roof. Add a hint of chimney smoke and tiny glowing windows if you want it to feel inviting. Frame the cottage with small flower mounds so it looks nestled into the landscape.
The cottage can be quite small. In fact, keeping it tiny makes the map feel larger and more adventurous.
Visual checkpoint: the eye should naturally travel from the pond and eggs up toward the cottage.
7. Add the colorful eggs and carrots
Place the eggs at key stops in the route using pink, purple, yellow, and blue. Decorate each with simple stripes, dots, or tiny motifs. Then add little orange carrots with leafy tops at a few directional points. These elements help the map read instantly as Easter themed.
Do not make every egg the same size. Slight variety makes the piece feel more lively.
8. Paint the bunny footprints and dotted arrows
Using white or very pale gray, paint simple paw print trails in pairs. Then switch to brown and add dotted arrows along the route. Keep them curved and friendly rather than harsh. These marks are small, but they provide the storytelling logic of the whole design.
If the paw prints disappear on your parchment area, outline just one side of each footprint lightly in tan gray.
9. Letter the sign
Near the pond, paint a tiny wood sign in brown with darker edges. Add simple lettering such as Egg Hunt. A micro brush or fine pen works best here. Keep the letters bold and slightly rustic rather than delicate.
If letter painting feels intimidating, block the letters in with a pencil first. Or use only initials and a little carrot motif instead.
10. Build the floral clusters
Paint foliage first around the eggs, pond, and cottage. Then add little blossoms in pink, white, lavender, and yellow. Use dot flowers, tiny daisies, and miniature tulip shapes to keep the map lively without overwhelming the route.
The flowers should frame important stops, not cover them. Think of them as punctuation marks around the story.
11. Add parchment texture and cracks
Once your main painting is dry, use a fine brush with diluted tan brown to paint a few subtle crackle lines across the parchment area. Keep them irregular and soft. You can also sponge on tiny darker edge shadows to make the map center look a little weathered.
This stage is optional, but it gives the rock that old treasure map character visible in the reference image.
12. Deepen contrast and clarify the route
Step back and check the flow. Darken the route dots if they are getting lost. Brighten a few eggs. Add a little more shadow under the bridge and around the cottage. These small contrast adjustments help the map read clearly from arm’s length.
Visual checkpoint: you should now be able to follow the hunt path easily with your eyes from start to finish.
13. Refine miniature details
Use white paint or gel pen for tiny highlights on eggs, flowers, water ripples, and stone edges. Add a couple of grass blades near the pond, a darker opening at the cottage door, and perhaps a slightly brighter puff of smoke or window glow. These details are the final layer that makes the piece feel finished and collectible.
14. Seal the rock
After the paint has dried completely, seal it with two or three thin coats of matte varnish. Because the design has many tiny lines, avoid very heavy coats that might puddle. A matte finish preserves the vintage map quality beautifully.
Troubleshooting
My map looks too busy
Reduce color intensity in the flowers and keep the path and eggs as the brightest areas. Too many equally strong details can make the route hard to follow.
The parchment center looks flat
Add soft edge shading, a few faint crack lines, and tonal variation with sponge dabbing. Slight aging effects bring it to life.
My cottage is too large
Paint more flower clusters around it and darken its lower edge to visually push it back. On your next attempt, keep the cottage no wider than about one sixth of the map width.
The dotted arrows look clumsy
Use the tip of a liner brush and rotate the rock rather than twisting your hand. Smaller, evenly spaced dots always look cleaner.
The eggs do not stand out
Darken the greenery behind them or add a pale highlight around one side of each egg.
Finishing details
This painted rock is especially cute displayed near a real Easter egg hunt setup or used as a tabletop marker for a spring brunch. You can even create a series of map rocks that each lead to a different imaginary destination. For an extra polished finish, date and sign the back, then tuck the rock into a nest of paper grass or moss for gifting.
Optional upgrades include adding metallic gold compass accents, a little X marks the spot somewhere along the route, a tiny bunny peeking near the cottage, or a personalized family name on the sign. You can also turn the pond into a flower meadow if you want an easier version with fewer shapes to paint.
Shop Similar
- Flat river rocks for painting crafts
- Miniature acrylic paint brushes for detail work
- Pastel acrylic paint set for spring projects
- Matte varnish spray for painted stones
- Fine paint pens for miniature lettering
Style It With
Bunny Garden Cottage Rock Painting How To Guide
What you’re making
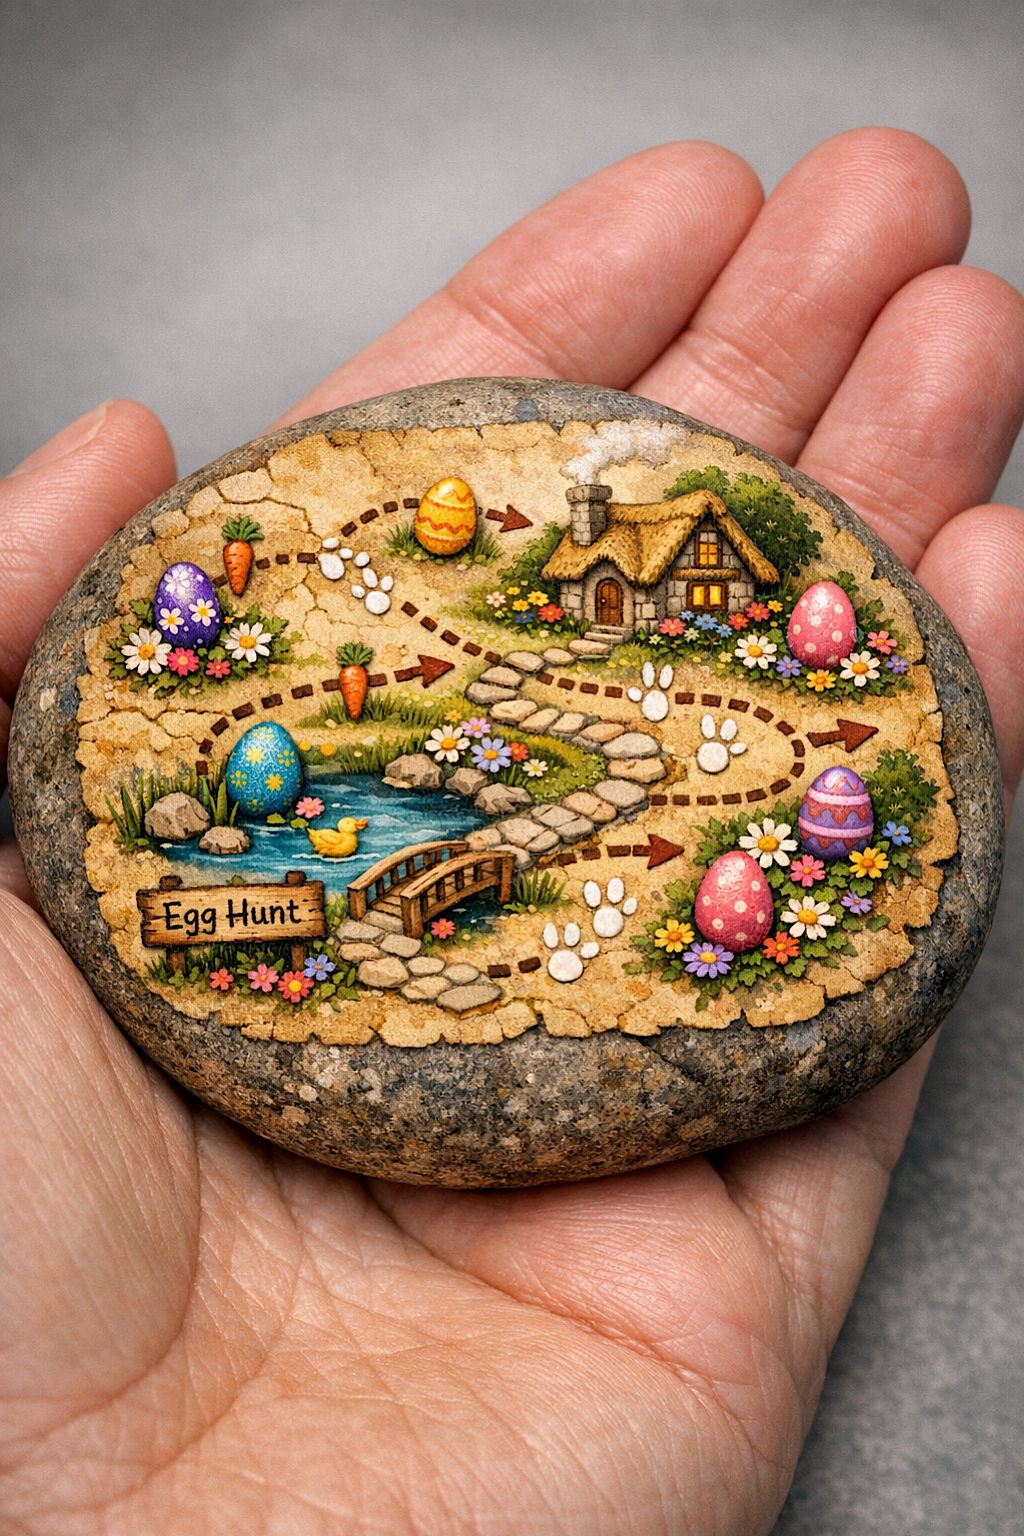
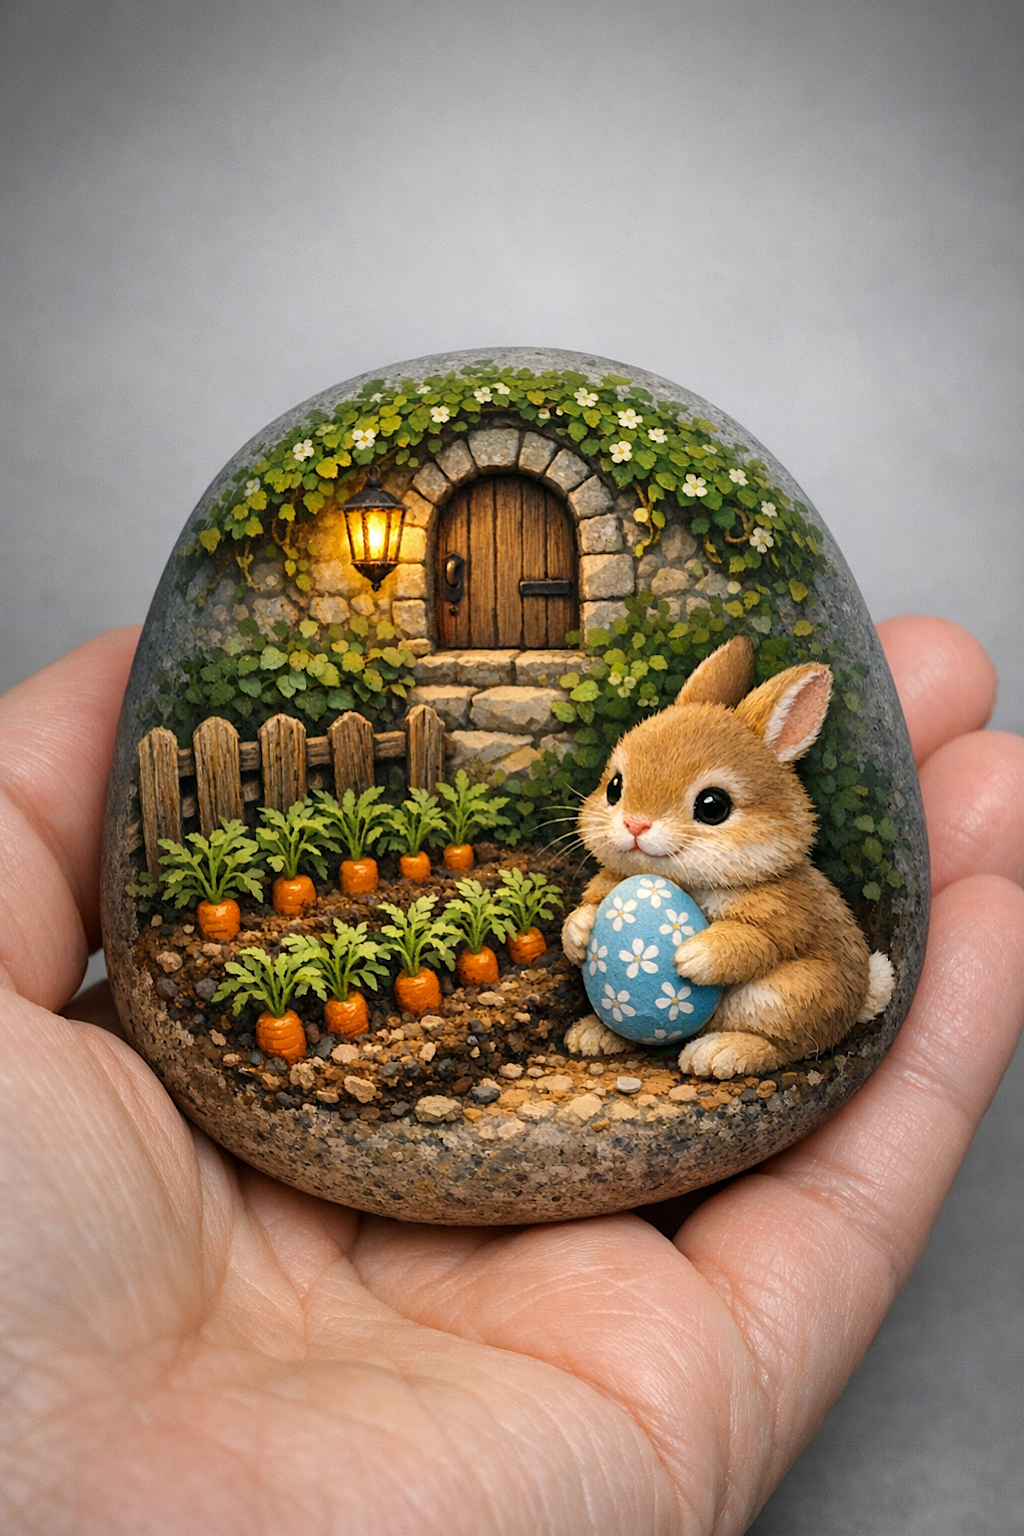
You’re painting an adorable spring bunny scene on a rounded stone, with a tiny rabbit holding a patterned Easter egg beside a neat carrot patch and an ivy covered cottage doorway glowing in the background. The design has a gentle woodland garden mood and feels almost three dimensional because of the rich shading, soft fur texture, and warm lantern light. It is ideal for Easter decorating, fairy garden displays, or gifting to someone who loves rabbits and cozy cottage imagery.
This project is a wonderful choice if you want a design that looks detailed but is actually organized into very clear sections: doorway, vines, fence, carrot bed, bunny, and egg. Each part can be completed one at a time, which makes the process calm and satisfying. You can simplify or enrich the detail depending on your comfort level.
Materials and tools
- Smooth rounded rock, about 3 to 5 inches tall
- Soap and water for cleaning
- Acrylic paints in gray, warm beige, brown, black, ivory, white, golden tan, soft orange, leaf green, olive, sage, pastel blue, and warm yellow
- Fine liner brush
- Small round brushes
- Flat brush for any base areas
- Pencil or transfer paper
- Dotting tool or stylus
- White gel pen or paint marker
- Matte or satin varnish
- Optional gloss medium for lantern glow
- Optional tiny filbert brush for soft fur blending
Finished size and customization notes
A rounded rock works especially well because it naturally frames the bunny and the garden bed in a cozy dome shape. If your rock is taller, place the doorway higher and let the vines drape more. If it is wider, expand the carrot bed and add a second lantern or more fence detail.
You can also customize the egg pattern. The sample shows a blue egg with tiny flowers, but stripes, dots, or a name monogram would also be beautiful. If you want a softer nursery look, use lighter pastel greens and peachier carrots. For a rustic version, deepen the browns and weather the fence.
Step by step instructions
1. Clean the rock and sketch the composition
Wash and dry the rock completely. Sketch an arched stone doorway near the upper center, with a hanging lantern on one side. Add a short fence and carrot patch in the lower left area. Place the bunny on the lower right, seated and holding an egg. Frame the top of the doorway with draping vines.
Keep the bunny large enough to be a focal point, but leave enough room around it for the garden to breathe.
Visual checkpoint: the design should feel balanced, with the doorway and lantern as the background anchor and the bunny as the foreground star.
2. Paint the doorway opening and stone surround
Start with the door in a medium brown. Shade the hinge side and lower edge darker. Then paint the surrounding stones in mottled beige, gray, and warm olive tones. Vary each stone slightly. Add a darker shadow line inside the doorway opening and beneath the step.
This depth behind the door is important. It gives the cottage entryway the cozy tucked in feeling seen in the sample.
3. Add the lantern glow
Paint the lantern shape in black or very dark brown. Fill the glass area with warm yellow, then blend in a deeper amber near the center. You can soften a little golden glow around the lantern onto the surrounding ivy and stones for extra magic.
Tip: keep the glow subtle. Too much bright yellow can overpower the otherwise natural palette.
4. Paint the ivy and upper florals
Use dark olive and deep green to establish the leafy masses above and around the doorway. Then add lighter yellow green highlights on leaf tips. Dot in a few tiny white blossoms among the vines so the top arch feels lush and springlike.
The vine canopy softens the stonework and makes the design feel enchanted rather than formal.
5. Build the carrot patch
Paint the soil in mixed browns, adding darker speckles and tiny lighter pebbles. Then paint rows of carrot tops with leafy green strokes. Add the orange carrot roots peeking from the soil in slightly varied sizes and angles. A tiny fence beside the patch helps define the little garden space.
Visual checkpoint: the left side of the rock should now clearly read as a vegetable patch, even before the bunny is painted fully.
6. Paint the bunny’s base colors
Use warm tan for the bunny’s body and a creamy ivory for the muzzle, chest, belly, and paw tips. Keep the body round and compact, with the head slightly larger in proportion than realism would suggest. This makes the bunny feel extra charming and toy like in the best way.
Do not chase tiny fur yet. Focus first on clean shapes and soft color placement.
7. Shape the bunny with shadows and highlights
Add deeper shading along the back, under the chin, around the lower cheek, and near the base of the paws. Use lighter cream and soft ivory on the face, forehead, muzzle, chest, and ear edges. Then begin adding short delicate fur strokes around the outline, especially on the cheeks and chest.
The face should remain soft and slightly rounded. Avoid overly sharp contour lines. Let the fur texture define the silhouette.
8. Paint the eye, nose, and expression
Use a glossy dark brown or black for the eye, leaving a tiny bright highlight for sparkle. Paint the nose a soft pink and add a fine mouth line. If you feel confident, add a few whisper thin whiskers with a liner brush or gel pen.
A small shift in the eye highlight changes the personality immediately. Place it high and slightly toward the center for a sweet, attentive look.
9. Paint the egg
Base coat the egg in pastel blue. Then add tiny white floral motifs and perhaps a few pale leaf details. Shade the lower side slightly darker blue and highlight the upper curve to make it round.
Because the egg sits in the bunny’s paws, its edges need to be clean. Let the blue dry fully before adding white flowers so the details stay crisp.
10. Refine the soil, fence, and steps
Paint the small fence slats in weathered brown and beige. Add darker gaps between them and a few lighter wood grain marks. Then refine the stone steps leading to the door with warm gray highlights and soft shadow underneath each edge. Add pebbles and little grass shoots in the soil to tie the whole foreground together.
Tip: the garden floor should look textured but not cluttered. Group small details in clusters.
11. Balance the doorway and bunny values
Step back and compare the brightness of the bunny to the brightness of the doorway. If the background is too strong, mute the stones with a thin gray glaze. If the bunny feels washed out, brighten the muzzle, chest, and paw highlights. This comparison step is important because the scene works best when the rabbit is clearly the first place the eye lands.
Visual checkpoint: you should now notice the bunny first, then the lantern, then the doorway and carrot patch.
12. Add tiny spring flowers and greenery
Dot in a few white blossoms among the ivy and perhaps one or two tiny blooms near the carrot patch. Keep these accents restrained. The sample design uses floral detail as a soft finishing touch rather than a dominant border.
13. Deepen contact shadows
Add a dark shadow where the bunny touches the ground, behind the egg, beneath the fence, under the door threshold, and inside the stone arch. These contact shadows make separate painted elements feel connected to the same world.
If the bunny looks like it is floating, this is the step that fixes it.
14. Add final highlights and seal
Use a very fine brush or paint pen to place tiny highlights on the lantern glass, stone step edges, bunny eye, egg curves, and a few leaf tips. Then let everything dry completely and seal with two or three thin coats of matte or satin varnish.
A satin finish is especially pretty here because it supports the warm glow and soft fur without looking overly shiny.
Troubleshooting
My bunny looks too stiff
Round the body more and soften hard outlines with tiny feathered strokes. The face should have gentle transitions, not sharp graphic edges.
The carrot patch looks flat
Add darker soil shadows around the carrot tops and brighten a few carrot shoulders where they emerge from the ground.
The ivy takes over the design
Tone it back with a muted green glaze and keep only a few leaf tips highlighted.
My egg pattern looks blurry
Let the base egg color dry completely before adding white motifs. Use thicker paint and a smaller brush for crisp detail.
The doorway feels disconnected from the foreground
Add more shadow at the base of the steps and a few transitional plants or stones between the door area and the garden.
Finishing details
This rock looks beautiful grouped with tiny terracotta pots, faux moss, and other spring painted stones. It also makes a lovely keepsake gift for a gardener or rabbit lover. Write a date or a little spring message on the underside if you are giving it away. If you want a more luminous finish, add a touch of gloss only to the eye and lantern after sealing the rest in matte.
Optional upgrades include adding a second little bunny footprint trail in the soil, painting a floral wreath around the doorway, personalizing the egg with initials, or extending the carrot bed with tiny radishes and herbs. You could even make a whole collection of bunny life scenes using the same stone size and palette.
Shop Similar
- Rounded smooth stones for painting crafts
- Detail paint brush set for miniature acrylic art
- Acrylic paint colors for bunny and cottage scenes
- Satin sealer for painted rock projects
- White gel pens for miniature highlights
Style It With
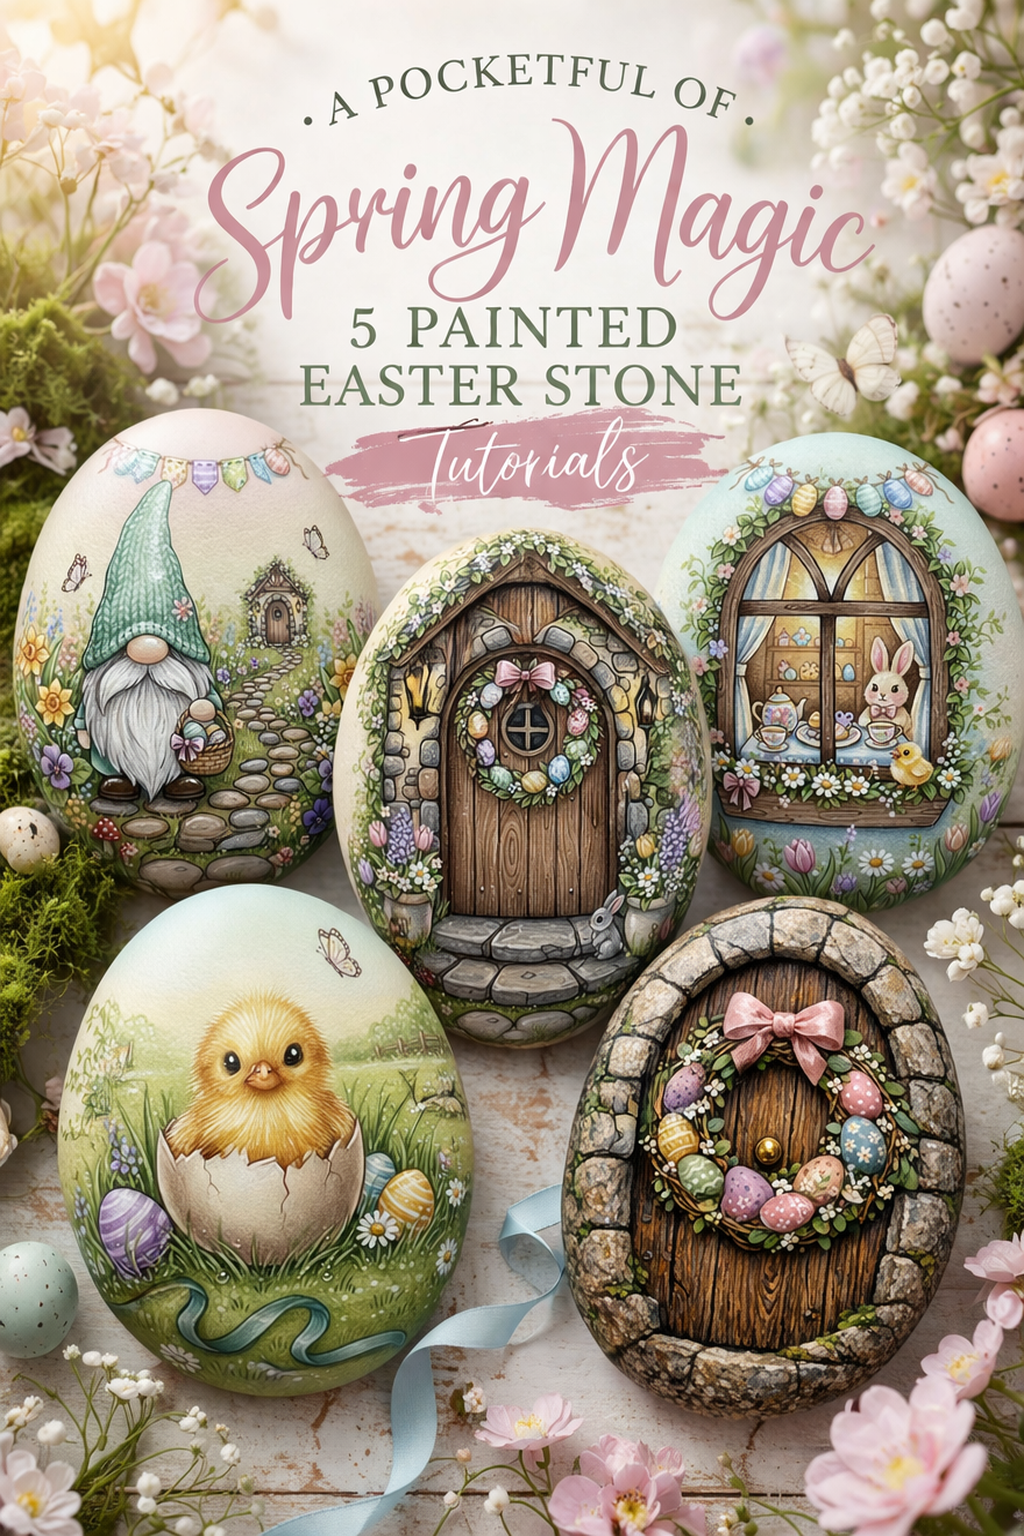
Pastel Stained Glass Easter Egg Painted Rock Step by Step Tutorial
What you’re making
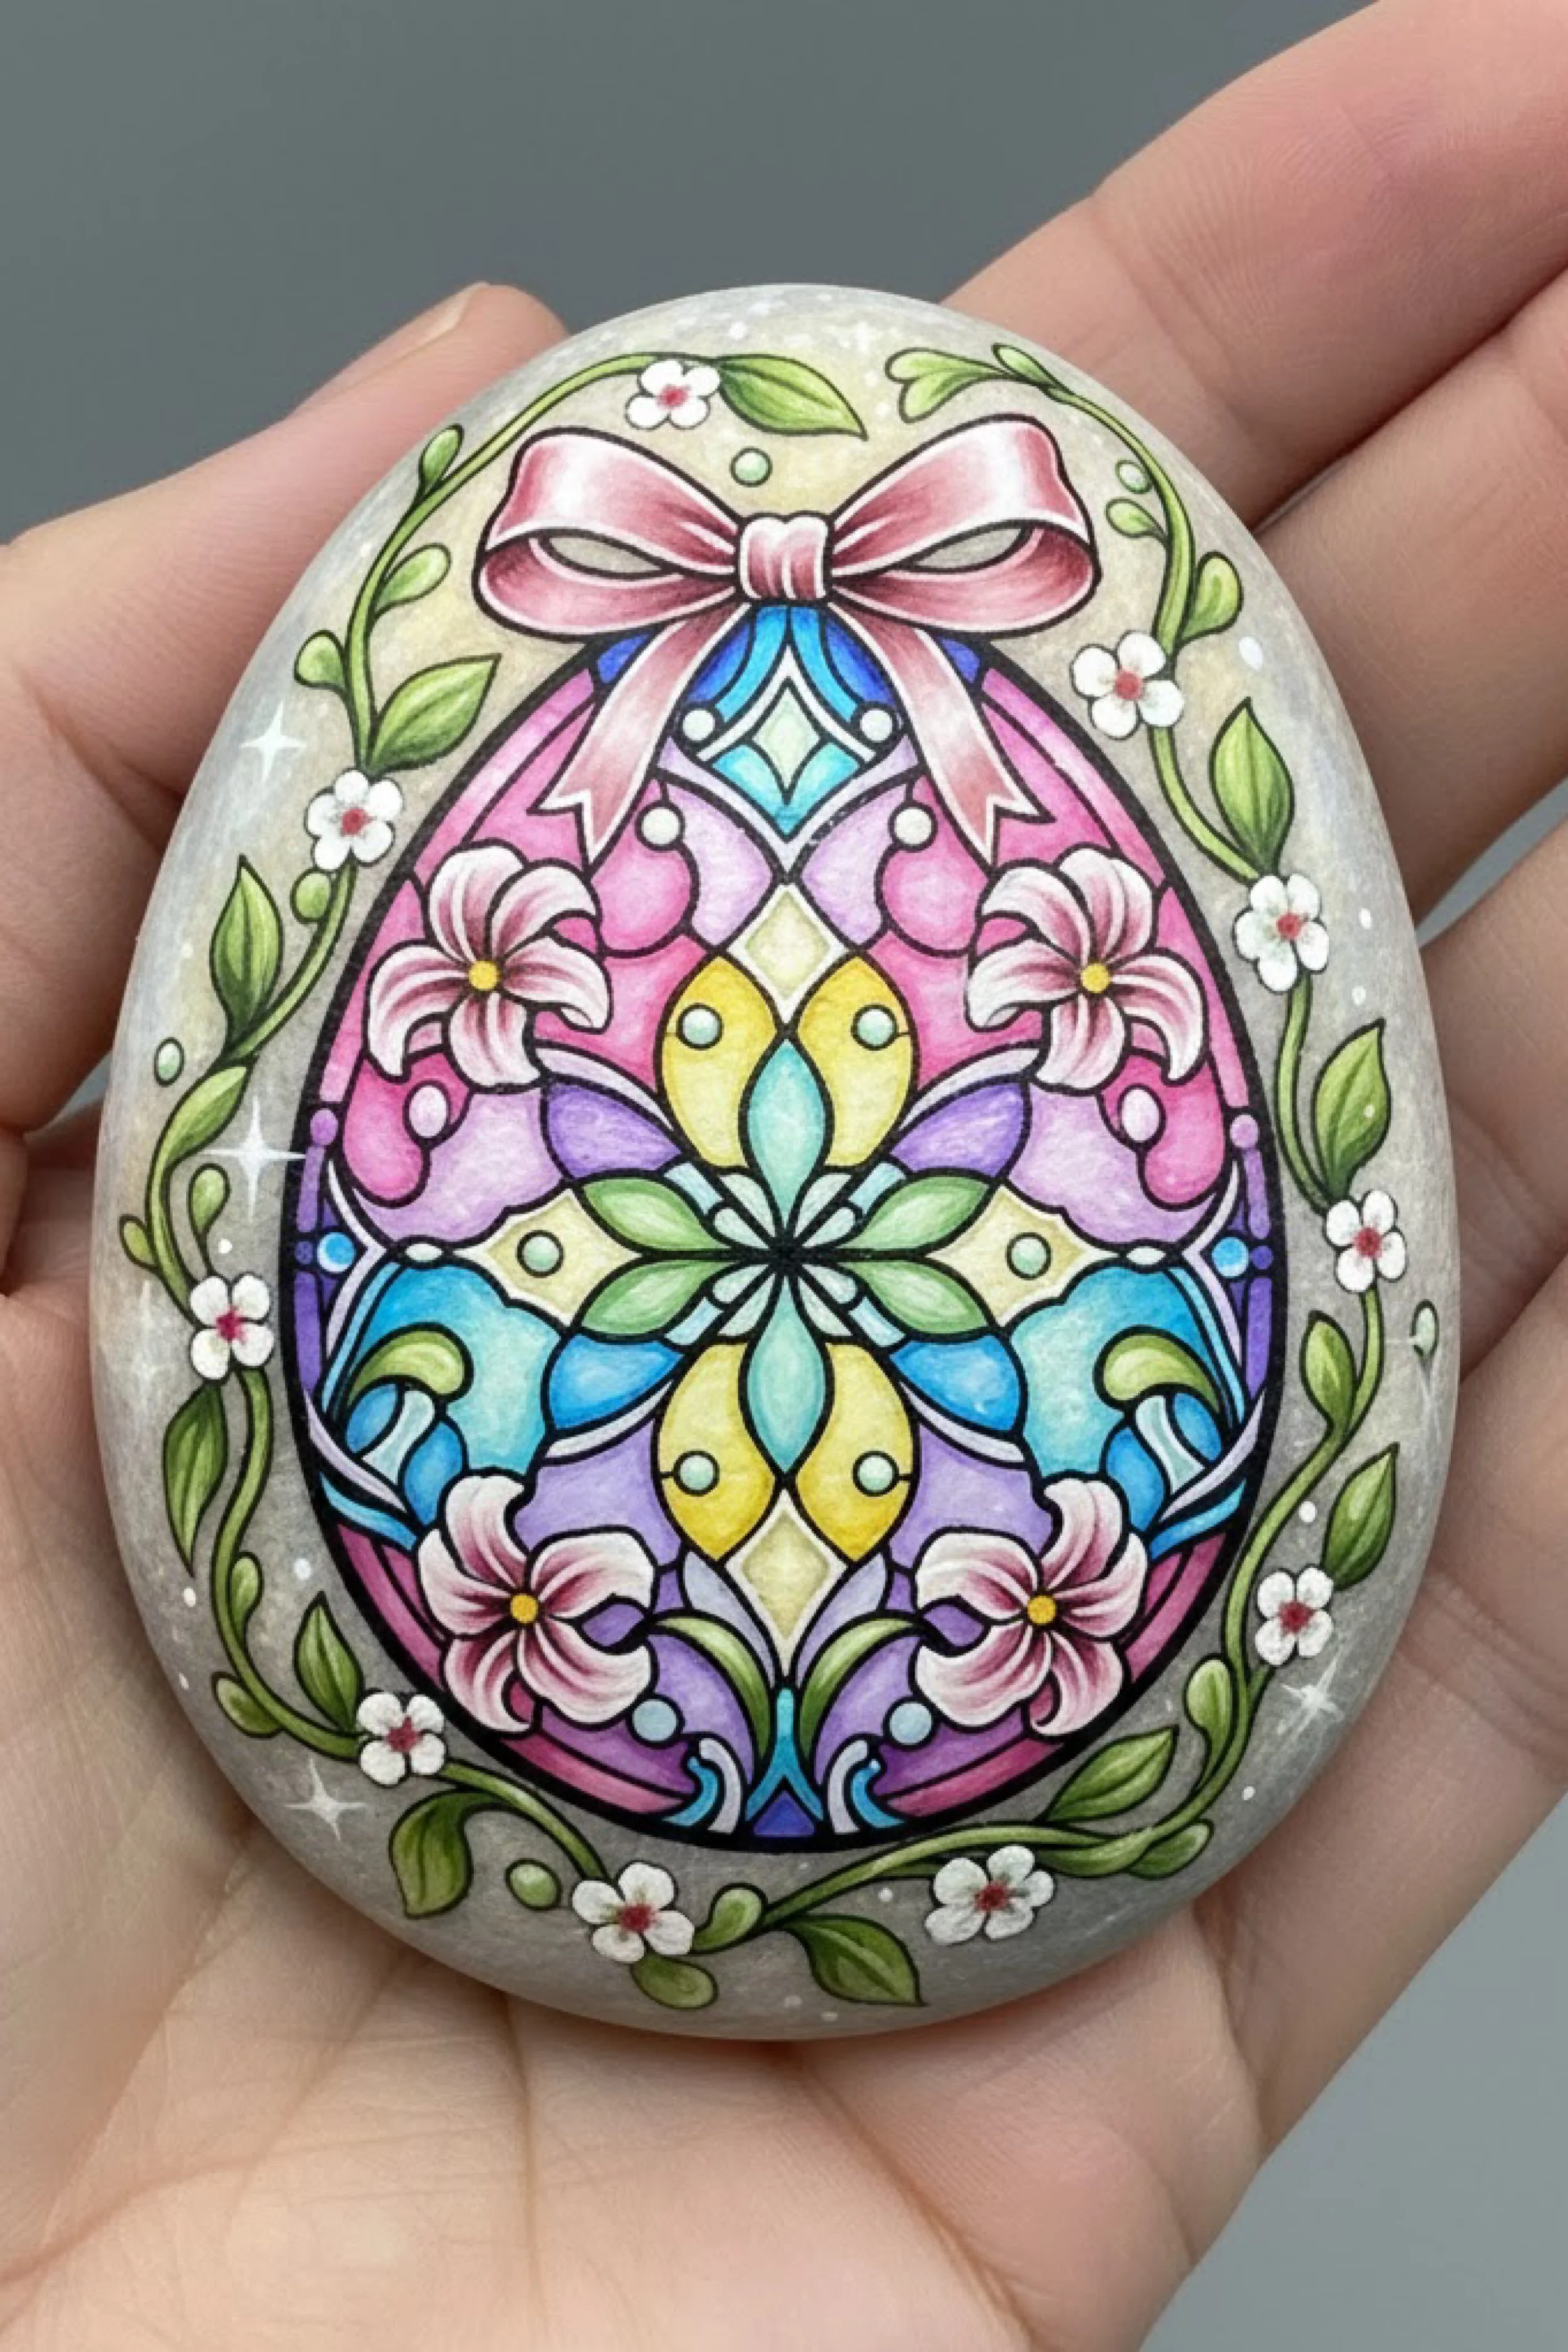
You’re painting a decorative Easter egg motif that looks like pastel stained glass set into a smooth stone, framed with curling vines, tiny blossoms, and a soft pink bow at the top. This design is more graphic and symmetrical than the storybook scenes in the other rocks, which makes it a beautiful contrast in a spring painted stone collection. The finished result feels elegant, polished, and almost jewelry like.
This is an ideal project if you love clean line work and luminous color. Rather than relying on heavy shading or character painting, this design depends on structure, symmetry, and clear color placement. It is a great choice for beginners who are comfortable tracing shapes, as well as experienced painters who want a refined decorative piece.
Materials and tools
- Smooth egg shaped rock
- Soap and water for cleaning
- Acrylic paints in white, black, soft gray, pastel pink, pastel blue, lavender, mint green, pale yellow, and leaf green
- Fine liner brush
- Small round detail brush
- Pencil or transfer paper
- Ruler or folded paper template, optional for symmetry
- White gel pen or paint marker
- Matte or satin varnish
- Optional extra fine black paint pen for crisp outlines
Finished size and customization notes
An egg shaped rock enhances this design beautifully, but any smooth oval will work. If your rock is larger, add more petal divisions and more vine detail around the border. If your rock is smaller, simplify the interior sections so each color area stays clean and readable.
You can customize the color palette widely while keeping the same structure. Soft pink, lavender, blue, mint, and yellow match the sample perfectly, but peach, sage, and buttercream would also be lovely. If you want a more classic stained glass feel, deepen the black outlines and use more jewel toned versions of the colors.
Step by step instructions
1. Clean the rock and choose the front
Wash the stone well and dry it completely. Because this design is centered and symmetrical, choose the side with the smoothest uninterrupted face. Hold it upright and imagine where the top bow and bottom point of the egg motif will sit.
Visual checkpoint: the stone itself should already feel like the outer frame of your design.
2. Lightly base the center if needed
If the stone is dark, paint a very thin pale warm gray or cream layer in the central design area. The sample keeps the stone visible as a subtle neutral background, so avoid covering the entire surface too opaquely. You want enough lightness for the pastel colors to glow, but not so much that the natural stone character disappears.
3. Draw the large egg motif
Sketch a large inner egg shape centered on the stone. This will contain the stained glass pattern. Add a bow at the top, then divide the egg interior into mirrored decorative sections using curved lines, petal shapes, diamond forms, and teardrops. Keep the design balanced from left to right.
This is the most important planning step. Take your time. A strong underlying drawing makes the painting stage much easier.
Tip: fold a piece of paper in half and sketch one side of the pattern first if you want extra symmetry, then transfer it.
4. Draw the outer vine frame
Around the main egg motif, sketch winding green vines with leaves and tiny blossoms. Let the vine border follow the shape of the stone and cradle the central design without competing with it. Add little white flowers and a few sparkle marks if you like.
Visual checkpoint: you should now see a decorative centerpiece framed by a delicate botanical border.
5. Paint the black outline structure
Using a fine liner brush or extra fine paint pen, paint the outlines of the central stained glass shapes in clean black lines. Also outline the bow, the vine frame, and a few major flower centers. Do not make the lines too thick at first. You can always strengthen them later.
The clarity of these lines is what creates the stained glass effect. Keep your hand relaxed and rotate the rock often for smoother curves.
6. Fill the bow and floral petals
Paint the bow in blush pink, then shade the folds with a slightly deeper rosy pink and highlight the ribbon edges with pale pink or nearly white. Paint the larger floral petals within the design in pink or lavender, keeping each section neatly contained inside the black lines.
Even though the design is decorative, a little shading on the bow makes the top feel more dimensional and elegant.
7. Fill the central sections with pastel color
Use pastel blue, mint, pale yellow, lavender, and pink to fill the interior stained glass segments. Spread the colors evenly so the design feels balanced. Try not to place identical colors directly beside one another too often. Thin, even coats are best. Two coats may be needed for smooth coverage.
Visual checkpoint: the design should begin to glow as the empty outlined shapes fill with color. If it looks patchy, let the first coat dry completely and add a second coat rather than overworking wet paint.
8. Paint the leaves and vine border
Use mid green for the leaves and vines, then add lighter yellow green highlights to one side of each leaf. Paint the small surrounding blossoms in white with tiny pink centers. Keep the border soft and graceful.
The outer greenery frames the central egg. It should feel airy, not heavy. Leave a bit of stone background visible between leaves and flowers.
9. Strengthen the black line work
Once the pastel fills are dry, go back in and sharpen any outlines that were softened during painting. Vary the line weight slightly if you want a more elegant finish, making some outer contours a touch thicker while keeping inner details delicate.
This second pass is often what transforms the design from cute to polished.
10. Add soft highlights inside the color panels
To mimic stained glass light, add subtle lighter highlights within some of the pastel sections. A pale stroke or tiny curved highlight near one side of a shape suggests sheen and gives the motif extra life. Keep these highlights restrained.
Tip: this effect is optional, but it makes the color sections feel less flat while preserving the clean decorative look.
11. Add flowers and sparkle details
Paint tiny white blossoms around the border, with small pink or yellow centers. Add a few white sparkle stars or dots near the outer edge if you enjoy a more whimsical finish. These little accents help the piece feel finished and celebratory.
12. Clean the edges and refine symmetry
Step back and compare both sides of the motif. Correct any obvious imbalance by adjusting line thickness, leaf size, or highlight placement. Perfect mathematical symmetry is not required, but the piece should feel visually centered and harmonious.
Visual checkpoint: you should now see one strong central egg motif with a graceful surrounding frame, rather than lots of disconnected shapes.
13. Add final bright accents
Use white paint or a gel pen to place pinpoint highlights on the bow, flower centers, and a few colored segments. Add tiny pale dots where two design lines intersect if that suits your style. These bright accents sharpen the whole piece.
14. Seal the painted rock
Let the rock dry thoroughly and seal with two or three thin coats of matte or satin varnish. Satin is especially lovely for this design because it keeps the colors luminous. If you want to imitate glass more strongly, use satin overall and add selective gloss only to the central stained glass egg after the main sealer cures.
Troubleshooting
My lines are shaky
Use a paint pen for the outlines or rest your painting hand on the table. Rotating the rock instead of twisting your wrist helps enormously.
The design feels uneven
Focus on overall balance, not perfect duplication. Match the largest shapes and most visible colors first, then refine smaller sections.
The pastel colors look dull
Apply a pale base coat under the design if needed and use two thin coats of each color. Dark stone can mute pastels quickly.
My vines are too heavy
Thin them with background color or reduce the number of leaves. The border should frame the motif, not dominate it.
It does not look like stained glass
Strengthen the black outlines and keep color fills clean and distinct. The contrast between dark structure and luminous pastel panels is the key.
Finishing details
This rock is gorgeous displayed on a small stand, layered into a spring centerpiece, or tucked into an Easter basket for an elevated handmade touch. Because it is decorative rather than scene based, it also works well as year after year seasonal décor. Sign and date the back if you want it to feel more collectible.
Optional upgrades include using metallic gold instead of black for a softer luxury look, adding pearl accents at key intersections, framing the outer edge with dotted white lacework, or painting a more elaborate ribbon with trailing tails. You can also scale this exact design up onto a wooden egg plaque or canvas panel.
Shop Similar
- Egg shaped smooth rocks for painting
- Fine liner brushes for acrylic detail painting
- Pastel acrylic paint set for decorative art
- Black paint pens for crisp craft outlines
- Satin varnish for painted stone crafts
Style It With
By the time you finish these painted rock ideas, you will have more than a handful of Easter crafts. You will have a little collection of spring keepsakes that feel personal, display worthy, and full of charm. That is the beauty of this kind of project. Even the smallest stone can hold so much detail, mood, and imagination when you build it patiently layer by layer.
These designs are also easy to revisit year after year. Tuck them into baskets, nestle them into moss on a shelf, add them to place settings, or bring them out with your favorite spring décor as tiny signs that the season has arrived again. However you choose to use them, the finished pieces carry that rare handmade quality that feels both playful and lasting. A painted Easter rock may be small, but when it is done beautifully, it feels like a little heirloom from the start.