A Pocketful of Spring Magic: 5 Painted Easter Stone Tutorials

More like this
💡 Pro Tip: Why I Link to Amazon Search Results and Not One Product
In the Shop the Look and Style it With sections under each bikini, I link to Amazon search results, not single products. Here’s why this matters:
Hot bikinis sell out fast. I don’t want you clicking on a dead link to a sold-out item. Search pages stay updated.
You get more options. Love the vibe but want a different color, cut, or price point? The search results give you everything that matches the look and energy.
I curate each search carefully. These aren’t generic. I spend hours crafting keywords that bring up exactly the kind of bikinis I’d wear—or recommend to my hottest friends.
Support with no pressure. If you click a link, browse, and buy something later, I may earn a small commission at no extra cost to you. That helps me keep bringing you curated collections like this one—powerful, seductive, and always fresh.
So dive in. Click through. Try something risky. These aren’t just bikinis—they’re commands, statements, and maybe even your new favorite weapon of choice.
There is something quietly magical about holding a tiny world in your hand. These painted Easter stones are more than simple crafts. They feel like little storybook moments you can create, keep, and gift. Each one captures a different piece of spring, from cozy cottage windows and winding garden paths to soft baby chicks and rustic fairy doors, all wrapped in delicate pastel tones and gentle detail.
What makes these especially beautiful is how approachable they are. You do not need to be a professional artist to achieve this soft illustrated look. With a smooth stone, a few thoughtful layers, and a steady hand, you can build depth, warmth, and charm step by step. The process itself becomes part of the experience, slowing you down just enough to enjoy the small details, the tiny flowers, the subtle shadows, the way each brushstroke brings the scene to life.
This collection is designed to guide you through five distinct designs, each one offering its own personality while still feeling cohesive as a set. Whether you display them together in a spring vignette or tuck them into baskets as handmade treasures, these stones carry a warmth that feels personal and timeless.
Set up a quiet workspace, gather your paints, and let yourself lean into the softness of the season. By the time you finish, you will not just have five beautiful stones, you will have created a small collection of spring memories, each one painted by hand.
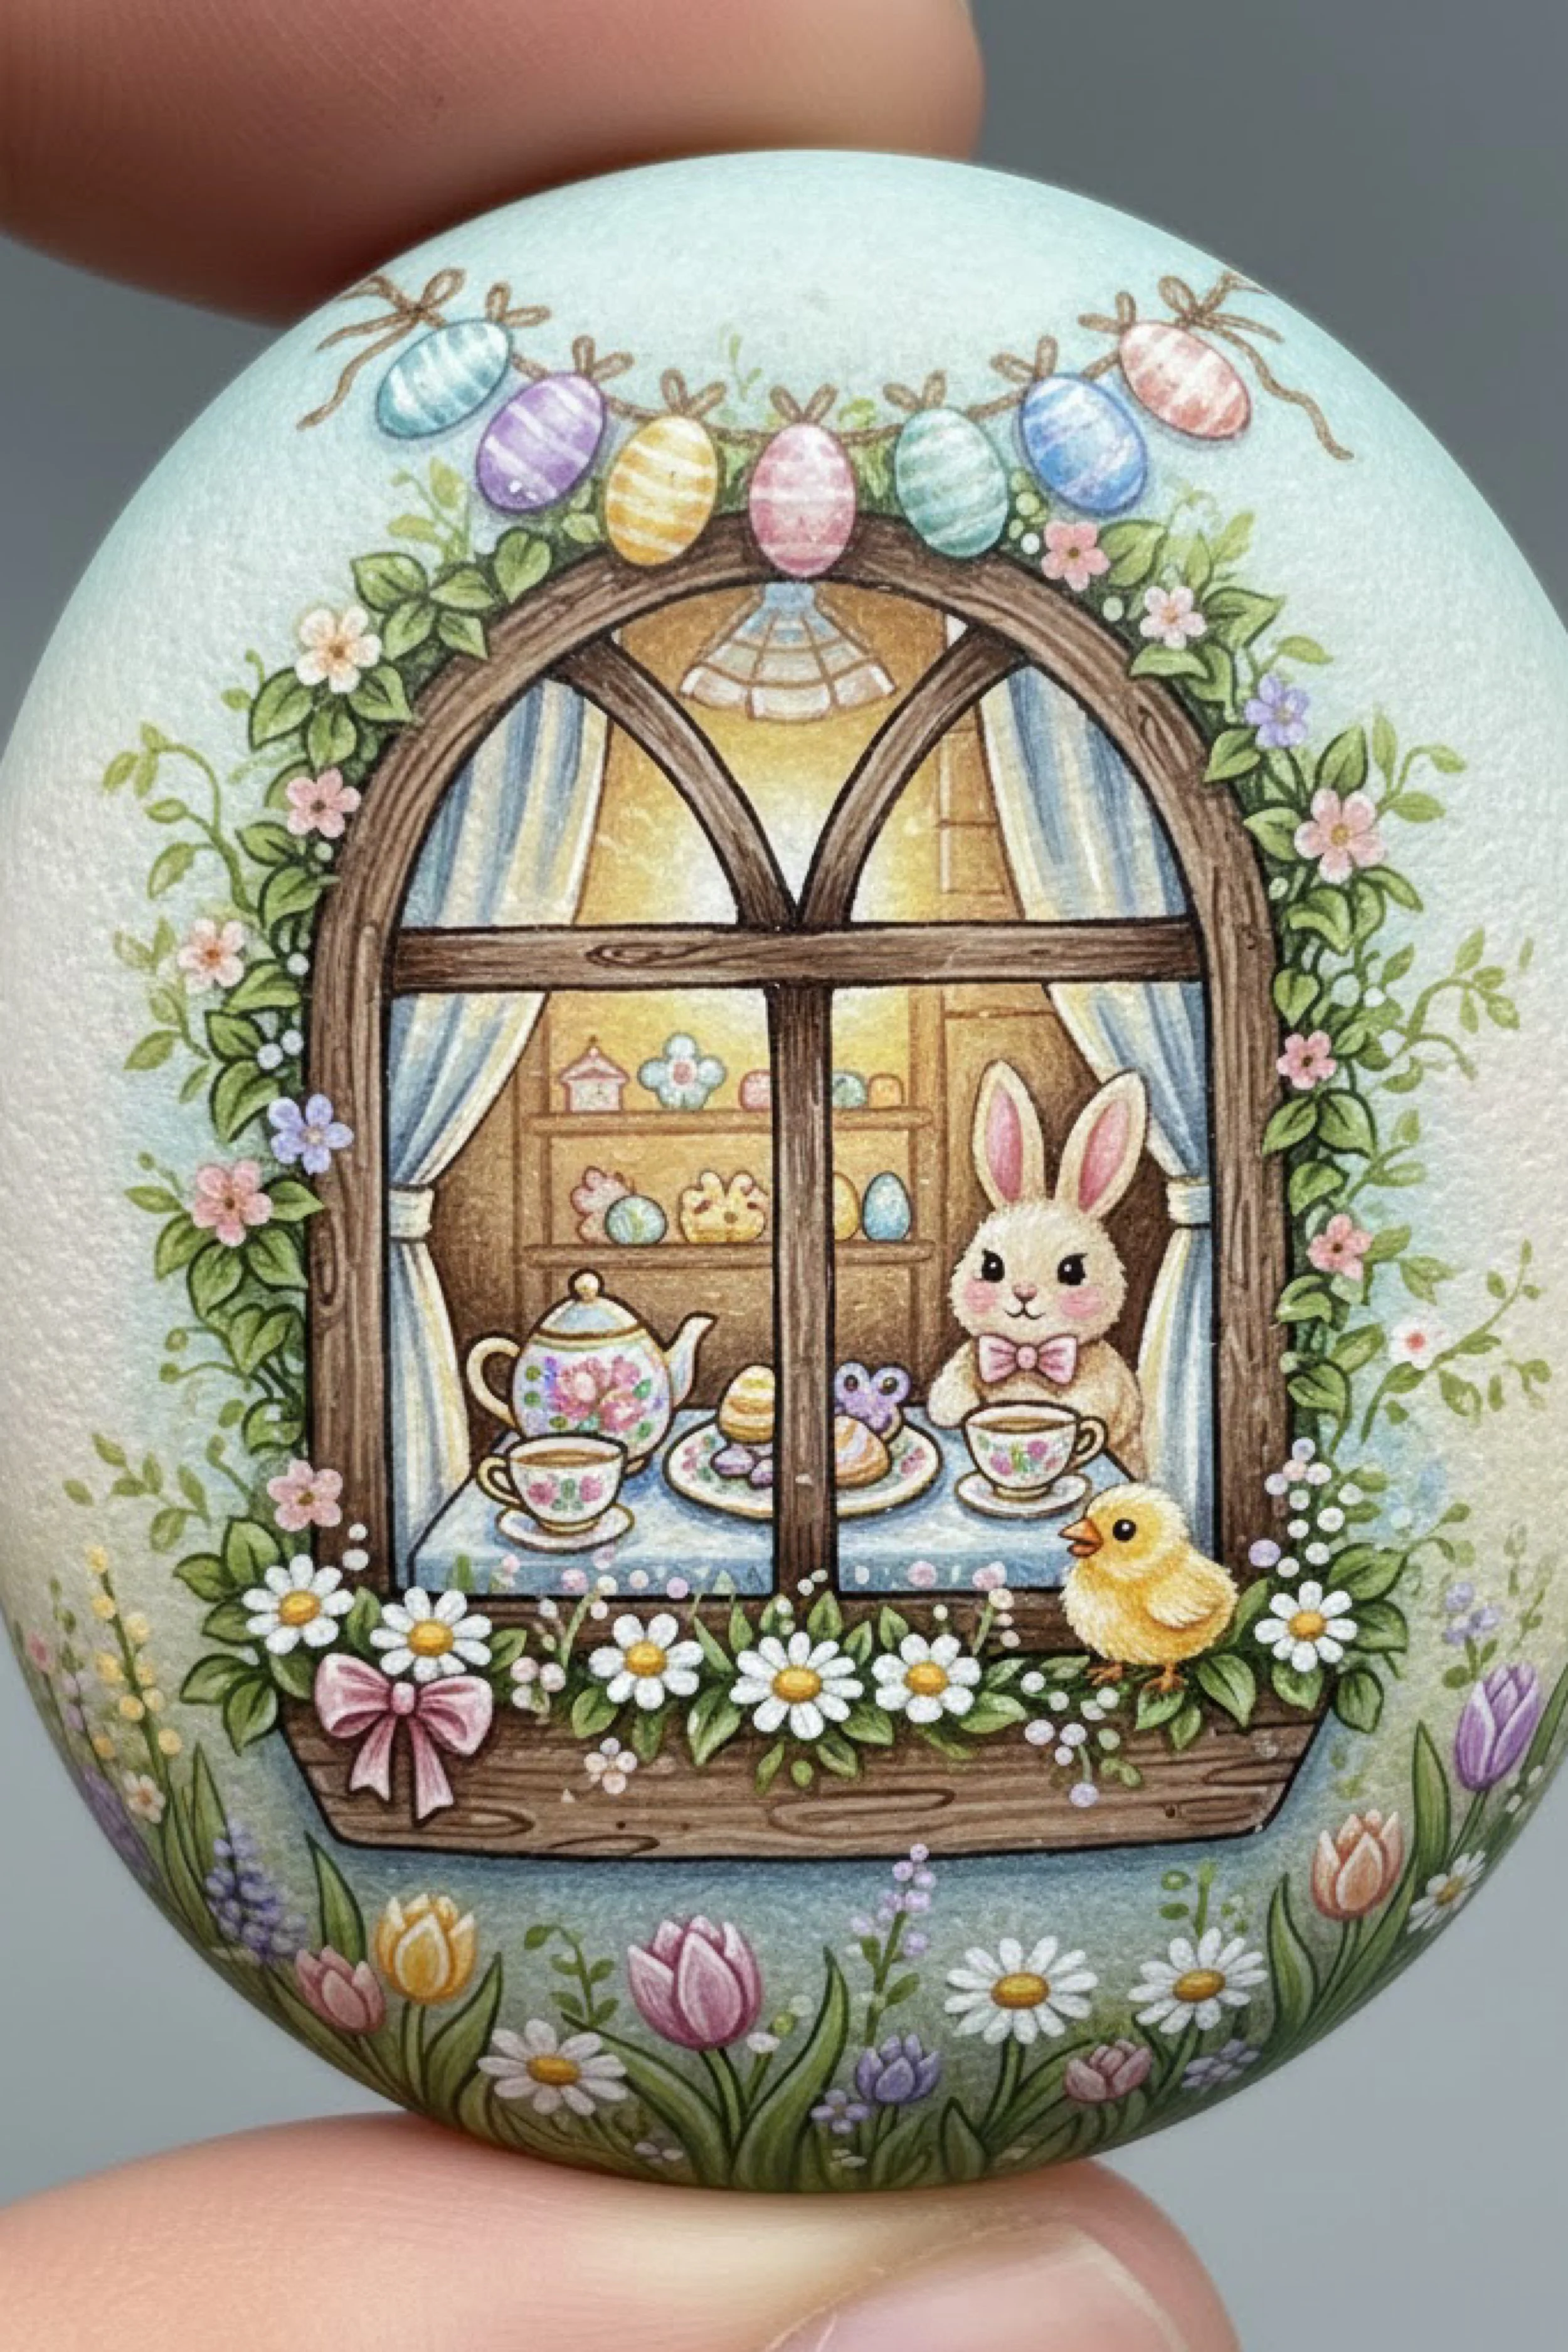
Painted Easter Tea Party Story Stone Step by Step Tutorial
What you’re making
You’re painting a smooth egg shaped stone with a dreamy spring window scene that feels like a tiny storybook hidden in your hand. The finished look features an arched cottage window, pastel egg garland, soft blue curtains, a bunny enjoying tea inside, daisies along the sill, and a tiny chick standing outside in the garden. It has that delicate watercolor illustration feel, but you can absolutely recreate it with beginner friendly layered painting techniques and a very small brush.
This project is ideal for Easter decorating, fairy garden displays, spring basket fillers, or collectible painted pebbles. The secret to getting this exact look is building the design in light layers, keeping the colors soft and powdery, and saving your darkest outlines for the very end.
Materials + tools
- Smooth oval river stone or egg shaped craft stone about 2.5 to 4 inches tall
- Fine grit sandpaper or nail buffer
- Soft cloth
- White acrylic primer or matte gesso
- Matte acrylic paints in white, cream, pale blue, dusty pink, lavender, mint, sage, yellow ochre, warm brown, dark brown, black, and soft green
- Optional acrylic gouache for a chalky storybook finish
- Ultra fine paint brushes in sizes 000, 00, and 0
- Small round brush for base coats
- Detail liner brush
- Colored pencils or watercolor pencils for soft shading if desired
- Pencil with a very sharp point
- Kneaded eraser
- Palette or ceramic plate
- Cup of water
- Paper towel
- Dotting tool or toothpick
- Matte varnish or satin sealer
- Optional magnifying lamp
- Optional paint pens in white and dark brown for tiny accents and outlines
Finished size + customization notes
A stone around 3 inches tall gives you enough room to include the full window, tea set, bunny, chick, and florals without the design feeling cramped. If your stone is smaller, simplify the shelves in the background and reduce the number of flowers around the frame.
You can shift the palette warmer or cooler depending on the stone and your Easter decor. Pastel eggs across the garland are the strongest visual cue, so keep those even if you simplify other details. If you want a softer look, use watercolor pencils over sealed acrylic layers. If you want a cleaner, more graphic result, rely more on paint pens for the final line work.
Step by step instructions
Prepare the stone surface.
Wash the stone with warm water and a drop of dish soap, then dry it completely. Buff away any dusty grit or rough specks with fine sandpaper. You want the face of the stone to feel smooth under your fingertip because every bump shows once you start tiny detailing. Prime the front with a thin coat of white gesso or primer and let it dry. Add a second coat if the stone color still shows through. Your surface should now look pale, matte, and slightly toothy rather than slick.Map the overall composition lightly in pencil.
Start by drawing a large arched window centered on the stone. Add the thick wooden frame, the crossbar, and the two pointed arch panes at the top. Sketch a window box or sill at the bottom, then a garland of hanging eggs above the arch. Inside the window, block out curtains, a shelf, a teapot, cups, treats, and the bunny. Outside the window, place a chick on the lower right and a band of tulips and daisies near the bottom edge. Do not chase tiny perfection yet. Focus on placement and balance. You should now see the whole story clearly even though it is only a faint map.Lay in the background glow.
Mix a very pale blue gray and brush it around the outside edges of the design to create a misty spring background. Inside the window, paint a warm golden cream glow so the cottage interior feels lit and cozy. Keep this soft and transparent. Feather the background so there are no harsh bands. If yours looks too bright or too white, glaze another thin layer rather than using one heavy coat.Paint the wooden window frame.
Use a medium warm brown for the main shape of the frame and sill. Once dry, add darker brown into the lower edges and inner seams. With a liner brush, pull a few gentle wood grain marks across the horizontal beam and vertical sections. Do not overdo it. This painted style looks sweetest when the wood grain is suggested, not hyper realistic. Add the darkest lines only where boards overlap or where the arches meet the center bar.Fill the curtains and interior shelf.
Paint the curtains a pale powder blue with a touch of gray. Shade the folds with a slightly deeper blue at the outer edges and under the tied sections. Add the back shelf in a muted warm beige brown so it recedes behind the bunny and tea table. Dot a few tiny eggs and little shapes on the shelf in soft pink, mint, yellow, and blue. These small pops make the stone feel charming and story rich.Create the table setting.
Paint the tabletop cloth a soft pastel blue. Add a floral teapot, a teacup and saucer, and a plate of treats. Use white mixed with a hint of cream so the ceramics do not look stark. Then add very tiny floral decals with dots of pink, lavender, and green. A toothpick is helpful here. You should now see the tea party theme taking shape, even before the bunny is finished.Paint the bunny character.
Block in the bunny with warm white rather than pure white. Shade lightly under the ears, beneath the chin, and along one side of the face using diluted beige gray. Fill the inner ears with pale pink. Add a small pink nose, glossy black eyes, and a tiny smiling mouth. Finish with a pastel bow tie at the neck. Keep the expression simple and sweet. If your bunny looks too old or stern, enlarge the eyes slightly and soften the mouth line.Add the chick and floral sill details.
Paint the chick in buttery yellow with slightly deeper gold under the wing and belly. Add a tiny orange beak and one bright black eye. On the window box, paint a row of daisies with white petals and warm yellow centers, then tuck in small leaves and baby white berries between them. A pink ribbon bow on one side helps anchor the composition. At this stage, the sill should look full but not heavy.Build the wreath of vines and blossoms around the arch.
Use a soft sage green to create leaf clusters around the window arch. Layer darker green at the base of each leaf cluster and lighter green or creamy white on top edges for dimension. Then add tiny blossoms in pale pink, white, and lavender. Keep flower centers tiny and warm. This floral border is what blends the cottage window into the garden scene, so let it feel loose and organic rather than perfectly symmetrical.Paint the pastel egg garland.
Across the top of the arch, paint several small hanging eggs in different pastel shades. Blue, lavender, butter yellow, blush pink, mint, and baby blue work beautifully together. Tie each with a tiny brown bow and connect them with a delicate twine line. Add soft striping or speckles to the eggs once the base coats dry. This is a major visual checkpoint. You should now see the unmistakable Easter look immediately, even from a distance.Finish the lower meadow.
Along the bottom curve of the stone, paint tulips, daisies, grass, and small spring blooms. Use soft pink, peach, lavender, and yellow tulips with slender green leaves. Let some flowers overlap the bottom edge of the window box so the whole design feels tucked into a blooming garden rather than floating on the stone.Deepen shadows carefully.
Step back and look for the darkest places. Usually these are inside the window arch, behind the curtains, beneath the sill flowers, around the bunny, and between leaves in the floral frame. Mix a soft brown gray and glaze shadows rather than drawing hard black lines everywhere. This keeps the art tender and painterly.Add final line work and sparkle.
Use a very fine liner brush or paint pen to sharpen only the most important edges such as the window frame, bunny face, teacup rims, and a few leaf outlines. Add tiny white highlight dots to the eyes, eggs, teapot, and flower centers. A few pale specks in the background can mimic illustrated texture. If yours looks busier than the photo, stop before outlining every single element. Selective detail is the difference between charming and cluttered.Seal the stone.
Let the stone dry for several hours, then seal with two to three thin coats of matte or satin varnish. Matte keeps the soft storybook finish. Satin gives the eggs and ceramics a gentle glow. Seal lightly and let each coat dry fully so your tiny details stay crisp.
Troubleshooting
My window looks crooked
Lightly redraw the outer arch using the stone’s centerline as a guide. The outer shape matters more than every inner pane. Fix the silhouette first, then realign the crossbar.
My colors look too bold, not pastel
Mix a touch of white, cream, or gray into each color and glaze over dry layers. Pastel storybook stones usually need muted tones more than bright craft paint straight from the bottle.
My bunny looks muddy
Let the base dry fully, then repaint with warm white and add only a little shading under the ears and chin. Too much gray makes white animals look dirty instead of fluffy.
The floral border is overcrowded
Paint back into a few areas with the background color and reopen some negative space. Tiny designs need breathing room.
I cannot paint details that small
Use a slightly larger stone, simplify the shelf items, or switch to acrylic paint pens for the final outlines and flower centers.
Finishing details
For the most polished finish, seal the painted front and wrap the varnish slightly around the edges so the design feels complete from every angle. If you want a collectible artisan look, paint the back a soft solid pastel and add a tiny signature with the year. You can also display the stone in a miniature easel, tuck it into an Easter vignette, or nestle it in faux moss for a spring mantel.
Optional upgrades work beautifully on this design. Add pearlized medium to the hanging eggs for a gentle shimmer. Outline a few window details with colored pencil after sealing for a soft illustrated look. Glue the finished stone into a shadow box with faux florals for wall decor. Or create a whole set of matching story stones featuring the bunny, teapot, wreath, and chick as separate characters.
Shop Similar
- Smooth oval river stones for painting
- Matte acrylic paint set in pastel colors
- Ultra fine detail paint brushes
- Acrylic paint pens for miniature details
- Matte varnish sealer for painted rocks
Style It With
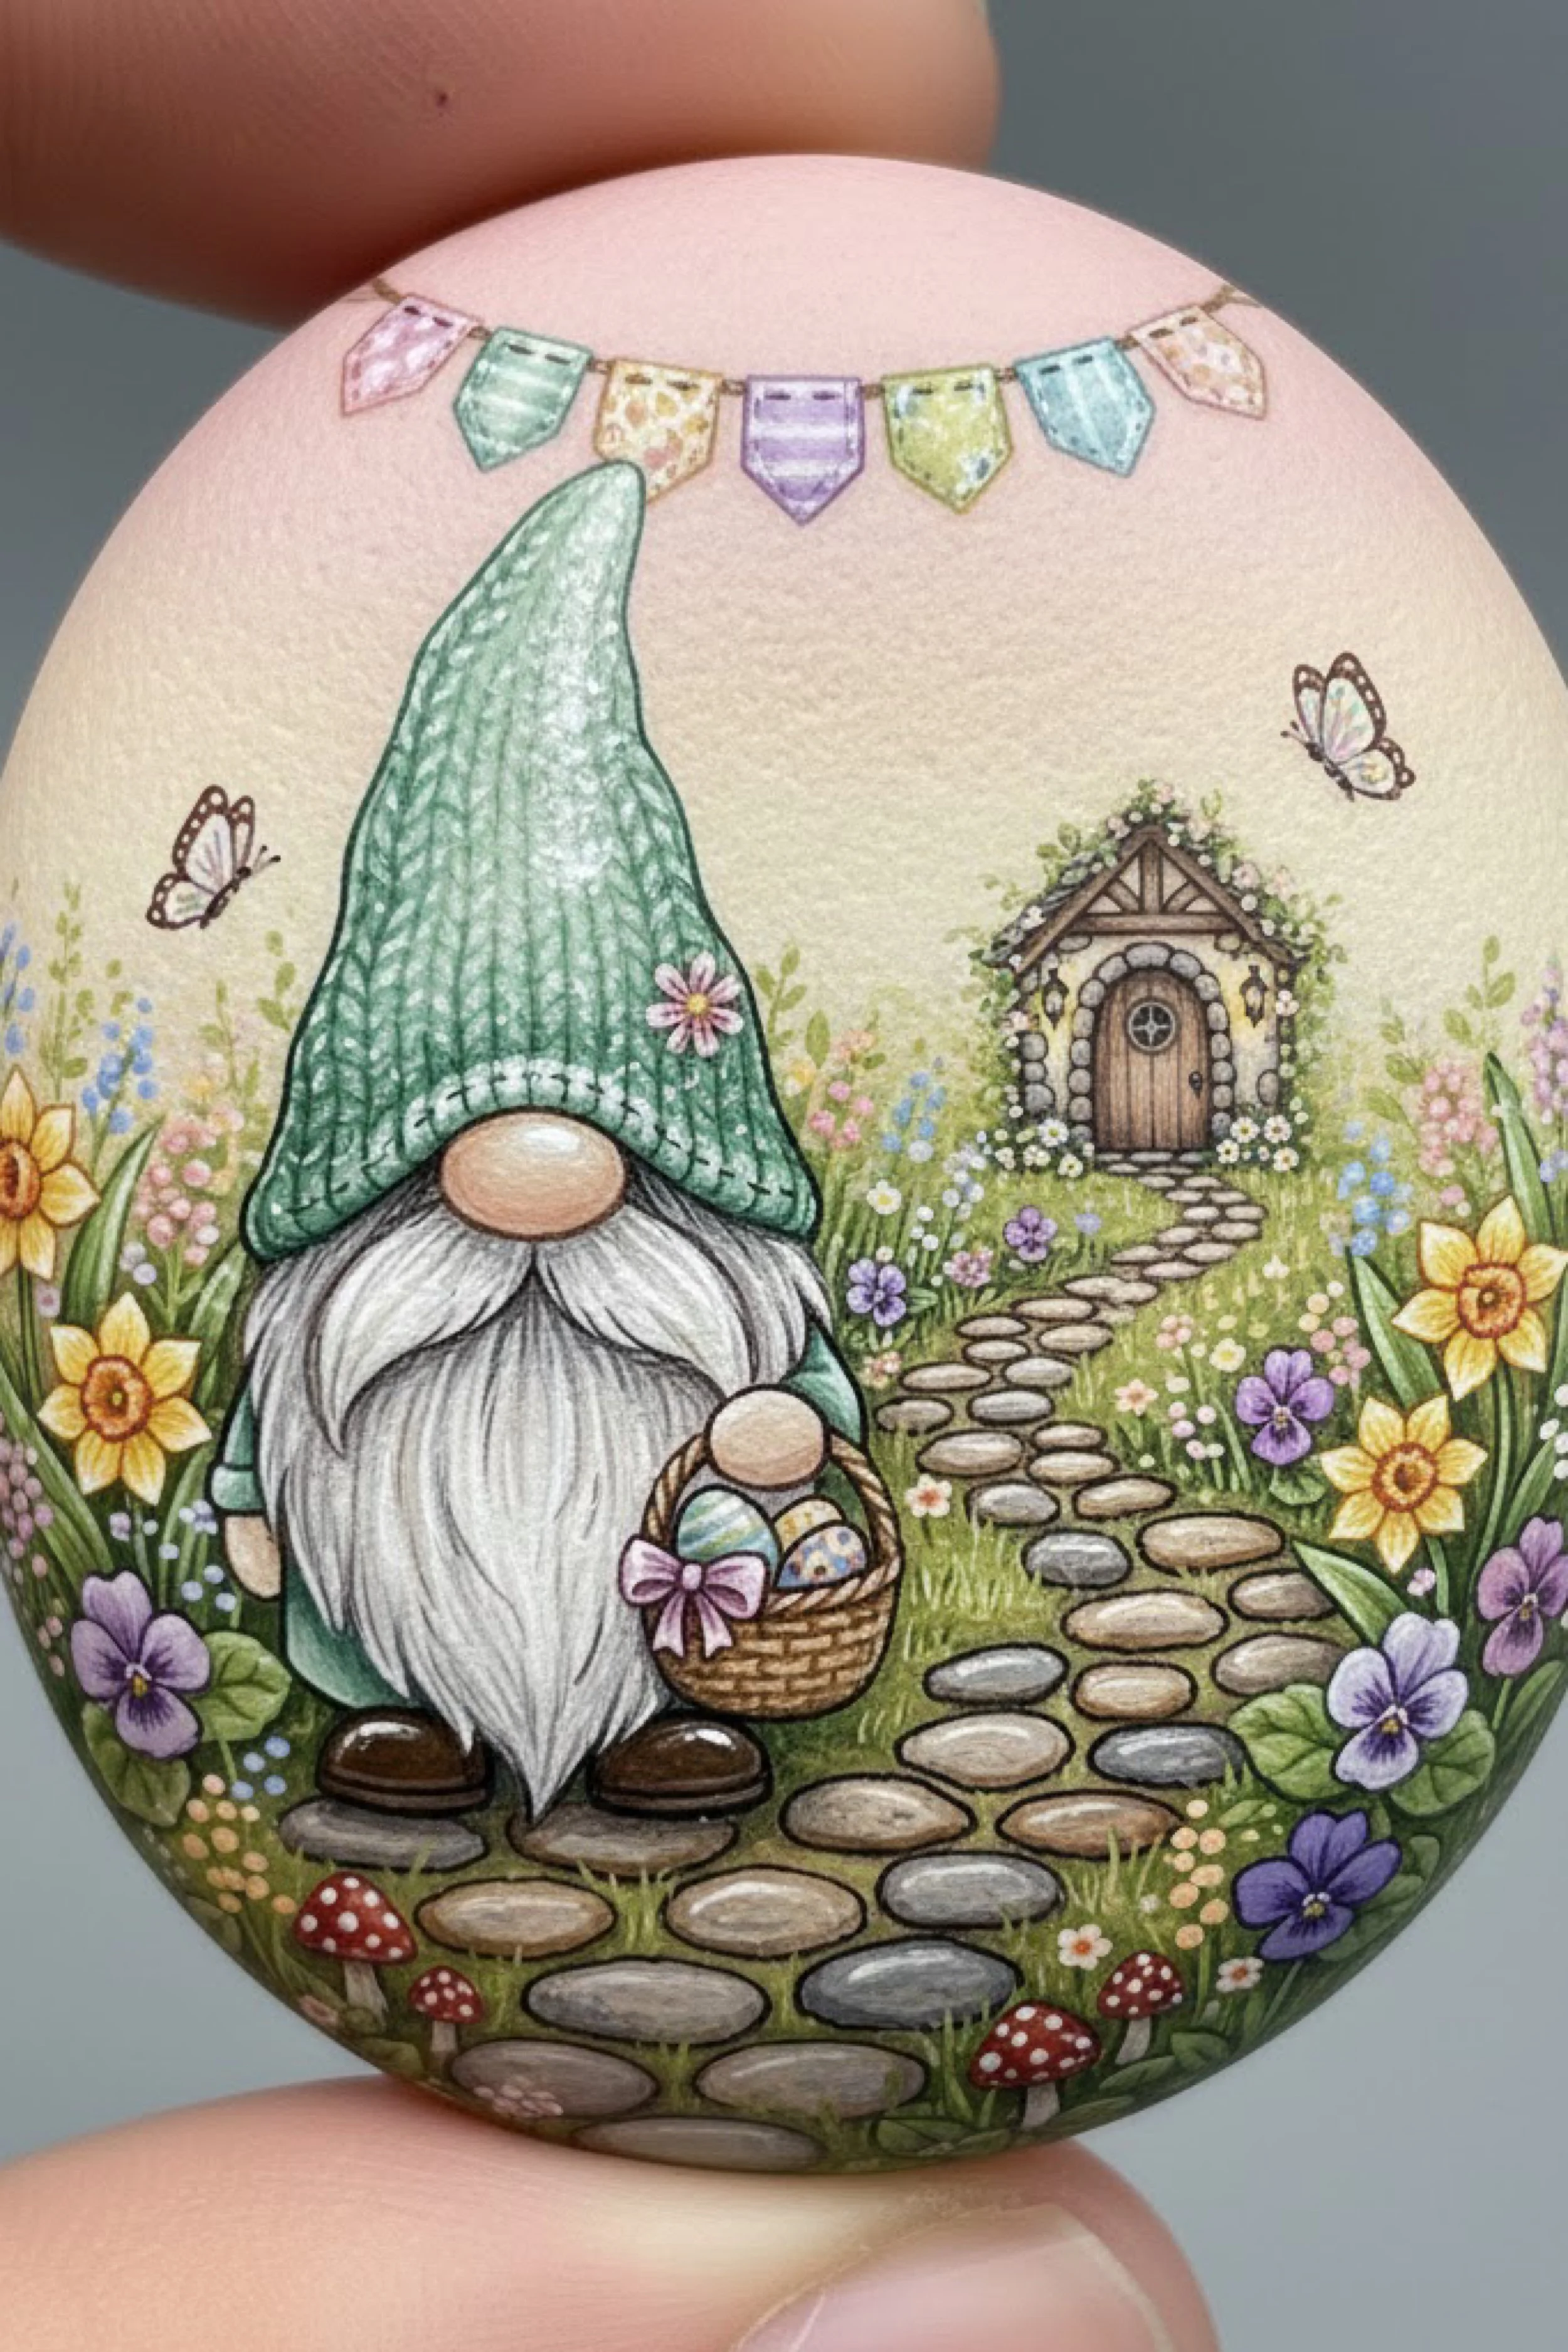
Spring Gnome Garden Stone DIY Guide
What you’re making
This painted stone captures the sweetest little spring path scene with a tall green hatted gnome carrying Easter eggs through a flower meadow toward a tiny cottage. The finished design feels whimsical and airy, with a soft blush sky, bunting overhead, butterflies in the background, and a winding cobblestone path that pulls the eye deep into the image.
The style is beginner friendly because the gnome’s face is mostly hidden and the shapes are simple, but the final result looks highly detailed thanks to careful layering and tiny line accents. If you want a painted rock that reads instantly as spring cottage magic, this is a lovely one to make.
Materials + tools
- Smooth oval or egg shaped stone about 3 to 4 inches tall
- Mild soap and water
- Fine grit sandpaper
- White gesso or acrylic primer
- Acrylic paints in blush, cream, sage, leafy green, dark green, lavender, pale blue, yellow, soft brown, gray, black, and white
- Fine tip detail brushes
- Small round brush
- Liner brush
- Pencil and eraser
- Optional colored pencils for beard texture and soft shadows
- Optional dotting tool or toothpick
- Matte or satin sealer
- Palette and water cup
- Soft cloth
- Optional magnifier for tiny details
Finished size + customization notes
A stone close to 3.5 inches tall works best because the path, cottage, bunting, flowers, and gnome all need room to breathe. On a smaller stone, make the cottage more suggestion than detail and reduce the number of individual stepping stones.
You can swap the green hat for dusty blue, lavender, or buttery yellow, but keep the beard bright and soft so the gnome remains the star. If you are not comfortable painting a distant cottage, replace it with a floral arch or garden gate and the design will still feel magical.
Step by step instructions
Prep and prime the stone.
Clean the stone thoroughly and smooth the painting face with fine grit sandpaper if needed. Apply one or two thin coats of white primer. The finished scene relies on soft, pale colors, so a bright clean base makes a big difference. Let it dry completely before sketching.Sketch the main layout.
Lightly draw the gnome large in the foreground, slightly left of center. Add the tall curved hat, round nose, wide beard, little shoes, and the basket of eggs. Then sketch a winding cobblestone path starting near the bottom and leading toward a tiny cottage in the distance. Add bunting across the top, flowers at both sides, and two butterflies floating in the sky. You should now see strong depth in the composition, with a foreground character, middle ground path, and background cottage.Paint the sky and meadow base.
Use a thin wash of blush cream in the upper background, fading into a warm pale yellow near the horizon. Paint the lower section in soft grassy greens. Keep these layers smooth and translucent. The charm of this design comes from the dreamy, storybook atmosphere, not heavy opaque color blocks.Block in the gnome hat and clothing.
Paint the hat a muted spring green. Add slightly darker green on one side and under the hat brim to suggest roundness. Fill the small visible sleeves or body areas with a similar toned green so the figure feels cohesive. If your hat looks too flat, glaze a second shadow layer on the far edge and add a lighter green highlight along one ridge.Create the beard texture.
Paint the beard with a soft light gray white base. Once dry, use thin downward strokes in light gray, white, and a hint of silver beige to build hair texture. Concentrate the darkest beard lines near the center split and underneath the nose. The beard should feel soft and feathery, not like stiff strings. A colored pencil can help here if you prefer more control than a brush gives you.Add the nose, shoes, and basket.
Paint the nose with a warm peach beige and keep it simple with a soft shadow along the bottom. The shoes can be dark brown with tiny highlights to suggest a polished finish. Paint the basket in a warm brown and add very fine woven lines once the base is dry. Nestle a few pastel eggs inside with a little pink bow for a sweet seasonal touch.Paint the cobblestone path.
This path is one of the most important features because it leads the eye toward the tiny cottage. Start with rounded stone shapes in warm grays and soft taupes. Shade each stone on the lower edge and leave a lighter top edge. Make the stones larger in the foreground and progressively smaller toward the cottage to create believable perspective. If your path looks flat, deepen the green grass between stones so each one stands out.Add the cottage in the background.
Paint a tiny stone cottage with a warm neutral wall, a peaked roof, and a simple wooden door. Outline the doorway arch softly and add a curving stone path to meet the main path. Tiny flowers climbing around the roofline will help the little house feel tucked into the meadow. Do not chase too much detail here. This background cottage should read as a charming destination, not compete with the gnome.Fill in the flowers and mushrooms.
Around both sides of the scene, paint spring blooms in yellow, lavender, blush, pale blue, and cream. Daffodil shapes and pansy like blooms work especially well. Near the bottom edge, add tiny red mushrooms with white dots for woodland whimsy. This lower floral border frames the gnome and helps the stone feel lush and finished.Paint the bunting and butterflies.
Stretch a light line across the upper portion of the stone and paint hanging pastel pennants in mixed soft patterns such as stripes, dots, or little floral marks. Then add two small butterflies with pale wings and brown outlines. These details break up the top area and make the scene feel celebratory.Refine shadows and depth.
Add gentle shading under the gnome, around the basket, between sections of the beard, and at the base of the flowers. The horizon should remain light so the little cottage stands out. This is a crucial checkpoint. You should now see the gnome clearly in front, the path flowing through the center, and the cottage softly receding into the distance.Line work and highlights.
Use dark brown or gray brown rather than pure black for most outlines. Sharpen the gnome’s beard edge, the basket rim, a few stones in the path, and the cottage door. Add tiny white highlights to the eggs, butterflies, and flower centers. Place just a few light dots in the meadow to imitate dew or illustrated sparkle.Correct balance if needed.
If the foreground feels too heavy, brighten the sky and add more tiny flowers around the cottage. If the background is stealing attention, soften the cottage edges with a thin glaze of the sky color. Small adjustments can dramatically improve this type of story stone.Seal the finished stone.
Let the work dry fully and apply two or three thin coats of sealer. Matte looks soft and classic. Satin adds a gentle glow to the path stones and eggs. Avoid a very glossy finish if you want the piece to keep its hand illustrated cottage look.
Troubleshooting
My gnome looks too large for the stone
That can still work beautifully if you simplify the cottage and let the beard fill more of the lower portion. The key is keeping the path visible enough to show depth.
The beard looks messy
Start over with a lighter base and use fewer, more confident strokes. Beard texture should flow downward in clean arcs, not crosshatch in different directions.
My path does not look like it goes anywhere
Make the stones bigger at the bottom and smaller near the cottage. Also narrow the width of the path as it recedes.
The cottage looks awkward
Keep it simple. A door, roofline, and a few stones are enough. Over detailing tiny architecture often makes it look clumsy.
My colors feel dull
Glaze a touch of warm cream into the sky and add brighter pastel accents to the eggs and flowers. Usually the design only needs a few cheerful points of color.
Finishing details
This stone looks especially pretty displayed standing upright in a little nest of moss or tucked into a spring shelf vignette. If you want a premium finish, paint the back a solid pale blush or sage and add a tiny floral motif or your initials. You can also create companion stones using the same palette such as a bunny cottage, chick in meadow, or floral wreath door.
Optional upgrades include using a shimmer medium on the bunting, adding tiny cottage lantern glow with warm yellow paint, or lightly dry brushing the meadow with pale cream to mimic sunlit grass. Another lovely option is to dot the flowers with dimensional paint after sealing so the meadow has a subtle raised texture.
Shop Similar
- Egg shaped painting stones for crafts
- Pastel acrylic gouache paint set
- Micro detail brushes for miniature painting
- Fine tip white and brown paint pens
- Matte sealer spray for painted stones
Style It With
Cottage Door Easter Wreath Painted Stone How To Guide
What you’re making
This project recreates a tiny stone cottage doorway painted onto an egg shaped rock, complete with a wooden arched door, spring planters, lanterns, climbing blossoms, and a pastel egg wreath finished with a pink bow. The design has a cozy cottage front door feel, but scaled down into a collectible hand painted keepsake.
It is an excellent project if you love architectural details but still want something soft and seasonal. The overall look is less busy than a full landscape scene, which makes it very approachable for beginners while still feeling polished and rich.
Materials + tools
- Smooth egg shaped river stone or craft stone
- White gesso or matte primer
- Fine grit sandpaper
- Acrylic paints in cream, stone gray, taupe, warm brown, dark brown, blush pink, sage, white, yellow, lavender, mint, pale blue, and black
- Detail brushes in very fine sizes
- Small round brush
- Liner brush
- Pencil and eraser
- Palette and water
- Toothpick or dotting tool
- Optional paint pens for tiny lines and floral dots
- Matte or satin sealer
- Optional transfer paper if you prefer tracing the doorway arch
Finished size + customization notes
A stone around 3 inches tall is ideal for the full cottage façade. If you are working on a smaller surface, keep the roofline, planters, and lanterns but simplify the egg wreath by using fewer eggs and leaves.
You can change the bow color to blue, lavender, or soft yellow to coordinate with your spring decor. The stone wall can look warm and rustic or cooler and storybook depending on whether you mix beige or blue gray into your neutral tones.
Step by step instructions
Prepare the stone.
Wash and dry the stone, then smooth away any bumps. Prime the face with one to two thin coats of white gesso. This design has lots of pale stone and floral detail, so a clean surface helps every layer stay bright and crisp.Sketch the cottage front.
Draw a peaked roofline near the top, then center a large arched doorway. Add the stone surround around the door, small lanterns on both sides, two flower pots near the base, and a circular egg wreath on the door. Keep the door large and dominant. That is the feature that makes the stone immediately recognizable.Paint the base background.
Fill the background cottage wall with a creamy warm beige. Keep the roof trim slightly darker and the inside of the doorway arch a deeper neutral. The door itself should be a warm wood tone. At this stage the piece will look flat, but the strong simple shapes will be in place.Build the stone surround.
Paint irregular stones around the door arch in mixed soft grays, warm taupes, and mushroom browns. Outline each stone lightly with a darker neutral and shade beneath overlapping edges. Stones should not all be identical. A mix of larger and smaller shapes feels more natural and charming. You should now start seeing the cottage character emerge.Add wood grain to the door.
Paint the door in mid brown, then layer darker vertical lines to create wood grain. Highlight a few raised areas with lighter brown or golden beige. Add a circular window near the top if desired, and suggest its pane lines very gently. A tiny brass toned knob on one side gives the piece a finished look.Paint the roofline greenery.
Along the roof and upper corners, add soft vines and little white blossoms. Use layered greens from olive to sage, then dot white petals with tiny warm centers. This floral trim softens the architecture and ties the design into spring.Create the lanterns.
Paint two tiny lanterns on either side of the doorway. Use deep gray or black brown for the frames, then add warm yellow inside to suggest lit glass. These are small details, so keep them simple and symmetrical. If one lantern ends up slightly larger, deepen the background shadow around the smaller one to balance the visual weight.Paint the Easter egg wreath.
Begin with a circular twig base in light brown. Weave in small leaves and tiny white blossoms. Then add pastel eggs in blush, lavender, blue, mint, yellow, and soft green around the wreath. Top it with a pale pink bow. This wreath is the heart of the design, so keep the colors cheerful and varied while the rest of the palette stays neutral and cottage soft.Add planters and spring flowers.
Paint two rounded pots near the base of the doorway. Fill them with tulips, lavender like spikes, daisies, and little filler flowers in pastel shades. Let a few leaves trail outward so the arrangement feels loose and garden inspired rather than stiff.Paint the rabbit and stepping stones.
Add a tiny gray bunny near the lower right for extra charm. Paint simple stepping stones across the threshold and lower foreground in muted grays and tans. These little grounding elements help the doorway feel like part of a real place rather than just an isolated door.Refine edges and shadows.
Add darker depth around the inside edge of the arch, beneath the wreath, under the roof trim, and behind the flower pots. Use soft glazes instead of harsh black lines. This stage is where the design moves from cute to dimensional. You should now see a warm inviting entry with believable depth.Introduce delicate line work.
Sharpen the wood grain, the door outline, select stone separations, and leaf edges with a fine liner brush. Do not line every petal or every stone. Pick the most important shapes only. Add tiny white highlights on the eggs, the bow folds, the lantern glass, and the door knob.Correct the color balance.
If the piece feels too brown, add more cool greens and lavender flowers. If it feels too pastel and washed out, deepen the wood and stone shadows. A strong balance between warm rustic neutrals and airy spring pastels creates the exact mood of the reference.Seal the painting.
Let the design dry well, then seal with thin coats of matte or satin varnish. Satin is especially lovely for this design because it gives the door and eggs a soft glow while keeping the cottage wall refined.
Troubleshooting
My stone wall looks like a brick wall
Make the stones more irregular and vary the colors. Cottage stones should feel organic, not uniform.
The wreath does not look round
Lightly redraw the circular base before adding eggs. Think of it as a clock face and place the main eggs at top, bottom, left, and right first.
My door looks flat
Deepen the sides of the arch, darken the wood grain grooves, and add a slightly brighter highlight down one plank edge.
The flowers feel messy
Use fewer blossoms and more leaf clusters. Tiny compositions often read better when the greenery does some of the visual work.
The lanterns look uneven
Tiny asymmetry is normal. Adjust by changing the glow intensity or the shadow around them rather than repainting everything.
Finishing details
This door stone is beautiful as a standalone shelf accent, but it also works as part of a full spring village collection. Paint the back in a matching cream tone and add a miniature blossom border for a finished artisan piece. If you like more texture, you can lightly dry brush the stone frame before sealing to emphasize the rock like feel around the door.
Optional upgrades include adding dimensional gloss only on the door knob and lantern glass, using metallic antique gold for the hardware, or tucking very tiny moss details into the stone cracks. You can also create a series where each door has a different seasonal wreath and palette.
Shop Similar
- Smooth painting rocks in egg shapes
- Pastel miniature acrylic paint set
- Tiny liner brushes for detail painting
- Fine point paint markers for rocks
- Satin varnish for hand painted stones
Style It With
Rustic Easter Fairy Door Pebble Make It Yourself Tutorial
What you’re making
You’re creating a rustic fairy door on a natural stone, framed with a rough rock arch and decorated with an Easter wreath full of pastel eggs and tiny blossoms. Compared with the previous cottage door design, this version leans more textured and natural, with a weathered wooden door, moss in the cracks, and a close up composition that fills almost the entire stone.
This is a wonderful project if you want maximum impact with a simpler layout. Because the design is zoomed in so closely, you can focus on texture, shading, and seasonal embellishment rather than painting a full scene.
Materials + tools
- Natural oval stone with visible texture
- Soft brush and damp cloth
- Matte primer suitable for stone
- Acrylic paints in warm brown, dark brown, gray, beige, moss green, blush, lavender, pale yellow, pale blue, white, and black
- Small and very fine detail brushes
- Dry brush or stiff small brush for texture
- Pencil
- Palette and water
- Toothpick or dotting tool
- Optional sponge for stone texture
- Matte varnish
- Optional satin topcoat for the wreath only
Finished size + customization notes
This design works well on a smaller stone because the composition is bold and close up. A 2.5 to 3.5 inch stone is perfect. The more naturally textured your stone is, the more convincing the rock arch will look.
You can make the wreath fuller and more floral or more egg focused depending on the look you want. If your stone is darker, use a stronger primer and keep the door wood tones warm so they stand out against the cooler rock border.
Step by step instructions
Choose the right stone and prep it.
Since this design highlights texture, pick a stone with a pleasing natural surface rather than an ultra polished one. Clean it gently and let it dry. Prime the front with a thin but thorough coat so your paint grips well without completely hiding the stone character.Sketch the door and arch.
Draw a tall rounded wooden door centered on the stone. Around it, sketch a chunky stone arch made from irregular rock pieces. Add a small circular knob near the center right. Then sketch a loose wreath shape around the upper middle of the door, topped with a bow.Paint the door base.
Lay down a warm medium brown over the door. While it is still slightly workable, streak in darker brown vertically to suggest weathered wood grain. Once dry, add lighter golden brown highlights on a few raised areas. The wood should feel old but well loved rather than decayed.Create the rocky arch texture.
Paint each stone in slightly different values of gray, taupe, sandy beige, and soft mushroom. Use a stippling or dry brush method on some pieces so the rock looks grainy. Deepen the crevices between stones with dark gray brown. This stage is important. You should now see the stone border reading as real masonry rather than a smooth painted outline.Add moss in the cracks.
Mix mossy green with a little olive and tap it into selected gaps between stones, especially near the edges and lower sections. Keep it subtle. A little moss goes a long way in making the fairy door feel old and magical.Build the wreath base.
Paint a tangle of thin twig lines in warm brown around the upper center portion of the door. Do not make it a perfect circle. Let it feel hand gathered and slightly wild. Layer in small sage and olive leaves around the twigs, keeping the bottom portion of the wreath slightly fuller.Paint the pastel eggs.
Add several eggs nestled into the wreath. Use blush pink, pale yellow, mint green, lavender, and powder blue. Decorate them with tiny dots, stripes, zigzags, or tiny white floral marks. Vary the size and angle of the eggs so the wreath feels natural and hand assembled.Add blossoms and bow.
Dot very small white blossoms around the wreath and place a dusty pink bow at the top. Shade the bow at the knot and under the loops to give it softness and volume. The bow provides a pretty focal point against the rougher stone textures.Paint the door knob and center details.
Use a warm metallic gold tone or a deep mustard yellow mixed with brown for the knob. Add a highlight dot so it catches the eye. Deepen the shadow around it so it stands out from the wooden door.Strengthen contrast.
Look at the design from arm’s length. If the door is disappearing into the arch, darken the crevice around the wood. If the wreath is blending into the door, brighten the eggs and blossoms. A strong value contrast is what makes this very simple composition look rich and finished.Refine the wood grain.
Use a liner brush to add only a few more vertical grain lines and knot marks. Too many lines will make the door look striped. You want visible weathering, not a barcode effect.Refine the stones individually.
Highlight the upper edges of select stones with a pale beige or light gray and deepen the undersides with a darker neutral. This is how you create the illusion that each stone has thickness. If yours still looks flat, intensify just a few stones rather than all of them.Final delicate accents.
Add tiny white highlights on the eggs, bow, and blossoms. Place a few extra moss flecks near the arch. If desired, use a very thin dark line to define the inner edge of the doorway opening. You should now see a tactile rustic fairy door with a sweet Easter wreath floating above the wood grain.Seal strategically.
Seal the whole piece with matte varnish to preserve the natural rustic feeling. If you want a subtle mixed finish, add a tiny satin layer only over the wreath eggs and bow after the matte layer dries.
Troubleshooting
My rock arch looks too smooth
Use a dry brush, stippling motion, or even a makeup sponge to break up the painted surface and create granular variation.
The wreath looks pasted on
Nestle some leaves behind the eggs and let a few twig lines overlap them. Layering makes the wreath feel built, not stuck on.
My door wood looks orange
Tone it down with a thin glaze of taupe brown or gray brown once dry.
The colors are getting muddy
Let each small section dry before touching adjacent details. On tiny stones, one wet brushstroke can easily drag color where you do not want it.
The bow is too stiff
Shade under the loops and pull a lighter highlight along the top folds so it feels soft and ribbon like.
Finishing details
This rustic door looks gorgeous styled with natural elements such as moss, bark, wood beads, or a grapevine nest. For an artisan look, leave the natural edge of the stone partially visible rather than painting all the way to the perimeter. You can also create a full set of seasonal doors using the same rustic method and simply change the wreath.
Optional upgrades include adding dimensional clear medium over the bow knot, painting tiny faux nail heads into the wood, or attaching the finished stone to a little block stand so it displays upright. Another pretty option is to pair it with miniature lantern decor for a fairy garden shelf.
Shop Similar
- Natural textured oval stones for painting
- Earth tone and pastel acrylic paint bundle
- Miniature detail brush set for craft painting
- Matte sealer for painted pebbles
- Fine acrylic paint pens for tiny designs
Style It With
Baby Chick Hatching Easter Stone Step by Step Tutorial
What you’re making
This adorable painted stone features a fluffy yellow chick hatching from an eggshell in a dew kissed spring meadow, surrounded by pastel Easter eggs, tiny daisies, ribbon, and a soft countryside background. The composition is simple, sweet, and centered, which makes it excellent for beginners who want a highly charming result without painting architecture or lots of miniature objects.
The magic of this stone comes from soft feather texture, a glowing pastel sky, and crisp contrast in the chick’s oversized eyes. It is perfect for Easter baskets, tiered tray decor, nursery spring styling, or a collection of seasonal hand painted pebbles.
Materials + tools
- Smooth oval stone about 2.5 to 4 inches tall
- Soap, water, and cloth
- Fine grit sandpaper
- White gesso or primer
- Acrylic paints in cream, pale yellow, golden yellow, soft orange, white, black, sage, spring green, lavender, pale blue, blush, and butter yellow
- Small round brush
- Fine detail brushes
- Liner brush
- Pencil
- Optional colored pencil for feather detail
- Dotting tool or toothpick
- Matte or satin varnish
- Palette and water cup
- Paper towel
Finished size + customization notes
This centered design works beautifully even on smaller stones because the chick fills much of the surface. A stone around 3 inches gives the nicest balance between the chick and the surrounding meadow details.
You can make the chick more realistic with subtler eyes and more feather blending, or lean into the storybook style with bigger glossy eyes and a rounder face. For a more minimal look, remove the side eggs and keep only the chick, shell, grass, and one butterfly.
Step by step instructions
Prepare the stone.
Clean and dry the stone well, then lightly buff if needed. Prime the front with white gesso so your pale sky and chick feathers stay luminous. Allow the primer to dry thoroughly.Sketch the composition.
Draw a large cracked eggshell centered low on the stone. Then sketch the chick rising from the shell with a rounded head, big eyes, tiny beak, and little feet resting on the shell edge. Add grassy meadow shapes across the lower half, pastel eggs on either side, a curling ribbon near the bottom left, and a butterfly above. Indicate a distant fence line and shrubs in the background.Paint the sky glow.
Fill the upper background with a very soft pale cream fading into the faintest warm yellow near the horizon. Blend carefully so the sky feels airy. This background should remain extremely subtle. The chick and foreground details provide the real contrast.Paint the meadow base.
Lay in a fresh spring green across the lower half, then deepen the grass in select areas with darker green. Add softer, blurred shrub shapes in the middle distance and a tiny fence line in muted brown. Keep the background out of focus so the chick remains the star.Block in the eggshell.
Paint the shell a warm off white with hints of beige gray in the cracks and underside. Shade the inner edge of the shell opening slightly darker so it feels hollow. Do not outline the cracks too harshly yet. A soft broken shell looks more natural and charming.Paint the chick base color.
Fill the chick with pale buttery yellow. While that dries, mix a slightly deeper golden yellow for the lower face, wing edges, and underside. The chick should read fluffy and warm, not flat neon yellow.Build feather texture.
Using small fine strokes, layer pale cream, golden yellow, and a touch of warm beige around the head and body. Radiate the strokes outward from the face, especially across the forehead and cheeks. Keep the body texture soft and short. If you have colored pencils, you can add very gentle feather lines after the acrylic base dries. This is your main visual checkpoint. You should now see a fluffy baby chick rather than a yellow blob.Paint the eyes and beak.
Add two large black eyes with bright white highlight dots. A touch of dark gray around the upper eye edge adds depth. Paint the beak warm orange with a darker line between upper and lower portions. Keep the beak small and centered so the expression stays baby like and sweet.Add the feet and shell grip.
Paint tiny orange toes curling over the shell edge. Deepen the shadow where the toes meet the shell so they look perched. These details are tiny, but they make the chick feel alive and interactive rather than pasted onto the shell.Paint the surrounding Easter eggs.
Add a lavender striped egg on one side and a yellow or blue patterned egg on the other. Decorate them with soft stripes or gentle marbling. Keep their colors slightly muted so they support the chick without stealing attention.Layer the grass and flowers.
Pull upward grass blades in several greens around the shell and eggs. Dot in little daisies and tiny lavender flowers. Add pale dew like dots around the meadow. A soft blue ribbon curling through the grass near the bottom adds a nice visual flow line.Add the butterfly and background details.
Paint a delicate butterfly in pale neutral tones near the upper right. Then strengthen the distant fence line just enough to suggest a pastoral setting. The background must remain quiet. If it starts to compete, glaze over it with a whisper of the sky color.Refine contrast.
Deepen shadows inside the shell cracks, under the chick’s chin, beneath the shell in the grass, and behind the side eggs. Brighten the top of the chick’s head and the eye highlights. This push and pull of shadow and light is what makes the soft storybook palette still feel dimensional.Finish with final details and seal.
Add a few tiny white dots in the grass for sparkle and highlight the chick’s beak very lightly. Once completely dry, seal with matte or satin varnish. Satin is lovely here because it makes the eyes sparkle while the feathers stay soft.
Troubleshooting
My chick looks more like a duck
Usually the beak is too wide or too flat. Make it smaller and more triangular, and keep the eyes larger in relation to the face.
The shell cracks look harsh
Glaze them with a light beige or cream to soften. The shell should frame the chick, not dominate the design.
My grass looks messy
Paint the meadow base first, then add fewer, more intentional blades on top. Too many random dark strokes can overwhelm a tiny stone.
The eyes look spooky
Add bigger highlight dots and soften any hard black outline around them. Large glossy eyes need balanced highlights to look sweet.
The pastel eggs stand out too much
Tone them down with a thin veil of white or cream once dry.
Finishing details
This design is especially cute in Easter basket styling, grouped with faux eggs or nestled in shredded paper and moss. Paint the back in a pale pastel and add a tiny feather motif or date for a polished handmade touch. You can also turn this into a full set by painting companion chick stones in slightly different shell poses or adding sibling chicks in other colorways.
Optional upgrades include iridescent medium on the Easter eggs, a tiny bit of dimensional gloss on the eyes only, or softly stippling the meadow for extra dreamy texture. If you want a nursery storybook feel, use even softer outlines and keep all edges gently blended.
Shop Similar
- Smooth white river stones for painting crafts
- Pastel acrylic paint set for rock painting
- Fine detail brushes for tiny animal painting
- White gesso primer for craft stones
- Satin varnish for painted rock art
Style It With
As you step back and look at your finished stones, you begin to notice something subtle but meaningful. Each one holds its own story, yet together they feel like a connected little world. The bunny at the window, the gnome on the path, the cottage door, the rustic wreath, the tiny chick, they all belong to the same quiet spring morning, just seen from different moments and perspectives.
That is the beauty of this kind of craft. It is not about perfection. It is about building something gently, layer by layer, until it feels alive. The slight variations in brushstrokes, the tiny differences in color, the way one flower leans a little differently than another, those are the details that make your pieces feel personal rather than manufactured.
You can keep expanding this collection if you want. Add more characters, more doors, more little seasonal scenes. Or simply enjoy the ones you have made and let them become part of your spring traditions year after year. These stones are small, but they carry a surprising amount of warmth when placed into a home or given to someone else.
Let them sit on a shelf, nestle them into a basket, or display them where sunlight can catch their soft colors. However you choose to style them, they will always hold that same quiet charm, a reminder that even the smallest creative moments can become something lasting and beautiful.