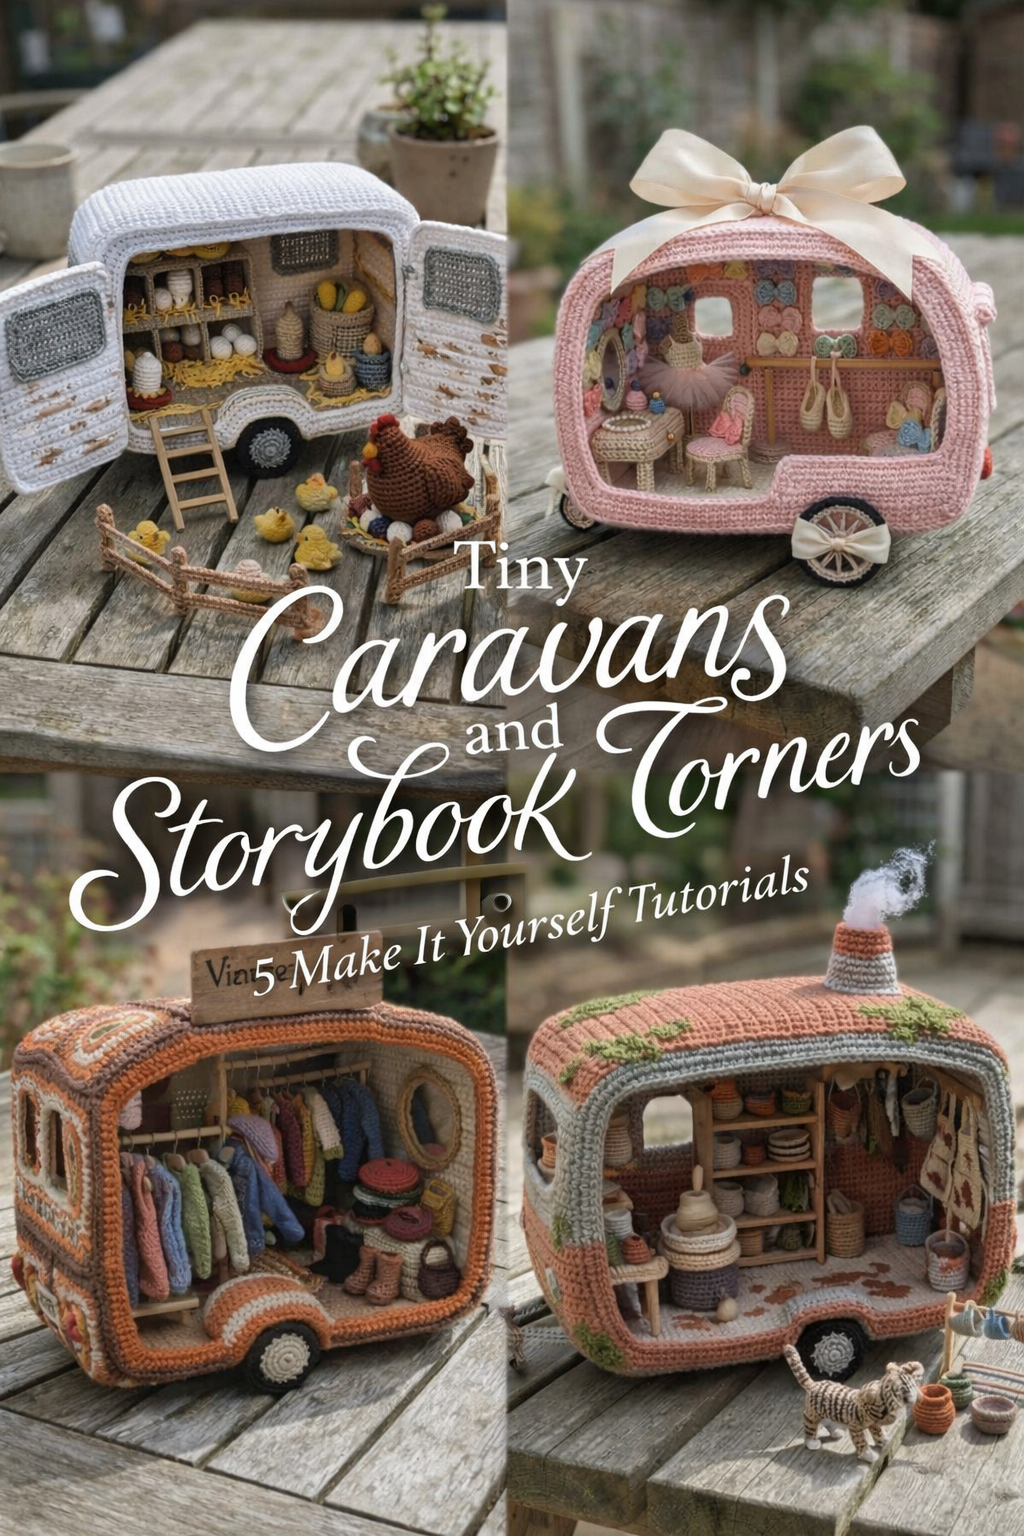
Tiny Caravans and Storybook Corners: 5 Make It Yourself Tutorials

More like this
💡 Pro Tip: Why I Link to Amazon Search Results and Not One Product
In the Shop the Look and Style it With sections under each bikini, I link to Amazon search results, not single products. Here’s why this matters:
Hot bikinis sell out fast. I don’t want you clicking on a dead link to a sold-out item. Search pages stay updated.
You get more options. Love the vibe but want a different color, cut, or price point? The search results give you everything that matches the look and energy.
I curate each search carefully. These aren’t generic. I spend hours crafting keywords that bring up exactly the kind of bikinis I’d wear—or recommend to my hottest friends.
Support with no pressure. If you click a link, browse, and buy something later, I may earn a small commission at no extra cost to you. That helps me keep bringing you curated collections like this one—powerful, seductive, and always fresh.
So dive in. Click through. Try something risky. These aren’t just bikinis—they’re commands, statements, and maybe even your new favorite weapon of choice.
There is something quietly magical about miniatures that hold entire worlds inside them. These tiny caravans are not just crochet projects. They are little stories you can hold in your hands. Each one invites you into a different scene, from cozy countryside mornings to soft pastel playrooms filled with gentle charm and imagination.
As you move through these five tutorials, you will notice that each caravan carries its own personality. One becomes a rustic farm filled with chicks and eggs, another transforms into a delicate boutique dressing room, while others unfold into pottery studios, vintage markets, and bunny filled springtime hideaways. The beauty of this collection is not just in the craftsmanship, but in how each piece feels alive once it is complete.
Take your time with these builds. Let each stitch shape the structure slowly, and enjoy the process of layering in the tiny details that bring everything together. The shelves, the baskets, the miniature props, and even the smallest embellishments all work together to create that unmistakable storybook finish.
By the end of this collection, you will not just have five finished pieces. You will have five little worlds that feel thoughtful, personal, and completely your own.
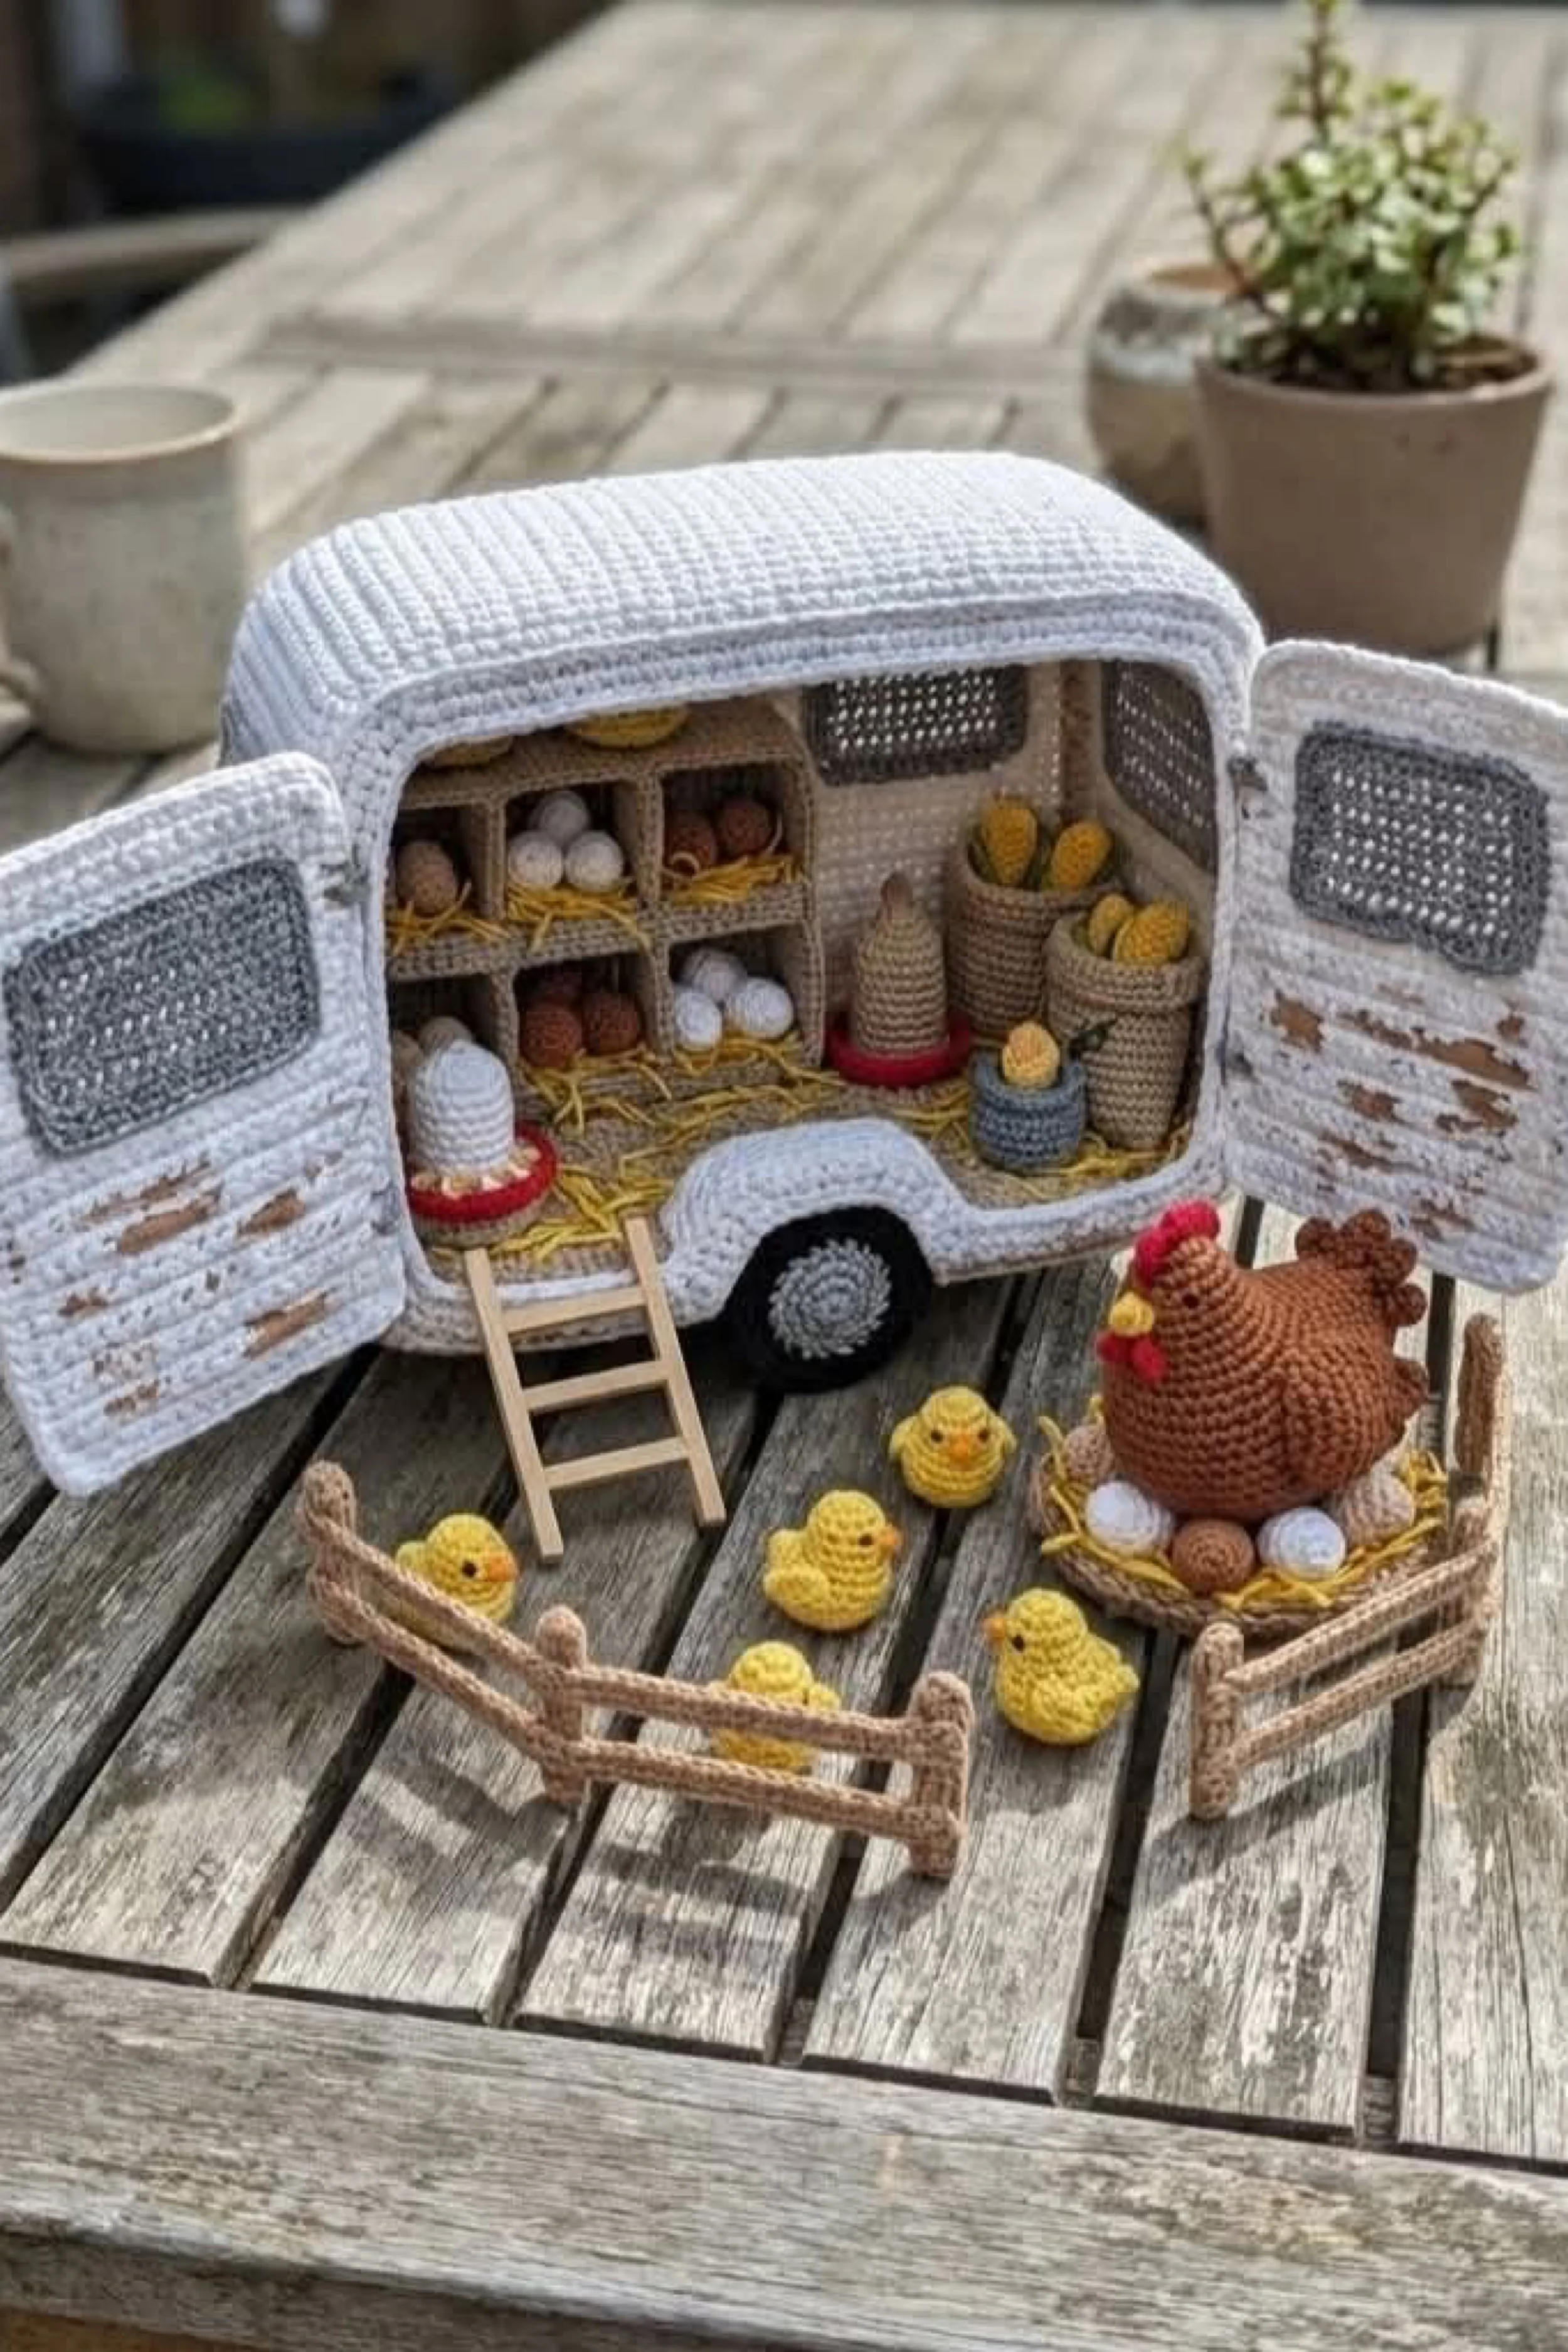
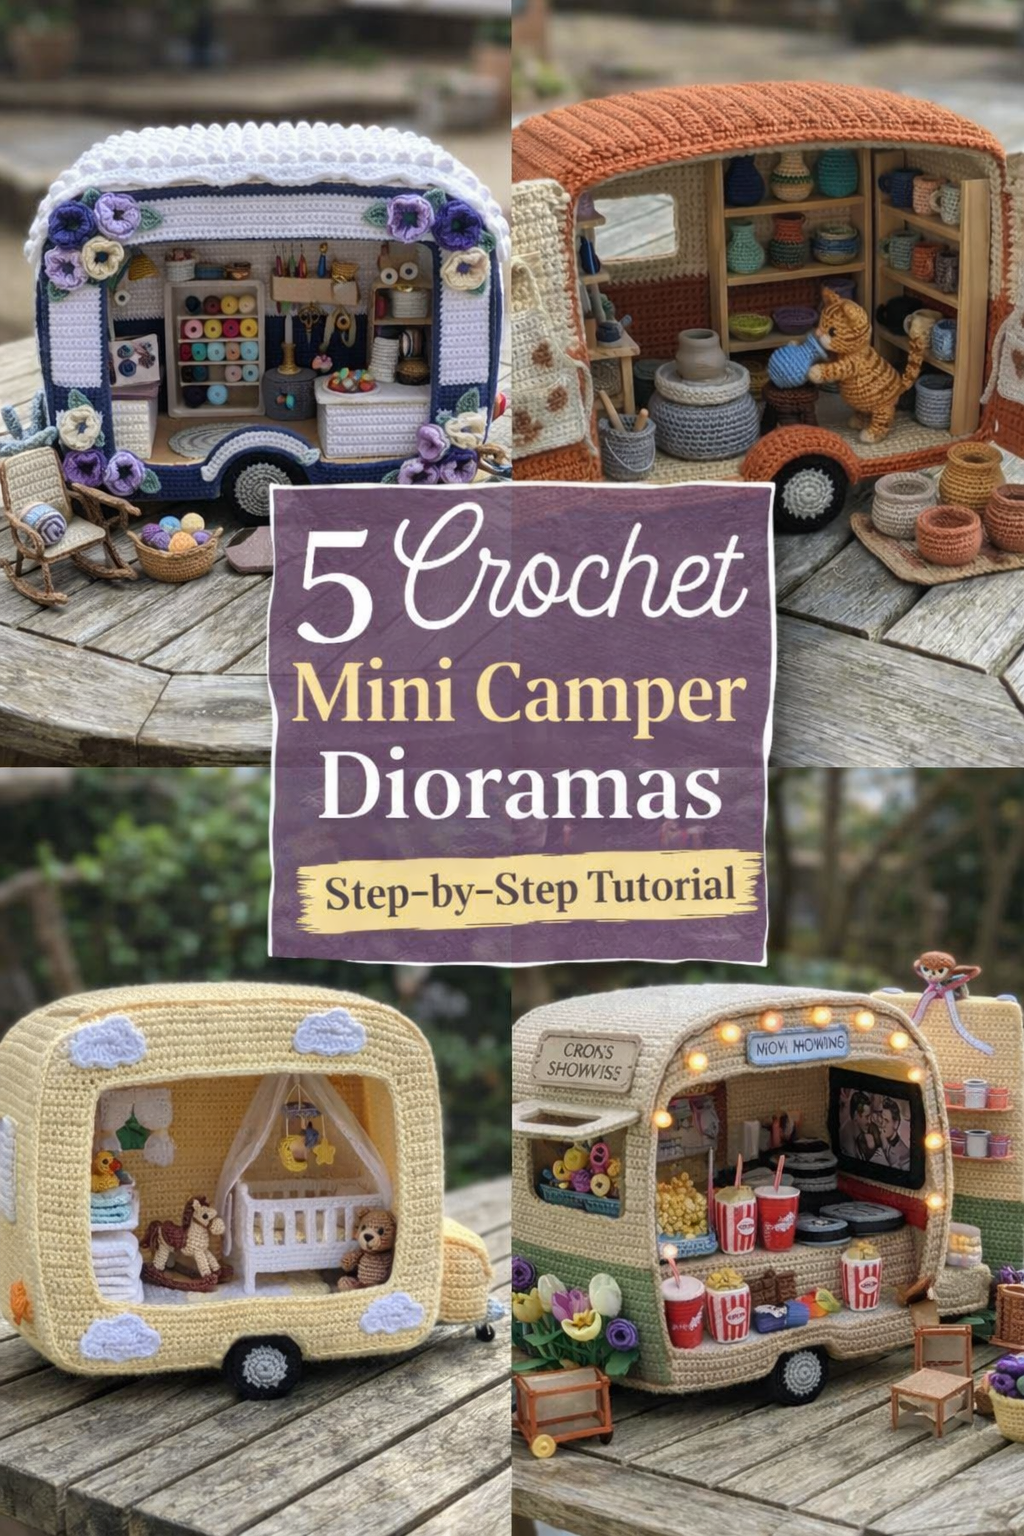
Crochet Chicken Coop Caravan Step-by-Step Tutorial
What you’re making
You’re making a whimsical crochet caravan that opens into a miniature hen house, complete with egg cubbies, tiny straw details, a ladder, little chicks, feeding bowls, and a proud mother hen sitting on her nest outside. The overall look feels storybook rustic, with soft farmhouse colors, a rounded vintage trailer shape, and just enough miniature structure to make it look like a real traveling chicken coop.
This project is best approached as a build in layers. You will crochet the caravan shell first, then add shaped doors, mesh style window panels, shelves, cubbies, eggs, chicks, fencing, and the hen scene. It looks elaborate, but the parts themselves are small and very manageable when you work one section at a time.
Materials + tools list
- Worsted weight cotton yarn in white, cream, beige, light gray, mustard, straw yellow, brown, rust red, and black
- Optional sport weight cotton for finer details
- Crochet hooks in 2.25 mm, 2.75 mm, and 3 mm
- Yarn needle
- Small sharp embroidery scissors
- Stitch markers
- Polyester stuffing
- Thin cardboard, plastic canvas, or lightweight craft foam for structure
- Floral wire or pipe cleaners for shaping doors and fence if needed
- Fabric glue or craft glue for non structural accents
- Wooden skewers, popsicle sticks, or dollhouse wood strips for the ladder and shelf supports
- Small piece of mesh fabric or crocheted filet style inserts for the doors and windows
- Brown embroidery floss or felt strips for distressed wood style door accents
- Hot glue gun if you prefer faster assembly for the wood parts
- Optional magnetic snaps or sewn loops for keeping doors closed
Finished size + customization notes
A good finished size for this caravan is about 10 to 14 inches long, 7 to 9 inches tall, and 6 to 8 inches deep. You can make it larger by switching to bulky yarn and a bigger hook, or smaller by using sport weight cotton and a finer hook.
To match the photo, keep the body mostly white with soft gray window inserts and warm beige interior shelving. If yours looks too modern, add distressed brown stitch accents to the doors and use more straw yellow on the floor. If you want a sturdier display piece, line the walls and roof with plastic canvas before final assembly.
Step-by-step instructions
Plan the caravan as separate zones first.
Before you crochet anything, sketch the side profile of the trailer. You need a rounded roof, flat base, wheel arch cutout, and a large back opening that will become the chicken coop interior. Mark where the doors will hinge, where the wheel sits, and where the cubby shelves go. This step saves a huge amount of guesswork later. You should now see a simple trailer silhouette with clearly labeled interior areas.Crochet the base panel.
Start with beige or cream yarn and crochet a firm rectangular base in single crochet. Work tight stitches because this piece supports everything else. Measure as you go until the base looks proportionate to the rounded trailer body. Slip stitch around the edge once to neaten it. If the panel feels floppy, stitch a matching second panel and sandwich cardboard or plastic canvas between them.Create the two side walls.
Crochet two matching side pieces in white. Shape the roof by increasing gradually at the corners and then working even rows over the arch. Leave the back mostly open so the caravan can open wide like the photo. Cut a wheel arch from the lower center area or crochet around a drawn arch shape from the beginning. Hold both side panels together and make sure they are mirror images. If one side looks taller, block lightly before continuing.Work the roof and top curve.
The roof is the visual star of this trailer. Crochet a long curved panel in rows, wide enough to bridge the two side walls. Use tight single crochet or waistcoat stitch for a clean, structured texture. The photo shows a subtle ribbed effect, so you can work through back loops every few rows to create faint horizontal ridges. You should now see a soft rounded caravan roof, not a flat box. If yours looks too square, add a few short shaping rows near the top center.Build the front and inner back frame.
Crochet a smaller front panel to close the front of the trailer, leaving room for a window if desired. The back stays open, but it still needs a neat frame so the double doors can attach cleanly. Work narrow border strips and sew them around the opening. This makes the opening look intentional rather than unfinished.Assemble the shell over structure.
Insert your plastic canvas or craft foam into the base, sides, and roof pieces. Whipstitch the caravan body together. Attach one side wall to the base, then the other, then sew the roof across the top. Finish by attaching the front panel. Test the balance before adding anything inside. The trailer should stand upright without collapsing inward. If it buckles, add another hidden support strip inside the roofline.Make the wheel and undercarriage.
Crochet one or two flat circle wheels in gray, black, and white. Use a tight spiral and stuff lightly if you want dimension. Sew the main visible wheel onto the side. For the hitch, braid or crochet a narrow tube and attach it to the front. Keep it small and understated so it does not distract from the coop scene.Crochet the two doors.
Each door is a rectangular panel in white, edged firmly so it holds shape. Stitch gray filet crochet or mesh panels into the upper half to echo the windowed chicken coop look. Add brown stitched bars or felt strips to mimic worn wood planks. The distressed detailing matters here because it gives the trailer age and charm. If yours looks too clean, lightly cross stitch a few uneven brown marks.Attach the doors so they open wide.
Sew each door to the back frame using whipstitch hinges, leaving enough looseness for movement. Open them fully and check the symmetry. The doors should flare outward, framing the coop interior. You should now see the scene begin to feel theatrical, like a dollhouse reveal.Crochet and install the cubby shelf wall.
Make a rectangular beige backing panel and then add horizontal and vertical dividers using narrow crocheted strips or thin wood covered in yarn. You want a cluster of little cubbies, just like nesting boxes. Glue or stitch the shelf wall into the left interior. If the cubbies lean forward, reinforce the back with cardboard.Fill the cubbies with eggs and straw.
Crochet tiny egg shapes in white, cream, and brown by making miniature ovals stuffed just enough to hold form. Add short strands of yellow yarn to the bottom of each cubby as straw. Tuck eggs in irregular groups. Some cubbies should have two or three eggs, while others look slightly messy. That variation makes the whole piece more believable.Make the floor straw.
Scatter more short cut strands of straw yellow yarn across the caravan floor. You can knot a few bundles through the crocheted base for permanence, then trim them so they stay tidy. If your straw overwhelms the miniature scale, thin it out. In the photo, the floor looks rustic but not chaotic.Add feeders and waterers.
Crochet tiny bottle or dome shaped feeders in white and beige, then set them on red circular trays. These can be made from a small stuffed cone or cylinder topped with a dome. Make one inside and one near the ladder for visual rhythm. You should now see that the scene reads clearly as a chicken setup rather than a generic storage caravan.Create the side baskets and corn or feed props.
Crochet slim baskets in beige and fill them with mustard yellow shapes that resemble corn cobs or feed bundles. Arrange them on the right interior. Add one tiny blue basket in front for a pop of color and scale contrast.Build the ladder.
Use thin wood strips or skewers cut to size. Glue two side rails and add cross rungs. The ladder should lean casually into the opening. Keep the scale delicate. If it looks too thick, replace with narrower strips because chunky ladders can make miniature scenes feel clumsy.Crochet the hen.
The hen outside is a rounded amigurumi body in warm brown with tiny wings, a tail, red comb, and yellow beak. Keep the body squat and generous. She should look settled and motherly, not upright and cartoonish. Sit her on a small nest ring made from brown and yellow yarn.Add eggs and chicks.
Crochet several tiny chicks in bright yellow. Two small rounds joined together with tiny beaks work beautifully. Scatter them around the fence area so the whole scene feels alive. Add extra eggs in the outdoor nest around the hen. You should now see the project transform from caravan to miniature narrative.Make the fence.
Crochet or wrap thin wire with beige yarn to form simple rustic fence sections. Each section can have two horizontal rails and upright posts. Set them loosely around the hen and chicks. They do not need to form a complete enclosure. The suggestion of fencing is enough.Refine the textures.
Go back and add border rounds, tidy joins, and reinforce any sagging edges. Steam block very lightly if needed, but avoid over softening the structure. The best result is crisp, cozy, and slightly rustic.Do a final styling check.
Step back and compare proportions. The cubbies should fill one side, the baskets should fill the other, and the ladder should lead your eye inward. If yours looks wider than the photo, reduce clutter and keep the central opening more visible. If it looks empty, add more straw and one or two extra eggs rather than large new props.
Troubleshooting
My caravan body is collapsing
Use plastic canvas or thin craft foam inside the roof and side walls. Tighten your stitch tension or go down one hook size.
The doors do not hang evenly
Count rows carefully and block both doors before attaching. Stitch them on with the caravan sitting flat so gravity does not distort placement.
The miniature eggs look too big
Use finer yarn or make them with only a few increase rounds. For tiny pieces, under stuffing is better than over stuffing.
The interior looks messy instead of charming
Limit the color palette. Use white, beige, straw yellow, muted brown, and one accent red. Too many bright colors will break the farmhouse effect.
The hen does not sit properly in the nest
Flatten the base of the body slightly while stuffing and stitch the bottom directly to the nest ring.
Finishing details
Line the inside roof with a neutral fabric if you want an extra polished finish. Weave in all ends on the hidden interior side of pieces before assembly, because exposed ends can ruin the miniature illusion. If you want the caravan to function as décor rather than a toy, add a weighted insert in the base so it displays securely on a shelf. A light mist of fabric stiffener on the doors and fence can help them hold their shape, but test on a scrap first. For an heirloom look, consider stitching a tiny name label inside the trailer door.
Optional upgrades that work beautifully here include a crocheted bunting strip across the opening, a removable egg basket, a tiny coop sign, or a battery tea light hidden behind the cubbies for a warm glow.
Shop Similar
- White cotton yarn for structured miniature caravan crochet
- Mini crochet hooks for detailed amigurumi work
- Plastic canvas sheets for strengthening crochet dollhouse walls
- Neutral cotton yarn bundle in farmhouse shades
- Tiny wooden craft sticks for miniature ladders and shelves
Style It With
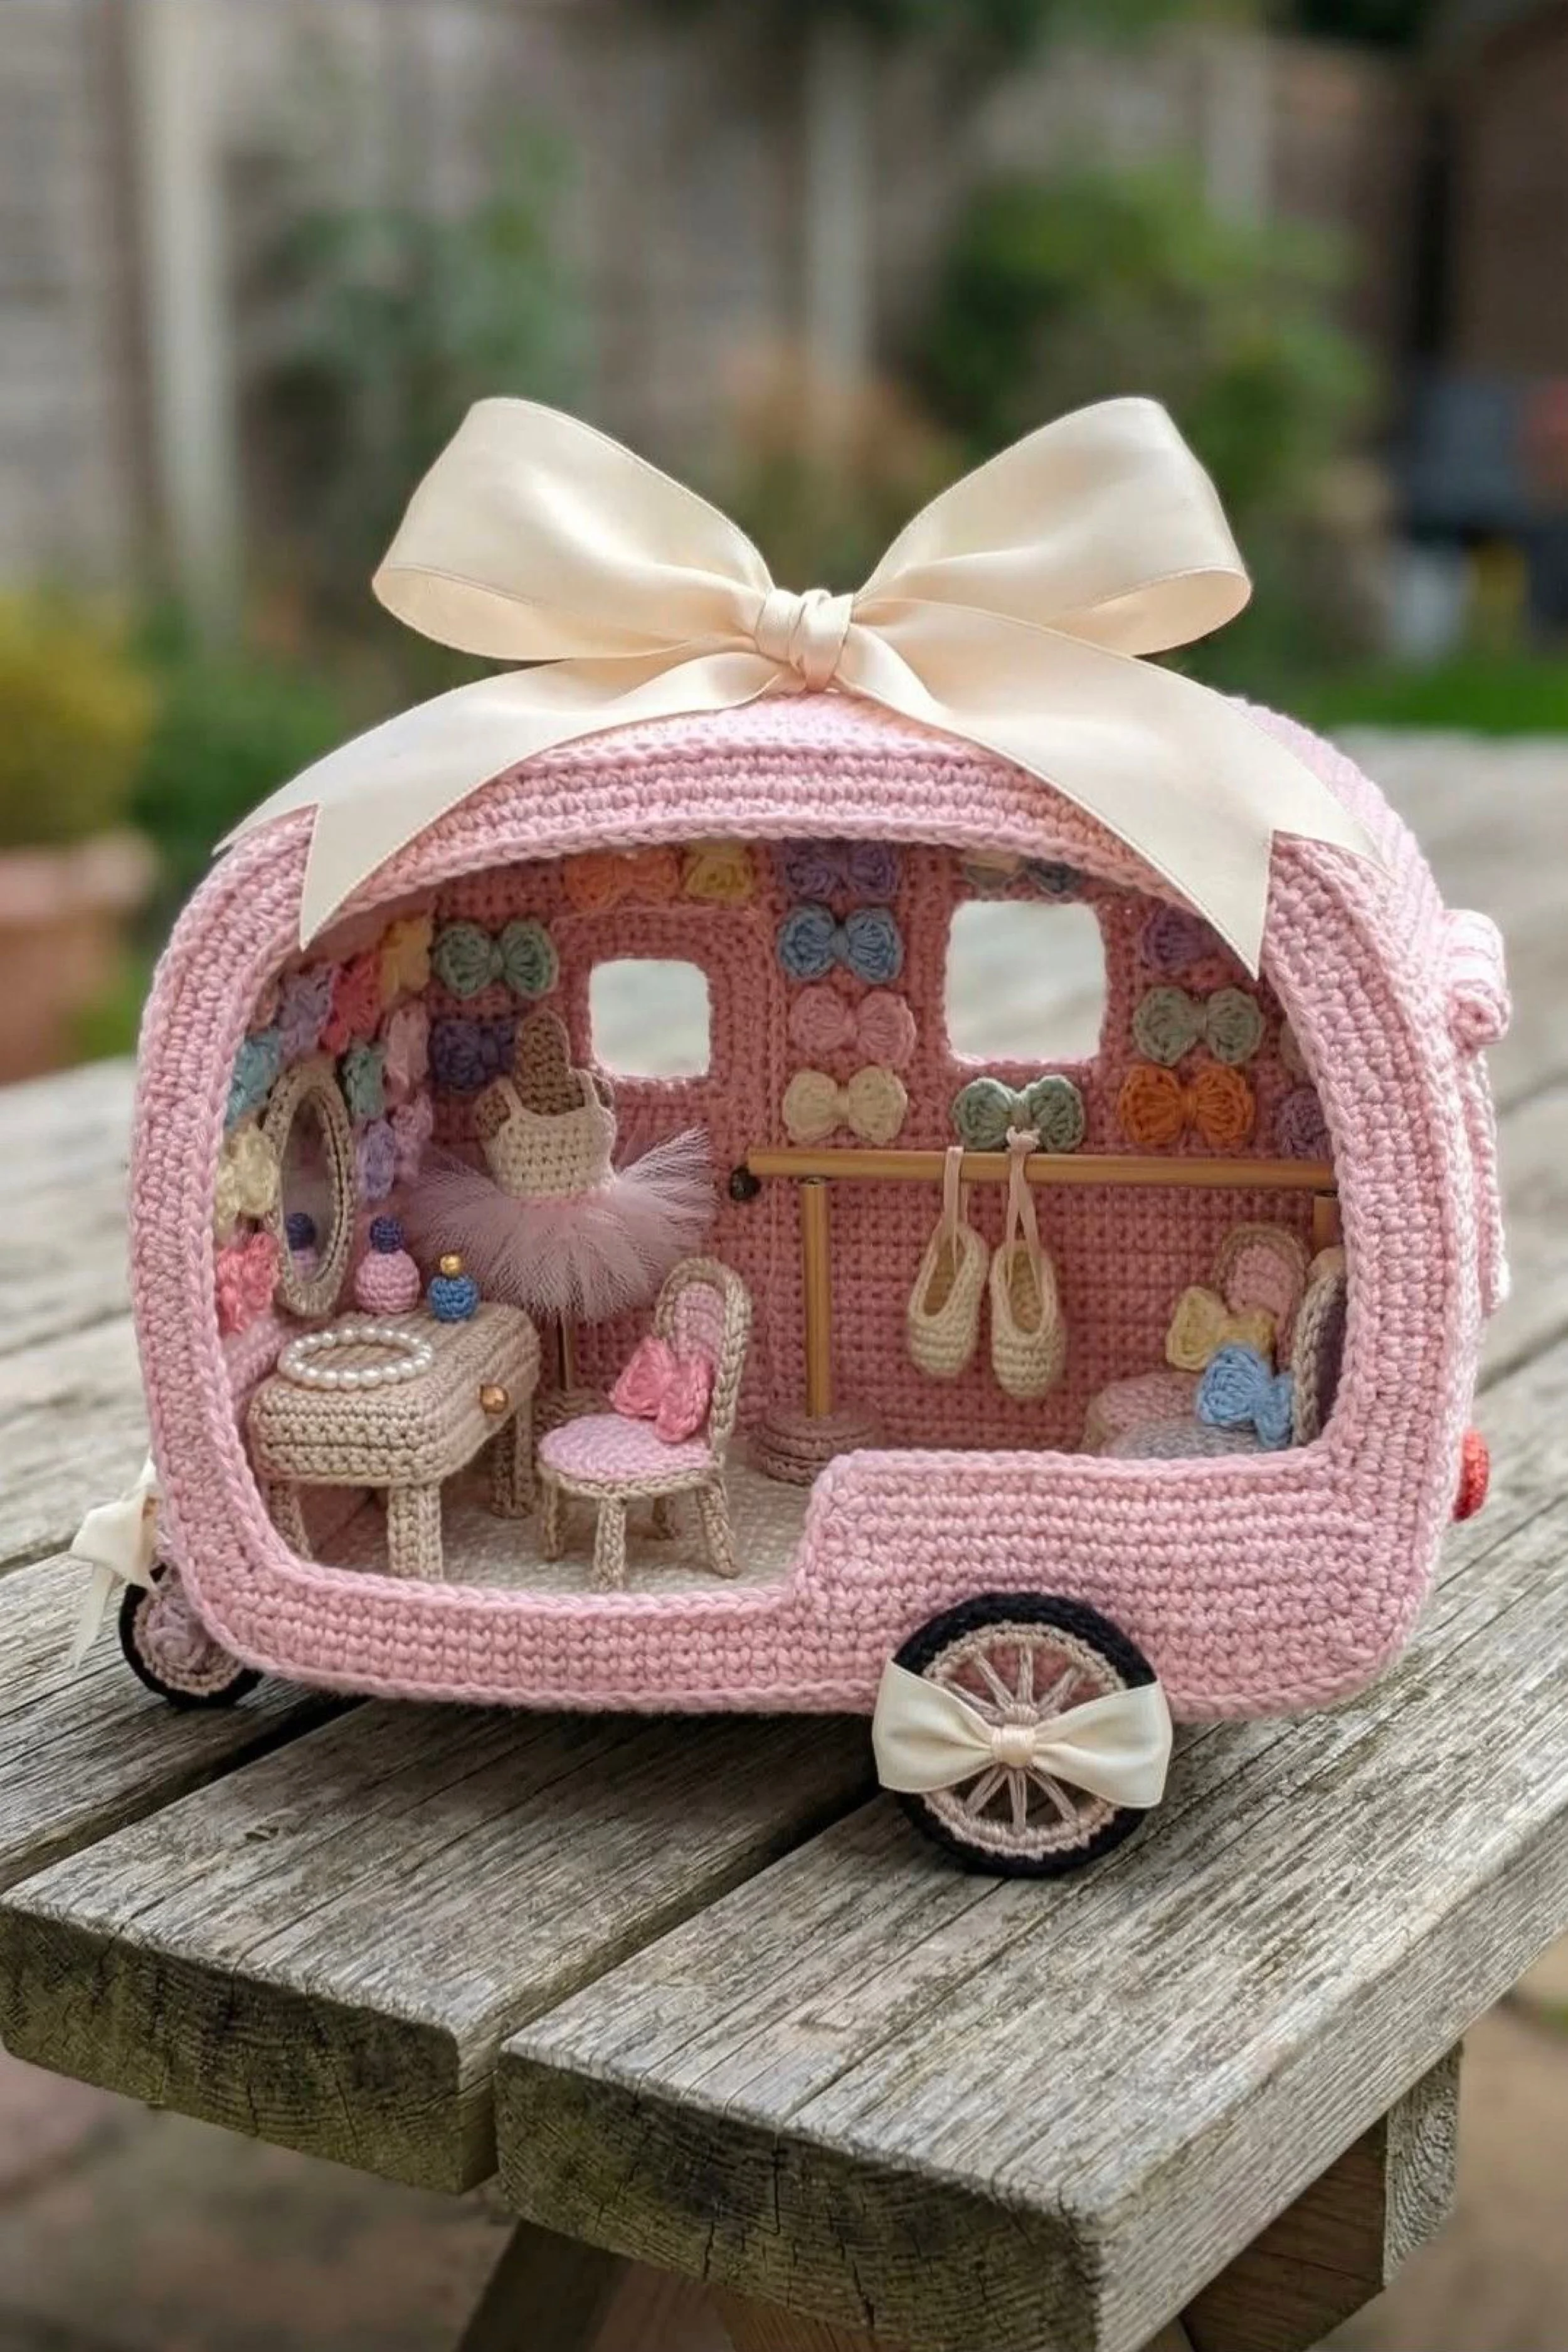
Pink Bow Boutique Caravan DIY Guide
What you’re making
You’re making a pastel pink crochet caravan styled like a tiny ballerina boutique, with bows lining the walls, a miniature vanity, a tutu display, doll shoes, a clothing rail, and oversized satin bow details on the exterior. The finished piece feels sweet, delicate, and theatrical, like a little dressing room on wheels designed for a storybook dancer.
The beauty of this project comes from soft structure and careful embellishment. The trailer shape itself is simple, but the styling does the real work, so your focus should be on clean curves, neat openings, and miniature accessories that make the interior feel finished and charming.
Materials + tools list
- Worsted weight cotton yarn in blush pink, cream, ivory, pale peach, soft lavender, powder blue, mint, butter yellow, and black
- Small amounts of tulle or fine net for the tutu
- Satin ribbon in ivory or blush for oversized bows
- Crochet hooks in 2.25 mm, 2.75 mm, and 3 mm
- Polyester stuffing
- Yarn needle
- Stitch markers
- Lightweight cardboard, plastic canvas, or craft foam
- Small dowels or bamboo skewers for clothing rails
- Tiny faux pearls or pearl beads for vanity styling
- Fabric glue or clear craft glue
- Embroidery thread for tiny details
- Miniature mirror or reflective foil backed with cardboard
- Optional magnetic snap or tie closure
Finished size + customization notes
Aim for a finished size around 10 to 13 inches long and about 8 inches tall. The key customization choice is how ornate you want the boutique to feel. For a softer nursery look, use fewer wall bows and more open space. For a maximal sweet shop look like the photo, cover the walls in neat clusters of pastel bows.
To keep the caravan elegant, stay inside a restrained palette of pink, cream, and muted pastels. If the piece starts to feel too busy, remove one color rather than adding more neutrals.
Step-by-step instructions
Start by mapping the caravan opening.
This version has a large side opening rather than double doors, so sketch the silhouette with a deep rounded roof and a big window like cutout side. Mark where the vanity will sit, where the clothing rail will go, and where the little bench or bed platform belongs. You should now see the boutique layout before you ever pick up your hook.Crochet the floor base.
Use cream or pale beige yarn for the base so the interior furniture stands out. Work a tight rectangle in single crochet. Add a second identical layer if you plan to insert cardboard. Because this caravan is highly decorative, a firm base will keep all those delicate accessories from looking droopy later.Make the pink caravan side walls.
Crochet two side panels in blush pink. One side can stay more solid, while the display side needs a large open cutout. Shape the roofline into a soft rounded curve. Keep your stitch tension even because pastel cotton shows irregularity more than darker yarn does. If your opening edges wobble, work a border round immediately to stabilize them.Work the roof panel.
Crochet a long curved roof section in pink. The top should arch smoothly without becoming boxy. Use simple single crochet rows and occasionally check the fit against the side panels. If you want the same polished look as the photo, line the interior with structural canvas and slightly stretch the outer crochet over it before sewing.Build and join the shell.
Stitch the side walls to the base, then add the roof and front and back panels. Leave the main side opening clean and symmetrical. A good checkpoint here is whether the caravan already feels charming even before accessories. If the shape alone does not feel sweet and balanced, correct it now.Add the exterior bow statement.
The oversized bow on top makes this piece instantly recognizable. You have two safe options. You can use real satin ribbon tied into a firm bow and stitched to the roof, or crochet a large bow from pink or ivory yarn and wrap the center tightly. For a closer match to the photo, satin ribbon gives the prettiest sheen. Attach it securely at the roof center.Crochet the wheels and bow wheel cap.
Make a wheel in black and cream, then add a tiny bow over the visible wheel center. This is a small detail, but it helps carry the feminine boutique theme all the way through the exterior.Create the vanity table.
Crochet a small rectangular top and four narrow legs, or cover a tiny wooden frame with crochet if you want better structure. The vanity in the photo has a soft, upholstered feel, so work in cream or pale beige. Add a tiny pearl bracelet or bead strand as tabletop styling. Place a miniature bottle or two for perfume.Make the chair.
Crochet a petite chair with a rounded back and small seat cushion in blush pink. If the legs feel too floppy, use wrapped wire or wood beneath the crochet covering. The chair should look delicate, not chunky. You should now see a tiny dressing corner beginning to appear.Add the mirror.
Crochet or wrap a small oval frame in cream yarn and insert reflective foil or mirrored cardstock. Stitch it to the interior wall above the vanity. This instantly reads as a proper dressing room.Create the tutu display mannequin.
For the mannequin, crochet a slim torso in beige or cream and mount it on a tiny stand. Add a short tulle skirt in pink around the waist. This is one of the most important visual moments in the caravan, so make the tutu airy and soft. If your tulle looks stiff, use less and gather it more lightly.Install the clothing rail.
Use a dowel or bamboo skewer as the hanging bar and stitch or glue it across the right side of the caravan. Crochet miniature slippers or ballet flats and hang them from the rail with tiny loops. You can also add a couple of bow accessories or miniature dresses.Make the wall bows.
Crochet many small bows in pastel pink, lavender, mint, butter yellow, and powder blue. Each bow can be made from a tiny rectangle cinched at the center or from two miniature loops worked directly. Arrange them in a gallery style cluster around the back and side walls. The best layout looks scattered but balanced. If one area feels heavy, move a bow to an emptier section.Add a little bed or bench nook.
In the photo, the right side includes a small cushioned display area. Crochet a low rectangular bench or platform and top it with a pale cushion. Add one or two bows on top to tie it into the boutique theme.Refine the interior floor.
Keep the floor simple. A textured neutral base keeps all the pink details from competing. If you want extra polish, stitch in a tiny oval rug or add a miniature mat under the vanity.Shape the opening edge.
Work one final clean border around the large side opening. This edge needs to be smooth because it frames the whole scene. You should now see the caravan read like a tiny shop window or open stage set.Secure all accessories thoughtfully.
Decide which items stay fixed and which can remain removable. The vanity, mirror, rail, and mannequin usually work best attached permanently. Shoes, bows, and tabletop accessories can be loosely secured or left movable if this is for gentle play.Balance the composition.
Step back and look at the left and right halves. The vanity corner should feel intimate and delicate. The rail side should feel open and airy. If the left side feels too crowded, remove one tabletop accessory. If the right side feels empty, add another pair of tiny shoes or one more bow cluster.Add finishing ribbon accents.
Tiny ribbon knots or bow accents at the rear, hitch, or window corners can beautifully echo the top bow. Do not overdo this. Two or three extra ribbon moments are enough.Final presentation check.
Compare the entire silhouette to the photo. The caravan should feel soft, feminine, curved, and polished. If yours looks wider than the photo, reduce the depth of the roof curve and keep the opening tall. If it feels too plain, the answer is usually more miniature bows, not larger furniture.
Troubleshooting
My caravan shape looks saggy
Use internal structure in the base and roof. Cotton yarn with a smaller hook size will also give firmer walls.
The satin bow keeps slipping
Wrap the ribbon center tightly and stitch through the knot several times into the caravan roof. A dot of fabric glue under the center wrap can help.
My wall bows look bulky
Use finer yarn or a smaller hook. Tiny bows should sit close to the wall, not protrude heavily.
The interior feels cluttered
Choose one focal point per zone. On the left, let the vanity and tutu speak. On the right, let the rail and shoes speak.
My miniature chair will not stand
Insert wire or a wooden inner support into the legs before closing the crochet.
Finishing details
Weave in ends carefully and keep the inside just as tidy as the outside, because the open design shows everything. A touch of spray starch on crocheted bows can help them hold crisp loops. If this is a decorative piece, lightly tack the caravan to a wooden display base or tray for stability. Optional upgrades include a tiny string of pearl garland across one wall, a mini hatbox, a tutu bag, or a name plaque above the opening.
For a truly heirloom finish, line the vanity stool and bench with tiny bits of velvet ribbon or felt. You can also add sheer curtains to the windows for an even softer boutique mood.
Shop Similar
- Blush cotton yarn for miniature boutique crochet projects
- Fine tulle for tiny ballerina skirt details
- Satin ribbon for oversized bow embellishments
- Mini crochet hook set for detailed dollhouse accessories
- Pearl beads for vanity and miniature dressing room accents
Style It With
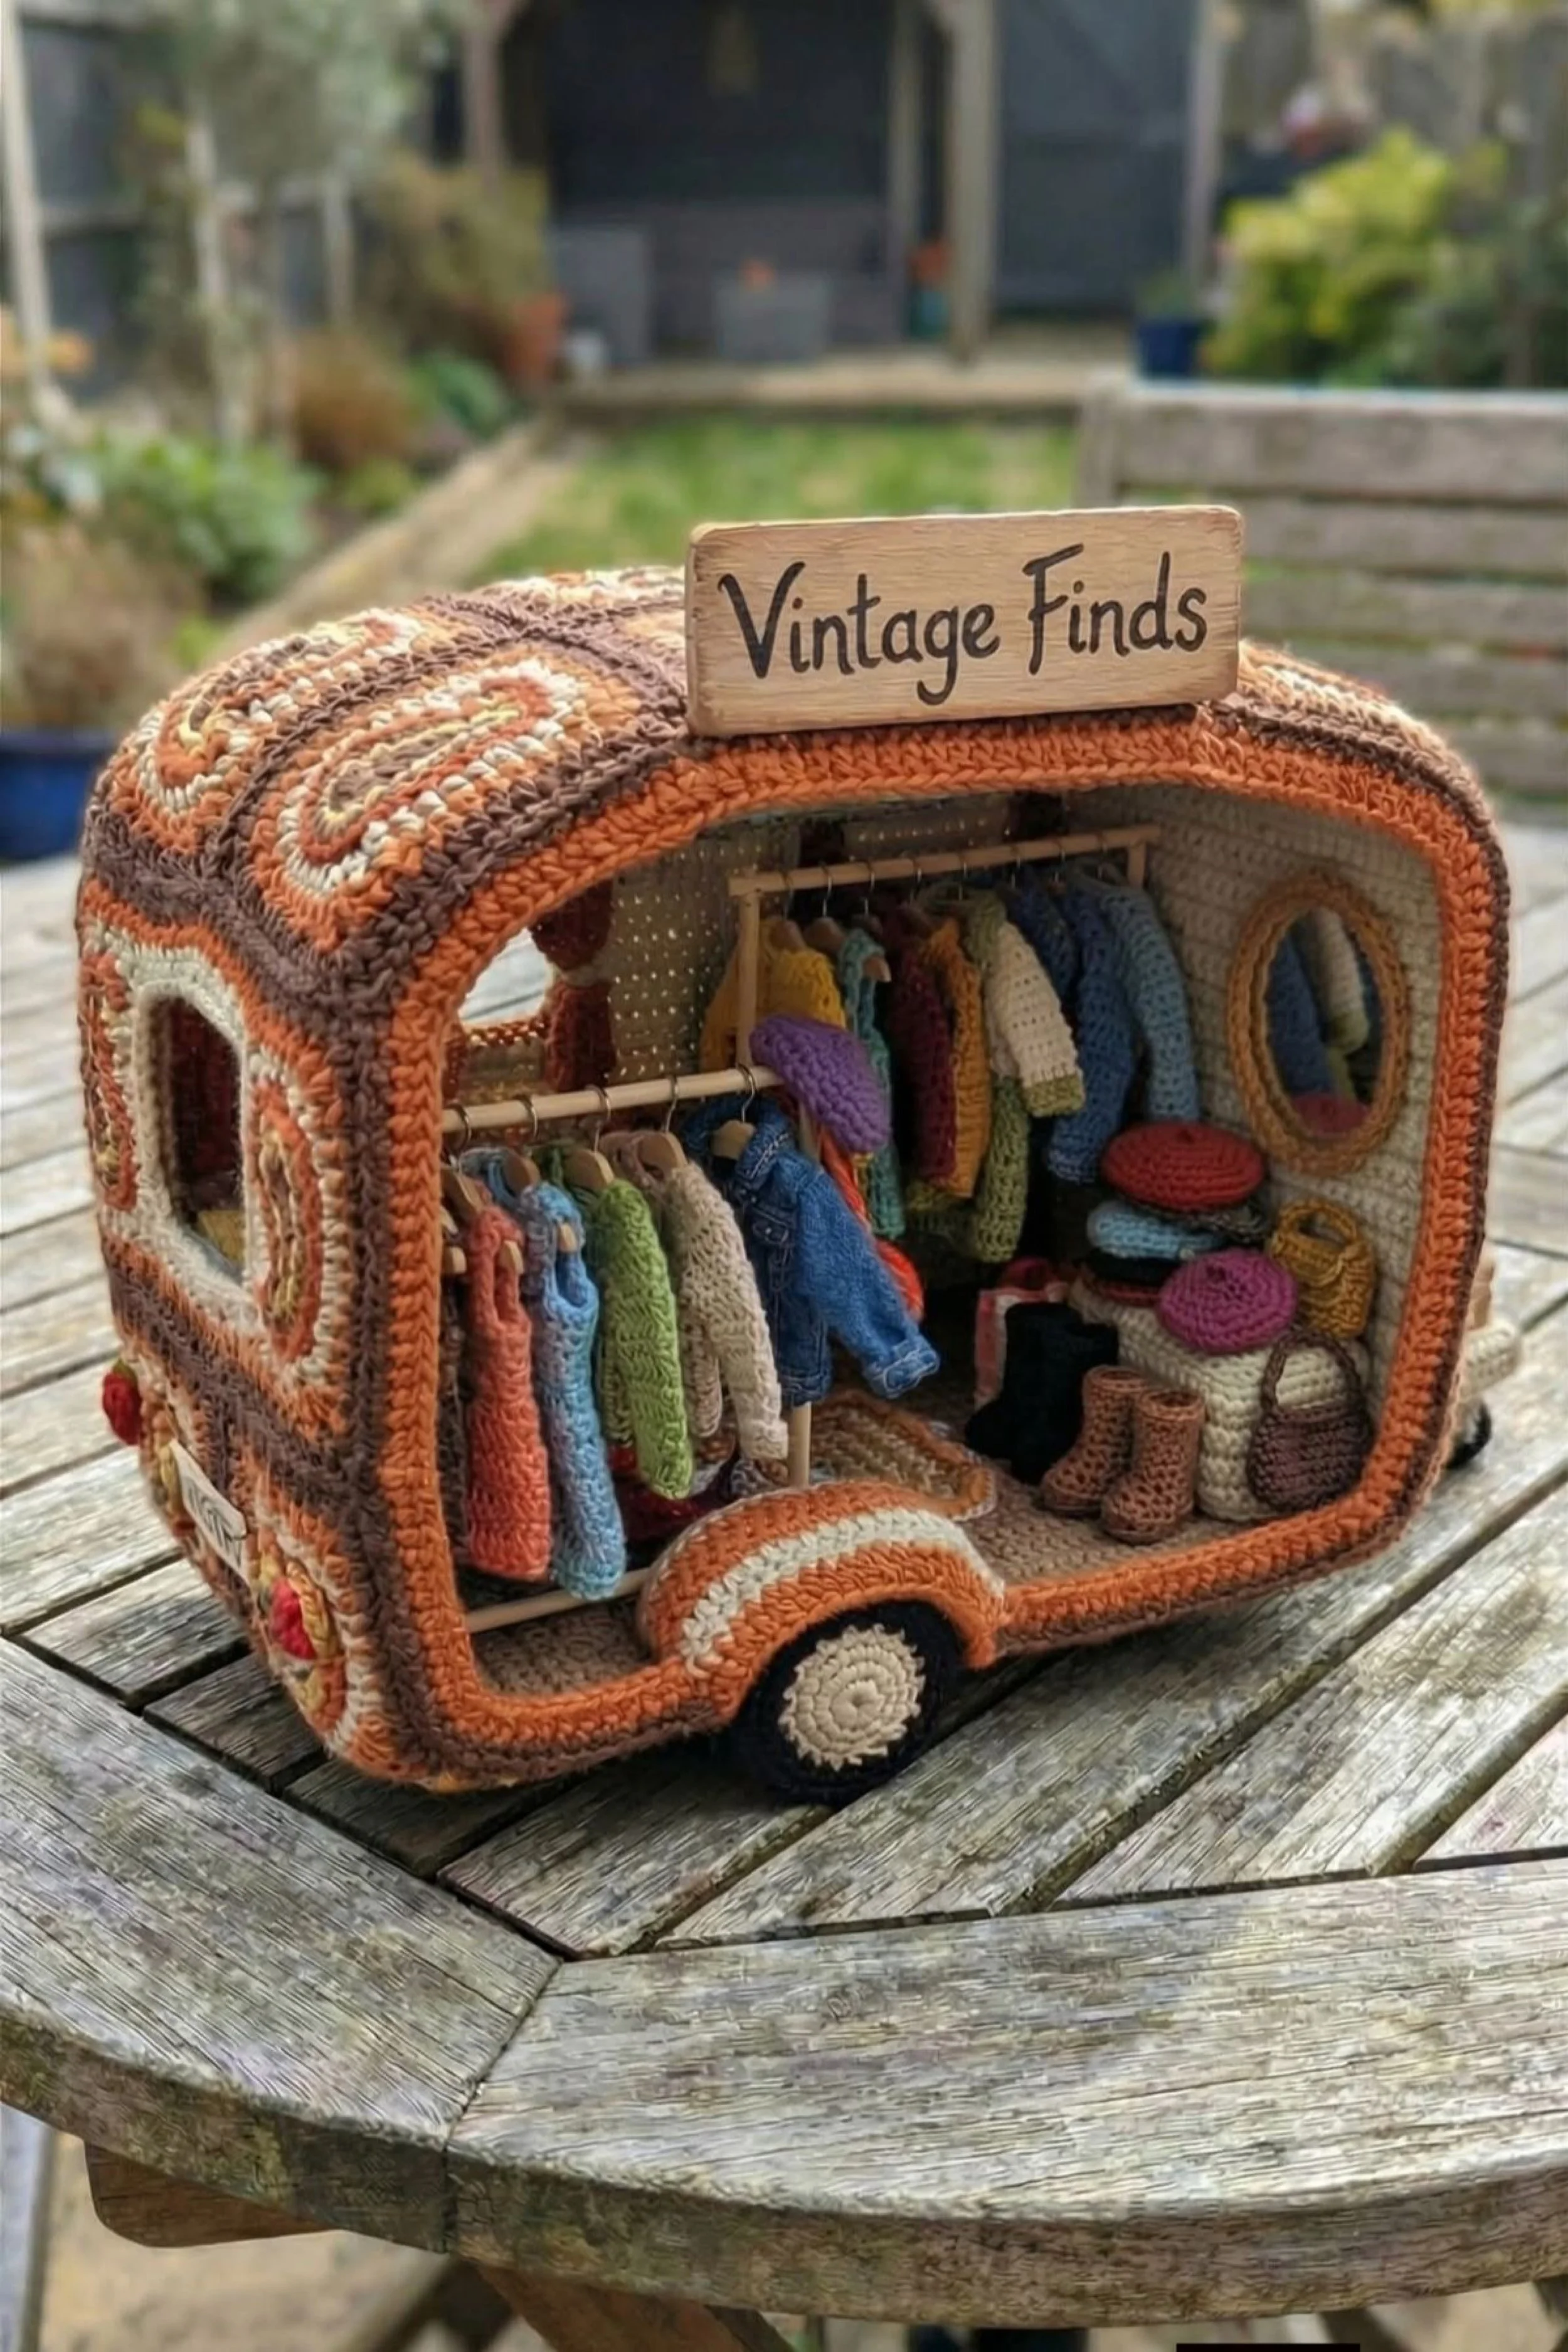
Vintage Finds Crochet Caravan How-To Guide
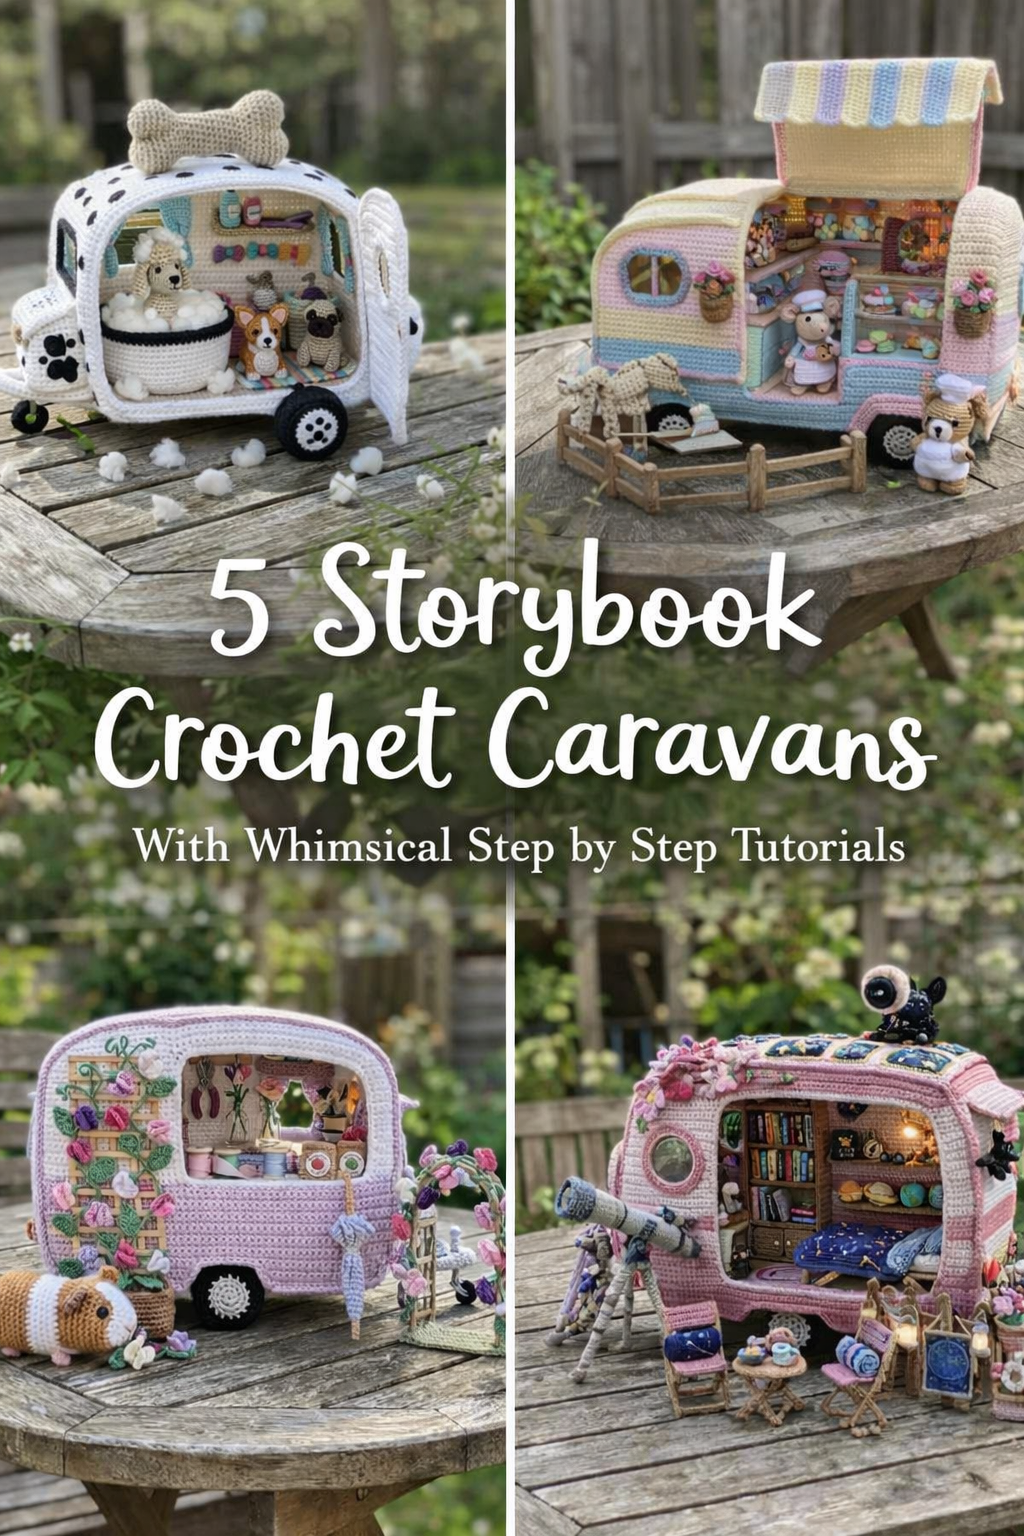
What you’re making
You’re making a retro inspired crochet caravan turned into a miniature vintage clothing boutique, complete with garment racks, tiny sweaters and dresses, boots, handbags, mirrors, stools, and a handmade shop sign on top. The finished look is warm, earthy, and delightfully nostalgic, with seventies style stripes and a cozy market stall feeling.
This piece is all about color placement and miniature merchandising. The caravan shell gives you the structure, but the clothing, racks, and tiny accessories are what make it instantly readable as a vintage shop. Work slowly, keep the scale consistent, and let each little detail feel curated.
Materials + tools list
- Worsted weight cotton yarn in rust, terracotta, caramel, cream, beige, chocolate brown, mustard, denim blue, olive, sage, plum, and black
- Crochet hooks in 2.25 mm, 2.75 mm, and 3 mm
- Yarn needle
- Stitch markers
- Polyester stuffing
- Plastic canvas, cardboard, or thin craft foam for structure
- Wooden dowels, skewers, or floral wire for garment racks
- Tiny jump rings or thread loops for hangers
- Embroidery thread for sign lettering
- Small wood rectangle or craft stick plaque for the sign
- Fabric glue or craft glue
- Optional tiny snaps or ties for closures
- Mini mirror insert or foil backed card
Finished size + customization notes
A finished size of about 11 to 14 inches wide works beautifully for this design. The most important customization choice is your stripe palette. To echo the image, stay inside warm vintage tones such as rust, cream, brown, and muted orange. You can go more boho with olive and mustard, or more cottage vintage with dusty rose and oatmeal.
If you want more clothing inside, slightly widen the caravan and use two garment rails. If you want a cleaner display piece, keep one main rack and reduce accessory clutter.
Step-by-step instructions
Sketch the shop layout first.
This caravan has an open side display and a shop sign on top, so map the silhouette and interior zones before starting. Plan one large clothing rack along the left, a second rack toward the back, and a right side display area for shoes, hats, or bags. You should now see a miniature boutique floor plan rather than just a trailer shape.Crochet the sturdy base.
Work a rectangular or slightly rounded base in beige or taupe single crochet. Keep the stitches tight. This caravan carries a lot of hanging detail, so the base needs to feel firm and flat. Add an internal layer if needed.Make the side panels with retro windows.
Crochet two side walls in cream and warm brown tones, shaping the roof into a rounded arch. Add small window cutouts on the closed side if you want to echo the photo more closely. The visible open side should have a large cutout that showcases the clothing rails.Add the striped roof and trim.
The roof is the personality of this piece. Work in rows or rounds using rust, brown, cream, and caramel stripes. You can do broad stripes or concentric curved bands depending on how you prefer to shape. The goal is a distinctly vintage caravan feel. If yours looks too modern, warm up the palette and increase the contrast between the stripes.Assemble the caravan shell.
Use structural inserts and sew the sides, base, and roof together. Add front and rear panels, then edge the opening neatly. At this stage, the caravan should already feel like a cozy retro trailer. You should now see a clean, rounded silhouette with inviting open shop frontage.Crochet the wheel and lower trim.
Make a simple black and cream wheel and sew it into place. Add a striped wheel arch trim if you want more detail. This helps connect the interior palette with the exterior.Create the rooftop sign.
Cut a small wooden plaque or crochet a rectangular base stiffened with cardboard. Embroider or paint the words “Vintage Finds” in a hand lettered style. Stitch or glue it securely to the roof center. This one detail instantly tells the story, so keep it clear and slightly rustic.Build the main garment rack.
Use a wooden dowel or wire wrapped in yarn for the top rail. Create two side supports and fix them to the caravan floor. Add a second lower rail if desired. The rack needs to look delicate but stable. If it leans, reinforce the legs with extra glue or stitch them into the floor.Make miniature hangers.
Form tiny hangers with wire or stitch thread loops onto each garment. They do not need full hanger shapes if the scale gets too fussy. A simple shoulder loop is often enough.Crochet the garments.
Make a varied collection of tiny cardigans, dresses, tops, sweaters, and jackets in earthy jewel tones. Use simple shapes: a rectangle with sleeves for a sweater, a flared lower half for a dress, narrow legs for trousers, or cropped rectangles for jackets. The key is color balance. Spread blues, greens, rusts, creams, and mauves around the rack rather than clustering all one shade together.Install a second rail or rear display.
The photo shows layered clothing storage, so add a rear rack or a shorter side rail to deepen the boutique feel. You should now see that the caravan reads like a real curated shop, not just a rack in a trailer.Make the shoe and accessory zone.
Crochet tiny boots, purses, and hats. A pair of boots can be made from very small cylinders with shaped feet and folded tops. Tiny berets or caps are just shallow circles with a little crown pinch. Arrange them on the right side near a stool or mirror.Add a mirror.
Make an oval or round framed mirror using yarn over a cardboard backing with reflective insert. Place it on the right wall. This helps the boutique feel complete and gives a dressing room hint without adding too much furniture.Crochet stools or hat stands.
A couple of little round stools in warm tones make the shop feel lived in. Keep them low so they do not visually fight with the hanging clothing.Work the floor as a subtle rug.
Add a striped or neutral floor rug inside the caravan. This can be a flat crocheted oval or rectangle stitched directly to the base. Choose muted tones so it supports the display instead of stealing attention.Shape the interior with dot or fabric lining if desired.
If you want the back wall to feel cozy, line it with a tiny polka dot fabric or work a contrasting neutral panel. This is optional, but it gives a finished shop interior feel.Refine the opening frame.
Edge the open side with a final neat border in rust or cream. This acts like a picture frame for the boutique. If the line looks wavy, steam block lightly.Style the clothing intentionally.
Do not pack every garment tightly together. Let a few pieces breathe so each color is visible. Hang longer dresses toward one side and chunkier knits toward the other. If yours looks crowded, remove three items and reposition. Miniature styling usually improves with restraint.Add tiny shop details.
Consider a folded scarf, a mini shopping basket, or a handbag placed near the stool. These extra touches should feel curated. You should now see a caravan that looks like a little market boutique parked at a vintage fair.Final comparison and balance check.
Step back and look at the warmth of the palette. The sign should be easy to read. The roof stripes should feel harmonious. The clothing colors should draw the eye inside. If the exterior steals all the attention, tone down one stripe or simplify the roof color changes.
Troubleshooting
My roof stripes look messy
Carry yarn neatly or fasten off between colors for cleaner transitions. Vintage does not mean sloppy.
The garments all look the same
Change hem length, sleeve width, and neckline shape. Even tiny differences create the illusion of a larger collection.
My clothing rack bows in the middle
Use a wooden dowel instead of yarn alone, or reinforce with wire inside.
The shop sign feels too large
Scale it back until it adds charm without blocking the roof shape. In miniatures, smaller usually looks more believable.
The palette is too loud
Choose four main shades and repeat them. Remove one bright color that feels out of place.
Finishing details
Secure hanging garments with a few hidden stitches so they stay arranged. Weave in all ends behind walls and racks. For an extra boutique look, sew a tiny curtain or fabric backing panel in the rear corner. Optional upgrades include a mini cash wrap, a folded blanket stack, tiny price tags, or a standing coat form. If this will sit on a shelf, mount it on a thin wooden base to make it feel like a collectible display.
A final light block of the caravan shell can help smooth the curves. Avoid heavy starch on the garments because you want them to keep a soft drape.
Shop Similar
- Earth tone cotton yarn bundle for retro crochet projects
- Mini wooden dowels for dollhouse clothing racks
- Fine crochet hooks for miniature garments
- Tiny craft plaques for miniature shop signs
- Neutral structural mesh for reinforcing crochet dollhouse walls
Style It With
Crochet Pottery Studio Caravan Make-It-Yourself Tutorial
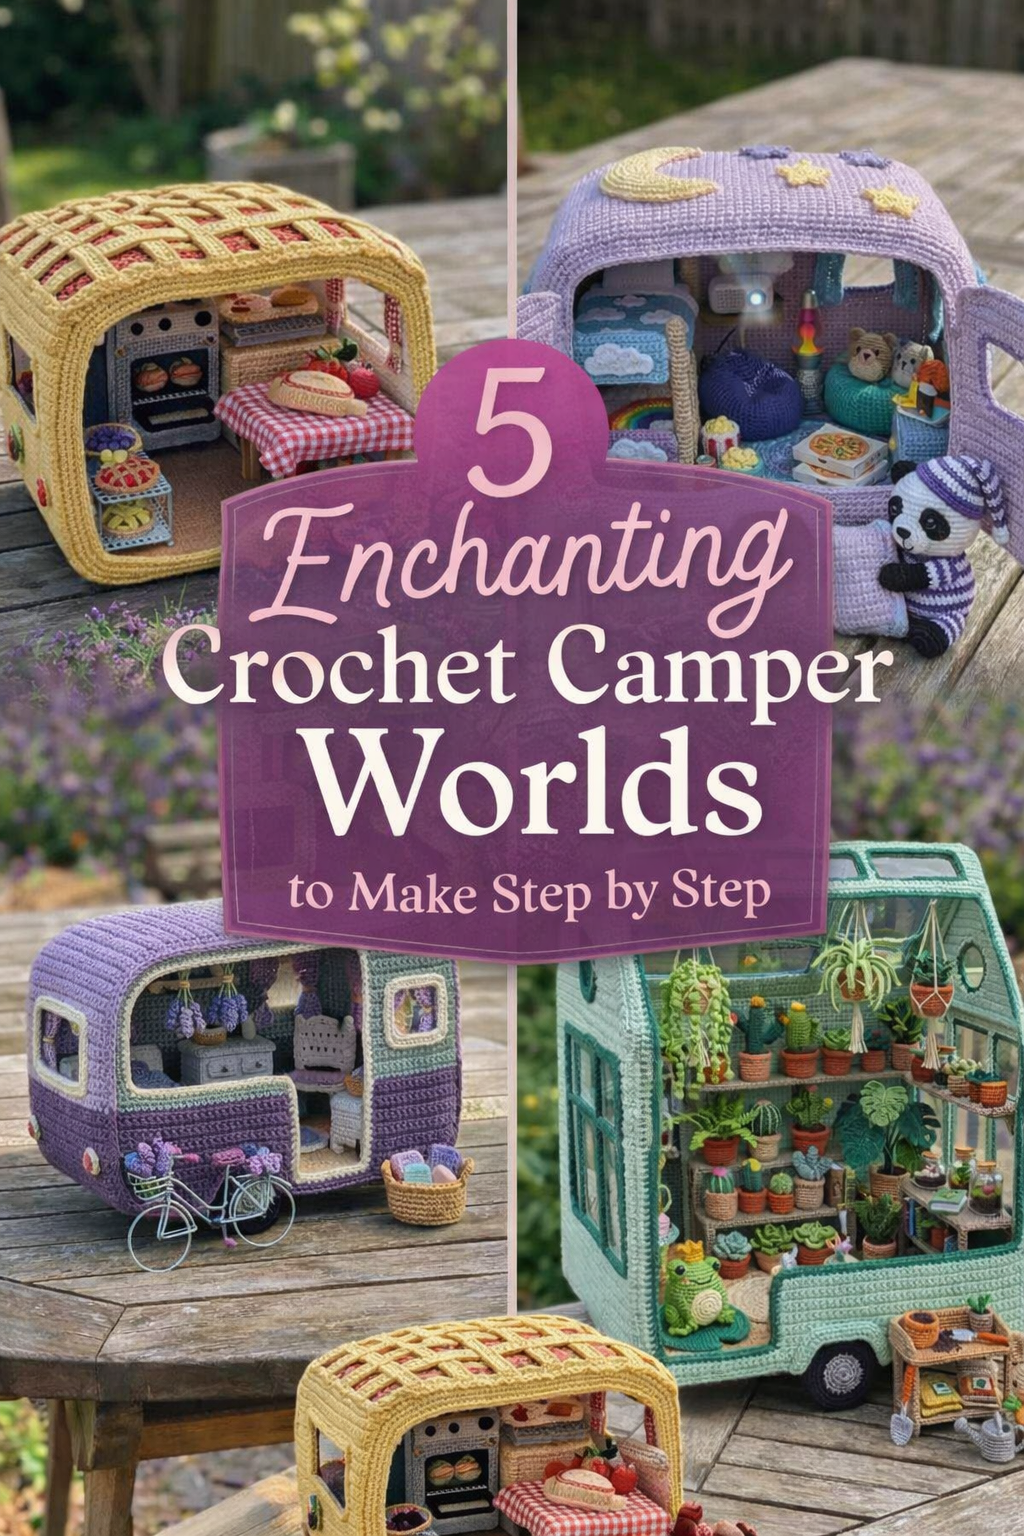
What you’re making
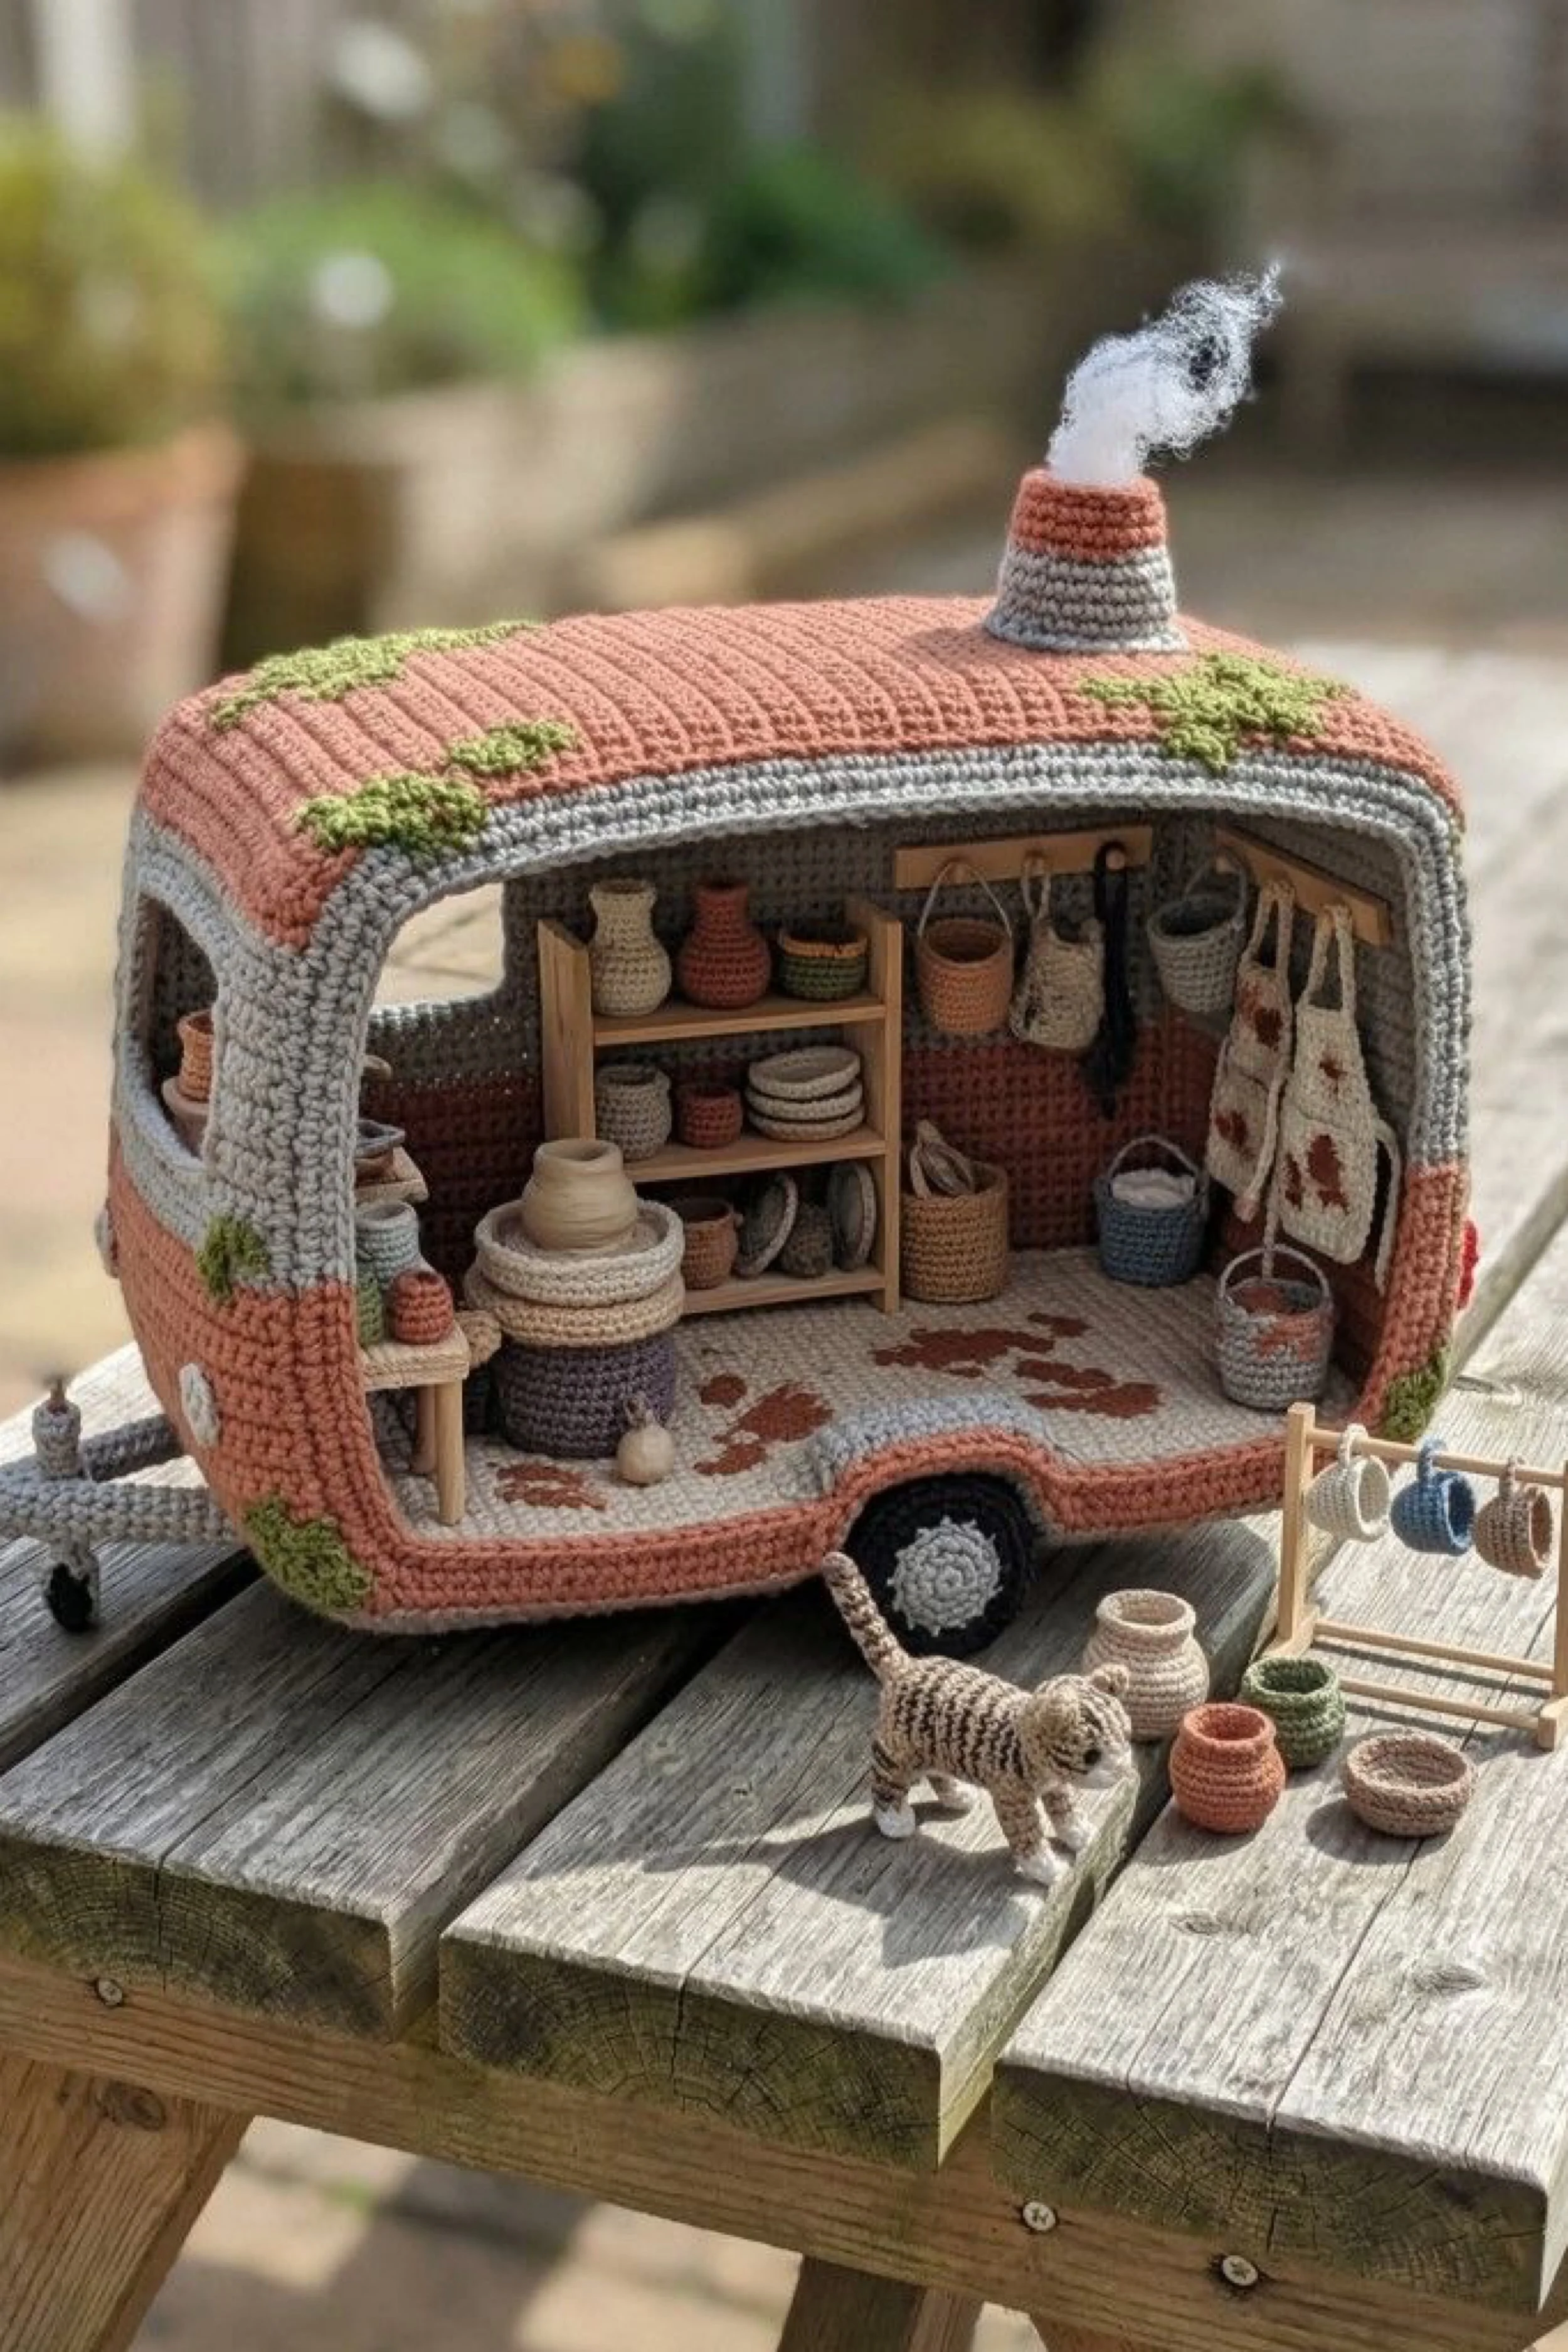
This project recreates a charming crochet miniature caravan that feels like a tiny traveling pottery studio parked in the morning sun. The look is soft, earthy, and handmade, with a rounded caravan shell, open side display, tiny shelves, hanging totes, miniature vessels, and even a little striped cat companion to bring the whole scene to life.
The overall effect comes from combining sturdy structural crochet with simple wooden details and carefully chosen miniature props. You are not just making a toy caravan here. You are building a styled scene with storybook warmth, mossy accents, cozy studio charm, and the visual texture that makes the photo feel so irresistible.
Materials + tools list
- DK cotton yarn in dusty terracotta, stone gray, cream, taupe, olive green, muted brown, and soft blue
- Optional worsted cotton if you want a slightly chunkier result
- Crochet hooks in 2.5 mm, 3 mm, and 3.5 mm sizes
- Tapestry needle
- Small sharp embroidery scissors
- Stitch markers
- Polyester stuffing
- Plastic canvas, thin chipboard, or lightweight foam board for hidden structure
- Craft glue suitable for wood and textile use
- Thin wooden dowels or bamboo skewers for shelves and hanging rails
- Tiny wood strips, coffee stirrers, or basswood for shelving
- Black and cream felt or crochet circles for wheel centers
- Pipe cleaner or floral wire for the tow bar if you want it poseable
- Brown embroidery thread for surface details
- Small amount of white toy stuffing for chimney smoke
- Beads or tiny dots of black thread for optional eyes on the cat
- Cardboard template paper
- Measuring tape or ruler
- Straight pins or clips
- Optional fabric stiffener
- Optional sewing thread in matching colors
- Optional magnetic snaps or ties if you want a removable panel
Finished size + customization notes
A good finished size for this look is about 10 to 14 inches long, 7 to 9 inches tall, and 6 to 8 inches deep. That scale gives you enough room for shelves, pots, hanging aprons, and floor accessories without making the caravan too flimsy.
To customize the size, increase the base oval and add more rows to the wall panels before shaping the roof. If yours looks taller than the photo, reduce roof rows and use a slightly smaller hook. If yours looks wider and softer than the photo, switch to a firmer cotton yarn and add internal plastic canvas to the side walls and roof.
Step by step instructions
1. Study the silhouette before you start
Look closely at the photo and notice the main shape. The caravan is rounded and slightly boxy, with a curved roofline, a large open display side, a tiny wheel arch cutout, and a neat little tow bar. The visual charm comes from the proportions. The caravan is not too long, not too tall, and not overly detailed on the outside. Most of the personality lives inside.
Sketch a simple side profile on paper first. Mark the base, wheel arch, roof curve, open side, and tow hitch. This little template will save you time later and help you keep both sides symmetrical.
Visual checkpoint: You should now have a side drawing that already resembles the caravan in the photo, with a gentle roof curve rather than a sharp camper angle.
2. Crochet the base floor
Start with stone, taupe, or cream yarn. Make an oval or rounded rectangle base using single crochet worked in continuous rounds. The goal is a sturdy floor about as long as the final caravan body.
Work tightly. Cotton yarn is ideal because it holds shape. Add rows until the base is flat and firm. If it begins to ripple, you have too many increases. If it cups upward, add one or two more increases around the corners.
When the size is right, make a second identical floor piece and sandwich a layer of plastic canvas or thin board between them. Slip stitch or sew around the edges to create a stiff floor platform.
Visual checkpoint: The base should feel more like a lightweight tray than a floppy crochet mat.
3. Build the two side wall panels
Use your paper template to guide the shape. Crochet two identical side panels in terracotta and gray stripes or in a stone and terracotta combination like the original. Work mostly in single crochet rows so the stitches stay dense and architectural.
Shape the rounded roof by decreasing gently at the upper corners. Create the window openings by chaining across a gap and continuing the next row. On one panel, leave a very large central opening to form the studio display side. On the other panel, keep smaller window cutouts.
Cut matching support pieces from plastic canvas or thin board and tack them to the backs of the panels using a few hand stitches or dots of glue.
Visual checkpoint: Both side panels should stand upright when propped, and the window openings should look neat and intentional rather than stretched.
4. Make the front and back curved sections
Crochet the front and back panels separately. These are rounded rectangles that connect the two side walls and complete the caravan shell. One end can stay simpler, while the other can include a small rear window if you want to match the handmade caravan look.
Test fit these pieces against the side walls before joining. Do not permanently attach them until you are happy with the proportions.
Tip: Slightly smaller end panels create a pleasing tucked shape and help the roof look more rounded. If yours feels bulky, remove one row from each end piece.
5. Join the shell
Sew or slip stitch the side walls to the base first. Then attach the front and back panels. Once the basic shell is assembled, add the roof by crocheting a large curved rectangle in terracotta with a narrow gray stripe if desired.
Slide plastic canvas into the roof section before closing it. Sew the roof firmly to the top edges of the shell, stretching slightly if needed so it sits smooth. Add the olive green mossy appliqué patches last. These are small freeform crochet blobs stitched on top for that weathered cottage look.
Visual checkpoint: You should now see the full caravan form, open on one side, with a soft rounded roof and a stable body that can sit on the table without sagging.
6. Create the wheel, wheel arch, and tow bar
Crochet two flat wheels in dark gray, black, and cream. Keep them simple spirals with a light center hub. Attach them low on the body. The wheel in the photo is mostly decorative, so it does not need to spin unless you want it to.
For the wheel arch, shape the side panel opening before assembly or crochet a separate curved trim piece to outline it. This little trim gives the caravan its polished miniature look.
Make the tow bar using tightly crocheted cords wrapped around wire or pipe cleaner. Cover the hitch end with matching yarn for a seamless finish.
7. Add the floor covering and inner wall lining
The interior needs to feel finished. Crochet or sew in a simple flat floor panel in cream or pale gray. Then line the inner walls with matching crochet fabric or leave the structured backing covered by your wall panel stitches.
This is the moment to decide shelf placement. Before decorating, mark where each shelf upright and rod will go.
Tip: A few dots of glue are fine for interior wood pieces, but test placement first. Once the shelves go in, the scene starts looking busy quickly.
8. Build the shelves and miniature display furniture
Use wood strips, coffee stirrers, or tiny dowels to make the shelf unit at the back of the studio. The photo shows a simple practical shelving system holding pots and bowls. That clean layout is what sells the handmade pottery studio feel.
Make one central shelf unit with three or four levels. Sand or trim the wood if needed, then glue it together outside the caravan first. Once dry, insert it into the back left area.
Add one hanging rail across the upper right side using a dowel. This rail is perfect for tiny crochet totes, aprons, or mugs with hanging loops.
Visual checkpoint: You should now see the interior divided into a back storage wall and a front working space, just like a real mini pop up studio.
9. Crochet the miniature pottery pieces
This step is where the scene comes alive. Make tiny vessels in muted earth tones. Use single crochet in spirals for all of them. Start with a magic ring, increase for the base, then work even rows and decrease or flare as needed.
Create a mix of:
- little bowls
- squat jars
- pitchers
- mini vases
- hanging totes
- stacked dishes
- market style baskets
Keep each shape very small and simple. The success comes from variety of height and tone, not from complex stitch work.
Stuff only the taller pots lightly if needed. Flat bowls can be left unstuffed and lightly shaped by hand.
Tip: Make more than you think you need. Tiny scenes always look better with layering and extras.
10. Add the chimney and smoke
Crochet a short striped cylinder for the chimney. Sew it to the roof near the front third of the caravan. Add a small wad of teased polyester stuffing to mimic a puff of smoke. Use only a tiny amount so it looks whimsical, not messy.
If you want a sturdier smoke shape, twist a bit of stuffing around thin wire and anchor it inside the chimney.
Visual checkpoint: The chimney should read immediately as a cozy studio detail, adding height and story without dominating the roof.
11. Make the tiny cat
The striped cat in front is adorable and simple enough for even intermediate amigurumi makers. Crochet a small body tube, a rounded head, four slim legs, a tail, and tiny ears in tan, cream, and brown stripes. Keep the face minimal. A suggestion of eyes is enough.
Position the cat near the front corner with one paw forward so it feels mid step, just like the photo.
If your cat looks too large, reduce hook size before changing the pattern. Tiny amigurumi almost always improves with tighter stitching rather than fewer details.
12. Style the floor props
Crochet or build a small drying rack or mug rail for the exterior, plus several bowls and pots scattered in front of the caravan. This makes the scene feel active and lived in, not like a sealed dollhouse.
Add a few pieces inside on the floor as well. The photo has an easy, casual arrangement, not a perfect showroom layout. Let one or two items tilt slightly for realism.
13. Surface embellishment for the rustic finish
Use olive yarn to add mossy patches. Embroider little worn marks or decorative spots in brown on the interior floor. You can also add tiny wall loops, peg hooks, or a little apron hanging from the rail.
If you want the caravan to look even more vintage, lightly brush some diluted fabric paint or pastel chalk on a few spots to soften the colors. Keep it subtle.
14. Final assembly and balance test
Place everything inside the caravan and check balance. If the caravan tips backward, hide a coin or washer beneath the front floor. If it leans, reinforce the side wall from within using another strip of plastic canvas.
Visual checkpoint: You should now see a complete crochet pottery caravan with a rounded shell, open studio side, cozy shelves, tiny vessels, a puff of smoke, and a cat that makes the whole setup feel like a story.
Troubleshooting section
My caravan is collapsing inward
Your yarn may be too soft or your hook too large. Switch to cotton and add plastic canvas to the roof, floor, and side walls.
My open side stretched out of shape
Reinforce the opening with a round of slip stitches or crab stitch. You can also sew a hidden wire around the inside edge.
My miniature pots look lumpy
Use tighter tension and fewer rounds. Tiny objects read better when the shapes are clean and simple.
My shelves do not fit
Always dry fit before gluing. Trim wood pieces a little at a time rather than trying to force them in.
The color palette looks too bright
Choose dusty, muted shades instead of vivid primary colors. This project needs soft earthy warmth to match the photo.
Finishing details section
Once everything is assembled, steam block only the removable crochet pieces lightly. Do not soak the finished caravan if it contains cardboard or plastic canvas. Weave in every end securely because loose tails will be very visible in an open sided miniature scene.
For extra structure, brush diluted fabric stiffener on the roof and side edges. Let it dry completely before styling. If you want a more polished interior, line the shelves with tiny fabric or paper shelf strips. You can also add a miniature woven rug, a tiny maker label, or a curtain tie at one window. Optional upgrades that suit this exact look include a removable side awning, extra hanging aprons, a little market sign, or a crate of fresh flowers near the hitch.
Shop Similar link section
- Dusty terracotta cotton yarn for miniature caravan crochet
- Miniature craft wood sticks and dowels for dollhouse shelves
- Plastic canvas sheets for structured crochet projects
- Amigurumi crochet hook set for tiny detail work
- Muted earth tone yarn bundle for cottagecore crochet
Style It With link section
Bow Topped Bunny Caravan Make It Yourself Tutorial
What you’re making
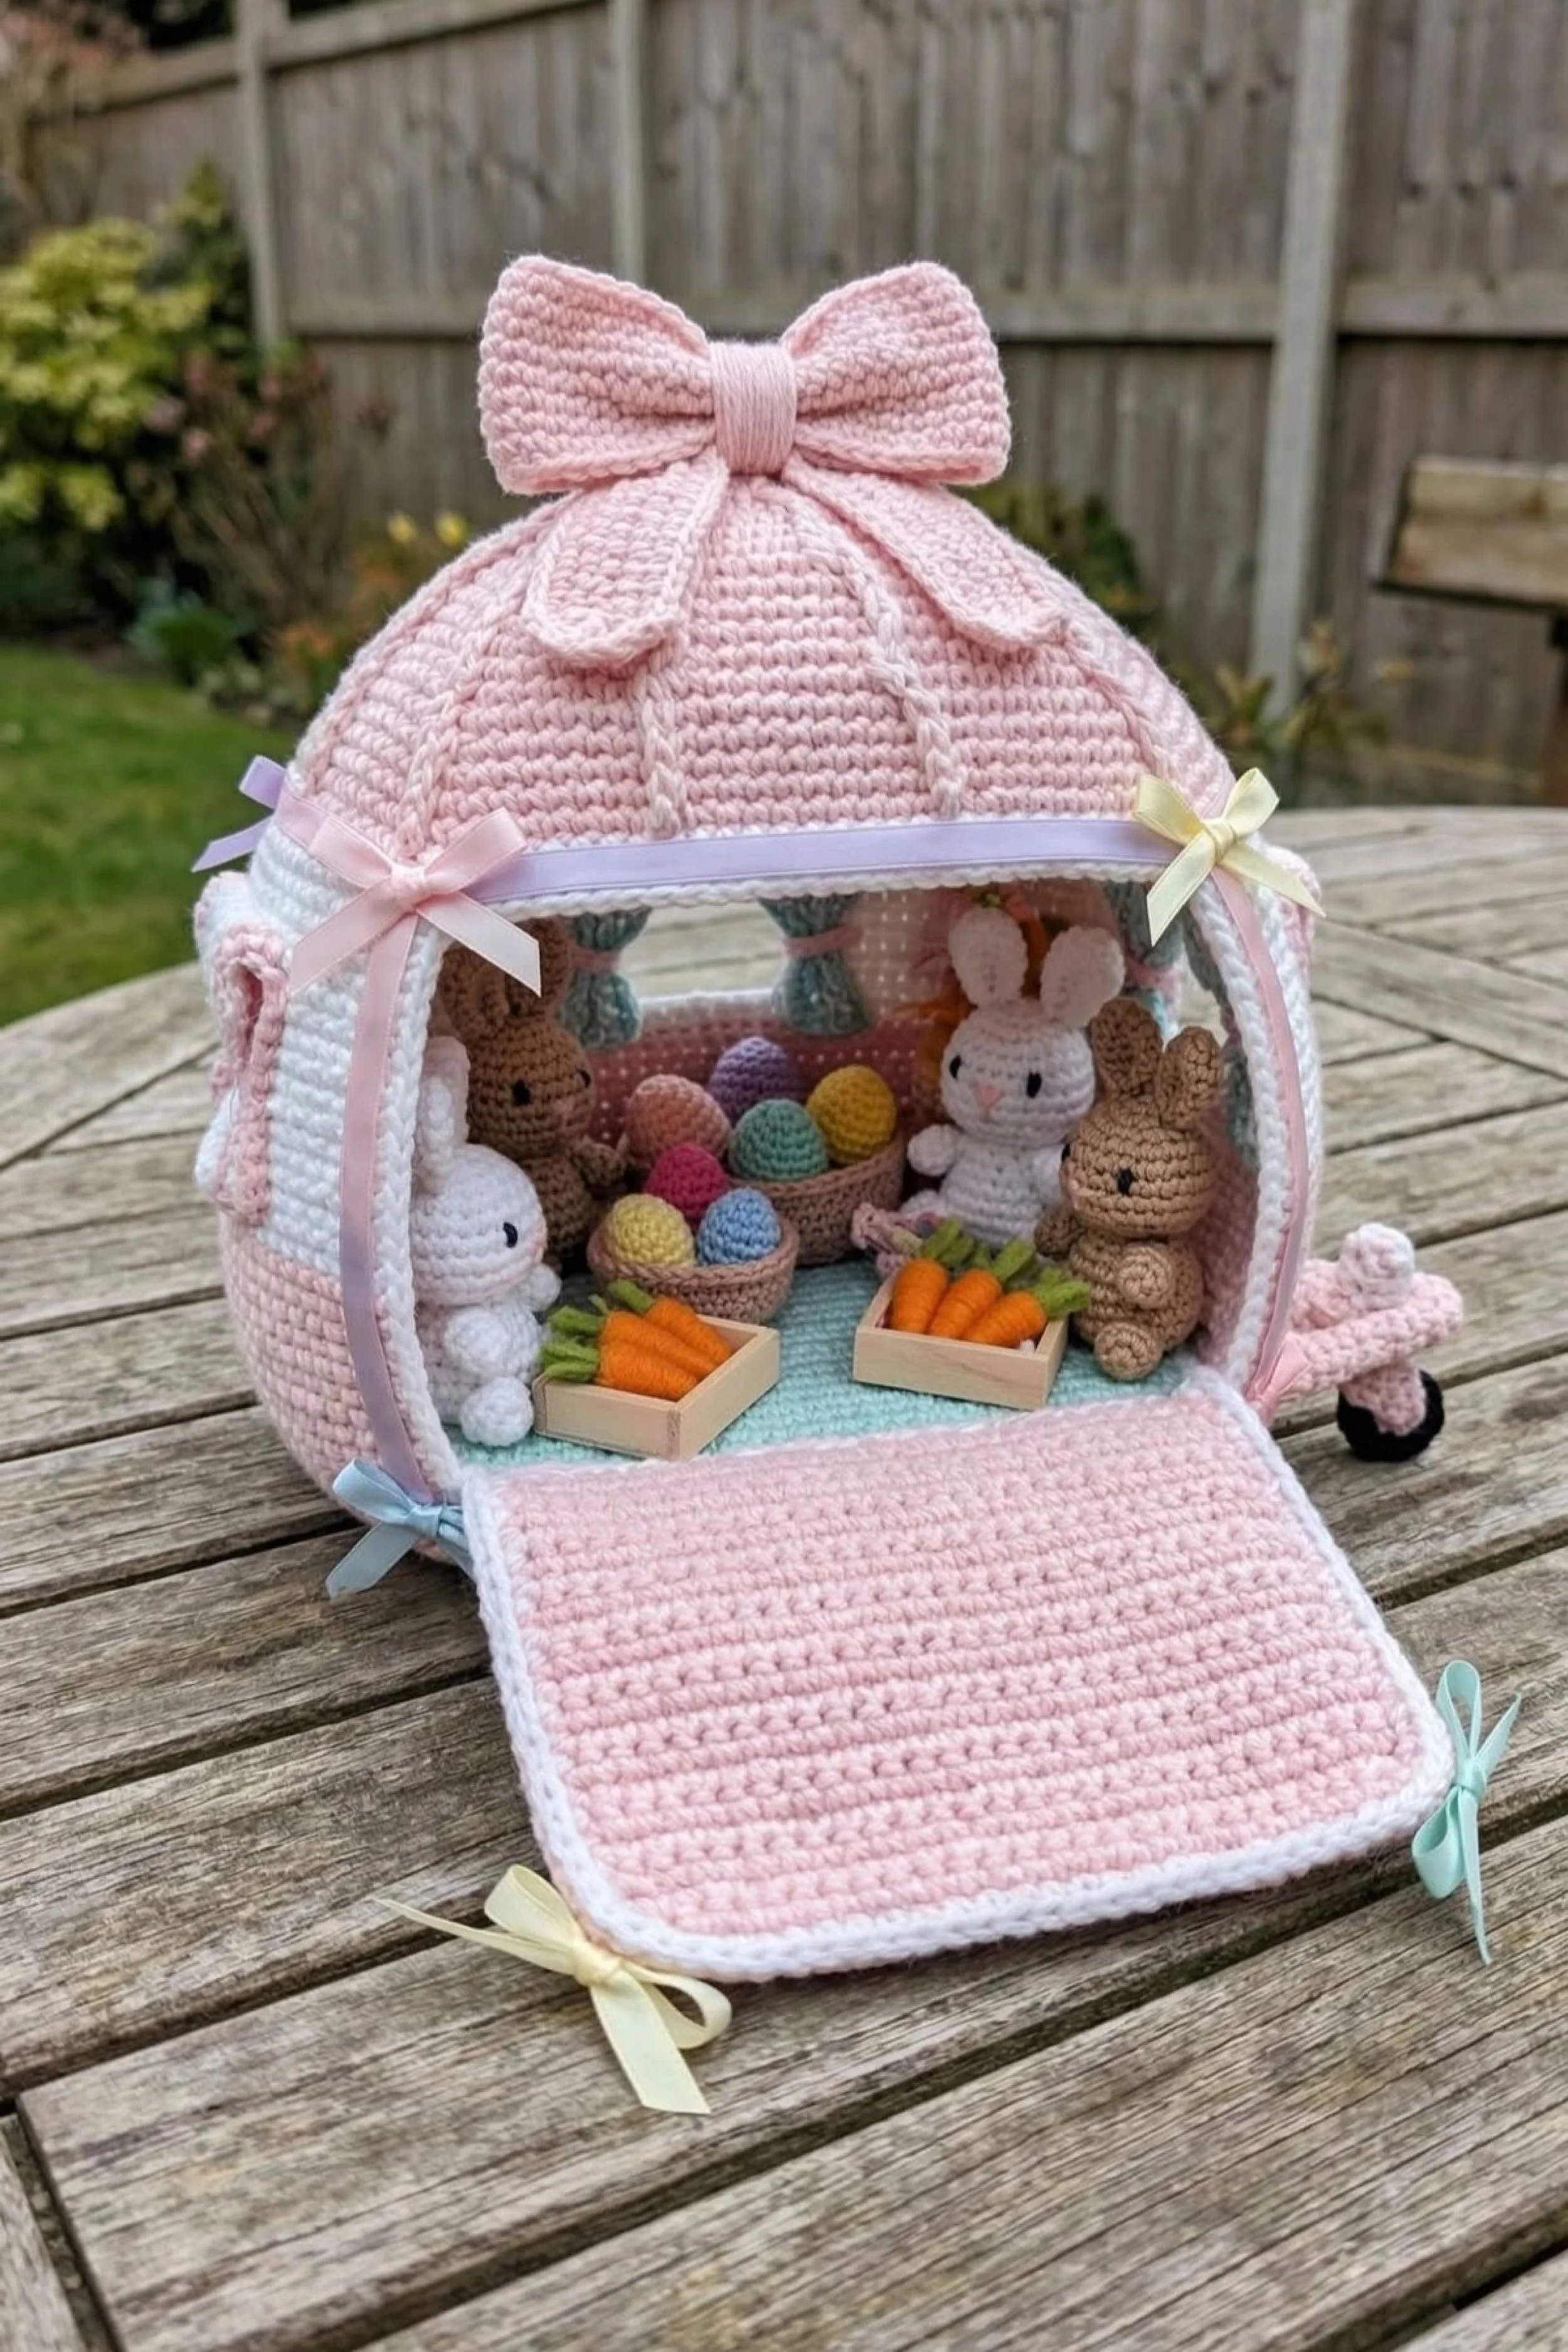
This project recreates an utterly sweet crochet bunny play caravan with a rounded pink shell, oversized bow on top, pastel ribbon trims, tiny curtains, and a fold down front panel that opens into a miniature Easter scene. Inside, little crochet bunnies gather around baskets of eggs and crates of carrots, turning the whole piece into a soft storybook display that feels part toy, part seasonal décor, and part heirloom keepsake.
The magic of this look is in the balance between structure and softness. The caravan itself must be sturdy enough to hold its rounded shape, while every decorative detail should stay delicate, pastel, and polished. Think charming nursery meets Easter village, with enough thoughtful finishing to make the scene look truly special.
Materials + tools list
- DK cotton yarn in blush pink, white, cream, pastel mint, lavender, pale yellow, sky blue, soft peach, tan, and bunny brown
- Optional light worsted cotton if you prefer slightly larger scale
- Crochet hooks in 2.5 mm, 3 mm, and 3.5 mm
- Tapestry needle
- Small embroidery scissors
- Stitch markers
- Polyester stuffing
- Thin plastic canvas, flexible craft mesh, or lightweight foam board for structure
- Pink and white sewing thread
- Craft glue for optional wood and ribbon accents
- Narrow satin ribbon in pastel shades
- Soft grosgrain or satin ribbon for the front trim
- Thin wooden rod or skewer for the tow bar
- Small black bead or black yarn for wheel detail
- Felt or crochet circles for wheel centers
- Small fabric scraps for optional curtain backing
- Tiny wooden trays or thin balsa wood to make carrot crates
- Embroidery thread for facial details
- Cardboard or paper templates
- Optional magnetic snap, ribbon ties, or hidden button loop for closing
- Optional fabric stiffener for the large top bow
Finished size + customization notes
A finished size of around 9 to 12 inches tall, 8 to 11 inches wide, and 7 to 9 inches deep works beautifully for this design. The rounded front and fold down panel need enough scale to show the tiny bunnies clearly, so do not go too tiny on your first attempt.
To make it larger, increase the base circle or oval and add more rounds before closing the shell upward. To keep the same look at a smaller size, use thinner cotton and a smaller hook rather than removing too many details. If yours looks too dome shaped, flatten the upper rounds slightly. If yours looks too wide and low, add two or three extra side rounds before shaping the top bow section.
Step by step instructions
1. Plan the structure first
Before you crochet, study the silhouette. This caravan is almost egg shaped from the front, with a rounded upper shell, a large front opening, a fold down ramp panel, tiny side windows, a tow hitch, and a huge decorative bow on top. The inside is staged like a miniature bunny room with baskets, eggs, and crates.
Draw the basic side shape and front opening on paper. Mark where the front panel folds downward. Also note where the ribbon trim and side bows sit. This piece depends on symmetry, so templates help a lot.
Visual checkpoint: You should now have a paper outline that already suggests a soft pastel caravan with a nursery like feel.
2. Crochet the base floor
Use pale pink yarn and work a flat oval or rounded rectangle in tight single crochet. Keep the stitches dense so the floor can support the bunny figures and baskets. Make the floor slightly deeper than you think, because the interior props need room.
Create a second matching floor piece and trap plastic canvas or foam board between the two layers. Stitch around the edge to seal them together. This gives you a rigid platform without making the caravan look bulky.
Tip: Cotton yarn is best here because it keeps the edges crisp and prevents the base from warping.
3. Make the side walls and rounded shell sections
This caravan shell can be built in two main ways. You can crochet separate shaped panels and sew them together, or you can build it as a structured three dimensional shell around template pieces. For beginners recreating this exact look, separate panels are easier.
Crochet two side panels in blush pink and white. Shape them with gentle curves so they rise from the base and round inward at the top. Add small side window openings by chaining across gaps and crocheting around them on the next row. Reinforce each panel with cut plastic canvas on the inside.
Then crochet the upper curved shell section, which wraps from one side over the top to the other side. This section should feel like a rounded hood. Test fit often and do not attach permanently until it sits smooth.
Visual checkpoint: You should now see the body beginning to resemble a sweet rounded trailer rather than a regular camper.
4. Create the large front opening
The front opening is the focal point. It is wide and tall, showing most of the interior, with the lower section folding down like a little stage or play mat. Crochet the front rim as a neat pink border reinforced with a second row in white if you want extra definition.
The opening needs to stay clean and firm. Work a tight edging around it, then sew a strip of plastic canvas or hidden wire just inside the rim. This keeps the shape from collapsing.
If your opening stretches wider than the photo, add one more reinforcing round in slip stitch. If it seems too small, do not force it open later. Rework the opening before assembly.
5. Make the fold down front panel
Crochet a flat rectangular panel with softly rounded corners in pink, edged in white. This will act as the front flap or little landing mat. Insert a thin support layer inside so it stays smooth when open.
Attach it to the bottom of the opening using either sewn stitches that act like a hinge, or ribbon hinges hidden along the inside edge. You want it to open down and rest flat on the table.
Add little pastel ribbon ties or tiny bows at the lower corners so the piece echoes the photo. These small touches make it feel finished and precious.
Visual checkpoint: When open, the flap should look like a neat soft platform extending the interior toward the viewer.
6. Assemble the caravan body
Attach both side panels to the base first. Then sew on the upper curved shell section, shaping it carefully so the whole body becomes rounded and symmetrical. Add the back wall panel in matching pink and white. This back panel can be more closed and simple, because most of the scene is viewed from the front.
Before fully closing the shell, insert your interior support pieces. The caravan should be sturdy enough to lift without sagging. If it feels soft at the crown, add another curved support strip inside the top.
7. Add the tow hitch and wheel
Create a simple tow hitch using a tightly crocheted cord around wire or a slim wooden rod wrapped with yarn. Keep it petite and delicate. The wheel is small and decorative, so a crocheted circle in black and pink with a pale hub is enough.
Attach both securely at the front underside. The wheel should sit low and cute, not oversized. In the photo it is almost toy like, which helps the caravan feel more magical than realistic.
8. Crochet the giant top bow
The large pink bow is essential. Crochet two wide rounded loops and two tapered tails in blush pink. Insert a little fabric stiffener or a hidden piece of felt inside each loop so they hold their shape. Wrap the center tightly with matching yarn to form the knot.
Sew the bow to the crown of the caravan. Add a second wrap of lighter pink or a soft satin band if you want extra polish. The bow should read immediately from a distance.
Visual checkpoint: You should now see the caravan transform from cute to unmistakably heirloom sweet.
9. Make the ribbon trims and side bows
Use narrow satin ribbon in pastel shades to trim the front opening and the sides. Add tiny bows at the corners just like the image. You can sew the ribbons on by hand or tack them with tiny drops of glue.
To keep the look soft, choose pale yellow, lavender, mint, and blush rather than bright Easter shades. The whole piece should feel airy and baby soft.
10. Add interior curtain details
Crochet or sew tiny curtains for the back windows. A simple gathered rectangle in mint or pale floral fabric works beautifully. Tie each curtain back with a tiny strand of ribbon or yarn.
These small curtains make the interior feel like a miniature room instead of a bare shell. They also soften the hard edges of the window cutouts.
11. Make the bunny figures
Create four to five tiny bunny amigurumi in white, tan, and soft brown. Each bunny needs a simple rounded body, small head, long ears, tiny arms, and little feet. Keep the faces minimal with embroidered eyes and a tiny nose.
Make the bodies small enough that they can sit upright inside the caravan without crowding it. If one bunny comes out too tall, shorten the torso rather than reducing the head. In tiny figures, body height affects scale more than head size.
Tip: Use the same hook size for all the bunnies so they look like a matching set.
12. Crochet the eggs and fill the baskets
Make miniature eggs in pastel shades using just a few rounds of single crochet in the round. Lightly stuff them so they hold shape. Then crochet one or two tiny baskets in tan yarn. Fill the baskets with the eggs.
The image shows a generous spread of eggs that feels cheerful and festive. Scatter some eggs in baskets and keep others grouped loosely as if ready for a bunny gathering.
Visual checkpoint: You should now see that unmistakable Easter scene beginning to appear.
13. Build the carrot crates
Make tiny wooden trays using thin balsa wood, matchsticks, or miniature craft wood. If you prefer all crochet, create shallow rectangular baskets in tan yarn. Then crochet several tiny carrots with bright orange bodies and green tops.
Place the carrots neatly in the trays at the front of the scene. These carrot crates bring contrast and give the pink interior something vivid but still soft.
14. Add the interior floor mat
Crochet a small pale mint or aqua rectangle for the floor covering inside. This extra color layer helps the eggs and carrots pop and matches the gentle pastel palette seen in the photo.
Stitch or tack the mat to the floor so it does not shift when you move the caravan.
15. Arrange the scene
Place the bunny figures around the baskets and crates. Position the central basket of eggs toward the back so the eye reads depth. Seat two bunnies in front and two farther back for balance.
Do not line them up too perfectly. The charm comes from a natural conversational arrangement, like the bunnies have gathered for a little Easter party.
If the interior feels sparse, add a few more eggs, a tiny cushion, or one miniature blanket. If it feels crowded, remove one prop before shrinking the bunnies. Overcrowding is usually a styling issue, not a pattern issue.
16. Finish the edging cleanly
Add a final tidy edging around the front opening, flap, and shell seams. Reverse single crochet or slip stitch works well here. The edging sharpens the outline and gives the whole project that polished boutique handmade look.
Also inspect every seam from the outside. Because this is a display piece, visible joins matter. Weave in all ends securely and hide them within the shell.
17. Shape and refine
Steam block any removable flat pieces very lightly. Finger shape the bow loops, the bunny ears, and the flap. If the flap curls up, place it under a book between towels for a few hours or brush it with very diluted stiffener.
Visual checkpoint: You should now see a rounded pink bunny caravan with a large top bow, neat ribbon trims, a fold down front mat, pastel eggs, carrot crates, and a group of tiny bunnies gathered inside.
Troubleshooting section
My shell looks floppy
Add more internal support. Plastic canvas in the sides, top, and flap makes a huge difference. Also check that your yarn is cotton and your stitches are tight.
My bow will not stand up
Use felt or lightly stiffened fabric inside the loops, or add a hidden wire edge if needed.
My bunnies are too big for the caravan
Go down a hook size and reduce stuffing first. Tiny amigurumi scale changes quickly with hook size alone.
My flap will not lie flat
Insert a firmer support piece and make sure the hinge stitches are not too tight. A ribbon hinge can help the panel open more smoothly.
The caravan looks more like a dome than the photo
Flatten the side walls slightly and reduce the top curve rows. The original shape is rounded, but still structured.
Finishing details section
Once the piece is assembled, do a final styling pass. Straighten the little bows, open the flap fully, space the bunnies evenly, and check that the interior reads clearly from the front. Weave in every yarn tail carefully because open display pieces reveal everything. If desired, line the inside back wall with tiny dotted fabric for extra sweetness, or add a miniature name plaque above the opening. Lovely optional upgrades for this exact look include a removable egg basket, a quilted floor mat, a set of interchangeable seasonal props, or a hidden loop closure so the caravan can shut when not on display.
Shop Similar link section
- Blush pink cotton yarn for miniature crochet caravans
- Pastel satin ribbon set for bows and craft trims
- Plastic canvas for structured crochet dollhouse projects
- Amigurumi supplies kit for miniature bunny crochet
- Mini craft wood trays and dollhouse accessories
Style It With link section
Now that you have worked through each caravan, what you are left with is more than a set of finished crafts. You have built a collection that feels cohesive, intentional, and deeply personal. Each piece carries a different mood, yet they all share that same soft handmade warmth that makes miniature work so special.
These caravans are perfect for seasonal displays, gifts, or simply as something beautiful to keep and revisit. You can arrange them together as a small village, rotate them throughout the year, or continue expanding the collection with your own variations. Changing colors, themes, or interior details opens up endless possibilities, and no two builds will ever feel exactly the same.
If you found yourself enjoying the tiny details the most, lean into that. Add more accessories, create interchangeable interiors, or even design entirely new caravan themes inspired by your own ideas. This style of crafting rewards creativity and patience in equal measure.
Above all, let these projects remind you that the smallest things often carry the most charm. With just yarn, a hook, and a bit of imagination, you have the ability to create pieces that feel warm, whimsical, and completely one of a kind.