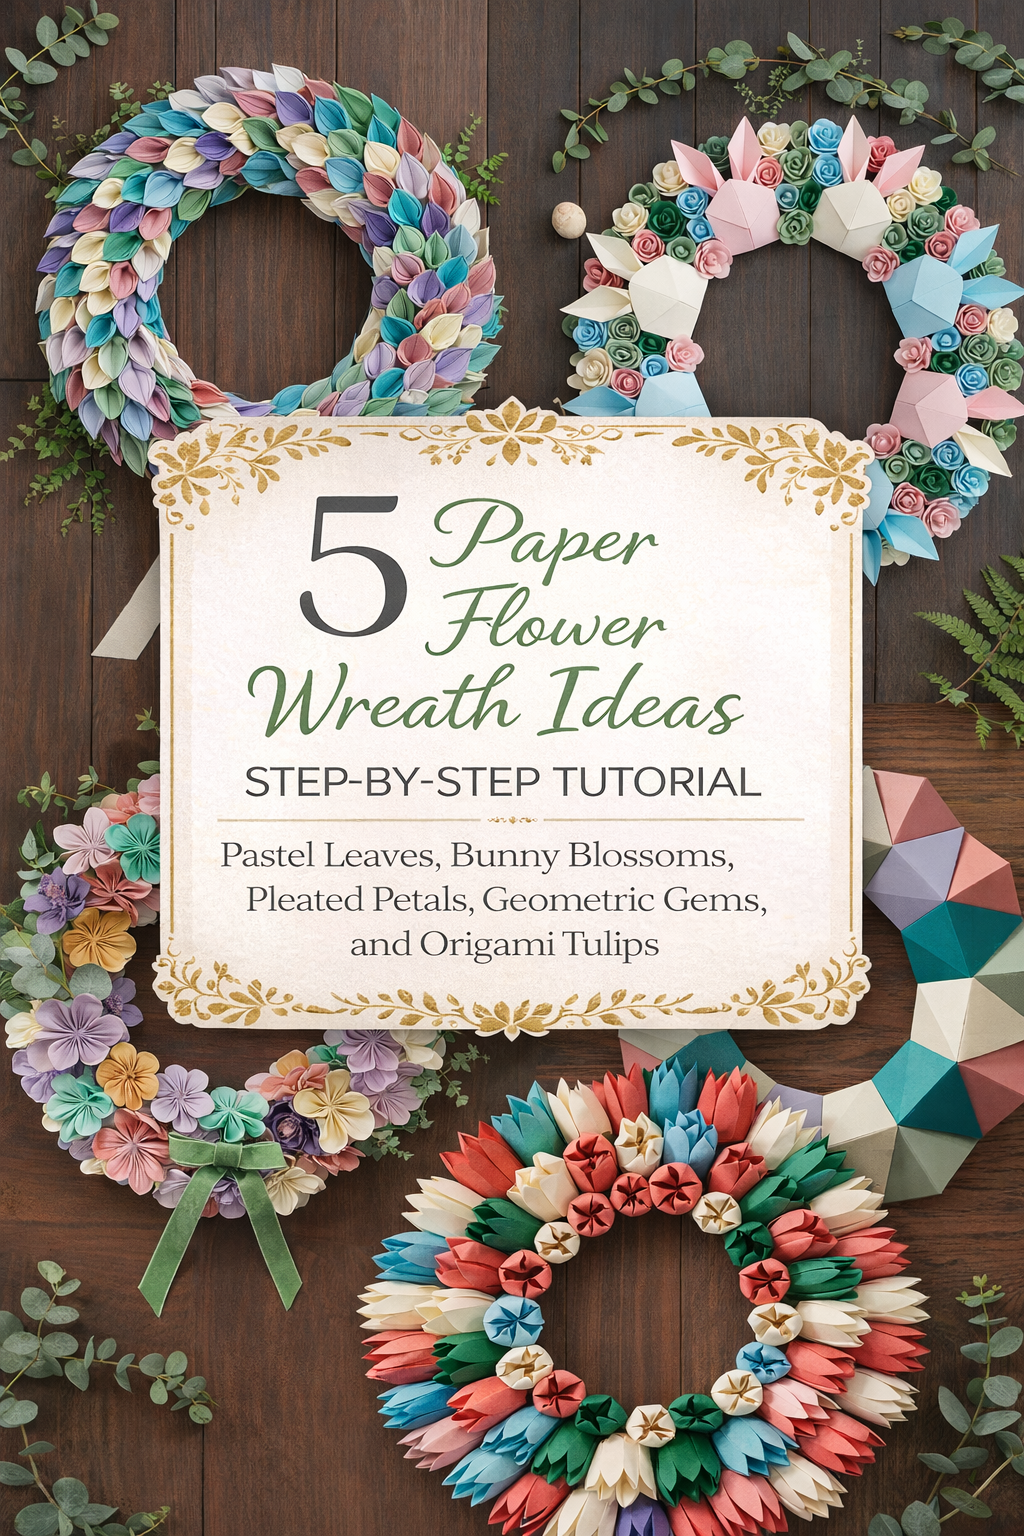
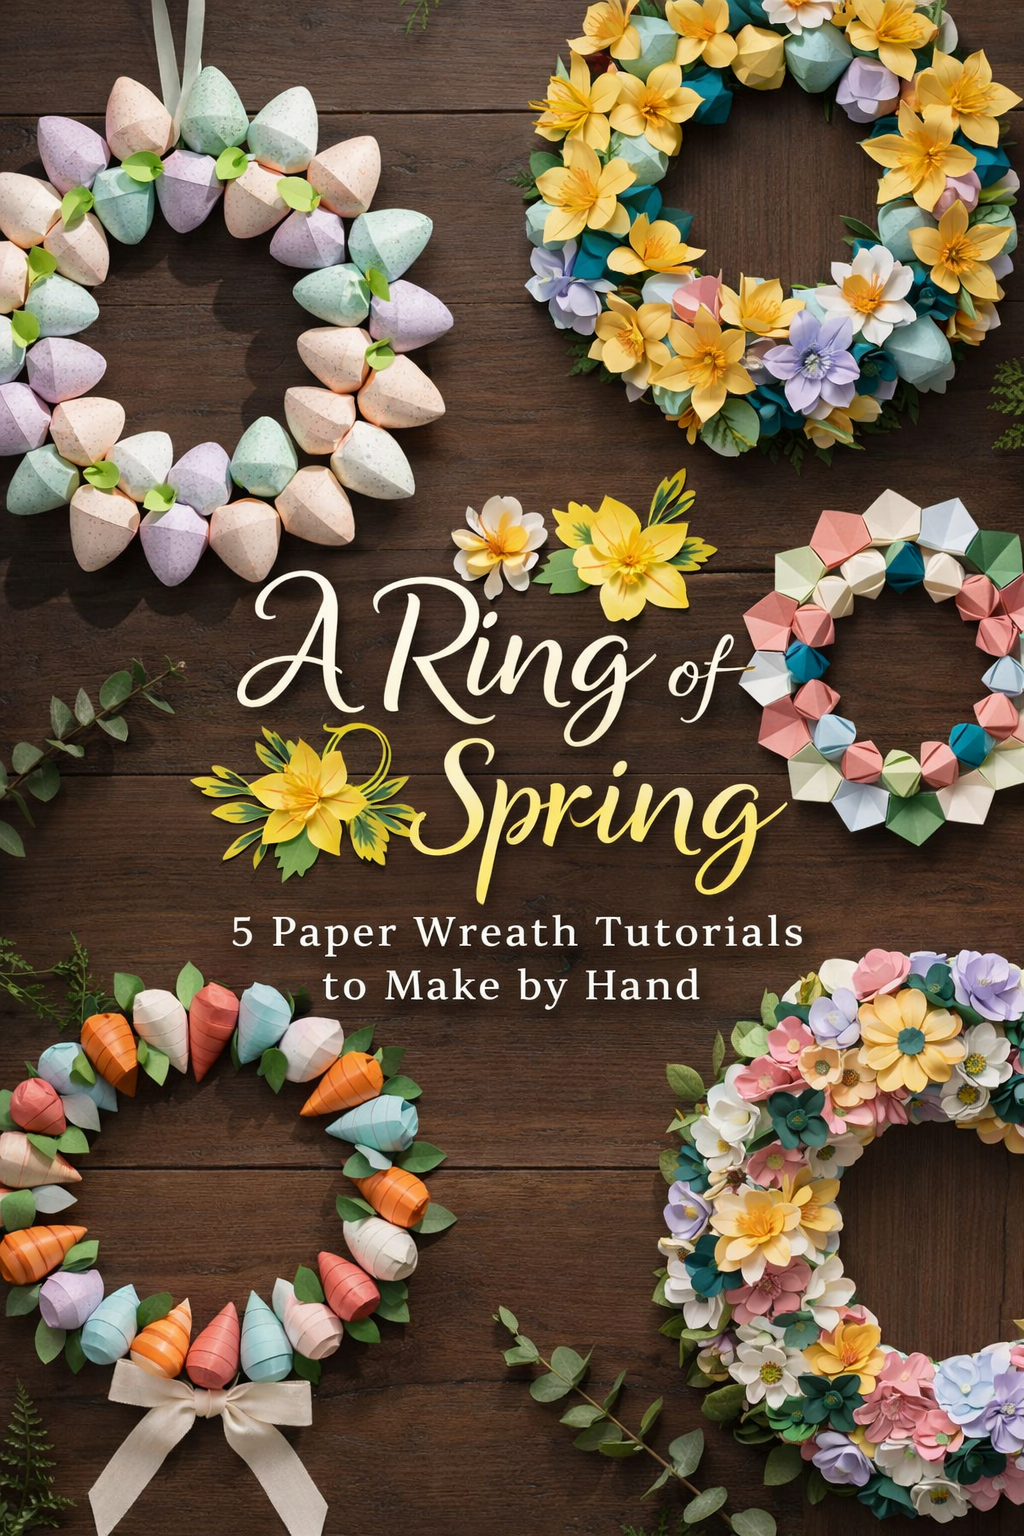
A Ring of Spring: 5 Paper Wreath Tutorials to Make by Hand
More like this
💡 Pro Tip: Why I Link to Amazon Search Results and Not One Product
In the Shop the Look and Style it With sections under each bikini, I link to Amazon search results, not single products. Here’s why this matters:
Hot bikinis sell out fast. I don’t want you clicking on a dead link to a sold-out item. Search pages stay updated.
You get more options. Love the vibe but want a different color, cut, or price point? The search results give you everything that matches the look and energy.
I curate each search carefully. These aren’t generic. I spend hours crafting keywords that bring up exactly the kind of bikinis I’d wear—or recommend to my hottest friends.
Support with no pressure. If you click a link, browse, and buy something later, I may earn a small commission at no extra cost to you. That helps me keep bringing you curated collections like this one—powerful, seductive, and always fresh.
So dive in. Click through. Try something risky. These aren’t just bikinis—they’re commands, statements, and maybe even your new favorite weapon of choice.
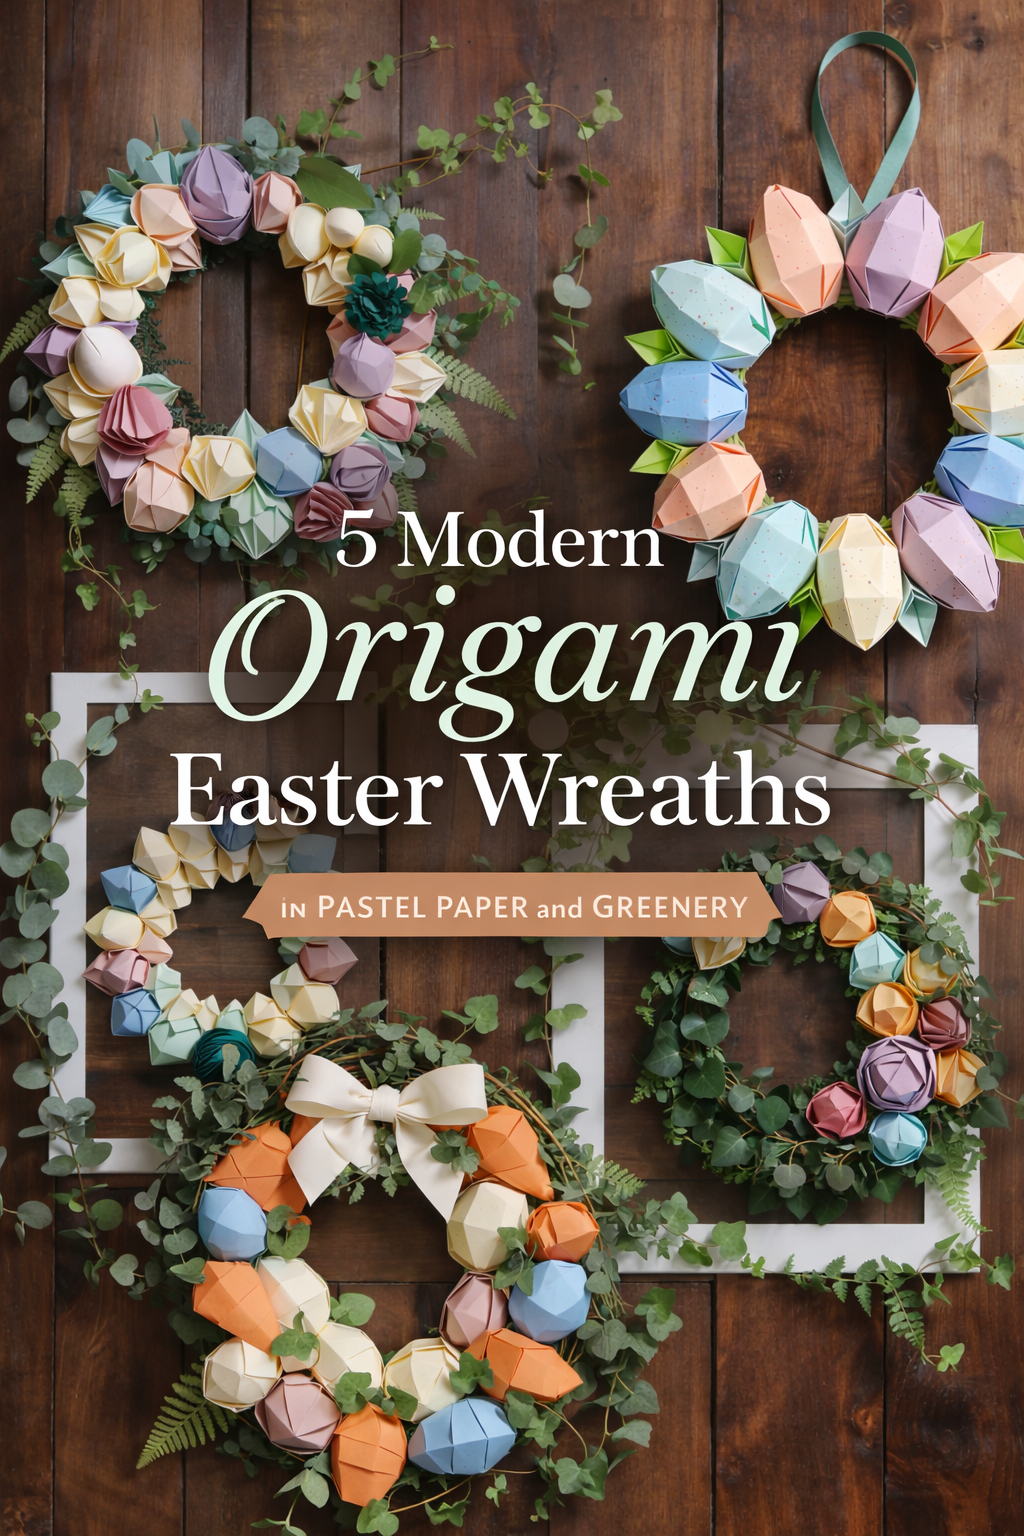
There is something especially charming about a handmade spring wreath that feels fresh, thoughtful, and a little unexpected. This collection brings together five paper wreath ideas that each capture a different side of the season, from softly faceted pastel eggs to sculptural geometric folds, sweet carrot forms, layered flowers, and bright daffodil details. Even though every wreath has its own personality, they all share the same lovely handmade spirit: light paper textures, gentle spring color palettes, and that satisfying moment when simple materials turn into something beautiful enough to hang front and center.
What makes these projects so appealing is that they look intricate without requiring complicated supplies. A stack of cardstock, a sturdy base, a glue gun, and a little patience are enough to create wreaths that feel polished, giftable, and completely display worthy. Some lean modern and minimal, some feel playful and seasonal, and some give you that lush floral fullness that instantly brightens a room. Together, they offer a full range of spring inspiration, whether you are decorating for Easter, refreshing your front door, styling a brunch table backdrop, or simply craving a craft that feels cheerful and creative. If you love paper crafts that look high end but are still wonderfully doable, this roundup gives you five beautiful ways to welcome spring by hand.
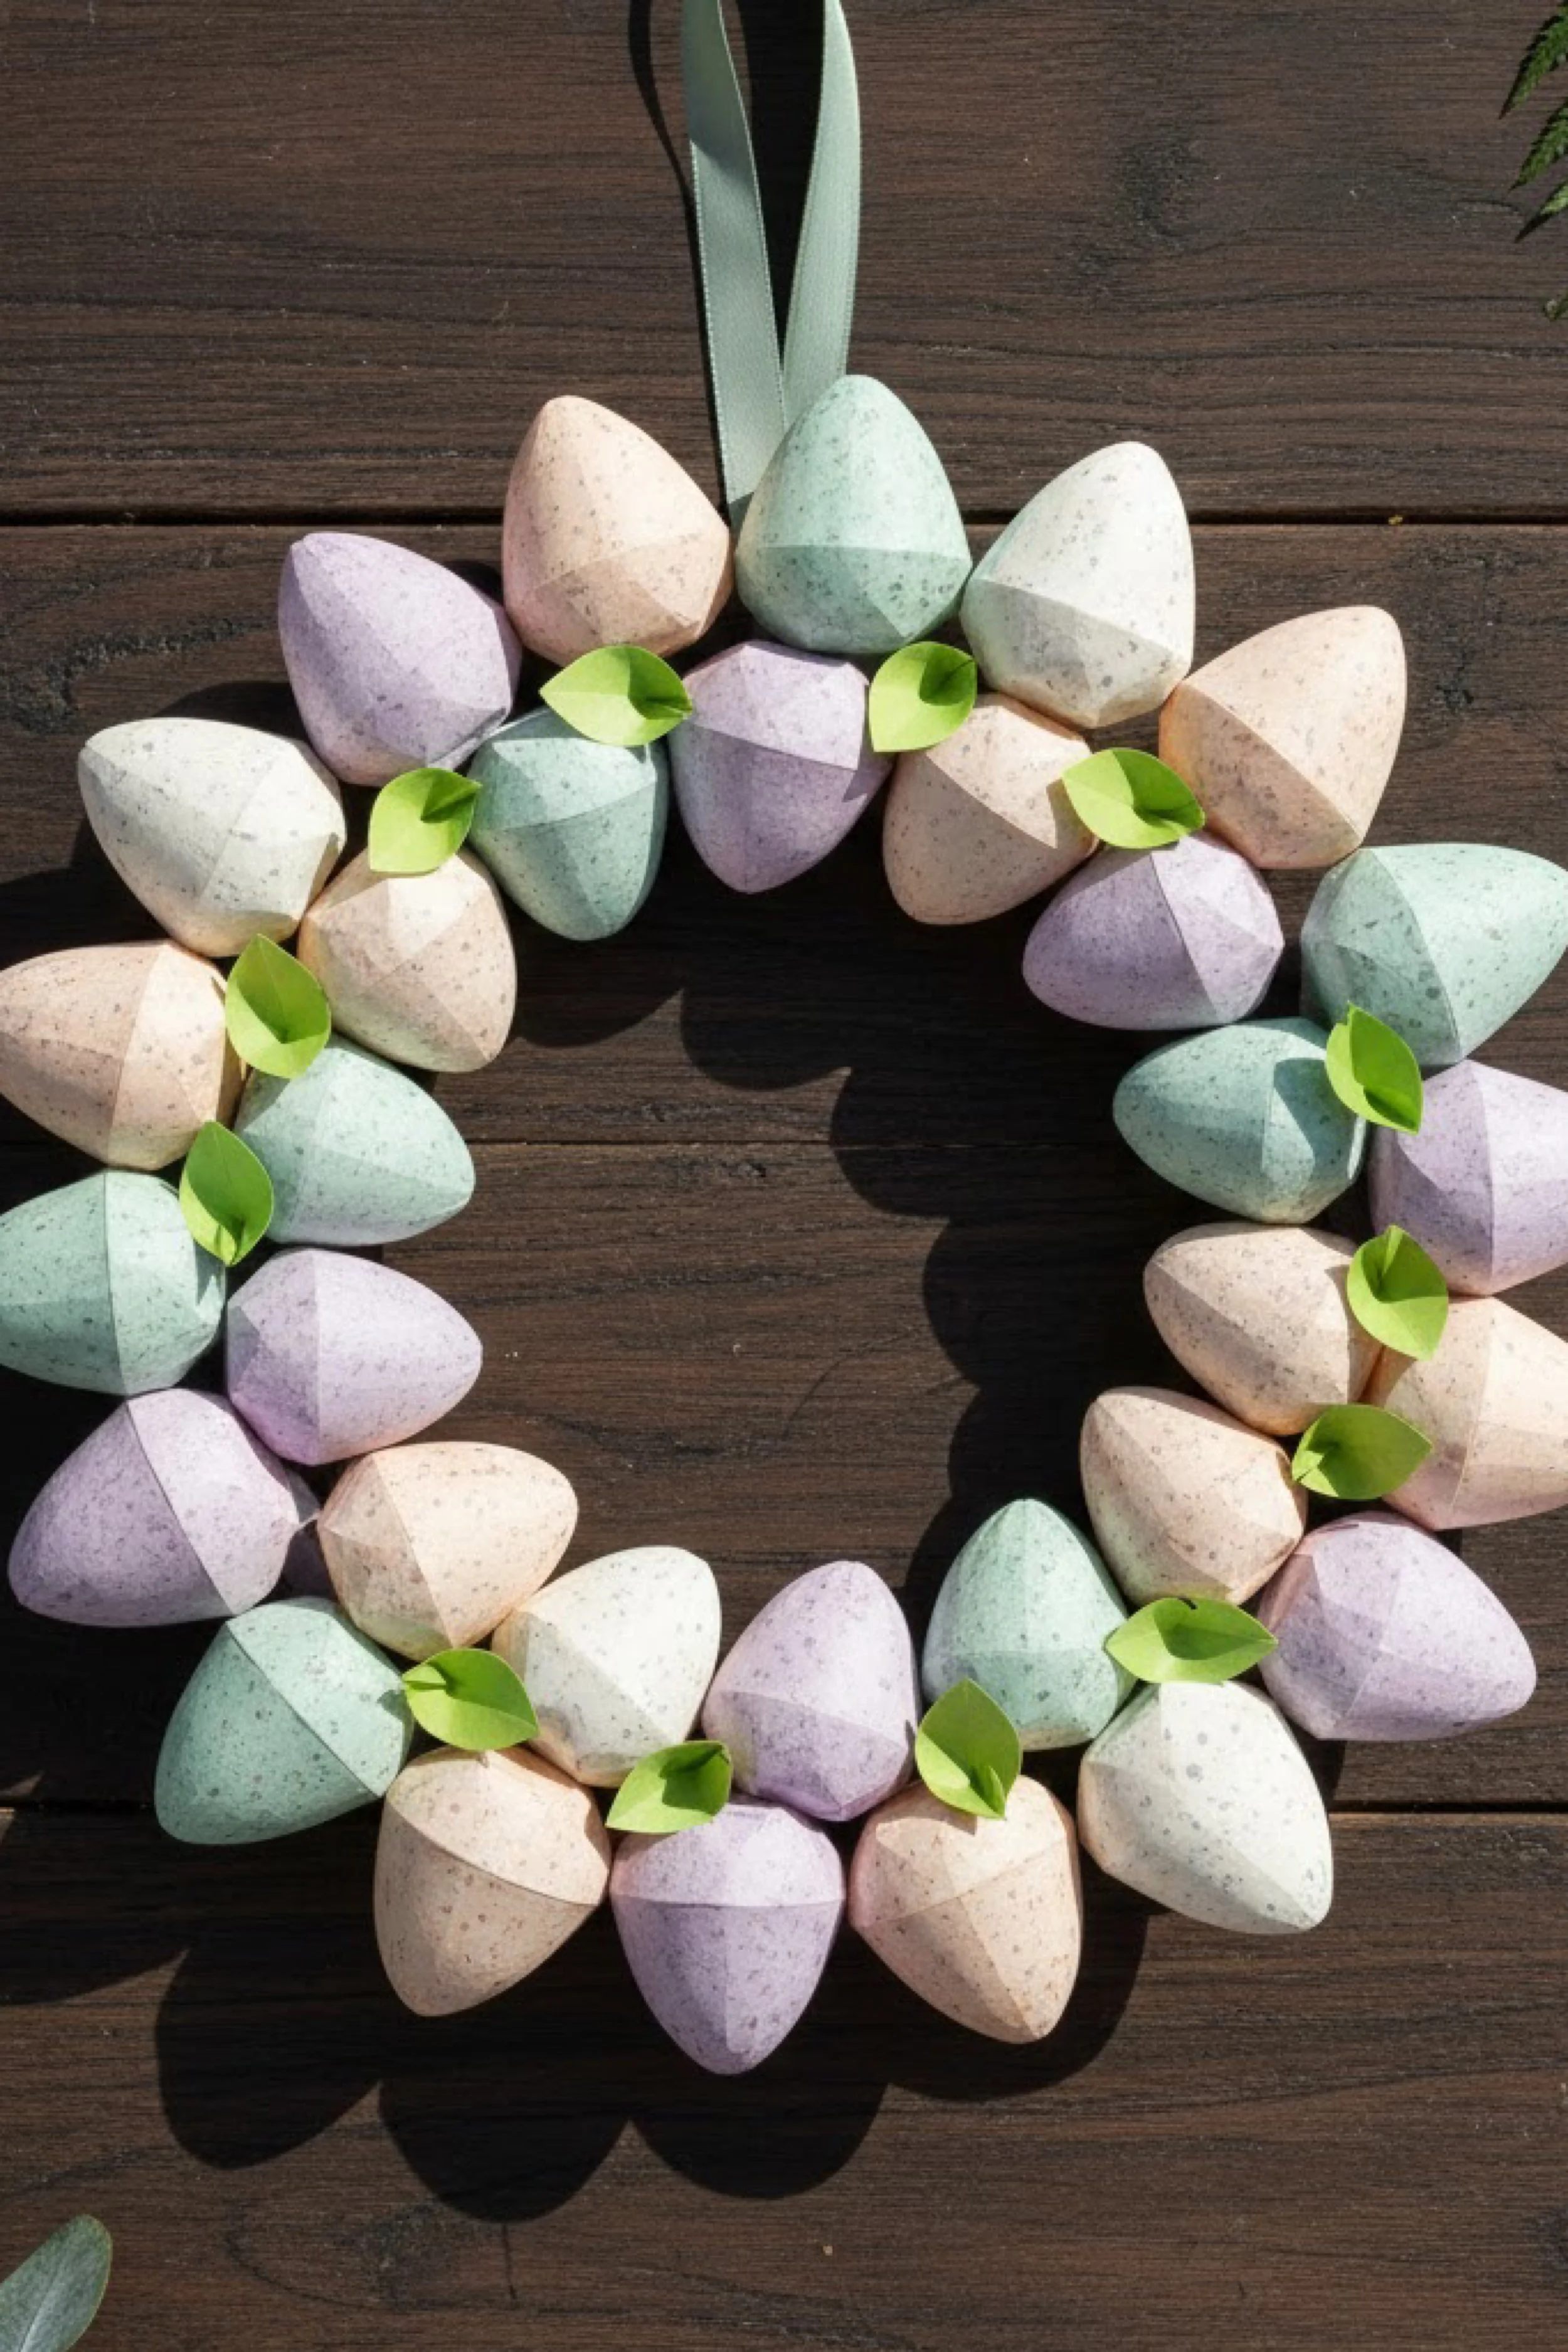
Speckled Pastel Egg Wreath Step by Step Tutorial
What you’re making
You are making a soft, modern spring wreath built from faceted paper eggs in a dusty pastel palette, arranged tightly around a wreath form with small fresh green paper leaves tucked between them. The finished look feels minimal, sculptural, and very elevated, with the kind of matte speckled finish that makes the whole piece feel more like boutique décor than simple seasonal craft.
This version is perfect if you love a wreath that reads quiet and refined rather than overly sweet. The eggs are slightly geometric, the colors are chalky and calm, and the leaves add just enough crisp green contrast to keep the design feeling alive.
Materials + tools
- 1 foam wreath form or flat cardboard ring, about 10 to 14 inches across
- Heavy cardstock or lightweight craft paper in pastel lavender, blush, mint, cream, and pale peach
- Optional speckled cardstock, or plain cardstock plus brown and gray craft paint for speckling
- Thin paper in bright leaf green for leaves
- Pencil
- Ruler
- Scissors
- Craft knife
- Cutting mat
- Bone folder or the back of a butter knife for scoring folds
- Hot glue gun and glue sticks
- Low tack tape or paper clips for holding shapes while glue sets
- Ribbon for hanging, about 18 to 24 inches
- Circular template, egg template, or hand drawn egg pattern
- Fine paintbrush or old toothbrush for speckle effect
- Acrylic paint in brown, taupe, and gray if you are making your own speckles
- Optional matte sealer spray
- Optional distress ink or soft pastel chalk for extra dimension
Finished size + customization notes
A 12 inch wreath form usually gives you a finished wreath around 14 to 16 inches wide once the eggs are attached. You can scale this up easily by using a larger base and making slightly larger eggs.
For a fuller look, use 28 to 34 eggs. For a lighter, more airy version, use 20 to 24. If you want the wreath to look closer to the photo, keep the eggs similar in size and let them overlap slightly rather than mixing dramatic large and small pieces. You can also switch the leaf count depending on style. Fewer leaves feels modern. More leaves feels garden inspired.
Step by step instructions
1. Plan the overall look before you cut anything
Start by studying the visual balance you want. This wreath has a very even ring shape, but it still looks natural because the pastel colors are shuffled instead of placed in strict repeating order. Before you begin cutting, decide on your palette. A good mix for this look is one third mint and pale aqua, one third blush and peach, and one third lavender and cream.
Draw a quick color map on scrap paper. It does not need to be exact. You are simply trying to avoid clumping all of one color in one area. You should now see a gentle color rhythm around the ring rather than obvious blocks.
2. Make your wreath base
If you have a foam wreath form, you can use it as is. If you are making your own, draw two circles on sturdy cardboard and cut out a ring about 2 to 3 inches thick. A 10 inch outer circle with a 6 inch inner circle works well.
Wrap the cardboard ring in plain paper, ribbon, or even strips of cardstock if you want a cleaner surface for gluing. This extra layer also helps hot glue grip better. If your base feels flimsy, glue two cardboard rings together.
Visual checkpoint: your base should feel rigid, flat, and light. If it bends easily, reinforce it now before you decorate.
3. Create a faceted egg template
The eggs in the photo are not just flat cutouts. They have folded planes that make them look almost like tiny paper gems. To get that effect, draw an egg shape about 2 1/2 to 3 inches tall. Then lightly sketch angled facet lines across the center, running diagonally from one side to the other.
You have two easy options here.
Option one is the simple folded method. Cut a flat egg, score one or two diagonal lines, then gently fold along those scores to create a faceted center.
Option two is the dimensional seam method. Cut mirrored halves and join them over a narrow paper tab so the center rises slightly. This creates a puffier egg.
For the photo look, the simple folded method is enough and much faster if you are making a full wreath.
4. Cut all of your eggs assembly line style
Trace your egg template onto your chosen cardstock colors and cut out all the pieces at once. Aim for 24 to 32 eggs. Keep the size mostly consistent so the wreath feels polished.
Next, use a ruler and bone folder to score your diagonal facet lines. Do not cut through the paper. You only want a shallow crease. Gently pinch the fold so each egg has a crisp plane through the middle.
If yours looks too flat, deepen the score slightly and refold. If yours looks crumpled, your score may be too deep or the cardstock may be too thin.
Visual checkpoint: each egg should catch light differently across its surfaces. When you set a few on the table, they should look sculptural, not floppy.
5. Add the speckled finish
If your paper already has a flecked stone like look, skip ahead. If not, create the finish now. Thin a little brown or gray acrylic paint with water. Dip an old toothbrush or stiff brush into the paint, then flick tiny speckles over the eggs. Let dry completely.
Keep the speckles light. Too much paint can make the eggs look muddy instead of softly organic. The prettiest result is delicate and irregular.
You can also brush a whisper of pastel chalk or ink around some edges for depth. This is optional, but it makes plain cardstock look more custom.
6. Make simple folded leaves
Cut leaf shapes about 1 to 1 1/2 inches long from green paper. Fold each leaf in half lengthwise, then slightly curl the sides inward with your fingers. These leaves are tiny details, but they matter. They break up the pastel palette and make the wreath feel finished.
Make at least 12 to 18 leaves. You may not use them all, but it is better to have extra. If you want a fresher botanical look, make a few leaves in two green tones.
Visual checkpoint: your leaves should look crisp and dimensional, not flat like confetti.
7. Attach your hanger first
Before you cover the top of the wreath, glue a loop of ribbon to the back. Make sure it is centered. Test the loop by lifting the wreath base. If it pulls loose now, it will definitely pull loose later.
For a neat finish, glue a small rectangle of cardstock over the ribbon ends on the back to anchor them.
8. Arrange the eggs before gluing
Lay your eggs around the wreath base first with no glue. Start at the top center, then place pairs moving down both sides. This helps keep the wreath visually balanced. Overlap the eggs just enough to hide most of the base, but leave tiny pockets for the leaves.
Try not to line up every egg at exactly the same angle. The photo has variety, which keeps it from feeling stiff. Turn some eggs slightly inward and some slightly outward.
You should now see the wreath taking shape. If one side looks heavier, swap a few darker or larger pieces to the opposite side.
9. Glue the first layer
Once you like the layout, begin gluing the eggs in place one at a time. Work in small sections so you do not lose your arrangement. Press each piece firmly for a few seconds while the glue sets.
Keep the inner and outer circle smooth as you go. It helps to step back every few eggs and check the silhouette. If yours looks wider than the photo, your eggs may be angled too far outward. Tuck the next few slightly inward to correct the shape.
10. Fill gaps with a second pass
After the first layer is attached, you will probably notice a few thin spots where the base shows. That is normal. Add a second pass of eggs in those areas, tucking them slightly over the first layer for depth.
This second layer is what gives the wreath that lush, boutique look. Be selective, though. You want fullness, not bulk. If the center opening starts shrinking too much, stop and balance by adding to outer edges instead.
Visual checkpoint: the wreath should now feel evenly filled, with a soft rounded profile and no obvious large gaps.
11. Tuck in the green leaves
Now add leaves in the open pockets between eggs. Glue the folded base of each leaf deep into a seam so the leaf pops out slightly. Scatter them rather than spacing them too evenly.
This is one of the easiest ways to make the wreath look expensive. The bright green accents wake up the whole palette and add shape contrast against the rounded eggs.
If your wreath starts looking busy, remove a few leaves. The image uses leaves sparingly, which keeps the design feeling calm.
12. Refine the composition
Hang the wreath up temporarily or prop it vertically against a wall. Looking at it upright reveals balance issues that are hard to spot flat on the table. You may notice one side dipping lower, one cluster feeling too pink, or a gap near the bottom curve.
Make final adjustments now. Add one more egg or leaf only where needed. This is the stage that separates homemade from polished.
13. Finish the surface
If you want added durability, give the wreath a very light matte sealer spray in a well ventilated area. Test first on scrap paper to make sure the spray does not warp the cardstock or darken the colors.
You can also leave it unsealed if it will be displayed indoors away from moisture. Many paper wreaths last beautifully when stored flat and dry.
14. Style and display
This wreath looks best against wood, painted doors, white walls, or layered over a mirror. Because the colors are soft and the shapes are modern, it works for Easter, spring, baby showers, brunch décor, or just a seasonal entry moment.
For display, use a removable wreath hook, ribbon on a peg, or lean it on a shelf as part of a vignette.
Troubleshooting
My eggs look sloppy instead of faceted
Your scoring may be uneven. Use a ruler for every score line and fold gently instead of sharply crushing the paper. A heavier cardstock also helps.
The wreath looks lopsided
Lay it flat and compare the left and right sides. Count eggs on each half. Often the fix is simply moving one darker piece or adding one extra egg to a sparse area.
I can still see the base
Add a few overlapping eggs in a second layer rather than trying to stretch the first layer too far apart.
The hot glue is showing
Use smaller dots of glue and place them toward the center of each piece. Strings can be removed after cooling by gently rubbing them away with your fingers.
My colors are not as soft as the photo
Use muted, chalky cardstock rather than saturated brights. A dusting of fine speckles can also tone down paper that feels too flat or vivid.
Finishing details
Store the wreath in a shallow box or large gift box with tissue underneath so the faceted eggs do not get crushed. If you want a more premium finish, back the entire wreath with felt or clean cardstock so the reverse side looks tidy when it hangs.
Optional upgrades:
- Add tiny white buds or pearl pins between eggs for a more dressed up spring look
- Replace a few paper leaves with preserved faux greenery for mixed texture
- Use a velvet or hand torn ribbon hanger for a softer editorial finish
- Ink the egg edges lightly for more dimension and shadow
The most important finishing detail is restraint. This wreath is beautiful because it is airy, matte, and quietly sculptural. Stop once it feels balanced and soft.
Shop Similar
- Muted pastel cardstock pack for sculptural eggs
- Speckled scrapbook paper in soft spring colors
- Foam wreath forms for paper wreath crafts
- Bone folder and paper scoring tool set
- Mini hot glue gun with clear glue sticks
Style It With

Modern Geometric Paper Wreath DIY Guide
What you’re making
You are making a clean, gallery inspired paper wreath built from folded geometric rosettes and faceted shapes in a refined palette of blush, cream, pale blue, moss, teal, and soft green. Mounted on a white backing or directly onto a wreath base, this version feels architectural, airy, and very design forward.
The finished look is perfect for anyone who wants a spring wreath that feels contemporary rather than rustic. It reads like paper art and seasonal décor at the same time, which makes it beautiful for a front door, studio wall, or mantel.
Materials + tools
- Cardstock in blush, dusty rose, cream, white, pale blue, moss green, mint, and teal
- 1 wreath form, embroidery hoop, or cardboard ring about 8 to 12 inches wide
- Optional square white backing board or foam board for mounted display
- Pencil
- Compass or circular templates
- Scissors
- Craft knife
- Ruler
- Bone folder
- Double sided tape
- Hot glue gun and glue sticks
- Low profile craft glue
- Clips or binder clips
- Cutting mat
- Optional circle punch
- Optional matte spray sealer
Finished size + customization notes
This design works beautifully at 10 to 12 inches wide. Because the shapes are smaller and more intricate than the first wreath, the finished piece looks best when kept relatively delicate.
For a softer spring look, lean into blush, cream, and pale green. For a more Scandinavian style version, use mostly white, gray green, and icy blue with just two accent colors. For a richer artful version, add more deep teal and moss.
Step by step instructions
1. Decide on your shape family
This wreath combines several related paper forms instead of relying on only one repeated piece. That variety is what creates the layered, curated look. Plan to make three shape types.
First, small faceted medallions made from folded circles or polygons.
Second, pointed rosettes or pinwheel like folded forms.
Third, a few slightly larger anchor shapes that help space everything around the ring.
Keeping all the pieces within the same size range is the secret. You want variety in fold style, not dramatic size jumps.
2. Build the base ring
Use a thin cardboard ring, wood embroidery hoop, or foam ring. If you want the mounted look from the photo, cut a white square backing board and center the wreath on it later. If you want a hanging wreath, add ribbon or a concealed loop to the back now.
A ring with an outer diameter of 9 inches and an inner diameter of 6 inches gives you a refined finished size. Wrap the base in white paper if needed so any tiny gaps blend in.
Visual checkpoint: the base should look minimal and light, because this design depends on negative space in the center.
3. Make a batch of folded medallions
Cut circles or hexagons about 1 1/2 to 2 inches wide. Fold each one into evenly spaced sections. For circles, lightly divide into sixths or eighths, score along the lines, and press inward to create faceted domes or angular pinched shapes. For hexagons, score from corner to corner to create shallow pyramidal planes.
This sounds technical, but once you make two or three, your hands understand the rhythm. The key is consistency. Keep the folds crisp but not so hard that the paper cracks.
You should now see tiny sculptural paper units that catch the light and look almost like folded gems.
4. Create pointed rosettes for contrast
To keep the wreath from looking monotonous, make a second shape with more obvious points. Cut small circles, accordion fold them tightly, then fan and secure them into rosettes. Another option is to fold a square toward the center from each corner, creating a low origami flower.
Use these more sparingly than the faceted medallions. They act like punctuation marks around the wreath.
Visual checkpoint: when you line up all your shapes, you should notice some are flatter and some more dimensional. That contrast is what makes the finished wreath feel curated.
5. Choose a disciplined palette
The image works because the palette is calm and selective. Lay out all your finished units on the table and remove any colors that feel too loud. You want a conversation between blush, cream, pale blue, muted green, and teal, not a rainbow.
A good ratio is lots of blush and cream, a smaller amount of blue and green, and only a handful of deep teal pieces to anchor the arrangement. Think of the teal as visual seasoning rather than the main ingredient.
6. Dry arrange the entire wreath
Without glue, place your largest shapes first at roughly four anchor points around the ring. Then fill between them with medium pieces, and finally tuck small pieces into gaps. Alternate colors so the eye moves around the circle smoothly.
This design looks especially good when no two identical bold colors sit directly next to each other. If you see two dark teal pieces touching, split them apart with cream or blush.
You should now see a clean circular silhouette with a lot of delicate movement around the edge.
7. Glue from the anchors outward
Start gluing the largest anchor shapes in place. Then add supporting pieces between them. Because the elements are small, use very little glue. Too much glue will flatten the forms and can seep out around the edges.
Work clockwise so you can keep track of spacing. Press each piece only at its center or back seam so the folded edges stay lifted and dimensional.
If yours begins to look crowded, stop and remove one or two pieces. This wreath is meant to breathe.
8. Layer selectively for depth
Once the first ring is in place, add a few pieces on top of others, especially where you want the circle to feel fuller. Do not build thick mounds. Instead, think in shallow layers. One piece slightly over another is enough.
The goal is a paper sculpture effect, not a bulky wreath. If the side profile starts looking thick, you have gone too far.
Visual checkpoint: viewed from the front, the wreath should look lively and textured. Viewed from the side, it should still look relatively slim.
9. Refine the inner circle
One of the easiest mistakes with small piece wreaths is letting the inner opening become jagged or too tight. Step back and check the center opening carefully. Trim or reposition any piece that pokes too aggressively inward.
A smooth, intentional inner circle makes the whole project look more professional. If needed, add slightly flatter pieces around the inner edge rather than bulky ones.
10. Mount it if you want the framed art look
If you love the presentation from the photo, center the finished wreath on a white backing board or foam board. Use strong double sided tape, foam dots, or a few secure glue points on the back of the wreath base. Mounting the wreath instantly makes it feel like wall art.
This is an especially good option if you want to lean the wreath on a shelf, style it on a gallery ledge, or photograph it for a blog post or product shot.
11. Fine tune the color story
Now that the wreath is assembled, take a final look at the color balance. Does one area feel too pink or too dark? You can almost always fix this by swapping a single unit.
A pale cream piece can soften a heavy section. A teal piece can add needed depth. A light green piece can freshen a quiet corner. Small changes matter a lot in restrained palettes.
12. Secure the dimensional folds
Some folded shapes may begin to relax open with time. Add a dot of glue inside any fold that feels unstable. Use clips until dry if needed. This is especially important for door wreaths that may be moved or handled often.
13. Optional finish coat
A very light matte sealer can protect the paper from dust and minor humidity changes. Spray lightly from a distance and allow everything to dry flat before hanging.
14. Display with intention
This wreath suits modern interiors, calm spring styling, and minimal holiday décor. It looks beautiful with ceramic vases, eucalyptus, pale wood, linen, and soft daylight. For a door, use a protected storm door or covered porch. For indoors, it shines above a console, over a mantel, or layered in a shelf arrangement.
Troubleshooting
My folds are messy
Score more lightly and use a bone folder. Crisp folds come from controlled scoring, not force.
The wreath looks too busy
Reduce the number of colors or remove a few pieces. This design needs visual rest.
It looks flat
Add a few more dimensional medallions or layer one piece slightly over another in three or four spots.
It looks childish instead of refined
Switch to more muted paper, simplify the palette, and keep your shape sizes consistent.
My mounted wreath keeps shifting
Use a sturdier backing board and stronger adhesive points around the ring rather than only one or two glue spots.
Finishing details
To make the wreath feel especially polished, hide all exposed glue strings, trim any uneven paper edges, and make sure your backing board is perfectly clean before photographing or displaying it. Tiny details stand out against a minimal design.
Optional upgrades:
- Add one slim velvet ribbon for hanging from a hook
- Use metallic cream cardstock for only one or two subtle highlights
- Frame the white mounting board inside a shallow wood frame
- Create matching miniature medallions for gift tags or table décor
This wreath is about discipline and balance. The beauty comes from repeating a few elegant forms in a controlled palette, then letting texture do the rest.
Shop Similar
- Muted blush and sage cardstock assortment
- Bone folder set for paper folding crafts
- Precision craft knife and self healing mat
- White foam board for mounted paper art
- Mini glue gun for detailed paper crafts
Style It With
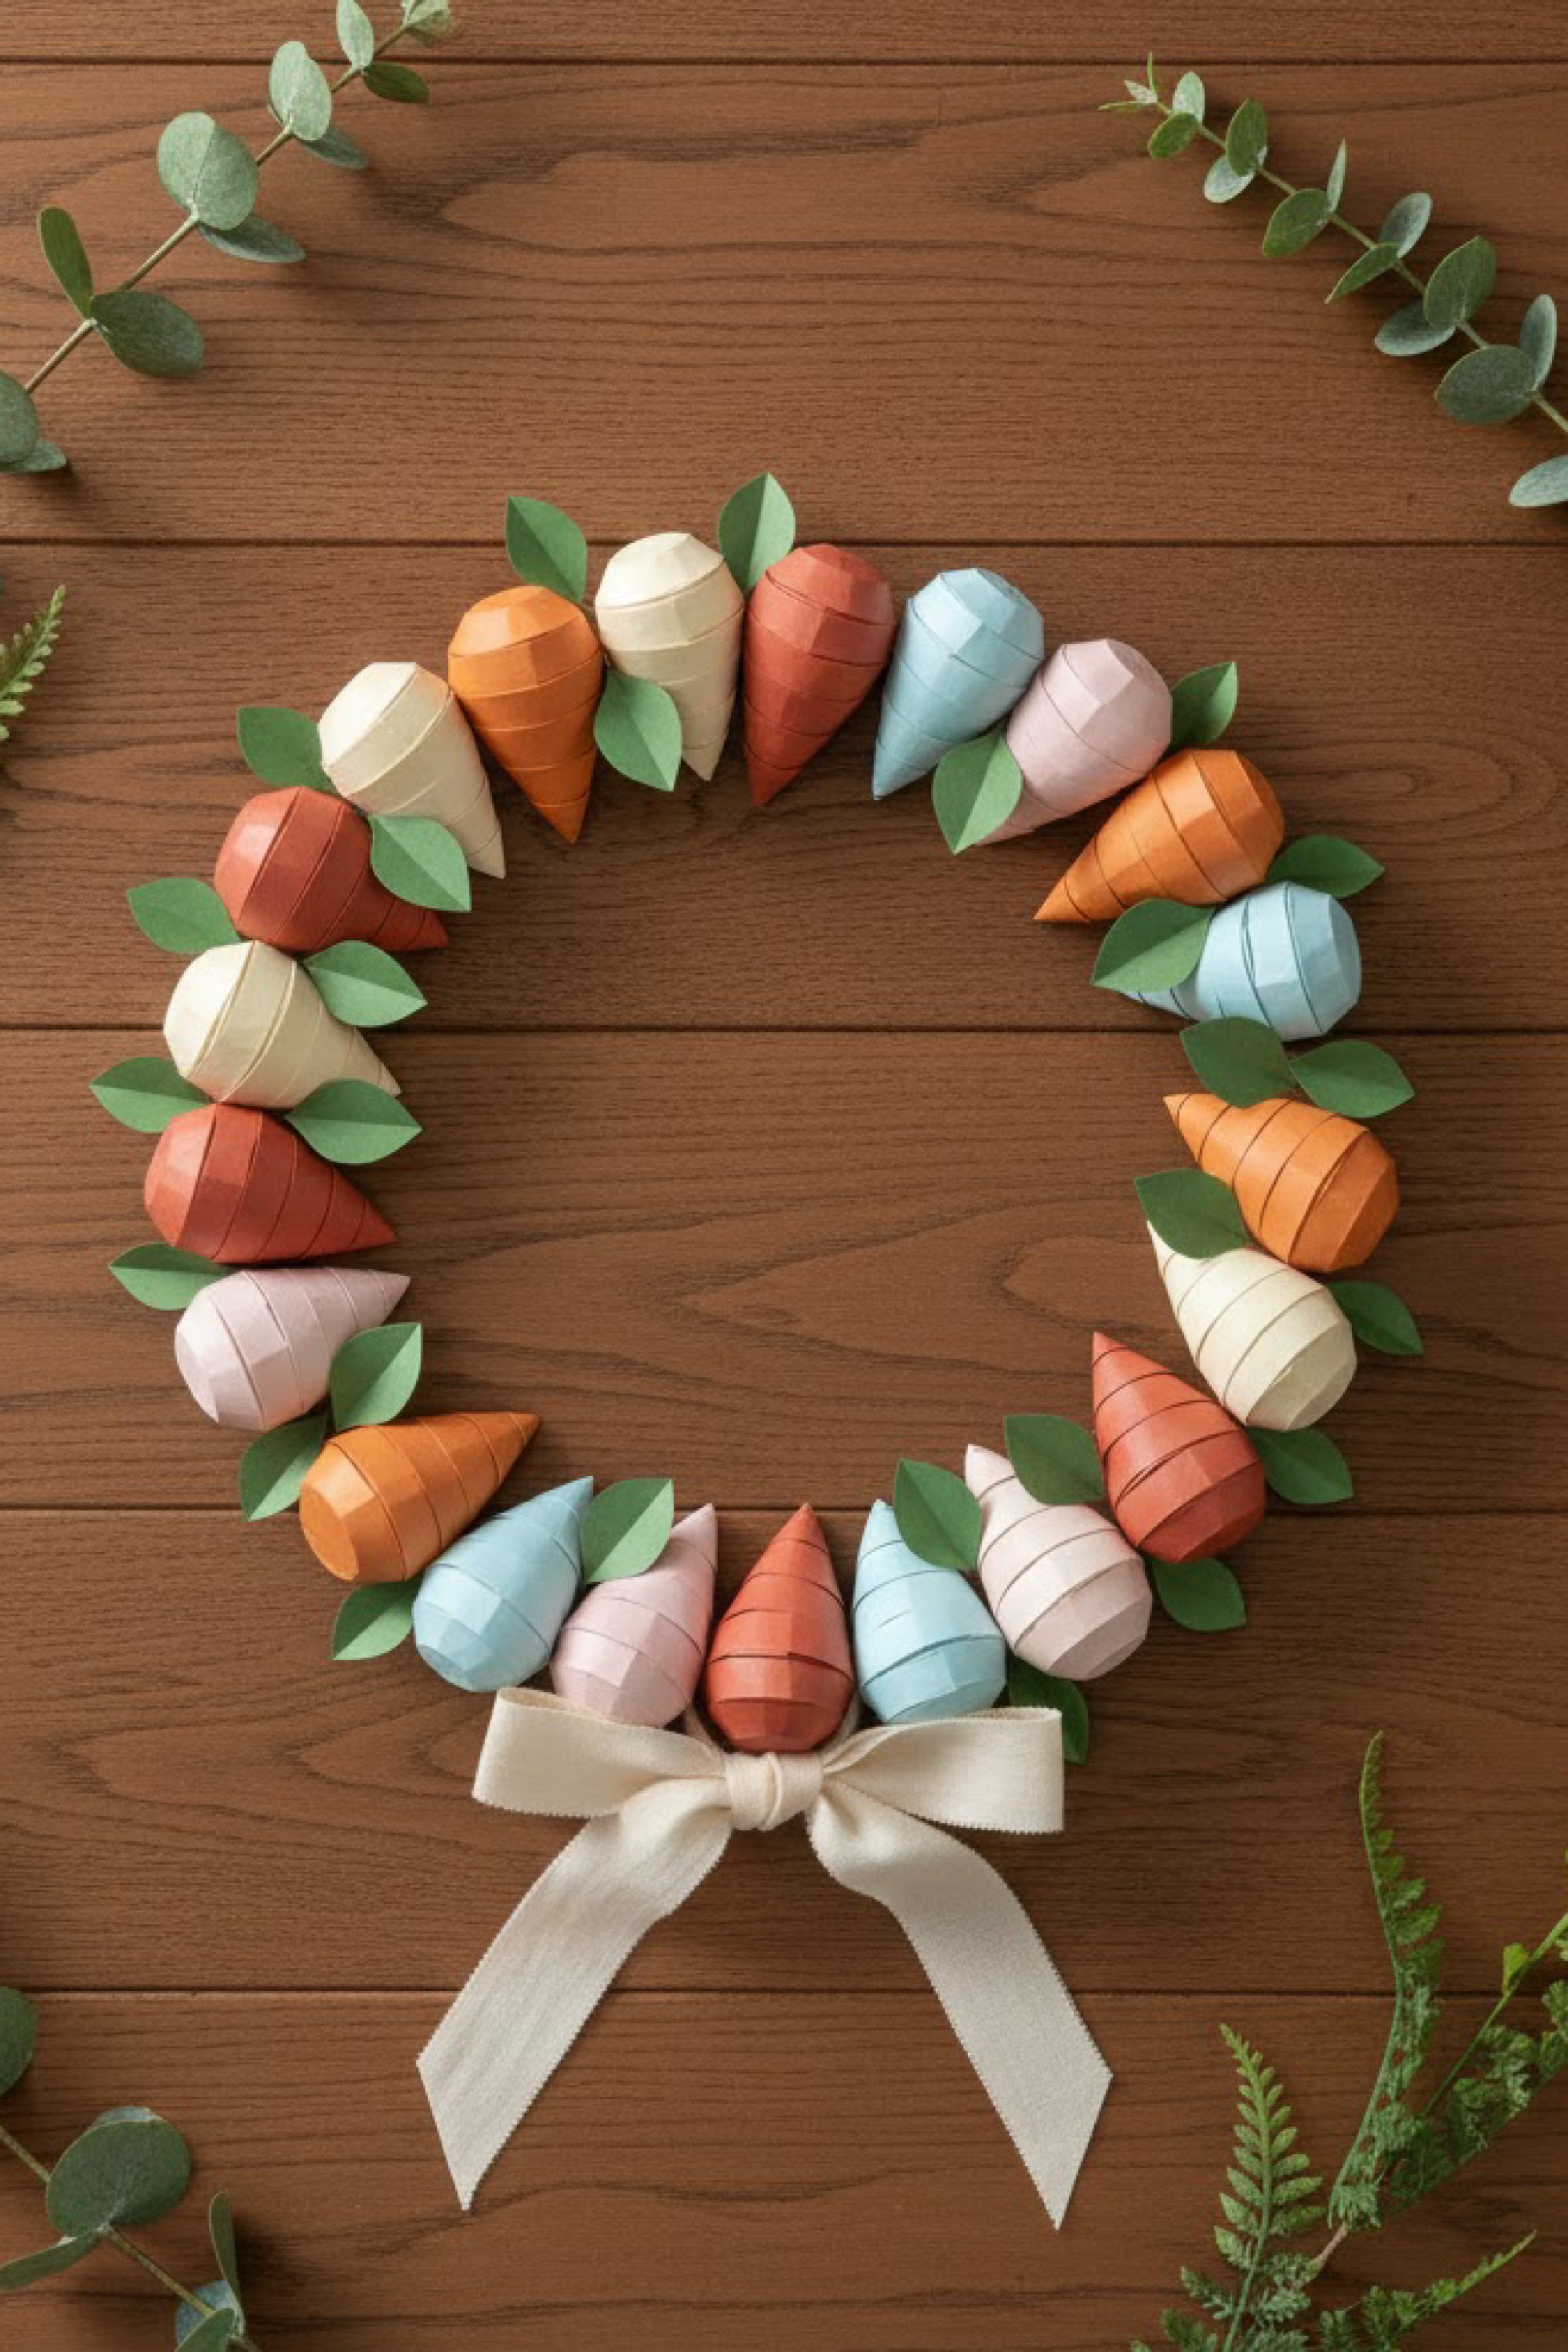
Paper Carrot Wreath Make It Yourself Tutorial
What you’re making
You are making a cheerful paper carrot wreath composed of rolled cone carrots in muted spring colors, accented with folded green leaves and finished with a soft cream bow. The look is playful and unmistakably seasonal, but the toned down palette keeps it feeling stylish rather than novelty driven.
This is an especially good project for a front door, mudroom, kitchen, or Easter brunch setup. The carrots are repetitive enough for relaxing assembly, and the final wreath has that clean handmade look that photographs beautifully.
Materials + tools
- Cardstock in terracotta, muted orange, dusty coral, blush, pale blue, cream, and soft peach
- Green cardstock for leaves
- 1 wreath form or cardboard ring, about 10 to 14 inches wide
- Cream ribbon for a bow
- Pencil
- Ruler
- Scissors
- Craft knife
- Bone folder
- Hot glue gun and glue sticks
- Tacky glue for paper seams
- Cutting mat
- Circular template for the base
- Optional chalk ink or distress ink
- Optional white paint pen for subtle highlights
Finished size + customization notes
A 12 inch base produces a finished wreath around 14 to 16 inches wide, depending on carrot size. Each carrot can be about 2 1/2 to 3 inches long.
For a more realistic carrot wreath, use mostly orange and cream tones. For a more editorial pastel spring version, keep the pale blue and blush carrots in the mix just like the photo. You can also enlarge the bow or add more leaves if you want a softer cottage look.
Step by step instructions
1. Build or prepare your wreath base
Start with a sturdy ring base. Cardboard is perfectly fine for this project because the carrots themselves create the volume. Cut a ring with a 10 to 12 inch outer diameter and a 6 to 8 inch inner opening. Cover the ring in kraft paper, ribbon, or matching cardstock so any tiny gaps blend in.
If you are using foam, wrap it lightly with ribbon or paper strips to give glue something easier to grip. Add a hanging loop to the back now.
Visual checkpoint: the base should feel strong, because cone carrots add outward pressure when layered around the edge.
2. Make a carrot template
Draw a carrot shape that is really just a curved triangle with a rounded top. When rolled, this becomes a cone. Your template should be about 3 inches tall and 2 1/4 inches wide at the top. Add a few curved horizontal guideline marks if you want the segmented banded look seen in the photo.
Cut out the template and test one carrot before committing to the whole batch. If your cone becomes too skinny, widen the template slightly. If it becomes stubby, lengthen it.
3. Cut all carrot bodies
Trace the carrot template onto your paper colors. You will need about 20 to 28 carrots depending on wreath size and fullness. Mix the warm neutrals and muted pastels evenly so the wreath feels playful but still coordinated.
For extra realism and structure, lightly score the curved segment lines before rolling. These lines do not need to fold sharply. They simply create gentle bands that make the carrots look finished.
4. Roll and glue each carrot cone
Curl each piece around a pen or your finger, then overlap the side edges to form a cone. Secure the seam with tacky glue or a tiny line of hot glue. Hold until set.
To make the top rim look neat, tuck it inward very slightly or flatten it with your fingers once the cone is formed. Repeat for every carrot.
Visual checkpoint: when you line up your finished cones, they should have fairly consistent length and width. Tiny variation is charming. Large variation makes the wreath harder to balance.
5. Add light surface detail
If your cardstock is very plain, add gentle shading. Brush or rub a little darker ink near the lower point and under the top rim. You can also add a faint highlight with a white paint pen or pastel pencil. Keep it subtle.
This step is optional, but it gives the cones depth and helps them read more like designed paper pieces instead of classroom cutouts.
6. Make double leaves for each carrot
Cut simple pointed oval leaves about 1 to 1 1/2 inches long. Fold each one in half lengthwise. Most carrots will use two leaves, one on each side of the top. Some can use three for variety.
Glue the leaves to the inside back of the carrot top so they peek out like a small tuft. Angle them outward slightly. Make enough for all carrots before moving on.
You should now see the carrot character come alive. Even before assembly, the cones should already feel sweet and polished.
7. Arrange the carrots around the base
Lay the carrots around the ring before gluing. Point most of them inward toward the center opening or slightly downward around the sides, just like the photo. This creates the clean radial flow that makes the wreath feel intentional.
Start at the bottom where the bow will sit, then build up both sides, then finish across the top. Alternate colors carefully. Keep especially bright orange pieces spaced apart so they do not dominate one area.
Visual checkpoint: the silhouette should feel round, not spiky. If carrots stick out too far, rotate them slightly.
8. Glue the first layer
Attach the carrots one at a time. Use glue along the back seam and near the top rim so each cone sits securely on the base. Keep the points aimed consistently around the ring.
Do not flatten the cones completely against the base. Let them keep some lift so the wreath has gentle dimension. Leave a little room between some carrots for extra leaves and later adjustments.
9. Build fullness with a second layer where needed
After the first ring is attached, add a few carrots over the first layer in sparse spots. The bottom sides and upper curve often need a second pass to look full. Overlap these carrots slightly to hide any visible base.
Try not to cover every seam with another carrot. You still want to see the individual forms. The prettiest version has fullness but remains readable as a wreath of distinct cones.
10. Add extra green leaves between carrots
Cut and fold more green leaves, then tuck them into gaps between carrots. These extra leaves soften transitions and make the wreath feel fresh. They also help guide the eye around the ring.
Use restraint. Too many leaves can make the design look messy and steal attention from the carrot forms. The best balance is enough green to brighten the wreath, but not so much that it becomes leafy.
11. Tie and attach the bow
Use cream ribbon to tie a simple soft bow with medium tails. The bow in the image is understated, which is part of the charm. It should finish the wreath, not overpower it.
Glue or wire the bow at the bottom center. Let the tails fall naturally. Trim the ends at an angle or soft notch. If you want a slightly more romantic finish, use frayed edge ribbon or soft cotton twill.
Visual checkpoint: once the bow is on, the wreath should feel complete and balanced. If the bottom looks heavy, reduce leaf bulk around the bow area.
12. Refine the overall shape
Hang or prop the wreath vertically and examine the roundness. Because cones are directional, one side can accidentally look wider than the other. Adjust by trimming a leaf, rotating a carrot, or adding one piece to a thin area.
Look specifically at the inner opening. It should stay generous and fairly even all the way around.
13. Strengthen the assembly
Once everything is where you want it, reinforce any loose carrot tips or lifted edges with a tiny additional dot of glue. This is especially useful if the wreath will hang on a front door where movement may loosen delicate pieces.
14. Optional finishing touches
You can leave the wreath matte and simple, or add tiny upgrades. A few ideas:
- Brush a touch of warm brown ink along carrot segment lines
- Add a tiny label tag on the bow
- Mix in one or two miniature paper eggs for a spring market feel
- Use a velvet or gauze bow for a softer luxury finish
Troubleshooting
My carrots look crushed
The paper may be too thin, or you may be pressing them too hard while gluing. Use medium weight cardstock and hold only at the seam area.
The wreath feels too busy
Reduce the number of colors or remove a few extra leaves. The cone pattern should be easy to read.
My bow looks awkward
Make it smaller. In this design, the bow is a finishing detail, not the main event.
The carrots keep slipping while I glue
Work with the wreath flat on the table and let the first few anchor carrots fully set before continuing.
The inner circle is uneven
Angle the next carrots slightly outward in tight spots and inward in sparse ones. Small angle changes fix a lot.
Finishing details
Store the wreath in a shallow box with tissue stuffed lightly inside the center opening so the cone shapes do not get squashed. If you want the piece to last for multiple seasons, avoid hanging it in direct rain or intense sun.
Optional upgrades:
- Add stitched detail lines to each carrot with a white gel pen
- Use double toned leaves in sage and dark green
- Wrap the base in natural linen ribbon before adding carrots
- Add mini wooden beads to the bow center for a subtle handmade accent
This wreath is one of those crafts that looks impressive because of repetition and clean color editing. Take your time on the arrangement and the final result will feel charming, modern, and very giftable.
Shop Similar
- Muted orange and blush cardstock for paper carrots
- Green cardstock assortment for folded leaves
- Foam wreath form for lightweight paper wreaths
- Cream ribbon for soft spring wreath bows
- Bone folder and scoring board for cardstock crafts
Style It With

Layered Paper Flower Wreath How To Guide
What you’re making
You are making a lush paper flower wreath covered edge to edge in softly folded blooms, using dusty spring shades like blush, lavender, buttercream, cream, mint, and deep leafy green. The result feels abundant and romantic, with enough variation in flower size and petal shape to mimic a fresh floral wreath while still clearly celebrating handcrafted paper detail.
This project is ideal if you want a statement wreath with a full garden look. It is richer and denser than the minimalist geometric versions, and it gives you plenty of freedom to mix flower styles while staying inside one cohesive palette.
Materials + tools
- Cardstock or crepe paper in blush, dusty rose, lavender, cream, butter yellow, mint, and leafy green
- Heavier cardstock or chipboard for the base
- 1 wreath form or cardboard ring about 12 to 16 inches
- Pencil
- Scissors
- Craft knife
- Hot glue gun and glue sticks
- Tacky glue
- Bone folder
- Small round objects for tracing circles
- Floral wire, optional
- Ink pads or chalk pastels for gentle edge shading
- Paper punches, optional
- Small beads or cardstock circles for flower centers
- Green paper for leaves
- Ribbon or hook for hanging
Finished size + customization notes
This design looks best slightly fuller and larger than the earlier wreaths. A 12 inch base often becomes a finished wreath around 15 to 17 inches once the flowers are added.
You can customize by changing the flower mix. Use mostly rounded petals for a soft heirloom look, or add more pointed flowers for a slightly wildflower feel. Dark green flowers used sparingly add contrast and keep the pastel palette from becoming too sweet.
Step by step instructions
1. Prepare a strong wreath base
Because this wreath carries many layered pieces, start with a sturdy base. Cut a cardboard or chipboard ring with a generous thickness, around 2 1/2 to 3 inches wide. Reinforce it by gluing two identical rings together if needed.
Cover the ring in plain paper or green cardstock. This makes any tiny gaps less noticeable and gives a clean foundation for gluing flowers.
Attach a hanger to the back now. Once the wreath is full of flowers, it becomes much harder to add neatly.
2. Decide on your flower vocabulary
The image features multiple flower types, but they all live in the same soft paper world. Plan for three or four simple bloom styles:
- Rounded six petal flowers
- Daisy style blooms with many narrow petals
- Pinwheel or accordion flowers
- Tiny filler blossoms with four or five petals
Add a few leaf clusters so the floral ring feels grounded and organic.
The easiest way to keep variety looking intentional is to repeat each flower style several times rather than inventing a brand new design for every bloom.
3. Make petal templates
Draw a few templates on scrap paper. One large rounded petal, one narrower petal, and one tiny filler petal will cover most needs. You can cut flowers as individual petals or as connected shapes folded from paper.
For beginners, connected flowers are easiest. Fold a square of paper into quarters or eighths, cut a petal silhouette along the open edges, then unfold to reveal a flower shape. This method is quick and gives pleasing symmetry.
Visual checkpoint: lay your first few template flowers on the table. They should look related, even if they are not identical.
4. Cut flowers in batches
Cut a generous number of flowers before assembly begins. For a full wreath, you may need 40 to 70 blooms depending on size. Make large flowers, medium flowers, and tiny fillers.
Keep your palette balanced. You want soft colors repeated across the whole ring. If you use butter yellow, echo it in several spots rather than only once. If you include deep green flowers, scatter them lightly for contrast.
5. Shape the petals
Flat flowers can still be pretty, but shaping is what makes this wreath look lush. Use a bone folder, pencil, or your fingers to curl petals upward slightly. Cup the flower centers by pressing gently with your thumb or the rounded end of a brush.
For accordion or pinwheel flowers, score or fold evenly first, then compress and glue the centers so the petals radiate outward.
You should now see dimension. Each flower should hold a little lift and shadow rather than lying completely flat.
6. Build layered blooms
Take some larger flowers and glue a smaller flower on top in a coordinating or contrasting tone. Add a center dot, bead, or rolled paper coil. Layering different sizes creates the full, complex look in the photo.
Try combinations like blush over cream, lavender over pale pink, or yellow over buttercream. For a sophisticated look, avoid stacking very high contrast colors too often.
7. Make filler flowers and leaves
Tiny blossoms are essential because they fill awkward spaces between larger blooms. Cut small four petal and five petal flowers in mint, cream, pale pink, and lavender. Then make leaf clusters in medium and dark greens.
Fold leaves lightly down the center and pinch their bases. You can also make little clover like dark green shapes to echo the image.
Visual checkpoint: your table should now look like a paper flower bar, with enough variety to build a rich wreath without improvising mid process.
8. Plan the large flower placement first
Lay the biggest blooms around the wreath base without gluing. Place them at uneven but balanced intervals so they feel natural. Then add medium flowers between them. Save the tiny flowers for the very end.
This stage matters more than people think. Good flower placement is what makes a floral wreath look lush rather than random. Step back often and rotate the base as you work.
9. Glue the main flowers
Begin gluing the large anchor flowers, then work down to medium flowers. Slight overlap is good. It helps hide the base and creates depth. Keep rotating the wreath so you do not accidentally build one heavy quadrant.
If you want the piece to mimic the photo closely, let the flowers completely cover the outer edge while keeping the center opening clean and round.
10. Fill in with smaller flowers
Now tuck in your filler blooms anywhere the base shows or where two large flowers meet awkwardly. This is where the wreath becomes abundant. Tiny flowers soften transitions and make the ring feel continuous.
Mix in different petal shapes so the eye keeps discovering new detail. If one area looks flat, add a layered flower there rather than another plain single bloom.
11. Add leaves for structure
Leaves stop the floral mass from turning into one undifferentiated cloud. Insert leaf clusters behind flowers and into little gaps around the outer and inner edges. Let some leaves peek from beneath blooms rather than sitting on top.
Use greens strategically. A few dark leaves near pale blooms add depth instantly.
12. Refine color balance
Hang the wreath or stand it upright. Look for color clumps. Are all the yellows on one side? Is one area too pale? Adjust now by swapping a few smaller flowers or adding one contrasting bloom.
The most professional floral wreaths feel balanced in tone as much as in shape.
13. Finish the inner and outer edges
Check the silhouette carefully. The outer edge should feel soft and lush, while the inner circle should remain intentional. Trim or reposition any flower that juts too far inward and makes the opening look ragged.
This small refinement makes the entire wreath look custom and editorial.
14. Add final centers and details
If some flowers need more life, add cardstock circles, pearl centers, rolled paper spirals, or tiny fringed centers. Use this sparingly. Not every bloom needs a center treatment.
Optional subtle shading on petal edges with chalk pastel can also make the flowers feel more dimensional and expensive.
Troubleshooting
My flowers look flat
Curl the petals more and add layered centers. Dimension comes from shaping as much as color.
The wreath feels chaotic
Reduce your flower styles to three strong repeats and keep the palette more controlled.
I can see too much base
Use small filler flowers and leaf clusters rather than trying to jam in another oversized bloom.
It looks too pastel and washed out
Add a few dark green flowers or deeper dusty rose blooms for contrast.
My paper tears when I shape petals
Your paper may be too dry or too thin. Use a smoother cardstock or lighter hand when curling.
Finishing details
A flower wreath like this stores best in a deep box with nothing pressing down on the petals. Tissue can support the center opening so the ring keeps its shape. Indoors, it can last beautifully for multiple seasons.
Optional upgrades:
- Add tiny paper butterflies tucked between flowers
- Use crepe paper for a softer botanical texture
- Mix matte and slightly pearly papers for depth
- Attach a small trailing ribbon cluster at the lower side for a romantic finish
This wreath succeeds because it feels full but still edited. Think garden abundance, then refine until every bloom earns its place.
Shop Similar
- Pastel cardstock pack for paper flower making
- Crepe paper assortment in soft spring colors
- Hot glue gun for detailed floral paper crafts
- Flower shaping tools and bone folder set
- Chipboard sheets for sturdy wreath bases
Style It With
Daffodil and Pastel Egg Wreath Step by Step Tutorial
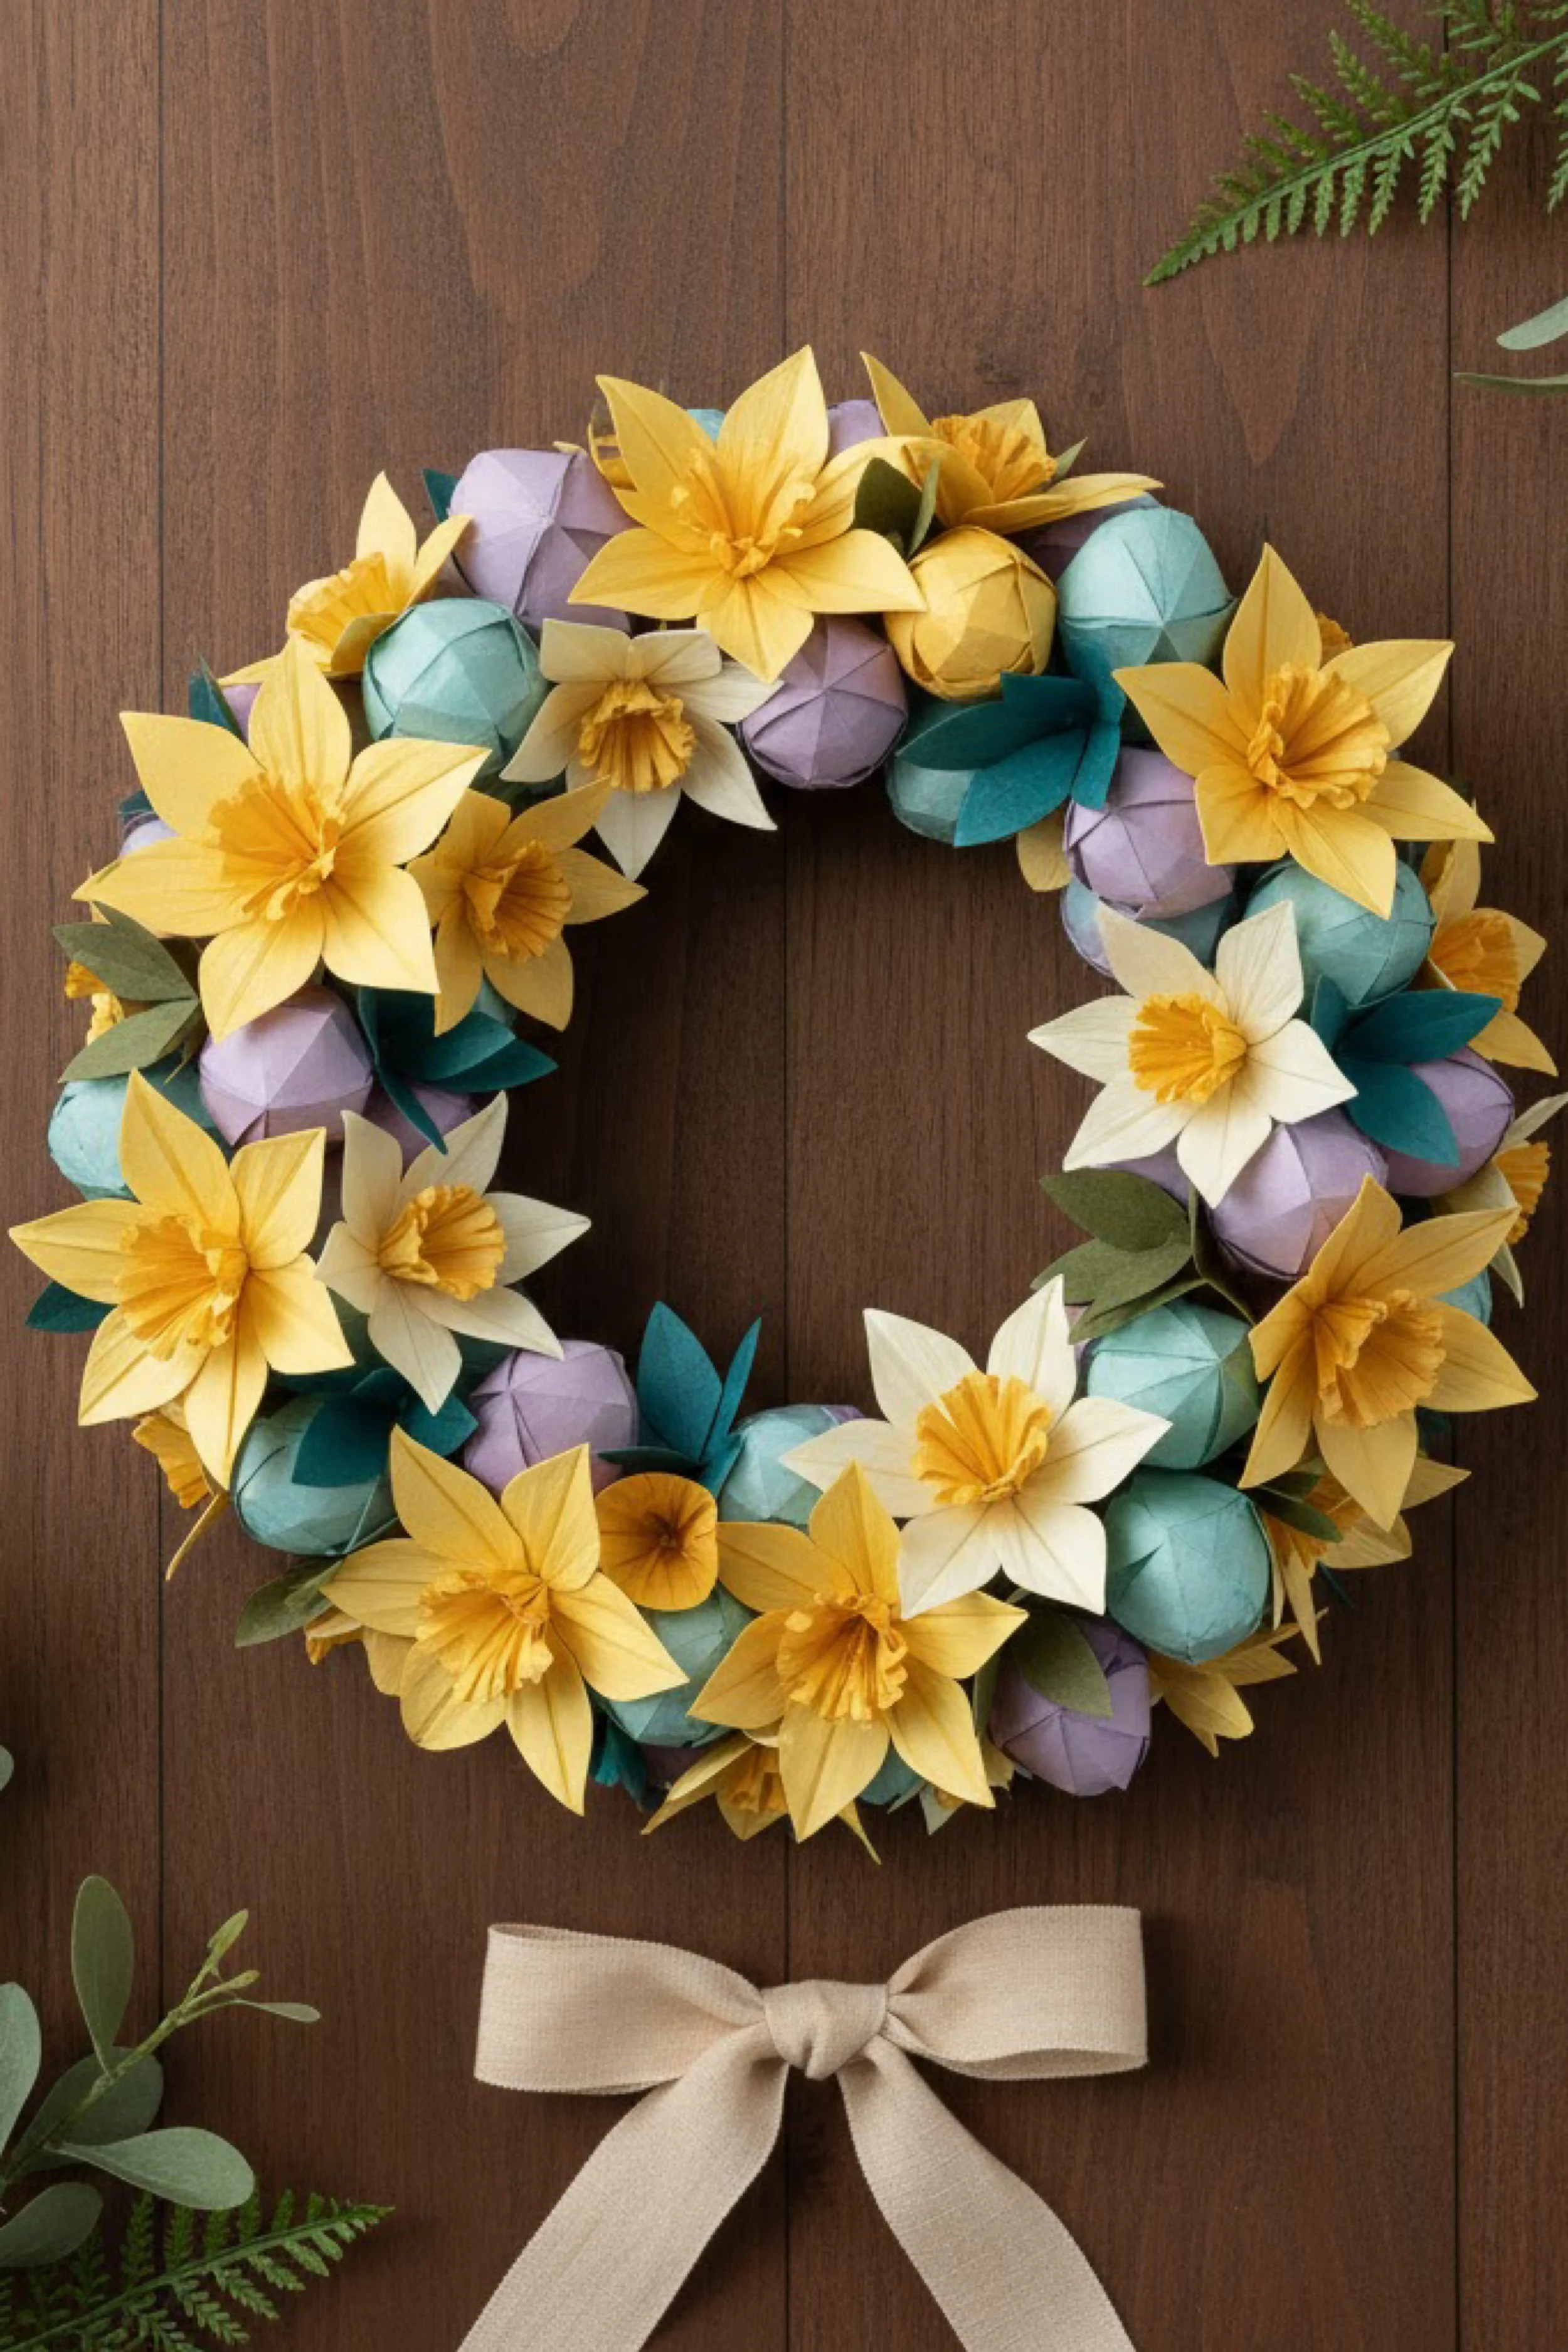
What you’re making
You are making a bright spring wreath that combines faceted pastel paper eggs with dimensional paper daffodils and a soft neutral bow. The mix of buttery yellow blooms and cool lavender, mint, and pale aqua eggs creates a classic Easter palette, but the faceted shapes keep the whole piece feeling fresh and modern.
This wreath is ideal if you want something fuller and more floral than a simple egg wreath, but still crisp enough to feel stylish on a front door or interior wall. It is joyful, detailed, and very photogenic.
Materials + tools
- Cardstock in yellow, buttercream, cream, mint, aqua, lavender, olive, and deep teal green
- Heavier cardstock or crepe paper for daffodils
- Green paper for leaves
- 1 wreath form or cardboard ring, about 10 to 14 inches wide
- Neutral ribbon for the bow
- Pencil
- Ruler
- Scissors
- Craft knife
- Bone folder
- Hot glue gun and glue sticks
- Tacky glue
- Floral wire, optional for flower support
- Round stylus or paintbrush handle for shaping petals
- Cutting mat
- Optional chalk pastel or ink for shading
Finished size + customization notes
A 12 inch base makes a full wreath around 15 to 17 inches once flowers and eggs are added. Plan on about 14 to 20 eggs and 8 to 14 daffodils depending on fullness.
If you want a softer version, reduce the yellow flower count and let the pastel eggs dominate. If you want a bold spring statement, increase the daffodils and use deeper green leaves for contrast. A larger bow creates more cottage charm, while a smaller bow keeps the look more modern.
Step by step instructions
1. Prepare the wreath base
Cut or gather a sturdy ring. Cover it in cream or light green paper so hidden areas still look tidy. Attach a hanging loop to the back first. Because this wreath includes heavier layered flowers, make sure the loop is anchored well.
Check the size of your base against your intended display spot. This design looks best large enough to show flower detail clearly.
2. Make the faceted eggs
Draw an egg template around 2 1/2 to 3 inches tall. Cut eggs from pastel cardstock in mint, aqua, lavender, pale yellow, and soft cream. Score diagonal or radiating facet lines across each egg, then fold gently to create geometric planes.
You can also make slightly puffed eggs by joining two mirrored halves over a slim center tab, but a scored flat egg is usually enough when the wreath already includes dimensional flowers.
Visual checkpoint: your eggs should look crisp and sculptural, with soft matte color and obvious planar surfaces.
3. Make enough eggs before moving on
Cut and shape all the eggs in one batch. Aim for at least 16. Lay them out on the table and check the palette. If the colors feel too sweet, add more mint and aqua. If they feel too cold, add one or two cream or yellow toned eggs to warm it up.
4. Create simple paper daffodil petals
Each daffodil needs six outer petals. Draw a pointed petal shape with a softly rounded base. Fold a square or stack several pieces of paper and cut multiple petals at once. You will need many, so batching helps a lot.
Lightly score a center vein down each petal and curl the edges gently backward with a stylus or the edge of scissors. This shaping is what makes paper daffodils look believable.
5. Make the trumpet centers
The cup or trumpet center is the iconic part of the daffodil. Cut a strip of paper with one long edge snipped into fine fringe or softly scalloped points. Roll it into a short cylinder and glue. Flare the fringed edge outward slightly.
For a more realistic look, make the center a shade deeper or richer than the petals. A warm golden center inside a pale yellow bloom looks especially lovely.
You should now see real daffodil character emerging. Even one assembled sample bloom should instantly suggest spring.
6. Assemble the daffodils
Glue six petals around the back of each trumpet center. Overlap the petal bases slightly so the flower feels full. Press gently until secure. Add a small backing circle behind the petals if needed for stability.
Make enough daffodils to distribute around the wreath evenly, usually 8 to 12. Vary the size slightly for a natural look, but keep most blooms within a similar range.
7. Add leaves and filler greenery
Cut pointed leaves in olive, sage, and dark teal green. Some can be long and narrow like daffodil foliage, while others can be broader accent leaves. Fold each leaf lightly along the center.
The image uses leaves as background support rather than dominant foliage, so keep them elegant and tucked in, not wild and sprawling.
8. Tie the bow now
Create a soft bow from neutral ribbon. A simple tied bow with two tails works beautifully. Leave it slightly oversized if you want a traditional Easter feel, or smaller if you want the flowers to remain the stars.
Set the bow aside for final placement at the bottom.
9. Arrange the eggs first
Lay the eggs around the wreath base with no glue. Spread colors evenly and allow a few to overlap. Keep in mind that flowers will sit on top of or between them, so leave intentional pockets. The eggs form the scaffolding of the design.
You should now see the circular flow of the wreath. If the ring already feels balanced, you are ready to layer the blooms.
10. Glue the egg layer
Attach the eggs around the ring, keeping the outer and inner circles relatively smooth. Use small glue amounts so the eggs retain their crisp surfaces. Step back often to make sure the silhouette stays round.
11. Add the daffodils in clusters
Place the daffodils next, clustering them in small groups around the ring. Avoid perfect spacing. A few groups of two and three blooms feel more natural than one flower every exact two inches.
Let some daffodils overlap eggs and some sit slightly deeper in the arrangement. This layering creates a lush, designed look. The flowers should feel integrated, not perched on top like afterthoughts.
Visual checkpoint: the yellow blooms should brighten the wreath in several places, creating movement around the circle.
12. Tuck in leaves and greenery
Insert folded leaves behind blooms and between eggs. Use deeper greens near pale flowers to create depth. The leaves also help hide any remaining visible base.
Be selective. This design works because the flowers and eggs do most of the visual work. Greenery should support, not overwhelm.
13. Attach the bow and refine the bottom
Glue the bow at the bottom center. Let its tails drape softly below the ring. If needed, add one or two extra eggs just above the bow so the transition feels full and finished.
The bow anchors the composition and gives the wreath a graceful ending point.
14. Adjust the final balance
Stand the wreath upright and examine it from a distance. Look for heavy spots. One side may need an extra bloom, a darker leaf, or one more pastel egg. Fine tuning is where the project becomes polished.
Pay special attention to the inner opening. Because the flowers are larger than eggs, they can crowd the center quickly. Trim or reposition any bloom that narrows the opening too much.
15. Add subtle detail if desired
You can deepen the trumpet centers with a hint of orange ink, shade petal bases with soft yellow pastel, or ink egg edges for a more editorial finish. These details are optional but lovely for close up photography.
Troubleshooting
My daffodils do not look realistic
Shape the petals more. Flat petals make even a well assembled bloom look stiff. Curl and cup them slightly.
The wreath is too yellow
Remove one or two blooms and replace with more pastel eggs or cool toned leaves.
My eggs look lost under the flowers
Use slightly fewer daffodils or place them in clusters rather than all the way around.
The bow looks disconnected
Tuck one or two leaves or eggs slightly behind the knot so it feels integrated.
The wreath is too bulky
Use fewer layered flowers and keep leaves flatter against the base.
Finishing details
This wreath stores best in a deep box where the daffodil trumpets do not get crushed. You can also hang it on a closet wall inside a garment bag style cover during the off season.
Optional upgrades:
- Add tiny paper buds or closed blooms between daffodils
- Use crepe paper for the flower centers for even more softness
- Add a few speckles to the eggs for an organic finish
- Attach a small handwritten spring tag to the bow
The charm of this wreath comes from combining two spring icons in one balanced design. Let the flowers bring joy, let the eggs bring structure, and keep the overall palette calm and edited.
Shop Similar
- Yellow and cream cardstock for paper daffodils
- Pastel cardstock for geometric paper eggs
- Neutral ribbon for spring wreath bows
- Foam wreath forms for layered paper wreaths
- Paper flower shaping tool set
Style It With
The beauty of this wreath collection is how versatile it feels once you see the pieces together. You can lean into the soft pastel eggs for a more modern spring look, choose the carrot wreath for something playful and welcoming, or go all in on layered flowers and daffodils when you want that fuller garden inspired effect. Each design offers its own mood, but all of them prove the same point: paper can be surprisingly elegant when color, texture, and shape are handled with intention. A few careful folds, a balanced palette, and thoughtful layering can turn an ordinary afternoon craft session into décor that looks truly special on the wall.
These are also the kinds of projects that reward slow making. You can cut pieces assembly style, shape petals while listening to music, arrange colors until the balance feels just right, and enjoy the satisfying process of watching a bare wreath base become something full and finished. That makes this collection especially lovely for seasonal crafting, because the experience is just as enjoyable as the final result. Whether you make one favorite wreath or work through all five for a full spring decorating moment, you will end up with something handmade, charming, and distinctly personal. The details are what make each piece memorable, and that is exactly what gives handmade spring décor its lasting magic.