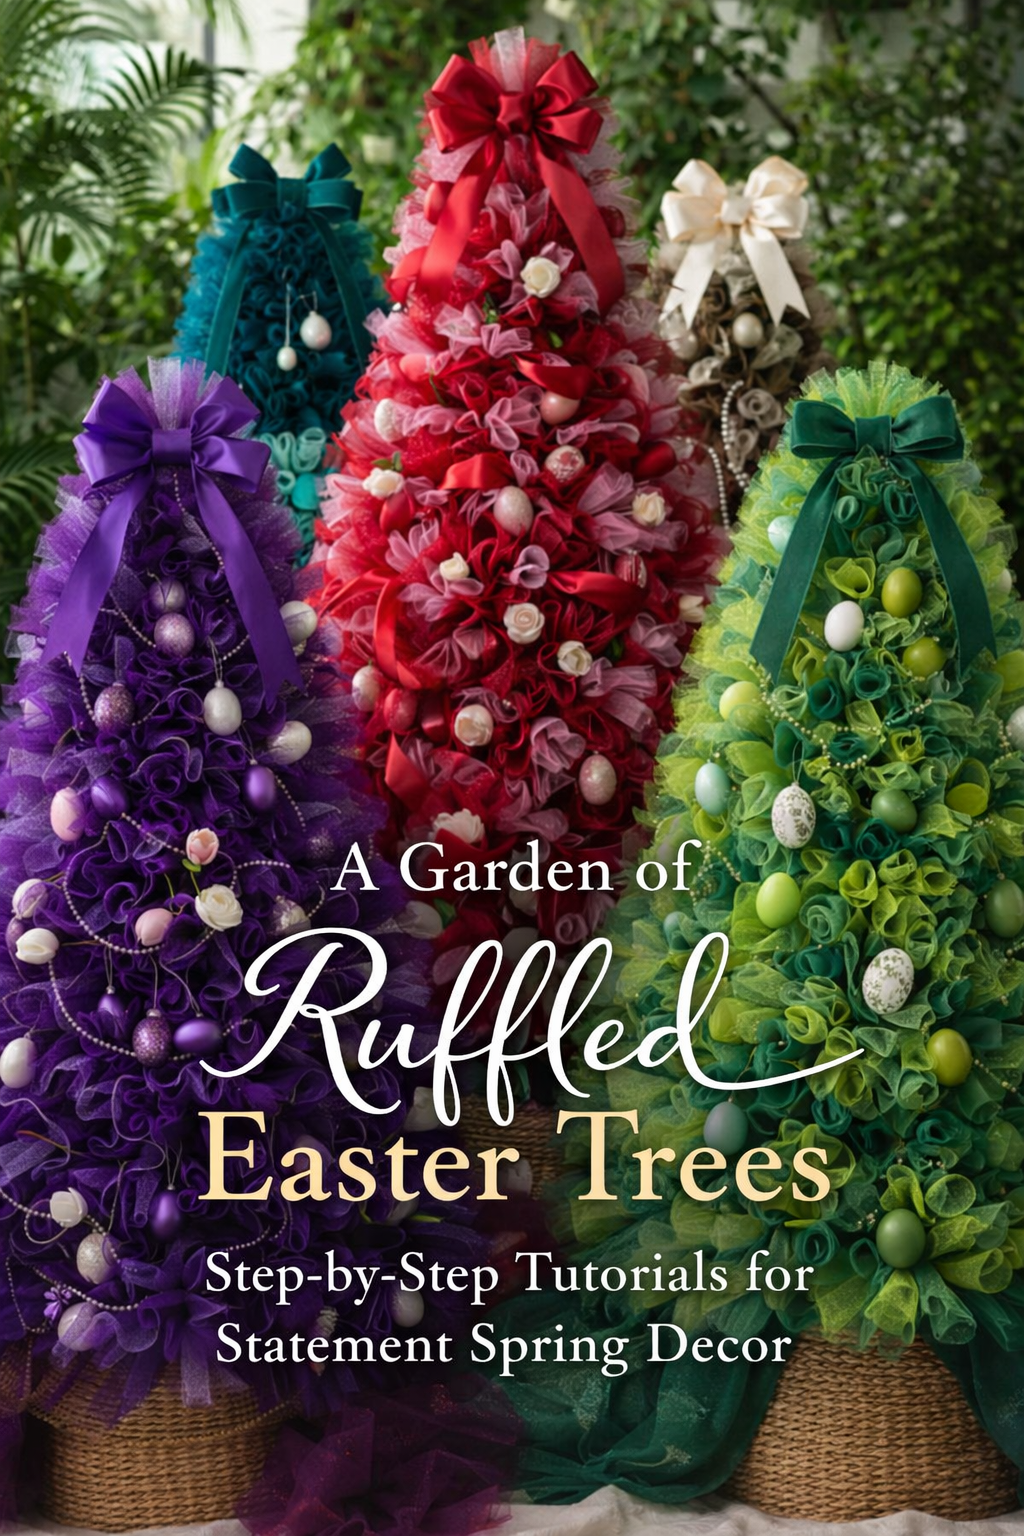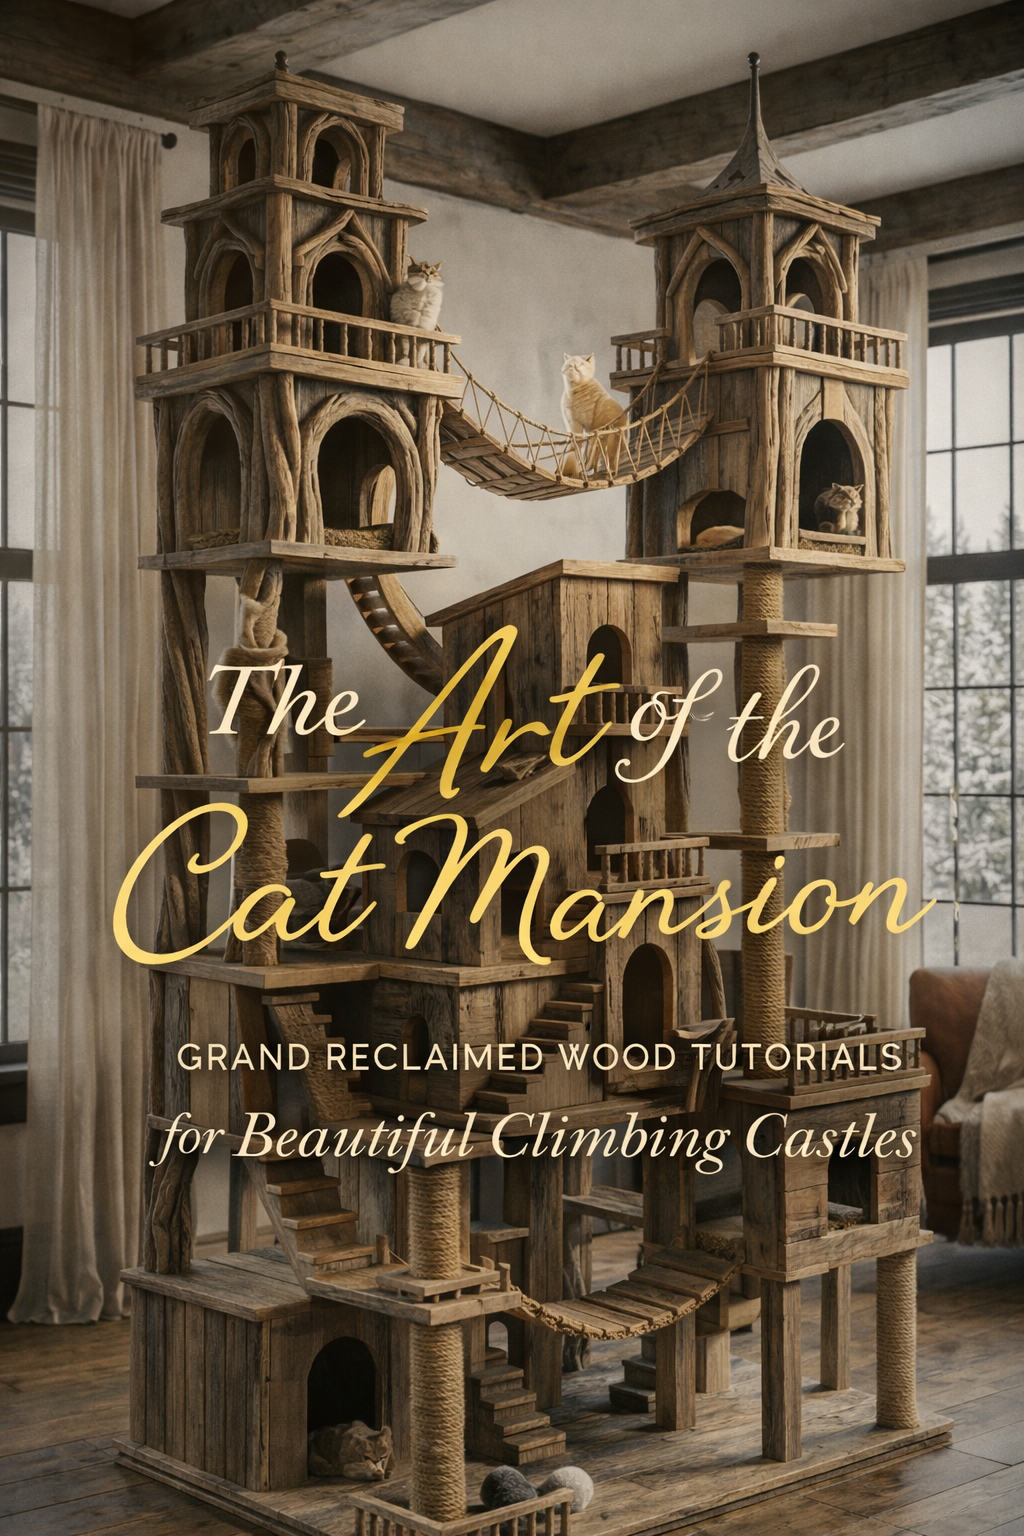
The Art of the Cat Mansion: Grand Reclaimed Wood Tutorials for Beautiful Climbing Castles

More like this
💡 Pro Tip: Why I Link to Amazon Search Results and Not One Product
In the Shop the Look and Style it With sections under each bikini, I link to Amazon search results, not single products. Here’s why this matters:
Hot bikinis sell out fast. I don’t want you clicking on a dead link to a sold-out item. Search pages stay updated.
You get more options. Love the vibe but want a different color, cut, or price point? The search results give you everything that matches the look and energy.
I curate each search carefully. These aren’t generic. I spend hours crafting keywords that bring up exactly the kind of bikinis I’d wear—or recommend to my hottest friends.
Support with no pressure. If you click a link, browse, and buy something later, I may earn a small commission at no extra cost to you. That helps me keep bringing you curated collections like this one—powerful, seductive, and always fresh.
So dive in. Click through. Try something risky. These aren’t just bikinis—they’re commands, statements, and maybe even your new favorite weapon of choice.
There is something quietly powerful about a cat mansion that rises from the floor like architecture rather than furniture. It changes the room. It creates presence. It becomes a place not just for your cats, but for the way your home feels.
These reclaimed wood builds are not about basic cat trees. They are about scale, structure, and intention. Each one carries the warmth of aged wood, the rhythm of levels and movement, and the kind of detail that makes it feel collected rather than assembled. When done right, a cat mansion does not sit in a space. It belongs to it.
What follows is a series of step by step builds designed to help you recreate that presence. From airy twin towers to industrial loft structures and soft coastal forms, each tutorial is grounded in real construction while still honoring the beauty that makes these pieces worth building in the first place.

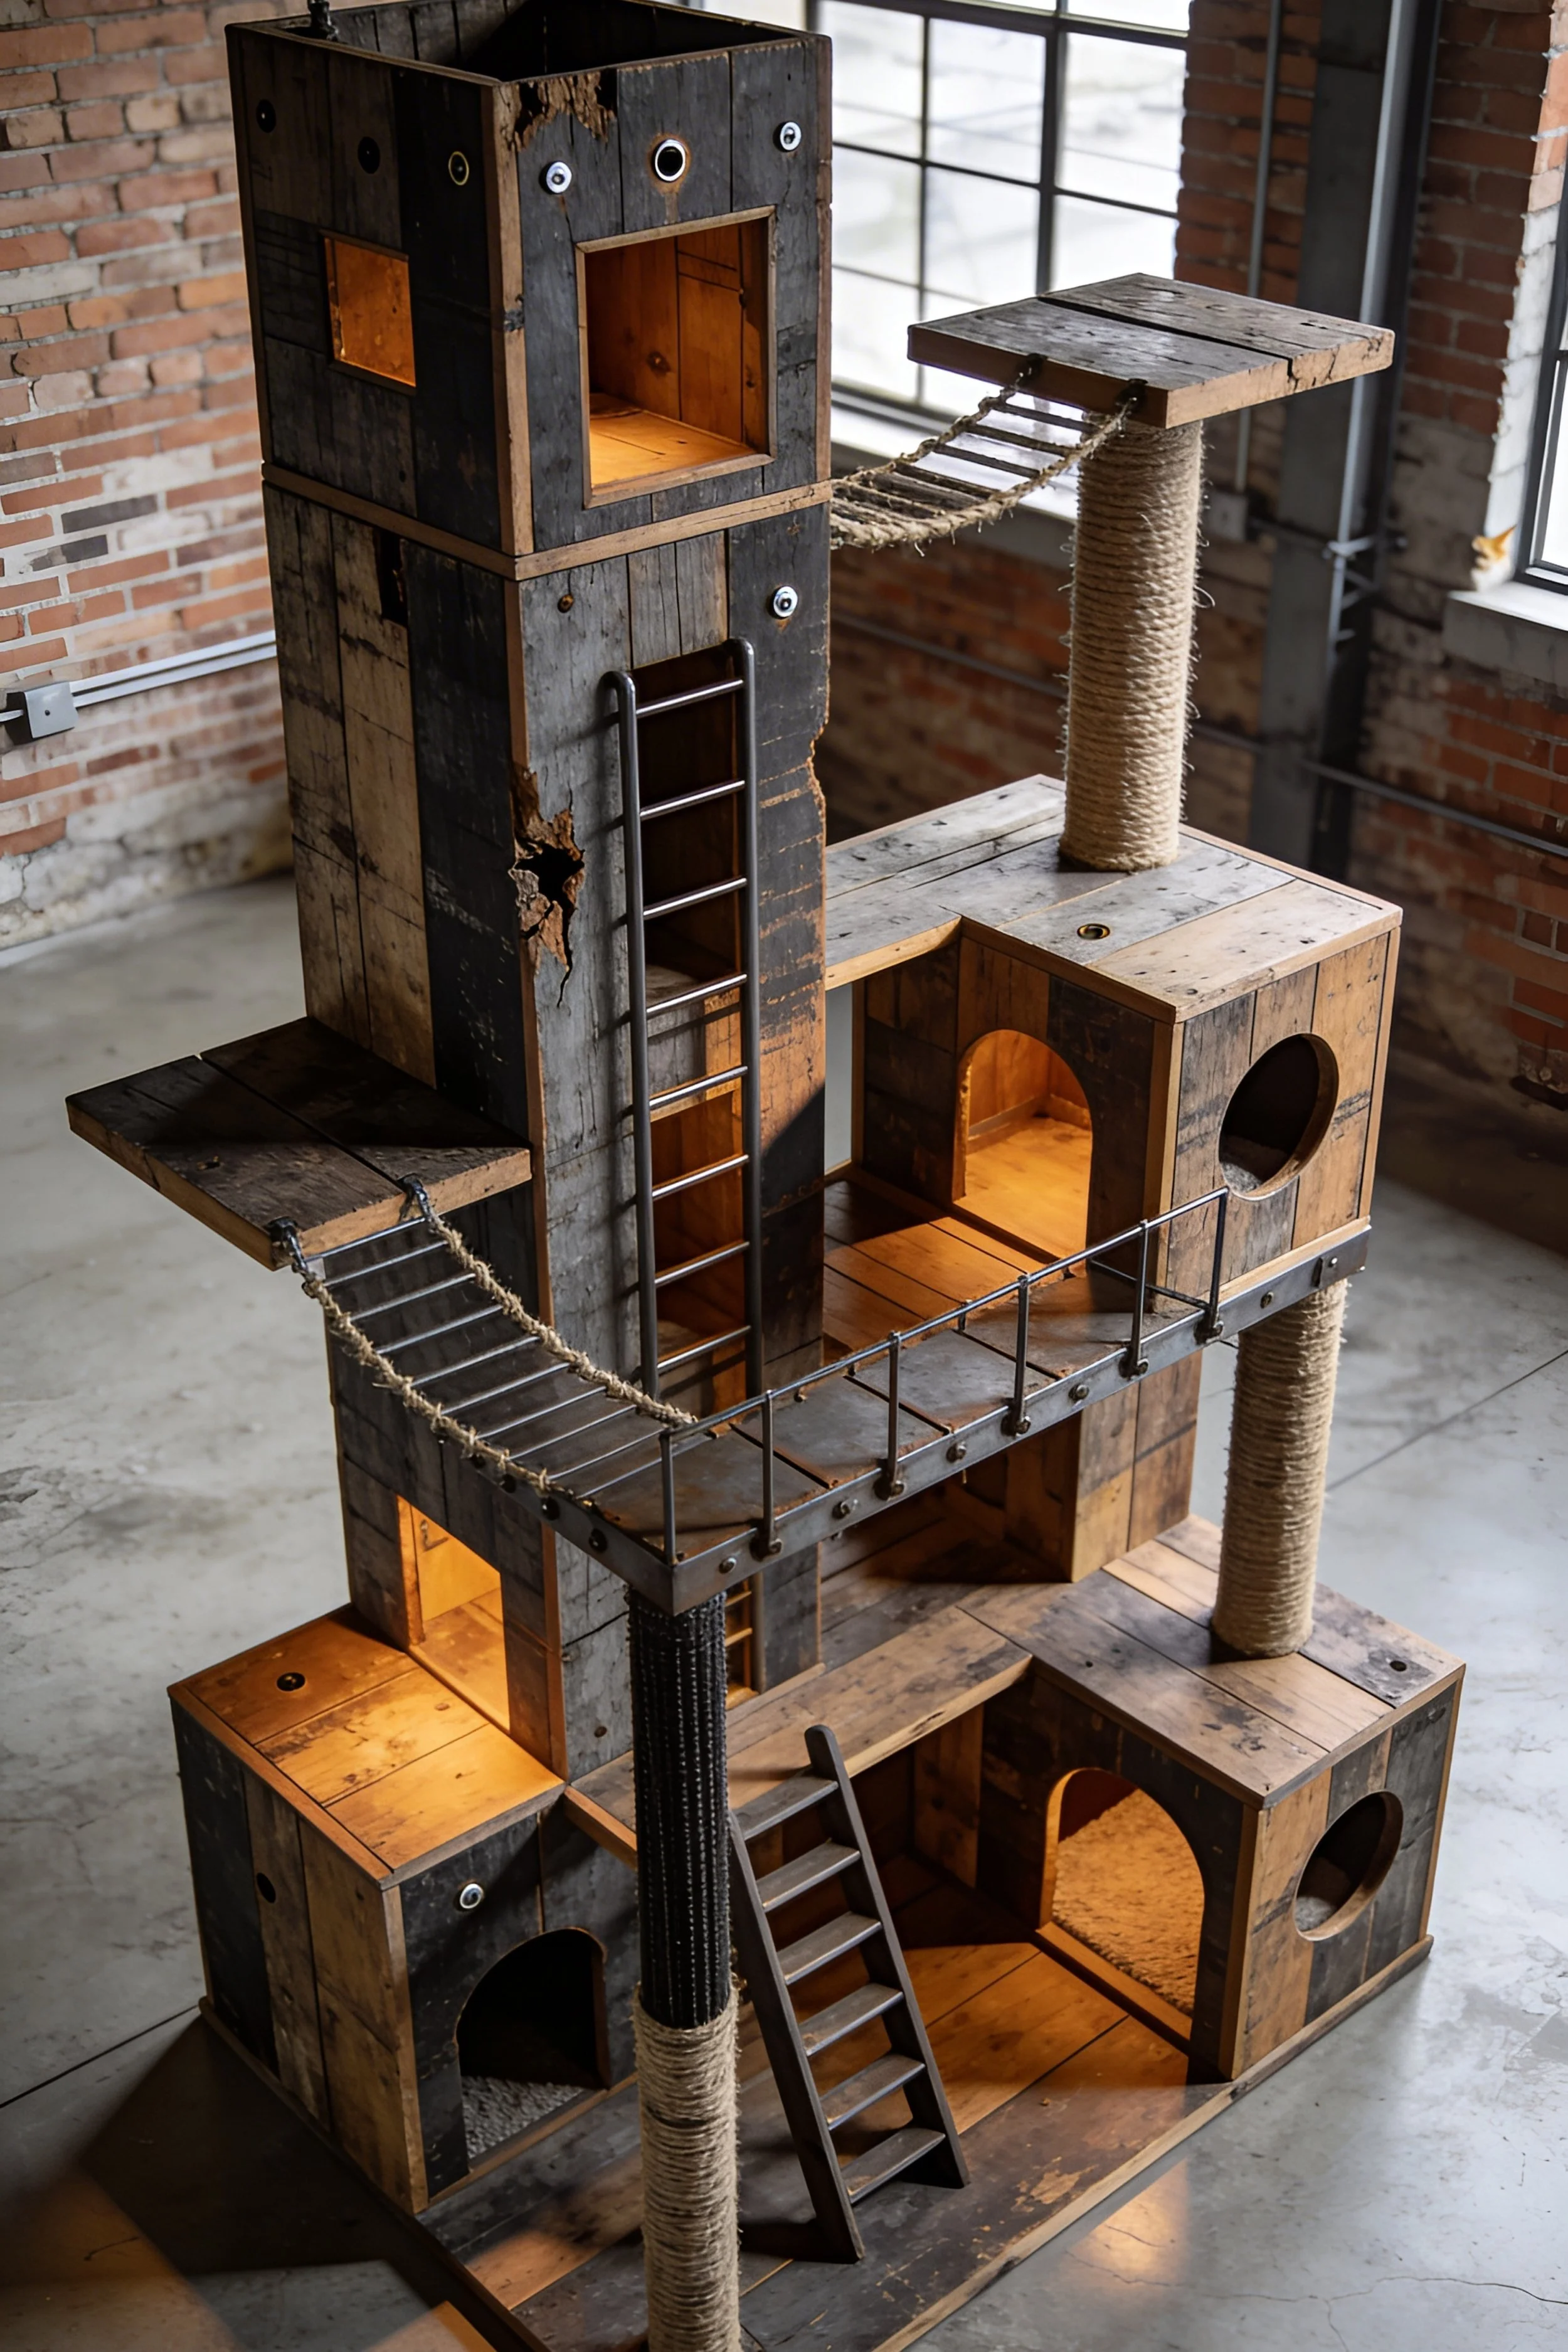
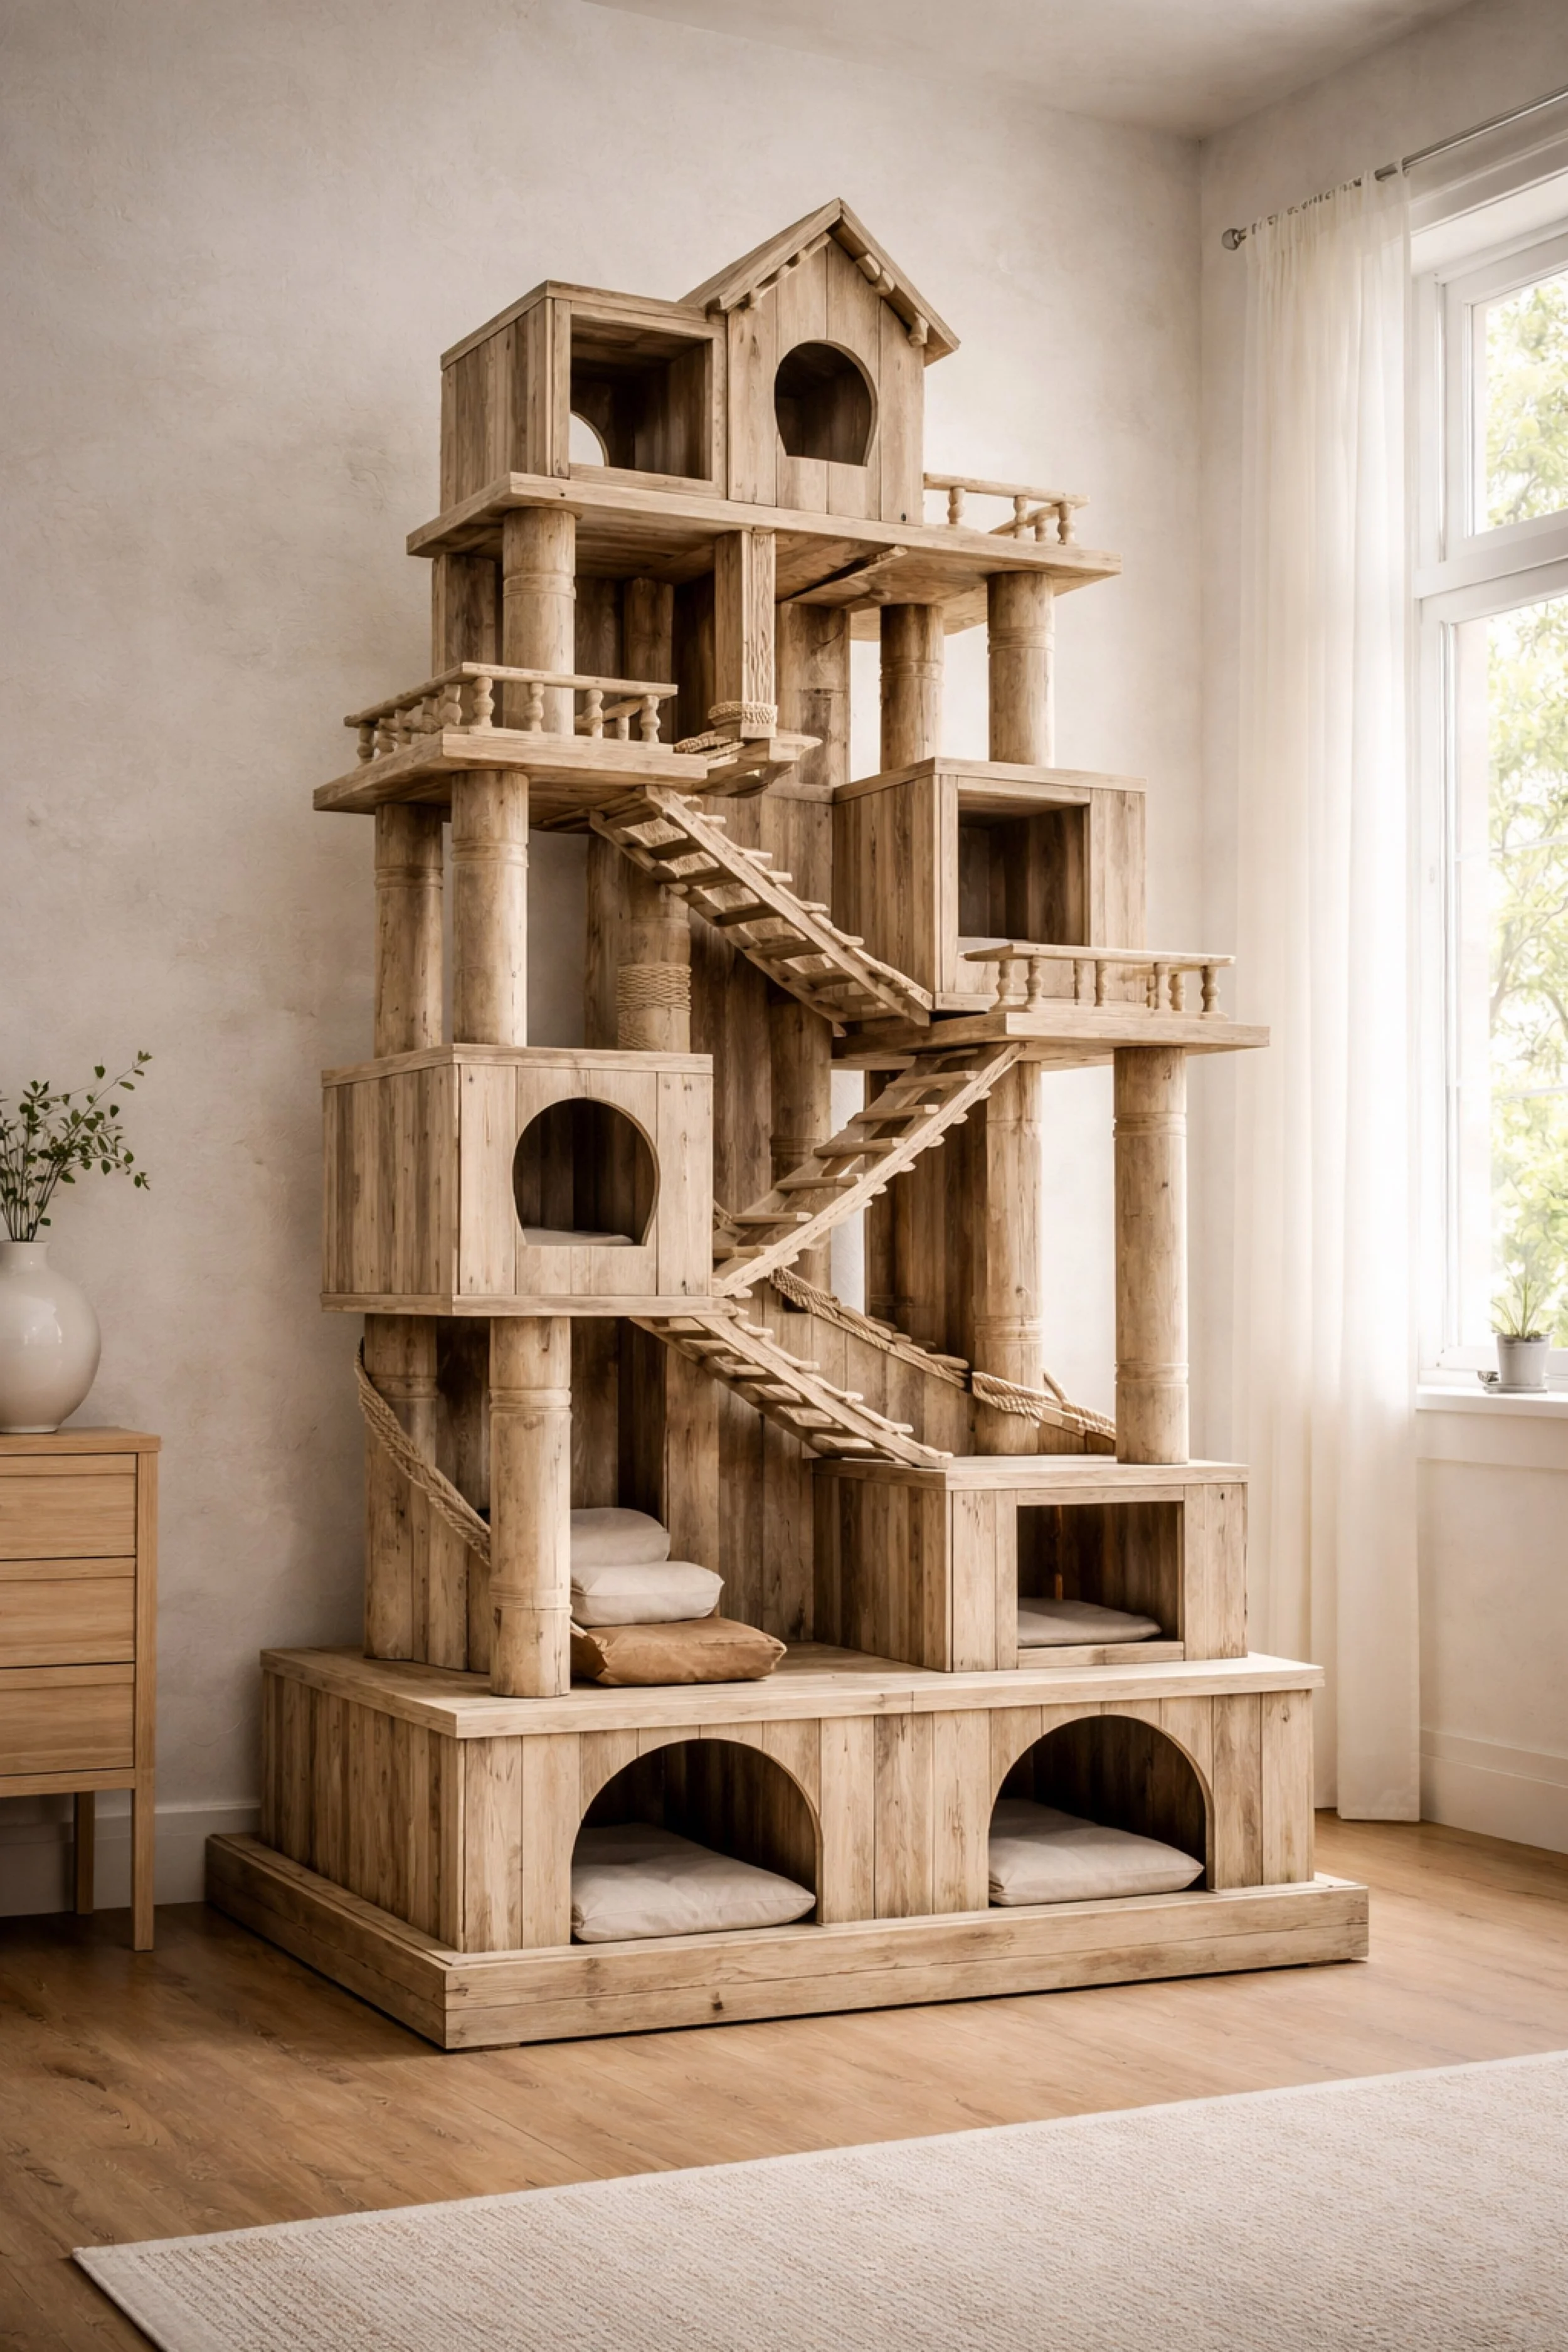
Reclaimed Wood Cat Castle Tower Step-by-Step Tutorial
What you’re making
You’re building a dramatic floor standing cat castle inspired by the towering reclaimed wood look in the photo, with multiple house style cubbies, elevated perches, stairs, rope bridges, and two tall lookout towers. The finished piece should feel sculptural and architectural, almost like a miniature rustic fortress made for climbing, hiding, lounging, and watching the room from above.
This version works especially well if you want a statement piece that feels handmade and custom rather than store bought. The goal is not factory perfection. The goal is sturdy, cat safe, beautifully weathered, and full of vertical interest.
Materials + tools list
- 3/4 inch plywood or furniture grade cabinet plywood for platforms, cubbies, and base
- Reclaimed wood boards, pallet boards, or faux reclaimed cladding for visible faces
- Solid 3x3 or 4x4 posts for structural legs
- Additional branch style reclaimed pieces or sanded driftwood style posts for decorative tower framing
- 2x2 lumber for internal framing and stair supports
- Natural sisal rope for scratching posts and bridge rails
- Wood screws in 1 1/4 inch, 2 inch, and 2 1/2 inch sizes
- Wood glue
- L brackets or flat mending plates for hidden reinforcement
- Sandpaper in coarse, medium, and fine grits
- Jigsaw for arched openings
- Circular saw or table saw
- Drill and driver bits
- Orbital sander
- Clamps
- Measuring tape
- Carpenter square
- Pencil
- Non toxic water based wood finish or clear matte sealer
- Upholstery stapler
- Thin carpet, felt, wool blend mat, or removable pet safe pads for sleeping zones
- Optional LED puck lights for cubbies
- Optional dowels or turned spindles for balcony rails
- Optional heavy duty furniture wall anchors for extra anti tip safety
Finished size + customization notes
A practical finished size for this look is about 72 to 92 inches tall, 40 to 60 inches wide, and 26 to 36 inches deep. If you have large cats, lean toward deeper platforms and roomier cubbies. If you have lightweight cats and want a more delicate look, you can slim some of the tower framing while keeping the structural posts heavy.
For the closest visual match, use a broad base, a centered multi room middle house, one taller tower on the left, a second lookout tower on the right, and at least two bridge connections. If your room has lower ceilings, reduce each upper tower by one level rather than shrinking every platform. That preserves the dramatic proportions from the photo.
Step-by-step instructions
1. Plan the footprint and decide your maximum height
Start by marking out your base on the floor with painter’s tape. For a look like the photo, a 48 by 30 inch base is a strong starting point. Then mark where your two tall towers will rise and where the central house mass will sit in between them.
This planning stage matters more than most beginners expect. A cat castle this tall can become awkward fast if everything is stacked in a straight line. You want visual rhythm. Place your left tower near one back corner, your right tower near the opposite side, and the main house slightly forward. That gives you room for stairs, underpasses, and a lower bridge near the front.
Visual checkpoint: You should now see a floor plan with three main vertical zones instead of one crowded column. If yours already looks cramped on the floor, it will feel even tighter once built.
2. Build a heavy, stable base platform
Cut a base from 3/4 inch plywood. If you want extra mass, double it by laminating two layers together with glue and screws. Trim the outer edge with reclaimed boards so the base looks thick and intentional.
Underneath, add a simple frame from 2x2 or 2x4 pieces. This keeps the base from flexing and gives you something solid to fasten the vertical posts into. If the final unit will stand on a slippery floor, add rubber feet beneath the base.
Do not skip mass at the bottom. The piece in the image feels elegant because the height is balanced by a grounded lower structure. Lightweight bases are the main reason tall cat trees wobble.
Tip: If you have very active jumpers, make the base slightly larger than the visible upper structure. That hidden footprint buys stability without changing the overall aesthetic much.
3. Install the primary structural posts
Before you build cubbies or pretty facades, set your real structure. Use 3x3 or 4x4 posts for the main corners that carry the upper towers and middle house. Predrill and fasten them from below the base and through hidden side framing.
For the reclaimed organic look shown in the photo, you can sheath some straight posts with decorative twisted wood pieces later. Structurally, though, rely on square lumber, not random branches. Branches can accent the look, but they should not be your only support.
Set at least four major supports for this design: two for the left tower, two for the right tower, and additional center support posts under the middle house. Add temporary braces while you check plumb.
Visual checkpoint: You should now see the skeleton of the castle. If you gently push a post and the whole base shifts, reinforce now before you add more.
4. Construct the lower cubbies and first level platforms
Build the ground level hideaways as simple plywood boxes. Use arched door openings for the softer storybook look. Each box can be 14 to 18 inches wide and 14 to 18 inches deep, depending on your cats. Attach them between posts and treat them like furniture carcasses, square and solid.
Then add the first set of walkable platforms above and beside these cubbies. Leave at least one open route underneath so the piece does not feel blocky. In the photo, part of the charm is that cats can move through, over, and around the entire structure.
Add cleats under every platform. A platform should never rely only on screws through its side panel. Support it from below with cleats, brackets, or frame rails.
5. Build the central house cluster
The middle of the design is a layered stack of house shaped rooms and balconies. Start with one main box around mid height, then add a smaller house volume on top or slightly offset. Cut arched doors and a sloped roof panel if you want the full cottage feel.
This central section should be deep enough for lounging, not just crossing. That means at least one room in the center needs enough floor area for a cat to fully curl up. Add a small front balcony with a rail for visual detail. Keep rail gaps narrow enough that paws cannot get stuck.
If you want the most photo accurate look, use stacked forms: large lower room, medium middle room, narrower upper room, then balconies stepping outward.
Visual checkpoint: You should now see the castle becoming layered rather than skeletal. If the center mass looks too flat, vary the depths of the boxes by 2 to 4 inches.
6. Frame the left tower
The left tower in the image reads tall, airy, and gothic with open arched framing. To recreate that feel, build stacked square platforms with open framed upper levels instead of fully enclosed boxes. Use reclaimed trim or curved wood pieces to form tall arch shapes on each side.
Fasten each level securely into the main support posts. Keep the upper platforms slightly smaller as they rise. That narrowing helps the tower look elegant and reduces top weight.
For the lower open chamber of the tower, add a soft mat or woven pad. Cats love semi sheltered perches that still allow them to look out.
If your arches are hard to cut, make simplified rounded openings instead. The overall silhouette matters more than perfect historic detailing.
7. Frame the right tower and scratching column
Build the right tower with similar height but slightly different detailing so the piece feels custom. In the photo, the right side feels more rugged and wrapped, with a visible sisal section below. Recreate that by using one main scratch post section wrapped tightly in sisal rope between two platforms.
To wrap rope correctly, apply a small amount of glue at the start, staple the first end on the hidden back side, and wind as tightly as possible with no gaps. Add glue every few turns and staple the finish at the back or underside.
Then add the upper lookout room and a top platform. This tower does not need to perfectly mirror the left. In fact, slight asymmetry makes the design feel more architectural and less mass produced.
8. Add stairs, ramps, and climbing transitions
Now connect the levels. For the strongest visual match, use a mixture of straight stairs, one curved ramp, and one short lower bridge. Stairs can be built from side stringers with shallow treads, or as simple tread blocks attached directly to an angled board.
Keep the rise between steps low enough for cats to move confidently. A rise around 3 to 5 inches usually works well. Add texture with thin carpet strips, routed grooves, or glued rope on the treads if the wood feels slick.
The curved ramp to the upper left platform is one of the most striking elements in the photo. You can fake that curve by kerf cutting the underside of plywood or by laminating thin strips over a simple curved frame.
Visual checkpoint: Your cats should now have at least two independent routes upward. If there is only one path to the top, the design may feel restrictive to multi cat households.
9. Build the rope bridges
Create bridges from small wood slats threaded or screwed onto rope side rails. For a more rigid bridge, attach slats to two narrow side rails and add decorative rope only as a handrail. If you want a more flexible suspended look, run rope through evenly spaced slats and tie secure knots between them.
Attach bridge ends to solid anchor points, not decorative trim. Test for sag. A gentle dip is attractive and cat friendly. A dramatic hammock sag can feel unstable and deter use.
One upper bridge between towers gives the grand castle effect. A shorter lower bridge near the center adds movement and makes the design feel more interconnected.
Tip: Cats usually prefer bridges that are wider than people think. Around 7 to 9 inches wide feels more confident than a very narrow strip.
10. Add balconies, rails, and trim details
Now move into the decorative stage that makes the structure feel like a real castle rather than utility shelving. Add balcony rails from dowels, reclaimed spindles, or square trim. Frame the arched openings with reclaimed wood strips. Trim roof edges and platform faces for a finished furniture look.
Balance detail with cleanability. Too many tiny ledges collect fur and dust. Focus the pretty details on the most visible areas: tower fronts, center balconies, and the outer edges of major platforms.
If you are using heavily weathered reclaimed wood, sand every surface that cats will touch. Rustic should never mean splintery.
11. Sand thoroughly and seal safely
Sand all edges, stairs, arched openings, and rope attachment areas. Round over any sharp corners. Check screw heads to make sure none sit proud. Fill unnecessary gaps where a small paw might wedge.
Seal the wood with a pet safe matte finish or water based polyurethane after confirming full cure time. You want protection from claws and the occasional hairball incident, but you do not want a glossy slippery surface.
If you love the dry unfinished look from the reference image, use a matte clear sealer rather than stain. That keeps the pale weathered tones visible.
12. Add bedding and invite use gradually
Place thin cushions, felt pads, or removable woven mats inside the cubbies and upper perches. Keep them low profile so the architecture still shows. Introduce the piece by placing treats at different heights, rubbing a little catnip on the mid level scratch post, and letting your cat explore on its own terms.
Do not force a nervous cat to the upper tower right away. Many cats claim the middle rooms first, then get bolder over several days.
Visual checkpoint: The finished castle should read as one connected destination, not separate boxes. Step back from across the room. If the eye travels up, across, and back down smoothly, you nailed the composition.
Troubleshooting section
The whole structure wobbles
This usually means the base is too light, the posts are under braced, or upper spans are too long. Add hidden corner blocks, metal brackets, and possibly a second layer to the base. For extra security, anchor the top rear to the wall with anti tip hardware.
My cats ignore the top levels
Upper zones may feel exposed or too difficult to reach. Add one intermediate landing, widen the bridge, or place a soft bed in the highest room. Cats are more willing to climb when they can pause along the way.
The stairs seem too steep
Reduce the rise and increase the number of treads. Even confident climbers appreciate a gentler route, especially when descending.
Reclaimed wood looks rough instead of elegant
Mix rough wood with cleaner trimmed edges. The contrast is what makes the piece look intentional. Sand, brush, and seal until the texture is visible but touch safe.
The bridges twist
Use wider anchor spacing, stiffer slats, or hidden flat supports beneath the decorative rope elements. Beauty matters, but cats want confidence underfoot.
Finishing details section
Brush away all sanding dust before sealing. After the finish cures fully, install the rope wraps, pads, and bridge slats. Consider lining the deepest cubbies with removable fleece or washable wool felt. If you want a more polished furniture look, add concealed warm puck lights inside one or two rooms, but keep cords fully hidden and inaccessible.
Optional upgrades that suit this look:
- Add a name plaque or carved crest at the base
- Install one hidden storage drawer for toys or grooming tools
- Add a second curved ramp on the right side
- Create a removable perch topper for easier cleaning
For long term care, vacuum weekly, retighten bridge ropes monthly, and inspect all screw joints every few months, especially if you have multiple cats launching onto the upper levels.
Shop Similar
- reclaimed wood boards for cat furniture builds
- sisal rope for scratching post wrapping
- water based matte wood sealer pet safe
- furniture grade plywood for diy cat tree
- wood dowels and trim for miniature balcony rails
Style It With
Industrial Loft Cat Tower Mansion DIY Guide
What you’re making
You’re creating a tall industrial style cat mansion with a stacked box tower, warm lit cubbies, metal ladder elements, sisal wrapped columns, and suspended walkways that feel right at home in a loft or modern rustic space. Compared with the first design, this one is more geometric and modular, with clean lines, stronger squares, and a moodier reclaimed wood finish.
It is an excellent choice if you want a cat structure that feels like functional art. The beauty of this look comes from the contrast between dark weathered wood, black metal accents, warm interior glow, and open vertical space.
Materials + tools list
- 3/4 inch plywood or laminated pine panels
- Reclaimed barn wood, dark stained cladding, or weathered planks
- 4x4 or doubled 2x4 posts for the main tower core
- 2x2 framing lumber
- Black pipe, steel rod, or metal flat bar for industrial rail details
- Sisal rope for wrap sections
- Metal ladder or custom wood ladder pieces
- Wood screws
- Pocket hole screws if desired
- Wood glue
- Metal brackets
- Drill and bits
- Circular saw or table saw
- Jigsaw
- Orbital sander
- Black matte hardware
- Warm low voltage puck lights or battery puck lights
- Non toxic matte finish
- Carpet remnants, felt pads, or cork shelf liner
- Heavy duty anti tip anchors
- Clamps
- Tape measure
- Carpenter square
Finished size + customization notes
A strong finished size for this style is about 78 to 90 inches tall, 36 to 48 inches wide, and 24 to 32 inches deep. Because this build has a more vertical stacked tower, base depth is especially important. Increase the base if you have large cats or plan to add lots of cantilevered platforms.
You can customize the warmth of the final piece by choosing either almost black reclaimed wood, smoky brown mixed tones, or a medium industrial walnut. If your room is very bright and airy, use a lighter weathered wood. If your room has brick, steel, or darker furnishings, lean into the moodier finish.
Step-by-step instructions
1. Create a simple elevation drawing
This style looks best when its boxy shapes are deliberate. Sketch the tower from the side and front before cutting anything. Plan one tall rear tower, one side sleeping cube at mid height, one upper lookout platform, one lower side cube, and at least two connecting walkways.
The reference image works because the tall tower acts like an anchor while the side rooms feel like satellites. Keep that in mind as you sketch. The main vertical shaft should be your tallest and visually heaviest mass.
Visual checkpoint: Your drawing should look like an abstract city tower for cats, not a random pile of cubes.
2. Build the oversized base and anchor points
Cut a thick base panel and reinforce it beneath with a frame. Mark where the main tower will sit, where your front sisal posts will rise, and where the side cube on the right will land. Predrill anchor points for the tower walls and vertical posts before assembly starts.
Because the tower is tall and rectangular, it is easy for beginners to underestimate side sway. Build for stability from the very start. Add cross framing inside the base and use structural screws where possible.
Tip: If you want hidden weight, a second laminated plywood base layer works beautifully and disappears once clad.
3. Assemble the main vertical tower shaft
Build the tall rear tower as a plywood box or framed shaft clad in reclaimed wood. Include at least three openings at different heights: one lower entry, one middle access opening, and one top lounge opening. These can be square or softened slightly with rounded corners.
Line the interior floors of each chamber with removable pads or thin carpet. If you are adding warm puck lights like the photo suggests, drill cord passages now and keep all wiring fully enclosed where cats cannot reach it.
This main shaft is the backbone of the whole project. Keep it square. Check every corner with a carpenter square before fastening permanently.
4. Add the lower side rooms
Build one lower box on the front left and another lower room on the front right. Use larger arched or circular openings here so the piece feels generous and cat friendly. These lower rooms also visually widen the bottom and help the structure feel planted.
Fasten the boxes to both the base and adjacent supports. Do not simply rest them beside the tower. They should contribute to the rigidity of the whole build.
Visual checkpoint: The silhouette should now feel grounded, with a broad lower footprint supporting the height above.
5. Create the middle bridge deck
In the photo, the most striking industrial feature is the bridge style walkway across the middle. Build this section like a mini cat catwalk. Use a solid wood deck or narrow slats, then add low metal railings from rod, flat bar, or black dowels.
Make the deck wide enough for confident movement, especially if your cats are large. Around 8 inches wide is often more practical than a narrow decorative bridge. Reinforce the bridge from below with hidden cleats or a metal flat bar if the span is long.
If you love the loft vibe, this is where you can let the metal accents show. Clean black rails against warm wood look especially good.
6. Install the vertical ladder and alternate route
Add a ladder on the front or side of the tower to echo the industrial look. For safety and usability, keep the rung spacing reasonable. Cats do not climb ladders the way people do, so most will use it as a gripping assist while jumping between nearby ledges rather than a full step by step climb.
That means the ladder should be paired with landings. Place a platform or box opening near the lower third and another at mid height. This gives cats multiple ways up and down.
If your cats are older, turn the ladder look into a shallow stair with metal sides. You will preserve the aesthetic while improving comfort.
7. Add the elevated side cube and upper perch
Build the right side mid level room as a box with one large circular opening and one side opening. Support it on a sisal wrapped post and a back brace tied into the main tower. Then add the highest lookout perch above on its own post, connected by a rope bridge or narrow suspended deck.
The key to this section is making it feel adventurous but still secure. Test the upper perch with firm pressure from multiple directions. If there is any twist, add diagonal support below the platform.
Visual checkpoint: You should now see a clear journey from ground level to the top perch in at least two ways.
8. Wrap the scratch posts
The industrial loft version benefits from strong vertical sisal columns. Sand the posts smooth first. Then wrap tightly from bottom to top, gluing and stapling the hidden side as you go. Keep the rope neatly packed with no gaps.
A tall scratch section is more useful than several tiny ones. The post should be long enough that a cat can fully stretch while scratching. Place at least one easy to reach scratch zone at ground or mid level rather than making every scratch point high.
9. Install warm interior lighting
To match the reference mood, add subtle warm puck lights inside select cubbies. Keep them soft, not theatrical. The light should make the wooden interior glow, not look like a stage set. Battery operated push lights are the easiest option if you want to avoid concealed wiring.
Mount the lights where curious paws cannot dislodge them. Test brightness at night. Too much light can make a den feel exposed, while a soft amber glow makes the cubbies feel inviting.
This is optional, but it elevates the piece beautifully in the evening.
10. Add access stairs and landing transitions
Install one or two short stair runs between the lower rooms and the bridge deck. Use shallow, broad treads. Industrial styling often looks best with clean rectangular stairs rather than curved whimsical ramps, so keep these lines simple and confident.
If your cats are athletic, you can space landings farther apart. If they are cautious, add intermediate ledges every 10 to 14 inches of climb. A usable cat mansion always beats a prettier but harder to navigate one.
11. Clad and finish the visible surfaces
Once all structural parts are complete, skin visible surfaces with your reclaimed wood boards. Mix tones and textures for an authentic look. Do not over arrange the boards into perfect repetition. Slight variation is what makes the piece feel salvaged and bespoke.
However, keep the cut lines crisp. Industrial rustic works because the rough wood is framed by orderly construction. Use trimmed corners, straight seams, and a consistent thickness wherever possible.
Seal with a matte finish that preserves the dry texture.
12. Stage the sleeping areas
Add low cushions, felt pads, or washable liners inside each main room. Keep the palette neutral so the wood remains the star. Beige, oatmeal, camel, or charcoal all work well.
Sprinkle treats in the bridge path and side room openings so the cats start exploring naturally. Most cats investigate lower boxes first, then the bridge, then the upper perch. Be patient and let curiosity build.
Visual checkpoint: Step back. The finished build should feel like a loft apartment tower for cats, with strong geometry, warm hidden dens, and one dramatic path across the middle.
Troubleshooting section
The tower leans slightly
This often comes from assembling the main shaft out of square. Loosen what you can, clamp it back into square, and reinforce with interior corner blocks.
My bridge flexes too much
Add hidden framing beneath, switch from rope only to a solid deck with rope detailing, or shorten the unsupported span.
Cats will not use the ladder
That is normal. Most cats prefer platforms and jumps. Treat the ladder as a secondary texture and climbing aid, not the main route.
The lighting feels harsh
Diffuse it by pointing the puck upward or recessing it slightly. The goal is glow, not glare.
The wood finish looks muddy
Too much dark stain can flatten reclaimed wood detail. Wipe back the stain or use a diluted wash instead so the grain and wear marks stay visible.
Finishing details section
After sealing and curing, install all pads and rope. Consider adding felt under the base to protect floors. For a truly polished furniture quality finish, blacken any visible screws or cover them with matching plugs. You can also add one small mounted toy or hanging rope teaser beneath a lower platform, but keep the overall design restrained.
Optional upgrades:
- Add motion activated low light in the main tower
- Include a hidden litter cabinet in one lower box if size permits
- Install cast iron style label plates for each level
- Add removable acrylic guards on certain ledges if you have a very energetic kitten
Inspect the metal railings and rope wraps routinely. Industrial builds invite jumping, and active cats will test every detail faster than you think.
Shop Similar
- dark reclaimed wood planks for diy cat tower
- black metal flat bar and hardware for furniture projects
- warm battery puck lights for wood shelves
- sisal rope for large cat scratching posts
- cabinet grade plywood for pet furniture
Style It With
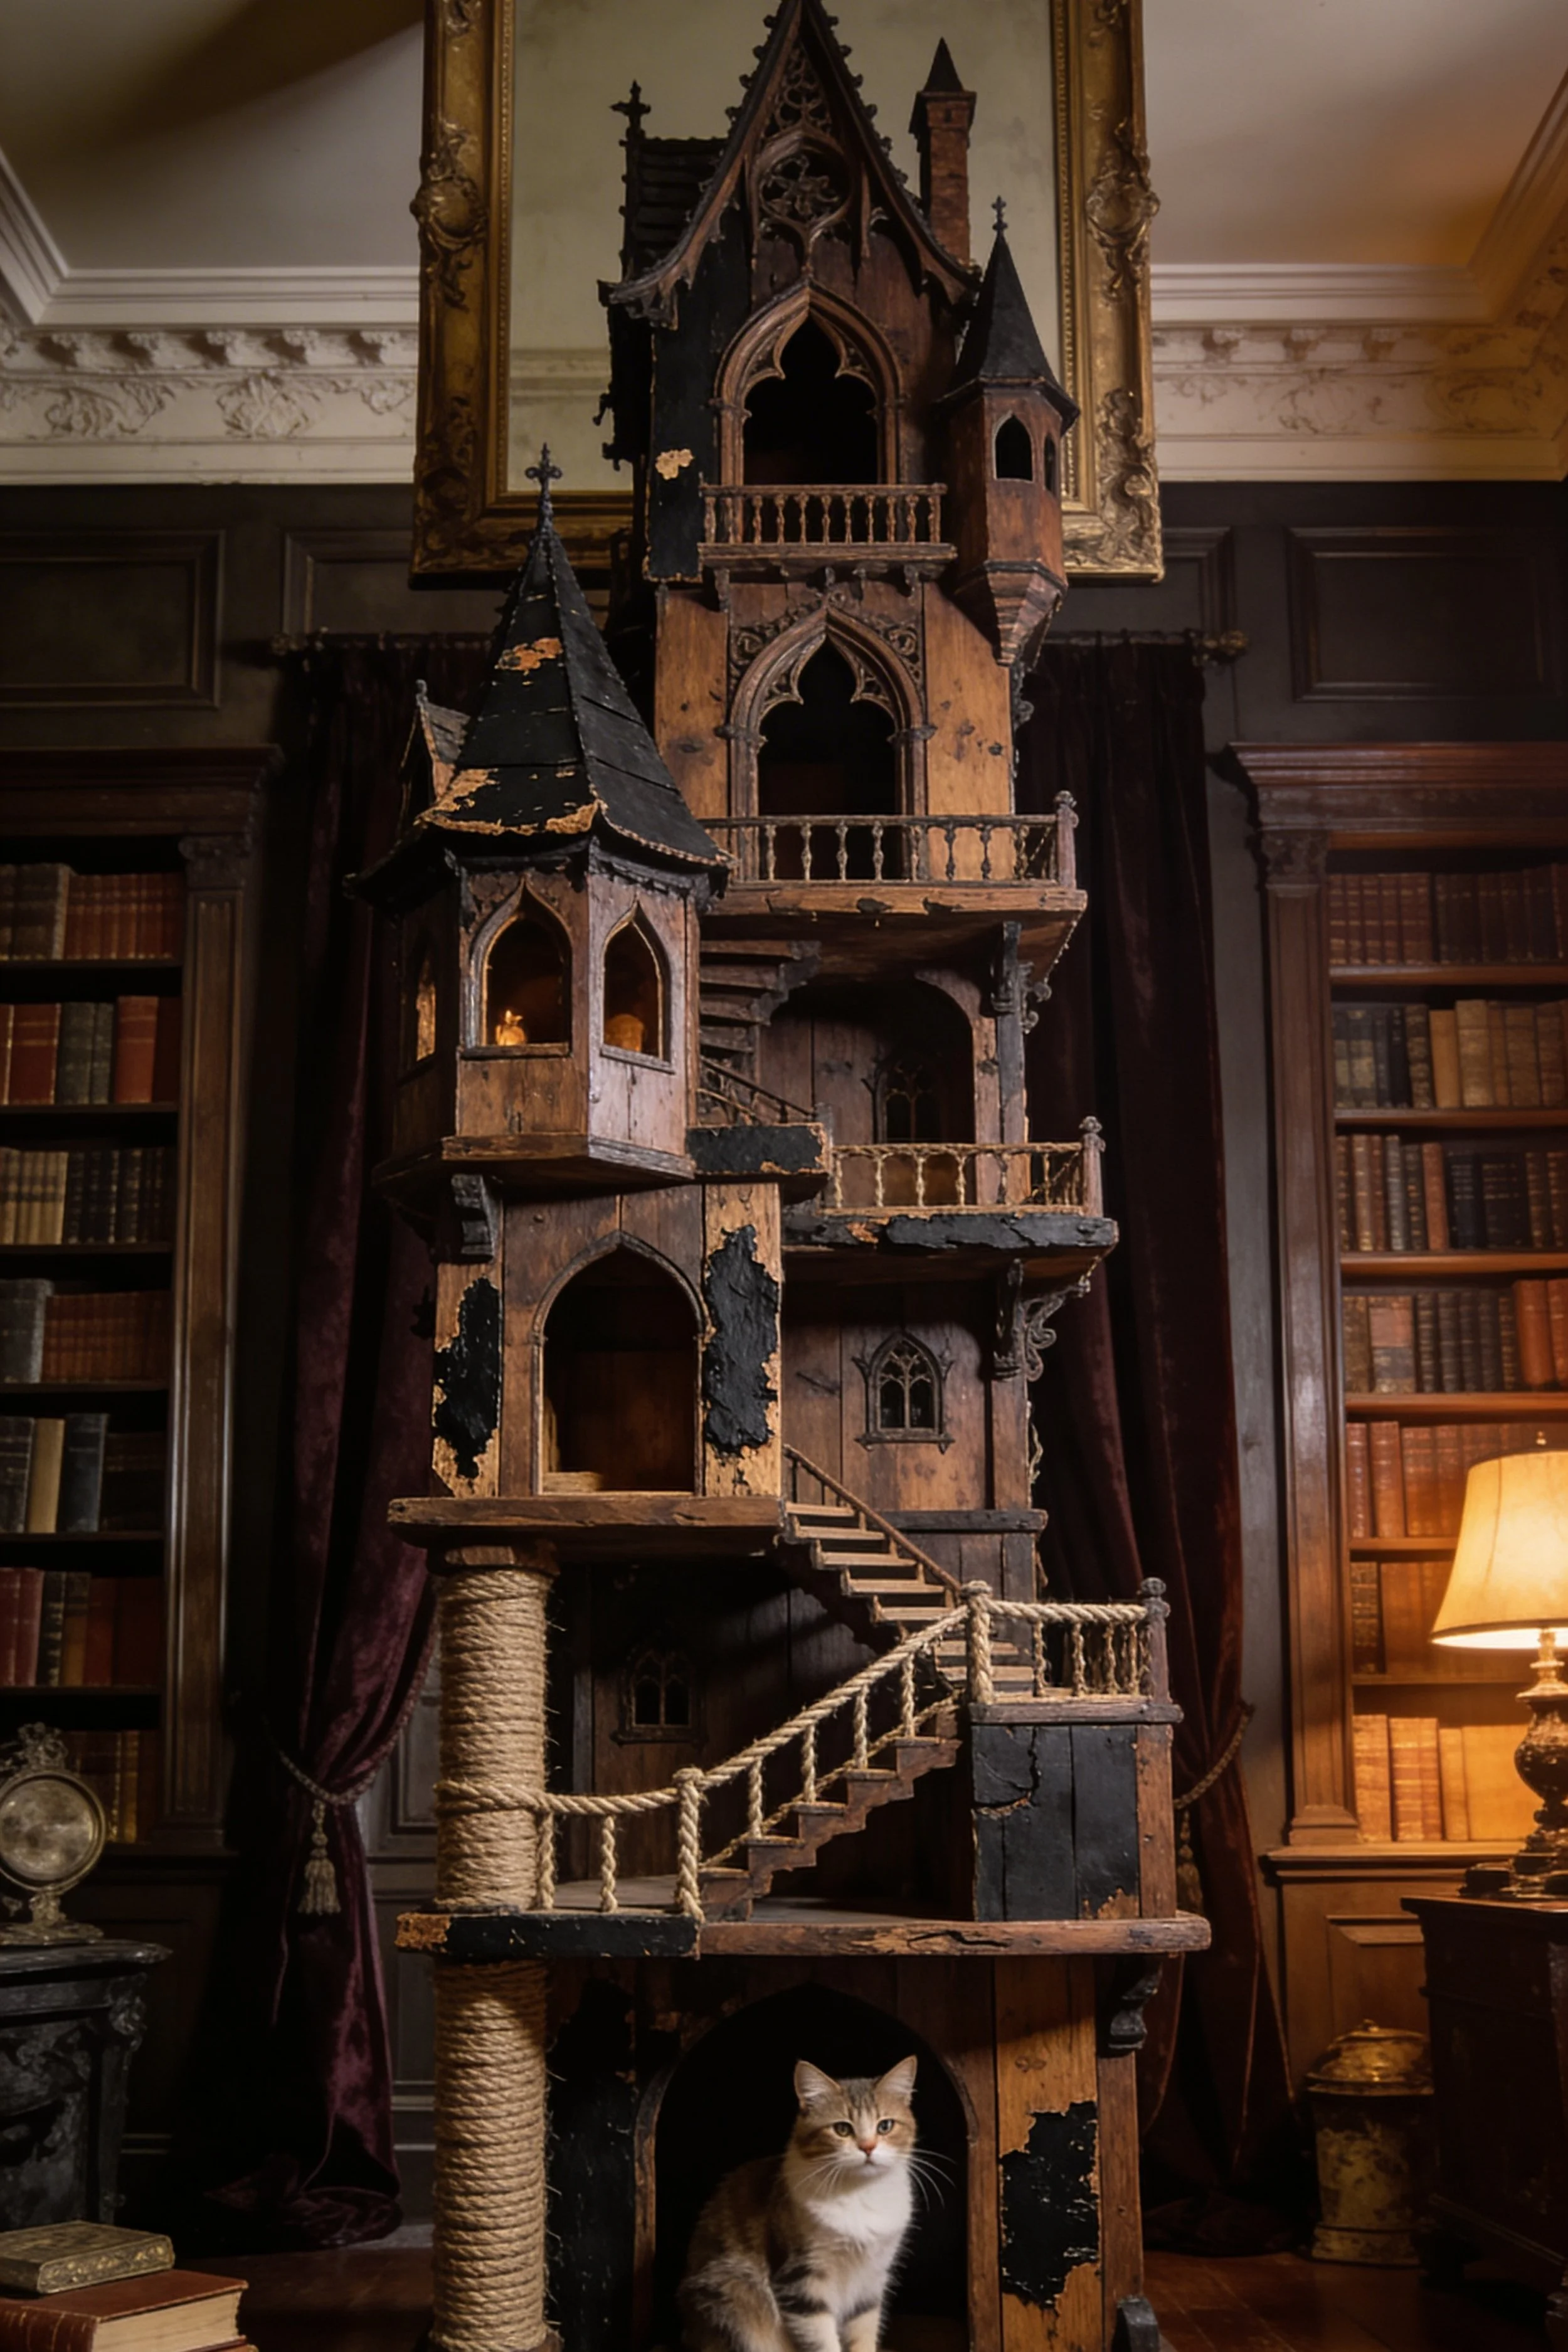
Gothic Cat Manor House Make-It-Yourself Tutorial
What you’re making
This project recreates a tall gothic cat manor with pointed arches, weathered blackened wood, narrow stairways, turret like sleeping chambers, and an antique haunted library mood. It feels more like a miniature old world manor than a standard cat tree, with dramatic vertical lines and layered balconies that make the whole piece look like it belongs in a moody historic room.
This is the build to choose if you love a darker romantic aesthetic. It is still practical for cats, but the style language is more ornate, vertical, and theatrical than the previous builds.
Materials + tools list
- 3/4 inch plywood
- 1/2 inch plywood for lighter decorative tower sections
- Solid posts or 2x2 internal framing
- Reclaimed wood boards or distressed cladding
- Decorative trim for gothic arches
- Jigsaw and fine blade
- Miter saw
- Circular saw or table saw
- Drill and screws
- Wood glue
- Black and brown water based stain or layered paint finish
- Matte clear sealer
- Sisal rope
- Small dowels or miniature spindle trim for balcony rails
- Thin carpet or felt liners
- Sandpaper
- Corner braces
- Template paper or cardboard for arch patterns
- Optional LED candles or safe warm puck lights for visual glow
- Anti tip wall anchor kit
Finished size + customization notes
A good finished size is about 72 to 84 inches tall, 28 to 40 inches wide, and 20 to 28 inches deep. This design can go taller, but once you add ornate upper architecture it becomes more top heavy, so widen the base if you extend above 84 inches.
You can customize the mood by choosing either heavily distressed black over warm brown wood, mostly warm antique walnut with black accents, or faded monastery tones with just a little dark crackle effect. If you want the photo’s slightly haunted manor feeling, let some warm wood peek through a rubbed black finish.
Step-by-step instructions
1. Decide on the manor silhouette
Start with a front elevation sketch. The reference image works because it has a tall central manor body, a secondary turret like section to one side, and stacked stairways rising diagonally across the front. Draw the largest mass first, then add the balconies, spires, and stair runs.
Aim for three clear visual levels: a strong lower base, a layered middle climbing level, and a narrow dramatic top. Gothic forms look best when they taper upward.
Visual checkpoint: Your drawing should feel elegant and slightly mysterious, not chunky. If the top looks as wide as the base, narrow it.
2. Build a wide and discreetly heavy base
Cut a deep plywood base and reinforce it underneath. Then build one or two lower enclosed rooms that visually read as the manor’s ground floor. Give at least one front opening large enough for comfortable lounging. These lower rooms also act as ballast.
Because gothic styling adds visual delicacy, you need the real structure underneath to be especially dependable. Use thicker framing than the piece appears to need.
Tip: Add a hidden rear weight compartment or a double base if you are going very tall.
3. Construct the lower manor body
Build the main lower body as stacked box rooms faced with distressed wood. Cut pointed arch or narrow gothic style openings using a cardboard template first. Even if you simplify the shape, keep the vertical feeling by making the openings taller than they are wide.
Attach small projecting ledges or shallow balconies at selected openings. These become stepping spots and visual detail at the same time.
If you are nervous about cutting gothic windows, cut simple arched openings and add trim on top to suggest the pointed shape. That approach is easier and still reads correctly from a distance.
4. Add the first staircase run
The stair visible on the front is one of the signature features of this look. Build a narrow but usable stair with side rails or low rope hand lines. Keep the treads broad enough for paws and the rise low enough to feel inviting.
Install the stair so it moves diagonally across the front or side of the manor. This helps the whole structure feel storybook and animated. Straight vertical climbs are practical, but diagonal stairs make the architecture feel alive.
Visual checkpoint: When you step back, the stair should guide your eye upward.
5. Build the middle balcony level
At mid height, create a balcony deck that wraps slightly around part of the structure. This is where the gothic manor begins to feel expansive. Add narrow rails from dowels or trim, but keep all gaps safe and not overly wide.
Cats love pause points, and this middle balcony can become the busiest social level of the whole piece. Make it generous enough for turning around and watching the room.
Balance openness with safety. An elegant balcony is lovely, but not if it is so narrow that a cat cannot comfortably land.
6. Add the side turret or tower room
Build a slightly projecting tower chamber on one side, ideally with a peaked roof or pointed top detail. This room can be smaller than the main body but should feel special. It is a perfect place for a tucked away nap zone.
Support it from below with a wrapped post or hidden framing bracket tied back into the main manor body. Decorative projection without support will sag over time.
If you want the fullest gothic look, add a small narrow spire or secondary roof peak above it, but keep these uppermost accents lightweight.
7. Construct the upper manor and lookout balcony
Above the middle level, build a narrower upper house with a front opening and a tiny balcony. This should feel like the manor’s attic or high chapel room. Position it so the cat can look out over the space while still feeling partially sheltered.
This is where the proportions become important. Make the upper room tall enough to feel elegant but not so tall that it becomes a top heavy box. Often, a slightly taller opening and a shallower room feels better than a full deep cube here.
Visual checkpoint: The upper room should crown the design. If it feels bulky, reduce its depth or lower the roofline.
8. Add secondary stairs and rope crossings
Use another stair run or rope edged ramp to connect the mid level balcony to the upper room. One slightly more dramatic crossing near the front gives the manor personality and makes the route feel like an adventure.
Keep all transitions close enough that cats do not have to leap dangerously far. Decorative complexity should never come at the cost of basic movement confidence.
If you want to echo the reference image more strongly, let one stair run sweep upward in a visible elegant line near the front right.
9. Wrap the scratch post section
Choose one lower or middle vertical support and wrap it fully in sisal. In a gothic build, the scratch post should be integrated into the architecture so it does not break the mood. A single tall wrapped column looks much more intentional than many short rope patches.
Keep the rope neat, tight, and flush. Stray ends or loose wraps quickly make a carefully styled piece look messy.
10. Distress and finish the surface
To get the aged manor look, layer a warm brown base tone with areas of rubbed black over top, then sand lightly on edges and corners. Focus wear where hands would naturally touch on old architecture: stair edges, balcony corners, trim faces, and door surrounds.
Do not distress every inch evenly. Authentic looking age is irregular. Some boards should remain mostly dark, others should reveal more warm wood beneath. Seal everything with a matte protective coat once you love the finish.
11. Add soft liners and tucked bedding
Line the lower den, side turret room, and one upper chamber with thin neutral bedding. Because the architecture is dark and rich, lighter pads help the interiors feel cozy instead of visually cavernous.
You can also add tiny clipped in curtains or soft interior panels, but keep embellishments secure and minimal so they do not become chew hazards.
12. Introduce cats and test traffic flow
Encourage exploration with treats on each stair landing and a favorite blanket in one middle balcony room. Watch how your cats move. If they hesitate at one transition, adjust the angle, add traction, or widen the landing.
Visual checkpoint: The finished manor should feel like a real route upward, not merely a dramatic sculpture. Cats should be able to climb, pause, retreat, and perch comfortably.
Troubleshooting section
My pointed arches look uneven
Make one master template and trace it for every opening. Small differences are very noticeable in gothic styling.
The upper balcony feels flimsy
Reinforce from below with hidden cleats or a triangular brace. Narrow balconies need more support than they appear to.
The finish looks fake
Layer less. Use thin coats, wipe back while wet, and sand selectively. A believable patina comes from restraint.
Cats avoid the narrow stairs
Widen the treads or reduce the rise. What looks graceful to you can feel awkward to them.
The piece feels too dark in the room
Lighten the interior pads and add a warm lamp nearby. The manor can stay moody without becoming visually heavy.
Finishing details section
Vacuum out every chamber before final setup. Apply felt pads to the bottom of the base so the furniture can slide slightly during cleaning without scratching the floor. Add one subtle warm light inside an upper room if you want that library at dusk glow, but keep it soft and hidden.
Optional upgrades:
- Add a carved crest or tiny house number plaque
- Include removable seasonal cushions in velvet or boucle
- Add a second miniature turret for more silhouette drama
- Use antique brass corner details on selected edges
Check the tall upper sections regularly for loosened trim. Decorative spires and rails should always be firmly secured, especially in multi cat homes.
Shop Similar
- distressed wood stain for antique furniture finish
- jigsaw blades for detailed wood arch cuts
- sisal rope for tall cat manor scratching post
- decorative wood trim for gothic craft projects
- matte clear wood sealer for indoor furniture
Style It With
Minimalist Timber Cat House Tower How-To Guide
What you’re making
This version is a light filled minimalist timber cat tower with broad platforms, simple square rooms, pale natural wood, and easy climbing ramps that feel calm, airy, and Scandinavian inspired. The look is softer and more architectural than playful, with clean lines and generous openings that make the entire structure feel like built in furniture for cats.
If you want something beautiful in a serene neutral room, this is the most approachable version to build. It relies on straightforward construction and careful proportions rather than ornate carving or heavy distressing.
Materials + tools list
- 3/4 inch plywood or birch plywood
- Solid round posts or square posts with wood sleeves
- 2x2 framing lumber
- Wood screws
- Wood glue
- Pocket hole jig optional
- Jigsaw
- Circular saw or table saw
- Drill and countersink bit
- Orbital sander
- Matte water based clear finish
- Natural sisal rope
- Neutral pet cushions or washable pads
- Edge banding optional
- Clamps
- Carpenter square
- Measuring tape
- Pencil
- Anti tip wall anchor optional
Finished size + customization notes
A balanced finished size is about 68 to 84 inches tall, 34 to 46 inches wide, and 22 to 30 inches deep. This design is flexible. You can make it a bit lower and wider for older cats or keep it taller if you want strong vertical presence.
The easiest way to customize the look is with wood tone. Pale ash, birch, pine, or white oak all work beautifully. Keep the finish matte and natural to preserve the calm soft mood from the reference image.
Step-by-step instructions
1. Establish a clean modular grid
Minimalist designs succeed on proportion, so begin by dividing your structure into a simple grid. Think in stacked rectangles: base platform, lower house, mid platform, upper bridge, top house. Keep widths and depths repeating so everything feels intentional.
A simple plan might be a 42 by 26 inch base with three major height zones. Use paper or masking tape to mock up where each cube and platform will sit.
Visual checkpoint: Your plan should look calm and balanced. If it already feels busy on paper, remove one feature rather than adding more.
2. Build a low, broad base with integrated den openings
Cut the base platform and create a lower front row of den openings that visually anchor the piece. These lower spaces can be built as one long box divided into compartments or as separate cubbies attached side by side.
Use large arched or rounded openings to soften the geometry. The pale room in the photo works because the structure is substantial but not visually heavy. Broad low openings help achieve that.
Line the lower compartments with flat cushions that can slide out for washing.
3. Install the vertical supports
Use evenly spaced vertical posts to carry the upper platforms. Round timber style posts echo the reference image nicely, but square posts are easier if you are building with standard lumber. You can sleeve square posts with thin wood to soften the appearance.
Keep the support pattern orderly. Minimal builds do not hide mistakes behind ornament. Measure carefully and check plumb as you go.
Tip: Leave enough open space between supports so cats can weave through the structure, not just climb on the outside.
4. Build the first elevated room and side platform
Construct one mid height room on the left side and one open platform on the right. This begins the staggered vertical path. Use crisp straight edges, flush faces, and consistent opening shapes.
The room should be deep enough for napping. The adjacent open platform should be wide enough for turning and observing. Think of the open ledges as terraces rather than narrow shelves.
Visual checkpoint: You should now see a clear contrast between enclosed rest zones and open lookout zones.
5. Add the main stair run
The pale timber design uses long simple stairs rather than tiny stepping blocks. Build an angled stair with broad treads attached to side rails. Keep the angle moderate. This design should feel easy and graceful to climb.
Add side support beneath the stair if the span is long. In a minimalist piece, visible quality matters. A clean stair with even tread spacing instantly makes the build look custom.
If you want more traction, route shallow grooves into each tread or add subtle textured strips.
6. Build the upper central room and bridge
Create one upper central room above the mid level, then connect it to another platform with a short bridge or flat walkway. The openings should remain large and simple. Avoid fussiness. One handsome proportioned cube is better than three undersized boxes.
Make sure the bridge lands flush with both levels. Cats dislike awkward lip changes. A small threshold is fine, but large height differences can interrupt their movement.
7. Add the top house and lookout ledges
At the very top, build a peaked top house or a clean rectangular upper room, depending on how closely you want to mirror the reference. The image has a gentle house silhouette at the top, which softens the otherwise modern lines. You can include that shape while keeping everything else very restrained.
Add one or two lookout ledges near the top. These should feel airy, not crowded. Leave breathing room around them so the upper section does not look over decorated.
Visual checkpoint: The tower should now feel vertical but still calm. If the top feels crowded, remove a ledge.
8. Add secondary stairs and rope accents
Install a second shorter stair linking two middle platforms. Then add rope wrapped sections selectively, usually on one or two posts only. Minimal style works best when the sisal feels integrated and not overused.
A wrapped post near the lower center gives cats an easy scratch target and visually breaks up the wood. Keep the rope natural and clean.
9. Sand and refine every edge
Minimalism is unforgiving, so sanding matters here even more than on rustic builds. Ease all sharp edges with light sanding. Fill screw holes if you want a furniture quality finish. Consider edge banding plywood faces if exposed plies do not suit your room.
When you run your hand across the finished piece, it should feel smooth, calm, and solid. There should be no splinters, no rough knots, and no ragged jigsaw cuts.
10. Seal with a soft matte finish
Apply a clear matte finish that deepens the grain slightly without making the wood yellow or glossy. Test on a scrap first. Many pale wood builds look best with the lightest possible finish.
Let the piece cure fully before adding textiles. Fresh finish smell can discourage use if you rush the final stage.
11. Add cushions and quiet styling
Use simple neutral cushions in cream, oatmeal, sand, or light camel. Keep them slim and tailored. Oversized fluffy beds can overwhelm the clean lines. Tuck one in the lower den, one in the mid room, and possibly one in the upper house.
Introduce the structure slowly. Place a favorite toy on the stair landing and a treat in the top room. Cats often appreciate a few days to decide the new tower belongs to them.
12. Observe movement and make final adjustments
Watch your cat use the tower. Minimal builds are easy to fine tune because every element is visible. If one transition is too far, add a small step. If a platform is too shallow, extend it by an inch or two. If a post blocks an entry awkwardly, shift the opening while the design is still simple.
Visual checkpoint: The finished tower should feel almost like custom built in architecture. Clean, open, warm, and easy to live with.
Troubleshooting section
It looks plain rather than elevated
Usually that means the proportions need work, not more decoration. Widen one platform, align edges more intentionally, or improve the finish quality.
My stairs flex
Add center support underneath or use thicker side rails. Long clean stairs need hidden reinforcement.
The pale wood turned too yellow
Switch to a water based matte finish labeled for clear natural appearance, or sand back and refinish.
Cats ignore the top house
It may feel too exposed. Add a cushion, partial side wall, or slightly deeper interior floor.
Plywood edges look messy
Use edge banding, hardwood trim, or cleaner sanding. Minimalist work depends on crisp detail.
Finishing details section
Add felt pads beneath the base if the structure sits on hardwood. For a premium furniture style finish, plug visible screw holes with matching wood plugs and sand flush. Keep accessories minimal and let the wood and structure speak for themselves.
Optional upgrades:
- Add removable linen curtain panels inside one den
- Include a hidden drawer in the base for toys
- Add a window side perch extension
- Use white oak veneer for a more refined finish
Check cushions and rope sections regularly for wear. Light wood shows dust more quickly, so a weekly quick vacuum keeps the tower looking intentional and serene.
Shop Similar
- birch plywood for minimalist furniture projects
- matte clear finish for natural wood furniture
- natural sisal rope for cat post wrap
- round wood posts for diy furniture builds
- neutral washable pet cushions
Style It With

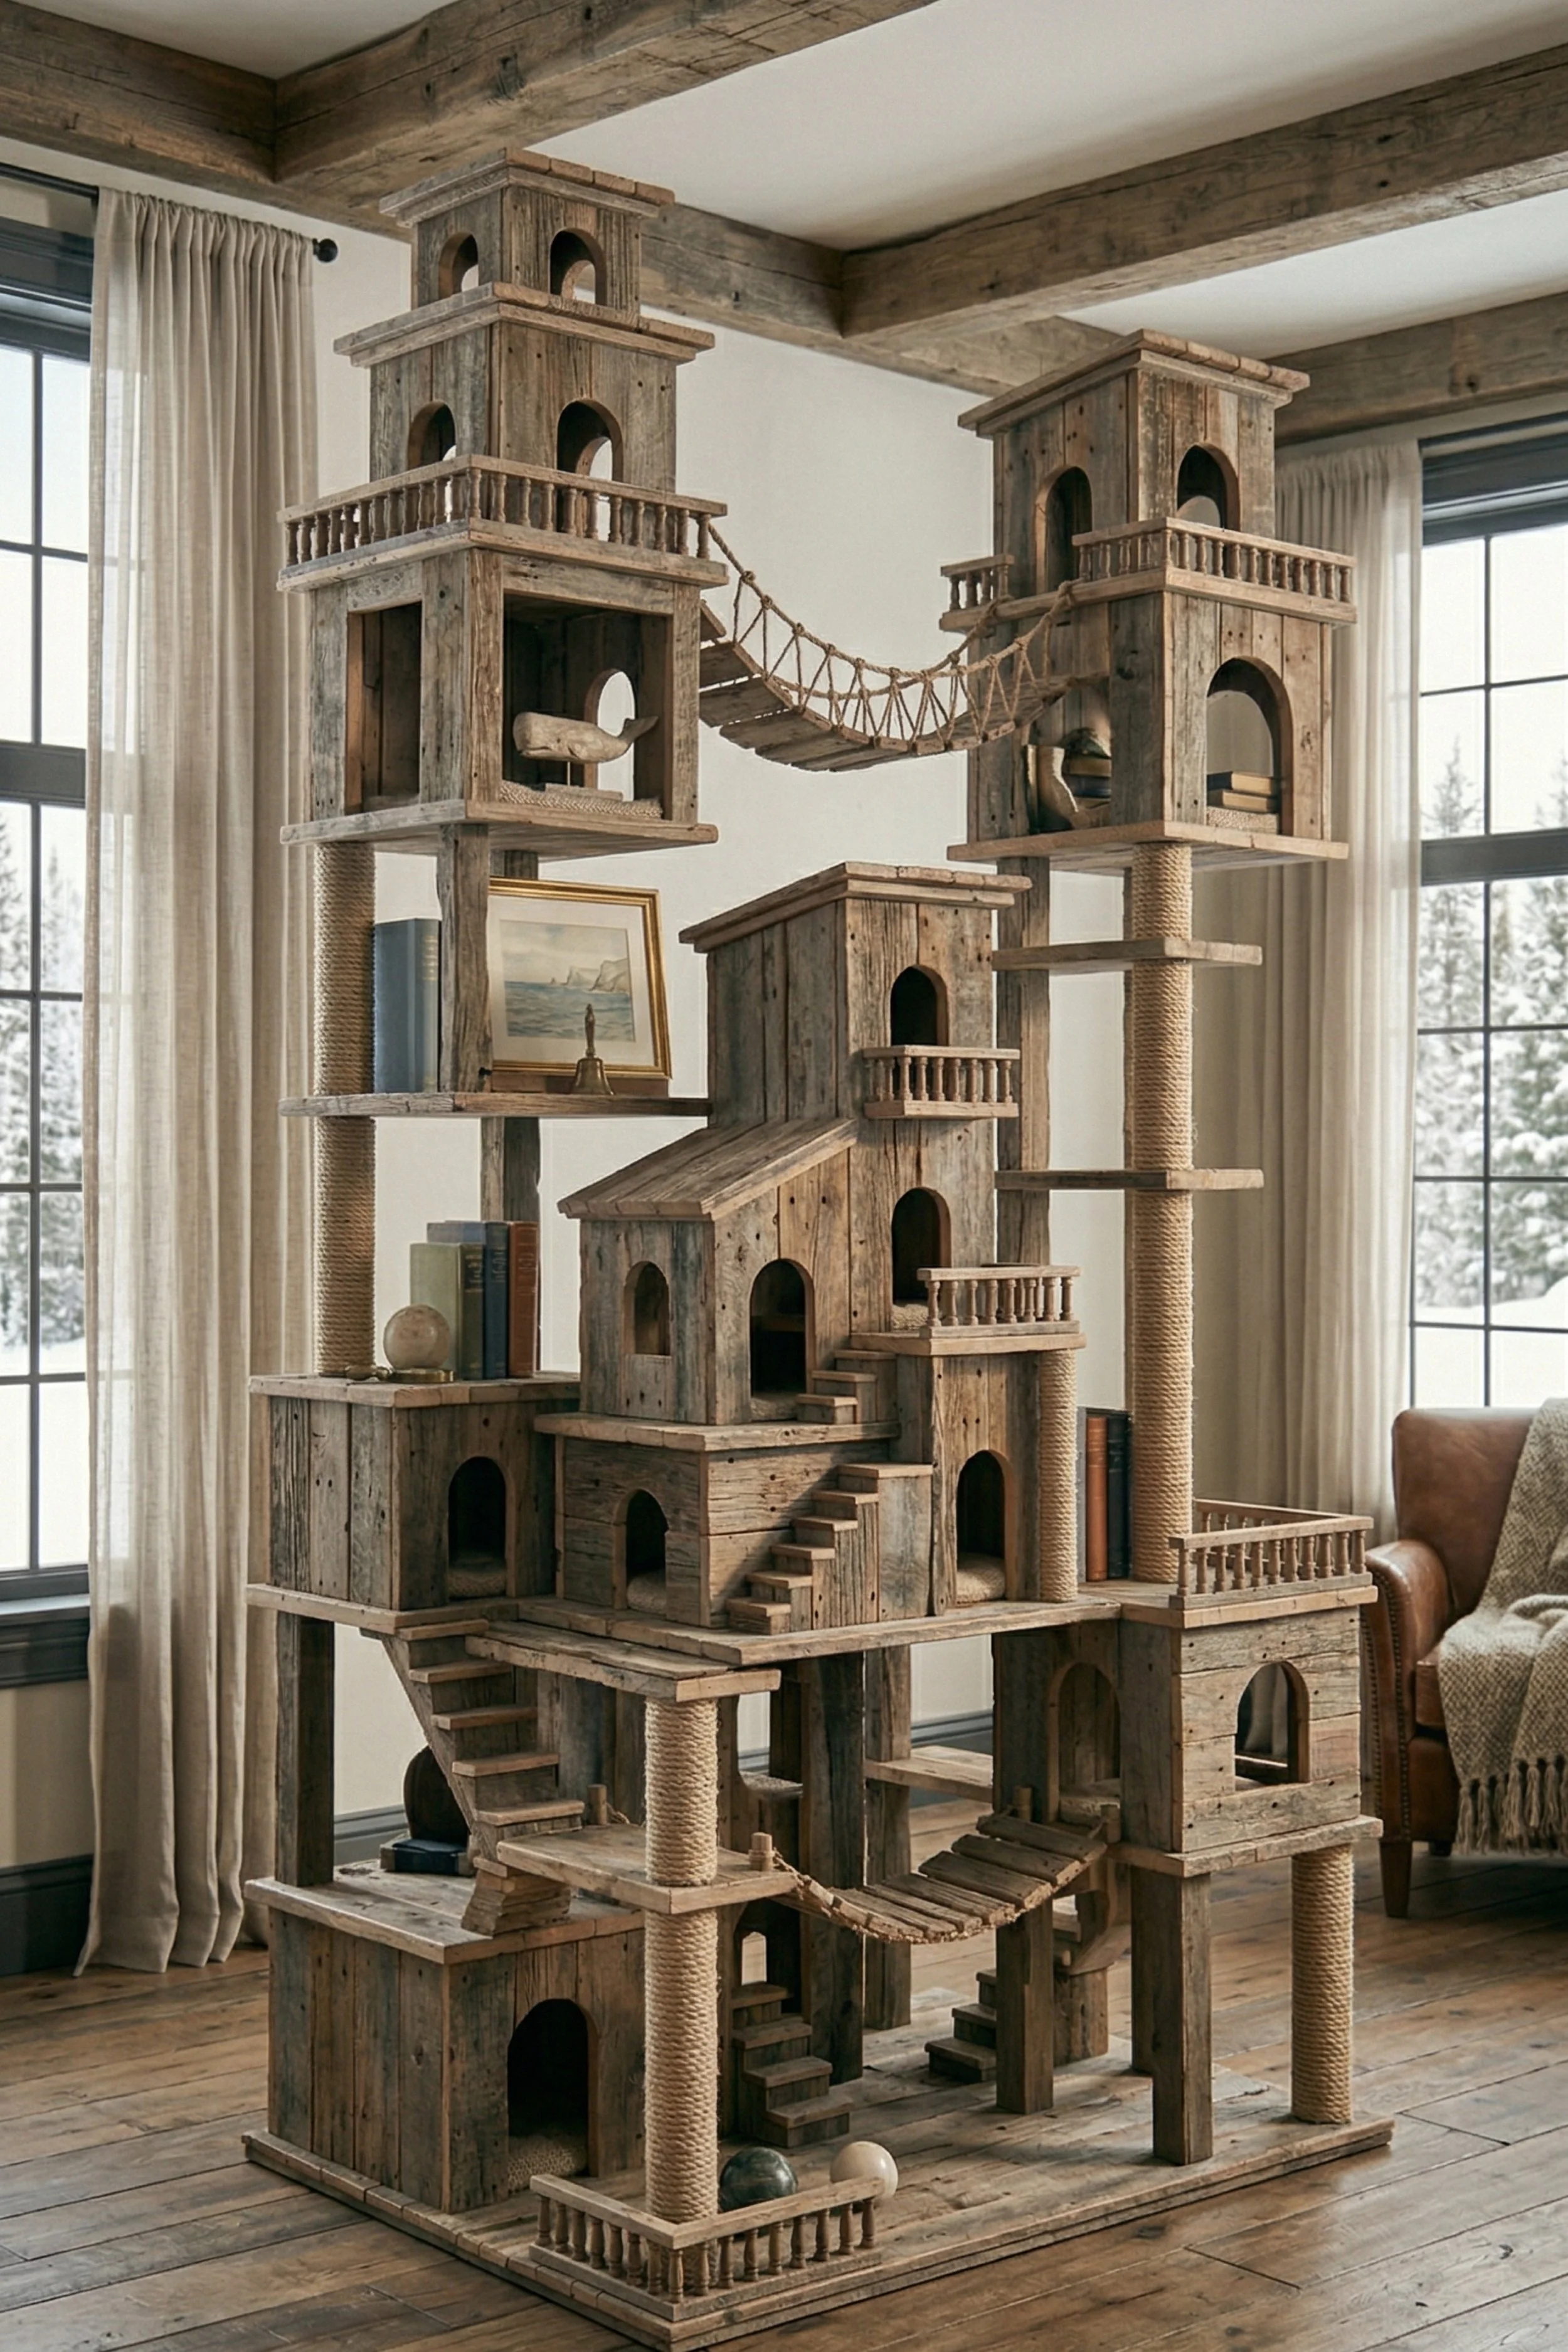
Rustic Twin Tower Cat Castle Step-by-Step Tutorial
What you’re making
This design is a large rustic twin tower cat castle with a central house cluster, two tall lookout towers, wide sisal columns, layered stair runs, and a suspended bridge across the top. It feels like a mountain lodge interpretation of a cat mansion, with warm weathered wood, open views, and strong vertical movement.
It is one of the best layouts for multi cat homes because it offers several routes, numerous sleeping chambers, and high vantage points without forcing every cat through one narrow circulation path.
Materials + tools list
- 3/4 inch plywood
- Reclaimed wood or rustic cladding boards
- 4x4 posts or sturdy square timber
- 2x2 framing strips
- Sisal rope
- Wood screws
- Construction adhesive or wood glue
- Mending plates and hidden brackets
- Jigsaw
- Circular saw or table saw
- Drill and countersink
- Orbital sander
- Matte clear finish or light weathered stain
- Upholstery stapler
- Removable mats or low pet beds
- Dowel rods or trim for rails
- Heavy duty anti tip anchor kit
Finished size + customization notes
A strong finished size for this version is around 80 to 96 inches tall, 46 to 60 inches wide, and 28 to 36 inches deep. The twin towers benefit from width. If you squeeze them too close together, the piece loses grandeur and usability.
This build can be warmed up or cooled down depending on the wood mix. Medium weathered oak gives a cozy lodge feel. Gray brown reclaimed boards create a more collected heirloom look. Keep the palette fairly quiet so the architecture remains the focus.
Step-by-step instructions
1. Mark tower positions on a full size base
Lay out your base and mark the footprints of the left tower, right tower, and central middle house. Think of the composition as a triangle: left tower high, right tower high, middle house slightly lower between them.
Leave enough clearance for a bridge to dip slightly between towers. Also allow room for front facing stairs, side cubbies, and at least one lower underpass. This generous spacing is what gives the photo its impressive, layered feeling.
Visual checkpoint: If the central cluster nearly touches both towers already, expand the base or narrow the middle section.
2. Build the deep base and lower lodge rooms
Construct a reinforced base platform and add several lower enclosed rooms around it. These act as sleeping dens and also visually root the entire structure. Use arched doorways and slightly varied box sizes for a custom built feel.
Make sure at least one lower room is placed beneath each tower area. That helps distribute visual weight and provides more stable stacking above.
Use internal cleats generously. The biggest mistake in large cat castles is relying on face screws alone.
3. Install the tower support posts
Set the main supports for both towers using sturdy posts. Each tower should have at least two serious vertical structural supports, plus tied in framing that connects back to nearby platforms. Predrill, clamp, and fasten carefully.
Once the posts are in, temporarily hold a scrap board across the tops to preview the future bridge span. This helps you judge whether the tower spacing feels dramatic but realistic.
Tip: Slight height difference between towers can feel custom and organic, but keep the bridge endpoints close enough that the final upper path still makes sense.
4. Build the central multi room lodge section
Construct the middle mass as stacked rooms of slightly different sizes. Use one broad lower room, one middle room with small front steps, and one upper house or lookout chamber. Add little balcony ledges on the front for charm and landing space.
This section should visually step upward toward both towers. Think of it like a mountain hamlet rising between two watchtowers. Vary depth slightly so some rooms project forward while others sit back.
Visual checkpoint: The middle should feel rich and layered, not like one big box dropped between two posts.
5. Add the left tower lower chamber and upper platform
Build the left tower with a roomy lower chamber and then stack increasingly smaller open or semi open levels above. Add rail details on one tier to soften the boxiness. The upper portion can be more airy, with open arches or wide openings.
Support every level independently back to the structural posts. Decorative cladding can come later, but the platform framing should already feel locked in.
Leave enough headroom inside the lower tower chamber for a cat to sit upright comfortably. Tight spaces may look cute but they get ignored.
6. Add the right tower with sisal support sections
The right tower can echo the left but include more visible sisal wrapped sections along the main vertical posts. This breaks up the wood and gives cats a satisfying stretch scratch route.
Add staggered mini ledges on the tower side as alternate climbing points. These are especially useful if one cat wants to ascend while another is already occupying the main stairs.
7. Install the main front stair system
One of the strongest features of this style is the visible front stairway that invites cats upward from ground level. Build a broad straight stair from a lower front room to the central platform, then continue smaller stairs up the middle house cluster.
Keep the treads consistent. Uneven stair rhythm can confuse cautious cats. If you are unsure, mock one section in scrap wood first and let your cat test it before final installation.
Visual checkpoint: A cat should be able to reach the mid level without jumping excessively.
8. Build the lower bridge and underpass details
Add a short lower bridge between two lower middle sections or between the center and right side. This makes the entire build feel connected on more than one level. Underneath, keep at least one open route for darting through.
Multi cat pieces benefit from escape paths. A shy cat should be able to move away without having to pass directly by a dominant cat on a single stair.
9. Build and hang the upper rope bridge
Construct the signature top bridge between the towers. Use wood slats and rope rails, allowing a gentle sag but not a dramatic droop. Test the span thoroughly before final fastening.
A beautifully built bridge often becomes the emotional center of the whole piece. Make it wide, secure, and inviting. Cats generally prefer a slightly rigid walking surface, so consider a hidden wood strip or double rope system if the bridge feels too loose.
10. Add rails, trim, and tower top details
Install balcony rails, front trim, and the upper lookout framing. You can keep the tops simple and square or add softened arched openings for a more collected handcrafted effect. The main thing is consistency. Repeat a few details so the design feels unified.
Do not over decorate every platform edge. Choose the most visible front areas for rail treatment and leave secondary surfaces simple.
11. Sand, weather, and seal
Sand every edge and stair tread thoroughly. Apply a light weathered stain if needed, then seal with matte protection. The finish should enhance the grain, not hide it.
If you are using mixed reclaimed wood tones, step back before sealing and redistribute boards if one area looks too dark or too pale compared with the rest. Balance matters.
12. Add bedding and test for multi cat flow
Place pads inside a few key rooms but leave other surfaces bare for sprawling. Then watch how your cats use the structure. One may claim a tower while another prefers the middle house. That is a good sign. It means the layout offers distinct territories.
Visual checkpoint: The finished castle should look like one rustic village rising upward, with the eye moving from base to middle to towers to bridge.
Troubleshooting section
It feels too busy
Rustic does not mean cluttered. Simplify by removing one small balcony, one extra ledge, or one decorative trim layer.
The bridge scares my cat
Reduce the sag, widen the deck, or add a side rail with slightly more height.
A tower vibrates when jumped on
Add hidden braces tying the tower level back into the central structure or base. Tall isolated sections need cross support.
My stairs are visually bulky
Use thinner side profiles and let the treads project slightly. That makes them look lighter without becoming weaker.
The structure dominates the room too much
Lighten the finish, use pale cushions, and place it near large windows or open space so it breathes.
Finishing details section
Vacuum every platform and check that no splinters remain. Add removable washable mats where cats are most likely to nap. For a furniture grade finish, touch up exposed screws with matching wood filler or plugs. Consider wall anchoring even if the base feels solid, especially for very energetic climbers.
Optional upgrades:
- Add hidden toy storage in one lower room
- Include a hanging rope teaser under the bridge
- Add engraved room names for each tower
- Create a removable winter fleece set and a summer linen set for the sleeping areas
Regular maintenance is simple: inspect bridge knots, retighten hardware seasonally, and rewrap scratch posts once wear becomes heavy.
Shop Similar
- reclaimed wood planks for rustic cat furniture
- heavy sisal rope for large cat towers
- furniture brackets for diy wood platforms
- matte weathered wood stain
- cabinet plywood sheets for furniture building
Style It With
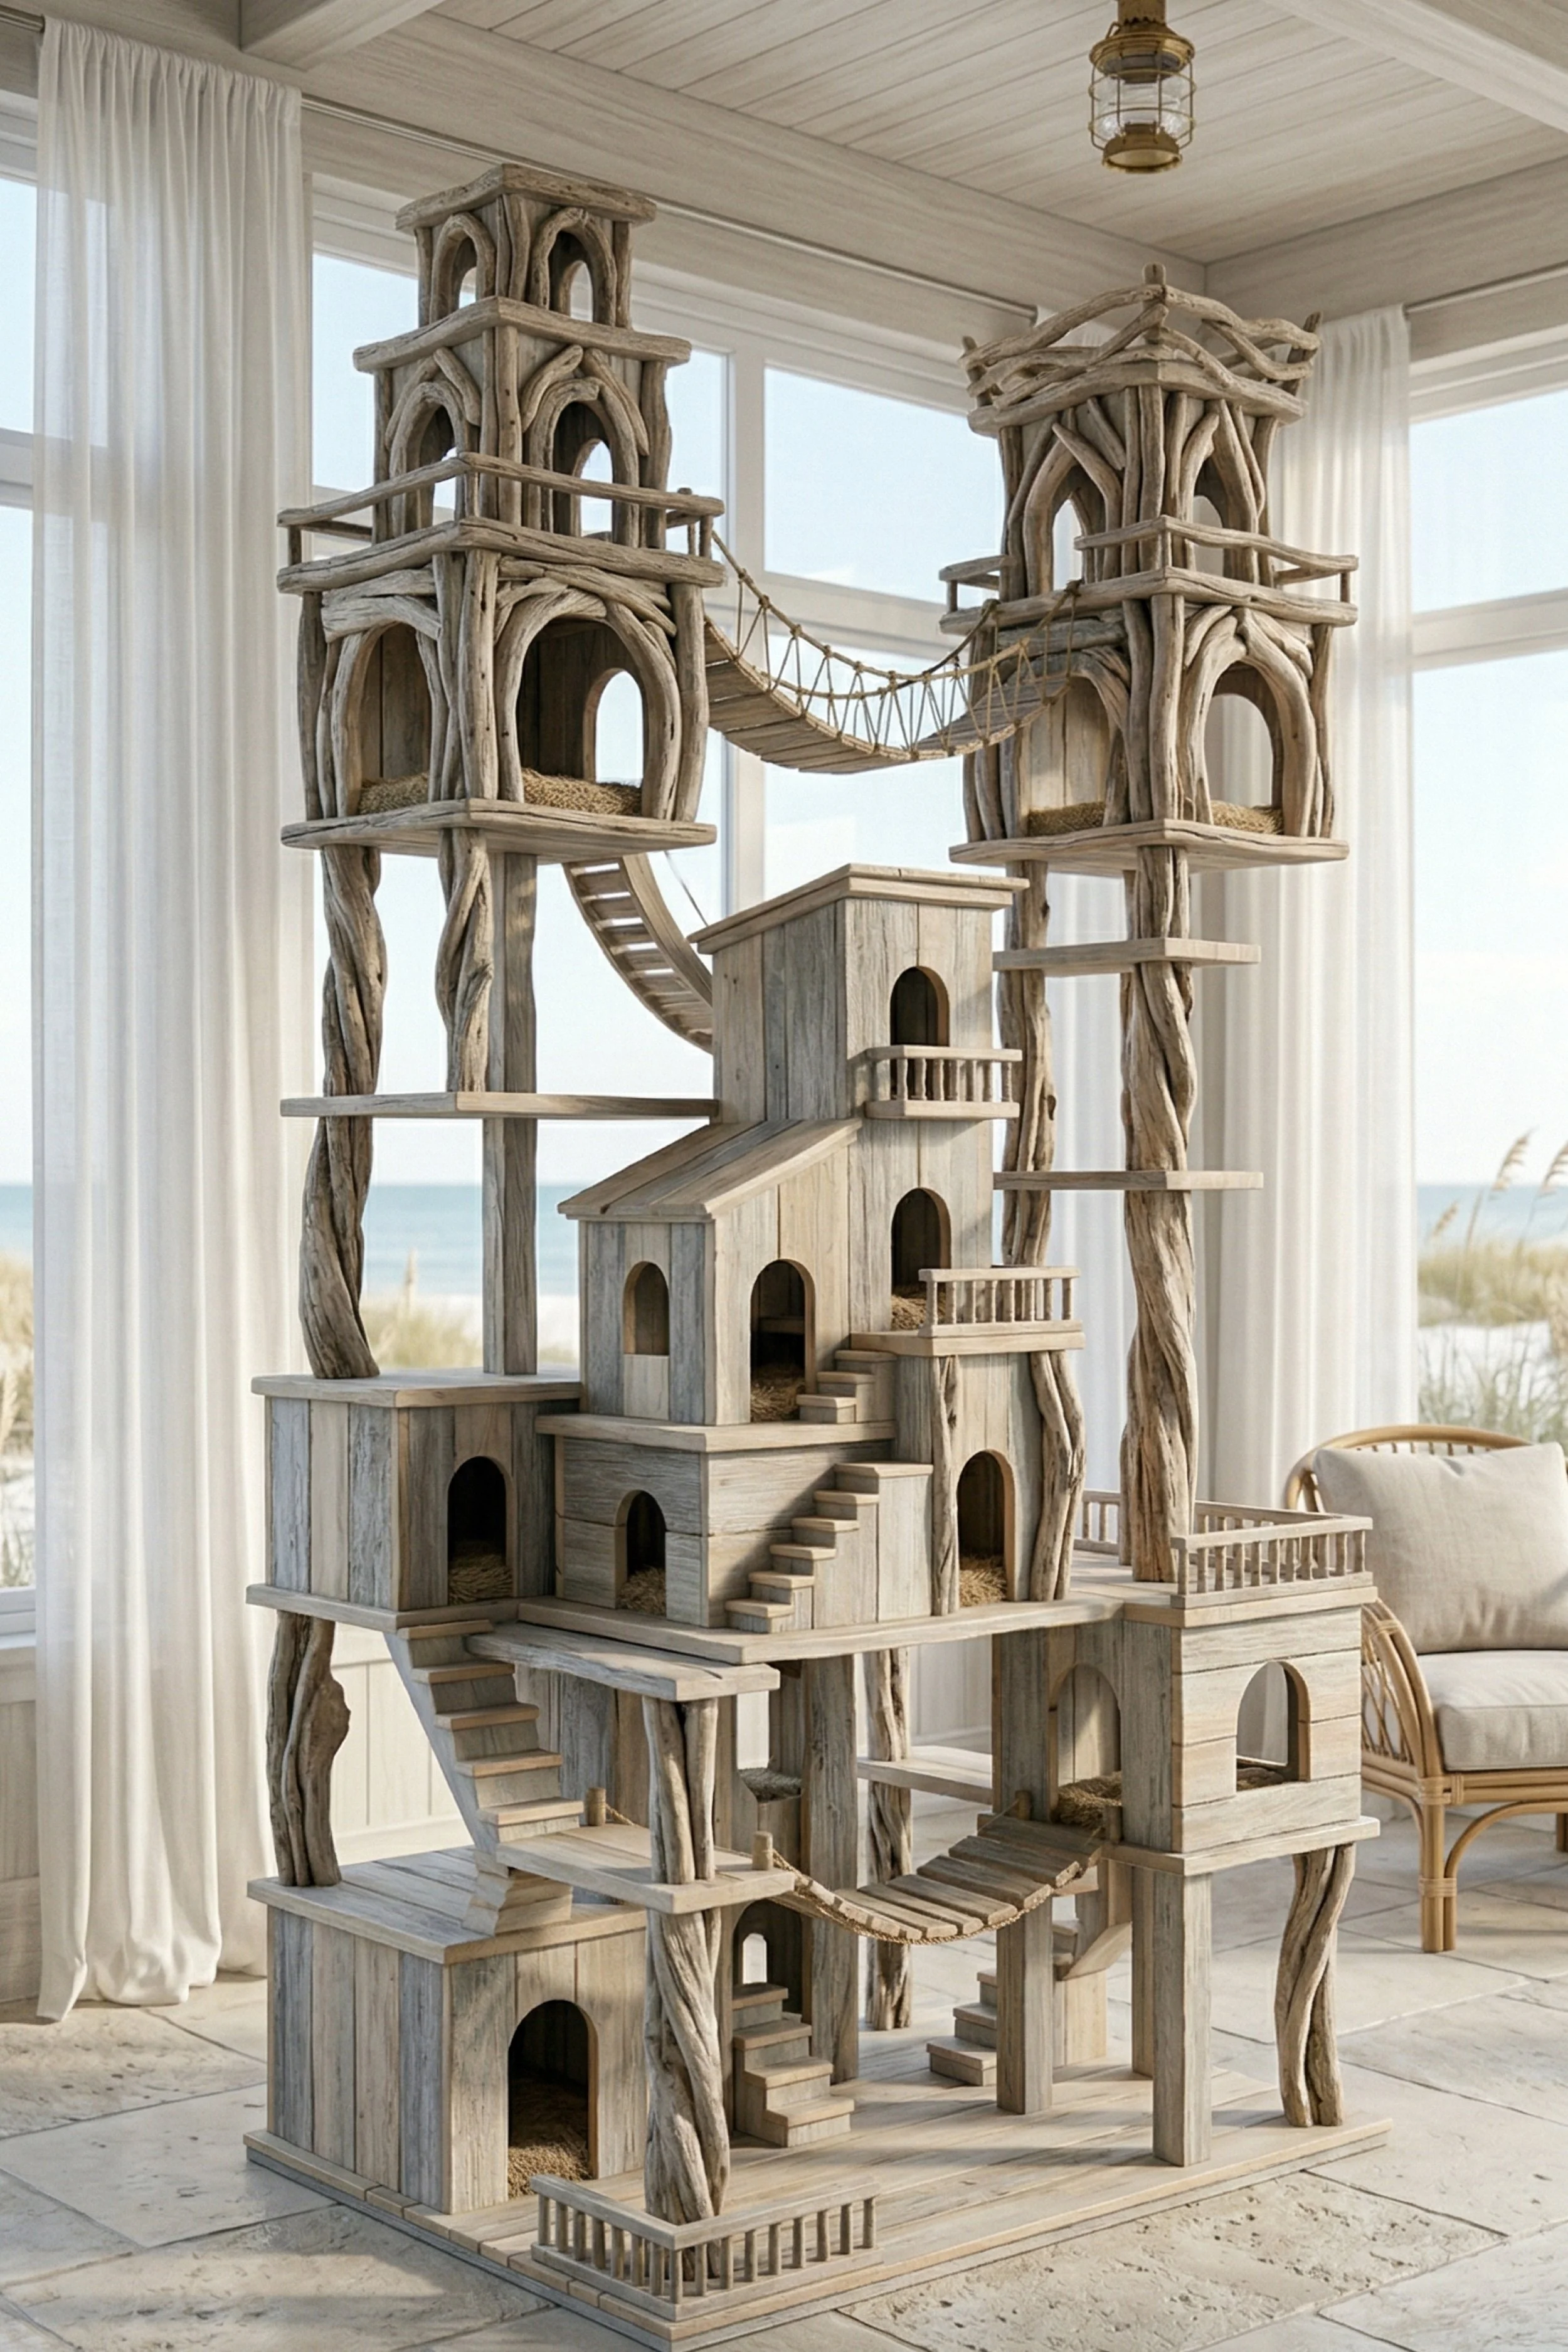
Driftwood Coastal Cat Mansion DIY Guide
What you’re making
This project recreates a pale driftwood inspired cat mansion with two airy towers, a central house cluster, soft beachy wood tones, rope bridges, and open breezy architecture that looks beautiful in a sunlit coastal room. It has the same grand multi level spirit as a rustic castle, but the finish is lighter, softer, and more relaxed, almost like weathered dune wood and salt washed timber turned into a cat resort.
If you love neutral coastal interiors, this version gives you drama without heaviness. It is especially pretty near large windows where the pale wood and open framing can glow.
Materials + tools list
- 3/4 inch plywood
- Pale reclaimed boards, driftwood toned cladding, or lightly whitewashed wood
- 3x3 or 4x4 posts
- Decorative branch like driftwood pieces for non structural trim
- 2x2 lumber for framing
- Sisal rope
- Wood screws
- Wood glue
- Jigsaw
- Circular saw or table saw
- Orbital sander
- Whitewash or diluted gray beige stain
- Matte clear sealer
- Neutral woven mats or low cushions
- Dowel rods for rails
- Clamps
- Measuring tape
- Pencil
- Anti tip anchors optional
Finished size + customization notes
A finished size around 76 to 92 inches tall, 42 to 56 inches wide, and 26 to 34 inches deep works well. Because the pale finish visually lightens the piece, you can sometimes go slightly larger in a bright room without the build feeling overpowering.
For a closer match to the reference image, combine soft gray beige boards with a few true driftwood style accent pieces around the tower framing. If you cannot source real driftwood looking lumber, faux the effect with shaped trim and layered whitewash.
Step-by-step instructions
1. Plan for openness and light
Start by sketching the layout with lots of negative space. This version should not feel heavy or densely enclosed. Place two tall towers at the sides, a central cottage like cluster in the middle, and open walking zones beneath and between them.
Keep windows, light, and room sightlines in mind. The coastal look works because air seems to move through the piece visually. Too many closed boxes will make it feel bulky.
Visual checkpoint: Your plan should look breezy and layered, not dense.
2. Build a stable but visually light base
Construct a strong plywood base with hidden reinforcement below. Then face the visible edges with pale boards so the base looks clean and furniture like. Add one or two low cubbies, but leave sections open beneath the central cluster.
The trick here is balancing real structure with visual delicacy. The piece should appear lifted and airy while still being safe for jumping cats.
3. Install the main tower supports
Set structural posts for the two side towers and central mass. If you want the branch framed look, install straight structural posts first, then later attach driftwood like decorative pieces to the fronts or sides. This gives you the organic style without sacrificing safety.
Space the towers generously. The upper bridge should feel suspended in open light, not cramped between closely packed columns.
4. Build the central cottage cluster
Create the middle as layered pale wood boxes with soft arched openings and tiny balcony ledges. Let one room sit slightly forward and another slightly back. Add a gentle sloped roof panel to one central house form to reinforce the relaxed seaside cottage mood.
Because the finish is pale, shadow and depth matter more. Offsetting the boxes helps the structure read beautifully even in bright light.
5. Build the left tower with open framed arches
Construct the left tower with open upper framing and large arch like openings. Use shaped trim or branch style overlays to soften the geometry. The goal is a weathered architectural lookout, not a sealed box stack.
Add a softly curved ramp leading from the central section toward the tower. This looks elegant and is very cat friendly.
Visual checkpoint: The left tower should feel tall and graceful rather than blocky.
6. Build the right tower and side terraces
Build the right tower with a slightly more enclosed upper room and a few side landing steps. Include one or two sisal sections on the visible supports, but do not overwhelm the pale wood with too much rope. Here, the rope should feel like a natural accent.
Add a right side terrace or open box balcony near the lower mid section so the whole structure has outward reach, not just upward height.
7. Make the bridges and soft transition paths
Install one suspended bridge between the two upper towers and one smaller bridge or ramp below. Keep both soft in tone and texture. Light wood slats and natural rope look right at home here.
A bridge in this palette should feel relaxed and inviting. Avoid black hardware dominating the look. Conceal fasteners where possible and keep the rope a natural oatmeal tone.
8. Add stairs with generous treads
Build stairs from the lower left up into the central cluster, then smaller steps toward the upper rooms. Because the whole design is gentle and airy, your stairs should be broad and calm rather than steep and dramatic.
Round over the front edges slightly to soften the look and feel. Cats often prefer these gentler transitions, especially when descending.
9. Create rail details and cottage accents
Add tiny rails, balcony edges, and maybe one or two little fence like details to the central house cluster. Keep them restrained. A few charming details will make the piece feel custom built. Too many will shift the look away from the serene coastal style.
If you are using decorative driftwood accents, now is the time to install them around tower fronts or upper framing.
10. Whitewash and seal
If the wood is too warm, apply a diluted whitewash or soft gray beige wash, then wipe it back. You want the grain to remain visible. The finish should look sun faded and salt softened, not painted solid.
Seal with matte clear protection once the tone feels right. Test finish samples in daylight if possible, since this look is very sensitive to undertone.
11. Add natural bedding and woven textures
Use linen look pads, woven mats, or light camel cushions in selected cubbies and platforms. Keep them simple and tailored. This build looks best with soft texture rather than bulky plush beds.
Cats usually love an upper airy perch plus one tucked middle nook. Give them both options.
12. Place and style the final piece
Set the finished mansion near a bright window if possible. Introduce your cats with treats placed at the lower stairs, central room, and upper bridge landing. Let the structure become part of the room rather than a separate toy.
Visual checkpoint: From across the space, the tower should feel almost like coastal furniture or a sculptural room piece, with the cat function revealed only as you look closer.
Troubleshooting section
The pale finish looks flat
Layer two subtle tones, such as a warm beige wash and a light gray wash, wiping back each one so the grain stays active.
Decorative driftwood accents feel loose
Use them only as overlays, never as the main support. Fasten through hidden backing strips if needed.
The bridges stand out too much
Lighten the wood slats, use softer rope, and hide hardware. In a coastal build, quiet transitions matter.
My cats slide on the stairs
Add grooves, a thin rope strip, or textured clear grip tape trimmed neatly.
It still feels heavy in the room
Remove one enclosed upper box or open up one side wall on a tower to let more light pass through.
Finishing details section
Vacuum sawdust from every cubby and wipe all pale surfaces clean before styling. Add washable pads in sand, ivory, or oat tones. For an even more refined look, use hidden magnets or Velcro to keep pads from sliding while still making them removable for laundry.
Optional upgrades:
- Add a hammock beneath one mid platform
- Include a window facing sunning shelf off one tower
- Use carved rope trim for nautical detail
- Add a storage basket tucked beneath the base for toys
This finish shows dust and paw marks more quickly than darker wood, so a simple weekly wipe keeps it looking fresh and intentional.
Shop Similar
- driftwood finish stain for furniture projects
- natural sisal rope for cat bridges and posts
- pale reclaimed wood boards for diy decor
- matte clear sealer for whitewashed wood
- neutral washable cat cushions
Style It With
Grand Reclaimed Wood Cat Mansion Make-It-Yourself Tutorial
What you’re making
You’re building a grand reclaimed wood cat mansion with sculptural tower frames, layered house rooms, rope bridges, stairs, lookout balconies, and dramatic floor to ceiling presence. This version combines the most striking qualities from the image set: reclaimed warmth, open tower architecture, multi route circulation, and enough enclosed rooms to feel luxurious for the cats while still reading as a showpiece in the room.
This is the statement build for someone who wants a true custom centerpiece. It is ambitious, but if you work methodically and respect the structure first and style second, it is very achievable.
Materials + tools list
- 3/4 inch plywood for base, rooms, and main platforms
- 1/2 inch plywood for lighter upper decorative walls if needed
- Reclaimed wood boards in mixed widths
- 4x4 posts for main structure
- 2x2 framing lumber
- Decorative branch style wood pieces or carved trims
- Sisal rope
- Wood screws in assorted lengths
- Wood glue
- Hidden L brackets and flat mending plates
- Jigsaw
- Circular saw or table saw
- Drill and impact driver
- Orbital sander
- Clamps
- Tape measure
- Carpenter square
- Matte clear finish or weathered wood stain
- Neutral pads or cushion inserts
- Dowel rods or spindle trim for railings
- Anti tip wall anchor kit highly recommended
Finished size + customization notes
A finished size of around 84 to 100 inches tall, 48 to 64 inches wide, and 30 to 38 inches deep captures the grandeur of the look. If your ceilings are low, keep the same width and depth and reduce the upper tower height by one level. That preserves the mansion feeling better than shrinking everything.
This design supports lots of customization. You can lean rustic lodge, gothic manor, pale coastal, or modern reclaimed simply by changing finish tone and trim style. The architectural plan remains similar.
Step-by-step instructions
1. Think in layers, not in parts
Before cutting anything, identify the major layers of the build: heavy base, lower dens, central middle village, left tower, right tower, lower bridge, upper bridge, and final trim. This mental organization keeps a large project from becoming overwhelming.
Many ambitious builds go wrong because the maker starts with pretty details before establishing circulation and stability. Sketch your layers first. Mark cat routes with arrows. If the path upward feels awkward on paper, fix it there, not after assembly.
Visual checkpoint: Your sketch should show at least three distinct vertical journeys and multiple resting zones.
2. Build the strongest base you can reasonably manage
Cut an oversized base from two laminated layers of plywood if possible. Frame underneath with substantial lumber. Then attach lower dens and support blocks directly into that base. A piece this tall benefits from unapologetic mass at the bottom.
You want the finished mansion to look lofty, but it should feel almost immovable when you grasp the base. If you can rock it at this stage, reinforce more before going further.
Tip: Hidden corner blocks, double layers, and through bolting into major posts are worth the effort here.
3. Set every major structural post
Install the main posts for the two side towers and central body. These posts are your skeleton. The decorative reclaimed panels, arches, and twig like accents come later. Keep the real structure plumb, square, and overbuilt.
Dry fit a few temporary boards across the post tops to visualize future platforms and bridge landings. Stand back often. This scale of project benefits from frequent visual correction before permanent fastening.
4. Build the lower sleeping village
Construct several lower cubbies across the base, with openings facing different directions. Include a mix of open and slightly tucked away spaces. These lower rooms create the feeling of a village base beneath the towers and provide valuable hideaways for resting or retreating.
Vary the heights slightly. One box can sit directly on the base while another rests on a short platform. That small change adds richness and prevents the lower section from feeling like a row of identical crates.
5. Create the central stacked house mass
Now build the heart of the mansion. Start with a broad central room, then stack a smaller room above or behind it, then add a narrower upper room with a balcony or porch. Use stairs to visually link these levels. Let at least one room project forward a bit so the facade feels layered.
This middle cluster is crucial. It makes the whole build feel inhabited and architectural instead of simply vertical. Keep one room deep and cozy, one more transitional, and one more lookout oriented.
Visual checkpoint: The center should now feel like a place, not just a connector.
6. Raise the left tower with open architectural framing
Build the left tower tall and airy. Use broad platforms and framed openings, then add decorative curved wood or arch forms to soften the silhouette. The top levels should look like elegant lookout chambers.
Do not overload the tower with enclosed boxes. The beauty of this side comes from openness, visibility, and height. Add a bed or mat in one upper chamber so the cats have reason to claim it.
7. Build the right tower with varied climbing options
The right tower can be slightly more rugged, with a wrapped scratch section, side ledges, and a semi enclosed upper room. Use the tower to provide both vertical scratching and vertical travel. This makes it especially useful in multi cat homes.
Make sure the tower aligns with your future top bridge. Bridge landings that are off by even a little can make the whole upper section feel awkward.
8. Add the main stair runs and a curved ramp
Install a broad front stair from the lower level to the central house, then smaller steps climbing higher through the middle. If you want to echo the most dramatic image, include one gentle curved ramp leading toward an upper tower chamber. This adds elegance and helps older or more cautious cats access height more comfortably.
Traction matters here. Before final finish, make sure the stair treads and ramp surface will not become slick.
9. Add the lower bridge and understructure interest
Build a short lower bridge or ramp between central and side sections. Keep some space below it open. That under layer depth is part of what makes the reference piece feel so rich. Cats enjoy underpasses as much as upper perches.
Think three dimensionally. This mansion should reward movement from every angle, not only the front view.
10. Construct and install the top suspended bridge
Build the top bridge carefully. Wide enough for confidence, slightly dipped for drama, and firmly anchored. Test with downward pressure and side pressure before letting cats use it. A well built top bridge is one of the most joyful elements in a big cat mansion and often becomes the structure’s signature feature.
If you have any concern about sway, use a semi rigid hidden base beneath the decorative rope and slat surface.
11. Wrap scratching posts and add balcony rails
Choose one or two highly accessible posts to wrap in sisal. Then install balcony rails on the most visible ledges. Repeat the same rail style in several places so the mansion feels cohesive. This is where a sprawling build starts to look intentional rather than improvised.
Keep every detail cat safe. Smooth rail tops, narrow gaps, and no sharp decorative points.
12. Trim, sand, finish, and soft stage
Now apply reclaimed cladding to visible faces, trim the platform edges, sand every touch point, and seal the entire piece with a matte protective finish. Once cured, add neutral pads and bedding to selected rooms. Do not fill every chamber. Leaving some platforms bare actually makes the mansion feel more spacious and architectural.
Introduce your cats gradually. Start with treats on the lower stairs, then middle rooms, then bridge landings. Watch their chosen routes. Minor route tweaks are normal on a build this large.
Visual checkpoint: The finished mansion should feel like a handmade piece of pet architecture, with height, warmth, mystery, and many ways to move through it.
Troubleshooting section
It looks impressive but not usable
Usually the routes are too steep or too disconnected. Add an intermediate landing or widen a bridge before assuming your cats are uninterested.
The upper towers sway independently
Tie them together more with bridge anchoring, rear bracing, or hidden cross members near the top third.
The reclaimed boards do not look cohesive
Mix them more evenly across the whole build instead of grouping all dark boards on one side and all pale boards on the other.
My decorative branch pieces are in the way
Trim them back. Ornament should frame openings, not obstruct movement or cleaning.
The mansion is too dominant visually
Use paler pads, place it near curtains or tall windows, and keep surrounding room styling calm so the structure feels integrated.
Finishing details section
After final sanding and sealing, inspect every opening with your hand and every platform with gentle pressure. Add felt or rubber beneath the base. Consider a rear wall anchor even if the piece feels sturdy. Large cat furniture experiences a lot of repeated force over time.
Optional upgrades:
- Add hidden cubby lighting in two chambers
- Create a detachable toy garland beneath one bridge
- Build a matching side step stool for older cats
- Add engraved plaques for each tower or house room
With a build this ambitious, routine maintenance matters. Check hardware every month at first, then seasonally once you know how your cats use it.
Shop Similar
- reclaimed wood boards mixed tone furniture build
- heavy duty sisal rope for diy cat mansion
- large plywood sheets for furniture projects
- matte clear sealer for rustic wood furniture
- dowel railing trim for miniature balconies
Style It With
When you step back and look at the finished piece, what matters most is not just that your cats use it. It is that the structure feels right in the room. That it holds its own visually. That it looks like something that was meant to be there.
Over time, these builds settle in. The wood softens. The paths become familiar. Favorite sleeping spots emerge. What began as a project turns into a lived in part of your home, shaped as much by your cats as by your hands.
If you take your time with the structure, respect the proportions, and keep the details intentional, you end up with more than a cat tower. You end up with a piece of architecture scaled for a different kind of life, one that climbs, watches, rests, and moves through your space in its own quiet way.