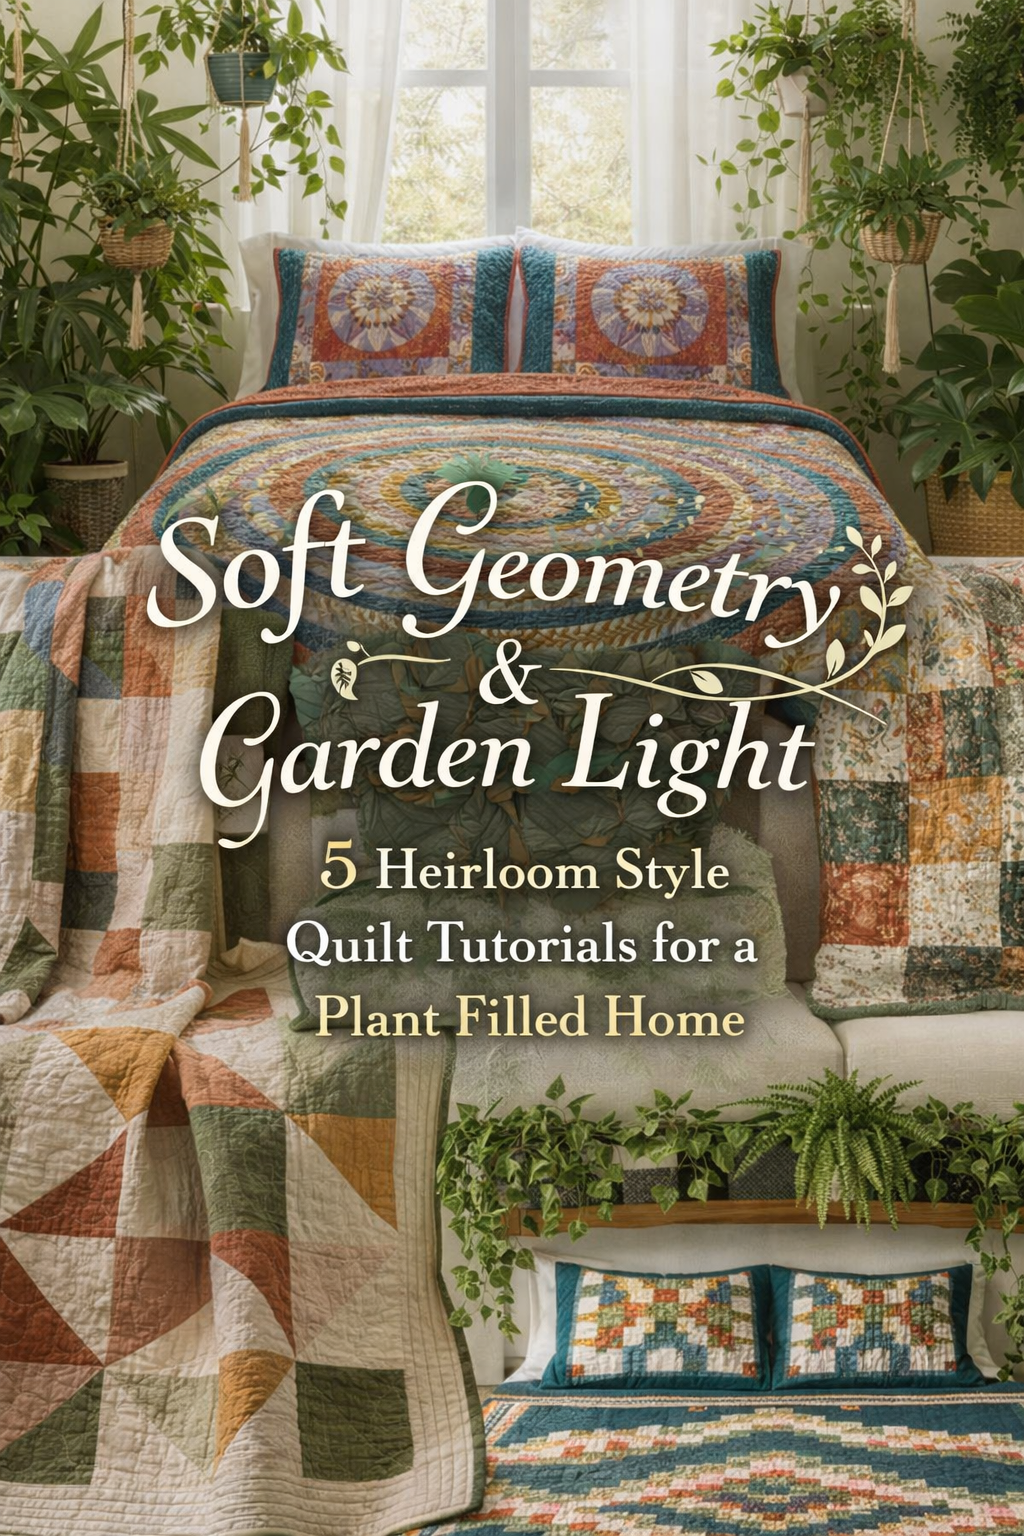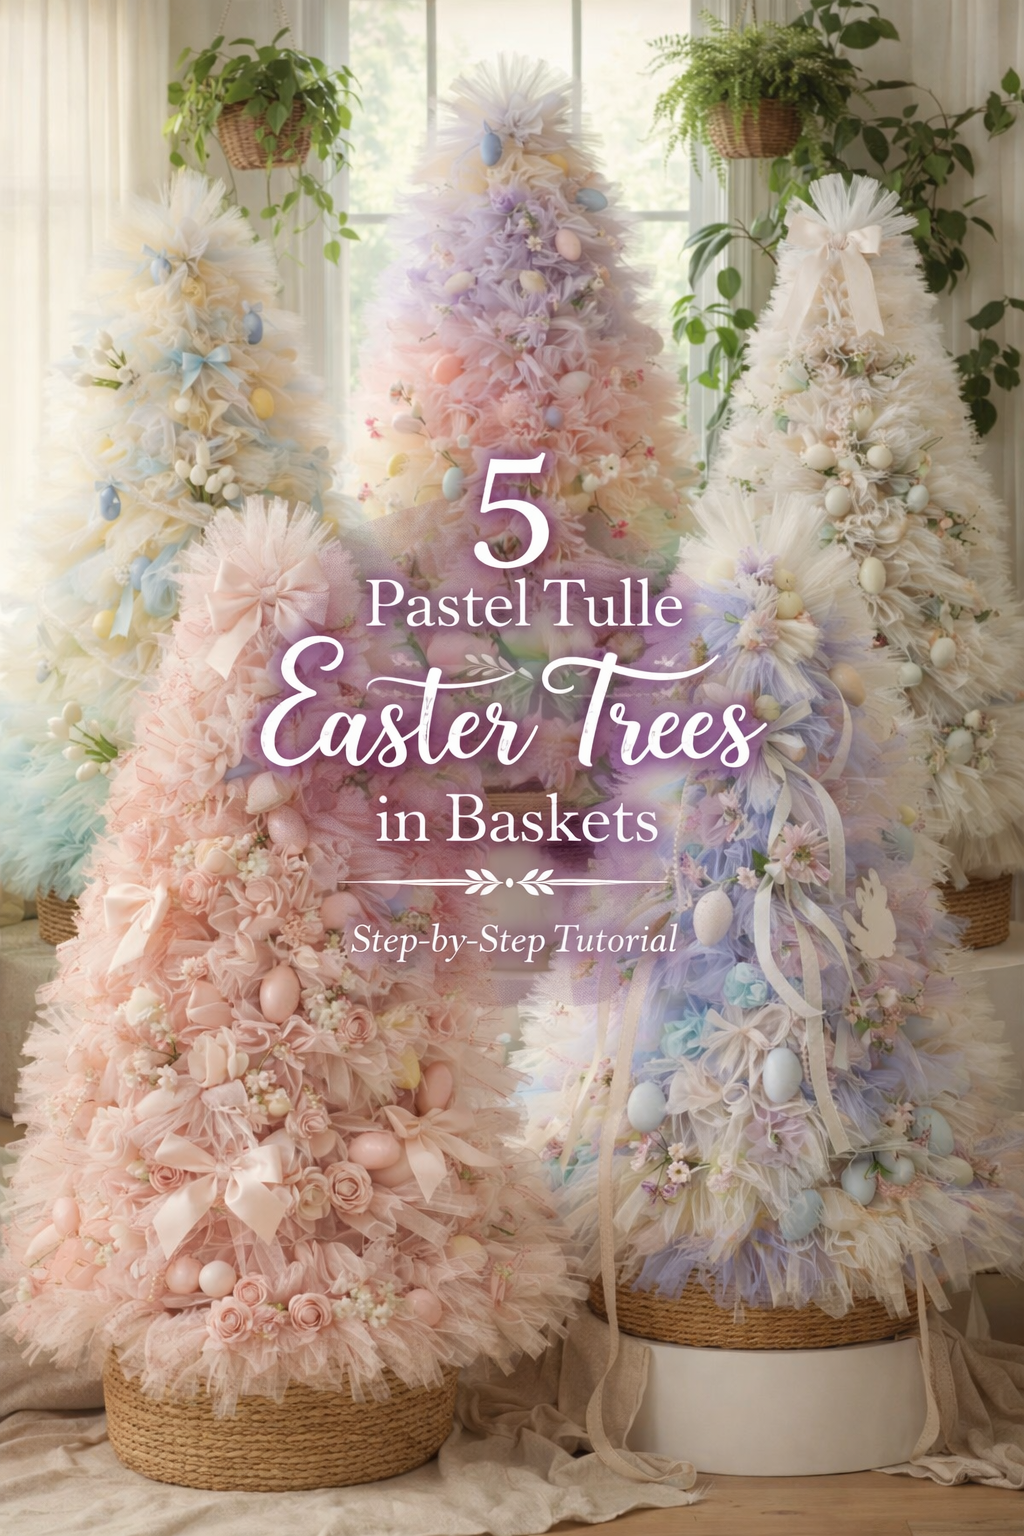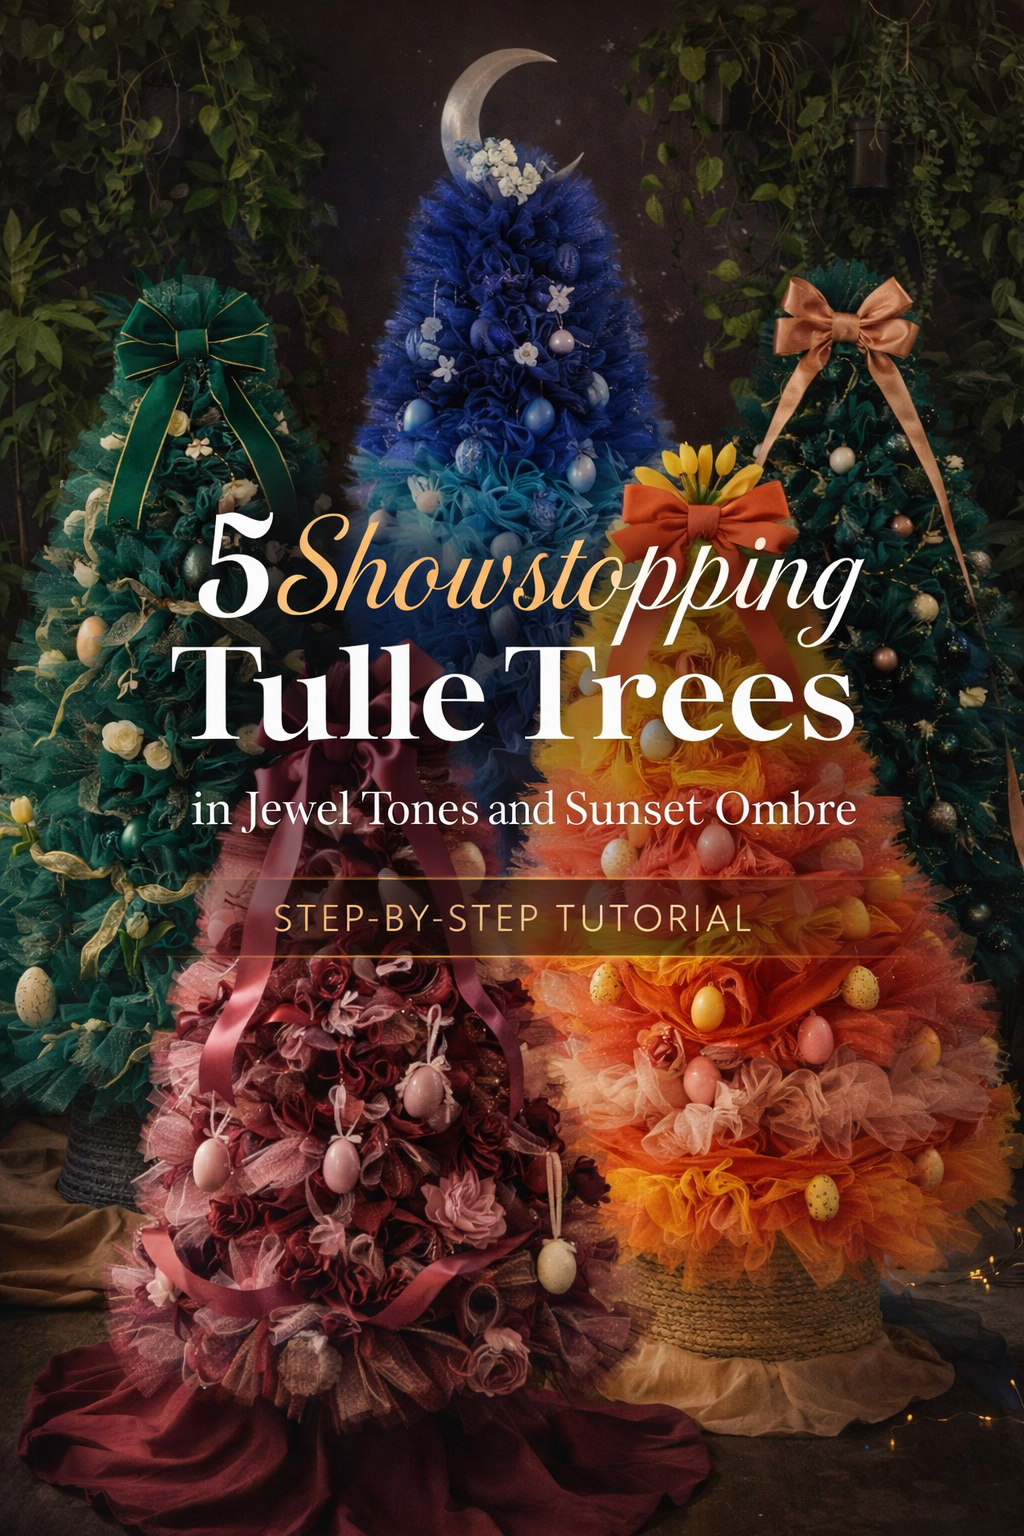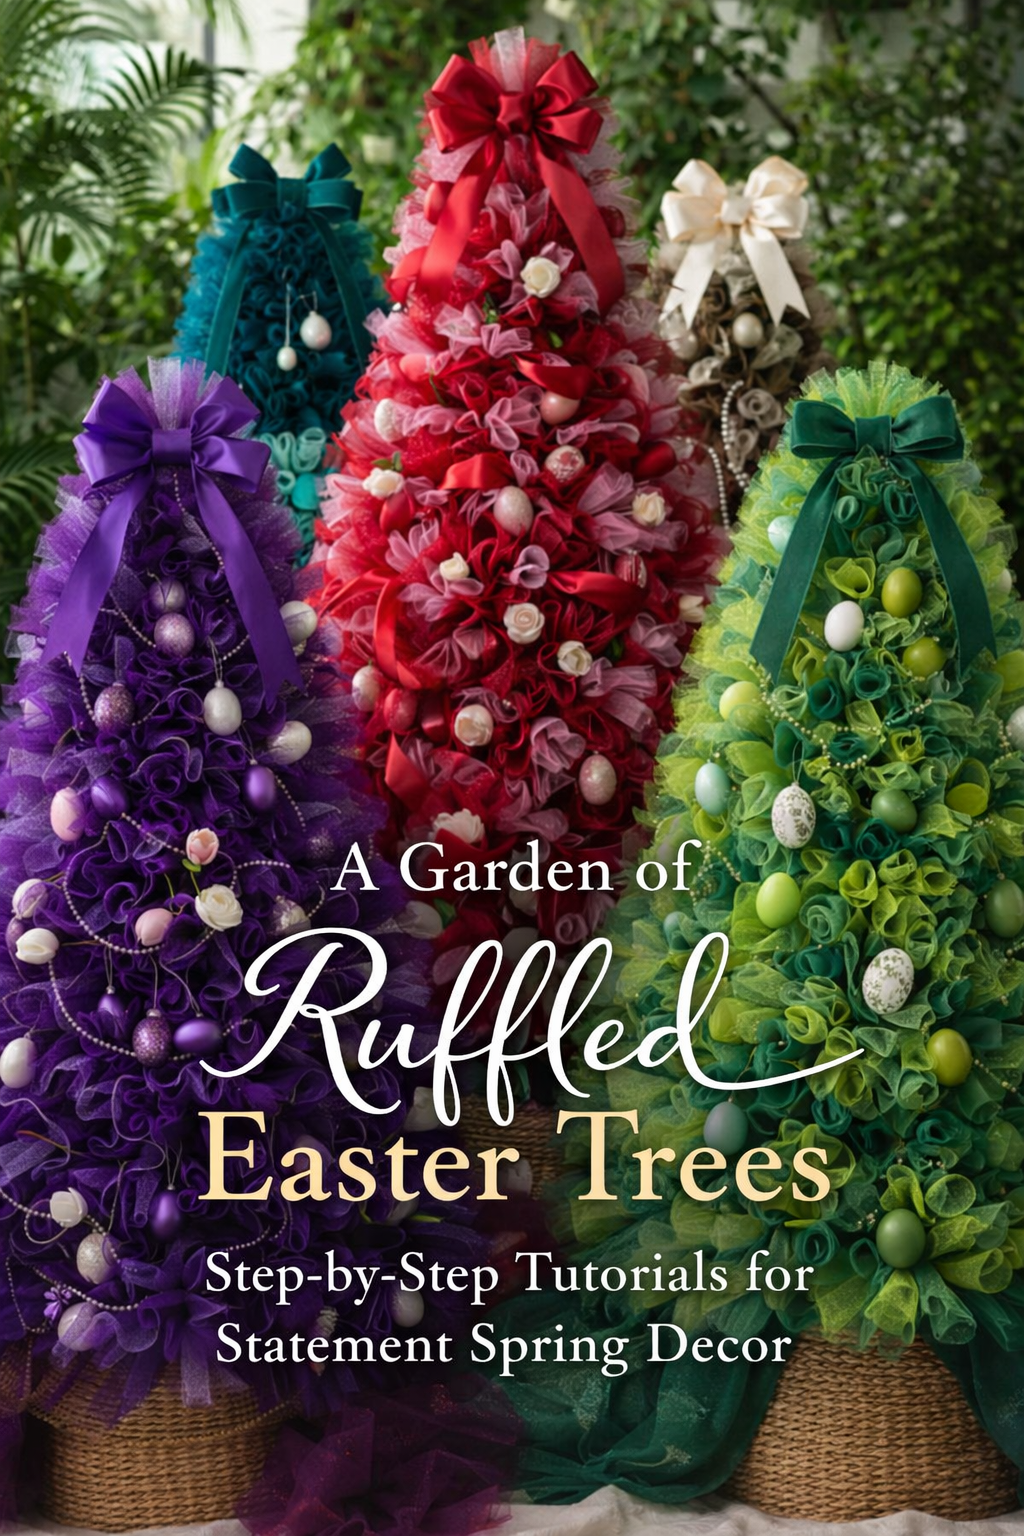
A Garden of Ruffled Easter Trees: Step by Step Tutorials for Statement Spring Decor

More like this
💡 Pro Tip: Why I Link to Amazon Search Results and Not One Product
In the Shop the Look and Style it With sections under each bikini, I link to Amazon search results, not single products. Here’s why this matters:
Hot bikinis sell out fast. I don’t want you clicking on a dead link to a sold-out item. Search pages stay updated.
You get more options. Love the vibe but want a different color, cut, or price point? The search results give you everything that matches the look and energy.
I curate each search carefully. These aren’t generic. I spend hours crafting keywords that bring up exactly the kind of bikinis I’d wear—or recommend to my hottest friends.
Support with no pressure. If you click a link, browse, and buy something later, I may earn a small commission at no extra cost to you. That helps me keep bringing you curated collections like this one—powerful, seductive, and always fresh.
So dive in. Click through. Try something risky. These aren’t just bikinis—they’re commands, statements, and maybe even your new favorite weapon of choice.
Spring decorating always feels a little more magical when it steps outside the expected. These ruffled Easter trees do exactly that. Instead of relying on traditional wreaths or tabletop baskets alone, they build height, softness, and color into a statement piece that feels part floral sculpture, part holiday fantasy, and completely unforgettable. Each version in this collection brings its own mood to the room, from jewel toned drama to airy ombré color stories to soft neutrals that feel quietly elegant.
What makes these projects especially satisfying is that they look elaborate while still being wonderfully buildable at home. With mesh, ribbon, eggs, baskets, and a little patience, you can create a centerpiece sized design that transforms an entry table, dining corner, sunroom, or covered porch into something far more immersive for the season. The texture is what makes them so captivating. Every gathered loop catches the light differently, every ornament nestles into the layers, and every bow gives the finished tree that polished, celebratory finish.
In the tutorials ahead, you will find five distinct interpretations of the same basic idea, each styled with its own palette and personality. Whether you are drawn to rich purple, fresh green, oceanic teal, romantic red, or warm neutral tones, there is a version here that can fit your space and inspire your own variation. Think of these as spring statement pieces that bridge craft and décor beautifully. They are festive without feeling childish, detailed without feeling fussy, and dramatic in the very best way.
If you have been wanting to make something for Easter that feels a little more editorial, a little more unexpected, and a lot more memorable, this collection is a beautiful place to begin.
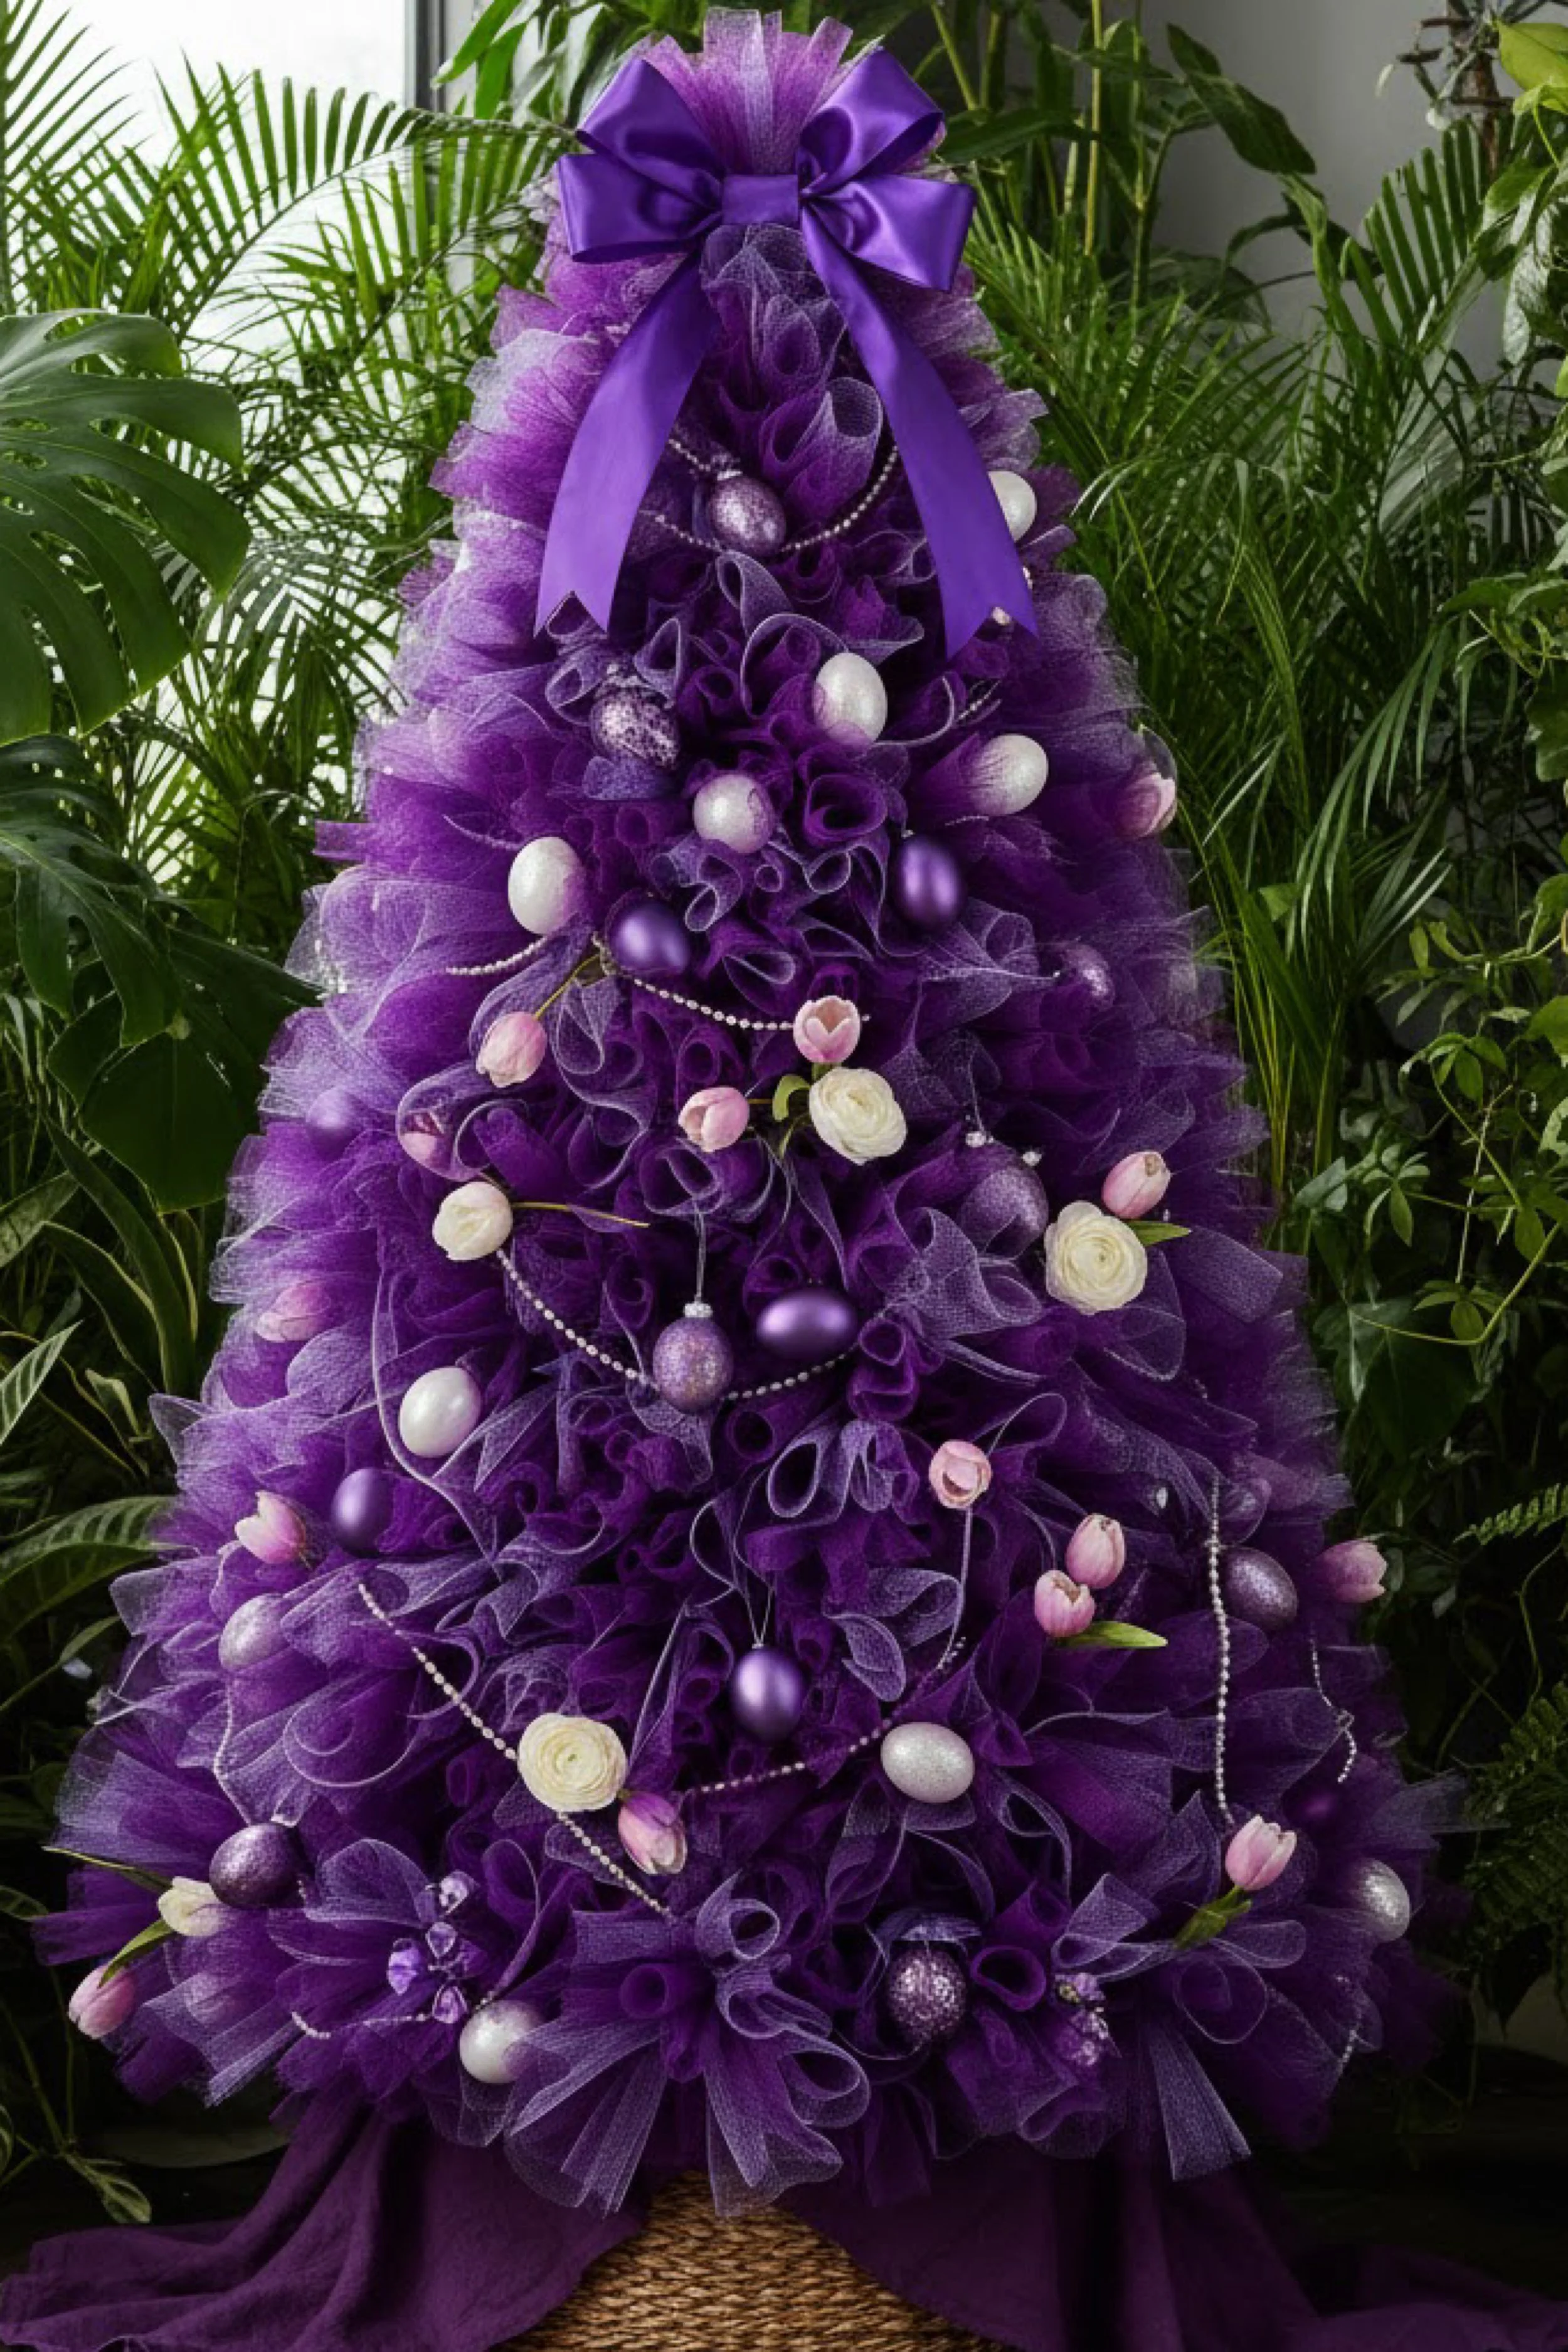
Regal Purple Easter Tulle Tree Step by Step Tutorial
What you’re making
You’re making a dramatic cone shaped Easter tulle tree with a lush, cloud like silhouette in saturated violet and plum tones, finished with a statement bow, pastel eggs, faux blooms, and pearl garland. The overall look is romantic, theatrical, and a little bit enchanted, like a spring holiday centerpiece styled for a jewel toned conservatory. This version is ideal for an entry table, a dining room sideboard, or a covered porch where you want something softer than a wreath but more sculptural than a standard floral arrangement.
The photo suggests a freestanding cone form wrapped densely with gathered deco mesh or tulle, then embellished in layers so the decorations sit inside the folds instead of floating on top. That is the secret to getting this exact look. Rather than decorating a bare cone sparsely, you will build a plush base first, then tuck each egg, pearl strand, and flower into the ruffles so the whole piece feels full and expensive.
Materials + tools list
- Wire tomato cage, cone topiary frame, or DIY cone frame made from floral wire
- Large woven basket or sturdy planter to anchor the tree
- Floral foam blocks, expanding craft foam, or crumpled paper for the base
- Purple deco mesh, tulle, or poly mesh ribbon in 10 inch or 12 inch width
- Optional second purple mesh in a lighter lavender for depth
- Wide satin ribbon for the topper bow
- Extra sheer tulle for soft loops around the bow
- Assorted faux Easter eggs in white, lilac, lavender, and glitter finishes
- Faux tulips or small blush and cream spring blooms
- Pearl bead garland or faux pearl strand
- Floral picks or wooden skewers
- Zip ties
- Floral wire
- Wire cutters
- Scissors
- Hot glue gun and glue sticks
- Straight pins or greening pins if using foam
- Fabric or drape cloth for the base
- Optional rhinestone picks or crystal sprigs for sparkle
- Optional battery fairy lights for an evening glow
Finished size + customization notes
A piece like the one in the image looks best at about 30 to 42 inches tall if used indoors on the floor or on a low stand. If you want a tabletop version, scale down to 20 to 24 inches and use smaller eggs and mini pearl strands. For a fuller, softer tree, use more mesh and shorter poufs. For a more open, airy version, use fewer bundles and larger loops.
You can also change the mood with color. Deep grape and lavender gives you a luxe, jewel toned Easter look. Orchid and blush feels more feminine and romantic. If yours looks wider than the photo, reduce the number of poufs at the lower third or tighten them closer to the frame.
Step by step instructions
1. Build the cone structure
Start with your frame. A three tier wire tomato cage flipped upside down works beautifully for this kind of project because it already has a cone shape. Pull the legs together at the top and secure them firmly with floral wire or a zip tie. If you are using a custom frame, shape heavy floral wire into a cone and add a few horizontal support rings so your mesh has something to attach to.
Set the frame into a basket or planter. Fill around the frame with foam blocks, tightly packed paper, or another anchoring material so the form stands straight and does not wobble. Cover the top of the basket fill with a draped fabric later, but for now make sure it is stable.
Visual checkpoint: You should now see a sturdy cone rising from the basket with no side lean. If it rocks when touched, fix that now before adding mesh.
2. Cut and prep your mesh bundles
For the lush ruffled look in the photo, cut your purple mesh into pieces about 20 to 24 inches long. This size creates big, rounded loops instead of flat frills. If you want extra dimension, cut some pieces from a lighter lavender mesh as well and pair one dark and one light together in some bundles.
Take each strip and pinch it at the center so it forms a bow tie or pouf shape. Another easy option is the rolled loop method. Roll both cut ends inward toward the center, then pinch in the middle. Both methods work. The photo leans toward poufy, gathered ruffles, so do not make the bundles too flat.
Make a large pile before attaching anything. For a medium tree you may need 45 to 70 bundles depending on how tightly packed you want the surface.
Tip: Mesh has memory. If it is flattened from the package, fluff each strip gently with your fingers before pinching it.
3. Attach the bottom layer first
Begin at the base of the cone. Attach your first row of mesh bundles with zip ties or floral wire, placing them close together. Angle each pouf slightly upward so it hugs the cone instead of sticking straight out. Work all the way around the base before moving up.
The bottom row should be especially full because it visually grounds the whole design. This is also the section most likely to show gaps if spaced too far apart. Overlap each pouf slightly.
Visual checkpoint: The wire frame should already start disappearing. If you can still clearly see the frame from the front, your poufs need to be closer together.
4. Continue layering upward
Add more rows, staggering each new bundle between the bundles below it. Think brick pattern, not straight columns. This creates the dense, organic fullness seen in the photo. As you move upward, slightly reduce the size of the rows to preserve the cone silhouette.
Mix in lighter lavender mesh occasionally if you are using it. Keep it subtle. In the reference look, the variation reads as soft tonal depth rather than striped color blocking.
Every few rows, step back and fluff the loops. Turn the tree as you work so the fullness is even from all angles.
Tip: If yours starts looking bumpy instead of lush, you probably have some bundles tied too tightly. Loosen and re fluff them before moving on.
5. Fill the top section and shape the peak
The top third of the tree in the photo narrows gracefully, but it is still plush. Use slightly smaller bundles here so the tip does not become bulky. Gather the frame tightly at the top and create a soft tufted finish with a few extra pieces of sheer tulle peeking out from behind the future bow.
Do not worry if the very tip looks a little unfinished. The topper bow will cover it.
Visual checkpoint: The full shape should now resemble a smooth cone with rich ruffled texture from top to bottom.
6. Make the oversized bow topper
Cut wide satin ribbon for a large multi loop bow. A classic hand tied bow works, but wired ribbon or velvet backed ribbon can help the loops stay full. Make two or three large loops per side, add long tails, and layer a bit of airy tulle behind it for softness.
Attach the bow at the top front of the cone using floral wire through the knot. Hot glue can help secure it, but wire is more reliable for the main hold.
The bow in the image is generous and polished, not droopy. Fluff each loop and angle the tails so they frame the upper section of the tree.
7. Add the largest eggs first
Now begin decorating. Start with the largest eggs and place them deep into the folds of mesh. Use floral wire, skewers, or glued picks on the eggs so you can insert them into the frame and not rely on hot glue alone. Cluster a few near the center and scatter others toward the outer edges.
Use a mix of matte, glittered, and pearl finish eggs in white and purple. The key is to avoid even spacing. The image feels curated but natural, with some small clusters and some singles.
Visual checkpoint: You should now see the eggs sitting inside the ruffles, not balancing on top of them. If they look pasted on, tuck them deeper.
8. Drape pearl garland in loose swags
Take pearl garland and drape it in soft, curved lines from one point to another. Secure only at the top points of each swag so the strands hang naturally. Keep the arcs loose and elegant. This detail adds movement and gives the tree that dressed, finished appearance.
Do not overdo it. Two to five gentle swags are enough for most sizes. Let some sections disappear into the mesh and reappear lower down.
9. Insert faux flowers and tiny accents
Tuck blush tulips, cream ranunculus, or rose shaped buds into open areas. The flowers in the photo act like soft punctuation marks among the eggs. Keep the stems short and angled slightly upward or outward so they look nestled in, not stuck in like picks at a craft fair.
You can also add crystal sprigs, tiny butterfly picks, or jeweled clusters near the base if you want a slightly more glamorous version. Keep these accents small so the ruffled texture stays dominant.
10. Refine spacing and balance
This step matters more than people think. Rotate the tree slowly and edit the arrangement. If one side has too many eggs, move one. If the pearls look too straight, loosen them. If a flower disappears, bring it slightly forward. Good craft styling often comes from this last fifteen minutes of adjusting.
Look especially at the lower front section. That area draws the eye first in a floor standing piece, so make sure it has a pleasing mix of eggs, pearls, and blooms.
Visual checkpoint: You should now see a rich, layered cone where no area feels empty and no embellishment looks random.
11. Cover the base beautifully
Drape the basket or planter with fabric if needed, or let the woven texture show if it complements the look. In the image, the base feels soft and luxe, so a pooled purple cloth works well. Tuck the cloth neatly around the rim and let a little spill onto the floor for a styled editorial finish.
12. Optional upgrades
You can line the inside of the frame with fairy lights before attaching all the mesh for a gentle evening glow. You can add a monogram charm hanging from one pearl swag for a personalized gift version. You can stiffen a few outer mesh loops with spray starch if you want extra sculptural shape. You can even nest a few miniature birds or butterflies among the blooms for a conservatory inspired Easter display.
Troubleshooting section
The tree looks sparse
Add more mesh bundles before adding more decorations. Extra ornaments will not fix a thin base. Density is what creates the luxurious look.
My cone is leaning
Your basket anchor is not heavy enough, or the frame is off center. Remove the base cover and rebalance with foam, stones, or a heavier insert.
The eggs keep falling out
Use picks or wire stems attached to the eggs and insert them into the frame or foam. Hot glue alone often pops loose from smooth egg surfaces.
My bow looks limp
Use wider ribbon, make shorter loops, and wire the bow tightly at the center. Fluff each loop individually.
The pearls look messy instead of elegant
Use fewer swags and secure them at intentional high points. Let them drape naturally rather than wrapping them all over the tree.
Finishing details section
Once everything is placed, do a final fluffing pass with clean hands. Open any crushed loops, especially around the lower front and near the topper. Trim visible zip tie tails and stray glue strings. If needed, mist silk flowers lightly with water to soften creases, but do not wet glitter eggs or paper components.
For longer term display, keep the tree away from direct sun to preserve the deep purple color. Store it upright in a tall box or wrapped loosely in a clean sheet so the ruffles do not flatten. Before reusing next season, gently shake it out, re fluff the mesh, and touch up the bow.
Shop Similar
- Deep purple deco mesh rolls
- Wide satin ribbon for oversized bows
- Mixed lavender and white decorative Easter eggs
- Pearl garland for craft trees
- Cream ranunculus and blush tulip faux stems
- Cone topiary frames and tomato cage forms
Style It With
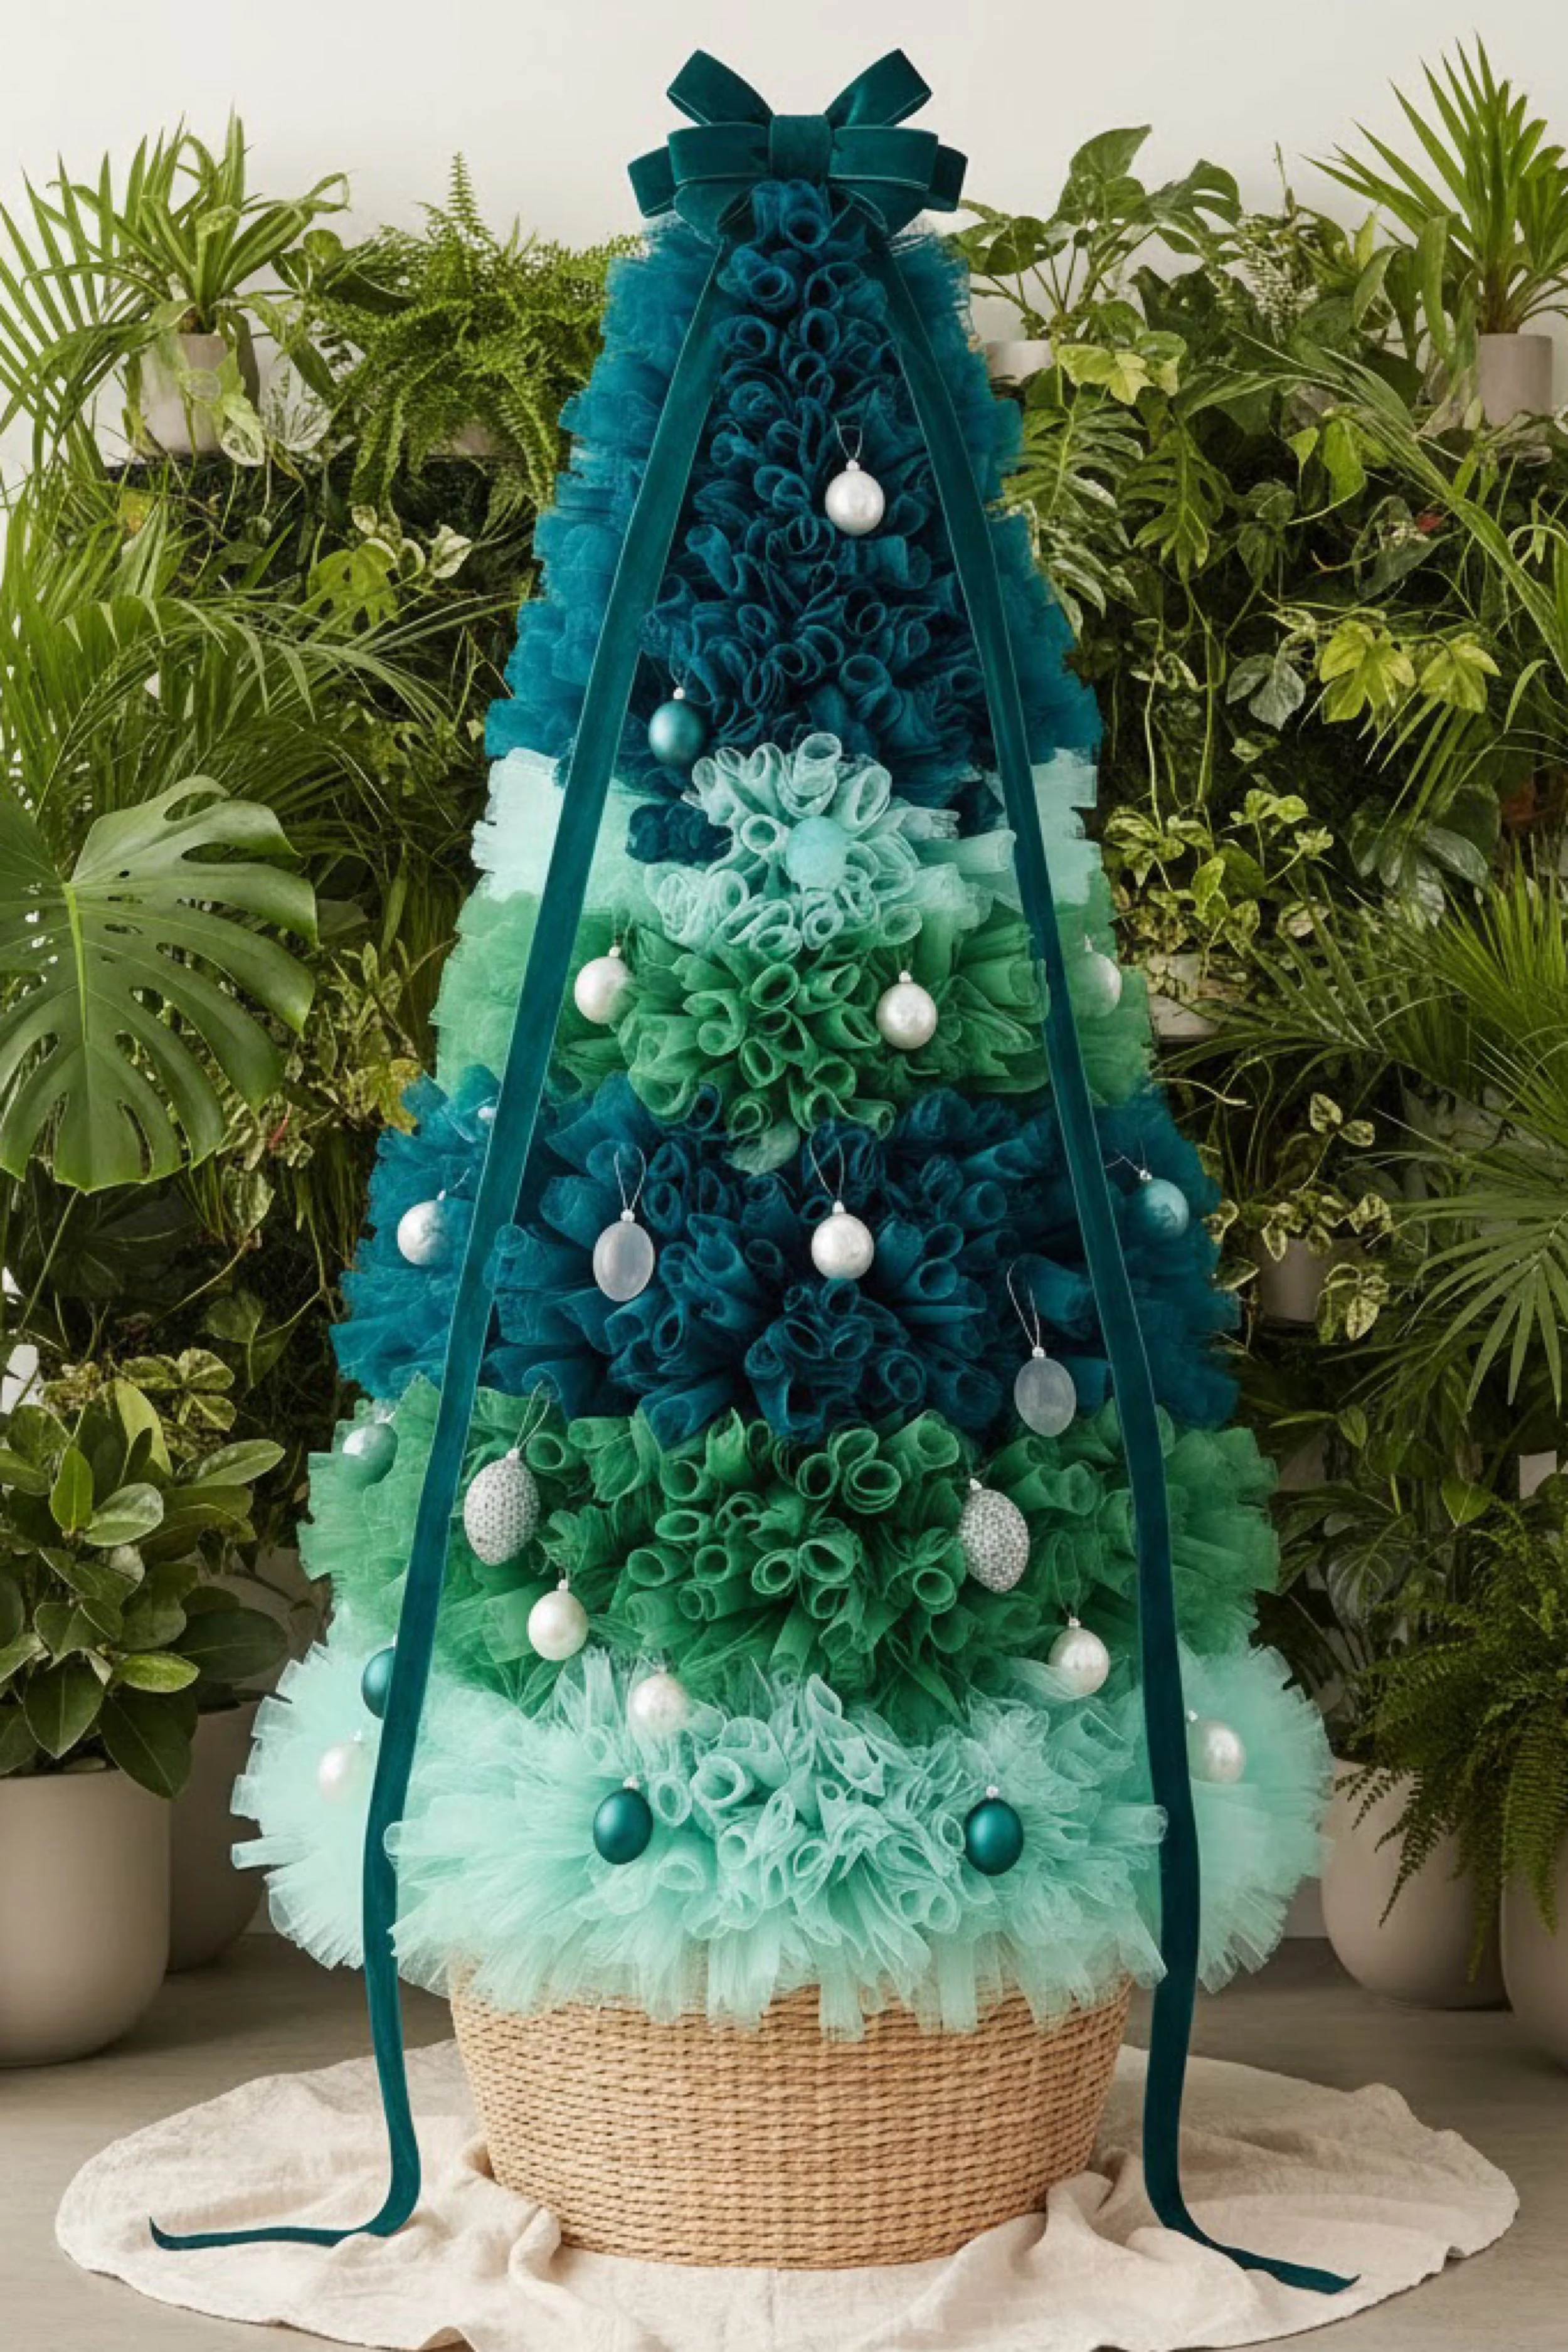
Ocean Jewel Easter Mesh Tree DIY Guide
What you’re making
This project recreates a tall ombré Easter tree built from layers of gathered deco mesh or soft craft tulle in deep teal, aqua, sea green, and pale mint, arranged over a cone form and set into a woven basket base. The finished look is airy, sculptural, and festive, with oversized ribbon tails, softly glowing egg ornaments, and dramatic color movement from top to bottom. It feels polished enough for an entry table or sunroom, yet the build itself is very approachable once you understand the layering method.
The visual magic comes from using repeated clustered loops instead of draping fabric flat. That gives the tree its plush, petal like fullness. You are essentially building hundreds of soft loops around a cone, then accenting the surface with eggs and ribbon so the tree looks lush rather than sparse.
Materials + tools list
- 1 foam cone, wire cone, tomato cage, or handmade poster board cone, about 30 to 42 inches tall
- 1 woven basket, planter basket, or rope basket wide enough to hold the cone securely
- Deco mesh, poly mesh, or soft tulle in 4 ombré shades such as deep teal, turquoise, seafoam, and pale mint
- Matching velvet ribbon or satin ribbon for the topper bow and long tails
- Floral pins, greening pins, or U pins
- Hot glue gun and glue sticks
- Zip ties if using a wire frame or tomato cage
- Scissors
- Wire cutters if needed
- Easter egg ornaments in pearl white, teal, silver, and soft frosted finishes
- Optional pearl garland or bead strands
- Floral foam, crumpled kraft paper, or a weighted insert to anchor the basket
- Straight pins or ornament hooks
- Optional wooden dowel for extra center support
- Measuring tape
- Optional spray adhesive for stubborn spots
- Optional battery fairy lights for a soft evening glow
Finished size + customization notes
A tree like the one in the photo looks best between 34 and 44 inches tall including the basket. The lower portion should feel generous and rounded, while the top narrows cleanly to a soft point. If your tree looks too skinny, add wider loop clusters around the lower third. If it looks too bulky at the top, trim back the width of the loops as you move upward.
For color placement, keep the deepest teal at the top and repeat it again lower down so the ombré feels intentional rather than striped. You can also soften the look by blending each band with a transition row where both neighboring colors appear together.
Step by step instructions
Build and anchor the cone base.
Start with your cone form. If you are using a foam cone, great. If you are building one, roll heavyweight poster board into a tall cone and tape it securely, or turn a tomato cage upside down and bind the legs together to create a pointed top. Place the form inside the basket and check the proportions. You should now see a tall, elegant silhouette with the widest point sitting just above the basket rim. Anchor the base with floral foam, paper stuffing, or a weighted insert so the form does not wobble.Plan your color map before attaching anything.
Lay out your mesh or tulle in the order you want the colors to appear. In the inspiration photo, the top begins with a saturated dark teal, moves into bright blue teal, then softens into sea green and pale mint near the base. Mark the cone lightly with horizontal guide lines if that helps. These are not strict stripes. Think of them as zones. The color should melt softly from one family into the next.Cut your material into manageable lengths.
Cut strips about 10 to 14 inches long for tighter curled loops, or 14 to 18 inches for fuller loops. For a tree this size, you will need a lot. It is better to cut a generous pile of each color now rather than stopping every few minutes later. If you are using mesh that frays, keep a clean pair of scissors nearby and handle the cut edges gently.Make your first loop clusters.
Take one strip and bring the ends inward so they overlap slightly, creating a loop or petal. Pinch at the center. Make two or three more from the same color and stack them together into a little cluster. Secure the middle with a floral pin, a zip tie for wire forms, or a dab of hot glue plus a pin. Your cluster should look fluffy and dimensional, not flat. If yours looks too collapsed, use longer strips or pinch less tightly.Attach the first row around the base.
Begin at the bottom edge of the cone, just above the basket. Attach clusters side by side so no base shows through. Overlap each cluster slightly. This row sets the fullness for the whole tree, so do not skimp. You should now see a plush ruffled skirt beginning to form. If yours looks wider than the photo, that is fine at this stage because the fullness compresses visually once upper rows are added.Work upward in overlapping spirals.
Rather than building in rigid rings, attach the next clusters in a gentle spiral upward. This hides seams and gives the surface a more organic, cloud like finish. Angle each new cluster so it overlaps the one below it by about one third. Keep stepping back every few rows. The tree should feel evenly filled from all angles.Create the ombré blend.
When you reach a transition area, mix the outgoing and incoming colors together. For example, in the shift from deep teal to brighter aqua, alternate one deep teal cluster with one aqua cluster, then change to mostly aqua with an occasional deep teal echo. This matters. It is what gives the tree the expensive, editorial look instead of a craft fair stripe effect.Narrow your loop size toward the top.
As you move higher, reduce the strip length slightly so the upper sections feel more refined. The top of the cone should not be as puffy as the base. You should now see the shape taper clearly. If the top looks blunt, use smaller, tighter curls near the tip.Fill any gaps immediately.
After every few rows, rotate the tree and inspect it at eye level. Insert smaller single loops anywhere the form peeks through. These small fillers are what make the final result look dense and luxurious. Do not wait until the end to patch everything because then the holes are harder to disguise.Add a dramatic top bow.
Use wide velvet or satin ribbon in a coordinating deep teal. Make a large multi loop bow or use a ready made bow and fluff it. Position it right at the top front with two long tails trailing nearly to the basket. The bow should feel generous and intentional. In the reference image, the long vertical tails visually lengthen the tree and help unify the upper and lower sections.Place the largest egg ornaments first.
Start decorating with the biggest eggs in pearl white, soft metallic teal, and frosted silver. Tuck them into the mesh rather than letting them sit on top. Distribute them evenly so no side feels heavy. Aim for a gentle zigzag placement from top to bottom. You should now see the tree shifting from textured cone to decorated Easter centerpiece.Layer in smaller eggs and a few special finishes.
Add tiny hanging eggs, glitter eggs, or textured eggs in between the larger ones. Vary the finish so the surface catches light in different ways. Matte, pearl, and lightly glittered ornaments work beautifully together. Avoid using too many fully shiny eggs or the piece can start to feel like holiday décor instead of spring décor.Add soft drape elements if desired.
A few bead strands or pearl garlands can be tucked lightly across the front. Do not wind them tightly like Christmas garland. Let them dip in relaxed arcs between ornament points. This keeps the overall look soft and romantic. Secure the ends deep inside the mesh with pins or a dot of hot glue.Refine the front focal area.
Every successful tree has a front. Turn your piece until you find the most balanced view. Add a slightly larger cluster, bow fluff, or accent egg where the eye naturally lands, usually around the upper middle. In the inspiration image, the center front has extra fullness that makes the tree photograph beautifully.Balance the lower edge.
The bottom should look lush and rooted, not abrupt. Add a few extra loop clusters around the base so the tree softly meets the basket. If your basket rim is too visible, tuck a ribbon band, moss, or extra mesh around the transition area.Secure everything well.
Once you are happy with placement, go back and reinforce ornaments and loose ribbon. Gently shake the tree. Nothing should swing wildly or fall out. This is especially important if you plan to move it around the house or store it seasonally.Optional upgrades for a more custom finish.
Add battery fairy lights deep inside the mesh for evening glow. Tuck in a few faux leaves or airy white blossoms if you want a more botanical interpretation. Swap the basket liner cloth for a pale linen for a cleaner room styled look. You can also add a monogrammed tag or tiny hanging charms for a personalized gift tree.Style and photograph your finished piece.
Set the tree where it has breathing room around it. A plant filled room, conservatory corner, or sunroom shelf makes this palette look especially rich. From a few steps back, you should now see a tall ombré silhouette with soft bands of color, a formal bow, and scattered egg sparkle. If the colors read too segmented, insert a few transition loops to soften the shift.
Troubleshooting
My tree looks flat instead of fluffy.
Your strips are probably too short, or you are pinching them too tightly. Make slightly longer loops and use more clusters per section. Fluff each loop open with your fingers before attaching the next one.
I can still see the cone underneath.
You need more overlap. Add filler loops in the same color and tuck them into any exposed spots. Also check that your rows are not spaced too far apart.
The color transitions look striped.
Blend the bands with mixed clusters. Use two neighboring colors together for at least one transition section. Random but controlled repetition looks much better than a hard color line.
The ornaments keep falling forward.
The surface is soft, so ornaments need deeper anchoring. Push wires or hooks farther into the mesh, or hot glue a hidden wooden pick to the back of the ornament and insert that into the cone.
My bow looks limp.
Use ribbon with some body. Wired velvet or wired satin gives the cleanest loops. If your ribbon is very soft, double it when forming the bow.
Finishing details
Once the tree is fully decorated, trim any obviously stray mesh ends, but do not over trim because the slight airy fray is part of the look. If needed, steam the ribbon tails lightly from a distance so they hang smoothly. Dust glittery ornaments before placing them. For storage, remove delicate hanging ornaments and wrap the tree in a large plastic garment bag or clean sheet. If you added lights, remove the battery pack before storing.
To elevate the final styling, place a soft cream or natural linen cloth under the basket so the colors feel even richer. You can also nestle a few extra eggs or moss around the base, but keep it minimal since the tree itself is already visually full.
Shop Similar
- Deep teal deco mesh and craft tulle rolls
- Large teal velvet ribbon for oversized bows
- Pearl white and teal Easter egg ornaments
- Cone tree forms for spring décor crafts
- Woven basket planters for decorative trees
Style It With
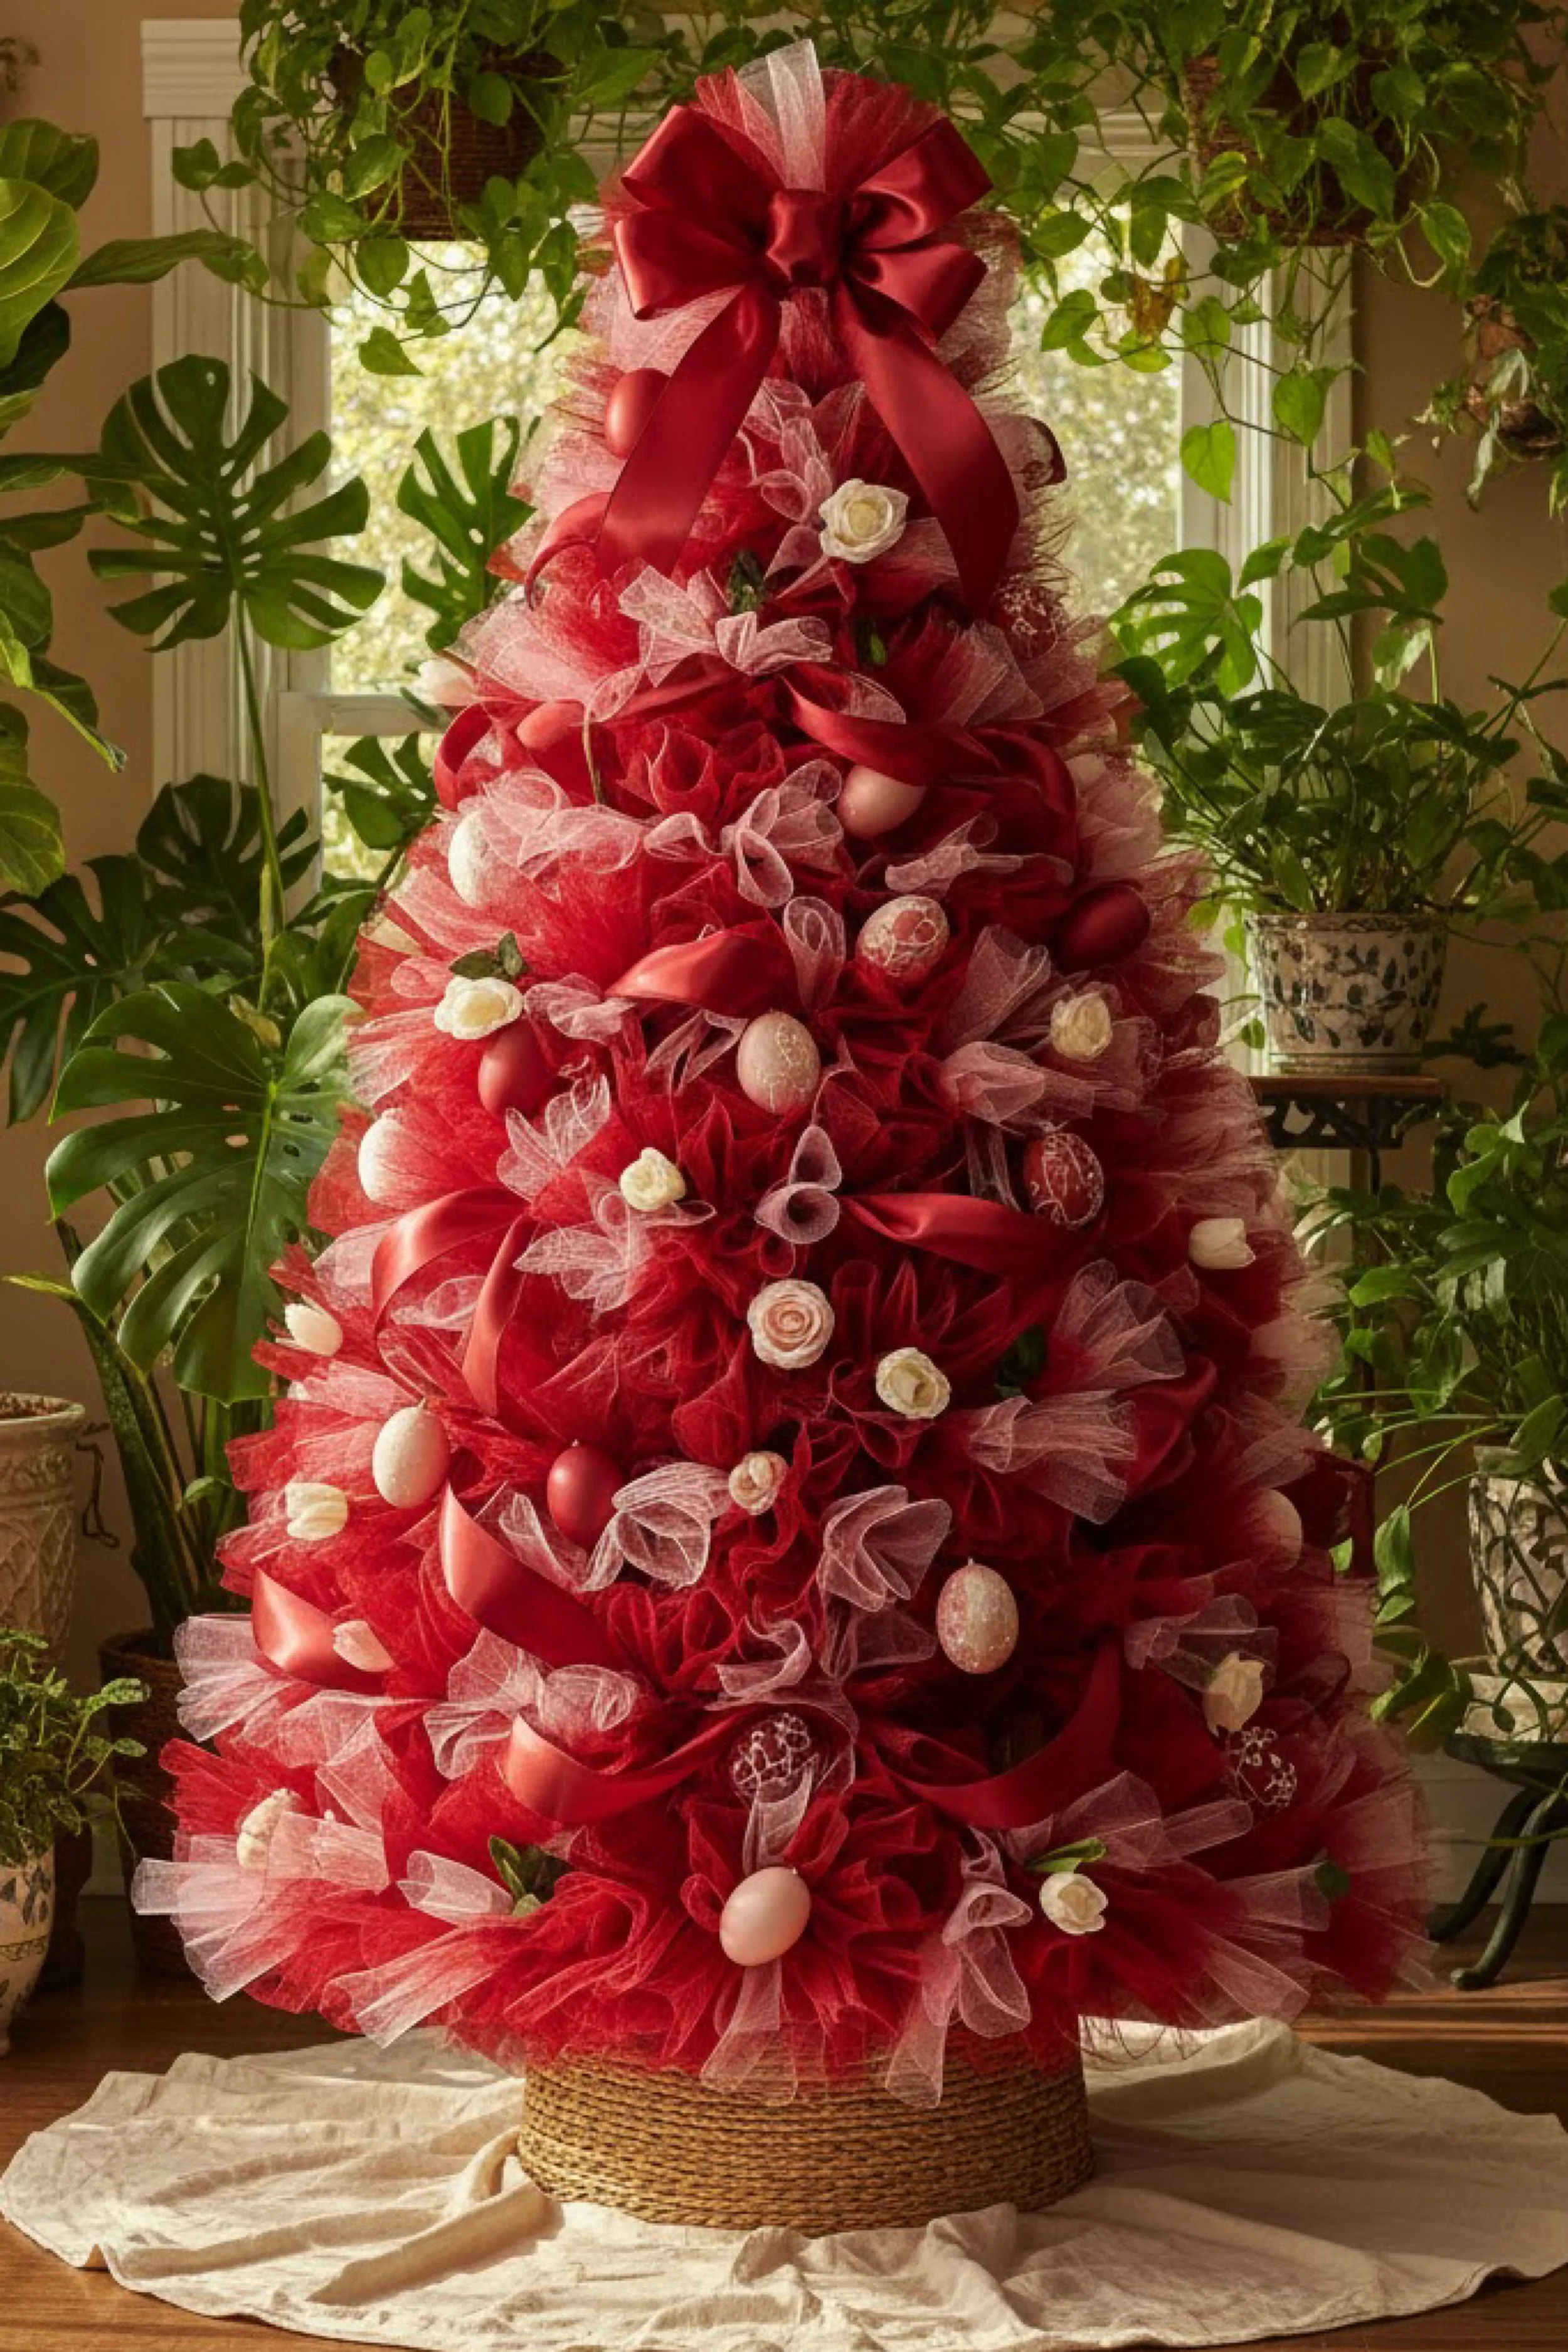
Romantic Red Easter Tulle Tree with Satin Bows — Step by Step Tutorial
What you’re making
This tutorial recreates a lush red Easter tulle tree with ivory accents, soft egg ornaments, and sweeping satin ribbon woven through the surface. The overall look is rich, theatrical, and surprisingly elegant, especially because the red is softened by pale blush mesh and creamy rosette details. It reads like holiday décor reimagined for spring entertaining rather than a standard pastel Easter craft.
The structure is simple at heart: a cone form inside a basket, covered in gathered mesh bundles, then finished with ribbon movement, eggs, and floral accents. The red palette is bold, so the key is building enough softness into the texture that the finished tree looks romantic rather than harsh.
Materials + tools list
- 1 tall cone form, foam cone, wire cone, or upside down tomato cage
- 1 woven basket or low planter basket
- Red deco mesh, craft mesh, or red tulle
- Blush pink or sheer ivory mesh for contrast
- Wide red satin ribbon for topper bow and sweeping accents
- Floral pins or greening pins
- Hot glue gun and glue sticks
- Wire cutters if working with metal frames
- Scissors
- Easter egg ornaments in blush, ivory, matte red, and soft glitter finishes
- Small faux roses, ranunculus, or rolled ribbon flowers
- Floral foam or weighted stuffing to stabilize the basket
- Optional pearl spray stems or tiny bead picks
- Measuring tape
- Optional dowel for center support
- Optional fabric liner or draped cloth for the base
Finished size + customization notes
A red tree like this feels most balanced between 36 and 46 inches tall. It should be full and rounded, with a generous lower half and a clear, clean taper at the top. Use deeper red near the center and let the blush mesh break up the saturation so the tree feels layered. If you want a softer Valentine to Easter crossover look, increase the blush and ivory. If you want a moodier, more dramatic version, keep almost everything red and use ivory only for highlight points.
This style also works beautifully in smaller table sizes. Just reduce the cone height and scale down the ornaments and bow proportionately.
Step by step instructions
Set the base and test the silhouette.
Place your cone form inside the basket and secure it firmly. If the basket is lightweight, add floral foam, pebbles, or crumpled paper below the cone so it cannot tip. Stand back and check the outline. You should now see a shape that resembles a classic decorative tree with a soft feminine taper. The lower width matters here because the red palette needs volume to feel luxurious.Prepare your color combination.
Lay out the red mesh and the blush or ivory mesh. The inspiration tree does not use the second color as an equal stripe. Instead, it appears in scattered airy ribbons and loop clusters that soften the red. Think of the pale mesh as light passing through the tree. It should brighten and separate the stronger red areas.Cut strips for loop making.
Cut the red mesh into strips around 12 to 16 inches long. Cut the blush or ivory into slightly shorter strips if you want those loops to tuck inside the red rather than dominate. A big tree will use far more material than you expect, so prepare extra. If you run short later and cut new strips at a different length, the texture can change visibly.Build fluffy red clusters first.
Take three or four red strips, loop each one inward, pinch the center, and combine them into a puff. Secure the center with a floral pin or a little glue plus a pin. Make a full tray of these before attaching them. Repetition speeds up the build and helps you keep the fullness consistent.Add blush accent clusters.
Make separate clusters from the pale mesh, but keep them slightly looser and airier. Some can be single loops, some double. These are not meant to create thick volume everywhere. They act like visual breath between the red. When you hold a blush loop against the red, it should read as a soft cloud rather than a stripe.Attach the first base row.
Begin at the bottom of the cone with red clusters all around. Pack them closely. The base should feel plush and almost skirted. Add a few pale loops between every few red clusters if you want an early blended start, but keep the red dominant. You should now see a strong foundation with enough density that the cone is already disappearing.Continue up the cone in spiraling rows.
Work upward in overlapping spirals or staggered rows. This keeps the surface more organic. Add mostly red, then tuck pale loops into spaces where the eye needs a break. Be careful not to create a regular repeating pattern because that can make the tree look machine made instead of richly handmade.Shape the middle for fullness.
The center third of the tree is where the design really opens up. Use the fullest clusters here. Allow some red satin ribbon to begin weaving diagonally through the surface, almost like a garland but softer and more integrated. Tuck the ribbon into the mesh, secure it discreetly, and let it rise and fall with gentle movement. If your ribbon sits flat, loosen it and give it more volume.Reduce bulk near the top.
As you move up, make the loops slightly smaller and place them more tightly so the point of the tree feels refined. You want a strong top for the bow to sit against. If the top looks too round, remove one or two big puffs and replace them with smaller ones.Create and attach the top bow.
Use wide red satin ribbon to make a large, classic bow with several loops and two long tails. The bow should feel polished, almost gift like. Position it slightly forward rather than directly on the very top point. This lets the tails fall down the front naturally and frames the whole tree. You should now see the structure becoming more formal and finished.Add egg ornaments in layers.
Start with the largest ivory and blush eggs, spacing them around the front and sides. Then add matte red eggs and a few textured eggs. Keep them tucked into the mesh so they appear nestled rather than hanging stiffly. The tree in the photo has a relaxed scattered look, so avoid evenly spaced rows.Weave in the ribbon accents.
Add more satin ribbon in long, gentle swags and small loops throughout the body of the tree. Let the ribbon disappear into the mesh and emerge again somewhere else. This is one of the signature details of the look. It makes the red tree feel romantic and high end. If the ribbon takes over too much, scale it back and let the mesh do more of the visual work.Insert floral accents sparingly.
Small ivory flowers or rolled ribbon roses add softness and keep the palette from becoming too ornament heavy. Place a few around the upper middle and lower middle sections. The flowers should look like little discoveries, not the main event. You should now see the tree becoming layered in three textures: mesh, ribbon, and blossoms.Balance the contrast.
Step back and squint slightly. Where does your eye go first? If only one section is grabbing attention, redistribute a few ornaments or pale loops. The reference tree feels evenly lush from top to bottom, even though the focal emphasis is slightly above center. Add a few pale touches anywhere the red feels too dense and visually heavy.Refine the bottom transition.
Tuck extra red and pale loops around the basket rim. You can also let a bit of neutral draped cloth show beneath the basket, which helps the red stand out and keeps the whole piece from feeling crowded. If the basket is very dark, consider wrapping its rim in neutral ribbon first.Optional upgrades for extra dimension.
Add tiny pearl sprays or soft twinkle lights deep in the mesh. Use a few blush feather butterflies if you want a garden inspired variation. Attach a small hanging tag with a seasonal greeting for gifting. You can also add a little scent sachet hidden in the basket if you want the display to feel extra thoughtful.Secure the most delicate accents.
Red satin is slippery and lightweight ornaments can shift. Reinforce any pieces that wobble. If you used hot glue, let it fully cool before moving the tree. Give the finished piece a gentle turn to ensure all sides look intentional, not only the front.Final visual checkpoint.
Place the tree where you plan to display it and step back several feet. You should now see a sculptural red silhouette softened with pale airy texture, with a strong top bow and scattered egg sparkle. If yours looks busier than the photo, remove two or three accents. Often a craft becomes more elegant by subtracting rather than adding.
Troubleshooting
The red looks too harsh.
Add more pale mesh or ivory accents to break it up. Warm room light also helps. Bright white light can make saturated red feel overly intense.
My ribbon looks messy.
Use fewer ribbon passes and keep each one purposeful. Tuck the ribbon deeper into the mesh between visible sections so it feels woven rather than laid on top.
The flowers disappear in the tree.
Choose ivory or blush flowers with a slightly larger bloom size, or place them near pale mesh clusters so they have contrast behind them.
The cone feels unstable in the basket.
Add more weight to the basket base and consider inserting a dowel through the center into the base support. Tall trees need a firm spine.
The top bow keeps drooping forward.
Anchor it with both glue and pins, and use ribbon with enough body to hold shape. Fluff the loops outward instead of letting them collapse inward.
Finishing details
Trim any frayed mesh edges that stick out awkwardly, but leave enough airy softness that the tree still feels cloud like. Smooth the ribbon tails with light heat from a garment steamer held at a distance, or simply finger press them flat. If your eggs are different shades of ivory and blush, scatter them evenly so no one area looks too warm or too cool.
For styling, this tree looks beautiful against greenery, near windows, or on a console with neutral linens. Because the palette is intense, give it space around it. Let the tree be the statement rather than crowding it with too many nearby decorations.
Shop Similar
- Red deco mesh and blush craft tulle for decorative trees
- Wide red satin ribbon for oversized decorative bows
- Blush and ivory Easter egg ornaments
- Cone forms and tomato cages for spring tree crafts
- Small ivory faux roses for craft decorating
Style It With
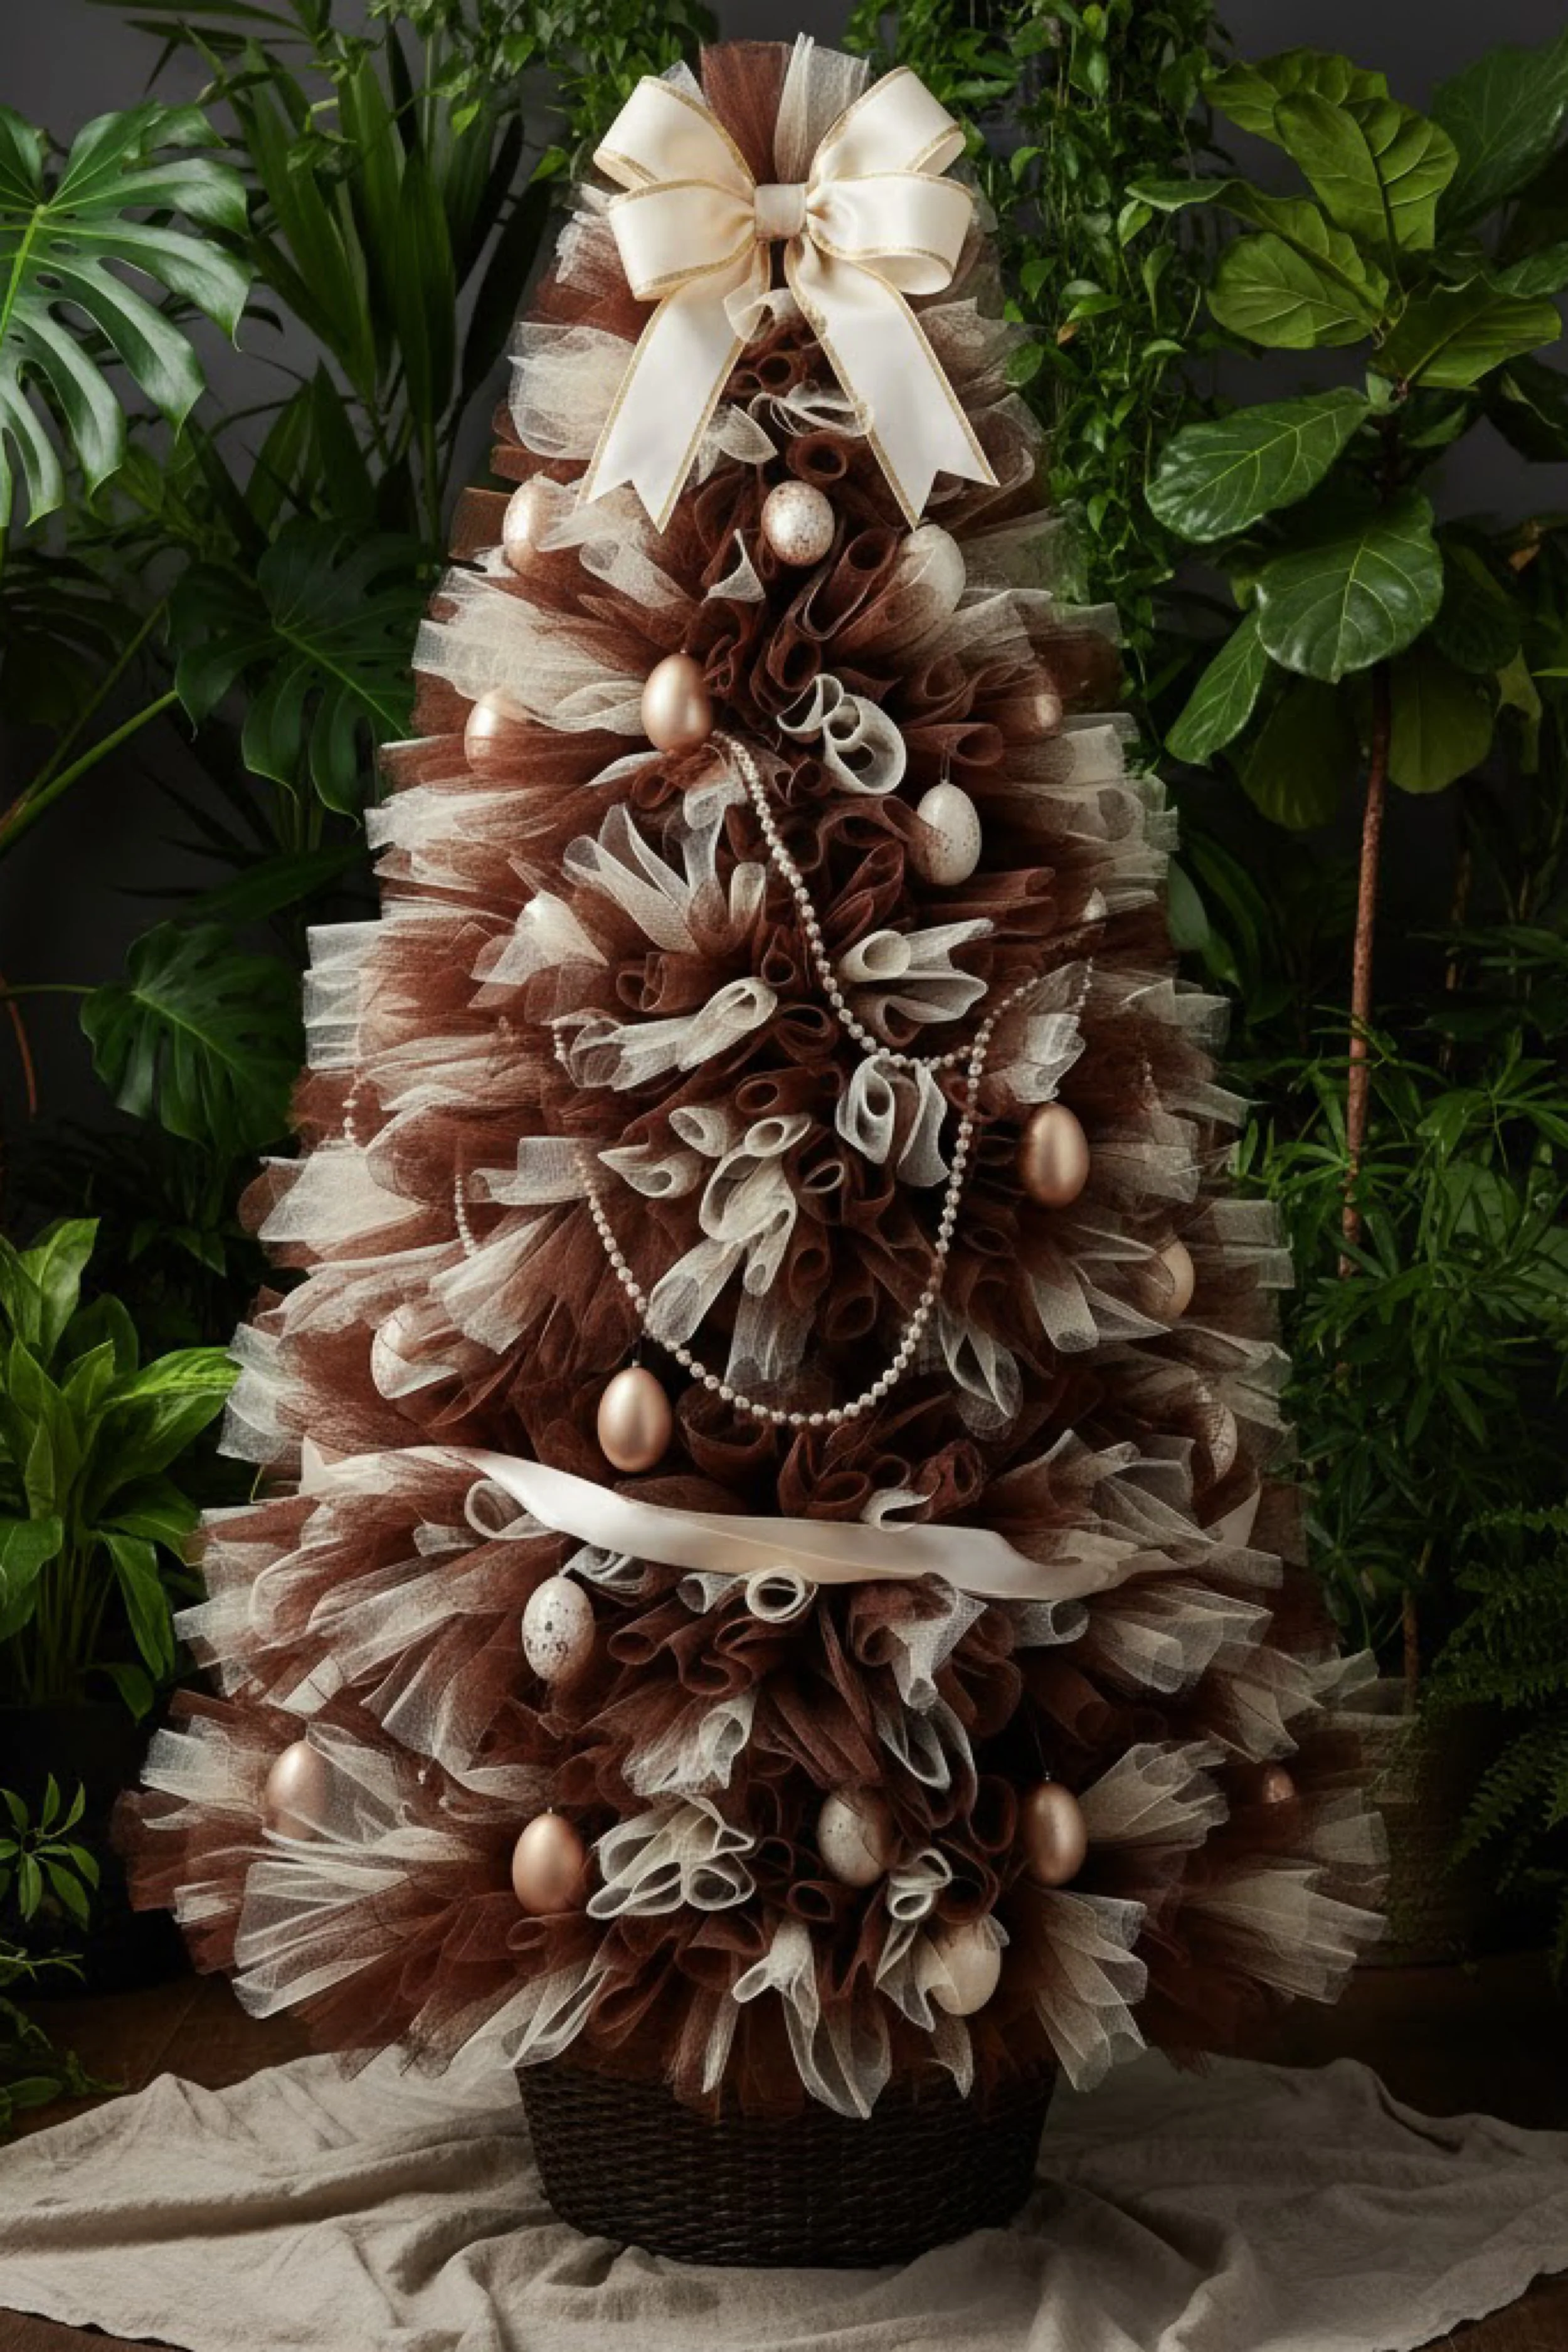
Neutral Cocoa and Cream Easter Mesh Tree — DIY Guide
What you’re making
This version is a beautifully understated Easter mesh tree in cocoa brown, warm cream, and soft champagne tones, finished with pearl garland and elegant egg ornaments. It has a quieter, more sophisticated mood than bright spring palettes, which makes it especially good for neutral homes, transitional spaces, and grown up seasonal decorating. The overall effect is textured and airy, with the warmth of ribbon and mesh doing most of the design work.
What makes this tree successful is restraint. Instead of filling every inch with many different accents, you will rely on tonal contrast, clean draped beads, and a crisp bow to create a refined silhouette. It is a wonderful project if you want spring décor that blends with natural woods, linen, stone, or darker interiors.
Materials + tools list
- 1 cone form, foam cone, wire cone, or tomato cage turned upside down
- 1 basket or planter basket in dark brown, wicker, or natural woven finish
- Brown deco mesh, cocoa tulle, or mesh ribbon
- Cream, ivory, or champagne mesh or tulle
- Wide cream ribbon for the top bow
- Narrow satin ribbon in ivory or champagne for extra detailing if desired
- Floral pins or U pins
- Hot glue gun and glue sticks
- Scissors
- Wire cutters if using wire forms
- Faux egg ornaments in champagne, blush beige, ivory, and speckled finishes
- Pearl garland or beaded strands
- Floral foam, paper stuffing, or weighted filler
- Optional dowel support
- Optional soft cream cloth for the base
- Optional tiny warm white lights
Finished size + customization notes
A neutral tree like this looks best when the cone is fairly full but not overly dramatic. Aim for 32 to 40 inches tall. The palette should alternate between cocoa and cream enough to create depth, but keep the distribution soft. If the contrast is too strong, the tree starts to look striped. If there is too little cream, the whole piece can feel visually heavy.
You can shift the palette warmer with taupe and champagne, or cooler with mocha and pale ivory. Rose gold eggs also work beautifully if you want a subtle shimmer.
Step by step instructions
Assemble and secure the main form.
Fit the cone form inside the basket and anchor it so it stands straight. Check it from the front and side. Because the palette is soft and tonal, any lopsidedness will be more noticeable than in a bright, busy design. You should now see a clean triangular silhouette with a gentle taper.Choose your base color strategy.
Decide whether brown or cream will dominate. In the inspiration tree, brown feels like the main body while cream acts as airy relief woven throughout. That gives the design warmth and depth. Lay out your materials in piles so you can grab them quickly as you work.Cut the mesh into loop lengths.
Cut both colors into strips about 10 to 14 inches long. Make some shorter cream strips for tighter accent curls. Keeping a few lengths varied helps the tree look more natural. The brown loops can be slightly fuller, with the cream loops sometimes tucked deeper into them.Create cocoa clusters.
Form the brown strips into loops by bringing the ends inward and pinching the center. Combine three to four loops into a puff and secure the center. Make enough to cover at least the lower third of the tree before starting attachment. This helps you maintain consistent density and texture.Make cream filler clusters.
Build smaller cream clusters and a few single loops. These are your light catchers. When placed correctly, they brighten the tree and keep it from becoming visually dense. Hold one cream loop against a brown cluster and notice how much it lifts the tone. That contrast is the heart of this design.Begin at the bottom and cover the cone.
Attach brown clusters around the base edge first. Tuck cream accents into the spaces between some clusters. Keep the cream irregular. You do not want a checkerboard effect. The lower edge should look abundant and soft. If the basket rim shows too strongly, add one extra row that slightly overhangs it.Build upward in blended rows.
Continue attaching clusters in slightly offset rows or a spiral. The brown remains the backbone, with cream popping in and out. As you work, rotate the cone often. You should now see a warm, cloud like surface where the two tones weave together. If the contrast looks too choppy, group the cream closer to the center of each brown section so the transition softens.Use cream more heavily in the upper middle.
The reference tree has a graceful concentration of lightness through the center and upper portions, which keeps the eye moving. Gradually add more cream loops around the upper middle without fully switching dominance. This subtle brightening makes the final bow and pearls feel connected.Refine the top shape.
Use smaller loops as you reach the top so the point feels elegant. Do not overstuff the very top or your bow will sit awkwardly. You should now see a cone that narrows naturally rather than bulging at the top.Add the top bow in cream ribbon.
Make a large structured bow with wide cream ribbon. The bow should feel formal and luminous against the brown beneath it. Position it at the top front and let the tails fall down the face of the tree. This immediately gives the piece a finished, heirloom styled look.Place the largest eggs first.
Use champagne, blush beige, ivory, and speckled eggs. Tuck them into the mesh at varied depths. Place a few near the top, several through the midsection, and several toward the base. Avoid perfect spacing. You want the eggs to feel discovered among the ruffles.Drape pearl garland in soft arcs.
Pearl strands are a defining feature here. Attach one end deep in the mesh, allow the strand to dip in a relaxed curve, then secure it again lower down. Repeat with two or three strands. They should drape, not wrap tightly. If yours looks too stiff, lengthen the arc and reduce the number of attachment points.Add a few small accent loops if needed.
Once the eggs and pearls are in place, you may notice thin spots. Tuck in tiny cream or brown loops to fill visual gaps. This is also the stage to adjust balance. If one side looks too dark, add one more cream cluster nearby. If one area feels too busy with eggs, remove one and let the texture breathe.Refine the middle bow or ribbon sweep.
The inspiration tree includes a softer ribbon sweep through the middle body. You can recreate this with a narrow cream satin ribbon tucked in one side and emerging on the other. Keep it understated. It should support the design, not compete with the top bow.Optional upgrades for added polish.
Try champagne glitter eggs for a touch more sparkle, or add tiny warm lights deep inside the mesh so the cream glows in the evening. A velvet ribbon instead of satin will make the look moodier and more upscale. For a very natural style, you can even add a few dried look faux blossoms in pale ivory.Stabilize and tidy everything.
Gently shake the tree and reinforce any ornaments or pearls that move too much. Trim stray threads. If your ribbon tails are curling awkwardly, flatten them by hand or lightly steam them. You should now see a soft neutral Easter tree with tonal depth, smooth draped details, and a calm elegant mood.Set the front focal view.
Turn the tree until the most graceful pearl drapes and bow placement face forward. Because this palette is subtle, the front matters. Take a photo from your display angle. If the tree looks flat in the image, add one cream cluster or one speckled egg slightly off center to create dimension.Place it into your room styling.
This design shines beside dark foliage, stoneware, wooden furniture, and linen textures. It also works well with brass or bronze accents. Once displayed, the piece should look like a seasonal sculpture rather than a novelty decoration.
Troubleshooting
The tree looks muddy instead of elegant.
Your tones may be too similar without enough contrast. Add a few lighter cream loops or brighter ivory eggs to sharpen the texture.
The pearls disappear.
Choose slightly larger pearl strands or place them over darker sections where they can show up clearly.
The cream sections look patchy.
Blend them into nearby brown loops rather than placing them as isolated tufts. Mixed clusters can solve this quickly.
The basket feels too dark and heavy.
Drape a soft neutral cloth under it or around the base, or wrap the rim with cream ribbon to lighten the transition.
My bow feels too bright compared to the rest.
Repeat a little cream ribbon lower on the tree so the bow color feels integrated rather than separate.
Finishing details
This project benefits from restraint, so once it looks balanced, stop. Overdecorating can quickly erase the quiet sophistication that makes this palette special. Dust any glittered eggs before attaching them, and keep the pearl drape soft and relaxed. If you add lights, hide the battery pack in the basket and line the interior with tissue or cloth.
For off season storage, place the whole tree in a large bag or box and keep the pearls from tangling by loosely pinning them in place. This makes next year’s setup much easier.
Shop Similar
- Brown and cream deco mesh rolls for seasonal trees
- Wide cream ribbon for decorative spring bows
- Champagne ivory and speckled Easter eggs
- Pearl garland strands for craft decorating
- Dark woven baskets for tabletop tree displays
Style It With
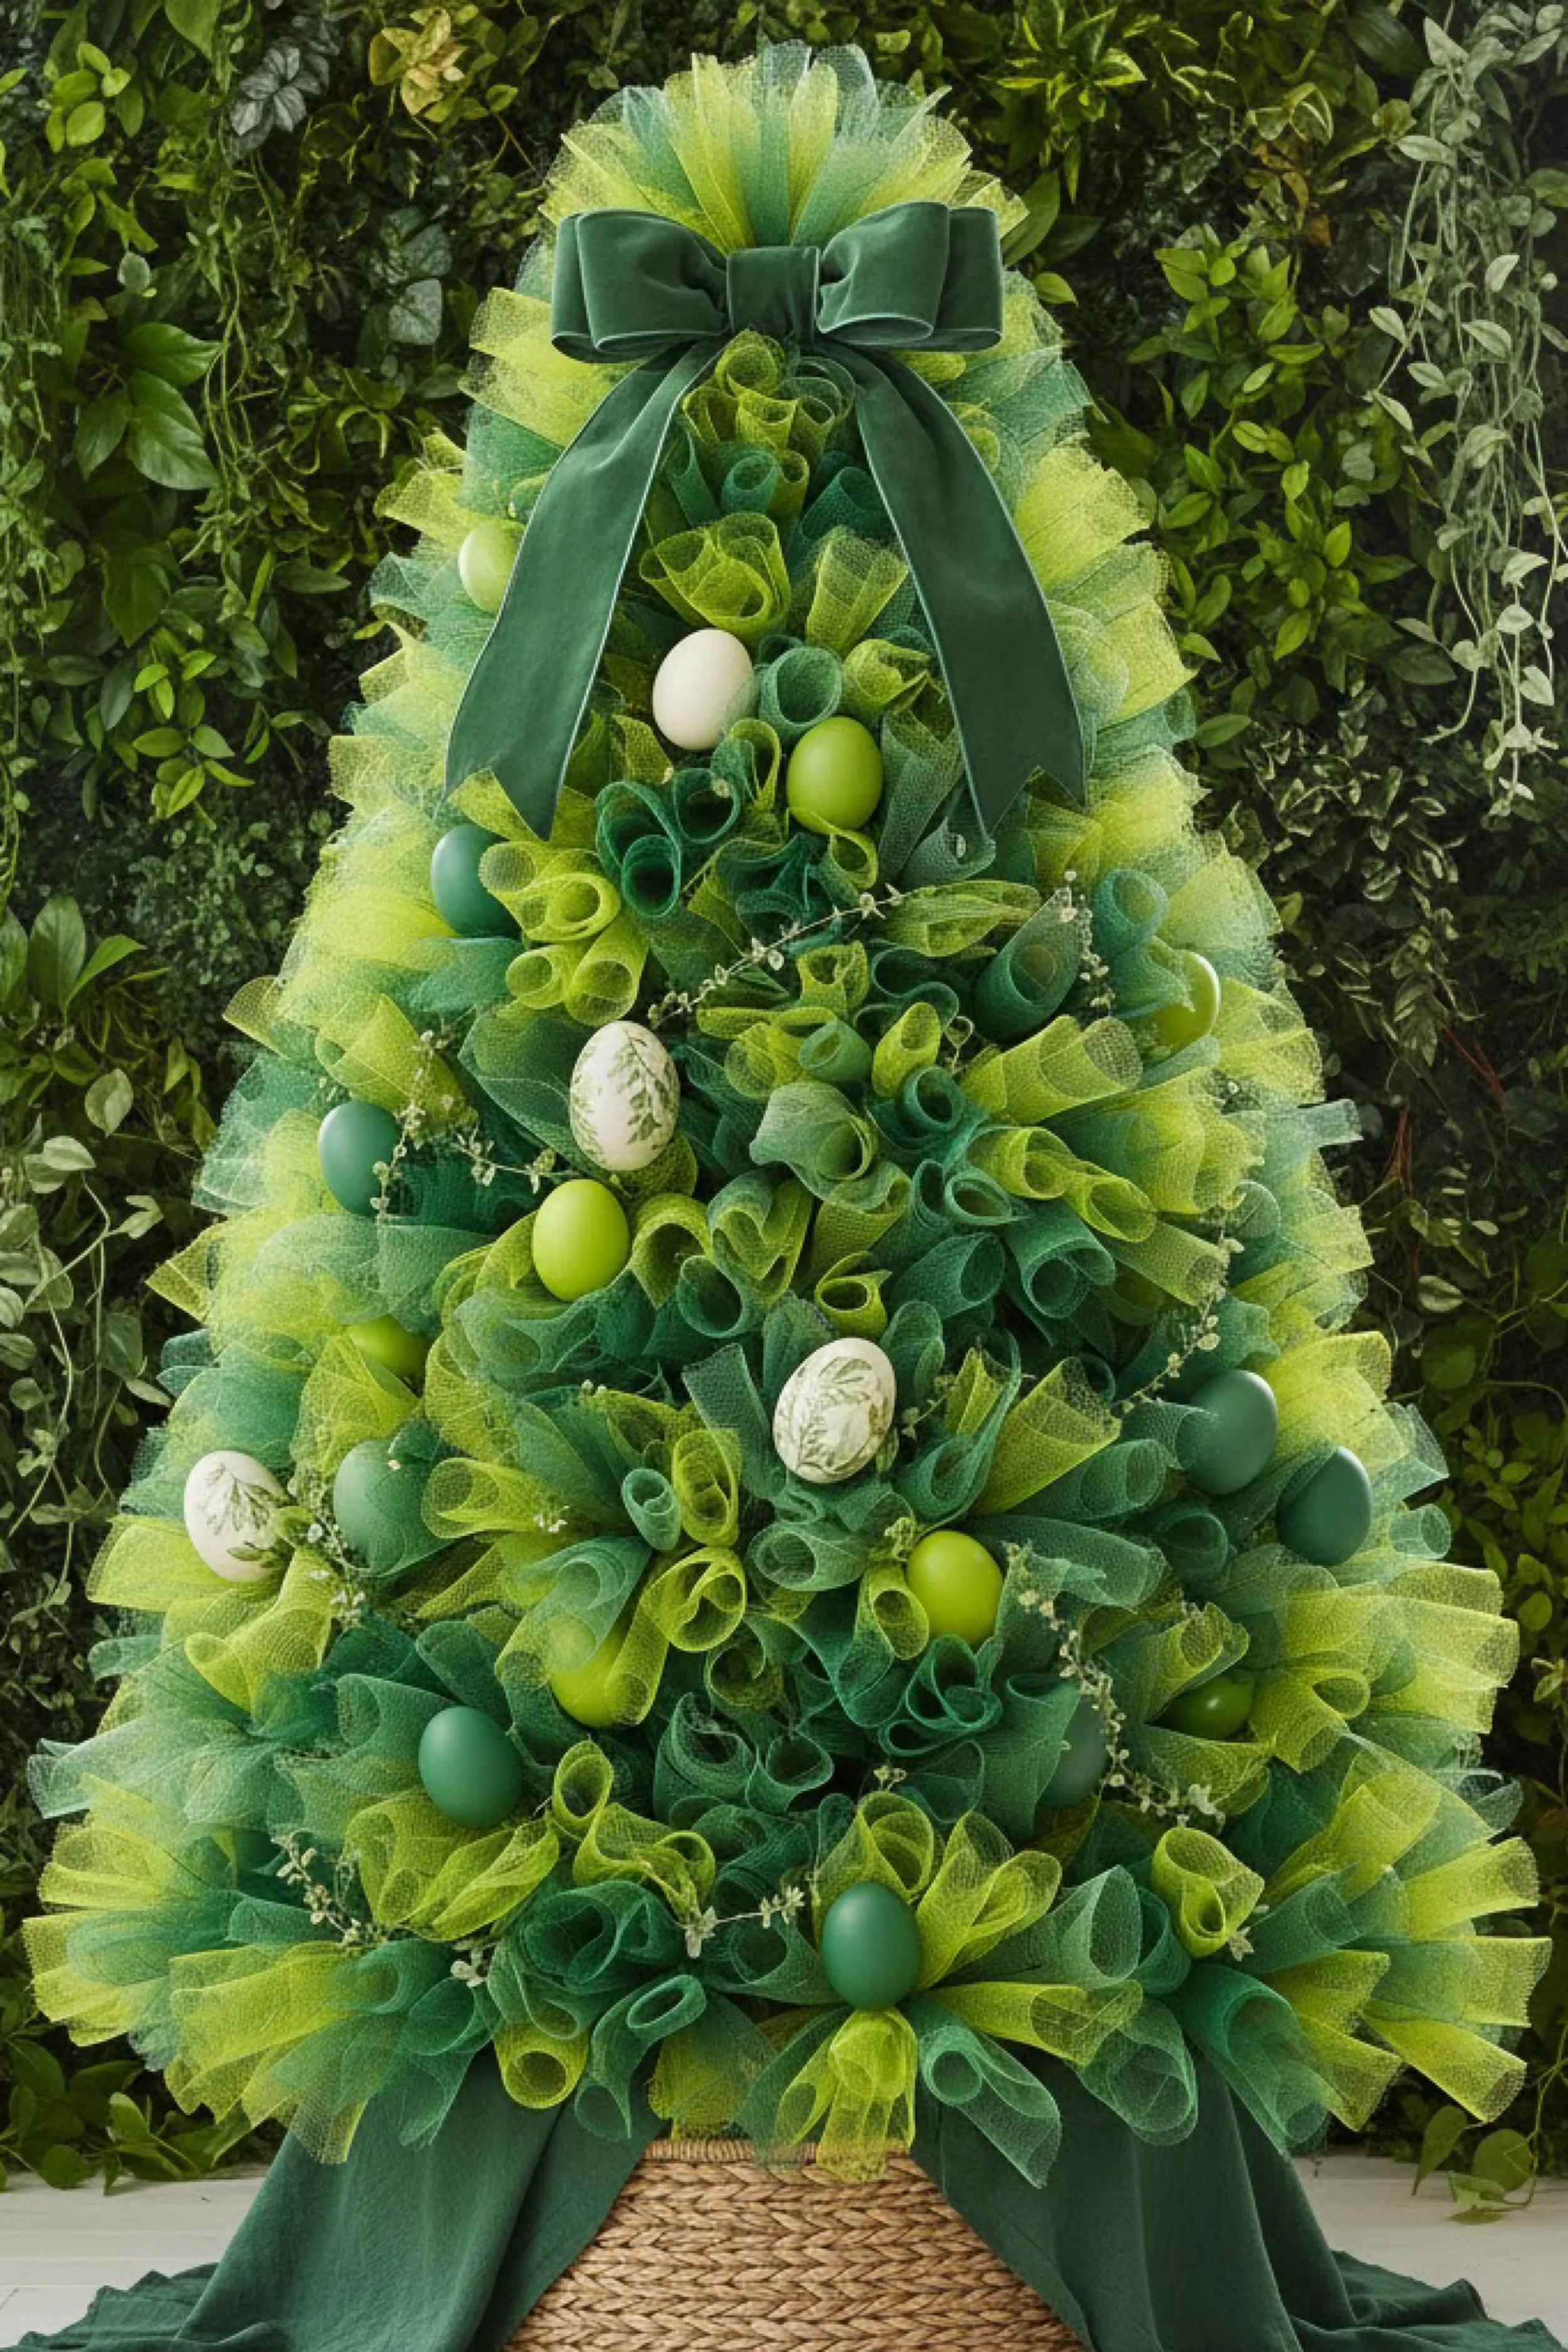
Fresh Green Easter Egg Tulle Tree with Botanical Charm — How To Guide
What you’re making
This final version is a vibrant botanical Easter tulle tree in layered greens and yellow green tones, decorated with painted eggs, soft bead sprays, and a structured green bow. It feels fresh, garden inspired, and full of spring energy without leaning sugary or overly pastel. The mix of mossy green, emerald, leaf green, and chartreuse gives the piece a lively depth that looks especially beautiful near plants, windows, and nature inspired décor.
The texture comes from tightly packed mesh loops that create a fluffy cone, while the egg ornaments and tiny sprays make the tree feel alive and lightly blooming. If you love seasonal décor that still feels natural and elevated, this is an excellent interpretation to build.
Materials + tools list
- 1 cone form, foam cone, wire cone, or tomato cage frame
- 1 woven basket or natural fiber planter basket
- Green deco mesh, soft tulle, or craft mesh in at least two to four green shades
- Dark green ribbon for the top bow
- Floral pins, U pins, or zip ties for wire forms
- Hot glue gun and glue sticks
- Scissors
- Wire cutters if needed
- Easter egg ornaments in white, green, moss, sage, and botanical painted styles
- Small pearl sprays, bead stems, or airy faux filler sprigs
- Floral foam or weighted filler for anchoring
- Measuring tape
- Optional dowel support
- Optional fairy lights
- Optional faux moss for the basket rim
- Optional draped green or neutral fabric for the base
Finished size + customization notes
This style can be anywhere from 34 to 44 inches tall. It looks best when the lower third is plush and the color mix stays variegated throughout the body. Unlike the ombré teal version, this design is more blended than banded. You can still use zones, but the colors should mingle more naturally, like fresh growth in a garden bed.
For a softer version, use sage, mint, and pale celery. For a richer woodland version, emphasize moss, fern, and deep evergreen. Botanical eggs with leaf motifs work especially well for this style.
Step by step instructions
Prepare the cone and basket foundation.
Assemble your cone form and fit it firmly into the basket. Add filler and weight until the piece stands securely on its own. Because this green tree is visually airy, structure matters. A leaning cone will be much more obvious once decorated. You should now see a balanced triangular base ready for layering.Sort your greens by depth.
Arrange the mesh into light, medium, and dark families. The reference image mixes dark forest green with yellow green and mid green for a fresh dimensional look. Avoid placing all the light colors only at the top or only at the bottom. Instead, plan for the tones to echo across the tree so it feels organic.Cut strips for loops.
Cut your mesh or tulle into strips about 10 to 15 inches long. Make some darker strips slightly longer if you want deeper shadowy curls. Keep the light green strips a bit shorter for tighter highlights. These small differences create natural looking variation once everything is attached.Form loop clusters in separate color piles.
Make clusters of dark green, medium green, and yellow green. Each cluster can hold three to four loops. Also make a few mixed clusters that combine two adjacent tones. This is especially helpful for transitions and for avoiding visible color blocks later.Start with a balanced base row.
Attach clusters around the bottom edge, alternating dark and medium greens, then tuck in some yellow green toward the front and sides. The base should look lush, not striped. You should now see the first suggestion of a garden inspired surface, with color movement rather than hard sections.Work upward in staggered layers.
Continue adding clusters row by row, slightly overlapping them as you go. Keep rotating the cone. Add darker greens deeper into the structure and lighter greens where the eye naturally catches the surface. This creates depth and keeps the tree from looking flat. If all the colors sit on the same plane, the result can feel artificial.Blend the center beautifully.
The middle of the tree is where the greens should feel most alive. Use mixed clusters here. Let one area have more moss green, another a flash of yellow green, then tuck a few deeper emerald loops behind them. You should now see a botanical, leafy richness rather than a decorative stripe pattern.Keep the shape controlled.
As you build, do not let the tree become too wide or mushroom shaped. The lower third can be full, but the sides should still slope inward cleanly. If one section starts to bulge, use smaller loops there or compress the existing loops gently before adding more.Refine the top with tighter curls.
Use slightly shorter strips for the upper portion so the tip looks crisp. The top should support the large bow without looking bulky. If the point is too soft, add one or two smaller dark green clusters right under the bow position to sharpen the silhouette.Add the green bow topper.
Make a generous dark green bow from wide ribbon. It should sit prominently at the top front with two long tails trailing downward. The bow anchors the design and gives it a finished editorial look. In the reference image, the bow reads almost like a formal package topper, which contrasts beautifully with the playful ruffled texture below.Place the largest botanical eggs first.
Begin with the white or pale eggs, especially any with green painted leaf designs. These act like highlights against the mesh. Space them through the front and sides. Then add deeper green eggs and a few yellow green eggs. Tuck each one into the loops so it feels nestled like an egg hidden in foliage.Scatter the smaller eggs thoughtfully.
Smaller solid eggs fill the gaps and keep the tree moving visually. Avoid lining them up. A meandering, slightly diagonal placement feels much more natural. If yours looks too symmetrical, shift one or two eggs off center and tuck one a little deeper than the others.Add airy botanical sprays.
Use bead stems, tiny pearl sprays, or faux filler branches very sparingly. Insert them into the mesh in little arcs so they look like delicate spring growth. These accents should soften the tree, not become a second major texture. You should now see a subtle garden effect that lifts the whole design.Fine tune the color rhythm.
Step back and look for areas with too much dark or too much bright yellow green. The inspiration piece spreads brightness around the tree so it feels luminous from several angles. Add a few light loops where needed. If one area is too bright, counter it with a deeper green cluster tucked just behind.Finish the basket transition.
Tuck additional mesh around the rim, or line the rim with faux moss for a more natural base. A draped green or neutral cloth under the basket also works nicely, especially if the tree is going on a table or pedestal. This part matters more than people think because it visually roots the tree into the display.Optional upgrades for a richer spring look.
Add tiny fairy lights for evening glow, or tuck in a few faux white buds to suggest fresh blossom branches. You can also add a soft nest accent near the base, though keep it small so it does not compete with the main form. A personalized seasonal tag tied into the bow is a lovely finishing touch.Secure and rotate for all sides.
Reinforce any ornaments that feel loose. Turn the tree fully around and make sure the back is covered enough if it will be visible in the room. If the back will face a wall, you can keep it simpler, but still avoid obvious gaps.Final display checkpoint.
Put the tree in its intended display spot and step back. You should now see a fresh green cone full of spring energy, with a formal bow, leafy color variation, and eggs that look gently tucked into a lush garden surface. If yours feels too busy, remove a few of the smallest ornaments and let the mesh texture show more.
Troubleshooting
The greens look flat.
You need more tonal variety. Add a deeper dark green and a brighter yellow green so the eye can see shadow and highlight.
My tree looks too yellow.
Balance it with more medium or dark green clusters. The bright tones should feel like highlights, not the whole body.
The eggs are getting lost.
Use a few lighter eggs near the center and upper third, or place darker eggs against lighter mesh areas for contrast.
It looks more like Christmas than Easter.
Choose matte eggs and botanical painted eggs instead of shiny ball ornaments. Keep the ribbon elegant and avoid metallic excess.
The top feels too heavy.
Reduce the size of the bow slightly or remove a couple of top clusters so the silhouette narrows more clearly.
Finishing details
Gently open any compressed loops with your fingers so the surface stays fluffy and dimensional. Trim only the most distracting stray ends. If you added sprays, make sure none stick out in a stiff unnatural line. They should follow the flow of the mesh. For storage, remove the most delicate eggs and wrap the tree loosely so the loops do not flatten too much.
This green palette looks stunning with other plant filled décor, natural textures, and fresh spring styling. It is an especially good choice for a sunroom, breakfast nook, garden room, or plant shelf vignette.
Shop Similar
- Green deco mesh and tulle rolls for spring trees
- Dark green ribbon for oversized decorative bows
- Botanical Easter egg ornaments with leaf patterns
- Natural woven baskets for tabletop tree crafts
- Pearl spray stems and filler picks for crafts
Style It With
By the time your last ribbon tail is adjusted and the final egg is tucked into place, these trees become more than simple seasonal crafts. They start to feel like full décor moments. That is the beauty of this project style. It turns lightweight, accessible materials into something with real presence. The finished pieces bring softness, color, and height into a room in a way that instantly changes the atmosphere.
One of the loveliest parts of making a collection like this is how flexible the idea really is. Once you understand the structure, you can reinterpret it endlessly with new palettes, new embellishments, and new styling directions. You can lean botanical, romantic, whimsical, modern, or even moody and refined. You can make one dramatic focal piece for a console table or create a whole coordinated set for different rooms throughout the season. The method stays approachable, but the results can look surprisingly custom and high end.
These five tutorials are meant to spark that kind of creativity. You can follow them closely to recreate the exact mood of each tree, or use them as the foundation for your own spring variations. Add florals, soften the colors, deepen the contrast, change the basket, or bring in lights and trims that better match your home. The bones of the project are wonderfully forgiving, which makes them especially fun for decorators who want a handmade result without sacrificing polish.
However you style yours, the final effect is all about creating a sense of celebration. These trees invite the eye in, make a room feel dressed for the season, and give Easter décor a more layered and artful personality. They are joyful, tactile, and full of charm, which is exactly what spring crafting should feel like.