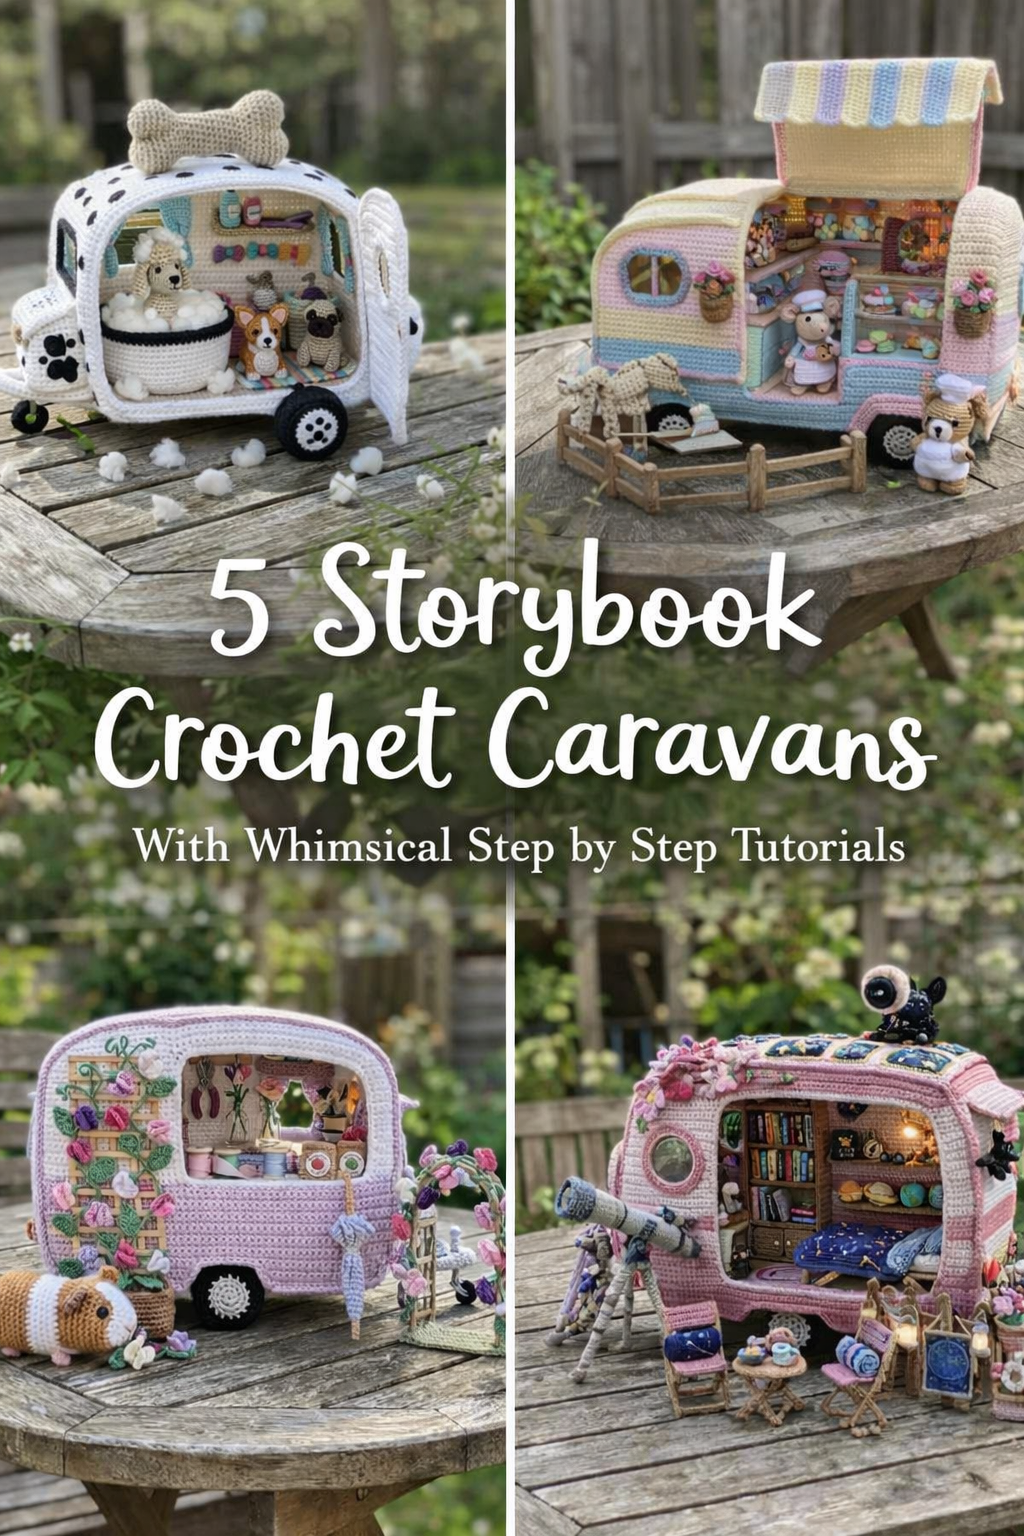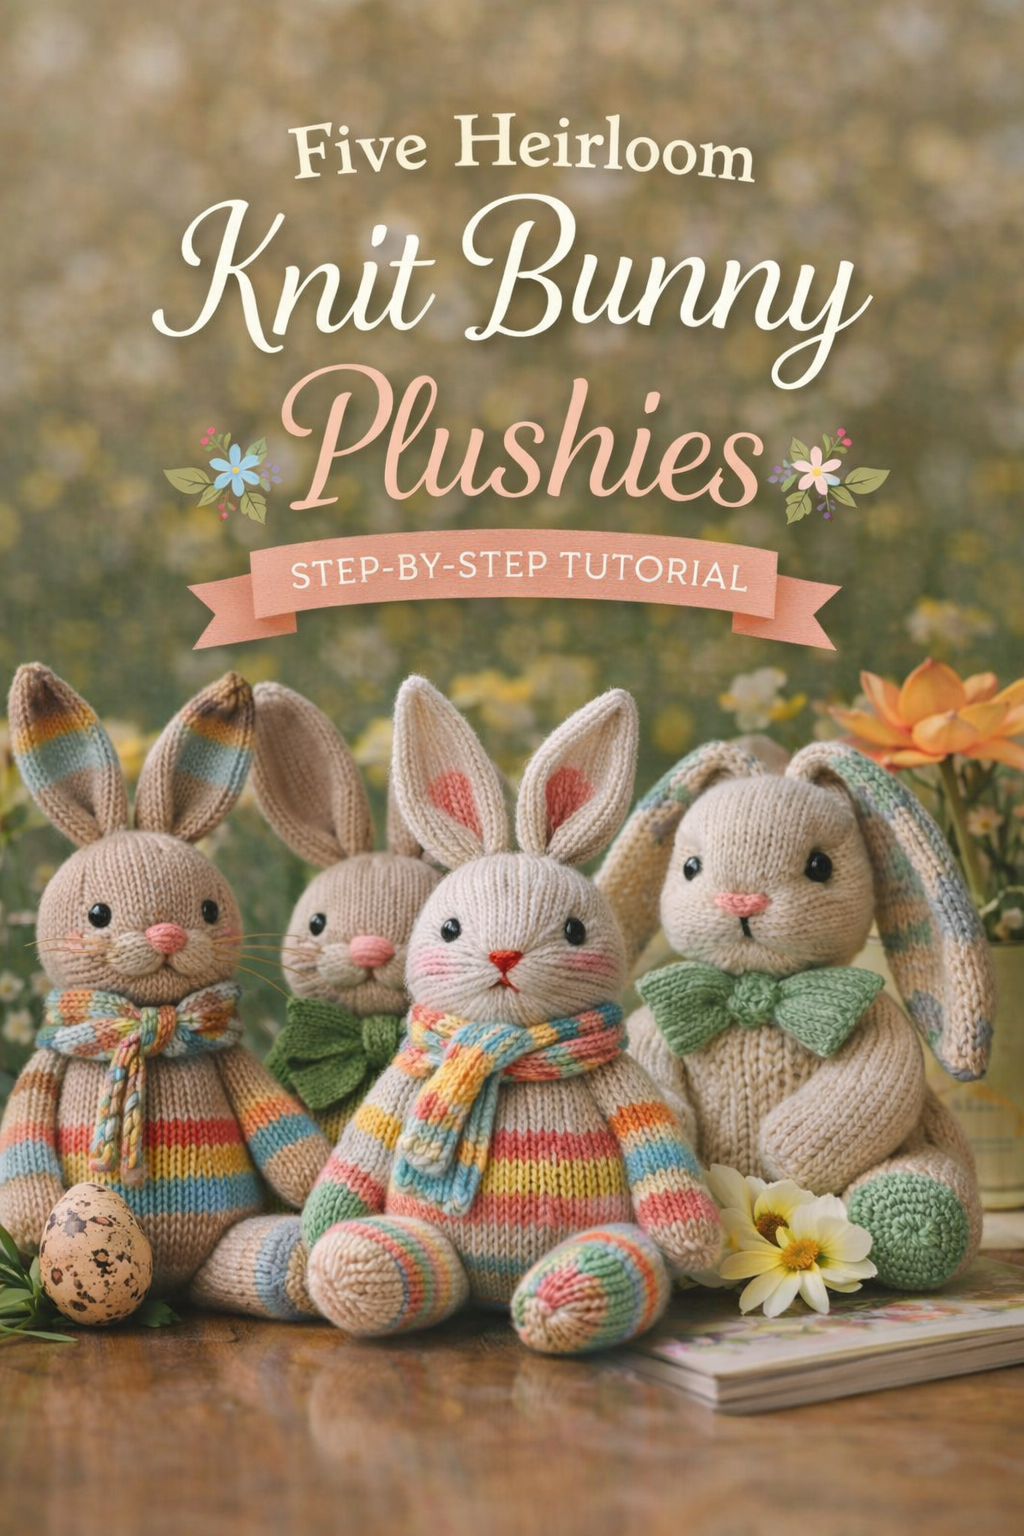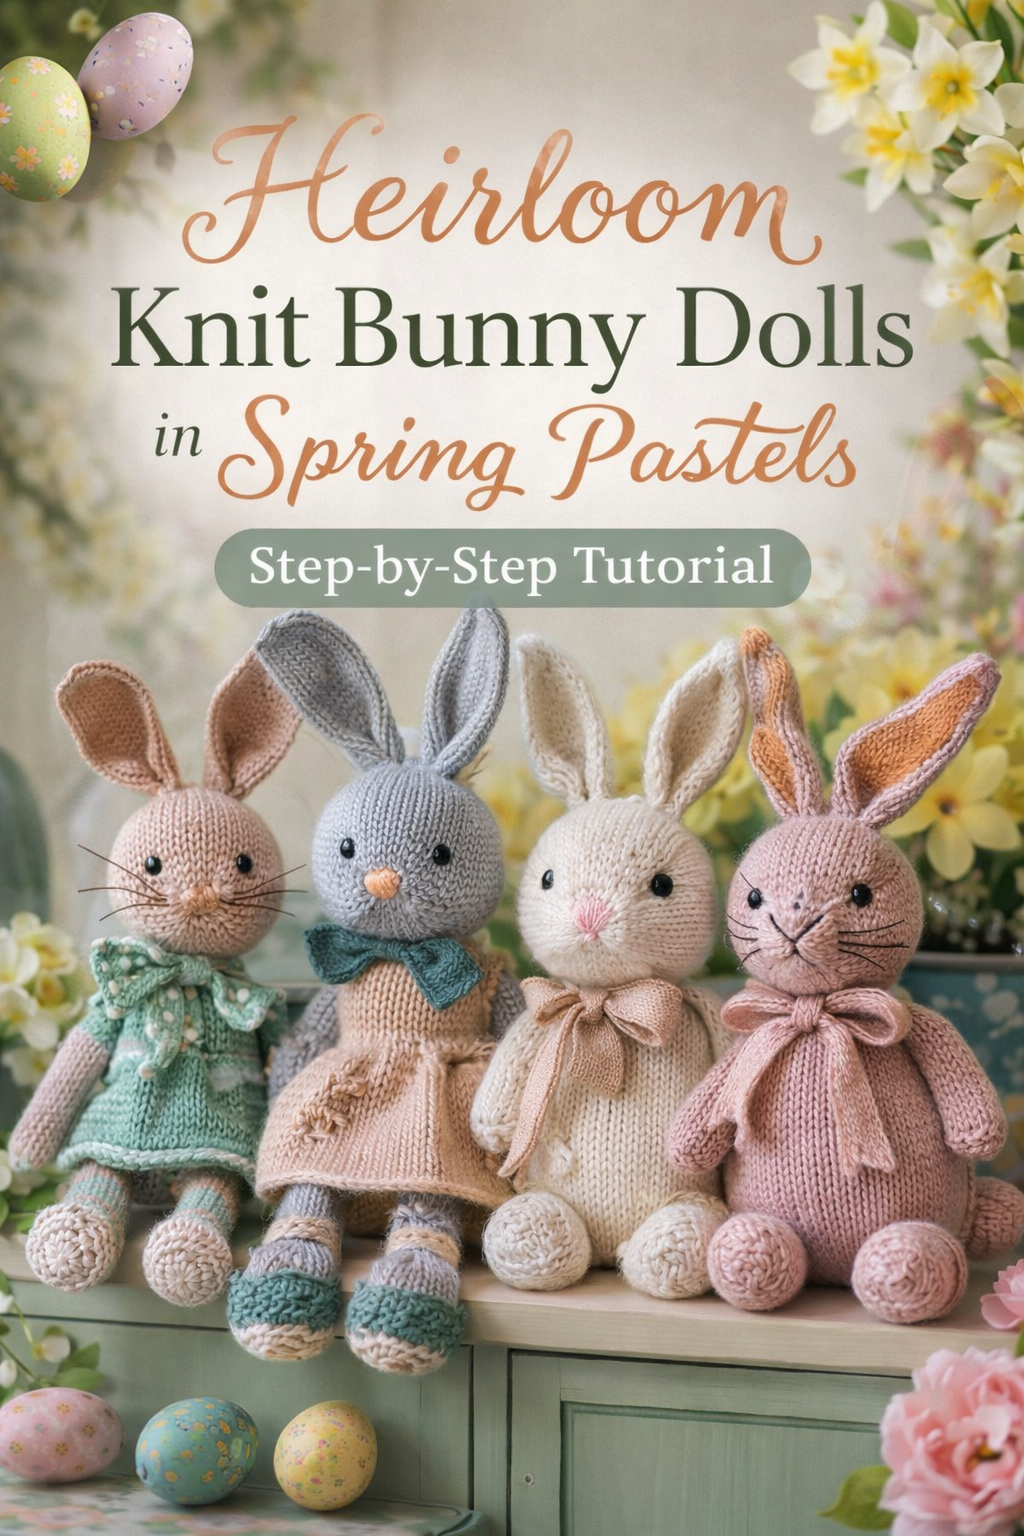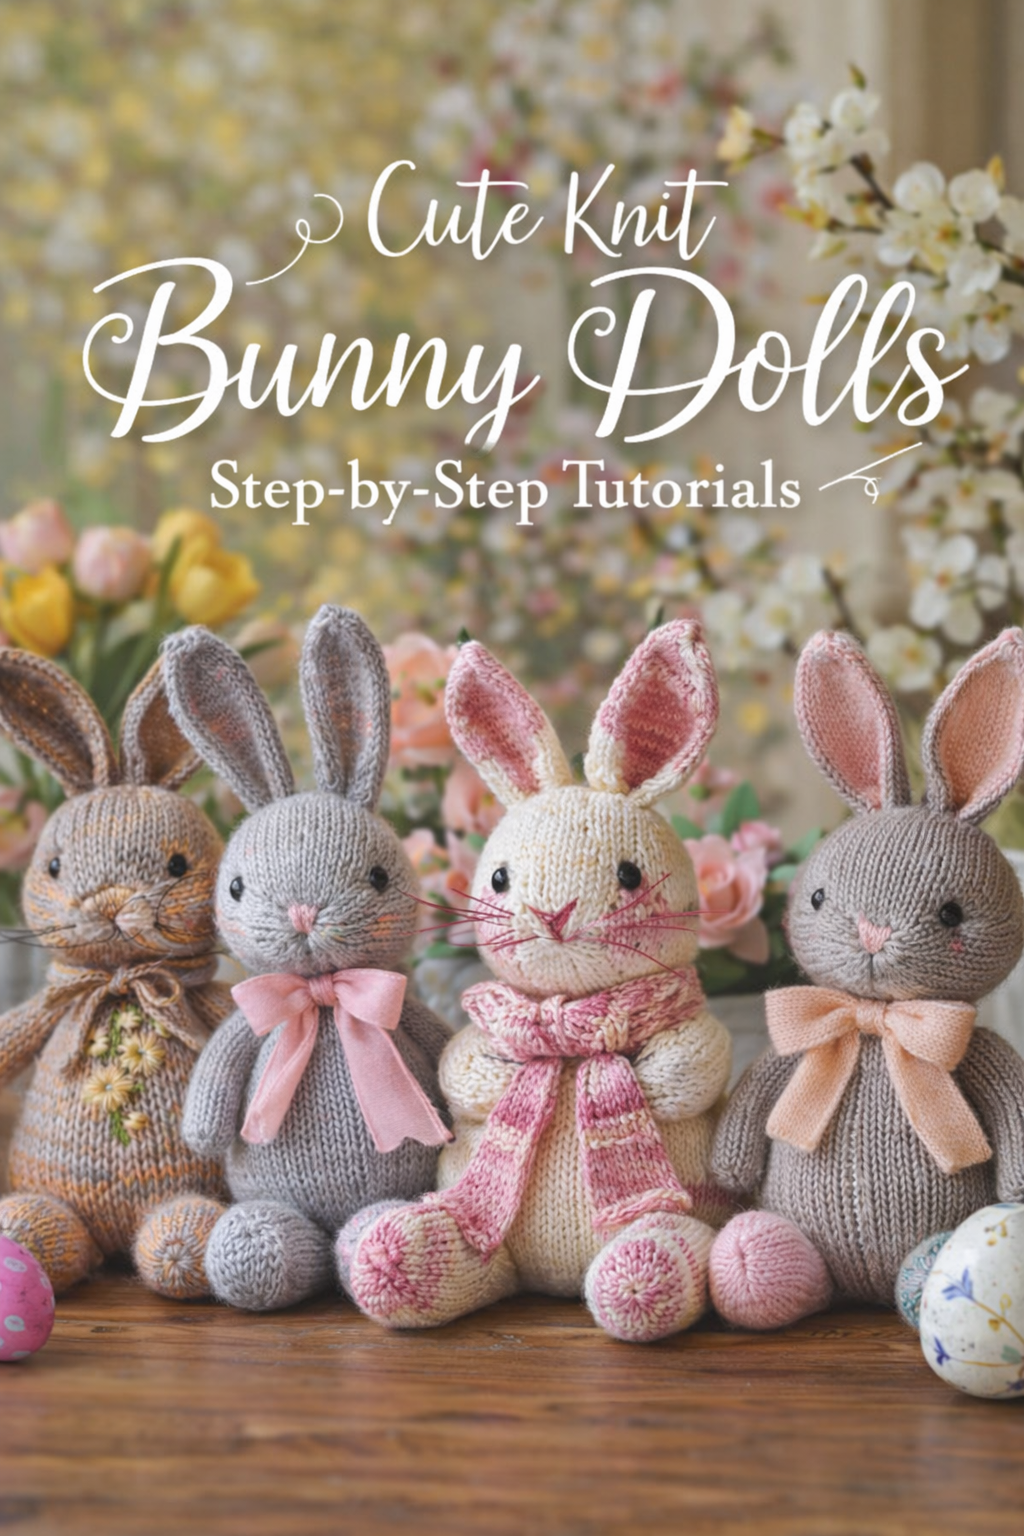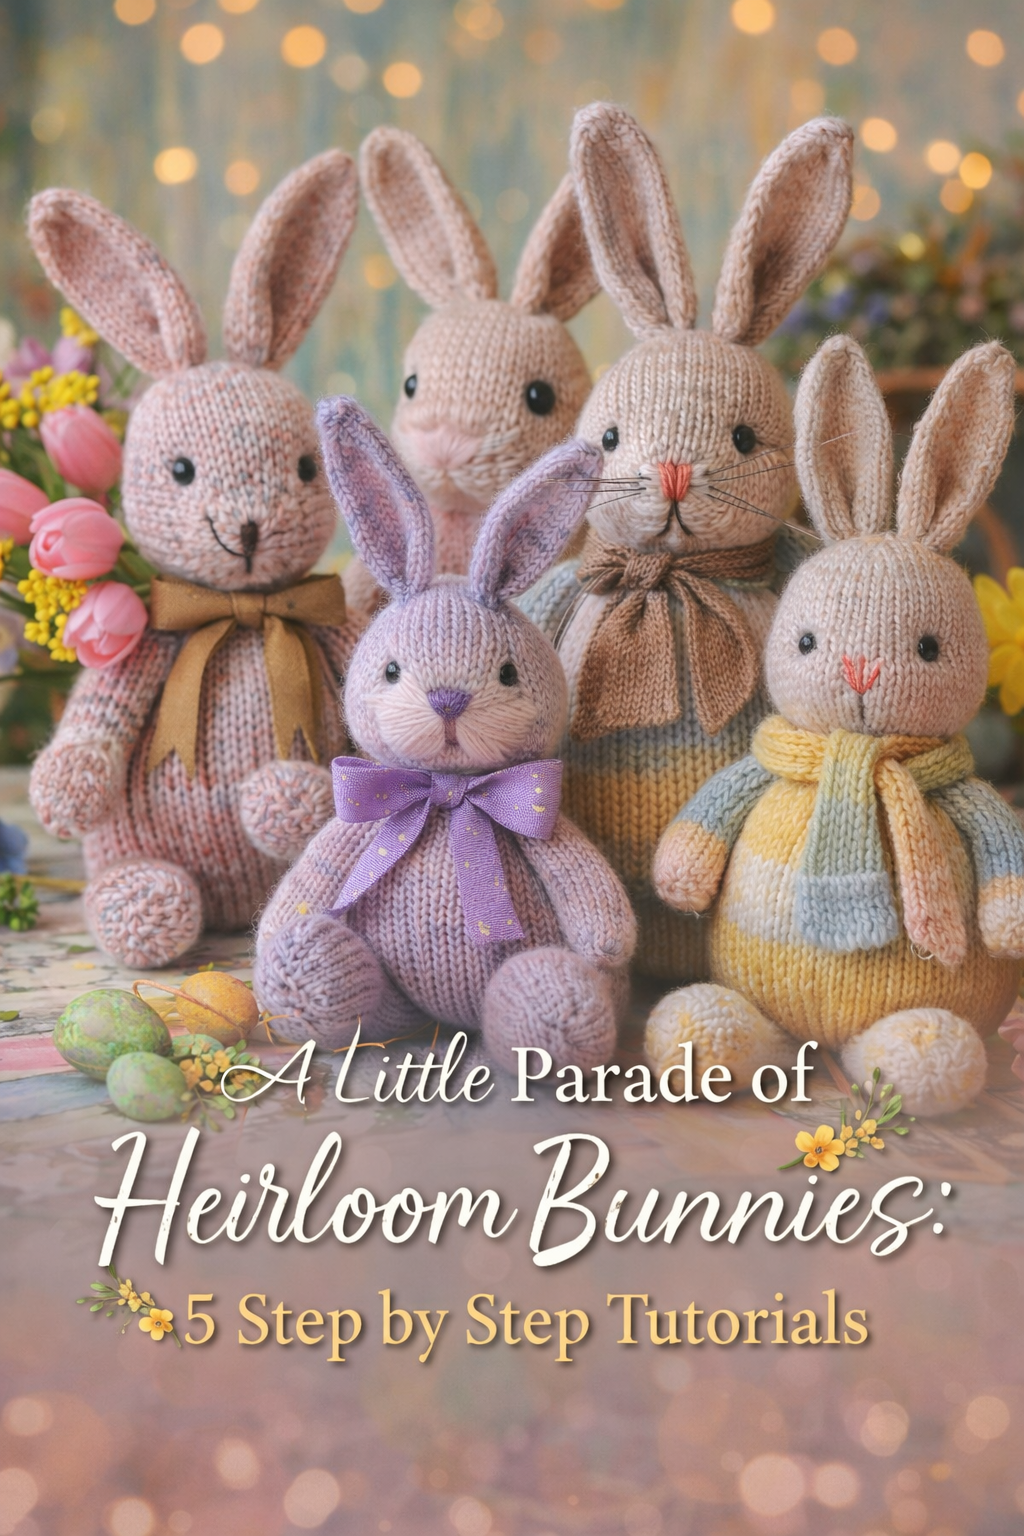
A Little Parade of Heirloom Bunnies: 5 Step by Step Tutorials

A Soft Beginning to a Handmade Spring
There is a certain quiet magic that only arrives with spring. It is not loud or demanding. It shows up gently in softened light, in the return of color, in the small rituals that feel almost ceremonial in their simplicity. A vase of tulips on the counter. A sunlit corner that suddenly feels alive again. A table that asks, without words, to be styled just a little more thoughtfully.
This is where handmade pieces belong.
Knitted bunnies have a way of slipping into a space and transforming it without trying too hard. They do not overwhelm a room. They do not compete for attention. Instead, they soften everything around them. They add a sense of care, of time taken, of something made slowly and intentionally. And in a season that celebrates renewal and small joys, that feeling matters more than ever.
This collection was designed to feel like a complete little world of spring. Not just one bunny, but five distinct personalities. Each one carries its own mood, its own proportions, its own quiet charm. One feels classic and heirloom, with soft marled tones and a timeless silhouette. Another leans storybook, dressed in a tiny cardigan and holding a basket as if it has somewhere gentle to be. Others bring in soft color play, delicate details, and just enough variation to keep the process interesting from start to finish.
What ties them all together is intention.
Every stitch, every shaping decision, every finishing detail is about creating something that feels considered. These are not quick novelty projects. They are pieces that sit beautifully on a shelf, that photograph like something from a magazine, that can be brought out year after year and still feel special.
And perhaps most importantly, they are approachable.
Even if you are not an expert knitter, these tutorials guide you through the process in a way that builds confidence as you go. You will start to understand how shaping creates personality, how yarn choice affects mood, how small details like ear placement or a ribbon bow can completely change the final look.
By the time you finish your first bunny, you will already be thinking about the next one. Not because you have to, but because you want to. Because something about the process feels calming, creative, and quietly rewarding.
This is your invitation into that rhythm.
A slower pace. A softer palette. A collection of handmade pieces that turn your space into something that feels just a little more beautiful, a little more personal, and a little more like spring.
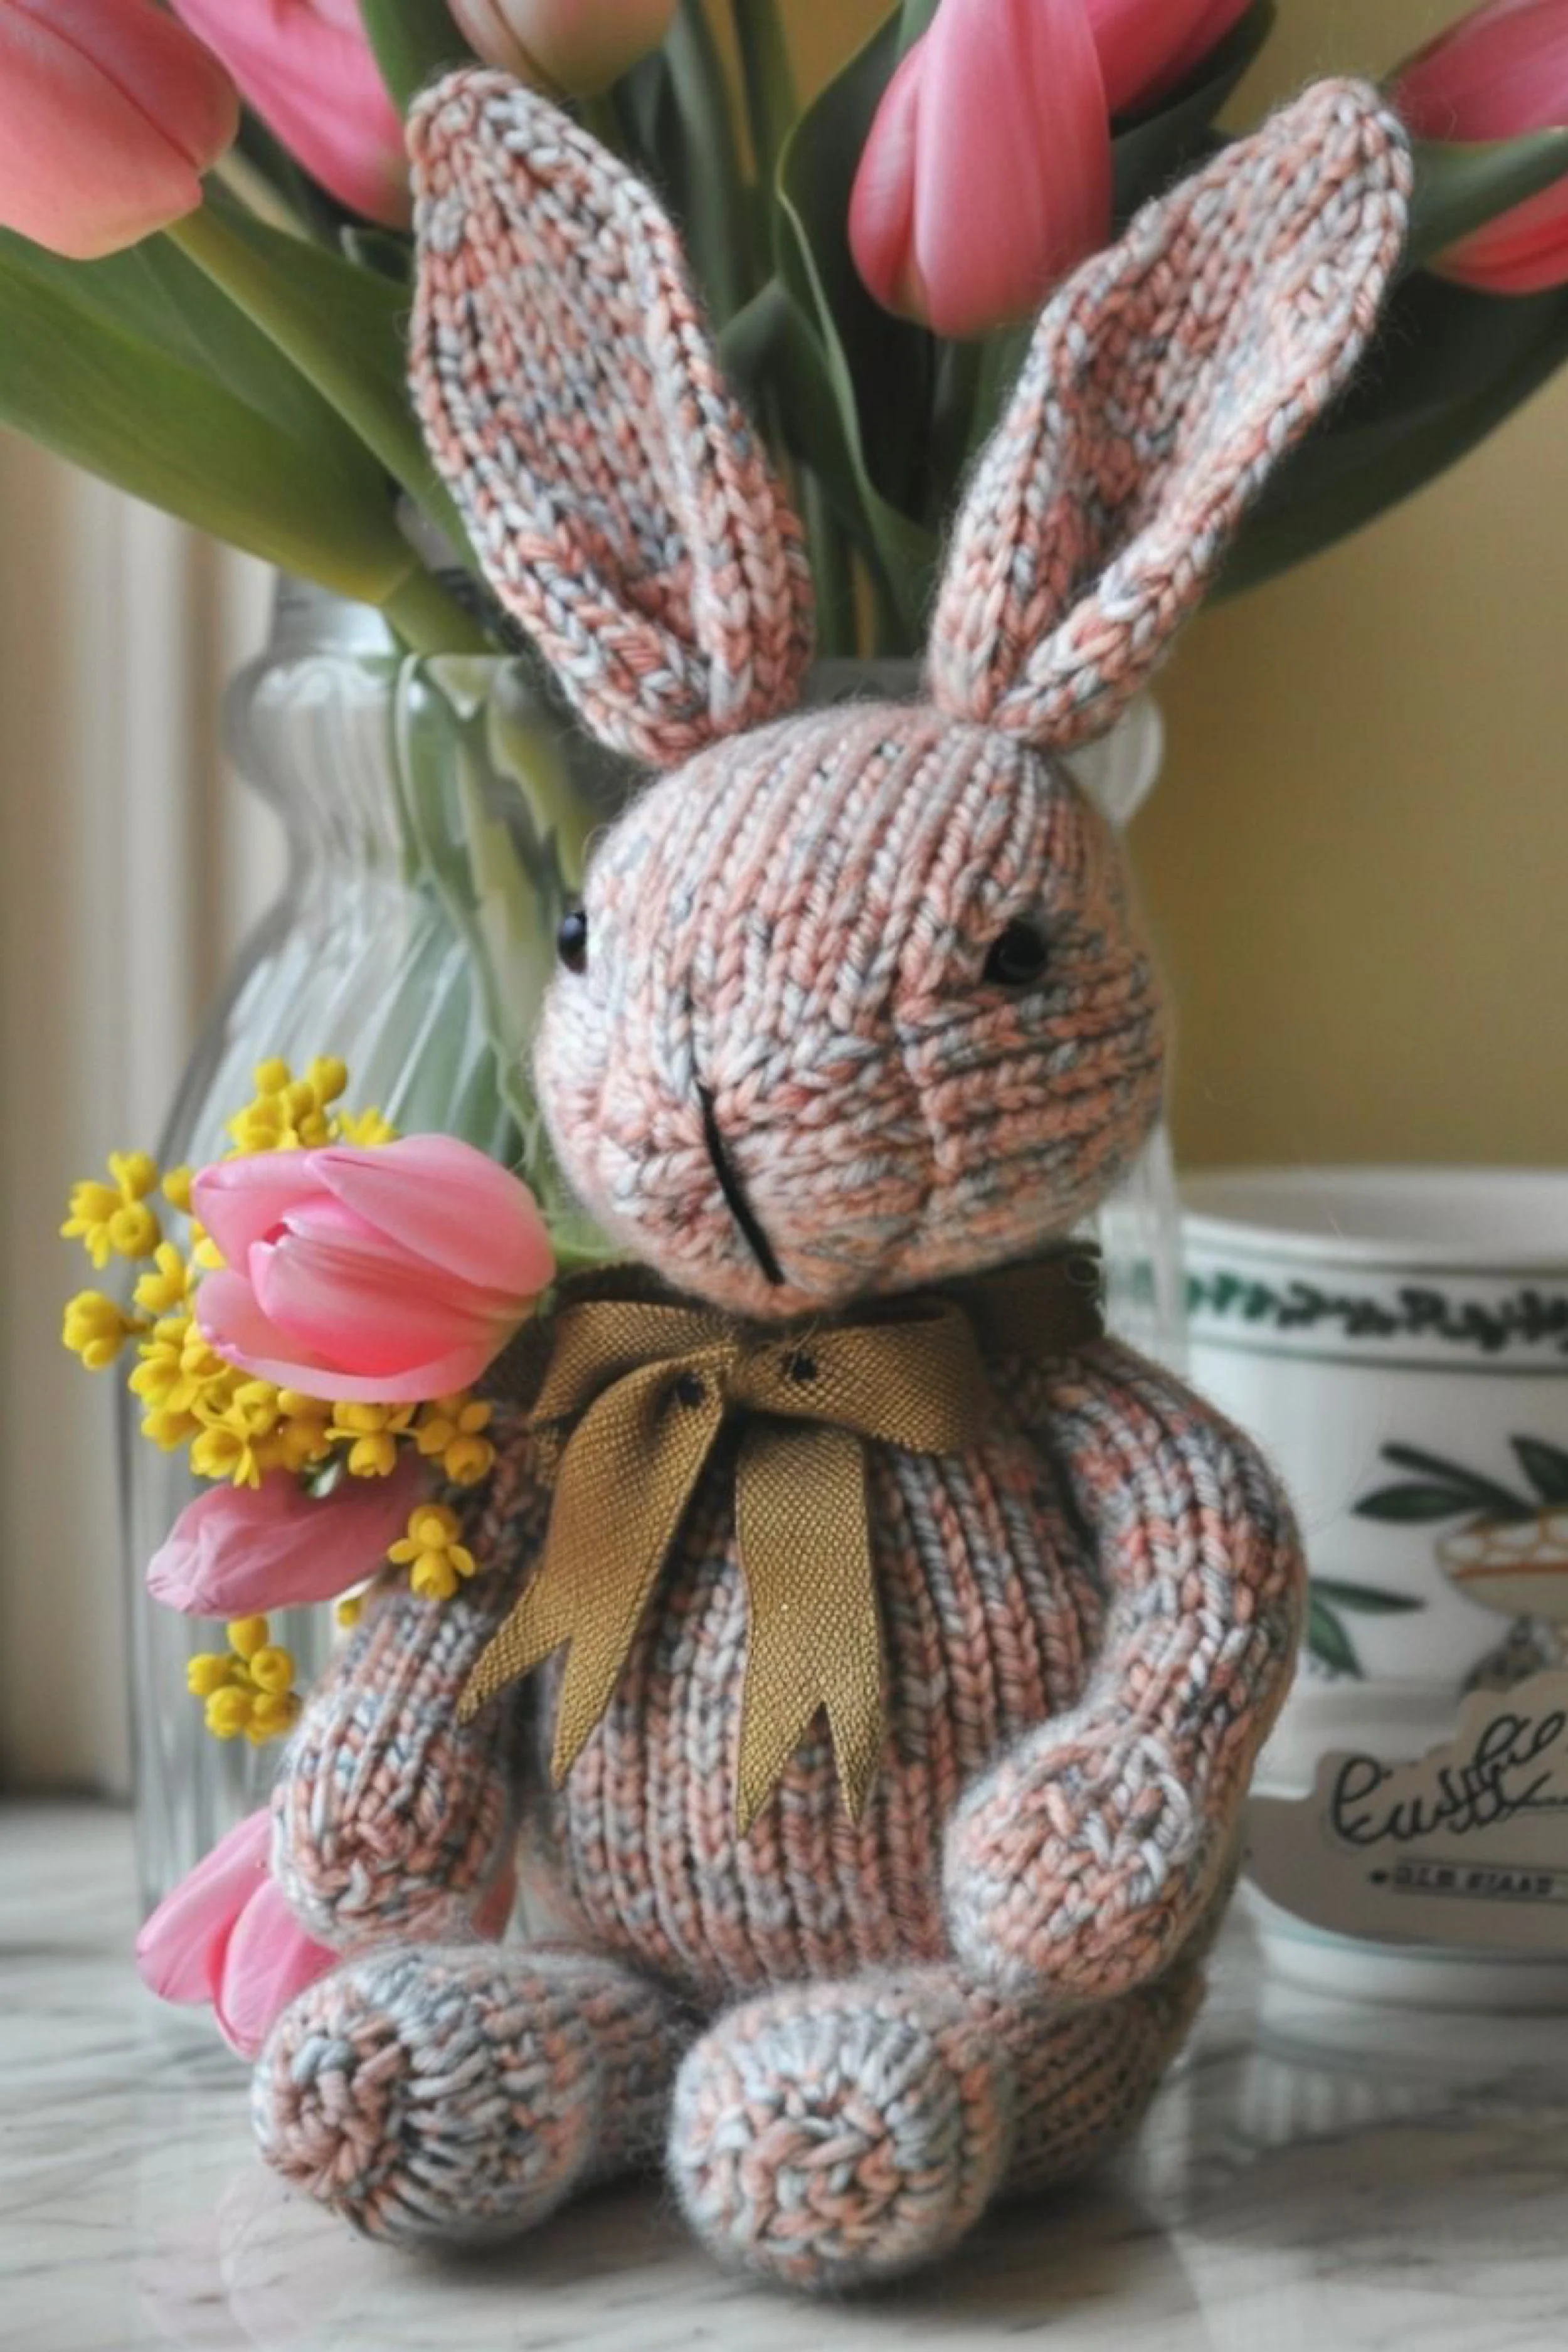
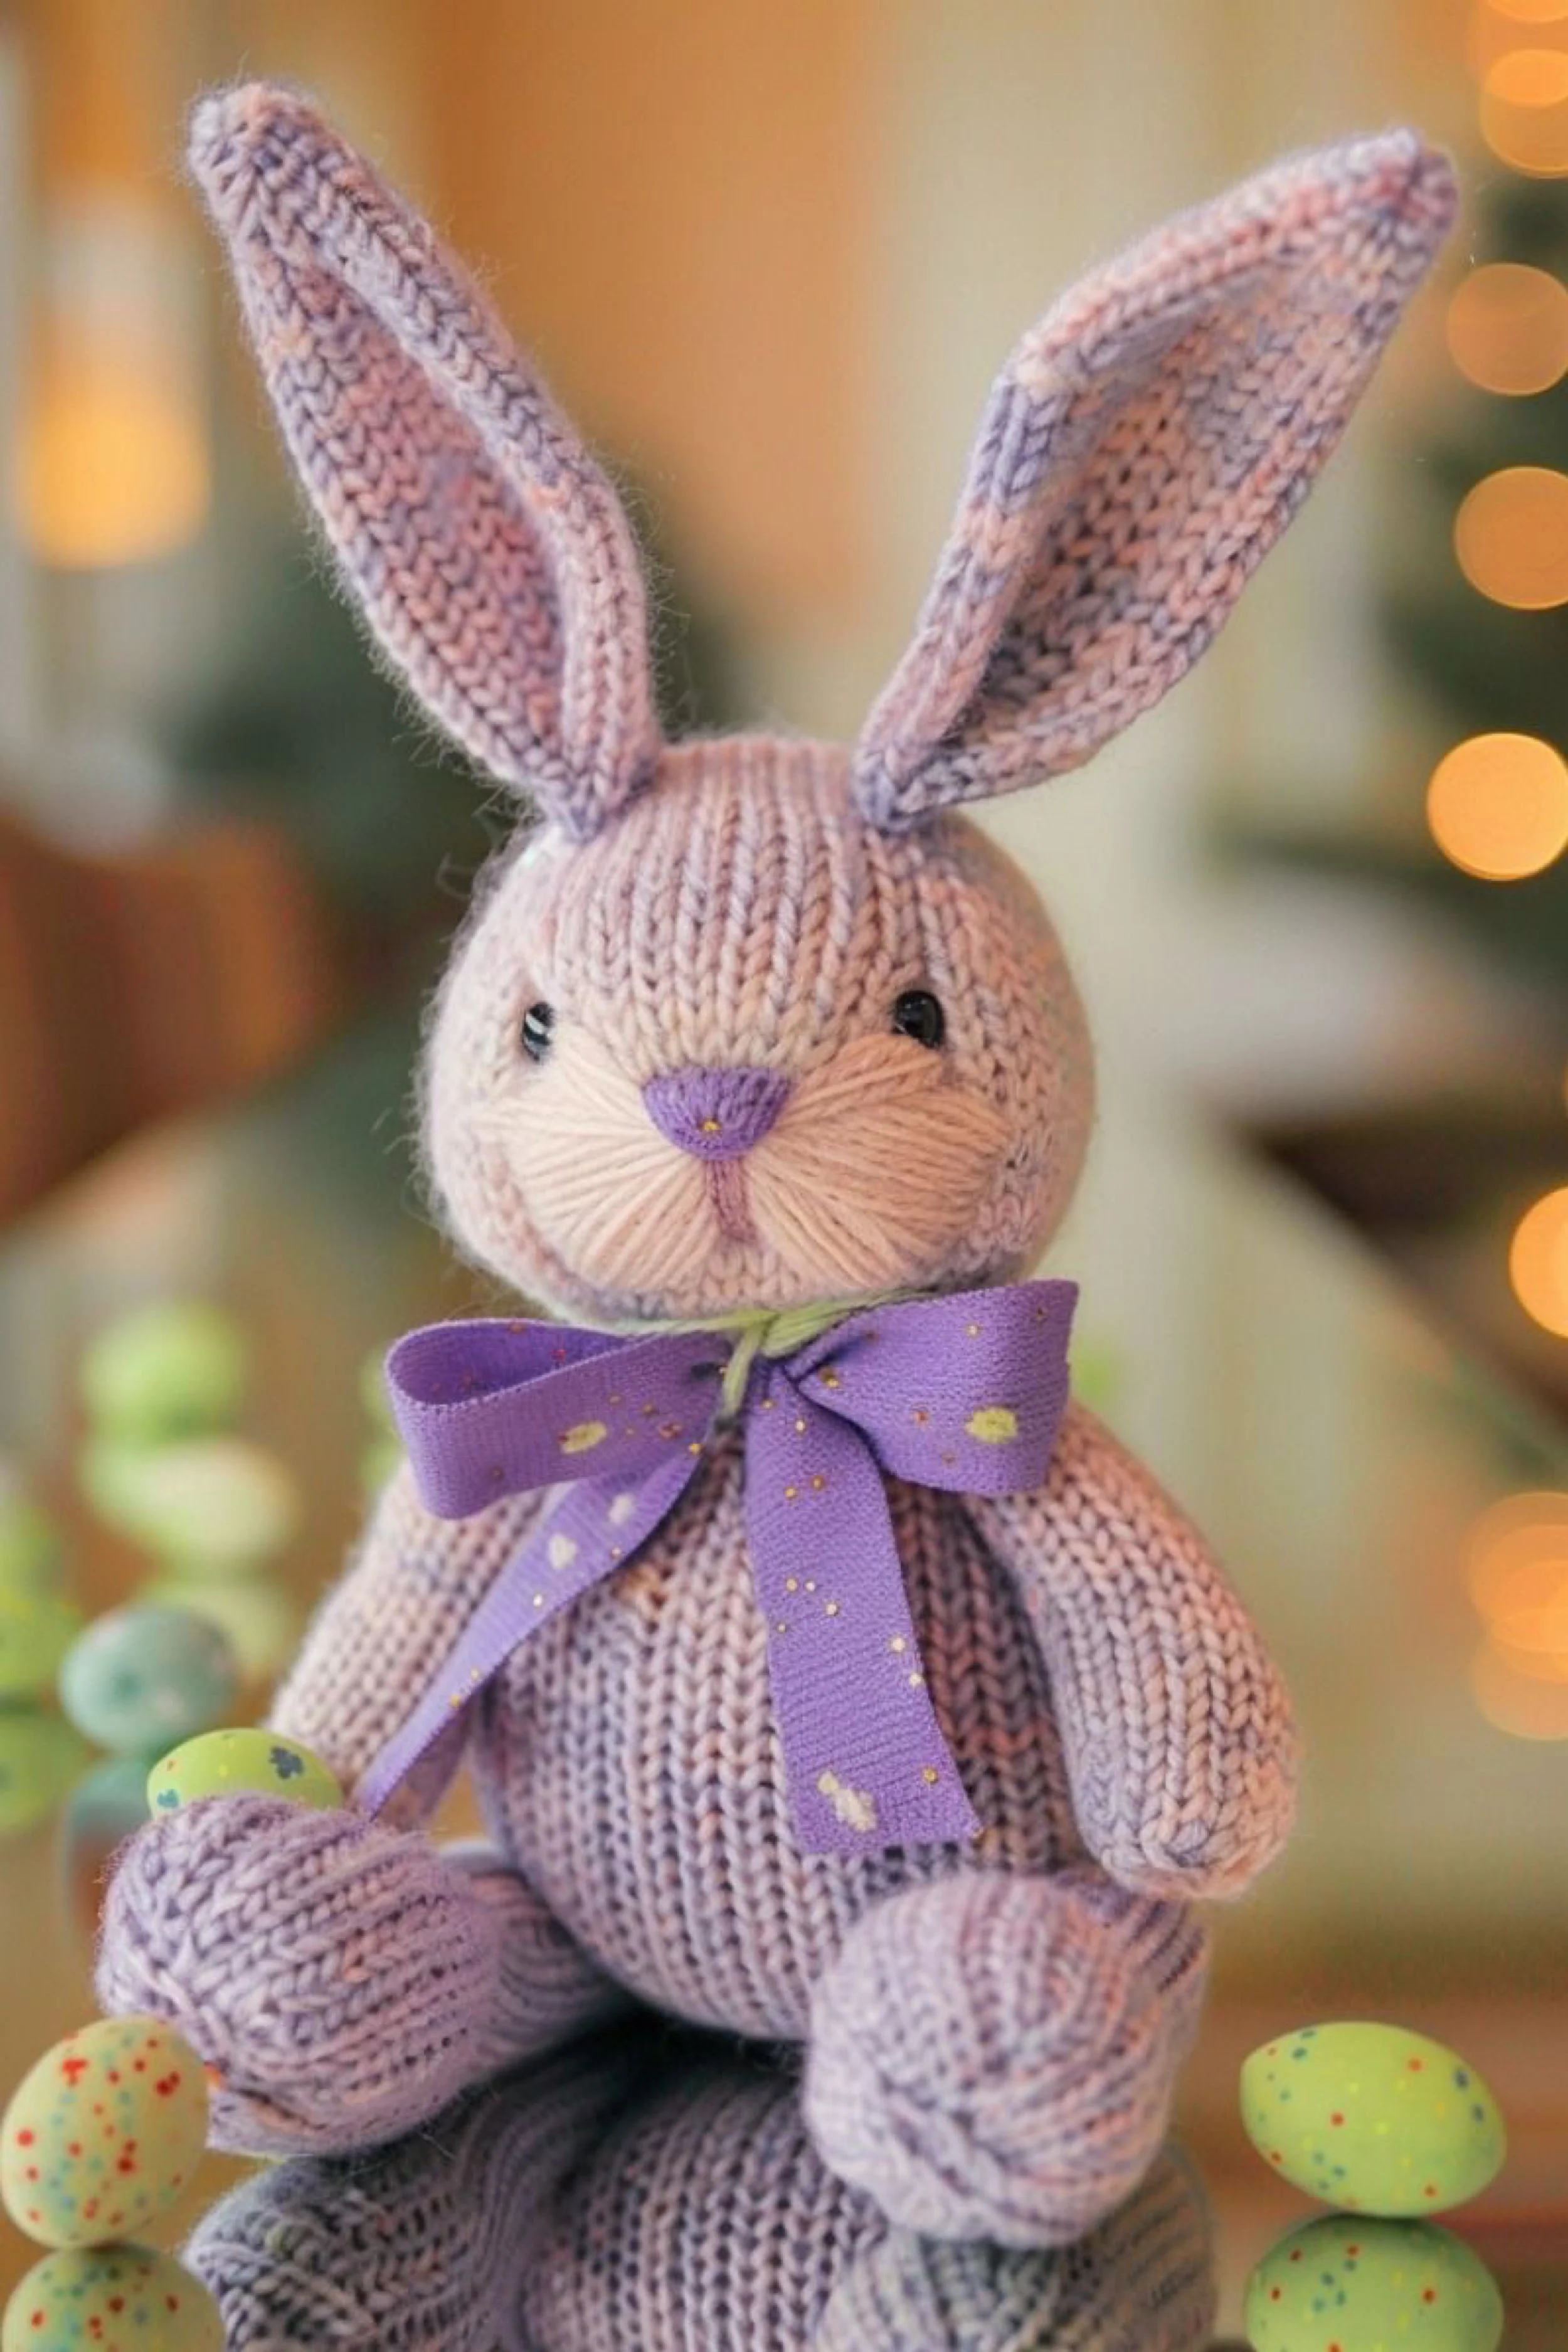
Marled Keepsake Bunny Step by Step Tutorial
What you’re making
You’re making a softly rounded knitted bunny with a classic seated pose, extra tall ears, a plump little tummy, and a tied ribbon at the neck. This version is designed to echo the marled pastel look in the photo, with blush, cream, and dusty gray tones blended together so the bunny feels heirloom sweet instead of overly bright. The finished toy looks beautiful styled beside spring flowers, tucked into an Easter vignette, or gifted as a nursery keepsake.
Materials + tools list
- DK or light worsted yarn in marled blush, cream, and pale gray
- Optional alternative: hold two fine yarns together, one blush and one cream or gray, to mimic the softly flecked fabric
- A small amount of black embroidery floss or black yarn for the mouth
- Two black safety eyes or small black beads
- Polyester toy stuffing
- Set of double pointed needles or one long circular needle for magic loop
- Needle size that gives a firm fabric, usually US 3 to US 5
- Stitch markers
- Tapestry needle
- Small sharp scissors
- Row counter
- Narrow ribbon in warm brown, gold brown, taupe, or dusty rose
- Floral wire or pipe cleaner, optional, if you want slightly poseable ears
- Sewing pins
- Measuring tape
Finished size + customization notes
Aim for a finished bunny about 8 to 11 inches tall seated, depending on yarn and needle size. If you want a smaller bunny, use sport weight yarn and a tighter needle size. If you want a chunkier display bunny, use worsted or even light bulky yarn, but keep the stitches dense so stuffing does not show through. The ears can be made shorter for a baby safe look or longer for the exact upright, elegant silhouette in the image. You can also swap the ribbon for velvet, grosgrain, or a hand knit bow.
Step by step instructions
Choose your yarn strategy before you cast on. The photo shows a marled fabric with gentle color shifts rather than hard stripes. The easiest way to recreate that is to use one pre marled yarn in blush and gray tones. If you do not have that, hold two strands of lightweight yarn together, such as one blush and one cream, then add a pale gray strand in certain sections of the body. You should now see a softly mottled fabric that looks handmade and slightly vintage.
Start with the body from the bottom up. Cast on a small circle, around 12 to 16 stitches depending on your yarn weight, and distribute evenly on needles. Knit one full round. On the next increase round, increase into every stitch or every other stitch until you reach roughly 24 to 32 stitches. Continue increasing every other round in an evenly spaced way until the base feels broad enough for a seated bunny. The goal is a rounded bottom that helps the bunny balance.
Knit the lower body straight for several rounds. Then begin widening the tummy. Increase 4 to 6 stitches evenly around every third or fourth round until the body reaches its fullest width. This should happen around the midpoint. If yours looks wider than the photo, stop increasing sooner. If it looks too narrow and tube like, add one more increase round. A visual checkpoint here is that the body should resemble a small pear with a stable base and a generous belly.
Shape the upper body and neck. Once the widest point is established, knit several plain rounds, then decrease gradually so the top becomes narrower. The neck on this bunny is not sharply pinched, so avoid dramatic decreases. You want a gentle transition from round tummy to smaller shoulder area. Stuff the body as you go, packing the base firmly and the upper area a little less firmly so the bunny feels plush rather than rock hard.
Finish the body opening. When the upper body is narrow enough, cut the yarn with a long tail, thread it through the remaining stitches, and pull closed. Weave the tail securely. Add more stuffing first if needed. The body should sit upright on a table without rolling backward too easily. If it tips, add more stuffing low in the belly and bottom.
Knit the head separately from the nose upward or from the crown downward. For a smooth round head like the one in the image, many knitters prefer beginning at the nose area. Cast on a small number of stitches and increase gradually into a rounded muzzle and cheeks. Continue knitting until the head circumference matches the upper body. Then work plain rounds to build height before beginning crown decreases. If you prefer simpler construction, make a sphere: cast on, increase to the fullest circumference, knit straight, then decrease.
Shape the muzzle. The photographed bunny has gentle cheek fullness and a slight vertical indentation at the center front. To copy that look, place a tiny bit more stuffing in the lower front of the head than at the back. Later, you will use a strand of matching yarn to sculpt from the chin area upward through the nose area, lightly pulling to create that central face line. Do not over tighten. You want soft definition, not a pinched cartoon snout.
Add the eyes before fully closing the head. Place them low enough that the forehead looks sweet and rounded and the muzzle remains prominent. Usually this means spacing them about 8 to 10 stitches apart and a little above the midpoint of the head. Insert safety eyes now if using them. If working for a very young child, skip hard eyes and embroider French knots later instead.
Close and stuff the head. Fill it firmly, especially around the cheeks and crown, so the head keeps its shape. Sew or draw up the opening closed. Hold the head against the body before attaching. It should look slightly oversized but not huge. The charm of this bunny comes from the generous head and tiny seated posture.
Knit the arms. Cast on a small circle and increase just enough for rounded paws. Knit straight for the forearm, then lightly stuff only the paw and lower arm. Leave the upper portion flatter so it can curve naturally against the body. If your arms look too sausage like, reduce the stitch count by 2 or knit the final few rounds more tightly.
Knit the legs. Start each foot with a small rounded oval or circle. Work a few increase rounds so the feet feel plump and stable. Then knit upward in a slightly narrower tube for the leg. Stuff the foot firmly and the leg lightly. The finished legs should tuck forward in a seated pose, almost like two rounded pebbles at the front of the bunny.
Make the ears. Cast on enough stitches for a slim leaf shape. Work flat. Increase at the edges for several rows, then knit even, then decrease toward a softly pointed tip. Make two identical outer ears. For extra structure and the cupped shape from the photo, make either a second smaller inner ear piece for each ear or pick up stitches around the finished ear and work a narrow edge band. Lightly steam block each ear so it curves inward.
Optional ear support. If you want the ears to stand exactly like the image, slip a thin floral wire or pipe cleaner inside each ear during finishing. Cover the support well and keep the ends blunt. For a decorative bunny this works beautifully. For a child’s toy, skip internal wire and instead make the ears double layered and firmly sewn upright at the base.
Assemble the bunny. Pin the head to the body first and check the angle from the front and the side. The bunny should look as though it is slightly lifting its face. Sew securely around the neck. Next attach the legs low on the front so the feet rest forward. Add the arms at the sides, angled inward a touch. You should now see the recognizable seated silhouette.
Attach the ears. Place them close together near the center top of the head, not too far apart. The inner edges should angle slightly inward and then rise tall. Sew the base of each ear firmly and pinch the lower section as you stitch so the ear cups inward. This creates that delicate folded structure visible in the photo.
Sculpt the face. Thread a long strand of matching yarn through the head from the back neck area to the nose front, pull gently, and return again if needed to create a soft vertical ridge. Embroider a tiny black mouth line extending down from the nose area. Keep it short. The face in the image is minimal, which is what makes it elegant.
Add nose details only if desired. This specific bunny can work with no separate colored nose, just face shaping and a mouth line. If you want slightly more definition, add one or two stitches in dusty rose or pale taupe at the nose point, but keep it subtle.
Stuff and weight check. Sit the bunny upright and turn it slightly. If it leans badly, open one seam just enough to add more stuffing at the lower back or bottom. This small correction makes a huge difference in display quality. You should now see a bunny that sits neatly and looks full through the belly.
Tie the ribbon. Wrap a narrow ribbon around the neck and tie a soft bow with slightly angled tails. The warm brown ribbon in the photo adds a pretty earthy contrast to the pastel yarn. Trim the ends into points or a gentle angle. If you prefer a more nursery look, use dusty pink, faded lavender, or natural linen ribbon.
Final styling. Brush away loose fibers, smooth the ears, and place the bunny beside flowers to check the mood. The photo feels springlike, gentle, and collected. If your bunny looks too rustic, use a satin ribbon and cleaner embroidery. If it looks too formal, choose a slightly fuzzier yarn and a softer bow.
Troubleshooting
A bunny that looks too lumpy usually needs either firmer stuffing or smaller needles. Dense fabric is essential for knitted toys.
If the head droops forward, the neck seam needs tighter stitching or the upper body needs more stuffing.
If the ears collapse, either knit them double, block them more firmly, or stitch a tiny tuck at the base to help them stand.
If the bunny will not sit upright, add stuffing to the bottom and lower back, or sew the legs slightly farther forward.
If the face looks too stern, move the eyes a row lower and farther apart next time. Lower eyes usually create a sweeter expression.
Finishing details
Light steam blocking helps the ears and limbs smooth out, but do not soak stuffed pieces heavily. Weave all yarn tails inward and anchor them through stuffed areas so they cannot work loose. If you used beads instead of safety eyes, stitch them several times through the head for security. For a polished heirloom finish, lightly brush the fabric with a clean, soft toothbrush to bloom the fibers just a little. You can also add a tiny sachet of dried lavender inside only if the bunny is for decor and not for a child. Optional upgrades include a miniature bouquet sewn to one paw, a velvet ribbon instead of grosgrain, softly blushed cheeks with textile safe color, or a personalized woven name label at the lower back.
Shop Similar
- Marled blush and cream yarn for heirloom toy knitting
- Double pointed knitting needles for stuffed animal projects
- Black safety eyes for knitted bunny toys
- Polyester stuffing for handmade plush animals
- Brown satin and grosgrain ribbon assortment
Style It With
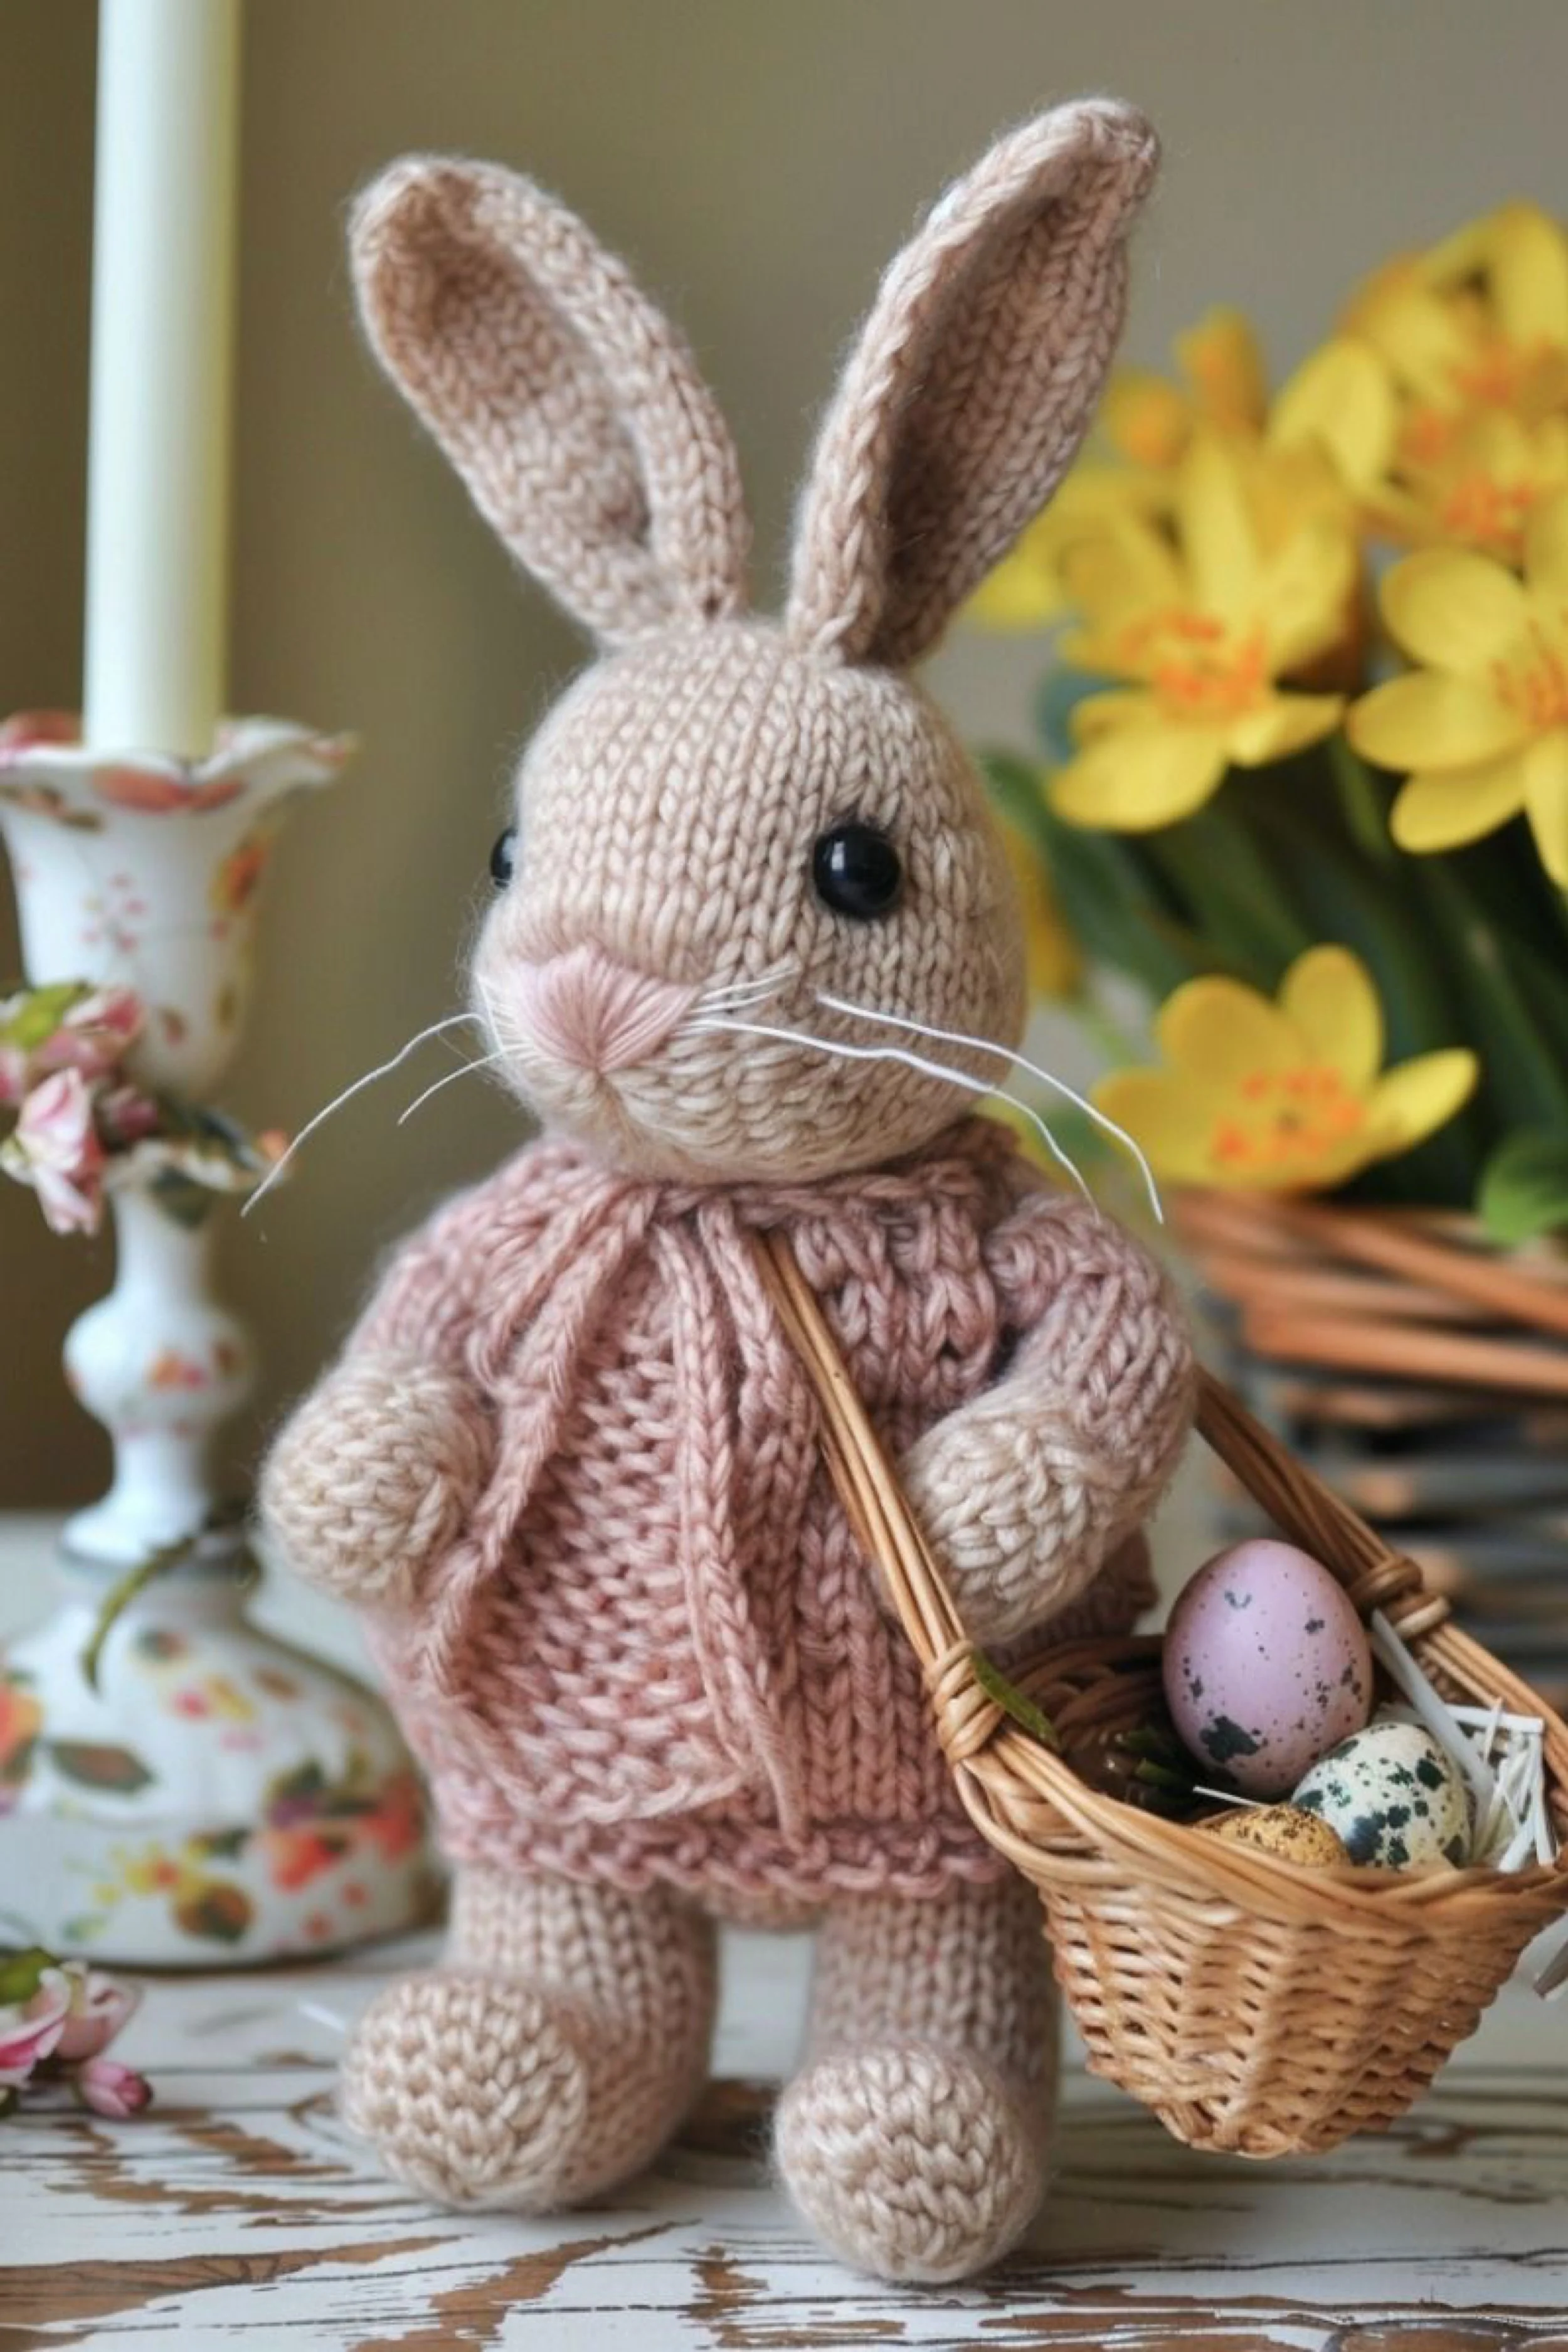
Cardigan Bunny with Easter Basket DIY Guide
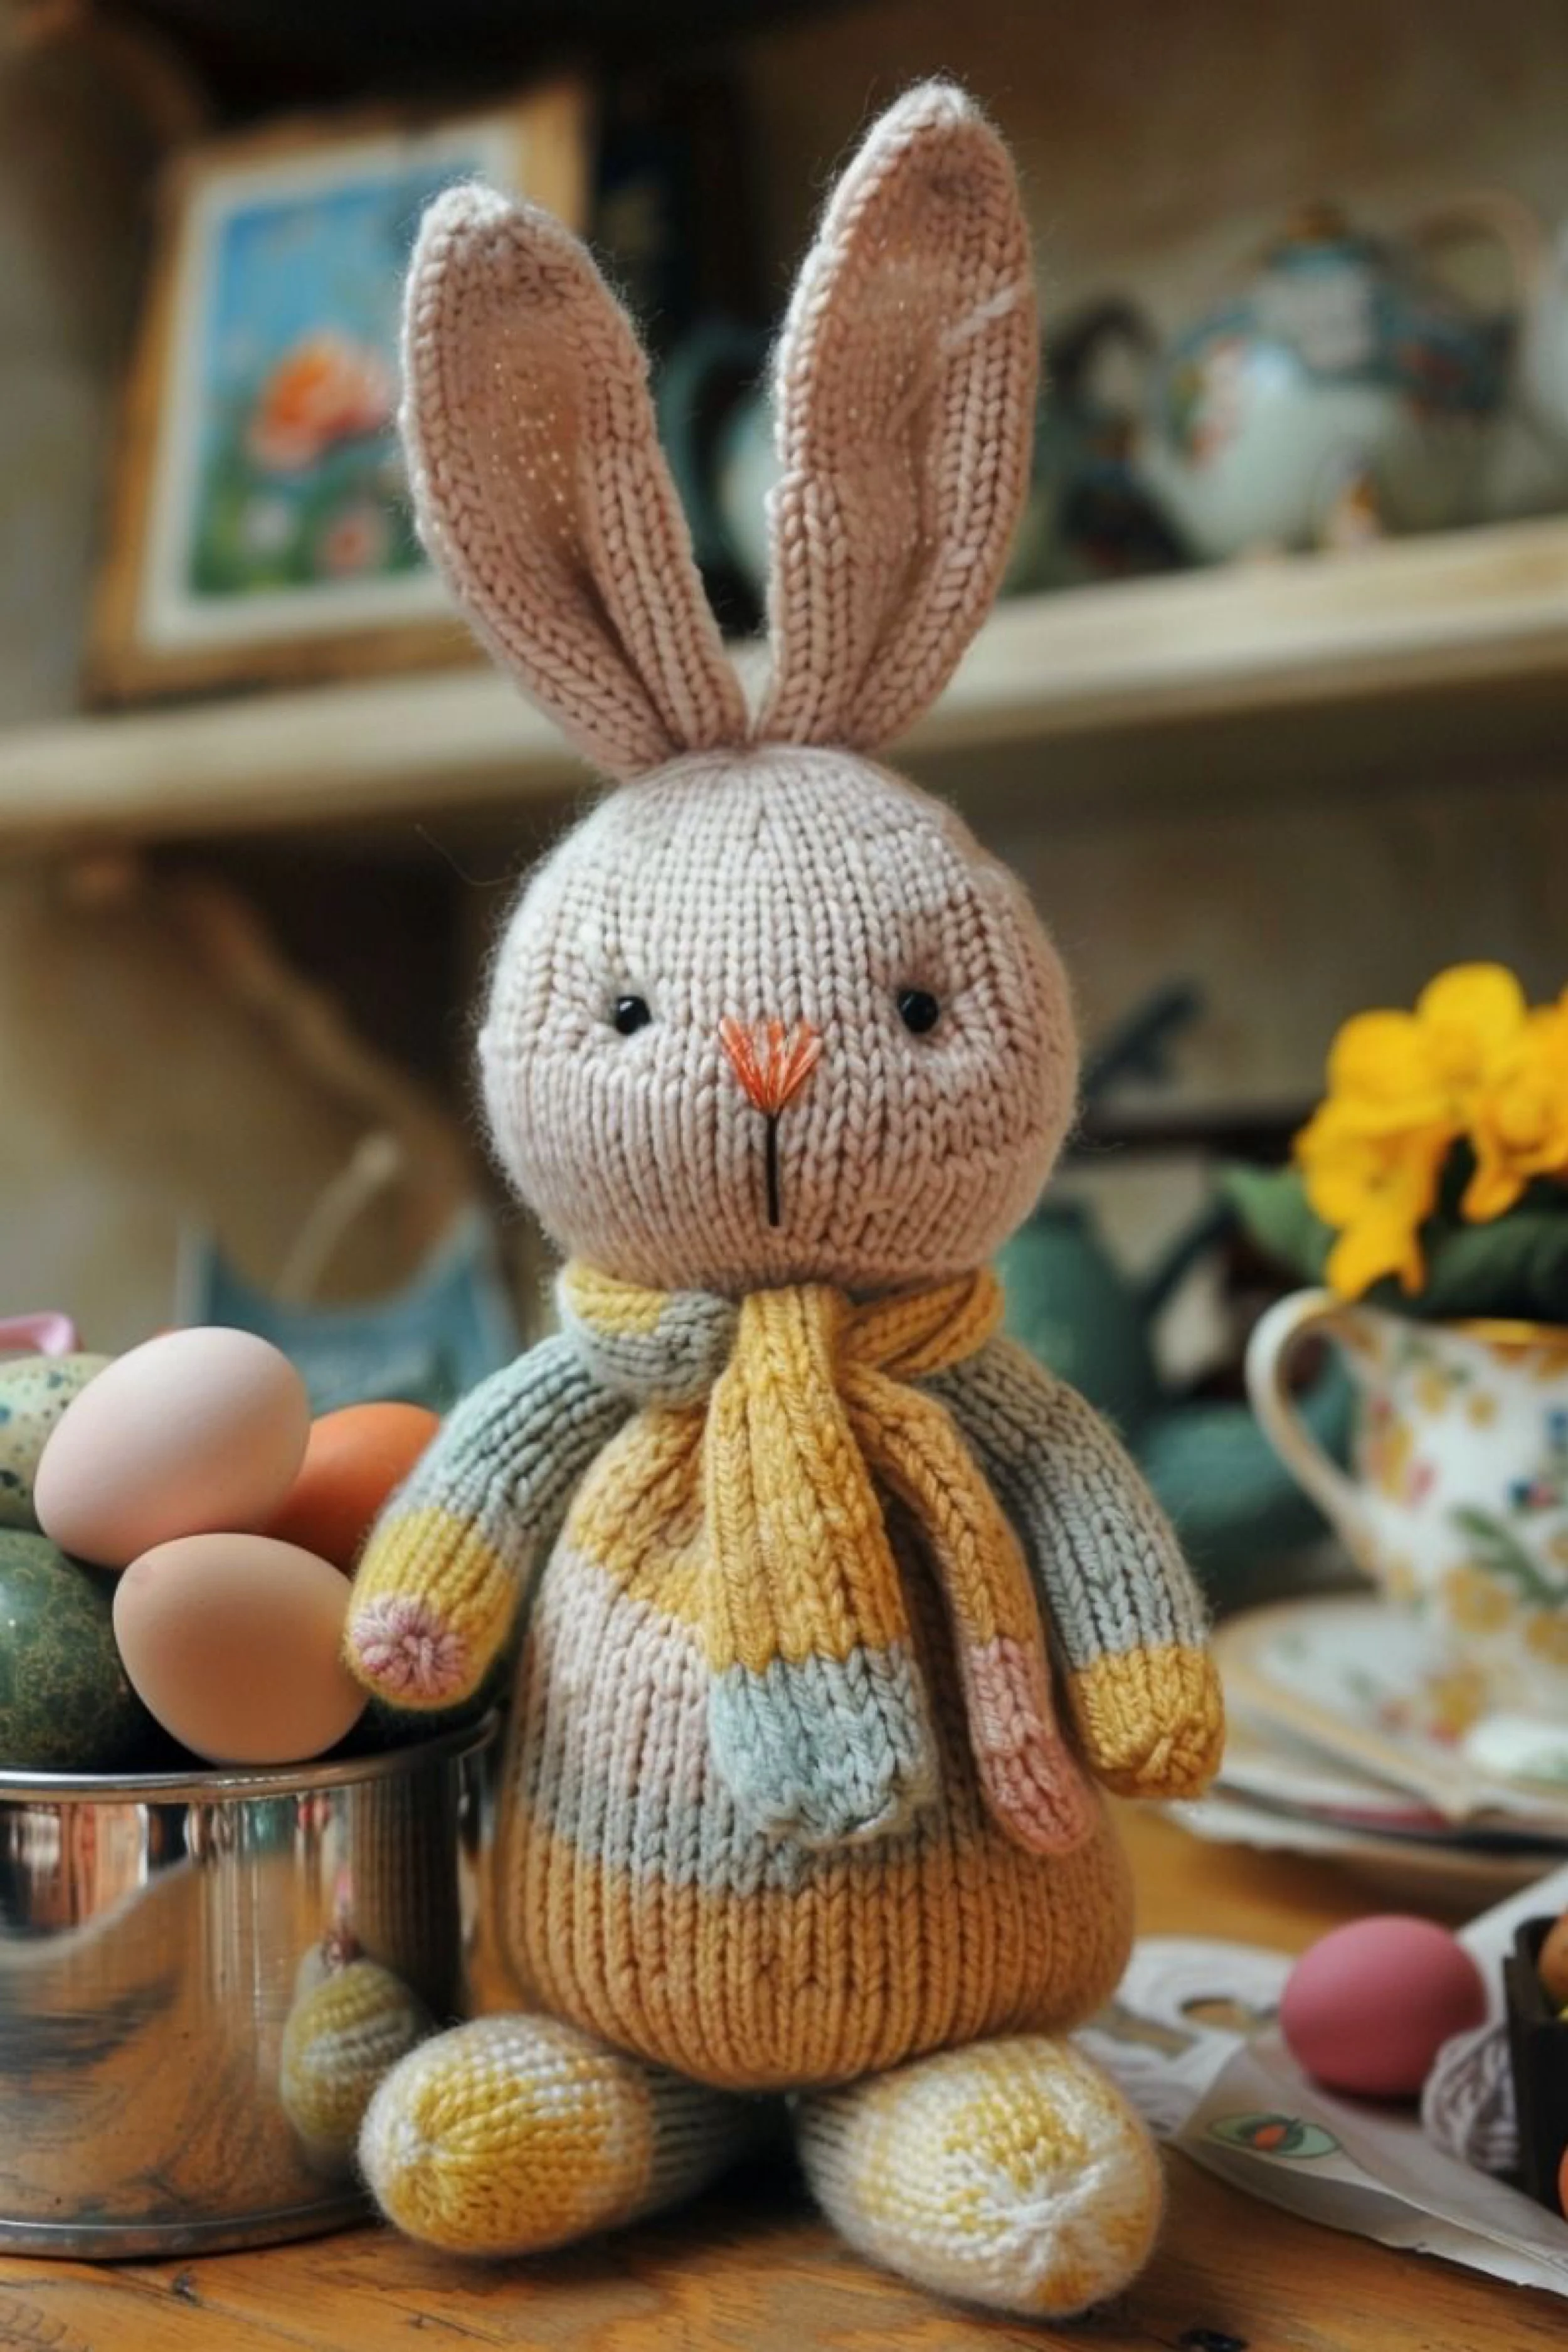
What you’re making
You’re making a standing knitted bunny dressed in a tiny blush cardigan and carrying a little basket of speckled eggs. This design has a sweeter storybook feel than the first bunny, with a lighter cream head, soft whiskers, and a dressed body that feels ready for spring shelf styling. The overall look is delicate, nursery pretty, and ideal for Easter centerpieces or a seasonal keepsake gift.
Materials + tools list
- DK yarn in pale beige or warm oatmeal for head, ears, arms, and legs
- DK yarn in blush pink for cardigan
- Optional cream or pale taupe yarn for subtle shading
- Small amount of pale pink embroidery floss for nose
- White thread, fishing line, or fine craft cord for whiskers
- Black safety eyes or embroidered black eyes
- Polyester stuffing
- Double pointed needles or circular needle for magic loop
- Small crochet hook, optional, for picking up dropped stitches
- Tapestry needle
- Stitch markers
- Small wicker basket or a hand woven miniature basket
- Tiny decorative eggs
- Fine floral wire, optional, to help the basket handle sit nicely in the paw
- Scissors
- Row counter
Finished size + customization notes
This bunny looks best around 9 to 12 inches tall standing. A slimmer body helps it pair well with the cardigan and basket. To make the bunny taller, add extra plain rounds to the legs and torso. To make it more child friendly, skip the basket and sew the arms closed into a relaxed front pose. The cardigan can be knitted directly onto the body as a false garment look, or made as a real removable layer if you enjoy tiny clothing construction.
Step by step instructions
Plan the proportions first. This bunny has a smaller torso than the seated marled bunny and longer visible legs. Sketch or imagine the shape as a narrow pear standing upright with a rounded head and tall ears. The cardigan adds volume at the chest, so the body itself should stay fairly streamlined.
Knit the legs first. Cast on a small circle for one foot, increase to form a rounded base, then knit several rounds plain. You want a soft oval foot that can support a standing or propped pose. Work the leg upward in a narrow tube. Stuff the foot firmly and the lower leg lightly. Repeat for the second leg. Leave long tails if you prefer to sew them to the body later.
Join the legs into the lower body. Once both legs are complete, place them on the needles with a small bridge of stitches between them or sew them to a separately made body. The joined leg method usually creates a more seamless finished bunny. Knit around both leg sections and the connecting stitches. You should now see the bunny beginning to stand as one piece.
Shape the torso. Increase a few stitches at the hips, then knit straight through the belly. After a short section, begin the chest area with a slight widening if needed. Because the bunny will wear a cardigan, avoid making the tummy too round. The photo shows a gently stuffed figure, not an oversized plush body.
Build the neck area. Decrease a few stitches gradually so the torso narrows before the head. If you are knitting the head separately, bind off at the top once the torso height feels right. If you are knitting body and head in one piece, continue directly upward and increase again into the head circumference.
Stuff as you go. Firm stuffing in the legs helps the bunny hold shape. The torso should feel plush but not too hard. The upper chest may need a little extra stuffing so the cardigan sits smoothly and the neck does not cave in.
Knit the head. Use the same pale beige or warm oatmeal yarn. Increase from the neck into a smooth round head, or create a separate sphere if you prefer easier assembly. Add extra width at the lower face for the cheeks. The bunny in the photo has a gentle muzzle and a softly rounded forehead. Avoid over shaping. Minimal shaping often looks more elegant in knitted toys.
Add the eyes. Position them with a sweet, open expression. Place them slightly wider apart than you think you need, because stuffing tends to bring them visually closer. The face in the image is airy and calm rather than tightly packed.
Shape the nose area. Before closing the head, stuff the muzzle area slightly more than the crown. Embroider a soft pink triangular or rounded nose with satin stitches. Then embroider a short line downward in a very light brown or matching beige. This creates that delicate rabbit expression. Add white whiskers after assembly so you can trim them evenly.
Make the ears. Knit two elongated leaf shapes in beige. These ears are fairly tall and lightly cupped. Work them flat for easier shaping. Increase at the start, work a long center section, then taper to the tip. Sew a small base pleat in each ear when attaching so they stand more naturally.
Knit the arms. Keep them slightly plump at the paws and narrow through the upper arm. These arms need to hold or appear to hold a basket, so do not overstuff. A lightly stuffed arm bends more naturally against the body. You can even insert a tiny bit of pipe cleaner only inside the arms for display use if you want them to curve around the basket handle.
Assemble the bunny. Sew the head to the torso, then attach the arms at shoulder height. Angle them slightly forward. Attach the ears close together at the top center of the head. Pin first and check from the front. The bunny should look attentive and upright, not wide eared or sleepy.
Add the whiskers. Cut several fine strands of white thread or nylon craft whisker material. Stitch them through the muzzle area from one side to the other, then trim to an elegant length. If yours looks too whimsical or messy, use fewer strands. The photo shows only a handful of fine whiskers, not a dense spray.
Knit the cardigan as a separate piece or faux front panel. For a separate cardigan, cast on from the bottom edge and work in rows with a simple rib or garter band. Increase slightly at the chest, separate for front openings, and knit tiny sleeves or cap sleeves if desired. For a simpler version, knit a small rectangular wrap with openings for the arms and a shawl collar. The exact image suggests a short cardigan or robe style layer tied softly at the neck.
Use texture thoughtfully. A seed stitch or broken rib edge can mimic the soft handmade cardigan look, but stockinette with neat borders also works. Keep the fabric supple. Stiff mini garments are harder to dress and less charming on soft toys.
Dress the bunny. Slide the cardigan on carefully. If the sleeves resist, use a tapestry needle or chopstick to gently guide the paws through. Tie the front loosely with a knit tie cord or tiny ribbon. You should now see the bunny transform from simple knitted toy to storybook spring character.
Add the basket. You can use a purchased dollhouse scale basket or weave one from fine raffia. Fill it with tiny decorative eggs, shredded paper grass, or little felt flowers. Stitch the basket handle lightly to one paw and tack the basket base against the body if you want a permanent arrangement. If you prefer a removable accessory, simply let the basket rest against the bunny with the handle looped over one arm.
Fine tune the pose. Stand the bunny against a backdrop or let it lean slightly. Many knitted toys with long legs look best when their feet point forward and the body leans just a touch back. If it feels unstable, add a small hidden weight pouch at the bottom of the torso or in the feet using plastic pellets in a fabric sachet.
Adjust proportions if needed. If yours looks more like a bear than a rabbit, lengthen the ears or narrow the muzzle. If it looks too thin, add a bit more chest stuffing or make the cardigan fuller. Visual checkpoint: you should now see a cream and blush bunny with a gentle old fashioned Easter feel.
Finish with styling details. Add a soft blush tint to the cheeks if desired using textile safe pastel chalk. Arrange beside daffodils, a floral candlestick, or chipped paint furniture for that collected spring tabletop mood seen in the photo.
Troubleshooting
If the cardigan bunches under the arms, the body may be too wide. On the next version, reduce torso stitch count slightly or use a softer yarn for the garment.
If the whiskers droop too much, switch to a slightly stiffer thread or trim them shorter.
If the basket pulls the bunny forward, tack the basket lightly to the side of the torso or add weight to the feet.
If the ears twist, block them flat before attaching and check that both were knit with the same row count.
If the nose disappears into the face, add a tiny bit of extra stuffing in the muzzle and use thicker embroidery floss.
Finishing details
Steam the cardigan separately before dressing the bunny so the stitches relax and the edges lie flat. Weave in every end securely, especially at the cardigan ties and the ear bases. A tiny hidden stitch under the chin can keep the cardigan collar positioned neatly. For a decorative upgrade, add miniature buttons, a hand knitted scarf under the cardigan, a little basket liner in floral cotton, or pastel eggs with speckled paint splatters. For a softer nursery version, replace the basket with a stuffed fabric carrot or small knitted flower cluster.
Shop Similar
- Beige and blush DK yarn for knitted bunny dolls
- Mini wicker baskets for doll and spring decor
- Speckled decorative mini eggs for Easter crafts
- Black safety eyes assortment for hand knit animals
- Toy stuffing and tapestry needle set
Style It With
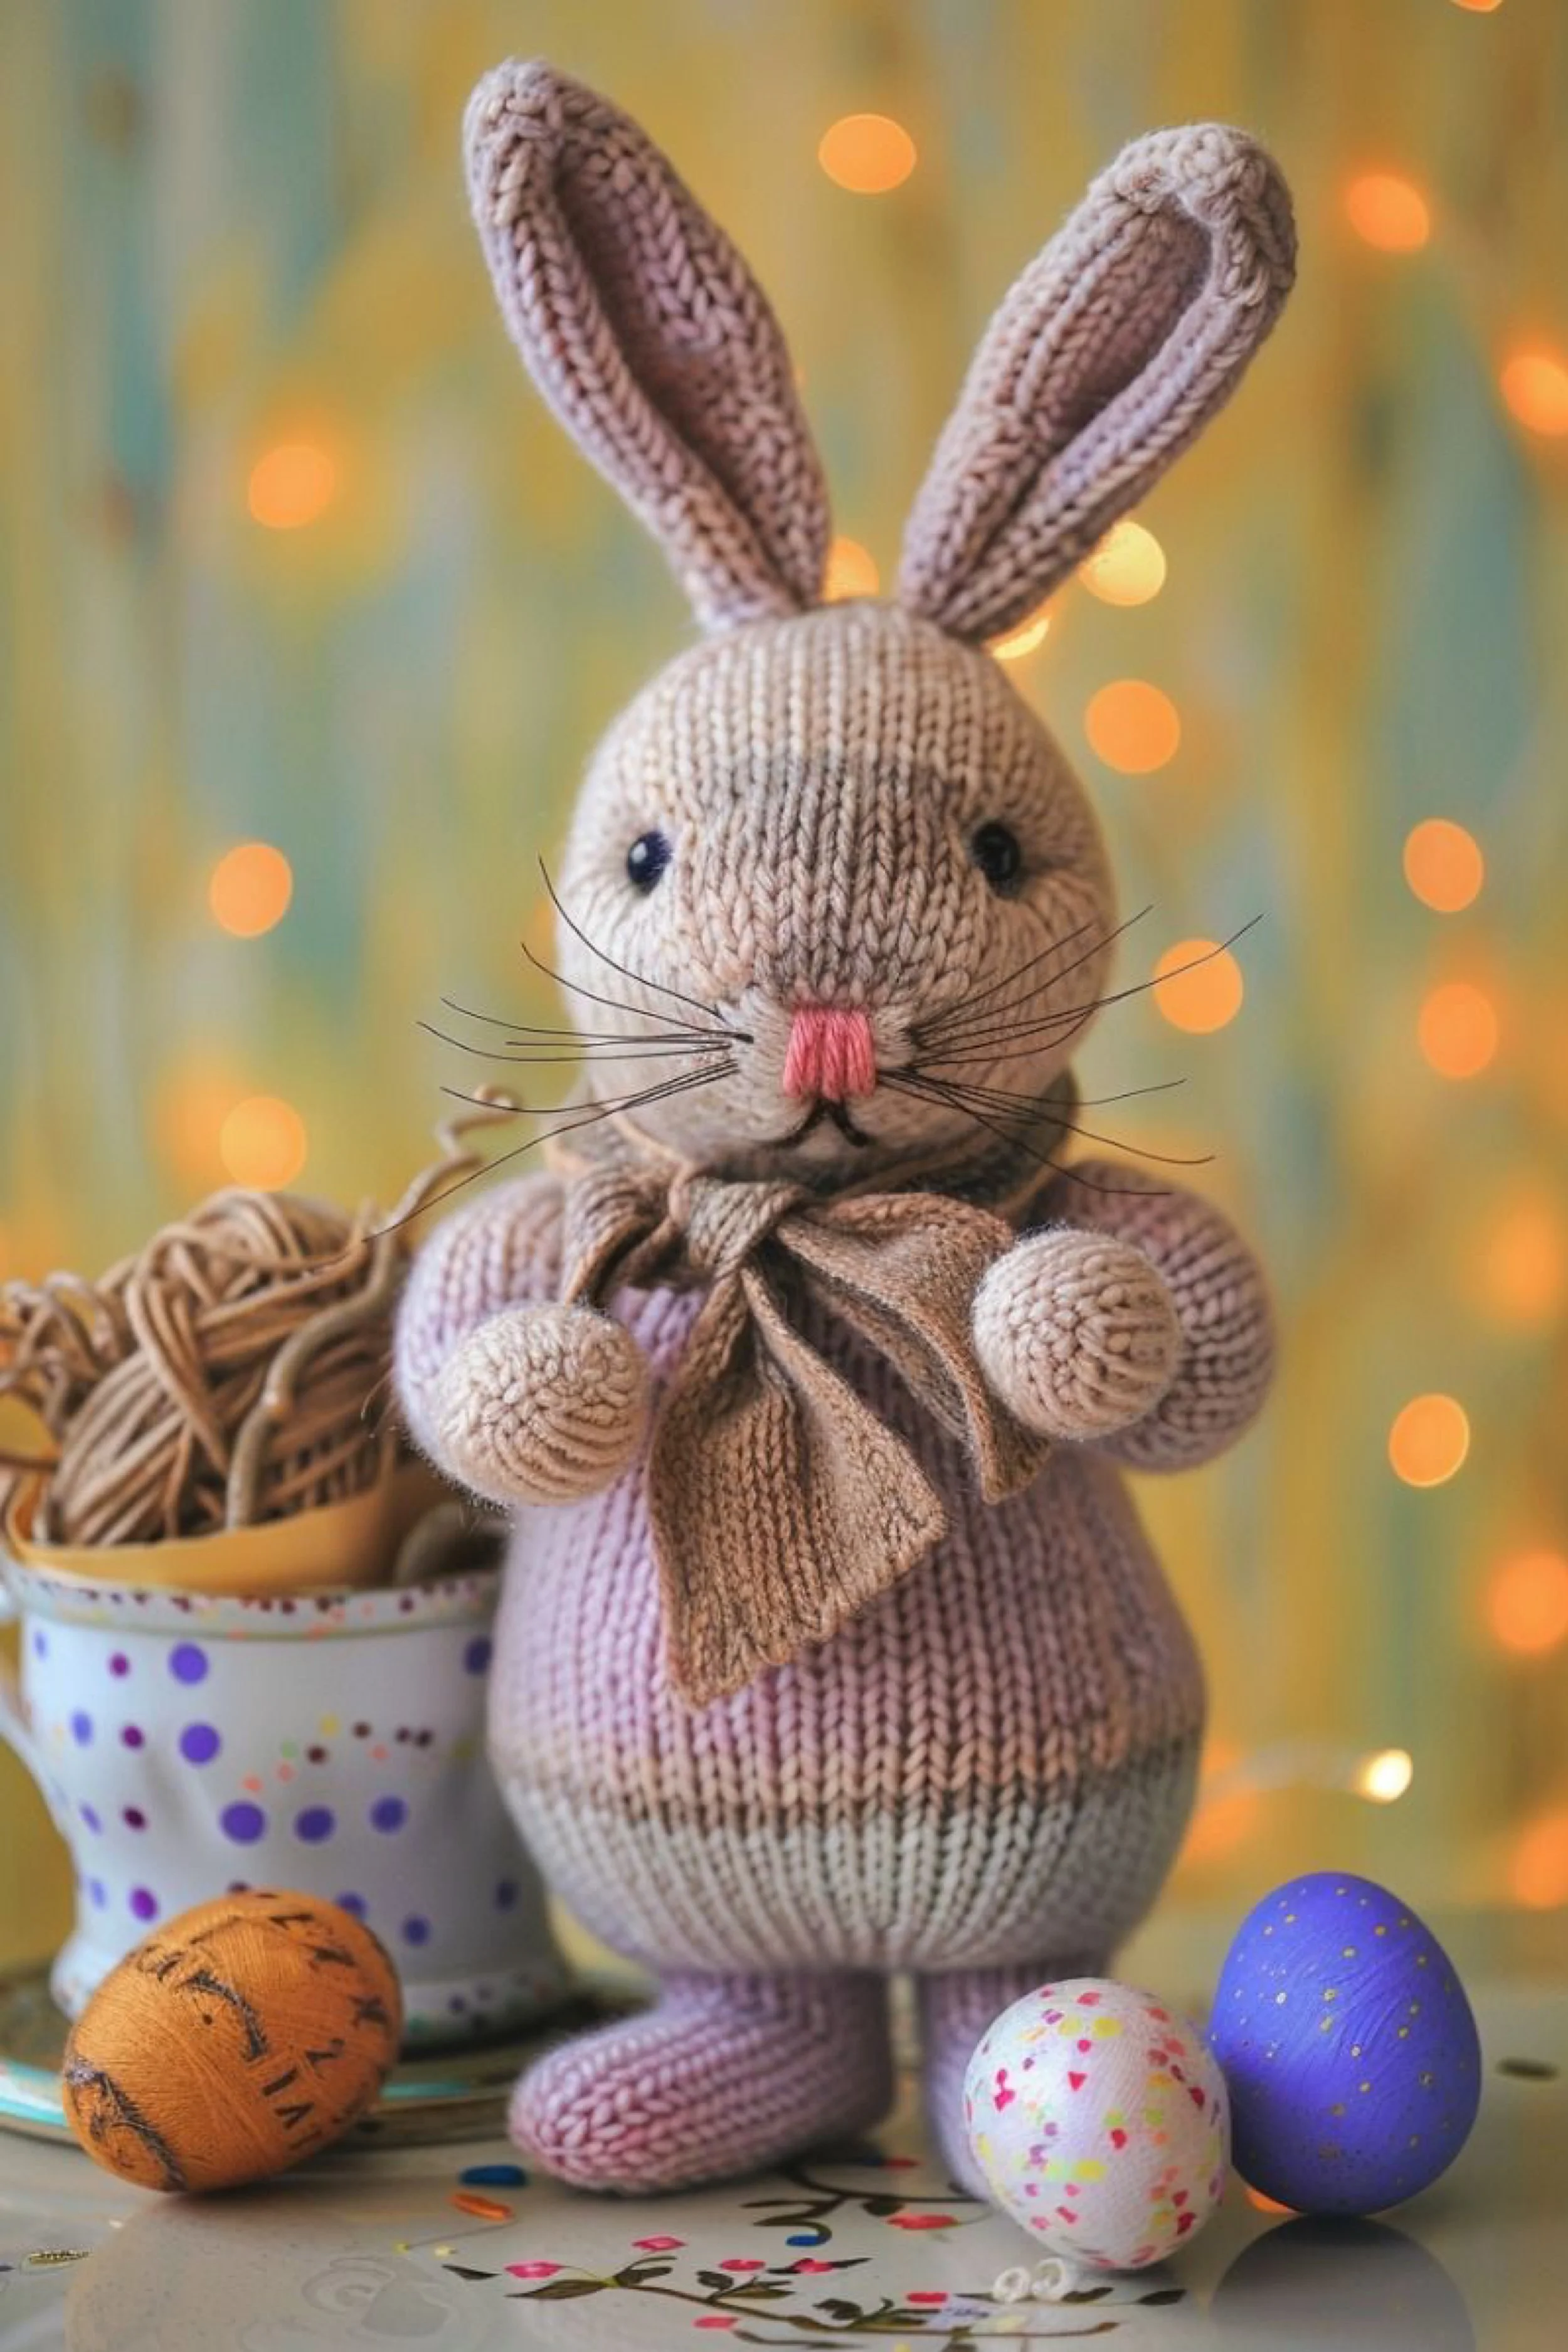
Soft Storybook Bunny Knitting How To Guide
What you’re making
You’re making a round bellied standing bunny with soft lilac shading, a small neck scarf, and simple stitched features that feel playful and handmade. This version captures the look of a beginner friendly knitted toy but still reads polished because of the neat shaping, tall ears, and charming Easter styling around it. The finished bunny looks right at home with painted eggs, yarn bowls, and twinkle light spring decor.
Materials + tools list
- DK yarn in pale beige, blush lilac, and soft cream
- Optional self striping pastel yarn for gentle lower body color changes
- Small amount of pink yarn for the nose
- Fine black thread or dark brown thread for whiskers and mouth
- Black safety eyes or small onyx beads
- Polyester stuffing
- Double pointed needles or magic loop circular
- Stitch markers
- Tapestry needle
- Small scissors
- Row counter
- Light woven ribbon, knit scarf strip, or tiny fabric square for neck scarf
- Decorative eggs for styling
- Yarn bowl or teacup for display, optional
Finished size + customization notes
This bunny can be made in two size directions. Use DK yarn for a bunny around 9 inches tall, or use worsted yarn on a slightly larger needle for a 12 inch statement version. The body can be knit in one color or softly shaded from cream at the head into blush or lilac at the body, just like the photo. You can make the scarf from matching knit fabric for a seamless look or use a contrasting woven ribbon for a more styled finish.
Step by step instructions
Decide whether you want a one piece body and head or a two piece build. For rounded standing bunnies, a one piece body often creates the smoothest line from belly to head, while separate pieces allow easier adjustments. Both will work. This guide describes a mostly one piece version because it helps maintain the plump vertical silhouette in the image.
Begin at the feet. Cast on a small number of stitches for one foot and work in the round. Increase until you have a softly rounded foot shape. Knit several rounds even, then decrease slightly into the ankle. Repeat for the second foot. Keep careful notes so both legs match.
Work the legs upward. These legs are shorter than the cardigan bunny legs, and the body starts to widen sooner. Knit plain rounds until each leg reaches your planned height. Stuff the feet firmly and the legs lightly. If the feet feel floppy, add a touch more stuffing or make the first few rounds with a smaller needle.
Join the legs to make the body. Place both leg sets on one needle and connect with a small bridge of stitches if needed. Knit around continuously. On the first few body rounds, increase a few stitches evenly to create the lower belly. You should now see the shape shifting from two small tubes into one rounded trunk.
Shape the body into a soft egg like form. Increase gradually over several rounds, then work plain until the widest area feels generous. The photo shows a bunny that is wider in the lower body and narrower at the chest, almost like an egg balanced on two small feet. Keep checking from the front. If yours looks too cylindrical, add more belly increases.
Add pastel shading. If you are using separate colors, begin with cream or pale beige at the head area and blend into blush lilac through the torso. The sample image has very soft transitions, so avoid hard stripes. You can alternate rounds between two shades or hold one neutral strand constant while swapping the second strand.
Narrow into the chest and neck. Once the body reaches the fullest point, work a few decrease rounds spaced out every third round. This creates a gentle shoulder area. Stuff the lower body quite firmly. The upper area should remain slightly softer so the bunny keeps a cuddly look.
Continue directly into the head. Increase again to form the head circumference. Knit several rounds plain to build the cheeks and forehead. Position stuffing so the muzzle has a bit more fullness than the crown. A visual checkpoint: the bunny should now have one flowing shape from feet to body to head, with no harsh seam lines.
Insert the eyes. Place them symmetrically and test the expression before locking them in. Because this bunny has whiskers, the eyes can sit a little farther back from the muzzle than on the first bunny. That spacing gives the face more depth.
Shape the muzzle. Use your stuffing placement first, then refine with sculpting if needed. Thread matching yarn from the lower face to the nose area and back again to create a tiny lift at the center. Embroider a pink vertical nose shape and a short mouth line beneath it. Keep it tiny. This bunny’s sweetness comes from restraint.
Add whiskers. Use fine dark thread, horsehair style whisker material, or even very thin jewelry cord. Pass a few strands through the snout and knot them securely inside. Trim them to equal lengths. If yours looks too dramatic, trim shorter. If they disappear into the yarn, use a slightly darker or stiffer material.
Close the head. Stuff firmly but evenly, then draw up the remaining stitches. Weave in the tail securely through the crown. Massage the shape gently with your fingers to round out any corners.
Knit the arms. Start from the paw end with a small rounded tip. Work the arm upward in a narrow tube. Lightly stuff the lower half only. The arms in the image are short and round and sit forward near the belly, almost as if the bunny is politely holding the air in front of it.
Attach the arms. Pin them on first. They should sit slightly high so the body still looks rounded below. Sew with a ladder stitch or whip stitch using matching yarn. Check both from the front and side before finishing.
Knit the ears. Use a simple leaf pattern. Cast on a modest width, increase along the edges, knit the center section, then decrease to a rounded point. For the image look, make the ears a little thicker or knit each ear as two pieces and seam them. This helps them stand tall and slightly open.
Sew the ears to the head with a folded base. Pin each ear so it stands upright with a subtle inward curve. The inner edges should be fairly close together. If they splay outward too much, take a couple of anchoring stitches from the ear base toward the top center of the head.
Add the scarf. Cut or knit a narrow strip long enough to wrap once around the neck and tie softly. The scarf in the photo is understated and natural toned, which helps the pastel body color remain the star. A tiny hand knit i cord tie or narrow gauze ribbon also works well.
Refine the body posture. Because this bunny is tall and round, it may need a little balancing help. Press the lower body gently on a flat surface. If the feet are well placed, the bunny will stand or lean attractively. If it rolls, shift stuffing lower or tack the feet slightly farther apart.
Introduce Easter styling elements. The image includes eggs and a yarn cup nearby, giving the bunny a craft room spring mood. You can knit tiny eggs as companion props, place the bunny beside a bowl of yarn, or set it in front of soft lights for a magical display.
Final quality check. Look at the bunny from all sides. You should now see a softly shaded, rounded rabbit with tall upright ears, neat whiskers, a tiny nose, and a cozy neck tie. If the face feels too flat, add more cheek stuffing next time. If the belly feels too huge, reduce a few increase rounds through the midsection.
Troubleshooting
If the lower body wrinkles, it usually needs more stuffing. Smooth fabric depends on even filling.
If the head seems too small for the body, add two extra rounds at the widest head point before decreasing.
If the ears flop backward, sew a small tack from the ear back to the head or make the ears double layered next time.
If the color blend looks stripy instead of soft, alternate shades every round for a few rounds to feather the transition.
If the bunny tips forward, the feet may be too small or too close together. Reposition them slightly apart for better balance.
Finishing details
Steam the ears lightly and let them cool while pinned in shape. Trim any whisker strands that feel too long or uneven. Add a hidden stitch under the scarf so it stays nicely angled. For a more polished finish, line the inside of each ear with a slightly lighter shade using duplicate stitch or a knitted insert. Optional upgrades include a tiny fabric pocket on the scarf, hand painted wooden eggs placed beside the bunny, subtle metallic thread woven into the scarf edge, or a miniature name tag tied at the neck.
Shop Similar
- Pastel DK yarn for knitted bunny and egg projects
- Magic loop circular needles for toy knitting
- Toy stuffing for small knitted animals
- Safety eyes and embroidery supplies for plush toys
- Natural ribbon and tiny scarf trims for dolls
Style It With
Lilac Ribbon Bunny Make It Yourself Tutorial
What you’re making
You’re making a plump seated bunny in soft lavender blush tones with a rounded body, tiny embroidered snout, and a statement ribbon bow at the neck. This design leans extra decorative, with a polished seated posture and a sweet spring palette that feels perfect for Easter tables, nursery shelves, or handmade basket gifts. The look is simple, but the elegance comes from careful proportions, very smooth stitching, and a pretty oversized bow.
Materials + tools list
- DK yarn in pale lavender, blush pink, cream, and heather gray
- Optional marled lavender yarn if you want an easier blended color effect
- Black safety eyes or embroidered black eyes
- Pale lavender or pink embroidery floss for the nose
- Matching yarn for facial sculpting
- Polyester toy stuffing
- Knitting needles sized to create a firm fabric
- Stitch markers
- Tapestry needle
- Row counter
- Scissors
- Grosgrain or cotton ribbon in lavender with tiny metallic flecks, optional
- Decorative pastel eggs for styling
- Small amount of fabric glue, optional, only if using a ribbon and the bunny is decorative rather than a child’s toy
Finished size + customization notes
This bunny works beautifully around 8 to 10 inches tall seated. The body should be generously rounded while the arms stay small and sweet. To make the exact pastel softness in the image, combine a neutral base yarn with pale lavender accents. You can create a more classic version by using oatmeal, cream, or dusty rose instead. The ribbon can be replaced with a knitted neck bow or tiny scarf if you want a fully fiber based finish.
Step by step instructions
Start by choosing the body shape. This bunny is more pear shaped and compact than the standing designs. Imagine a bottom heavy oval with a softly smaller head on top. The appeal comes from the big tummy, tiny paws, and upright ears. Keep that silhouette in mind through every shaping decision.
Knit the lower body in the round from the bottom center. Cast on a small number of stitches and increase quickly over the first several rounds to create a flat sitting base. You do not want a pointed bottom. You want a rounded pad that can rest on a shelf without rocking.
Build the belly. After the base is wide enough, continue increasing more slowly until the body reaches its fullest width. Knit a few plain rounds between increase rounds so the belly expands gradually instead of flaring sharply. If yours looks too cone like, you are increasing too quickly. Slow down and work more even rounds.
Add pastel depth. This image has a lovely pale lavender blush tone rather than obvious stripes. Alternate lavender and cream rounds, or hold a neutral strand with a pastel strand. If the lower body is slightly more gray lavender and the upper body slightly more blush cream, the final bunny will feel very close to the photo.
Begin narrowing toward the upper body. Once the belly is full and rounded, work several decrease rounds spaced apart by plain knitting. This should create a soft taper, not a sharp waist. Stuff the lower body firmly before the opening gets too narrow.
Close the body top or continue into the head depending on your preferred construction. Separate head construction makes it easier to perfect the face, so that is often the better choice for decorative bunnies. Finish the body and weave in the top tail, leaving a smooth surface for sewing.
Knit the head as a rounded sphere with slightly pronounced cheeks. Increase to the widest point, knit plain, then decrease. Use a little extra stuffing in the muzzle area and slightly less at the crown. This gives the face a gentle forward fullness.
Place the eyes. The image shows tiny black eyes set relatively wide on a smooth face. Mark their placement before inserting. They should sit low enough that the forehead looks generous and sweet. Eyes placed too high will make the bunny look surprised or severe.
Embroider the snout. Use matching or slightly lighter yarn to wrap the nose area horizontally, building a subtle muzzle pad. Then embroider a small lavender triangular nose on top. Add a single vertical line below it. This wrapped snout technique is especially helpful for reproducing the plush stitched look visible in the photo.
Sculpt the face if needed. Pass a strand of yarn through the face to create slight cheek definition or a central ridge. Pull gently. Because the snout wrapping already adds structure, only a little sculpting is usually needed.
Make the arms and legs. The paws on this bunny are rounded and compact. Start each with a small circular base, then knit a short tube. Stuff firmly enough that they hold shape, but not so much that they become rigid. The legs should be slightly larger than the arms and broad enough to sit forward.
Assemble the limbs on the body. Sew the legs low and toward the front. The feet should angle inward just a touch. Sew the arms at the sides of the upper body so they rest near the belly. If one arm looks higher, remove and redo it. Symmetry matters a lot on simple toy designs like this.
Knit the ears. These ears are tall and gently tapering, with a soft cupped center. Work flat in a leaf shape and make two pieces per ear if you want extra loft. Another good option is to knit one piece and then single crochet or whip stitch around the edge to create a firm outline. The image ears are very tidy and stand quite well.
Sew the ears on close together. Pin them first so you can check the personality of the bunny. Ears closer together feel younger and sweeter. Ears too far apart can make the bunny look more like a hare. Fold the lower inch of each ear slightly before sewing to create that realistic inward cup.
Attach the head. Place it securely on the body with the face centered over the belly. Slightly tilt the head upward for a more charming expression. A downward head angle can make the bunny seem sleepy rather than bright and decorative.
Add the ribbon bow. This is one of the main style elements in the image. Choose a lavender or purple ribbon with tiny speckled or metallic details if you want to echo the photo exactly. Tie a generous bow and trim the tails. If the bunny is only for decor, you can put one tiny dot of fabric glue at the knot to keep it perfect. For a toy, use a couple of discreet stitches instead.
Check the seat. Sit the bunny on a smooth surface. If it tips backward, add a little extra stuffing to the lower front belly or bottom. If it tips forward, the feet may need to be sewn slightly farther outward. You should now see a compact, plump bunny that sits in a very display friendly way.
Refine the surface. Because pale yarn shows irregularities easily, go over every seam and weave in ends carefully. Gently smooth the knitting with your fingers. If one ear edge looks jagged, block it lightly with steam and reshape while warm.
Add optional seasonal details. The image includes pastel eggs around the bunny, and that styling makes the project feel immediately Easter ready. You can also add a tiny hidden magnet in one paw and make a removable little egg accessory, or stitch a miniature felt flower beneath the bow.
Final visual checkpoint. Your bunny should now have a rounded body, neat upright ears, small sweet eyes, a softly wrapped muzzle, and a crisp ribbon bow that gives it a polished spring gift look. If your version feels too plain, the easiest upgrades are better ribbon, cleaner face shaping, and slightly taller ears.
Troubleshooting
If the snout looks bulky, use fewer wrapped strands and keep the nose embroidery smaller.
If the bow slips around the neck, anchor it with two tiny stitches at the back.
If the bunny body looks too narrow, increase more through the belly before tapering.
If the ears lean to one side, block them before attaching and use a folded base pleat to control direction.
If the head seam shows, sew it with mattress style hidden stitches using the exact same yarn as the head.
Finishing details
Steam block the unstuffed ears before final sewing for the cleanest finish. Weave in tails deeply through stuffed areas to keep them secure and invisible. For an even more luxe heirloom finish, line the back of the ribbon tails with a tiny dab of fray check or neatly fold and stitch the ends. Optional upgrades include a matching bow on one ear, a tiny pom pom tail, speckled painted wooden eggs stitched into the display, or a handmade gift tag tied under the neck bow.
Shop Similar
- Lavender and blush yarn for heirloom bunny knitting
- Grosgrain ribbon with gold flecks for craft bows
- Stuffing and doll making tools for knitted toys
- Safety eyes for small plush rabbit projects
- Pastel marled yarn for spring toy knitting
Style It With
Patchwork Scarf Bunny Step by Step Tutorial
What you’re making
You’re making a softly striped knitted bunny with a rounded sitting body, long upright ears, and a cheerful little patchwork style scarf in spring shades. This version feels the most cottagey of the group, with warm cream, pale yellow, soft blue, and blush tones working together in a gentle vintage palette. The final bunny looks wonderful in kitchen spring decor, on open shelves, or as part of an Easter breakfast table centerpiece.
Materials + tools list
- DK yarn in cream, pale yellow, dusty blue, blush pink, and warm beige
- Optional self striping pastel yarn for the body
- Small amount of orange or peach embroidery floss for the nose
- Black thread for the mouth
- Black safety eyes or embroidered eyes
- Polyester stuffing
- Double pointed needles or magic loop circular needles
- Stitch markers
- Tapestry needle
- Small scissors
- Row counter
- Extra yarn for a tiny striped scarf
- Lightweight pellets in a small fabric pouch, optional, for weighting the base
- Decorative eggs and teacup styling props, optional
Finished size + customization notes
This bunny looks best around 9 to 11 inches tall seated. The body is rounded and compact, while the scarf brings most of the color story. If you want a more muted version, keep the bunny neutral and make only the scarf striped. If you want a more whimsical version, stripe the entire body in soft blocks of color. A slightly larger bunny can be made by using worsted yarn, but keep the needle size tight for a clean toy fabric.
Step by step instructions
Choose your palette thoughtfully. The charm of this bunny comes from the delicate mix of spring colors that still feels calm and collected. Lay out cream, yellow, blue, and blush yarns together before you begin. If one shade looks too bright, replace it with a dustier tone. You want butter yellow, faded robin’s egg, and pale blush rather than bold Easter brights.
Begin the body at the base. Cast on a small circle and increase into a rounded sitting bottom. This bunny has a very settled seated pose, so spend time getting the base right. A slightly flattened bottom will help it sit better than a fully round sphere.
Work the lower body in the round. Increase gradually until the belly is full. You can either keep the body one neutral shade or begin subtle color blocks at the lower half. For the image look, the body reads mostly cream with softly blended pastel banding. Work several rounds in each shade so the changes feel intentional and cozy, not busy.
Shape the torso. After reaching the widest point, knit plain for a few rounds, then decrease slightly toward the chest. This bunny is broad through the middle but still tidy at the top. Stuff the base firmly as you go. If you want extra stability, insert a tiny weighted pouch now, fully enclosed in stuffing.
Knit the head separately. A separate head makes it easier to place the face and ears cleanly. Cast on, increase to a rounded circumference, knit even, then decrease. Keep the face area very smooth. The photo bunny has minimal features and a centered, tiny nose line.
Add the eyes. Position them evenly and quite small compared to the head size. Bigger eyes would shift the mood from heirloom bunny to cartoon bunny. This design needs just enough eye detail to feel alive.
Embroider the nose. Use a few satin stitches in peachy orange or soft carrot pink right at the center front. Add a short black vertical mouth line below. Keep the nose narrow and petite. A large triangle will overpower the face.
Create the muzzle shape. Use a little extra stuffing in the lower face. If you want slightly fuller cheeks, pass a strand of matching yarn through the muzzle sides and tug gently inward. The face should stay soft and understated.
Knit the ears. Make them tall, narrow, and symmetrical. The ears in the photo stand close together and rise fairly straight. Work them flat in leaf shapes, then seam or fold slightly at the base when attaching. If you want a more deluxe finish, make an inner ear piece in a slightly warmer blush beige and sew it inside.
Knit the arms and feet. The paws are compact, almost pebble like. Begin each limb with a rounded tip and work short tubes. Stuff the feet more firmly than the arms. For a seated bunny, the front feet can be a touch larger than you expect because they become an important visual feature when the bunny is posed.
Assemble the body. Sew the head to the torso, then attach the arms high enough that they do not drag visually. Attach the legs low on the front. Pin every piece first. You should now see a sweet, simple rabbit silhouette with lots of charm even before adding the scarf.
Make the scarf. This is the signature detail for this version. Cast on a narrow strip and work simple knit rows in alternating blocks of pale yellow, dusty blue, blush, and cream. A tiny ribbed texture or garter stitch works well because it lies flat and looks handmade. Keep the scarf long enough to wrap once and drape with small tails.
Add gentle scarf texture. If you want the scarf to feel more patchwork, work each color section in a slightly different texture, such as knit, purl ridge, or mini rib, but keep the transitions soft. Another beautiful option is duplicate stitch tiny patches after knitting the base scarf in cream.
Wrap and secure the scarf. Tie it loosely at the front or side. The image suggests an easy, cozy knot rather than a big bow. Stitch it in place with one or two hidden stitches if needed. The scarf should hug the neck but not squeeze the head upward.
Refine the ears and face balance. With the scarf on, the bunny can sometimes look shorter in the neck. If that happens, angle the ears slightly higher and trim the scarf tails shorter. These tiny styling choices change the whole personality of the toy.
Check the body color balance. If the bunny looks too striped or busy, make the scarf more neutral and keep the body mostly cream. If the bunny feels too plain, add a small pastel patch to one arm or a tiny contrasting tail.
Add the tail if desired. A small stuffed pom or tightly wound yarn pom pom stitched at the lower back makes the bunny feel extra finished. Keep it modest in size so the seated posture still works.
Evaluate the seated pose. Sit the bunny near your chosen display props, such as a teacup, daffodils, or decorative eggs. The bunny should hold its own visually without slouching. If it leans to one side, reopen a small seam and redistribute stuffing.
Final styling details. The photo gives warm, kitchen table, collected Easter morning energy. Set your bunny beside eggs in a bowl, floral china, or soft yellow flowers to really match that mood. The handmade scarf can become the bridge that connects the bunny to the rest of your decor palette.
Final visual checkpoint. You should now see a softly rounded cream bunny with neat upright ears, a tiny warm nose, and a cheerful striped scarf that adds charm without overwhelming the clean knit shape. If yours looks too bulky, reduce stuffing in the upper torso. If it looks too sparse, make the scarf slightly wider or add one more color block.
Troubleshooting
If the scarf curls too much, work it in garter stitch or block it lightly before tying.
If the body stripes create visible jogs, begin new colors at the back and smooth the transition by carrying yarn neatly.
If the bunny slumps, the lower body likely needs more stuffing or a small weight pouch.
If the ears lean apart, sew them closer together at the base with a couple of anchoring stitches.
If the facial embroidery feels uneven, remove it and redraw placement with a washable fabric pencil before stitching again.
Finishing details
Steam block the scarf and ears before final assembly for the cleanest finish. Weave in tails through the interior of the stuffed body so nothing loosens over time. Optional upgrades include a tiny removable scarf pin, duplicate stitch dots on the feet, a little fabric lined egg bowl prop for display, or a companion mini egg ornament sewn to one paw. For a giftable heirloom look, tuck the finished bunny into a pastel gift box with tissue and a handwritten tag.
Shop Similar
- Pastel self striping yarn for knitted bunny toys
- Cream DK yarn for heirloom stuffed animal knitting
- Toy stuffing and weighting pellets for handmade plush
- Small knitting needles for amigurumi style toys
- Embroidery floss set for toy facial details
Style It With
A Gentle Ending That Stays With You
By the time you reach the end of this collection, something subtle has shifted.
It is not just that you have made five bunnies. It is that you have begun to see how small creative decisions shape the feeling of a piece. You have seen how a slightly taller ear can make a bunny feel elegant instead of playful. How a softer yarn can turn something structured into something almost cloud like. How a simple ribbon or scarf can carry the entire personality of a design.
And more than that, you have created objects that hold presence.
These are not projects that disappear into a drawer. They sit out. They become part of your space. They catch light differently throughout the day. They make a shelf feel styled instead of filled. They invite a second glance. They quietly say that someone took the time to make something by hand.
That is what makes this kind of craft so lasting.
Long after the season passes, these bunnies do not feel out of place. The soft colors, the gentle shapes, the natural materials all allow them to blend into everyday life. They move from Easter decor into year round charm without losing their relevance. A bunny near a stack of books. One tucked into a nursery corner. One sitting beside a vase that changes with the seasons.
They become part of the environment.
And if you decide to make them as gifts, they carry something even more meaningful. They hold time. Effort. Intention. The kind of care that cannot be replicated by anything mass produced. People notice that. They keep pieces like this longer. They remember where they came from.
As you look at your finished collection, you may notice that no two are exactly alike. Even if you followed the same steps, your tension, your color choices, your tiny adjustments have made each one your own. That is not a flaw. That is the point.
This is not about perfection.
It is about creating something that feels alive in a quiet, handmade way. Something that softens a room. Something that marks a season. Something that, over time, becomes part of your story.
And if you find yourself already imagining a sixth bunny, or a variation you want to try, or a completely new direction inspired by these designs, then you have arrived exactly where you are meant to be.
In that place where making becomes part of how you live.