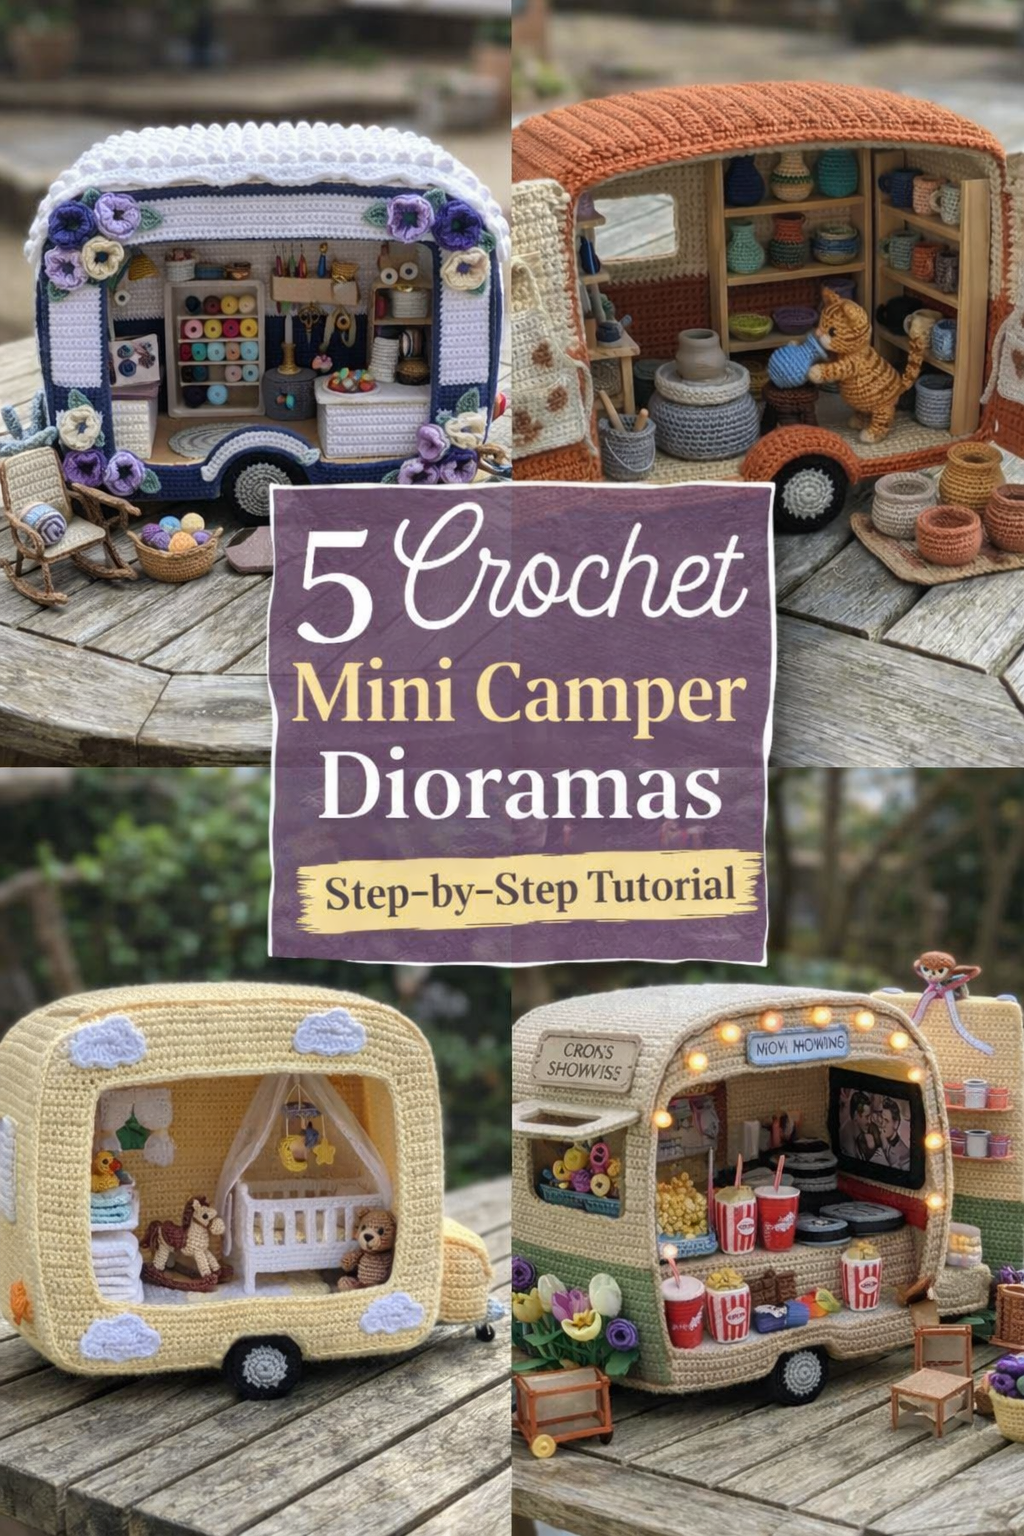
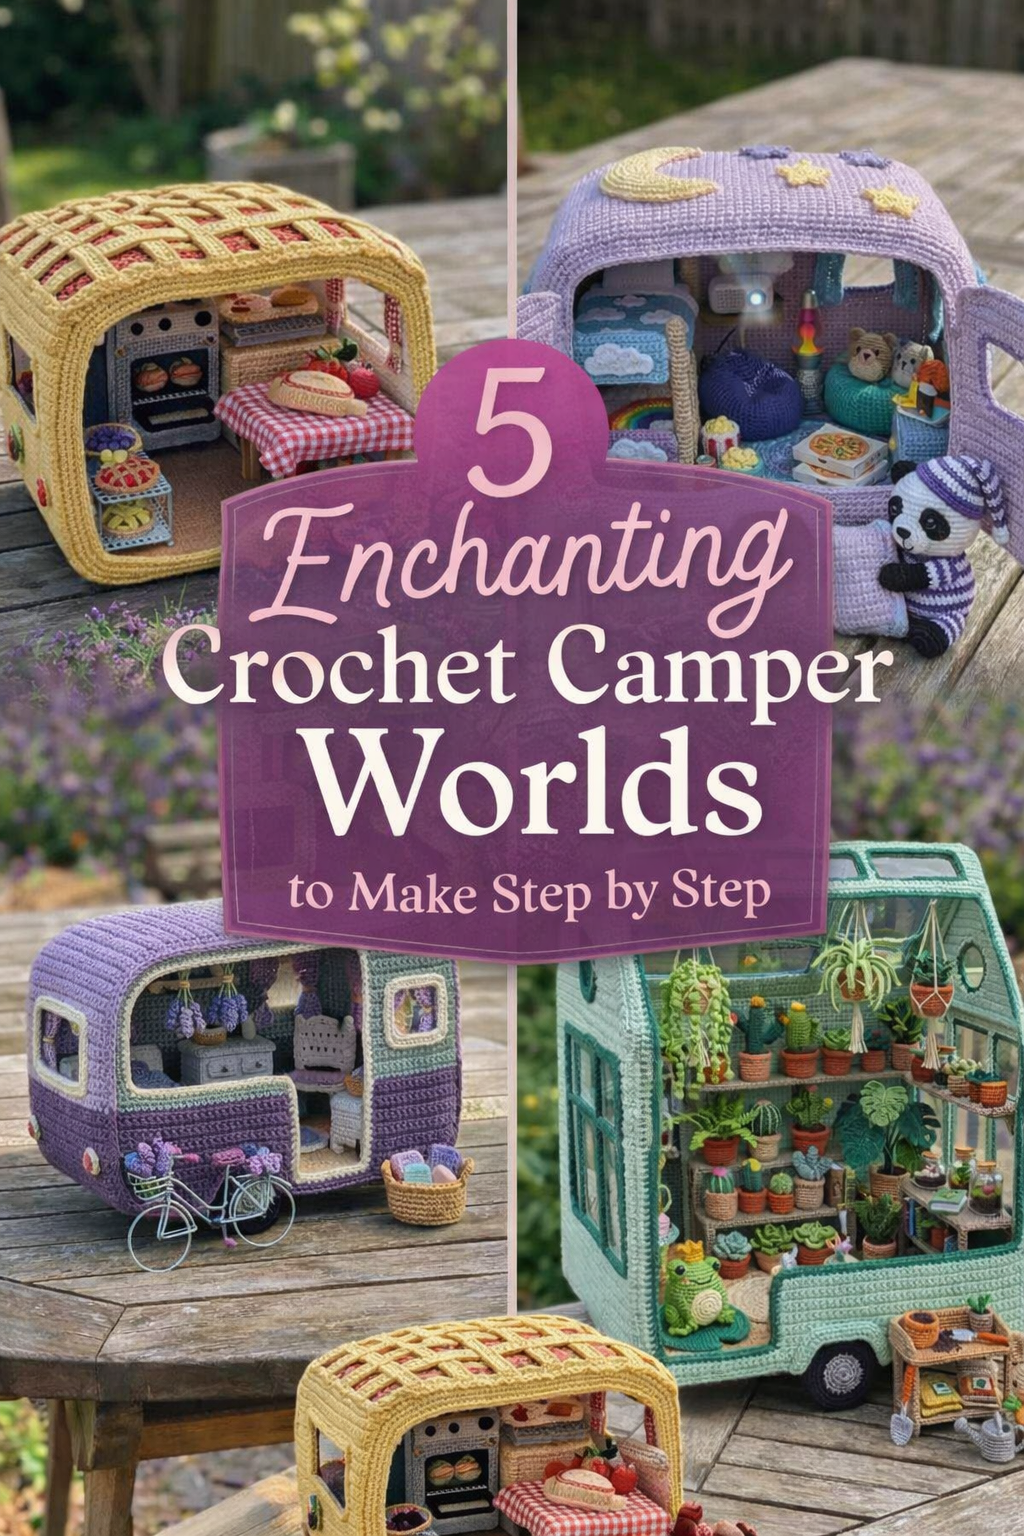
5 Storybook Crochet Caravans With Whimsical Step by Step Tutorials
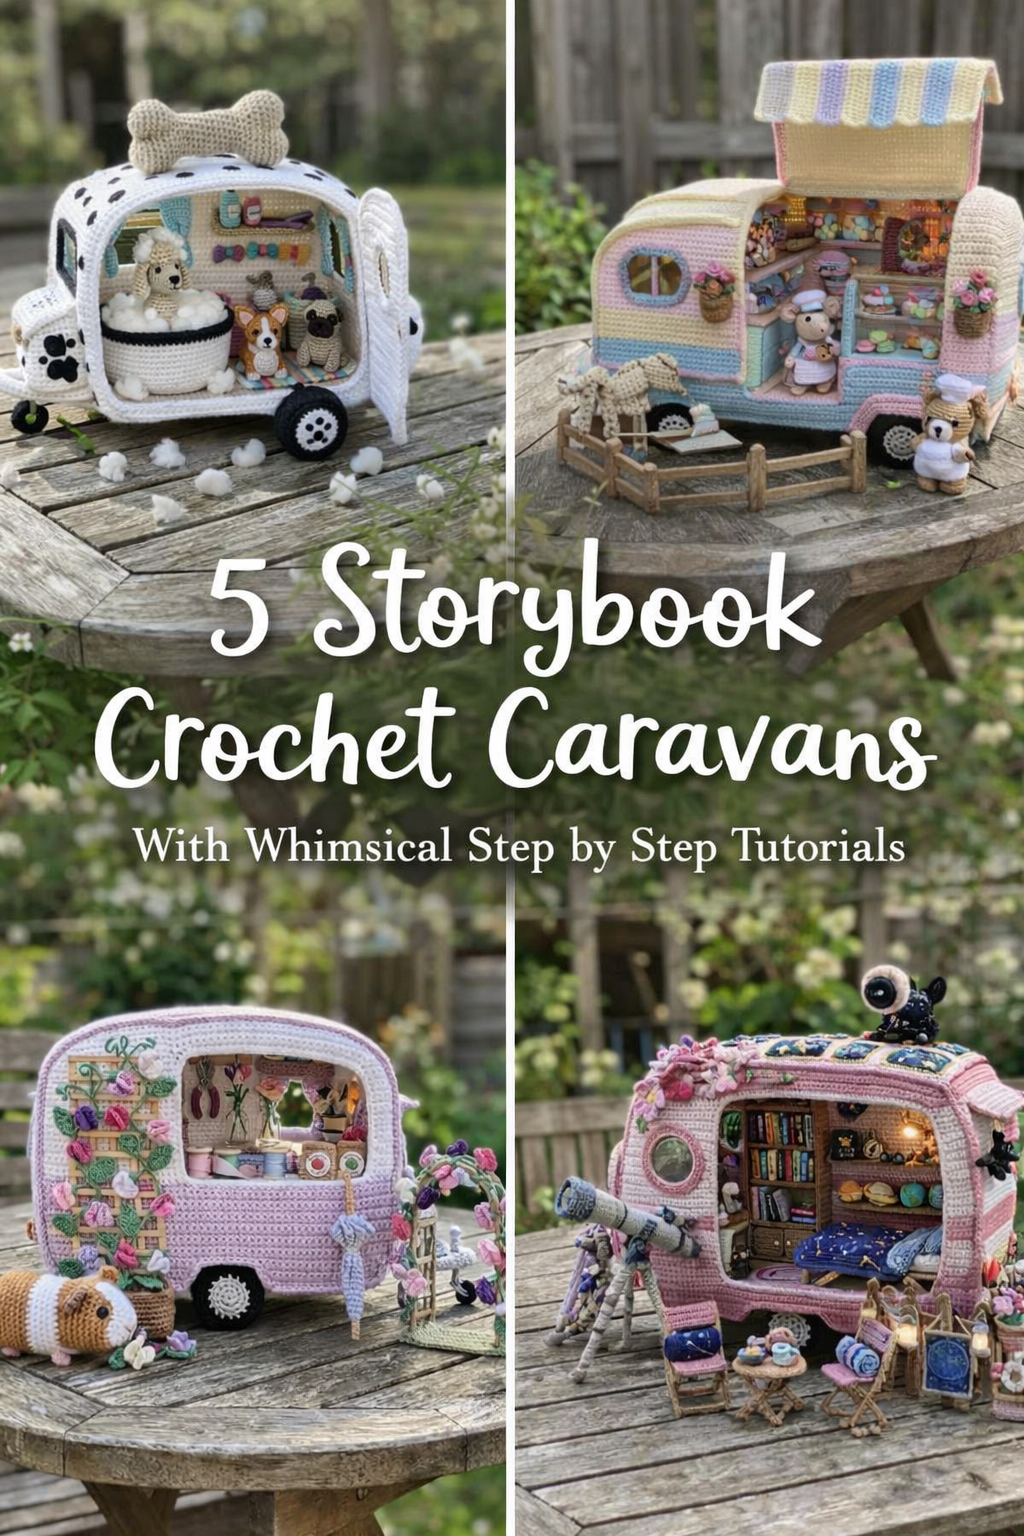
There is something especially magical about a crochet project that feels like an entire little world, and these miniature caravans absolutely do that. Each one turns yarn into a tiny story, from a puppy spa on wheels to a rose covered flower trailer, a cozy sheep retreat, a pastel bakery van, and a dreamy stargazing camper. They are playful, detailed, and full of personality, but they also show just how far crochet can go when you combine structure, amigurumi, and decorative styling in one project.
This collection is perfect for makers who love building scenes as much as they love stitching them. You can treat each caravan as its own standalone display piece or use the tutorials as inspiration to create your own themed mini trailer with custom colors, animals, props, and tiny interior details. Whether you are drawn to soft neutrals, candy colored pastel work, floral embellishment, or whimsical storytelling, these caravan tutorials are designed to help you recreate the charm of the original looks while still leaving plenty of room for your own creative spin.
Puppy Spa Caravan Step by Step Tutorial
What you’re making
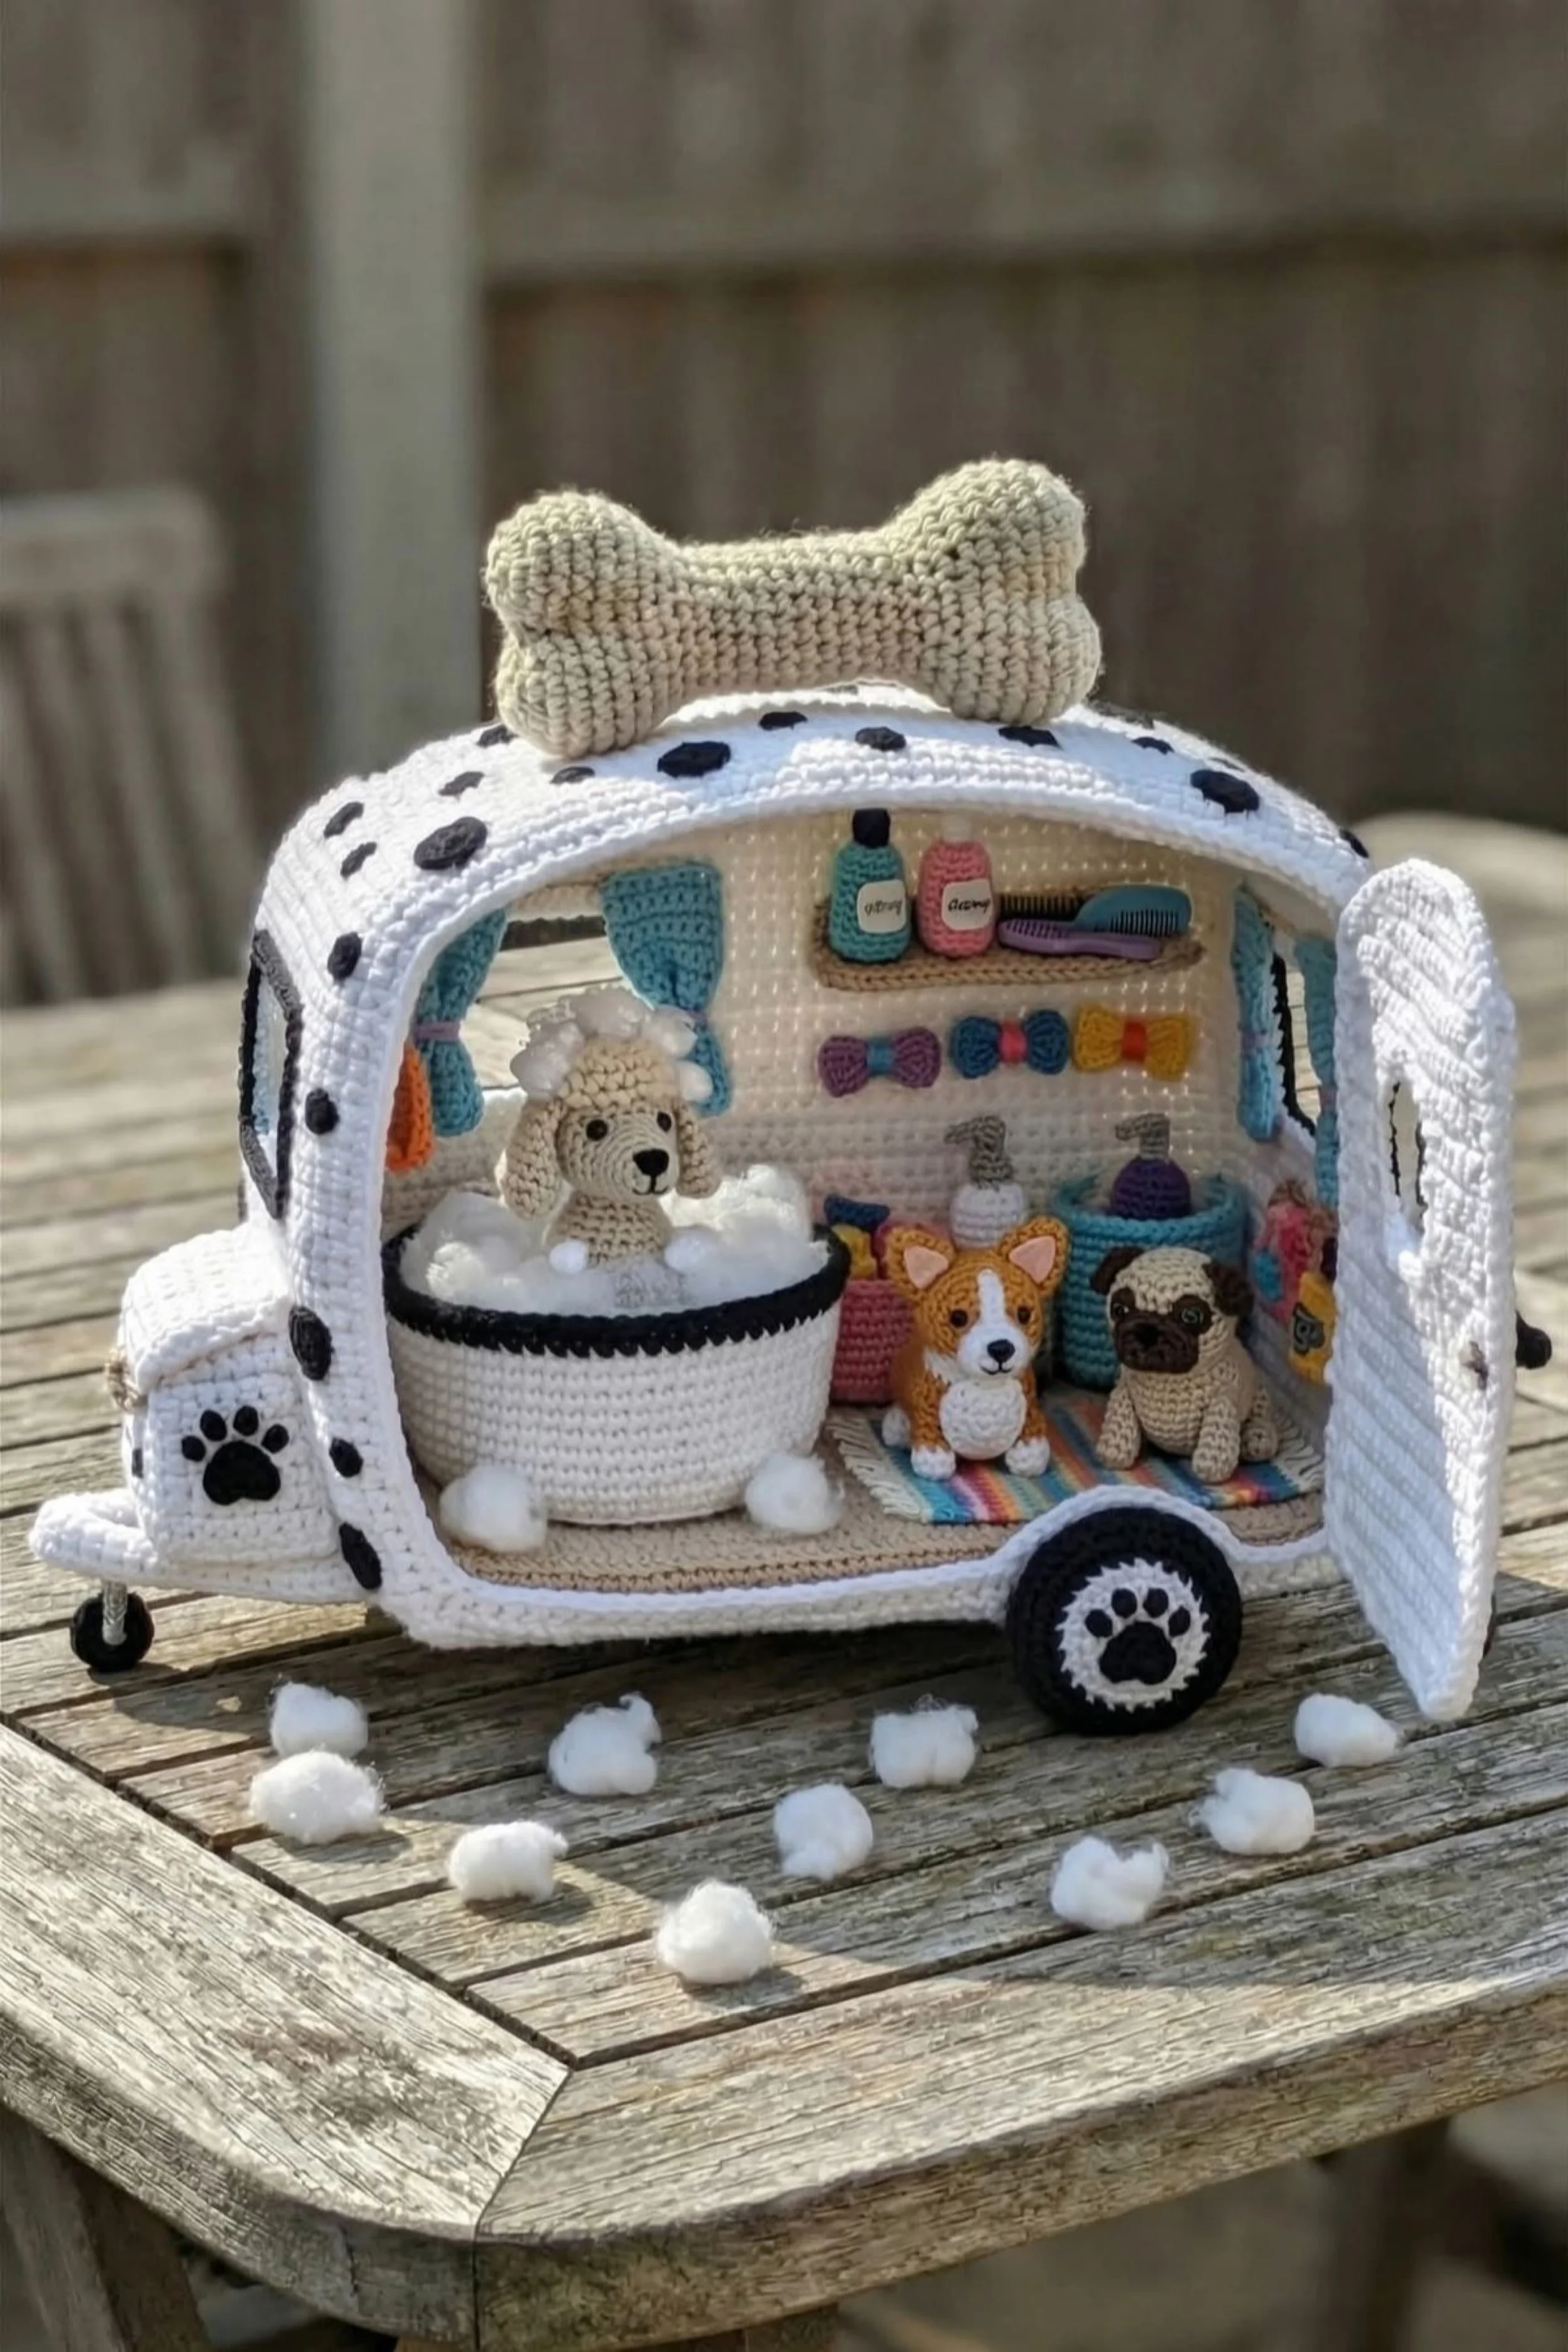
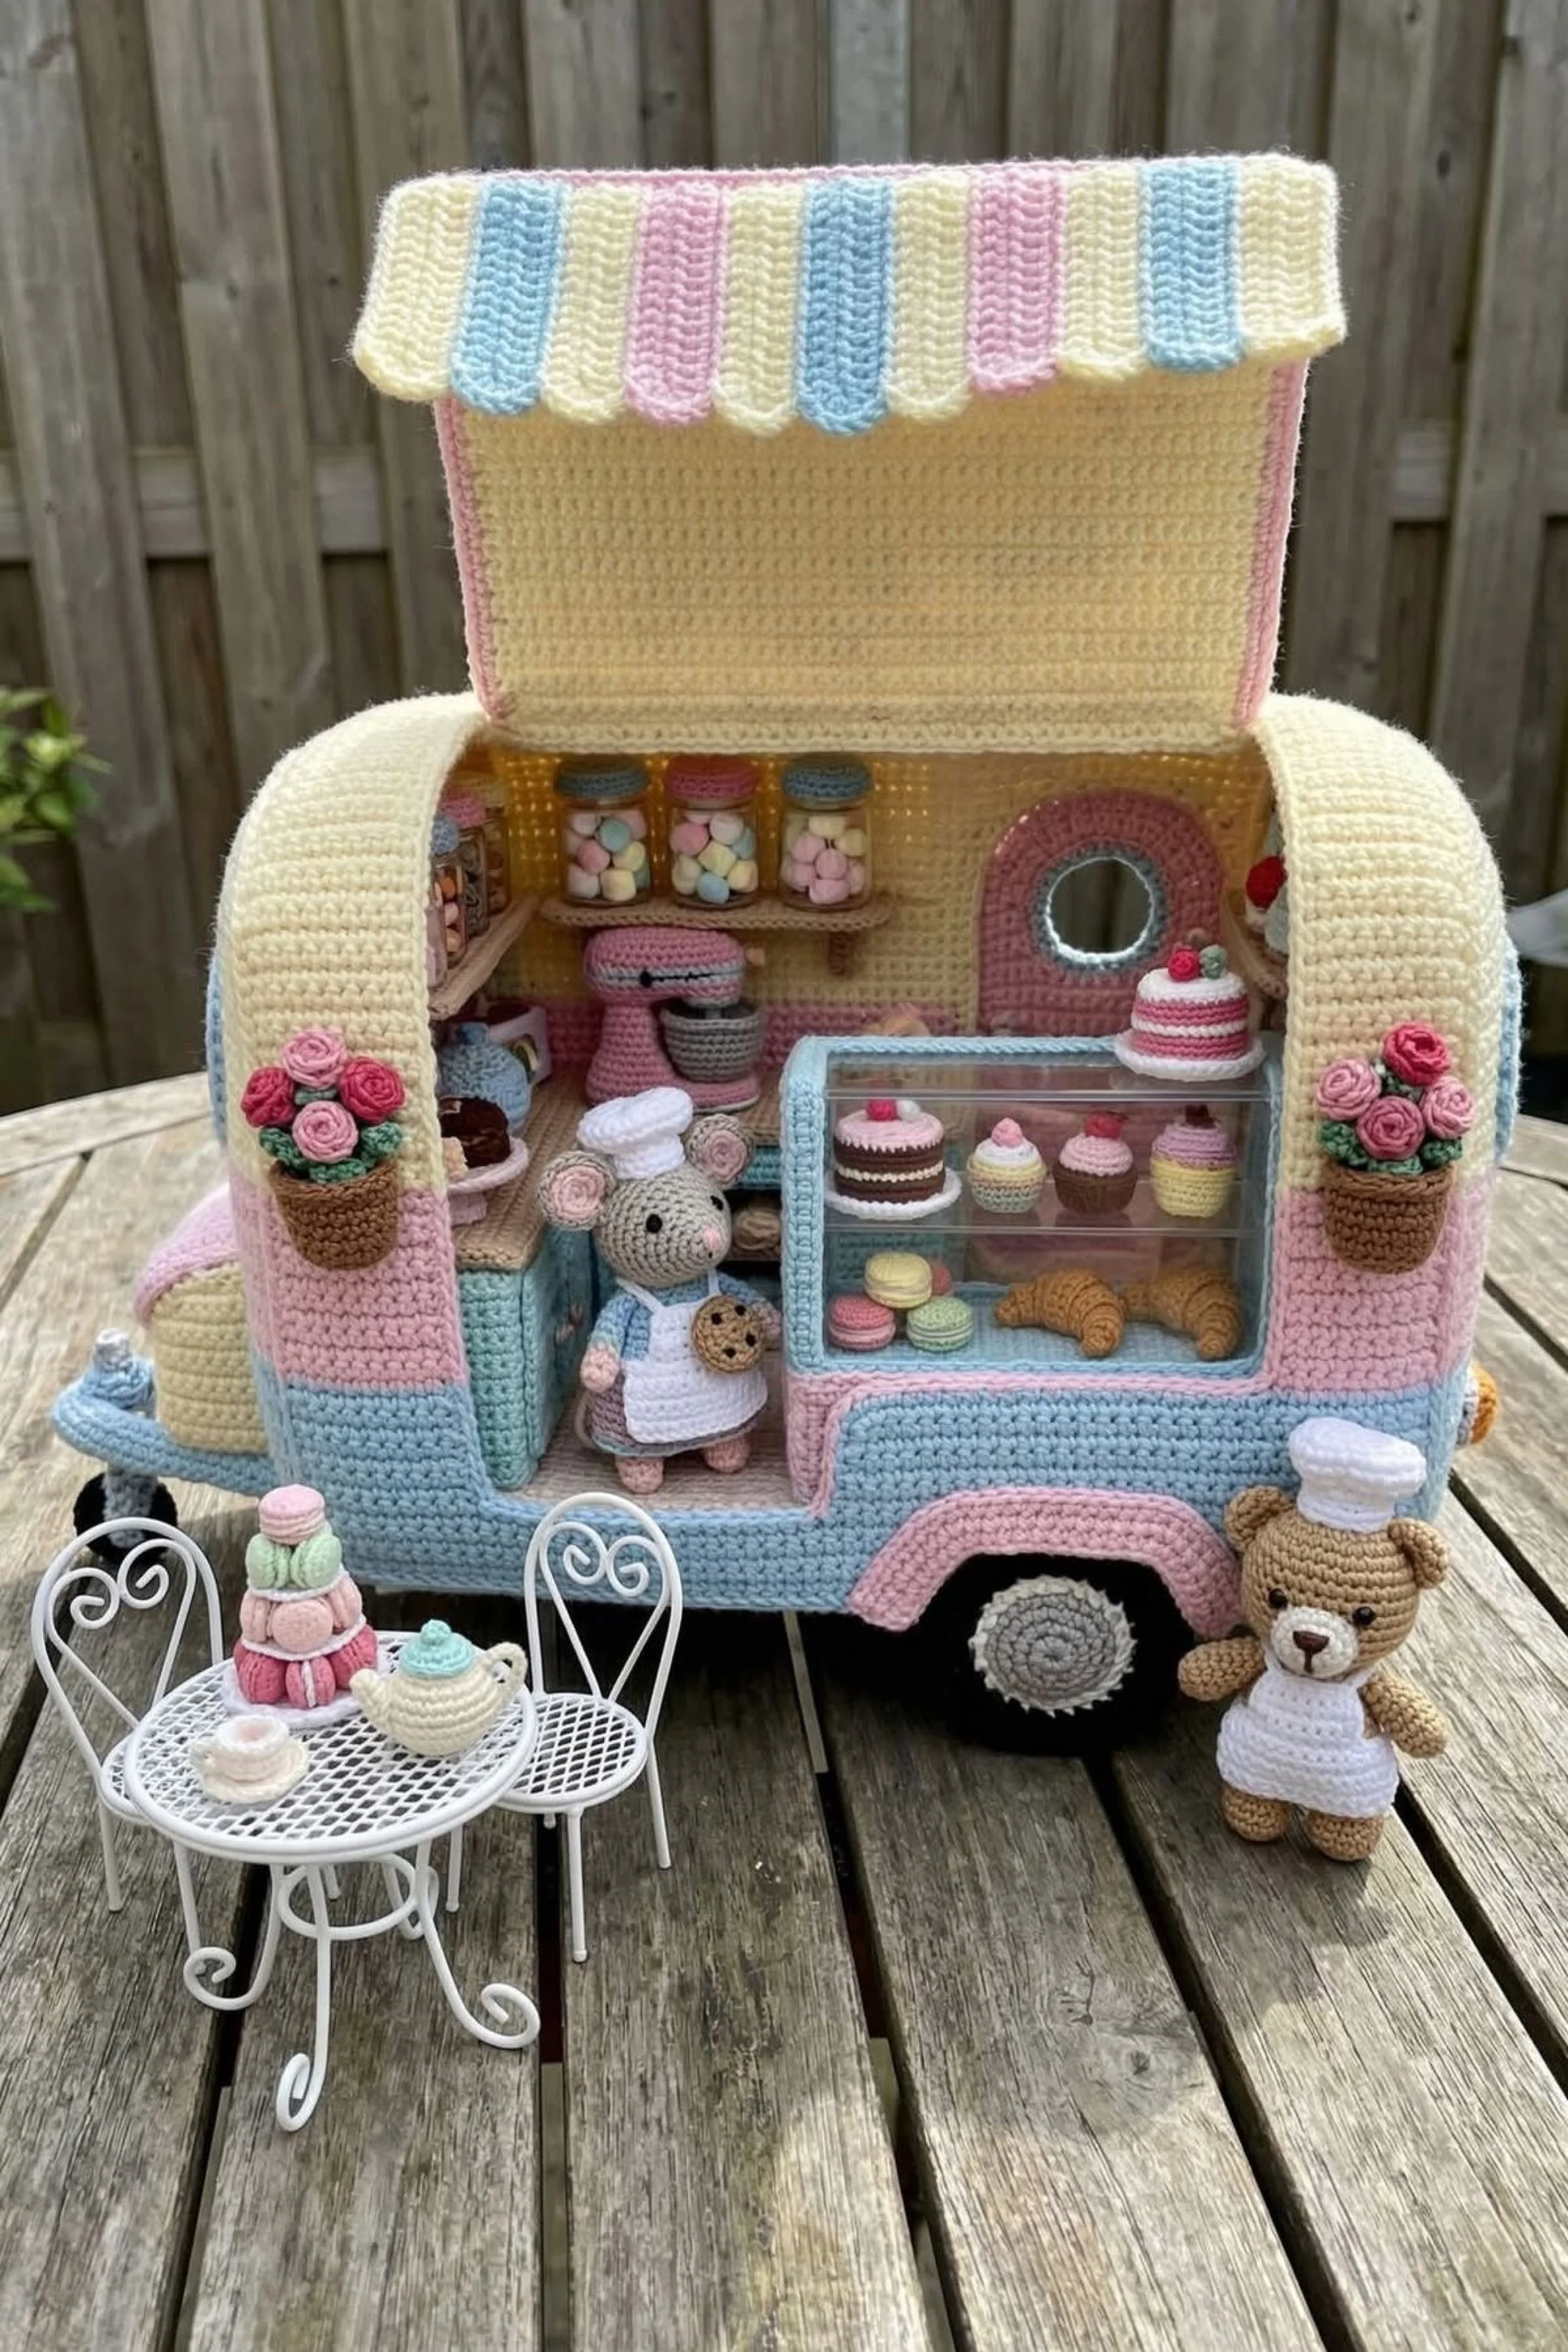
You are making a crocheted miniature pet grooming caravan that looks like a tiny white spotted camper turned into a dog bath and beauty salon. The finished scene includes a rounded caravan shell, a roof bone, a paw print wheel, a little tub filled with bubbles, colorful grooming bottles, bows on the wall, and three tiny dogs inside. It has the same playful, polished look as the photo and works beautifully as a display piece for a shelf, craft room, or nursery.
This project is best approached as a structured shell first, then a decorated interior scene second. The caravan itself carries the shape, but the tiny bath setup and pet details are what make it feel alive.
Materials + tools list
- DK or light worsted cotton yarn in white, black, cream, beige, turquoise, pink, purple, yellow, orange, blue, and small amounts of gray
- Optional slightly thicker yarn for the roof bone
- Crochet hooks in 2.25 mm, 2.5 mm, and 3 mm
- Polyester fiberfill
- Plastic canvas, thin craft foam, or lightweight cardboard for hidden structure
- Tapestry needle
- Stitch markers
- Small sharp scissors
- Fabric glue or tacky glue for hidden support
- Black safety eyes or black embroidery thread
- White pom poms or pulled fiberfill for bubbles
- Small snap, button loop, or tie for the door closure
- Felt or acetate for shelves and window support if desired
Finished size + customization notes
A finished size of about 10 to 13 inches long, 7 to 8 inches tall, and 6 to 7 inches deep will closely match the look in the photo. If you want a more toy like version, use worsted yarn and a slightly larger hook. If you want a more collectible display look, use cotton DK yarn and keep your stitches very tight.
You can easily customize the dog breeds, bottle colors, bow colors, or wall accessories. Worsted yarn gives a softer, chunkier finish. Cotton yarn gives a cleaner, more structured finish. Choose cotton if you want crisp edges and a polished caravan shape. Choose worsted if you want faster progress and a cuddlier look.
Step by step instructions
Begin by sketching the caravan silhouette. The body is a rounded rectangle with an arched roof and a large cutaway side opening. The front includes a small hitch box area, and the roof carries a decorative bone. Do not skip this planning step. You need to know where the opening, door, wheel, and roof topper will sit before you start crocheting.
Crochet the base panel in beige or cream. Work a long rounded rectangle using single crochet so the fabric stays dense and supportive. Make two identical base panels if you want extra strength, and sandwich plastic canvas between them before joining. You should now see a sturdy floor that sits flat on the table.
Make the two main side walls. One side wall can be mostly solid with small window details. The display side needs a large open cutout so the interior is fully visible. Work the opening like a window frame with rounded corners rather than a sharp square. If yours looks wider than the photo, reduce the opening and leave more frame around the edges.
Crochet the front and back panels. These should follow the gentle caravan curve rather than standing straight up like a box. Test fit them against the base and side walls before you commit to seaming. A well fitted front and back panel will make the whole caravan look intentional.
Create the roof panel in white. Work it as a broad flat piece and gently curve it over the top during assembly. You may add a hidden flexible support beneath the crochet if you want a more defined arch. The roof should look soft and rounded, not peaked. You should now see the classic camper shape starting to appear.
Assemble the shell slowly. Use stitch markers to pin the side walls, front, back, and roof onto the base before sewing. Insert plastic canvas into the side walls and roof as you go if you need more structure. Keep checking the shape from the front and side. If the shell leans inward, your side walls need more support.
Crochet the large side door as a separate white panel with stitched vertical texture lines. The door in the photo feels lightly padded and slightly curved at the top. A few back loop rows or surface slip stitches will mimic that paneled look. Attach the door with a soft hinge seam or hidden fabric hinge so it can swing open.
Add the black dalmatian spots. Make them irregular. Some should be small, some medium, and none should be perfectly round. Stitch them randomly across the roof and outer walls. Add a black paw print applique to the front hitch box and another paw detail in the wheel center. This is one of the most important styling steps because it instantly gives the caravan its dog themed identity.
Crochet the wheel in black and white. Make the tire as a black circle and the center as a white circle with a paw print on top. Reinforce with felt or card if needed. Stitch it securely to the lower side of the caravan. You should now see the body grounded visually.
Make the roof bone. Crochet two rounded ends joined by a short center section, lightly stuff it, and sew it firmly to the top. If you want it chunkier, use slightly thicker yarn than you used for the shell. This topper is whimsical and a major part of the photo’s charm.
Build the bathtub. Work a rounded bowl in white with a black rim and four tiny feet underneath. It should sit slightly left of center inside the caravan. Fill it with loose white fiberfill or pom poms so it looks like a bubbly bath. The tub should feel large enough for the main dog but not so large that it fills the whole interior.
Crochet the bath dog, which looks like a tiny poodle or fluffy cream puppy. Use cream yarn for the body, floppy ears, and a small round muzzle. Add a puff of textured stitches or a bubble tuft on top of the head to suggest shampoo foam. Keep the face simple with dark stitched eyes and a small nose.
Create the striped floor rug for the right side of the caravan. Use narrow rows in bright pastel shades to echo the color accents in the interior. The rug helps define the waiting area and balances the mostly white shell.
Make the two waiting dogs. One can be a corgi with orange and white color blocking and upright ears. The other can be a beige pug with a dark muzzle. Both should be seated and compact. At this scale, the silhouette matters more than tiny anatomy details. You should now see the interior beginning to feel like a real little pet salon.
Crochet the back wall shelf and grooming station. Add tiny pastel bottles in turquoise, pink, purple, and yellow. Make each bottle as a tiny cylinder with a stitched cap. You can embroider short label marks, but do not overwork them. Add a miniature comb and a few folded towel shapes if you want more realism.
Stitch several tiny bows and attach them in a row on the back wall. These colorful bows are a big visual cue in the image. Use bright shades, but keep the shapes tiny so they read as wall decor rather than oversized props.
Add curtains in turquoise or aqua at the side windows and opening edges. Tie them back lightly so the interior stays visible. Small curtains make the caravan feel like a cozy mobile boutique rather than just an open box.
Place the tub, rug, dogs, and shelf details inside the shell. Arrange the bath dog first, then the rug, then the waiting dogs, then the wall accessories. Leave a little visible floor between the pieces. If everything touches, the scene can look crowded instead of detailed.
Add the loose tufts of white fiberfill outside the caravan to mimic fallen bath fluff or bubbles. This tiny styling move makes the whole display feel more dynamic and photo ready. You should now see a complete miniature pet spa scene.
Check the composition from all sides. If one area feels empty, add a towel basket, leash hook, or tiny tag sign. If one area feels too busy, remove one accessory. The original look works because it is full of details without becoming messy.
Troubleshooting section
The caravan walls collapse inward
Your stitches are likely too loose or the shell needs an insert. Use a smaller hook and add plastic canvas inside the walls and roof.
The roof looks too flat
Block the roof over a curved form before sewing, or add a flexible insert so the arch holds its shape.
The door will not hang nicely
It may be too heavy or attached too tightly. Remove some reinforcement and reattach with a softer hinge seam.
The interior feels too crowded
Reduce the size of the tub slightly or shift the waiting dogs closer together on the rug. Leave visible negative space.
The dogs do not look like the photo
Focus on silhouette first. Floppy eared fluffy dog in the tub, pointy eared orange dog on the rug, small dark muzzled dog beside it. Those three shapes create the same story.
Finishing details section
Weave in ends as you finish each part instead of waiting until the end, because the interior becomes harder to access once assembled. Lightly steam block the flat shell panels before joining, but avoid heavy heat on stuffed miniatures. For a cleaner edge, work a final slip stitch border around the side opening and door.
Optional upgrades that work beautifully here include a removable bone sign above the opening, a tiny towel basket, extra wall hooks for leashes, or a miniature salon nameplate. You can also mount the whole caravan onto a shallow wooden display base if you want a more collector style finish.
Shop Similar link section
- White cotton yarn for amigurumi caravans
- Black and cream yarn set for pet themed crochet
- Small crochet hooks for miniature detail work
- Plastic canvas sheets for structured crochet builds
- Polyester fiberfill for tiny stuffed crochet pieces
- Safety eyes and embroidery supplies for mini animals
Style It With link section
Rose Trellis Flower Caravan DIY Guide
What you’re making
You are making a pastel crochet flower caravan with a blooming side trellis, a large service window, a tiny floral interior, a flower covered garden arch, and a plump little guinea pig posed beside it. The finished look feels like a miniature mobile flower shop crossed with a secret garden. It is romantic, storybook inspired, and full of layered floral texture.
This caravan works especially well because the structure is simple and the embellishment does the heavy lifting. If you get the proportions clean and then build the flowers gradually, the finished piece will closely echo the dreamy look in the photo.
Materials + tools list
- DK cotton yarn in pale pink, lilac, white, cream, tan, brown, green, and small accent shades of magenta and lavender
- Crochet hooks in 2.25 mm, 2.5 mm, and 3 mm
- Polyester fiberfill
- Plastic canvas or thin craft foam for the caravan shell
- Tapestry needle
- Stitch markers
- Sharp embroidery scissors
- Thin floral wire or jewelry wire for the freestanding arch
- Craft glue for hidden reinforcement
- Felt or thin card for shelf inserts
- Tiny beads for flower centers if desired
Finished size + customization notes
A finished caravan around 9 to 12 inches long will feel very close to the original. The floral arch can stand about 4 to 6 inches tall beside it. If you want a larger, more dramatic display, enlarge the trellis and arch rather than making the caravan much bigger.
You can shift the palette toward peach and cream, lavender and sage, or cottage garden brights, but soft pink with mixed blossom colors gives the closest look. Use cotton yarn for the clearest flower definition.
Step by step instructions
Start by mapping the caravan body. This design has a rounded top, a lower enclosed body, and a large central side window. The lower half is solid and the upper portion frames the open window. Sketch the outline and mark where the trellis will sit on the left side and where the floral arch will stand on the right.
Crochet the base in a pale neutral shade. Work a firm rounded rectangle with tight single crochet stitches. If you want the caravan to sit perfectly flat, make a double base and hide a layer of plastic canvas between them. You should now see a compact floor that feels stable in your hand.
Make the side walls. The visible side should include one large rectangular window opening with softly rounded corners. The opposite side can be more closed with a small window if you like. Keep the lower half pale pink and add a white or very pale trim near the top edge so the caravan has that sweet soft contrast.
Crochet the front and back panels. They should be gently rounded to match the overall soft caravan silhouette. Test fit them to the base and side walls before assembly. If the side opening looks too tall compared with the photo, add an extra row at the bottom of the window frame.
Work the roof panel. The roof is subtle here, not dramatic, so make a broad panel that gently curves across the top without a strong peak. A thin insert will help if you want crisper shaping. You should now be able to hold the shell pieces together and see the caravan form.
Assemble the caravan carefully. Sew the side walls to the base first, then attach the front and back, then fit the roof. Reinforce the inside if needed. This caravan should look neat and structured because the flowers will add a lot of visual softness later.
Add the wheel. Crochet a black tire with a cream center and stitch it low along the body. Keep the wheel modest in size so the caravan still feels delicate. Too large and it becomes toy like instead of decorative.
Build the trellis panel for the left side. Crochet narrow tan strips and stitch them into a lattice. The openings should be small and tidy. Attach this lattice over the left exterior side of the caravan, climbing up beside the window. This gives the flowers something to visually wrap around.
Make the vines. Start with a long green chain and add leaves at intervals. Crochet the leaves in mixed sizes so the vine looks organic. You can make some tendrils by crocheting chains that curl slightly. Stitch the vine through and around the lattice. You should now see the trellis beginning to feel alive.
Crochet the flowers. Make a mix of tiny buds, cupped blossoms, and more open flowers in pink, lavender, white, and deeper rosy shades. Use only a few petals per flower because the scale is small. The magic comes from quantity and placement, not complicated petal construction.
Layer the blooms onto the trellis. Start with the largest flowers first, then fill gaps with buds and smaller blossoms. Let some blooms trail upward and some spill outward. Keep the densest cluster along the left side and lower corner so it echoes the photo. If yours looks wider than the photo, reduce the number of large flowers and use more leaves instead.
Create the interior flower stall details. Add a little back shelf inside the window with tiny jars, spools, small pots, or seed tins. A miniature curtain at the back helps create depth. Use pale interior colors so the caravan still feels airy and delicate.
Make the hanging umbrella or narrow side prop on the caravan exterior. This can be a tiny folded umbrella shape in pale blue or lilac. It is a slim vertical detail that helps the exterior look more like a styled market scene.
Build the freestanding floral arch. Bend thin wire into an arch shape and wrap it with green yarn or a tight crochet tube. Add two side supports and attach them to a small base. Then stitch leaves and blossoms across the arch so it looks like a blooming garden entryway. You should now see the right side of the display balancing the left trellis beautifully.
Crochet the guinea pig. Work an oval body in tan and white with a rounded nose, tiny ears, and very small feet. Keep the body low and plump. The guinea pig is adorable because of its chubby silhouette, so do not over define the legs.
Add loose flowers at the base of the caravan and beside the guinea pig. These small blossoms help connect the caravan to the ground visually. Without them, the trellis can look like it floats above the scene.
Review the color distribution. Make sure pink, lavender, green, and white all appear in more than one place. A repeated palette makes the whole piece look intentional. You should now see a complete flower wagon scene with a balanced left and right side.
Secure everything with hidden stitches. The flowers and arch are delicate, and this project looks best when the surface stays tidy. Use tiny anchor stitches under petals and leaves if needed.
Style the window interior last. Arrange the little jars, vase, or rolled ribbon spools so they are visible without filling every inch. A little empty space in the window keeps the scene elegant.
Step back and look at the caravan as a whole. If it feels too heavy on the left because of the trellis, add one more small flower pot or bloom cluster near the arch on the right.
Troubleshooting section
The flowers look bulky
Use a smaller hook and fewer petals. Tiny flowers are more convincing than large ones at this scale.
The trellis looks messy
Build the lattice first, then attach the vines, then add flowers. Working in that order keeps the structure clean.
The caravan tips to one side
The arch or trellis may be visually or physically heavy. Add a hidden support under the base or secure the caravan to a display platform.
The window looks empty
Add one shelf, one vase, and two or three tiny props. You do not need many pieces, just enough to suggest a flower stall.
The guinea pig looks too small
Increase the body length by one round and add slightly larger cheeks.
Finishing details section
Lightly steam block the lattice strips, side walls, and arch pieces before final assembly. Weave in ends carefully because loose tails will show against the soft pastel palette. For a polished display finish, mount the caravan, guinea pig, and arch on a shallow oval base or weathered wood plaque.
Optional upgrades include a tiny flower bucket, a hanging shop sign, a miniature bouquet table, or a removable seasonal wreath. You can also turn this same base caravan into a herb wagon, craft trailer, or seed stand just by changing the side embellishments and window props.
Shop Similar link section
- Pastel cotton yarn set for floral amigurumi
- Green floral wire for miniature arches
- Mini crochet hooks for fine flower detail
- Plastic canvas for crochet caravan structure
- Fiberfill stuffing for miniature crochet animals
- Tiny craft beads for flower centers
Style It With link section
Neutral Sheep Retreat Caravan How To Guide
What you’re making
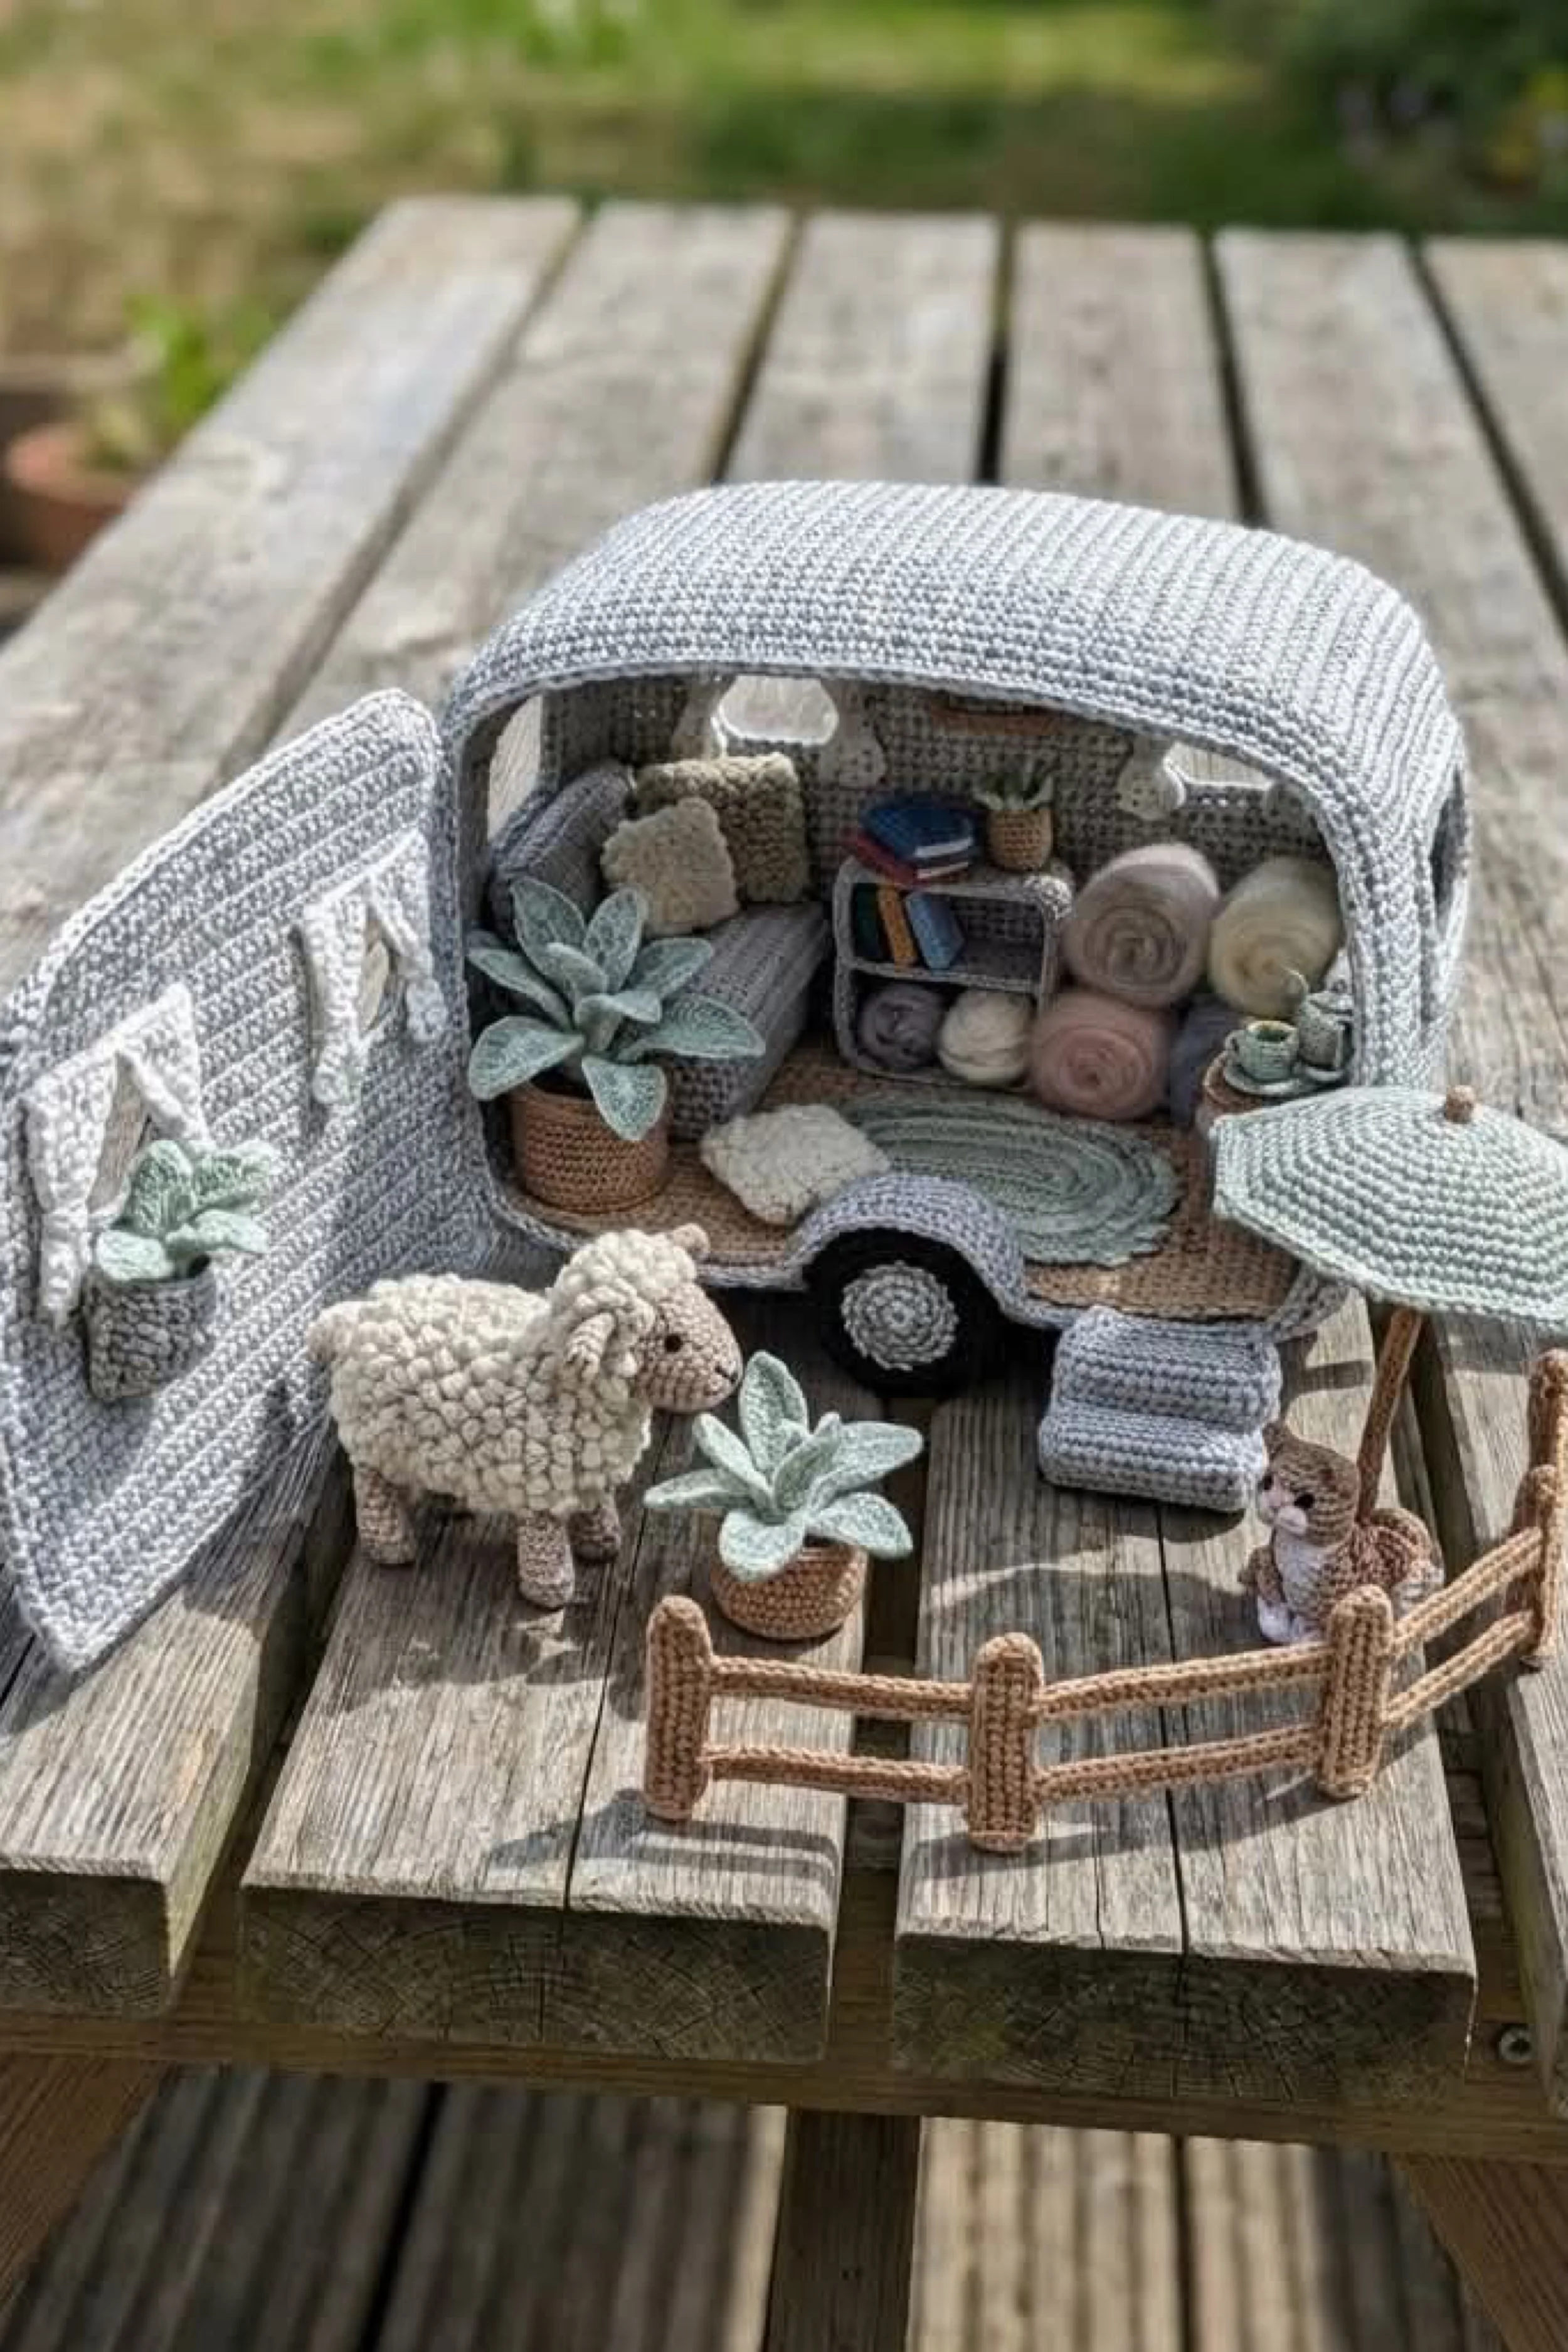
You are making a neutral toned crochet caravan that opens into a tiny farmhouse style retreat with a sofa, books, rolled blankets, potted succulents, a small outdoor setup, a curved fence, and a sweet woolly sheep in front. The finished look is soft, calm, and textural, with muted gray, cream, beige, and sage tones doing most of the design work.
This project is less about bright color and more about shape, layering, and surface texture. The charm comes from the cozy interior and the beautiful little farmyard vignette gathered around the caravan.
Materials + tools list
- DK or light worsted cotton yarn in soft gray, cream, oatmeal, beige, taupe, sage, and brown
- Boucle yarn or textured yarn for the sheep fleece, or regular yarn if you plan to use bobble stitches
- Crochet hooks in 2.5 mm, 3 mm, and 3.5 mm
- Polyester fiberfill
- Plastic canvas or thin craft foam
- Tapestry needle
- Stitch markers
- Small scissors
- Craft glue for hidden support
- Toothpicks, skewers, or thin wire for fence posts and outdoor props
- Felt for rug or shelf reinforcement if desired
Finished size + customization notes
A finished size of 10 to 13 inches long works beautifully for this scene. Because the interior includes a sofa and storage shelf, the caravan can be slightly roomier than some of the other miniatures in this batch.
You can keep the palette strictly neutral for the closest match, or add very soft dusty blush or pale blue accents if you want more contrast. If you do not have boucle yarn, textured stitches in regular yarn will still create a convincing sheep fleece.
Step by step instructions
Sketch the basic caravan shell with a large side opening. The door panel in this version opens wide and almost acts like a fold out wall. Mark where the sofa will sit, where the storage shelf goes, and where the outdoor fence and sheep will stand.
Crochet the floor in a tan or wood toned neutral. Work a tight rounded rectangle using single crochet. For a very flat base, make two layers and hide plastic canvas between them. You should now see a sturdy little platform that sits firmly on the table.
Make the side walls in pale gray. One wall should be mostly open, framed around a large cutout. The other can include a couple of small window openings. Keep the overall silhouette gently curved at the top.
Crochet the front and back end panels. Test fit them before joining. The shell needs to look calm and tidy, not overly rounded or too square. This project has a clean farmhouse feel, so neat proportions matter.
Create the roof panel in the same pale gray. It should arc softly across the top. If the roof collapses during testing, add a hidden insert or work the panel tighter with a smaller hook.
Assemble the shell. Join the base to the side walls first, then add the front and back, and finally fit the roof. Reinforce as needed. You should now see a simple gray caravan shape with a big open side ready for furnishing.
Crochet the large side door. Add vertical texture lines and stitch on a tiny cream bunting strand across the upper portion. Add a small exterior pocket planter in one corner and place a succulent inside it. This single detail is important because it gives the open door warmth and charm.
Make the wheel in gray and cream and attach it low on the caravan body. Keep it centered so the scene looks balanced. Add a small step stool near the doorway with two stacked rectangular steps in gray or taupe.
Build the sofa for the left interior. Crochet a low rectangular seat, a slightly taller back, and one or two soft pillows. Use a mix of gray, cream, and oatmeal yarn so the seat feels layered but still tonal. You should now see the caravan starting to feel like a room instead of a shell.
Make the storage shelf for the back wall. Create a narrow cubby unit and fill it with rolled blankets, folded throws, and a few tiny books. Use several different neutral shades to keep the shelf from visually disappearing into the wall.
Crochet a small round or oval rug for the center floor in pale sage or cream. The soft green helps break up the neutrals and echoes the succulents outside and inside.
Create the potted succulents. Work individual leaf shapes and stitch them into little rosettes. Place them in small brown crochet pots. You need at least three in the scene to get the same layered botanical feel as the photo.
Add a small tea or tray setup on the right interior. Tiny cups and a tray are enough. This subtle detail helps the caravan feel lived in and peaceful.
Make the sheep. Crochet a standing sheep body with slim beige legs and a simple head. For the fleece, use boucle yarn or work bobbles and loops across the body. The sheep should feel soft and round but still stand on its own. If you need help choosing, boucle yarn gives the quickest fluffy finish, while bobble stitches give you more control over size.
Build the little fence. Make short tan posts and rails and curve them slightly in front of the caravan. Insert toothpick or wire pieces inside if needed for support. The fence should be low and decorative, not tall or dominant.
Create the outdoor umbrella or shade prop on the right. Make a small circular cap in pale gray or sage and mount it on a wrapped stem. Keep it understated. It is there to echo the photo’s outdoor styling, not take over the composition.
Add the tiny woodland companion near the fence. A small squirrel or hedgehog shape in brown or beige will work well. This gives the scene that quiet storybook quality visible in the image.
Style the open door. Let the bunting drape softly and place the succulent planter so it is clearly visible. The inside of the door should feel decorated but still simple. You should now see the left side of the composition balancing the shelf and fence.
Arrange the rug, sofa, shelf, succulents, sheep, fence, and outdoor prop. Keep the center area slightly open. If yours looks busier than the photo, remove one object rather than shrinking everything.
Review the textures. The original look is all about contrast between smooth caravan walls, soft boucle sheep, ribbed blankets, and leafy plants. If everything looks too flat, add one more textured pillow or another rolled blanket.
Troubleshooting section
The caravan looks too plain
Add texture, not more color. A ribbed pillow, boucle sheep, or woven look rug will make a bigger difference than extra shades.
The sheep will not stand
Use firmer stuffing and slightly thicken the legs. Hidden wire can help, but often a flatter hoof base is enough.
The fence falls forward
Insert a support inside the posts or secure it to a base.
The interior blends together
Use a darker taupe for the shelf and at least one soft green accent to separate the pieces.
The door feels empty
Add a longer bunting strand or a second tiny planter pocket.
Finishing details section
Block the shell panels before assembly so the caravan keeps its elegant shape. Weave in ends thoroughly, especially around the open door and fence, where loose tails are easy to spot. If you want a premium display finish, mount the caravan and front fence onto a thin wooden plaque or painted board.
Optional upgrades include a tiny lantern, a milk can planter, an extra folded blanket by the sofa, or a removable roof section. A hidden warm light behind the shelf can also make the little retreat feel especially magical in the evening.
Shop Similar link section
- Neutral cotton yarn bundle for miniature crochet decor
- Boucle yarn for tiny sheep and textured crochet
- Plastic canvas sheets for sturdy crochet structures
- Small crochet hook set for amigurumi miniatures
- Fiberfill for small stuffed crochet projects
- Embroidery thread and bead eyes for mini animals
Style It With link section
Pastel Bakery Van Make It Yourself Tutorial
What you’re making
You are making a pastel crochet bakery van with a striped lift up awning, a pastry display case, tiny cupcakes and macarons, flower pots, and two sweet animal bakers. The finished scene feels like a soft candy colored mobile patisserie with a little outdoor café setup in front. It is bright, charming, and wonderfully detailed.
This build combines caravan construction with miniature food and character work. The van shell sets the stage, but the awning, pastry case, and tiny treats are what create the full bakery story.
Materials + tools list
- DK cotton yarn in pastel pink, pastel blue, butter yellow, cream, white, tan, brown, rose, and a little mint
- Crochet hooks in 2.25 mm, 2.5 mm, and 3 mm
- Polyester fiberfill
- Plastic canvas, thin craft foam, or lightweight card for structure
- Clear acetate or thin plastic packaging for the pastry case front
- Tapestry needle
- Stitch markers
- Small scissors
- Craft glue for hidden support
- Embroidery thread for tiny food details
- Thin wire if you want stronger chairs or awning support
Finished size + customization notes
A finished van around 10 to 13 inches tall with the awning lifted will match the feel of the photo. The front café table and standing bear extend the footprint, so the actual van can stay fairly compact.
You can swap the treats for doughnuts, breads, cookies, or ice cream if you like, but pastel pastries and layered cakes give the closest look. Use cotton yarn if you want a cleaner pastry case and more defined awning stripes.
Step by step instructions
Plan the bakery van shell. This design has a curved body, a front tow section, a side service opening, and a roof flap that lifts up into a striped awning. Sketch the proportions first so you know where the display case and counter will sit.
Crochet the floor and lower shell. Use a pale neutral or matching pastel base. Build the van body in soft pink and pastel blue, then introduce pale yellow in the upper awning or trim sections. Keep the stitches tight so the shell feels crisp. You should now see a rounded little trailer shape forming.
Make the side opening and service counter. The open side should have a lower half wall that holds the pastry case and an upper opening that flips open. This lower wall is important because it gives the bakery that real serving counter look.
Create the lift up awning flap. Work vertical stripes in pastel pink, pale yellow, and pale blue. Add a scalloped lower edge to mimic a classic sweet shop canopy. Reinforce the flap with a hidden insert if you want it to stay open cleanly.
Attach the awning flap to the roof with a flexible seam. It should sit raised and slightly curved. If it droops, you can add hidden side support strands or a flexible brace.
Assemble the shell. Join the base, sides, front, back, and roof. Add the wheel and front hitch section. The shell should now read as a complete mobile van even before you add the pastry details.
Build the pastry display case. Crochet the outer frame in pastel blue and pink and insert a clear front panel so it resembles glass. Add one or two little internal shelves. This display case is a major visual anchor, so keep it neat and not oversized.
Fill the pastry case with tiny treats. Make macarons as two little rounds joined with a cream center. Make cupcakes as short cylinders with domed tops. Make cakes as stacked discs, and croissants as tiny curved tapered shapes in warm tan. You should now see the van instantly turning into a bakery.
Create the back interior shelves. Add jars of sweets, a tiny mixer, and a few extra baked goods. Jars can be tiny cylinders with colored lids. The mixer can be made from stacked circles and a bowl shape. Keep the details small and evenly spaced so the back wall looks stocked, not cluttered.
Crochet the bunny baker for inside the van. Use cream yarn with long ears, a white apron, and a tiny chef hat. Add a little cookie in one hand if you like. The bunny should fit behind the counter without blocking the display case.
Crochet the standing bear baker for outside the van. Work it in warm beige or tan with a white apron and chef hat. Position one arm as if waving or greeting a customer. This figure helps extend the story beyond the van itself.
Add flower pots on the van exterior. Small brown pots with pink roses soften the shell and make the bakery feel boutique rather than purely functional.
Create the little front café table and chairs. You can crochet these over wire for more strength or keep them purely decorative. Add a tiny teapot, cup, and a mini dessert stand to the table. If yours looks larger than the photo, reduce the chair backs and use a smaller round table top.
Refine the pastry colors. The photo works because the pink, blue, yellow, cream, and tan shades all repeat across the food and the shell. Make sure no single pastel dominates too heavily. You should now see a cohesive candy shop palette.
Add the side shelves with cakes and jars. A few visible treats on the left interior help the inside feel active and layered. Keep the tallest objects toward the back so the front display case stays readable.
Secure the awning, display case, and animal figures. These are the pieces most likely to shift. A few hidden stitches or tiny dots of glue will help.
Arrange the front table and standing bear. The photo feels styled like a little shop display, not just a vehicle. Keep a little empty space in front of the counter so the van still has breathing room.
Review the silhouette from the side. The lift up striped canopy, rounded shell, and visible pastry case are the three most important shapes. If one gets lost, simplify the smaller props.
Add final dessert accents. A few extra macarons on the table or a tiny cake slice on a side shelf can bring the scene to life. Be careful not to overfill the front. Less is better once the main story is clear.
Step back and compare the scene balance. You should now see a pastel bakery van with a distinct top awning, a sweet serving counter, and enough tiny food details to feel magical.
Troubleshooting section
The awning will not stay raised
Use a hidden insert, tighter stitches, or a small support strap inside the opening.
The pastry case looks bulky
Use thinner plastic for the front and reduce the crochet frame width.
The pastries look too large
Switch to a smaller hook and thinner scraps for all food items only.
The front props overwhelm the van
Reduce the table size or remove one chair so the van remains the main focus.
The pastel colors feel random
Repeat each major color in at least three places across the shell, pastries, and accessories.
Finishing details section
Steam block the awning flap so the scallops sit cleanly. Weave in tails as you finish each miniature pastry rather than saving them for the end. Wipe any glue smudges immediately if you use a clear front panel in the case.
Optional upgrades include a little menu sign, a string of mini bunting, extra pastry trays, or a tiny bakery nameplate above the opening. If you want an even more polished display, mount the whole scene onto a painted wood tray or shallow platform.
Shop Similar link section
- Pastel cotton yarn for miniature bakery crochet
- Small crochet hooks for mini food and amigurumi
- Clear plastic sheets for tiny display cases
- Plastic canvas for structured crochet vehicles
- Fiberfill stuffing for little crochet animals
- Embroidery thread set for pastry details
Style It With link section
Stargazing Pink Caravan DIY Guide
What you’re making
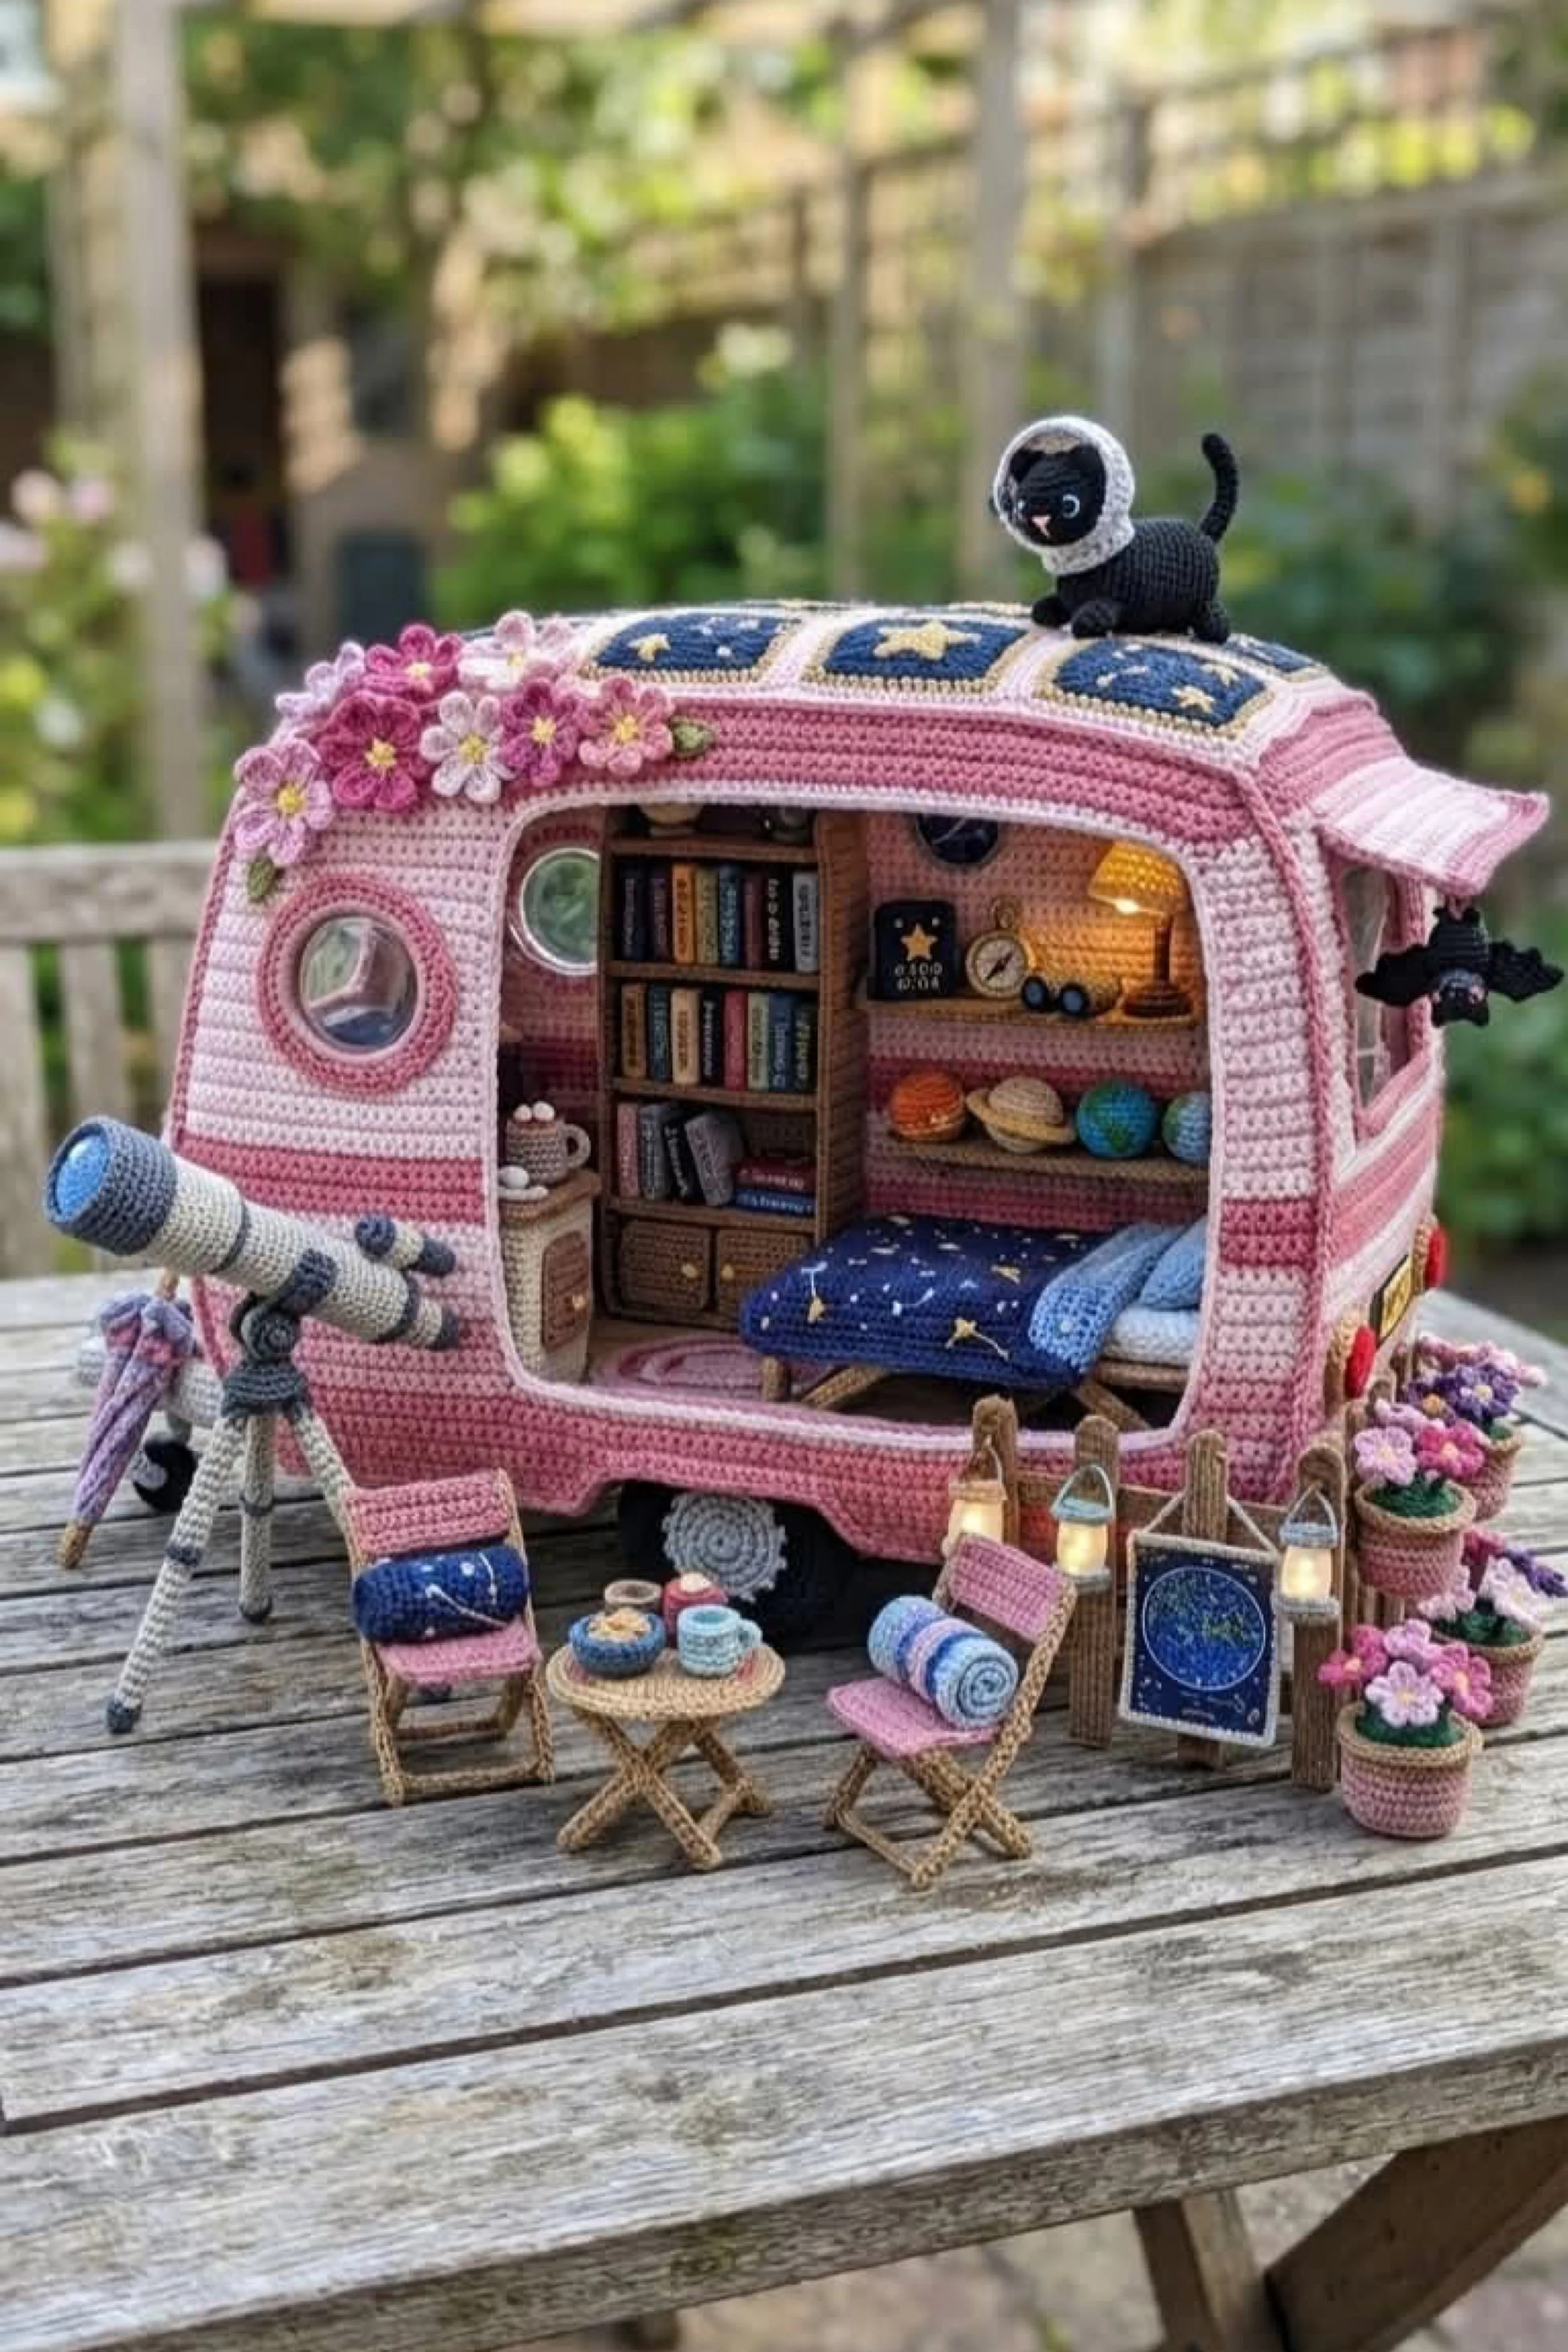
You are making a pink striped crochet caravan designed as a tiny celestial retreat, complete with a telescope, star themed bedding, bookshelves, lanterns, flowers, a little table and chairs, and a black cat perched on top. The finished scene feels like a dreamy blend of garden camper, reading nook, and stargazing hideaway.
This project shines because it mixes softness and wonder. Pink stripes and flowers keep it sweet, while navy star panels, a telescope, and constellation details give it a magical nighttime personality.
Materials + tools list
- DK cotton yarn in pink, blush, white, cream, navy, yellow, tan, brown, gray, black, green, and lavender
- Crochet hooks in 2.25 mm, 2.5 mm, and 3 mm
- Polyester fiberfill
- Plastic canvas or thin craft foam for support
- Tapestry needle
- Stitch markers
- Small scissors
- Craft glue
- Thin wire or skewers for telescope legs and sign posts
- Felt or card for books and shelf support
- Tiny battery micro lights optional if you want a lit effect
Finished size + customization notes
A finished size of around 10 to 13 inches long works very well. The front telescope, sign, chairs, and flower pots extend the scene, so the caravan body itself does not need to be oversized.
You can deepen the navy sections for a more dramatic celestial mood or keep the look lighter and more floral. The cat topper is especially memorable, so it is worth giving extra attention to that detail.
Step by step instructions
Sketch the caravan body first. This design has a rounded shell, a generous side opening, circular windows, horizontal pink stripes, and decorative star panels near the roof. Mark where the telescope will go and where the front seating vignette will sit.
Crochet the base in a pale neutral shade. Work a firm rounded rectangle using tight single crochet. A double base with hidden plastic canvas will help when you start adding front props. You should now have a sturdy platform.
Make the side walls with pink striping. Alternate two or three pink tones with lighter rows to create the layered effect seen in the photo. Keep the stripe spacing fairly even. This is one of the most defining visual features, so count carefully.
Add circular window openings to one side wall and frame them with pink or white edging. Round windows immediately give the caravan that charming vintage camper look. If yours look too large, reduce the number of stitches around the circle and widen the frame instead.
Crochet the front and back panels and assemble the shell with the side walls and roof. Keep the opening wide enough to clearly show the bookshelf and bed. Reinforce the roof if needed because you will add a cat and floral cluster on top.
Create the navy roof star panels. Crochet small navy squares or rectangles and embroider stars in pale yellow or cream. Stitch them along the top edge of the caravan. These panels visually bridge the pink shell and the celestial interior.
Make the floral cluster for the upper left side. Crochet small blossoms in pink, lavender, and white with a few leaves and stitch them into a dense little spray. Let them trail slightly down the side of the roof line. You should now see the sweet floral and celestial balance starting to emerge.
Crochet the black cat for the roof. Keep it small, arched, and alert with a curved tail and bright embroidered eyes. The cat should sit lightly on top, not dominate the caravan.
Add a tiny bat charm hanging near the opposite awning edge if you want to echo the playful detail in the photo. Keep it small and simple.
Build the telescope. Crochet a narrow tube in blue gray yarn and add darker ring details around the barrel. Mount it on a tripod made from wrapped wire, skewers, or tightly crocheted cords over a support core. Angle it slightly upward. The telescope is one of the clearest theme indicators, so position it confidently in front.
Make the tall interior bookshelf. Create narrow shelves and fill them with tiny books. Books can be made from folded felt or tightly stitched rectangles. Add little drawers below. The shelf should look full and cozy rather than sparse.
Crochet the bed or narrow daybed in navy and blush. Add a star embroidered blanket and one or two pillows. The bed in the photo is compact and tucked along the right side, which helps the caravan feel like a real little retreat.
Add right side shelving with celestial props such as planets, bowls, jars, or a tiny lamp. Use warm yellow for the lamp shade or glowing element. Even if you do not add a real light, that warm color suggests illumination.
Make the front chairs and tiny round table. Crochet them in pale pink and tan. If you need more strength, cover bent wire frames with crochet. Add tiny bowls or cups on the tabletop. You should now see the outdoor lounge area taking shape.
Build the sign or star chart panel. Use navy for the sign face and embroider pale dots and connecting lines like a constellation map. Mount it between two short posts and position it near the front seating area.
Add miniature lanterns. Crochet tiny cylinders or lantern shapes with loop handles and place or hang them near the front sign and chairs. They help create the soft twilight atmosphere visible in the photo.
Crochet small flower pots with pink and lavender blooms and arrange them around the front of the caravan. These flowers soften the darker star details and keep the piece bright and welcoming.
Secure the major pieces. Anchor the telescope, sign, lanterns, table, and chairs so they do not wobble. Keep the arrangement airy. If yours looks more crowded than the photo, remove one flower pot or shift the sign further aside.
Check the interior visibility. You should be able to clearly see the bookshelf, bed, and right side shelf through the opening. If the telescope or front chairs hide too much, move them slightly lower or outward.
Do a final composition pass. The pink stripes, navy star elements, telescope, cat, and little front seating area should all be readable at a glance. You should now see a complete stargazing caravan scene that feels cozy, feminine, and magical.
Troubleshooting section
The stripes look uneven
Count rows carefully and carry changes at the same side seam each time.
The telescope will not stand
Use a hidden wire core or attach the tripod to a weighted base.
The cat looks too large
Shrink the body and head slightly and lengthen the tail so it reads as delicate.
The interior disappears behind the front props
Move the telescope outward and keep the chairs low and compact.
The celestial theme is not obvious enough
Add more embroidered stars on the bedding, roof panels, or sign.
Finishing details section
Block the striped shell panels before assembly so the rows stay crisp. Weave in dark yarn ends carefully because they can show against the pink shell. If you want a higher end display finish, mount the caravan and front props onto a painted base with a subtle garden path effect.
Optional upgrades include a moon phase garland, a tiny rolled blanket on one chair, a removable star map book, or hidden micro lights tucked under the shelf. You can also personalize the scene with a small name sign on the caravan side.
Shop Similar link section
- Pink cotton yarn set for miniature caravan crochet
- Navy and yellow yarn for celestial crochet details
- Mini crochet hooks for fine amigurumi detail
- Plastic canvas for structured miniature crochet builds
- Fiberfill stuffing for tiny crochet props
- Thin floral wire for telescope and sign supports
Style It With link section
- Mini lantern accessories for tiny night scenes
- Tiny astronomy decor for miniature display styling
- Small faux flower pots for handcrafted caravan scenes
- Mini display bases for handmade diorama presentation
- Little tea set accessories for tiny table scenes
- Constellation themed scrapbook supplies for celestial accents
The beauty of these crochet caravans is not just in the finished display, but in the way every tiny detail adds to the story. A shelf of miniature books, a tray of tiny pastries, a flower covered arch, a soft little sheep, or a telescope pointed at the sky all help transform simple stitches into something memorable. Once you finish one, it becomes very easy to imagine a whole collection of themed caravans lined up together, each with its own mood, palette, and tiny handmade world inside.
As you work through these designs, remember that precision matters, but charm matters just as much. Keep your structure sturdy, your scale consistent, and your finishing neat, then let the small details bring the magic. These are the kinds of projects people will lean in close to admire, and that is exactly what makes them so satisfying to make. Tiny, beautiful, and full of character, they are the sort of crochet pieces that turn a craft table into a conversation piece.