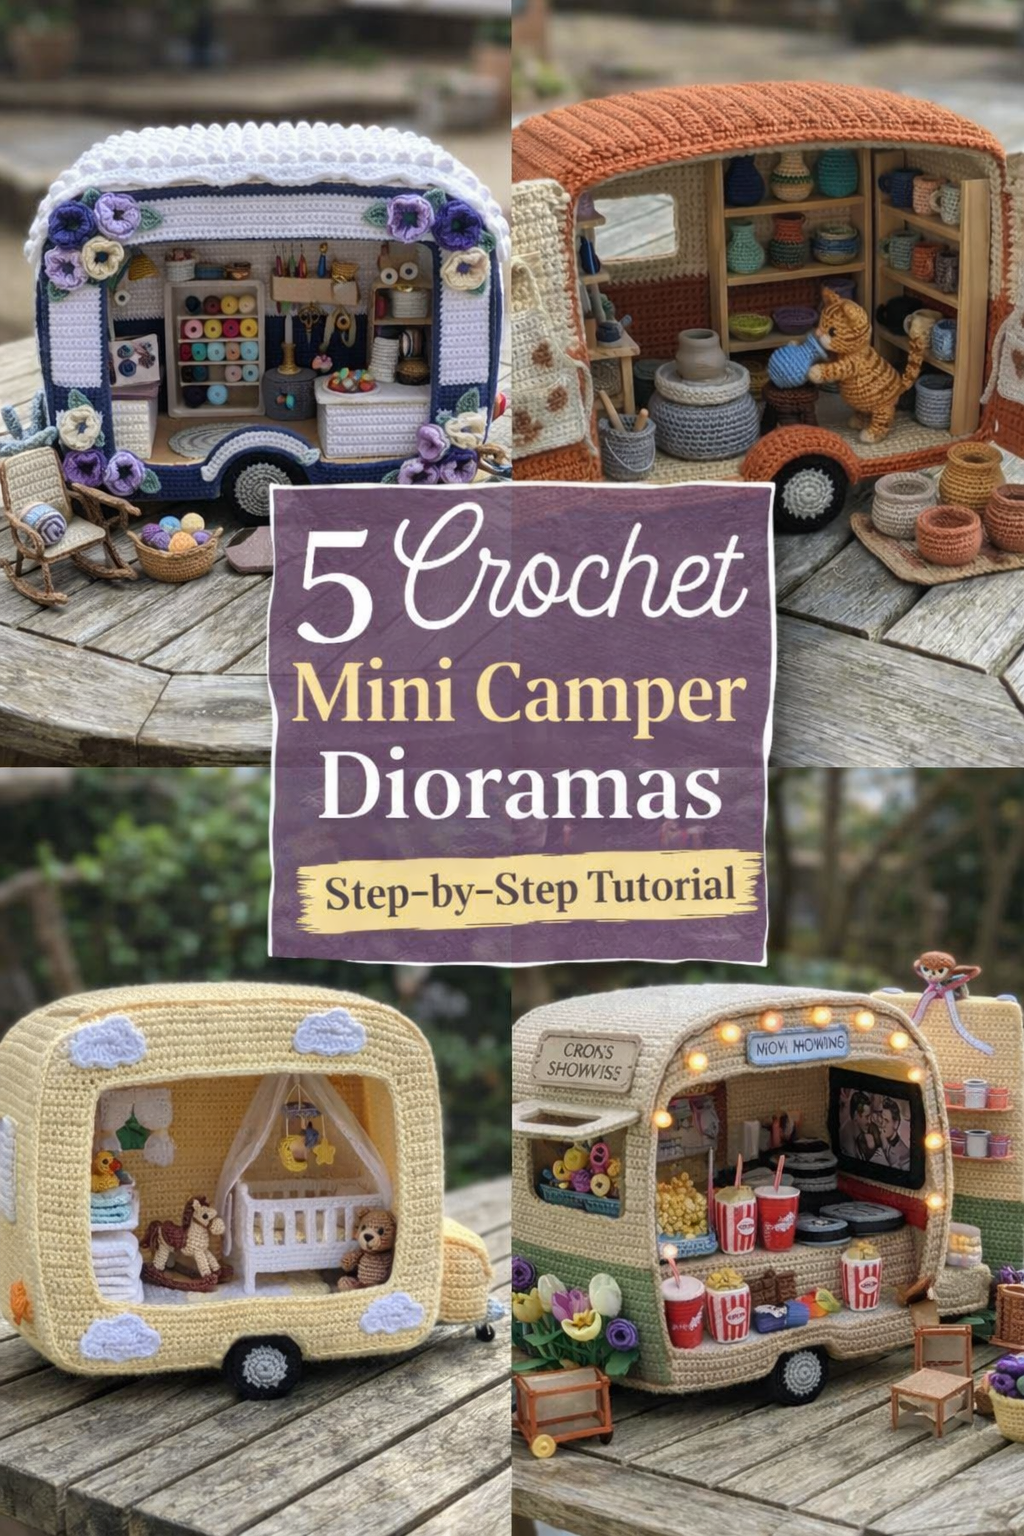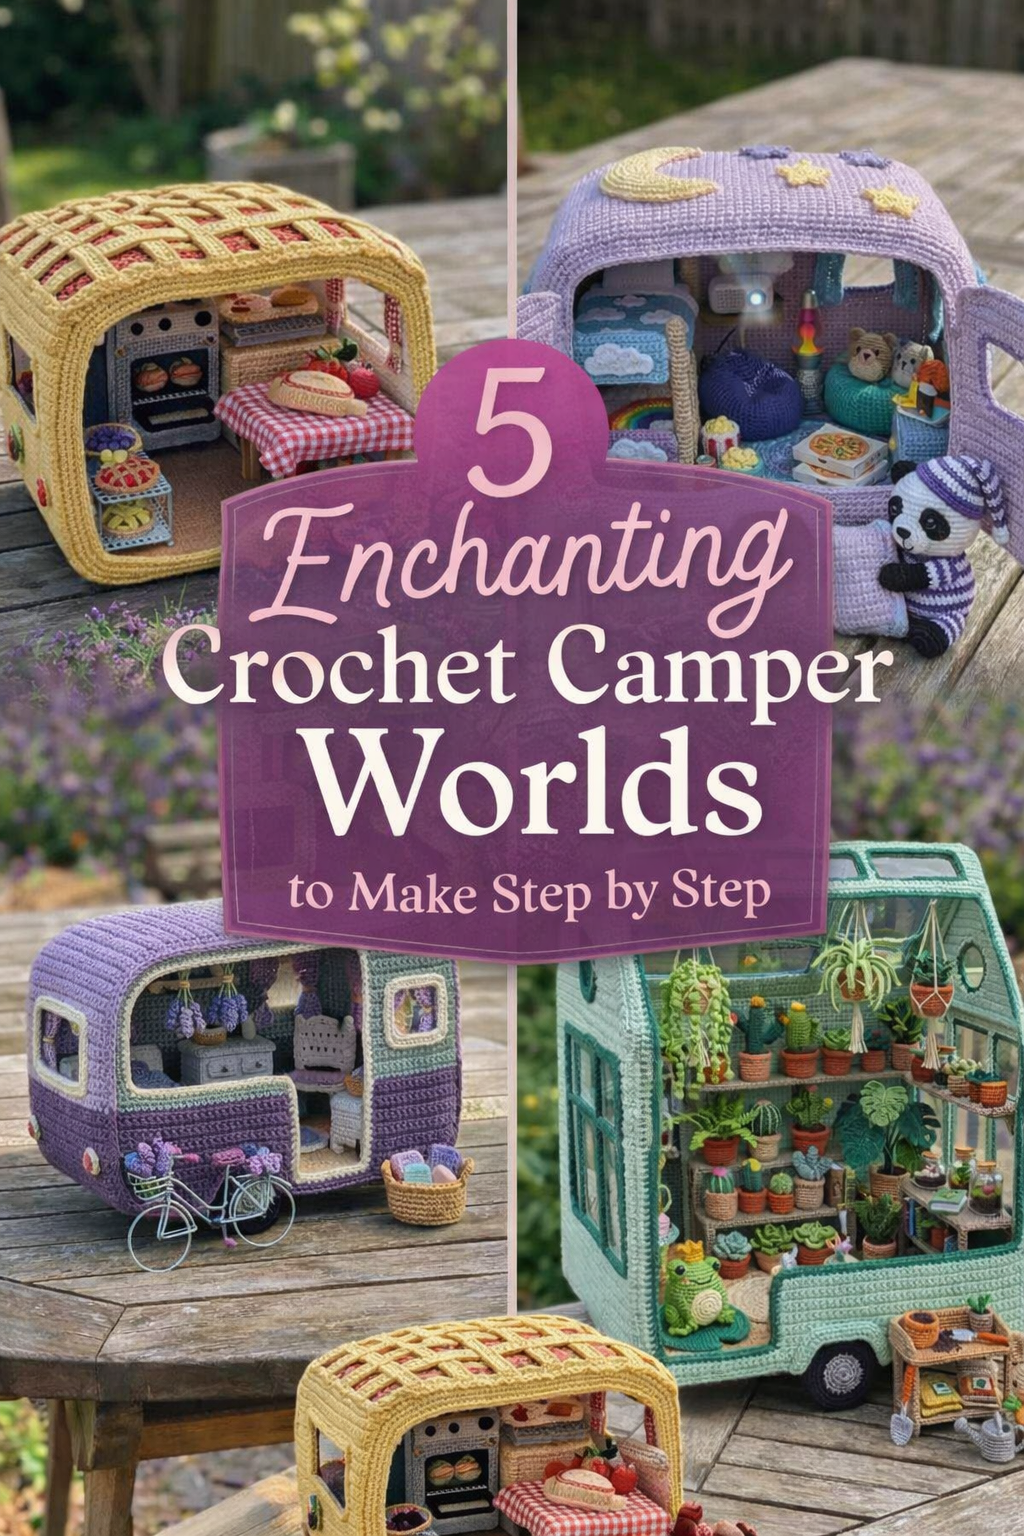
5 Enchanting Crochet Camper Worlds to Make Step by Step

More like this
There is something wildly charming about a crochet camper that feels like it could roll straight out of a daydream. These miniature caravans are not just adorable little builds. They are tiny worlds with their own mood, story, palette, and personality. Some feel like a pie shop on wheels, some look ready for a lavender field holiday, and others open up into soft sleepover lounges, breakfast wagons, or even leafy greenhouse retreats. That is exactly what makes this collection so irresistible. Each one takes the familiar shape of a vintage camper and turns it into something imaginative, detailed, and display worthy.
In this collection, you will find five crochet camper ideas that feel cozy, creative, and full of character. The beauty of these projects is that they invite you to think beyond the shell itself and treat every detail as part of the story. Curtains, tiny shelves, little food pieces, miniature plants, plush companions, and themed accessories all work together to make each camper feel alive. Whether you love playful novelty projects, dollhouse scale styling, or simply want a showpiece crochet project that sparks conversation, these campers offer so much inspiration. They are the kind of makes that reward patience, celebrate detail, and turn yarn into something people cannot stop staring at.
If you have been wanting a project that feels more magical than ordinary, this is a beautiful place to start. These step by step tutorials walk you through the process of shaping the camper body, building the interior, and adding the finishing details that make each design feel polished and memorable. Pick the theme that speaks to you most, gather your yarn, and get ready to create a tiny crochet escape that feels every bit as special as the photo.
Cozy Crochet Pie Caravan Step by Step Tutorial
What you’re making
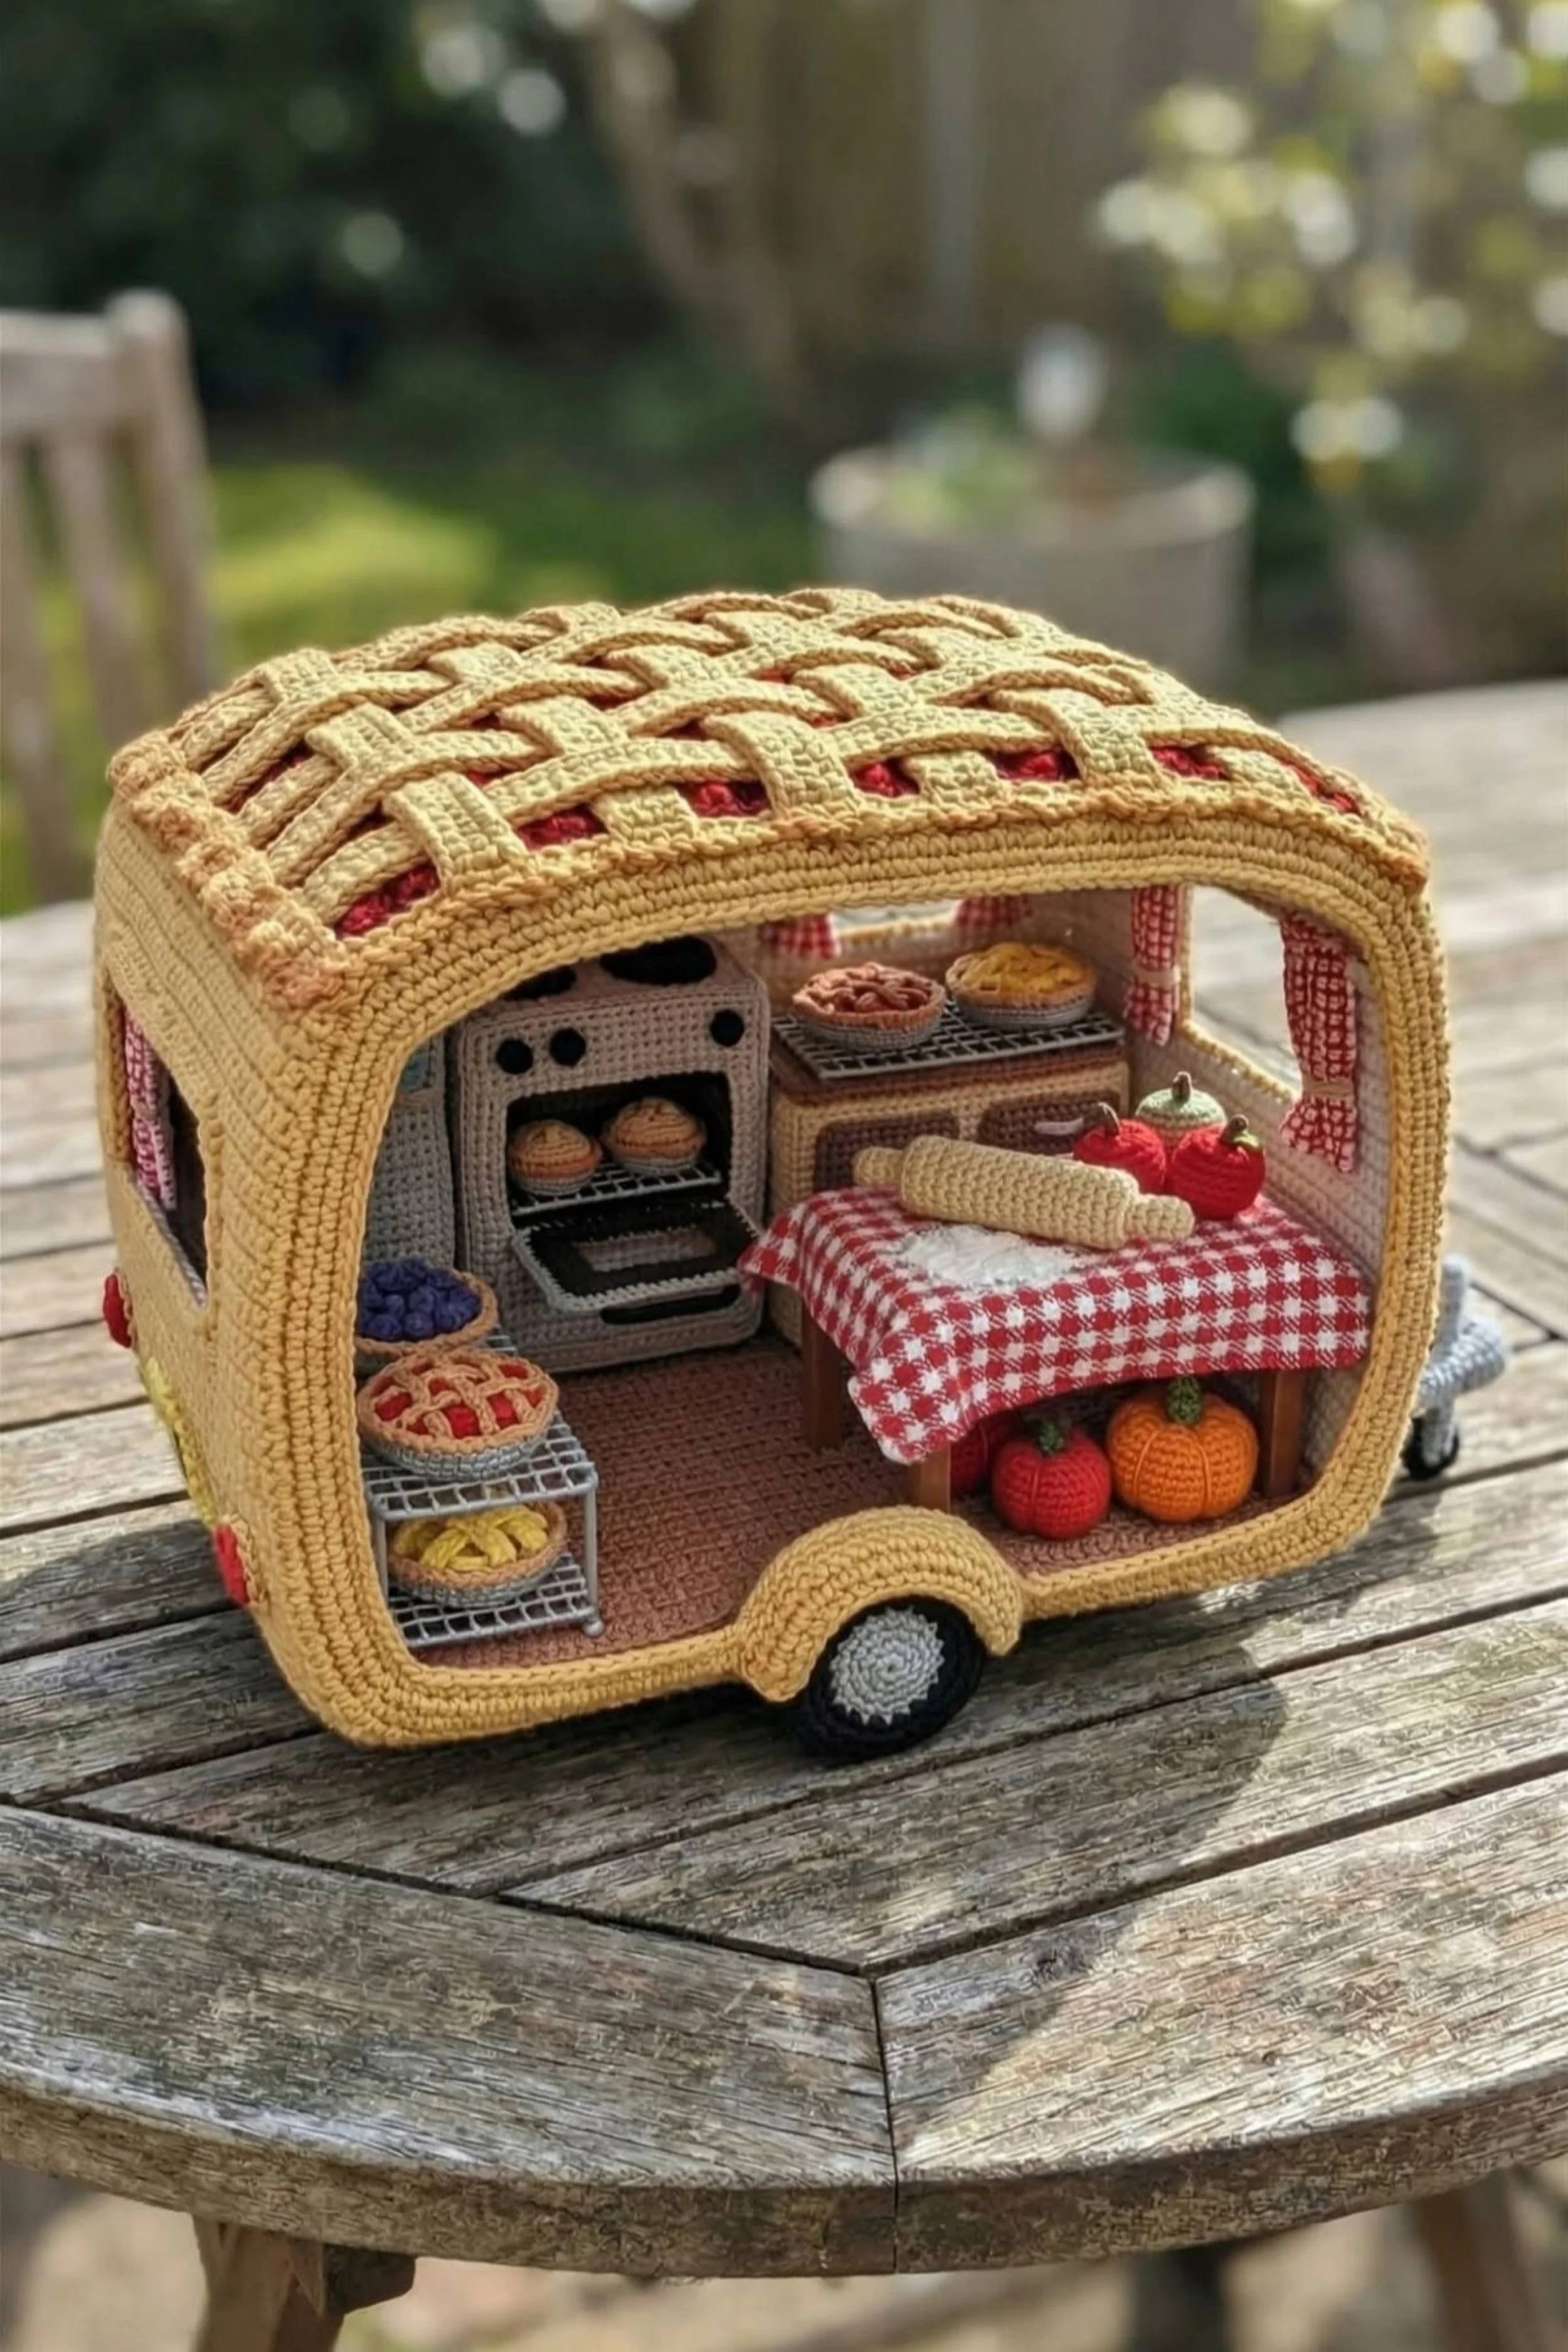
You are making a miniature crochet camper that feels like a tiny farmhouse pie kitchen on wheels. The look in the photo is warm, golden, and nostalgic, with a rounded trailer shell, a woven lattice crust style roof, red “pie filling” peeking through the top, and a fully styled baking scene inside complete with oven, pastries, produce, and a gingham covered prep table. The finished piece works beautifully as a collectible display, a dollhouse style scene, or a statement piece for anyone who loves crochet miniatures with a storybook twist.
This design is less about speed and more about building a clean, sturdy shell and then styling the interior so it feels alive. Think of it as part amigurumi, part soft sculpture, and part tiny set design.
Materials + tools list
- Worsted weight cotton yarn in butter yellow, warm beige, cream, taupe, brown, gray, red, white, black, orange, blue purple, and leaf green
- Optional light DK cotton for tiny food details if you prefer finer accessories
- Crochet hooks in sizes 2.25 mm, 2.75 mm, and 3 mm
- Stitch markers
- Yarn needle
- Small sharp scissors
- Polyester stuffing
- Thin plastic canvas or heavy craft interfacing for wall support
- Lightweight cardboard or thin foam sheet for removable interior templates
- Craft wire for shelves and table stability
- Pipe cleaners or floral wire for tiny rolling pin and accessories
- Fabric glue or craft glue for hidden support points
- Red and white gingham fabric for the prep table cover and tiny curtains
- Snap fasteners, tiny magnets, or sewn tabs if you want removable parts
- Black felt or dark fabric for oven interior
- Optional clear vinyl for windows
- Measuring tape
- Pins or clips for blocking pieces into shape
Finished size + customization notes
A finished camper like the one in the photo looks best at about 9 to 12 inches long, 6 to 8 inches tall, and 5 to 6 inches deep. If you want more room for interior details, size up your hook slightly and add extra rows to the side walls and roof arch. If yours looks too tall compared with the photo, reduce the height of the side walls before curving into the roof. If you want a more toy like finish, use acrylic yarn. If you want crisp stitch definition and that polished handmade miniature look, cotton is the better choice.
You can also swap the pie kitchen theme for a bakery, cider stand, or holiday baking wagon by changing only the accessories and fabric accents.
Step by step instructions
Sketch the camper shape before crocheting.
Draw the side profile of the trailer first. The photo shows a rounded rectangle silhouette with a soft arching roof and a wide open serving side. Mark where the wheel sits, where the open side cutout begins, and where the back and front curve upward. This sketch becomes your guide for symmetry. You should now see a shape that looks like a tiny vintage caravan, not a sharp box.Crochet the floor panel.
Start with a tight rectangular base in single crochet worked in rows using brown or taupe yarn. Make it slightly longer than you think you need because the side walls will curve upward and visually shorten the piece. Work evenly and count each row. If your base ripples, your tension is too loose or your starting chain is too tight. Add a backing of plastic canvas or thin cardboard cut slightly smaller than the base.Build both side walls separately.
Crochet two matching side panels in butter yellow. Work from the bottom up in single crochet. Shape the wheel arch by skipping or decreasing in a shallow curve, then continue upward. On the serving side, leave a large window like opening that stretches nearly the full length of the camper. On the opposite side, include smaller window cutouts. The top should round inward gently. Visual checkpoint: each side should look like a soft vintage trailer wall with smooth corners, not a square tote bag side.Reinforce the walls before joining.
Cut matching inserts from plastic canvas or stiff interfacing to fit inside the solid wall portions. Do not place support in open window areas. Slip stitch or sew the supports inside a double layer if you want the cleanest result. This is what keeps the camper from collapsing once the roof is added.Create the front and back panels.
Crochet the front and back as rounded rectangles that match the width and height of the floor and side walls. The back may stay mostly solid. The front can be partially solid depending on how visible you want the interior to be. Join these panels to the side walls and floor using whip stitch through back loops or a neat slip stitch seam. Stuff lightly only where needed. You are aiming for structured, not plush.Work the roof base.
For the pie camper, the roof is the star detail. Begin with a wide arched panel in butter yellow that spans the full trailer and bends smoothly from one side to the other. Work it in rows of single crochet, checking the fit every few rows. Before attaching, line the underside with a thin curved insert so it holds its shape. If yours looks flatter than the photo, add a few extra center rows. If it looks too domed, remove a couple of rows or block it over a rounded surface.Make the lattice crust strips.
Crochet multiple narrow strips in the same butter yellow, each around 3 to 5 stitches wide, long enough to cross the roof. Steam or finger block them flat. Weave them over and under one another directly on top of the roof base. Under the woven strips, add glimpses of red crochet fabric or red felt to mimic pie filling. This tiny illusion is what makes the whole camper feel clever and memorable. Stitch the lattice down only at intersections and edges so the texture stays raised.Join the roof to the camper body.
Pin the roof first, then sew carefully along both long top edges. Work slowly around the curves. You should now see the trailer silhouette fully come together. Set it on a flat table and check whether it rocks. If it does, add a small hidden stabilizer under the floor or slightly adjust the wheel height.Add the wheel and hitch.
Crochet a flat round wheel in gray with a darker tire edge and a lighter center. Sew it beneath the wheel arch. For the hitch, wrap gray yarn around wire or crochet a tiny tube and shape it into a tow bar. Secure firmly. Even though it is small, this detail makes the scene read instantly as a camper.Construct the oven.
The oven in the photo is boxy, soft gray, and perfectly miniature. Crochet a small rectangular box with a cutout front door. Insert cardboard inside to keep the edges crisp. Add black felt for the inside and tiny black stitched knobs above. Make an oven rack from painted plastic canvas or thread wrapped wire. Leave the oven door slightly open for that lived in baking moment.Create the back counter and shelves.
Work small rectangles in taupe or warm brown for the back counter and side storage unit. Add darker trim for depth. Use plastic canvas or card inserts again. Tiny shelves can be made from silver painted mesh, plastic canvas, or crochet reinforced with wire. The photo has open racks that hold finished pies and pastries, so keep them visually airy.Make the prep table.
Crochet or build a simple rectangular table in medium brown. The proportions should allow it to fill the open serving side without crowding the oven. Drape a small red and white gingham cloth over the top. Let the cloth soften the geometry and add that picnic pie stand feeling. Dust the surface with a little white embroidery floss or felt to imitate flour.Crochet the miniature foods.
Make at least three pies, a few pastries, apples, pumpkins, and a rolling pin. For pies, crochet a shallow tan circle for the crust and a slightly smaller filling circle in red, brown, or yellow. Add a tiny top crust or lattice. For pumpkins, work mini rounds in orange with stitched grooves. For apples, use red yarn and tiny stems. For the rolling pin, wrap tan yarn around a short wire or crochet a small tube with tapered handles.Style the food realistically.
Place one pie on the lower metal rack, one near the oven, and one on the table. Set apples and pumpkins under the table to echo the harvest palette. Keep the arrangement slightly asymmetrical. The photo feels charming because it looks styled, not lined up. If your scene feels stiff, shift one pie off center and angle the rolling pin.Add curtains and soft details.
Sew little gingham panels inside the window edges. Tiny gathers make a big difference. You can back the windows with clear vinyl if you want more realism, but leaving them open also works and makes the details more visible.Refine the interior floor and walls.
Add a darker brown floor panel or stitched “mat” inside. A simple change in color makes the space look finished. You can embroider faint plank lines or keep it plain. If yours looks too empty, add a tiny bowl, folded towel, or recipe book.Check proportions and edit before final sewing.
Step back and compare your camper to the photo. You should now see a warm yellow caravan with a bakery kitchen interior and a roof that reads like pie crust. If yours looks wider than the photo, reduce accessory size rather than reworking the whole shell. If yours looks too crowded, remove one or two food pieces and let the oven and table breathe.Secure everything for display.
Once happy with the scene, tack the major furniture in place with a few hidden stitches or dots of glue. Leave a couple of loose accessories removable if you want play value. Block any crooked strips, trim stray fibers, and shape the open serving edge with your fingers.
Troubleshooting section
My camper walls lean inward.
Add firmer inserts and make sure your stitches are tight enough. Cotton yarn and a smaller hook help a lot here.
The roof will not curve smoothly.
Your roof panel may be too short or too stiff. Add a couple of center rows, lightly steam it, and pin it over a curved object until cool.
The lattice looks messy instead of woven.
Make fewer strips and space them evenly. It helps to pin all vertical strips first, then weave the horizontal strips one by one.
The accessories look oversized.
Switch to a smaller hook for all food items. Miniatures need tighter tension than the main shell.
My oven collapses.
Insert stiff plastic canvas inside each wall of the oven box and seam more tightly at the edges.
The interior does not feel cozy.
Use contrast. Add fabric curtains, a printed cloth, and a few saturated food colors against the soft yellow shell.
Finishing details section
For a polished final result, gently steam block the major shell pieces before full assembly, but avoid over steaming stuffed accessories. Weave in every end as you go because miniature builds become hard to access later. If you want the camper to hold its open shape permanently, line the inside roof and wall edges with hidden plastic canvas strips. Optional upgrades include a battery tea light hidden behind the oven for a warm bakery glow, tiny menu signage at the serving window, stitched edging around the open side frame, or a removable seasonal crate of fruit. A maker label sewn discreetly into the back corner is also a beautiful finishing touch.
Shop Similar
- Butter yellow cotton yarn for vintage camper shells
- Mini crochet hooks for amigurumi detail work
- Plastic canvas sheets for structured crochet miniatures
- Red and white gingham fabric for miniature table covers
- Cotton stuffing and fiber fill for crochet toys
Style It With
Dreamy Moonlight Sleepover Camper DIY Guide
What you’re making
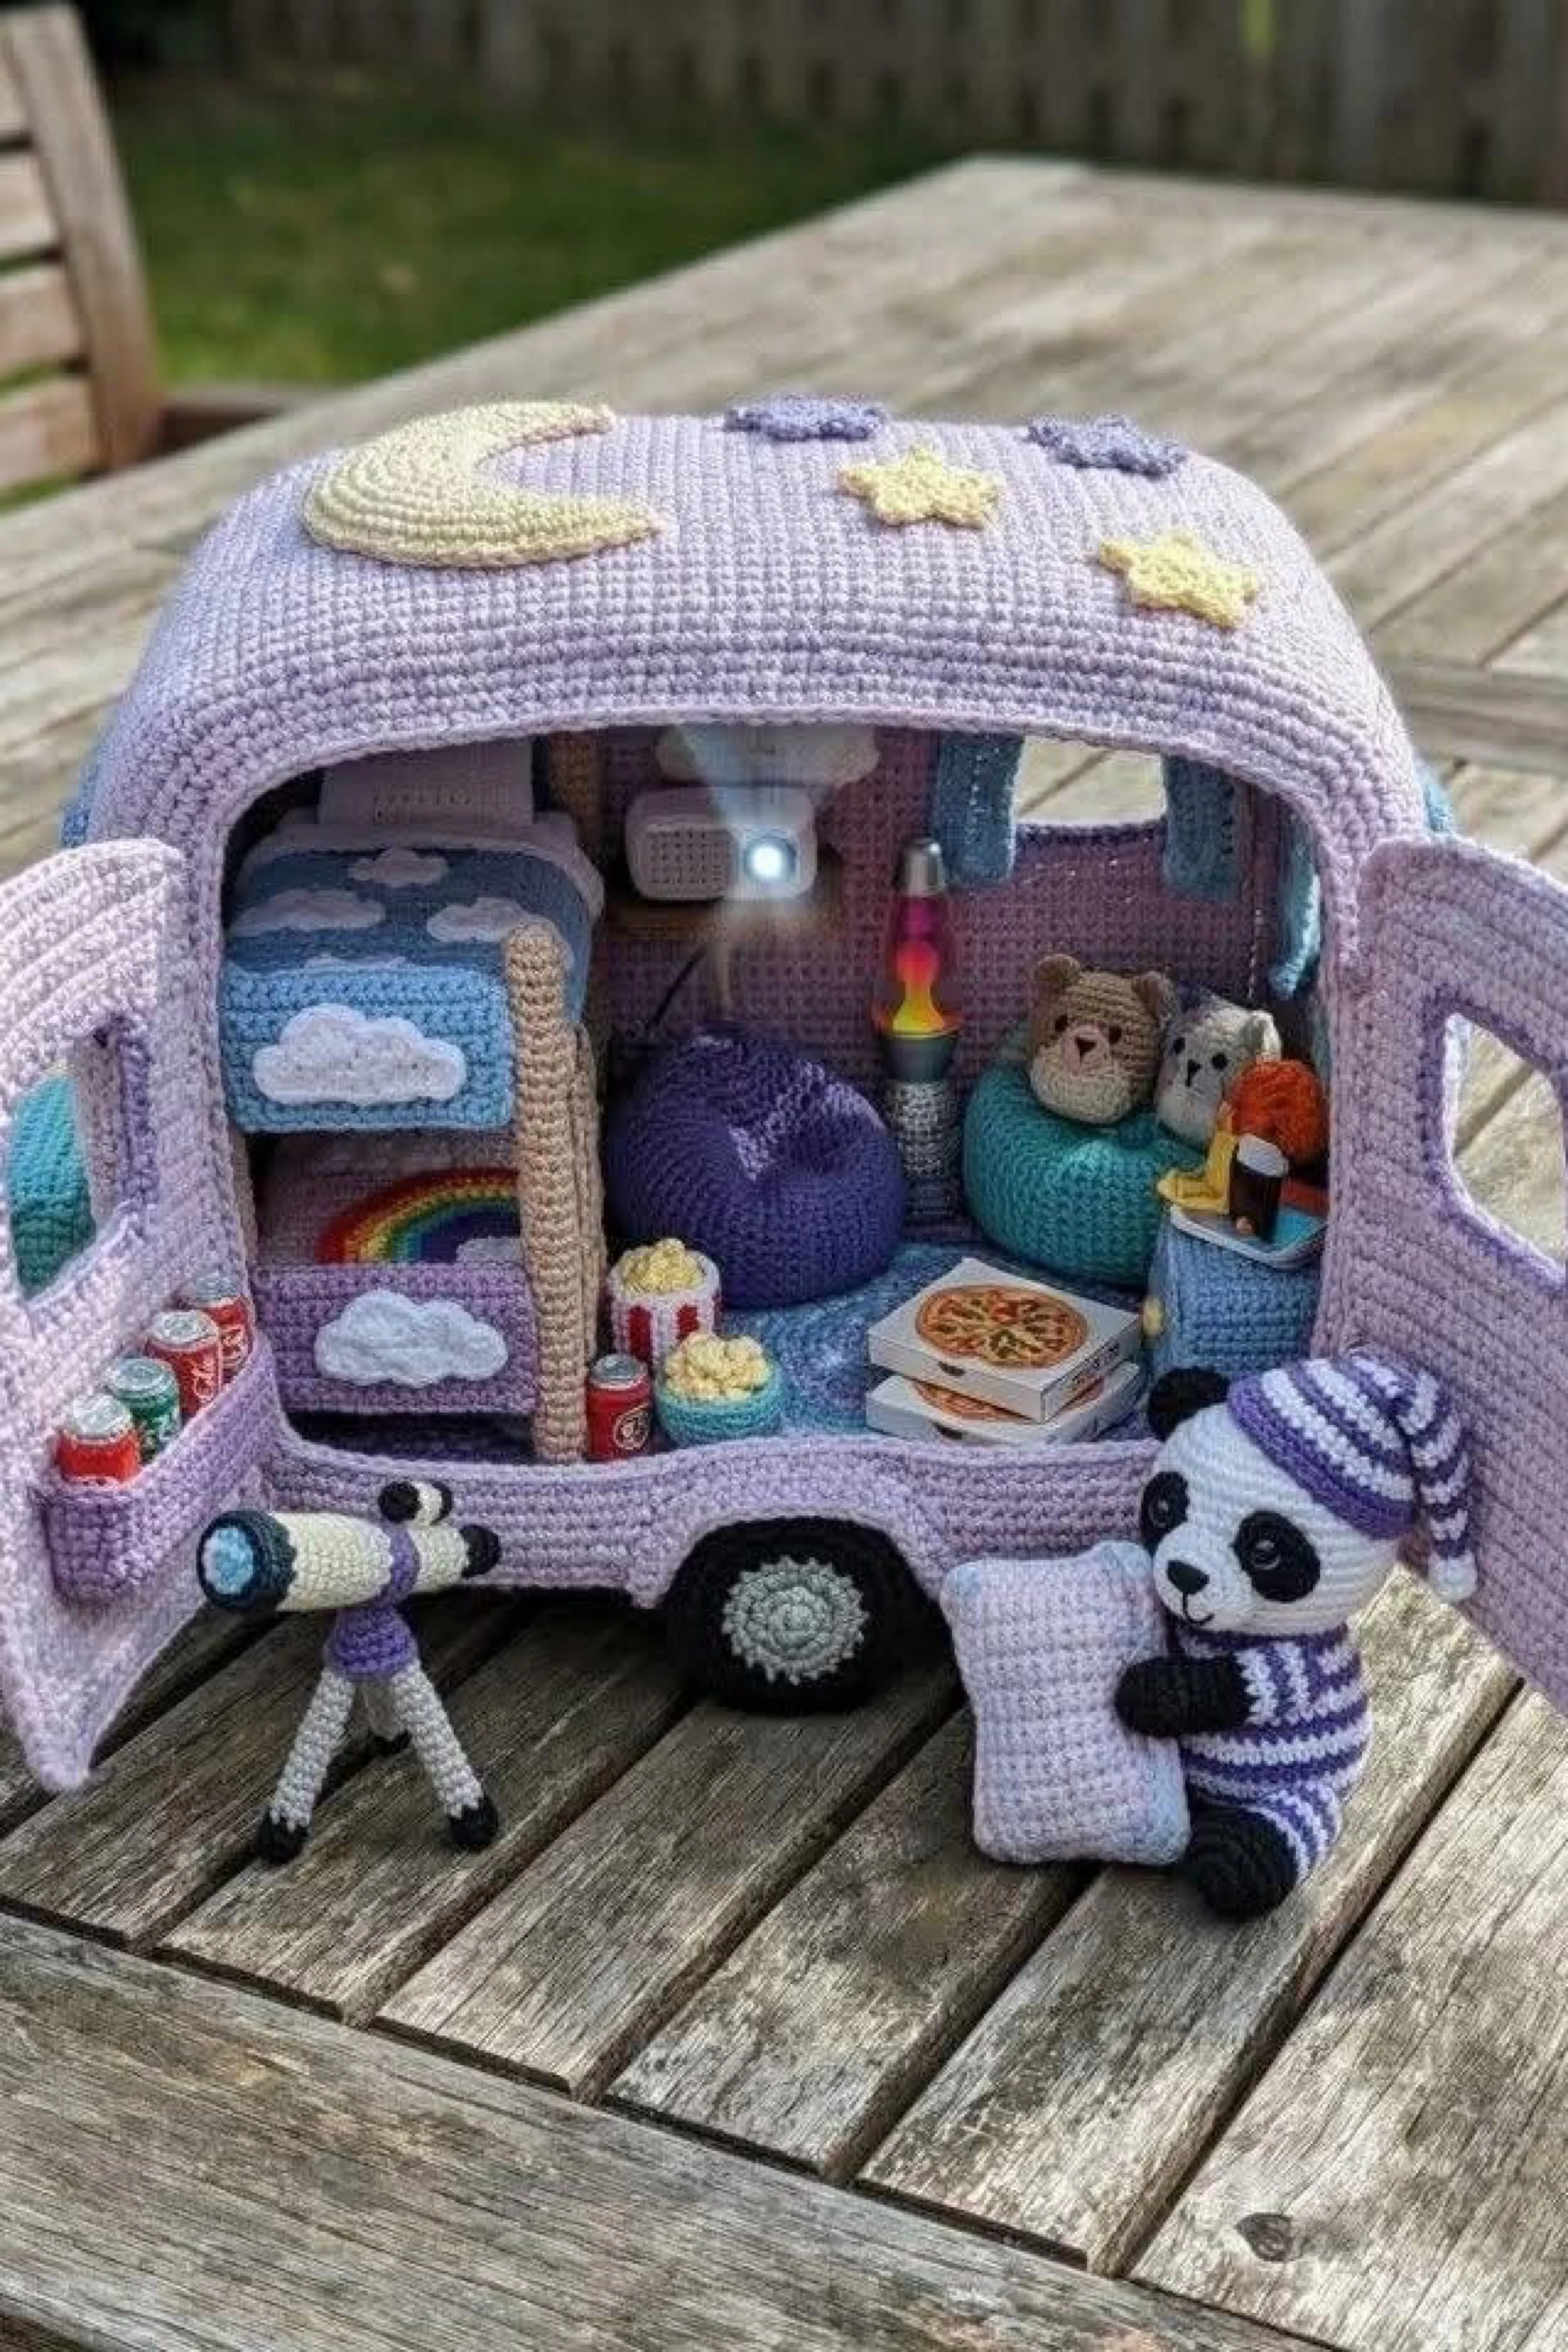
You are making a pastel crochet camper transformed into a tiny sleepover lounge. The photo shows a lavender trailer with a moon and stars on the roof, cloud themed bedding, a glowing projector feel inside, a beanbag, snacks, a telescope, and a pajama wearing panda friend posed just outside the door. It is whimsical, soft, and playful, with just enough structure to feel like a proper miniature room instead of a plush toy shell.
This is a great project for makers who love color storytelling. The magic comes from combining a sturdy camper frame with cozy accessories that instantly read as a dreamy night in.
Materials + tools list
- Worsted weight cotton yarn in lavender, lilac, soft blue, aqua, cream, white, black, gray, red, yellow, and pastel rainbow shades
- Small amounts of fuzzy or velvet yarn for optional plush accents
- Crochet hooks in sizes 2.25 mm, 2.75 mm, and 3 mm
- Yarn needle
- Stitch markers
- Scissors
- Polyester stuffing
- Plastic canvas, craft foam, or thick interfacing for structure
- Small LED tea light or dollhouse light if you want the inner glow effect
- Clear glue or fabric glue
- Felt in black, white, and cloud colors
- Embroidery thread for facial details and tiny accents
- Thin wire for telescope legs and light stand support
- Cardboard templates for walls and furniture
- Optional magnet or snap for an opening door
Finished size + customization notes
Aim for a camper around 10 to 12 inches long so the accessories have enough room to shine. The open side and door should be large enough for the bed, beanbag, and snack setup to read clearly from the front. If you want a more toy friendly version, simplify the accessories and make them larger. If you want a collector display version, use finer cotton and a smaller hook for sharper miniatures.
You can easily swap the panda for a bunny, bear, or cat and keep the whole dreamy camper theme intact.
Step by step instructions
Plan the camper body and open doorway.
This version has a large front opening plus an actual hinged or attached side door. Sketch the overall shell first with a rounded roof and boxy base. Mark the door on one side wall so you do not accidentally crochet both sides as fixed panels. The body should feel soft and rounded, not angular.Crochet the floor and lower shell.
Begin with a rectangular base in lavender or lilac. Work tight single crochet rows and reinforce with plastic canvas. Build the lower wall portions directly onto the base if you like working three dimensionally, or create separate panels if you prefer more control. Keep tension even because light pastel yarn shows every wobble.Create the side walls.
Make one side wall with a large open front area and one smaller window. Make the other side wall with a cutout for the door. Crochet the door separately as a rounded rectangle matching the curve of the wall opening. Add a narrow border so the edge looks finished and slightly padded.Join the shell and test the silhouette.
Attach the side walls to the floor and back panel first. Before sewing on the roof, hold the structure at eye level. You should now see the same soft camper silhouette as the photo, with generous openings and a cozy compact interior. If the opening looks too short, remove a few rows at the top before the roof begins.Make the arched roof panel.
Work the roof in lavender single crochet rows. Shape it as a broad arch that fits snugly from one side wall to the other. Reinforce it lightly so it stays curved. This roof is smoother and less textured than the pie camper roof, so your stitches become the surface design.Add the moon and stars appliqués.
Crochet a crescent moon in cream and several puffy little stars in pale yellow and lavender. Sew them onto the roof before final assembly. Space them in a scattered storybook layout. Visual checkpoint: the roof should already feel like a night sky even before the interior goes in.Install the roof and door.
Sew the roof to the camper shell carefully. For the door, either attach it permanently at a slightly open angle or use a soft sewn hinge along one side. Add a little inside pocket to the door and tuck in tiny soda cans if you want to match the image closely. This tiny detail gives the camper an instantly believable lived in feeling.Create the bed platform.
Crochet a slim rectangular bed frame in cream or pale wood tones. Add a mattress panel in soft blue and top it with cloud themed bedding. You can make cloud appliqués from white felt or crochet them separately and stitch them onto the blanket and pillow. Keep the bed tucked along the left side wall just like in the photo.Add under bed storage.
The rainbow peeking beneath the bed is one of the sweetest details. Crochet a small arched rainbow in pastel stripes and mount it under the bed frame or on the wall near the floor. This helps fill negative space and adds another playful layer without crowding the room.Make the beanbag and lounge area.
Crochet a pear shaped beanbag in rich purple, then stuff it lightly so it slouches instead of standing stiff. Place it in the center front of the camper. Add a second small floor cushion in aqua or turquoise along the back wall. If your seating looks too tall, reduce the stuffing. You want cozy floor lounging proportions.Build the projector or glowing feature.
The image suggests a tiny projection or lamp beam. You can recreate this with a mini LED tucked behind a small crochet projector box or lamp unit mounted near the upper center wall. Crochet a tiny box in white or lavender, then insert a battery light or mimic the glow with white felt and careful placement. Even if it does not light up, the visual suggestion is enough.Make the telescope.
Use cream and lavender yarn wrapped around wire or a slim tube for the scope body. Add three little tripod legs. Keep it tiny but recognizable. Place it outside the camper near the door so the whole theme reads as moon gazing and stargazing sleepover.Crochet snack accessories.
Make a striped popcorn tub, mini cans, and stacked pizza boxes. For the popcorn, use a tiny cup base with fluffy yellow knots or stitched puffs on top. Pizza boxes can be crocheted flat in cream with a tiny round pizza inside from tan and red yarn. These details are simple but tell the story immediately.Make the panda in pajamas.
Start with a classic amigurumi panda body using white and black yarn. Keep the limbs short and rounded. Add a striped lilac pajama set and a matching nightcap. A small pale pillow completes the pose. If your panda starts looking too large, stop earlier than you think. Mini scene characters grow fast.Create tiny soft toys.
Add one or two plush animal heads or mini stuffed friends in muted neutrals and pastel shades. Position them on the back cushion area. They do not need full bodies if only the heads and upper torso are visible from the front.Add curtains and interior softness.
Crochet or sew slim curtains in blue and aqua and hang them inside the windows. A soft rug in pale blue or mottled lavender can go on the floor. These gentle layers make the camper feel finished and help the pastel palette flow from one detail to the next.Refine the wheel and outside details.
Add a single gray wheel with a spiral center, a simple hitch, and neat edging along the camper base. Keep the outer silhouette clean because the pastel styling works best when the frame is uncluttered.Arrange the scene for maximum charm.
Put the bed to the left, beanbag in front center, soft toy cluster at the back, snacks near the right, and panda outside with the pillow. Set the telescope slightly forward of the open door. You should now see a complete miniature story: a dreamy night camper ready for snacks, movies, and stargazing. If the scene looks crowded, remove one snack piece. If it feels too empty, add another pillow or tiny book.Secure key pieces and leave a few movable.
Tack the bed, beanbag, and wall features in place. Leave the panda, telescope, and pizza boxes loose if you want styling flexibility. This makes photography easier too.Final shape check.
Compare your camper to the photo. The shell should feel rounded and plush but not floppy. The palette should read mostly lavender with soft blue accents. The mood should feel sleepy, magical, and a little playful. If yours looks too bright, swap in softer yarn tones. If it looks washed out, add one deeper purple accent like the beanbag.
Troubleshooting section
My pastel shell looks uneven.
Use cotton yarn and a smaller hook. Pastel shades show tension changes more clearly than dark colors.
The door droops.
Add a thin plastic canvas insert or sew the door permanently ajar instead of letting it swing freely.
The panda takes over the whole scene.
Scale the character down. Mini companions should usually be no taller than one third of the camper opening.
The interior is cute but not dreamy.
Add more softness. Clouds, stars, curtains, pillows, and one glow source all help shape the mood.
My telescope falls over.
Wrap the legs around a hidden wire core or tack it to the floor with a dot of glue for display.
Finishing details section
Steam block only the shell panels, not the stuffed accessories. Weave in ends with care because pale yarn makes shadowy tails obvious. Optional upgrades include a real LED projector glow, embroidered star constellations on the roof, tiny bedtime books, or a removable door so the interior is easier to photograph. You can also line the inside walls with fabric if you want an even softer dollhouse finish. A final lint roll or soft brush keeps pastel yarn looking clean and polished.
Shop Similar
- Lavender cotton yarn for pastel crochet miniatures
- Small crochet hooks for detailed amigurumi scenes
- Mini LED lights for dollhouse and craft projects
- Plastic canvas for structured crochet campers
- Pastel felt sheets for cloud and star appliqués
Style It With
Lavender Field Crochet Caravan How To Guide
What you’re making
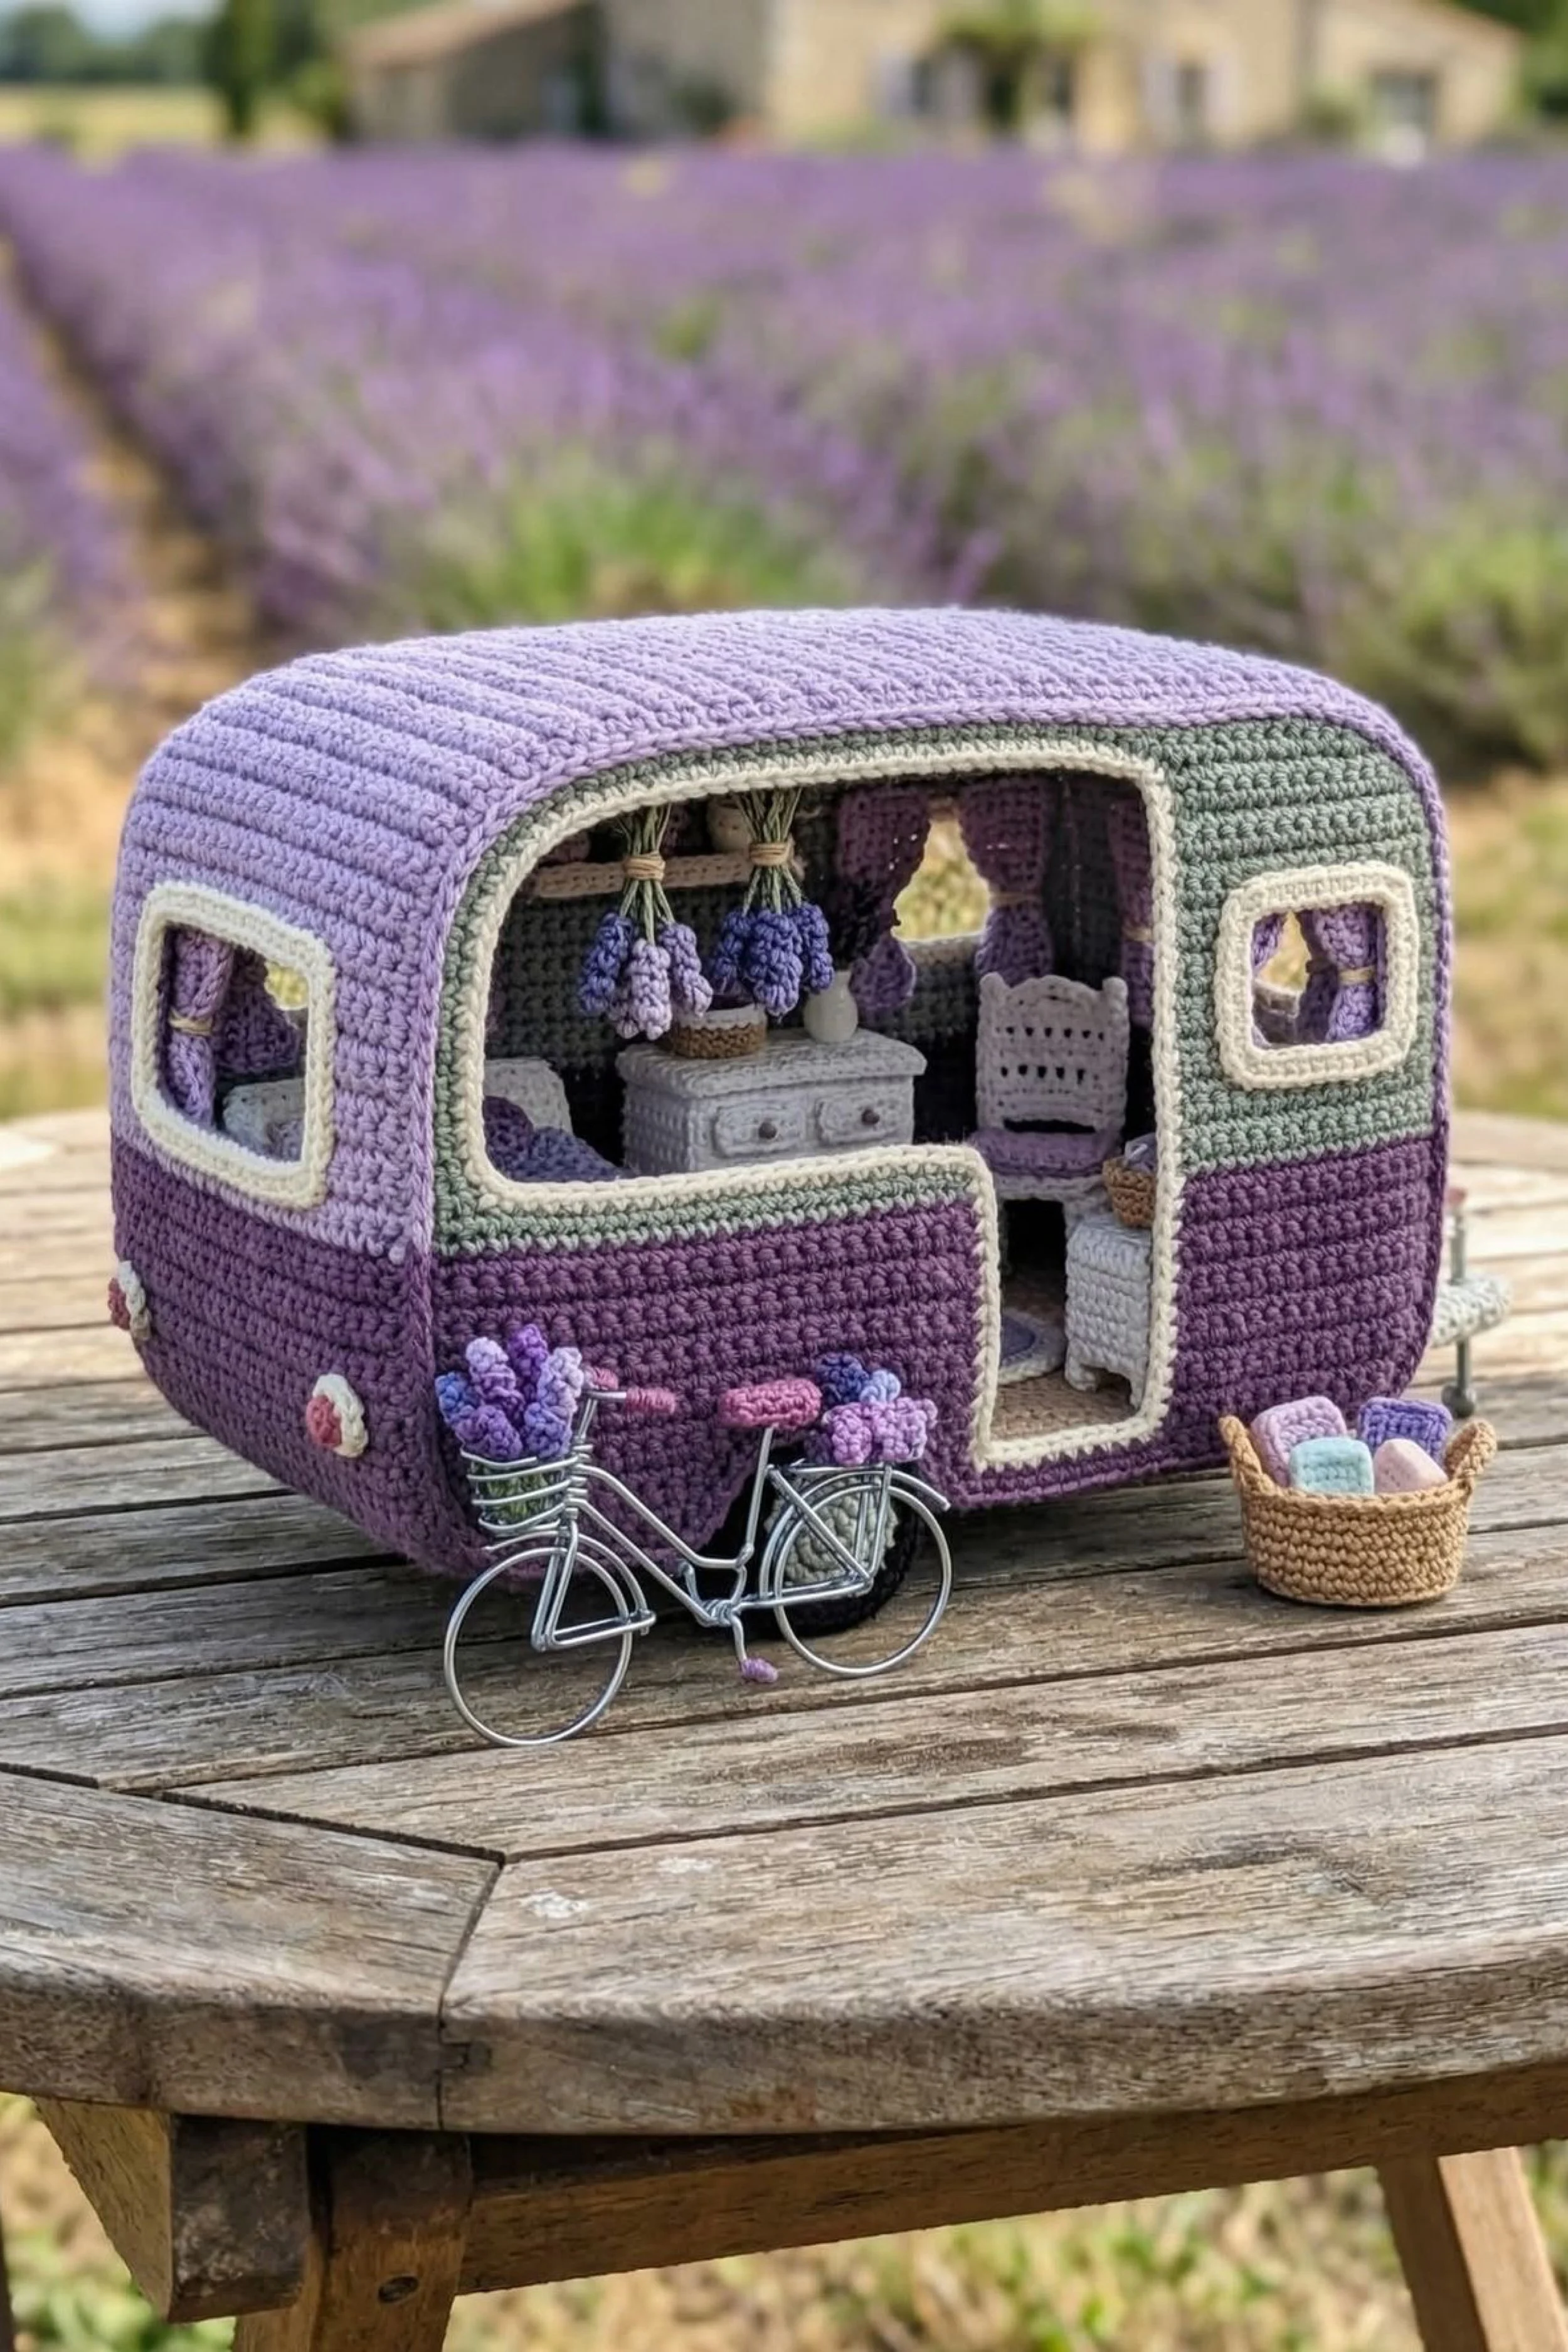
You are making a lavender inspired crochet camper with a soft cottage interior and a romantic countryside palette. The photo shows a small rounded caravan in layered purple and sage tones, trimmed in cream, parked in front of a lavender field with tiny bunches of lavender, delicate curtains, a white dresser, and a silver bicycle loaded with blooms. It feels peaceful, French inspired, and beautifully styled without becoming fussy.
The charm of this version comes from color blocking and restraint. Instead of packing the camper with many novelty items, you are creating a refined miniature scene where every detail feels calm and intentional.
Materials + tools list
- Worsted weight cotton yarn in lavender, dusty lilac, deep purple, sage green, cream, white, tan, and silver gray
- Crochet hooks in 2.25 mm, 2.75 mm, and 3 mm sizes
- Yarn needle
- Scissors
- Stitch markers
- Polyester stuffing
- Plastic canvas or heavy interfacing for structure
- Craft wire for bicycle details and furniture stability
- Small amount of floral wire for lavender stems
- Embroidery floss in green and purple
- Fabric glue
- Cardboard templates
- Optional lace ribbon or fine trim for extra cottage detailing
- Tiny basket base or stiff felt for the outside basket
Finished size + customization notes
This caravan looks especially elegant around 9 to 11 inches long. Keep the roof slightly lower and more elongated than the sleepover camper so the profile feels refined. The color bands matter here: pale lavender on top, sage through the middle, and deep purple at the base create the exact layered look. If you want a brighter spring finish, swap sage for mint. If you want a moodier countryside look, deepen the purple and soften the cream trim.
This design also works beautifully as a seasonal display for spring, summer, or lavender themed décor.
Step by step instructions
Map out the color blocked shell.
Draw the camper side with three horizontal color zones. The photo clearly separates pale lavender on top, muted sage in the middle, and a deeper purple along the base. This striped structure gives the caravan its polished visual identity, so plan the row counts for each band before you begin.Crochet the base and lower walls.
Work the floor in tan or beige single crochet with a stiff insert. Then build the lower section of the side walls in deep purple. This lower band should be substantial enough to anchor the whole camper visually. Keep the stitch tension tight so the stripes stay clean and straight.Shape the door opening.
One side of the camper has a central open doorway rather than a giant service window. Mark the door placement and crochet around the opening carefully. You want enough room to see inside while preserving the cozy enclosed feeling. Add window openings on both sides with rounded corners.Add the middle sage band.
Change to sage green and continue upward. Carry the color cleanly and align each row at the same height on both side panels. If your stripe jogs harshly at the seam, finish off and rejoin yarn strategically instead of carrying it across.Work the top lavender section and roof.
Transition to pale lavender for the upper wall and roof curve. Crochet the roof as a continuous rounded extension if you enjoy shaping in one piece, or create a separate roof panel and sew it later. The silhouette should feel compact and gently arched. Visual checkpoint: you should now see a neat vintage caravan form with soft countryside colors.Trim the openings in cream.
Add cream edging around the door and window openings. This crisp trim frames the colors and mirrors the photo beautifully. Work one even round of single crochet or slip stitch border. The trim should sharpen the shape without becoming bulky.Join the body and reinforce it.
Sew side walls, front, back, and roof together, inserting support as needed. This camper looks smooth and tailored, so avoid over stuffing. Instead, rely on internal structure. Set the shell on the table and make sure it stands level.Create the interior dresser.
Crochet a tiny white dresser with two or three shallow drawers. Use gray embroidery or tiny stitched lines for drawer seams and handles. Insert cardboard so the top surface stays flat. Place it toward the back interior wall, visible through the doorway.Make the chair and bedside style pieces.
Crochet a petite chair or narrow stool in white or cream with a lavender cushion. Keep it delicate. The furnishings in this scene feel light, not chunky. A tiny side table or small storage box can sit opposite if you want to fill the room further.Craft the lavender bundles.
For each bunch, wrap a little floral wire or stiff thread with green yarn for stems, then attach several tiny purple bobbles or French knots for blooms. Tie the bunches with beige embroidery thread and hang them from a small rack inside. This single detail does so much to tell the story of the camper.Add curtains.
Crochet or sew slim purple curtains and tie them back lightly. Place one at the rear window and one at the side window. Keep the fabric or crochet soft and draped. If the interior feels too plain, curtain details bring immediate warmth.Create the mini rug and floor basket.
A tiny circular rug in pale lavender, cream, or dusty violet gives the doorway a finished look. A small basket near the entrance can hold folded textiles or extra blooms. These help lead the eye into the scene.Make the outside bicycle.
This is one of the standout styling pieces. Use silver wire to shape a tiny bicycle, or substitute a purchased miniature bike and embellish it with crochet touches. Add little baskets or a front carrier filled with lavender stems. Even if the bike is not fully crocheted, it can still work beautifully as part of the handmade scene.Create the towel or linen basket.
Crochet a small tan basket and fill it with rolled pastel “towels” made from tight little fabric or crochet cylinders. Place it outside near the doorway. This adds a practical cottage touch and balances the bicycle visually.Add the wheel and hitch.
Use a gray wheel with a light center and attach it low and centered beneath the doorway area. Add a simple silver hitch at the front. Keep these understated so the color palette remains the focus.Refine the entry area.
The open doorway should feel welcoming. Add a cream border, a visible threshold, and perhaps a tiny step rug just inside. If the opening edge curls outward, slip stitch around it with slightly tighter tension.Style the interior with intention.
This camper should not feel cluttered. Place the dresser at the back, lavender bundles above, chair to one side, rug centered, and curtains framing the windows. You should now see a calm little retreat that feels more like a lavender cottage on wheels than a toy camper. If yours looks busy, remove one item.Balance the exterior vignette.
Place the bicycle toward the front side and the linen basket near the doorway. Keep them low so they do not compete with the caravan itself. The photo succeeds because the props support the story rather than stealing it.Fine tune color harmony.
If one shade feels too bright, lightly mute it by swapping one accessory to cream or sage. The finished piece should feel soft and layered. If yours looks flat, add one more small pop of deeper purple in a curtain tie or floral bunch.Secure and finish.
Tack key furnishings into place, weave in ends, and gently block the curtains and roof. Compare the whole piece to the image. You should now have a romantic purple camper that feels airy, floral, and beautifully serene.
Troubleshooting section
My color bands do not line up.
Count rows carefully and mark transition points on both side panels before changing yarn colors.
The camper looks more childish than elegant.
Use dusty muted tones rather than bright purple and keep accessories minimal.
My lavender bunches look like grapes.
Use fewer bobbles and make stems slightly longer. Real lavender reads as slim and airy.
The bike overwhelms the camper.
Scale it down or place it slightly farther forward so it reads as a prop, not the main subject.
The doorway curls.
Add a firmer trim round in cream and block the opening flat before final styling.
Finishing details section
For the most polished result, block the shell panels before joining and lightly stiffen the curtains so they keep their tied back shape. Optional upgrades include faux wood embroidery on the floor, a tiny enamel style pitcher on the dresser, a removable lavender wreath for the side wall, or a soft mattress at the back if you want a more cottage bedroom feel. A discreet loop at the top back can even let this piece hang as wall art if displayed against a floral background.
Shop Similar
- Dusty lavender and sage cotton yarn set
- Mini crochet hooks for fine detail work
- Floral wire for miniature lavender stems
- Plastic canvas sheets for structured crochet décor
- Miniature decorative bicycles for craft displays
Style It With
Crochet Greenhouse Camper Make It Yourself Tutorial
What you’re making
You are making a mint green crochet camper that has been transformed into a miniature greenhouse and plant shop. The photo shows a bright airy structure with large window panels, hanging planters, shelves packed with succulents and cacti, tiny terrariums, a gardening bench, and a crowned frog sitting proudly inside like the keeper of the whole space. It is cheerful, botanical, and wonderfully detailed while still feeling clean and organized.
This project is ideal for makers who love tiny plants and want a showpiece craft that doubles as décor. The secret here is structure and repetition: once you build the shell and shelves, the many small pots create the lush layered look.
Materials + tools list
- Worsted weight cotton yarn in mint, pale aqua, emerald, dark green, cream, terracotta, brown, beige, gray, pink, and yellow
- Crochet hooks in sizes 2 mm, 2.25 mm, 2.75 mm, and 3 mm
- Yarn needle
- Scissors
- Stitch markers
- Polyester stuffing
- Plastic canvas or strong clear packaging plastic for structure and window frames
- Clear vinyl or acetate sheets for greenhouse window panels
- Floral wire or thin craft wire for hanging planters
- Embroidery floss for plant details
- Cardboard templates for the shell and shelves
- Fabric glue or clear drying craft glue
- Optional tiny beads for terrarium accents
Finished size + customization notes
This camper wants a slightly taller build than the others because the greenhouse shelves need vertical space. Aim for about 10 to 12 inches tall and 8 to 10 inches long, depending on how many rows of shelves you want. The windows are essential, so avoid overly fuzzy yarn and choose cotton with crisp stitch definition. If you want a softer cottage plant van, reduce the window area and add more wall. If you want a true greenhouse look, enlarge the top window band and use clear inserts.
You can theme the plants in many ways: desert cactus, tropical foliage, herb garden, or mixed succulent collection.
Step by step instructions
Draft the greenhouse profile.
Unlike the rounded campers, this one has a taller, more upright silhouette with a broad serving style opening and a band of upper windows. Sketch the side first, marking the large front opening, circular side window, and three upper roof windows. These proportions are what make it read as greenhouse rather than camper.Crochet the floor and lower frame.
Make a sturdy rectangular floor in beige or tan. Build the lower mint walls upward in tight single crochet. Insert plastic canvas into the base and side edges. Because this shell has many openings, support is especially important.Create the large windowed side walls.
Crochet the side walls in mint with darker green trim. Leave generous open sections for the main side opening and window areas. Frame the openings with darker edging so they mimic greenhouse metal or painted wood supports. The photo has a very tidy frame, so crisp edging matters.Add the top window band.
Crochet three narrow upper window frames across the top section and border them in dark green. Attach clear vinyl behind them if you want the same airy, glasshouse feeling. Visual checkpoint: you should now see the shell beginning to resemble a miniature conservatory.Join the body and reinforce the roofline.
Sew the walls to the base, front, and back. Add hidden support along every top edge. This is what keeps the large openings from sagging. If your structure leans, reinforce before adding anything decorative.Insert clear window panels.
Cut vinyl or acetate slightly larger than each opening and glue or stitch it from behind. Keep the glue minimal and neat. These transparent panels instantly create that greenhouse look. If you prefer all yarn construction, you can leave openings empty, but the botanical glasshouse effect will be softer.Build interior shelving.
Create three levels of shelves along the back wall using beige, taupe, or light gray yarn over plastic canvas. Add another long shelf along the right side. Make sure the shelves can hold small crochet pots without bowing. A slightly rustic finish works well because it contrasts nicely with the crisp window lines.Crochet the terracotta pots.
Work many tiny pots in rounds using terracotta yarn. Keep some short and wide, others tall and narrow. Make at least fifteen if you want the lush density seen in the photo. Add a cream or brown round base if you want extra stability.Make cactus forms.
Create slim column cacti, round barrel cacti, paddle cacti, and tiny clustered succulents. Use dark green, medium green, and blue green shades. Add French knot flowers in pink or yellow on a few cactus tops. The variety matters. If every plant is the same height, the shelves will look flat.Crochet trailing plants.
For string of pearls style vines, make a cord with evenly spaced bobbles. For spider plants, stitch long cream and green leaves from a central point. For ferns, work chains with tiny side loops. Hanging plants are key because they bring movement to the upper part of the scene.Create hanging planters.
Make small terracotta baskets and suspend them from cream cords or knotted crochet strands. Attach one on the left with a trailing vine, one in the center with a spider plant, and one on the right with a compact plant. Make sure the cords are even so the pots hang naturally.Add terrariums and jars.
Crochet or assemble tiny jar shapes with clear beads, vinyl scraps, or stitched outlines. Place them on the right side shelf. A tiny book or seed packet beside them helps the greenhouse feel like a real workspace.Make the frog character.
Crochet a bright green frog with a cream belly and a little crown. Keep the body squat and cheerful. Place it on a lily pad style mat inside the camper. This gives the scene personality without distracting from the plant focus.Construct the gardening bench.
Build a simple small bench or potting table for the exterior right side. Add a lower shelf and place tiny seed bags, pots, tools, and soil pieces on it. Use wire wrapped yarn for a mini trowel and spade. A little watering can in gray or silver completes the setup.Add a floor rug and central path.
A small round jute colored rug or woven style mat warms up the space and prevents the camper from looking too utilitarian. Keep it subtle so the plants remain the stars.Arrange the plants by height and type.
Place taller cacti on the middle shelf, rounded succulents on the lower shelf, and statement trailing plants up high. Put broad leaf plants like monstera or larger foliage near the floor. You should now see a lush layered plant display with clear visual rhythm. If the shelves feel messy, group pots by height rather than color.Refine the greenhouse mood.
Add one tiny mug, a little gardening book, and perhaps a jar of cuttings. These hints of human use make the scene feel curated and lived in. Keep extras minimal. Plants already provide plenty of texture.Finish the exterior details.
Add the wheel, hitch, circular side window trim, and neat dark green lines around the window frames. Make sure the shell still looks bright and open. If it feels visually heavy, reduce dark trim and let the mint dominate.Secure the main pieces.
Tack shelves, hanging planters, and the largest floor pots in place. Leave one or two smaller pots loose if you want to rearrange for photos. The frog can be fixed or removable.Final visual check.
Compare your work to the photo. You should now see a mint greenhouse van full of varied greenery, hanging texture, and miniature gardening tools. If yours looks sparse, add more small pots rather than one giant plant. If it looks too crowded, create more negative space around the frog and central floor area.
Troubleshooting section
My camper collapses at the openings.
This build needs more structure than a standard amigurumi piece. Add support to all edges and shelf connection points.
The plants all blend together.
Use at least three green tones and mix leaf shapes. Contrast is what keeps the collection readable.
The hanging planters sag.
Use wire inside the cords or anchor them into the roof support instead of only through soft crochet stitches.
The greenhouse does not look bright enough.
Increase the size of the clear window areas and use lighter mint yarn for the shell.
My pots tip over.
Flatten the bottoms more firmly and stitch them lightly to the shelf surface.
Finishing details section
Wipe the clear panels gently before photographing so they stay transparent and polished. Steam block the shell and shelves, but keep heat away from acetate or vinyl. Optional upgrades include a tiny hanging sign, plant labels, a removable seasonal display table, or battery lighting hidden behind the shelves for a sunlit effect. For a truly refined finish, line the inside seams with matching yarn so no support edges show from the front.
Shop Similar
- Mint green cotton yarn for crochet décor builds
- Clear vinyl sheets for craft windows
- Terracotta colored yarn for miniature plant pots
- Mini crochet hooks for succulent and cactus details
- Plastic canvas for structured miniature scenes
Style It With
Waffle Breakfast Camper Step by Step Tutorial
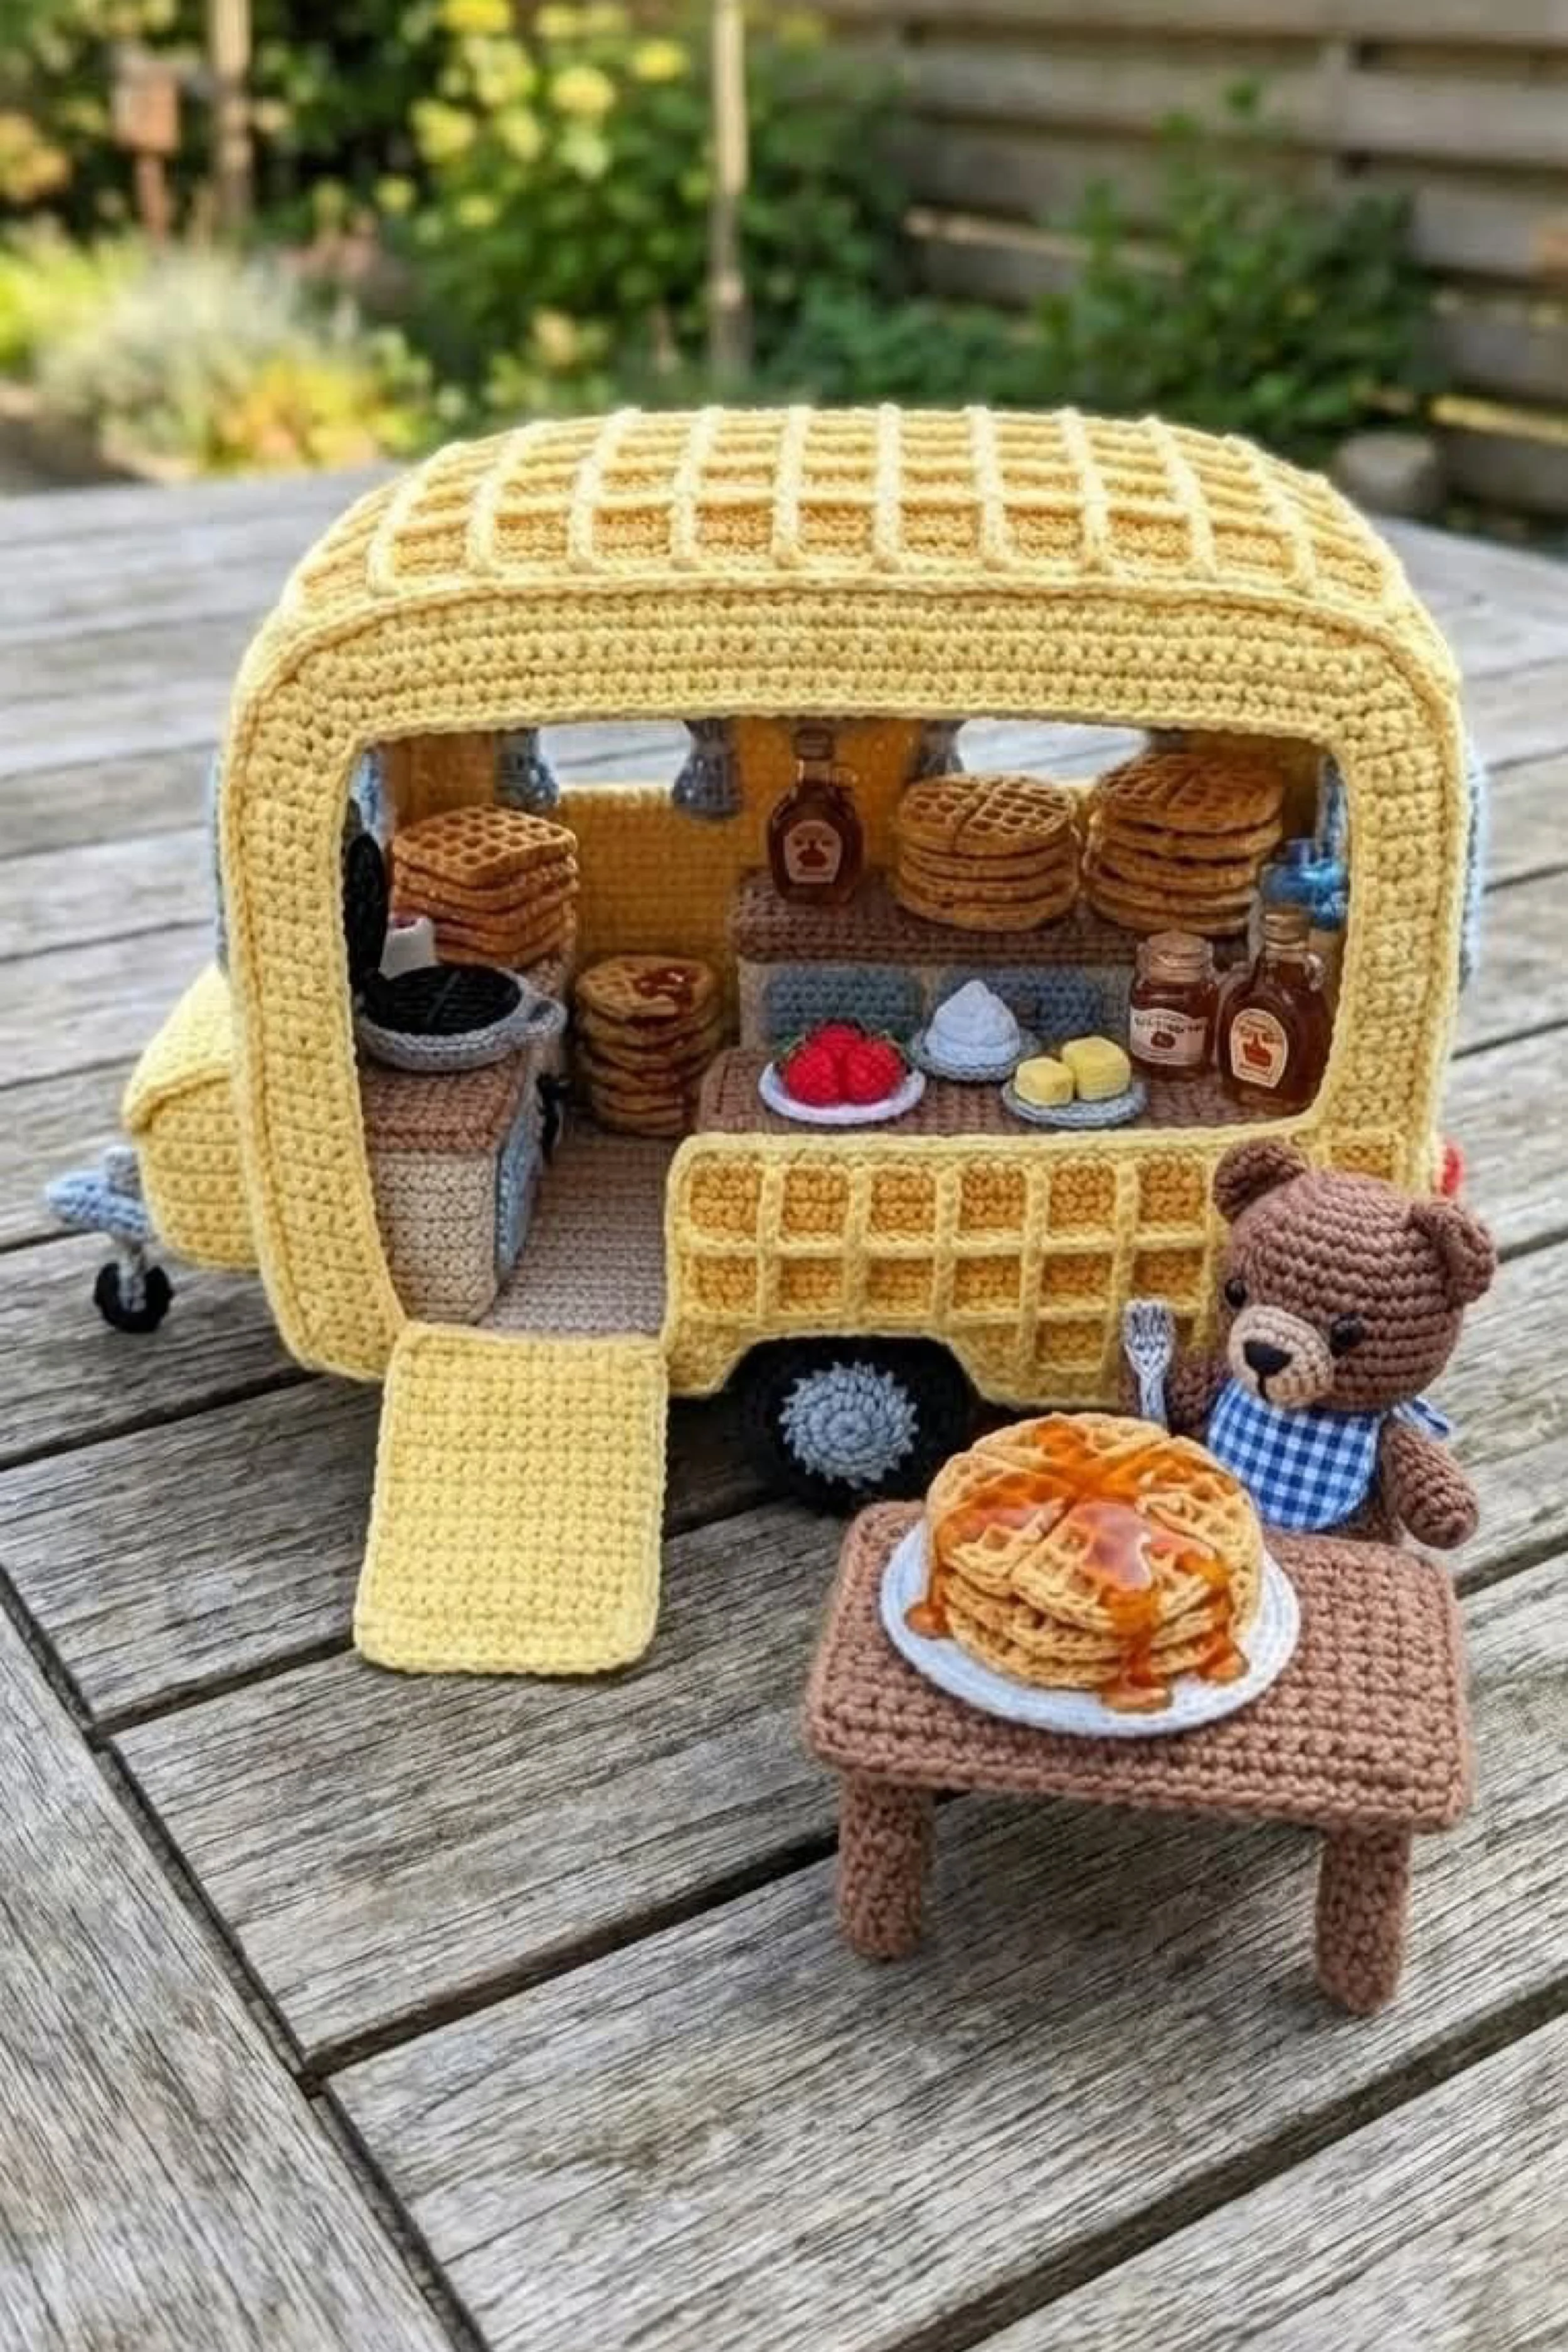
What you’re making
You are making a cheerful miniature crochet camper styled as a breakfast wagon overflowing with waffles, syrup, berries, and cozy diner charm. The photo shows a sunny yellow camper with a waffle textured roof and counter, stacks of waffles inside, tiny bottles of syrup, whipped cream, a teddy bear diner guest, and a little outdoor table topped with a syrup drenched plate. It is sweet, playful, and incredibly effective because the whole build commits fully to one delicious theme.
This project is perfect for anyone who loves novelty crochet done in a polished way. The camper shell itself is simple, but the food styling and waffle texture transform it into a standout piece.
Materials + tools list
- Worsted weight cotton yarn in pale yellow, golden yellow, cream, tan, brown, gray, black, white, red, blue, and amber
- Optional DK cotton for smaller food details
- Crochet hooks in 2.25 mm, 2.75 mm, and 3 mm sizes
- Yarn needle
- Scissors
- Stitch markers
- Polyester stuffing
- Plastic canvas or stiff felt for structural panels
- Cardboard templates for furniture
- Thin wire for syrup bottle necks or tiny cutlery if desired
- Fabric glue or tacky glue
- Embroidery thread for facial details on the teddy bear
- Small plate or stiff circle insert for the table setting
Finished size + customization notes
This camper looks best at about 9 to 11 inches long and 7 to 8 inches tall. The front opening should be wide enough to show the stacks of waffles clearly. The removable front flap or ramp in the photo can be recreated as a sewn panel that folds down. If you want a more compact build, keep the accessories fewer and larger. If you want a collector style piece, use finer yarn and create more stacks, toppings, and countertop details.
The theme can also become pancakes, brunch, donuts, or a maple breakfast stand with only minor changes.
Step by step instructions
Design the breakfast camper shell.
Sketch a rounded yellow caravan with a very open front face and a rear bump for the hitch area. This version reads almost like a serving kiosk on wheels, so keep the opening large. Mark where the fold down panel will sit at the lower front edge.Crochet the base and outer shell.
Begin with a rectangular tan floor and reinforce it. Build the side walls and back in pale yellow single crochet with smooth rounded corners. Insert plastic canvas or interfacing into the walls so they hold a neat, display ready shape. Join the shell, leaving the front broad and open.Make the fold down front panel.
Crochet a rectangular yellow panel sized to the front lower opening. Add a soft hinge by sewing one long side to the camper edge, or simply position it in an open angle for display. This little ramp like flap adds a cute food truck feel and also helps frame the inside scene.Create the waffle texture for the roof.
This is the key detail. Make a broad roof panel in yellow, then add narrow raised strips in a grid pattern across the top to mimic waffle squares. Sew the strips down neatly so the grid stays even. The same effect can be used on the front service counter for a matched theme. Visual checkpoint: once the roof is on, the camper should instantly suggest a waffle.Attach the roof and outer details.
Sew the roof onto the shell carefully, easing around the curve. Add the wheel and hitch in gray. Keep the exterior very clean since the interior accessories do most of the storytelling.Build the back counter and griddle area.
Crochet a compact counter unit in beige or light brown for the back left interior. Add a tiny griddle or waffle iron surface in black or dark gray. This grounds the breakfast story and gives the stacks of waffles a believable source.Create the interior display shelf.
Add a small side shelf or raised platform on the right back side to hold bottles, whipped topping, and extra waffle stacks. Use cardboard inside so the top stays flat. The image shows varied levels inside, which makes the display feel abundant instead of flat.Crochet the waffles.
Work many flat rounds or squares in warm golden tan, then top them with stitched waffle lines or a tiny grid overlay. Make several loose waffles for stacking. Some can be plain, one can have a berry topping, and one can sit on the outside table with syrup cascading down. Keep the edges slightly rounded rather than sharp.Make the syrup bottles and toppings.
Use amber brown yarn for syrup bottles with cream or tan caps. Add a small whipped cream swirl in white and a berry cluster in red. Tiny butter pats can be little yellow squares or circles. These small accents create the appetizing brunch mood.Style the inside stacks.
Pile waffles high on the back counter and side shelf. Vary the stack heights so it does not look too uniform. Place syrup bottles beside them and keep the center area open enough to see each detail. If the interior feels cramped, reduce one stack rather than shrinking every piece.Make the teddy bear diner guest.
Crochet a small brown teddy with rounded ears, cream muzzle, and embroidered nose. Dress it in a blue gingham style bib or top to echo the picnic breakfast mood. Keep the bear posed beside the outdoor table, fork in hand if you want extra charm.Build the outdoor table.
Crochet a simple brown rectangular table with sturdy legs. Place a plate on top and add a tall stack of waffles with syrup running over the sides. You can suggest syrup with glossy amber yarn stitched in loose curves or with a little line of clear drying dimensional craft glue over brown yarn for shine.Add window curtains and interior softness.
Small gray or neutral curtains inside the camper make the scene feel more lived in. Keep them understated so they do not compete with the yellow waffle textures.Refine the service counter.
The front right ledge in the photo repeats the waffle grid motif. Crochet a short panel and stitch a small raised grid onto it to mimic the roof. This repetition makes the whole design feel intentional and well art directed.Check the color balance.
This build works because of the warm palette: yellow shell, tan waffles, amber syrup, brown furniture, and small red fruit accents. You should now see a cozy breakfast van, not simply a yellow camper with random food. If it looks too plain, add one more syrup bottle and a plate. If it looks too busy, remove one stack.Secure main accessories.
Fix the interior shelves and major waffle stacks with a few hidden stitches or a dab of glue. Keep the outdoor table and bear loose if you want flexibility for photos and shelf styling.Shape the fold down panel.
If you included a movable front flap, block it flat so it rests nicely on the table or surface. If it sticks upward, add a hidden insert or stitch a little support tab underneath.Final realism touches.
Add a tiny napkin, a mini fork, or a second plate inside. Even one or two extras can make the breakfast scene feel complete. You can also place a tiny coffee mug near the back counter if you want a diner breakfast moment.Compare to the photo and edit.
The photo is playful but organized. The waffles are abundant, yet every detail is readable. Step back and ask whether your eye knows exactly where to look. If not, clear space around the main stacks and outside table.Finish and display.
Weave in every end, brush away lint, and block any warped panels. Your finished camper should look like a tiny brunch dream, cheerful enough for a kitchen shelf and detailed enough for close up photos.
Troubleshooting section
My waffle texture does not show well.
Make the raised grid strips thicker or use a slightly darker golden yellow on top of a pale yellow base.
The interior food looks like cookies, not waffles.
Add more defined grid lines and stack them in taller breakfast style piles.
The fold down panel droops too much.
Insert plastic canvas or make the panel with a tighter hook for more firmness.
The bear is too large for the table scene.
Reduce the stitch count early. Characters scale up fast in worsted yarn.
My breakfast palette feels flat.
Introduce stronger contrast with amber syrup, bright berries, and creamy whipped topping.
Finishing details section
Steam block shell pieces before adding food items and characters. Optional upgrades include a tiny menu board, mini gingham placemat, removable syrup bottles, or a hidden magnet to hold the flap closed when not displayed. For a glossy syrup effect, use embroidery floss over the yarn syrup lines or a clear dimensional medium sparingly. A soft matte finish everywhere else helps the syrup stand out.
Shop Similar
- Golden yellow cotton yarn for novelty crochet décor
- Amigurumi hook set for miniature food crochet
- Plastic canvas for structured miniature campers
- Gingham fabric for tiny kitchen and picnic accents
- Fiber fill stuffing for crochet toys and miniatures
Style It With
By the time you finish one of these crochet campers, you will have made far more than a miniature trailer. You will have built a tiny scene with atmosphere, texture, and personality stitched into every corner. That is the real magic of projects like these. They blend structure, storytelling, and soft handmade detail in a way that feels both playful and surprisingly elegant. From the shape of the roof to the tiniest accessory on a shelf, every choice helps create a finished piece that feels thoughtful, charming, and completely unique.
These campers also leave plenty of room for your own creativity. You can change the color palette, swap out the accessories, add seasonal details, or turn one theme into something entirely your own. A pie caravan can become a holiday bakery. A sleepover camper can become a reading nook. A greenhouse on wheels can shift into a flower shop, herb cart, or plant filled studio. Once you understand the basic shell and how to layer in the miniature details, the possibilities open up beautifully.
Most of all, these are projects to enjoy slowly. Take your time with the shaping, pay attention to the little styling moments, and let yourself have fun with the storytelling side of the build. The finished result is the kind of crochet piece that feels special on a shelf, sweet in photos, and impossible not to smile at. Whether you make one camper or all five, you will end up with a handmade miniature that feels cozy, imaginative, and full of heart.