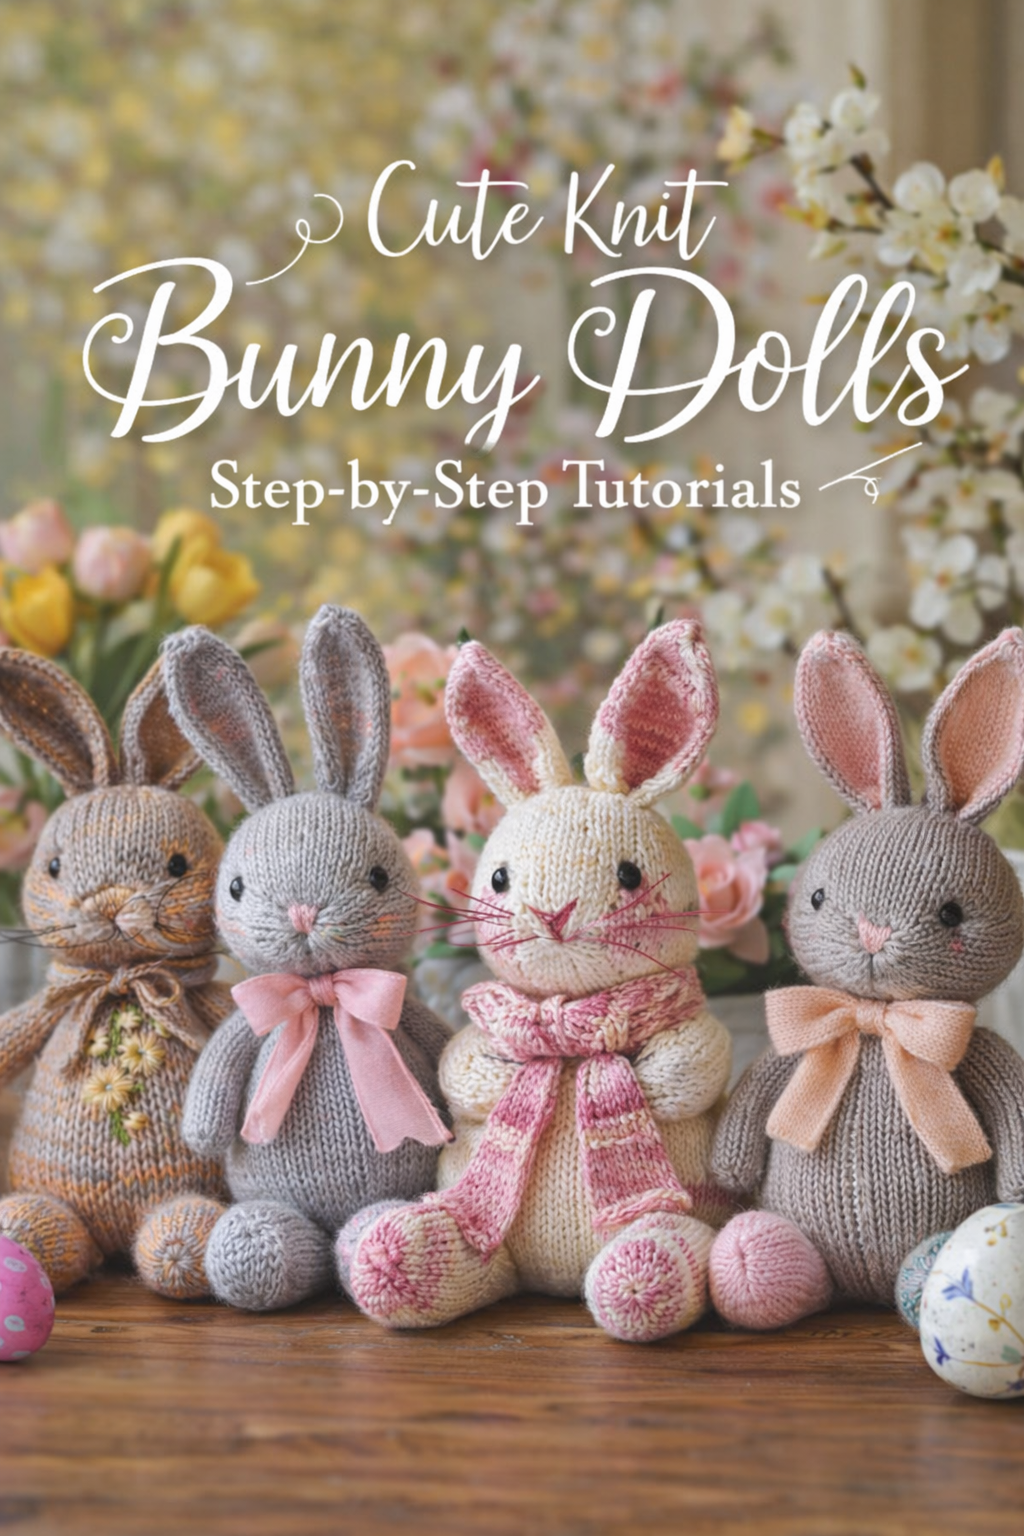
6 Soft Bunny Garland Ideas to Sew for Spring Step by Step Tutorial
More like this
There is something so charming about a handmade spring garland, especially when it blends soft pastel color, gentle texture, and just enough whimsy to make a room feel instantly lighter. These six bunny garland ideas have that exact sweet spot. They feel playful and seasonal, but still polished enough to style across a mantel, tuck into a window, drape over a shelf, or use as part of a soft Easter decorating moment. What makes them especially lovely is how approachable they are. The shapes are simple, the materials are easy to find, and the finished result looks far more boutique than difficult.
Across these six variations, you will see how small changes in pennant shape, felt texture, bunny color, and pom pom size can completely shift the mood of the finished piece. Some feel airy and delicate for bright windows, while others lean more cottage inspired or softly tailored for mantels and entry tables. That is the beauty of this project. You can follow the same basic construction and still end up with something that feels personal to your home. Whether you want a clean pastel bunting, a sweeter appliqué style, or a more textured rustic banner, these ideas give you plenty of room to create something beautiful for spring.
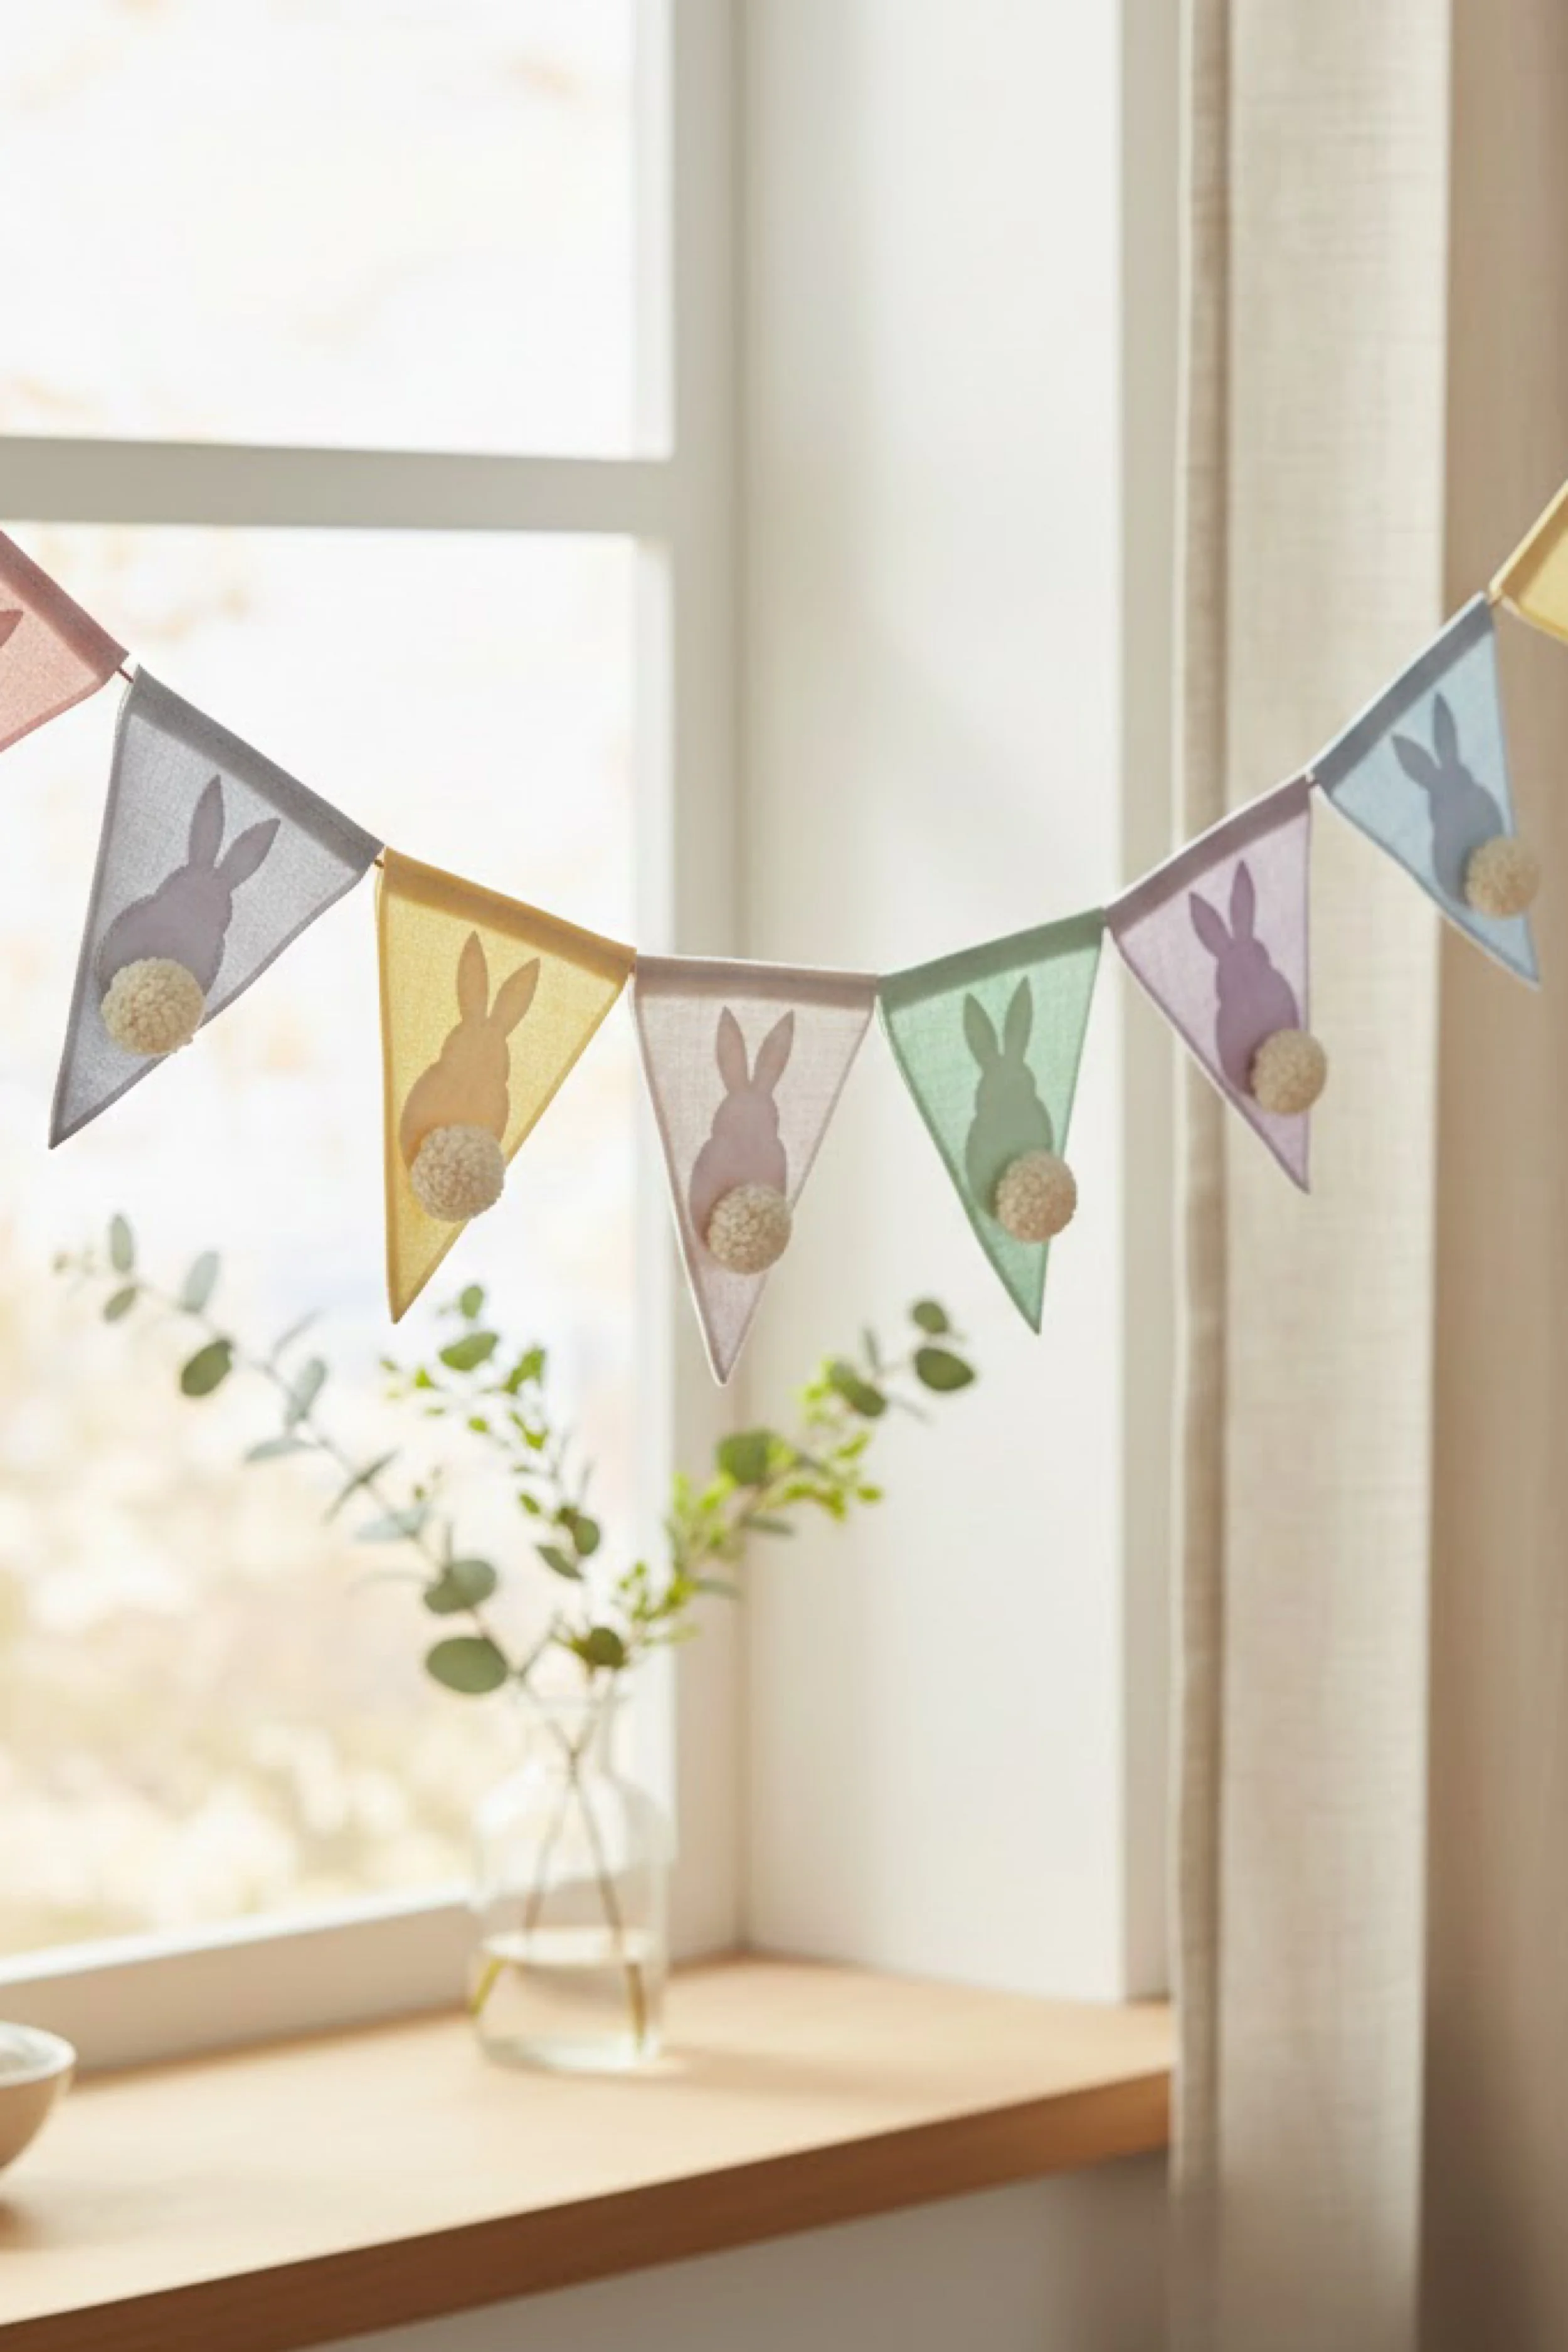
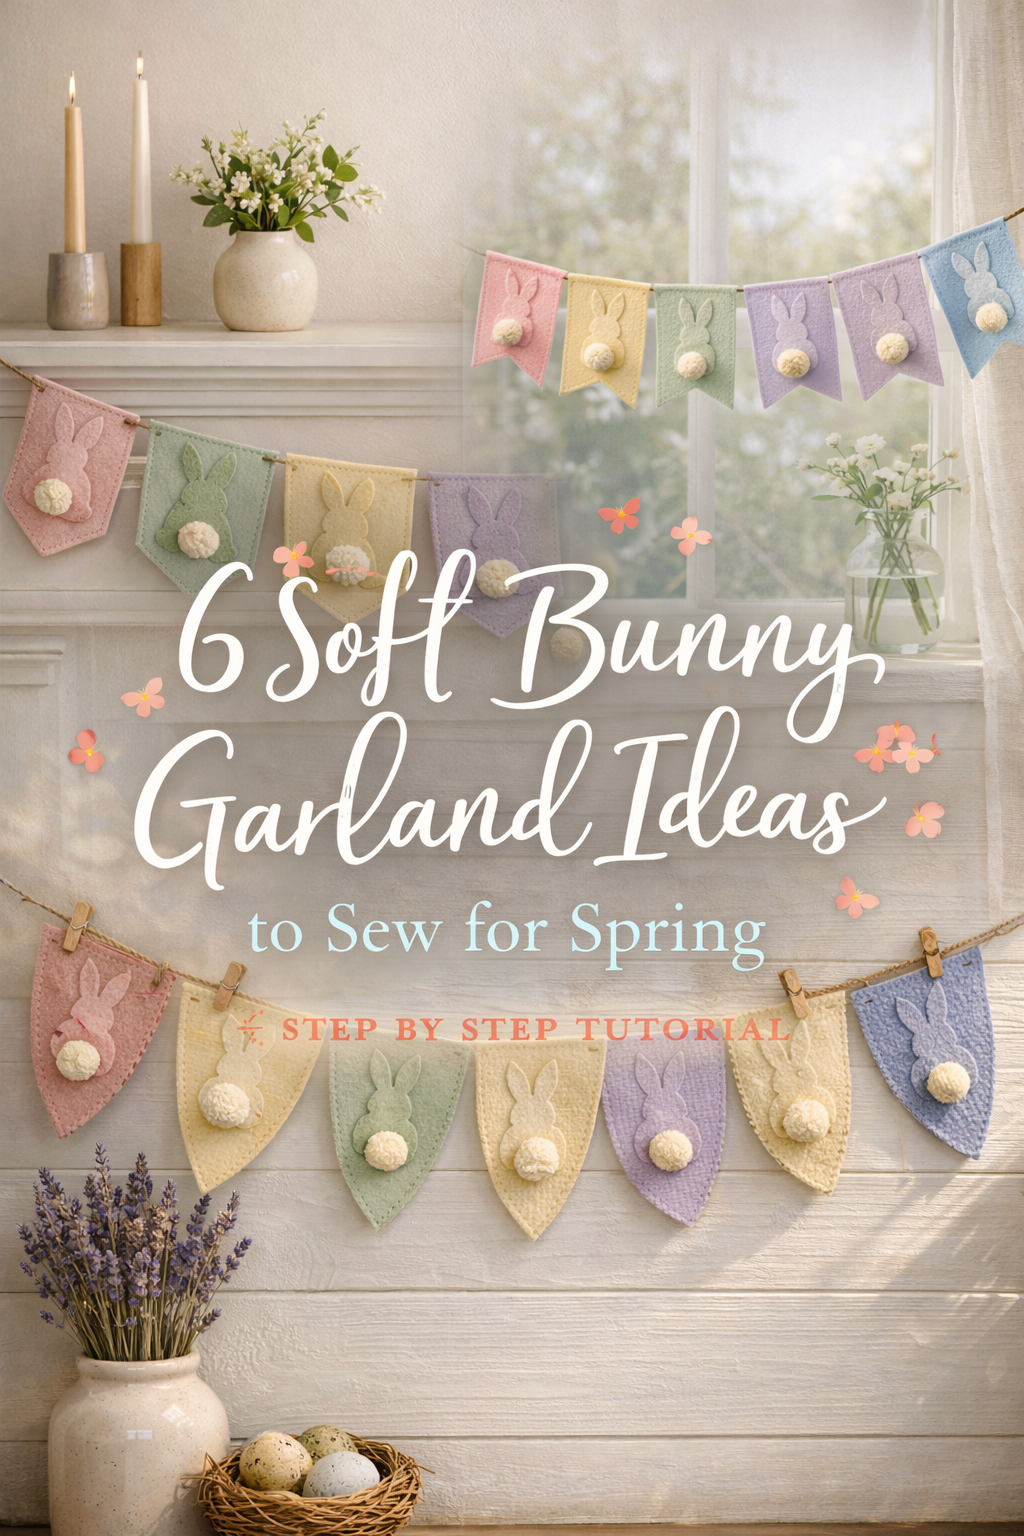
Soft Pastel Bunny Window Garland Step by Step Tutorial
What you’re making
You’re making a soft pastel Easter garland with triangular fabric flags, simple bunny silhouettes, and fluffy little pom pom tails that give the whole piece a sweet handmade storybook look. The version in the photo feels airy, light, and modern, with a gentle curve across the window and a palette of blush pink, butter yellow, mint, lavender, pale blue, and soft gray. This project is wonderfully beginner friendly because each flag is small, the shapes are simple, and the charm comes from clean finishing and color balance rather than difficult techniques.
The overall look is polished but not fussy. Each pennant has a soft textile body, a centered bunny motif, visible neat stitching around the edges, and a cream pom pom tail placed low enough to read instantly as a bunny from a distance. You can hand sew the entire thing or use a sewing machine for the pennants and finish the appliqué by hand.
Materials + tools
- Wool blend felt or soft craft felt in pastel shades such as pink, yellow, mint, lavender, blue, and light gray
- Additional felt for bunny silhouettes in white, gray, blush, brown, or tonal pastels
- Cotton or linen blend fabric as an option if you want the slightly woven look seen in the closeup
- Lightweight fusible interfacing if using fabric instead of thick felt
- Embroidery thread or strong sewing thread in cream or ivory
- Twine, cotton cord, or thin rope for hanging
- Small pom pom maker, fork, or your fingers for making mini tails
- Cream or ivory yarn for pom pom tails
- Fabric scissors
- Small embroidery scissors
- Sewing needle
- Fabric chalk or disappearing marker
- Paper for templates
- Pins or fabric clips
- Ruler
- Optional hot glue gun for quick placement before stitching
- Optional sewing machine
Finished size + customization notes
A pretty finished size for this look is 6 to 8 pennants, each about 4 to 5 inches wide and 5 to 6 inches tall. The full garland usually spans 36 to 60 inches depending on spacing.
To customize it, you can:
- Make the pennants smaller for a nursery shelf or larger for a mantel
- Use all one bunny color for a quieter designer look
- Alternate warm and cool pastels for a more intentional color rhythm
- Swap triangle pennants for notched banner ends if you want a slightly more cottage style finish
Step by step instructions
Study the look before cutting anything.
Lay out your color palette first. The photo works because the tones are muted and balanced. Nothing is too bright. You should now see a mix that feels chalky and springlike rather than loud. If one color jumps forward too much, replace it with a softer version.Make your pennant template.
Draw an isosceles triangle on paper about 4.5 inches wide at the top and 5.5 inches tall. Add a 0.25 inch seam allowance if you are sewing two fabric layers together. If using sturdy felt, you can cut a single layer and finish the edge with decorative top stitching instead.Create a bunny silhouette template.
Draw a simple rear facing bunny with two ears, a rounded body, a small front paw bump, and a flat base where it sits. Keep the shape simple and bold. The bunny should be around 2 to 2.75 inches tall so it sits comfortably in the center of the pennant. The tail area should have room for a small pom pom. If the silhouette feels too thin, widen the body slightly. From across the room, chunky shapes read better.Cut your pennants.
Cut one pennant front and one pennant back for each flag if you are using fabric. If you are using thick felt, cut one pennant per flag. Aim for at least five or six flags for the same visual fullness as the photo. You should now see the pastel palette taking shape on your table.Prepare your fabric if needed.
If using woven fabric, fuse interfacing to the back of each pennant front and back. This helps the flags hold their shape and prevents drooping. If yours looks floppy when you lift it, it needs more structure.Cut the bunny appliqués.
Cut one bunny shape for each flag in contrasting or tonal felt. The sample look uses a mix that stays soft and coordinated. White on pink, gray on mint, brown on yellow, and pale pink on lavender all work beautifully. Lay one bunny onto each pennant front and adjust placement until it sits slightly above the lower point of the pennant.Make mini pom pom tails.
Wrap cream or ivory yarn around a fork 20 to 30 times for each tail. Tie tightly in the center, snip the loops, and trim into a tiny round pom pom. You want them fluffy but compact. Around 0.75 to 1 inch wide is ideal. If yours looks shaggy rather than round, keep trimming a little at a time.Attach the bunny appliqués.
Pin or lightly glue each bunny to the pennant front. Sew around the silhouette with tiny running stitches, whipstitches, or a machine edge stitch if you prefer. Use thread that blends with the bunny or the pennant depending on whether you want the stitching to stand out. The photo has neat visible stitching that adds a handmade finish without looking rustic.Sew on the tails.
Position each pom pom low on the bunny body where the tail would naturally sit. Hand stitch securely through the center several times. Tug very gently to test it. You should now see the bunny shape come to life instantly. If the tail covers too much of the silhouette, trim it smaller.Assemble each pennant.
For double layered fabric pennants, place front and back right sides together, stitch around the edges, and leave the top open. Turn right side out and gently push out the point with a blunt tool. Press carefully on low heat if your materials allow. Top stitch close to the edge for that clean outlined finish from the inspiration image.
For single layer felt pennants, simply top stitch around the perimeter about 0.125 to 0.25 inch from the edge.Add the hanging channel or attachment points.
There are two good options here.
Option one: fold the top edge over slightly and stitch a narrow casing for the cord.
Option two: stitch or pierce small holes at the upper corners and thread the twine through later.
Choose the method that matches your material thickness. If your felt is bulky, corner holes are easier.Lay out the full garland before stringing.
Place your pennants in a line and test color order. Try not to cluster all cool shades or all warm shades together. In the photo, the colors move softly from one to the next. You should now see a rhythm rather than randomness. If one flag steals attention, move it to an end.Thread the twine or cord.
Cut a length of twine longer than you think you need so you have room for tying and drape. Thread through the casing or corner holes. Space pennants about 0.5 to 1 inch apart for the airy look in the window image. Too much gap makes the garland feel sparse. Too little makes it feel crowded.Test the drape.
Hold the garland up before hanging permanently. The center should dip slightly and the pennants should hang evenly. If yours twists forward or backward, adjust the threading so the weight distributes evenly.Style and display.
This garland looks best in natural light near a window, across a mantel, or above a console with simple spring décor. Pair it with eggs, branches, white ceramics, or a clear bud vase. The softness of the materials works best against clean backgrounds and pale walls.Optional upgrades.
Add light quilting between layers for extra body.
Add tiny embroidered names or initials on the back for a nursery.
Use linen instead of felt for a more grown up Scandinavian look.
Add a second parallel strand for a layered window treatment.
Troubleshooting
My pennants look limp
Use thicker felt or add interfacing. You can also top stitch closer to the edge to help define the shape.
My bunny shape does not read clearly
Make the ears slightly taller and the body more rounded. Tiny details get lost at display distance.
My pom pom tails look messy
Trim them slowly with sharp embroidery scissors. Small pom poms need more shaping than large ones.
My color palette feels off
Remove the brightest color and replace it with a dusty or muted pastel. This style depends on softness.
My stitching looks uneven
Use longer guide marks around the edge or stitch more slowly. Slightly visible handmade stitches are charming, but wildly inconsistent spacing can make the piece look unfinished.
Finishing details
Give the pennants a final press if your material allows. Trim all threads closely. Brush the pom pom tails gently with your fingers so they look full and round. If you used woven fabric, a tiny dab of fray prevention along hidden seam allowances can help longevity. For heirloom level finish, line the backs with a second neat layer and hand stitch the top corners invisibly. Store flat or loosely rolled after the season so the pennants keep their crisp shape.
Shop Similar
- Pastel wool blend felt sheets
- Mini pom pom maker for tiny yarn tails
- Cream yarn for small pom poms
- Cotton twine for garland hanging
- Embroidery needles and cream thread set
Style It With
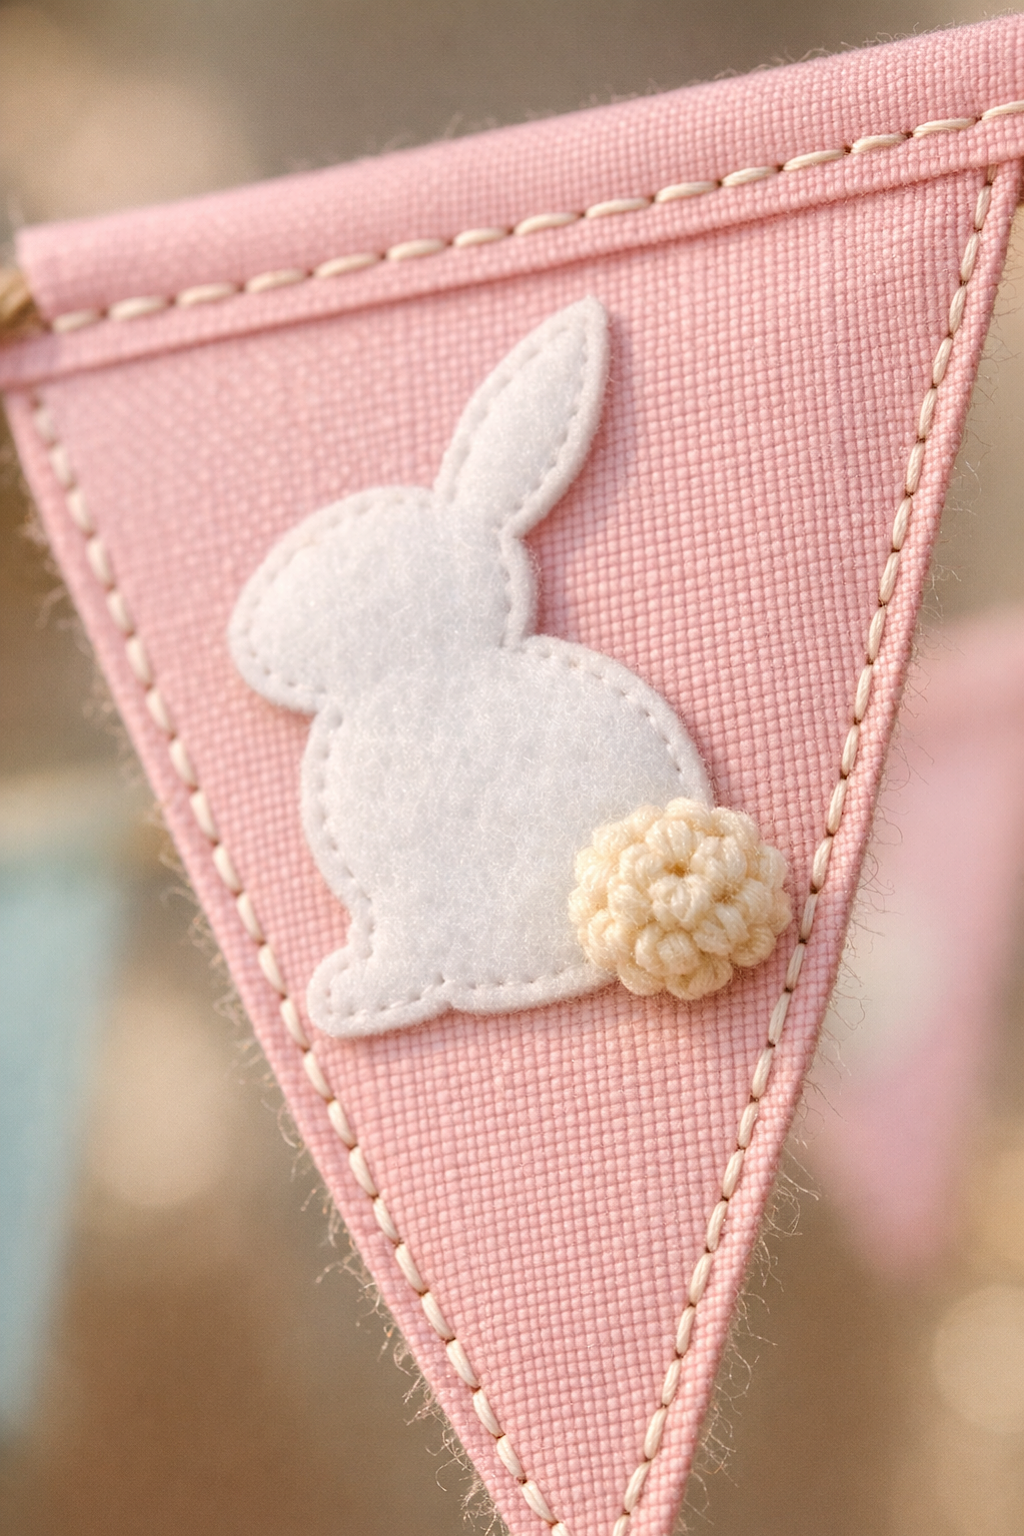
Blush Bunny Appliqué Pennant Banner DIY Guide
What you’re making
You’re making a closeup worthy bunny pennant with a blush pink background, a soft white bunny appliqué, visible hand stitching, and a tiny cream pom pom tail. This version looks especially sweet because the materials are simple but the finishing is crisp and tactile. It is the kind of small project that feels relaxing to sew and makes a lovely seasonal garland, gift topper, basket tag, or nursery decoration.
This design is all about texture. The woven background, blanket stitched edges, plush felt bunny, and knotted tail create depth even though the construction is simple. If you want that polished handmade look from the photo, focus on neat cutting, centered placement, and consistent stitches.
Materials + tools
- Blush pink felt or sturdy woven fabric backed with interfacing
- White felt for the bunny appliqué
- Cream yarn for the tail
- Ivory embroidery floss or heavy sewing thread
- Needle suitable for embroidery or hand sewing
- Paper for templates
- Fine fabric scissors
- Ruler
- Fabric marker or chalk
- Pins or fabric glue stick
- Optional pinking shears for test edges
- Optional rotary cutter and mat for precise pennants
- Twine or narrow ribbon if making a full garland
Finished size + customization notes
A single pennant like the one shown can be about 4 inches wide and 5.5 inches tall. The bunny appliqué should be roughly half the height of the pennant. If using this as part of a full garland, repeat the same size for each flag.
You can customize it by:
- Switching the bunny color to gray, brown, blush, or lavender
- Using tonal stitching for a more subtle finish
- Making a larger pennant for a door knob hanger or Easter basket accent
- Adding a name or monogram to the back
Step by step instructions
Choose the right base material.
The photo shows a fabric with a visible weave and enough body to hold shape. You can get this look with heavy cotton canvas, linen backed with interfacing, or thick felt. If you choose fabric, structure matters. You should now feel the piece stand up slightly when held rather than collapsing.Create your pennant pattern.
Draw a long triangle with a straight top, broad shoulders, and a narrow point. For this version, keep the sides even and clean. If you want the exact closeup feel, skip fancy notches and stay with a classic triangular pennant shape.Cut front and back pieces.
Cut two matching pennants from your pink material if you want a finished two sided flag. If using thick felt, a single layer also works. Precision matters here. Uneven sides will become obvious once you sew the border.Make a bunny template.
Draw a side or rear bunny silhouette with one ear slightly forward if you like a playful profile, or use the simple rear view shape from the inspiration. Keep the edges rounded and not overly detailed. The bunny should sit comfortably in the middle area of the pennant.Cut the bunny appliqué from white felt.
Cut as smoothly as possible. Felt shows jagged cuts, so take your time around the ear curves and lower body. Hold it against the pink background and check contrast. You should now see that soft spring contrast that makes the design feel clean and fresh.Make the pom pom tail.
For a miniature tail, wrap cream yarn around two fingers about 18 to 24 times. Tie tightly in the center, trim loops, and shape into a tiny puff. Smaller is usually better for this style. If the tail overwhelms the bunny, reduce the wraps and remake it.Place the bunny.
Position the bunny slightly above the lower half of the pennant so there is room for the tail without touching the point. Step back and look at it from arm’s length. If it feels too high, the flag can look top heavy. If it feels too low, the silhouette gets cramped.Secure the appliqué.
Use a few dots of fabric glue or a small pin to hold it. Sew around the bunny with tiny hand stitches. A running stitch gives a soft handmade look. A tiny whipstitch gives more definition. Keep the spacing steady. You should now see a gentle stitched outline that makes the bunny feel integrated, not just stuck on.Attach the pom pom tail.
Sew through the center of the pom pom several times and anchor it to the bunny. Do not rely on glue alone. This is the part people will want to touch. Tug lightly to test. If it wobbles, add more stitches.Construct the pennant body.
For a double sided version, place right sides together, stitch around the sides and point, then turn right side out. Leave the top open. Gently shape the point with a blunt tool. Press if needed.
For a single layer felt version, move straight to edge stitching.Top stitch the border.
This is one of the most important details in the photo. Sew a neat border around the pennant about 0.125 to 0.25 inch from the edge. Use ivory thread to create a slightly visible frame. If yours wobbles, mark a guide line first with disappearing ink.Finish the top edge.
Fold the top edge inward and stitch it closed neatly, leaving a tiny channel if threading onto a garland. Another option is to sandwich the twine between front and back layers as you sew. Choose whichever feels easiest for your skill level.Check balance and shape.
Hold the pennant upright. The bunny should appear centered and the tail should sit low and sweetly rounded. You should now see the exact charm of the reference image. If your pennant pulls to one side, your border stitching may be tighter on one edge than the other.Repeat for a full set if desired.
This single pennant becomes especially striking when repeated in multiple pastel colors. Keep the same size template so the full garland looks intentional. Vary the bunny colors or keep the silhouette white throughout for a more refined collection.Optional upgrades.
Add a second inner border stitch in matching thread for a boutique finish.
Add tiny seed bead eyes only if you want a front facing bunny style, though the rear view silhouette is more elegant here.
Add quilt batting between layers for a plush pennant.
Add scented dried lavender inside the pennant for a soft seasonal sachet effect.Style the finished piece.
Use one pennant as a basket tag, gift embellishment, or wall peg charm. Or make several and string them across a mirror, mantel, or window. This design looks best with pale woods, cream ceramics, and soft spring flowers.
Troubleshooting
My edges look bulky
Trim seam allowance more closely before turning, especially near the point.
The bunny looks crooked
Use a center guideline down the pennant before placing the appliqué.
The pom pom is too loose
Stitch through the center knot from multiple angles and knot securely on the back.
My fabric frays
Use interfacing, pinking on hidden seams, or switch to felt for cleaner beginner results.
My stitches look too visible
Use a finer thread or slightly smaller stitches. Visible stitching is pretty here, but it should still look tidy.
Finishing details
Steam or lightly press the pennant from the back if using fabric. Comb the pom pom lightly with your fingers and trim stray strands so it looks full but round. Remove all visible marking lines. For a polished heirloom finish, add a backing piece of soft felt to cover the inside stitching. If gifting, tie it to a basket handle or wrap it around a spring branch arrangement for a charming handmade touch.
Shop Similar
- Blush pink felt fabric sheets
- White wool felt for appliqué
- Ivory embroidery floss
- Mini pom pom maker tool
- Heavy duty fusible interfacing for crafts
Style It With
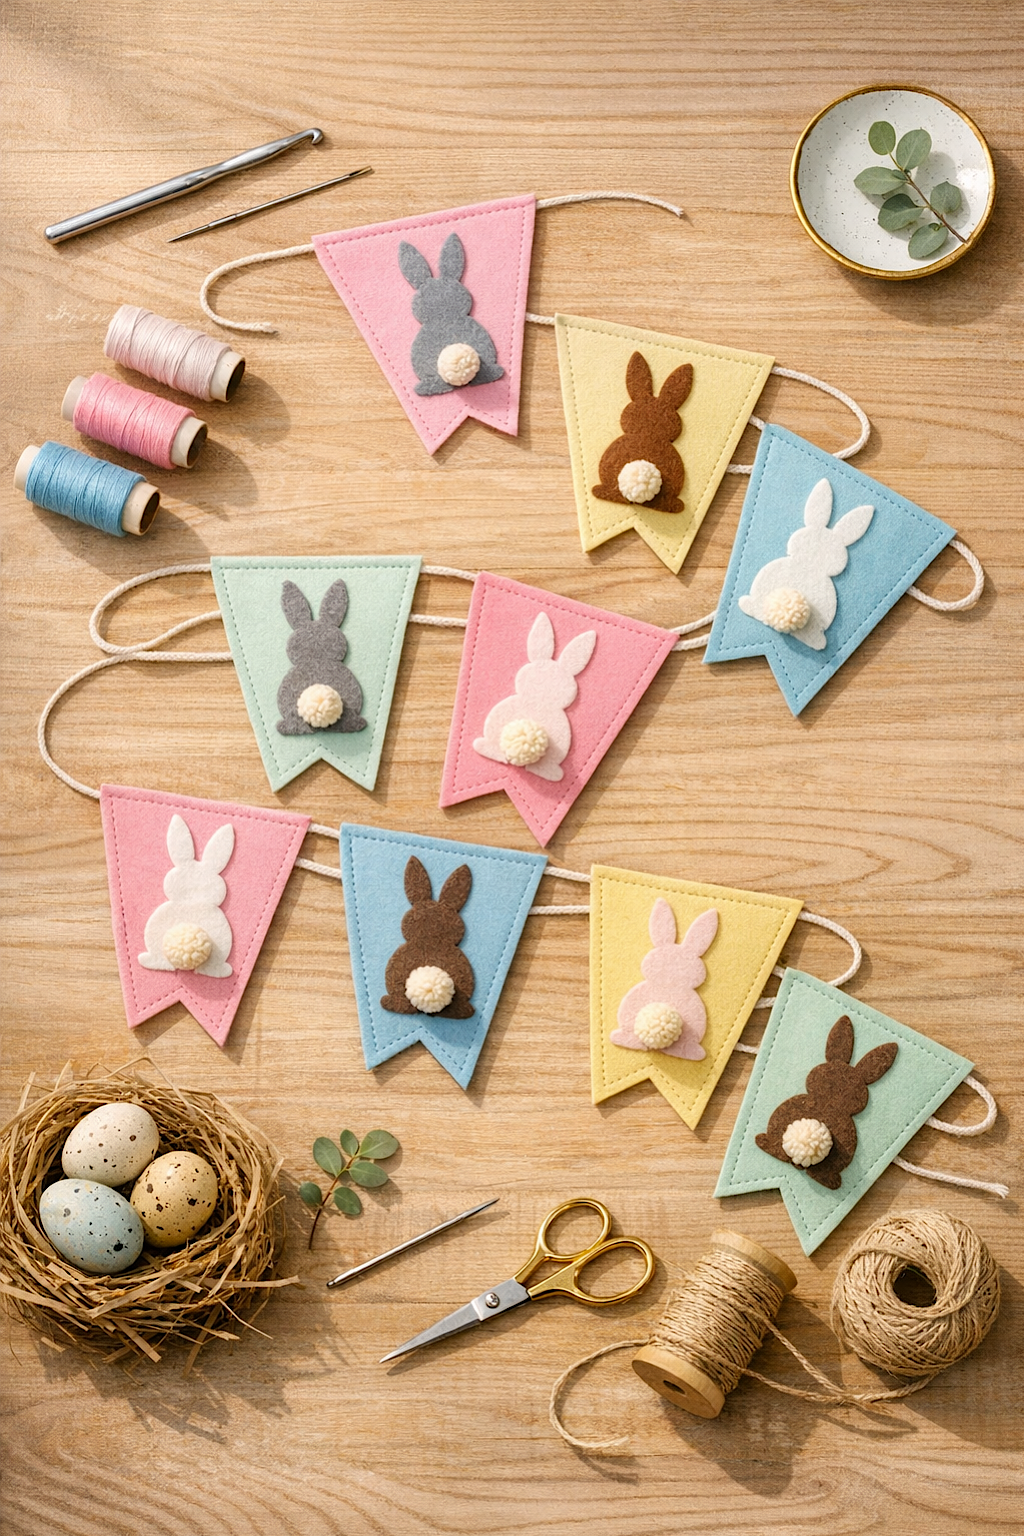
Handmade Bunny Banner Pennants Make It Yourself Tutorial
What you’re making
You’re making a full set of handmade bunny banner pennants laid out assembly style on a wooden table, each with a soft pastel body, stitched outline, bunny appliqué, and fluffy tail. This version has a cheerful workshop feel and is perfect if you want to batch produce a complete garland in one sitting. It is one of those projects that feels incredibly satisfying because you can see all the pieces come together from flat cutouts into a cohesive holiday decoration.
The look in the photo mixes banner shapes with small notched bottoms, which gives the garland a slightly more classic bunting feel than a simple triangle. The palette is springy but quiet, and the visible tools make this a great sew by hand afternoon craft.
Materials + tools
- Felt sheets in pink, blue, mint, yellow, and other spring pastels
- Felt sheets in white, gray, blush, and brown for bunny shapes
- Ivory yarn for pom pom tails
- Cotton twine or narrow cord
- Embroidery floss or all purpose sewing thread
- Sharp hand sewing needle
- Paper for a notched pennant template
- Fabric scissors
- Small pom pom maker or fork
- Ruler
- Chalk pencil or disappearing marker
- Pins or fabric clips
- Optional gold embroidery scissors if you want a dedicated precision pair
- Optional small bird nest and faux eggs for styling if photographing the finished project
Finished size + customization notes
Each banner can be about 4 inches wide and 5 inches tall with a small center notch cut into the bottom. A garland of 8 to 10 flags will give you a generous full display across a shelf, window, or entry.
You can customize this design by:
- Using only one pennant shape but changing the bunny colors
- Making each flag double sided for a reversible garland
- Adding extra tiny stitched flowers or initials on alternating flags
- Creating mini versions for tiered trays or dollhouse spring décor
Step by step instructions
Build a strong template first.
Draw a pentagon style banner shape with a straight top, angled sides, and a shallow center notch at the bottom. Fold the template in half before cutting the notch so both sides are symmetrical. This one step makes the finished set look far more professional.Choose your color story.
The inspiration image mixes several pastels without feeling chaotic. Limit yourself to four or five base colors and two or three bunny colors. Lay everything out before cutting. You should now see the collection looking coordinated instead of random.Cut the banner bases.
Cut one front and one back for each pennant if using a two layer construction. If using thick felt, one layer is enough. Keep the tops straight because crooked tops will make threading the garland difficult later.Create a rear view bunny template.
This silhouette should have two upright ears, a rounded back, a small side leg shape, and a gentle seated base. The bunny in this style is viewed from behind, which makes the pom pom tail the star. Keep the silhouette about 2.25 inches tall.Cut multiple bunny appliqués at once.
Batch work speeds this project up. Stack two layers of felt if your scissors can handle it and cut carefully. Try several combinations such as white on blue, gray on mint, blush on yellow, and chocolate brown on pink. Spread them across the table until the arrangement feels balanced.Make all the pom poms before sewing.
It is much easier to make a small batch in one go. Wrap ivory yarn around a fork or mini pom pom maker for each tail. Tie tightly, trim, and shape into neat round puffs. Set them aside in a bowl so they do not roll away.Mark bunny placement.
Draw a light center line on each banner base. Place each bunny so the bottom of the silhouette sits above the notch, leaving room for the tail. Consistent placement is what makes a multi flag set look intentional. If one bunny sits noticeably higher than the others, the whole set will feel slightly off.Attach the appliqués.
Sew each bunny onto the front banner piece with small, tidy stitches. Running stitch is great for a soft handmade look. Blanket stitch can work too, but on small shapes it can get visually busy. You should now see the banner fronts starting to feel complete.Add the tails.
Sew the pom pom tails onto the lower back area of each bunny. Make sure they are centered. This is your main visual checkpoint. You should now instantly recognize the bunny silhouette even from farther away.Assemble the banner pieces.
If using two layers, place the back behind each finished front and stitch around the sides and bottom, leaving the top open. Top stitching works beautifully here because the visible border suits the handmade look. If using one felt layer, simply stitch around the perimeter for decoration and strength.Finish the top edge for hanging.
Fold over a small hem to create a casing, or punch tiny corner holes and thread the cord through both holes. The looped twine look in the layout image suggests a simple pass through the sides works beautifully. Choose the method that best suits your material thickness.Thread the garland.
Cut a long piece of cord and start threading from one end. Space the pennants evenly. For a cozy full look, keep the spacing minimal. For a lighter airy look, leave about 0.75 inch between flags.Test the arrangement on a flat surface.
Lay the completed garland out exactly as it will hang. Step back. Check the order of colors and bunny tones. You want the eye to move pleasantly across the piece. If two similar colors sit together and create a dull patch, separate them with a contrasting pastel.Hang and evaluate.
Once hung, each pennant should tilt only slightly and the cord should create a soft arc. If the flags twist, add a tiny hidden dot of removable adhesive at the back when styling for photos.Optional upgrades.
Add a second layered bunny silhouette in a slightly smaller size for dimensional appliqué.
Stitch tiny seed stitches around the edges for extra texture.
Use velvet ribbon instead of twine for a softer romantic look.
Add tiny bells inside one or two flags for children’s room décor.Photograph or gift the finished set.
This project photographs beautifully on pale wood with thread spools, spring eggs, and gold scissors. If gifting, roll it gently around tissue paper rather than folding so the pennants stay flat and pretty.
Troubleshooting
My notched banner bottoms are uneven
Fold the template in half and trim again. Symmetry makes a huge difference in small projects.
My set looks too busy
Reduce the number of bunny colors and let the pennant colors do more of the visual work.
My pom poms vary too much in size
Count your yarn wraps and trim each one against the same visual reference.
My flags sag on the cord
Use thicker felt or add a stitched top channel that supports the weight more evenly.
My appliqués ripple
Avoid stitching too tightly. Pulling the thread hard can distort small felt shapes.
Finishing details
Trim loose threads and give each pom pom a final shaping. If any pennant edge feels soft, add another line of top stitching near the border for extra body. Store flat between sheets of tissue paper or hang it on a padded hanger in a closet after the season. Because this is a small soft project, careful storage helps preserve the crisp boutique finish.
Shop Similar
- Pastel felt bundle for spring crafts
- Embroidery floss pastel neutral set
- Cotton cording for bunting garlands
- Small sharp embroidery scissors
- Mini pom pom maker craft tool
Style It With
Felt Bunny Mantel Garland How To Guide
What you’re making
You’re making a pastel felt bunny garland sized and styled beautifully for a mantel, shelf ledge, or fireplace surround. This version has a slightly more structured pennant shape with straight sides and pointed bottoms, giving it a tidy decorative look that feels right at home with candles, spring flowers, and a bowl of speckled eggs. It is simple enough for a beginner, but the finished effect looks charmingly boutique.
What makes this design special is the clean repetition. The bunnies are tonal with their background flags, so the effect is softer and more elevated than a high contrast appliqué. The cream pom pom tails become the brightest detail and tie the whole garland together.
Materials + tools
- Soft felt in dusty pink, sage, pale yellow, lavender, and baby blue
- Matching or slightly darker felt for tonal bunny appliqués
- Cream yarn for tails
- Embroidery floss in matching colors or soft neutral thread
- Hand sewing needle
- Paper and pencil for templates
- Fabric scissors
- Ruler
- Twine or jute cord
- Fabric glue stick or washable school glue stick for temporary hold
- Optional interfacing for extra structure if using thinner felt
- Optional iron on adhesive web for appliqué placement
Finished size + customization notes
For a mantel like the one shown, make five pennants about 5 inches wide and 6 inches tall. The full garland should span roughly 30 to 40 inches, plus extra cord at the ends for tying.
Customization options:
- Add more pennants for a wider fireplace
- Use all tonal bunnies for a subtle designer look
- Switch to contrasting bunnies for a more playful child friendly version
- Add stitched names or year on the back for keepsake décor
Step by step instructions
Measure your display area.
Before cutting, measure the mantel or shelf where the garland will hang. Decide how low you want the center dip. This prevents making a beautiful garland that is too short or too crowded.Draft the pennant shape.
The pennants in the photo are more shield shaped than classic triangles. Draw a template with a straight top, gently angled sides, and a single pointed bottom. Keep the proportions moderate so the bunny has room to sit in the center without feeling cramped.Cut the felt bases.
Cut one pennant from each pastel color. If your felt is thin, cut a second matching piece for backing or fuse a stabilizer. You should now see a soft rainbow of spring flags ready for embellishment.Create a simple bunny template.
Trace a seated rear view bunny shape with rounded ears and a softly curved body. For this tonal version, keep the silhouette large and very simple. Because the bunny and pennant are close in color, the shape needs to be bold enough to read without strong contrast.Cut the bunny shapes.
Cut one bunny per flag in a matching or slightly darker shade. Examples that work well are sage on mint, lavender on lavender, pale pink on blush, and sky blue on baby blue. Lay them out centered on each pennant.Attach the bunnies.
Use a few dabs of temporary glue or pins, then sew around the shapes with small neat stitches. Matching thread keeps the look soft. If yours disappears too much, switch to one shade darker thread so the outline defines the bunny gently.Make the pom pom tails.
Wrap cream yarn around a fork or small pom pom maker until you have a compact bundle. Tie tightly, trim, and fluff. The tails in the photo are pleasantly plump without being oversized. Test one against your pennant before making the rest.Sew the tails on securely.
Center each tail low on the bunny body. Make several passes through the middle and knot firmly on the back. You should now see the whole design come alive. This is the feature people notice first.Add border stitching.
Stitch around each pennant edge in a coordinating thread. This strengthens the felt and adds visual polish. Keep the stitching distance from the edge consistent. If your lines wander, draw a faint guide first.Prepare the hanging cord.
Cut your jute or twine a little longer than the width of your display area. Natural twine looks lovely against pastel felt because it adds a touch of warmth and texture. If you prefer something more delicate, cotton cord also works.Add hanging holes or loops.
Punch or stitch small openings near the top corners of each pennant, or sew tiny loops on the back. Threading through the corners helps the pennants hang flatter on a mantel garland.Arrange the color sequence.
Try several layouts before threading. The photo keeps the palette moving softly from one shade to the next. Place yellow near the center if you want a warm focal point, with cooler colors balanced on either side.Thread and space the pennants.
Slide the cord through your openings and leave equal spacing. Because a mantel display is seen straight on, symmetry matters more here than on a casual window garland. Use a ruler if needed.Hang and refine the drape.
Tie the ends and step back. The center should dip slightly but not dramatically. You should now see a garland that frames the mantel rather than swallowing it. If the pennants overlap visually, increase the spacing a little.Optional upgrades.
Add a tiny backing layer behind each bunny for extra dimension.
Use blanket stitch around the bunny instead of a simple running stitch for a folk inspired finish.
Add tiny hidden weights inside the bottom points if you live in a drafty home.
Add a second smaller garland above it with felt eggs or flowers.Style your mantel.
This garland pairs beautifully with taper candles, a small cream vase of spring blooms, and a shallow bowl of faux eggs. Keep the rest of the styling simple so the softness of the felt remains the focus.
Troubleshooting
The tonal bunny disappears too much
Use slightly darker felt for the bunny or outline it with a single strand of contrast thread.
The pennants bend at the top
Add interfacing or use two felt layers stitched together.
The garland hangs unevenly
Measure the spaces between pennants and make sure the cord is pulled evenly before tying.
The pom poms look too large
Trim them down. Small scale details suit this refined style.
My mantel décor looks crowded
Remove one accessory from the top surface. This garland shines best with breathing room.
Finishing details
Give each pennant a quick lint roll if needed because felt loves to catch fibers. Snip all loose threads and round out the pom pom tails with tiny trimming cuts. If your felt wrinkles from handling, place it under a stack of books overnight between clean sheets of paper. For longer use, store flat in a sweater box or hang it loosely so the points stay smooth.
Shop Similar
- Pastel felt sheets for spring bunting
- Natural jute twine for garland crafts
- Cream yarn mini pom pom supplies
- Iron on adhesive web for felt appliqué
- Hand sewing needles for felt crafts
Style It With
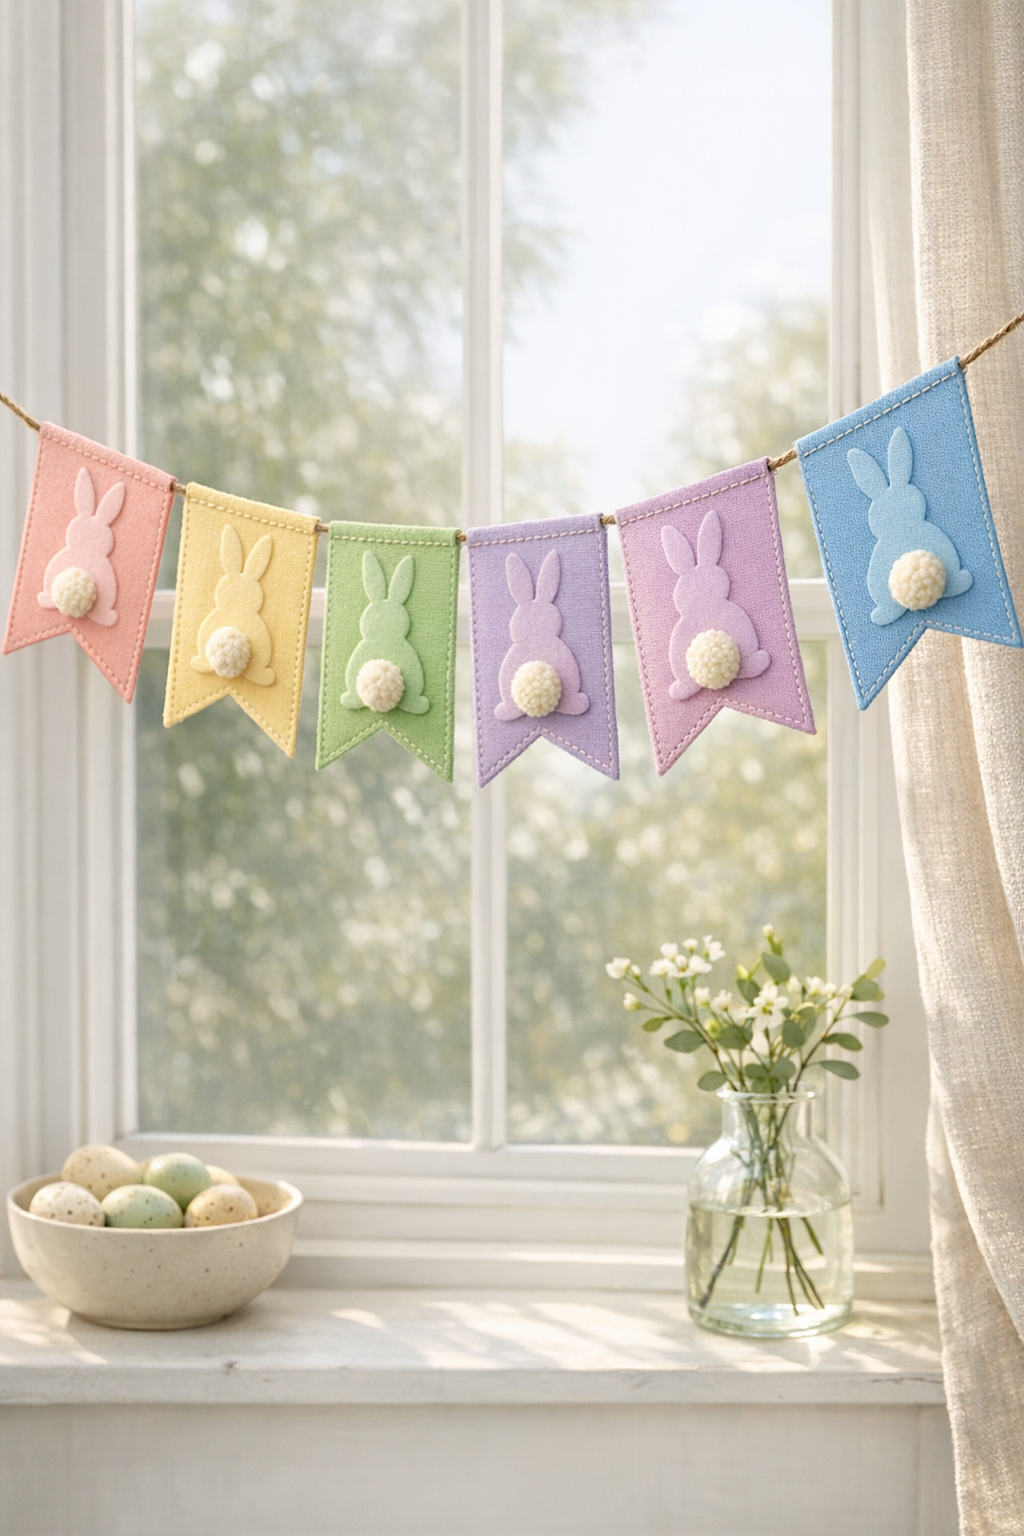
Sweet Spring Bunny Bunting for Bright Windows DIY Guide
What you’re making
You’re making a cheerful pastel bunny bunting designed to glow in soft daylight across a window. This version has gently pointed banner flags, tonal bunny cutouts, and cream pom pom tails that catch the light beautifully. The effect is bright, airy, and very spring forward without feeling childish, which makes it ideal for kitchens, breakfast nooks, sunrooms, or anywhere you want a seasonal detail that still feels tasteful.
The beauty of this design is in its simplicity. Repeating the bunny silhouette across several candy soft colors creates a clean visual rhythm, and the fluffy tails add just enough texture to keep the piece from looking flat. It is a lovely first seasonal sewing project.
Materials + tools
- Felt in blush pink, buttery yellow, light green, lilac, soft lavender pink, and sky blue
- Matching or slightly lighter felt for bunny silhouettes
- Ivory or cream yarn for pom poms
- Strong sewing thread or embroidery floss
- Needle
- Sharp scissors
- Ruler
- Paper templates
- Jute twine or cotton cord
- Clips or pins
- Optional fabric stiffener spray for very soft felt
- Optional low temp glue gun for quick positioning
Finished size + customization notes
Each pennant can be around 4.5 inches wide and 6 inches tall. Six flags works beautifully for a standard window. The full garland can span roughly 40 to 50 inches depending on spacing and desired drape.
Customize it by:
- Making a shorter version with four flags for a small window
- Using all one shade family for a monochrome nursery look
- Increasing the bunny size for a bolder silhouette
- Adding beads between flags for a more dressed up finish
Step by step instructions
Observe the proportion of the window display.
The inspiration uses a gentle drape with evenly sized flags that sit clearly against the bright background. Before cutting, decide whether your window is best suited to a shallow curve or a deeper swag. For most spaces, subtle is prettier.Create the banner template.
Draw a shape with a straight top, slightly angled sides, and a shallow center notch or pointed lower end. Keep all flags the same size. Consistency is what makes pastel projects feel refined rather than homemade in a rushed way.Cut your pastel bases.
Cut six pennants in the colors you want to use. Arrange them in a pleasing order. A good formula is to alternate warmer and cooler shades. You should now see a soft spring rainbow that already looks decorative.Make the bunny pattern.
Keep the silhouette rounded, symmetrical, and simple. This version works best as a rear view bunny with upright ears. Because the flags are vertical, the bunny should sit tall enough to feel centered but not so tall that it crowds the top edge.Cut bunny appliqués in tonal shades.
Using a color that is close to the pennant color creates the elegant layered look from the photo. Pink on blush, pale cream on yellow, fresh green on mint, and lavender on lilac all work beautifully. If tonal shapes feel too subtle to you, go one step deeper or lighter in shade.Attach the bunny shapes.
Center each bunny on a flag and stitch it down neatly. Matching thread helps keep the project soft and cohesive. If you are a beginner, use a small running stitch and go slowly around the ears. You should now see the layers begin to read as intentionally dimensional.Make fluffy tails.
Wrap cream yarn around a fork about 20 times, tie tightly, snip, and trim into round mini pom poms. Make all tails before attaching them so you can choose the best matched sizes. In a row, uneven tails stand out more than you think.Sew the tails in place.
Add one tail to the lower center of each bunny. This is your strongest visual checkpoint. You should now instantly get that playful bunny from behind look. If the tail sits too high, move it down slightly before locking the stitches.Edge stitch the flags.
Stitch around each pennant about 0.125 to 0.25 inch from the border. This helps the shapes stay crisp and echoes the clean finish in the inspiration. It also gives the eye a tidy frame around each soft color block.Add hanging points.
Thread through top corner holes, stitch small loops, or make a top casing. For window bunting, top corner threading often hangs best because it keeps the pennants flat against the line.Thread onto twine.
Use natural jute twine for warm rustic contrast or white cotton cord for a cleaner look. Leave enough extra at both ends for tying around hooks or small nails. Space flags evenly. Too much gap can make the piece feel disconnected.Test in daylight.
Hold the garland against a bright window. This is important because backlighting can change how tonal colors read. You should now check whether any bunny disappears too much. If one does, outline it with slightly darker thread.Refine the color order.
Sometimes a sequence looks good on the table but better in a different order once hung. Move colors around until the flow feels balanced. A nice trick is to put your strongest or darkest color near one end and repeat another cool tone at the opposite side for balance.Hang with a soft curve.
Secure the ends and let the center dip naturally. The line should feel relaxed, not droopy. If your window is drafty and the flags swing too much, a tiny removable adhesive dot behind the bottom corners helps.Optional upgrades.
Add beads or wooden balls between flags on the cord.
Use blanket stitch in matching thread for extra texture.
Add a second mini line of flags beneath for a layered display.
Add a tiny stitched date on the back so it becomes part of your seasonal collection.Style the scene.
This bunting looks lovely above a marble or painted sill with a small bowl of eggs and a clear bud vase of white blossoms. Keep the styling light and clean. This craft shines when surrounded by sunlight and simple objects.
Troubleshooting
My bunny does not show up enough
Use a slightly more contrasting felt or define the edge with thread.
My flags curl at the edges
Add another line of stitching or use firmer felt next time.
My drape is too deep
Shorten the hanging span or tighten the cord slightly at the ends.
My colors feel too candy bright
Switch one or two shades to dustier versions like sage, buttercream, or muted lavender.
My tails are misshapen
Trim them while rolling them between your fingers to find the roundest silhouette.
Finishing details
Trim loose fuzz from the felt and snip any long yarn ends hiding in the pom poms. If needed, very lightly steam from a distance or press under a cloth, depending on your material. Store the garland flat between tissue sheets or wrap it around a cardboard piece so the flags keep their clean lines. A tidy seasonal craft always looks more luxurious when the finishing is calm and careful.
Shop Similar
- Pastel felt craft pack spring colors
- White cotton cording for bunting
- Cream baby yarn for tiny pom poms
- Appliqué scissors for felt crafts
- Pastel embroidery thread set
Style It With

Textured Bunny Flag Garland How To Guide
What you’re making
You’re making a textured bunny flag garland with a more rustic handmade finish, clipped to twine and styled against light wood planks. This version feels slightly more cottage inspired than the others because the pennants are textured, the twine is visible, and the display uses tiny clothespins rather than threaded holes. It is still soft and pastel, but the overall mood is a little warmer and more homespun.
This is a wonderful project if you like fiber rich surfaces and relaxed handmade charm. The clipped display also makes it easy to adjust spacing, swap colors, or reuse the individual flags as tags or ornaments.
Materials + tools
- Textured felt, boucle felt, fleece felt, or soft terry like craft fabric for pennants
- Coordinating felt for bunny shapes
- Cream yarn for pom pom tails
- Cotton or jute twine
- Mini wooden clothespins
- Needle and thread
- Paper pennant template
- Scissors
- Ruler
- Marking pencil
- Optional fabric backing if your texture is very loose
- Optional tacky glue for positioning
Finished size + customization notes
Make pennants about 4.5 inches wide and 5 inches tall for this rustic clipped version. Five flags looks balanced and relaxed on a narrow wall or shelf vignette.
You can customize it by:
- Using triangle pennants instead of curved edged ones
- Mixing smooth and textured fabrics together
- Adding tiny lace trim to the top edge
- Turning each flag into an individual ornament or gift tag
Step by step instructions
Choose fabrics with texture but enough structure.
The inspiration flags have a nubby, tactile finish that adds softness and dimension. Look for felted wool, boucle style craft fabric, or plush felt. If the fabric stretches too much, back it with stabilizer before cutting.Create a pennant template suited to texture.
Textured fabrics can fray or distort at very sharp points, so make a broad triangular pennant with gentle angles. A slightly softer point is easier to sew neatly and still matches the look.Cut your pennants.
Cut five flags in muted blush, sage, cream, buttery yellow, and soft lavender. Because the texture is doing part of the visual work, a restrained palette looks best. You should now see a set that feels calm and tactile.Cut your bunny silhouettes.
Use a simple rear view bunny shape again, but make it slightly larger than on smooth pennants so it stands out against the texture. Cut them in coordinating shades rather than high contrast if you want the subtle cottage look from the image.Stabilize the shapes if needed.
If your textured fabric is floppy, back the bunny shapes or the pennants with felt. Texture can soften edges, so this extra support helps the silhouette stay recognizable.Attach the bunny appliqués.
Hand stitch around each bunny using matching thread. On textured materials, stitches can disappear a bit, so go slowly and keep tension even. You should now see the bunny shapes sitting softly but clearly on each pennant.Make the pom pom tails.
Because the fabric is already textured, keep the tails tidy and round rather than shaggy. Smaller compact pom poms work best. Trim carefully until each one looks like a neat little puff.Sew on the tails.
Attach the pom pom near the lower center of each bunny. Against the textured flag, the fluffy tail should still stand out clearly. If it sinks visually into the fabric, use a slightly brighter cream yarn.Finish the pennant edges.
Sew around the perimeter with a simple border stitch. If the fabric frays, either back each pennant with felt or use a very small zigzag on a machine. For a rustic handmade look, a visible blanket stitch can also be beautiful here.Prepare the hanging line.
Cut a length of twine and decide how much sag you want in the display. This clipped style looks best with a gentle relaxed curve rather than a tightly stretched line.Clip rather than thread.
Use mini clothespins to attach each pennant to the twine. This makes the project flexible and gives it the sweet handmade display quality seen in the inspiration. Space them evenly, but not rigidly. Slight imperfection suits this look.Check visual balance.
Stand back and look at the spacing between flags. You should now see a soft rhythm across the garland. If one pennant looks too dominant, swap it with a quieter color or move it closer to the edge.Style with rustic spring props.
This garland looks especially charming with dried lavender, a ceramic crock, a little nest, and speckled eggs. Keep the palette muted so the textile work remains the main event.Optional upgrades.
Add hand embroidered French knots around the pennant edges.
Sew lace or crochet trim to the top of each flag.
Add tiny stamped letters to spell a spring greeting across the backs.
Add a scented lavender sachet layer inside each pennant.Display in layered vignettes.
This clipped style works well on shiplap walls, hutches, open shelves, and farmhouse benches. Because the individual flags are removable, you can change the arrangement year to year.Care for your finished project.
Brush off lint gently and store with the clothespins clipped separately to avoid denting the fabric over time.
Troubleshooting
The textured fabric hides the bunny shape
Make the bunny slightly larger or use smoother felt for the appliqué.
My clothespins pull the flags unevenly
Clip each one at the same depth and test the line before final styling.
The tails look messy against the nubby fabric
Trim them tighter and rounder so they read clearly.
The pennants curl
Back them with felt or press lightly under a book overnight.
The rustic styling feels too busy
Keep the props minimal. One vase and one nest is enough.
Finishing details
Trim away any stray fibers along the pennant edges and refine the pom pom tails until they look intentionally fluffy. If your fabric sheds, a lint roller helps before display. You can also add a backing layer of lightweight felt for a cleaner reverse side. Store the garland flat, with tissue between the flags if the pom poms press into the fabric.
Shop Similar
- Textured felt fabric for crafts
- Mini wooden clothespins for garlands
- Natural jute twine rustic décor
- Cream yarn for mini pom poms
- Wool felt sheets muted pastel
Style It With
Once your garland is finished, the styling can be just as fun as the making. These bunny banners pair beautifully with bud vases, speckled eggs, taper candles, spring branches, and simple ceramic bowls, which means you can build an entire little seasonal vignette around them without spending much. They also store easily, making them the kind of handmade decoration you will actually look forward to bringing back out each year. That reusable, keepsake quality is part of what makes them feel so special.
The nicest thing about all six designs is that they prove seasonal crafting does not have to be complicated to feel memorable. A few carefully chosen colors, tidy stitching, and fluffy little tails are enough to create something that feels cheerful, soft, and thoughtfully handmade. If you have been wanting a spring project that is easy to personalize and lovely to display, this is one of those ideas that delivers both the process and the payoff. Pick your favorite version or mix details from several and make a bunny garland that feels completely your own.