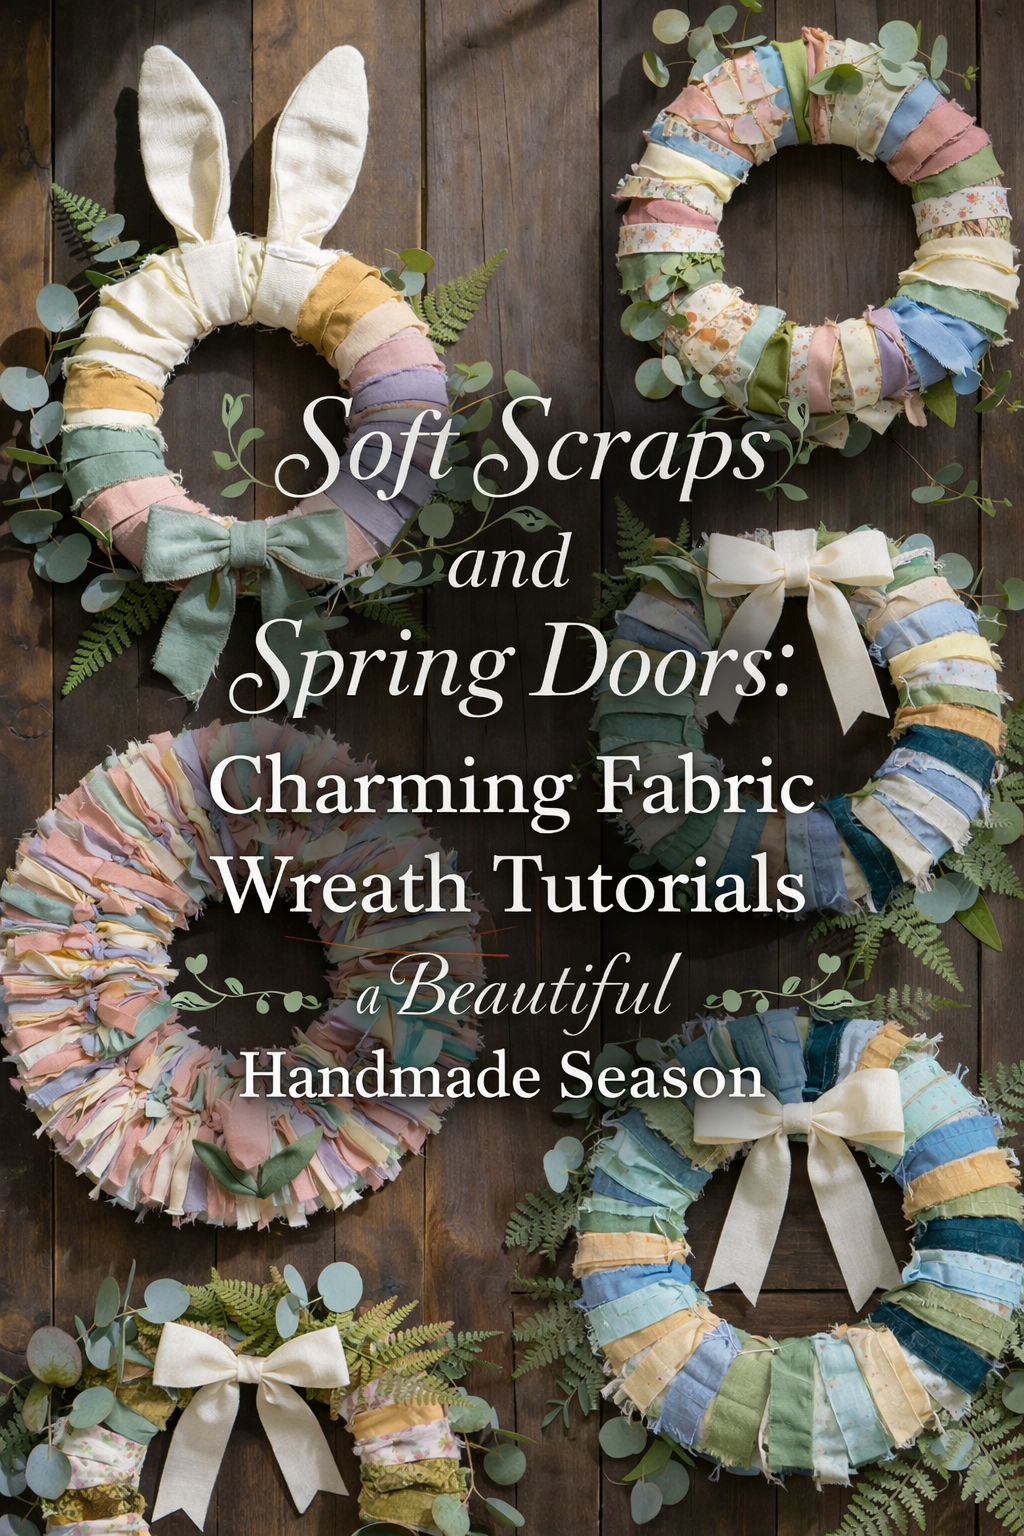
Sunlit Stitches and Houseplant Rooms: Dreamy Quilt Tutorials for a Soft Collected Home

More like this
💡 Pro Tip: Why I Link to Amazon Search Results and Not One Product
In the Shop the Look and Style it With sections under each bikini, I link to Amazon search results, not single products. Here’s why this matters:
Hot bikinis sell out fast. I don’t want you clicking on a dead link to a sold-out item. Search pages stay updated.
You get more options. Love the vibe but want a different color, cut, or price point? The search results give you everything that matches the look and energy.
I curate each search carefully. These aren’t generic. I spend hours crafting keywords that bring up exactly the kind of bikinis I’d wear—or recommend to my hottest friends.
Support with no pressure. If you click a link, browse, and buy something later, I may earn a small commission at no extra cost to you. That helps me keep bringing you curated collections like this one—powerful, seductive, and always fresh.
So dive in. Click through. Try something risky. These aren’t just bikinis—they’re commands, statements, and maybe even your new favorite weapon of choice.
There is something quietly magical about a home that feels soft before you even sit down. It is in the way sunlight moves across fabric, in the layered textures that invite you closer, and in the gentle rhythm of pieces that feel handmade rather than manufactured. Quilts have always carried that kind of presence. They are not just functional. They are emotional. They hold color, memory, patience, and intention all at once.
In this collection, we are stepping into a world where quilting meets atmosphere. Think warm earth tones, botanical surroundings, and rooms that feel alive with greenery and light. Each quilt in this series is designed to feel collected rather than overly polished, with palettes that echo nature and layouts that feel both modern and timeless. Whether you are drawn to bold geometric statements, soft floral patchwork, or expansive color blocked designs, these tutorials are here to guide you into creating pieces that feel deeply personal and beautifully lived in.
This is not about perfection. It is about creating something that softens a space, warms a room, and makes your home feel like it belongs to you.
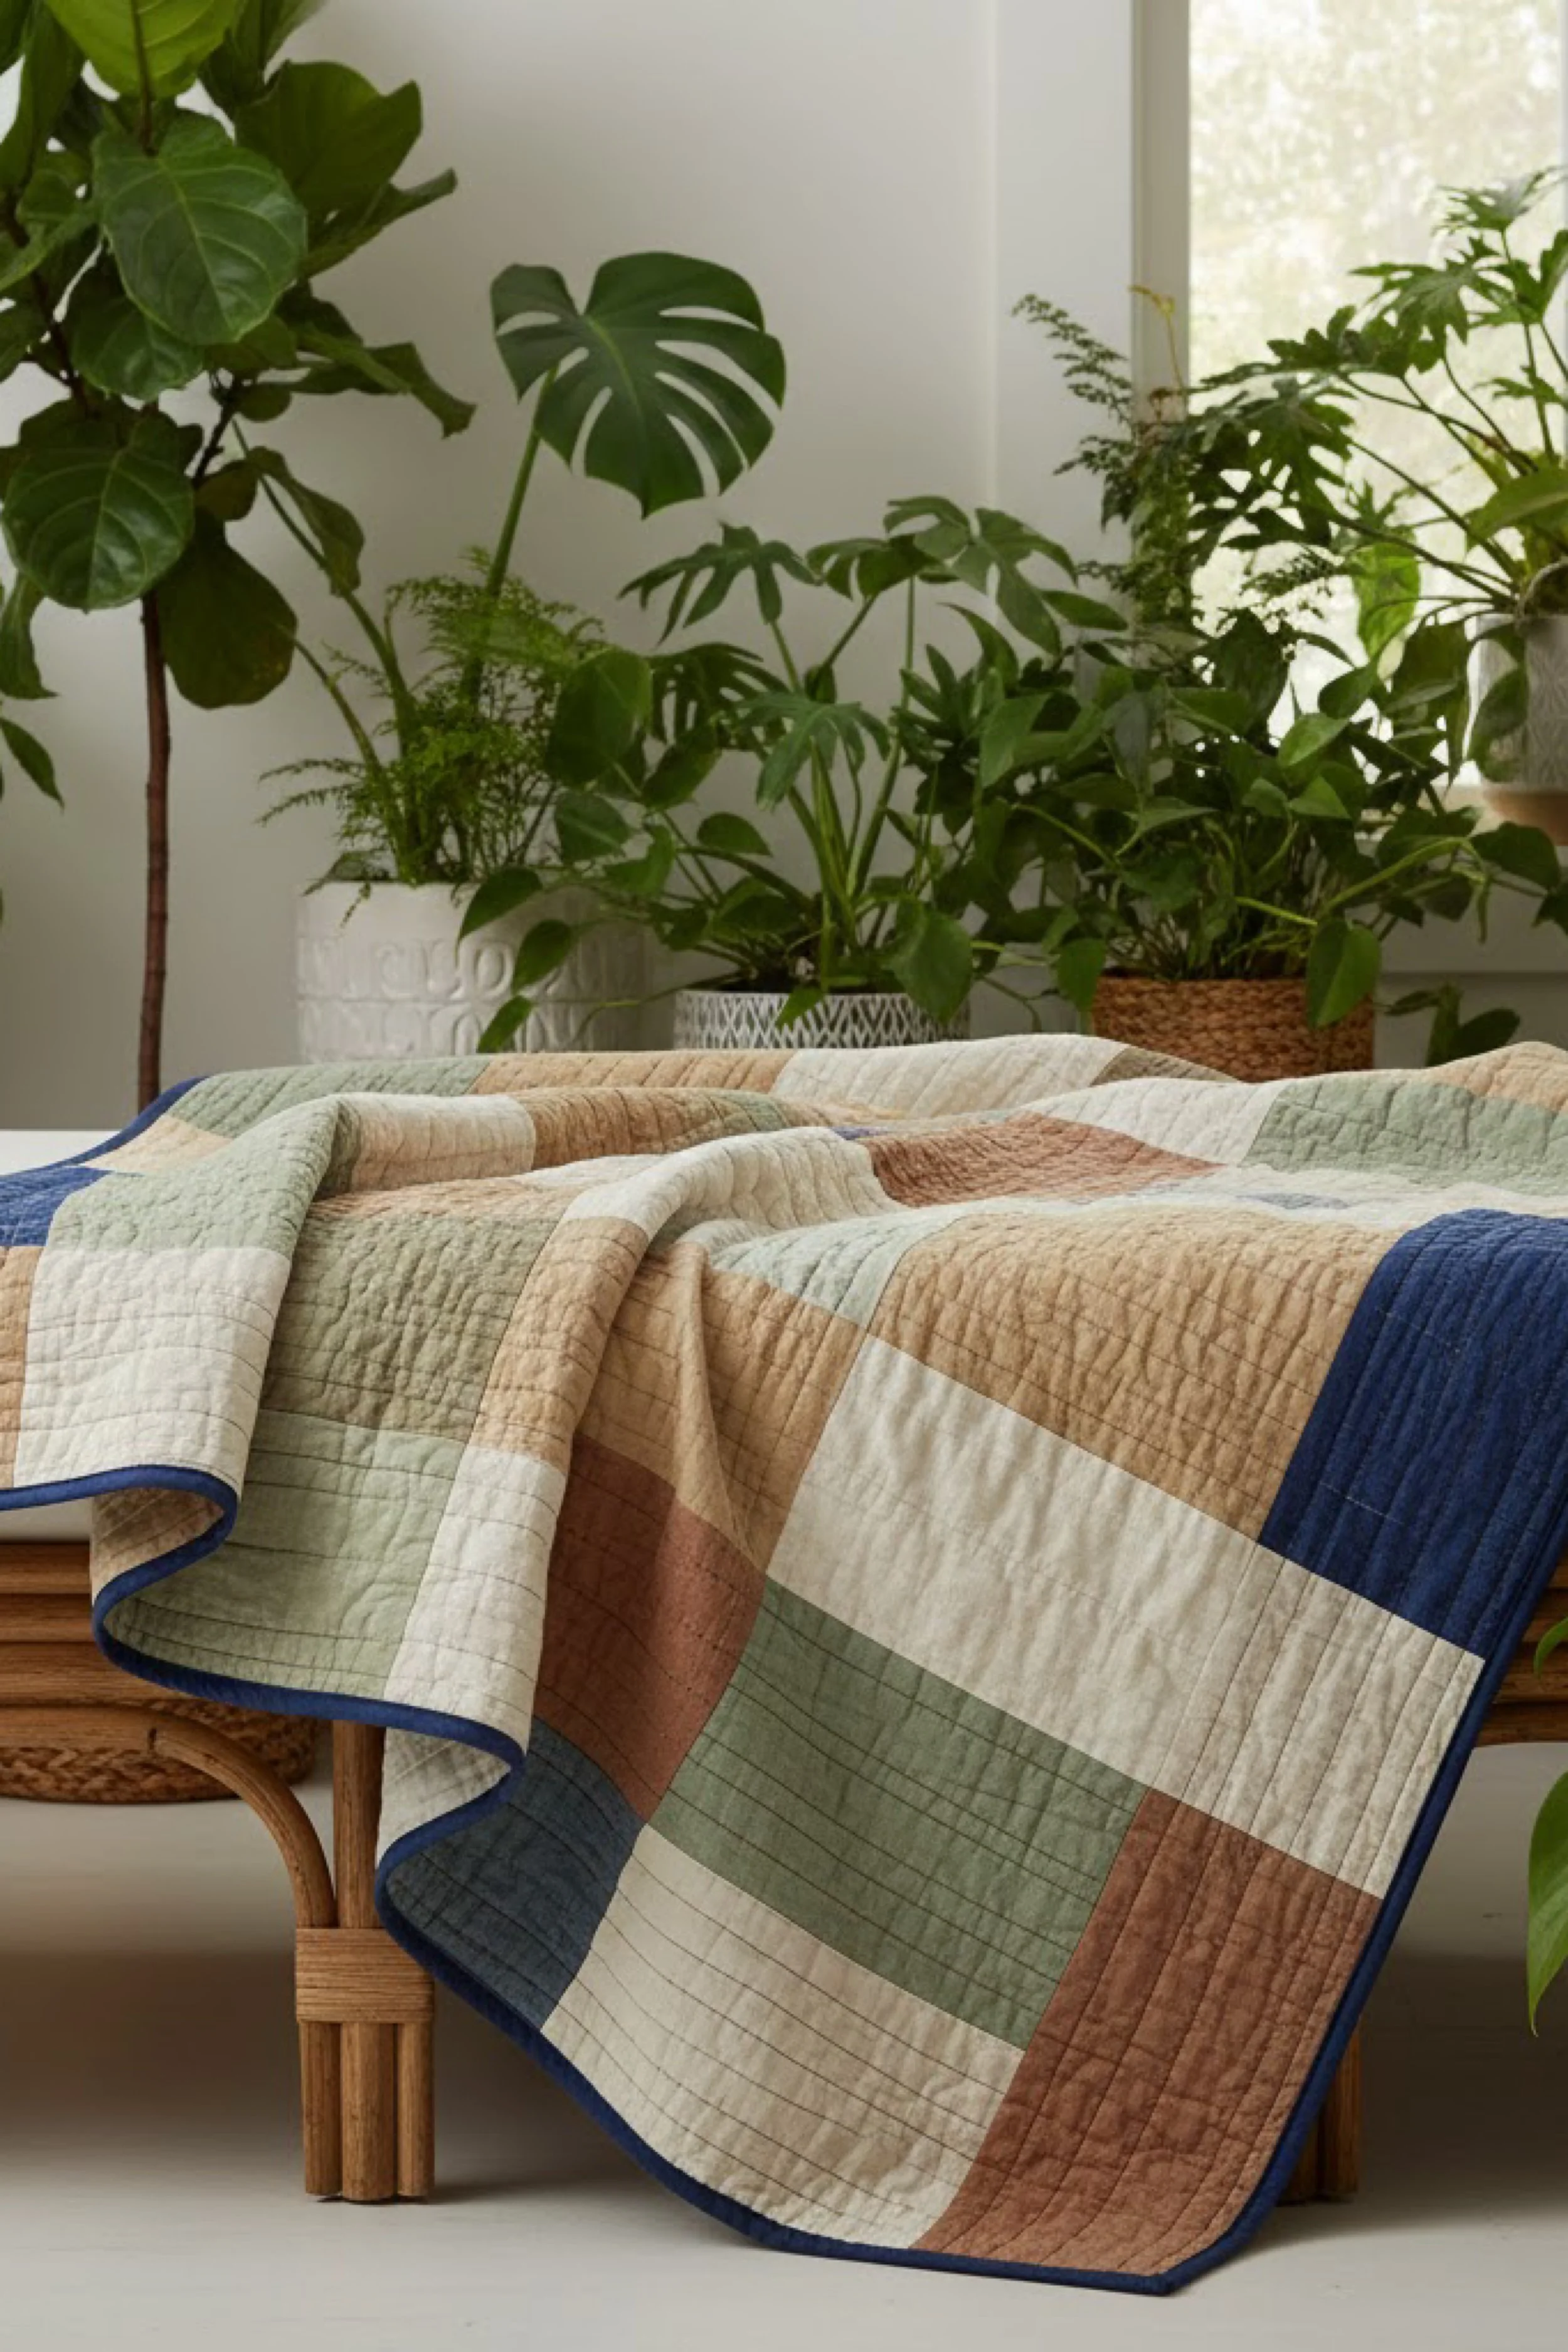
Earth Tone Windowpane Quilt — Step by Step Tutorial
What you’re making
You’re making a soft, modern patchwork quilt with oversized rectangular and square pieces in muted earth tones, finished with a deep contrast binding that gives the whole piece a crisp, gallery clean edge. The look in the photo feels calm, tailored, and organic at the same time, with sage, clay, cream, sand, and deep blue working together in a simple geometric layout that lets the color blocking do all the talking. This is an excellent project if you want something that looks expensive and design forward without requiring tiny pieces or intricate foundation piecing.
The quilt reads beautifully because the piecing is large scale, the quilting lines are subtle and evenly spaced, and the binding is bold enough to frame the composition. If you are a newer quilter, this is a very approachable way to make a statement quilt. If you have more experience, it is a satisfying weekend or two weekend project that leaves plenty of room for your own color story.
Materials + tools
- Quilting cotton in cream
- Quilting cotton in pale sage
- Quilting cotton in sand or warm beige
- Quilting cotton in muted terracotta or dusty clay
- Quilting cotton in deep navy or ink blue
- Optional extra neutral for more variation
- Backing fabric wide enough for your finished quilt
- Batting, cotton or cotton blend
- Binding fabric in deep navy or ink blue
- Coordinating thread for piecing
- Thread for quilting, cream, light taupe, or muted sage all work well
- Rotary cutter
- Self healing mat
- Quilting ruler, ideally a long one
- Sewing machine
- Iron and pressing surface
- Pins or clips
- Fabric marker or chalk
- Walking foot for quilting
- Safety pins or spray baste
- Seam ripper
- Large square ruler is helpful but optional
Finished size + customization notes
A throw size version works especially well for this design. Aim for about 54 x 72 inches if you want a draped sofa or bench quilt like the image. For a bed version, enlarge the number of blocks while keeping the same proportions.
To match the look closely, use large cut pieces rather than lots of tiny blocks. Think rectangles around 4 x 8 inches, 5 x 10 inches, and squares around 8 x 8 inches once finished. If yours looks busier than the photo, your pieces are probably too small. If yours looks too plain, add one more dark blue rectangle and one more clay section for contrast.
Step by step instructions
Build your color plan first.
Before cutting anything, lay out your color story on paper or in a simple phone sketch. This quilt works because the colors are restrained. You want cream to be the breathing room, sage and sand to soften the layout, clay to warm it up, and navy to punctuate the design. A good starting balance is about one third cream, one quarter soft green, one quarter beige and clay combined, and a small amount of navy. You should now see a palette that feels grounded and airy rather than bright or busy.Choose your finished block scale.
The quilt in the image is made from generously sized pieces. Cut your units so they will finish large after sewing. A beginner friendly approach is to cut strips and subcut them into rectangles. Try cutting several 8 1/2 x 4 1/2 inch rectangles, several 8 1/2 x 8 1/2 inch squares, and a few longer pieces like 12 1/2 x 4 1/2 inches. Keep all measurements on the half inch so your quarter inch seams give you neat finished sizes. If yours already looks tiny and fiddly on the floor, scale up.Cut more cream than you think you need.
Cream acts like negative space in this design. It keeps the darker and warmer tones from crowding one another. Cut a generous stack of cream pieces in a few sizes that match your other fabrics. This will let you move pieces around later without having to stop and cut more. Visual checkpoint: when you spread the cut pieces out, cream should look abundant rather than scarce.Create a loose layout on the floor or design wall.
Arrange the pieces in offset rows. Avoid making them line up too perfectly like a checkerboard. The photo shows a balanced but relaxed composition, so let some vertical seams stagger. Place your navy pieces near outer corners and edges, not clustered in the center. The clay pieces can sit nearer the middle, balanced by sage and cream. If yours looks wider than the photo, reduce the number of horizontal pieces and add longer vertical sections.Refine the composition before sewing.
Step back from your layout. Squint at it. You should notice the dark blue pieces acting like anchors, not taking over. No one fabric should dominate a single area. Move pieces until the eye travels gently across the quilt. This is the difference between a homemade quilt and a thoughtfully designed one. Take a photo before sewing so you can rebuild the arrangement if needed.Sew row units together.
Start piecing small groups into horizontal row sections. Sew with a consistent quarter inch seam allowance and press each seam to one side or open, whichever gives you the flattest result. Because the pieces are large, accuracy matters. If one row starts bowing, check your seam allowance right away. You should now see broad bands of color forming, with clean intersections and a smooth top edge.Join row sections carefully.
Once your smaller units are assembled, join the rows into the full quilt top. Pin at seam intersections so your lines meet neatly. Because the look is geometric, crooked joins show more than they would in a busy floral patchwork. If a point or edge is off by more than one eighth inch, fix it now. Small inaccuracies compound quickly in large modern piecing.Square the quilt top.
After the top is complete, press it well and trim the outer edges. Use a long ruler and check opposite sides so the quilt is truly rectangular. This helps the binding sit beautifully later. Visual checkpoint: your quilt top should lie flat without ripples or stretched corners.Make the quilt sandwich.
Layer backing right side down, batting in the middle, and your quilt top right side up. Smooth carefully from the center outward. Pin baste or spray baste so nothing shifts. Since the finished look is soft and not heavily puffed, a cotton batting or low loft cotton blend is a smart choice. If you want more drape like the photo, prewash the fabrics and use cotton batting.Mark simple quilting lines.
The quilting in the image is understated and evenly spaced, likely straight lines that follow the quilt shape rather than elaborate motifs. Mark lines about 1 inch apart or use the edge of your walking foot as a guide. Quilt either vertically across the entire top or follow selected seam directions to echo the geometric feel. Straight line quilting keeps the design modern and lets the colors shine.Quilt slowly and evenly.
Start near the center and work outward, smoothing as you go. A walking foot helps feed all layers evenly and reduces puckers. Pause often to check the backing. You should now see texture developing, but it should not overpower the patchwork. If the quilt starts to draw inward or ripple, your lines may be too close together or your tension may need adjustment.Trim and bind with contrast fabric.
The deep navy binding is one of the strongest style details in the photo. Cut binding strips 2 1/4 inches wide for a neat finish, join them end to end, press in half lengthwise, and attach to the front of the quilt. Fold over and finish by hand or machine on the back. This dark edge acts like a picture frame and makes the pale colors look even richer.Final press and drape test.
Once bound, give the quilt a gentle final press and drape it over a bench, sofa, or bed. It should look relaxed, clean lined, and softly structured. If yours feels stiff, laundering it once will soften the finish and bring out that lightly crinkled quilted texture seen in the image.
Troubleshooting
My quilt looks too busy.
Your pieces are probably too small or your color contrast is too sharp. Replace some mixed tones with more cream and enlarge your units.
The dark blue stands out too much.
Use fewer navy pieces or move them outward toward the corners and edges. In this design, dark fabric should accent, not dominate.
My rows are not lining up.
Check that your seam allowance is a true quarter inch. Trim row units before joining them if needed.
The quilt top waves at the edges.
This often means stretching during piecing or pressing. Press without dragging the iron, then square the whole top before quilting.
The binding feels clunky.
Trim batting close to the quilt edge and reduce bulk at the corners before folding the binding over.
Finishing details
Wash the quilt on a gentle cycle if you want that soft, slightly puckered heirloom texture. A cotton batting will crinkle beautifully and make the straight quilting more visible in the best way. If you want a sharper, more showroom finish, skip the wash, use spray starch while pressing, and display it immediately.
Optional upgrades for this quilt include adding a solid backing in deep blue for a reversible look, hand stitching a label in one corner, using a striped binding for extra personality, or making matching lumbar pillows with leftover fabric. You can also enlarge the design into a bed quilt by repeating your layout logic rather than copying exact piece placement. The secret is keeping the composition spacious and balanced.
Shop Similar
- Muted earth tone quilting cotton bundle
- Deep navy quilt binding fabric
- Cotton quilt batting for throw quilts
- Long acrylic quilting ruler set
- Walking foot for quilting machine
Style It With
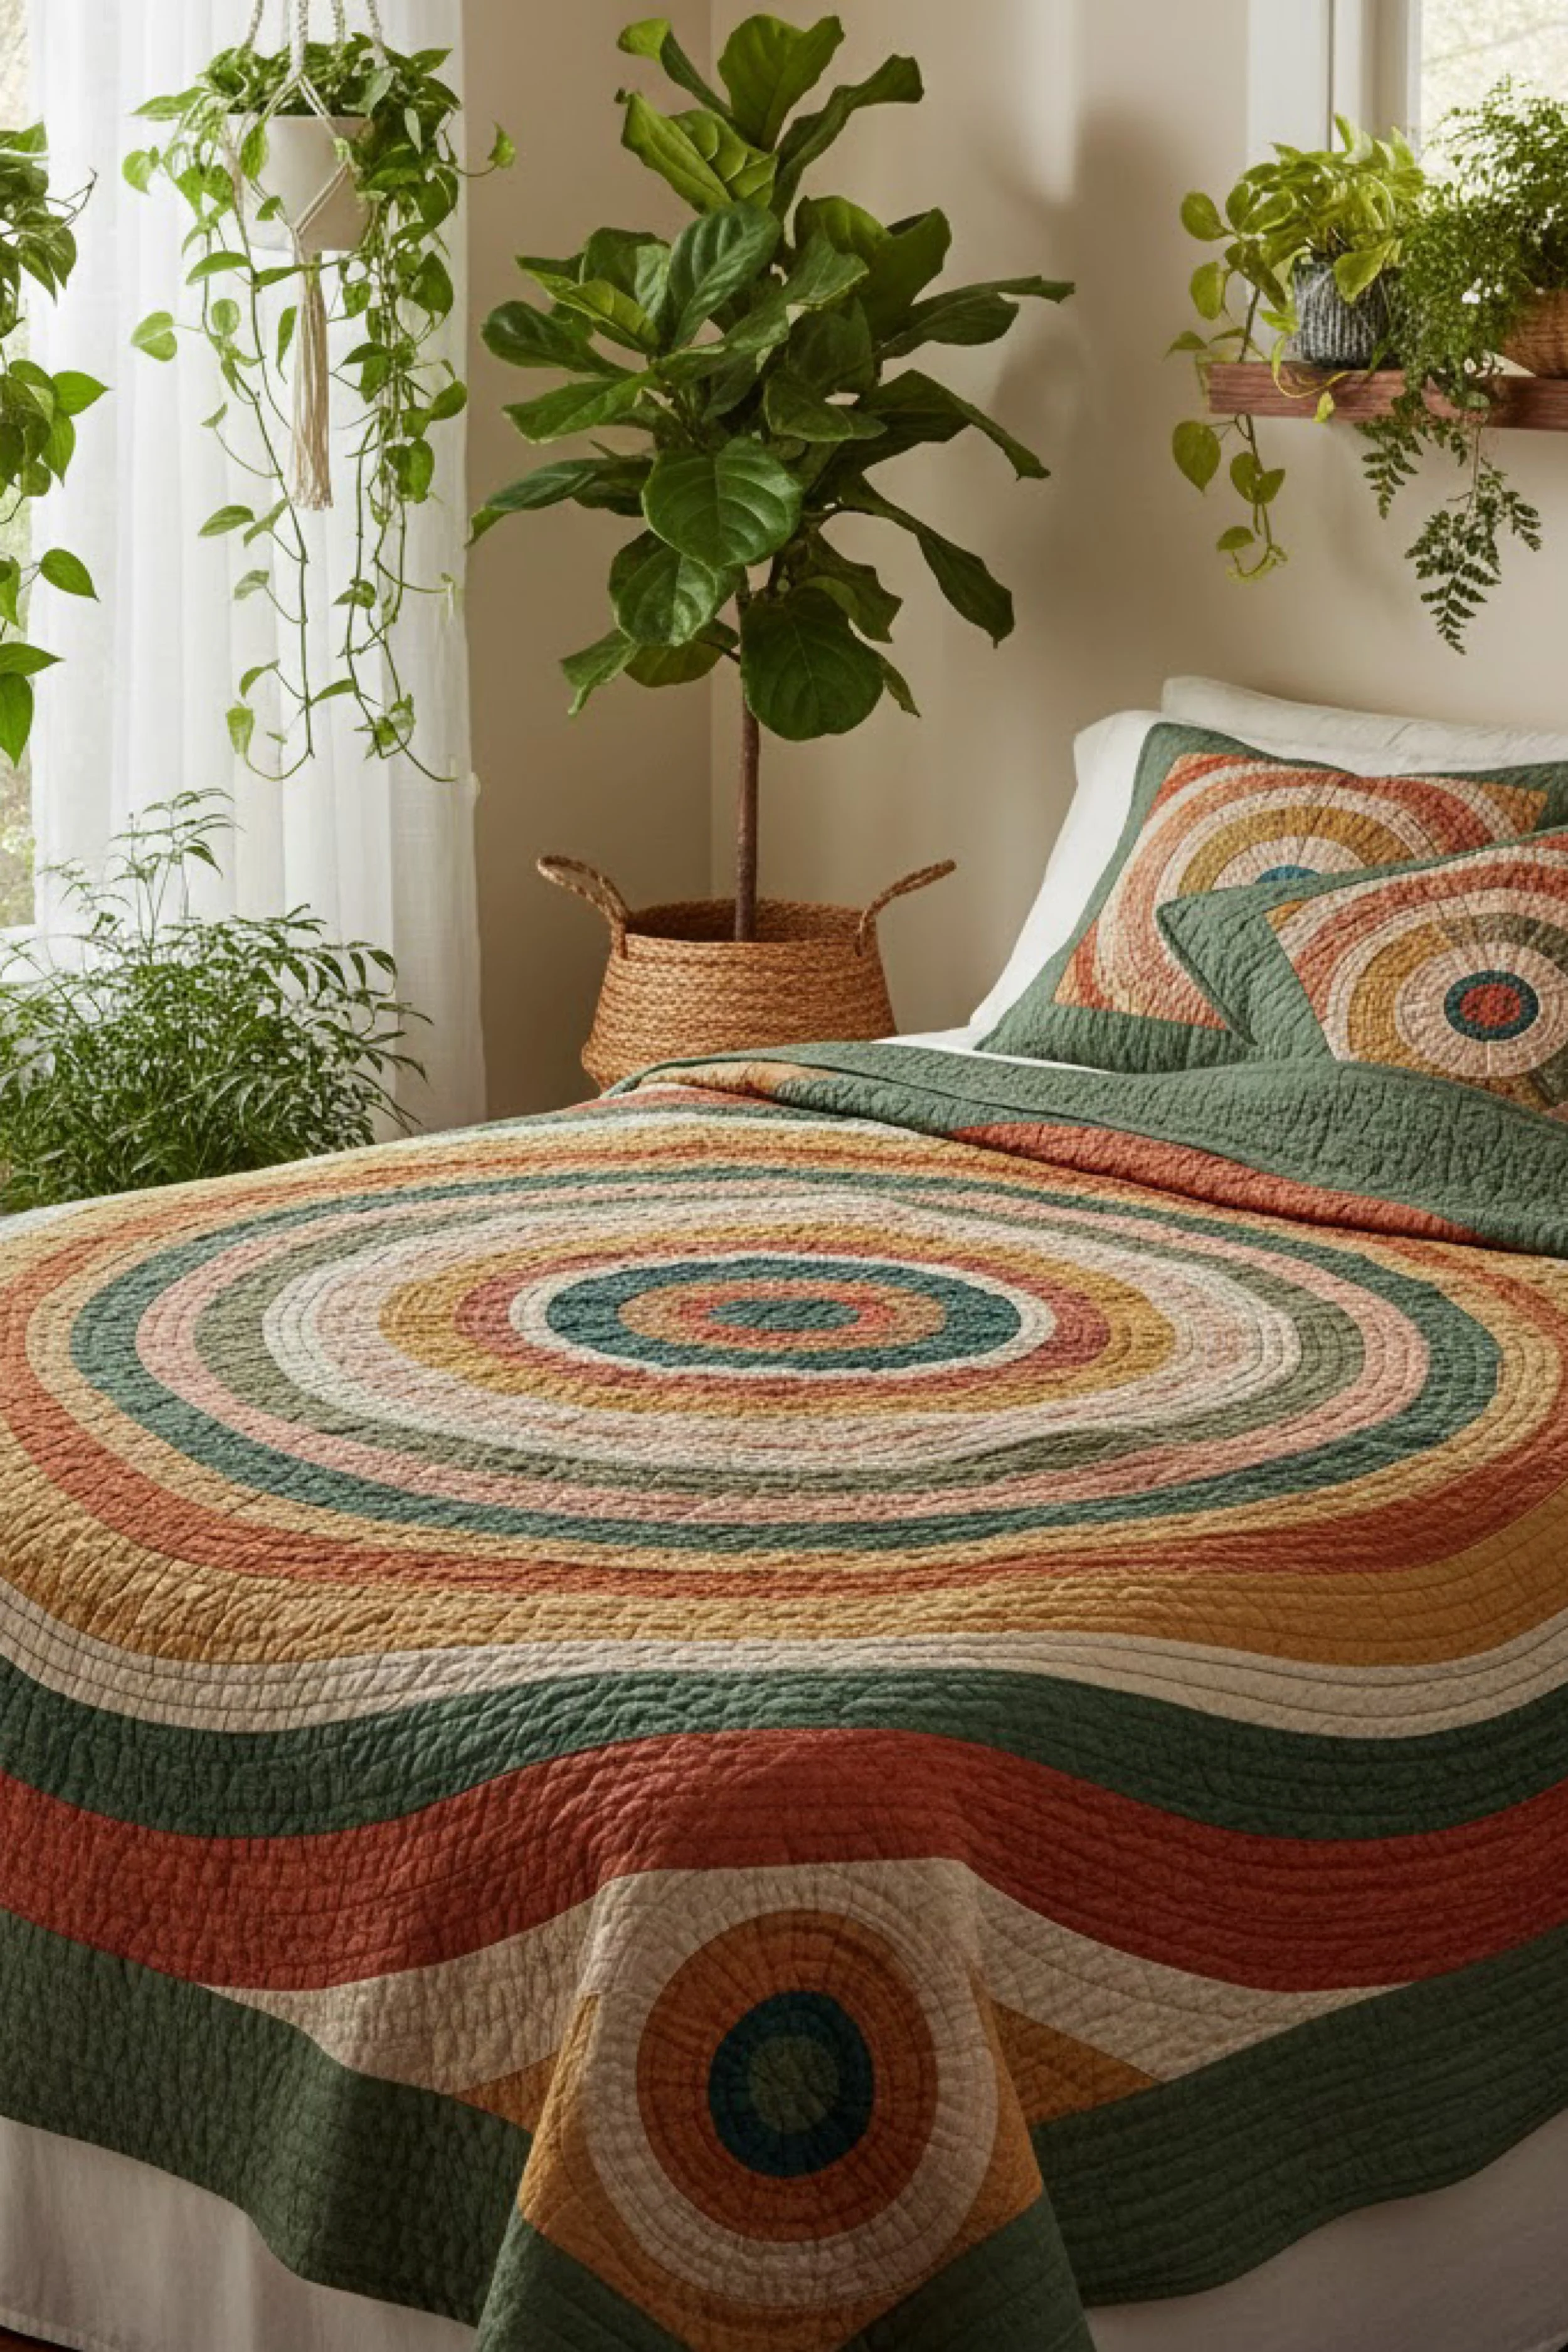
Concentric Rainbow Bed Quilt — DIY Guide
What you’re making
You’re making a bold, retro inspired quilt with wide concentric rings that radiate from the center of the bed like a soft target or sunrise. The palette in the image is warm, earthy, and cheerful rather than neon, using mossy green, rust, mustard, blush, cream, and muted teal to create a rounded rainbow effect. This quilt looks intricate at first glance, but the magic is really in careful planning, smooth curved piecing or appliqué, and consistent quilting that lets the arcs feel clean and intentional.
This is a beautiful project for a bed because the circular design reads dramatically from across a room. It also pairs wonderfully with matching pillows, which help the whole bedding setup feel custom and finished. If you have never made a curve heavy quilt before, this is a great design to try because the bands are broad and forgiving.
Materials + tools
- Quilting cotton in cream
- Quilting cotton in blush or dusty peach
- Quilting cotton in rust
- Quilting cotton in mustard or golden ochre
- Quilting cotton in olive or moss green
- Quilting cotton in muted teal
- Optional extra neutral or soft tan
- Backing fabric for quilt
- Batting, cotton or cotton blend
- Matching fabric for pillow fronts if desired
- Binding fabric in one of the darker outer ring colors
- Rotary cutter and mat
- Large quilting ruler
- Flexible curve ruler or long string and fabric pencil
- Fabric scissors
- Sewing machine
- Iron and pressing surface
- Pins or clips
- Walking foot
- Safety pins or spray baste
- Paper for templates, optional but helpful
Finished size + customization notes
For a full bed impact like the image, aim for approximately 84 x 96 inches for a full or queen coverlet style quilt. You can scale smaller for a throw by reducing the width of each ring.
The easiest way to control the look is to decide the width of each band before cutting. Wide bands, around 3 to 5 inches finished, create the clean contemporary effect shown in the photo. Narrow rings will make it feel more traditional and busier. Matching pillow covers can echo the center circle for a beautifully cohesive look.
Step by step instructions
Decide on your construction method.
There are two practical ways to recreate this look. Option one is traditional curved piecing, where each ring is sewn to the next. Option two is appliqué, where you layer and stitch shaped bands onto a base. If you are a confident beginner, appliqué is often easier and still gives a beautiful result. If you want the cleanest heirloom finish with no extra layers, choose curved piecing. Either method can look excellent here.Plan the ring sizes.
Measure your desired finished quilt. Mark the center point. From there, determine the diameter of each ring. The image uses many broad concentric bands, not tiny narrow circles. A helpful starting plan is a center circle around 8 to 10 inches across, then add successive bands 3 to 5 inches wide. You should now see a target like layout that fills the quilt face gracefully.Choose a gentle retro palette.
The success of this quilt depends on color order. Begin with a muted teal center, then move outward through cream, warm clay, mustard, blush, moss, rust, and cream again, repeating where needed. Keep the tones softened and slightly dusty rather than bright and primary. If yours looks childish instead of sophisticated, the colors are probably too saturated.Make full size templates.
On paper or directly on template material, draw your rings. For curved piecing, each ring will need to be divided into manageable arcs or quarters. For appliqué, cut freezer paper or cardstock templates for the center and each band. This is the stage where accuracy saves you hours later. Visual checkpoint: your templates should nest smoothly inside one another with even spacing all the way around.Cut your fabric carefully.
Cut each color band according to the templates, adding seam allowance if piecing. Keep each ring labeled. Curves are easy to confuse once stacked. If you are appliquéing, prepare the shapes with your preferred method, such as fusible web or turned edge appliqué. Broad, smooth curves are the goal. Jagged or wobbly edges will stand out immediately in a design this clean.Assemble the center first.
Start with the center circle or oval and the first surrounding band. Sew slowly, pinning quarter marks so the curves distribute evenly. Do not force the fabric through the machine. Let the feed dogs work while your hands guide gently. Press carefully after each round. You should now see the signature ripple free curve forming. If you get tiny tucks, unpick and resew that section before moving outward.Work outward one ring at a time.
Continue adding bands in order, pressing after every seam. If the quilt begins to bowl or wave, your seam allowance may be inconsistent or your curves may be stretching. Use lots of reference points and pin more than you think you need. The broader the bands, the easier it is to keep the lines elegant.Square the outer edges.
Once the full circular or oval composition is assembled, you will likely need to trim the quilt top to a rectangle. This is normal. Center the design and cut away excess so the rings appear balanced on the finished bed. The image shows the circles extending beyond the bed edges, which gives that dramatic oversized look.Add coordinating pillows.
To get the exact styled look, make one or two matching pillow covers. A simple version uses a small center circle with surrounding rings on the pillow front. This small repeat ties the whole set together. If you want an easier shortcut, use leftover strips from the quilt to create arched or pieced pillow fronts in the same palette.Layer the quilt sandwich.
Place backing, batting, and top together. Smooth thoroughly. Because there are lots of curved seams or layered bands, take extra time here so the quilt lies flat. Pin baste heavily, especially near the center where the eye will land first.Choose quilting that supports the rings.
The quilt in the image appears softly textured rather than densely decorated. Echo quilting along the rings is the best choice. Stitch just inside each seam line or at evenly spaced intervals following the curve. This reinforces the circular motion and adds gorgeous dimension. If you are uncomfortable quilting curves, use a walking foot and work slowly. The result is worth the patience.Bind the quilt cleanly.
Trim the finished quilt and bind it in a coordinating darker tone like rust or green. A narrow binding helps keep the focus on the rings. Miter your corners carefully. If the quilt is for a bed, machine finishing the binding is durable. If it is more of a showpiece, hand finishing adds a refined touch.Style and evaluate.
Spread it over the bed and step back. You should now see a large, centered medallion effect that feels grounded, cozy, and graphic. If the center is drifting visually to one side, check whether the outer trimming was uneven. This is fixable before binding if caught early.
Troubleshooting
My curves are puckering.
Use more pins, mark quarter points, and sew more slowly. Curved piecing punishes rushing.
The rings do not look smooth.
Your templates may not be even. Recheck the spacing and redraw if needed before cutting more fabric.
The quilt top is rippling.
This can happen if one ring stretched while sewing. Staystitching curved edges before assembly can help.
The colors feel too loud.
Add more cream or replace one bright band with a muted earth tone. This design needs breathing room.
My center is not centered.
Before trimming the outer edges, fold the quilt top in half both ways and mark the true center to align the medallion.
Finishing details
Wash the finished quilt gently to soften the curves and bring out the quilted texture. This design benefits from a lived in crinkle because it makes the bed feel welcoming rather than stiff. For a more polished boutique bedding look, starch the pillow covers lightly and press the quilt top before styling.
Optional upgrades include piping on the pillow edges, a pieced backing made from leftover arcs, hand stitched echo quilting around the center ring, or a scalloped edge if you want a more whimsical finish. If you are making a child’s version, you can brighten the palette a bit. For a grown up bedroom like the photo, stay in the muted earth and plant friendly range.
Shop Similar
- Earth tone quilting cotton fabric bundle
- Fusible appliqué web for quilting
- Flexible curve ruler for sewing
- Cotton batting queen size quilt
- Muted green rust cream pillow insert covers
Style It With
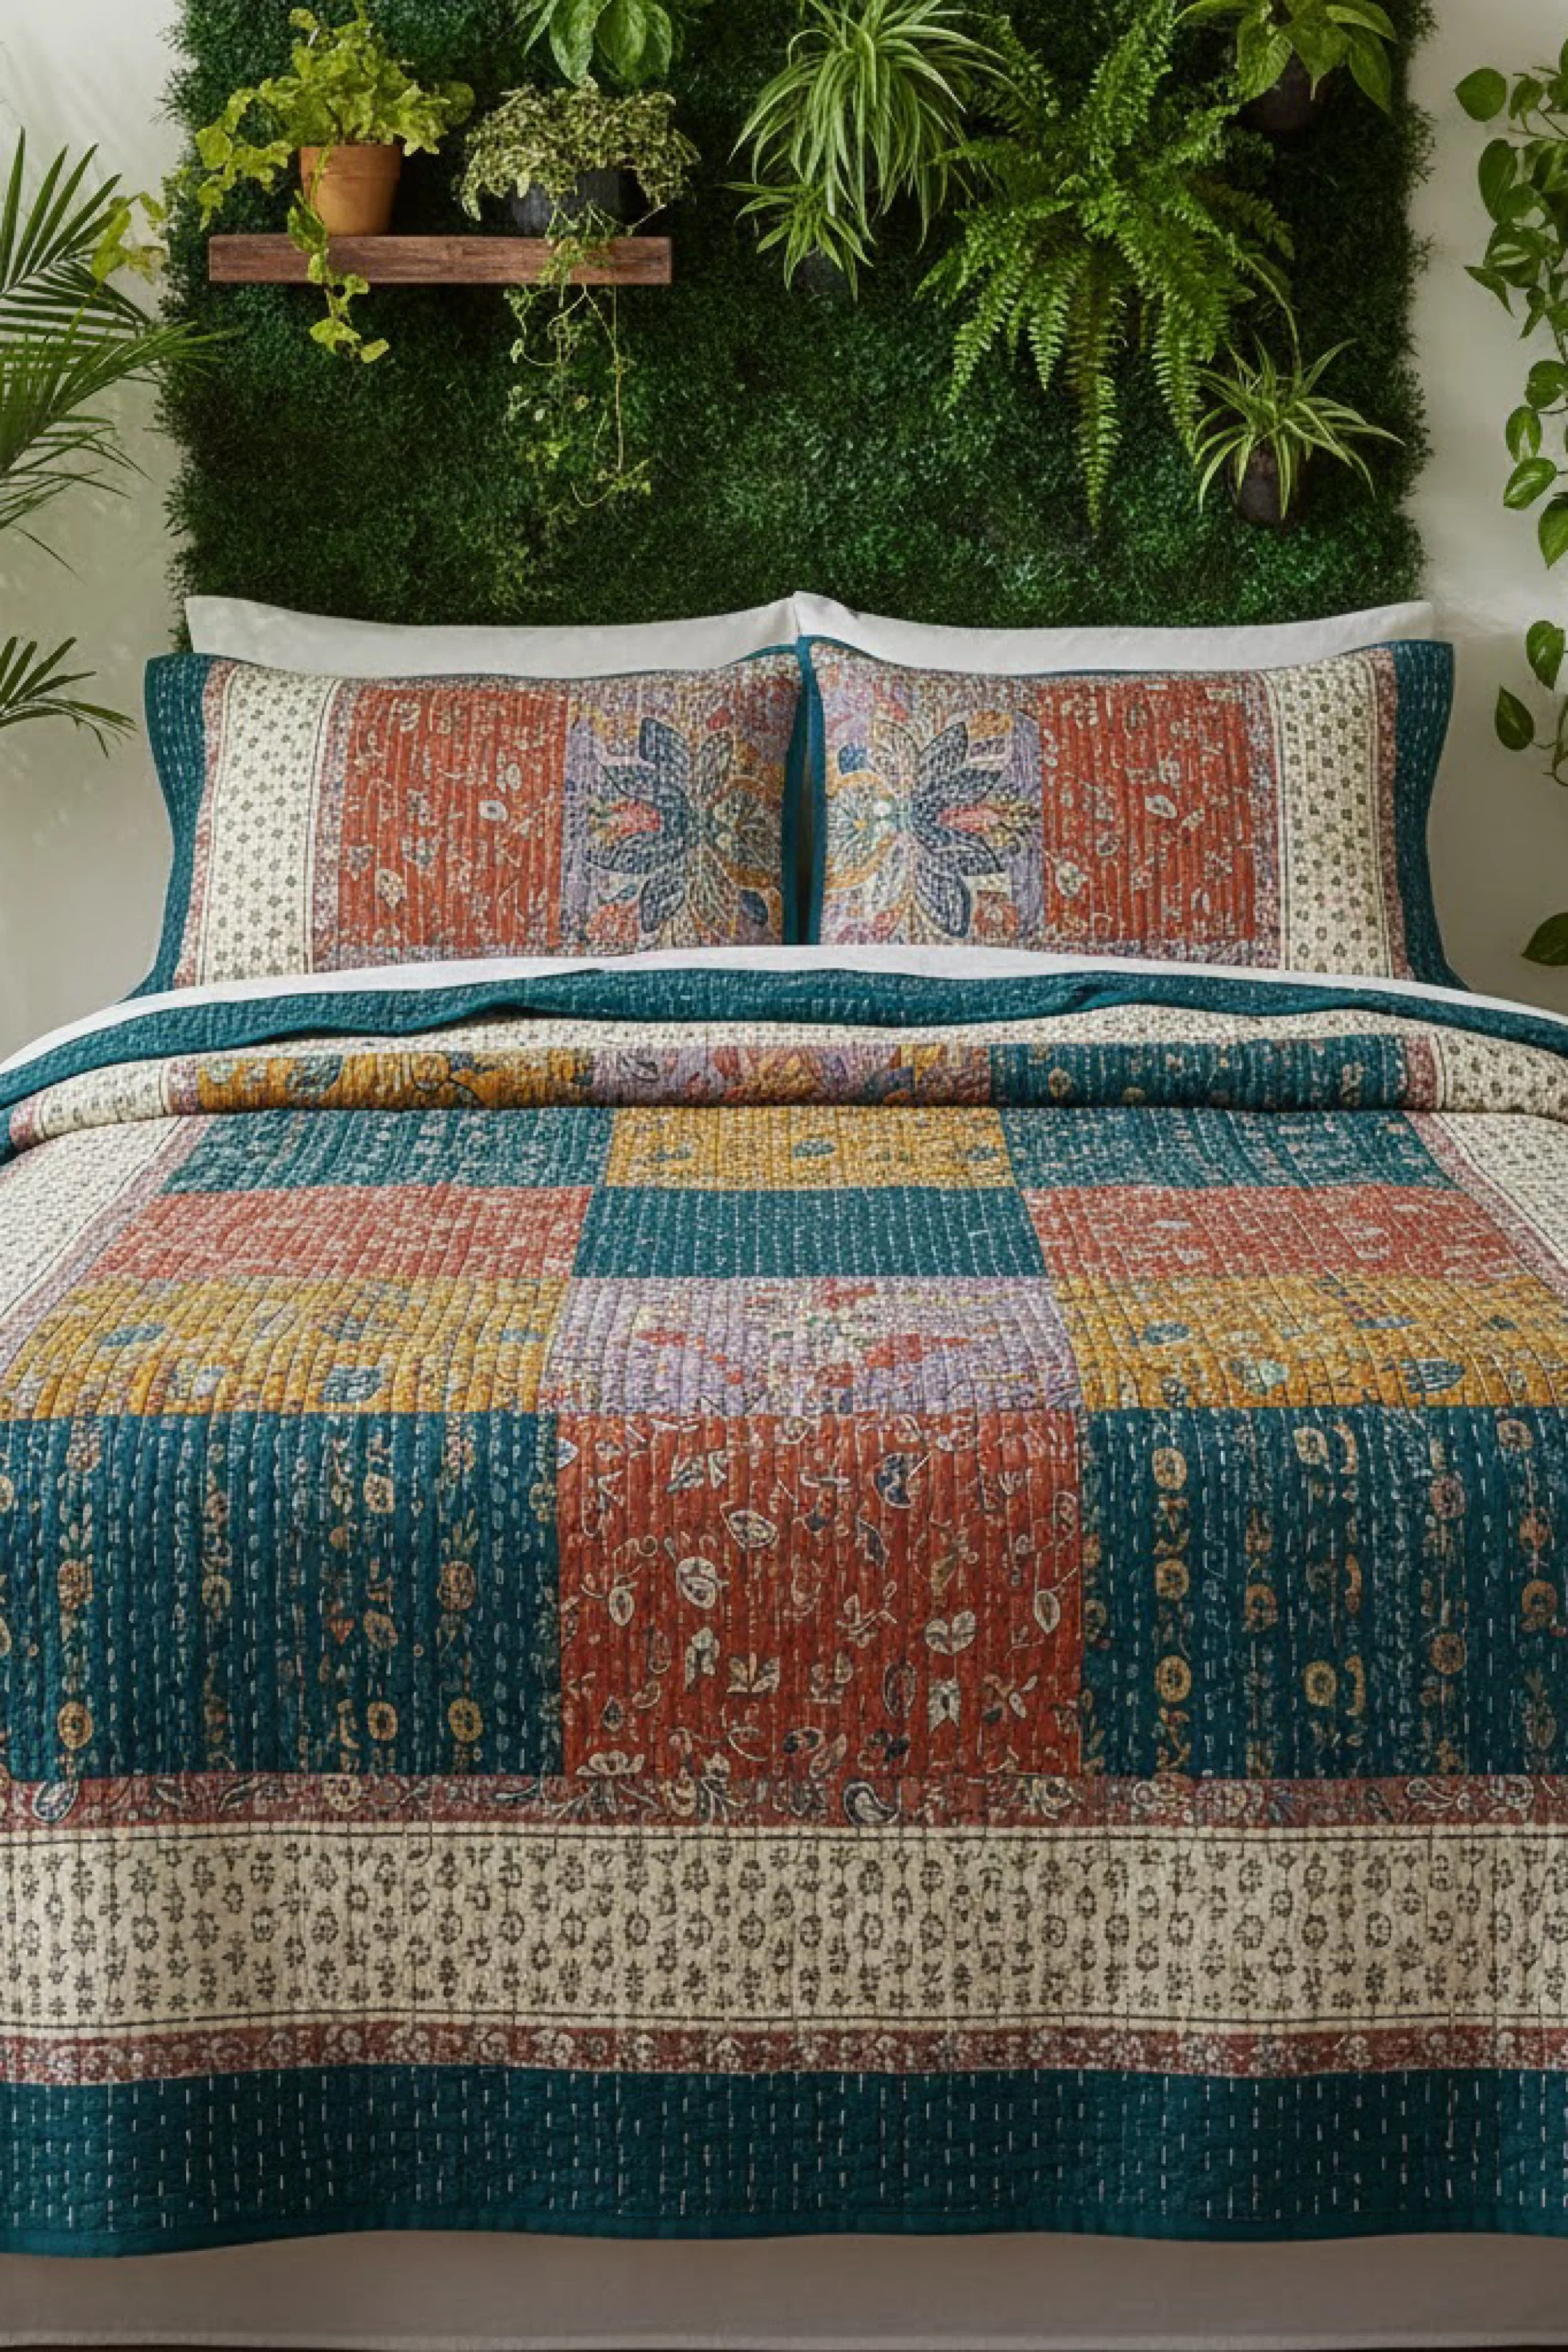
Botanical Patchwork Kantha Style Quilt — How To Guide
What you’re making
You’re making a richly patterned patchwork quilt inspired by vintage kantha and globally collected textiles, with a mix of floral, dotted, and micro print fabrics arranged into bold blocks and borders. The color story in the image leans jewel toned and earthy at once, with teal, rust, mustard, cream, and faded lavender creating a layered, collected feel. This kind of quilt looks soulful and storied, as if it has been pieced together from treasured fabric fragments over time.
The stitched texture is a huge part of the charm. Rather than thick, puffy quilting, the image suggests dense running lines or subtle kantha inspired stitching that gives the surface life and age. If you love quilts that feel artistic, textural, and full of detail, this is a gorgeous project to build.
Materials + tools
- Assorted quilting cottons or lightweight cotton prints in teal, rust, mustard, cream, muted lavender, and soft neutrals
- A mix of floral, geometric, dotted, and tiny patterned prints
- Border fabric in cream or small print
- Backing fabric
- Low loft batting or cotton flannel batting for a flatter feel
- Binding fabric in teal or rust
- Piecing thread
- Quilting or hand stitching thread
- Rotary cutter and mat
- Quilting rulers
- Sewing machine
- Iron and pressing mat
- Pins or clips
- Hand quilting needle if doing kantha style stitching
- Fabric marker
- Basting pins or spray baste
- Optional embroidery floss for visible hand stitching
Finished size + customization notes
A bed size around 80 x 90 inches will recreate the presence in the photo, though this design also scales beautifully to throws. The look depends on varied prints, so even a smaller version still feels rich.
For authenticity, use a mix of block sizes rather than identical squares only. Combine medium rectangles, squares, and border strips. If you want the quilt to feel more vintage, choose fabrics that look slightly faded or washed. If you want it more polished, keep the palette tight and the contrast controlled.
Step by step instructions
Collect your fabric family.
The best part of this quilt is the sense of gathered variety. Pull prints that share a common mood rather than matching exactly. Look for small florals, dotted motifs, tiny vines, paisleys, hand block inspired prints, and subtle stripes. Keep the colors in conversation with one another. Teal and rust should lead, with cream balancing the busier pieces. You should now see a stack that feels layered and eclectic, not random.Sort prints by scale and tone.
Separate your fabrics into small scale, medium scale, and strong accent prints. Also sort by dark, medium, and light value. This will help you distribute them evenly. If all your bold fabrics end up clustered together, the quilt will feel heavy. If you spread them well, it will feel curated.Plan a patchwork layout with larger panels.
The image shows a mix of blocky patchwork areas and longer printed sections, especially in the pillows and central panels. This means you do not need every block to be identical. Cut a range of pieces such as 6 1/2 inch squares, 6 1/2 x 12 1/2 inch rectangles, and longer strip sections. Add narrow sashing or border style strips between some blocks to echo vintage textile construction.Create focal sections first.
Make two or three statement panels using your most beautiful fabrics. These can be mirrored floral rectangles, richly colored patchwork columns, or bordered printed sections. The pillows in the image suggest that the top edge could feature more decorative panels. Build those focal elements first, then let the simpler patchwork support them.Piece blocks into rows.
Sew smaller blocks and rectangles into row units. Press carefully so seams lie flat. Because you are using many prints, organization matters. Label rows or stack them in order. Visual checkpoint: you should now see contrast between patterned sections and quieter sections, with cream and lighter prints creating rest points.Assemble the full quilt top.
Join your rows and panels into the finished top. Keep stepping back to ensure the dark teal sections are balanced across the whole piece. The quilt should feel symmetrical enough to be stable, but not rigidly formal. If one side is visually heavier, swap in a lighter block or add a cream strip to even it out.Add border elements.
The image includes border like zones that frame the central patchwork. Add one or two horizontal bands near the bottom or top, or surround the entire quilt with a printed border in a lighter neutral. This gives the patchwork a finished, intentional structure.Make coordinating shams or pillow covers.
To recreate the bedding look, sew matching pillow covers from leftover focal fabrics. Use rectangular decorative panels across the pillow fronts. This is a good way to feature your most ornate prints without overwhelming the quilt center.Prepare for quilting.
Layer the top, batting, and backing. Because this style benefits from texture, choose a low loft batting that lets the stitching become visible. A flatter batting will make the finished quilt feel more like vintage kantha or old world coverlet work.Quilt with many simple lines.
Straight line quilting, hand running stitches, or gently irregular kantha inspired lines all work beautifully here. The image suggests close rows of stitching that travel over the entire surface. If machine quilting, stitch lines around 1/2 to 1 inch apart. If hand stitching, use embroidery floss or quilting thread and embrace subtle irregularity. You should now see the whole quilt gaining texture and cohesion as the mixed prints visually settle together.Bind in a strong solid.
A teal binding works especially well because it echoes the darker printed sections and gives the quilt a frame. Cut, join, press, and attach your binding as usual. A slightly wider binding can suit this kind of richly patterned quilt.Soften the finished piece.
This style becomes even more beautiful after washing. The layers relax, the stitching rises slightly, and the whole quilt starts to feel lovingly worn. If you want that collected vintage look, a gentle wash and tumble dry on low is part of the finishing process.Style against greenery and warm neutrals.
The photo pairs this quilt with plants and a deep green wall, which makes the rust and teal sing. Drape it on a bed with simple neutral sheets so the patchwork remains the star. If yours feels too busy in the room, tone everything else down and let the quilt carry the pattern.
Troubleshooting
My prints clash.
Reduce the number of competing large scale prints and add more small scale or tonal fabrics.
The quilt feels chaotic.
Introduce more cream, add a consistent border, or repeat one or two anchor fabrics more often.
My hand stitching puckers the quilt.
Do not pull the thread too tight. Kantha style stitching should secure layers while allowing softness.
The quilt looks too flat.
Choose a slightly more contrasting thread or stitch a little more densely to bring out texture.
My rows do not sit evenly.
Trim each row unit before joining and keep checking measurements as you go.
Finishing details
This quilt is perfect for slow finishing touches. Add a hand sewn label, contrast thread for visible stitched rows, or a pieced backing made from the smaller leftovers. You can also wash the finished quilt with a color catcher sheet if you are using rich prints and want peace of mind on the first wash.
Optional upgrades include making matching euro shams, adding hand stitched accents only on certain panels, using soft striped binding, or including a hidden sleeve on the back if you want to hang the quilt decoratively. If you want the most faithful look, keep the stitching dense and the fabric mix rich but coordinated.
Shop Similar
- Vintage inspired quilting cotton bundles
- Teal rust mustard floral quilt fabric
- Hand quilting needles and thread set
- Low loft cotton quilt batting
- Teal quilt binding fabric
Style It With
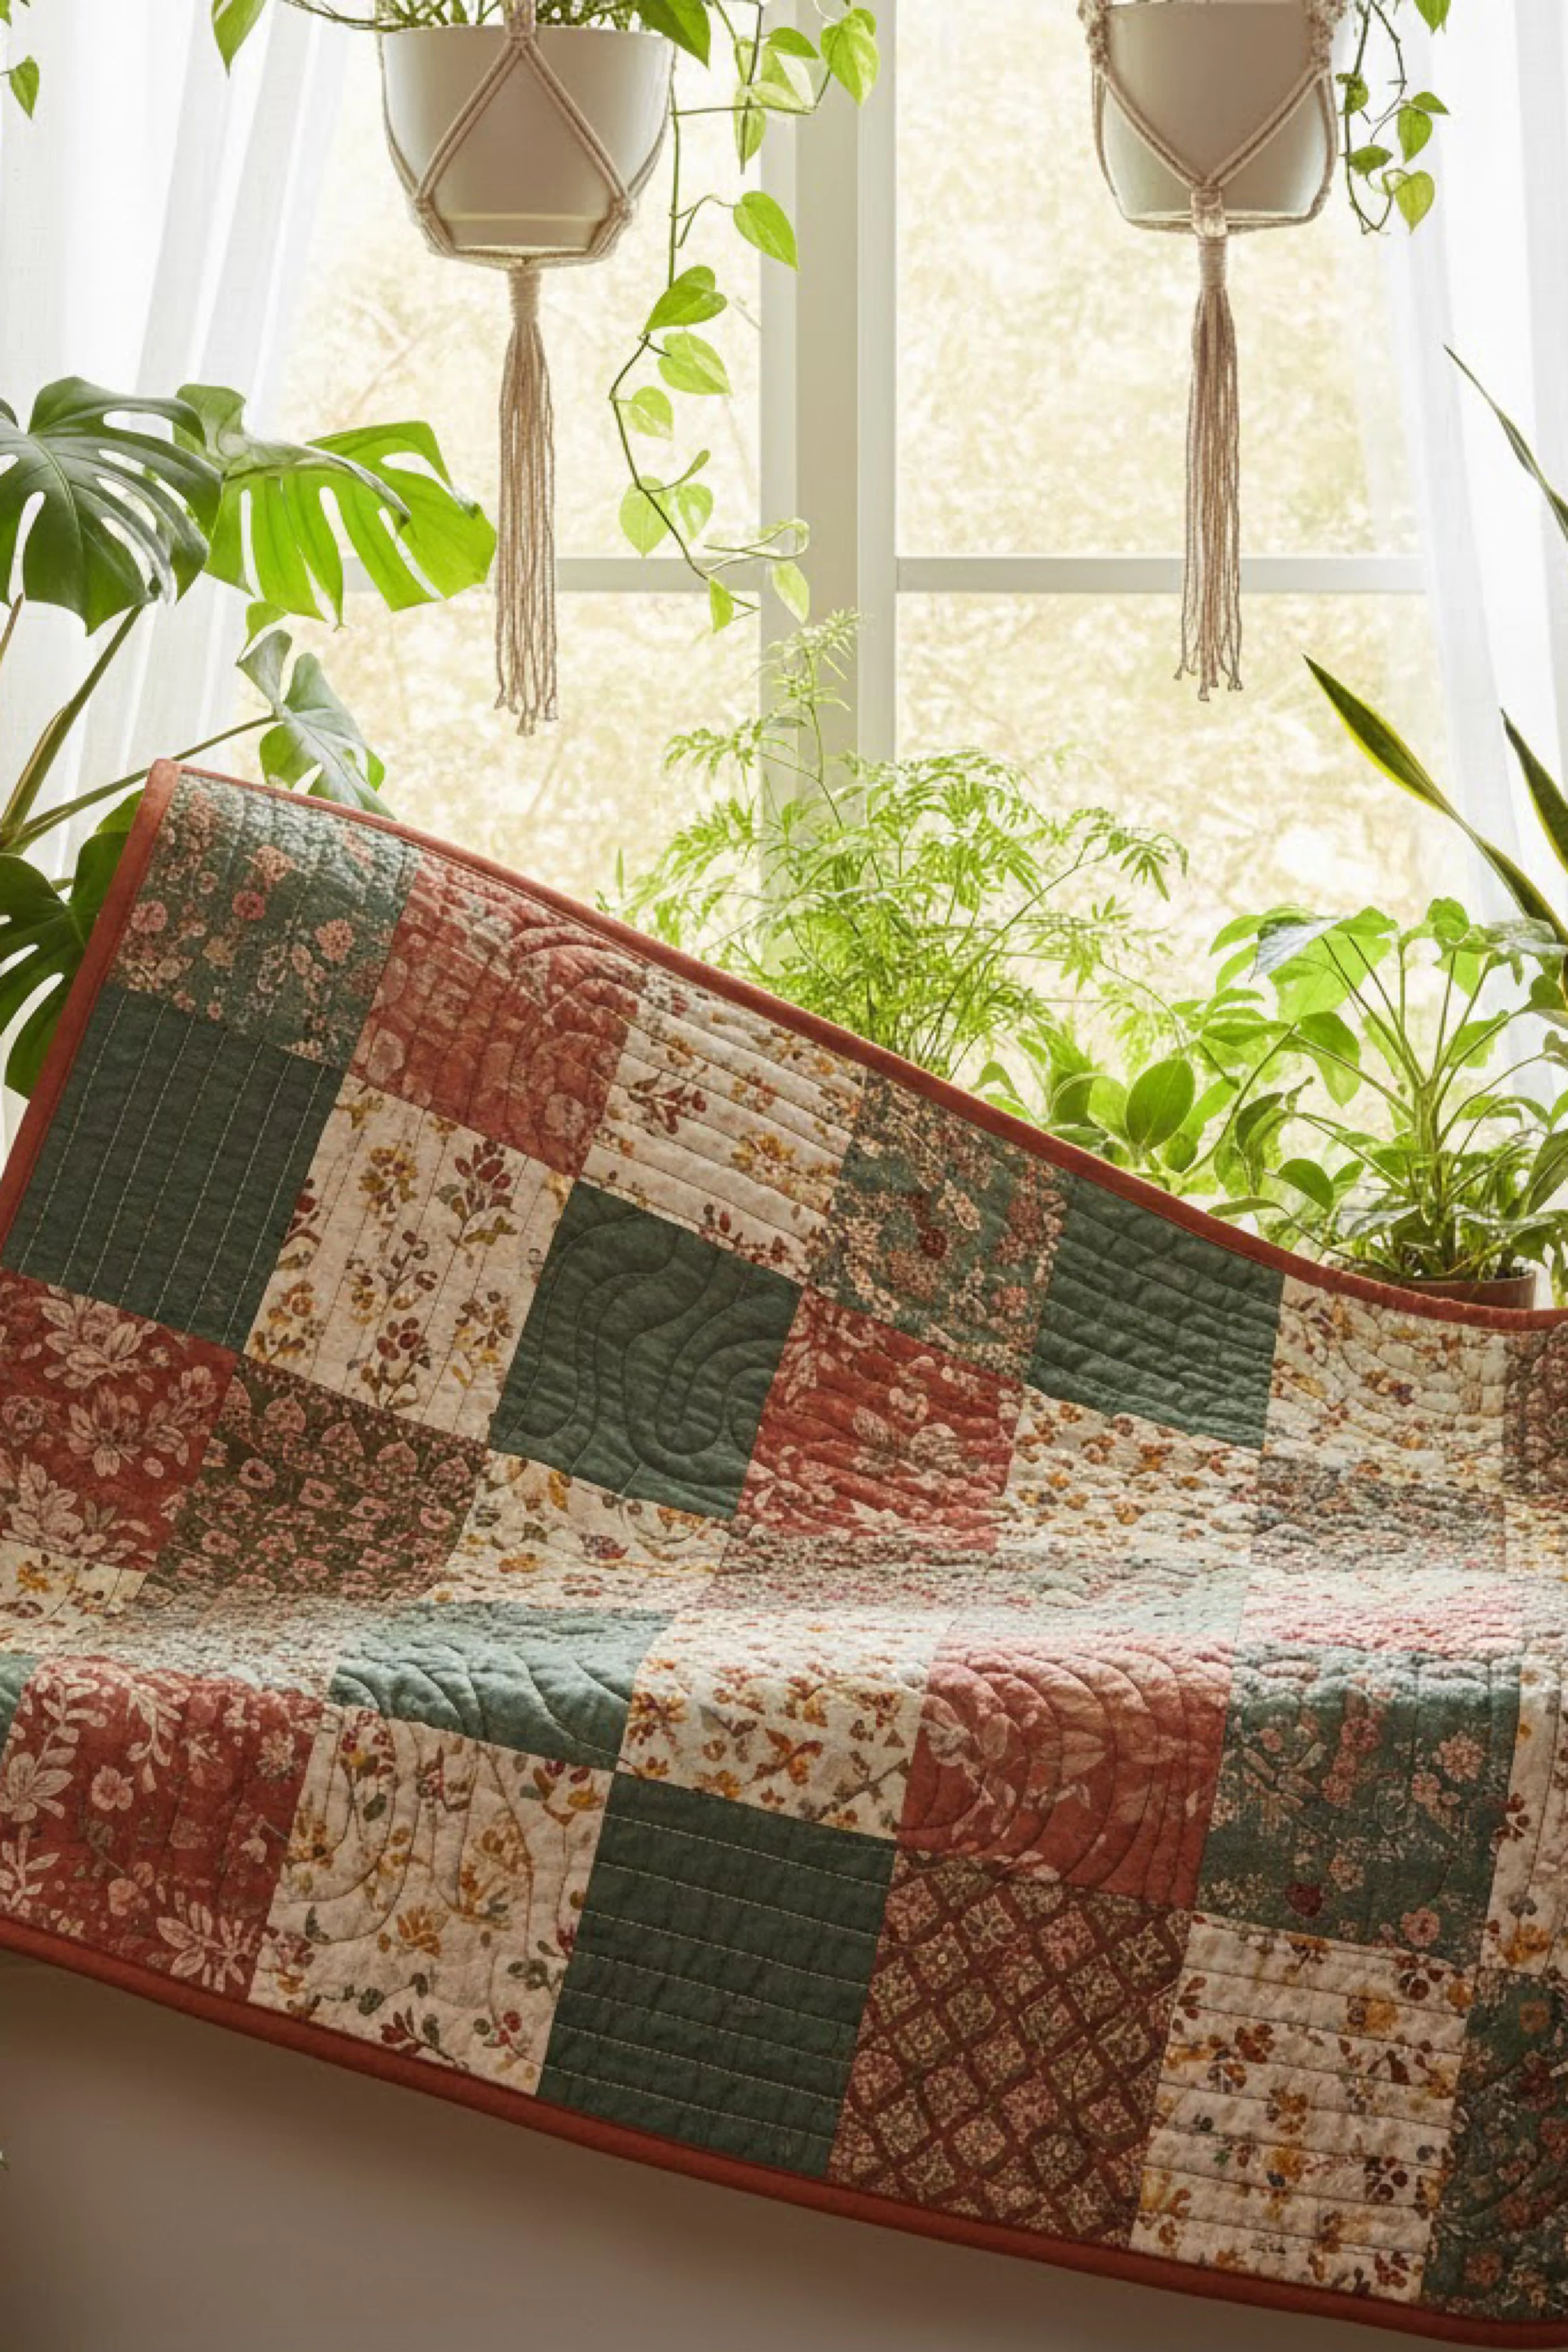
Romantic Garden Patchwork Quilt — Make It Yourself Tutorial
What you’re making
You’re making a soft, floral patchwork quilt with a romantic cottage feel, built from small to medium fabric squares in blush, cream, moss, dusty rose, and warm berry tones. The quilt in the image feels tender and sunlit, especially because it is styled among trailing plants and soft window light, but the fabric choices are what really create the mood. This is the kind of quilt that looks lovely draped over a chair, layered on a bed, or given as an heirloom style gift.
The beauty here comes from mixing prints that share a vintage garden story. You want florals, tiny vines, subtle geometrics, and a few darker patches to keep the overall design grounded. The quilting can stay simple, because the patchwork itself carries so much charm.
Materials + tools
- Quilting cotton in blush pink floral prints
- Quilting cotton in cream floral prints
- Quilting cotton in moss or deep green prints
- Quilting cotton in dusty rose or muted berry prints
- A few solid or near solid pieces for visual rest
- Backing fabric in floral or solid coordinating tone
- Batting
- Binding fabric in dusty rose, terracotta, or soft red
- Rotary cutter
- Cutting mat
- Quilting rulers
- Sewing machine
- Iron and pressing surface
- Pins or clips
- Basting spray or safety pins
- Walking foot
- Fabric marker
- Optional template for a few quilted motifs
Finished size + customization notes
A throw around 50 x 70 inches works beautifully for recreating the draped look in the image, though you can enlarge it to a bed quilt by adding more rows. This style is very forgiving, so it is a wonderful scrap quilt candidate.
Keep your square sizes consistent for easier assembly. Finished squares around 4 inches or 5 inches create the look nicely. If you go much smaller, the quilt becomes fussier and more old fashioned. If you go larger, it loses some of that gathered garden patchwork feel.
Step by step instructions
Curate your floral mix.
Pull your fabrics and lay them out together. The image combines warm floral romance with enough dark green to stop it from becoming sugary. Aim for about forty percent light fabrics, thirty percent medium florals, twenty percent darker greens or berries, and ten percent supporting solids or low volume prints. You should now see a palette that feels like faded flowers in a greenhouse.Choose a square size and stick to it.
Decide whether your quilt will use 4 1/2 inch cut squares for a 4 inch finished block or 5 1/2 inch cut squares for a 5 inch finished block. Consistency is the key to easy assembly. Cut generously from each fabric, but do not overuse any single print. Variety is part of the charm.Balance the darker fabrics.
The deep green patches in the image are essential. Scatter them intentionally through your layout so they act like shadows between the lighter prints. Avoid clustering them only along one edge or in one quadrant. Visual checkpoint: when you step back, the darker blocks should guide the eye softly across the quilt.Lay out the patchwork.
Arrange your squares on a floor or design wall. Mix florals so similar prints are not touching too often. Break up strong prints with creams and quieter fabrics. You want the final layout to feel organic, like gathered swatches from a garden themed fabric box, not like a strict repeating pattern.Sew rows together.
Piece your squares into horizontal rows. Press seams in alternating directions from row to row so they nest neatly when joined. This helps intersections line up and keeps the quilt top flatter. If your rows start stretching, stop and press rather than pulling the fabric to fit.Join the rows into a quilt top.
Sew the rows together carefully, pinning at intersections. Since the pattern is simple, clean assembly makes a big visual difference. You should now see a soft mosaic of floral squares that looks balanced and inviting. If one section jumps out too harshly, unpick that square and swap in a gentler print.Add a narrow border if needed.
The image could be interpreted as borderless, but a very narrow outer border in cream or muted rose can help stabilize the edges and make binding easier. This is especially useful if your patchwork feels visually dense right to the edge.Layer the quilt sandwich.
Backing face down, batting in the middle, top face up. Smooth thoroughly and baste well. Because the finished quilt is meant to drape softly, a cotton batting is a lovely choice. If you want extra vintage softness, prewash the fabrics before sewing.Choose quilting that suits the mood.
Straight line quilting, gentle serpentine lines, or simple free motion loops can all work here. The image shows visible quilting texture but nothing overly ornate. A wonderful option is to quilt wavy organic lines that travel across blocks and soften the grid. If you prefer a tidier finish, quilt straight lines one half inch to one inch apart. If yours feels too stiff after quilting, your lines may be too dense.Try a few feature motifs if desired.
If you want to elevate the quilt, add a few subtle free motion flowers, leaves, or curved vines in select darker patches. Keep them sparse. This should feel like a quiet embellishment, not an entirely different quilting style layered on top.Trim and bind the quilt.
Use a warm rose or terracotta binding to echo the floral tones. A binding around 2 1/4 inches cut width usually finishes neatly. The image shows a warm framed edge, so do not choose a very cool or stark binding. Fold, stitch, and finish as preferred.Soften the quilt with a wash.
This patchwork style looks especially lovely after the first wash, when the quilting sinks in slightly and the fabrics develop that crinkled softness. Dry gently and remove while still a little warm for a relaxed press if needed.Hang or drape for final styling.
The photo shows the quilt draped in a plant filled window. To get that exact visual feeling, hang or fold it where light can pass across the stitching. You should now see the varied prints working together like a romantic garden collage.
Troubleshooting
My floral prints look messy together.
Use more creams and low volume prints between the bolder fabrics.
The quilt feels too pink.
Add more greens and a few earthy neutrals to ground it.
My seams are bulky.
Press carefully after every row and trim stray threads as you go.
The patchwork looks flat.
Increase contrast slightly by adding two or three deeper blocks or choosing more visible quilting.
The drape is stiff.
Use cotton batting and less dense quilting lines.
Finishing details
This quilt is a wonderful place for personal touches. Add a monogrammed label, a pieced backing from leftover squares, or hand tied tassels at the corners if you want a more decorative cottage finish. You could also make a matching pillow sham or fabric basket with the scraps.
Optional upgrades include scalloped machine quilting in a few sections, a floral backing for a reversible effect, hanging tabs for wall display, or hand stitched big stitch details in pearl cotton for a modern heirloom look. The biggest secret to this quilt is not perfection. It is warmth, softness, and a fabric mix that feels lovingly chosen.
Shop Similar
- Vintage floral quilting fabric bundle
- Dusty rose quilt binding fabric
- Cotton batting for throw quilt
- Rotary cutter and quilting ruler set
- Walking foot quilting attachment
Style It With
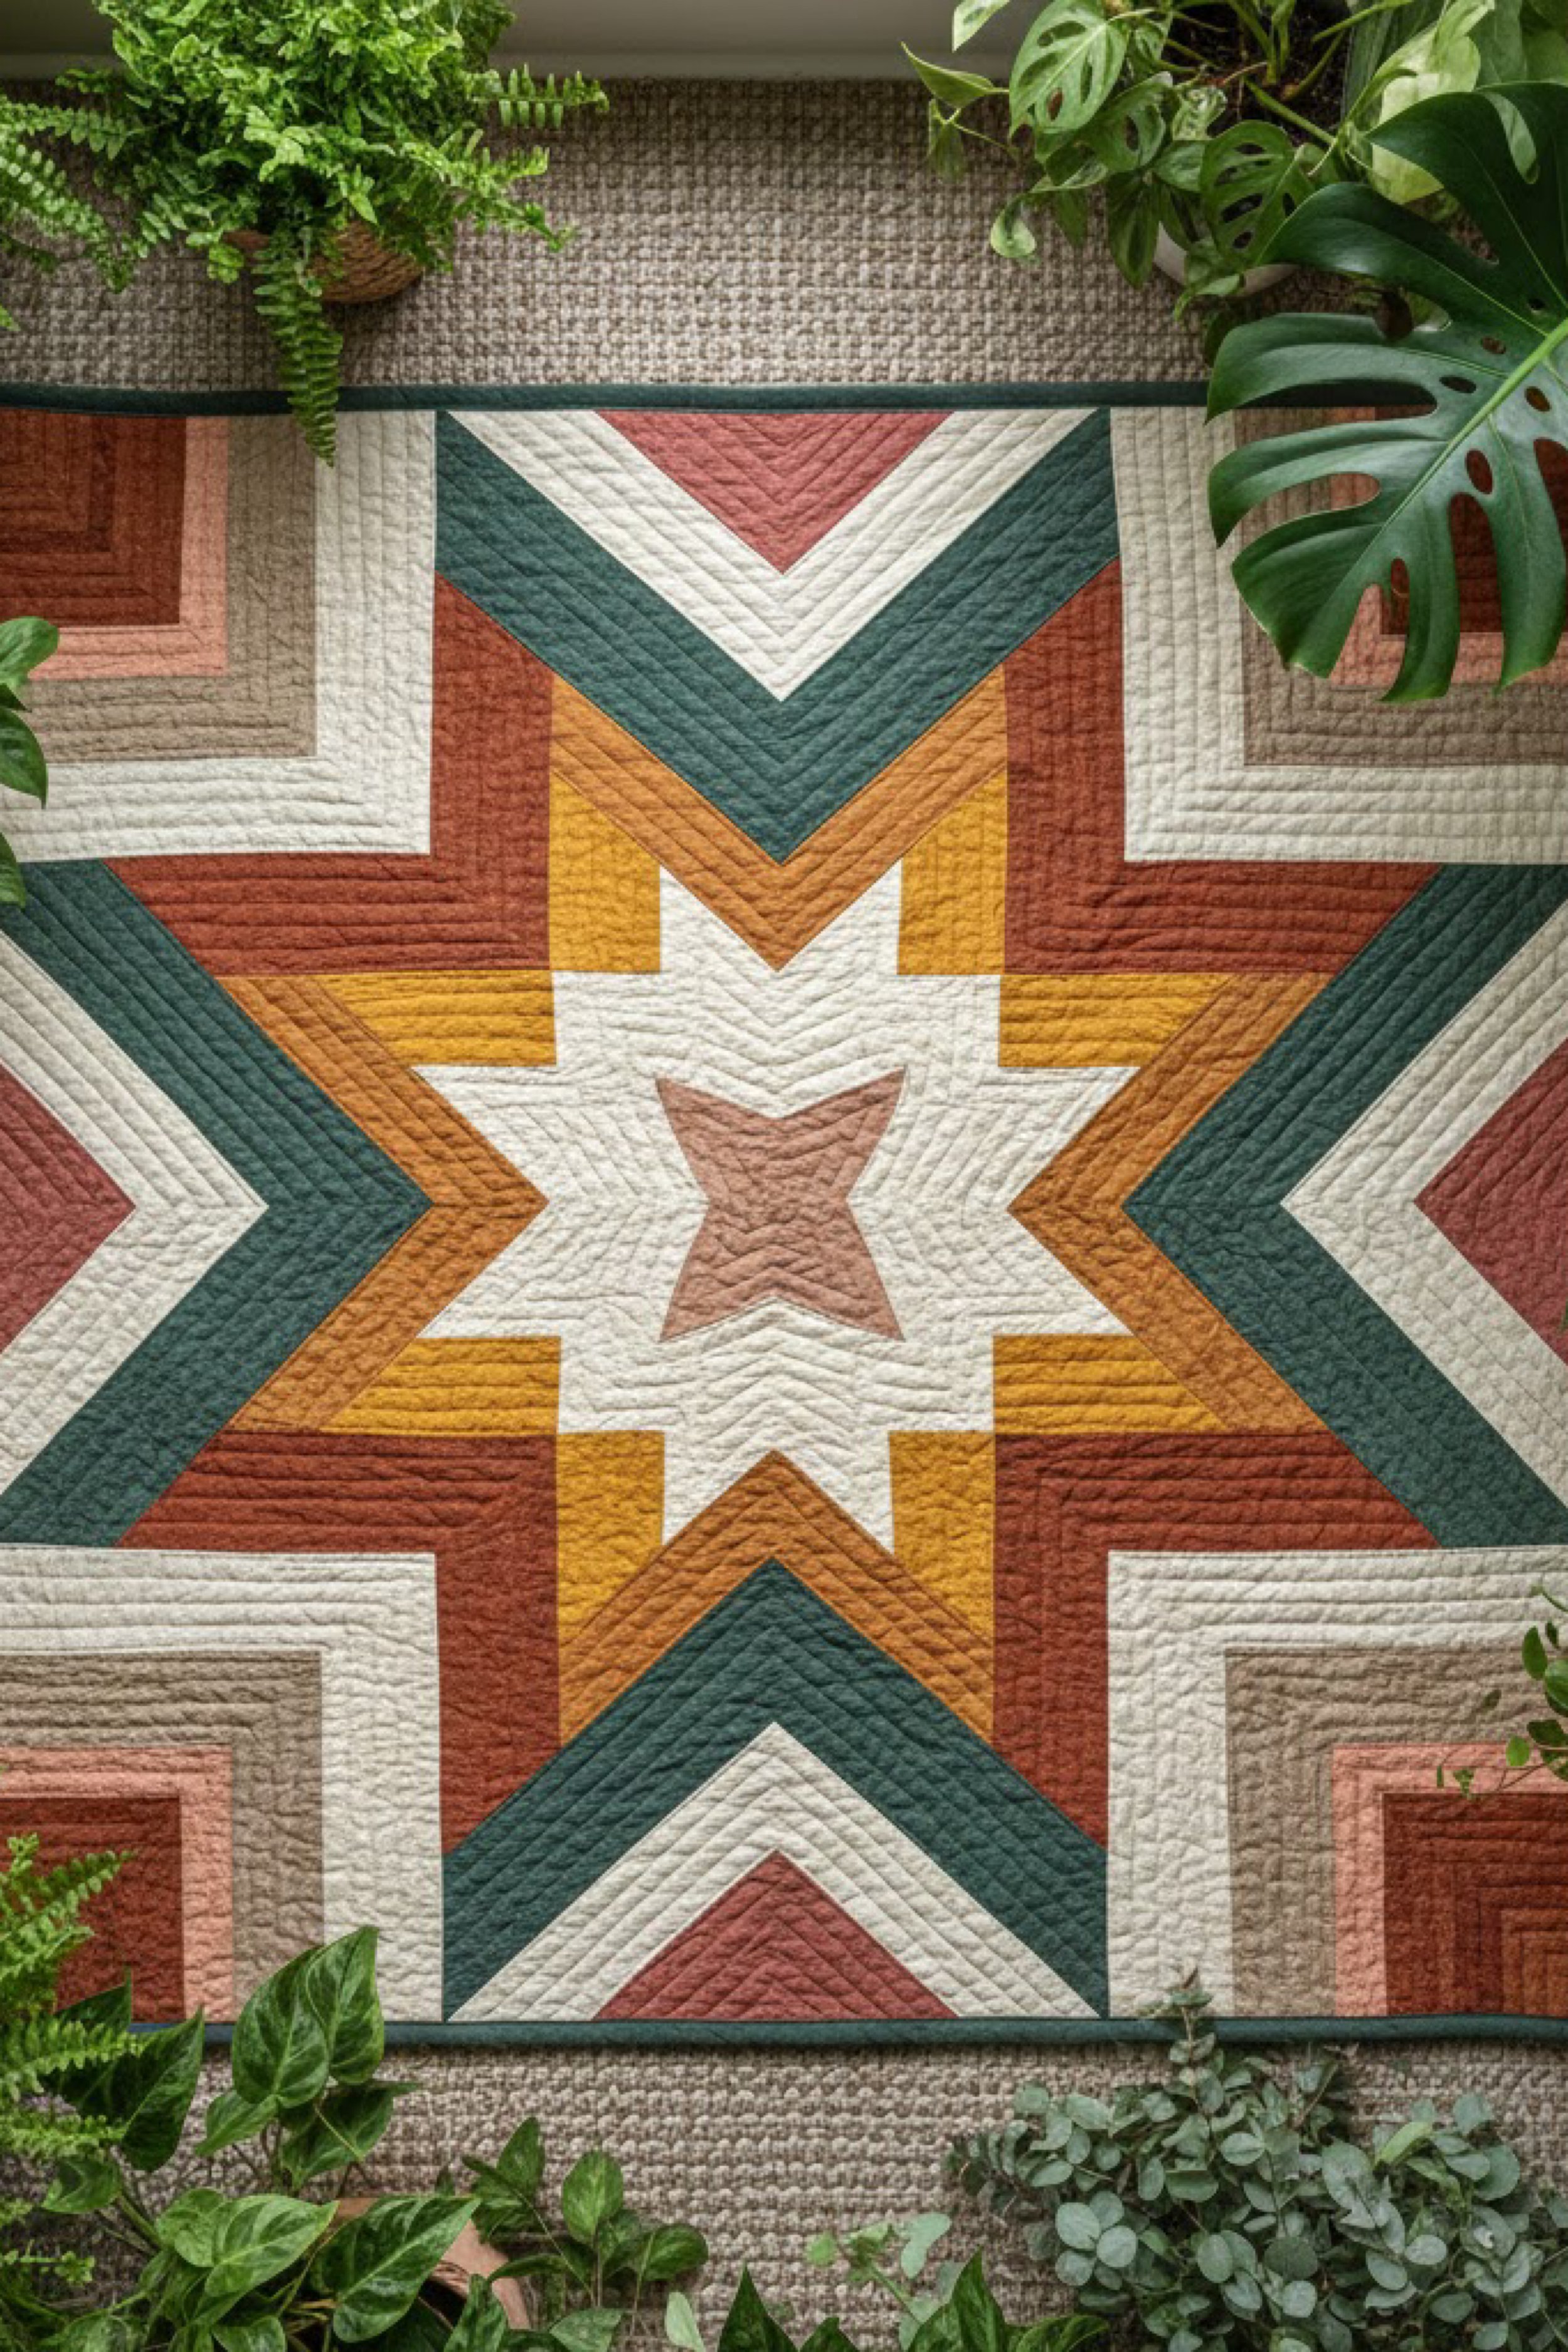
Desert Star Geometric Quilt — Step by Step Tutorial
What you’re making
You’re making a bold geometric quilt centered around a large star and stepped angular motifs in desert inspired tones. The design in the image feels graphic and modern, but the palette keeps it warm and livable with cream, terracotta, blush, taupe, mustard, and deep green. This is a striking wall worthy quilt, but it can also become an unforgettable throw or bed topper if scaled up.
The overall look depends on clean piecing and symmetry. Even though the shapes are simple, the design has strong visual architecture, so precision is important. The good news is that this is all straight line piecing, which makes it very achievable if you cut accurately and stay organized.
Materials + tools
- Quilting cotton in cream
- Quilting cotton in terracotta
- Quilting cotton in blush
- Quilting cotton in taupe or greige
- Quilting cotton in mustard
- Quilting cotton in deep green
- Optional extra neutral for corner blocks
- Backing fabric
- Batting
- Binding fabric in deep green or terracotta
- Rotary cutter
- Self healing cutting mat
- Quilting rulers, including square rulers
- Sewing machine
- Iron and pressing station
- Pins or clips
- Fabric marker
- Design wall or floor space
- Basting supplies
- Walking foot for quilting
Finished size + customization notes
The wall hanging version shown in the image could be around 50 x 65 inches, though this layout scales beautifully. If you want a throw, expand the borders or repeat the stepped motifs farther outward. If you want a bed quilt, frame the central medallion with additional pieced borders.
This design works best when the star stays crisp and centered. Be careful not to shrink the center too much with oversized borders or overly dense quilting. Keep the contrast strong enough that the cream star shape reads clearly from across the room.
Step by step instructions
Study the geometry before cutting.
This quilt is built from a central star and mirrored stepped sections around it. Break the pattern into zones: center star, arrow or chevron sections, side stepped blocks, and corner frames. When a complicated quilt starts to feel overwhelming, reducing it to sections makes it manageable.Draft or print a full plan.
Use graph paper or quilting software to map the design. Assign each fabric a color code. The image uses cream for the main star and many outlining sections, terracotta and blush for warmth, mustard for pop, taupe for grounding, and deep green for contrast. You should now see a balanced medallion with strong symmetry.Decide on your unit size.
Choose a base measurement, such as 2 inch or 3 inch finished units, and let the whole pattern build from that. Larger units make the quilt faster and bolder, which suits the image well. Smaller units will create more detail but require more precision. For most makers, 3 inch finished units are a sweet spot.Cut fabrics by section.
Label everything. Cut all center star pieces first, then the chevron arms, then the outer stepped blocks. Keeping sections separate prevents confusion later. Visual checkpoint: your cut stacks should look orderly and clearly grouped by area of the quilt.Assemble the center star.
Begin with the middle star block. Use careful quarter inch seams and press each unit flat. If your pattern includes flying geese or half square triangles, trim them accurately before assembly. The center should look crisp and symmetrical before you move on. If it does not, fix it now. The entire quilt depends on this section.Build the surrounding chevrons.
Piece the V shaped or arrow sections that radiate from the center. These are what give the quilt its strong directional movement. Match points where needed and press thoughtfully so bulk does not build at the intersections. You should now see the quilt’s graphic personality emerging.Create the outer stepped frames.
The corners and side motifs in the image resemble stepped logs or nested right angles. These can be assembled as separate blocks. Keep the color order consistent on all sides so the symmetry stays strong. If one corner is reversed accidentally, it will be obvious in this design.Lay out all sections before joining.
Put the center, surrounding motifs, and corners on a design wall or floor. Check alignment and color balance. The green should help define shapes, not overpower them. The mustard should feel like a warm accent. If yours looks too heavy, replace one dark section with a lighter neutral.Join the quilt top in rows or quadrants.
Depending on your draft, it may be easier to assemble the quilt in four large quadrants and join them, or in horizontal rows. Use the method that keeps your seams most accurate. Pin generously where points meet. This is one of those quilts where careful matching really pays off.Press and square the top.
Once the top is together, give it a thorough press and square all edges. The geometry should look clean and centered. Visual checkpoint: the cream star should read instantly from a distance, with all outer motifs framing it evenly.Quilt to enhance the shape.
Straight line quilting is perfect here. You can echo the angles of the star and chevrons or use evenly spaced lines across the whole quilt for a modern finish. The image suggests visible texture without distracting from the design, so avoid overly ornate quilting motifs. Let the piecing be the star.Bind with intention.
A green binding blends beautifully and frames the piece without fighting the design. A terracotta binding makes it warmer and more graphic. Either works. Choose based on whether you want the outer edge to disappear or stand out.Display or drape.
This quilt looks incredible as wall art, especially in a plant filled or textural room. You can also use it as a statement throw. If hanging it, add a sleeve on the back before binding or hand stitch one on afterward.
Troubleshooting
My points do not meet cleanly.
Trim units before assembly and verify the seam allowance is consistent.
The design looks off center.
Check that all border or outer section measurements match before attaching them.
The star shape does not stand out enough.
Increase contrast around it by lightening adjacent pieces or deepening the surrounding tones.
The quilt top is bulky at intersections.
Press seams open in the densest sections to reduce thickness.
My colors feel flat.
You may need one more dark accent or one more warm accent to create dimension.
Finishing details
For a polished finish, add a hanging sleeve and a label if you intend to display the quilt. If using it as a throw, wash it once to soften the quilted texture. This design also looks fantastic with big stitch hand quilting added selectively around the star after machine quilting, if you want a mixed technique finish.
Optional upgrades include a pieced backing using leftover geometric units, a narrow flange border before the binding, metallic thread for a few accent quilting lines, or matching cushion covers using the corner block motif. The main goal is to preserve the bold architecture and keep the finish clean.
Shop Similar
- Desert tone quilting cotton bundle
- Square quilting ruler set
- Cotton batting for wall quilt
- Deep green quilt binding fabric
- Design wall for quilting
Style It With
As you finish each piece, you may notice something subtle shift in your space. A quilt changes more than a surface. It changes the way a room feels when you walk into it. It catches light differently. It adds weight and warmth in a way that feels grounding. Over time, it becomes part of the rhythm of your home, something you reach for without thinking.
What makes these quilts special is not just the design, but the way they live alongside everything else. Draped over a bench, layered across a bed, folded at the edge of a sofa, they become part of the atmosphere you are building. Paired with plants, natural textures, and soft light, they create spaces that feel calm, expressive, and quietly intentional.
Let this be the beginning of a collection that grows over time. Try new palettes. Experiment with scale. Save your favorite scraps. Each quilt you make adds another layer to your home, and another chapter to the story you are shaping around it.