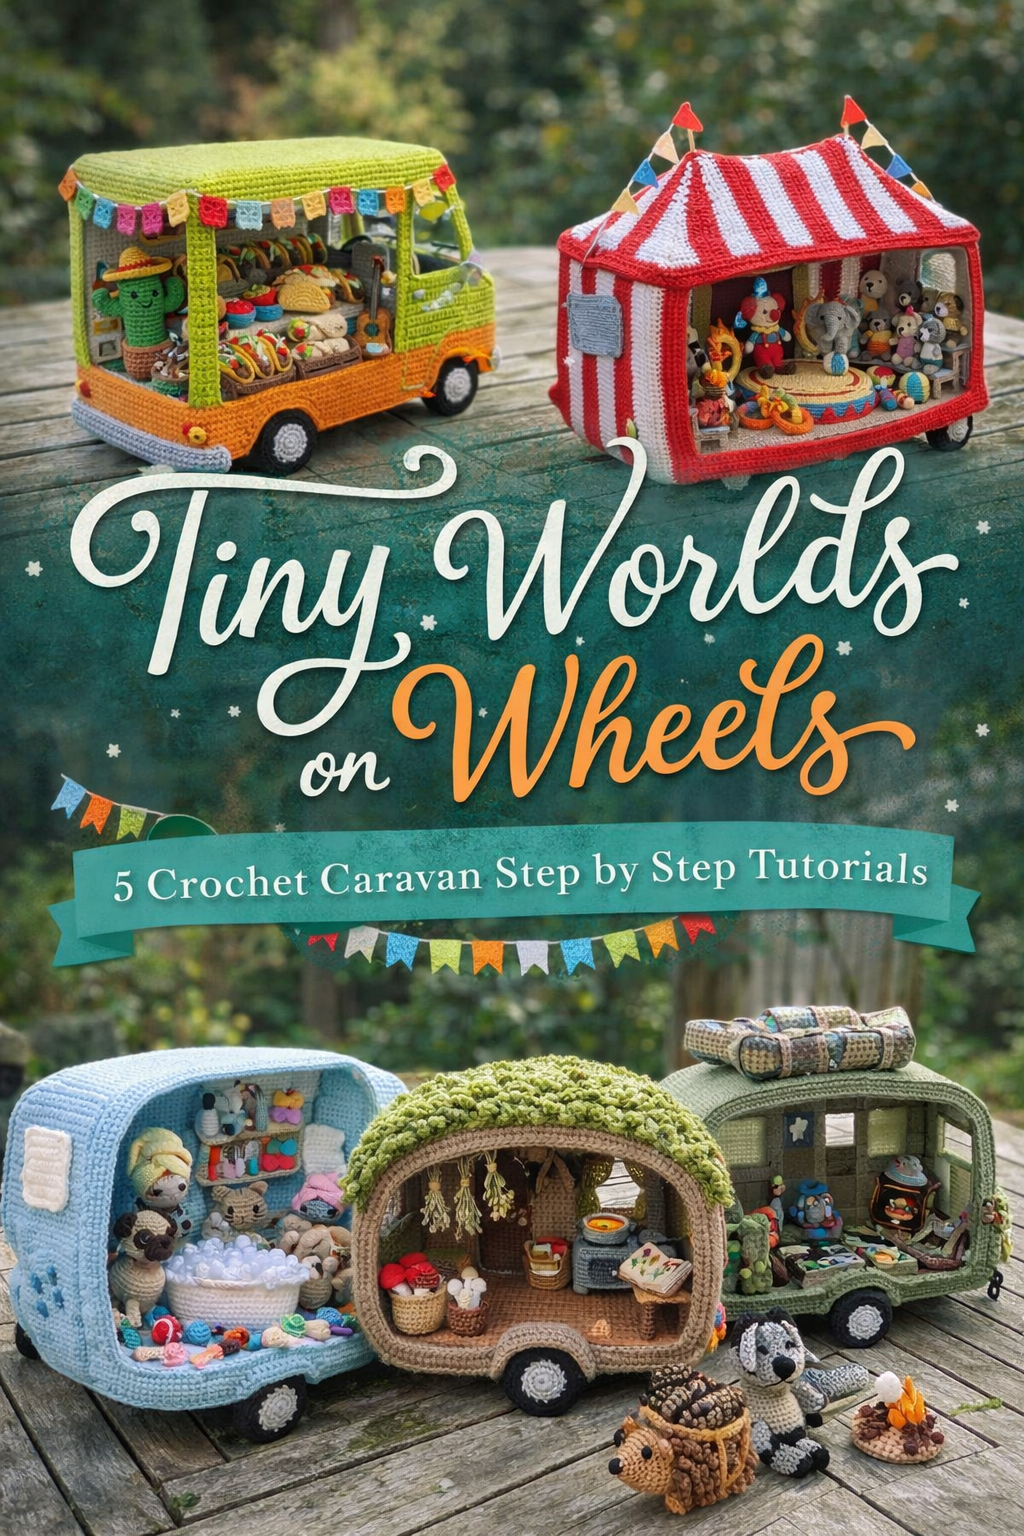
Tiny Worlds on Wheels: 5 Crochet Caravan Step by Step Tutorials

More like this
💡 Pro Tip: Why I Link to Amazon Search Results and Not One Product
In the Shop the Look and Style it With sections under each bikini, I link to Amazon search results, not single products. Here’s why this matters:
Hot bikinis sell out fast. I don’t want you clicking on a dead link to a sold-out item. Search pages stay updated.
You get more options. Love the vibe but want a different color, cut, or price point? The search results give you everything that matches the look and energy.
I curate each search carefully. These aren’t generic. I spend hours crafting keywords that bring up exactly the kind of bikinis I’d wear—or recommend to my hottest friends.
Support with no pressure. If you click a link, browse, and buy something later, I may earn a small commission at no extra cost to you. That helps me keep bringing you curated collections like this one—powerful, seductive, and always fresh.
So dive in. Click through. Try something risky. These aren’t just bikinis—they’re commands, statements, and maybe even your new favorite weapon of choice.
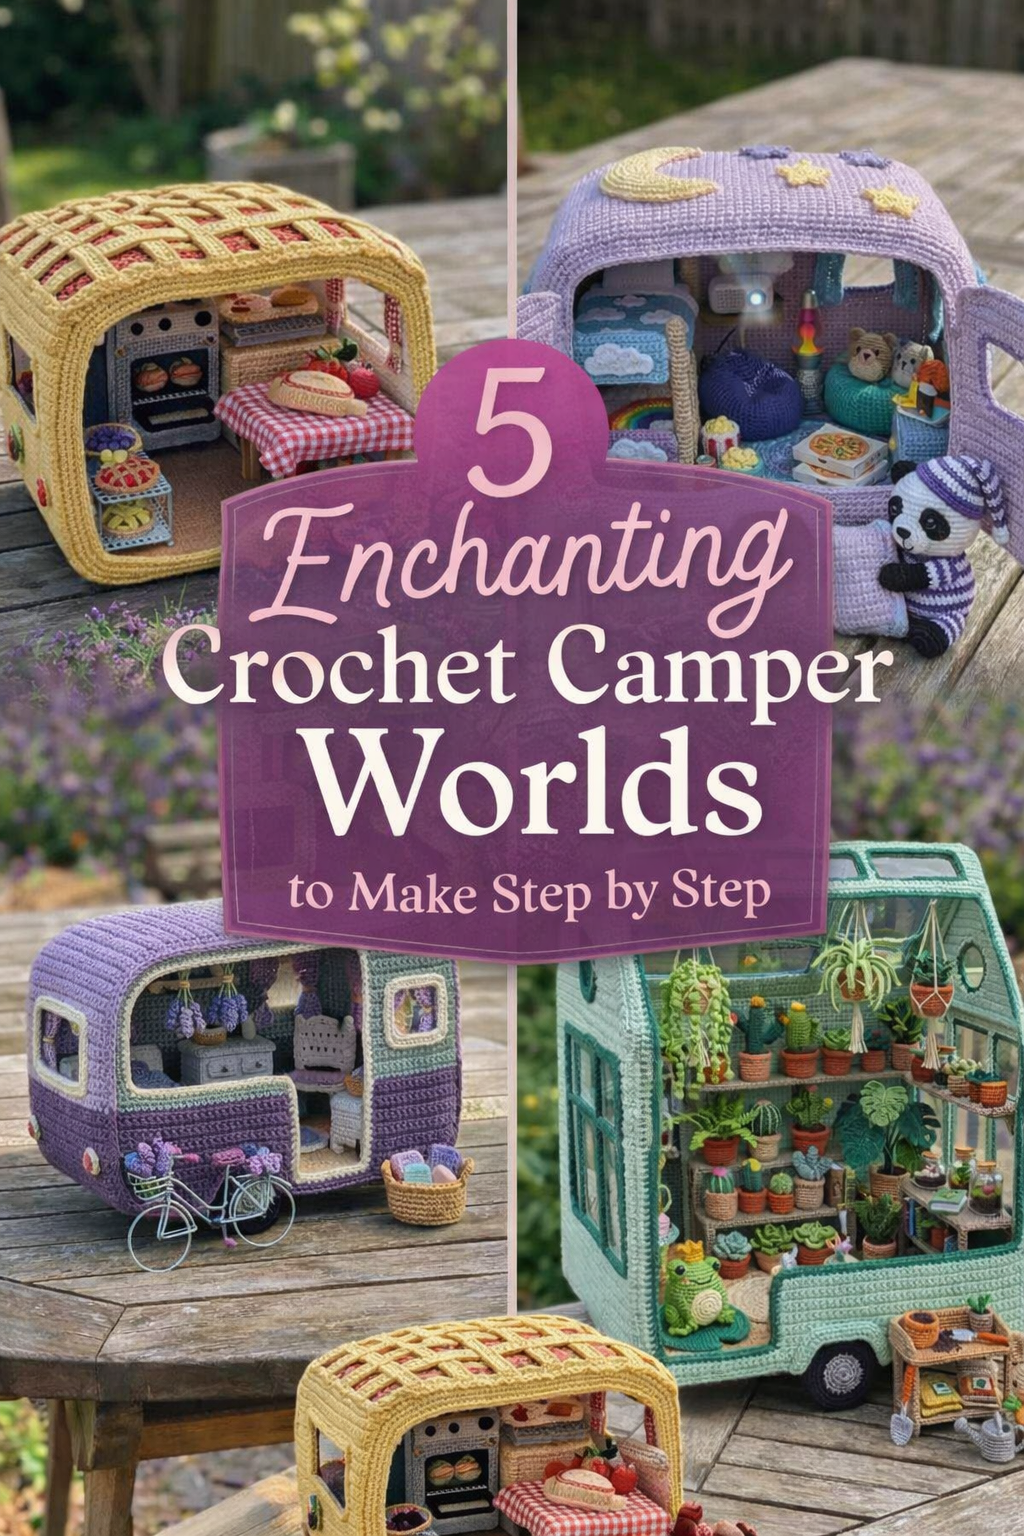
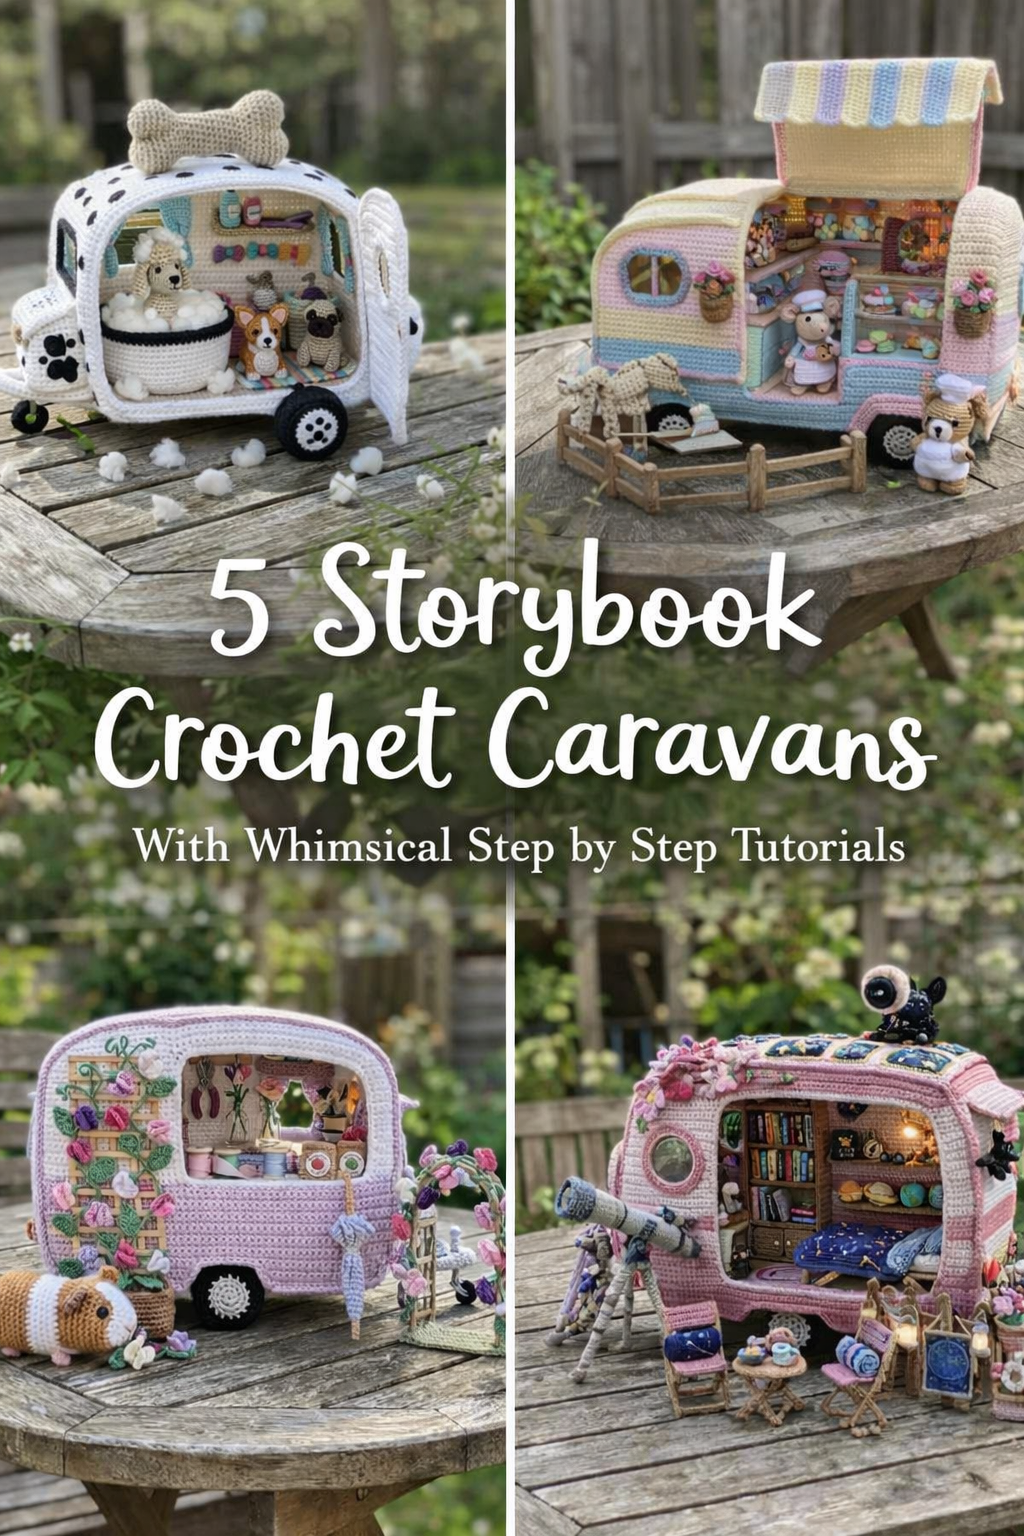
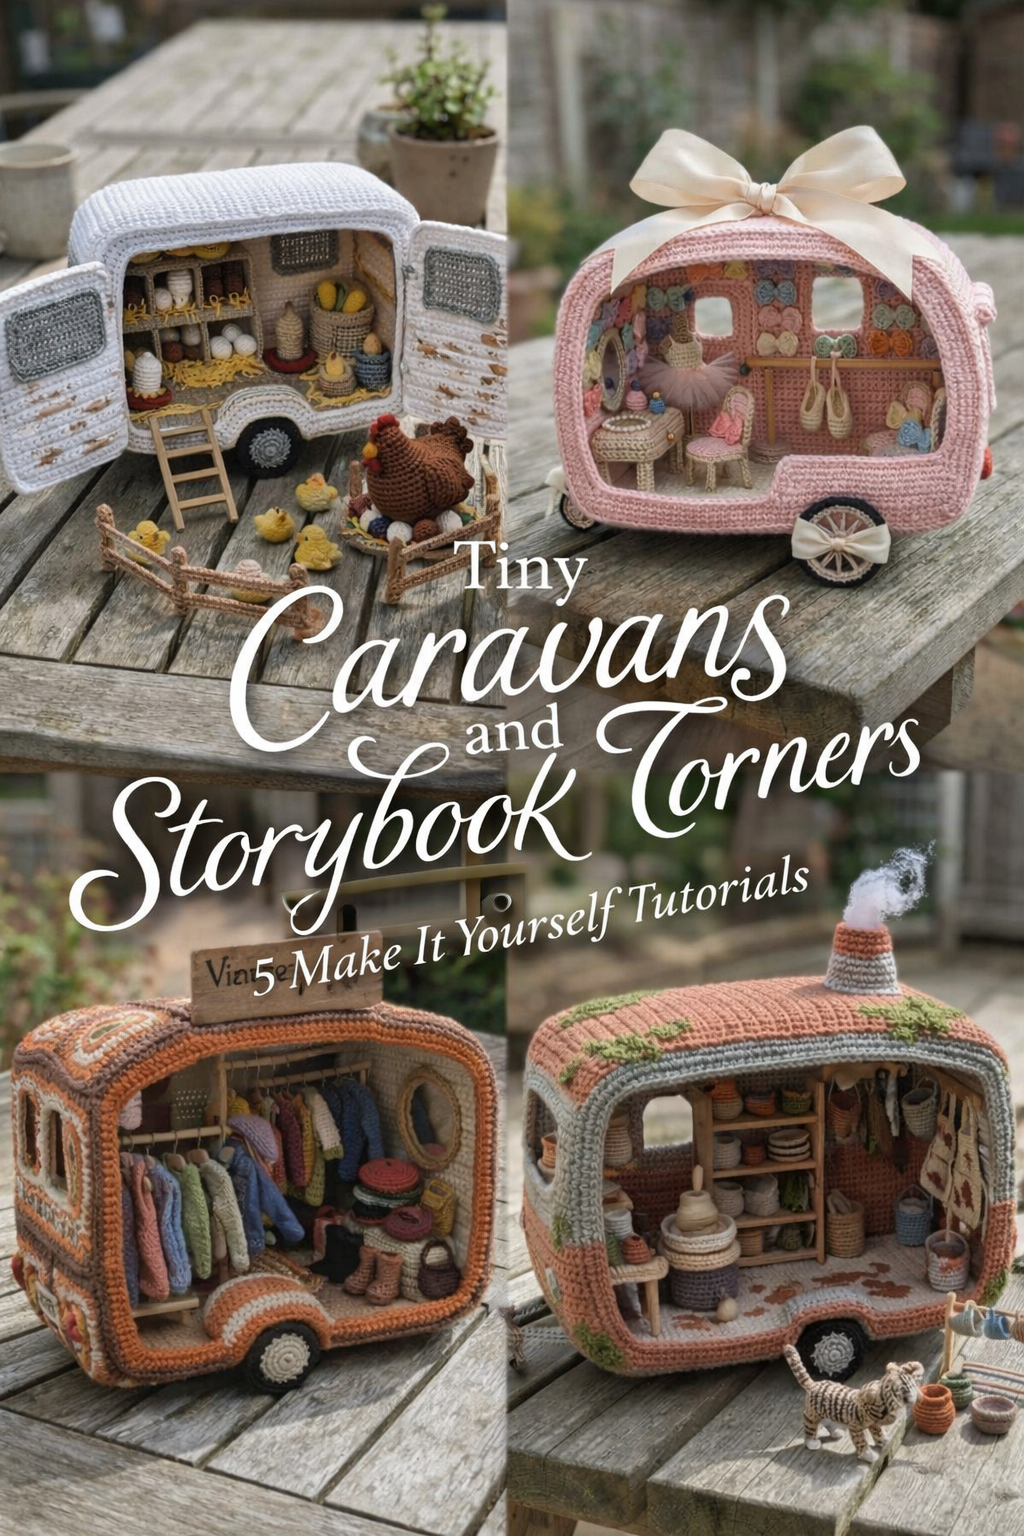
Welcome to a tiny world of crochet caravans where every stitch tells a story. In this collection, we are stepping inside five wildly imaginative handmade campers, each one transformed into its own miniature scene full of charm, texture, and personality. From a taco truck packed with colorful food and fiesta details to a woodland retreat with mossy textures and forest finds, these projects are the kind of creations that make people stop, stare, and smile.
What makes these crochet caravans so special is the way they blend amigurumi technique, soft sculpture, and dollhouse style storytelling into one unforgettable project. They are playful enough to feel magical, detailed enough to feel impressive, and customizable enough to make entirely your own. Whether you want to recreate the exact look of each caravan or use them as inspiration for your own tiny themed trailers, this guide will walk you through the possibilities one beautiful design at a time.
If you love projects with lots of character, layered detail, and that irresistible handmade feel, you are in exactly the right place. Grab your yarn, your smallest hooks, and your imagination, because these tiny worlds on wheels are about to steal the show.
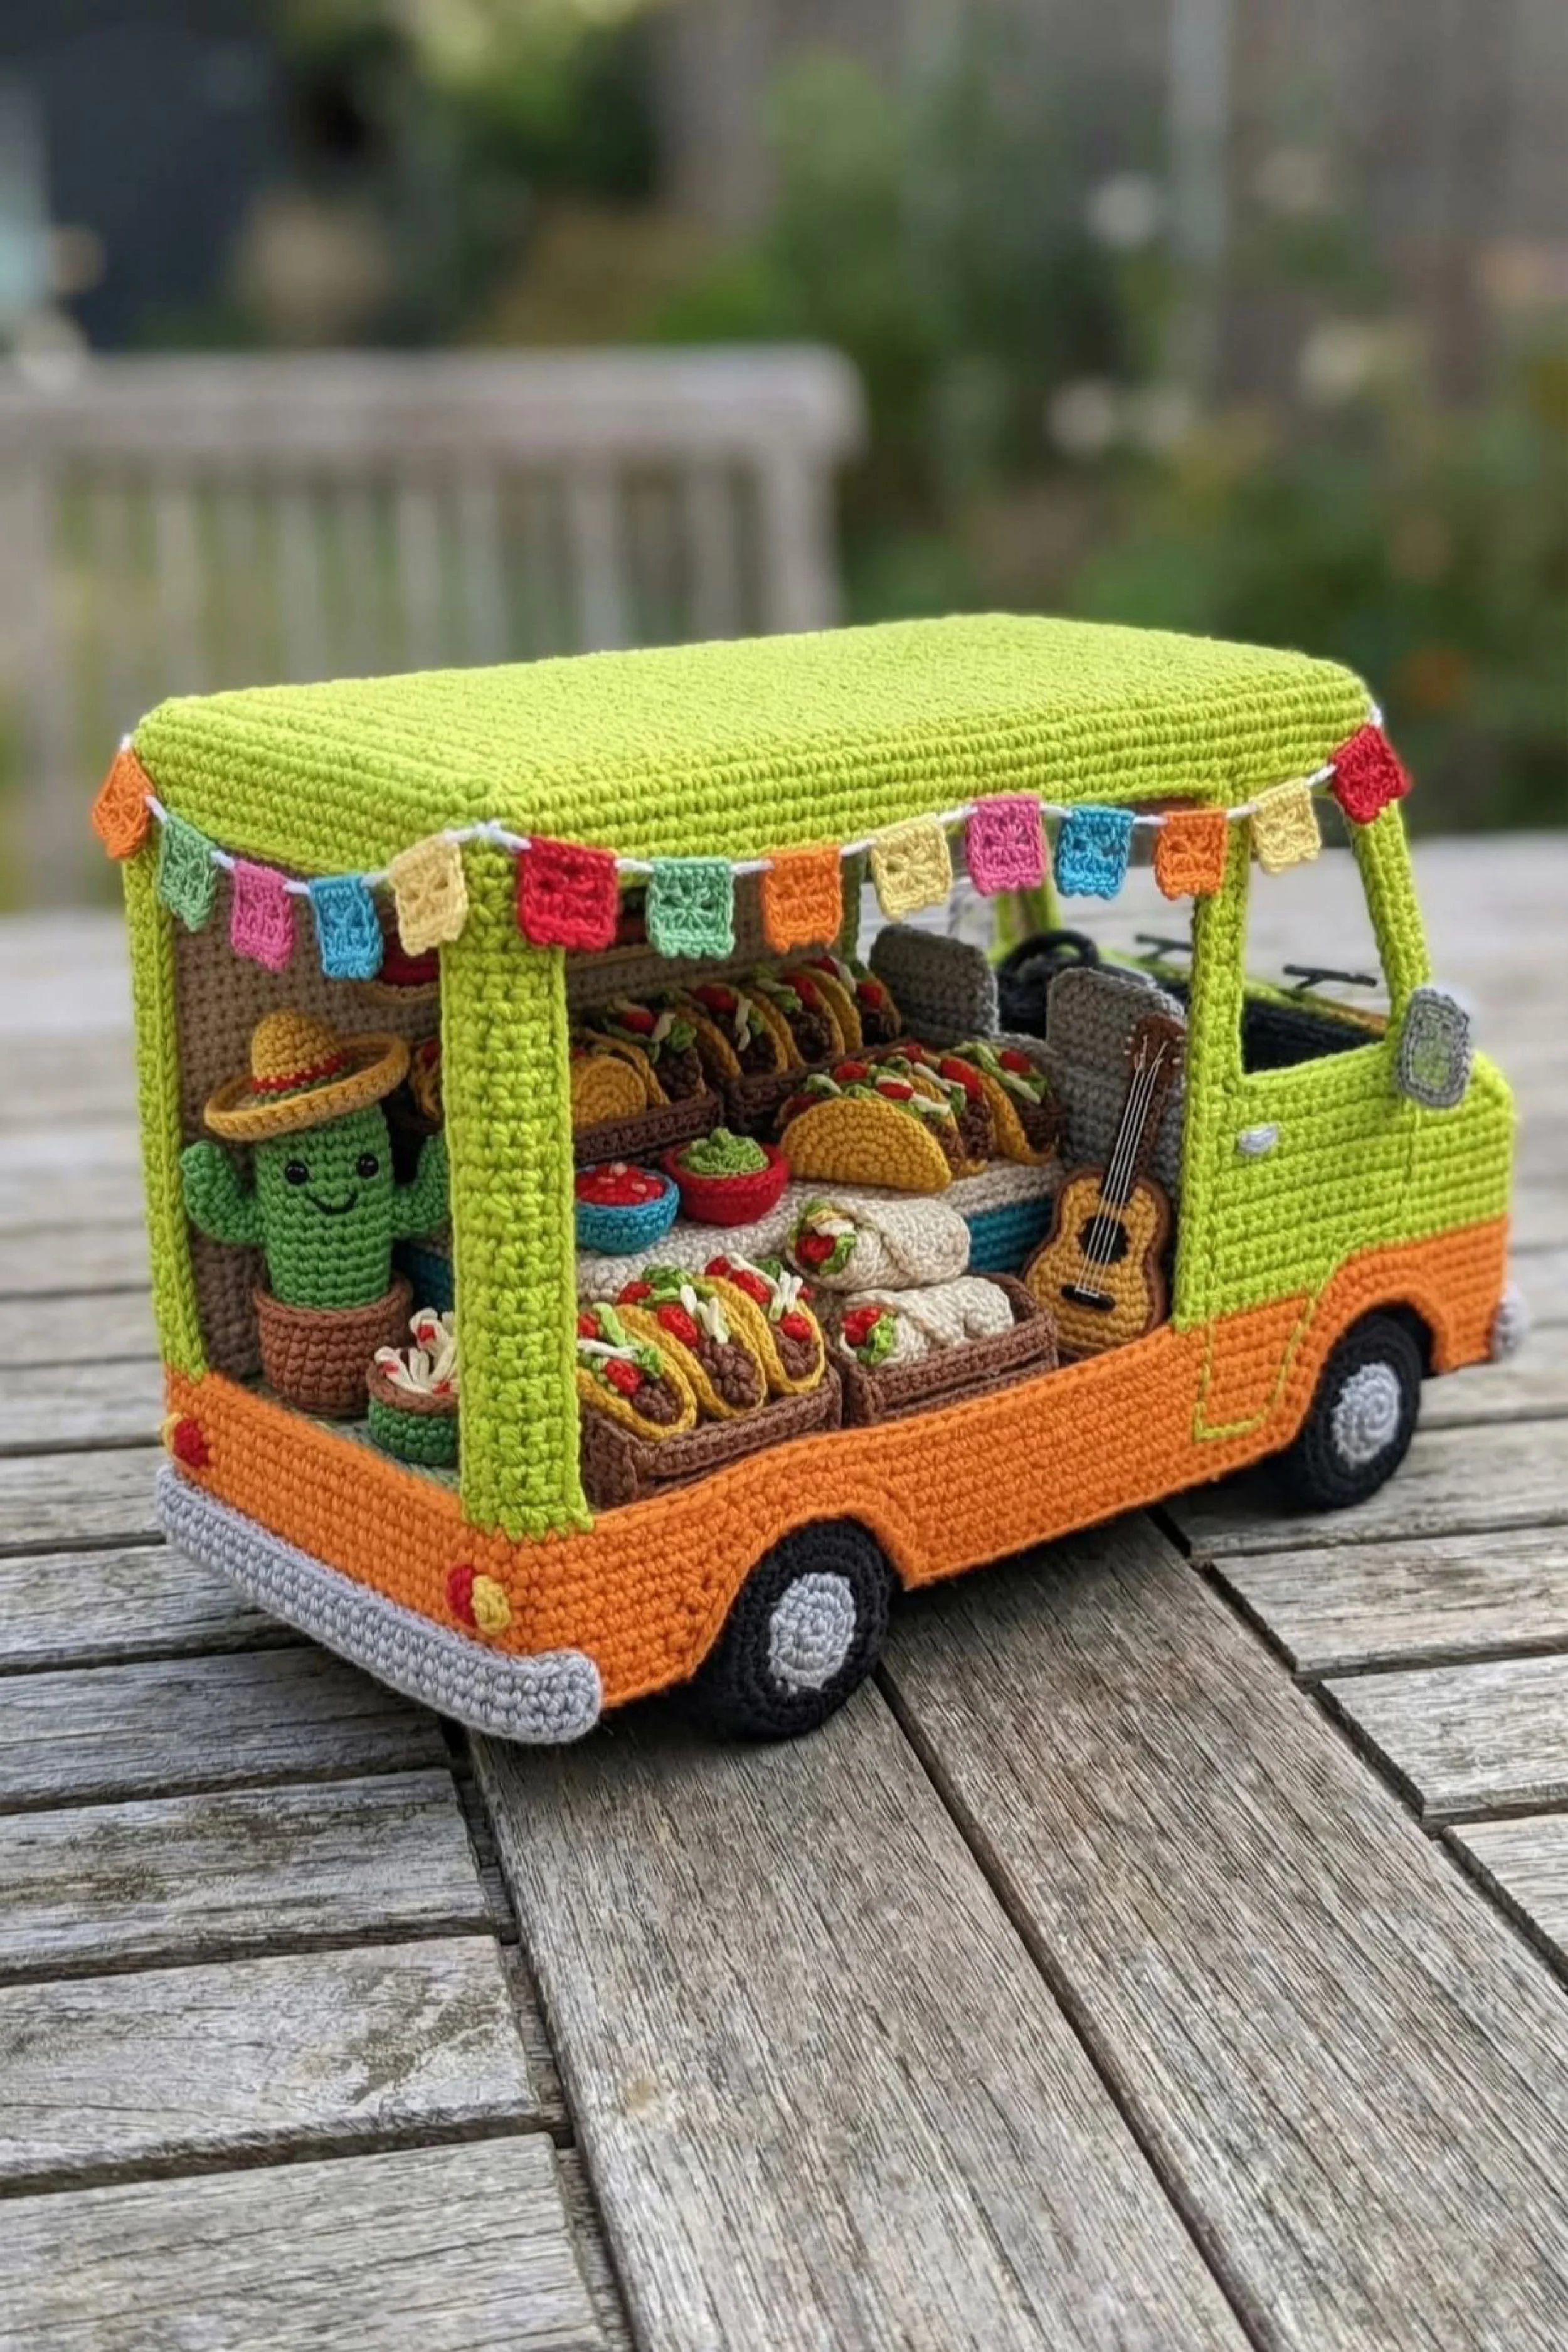
Crochet Taco Truck Caravan Step by Step Tutorial
What you’re making
You’re making a whimsical crochet taco truck caravan with a bright lime roof, warm orange lower body, tiny wheels, an open serving side, and a fully styled miniature food counter packed with tacos, burritos, bowls, a cactus mascot, and even a little guitar. The overall look is playful, polished, and dense with detail, but the construction itself can be broken into manageable parts so it feels much more achievable than it looks at first glance.
This version is best approached as a structured amigurumi build, meaning most parts are worked in tight single crochet to create a firm fabric. The secret to getting the photo look is not speed. It is consistency, solid shaping, and assembling the truck in layers so the body stays neat while the tiny accessories make the scene come alive.
Materials + tools
- Worsted weight cotton yarn in lime green, orange, light gray, dark gray, black, white, tan, brown, cream, red, yellow, turquoise, pink, blue, and small amounts of green for garnish
- Optional alternative: DK cotton for smaller details if you want a slightly finer finish
- Crochet hook in a size that gives you a very tight fabric, usually 2.5 mm to 3.25 mm
- Smaller hook for mini food pieces if needed
- Polyester fiberfill
- Plastic canvas, thin cardboard, or craft foam to reinforce walls, roof, shelves, and counter
- Yarn needle
- Stitch markers
- Scissors
- Sewing pins or clips
- Fabric glue for paper thin pieces only if desired
- Florist wire or pipe cleaners for bunting support and tiny sign support
- Black embroidery floss
- Safety eyes or embroidered eyes for the cactus
- Optional magnetic snaps if you want a removable side panel rather than a fixed open side
Finished size + customization notes
A truck like the one in the photo will usually finish around 10 to 14 inches long if made in worsted cotton with a tight hook. You can scale it down with DK yarn or scale it up with a cotton acrylic blend and a slightly larger hook. If you want a wider truck, add stitches across the floor panel first. If you want a taller serving window, reduce the height of the side wall opening less aggressively. To match the photo closely, keep the proportions boxy and low with a broad flat roof.
Step by step instructions
1. Plan the build in modules
Before you crochet anything, list the build in five groups: base, body shell, roof and supports, interior furniture, and decorative accessories. This matters because the truck must hold its shape before you start filling it with tacos. Sketch the side view and front view. Mark where the serving opening sits and how deep the counter will be.
Your visual checkpoint here is simple: you should now know where every major wall, pillar, and shelf goes before stitching the first round.
2. Crochet the floor panel
Start with the truck floor in orange or tan depending on whether you want the floor hidden or visible. Work an oval or rectangle in single crochet. A rectangle with softened corners is easiest for this design. Make it slightly longer than it is wide. Work several rounds evenly until the footprint matches the truck in the image.
Slip a piece of plastic canvas or craft foam inside later, so leave room for that insert. The base should feel firm, not floppy.
If yours curls upward, your tension is too tight or you are increasing too slowly. If it ripples, reduce increases.
3. Build the lower body walls
Work the outer lower walls directly onto the floor edge in orange. Crochet in the back loop only around the perimeter to make a crisp turn upward. Continue in single crochet rounds or joined rows depending on your preferred construction. Keep the back and front walls closed, and leave the serving side partially open.
Make the opposite side mostly enclosed with a smaller driver window opening. For the truck look, the orange lower section should reach about one third of the total body height.
You should now see a clean orange tray shape with one side open wider than the other.
4. Add the upper body in lime green
Switch to lime green and continue building the upper wall area. The front needs a windshield opening, and the side opening should stay large to show the food display. The back corner pillars are important because they visually divide the open serving area and help support the roof.
Crochet separate lime green pillars if needed and sew them in rather than forcing all shaping into one piece. That often gives a neater result. Reinforce the inside of the front wall and the closed back panel with plastic canvas.
If yours looks wider than the photo, reduce wall thickness by tightening tension and keeping interior inserts thin.
5. Shape the cab front
The front of the truck in the photo is soft and rounded, not sharply squared. Crochet a front nose section separately in lime and orange, then sew it to the front opening. Add a small gray bumper at the bottom. Embroider tiny headlight or mirror details and attach a dark windshield insert inside.
This is the step where the truck starts reading as a vehicle rather than a box.
6. Make and attach the roof
The roof is a large flat lime rectangle with gently softened corners. Crochet it as a separate panel, working enough rows to create a thick, sturdy top. Sandwich plastic canvas between two matching crochet panels if you want a very crisp result. Sew the roof to the top edges and pillars only after checking alignment from every angle.
You should now see a straight roof line sitting level over the serving side. If one corner dips, insert more support before closing the seam.
7. Create wheels and undercarriage
Make four small wheels from black circles with gray or white hubcaps. Lightly stuff them or back them with felt circles. Sew them low and evenly. Add a slim gray strip along the lower back and front for bumpers. Tiny dark half circles under the body can help fake shadowed wheel wells.
Check that the truck sits flat on the table. If it rocks, reposition one wheel before moving on.
8. Add the interior counter and display shelves
Crochet shallow rectangular trays in brown for the taco and burrito baskets. Make one long serving counter along the open side and one rear shelf for extra food items. Reinforce each with thin card or plastic canvas so they do not sag. A cream countertop works nicely against the orange and green shell.
This stage is crucial. The interior should already look intentionally organized before the food goes in.
9. Make the tacos
For each taco, crochet a folded yellow shell shape. Then make tiny fillings in curved strands or short stuffed rolls using brown, green, red, and cream. Stitch them into the shell so they spill slightly upward. Make many more than you think you need because abundance is what sells the look.
Your tacos should look plump and overfilled. If they look flat, add extra filling strands before sewing them closed.
10. Make burritos and bowls
Crochet small cream cylinders for burritos and wrap a slightly darker seam around them. Add tiny red and green toppings peeking from one end. For bowls, make miniature round cups and fill them with textured rounds for salsa, guacamole, or shredded toppings.
Group these in pairs or trios so the counter feels busy, not scattered.
11. Crochet the cactus character
The cactus is a tiny amigurumi accent in a pot with a smiling face and sombrero. Make the pot first in brown, then a simple upright cactus body in green with two stubby arms. Embroider the face. The sombrero can be a flat yellow circle with a raised center and a thin red stripe.
This piece gives the whole truck charm. Keep it slightly oversized compared to the bowls so it reads instantly.
12. Make the guitar and seat details
The miniature guitar can be worked as two flat brown body shapes sandwiching a tiny insert. Embroider strings with black thread. Add simple dark seats inside the cab using folded rectangles stuffed lightly. These background details matter because they make the vehicle believable even when partly hidden.
You should now see depth from front cab to serving counter.
13. Add the bunting
Crochet many tiny square or pennant flags in mixed bright colors. Join them to a white chain and drape the strand across the roof edge. If you want the strand to hold a clean curve, run a fine wire through the chain or lightly starch it.
This is where the truck shifts from cute to festive. The colors should echo the fillings and bowls inside.
14. Assemble everything carefully
Pin every interior object in place before sewing permanently. Put the largest trays in first, then medium items, then accents like bowls, cactus, and guitar. Sew through the base where possible rather than only tacking objects to each other.
Stand back often. You should now see a full scene with clear layers: vehicle shell, serving setup, food abundance, playful decor.
15. Final shaping
Stuff only where needed. The truck body should be structured more by inserts than by stuffing. Smooth any roof waviness by stretching gently into place. Reposition the bunting if it blocks the opening too heavily.
Troubleshooting
The truck body looks saggy
Use internal support. Plastic canvas in the floor, roof, and closed walls makes a huge difference. Cotton yarn also helps hold shape better than soft acrylic.
My serving opening collapses inward
Add hidden supports inside the front and back pillars. You can also sew a narrow strip under the roof edge to stabilize the opening.
The food looks messy instead of abundant
Work in repeated color families. Use the same shell yellow, meat brown, lettuce green, and tomato red throughout so the counter reads cohesive rather than chaotic.
The wheels look too small
Miniature caravans often need slightly exaggerated wheels to read correctly. Size them up one round before attaching.
My bunting flops
Use starch, diluted craft glue, or a fine wire support.
Finishing details
Steam lightly from a distance if your yarn tolerates it, but do not flatten the texture. Weave in ends as you finish each miniature food piece instead of waiting until the very end. For the crispest truck silhouette, line the inside walls with cut plastic canvas panels covered by the crochet shell. You can also add a fabric lining behind the closed walls if you want a cleaner interior. A tiny printed menu sign, faux napkin stack, or stitched logo patch would all be lovely optional upgrades. Another upgrade is LED tea light style glow from the cab or service area, but keep electronics removable.
Shop Similar
- lime green worsted cotton yarn for structured miniature vehicles
- orange cotton crochet yarn for amigurumi caravans and food trucks
- mini plastic canvas sheets for reinforcing crochet dollhouse builds
- small steel crochet hooks for tight amigurumi stitches
- polyester fiberfill for miniature crochet scenes
Style it With
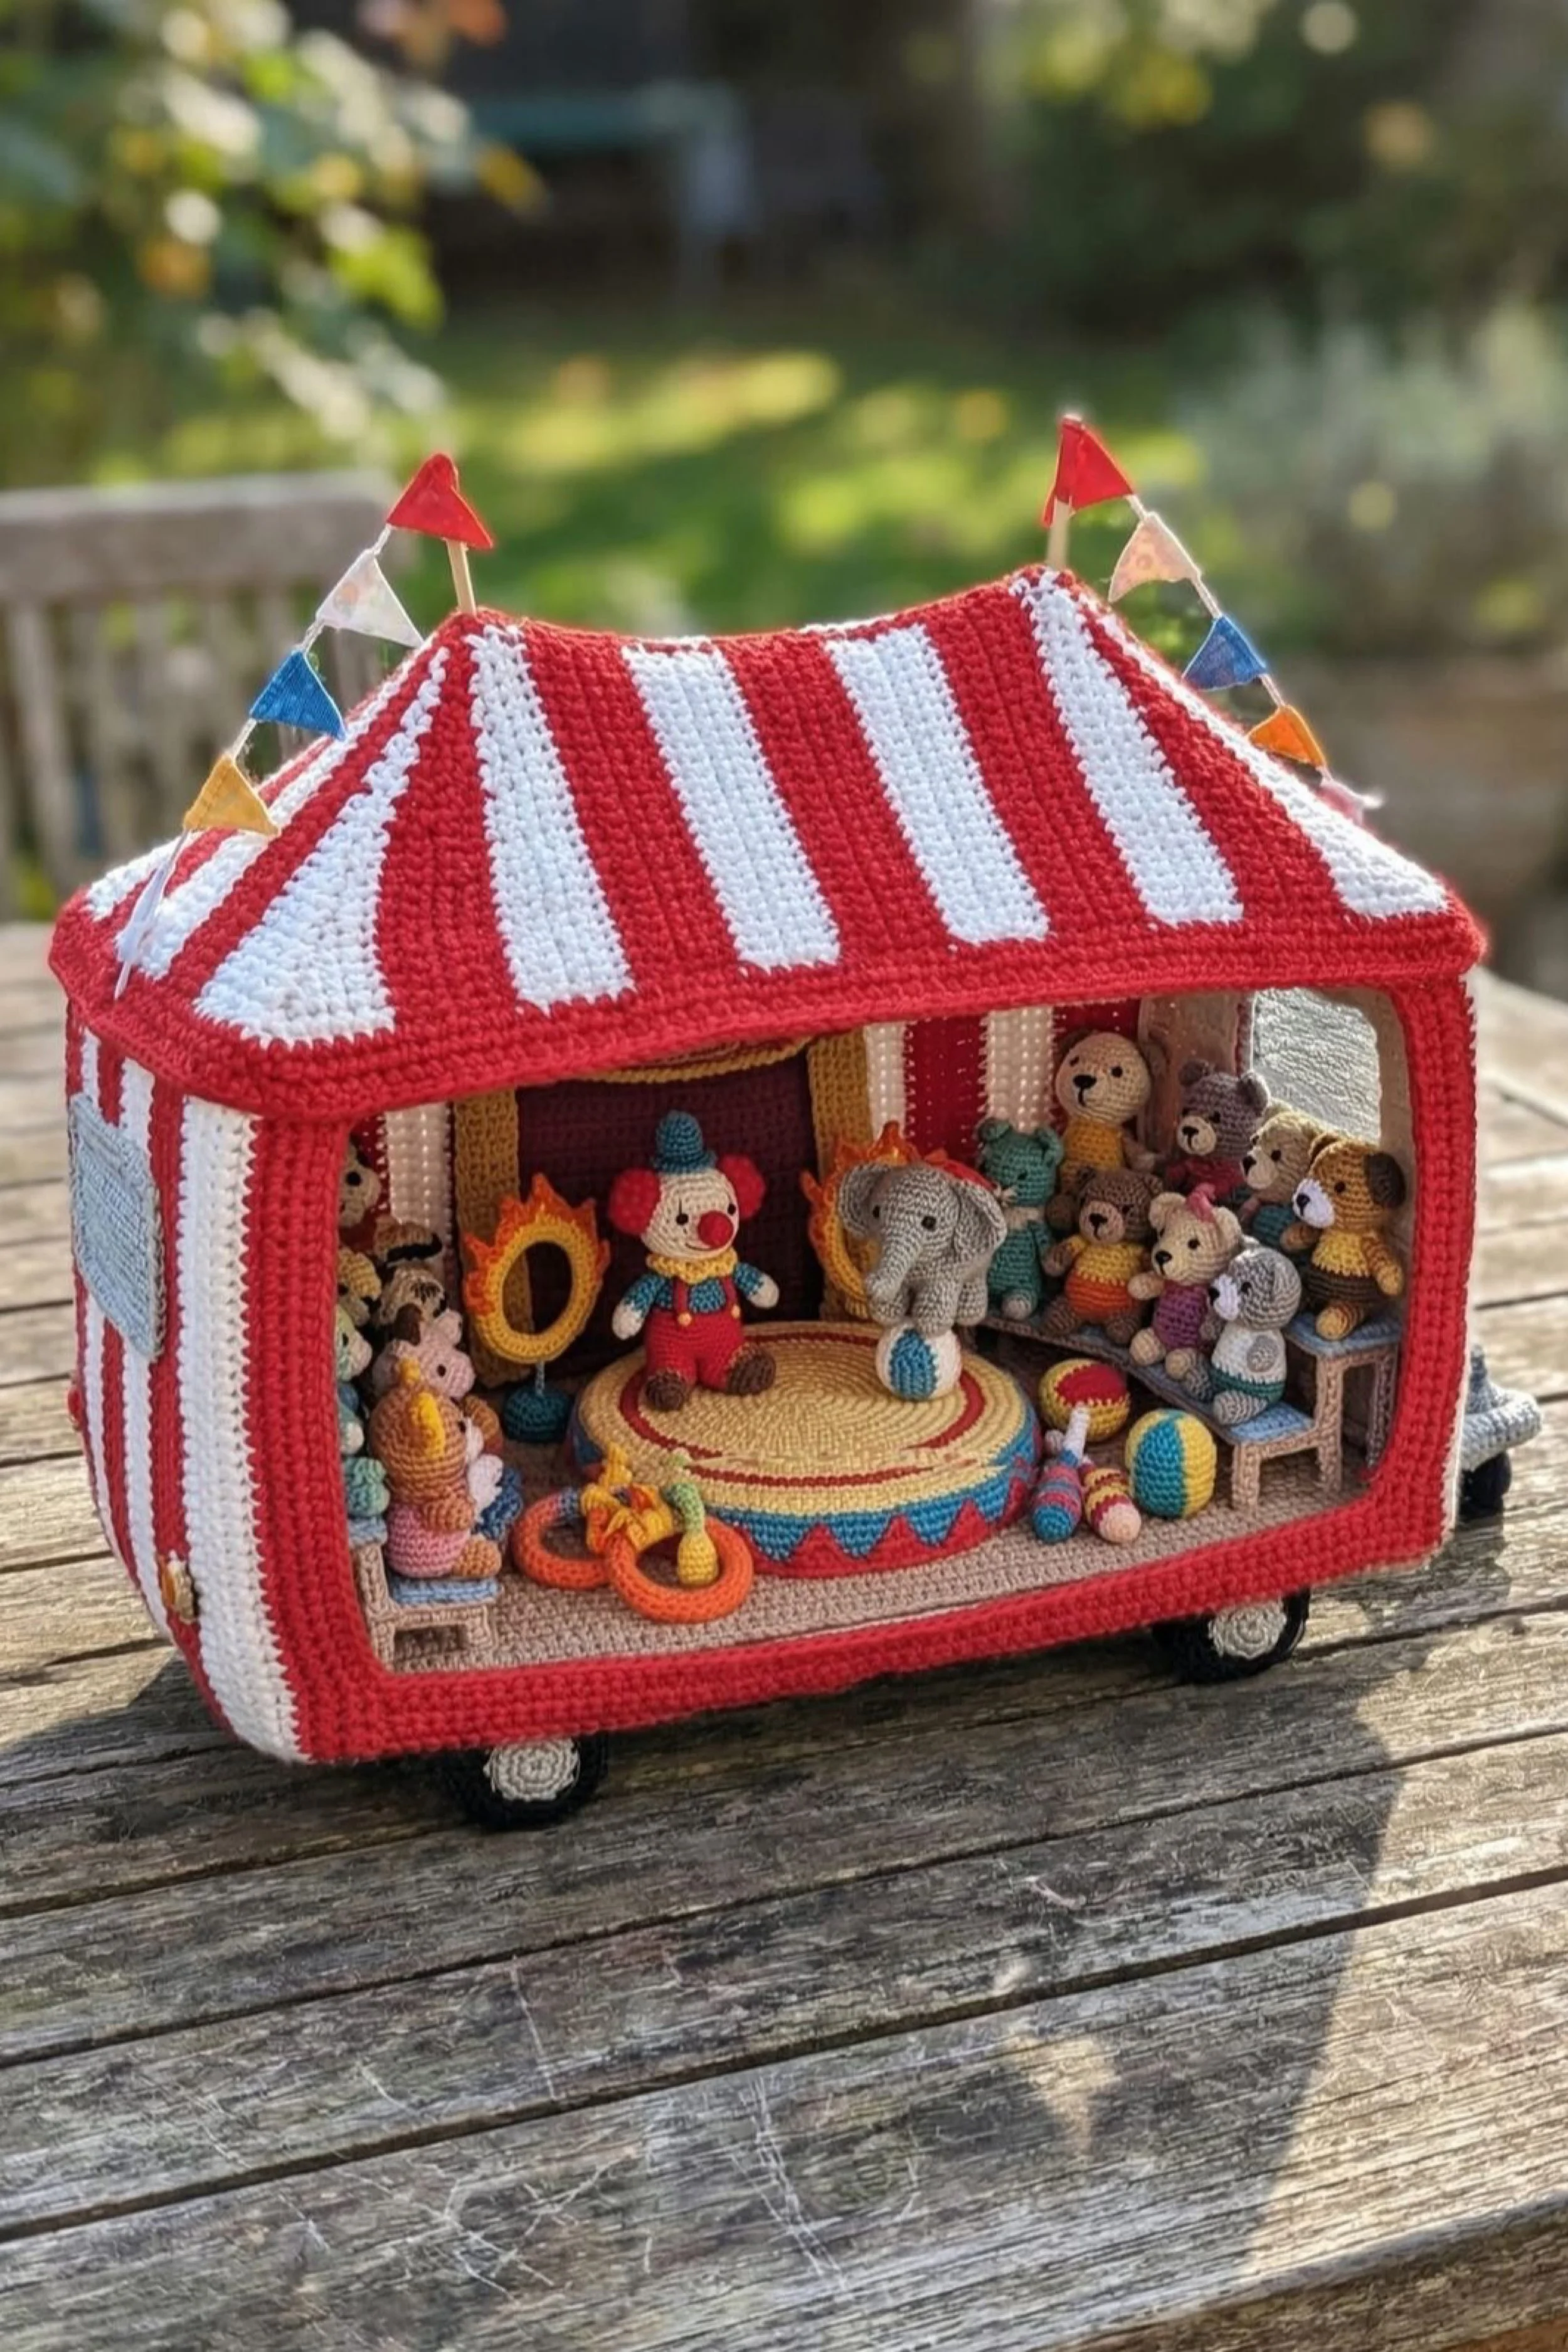
Crochet Circus Caravan Make It Yourself Tutorial
What you’re making
You’re making a striped crochet circus caravan that opens into a miniature performance scene with a center ring, tiny animal audience, juggling props, pennant flags, and a sweet vintage circus palette in red, white, blue, gold, and pastel accents. The finished piece feels like a traveling toy theater and a soft sculpture all at once, which is exactly why the structure matters as much as the tiny details.
Although the photo looks intricate, this project becomes far more approachable when you treat it like a little stage set on wheels. First you build the circus shell, then the open side, then the ring and seating, and finally the performers and props that make it magical.
Materials + tools
- Worsted weight cotton yarn in bright red, white, cream, tan, brown, gold, blue, teal, pink, yellow, and small amounts of black and gray
- Optional DK cotton for the smallest audience animals and juggling pieces
- Crochet hooks sized for tight amigurumi fabric, usually 2.5 mm to 3.25 mm
- Polyester stuffing
- Plastic canvas, card, or craft foam for structural support
- Yarn needle
- Stitch markers
- Pins or clips
- Black embroidery floss
- Tiny safety eyes or embroidered eyes
- Thin floral wire or wooden skewers for the flag poles
- Optional starch for the roof and pennants
Finished size + customization notes
A version close to the photo will usually land around 10 to 13 inches long and 8 to 10 inches tall because of the tent roof peak. To make the caravan more toy like, keep the roof extra high and dramatic. To make it more realistic, lower the pitch of the tent slightly. The easiest customization is changing the stage story. You can swap the elephant act for a bear, rabbit magician, acrobat, or puppet show while keeping the same caravan body.
Step by step instructions
1. Establish the caravan footprint
Start with the floor panel in tan or beige. A rounded rectangle works best so the wheels tuck under neatly and the tent top feels balanced. Work tightly in single crochet. The floor should be firm and flat because it supports the entire performance setup.
Insert a hidden reinforcement panel later. You do not want the center ring to sag.
2. Build the caravan walls
Crochet the lower side walls upward from the floor edge. Keep one long side mostly open because the caravan functions as a theater front. The back and two narrow ends remain enclosed. Use white and red strategically so the outside already suggests circus striping.
For the cleanest finish, make some wall panels separately and sew them together. Vertical stripes often look sharper when worked as distinct pieces rather than trying to carry yarn across every row.
You should now see a wagon like base with an open audience side.
3. Create the tent roof
The roof is the signature element. Make several wedge shaped panels in alternating red and white and seam them together into a peaked circus tent form. Reinforce the underside with light card or craft foam, especially near the ridge. Add a red trim around the lower roof edge to frame it cleanly.
If your roof looks too flat, increase the angle of each wedge. If it looks too pointy, widen the top section.
4. Add the side roof extension and frame
The photo shows the roof extending slightly over the open performance side. Crochet a small overhang or simply position the roof so it projects a bit beyond the wall edge. This gives the whole caravan that real circus wagon silhouette. Attach the roof securely only after the stage furniture is tested inside.
5. Make the wheels and underbody
Crochet simple dark wheels with pale centers and attach them low under the wagon. Because the caravan body is visually bulky, the wheels should be small but still distinct. Add a tiny drawbar or hitch only if you want it to feel more like a traveling wagon.
You should now see the basic structure reading clearly as a circus trailer.
6. Build the center ring
Crochet a circular stage in cream, tan, red, and blue. The center ring should sit slightly raised from the floor, like a proper circus platform. Reinforce it with a thin circle of card inside so it stays flat. Add a decorative edge in a contrasting color.
Place it slightly forward of center, leaving room for back wall curtains and side seating.
7. Add curtains and interior backdrop
Crochet soft striped or solid curtains for the back interior wall. You can use gathered rectangles stitched at the top so they frame the performance space. A rich burgundy, red, or warm berry tone works beautifully. The curtains create depth and make the center ring feel intentional.
If you skip this, the caravan can look like an empty box. The backdrop is what gives it theater.
8. Make the side benches and tiny seats
Create small benches or chair like seats for the audience animals. Work flat rectangles for seats and backrests, then seam them into shape. Use muted browns and blues so the bright characters stand out more strongly.
Your visual checkpoint here: the audience should already have places to sit, and the stage should still feel like the focal point.
9. Crochet the elephant performer
The elephant on the ring is the star. Make the body in gray with a rounded head, short trunk, tiny ears, and colored costume accent around the neck or tummy. Keep it small but not tiny. It should be large enough to command the center ring.
Stuff lightly but evenly so the elephant stands securely. A little blue ball under one foot or near the stage can suggest performance without overcomplicating the pose.
10. Make the clown and supporting figures
Crochet a clown with a round head, tiny hat, bright outfit, and cheerful color blocking. Then make several miniature audience animals in soft browns, creams, and pastel shades. Bears, rabbits, mice, and kittens all suit this look. Keep the face style simple and consistent so the whole caravan reads as one collection.
If yours starts feeling crowded, vary height rather than width. Some animals can sit lower while one or two stand in the back.
11. Create juggling props and stage toys
Crochet tiny balls, rings, bowling pin shapes, and a fire hoop or gold hoop. Use bright circus colors but repeat them carefully. Red, yellow, blue, and orange should appear more than once so the composition feels designed. Arrange the props around the center ring in a loose semicircle.
You should now see a lively performance zone with movement built in even though everything is stitched.
12. Add pennant poles and mini bunting
Use fine wooden skewers, floral wire, or wrapped pipe cleaners for the two roof top poles. Add tiny red flags at the top and string miniature pennants between them. You can also drape a second smaller pennant strand along the sides if you want extra flourish.
This step instantly lifts the silhouette and makes the caravan look celebratory from a distance.
13. Assemble the audience scene
Sew the benches first, then seat the audience animals. Angle a few slightly inward toward the ring. That single trick makes the whole caravan feel animated. Secure all pieces through the base if possible. Keep the clown to one side so the elephant stays center stage.
If the scene feels flat, raise the back row with a hidden riser under the rear bench.
14. Refine the front opening
The large open side needs a smooth red border so the theater reads cleanly like a frame. Add an extra edging round if needed. This polished border is important because the eye lands there first.
You should now see a strong red outline around the opening, like the trim of a vintage circus wagon.
15. Final checks and shaping
Stand the caravan at eye level. Can you clearly see the elephant, clown, audience, and circus ring without anything blocking the view? If not, reposition props or lower the height of front objects. Smooth the roof lines, adjust the bunting, and tighten any loose audience figures.
Troubleshooting
The tent roof won’t hold its shape
Use two layers with a reinforcement panel between them. Starching alone helps, but structure matters more.
My stripes look uneven
Work separate color panels and seam them rather than changing colors every few stitches. That produces cleaner lines for this type of project.
The interior feels cluttered
Choose one hero act and let the supporting pieces sit lower or farther back. The center ring should always remain visually clear.
My audience animals are too big
Go down a hook size or use DK yarn for the smallest figures. Tiny variation in scale creates realism.
The caravan tips backward
Move the center ring slightly forward and avoid overstuffing the rear wall.
Finishing details
Weave in every end as you go because circus colors create lots of tails. Lightly steam the curtain pieces and roof trim if needed, but protect any reinforcement material from moisture. If you want a really polished heirloom finish, line the inside floor with felt before sewing down the stage. Optional upgrades include a removable front curtain, tiny ticket sign, hand stitched stars on the tent, or battery tea light glow hidden behind the rear curtain for a warm theater effect.
Shop Similar
- red and white cotton yarn for circus stripe crochet projects
- small crochet hooks for detailed amigurumi caravans
- plastic canvas sheets for structured crochet dollhouse scenes
- mini stuffing fiber for tiny crochet toys
- embroidery floss set for tiny facial details
Style it With
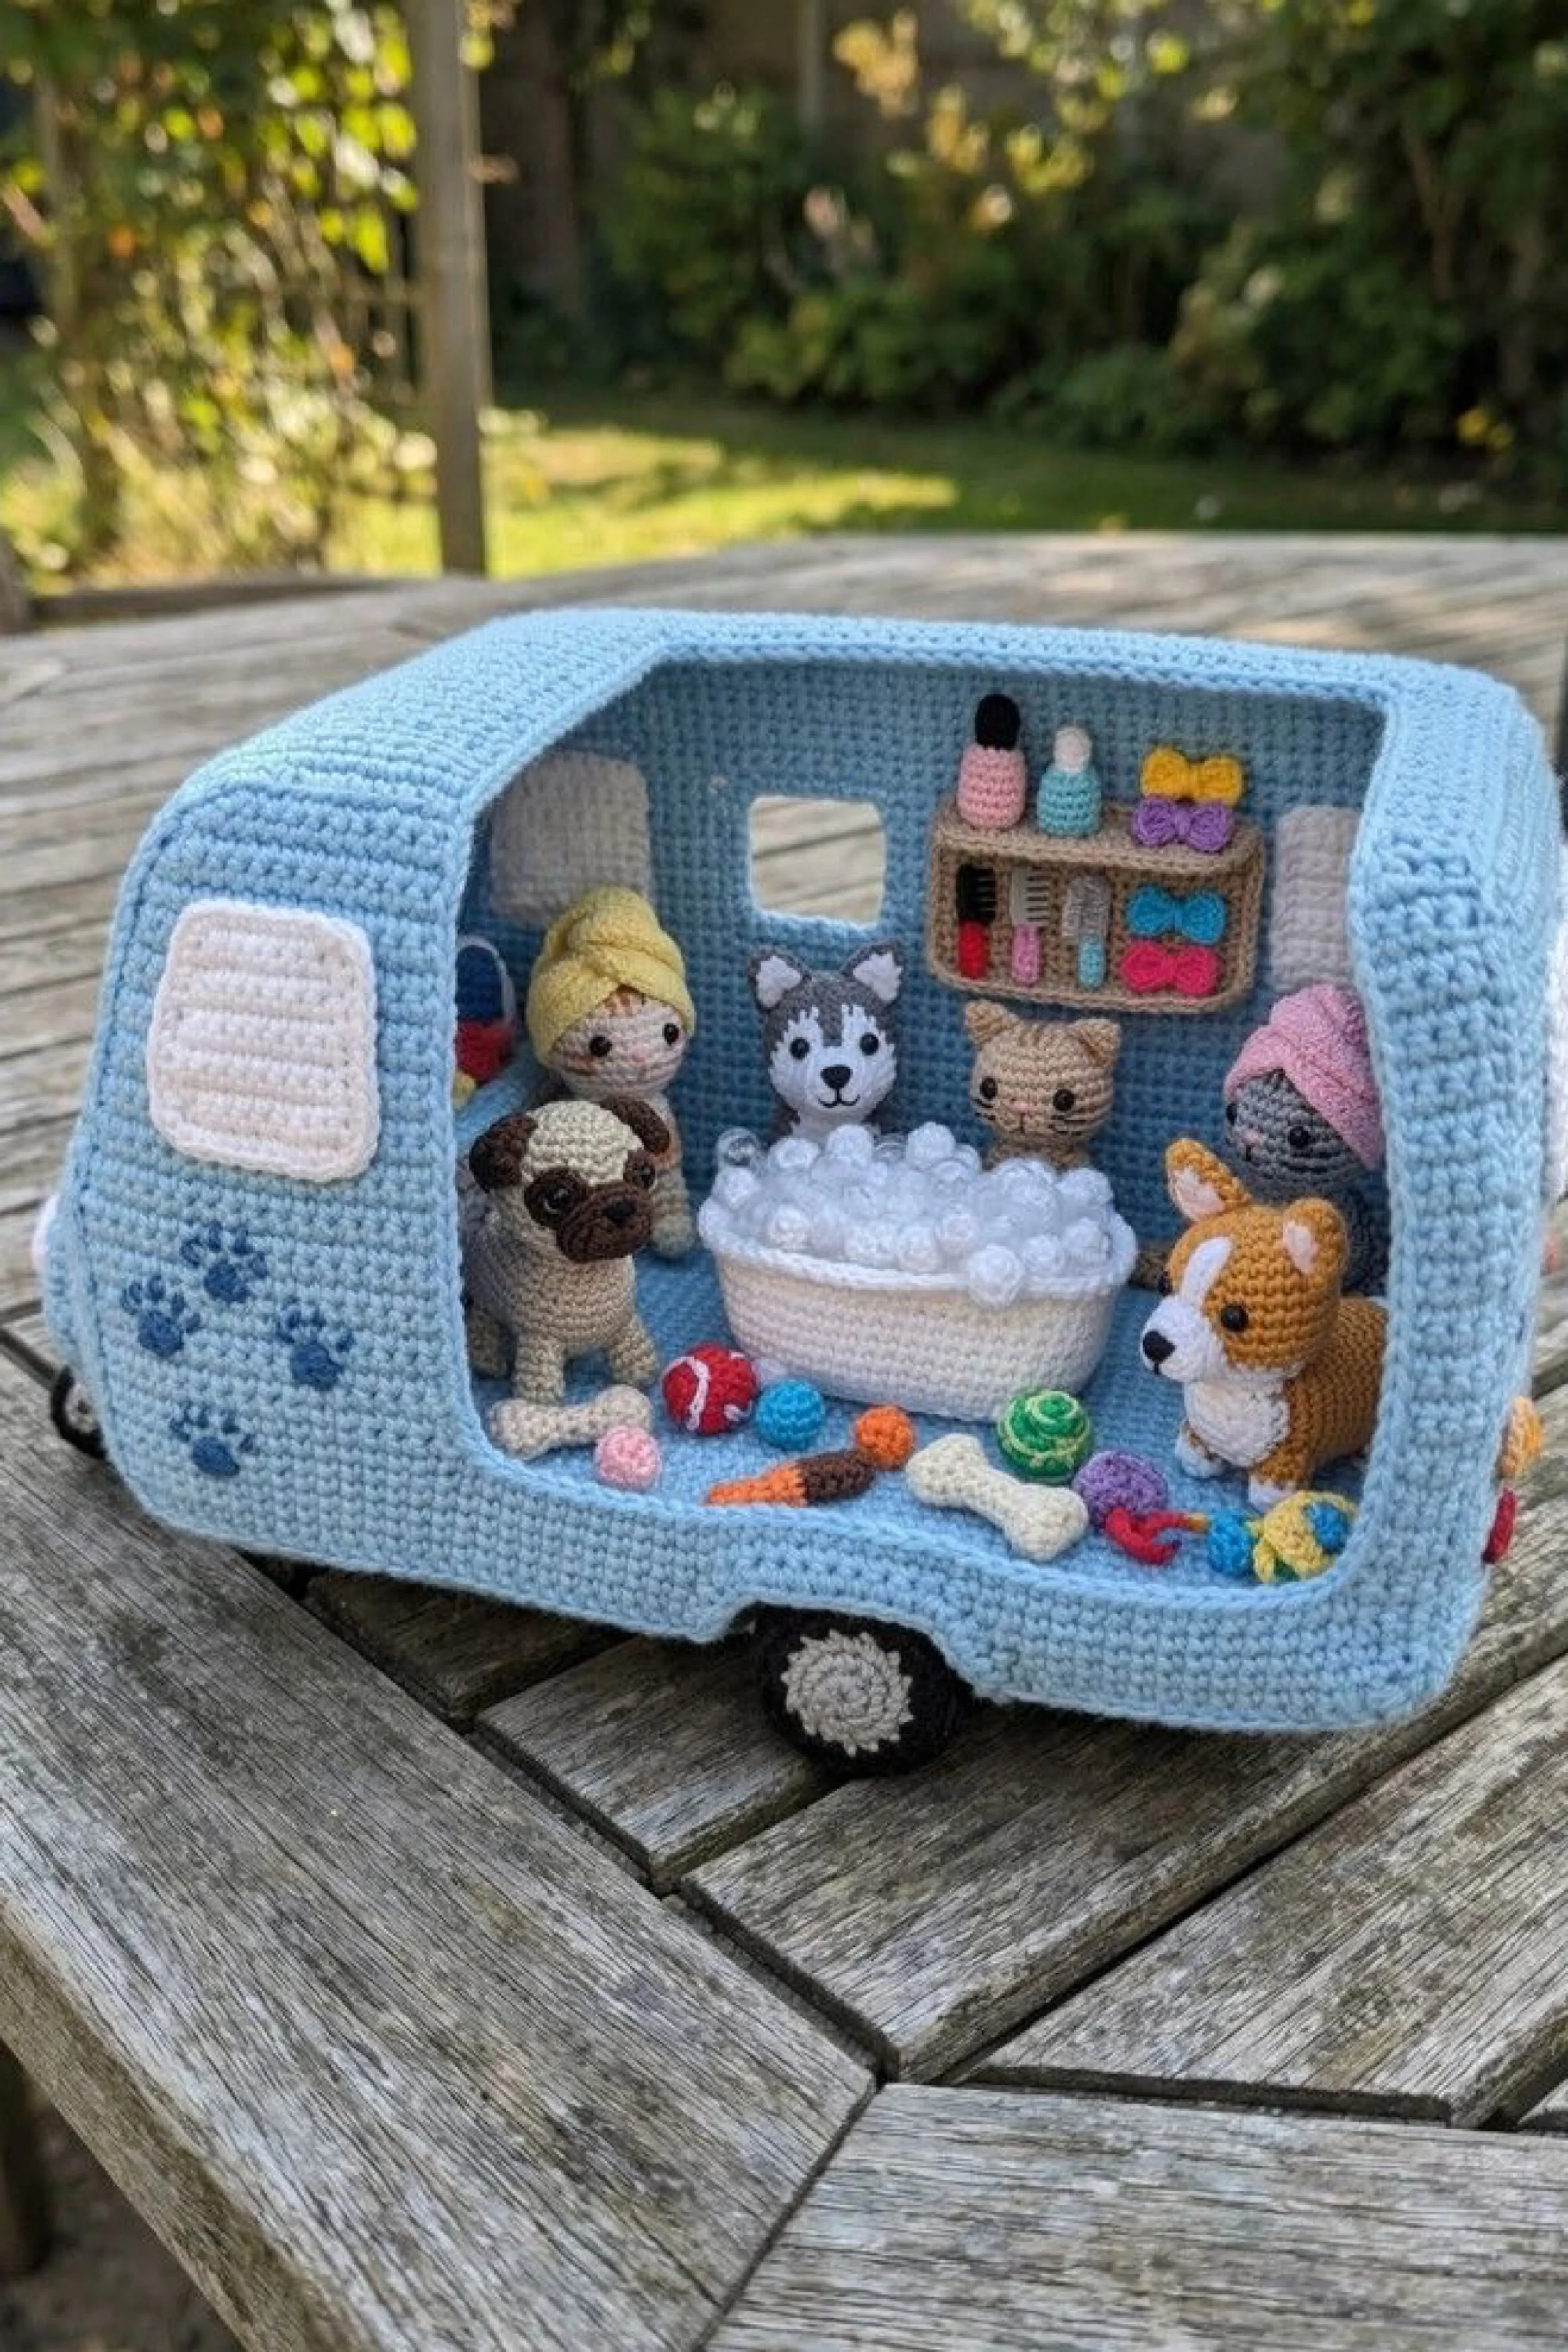
Crochet Pet Spa Caravan DIY Guide
What you’re making
You’re making a pale blue crochet pet spa caravan with an open side, tiny groomed animals, a bubbly wash tub, pet toys scattered across the floor, and a miniature shelf filled with grooming products and bows. The shape is soft and rounded, almost like a little mobile salon trailer, and the styling is sweet, clean, and cozy rather than overly busy.
What makes this look special is the calm pastel palette and the way the interior tells a complete story. Instead of packing the caravan with random objects, you’re creating one clear scene: bath time and pampering for tiny pets. That focus makes the final result feel polished and charming.
Materials + tools
- Worsted weight cotton yarn in pale blue, white, cream, gray, tan, peach, pink, yellow, brown, orange, black, and small accent colors
- DK cotton yarn for tiny grooming items if desired
- Crochet hooks in sizes 2.25 mm to 3.25 mm for a firm fabric
- Polyester fiberfill
- Plastic canvas or craft foam for structural inserts
- Yarn needle
- Stitch markers
- Scissors
- Black and pink embroidery floss
- Tiny safety eyes or embroidered faces
- Optional clear elastic thread for securing lightweight loose toys
- Optional felt for backing wall shelf items
Finished size + customization notes
This caravan works beautifully at about 9 to 12 inches long. If you want a more nursery like feel, use softer rounded proportions and larger bubbles. If you want a more realistic salon trailer, make the shelf squarer and the tub shallower. You can customize the pets to match favorite animals. A corgi, pug, husky, kitten, and plush spa attendant fit the photo vibe, but you could easily swap in a poodle, bunny, or dachshund.
Step by step instructions
1. Build the base and floor
Crochet a rounded rectangle floor in pale blue. This caravan has a softer silhouette than the taco truck, so the corners should be well rounded from the start. Work tightly in single crochet and keep the floor flat. Add a hidden support insert later so the tub and figures stay level.
Your first checkpoint: the base should look like a little compact trailer footprint with gentle corners.
2. Raise the lower walls
Work upward from the floor edge in pale blue. Keep one full side largely open. Leave a window opening on the far wall and a smaller opening toward the front. The outer silhouette should curve gently at the roof line, so do not make the side walls too tall before beginning the top arch.
If yours already looks boxy, reduce the vertical wall height and transition into the roof curve sooner.
3. Shape the rounded roof shell
For this caravan, the roof and upper side curve almost merge into one soft capsule form. You can achieve this two ways. The easiest is to crochet the side walls separately and join a curved roof panel across the top. The other method is to decrease gradually across top rows to form an arch. Either works, but separate panels often give cleaner control.
Reinforce the roof with a flexible insert so it holds the rounded shape without collapsing inward.
4. Add the rear and side window details
Crochet small white or cream framed window panels and stitch them onto the outside. Embroider or applique tiny blue paw prints along the trailer side. These little motifs immediately communicate pet theme and make the outside feel finished, not plain.
You should now see a sweet baby blue shell with an obvious pet salon vibe.
5. Attach the wheels
Make simple wheels with black outer rounds and pale centers. Because the caravan body sits low, keep the wheels compact. Sew them firmly so the trailer appears grounded. A little hidden padding under the body can help it stand level if the shell is heavy in front.
6. Create the interior wall shelf
The tiny product shelf is one of the strongest visual features in the photo. Crochet a small rectangle in beige or taupe, then add narrow dividers or stitched outlines to suggest shelves. Make miniature bottles, folded towels, bows, or grooming jars in pastel shades and tack them in place. You do not need many. A handful of distinct items reads better than a crowded wall.
If yours looks too bulky, flatten the shelf objects more and rely on color blocking to suggest products.
7. Make the bath tub
Crochet a shallow round or oval basket shape in white or cream. Build the walls only high enough to cradle a mound of bubbles. Stuff lightly or insert a form so it holds shape. For bubbles, crochet tiny white bobble balls, small puff stitch circles, or use soft pom poms stitched securely in place.
The tub should sit central and slightly forward so it becomes the scene anchor.
8. Crochet the spa attendant doll
Make a tiny seated human figure with a towel turban. Keep the body simple and compact. A small round head, embroidered eyes, a peach face, and a pale yellow or cream towel wrap will instantly read as spa attendant. Add a little robe or apron if you like.
This figure does not need elaborate limbs. The expression and head wrap sell the story.
9. Make the pets
Crochet a husky or gray puppy, a tan kitten, a corgi, and a pug. Work them in a consistent simple style with rounded heads, tiny snouts, and little triangular or floppy ears depending on breed. The corgi should be slightly larger and warmer toned. The pug benefits from a darker muzzle patch. The husky can have a pale face and gray cap.
Place one pet close to the tub, one near the shelf, and one near the foreground toys to create depth.
10. Add spa towel wraps
For the cat or one of the pets, make a tiny pink towel turban or wrap. This little touch creates instant humor and polish. A narrow strip rolled and stitched around the head works well. Keep it neat so it reads clearly.
11. Crochet pet toys and grooming accessories
Make several mini balls in bright colors, a bone shape in cream, a carrot toy, a rope ring, and maybe a little brush or comb. Scatter them across the floor with intention. Keep larger toys in front and smaller ones near the tub.
You should now see a believable grooming scene, not just a room with animals in it.
12. Refine the open side edge
Add one extra border round around the large opening. The edge should look smooth and deliberate, almost like a display cutaway. If the opening warps, block it lightly or stitch a hidden support around the inside edge.
This step helps the whole caravan photograph beautifully and keeps the eye on the interior.
13. Arrange the composition
Before sewing everything permanently, set the tub first, then the attendant, then the largest pets, then the smallest props. The photo works because the bubble bath sits center while the pets ring it from different heights. Try to avoid putting all figures in one flat row. Stagger them.
If yours feels empty, add one folded towel or a second shelf item rather than more loose toys.
14. Secure the miniatures
Sew through the floor wherever possible. Wall shelf items can be stitched from the back before the shell is fully closed if that is easier. Keep the tub very secure because it is visually central. A dropped or leaning tub throws off the whole scene immediately.
15. Final polish
Check the faces. Tiny embroidered eyes and noses can change the emotional feel of the whole piece. Make sure all pets look soft and friendly. Straighten the towel wraps, fluff the bubbles, and adjust toy spacing.
Your final checkpoint: you should now see a serene pastel spa caravan with one clear focal point and a lovely sense of tiny narrative.
Troubleshooting
The caravan roof caves in
Use a curved reinforcement insert or add a second roof layer. Soft yarn alone rarely holds this shape cleanly.
My bubbles look lumpy
Use repeated small identical bubble units rather than random stuffing. Consistent sizing looks much neater.
The interior looks chaotic
Reduce the number of floor toys and keep the tub as the visual center. This scene works best when it feels calm.
My pets are too large for the space
Move to DK yarn or a smaller hook for animals only. Mixed scales are perfectly fine in storybook miniatures.
The shelf keeps drooping
Back it with felt or card and stitch it flat against the wall.
Finishing details
Weave in ends as you finish each animal and accessory. Use only light stuffing so pieces remain refined rather than over puffy. If you want the most polished finish, line the inside floor with a pale felt panel. Optional upgrades include a removable towel basket, a tiny paw shaped sign on the exterior, mini framed grooming certificates on the wall, or a stitched curtain tie back by the side window. You could also personalize the pets to match real pets, which would make this caravan especially giftable.
Shop Similar
- pale blue cotton yarn for pastel crochet caravans
- small crochet hooks for miniature amigurumi pets
- white fiberfill for tiny crochet toys and props
- plastic canvas sheets for structured crochet dollhouse builds
- pastel yarn bundle for small amigurumi accessories
Style it With
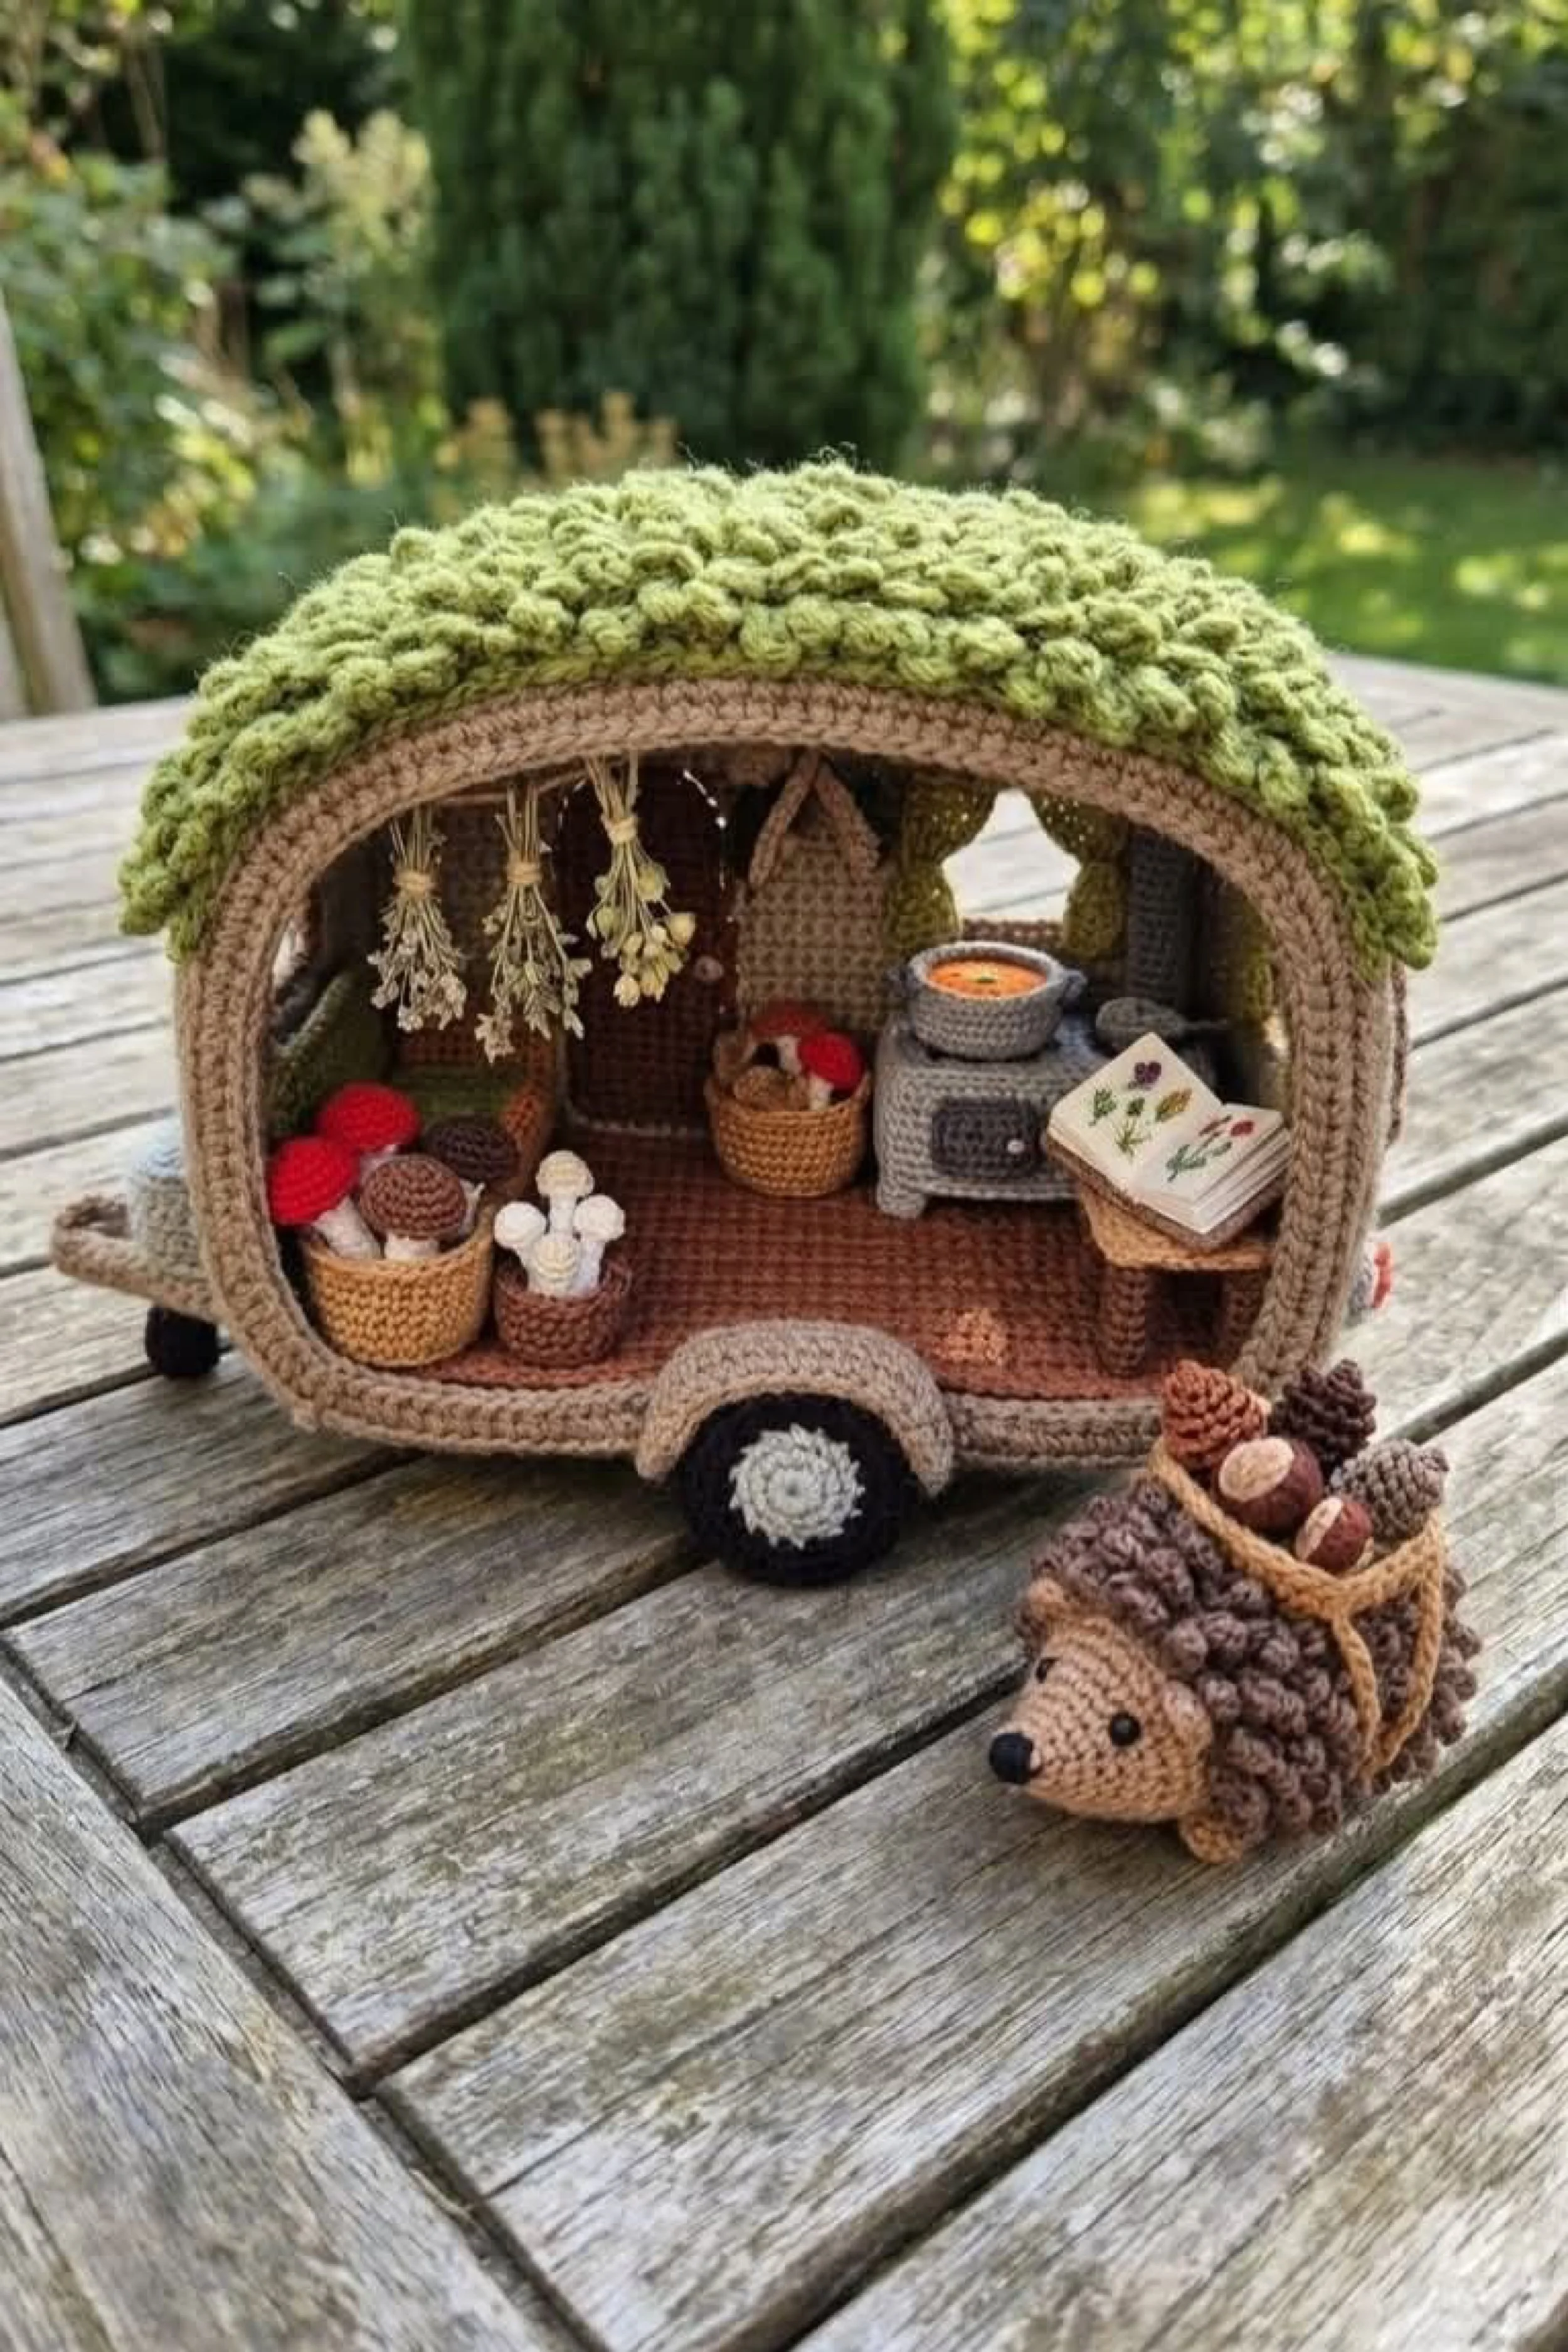
Woodland Hedgehog Caravan How To Guide
What you’re making
You’re making a cozy woodland crochet caravan with a mossy textured roof, earthy neutral body, mushroom baskets, dried herbs, a tiny stove, a miniature botanical book, and an adorable hedgehog companion posed outside with a basket of forest finds. This piece feels less like a vehicle and more like a traveling woodland cottage, which is exactly its charm.
The success of this look comes from restraint. The color story stays natural and muted, the details are tiny but meaningful, and the roof texture does a lot of visual work. If you build the body cleanly and then layer in quiet forest details, the result feels storybook and elevated.
Materials + tools
- Worsted weight cotton yarn in beige, mushroom brown, taupe, moss green, olive, cream, rust, charcoal, and small accents of red, white, and yellow
- Optional fuzzy or boucle accent yarn in moss green for extra roof texture
- Crochet hooks from 2.5 mm to 3.25 mm
- Polyester fiberfill
- Plastic canvas or craft foam inserts
- Yarn needle
- Stitch markers
- Scissors
- Black embroidery floss
- Safety eyes or embroidered eyes
- Fine wire for hanging herbs if desired
- Optional starch or diluted fabric glue for tiny pages or book covers
Finished size + customization notes
A finished size around 9 to 11 inches long suits the proportions in the image. This design looks especially good when the caravan stays compact and low, with the roof becoming the main silhouette feature. You can customize the woodland story easily by swapping mushrooms for pumpkins, herbs for hanging garlic, or the hedgehog for a fox, rabbit, or squirrel. To stay true to the photo, keep the palette softly earthy rather than bright.
Step by step instructions
1. Make the trailer floor
Crochet a rounded rectangle base in warm brown or taupe. Work tightly and keep it flat. Because this caravan has a cottage feel, slightly softer corners look better than sharp ones. Insert a hidden support panel later to prevent sagging.
You should now have a compact little footprint that already feels snug rather than oversized.
2. Build the lower walls
Work upward from the floor in beige or taupe. Keep one full side open to show the interior. The opposite side and ends remain enclosed. The wall height should be moderate because the roof is the dramatic feature here. Add an arch shaped top edge rather than a straight line so the shell already suggests a rounded caravan.
If yours looks too tall and boxy, reduce a couple of rows before forming the arch.
3. Shape the rounded roof
Crochet the roof as a separate large curved panel in moss green. The photo roof has a heavily textured, lumpy, almost living quality. You can mimic this by using bobble stitches, loop stitches, popcorn stitches, or by stitching clusters of textured yarn onto the finished panel. Work the base roof first in solid green, reinforce it, then add texture.
This layered approach keeps the caravan structured while letting the roof feel soft and organic.
4. Attach the roof to the shell
Sew the curved roof from one lower edge to the other so it wraps like a little barrel top. Insert flexible support inside so the arch stays smooth. The lower edge of the roof should meet the wall neatly with no visible gaps.
Your checkpoint: you should now see a woodland pod shape with the roof clearly reading as moss.
5. Add wheel and hitch details
Make one visible wheel with a pale center and dark outer round. Add a subtle front hitch or tow loop in beige. This design is less about the vehicle mechanics and more about the cottage atmosphere, so keep these details understated.
6. Create the interior floor mat
Crochet or embroider a warm brown floor mat inside. A flat woven look works beautifully here. Because the inside is simple, every detail matters. The floor should look grounded and warm, not empty.
7. Make the tiny stove
The stove is a key focal point. Crochet it in gray with a slightly rounded body, little door detail, and a tiny pot on top. Add a stitched or embroidered flame glow through the door opening if you like. Position it on one side toward the back so it anchors the room.
If yours looks too bulky, make it as a flatter front facing piece instead of a fully stuffed cylinder.
8. Add the table and botanical book
Create a small brown side table from a narrow top and one or two support legs. Make a miniature open book in cream and beige with tiny stitched green and red floral motifs on the pages. This tiny book gives the caravan intelligence and tenderness. It suggests someone lives here thoughtfully.
You should now see a real interior scene beginning to form.
9. Crochet the hanging herbs
Use thin strands of beige, olive, and cream yarn to make little tied herb bunches. Stitch them from the roof inside so they hang at varied lengths. Keep them delicate. A few are enough. Too many and the caravan will feel cluttered.
This is one of the easiest ways to make the caravan feel atmospheric and handmade.
10. Make baskets and woodland finds
Crochet tiny baskets in tan and fill them with mushrooms, acorns, and small white toadstool stems. For mushrooms, make short cream or tan stems with rounded caps in rust, red, or brown. Group them in little foraging collections rather than scattering them randomly.
The baskets should sit low and cozy along the interior edge.
11. Build the hedgehog
The hedgehog outside is the emotional hook of the whole piece. Make a small tan face and body, then add loop stitch or textured brown spines across the back. Give it tiny black eyes and a small dark nose. Create a little basket or bundle strap loaded with pinecones or forest goods.
Keep the hedgehog proportionately smaller than the caravan opening so it feels like a companion, not the resident itself.
12. Add the exterior basket of pinecones
Crochet a shallow tan basket and fill it with brown textured cones or acorns. Place it near the hedgehog outside. This exterior detail expands the scene beyond the caravan and makes the whole setup feel more alive.
13. Assemble the interior thoughtfully
Place the stove first, then the table and book, then the baskets, then the hanging herbs. Because the interior is understated, spacing matters. Leave some floor visible. Negative space is part of the charm here.
If yours looks emptier than the photo, add a folded blanket roll or tiny wooden crate rather than more random miniatures.
14. Finish the roof texture
Once the caravan is assembled, add extra textured moss knots or loop stitch clusters anywhere the roof looks sparse. Concentrate more texture along the ridge and upper curve. Let it feel natural, not evenly manicured.
You should now see a roof that reads immediately as lush moss or forest growth.
15. Final shape and storytelling pass
Set the hedgehog in front, angle the pinecone basket slightly, and make sure the interior book is visible from the main viewing side. Check that the hanging herbs do not hide the stove or table too much. The best miniature scenes always have one clear line of sight.
Troubleshooting
The roof looks like a plain green panel
Add texture after assembly. Bobbles, loops, and stitched clusters create dimension much more effectively than color alone.
My caravan feels too empty
Use a few highly specific props like herbs, mushrooms, and a book. Theme specific details are stronger than adding lots of generic pieces.
The arch collapses inward
Use flexible support inside the roof and keep the side opening from becoming too wide.
The hedgehog is hard to shape
Work the face separately and attach it to a rounded textured body. That gives you better control over proportions.
My neutral colors look dull
Use a warm range, not flat gray browns. Mix cream, mushroom, moss, and rust for depth.
Finishing details
This caravan benefits from gentle finishing. Steam only lightly and avoid flattening the roof texture. Weave ends inside baskets and props before attaching them. Optional upgrades include a tiny curtain tie back, faux embroidery along the roof edge, a removable hedgehog basket, or a stitched moon motif above the doorway. You could also add a hidden battery tea light style glow behind the stove area for a magical woodland evening effect.
Shop Similar
- moss green cotton yarn for textured crochet roofs
- earth tone yarn bundle for woodland amigurumi scenes
- small crochet hooks for miniature dollhouse crochet
- plastic canvas sheets for structured crochet caravan walls
- fiberfill stuffing for tiny crochet toys
Style it With
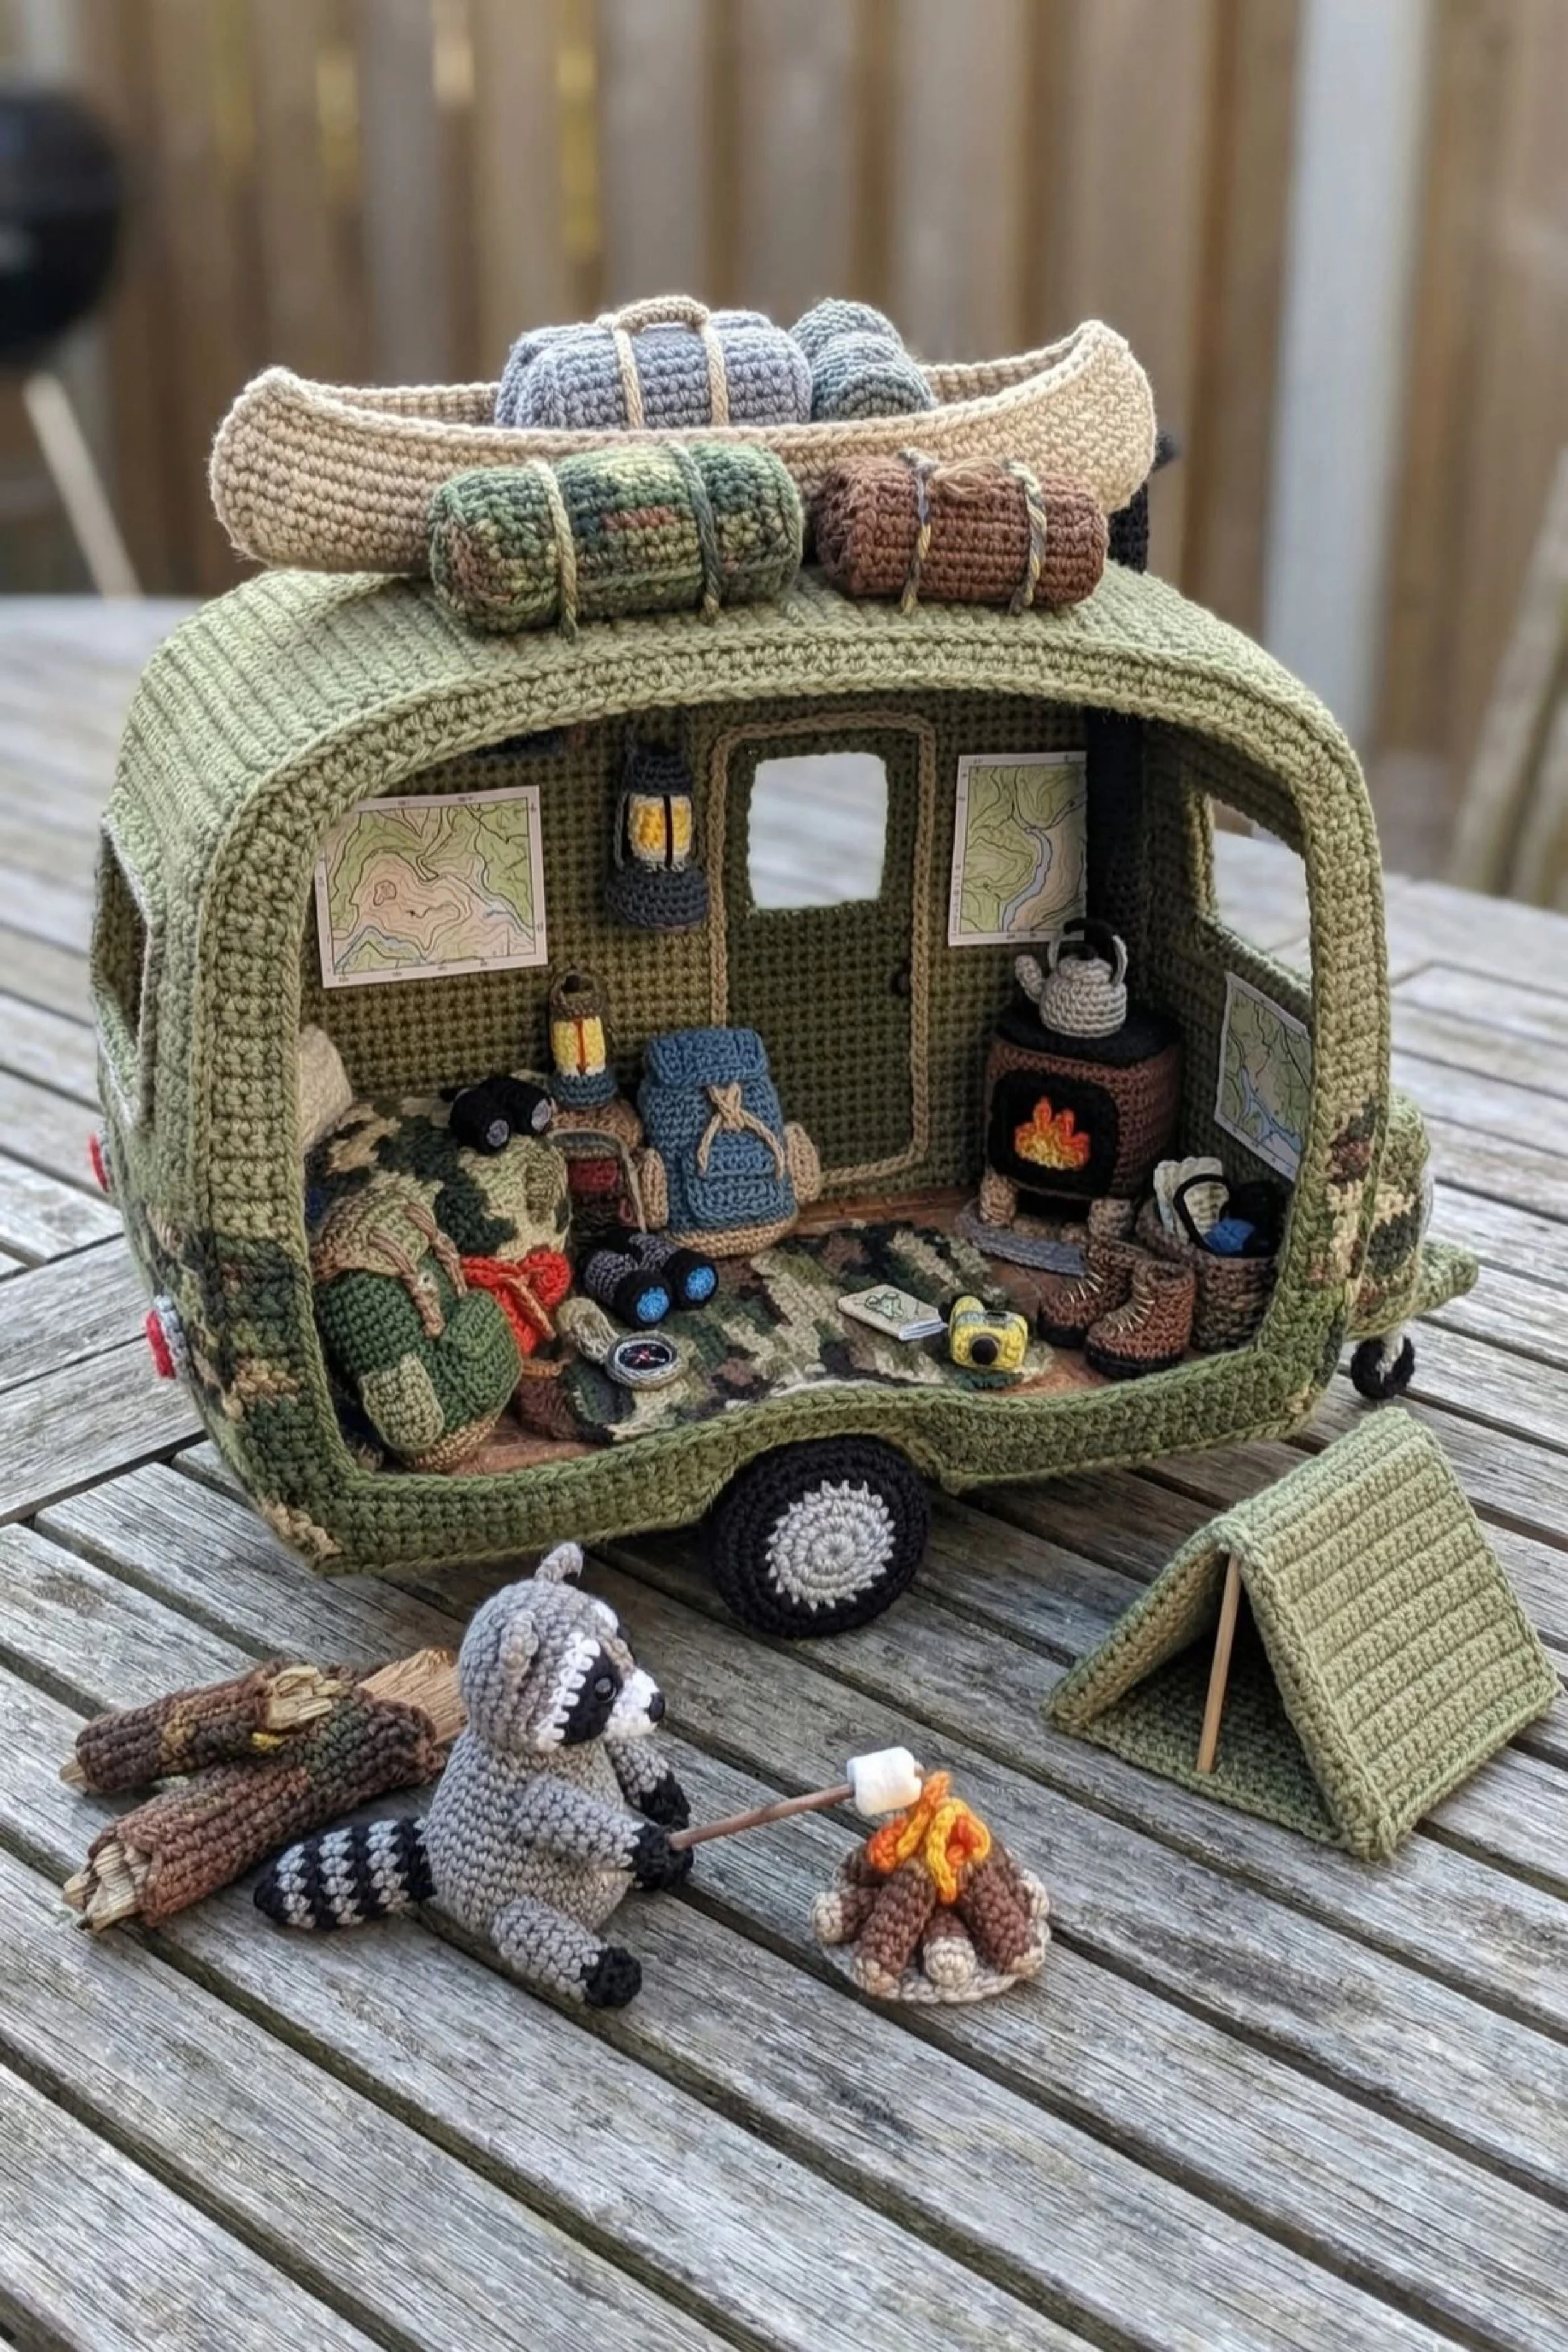
Crochet Wilderness Camper Caravan Step by Step Tutorial
What you’re making
You’re making a rugged crochet wilderness camper caravan in layered olive and camouflage tones with rooftop gear, a tiny wood stove, rolled blankets, maps on the wall, a floor sleeping area, and an adorable raccoon roasting a marshmallow beside a campfire. The feeling is cozy, outdoorsy, and story driven, like a tiny base camp built for woodland adventures.
This project works best when you treat it as a miniature room box inside a travel trailer shell. The caravan itself is relatively straightforward. The magic comes from the restrained color palette, well chosen camping props, and the way the exterior scene continues outside the trailer with the raccoon, fire, and little tent.
Materials + tools
- Worsted weight cotton yarn in olive green, sage, moss, camouflage shades, tan, brown, cream, black, gray, rust, orange, yellow, blue, and a little red
- Optional DK yarn for map details and tiny accessories
- Crochet hooks from 2.25 mm to 3.25 mm
- Polyester stuffing
- Plastic canvas or craft foam inserts
- Yarn needle
- Stitch markers
- Scissors
- Black embroidery floss
- Tiny safety eyes or embroidered eyes
- Floral wire for lantern handles if desired
- Thin card for wall maps and gear labels
- Optional felt for flooring or blanket backing
Finished size + customization notes
A camper like this usually finishes around 10 to 12 inches long. The shape should stay compact and softly rounded, with the interior feeling dense and practical. You can customize the theme by shifting it toward fishing, hiking, hunting cabin style, or national park glamping. For the exact photo mood, stick with camp green, brown, cream, charcoal, and firelight accents, and let the raccoon and marshmallow scene soften the rugged palette.
Step by step instructions
1. Start the trailer base
Crochet a rounded rectangle floor in olive or dark sage. Keep the fabric very tight so later props do not distort it. Insert structure later, but size the floor with that insert in mind. The floor should feel slightly longer than the woodland hedgehog trailer because this version holds more gear.
You should now have a sturdy, flat footprint with softly rounded corners.
2. Build the outer shell
Work the lower walls upward from the base in olive. Keep one long side open to reveal the interior. Shape the top edges into a barrel curve rather than a flat roof line. The caravan body should feel practical and utilitarian, not decorative. Add a narrow rear opening or door shape at the back wall center.
If the shell looks too cheerful, deepen the olive tones and reduce contrasting trim.
3. Add camouflage accents
The photo shows darker camo like shading along the lower body and inside textiles. You can mimic this with simple stitched patches in moss, dark olive, and brown. Do not overwork it. A few mottled accents along the lower exterior and bedding are enough to suggest camouflage.
This is a good moment to decide how rugged or polished you want the final trailer to feel.
4. Shape the roof and doorway
Create the arched roof as a separate olive panel reinforced with flexible support. Attach it to the shell and frame the back door opening with a slightly darker trim. Add a square side window opening and a second small wall opening if desired. Once attached, the caravan should already read as a compact expedition trailer.
5. Make the wheel and hitch details
Create the wheel with black outer round and pale center. Add a small hitch at the front if you like. The hardware can stay simple because the scene relies more heavily on interior storytelling.
6. Build the sleeping area
Crochet a floor mattress or sleeping roll in cream, olive, and camouflage tones. Layer a tiny blanket over part of it and add a small pillow. Position this toward the left side as in the photo, making the interior feel lived in immediately.
Your checkpoint: you should now see a comfortable nest area that grounds the whole camper.
7. Make the wood stove
Crochet a tiny dark stove with a front opening and a kettle on top. Add orange and yellow embroidery inside the stove window to suggest fire. Place it on the right rear side of the caravan so it balances the bedding on the left. The stove is one of the strongest visual anchors inside the trailer.
8. Add maps and wall art
Print or hand draw tiny topographic maps on paper or card and mount them to the inside walls. If you prefer fully crocheted details, make flat pale rectangles and draw on them with fine markers after assembly. This paper element works beautifully in mixed media miniatures and helps the trailer feel real.
Keep the maps square and slightly oversized for readability from a distance.
9. Crochet the gear
Make a backpack, binoculars, boots, flashlight, camera, lantern, and a tiny cup or kettle accessory. Keep each one simplified. The backpack can be a stuffed rectangle with straps. Binoculars can be two tiny joined cylinders. Boots can be stubby brown shapes. Arrange these near the bedding and stove to create zones of use.
If the interior starts looking cluttered, choose fewer but larger props.
10. Make roof storage
Crochet a canoe in beige and add rolled blankets or sleeping bags in muted green, gray, and brown. Tie them with yarn straps and mount them on top of the roof. This rooftop bundle is a major part of the silhouette, so spend time getting it balanced. The canoe should be the longest rooftop element.
You should now see a trailer that feels truly expedition ready.
11. Create the exterior mini tent
Crochet a tiny triangular tent in matching olive and support it with a simple internal card insert or stitched seam. Place it outside the trailer opening on the right side. This helps expand the campsite beyond the vehicle itself.
12. Build the raccoon
The raccoon is the emotional star. Crochet a gray body, darker eye mask, striped tail, small ears, and tiny paws. Pose it sitting upright. Keep it just large enough to interact clearly with the marshmallow stick and fire. Embroidered features often look softer than plastic eyes here.
13. Make the campfire and logs
Crochet a ring of stones in beige or gray and add logs in brown around orange and yellow flame tongues. Then make a skewer with a cream marshmallow for the raccoon to hold. Add a few extra log bundles nearby.
This instantly creates a complete story. Without the fire scene, the camper would still be cute. With it, the whole setup becomes memorable.
14. Arrange the interior and exterior together
Place the bedding, stove, backpack, and wall maps first. Then add the lantern, boots, and smaller props. Outside, position the raccoon in front of the fire and place the tent to the side. Make sure the raccoon does not block the wheel too much. The outside scene should feel like an extension, not a separate vignette.
15. Final edits and color balance
Stand back and check the palette. You want olive, brown, cream, and charcoal to dominate, with orange firelight and blue gear acting as accents. If your trailer looks too busy, remove one accessory rather than adding more.
Your final checkpoint: you should now see a calm, rugged caravan that feels ready for a tiny night in the woods.
Troubleshooting
The caravan feels too dark
Add more cream or sage on the bedding and roof bundles. You need contrast to keep the details visible.
My camo looks messy
Use only two or three accent shades and apply them sparingly. Suggestion is stronger than literal camouflage coverage.
The rooftop storage tips the trailer visually
Keep the canoe light and narrow, and do not overstuff the rolled blankets.
The raccoon looks more like a cat
Emphasize the eye mask and striped tail. Those two features do most of the visual identification.
The interior props disappear
Use slightly exaggerated size for key objects like the backpack, stove, and maps.
Finishing details
Reinforce the roof well because the rooftop gear draws attention to any sagging. Weave in ends as each accessory is finished. Optional upgrades include a removable canoe strap system, a tiny compass, a fold out camp chair, or a battery tea light style glow inside the stove area. A stitched trail name patch or mini paper field journal would also be lovely and fit the tone perfectly.
Shop Similar
- olive green cotton yarn for crochet camping caravans
- earth tone yarn bundle for woodland amigurumi scenes
- small crochet hooks for tight amigurumi camping props
- plastic canvas sheets for structured crochet camper builds
- mini fiberfill stuffing for tiny crochet animals and gear
Style it With
There is something extra special about a crochet project that feels like a complete little universe, and these caravans do exactly that. They are more than cute miniatures. They are storytelling pieces, conversation starters, and heirloom style makes that invite you to slow down and enjoy every tiny detail. Each one has its own mood, palette, and personality, which makes this collection especially fun to work through whether you make one favorite or decide to build all five.
The beauty of projects like these is that they reward patience and creativity in equal measure. You can keep them close to the originals or add your own signature through colors, characters, props, and little finishing touches that make the scene feel personal. Once finished, they are wonderful for display shelves, seasonal decor, handmade gifts, nursery styling, or simply as joyful pieces of art for your own home.
I hope these tiny crochet caravans leave you feeling inspired to make something imaginative, detailed, and completely unforgettable. Save your favorite, start with the one that makes you smile the most, and enjoy bringing each tiny stitched world to life one piece at a time.